

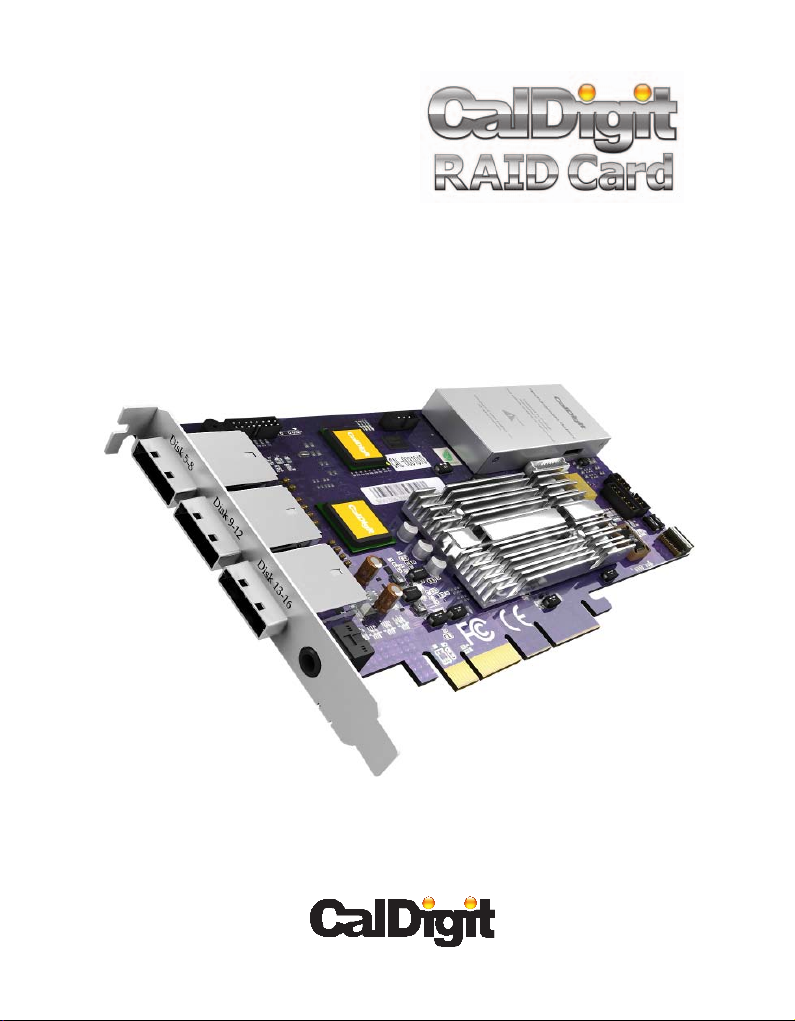
Page 1
Getting Started
Page 2

Apple, Apple Logo, Mac, the Mac logo, FinalCut Pro, Macintosh, are trademarks
of Apple Computer Inc. Microsoft, Windows and Windows Logos are registered
trademarks or trademarks of Microsoft Corporation. All other trademarks are the
property of their respective owners.
*Specications and package contents are subject to change without notice.
2
Page 3
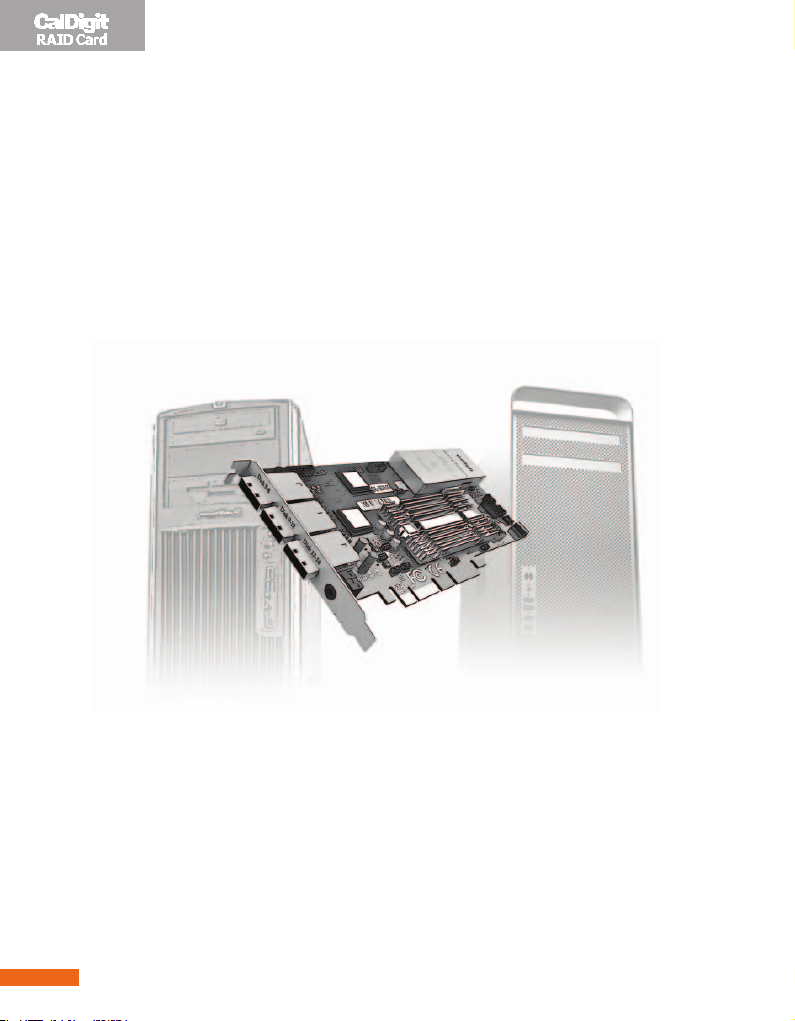
Installing the CalDigit RAID Card
Follow the instructions on the following pages to install the
CalDigit RAID card in your Mac Pro, PCI-e PowerMac G5 or PC
workstation.
Back Up
Please back up your data before proceeding with the following steps.
Identifying your workstation
Although the CalDigit RAID Card is compatible with Mac or PC, different
installation procedures will apply with dierent workstations.
If you are using a Mac, please identify your Mac according to the information
provided under Apple’s System Profiler (Apple Menu/About this Mac/More
Info).
A 4-core Mac Pro will display as 2 x 2.0, 2.66 GHZ Dual-Core Intel XEON;
A 8-core Mac Pro will display as 2 x 2.8, 3.0, 3.2 GHz Quad-Core Intel XEON;
A PCI-e Power Mac G5 will display as Dual-Core 2.0, 2.3, 2.5GHz PowerPC G5; If
you are using a PC, please install the RAID Card on any available PCI-e slot.
For PCI-Express Power Mac G5, Please use the external
Note:
mini-SAS port of the RAID Card to connect the HDElement. Internal
drive connection is not supported.
Optimize the CalDigit RAID Card's performance
To obtain optimum performance, please use four identical hard drives for
internal drives, (we strongly suggest using CalDigit certied drives). To see a list
of certied drives, please
go to http://www.caldigit.com/support.asp
3
Page 4
Working Safely Inside the Mac Pro.
Make sure to discharge any potential static electricity before you touch any
components inside. To do this, simply touch the outer chassis of the Mac
Pro before handling any components internally or installing any internal
components. We also recommend using an anti-static wrist band, which can be
purchased at any computer components store.
To avoid generating static electricity, do not walk around the room until
you have finished working inside the workstation and have replaced the
cover, (walking on carpeted surfaces enhances the effect of static electricity).
To minimize the possibility of damage due to static discharge, again, we
recommend wearing an antistatic wrist strap while you work inside the
workstation.
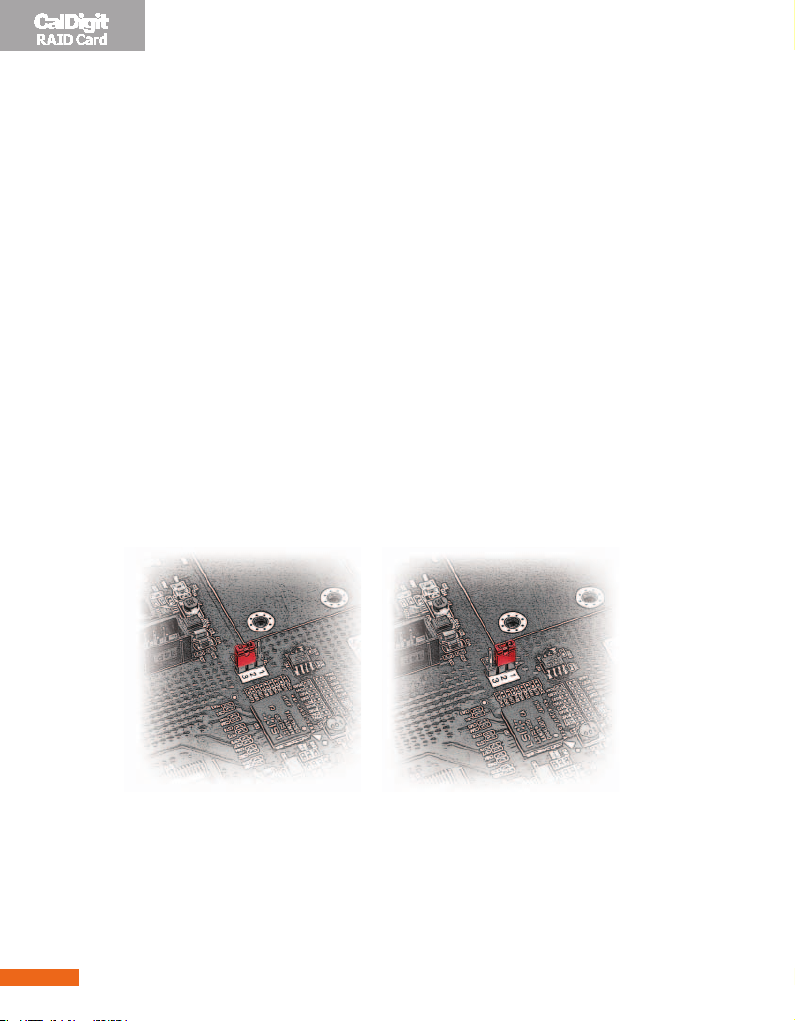
Preparing to install CalDigit RAID Card
Please make sure the jumper of the card is installed on 2, 3.
If you want to use BootCamp in your Mac Pro, you will need to make sure the
jumper is installed on 1, 2. You will also need to purchase an optional CalDigit
Mini-SAS cable(*1).
BootCampDefault
If you are using a PC, please purchase a CalDigit Mini-SAS to SATA cable(*2)
(a)
for your internal hard drives.
If you purchased a CalDigit RAID card back-up battery pack(*3), Please
(b)
install it to the RAID card and make sure the 3 screws are tightened at this
time.
4
Page 5

About the Installation of the CalDigit RAID Card
The installation instructions provide the following congurations:
If you are using a Mac Pro
1.
To install a hard drive into the second optical drive bay, to use as the
(a)
system drive, and to connect four internal hard drives as the RAID
volume, using the four hard drive bays. Please refer to P. of the installation
instructions.
To use the rst internal hard drive as the system drive (including the use of
(b)
Boot Camp), and the other three drives for the RAID volume. Please refer
to P. of the installation instructions.
To make four internal hard drives into a RAID volume, and install the
(c)
operating system onto the RAID volume. Please refer to P. of the
installation instructions.
If you are using a PCI-e G5
2.
Please refer to P. of the installation instructions. (PCI-Express G5 does not
support internal hard drives, and supports up to three external HDElements)
If you are using a PC
3.
Please refer to P. of the installation instructions.
5
Page 6
Installing your RAID
Please follow the following steps to install your CalDigit RAID Card.
6 A. MacPro
Page 7
1(a) If you are using a MacPro with one hard drive
as the system drive and four internal hard drives as
the RAID volume
Install the CalDigit Driver v1.8.0
1.1
Go to http://www.CalDigit.com/Support/HDPro-HDOne-
(a)
RAIDCard-1.8.0.zip
Select CalDigit/Mac Installer/1.8.x/HDPro_IP_MAC_1.8.x.mpkg
(b)
Welcome to CalDigit installation program, please click continue
(c)
Select your desired destinatino and click continue
(d)
Enter your Administrator password and click OK
(e)
After nishing the installation click Restart
(f)
If you are using Mac Pro and have 10.5.3 installed. Please
Note:
refer to http://support.apple.com/kb/HT1237 and make sure your
Mac Pro’s EFI is 1.3 or above.
If your dont have the latest EFI version, please download it at
http://www.apple.com/downloads/macosx/apple/firmware_
hardware/macproermwareupdate13.html. You may not be able
to boot up your Mac Pro if you fail to upgrade your EFI.
7A. MacPro
Page 8
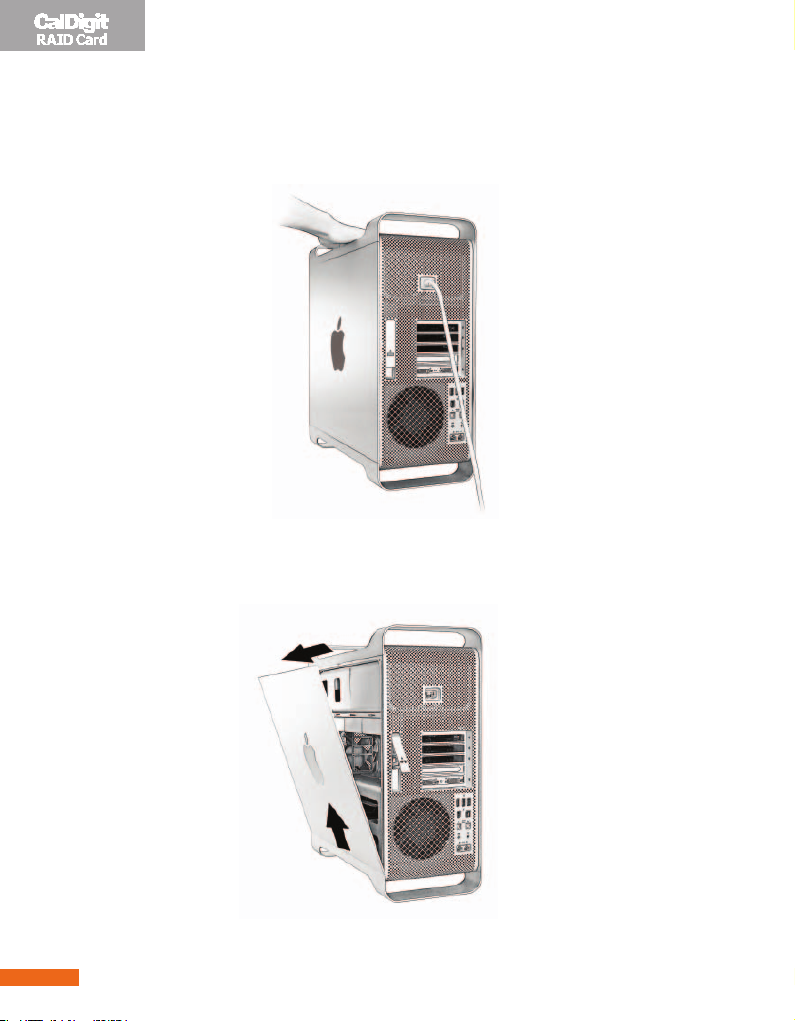
Turn O / Shut Down your computer
1.2
Turn o your computer. Touch the metal on the outside of your Mac Pro
(chassis) while it’s still plugged in to discharge any static electricity from
your body.
Open your computer case
1.3
Remove the sid e panel. Let the computer cool dow n. Its internal
components can still be very hot even when the computer is o.
8 A. MacPro
Page 9
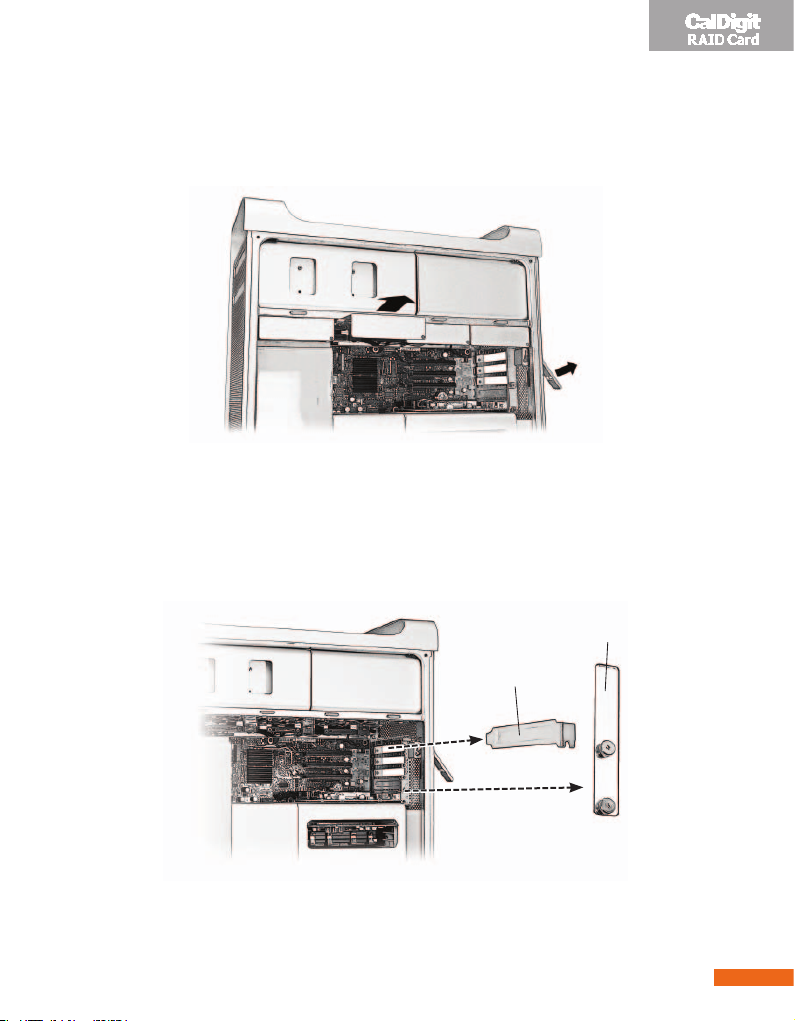
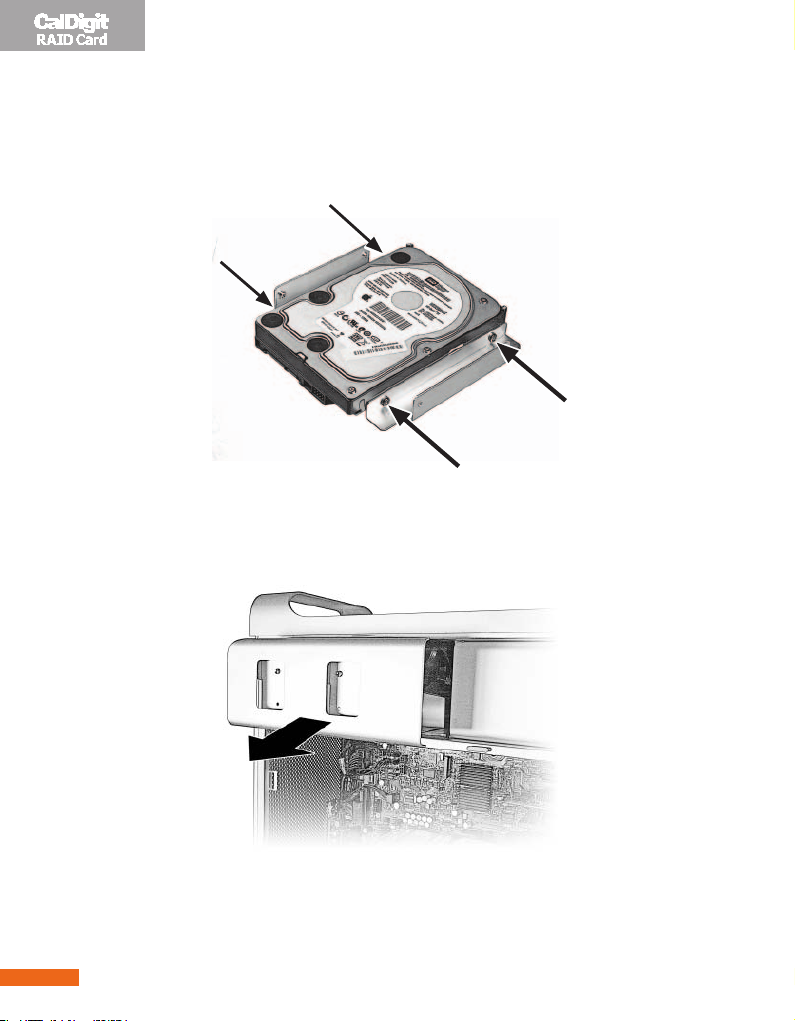
Remove the drive modules
1.4
Make sure the latch on the back panel is open, and pull out all four drive
modules as well as their empty carriers.
Latch
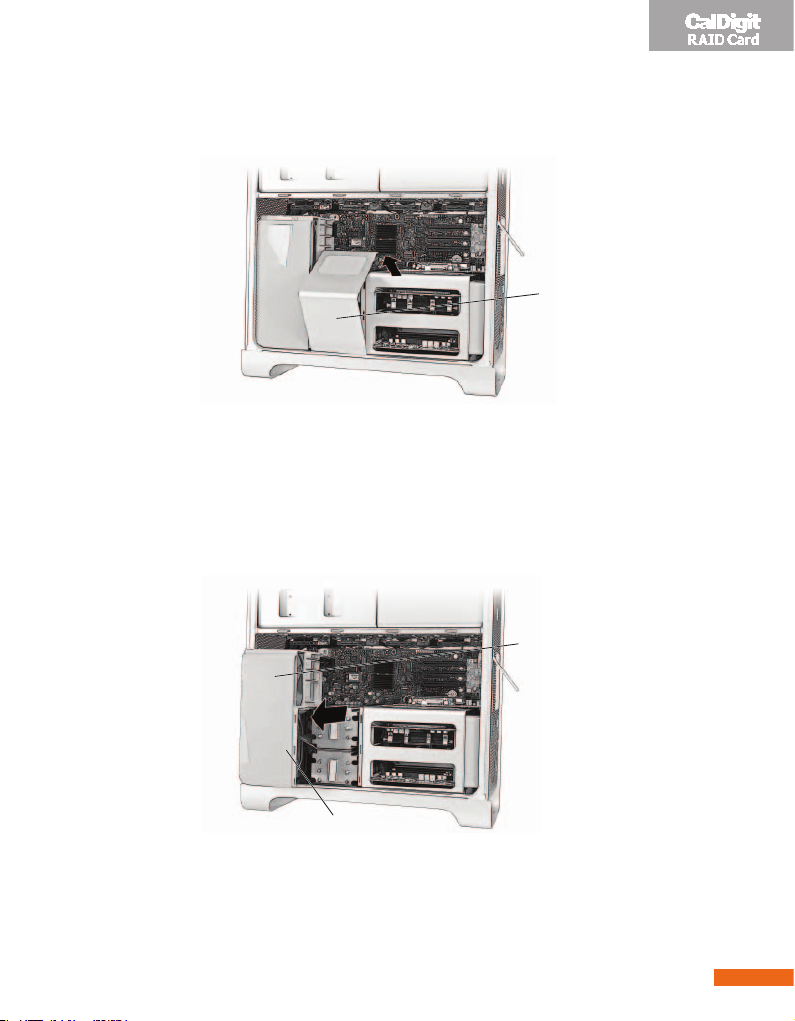
Remove the PCI bracket
1.5
(Loosen the two thumbscrews on the bracket that holds the PCI Express
cards in place, and remove the bracket and the port access cover.
PCI bracket
Port access cover
9A. MacPro
Page 10
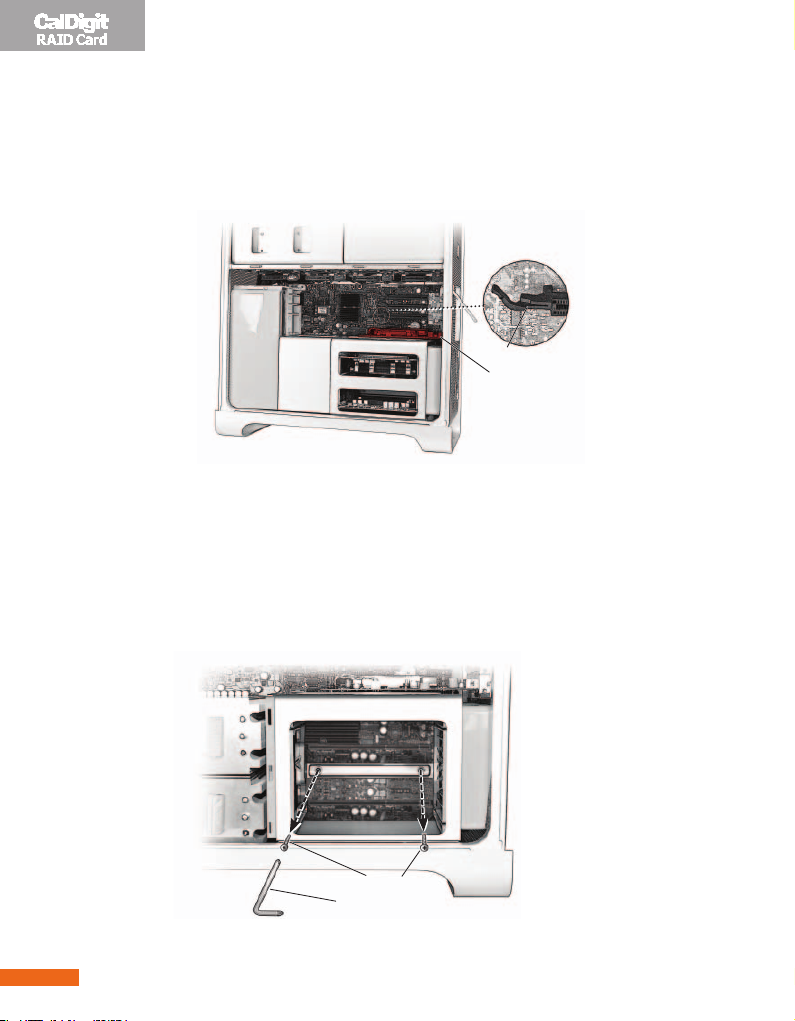
Remove PCI-Express card(s)
1.6
Disconnect and remove all PCI-Express card(s) except for your graphics
card, lift the latch on the card conector, and pull the card out of the slot.
Note each cards slot position in order to put them back in the same order
when you nish the installation.
Latch
Graphics card
Remove the CPU cover
1.7
Depending on the model of your Mac Pro, please refer to the appropriate
instructions:
(4 Core Mac Pro) Remove the memory cards and the two long screws
(a)
from the back of the DIMM cage and the two short screws on the
bottom front edge of the DIMM cage. Move the DIMM cage toward
the back panel of the computer and widen the gap between the
DIMM cage and the CPU cover. Remove the CPU cover.
10 A. MacPro
Long screws(2)
Screwdriver
Page 11
(8 Core Mac Pro) Remove the CPU cover by pulling the bottom edge of
(b)
the CPU cover slightly toward you.
CPU Cover
Remove the fan module
1.8
(4 Core Mac Pro) Remove the fan module screw and take out the fan
(a)
module.
(8 Core Mac Pro) Remove the fan module screws (one at the upper-right
(b)
rear corner and a second at the lower- right front corner and take out
the fan module.)
Fan module
Pull from here.
11A. MacPro
Page 12
Remove the system drive
1.9
Remove the system drive from MacPro hard disk drive carrier. FixedCalDigit
optical bay tray (as shown below) to the sides of the system drive.
Remove MacPro optical drive carrier
1.10
12 A. MacPro
Page 13
Install CalDigit optical bay tray
1.11
Install CalDigit optical bay tray with the system drive into the 2nd optical
drive and xed .
Install CalDigit optical SATA cable
1.12
Plug SATA connector into the gap (as shown below)
1.13
13A. MacPro
Page 14
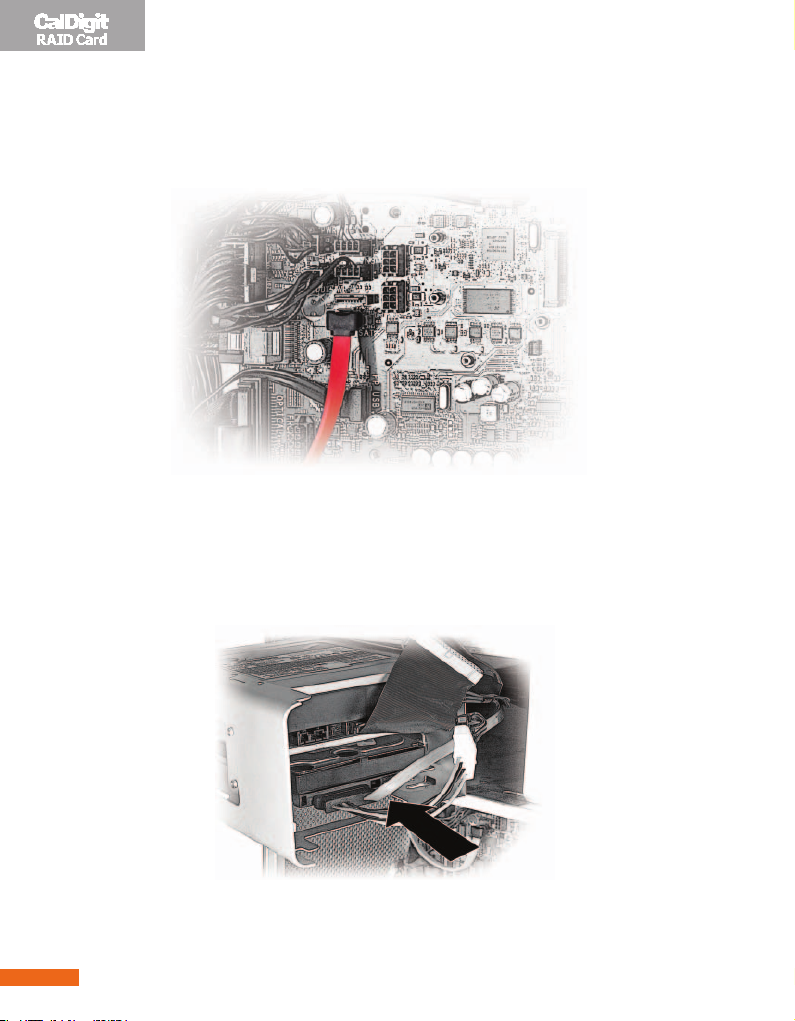
Connect SATA connector to the SATA port
1.14
Connect SATA connector to the SATA port on the mother board, and
make sure It's fully seated in the connector.
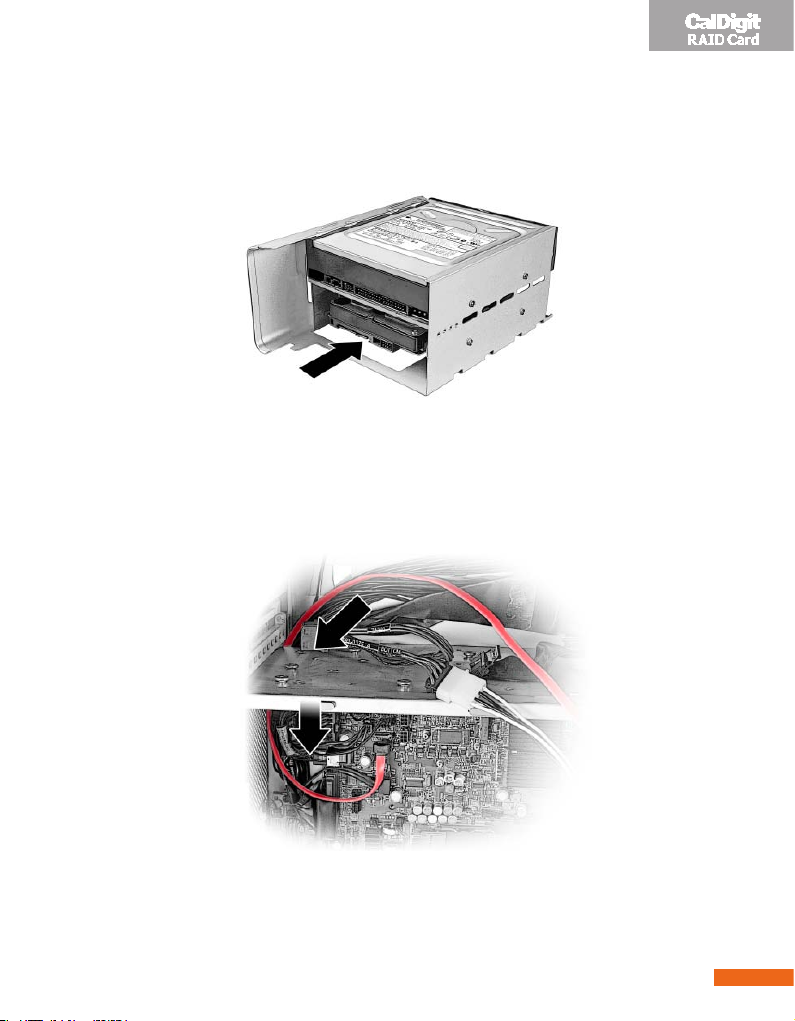
Conntect CalDigit optical SATA power cable middle connector
1.15
to MacPro optical bay ribbon cable end connector
Connect CalDigit optical SATA cable to the system drive and
1.16
connect the ribbon cable end connector back to optical bay
14 A. MacPro
Page 15
Replace the optical bay
1.17
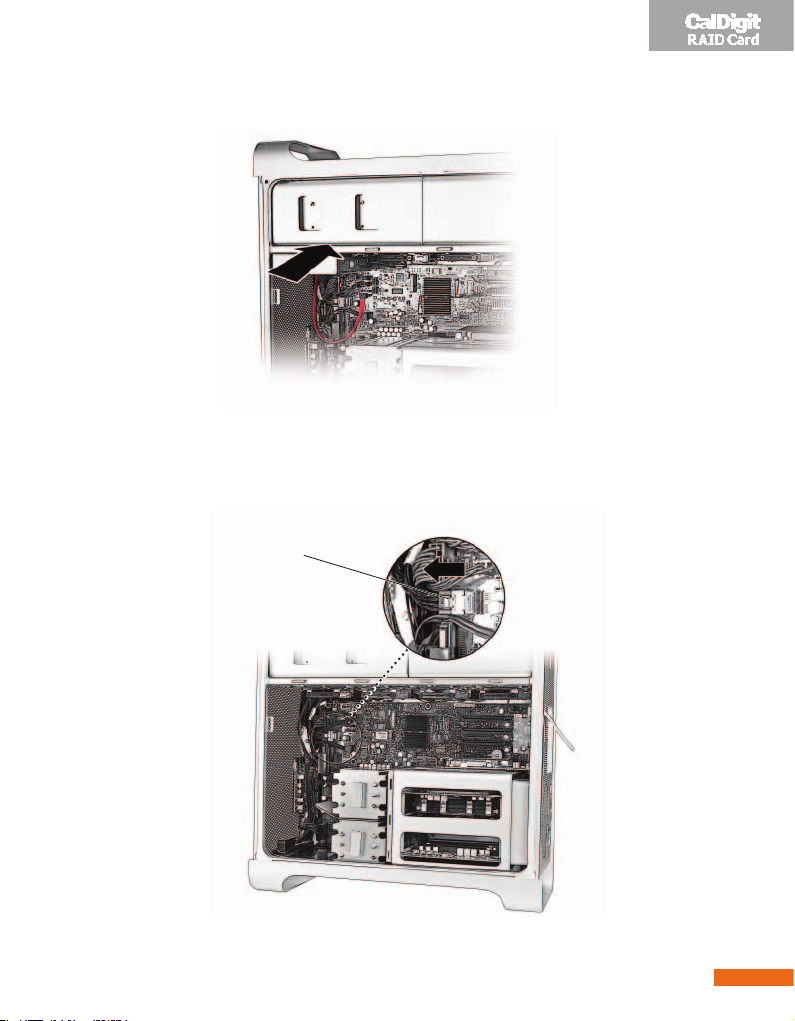
Disconnect the iPass cable
1.18
Disconnect the iPass cable from the upper left corner of the main logic
board and extend toward the PCI connectors as far as possible. You
might need to re –arrange some cable wiring for easy access of the iPass
cable.
iPass cable
15A. MacPro
Page 16
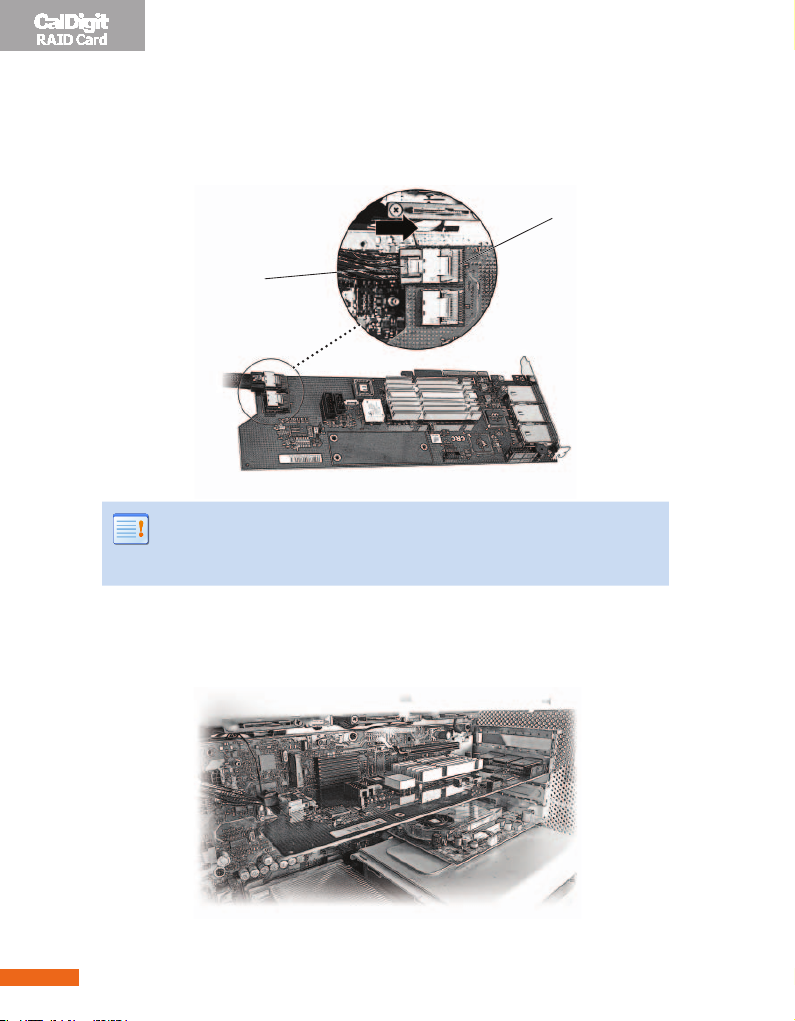
Connect the iPass connector to CalDigit RAID Card
1.19
(Make sure the iPass connector is securely connected to CalDigit RAiD
Card's J18 Mini-SAS connector.
Connector on card
iPass cable
If the length of iPass cable is not long enough to reach the
Note:
CalDgiti RAID Card, you might need to re-arrange cable wiring for
easy access of the connection.
Slide the CalDigit RAID Card into the PCI-Express slot
1.20
(Slide the CalDigit RAID Card into PCI-Express slot (slot 3). Make sure the
card is fully seated into the PCI-Express slot.
16 A. MacPro
Page 17
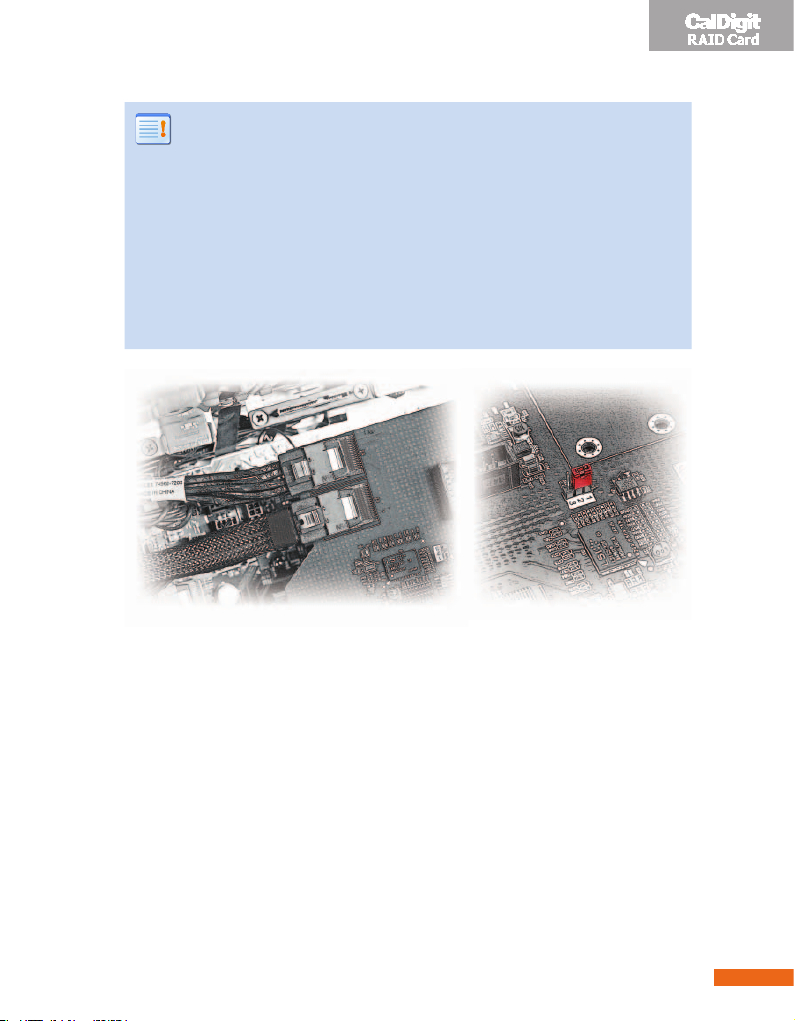
It maybe necessary for you to disentangle the iPass cable
Note:
from other cables running through the same area so that the loose
end of the iPass cable extends toward the PCI connectors as far as
possible.
If you want to use BootCamp in your Mac Pro, you will need to
purchase an optional CalDigit Mini-SAS Cable, Part# CBMiniSAS-
BC, SKU# 702101. You will need to connect it to the CalDigit RAID
Card's J19 Mini-SAS port at one end. And connect the other end to
the iPass connector on MacPro's motherboard. Please make sure
the jumper is installed on 1, 2 as shown below.
17A. MacPro
Page 18
Installing the fan module
1.21
If you are using a Power Mac G5, please skip to step 1.24. Install the fan
module back insdie the chassis. Make sure the cabling is clear of the fan
modules mounting arm and then tighten the screws.
(One screw for the 4 Core MacPro at the upper-right rear corner. Two
screws for the 8 Core MacPro, one at the upper-right rear corner and a
second at the lower-right front corner and take out the fan module).
Fan module
Install the CPU cover
1.22
(4 Core MacPro) Install the CPU cover by inserting the top-left edge of
(a)
the cover under the retainer on the fan module just below PCI card
support (slot 1) and then rotate the cover into place. Slide in the
memory cards and tighten the two long screws from the back of the
DIMM cage and the two short screws on the bottom front edge of the
DIMM cage.
18 A. MacPro
Page 19

(8 Core MacPro) Position the bottom front edge of the cover and then
(b)
rotate the top back until the magnets snap it into place.
CPU Cover
Install any card(s) that you removed initially into their PCI- Express
1.23
slots.
Make sure that each card is properly seated.
19A. MacPro
Page 20

Install the PCI bracket and tighten the thumb screws
1.24
PCI bracket
Slide the memory cards back into the DIMM cage (4 Core Mac
1.25
Pro)
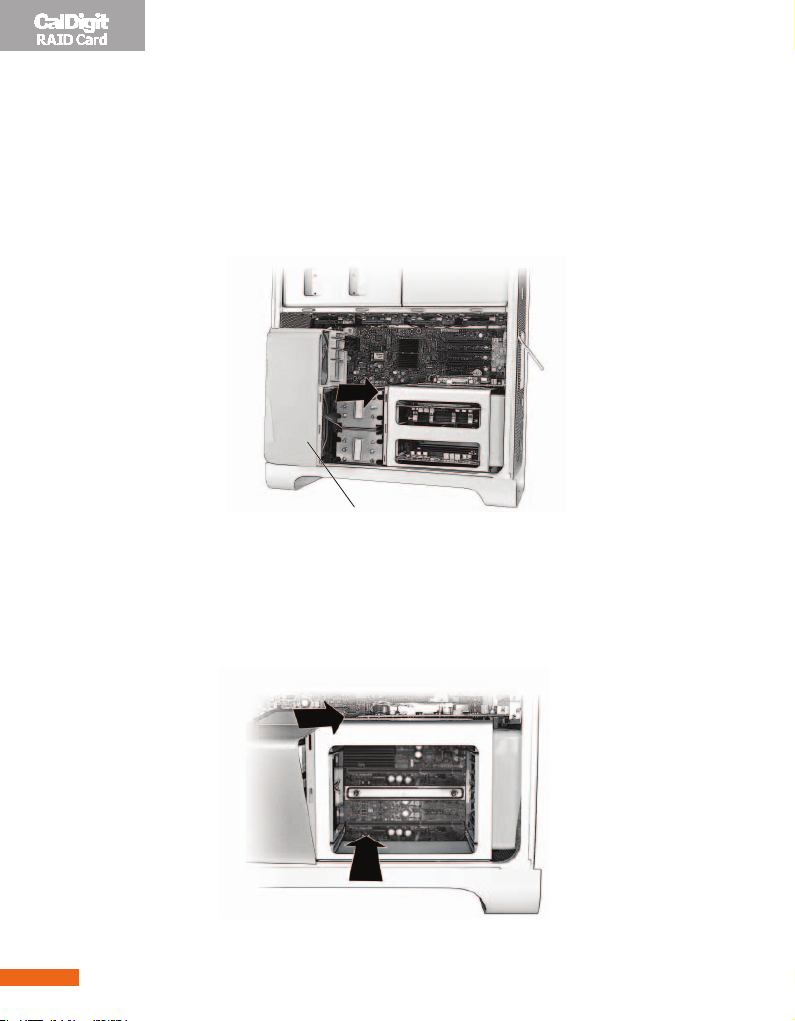
Make sure the rear latch is up. Install the drive modules and slide
1.26
in the drive modules
20 A. MacPro
In order to boot up the system correctly, please install the
Note:
system drive to the rst left drive slot in your Mac Pro.
Page 21

Insert the side panel and close the latch
1.27
Reconnect the external cables and the power cord. Turn on the power of
your Mac.
To insure proper airflow (and avoid over heating), make
Note:
sure that the fan module is running correctly and the side panel is
completely closed. Place your hand near front of the Mac Pro and
make sure that you can feel air moving.
21A. MacPro
Page 22

1(b) If you are using the rst internal hard drive as
the system drive (including the use of Boot Camp),
and the other three drives for the RAID volume
Install the CalDigit Driver v1.8.0
1.1
Go to http://www.CalDigit.com/Support/HDPro-HDOne-
(a)
RAIDCard-1.8.0.zip
Select CalDigit/Mac Installer/1.8.x/HDPro_IP_MAC_1.8.x.mpkg
(b)
Welcome to CalDigit installation program, please click continue
(c)
Select your desired destinatino and click continue
(d)
Enter your Administrator password and click OK
(e)
After nishing the installation click Restart
(f)
If you are using Mac Pro and have 10.5.3 installed. Please
Note:
refer to http://support.apple.com/kb/HT1237 and make sure your
Mac Pro’s EFI is 1.3 or above.
If your dont have the latest EFI version, please download it at
http://www.apple.com/downloads/macosx/apple/firmware_
hardware/macproermwareupdate13.html. You may not be able
to boot up your Mac Pro if you fail to upgrade your EFI.
22 A. MacPro
Page 23

Turn O/ Shut Down your computer
1.2
Turn o your computer. Touch the metal on the outside of your MacPro
(chassis) while it's still plugged in to discharge any static electricity from
your body.
Open your computer case
1.3
Remove the sid e panel. Let the computer cool dow n. Its internal
components can still be very hot even when the computer is o.
23A. MacPro
Page 24

Remove the drive modules
1.4
Make sure the latch on the back panel is open, and pull out all four drive
modules as well as their empty carriers.
Latch
Remove the PCI bracket
1.5
Loosen the two thumbscrews on the bracket that holds the PCI Express
cards in place, and remove the bracket and the port access cover.
PCI bracket
Port access cover
24 A. MacPro
Page 25

Remove PCI-Express card(s)
1.6
Disconnect and remove all PCI-Express card(s) except for your graphics
card, lift the latch on the card conector, and pull the card out of the slot.
Note each cards slot position in order to put them back in the same order
when you nish the installation.
Latch
Graphics card
Remove the CPU cover
1.7
Depending on the model of your MacPro, please refer to the appropriate
instructions:
(4 Core MacPro) Remove the memory cards and the two long screws
(a)
from the back of the DIMM cage and the two short screws on the
bottom front edge of the DIMM cage. Move the DIMM cae towards the
back panel of the computer and widen the gap between the DIMM
cage and the CPU cover. Remove the CPU cover.
Long screws(2)
Screwdriver
25A. MacPro
Page 26

(8 Core MacPro) Remove the CPI cover by pulling the bottom edge of
(b)
the CPI cover slightly toward you.
CPU Cover
Remove the fan module
1.8
(4 Core MacPro) Remove the fan module screw and take out the fan
(a)
module.
(8 Core MacPro) Remove the fan module screws (one at the upper-right
(b)
rear corner and a second at the lower-right front corner and take out
the fan module).
Fan module
26 A. MacPro
Pull from here.
Page 27

Disconnect the iPass cable
1.9
Disconnect the iPass cable from the upper left corner of the main logic
board and extend toward the PCI connectors as far as possible. You might
need to re-arrange some cable wiring for easy access of the iPass cable.
iPass cable
27A. MacPro
Page 28

Connect the iPass connector to CalDigit RAID Card
1.10
Make sure the iPass connector is securely connected to CalDigit RAiD
Card's J18 Mini-SAS connector.
Connector on card
iPass cable
If the length of iPass cable is not long enough to reach the
Note:
CalDgiti RAID Card, you might need to re-arrange cable wiring for
easy access of the connection.
Slide the CAlDigit RAID Card into the PCI-Express slot
1.11
Slide the CalDigit RAID Card into PCI-Express slot (slot 3). Make sure the
card is fully seated into the PCI-Express slot.
28 A. MacPro
Page 29

It maybe necessary for you to disentangle the iPass cable
Note:
from other cables running through the same area so that the loose
end of the iPass cable extends toward the PCI connectors as far as
possible.
If you want to use BootCamp in your Mac Pro, you will need to
purchase an optional CalDigit Mini-SAS Cable, Part# CBMiniSAS-
BC, SKU# 702101. You will need to connect it to the CalDigit RAID
Card's J19 Mini-SAS port at one end. And connect the other end to
the iPass connector on MacPro's motherboard. Please make sure
the jumper is installed on 1, 2 as shown below.
29A. MacPro
Page 30

Installing the fan module
1.12
If you are using a Power Mac G5, please skip to step 2.15. Install the fan
module back insdie the chassis. Make sure the cabling is clear of the fan
modules mounting arm and then tighten the screws.
(One screw for the 4 Core MacPro at the upper-right rear corner. Two
screws for the 8 Core MacPro, one at the upper-right rear corner and a
second at the lower-right front corner and take out the fan module).
Fan module
Install the CPU cover
1.13
(4 Core MacPro) Install the CPU cover by inserting the top-left edge of
(a)
the cover under the retainer on the fan module just below PCI card
support (slot 1) and then rotate the cover into place. Slide in the
memory cards and tighten the two long screws from the back of the
DIMM cage and the two short screws on the bottom front edge of the
DIMM cage.
30 A. MacPro
Page 31

(8 Core MacPro) Position the bottom front edge of the cover and then
(b)
rotate the top back until the magnets snap it into place.
Install any card(s) that you removed initially into their PCI-
1.14
Express slots
Make sure that each card is properly seated
CPU Cover
31A. MacPro
Page 32

Install the PCI bracket and tighten the thumb screws
1.15
PCI bracket
Slide the memory cards back into the DIMM cage (4 Core Mac
1.16
Pro)
Make sure the rear latch is up. Install the drive modules and slide
1.17
in the drive modules
32 A. MacPro
In order to boot up the system correctly, please install the
Note:
system drive to the rst left drive slot in your Mac Pro.
Page 33

Insert the side panel and close the latch
1.18
Reconnect the external cables and the power cord. Turn on the power of
your Mac.
To insure proper airflow (and avoid over heating), make
Note:
sure that the fan module is running correctly and the side panel is
completely closed. Place your hand near front of the Mac Pro and
make sure that you can feel air moving.
33A. MacPro
Page 34

1(c) If you are using a MacPro to make four internal
hard drives into a RAID volume, and install the
operating system onto the RAID volume
Install the CalDigit Driver v1.8.0
1.1
Go to http://www.CalDigit.com/Support/HDPro-HDOne-
(a)
RAIDCard-1.8.0.zip
Select CalDigit/Mac Installer/1.8.x/HDPro_IP_MAC_1.8.x.mpkg
(b)
Welcome to CalDigit installation program, please click continue
(c)
Select your desired destinatino and click continue
(d)
Enter your Administrator password and click OK
(e)
After nishing the installation click Restart
(f)
If you are using Mac Pro and have 10.5.3 installed. Please
Note:
refer to http://support.apple.com/kb/HT1237 and make sure your
Mac Pro’s EFI is 1.3 or above.
If your dont have the latest EFI version, please download it at
http://www.apple.com/downloads/macosx/apple/firmware_
hardware/macproermwareupdate13.html. You may not be able
to boot up your Mac Pro if you fail to upgrade your EFI.
34 A. MacPro
Page 35

Turn O/ Shut Down your computer
1.2
Turn o your computer. Touch the metal on the outside of your MacPro
(chassis) while it's still plugged in to discharge any static electricity from
your body.
Open your computer case
1.3
Remove the sid e panel. Let the computer cool dow n. Its internal
components can still be very hot even when the computer is o.
35A. MacPro
Page 36

Remove the drive modules
1.4
Make sure the latch on the back panel is open, and pull out all four drive
modules as well as their empty carriers.
Latch
Remove the PCI bracket
1.5
Loosen the two thumbscrews on the bracket that holds the PCI Express
cards in place, and remove the bracket and the port access cover.
PCI bracket
Port access cover
36 A. MacPro
Page 37

Remove PCI-Express card(s)
1.6
Disconnect and remove all PCI-Express card(s) except for your graphics
card, lift the latch on the card connector, and pull the card out of the slot.
Note each cards slot position in order to put them back in the same order
when you nish the installation.
Latch
Graphics card
Remove the CPU cover
1.7
Depending on the model of your MacPro, please refer to the appropriate
instructions:
(4 Core MacPro) Remove the memory cards and the two long screws
(a)
from the back of the DIMM cage and the two short screws on the
bottom front edge of the DIMM cage. Move the DIMM cae towards the
back panel of the computer and widen the gap between the DIMM
cage and the CPU cover. Remove the CPU cover.
Long screws(2)
Screwdriver
37A. MacPro
Page 38

(8 Core MacPro) Remove the CPI cover by pulling the bottom edge of
(b)
the CPI cover slightly toward you.
CPU Cover
Remove the fan module
1.8
(4 Core MacPro) Remove the fan module screw and take out the fan
(a)
module.
(8 Core MacPro) Remove the fan module screws (one at the upper-right
(b)
rear corner and a second at the lower-right front corner and take out
the fan module).
Fan module
38 A. MacPro
Pull from here.
Page 39

Disconnect the iPass cable
1.9
Disconnect the iPass cable from the upper left corner of the main logic
board and extend toward the PCI connectors as far as possible. You might
need to re-arrange some cable wiring for easy access of the iPass cable.
iPass cable
39A. MacPro
Page 40

Connect the iPass connector to CalDigit RAID Card
1.10
Make sure the iPass connector is securely connected to CalDigit RAiD
Card's J18 Mini-SAS connector.
Connector on card
iPass cable
If the length of iPass cable is not long enough to reach the
Note:
CalDgiti RAID Card, you might need to re-arrange cable wiring for
easy access of the connection.
Slide the CAlDigit RAID Card into the PCI-Express slot
1.11
Slide the CalDigit RAID Card into PCI-Express slot (slot 3). Make sure the
card is fully seated into the PCI-Express slot.
40 A. MacPro
Page 41

It maybe necessary for you to disentangle the iPass cable
Note:
from other cables running through the same area so that the loose
end of the iPass cable extends toward the PCI connectors as far as
possible.
If you want to use BootCamp in your Mac Pro, you will need to
purchase an optional CalDigit Mini-SAS Cable, Part# CBMiniSAS-
BC, SKU# 702101. You will need to connect it to the CalDigit RAID
Card's J19 Mini-SAS port at one end. And connect the other end to
the iPass connector on MacPro's motherboard. Please make sure
the jumper is installed on 1, 2 as shown below.
41A. MacPro
Page 42

Installing the fan module
1.12
If you are using a Power Mac G5, please skip to step 3.15. Install the fan
module back insdie the chassis. Make sure the cabling is clear of the fan
modules mounting arm and then tighten the screws.
(One screw for the 4 Core MacPro at the upper-right rear corner. Two
screws for the 8 Core MacPro, one at the upper-right rear corner and a
second at the lower-right front corner and take out the fan module).
Fan module
Install the CPU cover
1.13
(4 Core MacPro) Install the CPU cover by inserting the top-left edge of
(a)
the cover under the retainer on the fan module just below PCI card
support (slot 1) and then rotate the cover into place. Slide in the
memory cards and tighten the two long screws from the back of the
DIMM cage and the two short screws on the bottom front edge of the
DIMM cage.
42 A. MacPro
Page 43

(8 Core MacPro) Position the bottom front edge of the cover and then
(b)
rotate the top back until the magnets snap it into place.
Install any card(s) that you removed initially into their PCI-
1.14
Express slots
Make sure that each card is properly seated
CPU Cover
43A. MacPro
Page 44

Install the PCI bracket and tighten the thumb screws
1.15
PCI bracket
Slide the memory cards back into the DIMM cage (4 Core Mac
1.16
Pro)
Make sure the rear latch is up. Take out the system drive in
1.17
MacPro hard disk tray, install the drive modules, and slide in the
drive modules.
44 A. MacPro
In order to boot up the system correctly, please install the
Note:
system drive to the rst left drive slot in your Mac Pro.
Page 45

Install the system drive from MacPro into USB or Firewire 外接盒,
1.18
and then connect to your computer.
Insert the side panel and close the latch
1.19
Reconnect the external cables and the power cord. Turn on the power of
your Mac.
To insure proper airflow (and avoid over heating), make
Note:
sure that the fan module is running correctly and the side panel is
completely closed. Place your hand near front of the Mac Pro and
make sure that you can feel air moving.
45A. MacPro
Page 46

Open RAID Shield, to add a new Controller.
1.20
To set up a RAID volume based on the RAID Level you need
1.21
46 A. MacPro
Page 47

After conguring your RAID, please launch Apple's Disk Utility
1.22
( application / utility / Disk utility ) to restore your Mac OS to
your new RAID Volume.
Make sure you choose the appropriate startup disk under system
preference after the restoring process is done.
Restart your computer and disconnect external hard disks.
1.23
47A. MacPro
Page 48

2 If you are using a PCI-e G5
Install the CalDigit Driver v1.8.0
2.1
Go to http://www.CalDigit.com/Support/HDPro-HDOne-
(a)
RAIDCard-1.8.0.zip
Select CalDigit/Mac Installer/1.8.x/HDPro_IP_MAC_1.8.x.mpkg
(b)
Welcome to CalDigit installation program, please click continue
(c)
Select your desired destinatino and click continue
(d)
Enter your Administrator password and click OK
(e)
After nishing the installation click Restart
(f)
If you are using Mac Pro and have 10.5.3 installed. Please
Note:
refer to http://support.apple.com/kb/HT1237 and make sure your
Mac Pro’s EFI is 1.3 or above.
If your dont have the latest EFI version, please download it at
http://www.apple.com/downloads/macosx/apple/firmware_
hardware/macproermwareupdate13.html. You may not be able
to boot up your Mac Pro if you fail to upgrade your EFI.
48 B. PCI-e G5
Page 49

Turn O/ Shut Down your computer
2.2
Turn o your computer. Touch the metal on the outside of your MacPro
(chassis) while it's still plugged in to discharge any static electricity from
your body.
Open your computer case
2.3
Remove the sid e panel. Let the computer cool dow n. Its internal
components can still be very hot even when the computer is o.
49B. PCI-e G5
Page 50

Loosen the screws and remove the bracket and the port access
2.4
cover of PCI Express slot 4 by using the provided tool
Make sure the latch on the back panel is open, and pull out all four drive
modules as well as their empty carriers.
Slide the CalDigit RAID Card into the PCI-Express slot
2.5
Slide the CalDigit RAID Card into the PCI-Express slot 4. Make sure the card
is fully seated.
50 B. PCI-e G5
Page 51

Insert the side panel and close the latch
2.6
Reconnect the external cables and the power cord. Turn on the power of
your PCI-e G5.
To insure proper airflow (and avoid over heating), make
Note:
sure that the fan module is running correctly and the side panel is
completely closed. Place your hand near front of the Mac Pro and
make sure that you can feel air moving.
51B. PCI-e G5
Page 52

3 If you are using a Wintel PC
Download CalDigit Windows or Linux Driver
3.1
Go to http://www.CalDigit.com/Support/
52 C. Wintel PC
Page 53

Turn O/ Shut Down your computer
3.2
Turn o your computer. Touch the metal on the outside of your MacPro
(chassis) while it's still plugged in to discharge any static electricity from
your body.
Open your computer case
3.3
Remove the sid e panel. Let the computer cool dow n. Its internal
components can still be very hot even when the computer is o.
53C. Wintel PC
Page 54

Loosen the screws and remove the bracket and the port access
3.4
cover of PCI Express x4 and above
Slide the CalDigit RAID Card into the PCI-Express slot
3.5
Slide the CalDigit RAID Card into the PCI-Express slot. Make sure the card is
fully seated.
54 C. Wintel PC
Page 55

Install PCI-Express screws back in place.
3.6
Insert the side panel and close the latch
3.7
Reconnect the external cables and the power cord. Turn on the power of
your PC.
To insure proper airflow (and avoid over heating), make
Note:
sure that the fan module is running correctly and the side panel is
completely closed. Place your hand near front of the Mac Pro and
make sure that you can feel air moving.
55C. Wintel PC
Page 56

Follow your Operating System to select CalDigit Windows or
3.8
Linux driver
Install RAID Shield from our website.
3.9
www.CalDigit.com/Support.asp
Restart your PC.
56 C. Wintel PC
Page 57

After installing the CalDigit RAID Card drivers and RAID Shield, you will be
able to use RAID Shield to set up your RAID and congure your RAID levels.
For adding external storage to the CalDigit RAID Card, please go to
http://www.caldigit.com/HDElement/ for more information.
The HDElement is a compact 4-bay storage enclosure that fully utilizes the
CalDigit RAID Card's hardware protection and performance for all your
valuable data.
Thank you for choosing the CalDigit RAID Card. Please download the latest
driver and manual from http://www.CalDigit.com/support.asp
57
Page 58

*Optional accessories
(*1)Part # CBMiniSAS-BC SKU# 702101 (for Boot Camp)
(*2)Part # CBMiniSAS-4C SKU# 702102 (for PC)
(*3)Part # CRCCBBM SKU# 760400
58
Page 59

CalDigit RAID Card Getting Started Manual v1.5
www.caldigit.com
©Copyright 2008 CalDigit, Inc. All Rights Reserved
 Loading...