

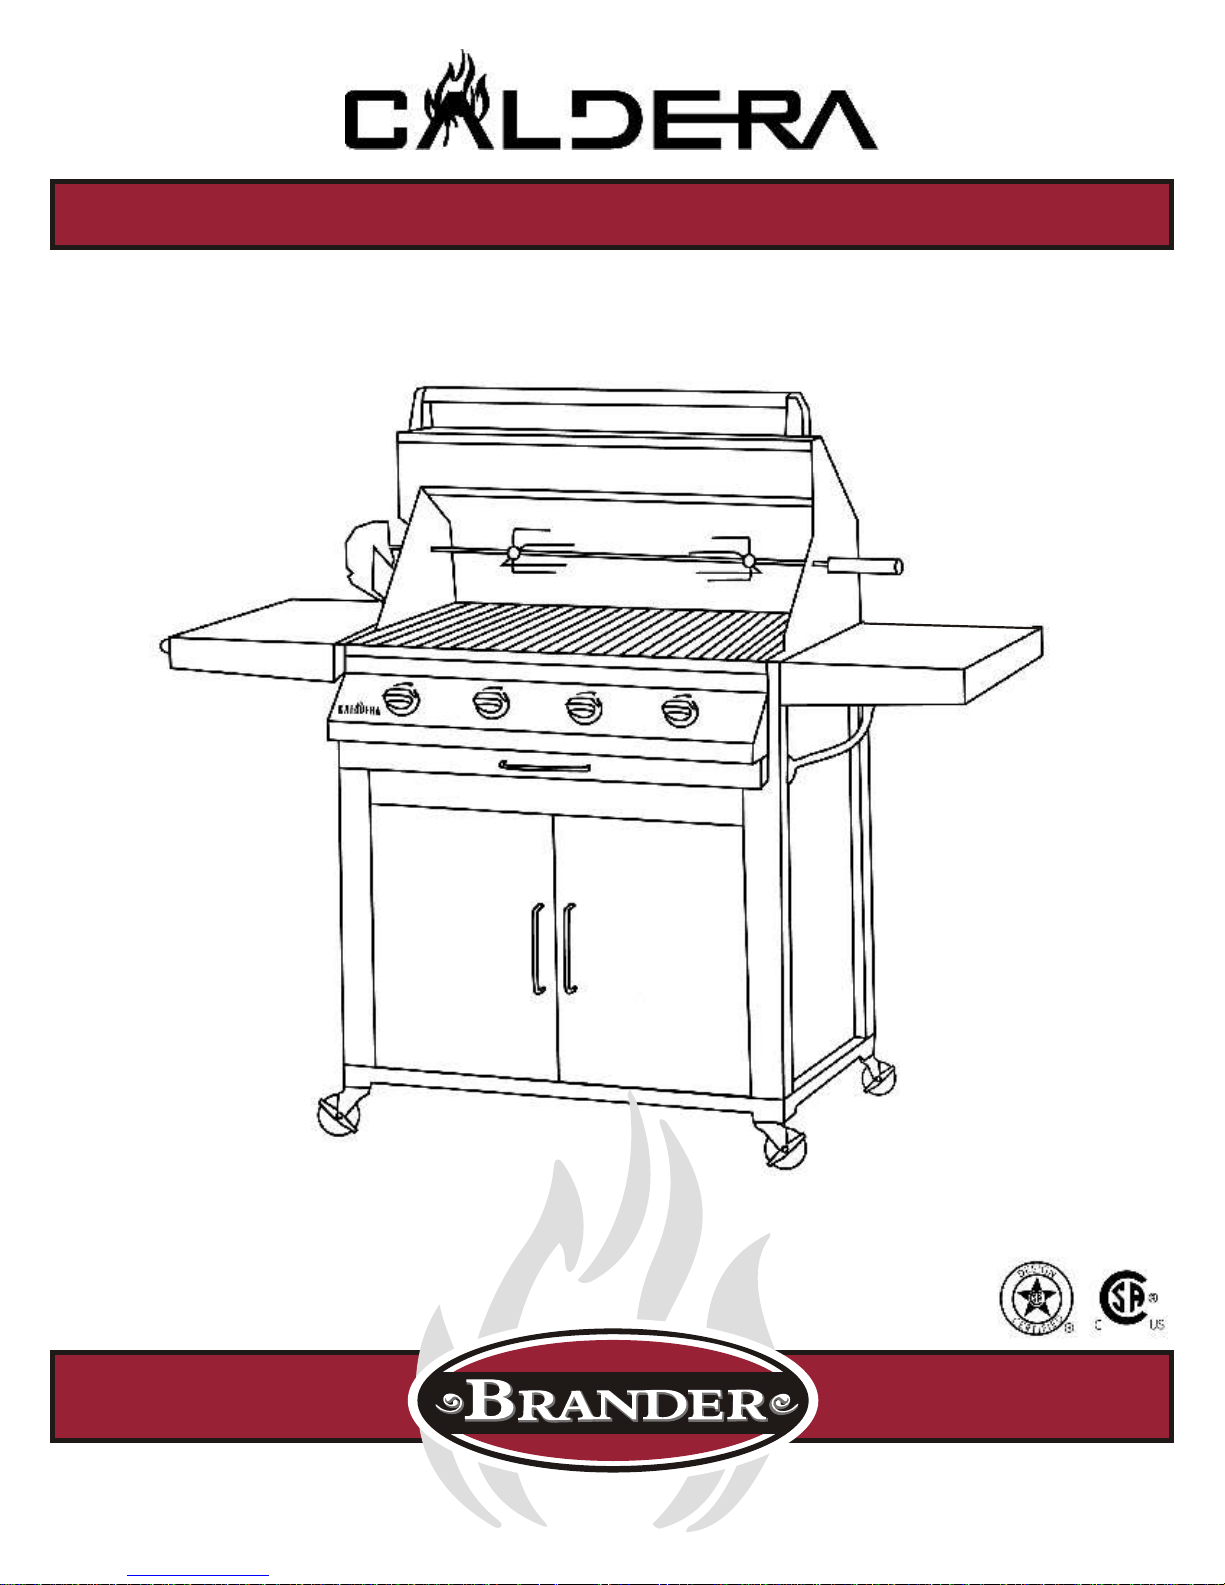
CALDERA STAINLESS STEEL GAS GRILL
BARBECUE
For Models C4640 / C4670 / C5640 / C5670 Outdoor Gas Grill
OUTFITTERS
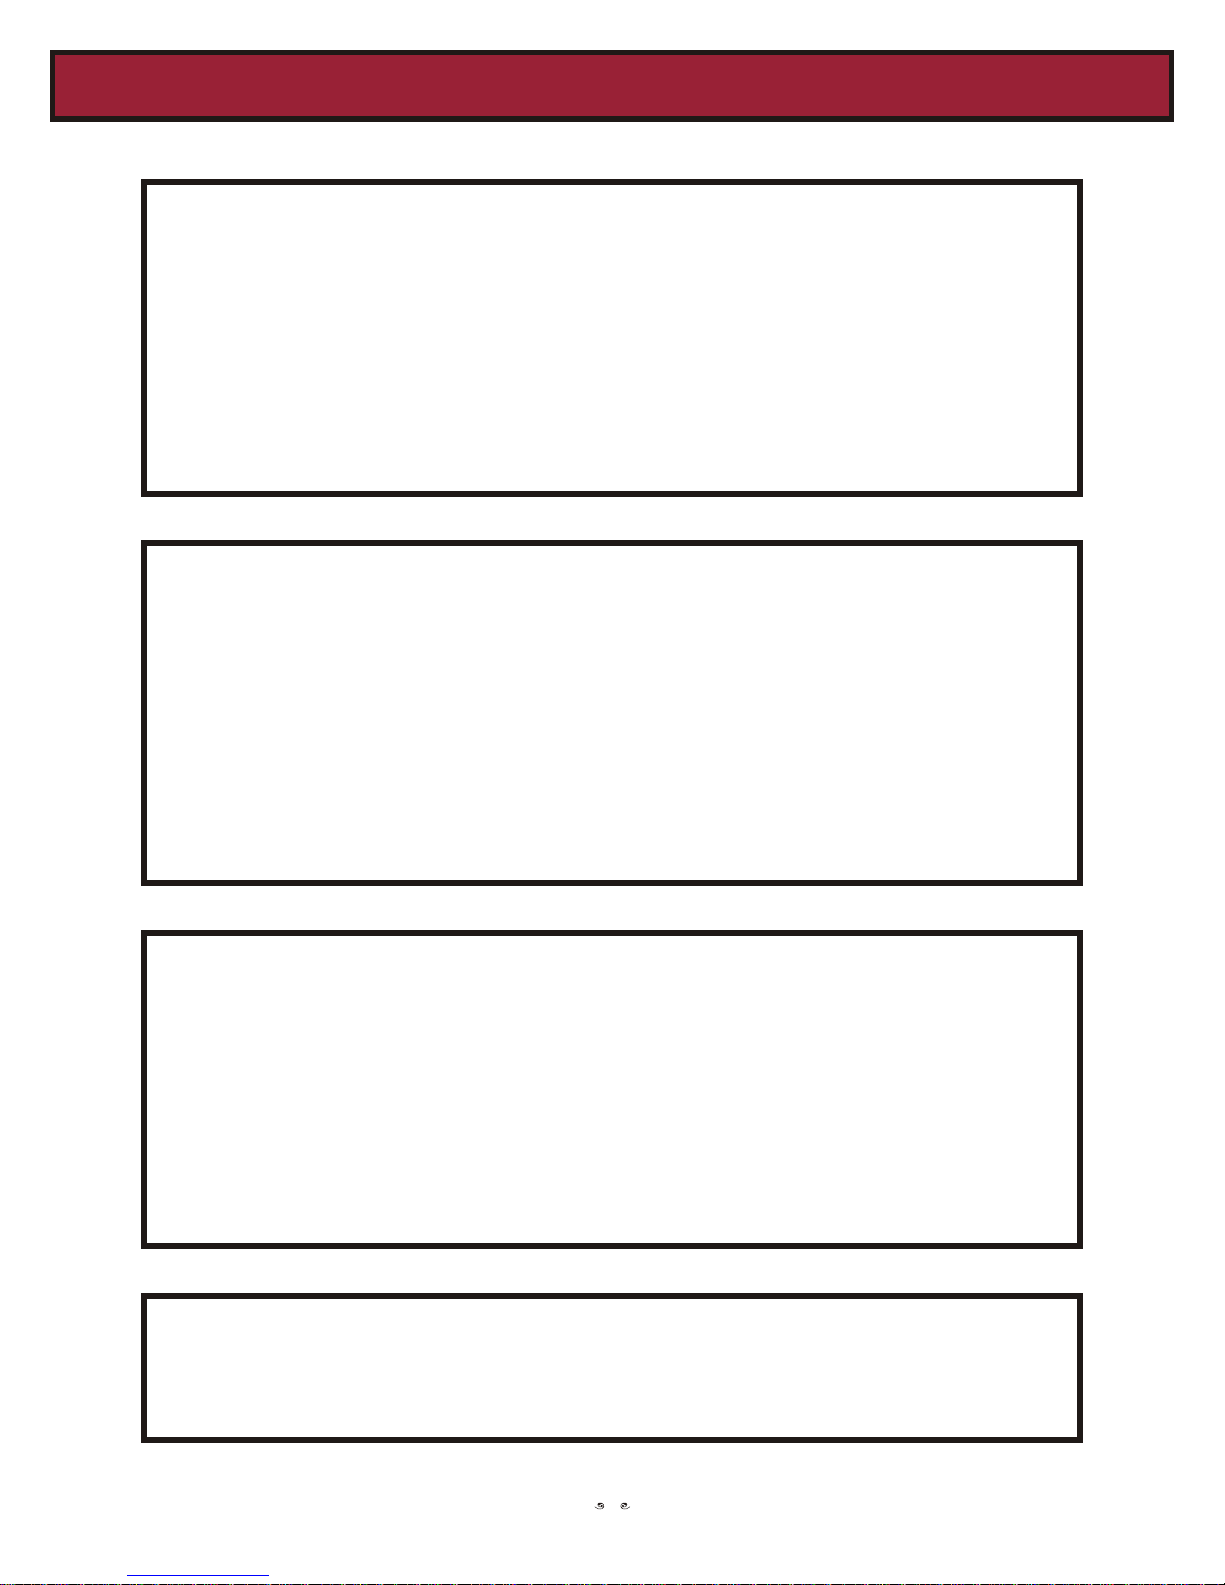
TABLE OF CONTENTS
Assembly . . . . . . . . . . . . . . . . . . . . . . . . . . . . . . . . . . . . . . . . . . . . . . 3
Warranty . . . . . . . . . . . . . . . . . . . . . . . . . . . . . . . . . . . . . . . . . . . . . . 5
Gas Hook-up . . . . . . . . . . . . . . . . . . . . . . . . . . . . . . . . . . . . . . . . . . . 7
Leak Testing . . . . . . . . . . . . . . . . . . . . . . . . . . . . . . . . . . . . . . . . . . . 8
Grill Lighting Instructions . . . . . . . . . . . . . . . . . . . . . . . . . . . . . . . . 9
Operating Instructions . . . . . . . . . . . . . . . . . . . . . . . . . . . . . . . . . . . 10
Maintenance & Care . . . . . . . . . . . . . . . . . . . . . . . . . . . . . . . . . . . . . 11
Troubleshooting . . . . . . . . . . . . . . . . . . . . . . . . . . . . . . . . . . . . . . . . 12
IF YOU SMELL GAS
1. Shut off Gas to the Appliance.
2. Extinguish any open flames.
3. Open lid.
4. If odour continues, immediately call your gas supplier or your
Fire Department.
S’IL Y A UNE ODEUR DE GAZ
1. Coupez l’admission de gaz de l’appareil.
2. Eteindre toute flame nue.
3. Ouvrir le couvercle.
4. Si l’odeur persiste, appeler immediatement votre compagnie de gaz ou votre
FOR YOUR SAFETY
1. Do not store or use gasoline or other flammable vapours or liquids in the vicinity of
this or any other appliance.
2. An LP cylinder not connected for use should not be stored in the vicinity of this or
any other appliance.
AVERTISSEMENT
1. Ne pas entreposer ni utiliser de l’essence ni d’autres vapeurs ou liquids inflammable
dans le voisinage de l’apareil, ni de tout autre appareil.
2. Une bouteille de propane qui n’est pas raccordée en vue de son utilization, ne doit
pas être entreposée dans le voisinage de cet appareil ou de tout autre appareil.
READ INSTRUCTIONS BEFORE LIGHTING
Lire les instruction avant d’allumer l’appareil
2
ASSEMBLY INSTRUCTIONS
PLEASE READ THE INSTRUCTIONS CAREFULLY AND FOLLOW STEP BY STEP
TOOLS REQUIRED: Philips head screwdriver (not provided)
STEP 1
Assemble right side shelf with 1/4”-20x1/2 " screws. Align the holes on the right side of
grill housing and screw through the holes in the right side. Tighten into the grill housing as
per the diagram below.
STEP 2
Repeat STEP 1 for the left side shelf.
3
ASSEMBLY INSTRUCTIONS
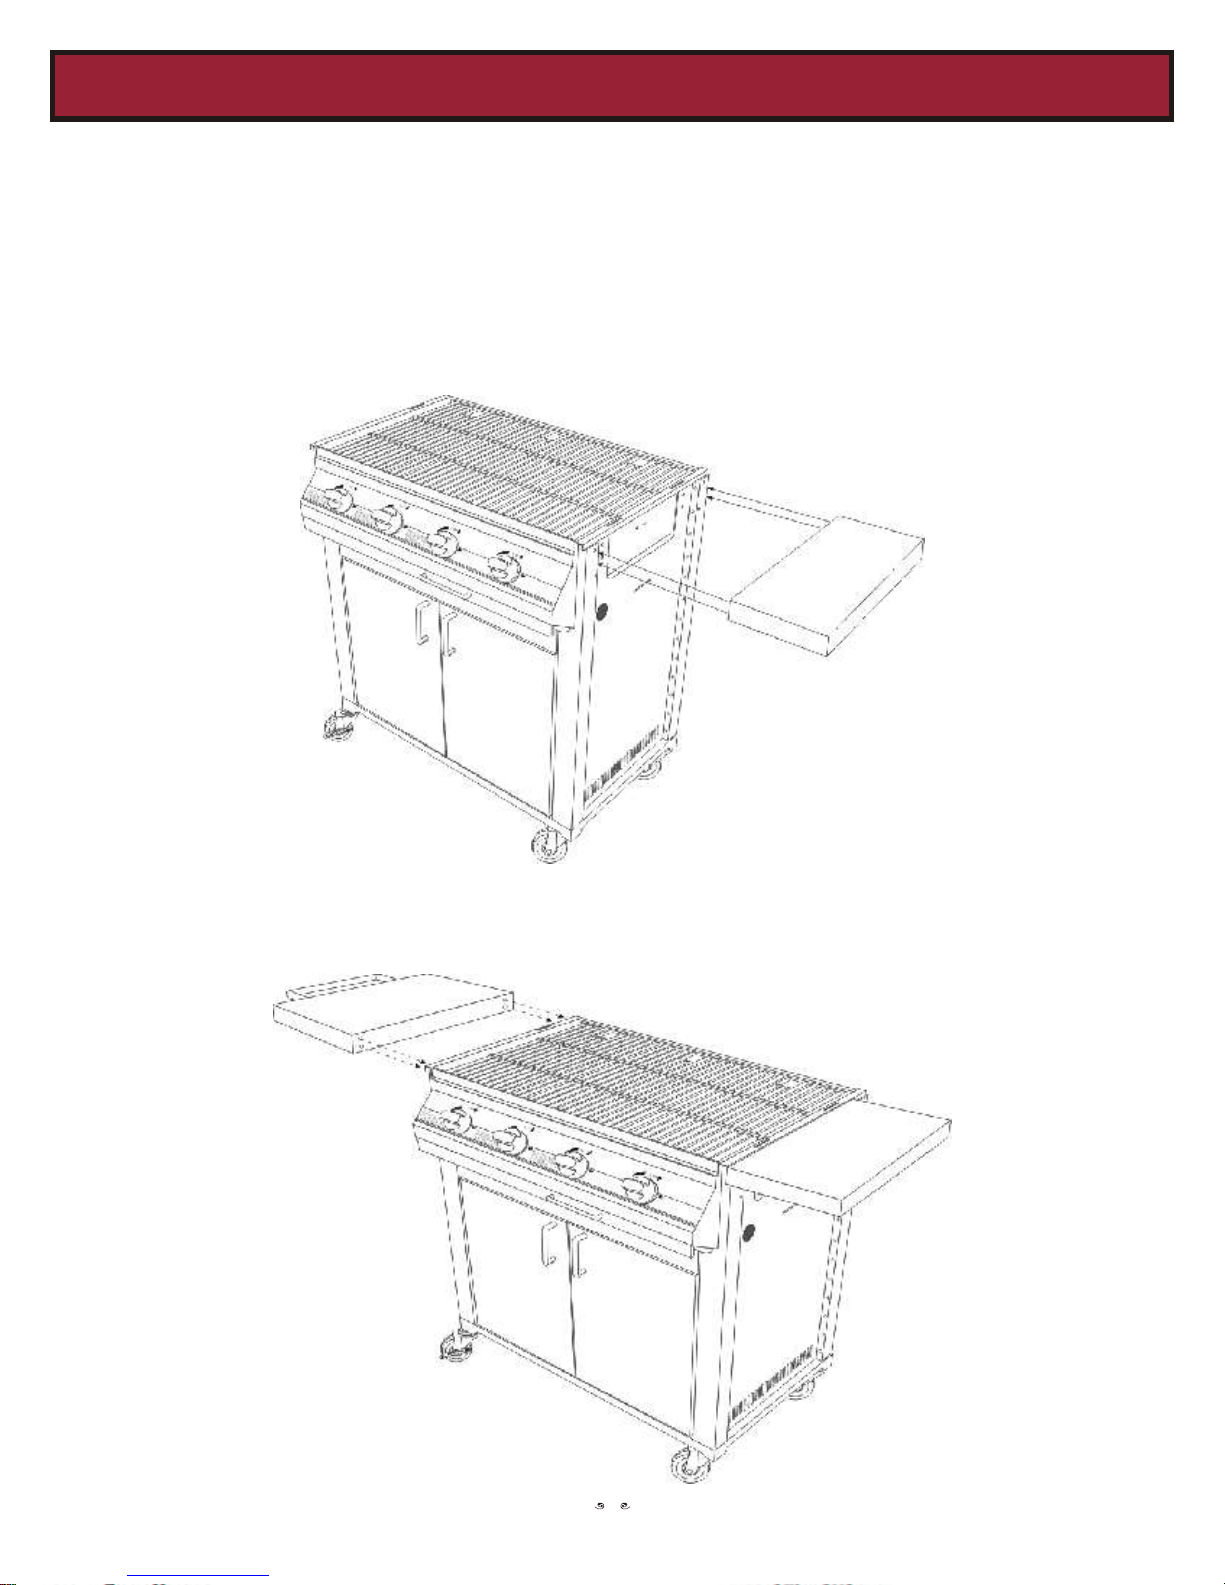
STEP 3
Assemble hood into the holes on the surface of both side as the diagram below.
STEP 4
Assemble the rotisserie kit as shown in the diagram below: Push the ring of the rotisserie
handle and assembly on the rotisserie kit, then place onto the hood.
4

CALDERA LIMITED WARRANTY
The stainless steel frame and body of your Brander Caldera Gas Barbecue Grill
are warranted against manufacturing defects for a period of ten years.
Discolouring of the stainless steel is not considered a defect. All cast
components (brass burners, cast iron grills and griddles) are warranted against
manufacturing defects for a period of five years. All remaining parts, including
flame tamers over the burners, are warranted against manufacturing defects for
a period of one year from the date of purchase.
TERMS and CONDITIONS
! Brander warrants its gas grills to be free of defects in materials and workmanship as
outlined above. Warranty is extended and limited to the original purchaser and may
not be transferred under any circumstances.
! Warranty is limited to units installed in accordance with the installation instructions
included with this manual and national and local building and fire codes.
! This warranty does not cover damages to the unit or personal property due to neglect,
misuse, lack of proper maintenance, alterations and modifications, or commercial use.
Failure to observe these directives will nullify this warranty.
! Any defective parts are to be returned to Brander Barbecue Outfitters at the address
below at owner's expense for warranty repair or replacement. Repaired or replaced
parts shall be returned to the registered owners at Brander's expense via ground
transportation.
! Any labor required for the removal and reinstallation of above parts in the
responsibility of the owner. Brander will make no allowances for reimbursement of
said charges.
! Notwithstanding any provisions contained in this warranty. Brander's responsibility
under this warranty is defined as above and it shall not in any event extend to
incidental, consequential or indirect damages to individuals or personal property.
! Brander reserves the right to have its representatives inspect any product or parts
therein prior to honoring any warranty claim.
! A bill of sale along with the unit model number and serial number will be required at
the time of claim with your authorized dealer.
Brander Barbecue Outfitters
3505 Edmonton Trail NE
Calgary, AB
T2E 3N9 Canada
Toll free 1-800-661-8152
5

PRECAUTIONS
When using the grill do not touch the cooking grills, Be sure all grill controls are turned off and the grill is cool
burner grate or immediate surrounding area as these before using any type of aerosol cleaner on or around the
areas become extremely hot and could cause burns. grill. The chemical that produces the spraying action could,
Use only dry potholders. Moist or damp potholders in the presence of heat, ignite or cause metal parts to
on hot surfaces may cause burns from steam. Do not severely corrode.
use a towel or bulky cloth in place of potholders. Do
not let potholders touch hot portions of the grill rack. Do not install this appliance in or on recreational vehicles
and/or watercraft.
Grease is flammable. Let hot grease cool before
attempting to handle it. Avoid letting grease deposits THIS UNIT IS FOR OUTDOOR USE ONLY. Do not
collect in the bottom of the grill. Clean often. operate the grill directly under overhead, unprotected
combustible construction. Use only in well ventilated areas.
DO NOT USE ALUMINUM FOIL TO LINE Do not use in buildings, garages, sheds, breezeways or any
THE COOKING GRILLS. This can severely upset other enclosed areas.
combustion airflow or trap excessive heat in the
control area. The result of this can be melted knobs, Keep outdoor cooking gas appliance area clear and free
rotary igniters and an increased risk of personal injury. from combustible materials, gasoline and other flammable
vapors and liquids.
For proper lighting and performance of the burners
keep the ports clean. It is necessary to clean them Do not obstruct the flow of combustion and/or ventilation
periodically for optimum performance. The burners air. If the unit is stored ensure that it is cool before covering.
will only operate in one position and must be mounted If propane is used, the cylinder must be unhooked and the
correctly for safe operation. propane cylinder stored outside in a well ventilated area, out
of reach of children.
Clean the grill with caution. Avoid steam burns; do
not use a wet sponge or cloth to clean the grill while it DO NOT USE BRIQUETTES OF ANY KIND IN
is hot. Some cleaners produce noxious fumes or can THE GRILL. The stainless steel gas grill is designed for
ignite if applied to a hot surface. optimum performance without the use of briquettes.
INSECT WARNING: Spiders and insects can nest Keep the back of the cart free and clear from debris. Keep
in the burners of this and any other grill. This can any electrical supply cord or the rotisserie motor cord away
cause a fire to occur behind the valve panel, thereby from the heated areas of the grill.
damaging the grill and making it unsafe to operate.
Inspect the grill twice a year. NEVER USE A DENTED RUSTY PROPANE TANK
PLACEMENT OF THE GRILL
LOCATION CLEARANCES
When determining a suitable location for your Minimum clearance from sides and back of unit to adjacent
barbecue take into account concerns such as exposure combustible is 24 inches. Minimal clearance from the grill
to wind, proximity to traffic paths and keeping any gas top to any overhanging combustible material is 48 inches.
supply lines as short as possible. Locate the grill only Barbecues are hot. Putting them close to combustible
in a well ventilated area. Never, under any materials is a BAD idea. Vinyl siding and other housing
circumstances, locate the grill in a building, garage, materials may melt or char if they are too close to the
breezeway, shed or other such enclosed areas. During barbecue when operating.
heavy use, the grill will produce a lot of smoke. Lock
the wheels after the grill is placed in a suitable
position.
8

GAS HOOK UP
Total gas consumption (per hour) of the 2. Check tank valve to assure it has proper external
Caldera stainless steel gas grill with all burners male thr eads (typ e I con nectio n per
on “HI”: ANSIZ21.81)
3. Make sure all burner valves on the barbecue are in
Main burners 18,000 BTU/ hr per burner their off position.
4. Inspect valve connections port and regulator
The installation of this appliance must assembly. Look for any damage or debris.
conform with local codes or, in the absence of Remove any debris. Inspect hose for damage.
local codes, with either the National FuelGas Never attempt to use damaged or plugged
Code, ANSI Z223.1/NFPA 54, or CAN CGA equipment. See your local L.P. gas dealer for
B149.1 Natural Gas and Propane Installation repair.
code. 5. When connecting regulator assembly to the valve,
hand tighten nut clockwise to a positive stop. Do
PROPANE GAS HOOK-UP C4640/C5640 not use a wrench to tighten. Use of a wrench
may damage quick coupling nut and result in a
Manifold pressure (operating): 10” water hazardous condition.
column (W.C.), None operating): 11.2” water 6. Slowly open tank valve fully (counterclockwise).
column (W.C). Use a soapy water solution to check all
connections for leaks before attempting to light
L.P. TANK REQUIREMENTS grill. If a leak is found, turn tank valve off and do
not use grill until local L.P gas dealer can make
A dented or rusty L.P. tank may be hazardous repairs.
and should be checked by your L.P. supplier.
Never use a cylinder with a damaged valve. Warning: Keep any fuel supply hose away from
The L.P. gas cylinder must be constructed and any heated surface.
marked in accordance with the specifications
for L.P. gas cylinders of the U.S. Department To disconnect L.P. gas cylinder:
of Transportation (D.O.T) or the National 1. Turn the burner valve off.
Standard of Canada.CAN/CSA-B339, 2. Turn the tank valve off fully (turn clockwise to
Cyl i n d e rs, S p h e res and Tub e s fo r stop).
Transportation of Dangerous Goods; and 3. Detach the regulator assembly from tank valve by
Commission, as applicable; and the cylinder turning the quick coupling nut counterclockwise.
must be provided with a listed overfilling The regulator shall be installed in such a location that
prevention device. The cylinder must be
provided with a shut off valve terminating in an
L.P. Gas supply cylinder valve outlet specified,
as applicable, for connection, for connection
type QCC1 in the standard for compressed gas
cylinder valve outlet and inlet, connection
ANSI/CGA.V-1.
Ensure that the hose does not come into
contact with the heat shield or the grill head.
To connect the L.P. gas supply cylinder please
follow the steps below:
1. Make sure the tank valve is in its full off
position (turn clockwise to stop)
it will not attain a temperature above 140 F (60 C).
Natural Gas Hook-Up: (C4670/C5670)
Natural gas models can be connected to a regulated
natural gas supply by means of a flexible hose
connector complying with the current Standard,
Electrometric Composite Hose and Coupling for
Conducting Propane and Natural Gas, CAN/CGA-
8.1 or with the Current Standard, Thermoplastic
Hose and Hose couplings for Conducting Propane
and Natural Gas, CAN/C. Installation and all gas
connections should be performed by a certified gas
fitter.
o o
7

LEAK TESTING
GENERAL TO TEST
Although all gas connections on the grill have Make a soap solution of one part liquid detergent
undergone a leak test at the factory prior to and one part water. You will need a spray bottle,
shipment, a complete gas tightness check must brush or rag to apply the solution to the fittings. For
be performed at the installation site due to the initial leak test, make sure the L.P. cylinder is full.
possible mishandling in shipment, or excessive Make sure that all barbecue controls are in the “off”
pressure unknowingly being applied to the unit. position. Make sure that the control to your gas
This is the owner's responsibility. Periodically supply is in the “off ” position. Spray or brush soap
check the whole system for leaks, or solution on all hoses, fittings and connections. Turn
immediately check if the smell of gas is your gas supply to “on”. Visually inspect all hoses,
detected. fittings and connections. Any bubbles in the soapy
solution mean that there is a leak present.
DO NOT USE THIS BARBECUE
BEFORE PERFORMING A LEAK TEST If there is a leak indicated turn off the gas supply and
tighten any visible fittings. Re-test. If there is still a
BEFORE TESTING leak indicated contact a qualified gasfitter.
Make sure that all packing material is removed
from the grill including the burner tie down Fittings can become loose. Hoses can develop
straps. cracks over time. Leak test often to insure your own
DO NOT SMOKE WHILE LEAK safety.
TESTING. NEVER LEAK TEST WITH
AN OPEN FLAME.
The gas supply must be turned off L'alimentation du gaz doit être fermee á
and disconnected from the LP-gas la boutille de gaz de pétrole liquéfié,
supply cylinder when the outdoor lorsque cet appareil de caisson exteriéur
cooking gas appliance is not in use. n'est pas utilize. La boutille d'
Indoor storage of an outdoor allmentation en gaz de pétrole liquife,
c o o k i n g g a s a p p l i a n c e i s doit être debranchee, lorsque cet
permissible only if the cylinder is appareil de caisson exterieur n'est pas
disconnected and removed. utilizé.
Cylinders must be stored outdoors,
out of reach of children. Do not
store in a building or any other
enclosed areas.
10

GRILL LIGHTING INSTRUCTIONS
WARNING: !
TO MATCH LIGHT THE GRILL
IMPORTANT! After several attempts, if the burner will not light
using the built-in igniter, then the burner can be
Having more than two burners on high match lit. Use an extra long match or use a regular
with the roasting hood closed may damage sized match and the extension rod provided (on a
the internal components of the barbecue. chain behind the front accessory doors). Simply
And cause discolouration of the stainless place an unlit match between the coils at the end of
steel. the extension rod.
BEFORE LIGHTING If you've just attempted to light the burner with the
Inspect the gas supply piping or hose prior to igniter, allow 5 minutes for any accumulated gas to
turning the gas “ON”. If there is evidence of dissipate. Keep your face and hands as far away as
cuts, wear, or abrasion, it must be replaced possible. Insert a lit extended match into the hole on
prior to use. Do not use the grill if the odour of the left side of the cart. Press the control knob and
gas is present. rotate left to the “HI” setting, which should release
the gas. Burner will light immediately.
With a propane barbecue, ensure the tank is
securely closed. Screw the regulator (type Note: If ignition does not immediately take place,
QCC1) onto the tank. Leak check the hose and turn the burner valve handle to “OFF”, wait 5
regulator connections with a soap and water minutes, and repeat the lighting procedure.
solution before operating the grill (see leaktesting instructions in this manual). CHECKING BURNER FLAMES
Flames should be blue and stable with small yellow
With a propane barbecue, turn your propane tips. There should not be excessive noise. The flames
tank on slowly so as not to trick your tank into should not “lift” off the burner. The flames should
thinking there's a leak in the tank (see bottom not be totally yellow. If any of these conditions
of page 12). exist, check if the air shutter or burner ports are
blocked by dirt, debris, spider webs, etc.
TO LIGHT THE BARBECUE Following the operating instructions, light each
Turn all knobs to “OFF” then turn on the gas burner and check for a clear blue flame with just a tip
supply. Always keep your face and body as far of yellow. If necessary, avoid excess yellow tipping
from the grill as possible when lighting. by adjusting the screw on the side of the burner
Open the lid, push and turn one control knob counter-clockwise (see Fig. below).
slowly to the “HI” position. Upon hearing gas
flow, (a faint hissing sound) continue holding
the knob in position to accumulate a small
amount of gas for ignition. After three to four
seconds, continue to turn the knob to “HI” to
light the burner. If the burner does not light,
turn all burners “OFF” and wait 5 minutes.
Then repeat the above process.
9

OPERATING INSTRUCTIONS
The Caldera is a hot barbecue. It is designed to kind. Heat is radiated by the stainless steel flame tamers
provide the benefits of open grilling in all types positioned beneath the cast iron cooking grills.
of weather. DO NOT turn more than two
burners to high and put down the roasting Note: The hot grill sears the food, sealing in the juices.
hood. Doing so can cause damage to the valves The longer the preheating time, the faster the meat
and ignition system. Operating the barbecue with sears and the darker the grill marks. Proper preheating
more than two burners on high is acceptable if also aids in preventing food from sticking to the grill
the roasting hood is left up. surface.
The Caldera has been designed to burn hotter at USING THE ROTISSERIE KIT
the rear of the barbecue than at the front. After
using your Caldera a few times you will quickly To load the skewer, begin with the handle in place and
learn to use the heat differentiation to your slide one of the meat forks (prongs toward the food)
advantage while cooking. onto the skewer. Slide the remaining meat fork/prongs
onto the skewer from the opposite end. Center the
Each burner is rated at 18,000 BTUs/hr. The product to be cooked on the skewer, then push the
grill burners encompass the entire cooking area meat forks firmly together. Tighten the wing nuts. With
and are side ported to minimize blockage from the barbecue grill off, place the skewer such that the
falling grease and debris. The igniter/control pointed end rests firmly in the motor receptacle with
knobs are located on the front panel. the other being supported on the “keeper” on the
grove in the right side of the roasting hood.
USING THE GRILL
Make sure the grill has been leak tested and is It may also be necessary to wrap the food with butchers
properly located. Remove any packing material. string (never use nylon or plastic string), to secure any
Grilling requires high heat for searing and proper loose portions. It is normal for the skewer to flex when
browning. Some foods are cooked at the larger cuts of meat are being cooked. It may also be
“HIGH” heat setting for the entire cooking time. necessary to remove the cooking grills for larger cuts
However, when cooking large pieces of meat or of meat. If the meat scrapes on the cooking grills
poultry, it may become necessary to turn the heat during any part of the rotation, then the grills must be
to a lower setting after the initial searing. This removed. Assemble the counter weight with washers
cooks the food through without burning the and handle to counter balance the heaviest side of the
outside. Foods cooked for a long time or basted meat. By using the counterweight the rotisserie should
with a sugary marinade may need a lower setting
near the end of the cooking time.
Light the grill burners using the instructions in
this manual. Preheat the grill for a few minutes.
Place the food on the grill and cook to the desired
doneness. adjusting the heat setting as necessary.
The control knob may be set to any position
between “HIGH” and “LOW”
Note: The grill is designed to grill efficiently
without the use of lava rocks or briquettes of any
turn more smoothly through all 360 of rotation.
Plug the rotisserie motor power cord into a 120VAC
grounded GFCI protected outlet. Ignite the burners
on “HIGH” as you would for grilling purposes and
turn the motor on using the rocker switch. Turn the
burners to low or medium. Close the roasting hood.
After five minutes, turn the central burners to the
“OFF” position and adjust the remaining outer
burners to a medium setting for the remainder of the
cooking time. In general, you do not want direct heat
underneath the food on your rotisserie rod. Check
cooking progress regularly.
o
DO NOT LEAVE THE GRILL UNATTENDED WHILE COOKING
10

MAINTENANCE & CARE
WARNING ! IMPORTANT GRILL BURNERS
Extreme care should be taken when moving a burner as
BARBECUE GRILL MAINTENANCE it must be correctly centered on the orifice before any
AND CARE attempt is made to relight the grill. Frequency of
The grill is made from non-rusting and non- cleaning will depend on how often you use the grill.
magnetic stainless steel. Discolouration of the Ensure the gas supply is off and the knobs are in the
grill body is and all other stainless steel surfaces is “OFF” position. Make sure the grill is cool. Clean the
a normal result of prolonged exposure to high exterior of the burner with a wire brush. Clear
temperature and does not indicate a defect in stubborn scale with a metal scraper. Clear any clogged
either materials or workmanship. ports with a straightened paper clip. Never use a
wooden toothpick as it may break off and clog the
There are many different stainless steel cleaners port. Please note, if insects or other obstructions are
available. Always use the mildest cleaning blocking the flow of gas through the burner, you will
procedure first, scrubbing in the direction of the need to call your dealer.
grain. Specks of grease can gather on the surface
of the material and bake on to the surface and STAINLESS STEEL FLAME TAMERS (under
give the appearance of rust. For removal use an the burners)
abrasive pad in conjunction with a cleaner. To avoid burns, do not clean while hot. They may be
wiped while in place with hot, soapy water, rinsed and
GRILL SURFACE wiped dry. Never immerse a hot grate in water as it may
Prior to their first use, your cast iron cooking result in splattering of grease and steam resulting in an
grills should be seasoned by coating the cold grills increased risk of personal injury.
with vegetable oil (peanut or olive oil is
recommended) using a clean cloth or brush. SPIDER AND INSECT WARNING!
Light the grill burners and allow the grills to heat Spiders and insects can nest in the burners of this or
up for ten or fifteen minutes with the roasting any other grill and can cause the gas to flow from the
hood open. Allow the grills to cool down and front of the burner. This can cause a fire to occur
repeat the process. behind the valve panel, thereby damaging the grill and
making it unsafe to operate.
The easiest way to clean the grill is immediately
before cooking and after pre-heating the grill WHEN TO LOOK FOR SPIDERS
surface. Wear a barbecue mitt to protect your You should inspect the burners at least once a year or
hand from the heat and steam. Scrub the hot grill immediately if any of the following conditions occur:
with a brass bristled cleaning brush. Avoid using 1. The smell of gas in conjunction with the burner
water when cleaning cast iron as it may cause flames appearing yellow.
premature rusting and decay of the grill surface. 2. The grill does not reach temperature.
3. The grill heats unevenly.
GREASE TRAY CLEANING: 4. The burners make popping noises.
The grease tray should be emptied and wiped
down periodically and washed in a mild detergent BEFORE CALLING FOR SERVICE
and warm water. If the grill does not function properly, use the
A small amount of sand or cat litter may be troubleshooting guide on the following page before
placed in the bottom of the grease try to absorb contacting your dealer for service. You may save the
the grease falling through the cooking grills. cost of a service call.
If you allow grease to accumulate in your grease
tray you run the risk of a grease fire.
11

TROUBLESHOOTING
PROBLEMS WHAT TO DO
Remove the cooking grills and the flame tamer.
With a mirror, watch the igniter tip. You should
see a spark jump from the tip of the igniter
when the button is turned. You should also hear
a click every time the knob is reset to the
“HI” position.
Grill won’t light when the
ignition button is turned
Burner flame is yellow or
orange, and there is the
odour of gas
Low heat with knob in
“HI” position
If there is no spark and no click, can you match
light the burner? If the burner lights with a match,
you can continue operating the grill, but you may
need to replace the control valve(s) affected.
Check the igniter tip to see if its clean and free
from debris. You can sand this area lightly and
re-adjust it for 3/16” gap.
Do other igniters on the unit function properly?
Check the affected valve orifice for blockage.
Turn off the grill and leak test all connections. In
the event the leak is traced to a control valve,
contact your dealer to obtain a replacement.
Is the fuel hose bent or kinked?
Is the grill in a dusty area?
Is there an adequate gas supply available? If it is
only one burner that appears low, does the orifice or
burner need cleaning?
NOTE: Modern propane tanks will cut the flow of propane to approximately
10% if they perceive a leak in the system. Turning your tank on too quickly can
cause your tank to “think” there is a leak. If, all of a sudden, you are getting very
little propane flow in your barbecue, completely disconnect your propane tank
from the barbecue, hook it back up and turn on your tank exaggeratedly slowly.
Is the gas supply or gas pressure low?
Is the grill being pre-heated for 15 minutes?
12
 Loading...