

Page 1
Multi-Scale Digital Plan Measure
SC A L E MA S T E R®CL A S S IC
V2 . 0
U s e r ’s Guide
Page 2

P re l i m i n a ry Inform a t i o n
I n t ro d u c t i o n . . . . . . . . . . . . . . . . .3
Key D e fi n i t i o n s / F u n c t i o n s . . . . . .4
Adjusting the W h e e l . . . . . . . . . . .9
Using the Scale Master Classic
I m p e ri a l / M e t ric Modes. . . . . . . . 1 0
“ R o l l i n g ”a Measure m e n t. . . . . . . 1 1
Built-in Scales . . . . . . . . . . . . . . . 1 4
C h a n ging Measurement Units . . 1 6
Bell On/Off . . . . . . . . . . . . . . . . . 1 6
C o nve rting Between Scales . . . . 1 6
L o cking Scale Settings. . . . . . . . . 1 7
Using the Counter . . . . . . . . . . . 1 8
Using Memory Function. . . . . . . 1 9
Finding A r ea & Vo l u m e . . . . . . . . 2 1
Setting Custom Scales. . . . . . . . . 2 5
Using Custom Scale/Ruler . . . . . 2 7
A p p e n d i x
Common Questions . . . . . . . . . .2 8
Additional Calculator
F u n c t i o n s . . . . . . . . . . . . . . . . 3 5
S p e c i fi c a t i o n s . . . . . . . . . . . . . . . 3 7
Limited Wa rra n t y. . . . . . . . . . . . . 3 8
TA B L E O F CO N T E N T S
2 – Scale Master®C l a s s i c v 2 . 0
Page 3

I n t ro d u c t i o n
The Scale Master®Classic M u l t i Scale Digital Plan Measure has been
s p e c i fi c a l ly designed to simplify
t a ke - o ffs from arch i t e c t u ral and engin e e ring draw i n g s .
◆ Ta kes linear measurements of
a ny shape
◆ Finds rectangular areas and
vo l u m e s
◆ C o nve rts between scales and
d i m e n s i o n s
◆ Built-in push button counter
◆ S u b t ract function
◆ Six Custom Scales that let yo u
d e fine and roll in any scale
PR E L I M I N A RY IN F O R M AT I O N
3 – User’s Guide
Page 4

Key Definitions/Functions
[ O ff/On] – Power On/Off switch
Tu rns power On or Off. Tu rn i n g
p ower Off cl e a rs the display and all
values prev i o u s ly stored in memory. Tu rning the unit Off does not
clear scales or modes.
[Lock] – Lock switch
Locks the mode and scale so that they
cannot inadvertently be changed. It
is advised to operate in the locked
position unless you are specifically
setting or changing scales.
[Subtract/Count] – Subtract key
Used to perfo rm four functions:
1) when this key is held dow n
while you are ro l l i n g , the unit will
s u b t ract the rolled distance fro m
a ny prev i o u s ly rolled distances or
f rom zero ;2) when in Count mode,
used to increase the count value by
one (pressing [Reset] will clear the
c o u n t ) ; 3) when in the pro gra m-
ming mode for height or custom
s c a l e s ,used to decrement the fl a s hing va l u e ; 4) when holding key
4 – Scale Master®C l a s s i c v 2 . 0
Page 5

d own turning unit on will sw i t c h
unit between Imperial and Metri c
u n i t s .
[Rcl] – Recall key
Used to recall stored va l u e s .W h e n
you pre s s [Rcl] [Rcl], the last va l u e
rolled is displaye d .
[Mode] – Mode key
Used to toggle between the fo l-
l owing scale modes (in sequence):
1 ) A rch i t e c t u ral (A R C H) ;
2 ) E n gi n e e ring 1 (ENG 1)
3 ) E n gi n e e ring 2 (ENG 2) ;
4 ) Custom (C U S T O M)
5 ) Count (C O U N T) .
When in pro gramming mode, t h i s
key moves the cursor back to the
p revious field or digi t .
[Scale] – Scale key
Used to toggle between the va ri o u s
scales within each scale mode.
When in the pro gramming mode
for height or custom scales,this key
m oves the cursor fo r wa r d to the
n ext field or digit to be progra m m e d .
5 – User’s Guide
Page 6

[M1+] – Memory Add key
Adds the displayed value to memory. When this key is pre s s e d , t h e
value on the display is added to
m e m o ry, the display cl e a rs to “ 0 ”
and an indicator (M) lights.When in
the pro gramming mode for height
or custom scales,this key adva n c e s
the flashing digit or units.
[M2x] – Memory Add key
S t o res displayed value in memory.
When this key is pre s s e d , the va l u e
on the display is added to memory,
the display cl e a rs to “ 0 ”and an indi-
cator (M) lights.
[Reset] — Reset key
Resets the display to zero .W h e n
p ressed simu l t a n e o u s ly with another key,it cl e a rs the value of that
re gister (for ex a m p l e , [Reset] [M1+]
cl e a rs the value stored in the mem-
o ry re gi s t e r ) .
6 – Scale Master®C l a s s i c v 2 . 0
Page 7

[Reset] [Subtract] — Full Reset
P ress keys simu l t a n e o u s ly. Used to
clear all re gi s t e rs and reset the unit
to initial default va l u e s . T h i s
key s t ro ke does not wo rk in the
Count Mode.
[Subtract] [Mode] — Units of Measure m e n t
S w i t ches between diffe rent units
of measurement and conve rts the
d i s p l ayed va l u e .The units of meas u rement sw i t ch in this ord e r :
( I m p e rial Mode) feet and inch e s ,
decimal fe e t , decimal inch e s ,ya rd s ,
m e t e rs . In Metric Mode, the ord e r
i s :m i l l i m e t e rs ,m e t e rs ,k i l o m e t e rs .
[Reset] [Rcl] — Clear All Memory
P ress keys simu l t a n e o u s ly. C l e a rs
all memory re gi s t e rs (the [ M 1 + ] ,
[ M 2 x ] , and height re gi s t e rs ) .
7 – User’s Guide
Page 8

[Rcl] [M2x] — Are a / Vo l u m e
Used to calculate area and
vo l u m e :
1 ) The fi rst press displays the
linear value stored in the [ M 2 x ]
m e m o ry re gi s t e r.
2 ) The second press calculates
and displays the are a ,
mu l t i p lying the two linear
values stored in the memory
re gi s t e r s ([M1+], [M2x]).
3 ) If a height is store d , the third
p ress calculates and display s
the vo l u m e . If no height is
s t o re d ,d i s p l ays the linear va l u e
s t o re d .
4 ) If a height is store d , the fo u rt h
p ress displays the height va l u e .
8 – Scale Master®C l a s s i c v 2 . 0
Page 9
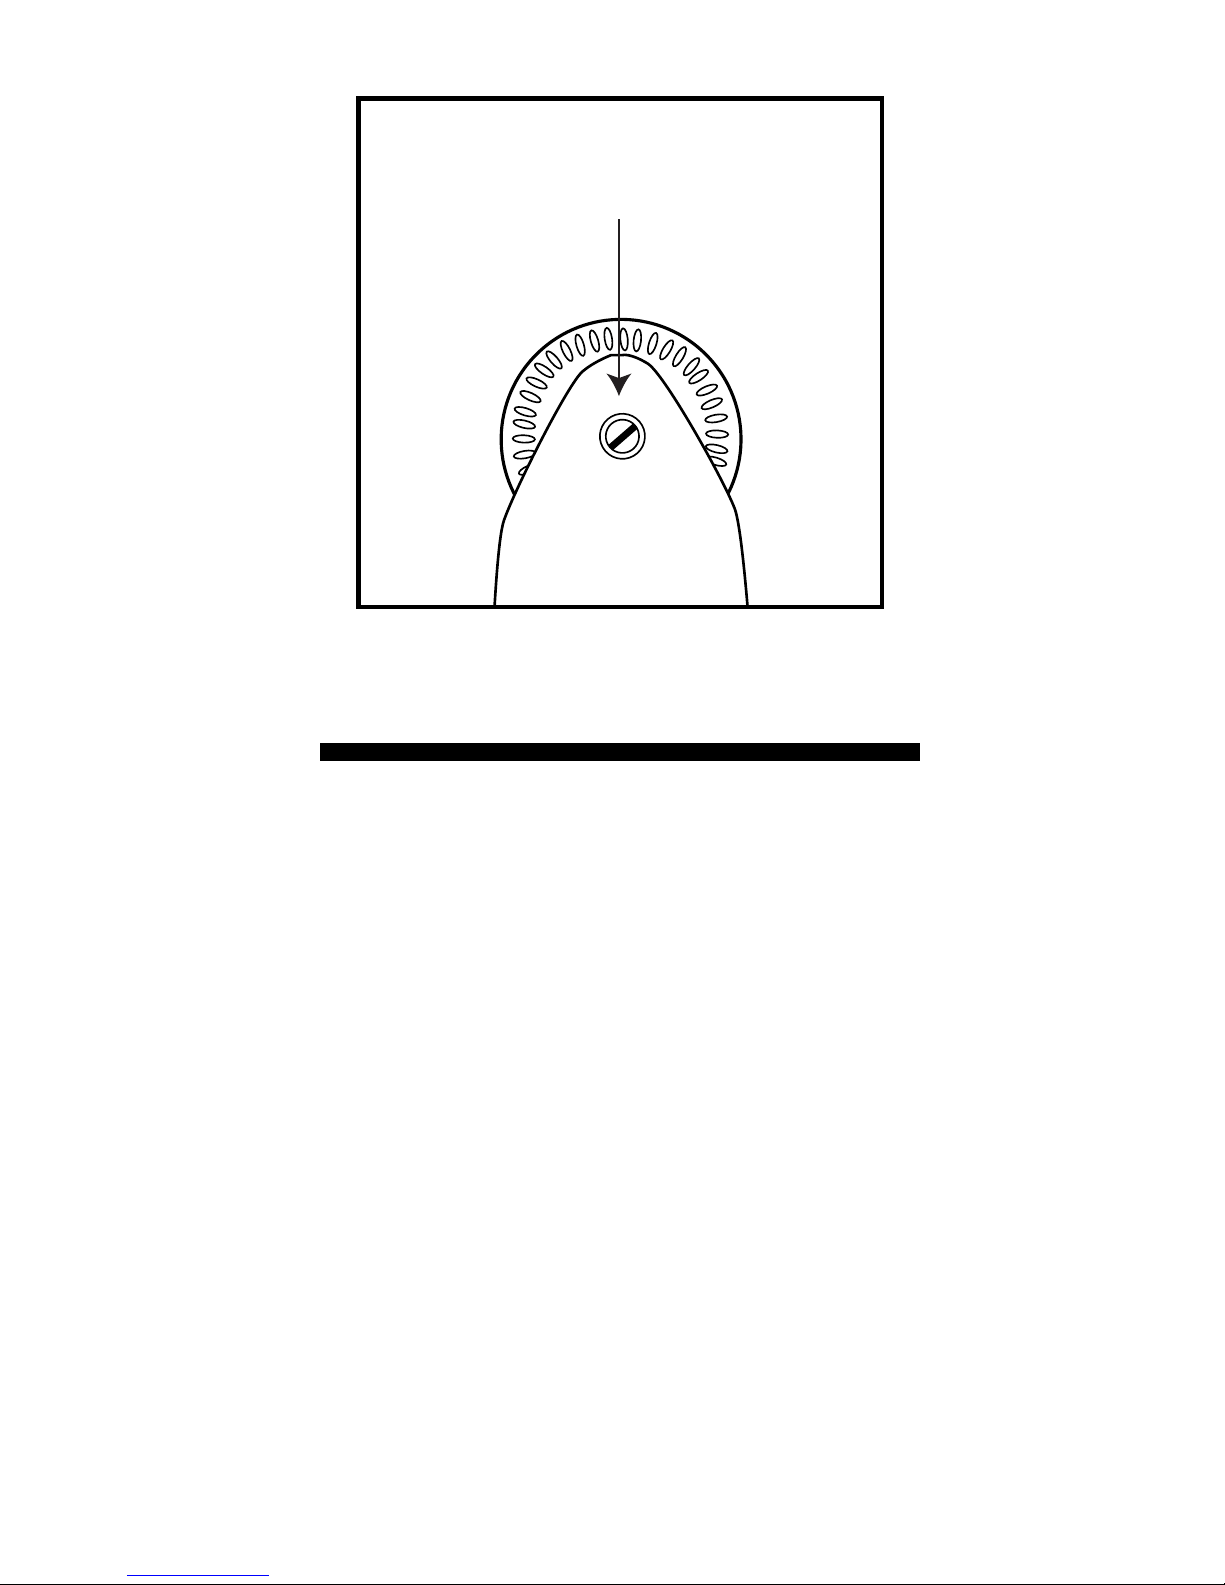
Adjusting the Wheel
The Celcon
®
polymer wheel can be
adjusted for each user’s preference.To
adjust the wheel,take a small,flat-head
jeweler’s screwdriver and slightly
rotate the screw located near the
wheel tip. Rotating the screw about
1/4 to 1/3 turn should be sufficient.
Rotating the screw within those two
values should adjust the wheel
between free spinning (which is too
loose) to skidding (which is too tight).
Rotate to Adjust Wheel
9 – User’s Guide
Page 10

Imperial/Metric Modes
The Scale Master Classic is set up to
use Imperial (English) dimensional
units by default. The Scale Master
C l a s s i c can be set up to use Metric
scales by using the following seq u e n c e :
1 ) Turn unit off via switch.
2 ) P ress and hold [ S u b t r a c t / C o u n t ] k e y.
3 ) Turn unit on via switch.
4 ) Release [ S u b t r a c t / C o u n t ] k e y.
While in Metric mode, M E T will remain lit in the scale box.
Repeat the pro c e d u re above to
switch back to Imperial mode.
US I N G T H E SC A L E MA S T E R CL A S S I C
1 0 – Scale Master®C l a s s i c v 2 . 0
Page 11

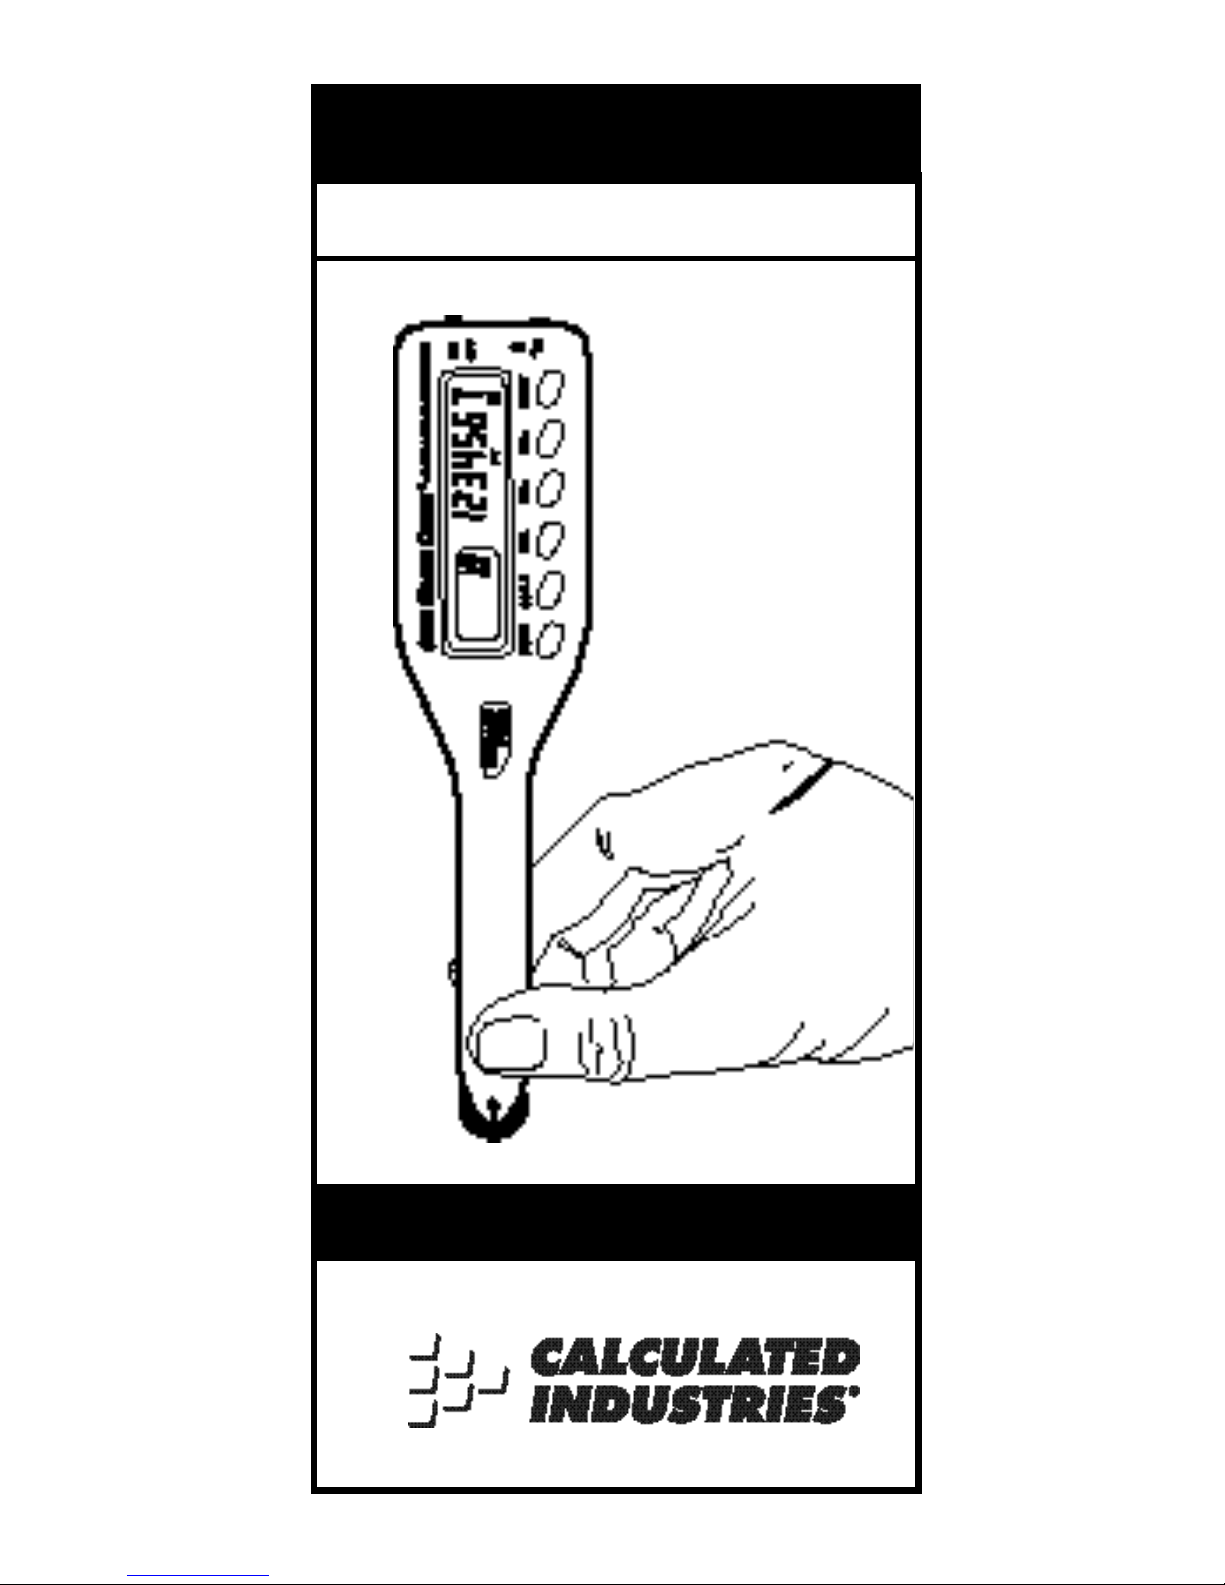
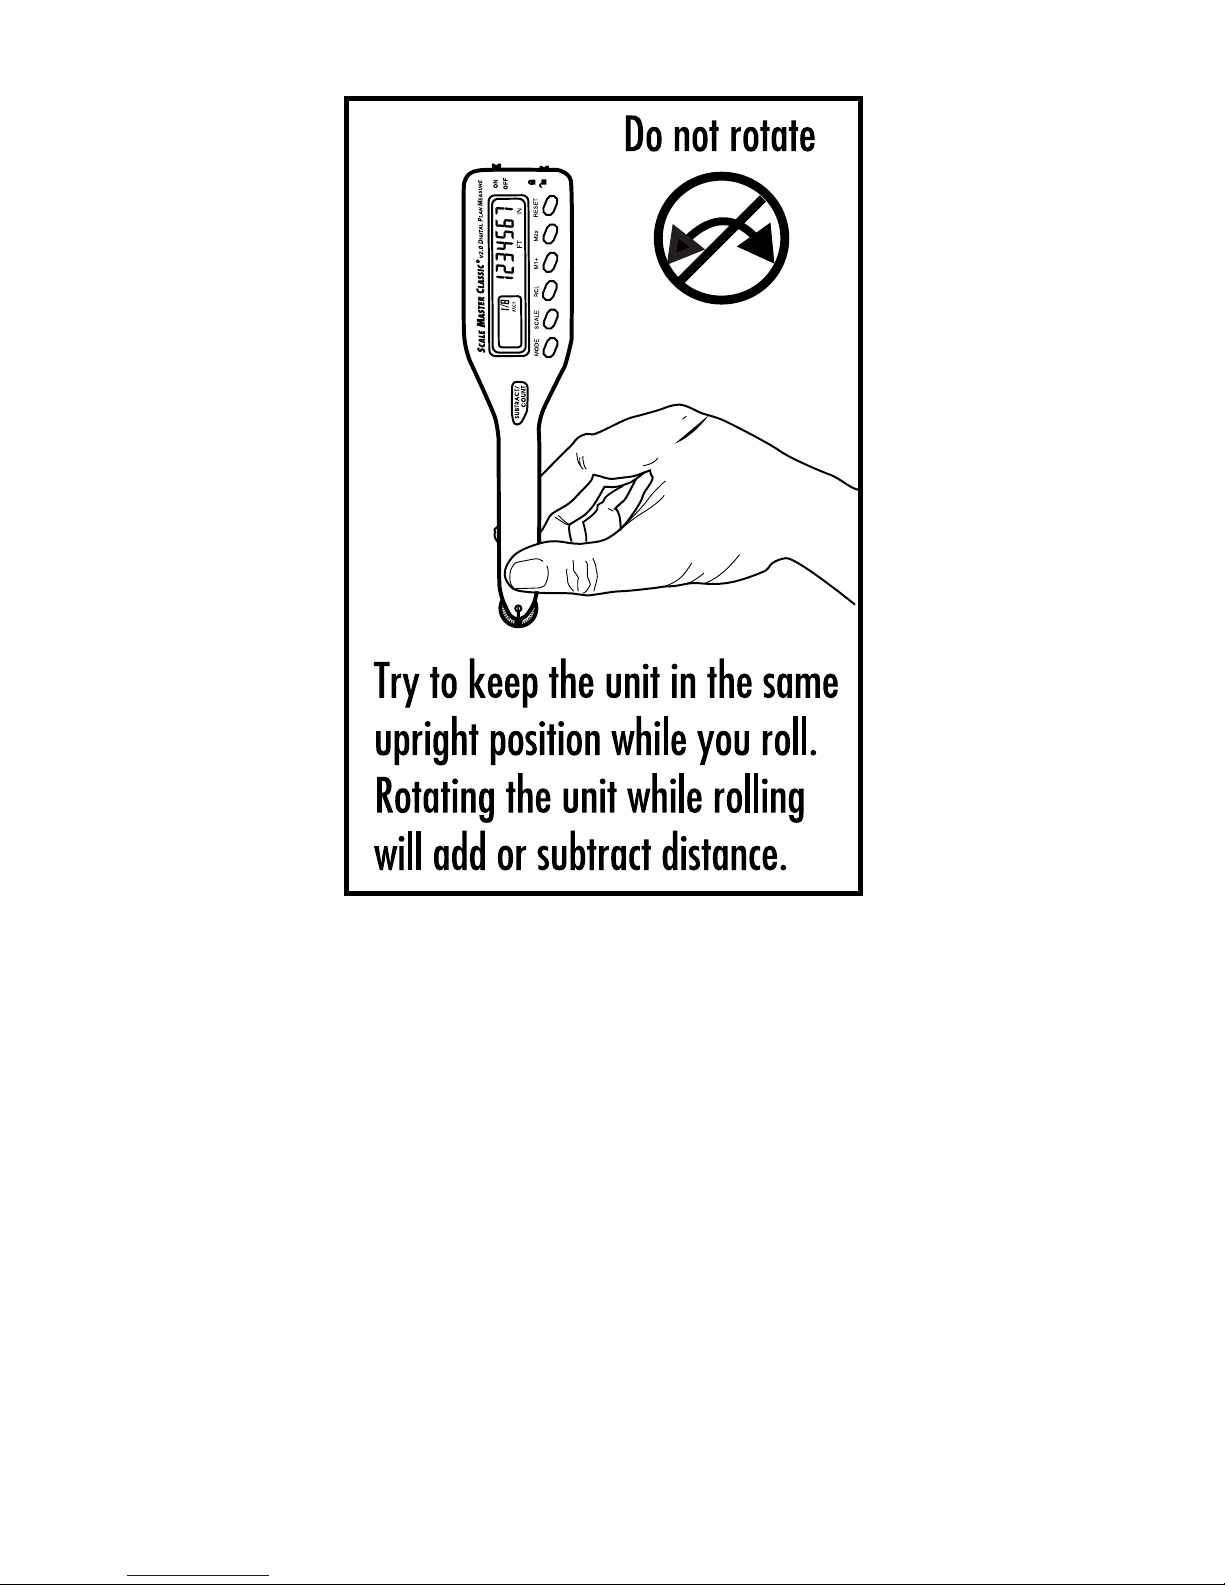
“Rolling” a Measure m e n t
To take a measurement with the S c a l e
Master Classic:
1 ) S w i t ch the unit on. If the
d i s p l ay does not show zero (0),
p ress the [Reset] key to cl e a r
the display.
2 ) Select your mode by pressing the
[Mode] key.Then press the [ S c a l e ]
key to select your scale.
3 ) B e gin ro l l i n g .The display will re g-
ister your measure m e n t s .W h e n
you roll the unit, be sure to hold
the unit upright (see picture on
n ext page ) .
Also make sure you start and
stop at the exact points you a re
m e a s u ri n g . Otherwise your ro l l
m ay not be accurate (see pict u re on next page ) .
1 1 – User’s Guide
Page 12
We suggest several practice runs with
the Scale Master Classic so that you
can become comfortable with the
unit and develop your rolling technique.
12 – Scale Master®Classic v2.0
Page 13

4) To store your measurement,
press one of the memory keys
(
[M1+] or [M2x]).
13 – User’s Guide
Page 14

Built-In Scales
Imperial (English) Units
A rc h i t e c t Engineer I Engineer II
A R C H E N G I E N G I I
1 foot= 1 inch= 1 inch=
1 / 3 2 ” 1 0 . 0 ’ 3 0 0 . 0 ’
1 / 1 6 ” 2 0 . 0 ’ 3 3 3 . 3 ’
3 / 3 2 ” 3 0 . 0 ’ 4 0 0 . 0 ’
1 / 8 ” 4 0 . 0 ’ 4 1 6 . 6 ’
3 / 1 6 ” 5 0 . 0 ’ 5 0 0 . 0 ’
1 / 4 ” 6 0 . 0 ’ 5 8 3 . 3 ’
3 / 8 ” 8 3 . 3 ’ 6 0 0 . 0 ’
1 / 2 ” 1 0 0 . 0 ’ 6 2 5 . 0 ’
3 / 4 ” 1 6 6 . 6 ’ 6 6 6 . 6 ’
1/1 (1”) 2 0 0 . 0 ’ 7 5 0 . 0 ’
3/2 (1 1/2”) 2 5 0 . 0 ’ 1 , 0 0 0 . 0 ’
2/1 (2”) 1 , 2 0 0 . 0 ’
3/1 (3”) 2 , 0 0 0 . 0 ’
4/1 (4”) 3 , 0 0 0 . 0 ’
1 4 – Scale Master®C l a s s i c v 2 . 0
Page 15

Metric Units
A rc h i t e c t Engineer I Engineer II
A R C H E N G I E N G I I
1: 1 1: 100.0 1: 1,000
1: 2 1: 125.0 1: 1,250
1: 3 1: 150.0 1: 1,500
1: 4 1: 200.0 1: 1,625
1: 5 1: 250.0 1: 2,000
1: 10 1: 300.0 1: 2,500
1: 20 1: 400.0 1: 5,000
1: 25 1: 500.0 1: 6,000
1: 30 1: 10k
1: 40 1: 12.5k
1: 50 1: 20k
1: 75 1: 25k
1: 50k
1 5 – User’s Guide
Page 16

Changing Measurement Units
P ress [Subtract/Count] [Mode] s i mu l t a-
n e o u s ly to sw i t ch to the next ava i l-
able units of measure m e n t .E a ch key
p ress will sw i t ch to the next units of
m e a s u rement on this list:
Imperial Mode — Fe e t - I n ch ,D e c i m a l
Fe e t ,Decimal Inch e s ,Ya rd s ,M e t e rs ;
Metric Mode — Millimeters ,M e t e rs ,
K i l o m e t e rs .
Bell On/Off
To toggle the bell sound on or off,
p ress [Reset] [Scale] s i mu l t a n e o u s ly.
C o n v e rting Between Scales
The Scale Master Classic can auto-
m a t i c a l ly conve rt values betwe e n
s c a l e s . For ex a m p l e , 20 feet rolled in
1 / 1 6 ” scale will be conve rted to 10
feet in 1/8”s c a l e . You may want to ro l l
a value in one scale and then add that
exact value (unconve rted) in another
s c a l e .
1 6 – Scale Master®C l a s s i c v 2 . 0
Page 17

1 ) Roll a value and press [ M 1 + ] .P re s s
[ S c a l e ] to ch a n ge scales.
2 ) Roll another value and pre s s
[ M 1 + ].
3 ) P ress [Rcl] [M1+] to recall the com-
bined total.
You can also conve rt values fro m
I m p e rial Units (English) to meters
within the Imperial mode. P re s s
[ S u b t r a c t / C o u n t ] a n d [Mode] s i mu l t a n e-
o u s ly to sw i t ch to other units of meas u re m e n t ,i n cluding meters .
Note: You cannot convert values when
changing Imperial/Metric modes.
Locking Scale Settings
Your Scale Master Classic c o m e s
equipped with a lock switch that
p revents inadvertently changing
drawing scales. When the lock is
activated, a lock symbol will be
displayed in the LCD. While active, the
Scale and Mode cannot be re v i s e d
(other than removal of the battery).
1 7 – User’s Guide
Page 18

Using the Counter
You can use the [ S u b t r a c t / C o u n t ] key to
count items such as electrical outlets,
d ra i n s ,e t c .
P ress [Mode] until you find the Count
m o d e .Then press the [Subtract /Count]
key to count the items.
You can use the [M1+] and [M2x] m e m-
o ry keys to store or accumulate the
counts for two diffe rent items. A f t e r
you have a count va l u e ,p ress [M1+] t o
s t o re it. You can then count more
items and press [M1+] to continu e
a c c u mulating the count va l u e . You can
use the same process to store and
a c c u mulate counts in the [M2x] m e m-
o ry re gi s t e r.
1 8 – Scale Master®C l a s s i c v 2 . 0
Page 19

Using the Memory Function
The memory function allows you to
add rolled or counted va l u e s . B u t
you cannot add dimensioned
( ro l l e d ) and undimensioned ( c o u n ted) va l u e s .
To add rolled va l u e s :
1 ) Roll the fi rst va l u e * .P ress [ M 1 + ] .
The display resets to “ 0 ,” t h e
m e m o ry indicator (M) lights and
the value is added to memory.
2 ) Roll the next va l u e .P ress [ M 1 + ] .
This value is added to your previous value stored in memory.
3 ) You can continue to add va l u e s
using the [M1+] key. P re s s [ R c l ]
[ M 1 + ] to rev i ew the total in mem-
o ry.
* For Count va l u e s ,you must press the
[ S u b t r a c t / C o u n t ] key to count yo u r
va l u e .P ress [ M 1 + ] to add this value to
m e m o ry.
The annunciator “M” will display
when a value is stored in memory.
1 9 – User’s Guide
Page 20

Other memory function keystro k e s
[Rcl] [M1+]
o r
[Rcl] [M2x]
D i s p l ays the value stored in the
m e m o ry re gi s t e r.
[Reset] and [M1+] s i m u l t a n e o u s l y
o r
[Reset] a n d [M2x] s i m u l t a n e o u s l y
C l e a rs the value stored in the memo ry re gi s t e r.
[Reset] a n d [Rcl] s i m u l t a n e o u s l y
C l e a rs values stored in memory re gi s t e rs (the [M1+], [M2x], and height
re gi s t e rs ) .
2 0 – Scale Master®C l a s s i c v 2 . 0
Page 21

Finding Area & Vo l u m e
The Scale Master Classic can calcu-
late area and volume once you have
values set for length, w i d t h , and (fo r
volume calculation only) height.T h e
l e n g t h , width and height re gister va lues are stored in semi-perm a n e n t
m e m o ry. These values will not be
cl e a red when you pre s s [ R e s e t ] by
i t s e l f. These values will only clear if
yo u :
1 ) p ress [ R e s e t ] then the re gi s t e r
( cl e a rs one value at a time)
2 ) p ress [ S u b t r a c t / C o u n t ] [Reset] s i m u l -
t a n e o u s l y ( cl e a rs all values)
Once you have rolled or set the height
va l u e , it will be used for all s u b s eq u e n t volume calculations u n l e s s
you ch a n ge it.
2 1 – User’s Guide
Page 22

Finding Area
1 ) Roll the fi rst dimension and
p ress [ M 1 + ]. A small “M” w i l l
appear in the scale box display
and the main display will reset to
z e ro (0).
2 ) Roll the second dimension and
p ress [ M 2 x ]. The main display
will reset to zero .
3 ) P ress [Rcl] [M2x]. The fi rst pre s s
d i s p l ays the linear value stored in
this re gi s t e r. The second pre s s
will calculate and display the
a re a .
Rolling or Setting Height
Note: Once you have a value stored for
height, you do not need to re p rogram it unless you want to
change it.
To set or roll in a height:
1 ) To set a height, skip to step 2.To
roll in a height, roll the desire d
d i m e n s i o n .
2 2 – Scale Master®C l a s s i c v 2 . 0
Page 23

2 ) P ress [Subtract/Count] and [M2x]
s i m u l t a n e o u s l y. If you are setting a height, go to step 3. If yo u
a re rolling in a va l u e ,the display
will show the rolled value and an
a n nunciator will b e gin fl a s h i n g
(F T-I N for I m p e rial Mode, M M fo r
M e t ric Mode).
3 ) If you do not want to ch a n g e the
units of measure m e n t ,go to step
4 . To ch a n ge the units of mea-
s u re m e n t , p re s s [ M 1 + ] until yo u
re a ch the desired units.
4 ) If you have rolled a va l u e ,p re s s
[ S c a l e ]until the display re t u rns to
z e ro . If you are setting a height,
p ress [Scale] to begi n . The left-
most digit will begin fl a s h i n g .
P re s s :
[ M 1 +] to increment this digi t
[S u b t r a c t / C o u n t] to decre m e n t
[S c a l e] to advance to next digi t
[M o d e] to move back one digi t
C o n t i n ue until all digits are set and the
d i s p l ay re t u rns to zero .
2 3 – User’s Guide
Page 24

Finding Vo l u m e
1 ) Roll the fi rst dimension and
p ress [ M 1 + ].
2 ) Roll the second dimension and
p ress [ M 2 x ].
3) Roll in or set a height va l u e .If yo u
a l re a d y have a height va l u e ,s k i p
to step 4.
4 ) P re s s [Rcl] [M2x]. The fi rst pre s s
d i s p l ays the linear value stored in
this re gi s t e r. The second pre s s
will calculate and display the
a re a .P ress the [ M 2 x ] key again to
find vo l u m e .P ress a fo u rth time
to display the height va l u e
s t o re d .
2 4 – Scale Master®C l a s s i c v 2 . 0
Page 25

Setting Custom Scales
You can pro gram and store six
Custom Scales: t h ree in Imperi a l
(English) and three in Metric Units.
The default units of measurement are
fe e t - i n ches (F T-I N) for Imperial Mode
and millimeters (M M ) for Metric Mode.
If all custom scale settings are fi l l e d ,
you can ove r w rite an old scale with a
n ew scale.
You can set a Custom Scale two way s :by
rolling in a known distance or by setting the exact distance.
Rolling or Setting a Custom Scale
1 ) P r ess [Mode] until “1: C U S ” a p p e a rs
in the scale box display.
2 ) P ress [Subtract/Count] and [ S c a l e ]
s i m u l t a n e o u s l y. “R O L L” will ap-
pear in the main display.If you are
setting a scale,skip to step 4.
2 5 – User’s Guide
Page 26

3 ) R o l l d e s i red d i m e n s i o n .“R O L L I N G“
n ow appears in the main display.
Note: For greater accuracy, you may
want to roll the known distance
several times, then enter the dis tance times the number of rolls (for
example, roll a distance 5 times
and if the distance is 3 feet, enter
15 feet).
4 ) P ress [Scale]. The display will
s h ow zeroes and the units of
m e a s u rement annunciator will
b e gin flashing (F T-I N for Imperi a l
M o d e , M M for Metric Mode).
5 ) If you do not want to ch a n g e the
units of measure m e n t , skip to
step 6. If you want to ch a n ge the
units of measure m e n t , p re s s
[M1+] until you re a c h the desire d
u n i t s .
6 ) P ress [Scale] to begin setting the
scale distance.The leftmost digi t
will begin fl a s h i n g .P re s s :
[M1+] to increment this digi t
[ S u b t r a c t / C o u n t ] to decre m e n t
[Scale] to advance to next digi t
2 6 – Scale Master®C l a s s i c v 2 . 0
Page 27

[Mode] to move back one digi t
C o n t i nue until all digits are set
and the display re t u rns to zero .
Using the Custom Scale/Ruler
The default value (after a full reset) fo r
Custom Scale is one-to-one (1 fo o t
equals 1 fo o t ) .This lets you use yo u r
Scale Master Classic as a rolling ru l e r
(in Fe e t - I n ch e s ) , w h i ch is especially
useful for measuring irregular shapes.
1 ) To reset your Custom Scale set-
ting to a one-to-one ra t i o , p re s s
[Reset] a n d [Subtract/Count] s i m u l -
t a n e o u s l y .
2 ) Then press the [Mode] key until
the “ C u s t o m ”mode appears .
3 ) B e gin ro l l i n g .
2 7 – User’s Guide
Page 28

Common Questions
Q : The wheel on my Scale Master
feels a little too tight, can I
adjust it?
A : Yes! The wheel is specifi c a l ly
designed to “ a d j u s t ” to each user’s
fe e l .S i m p ly take a small, fl a t - h e a d
j ewe l e r ’s screw d ri v er and slightly
rotate the screw located near the
wheel tip. Rotating the wheel
about 1/4 to 1/3 turn should be
s u ffi c i e n t .Rotating the screw within those two values should adjust
the wheel between free spinning
( w h i ch is too loose) to skidding
( w h i ch is too tight).
Q : Once adjusted to my desire d
“feel,” will the wheel stay that
w a y ?
A : Under normal conditions, t h e
wheel setting should not ch a n g e
mu ch .If the device is jarred or subject to ex t reme env i ro n m e n t a l
AP P E N D I X
2 8 – Scale Master®C l a s s i c v 2 . 0
Page 29

c o n d i t i o n s , h oweve r, you may
o c c a s i o n a l ly need to make adjustm e n t s .
Q : How accurate is the S c a l e
M a s t e r?
A : The internal mechanics of the
Scale Master Classic a re ex t re m e ly
a c c u ra t e : better than 99.75%.
H oweve r,w h e r e you start and stop
the device on your plans will gre a tly affect the accuracy of yo u r
re s u l t s .Depending on the length of
your “ ru n s ,” after getting used to
the feel of the Scale Master’s ro l l ,
you should expect your results to
be within ±1.5%– 2%.
Q : What’s the best way to ensure
my Scale Master is lined-up
p roperly for my beginning and
ending points?
A : While all users differ in the way
t h ey hold and roll the S c a l e
M a s t e r,holding the device stra i g h t
u p , at a 90° angle to your plans, i s
the best way to ensure pro p e r
s t a rting and stopping.And re - m e mb e r, if you roll past your end point,
2 9 – User’s Guide
Page 30

s i m p ly hold down the
[ S u b t r a c t / C o u n t ] button and ro l l
b a ck wa rd s .
Q : Do you have any other advice
for better ro l l i n g ?
A : A g a i n ,e a ch person has their ow n
t e chnique for rolling the S c a l e
M a s t e r — or any other plan meas u re for that matter.H oweve r,m a n y
u s e rs find that,in addition to holding it straight up and dow n ,h o l ding it ve ry lightly (like an egg)
helps rolling both along straight as
well as curved lines.
Q : I often lose my previously se-
lected scales and modes. What
am I doing wro n g ?
A : P ressing the [ S u b t r a c t / C o u n t ] key,
s i m u l t a n e o u s l y with other key s ,
accesses special functions.
You may be pressing [ R e s e t ] a n d
[ S u b t r a c t / C o u n t ] s i m u l t a n e o u s l y.
This is a special Clear-All function
w h i ch resets all internal re gi s t e rs ,
i n cluding scales and modes (do not
use this as a regular method of
cl e a ring the display ) .To avoid this
3 0 – Scale Master®C l a s s i c v 2 . 0
Page 31

p ro bl e m ,m a ke sure that you pre s s
keys one at a time, unless you are
t rying to access a special function.
Q : I read it in the User’s Guide, but
could you simplify the setting
of a Custom Scale?
A : This is one of the most commonly -
a s ked questions.The Custom Scale
is pri m a ri ly used when you have
bl u e p rints that have been re d u c e d
or enlarged and are no longer tru e
to their printed “ s c a l e .” To set a
Custom Scale:
1 ) P ress [ M o d e ] until you re a ch
Custom (indicated by a small
“ C u s t o m ”l e gend on the left of
the display ) .
2 ) When Custom Mode is select-
e d , p ress [ S u b t r a c t / C o u n t ] a n d
[Scale] s i m u l t a n e o u s l y. T h e
main display will prompt you to
roll a known distance on yo u r
plans by displaying the wo rd
“R O L L”on the main display.
3 1 – User’s Guide
Page 32

3 ) Roll a know n ,m a rked distance,
being careful of your start and
stop points. The display will
n ow ch a n ge from “R O L L” t o
“R O L L I N G .”
4 ) After yo u ’ve rolled in your dis-
t a n c e ,p ress the [ S c a l e ]button to
tell the device yo u ’re fi n i s h e d
ro l l i n g . The main display will
n ow look similar to this:
F T I N
The units of measurement a n nunciator will begin fl a s h i n g
(F T-I N for Imperial Mode, M M fo r
M e t ri c ) .
5 ) If you want to ch a n ge the units
of measure m e n t , p r ess [ M 1 + ]
until you re a ch the desire d
u n i t s .Then press [ S c a l e ] to begi n
setting the scale distance.If yo u
d o n ’t want to ch a n ge the units,
s i m p ly press [ S c a l e ].
6 ) N ow tell the Scale Master w h a t
that rolled distance was ( a c c o r ding to the plans),using [M1+] ( t o
a d vance the count of each
d i git) and [ S c a l e ] (to enter the
3 2 – Scale Master®C l a s s i c v 2 . 0
Page 33

value for each digit and move to
the next digit to the ri g h t ) .P re s s
[ M o d e ] to move back one digi t .
If a digit is zero ,s i m p ly press the
[ S c a l e ] key to enter it.
7 ) A d vance through all displaye d
d i gi t s .C o n fi rm the scale entry
by pressing [Rcl] [Scale]. R e m e m -
b e r, Custom Scales remain set
even when the unit is off.To ge t
rid of a Custom Scale, enter a
n ew scale over it or perfo rm a
full re s e t .
Q : When setting a Custom Scale,
the User’s Guide says something about rolling a known
distance several times. What
does this mean?
A : S t a rting and stopping points are
e s p e c i a l ly critical to the accura c y
of all ro l l i n g .N ow h e re is this more
t rue than in the setting of a Custom
S c a l e .If you roll a known distance
o n ly once, you may roll it too short
or too long. By rolling a distance
s eve ral times, you can offset the
s t a rt/stop inaccuracies of each
gi ven ro l l .I t ’s equivalent to gi v i n g
3 3 – User’s Guide
Page 34

the Scale Master an ave rage ro l l e d
length for the known distance.
When setting the Custom Scale,a n d
the unit displays “R O L L ,”you roll the
k n own distance seve ral times.
Since you don’t want the S c a l e
M a s t e r to re c o r d all the rolls as
being your one known distance,
you enter the known distance
times (multiplied by) the nu m b e r
of rolls — for ex a m p l e , if you roll a
10 foot distance fi ve times, yo u
must enter it as 50 fe e t .
Q : How long will the batteries last
and where may I obtain re -
p l a c e m e n t s ?
A : The Scale Master Classic is pow-
e r ed by two CR-2430 3–Volt L i t h i u m
b a t t e ries (6 volts total).
T h ey should last upwa rds of 400
h o u rs of actual use time and are
re a d i ly ava i l able at most camera
s t o res as well as Radio Shack
®
s t o res in North A m e ri c a . If yo u
h ave difficulty finding re p l a c e-
m e n t s , t h ey may be obtained
d i re c t ly from Calculated Industri e s
( by calling 1-800-854-8075 in the
3 4 – Scale Master®C l a s s i c v 2 . 0
Page 35

Continental U. S . or 775-885-4900
wo r l dw i d e ) .
Additional Calculator Functions
E rro r s
If you make an incorrect entry (such
as trying to add dimensioned and non-
dimensioned va l u e s ) ,the wo rd “E R R O R”
will display.P ress [ R e s e t ] to cl e a r.
Auto Range
If the calculated value is too large to
d i s p l ay in the selected units of meas u re m e n t,the answer will be d i sp l a ye d
in a larger unit of m e a s u rement instead
of showing an error (for ex a m p l e :
“10,000,000 MM” can not be disp l aye d ,so “10,000 M”will be displaye d
i n s t e a d ) .
3 5 – User’s Guide
Page 36

B a t t e ry & Automatic Shut-Off
The Scale Master Classic is powe re d
by two 3-Volt CR-2430 Lithium batt e ries (6 volts total).To conserve batt e ry powe r,the unit will shut itself off
if it is not used for 5 m i nu t e s .P ress any
key to re s t o re powe r.All re gi s t e rs and
settings remain intact, i n - cluding all
t e m p o ra ry re gi s t e rs .
Tu rning Bell & Clicker On/Off
The built-in cl i cker lets you know
when the wheel is ro l l i n g ,and the bell
lets you know when you have incremented the count va l u e .To toggle the
bell and cl i c ker off or on, p r ess [ R e s e t ]
a n d [Scale] s i m u l t a n e o u s l y.
Full Reset/All Clear
To perfo rm a complete reset of the
unit and re t u rn all re gi s t e r s to their ini-
tial default va l u e s , p ress [Reset] a n d
[ S u b t r a c t / C o u n t ] s i m u l t a n e o u s l y.
3 6 – Scale Master®C l a s s i c v 2 . 0
Page 37

S p e c i f i c a t i o n s
PO W E R SO U R C E:
Two 3-Volt CR-2430 lithium batteries
A p p roximately 400 hours normal use
DI S P L AY ME T H O D:
LCD with zero suppression, commas
and annunciators.
DI S P L AY CA PA C I T Y ( MA I N DI S P L AY) :
9,999,999 (7 digits)
RE S O L U T I O N/ AC C U R A C Y:
.025 Inch/99.75%
IN T E R N A L MAT H AC C U R A C Y:
10 Digits
DI M E N S I O N S:
6.7” x 1.6” x 0.6”
170mm x 41mm x 15mm
3 7 – User’s Guide
Page 38

LI M I T E D WA R R A N T Y
Calculated Industri e s ,I n c .(“CII”) wa rra n t s
this product against defects in materi a l s
and wo rkmanship for a period of one (1)
year from the date of ori ginal consumer
p u rchase in the U. S . If a defect exists during the wa rranty peri o d , CII at its option
will either repair (using new or re m a nufa c t u red parts) or replace (with a new or
re m a nu fa c t u red unit) the product at no
ch a rge .
The warranty will not apply to the
p roduct if it has been damaged by
misuse, alteration, accident, impro p e r
handling or operation, or if unauthorized repairs are attempted or made.
Some examples of damages not cove red by warranty include, but are not
limited to, battery leakage, bending,
or visible cracking of the LCD which
a re presumed to be damages re s u l t i n g
f rom misuse or abuse.
To obtain wa rranty service in the U. S . ,
ship the product postage paid to the CII
Au t h o rized Service Provider listed on the
b a ck page of the User’s Guide. Please provide an explanation of the serv i c e
re q u i rem e n t ,your name,a d d re s s ,d a y p h o n e
number and dated proof of purchase (typi c a l ly a sales re c e i p t ) .If the product is ove r
3 8 – Scale Master®C l a s s i c v 2 . 0
Page 39

90 days old,i n clude payment of $6.95 fo r
re t u rn shipping and handling within the
contiguous 48 states. (Outside the contiguous 48 states,please call CII for re t u rn
shipping costs.)
A re p a i red or replacement pro d u c t
assumes the remaining wa rranty of the
o ri ginal product or 90 day s ,w h i ch ever is
l o n ge r.
N o n - w a rranty Repair Service — U S A
N o n - wa rranty repair cove rs serv i c e
b eyond the wa rranty period or serv i c e
requested due to damage resulting fro m
misuse or ab u s e .
Contact the CII Au t h o rized Serv i c e
P rovider listed on the back page of the
U s e r ’s Guide to obtain current pro d u c t
repair info rmation and ch a rge s .R e p a i rs are
g u a ranteed for 90 day s .
Repair Service — Outside the USA
Not all countries have CII Au t h o ri z e d
S e rvice Prov i d e rs or the same wa rra n t y
and service policies.To obtain wa rranty or
n o n - wa rranty repair service for goods purchased outside the U. S . ,contact the dealer
t h rough which you initially purchased the
p ro d u c t .
If you cannot re a s o n ably have the pro d-
3 9 – User’s Guide
Page 40

uct re p a i red in your are a ,you may contact
CII to obtain current product repair info rmation and ch a rge s ,i n cluding freight and
d u t i e s .
D i s c l a i m e r
CII makes no warranty or re p re s e n t at i o n , e i t h e r e x p ress or i m p l i e d , w i t h
respect to the p roduct’s quality, perf o r mance, merchantability, or fitness for
a particular purpose. As a result, this
p roduct, including but not limited to,
k e y s t roke pro c e d u r es, mathematical
accuracy and pre p rogrammed material, is sold “as is,” and you the purchaser assume the entire risk as to its
quality and perf o rm a n c e .
In no event will CII be liable for
d i rect, indirect, special, incidental, or
consequential damages resulting f ro m
any defect in the product or its docum e n t a t i o n .
The wa rra n t y,d i s cl a i m e r, and re m e d i e s
set fo rth ab ove are ex cl u s i ve and re p l a c e
all others , o ral or wri t t e n , ex p ressed or
i m p l i e d .No CII dealer,age n t , or employe e
is authorized to make any modifi c a t i o n ,
ex t e n s i o n ,or addition to this wa rra n t y.
Some states do not allow the ex cl u s i o n
or limitation of implied wa rranties or liability for incidental or consequential dam-
4 0 – Scale Master®C l a s s i c v 2 . 0
Page 41

age s , so the ab ove limitation or ex cl u s i o n
m ay not apply to yo u .This wa rranty gi ve s
you specific ri g h t s , and you may also have
other rights which va ry from state to state.
FCC Class B
This equipment has been cert i fied to c o mp ly with the limits for a Class B c o m p u t i n g
d ev i c e ,p u r suant to S u b p a rt J of Pa rt 15 of
FCC ru l e s .
Legal Notices
S o f t w a re copyrighted and licensed to
Calculated Industries by Scale Master
Technologies, LLC, 1999.
U s e r’s Guide copyrighted by Calculated Industries, 1999.
Scale Master®and Calculated Indust r i e s®a re re g i s t e red trademarks of Calculated Industries, Inc.
AL L RI G H T S RE S E RV E D.
4 1 – User’s Guide
Page 42

Looking for New Ideas
Calculated Industri e s , a leading manu fa ct u rer of special function calculators and
d i gital measuring instru m e n t s , is alway s
looking for new product ideas in these
a re a s .
If you have one, or if you have any suggestions for improvements to this pro d u c t
or its User’s Guide,please call or w rite our
P roduct Development De-part m e n t .
Thank yo u .
4 2 – Scale Master®C l a s s i c v 2 . 0
Page 43

How to Reach CII Headquarters
.32
C
a
r
s
o
n
C
i
t
y
V
N
MAY-6 97
43 – User’s Guide
Mail
Calculated Industries, Inc.
4840 Hytech Drive
Carson City, NV 89706 USA
Phone
775-885–4975
Fax
775-885–4949
Email
techsup@calculated.com
World Wide Web
http://www.calculated.com
File: SMC(IND)-6020-MNv1.0-98
Page 44

Designed in the
United States of America
Manual 6020–MNv1.0
 Loading...