

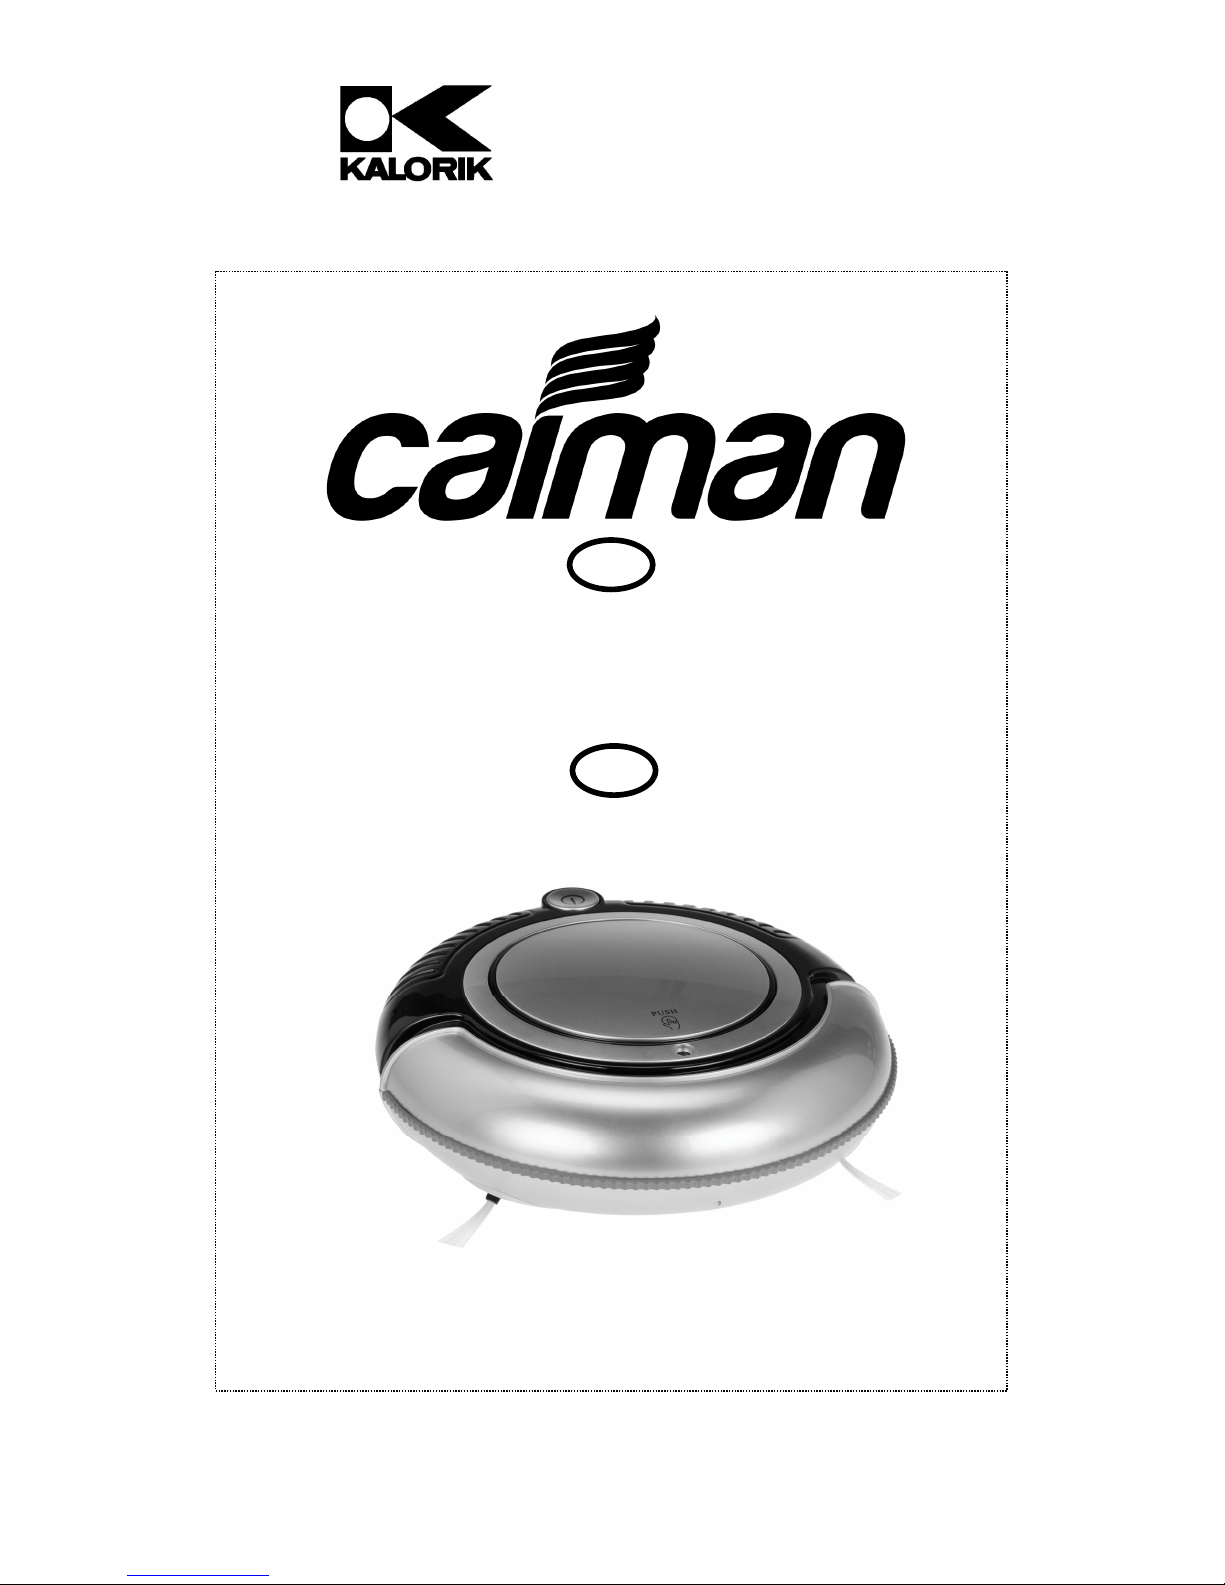
Caiman RVC 40540 Operating Instructions Manual
Copies of the I/B. Please reproduce them without any
Fax +1 305 430 9692
changes except under special instruction from Team
International USA. The pages must be reproduced and
folded in order to obtain a booklet A5 (+/- 148.5 mm
width x 210 mm height). When folding, make sure you
keep the good numbering when you turn the pages of
the I/B. Don’t change the page numbering. Keep the
language integrity. Print only what is inside the frame.
Rechargeable Robot Vacuum
Aspiradora Robótica Recargable
USA
Cleaner
SP
14.4V DC - Ni-Mh batteries (Adapter 19V DC – 600 mA)
RVC 40540
Front cover page (first page)
Assembly page 1/32

Copies of the I/B. Please reproduce them without any
Fax +1 305 430 9692
changes except under special instruction from Team
International USA. The pages must be reproduced and folded
in order to obtain a booklet A5 (+/- 148.5 mm width x 210 mm
height). When folding, make sure you keep the good
numbering when you turn the pages of the I/B. Don’t change
the page numbering. Keep the language integrity. Print only
what is inside the frame.
IMPORTANT SAFEGUARDS
WARNING:
your appliance, basic safety precautions should always be followed,
including the following:
1. READ ALL INSTRUCTIONS BEFORE USING!
2. Check that the voltage in your home corresponds to that stated on
the rating plate of the appliance or the adapter.
3. Do not allow unit to be used as a toy. Close attention is necessary
when being used by or near children. Children need to be
supervised to make sure they do not play with this appliance.
4. Please keep out of reach of children and pets. This product is not
intended for use by children, by persons with reduced physical,
sensory or mental capabilities, or lacking experience or knowledge,
unless they have been given supervision or instruction concerning
the use of the product, by a person responsible for their safety. Extra
caution is always necessary when using this product.
5. Use only as described in this manual. Use only manufacturer's
recommended attachments.
6. Do not use the appliance to clean wet surfaces. Never immerse the
motor part or the charger in water or other liquids.
7. Do not use outdoors and do not charge the unit outdoors.
8. Do not use in wet or damp rooms, or outdoors. Please close the door
of rooms that may be very humid, or have a wet or damp floor (ex.
laundry room).
9. Do not use with damaged cord or plug. If appliance is not working
as it should, has been dropped, damaged, left outdoors, or dropped
into water, return it to the service center of the manufacturer.
10. Do not abuse the cord. Never carry the charger or base by the cord
or yank to disconnect from an outlet; instead grasp the charger and
pull to disconnect.
11. Keep the unit, cord and its batteries away from heated or warm
surfaces. Do not pull cord around sharp edges or corners. Do not
close the door on the charger cord.
12. Do not store in places exposed to direct sunlight. Store the
appliance only in a dry, cool place.
13. Do not handle plug or appliance with wet hands.
To reduce the risk of fire, electric shock or injury when using
2
RVC 40540 - 120501
Assembly page 2/32
Copies of the I/B. Please reproduce them without any
Fax +1 305 430 9692
changes except under special instruction from Team
International USA. The pages must be reproduced and folded
in order to obtain a booklet A5 (+/- 148.5 mm width x 210 mm
height). When folding, make sure you keep the good
numbering when you turn the pages of the I/B. Don’t change
the page numbering. Keep the language integrity. Print only
what is inside the frame.
14. This product includes a rechargeable battery. Do not incinerate the
battery or expose to high temperatures, as it may explode.
15. Unplug the charger from the outlet before any routine cleaning or
maintenance.
16. Do not change the accessories when the appliance is on.
17. Do not put any object into openings. Do not use with any opening
blocked; keep free of dust, lint, hair, and anything that may reduce
airflow.
18. Keep hair, loose clothing, fingers, and all parts of body away from
openings and moving parts.
19. Do not use without the filter or dust container in place. After each
use, clean the dust container and the dust cup filter.
20. Turn off all controls before unplugging.
21. Do not use to clean on stairs.
22. Do not pick up anything that is burning or smoking, such as
cigarettes, matches, or hot ashes.
23. Do not use to pick up flammable or combustible liquids such as
gasoline or use in areas where combustible liquids may be present.
24. Leaks from battery cells can occur under extreme conditions. If the
liquid gets on the skin, wash quickly with soap and water or
neutralize with a mild acid such as lemon juice or vinegar. If the
liquid gets into the eyes, flush them immediately with clean water for
a minimum of 10 minutes. Seek medical attention.
25. If the appliance will not be used for a long period of time, turn off
the power and remove the battery pack.
26. Use only the charger supplied by the manufacturer to recharge.
27. Do not try to open the battery pack or adapter.
28. Preferably use on flat hard floors and avoid using on long hair
carpets or rugs.
29. Put aside loose or small or fragile objects scattered on the floor
before cleaning (Examples: clothes, newspapers, etc).
30. Remove any sharp object from the surfaces to be cleaned.
31. Do not stand on or put any foreign object on the vacuum cleaner.
32. Do not use in extremely dirty areas or to pick up cement dust.
SAVE THESE INSTRUCTIONS
HOUSEHOLD USE ONLY
3
RVC 40540 - 120501
Assembly page 3/32
Copies of the I/B. Please reproduce them without any
Fax +1 305 430 9692
4
changes except under special instruction from Team
International USA. The pages must be reproduced and folded
in order to obtain a booklet A5 (+/- 148.5 mm width x 210 mm
height). When folding, make sure you keep the good
numbering when you turn the pages of the I/B. Don’t change
the page numbering. Keep the language integrity. Print only
what is inside the frame.
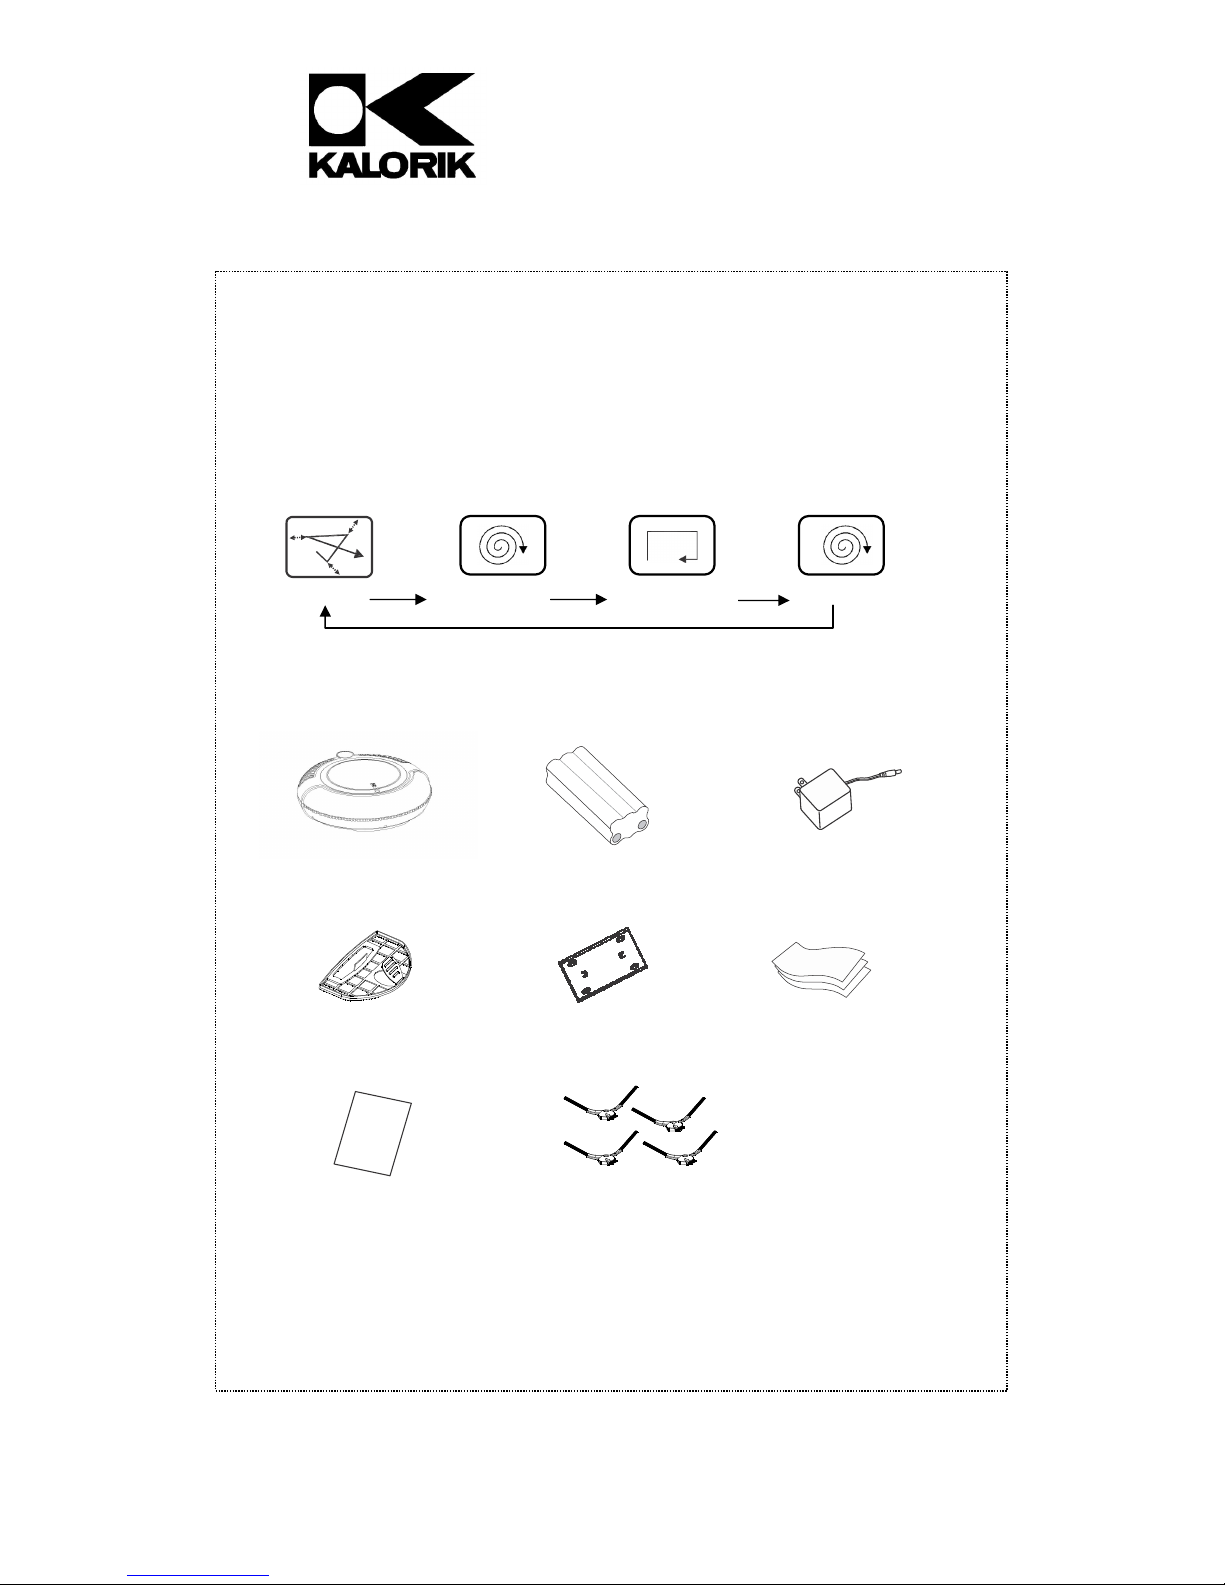
PRODUCT DESCRIPTION
Thank you for purchasing this Robotic Vacuum Cleaner!
This revolutionary Mini Robotic Vacuum Cleaner is equipped with
functions suitable for cleaning up floor surfaces, at home or in the
office, such as wood, tile, and linoleum. It will follow different cleaning
patterns in order to clean the largest floor surface.
Random
Spiral
Along the wall
Spiral
PARTS AND ACCESSORIES
Main body x1
Filter x1
User
manual
User manual x1
Rechargeable battery
Dusting cloth
Side brushes x
Main body x1
Dusting mop
4
RVC 40540 - 120501
Assembly page 4/32
Copies of the I/B. Please reproduce them without any
Fax +1 305 430 9692
changes except under special instruction from Team
International USA. The pages must be reproduced and folded
in order to obtain a booklet A5 (+/- 148.5 mm width x 210 mm
height). When folding, make sure you keep the good
numbering when you turn the pages of the I/B. Don’t change
the page numbering. Keep the language integrity. Print only
what is inside the frame.
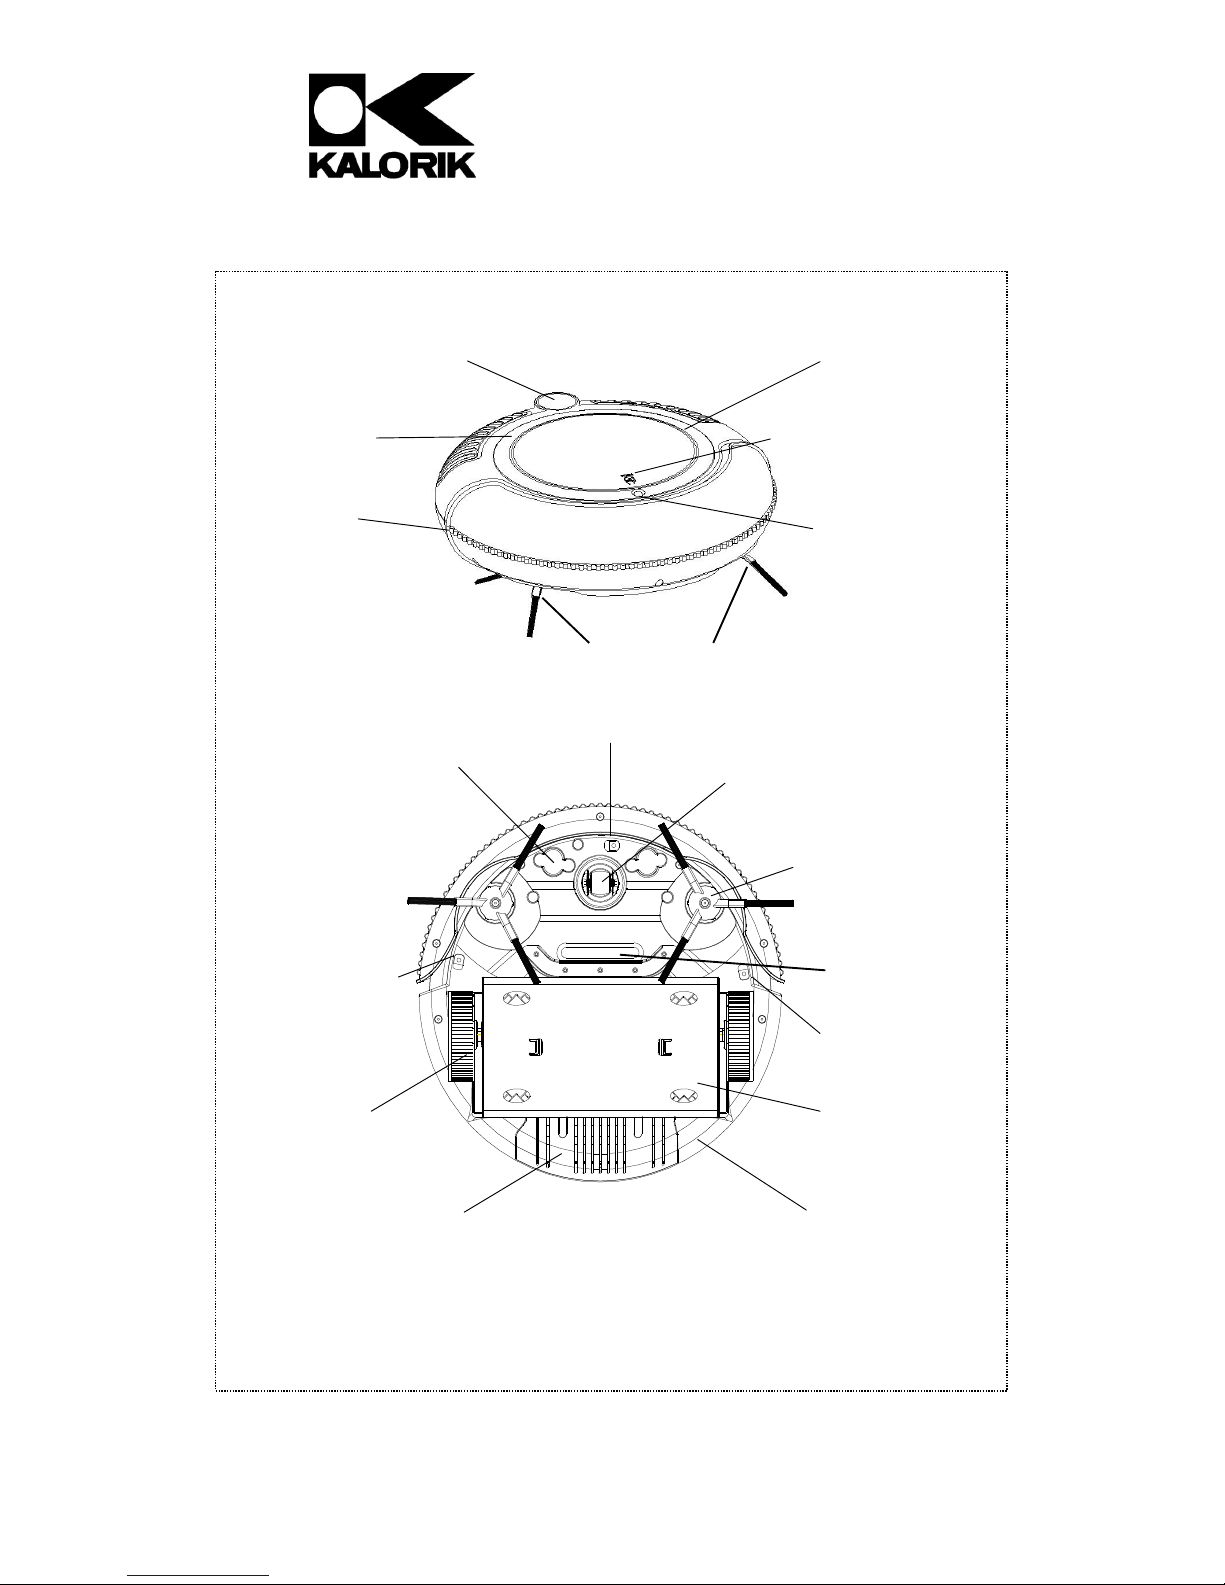
LED Illumination
ring
Bumper
Anti-drop sensor
Power button
Handle / lift
groove
Wheel
Battery cover
Side brushes
Anti-drop sensor
Front small
Inner dust bin
Upper cover
Charger input
Side brush
Air intake
Anti-drop sensor
Dusting cloth
holder
Base
5
RVC 40540 - 120501
Assembly page 5/32
Copies of the I/B. Please reproduce them without any
Fax +1 305 430 9692
changes except under special instruction from Team
International USA. The pages must be reproduced and folded
in order to obtain a booklet A5 (+/- 148.5 mm width x 210 mm
height). When folding, make sure you keep the good
numbering when you turn the pages of the I/B. Don’t change
the page numbering. Keep the language integrity. Print only
what is inside the frame.
TECHNICAL SPECIFICATIONS
Battery: 14.4V DC Ni-Mh; 800 mAh
Adapter: Input 100-240V~50/60Hz AC, Output: 19VDC 600 mA.
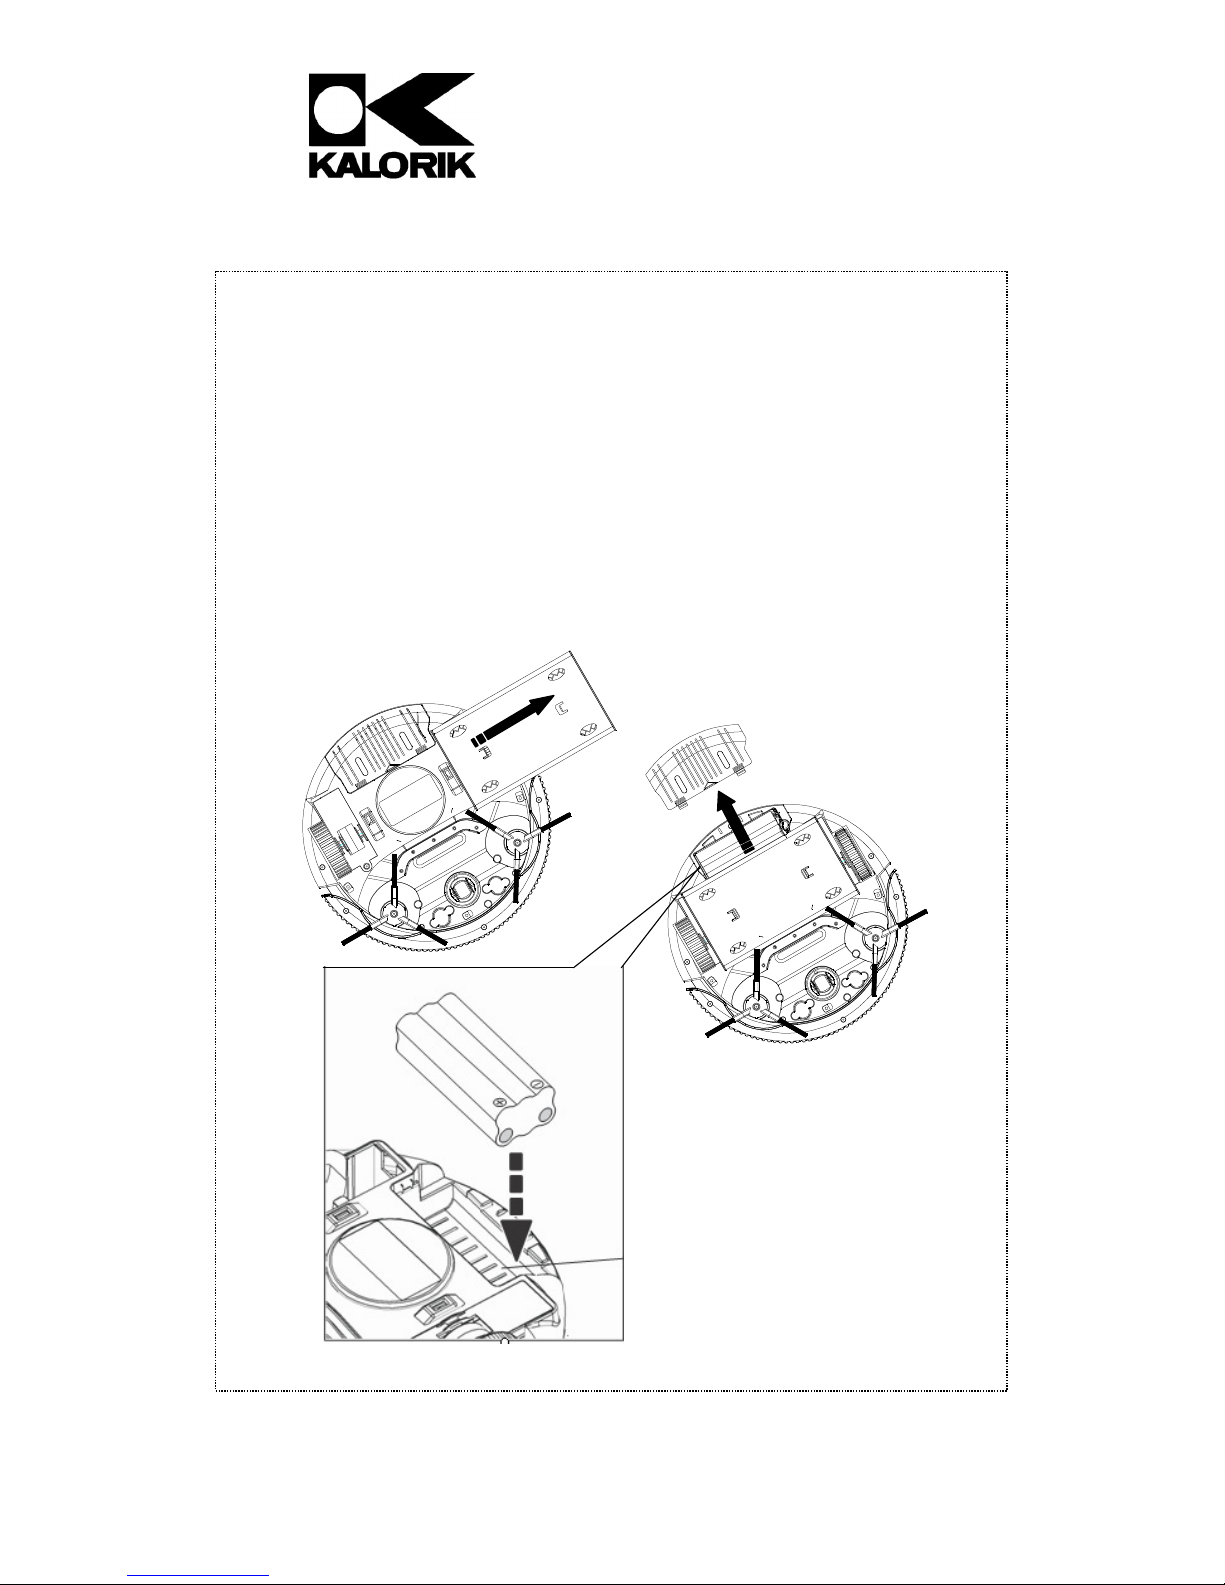
BATTERY INSTALLATION AND REMOVAL
1. Before installing or removing the battery, the product must be
disconnected from the power source.
2. Remove the dusting paper holder. (Fig 1)
3. Open the battery cover. (Fig 2)
4. Insert the battery into the battery cabinet and close the cover.
Make sure the cover clips well located in its position.
FIG. 1
FIG. 2
Battery
compartment
FIG. 3
6
Assembly page 6/32
RVC 40540 - 120501

Copies of the I/B. Please reproduce them without any
Fax +1 305 430 9692
changes except under special instruction from Team
International USA. The pages must be reproduced and folded
in order to obtain a booklet A5 (+/- 148.5 mm width x 210 mm
height). When folding, make sure you keep the good
numbering when you turn the pages of the I/B. Don’t change
the page numbering. Keep the language integrity. Print only
what is inside the frame.
CHARGING THE VACUUM CLEANER
Note: Before using your vacuum cleaner for the first time, charge the
battery for approximately 6-8 hours. For every charge after the initial
charge only 4 hours of continuous charge is required to have a full
battery. A fully charged battery will give approximately 55 minutes of
continuous vacuum cleaning.
• Place the unit on a flat, horizontal, stable surface that is not
exposed to direct sunlight or humidity.
• Make sure the appliance is set to off.
• Plug the charger into the charger input (2), and then plug it into a
wall socket.
• The Blue LED ring starts blinking, indicating the unit is charging.
• Once fully charged, the blue LED ring light will stop blinking and
remain lit.
Caution:
o Do not touch the charger, plug or electric wire with wet
hands.
o Do not use if the connection of the battery is damaged.
o Only use the charger supplied.
Important: The charger and its cord cannot be repaired. Should they
be damaged, they must be discarded. Contact Customer Service to
replace them.
Do not charge the battery if the room temperature falls below 32°F
(0°C) or rises to more than 98°F (37°C).
Other notes and tips:
• The charger might get warm during use. This is perfectly normal. It
will cool down as soon as the charging process is over.
• When you notice that the motor is turning less quickly, it means
that the battery needs to be charged completely.
• It can be useful from time to time (once a month) to completely
discharge the battery, and then completely recharge it, to
maintain optimal performance.
• Fully recharge for 4 hours after every use.
7
Assembly page 7/32
RVC 40540 - 120501

Copies of the I/B. Please reproduce them without any
Fax +1 305 430 9692
L R
changes except under special instruction from Team
International USA. The pages must be reproduced and folded
in order to obtain a booklet A5 (+/- 148.5 mm width x 210 mm
height). When folding, make sure you keep the good
numbering when you turn the pages of the I/B. Don’t change
the page numbering. Keep the language integrity. Print only
what is inside the frame.
• When the battery’s lifetime is over and it does not charge up
anymore, please order a genuine battery pack replacement
from the manufacturer’s authorized service center.
INSTALLING THE SIDE BRUSHES
Simply insert the “L” marked side brush on the pin near the L letter on
the base, and the “R” marked side brush on the pin near the R letter.
Push to put in place. To remove the side brushes, simply pull them
out.
INSTALLING A MOP CLOTH
• On a flat surface, with a flat screwdriver or the tip of your fingers,
insert the 4 corners of the mop cloth into the clamps at the back
of the dusting cloth holder (FIG 5.)
• Replace the board on the unit by inserting the holder’s tabs in the
holes between the side wheels. To remove it, lift up the dust cloth
holder gently.
Note: Before operating the product, if there is no dusting cloth on
the holder, please remove the dusting cloth holder from the main
body.
8
Assembly page 8/32
FIG. 4
RVC 40540 - 120501

Copies of the I/B. Please reproduce them without any
Fax +1 305 430 9692
changes except under special instruction from Team
International USA. The pages must be reproduced and folded
in order to obtain a booklet A5 (+/- 148.5 mm width x 210 mm
height). When folding, make sure you keep the good
numbering when you turn the pages of the I/B. Don’t change
the page numbering. Keep the language integrity. Print only
what is inside the frame.
Grooves
FIG. 5
USING YOUR VACUUM CLEANER
• Once your appliance is fully charged, remove the charger from
the wall outlet and unplug the other end from the unit.
• Make sure the dust bin with the filter and lid are properly installed
inside the main housing.
• Place the unit on a flat surface to clean, ideally a hard floor.
Please avoid using on long hair carpets or rugs.
• Switch it on by pressing the ON/OFF switch.
• The red and blue light are blinking alternatively and the unit will
start moving forward and vacuuming.
• Each time an obstacle is met, the unit will change direction.
• After a while the whole room will be cleaned completely.
Notes:
o If the unit gets stuck against an obstacle, like a big rug, just
press gently on the bumper (6) so that the unit changes
direction and keeps vacuuming.
o The unit is equipped with a stairs detector that will stop the
unit and prohibit letting it fall down the stairs. Please note that
this feature is only activated a few seconds after the unit is
switched on, so do not start vacuuming in stairs or in high
places like a table, or the unit might fall.
9
Assembly page 9/32
RVC 40540 - 120501
Copies of the I/B. Please reproduce them without any
Fax +1 305 430 9692
changes except under special instruction from Team
International USA. The pages must be reproduced and folded
in order to obtain a booklet A5 (+/- 148.5 mm width x 210 mm
height). When folding, make sure you keep the good
numbering when you turn the pages of the I/B. Don’t change
the page numbering. Keep the language integrity. Print only
what is inside the frame.
Caution:
• Preferably use on flat hard floors and avoid using on long hair
carpets or rugs.
• Put aside loose or small objects scattered on the floor before
cleaning (Examples: clothes, newspapers, etc.).
• Remove any sharp object from the surfaces to be cleaned.
• Do not stand on or put any foreign object on the vacuum
cleaner.
• Do not use in extremely dirty areas or to pick up cement dust.
MAINTENANCE AND CLEANING
Cleaning the filter and the dust container after each use is extremely
important as it allows for optimal use of your appliance and
eliminates the unpleasantness of bad smells.
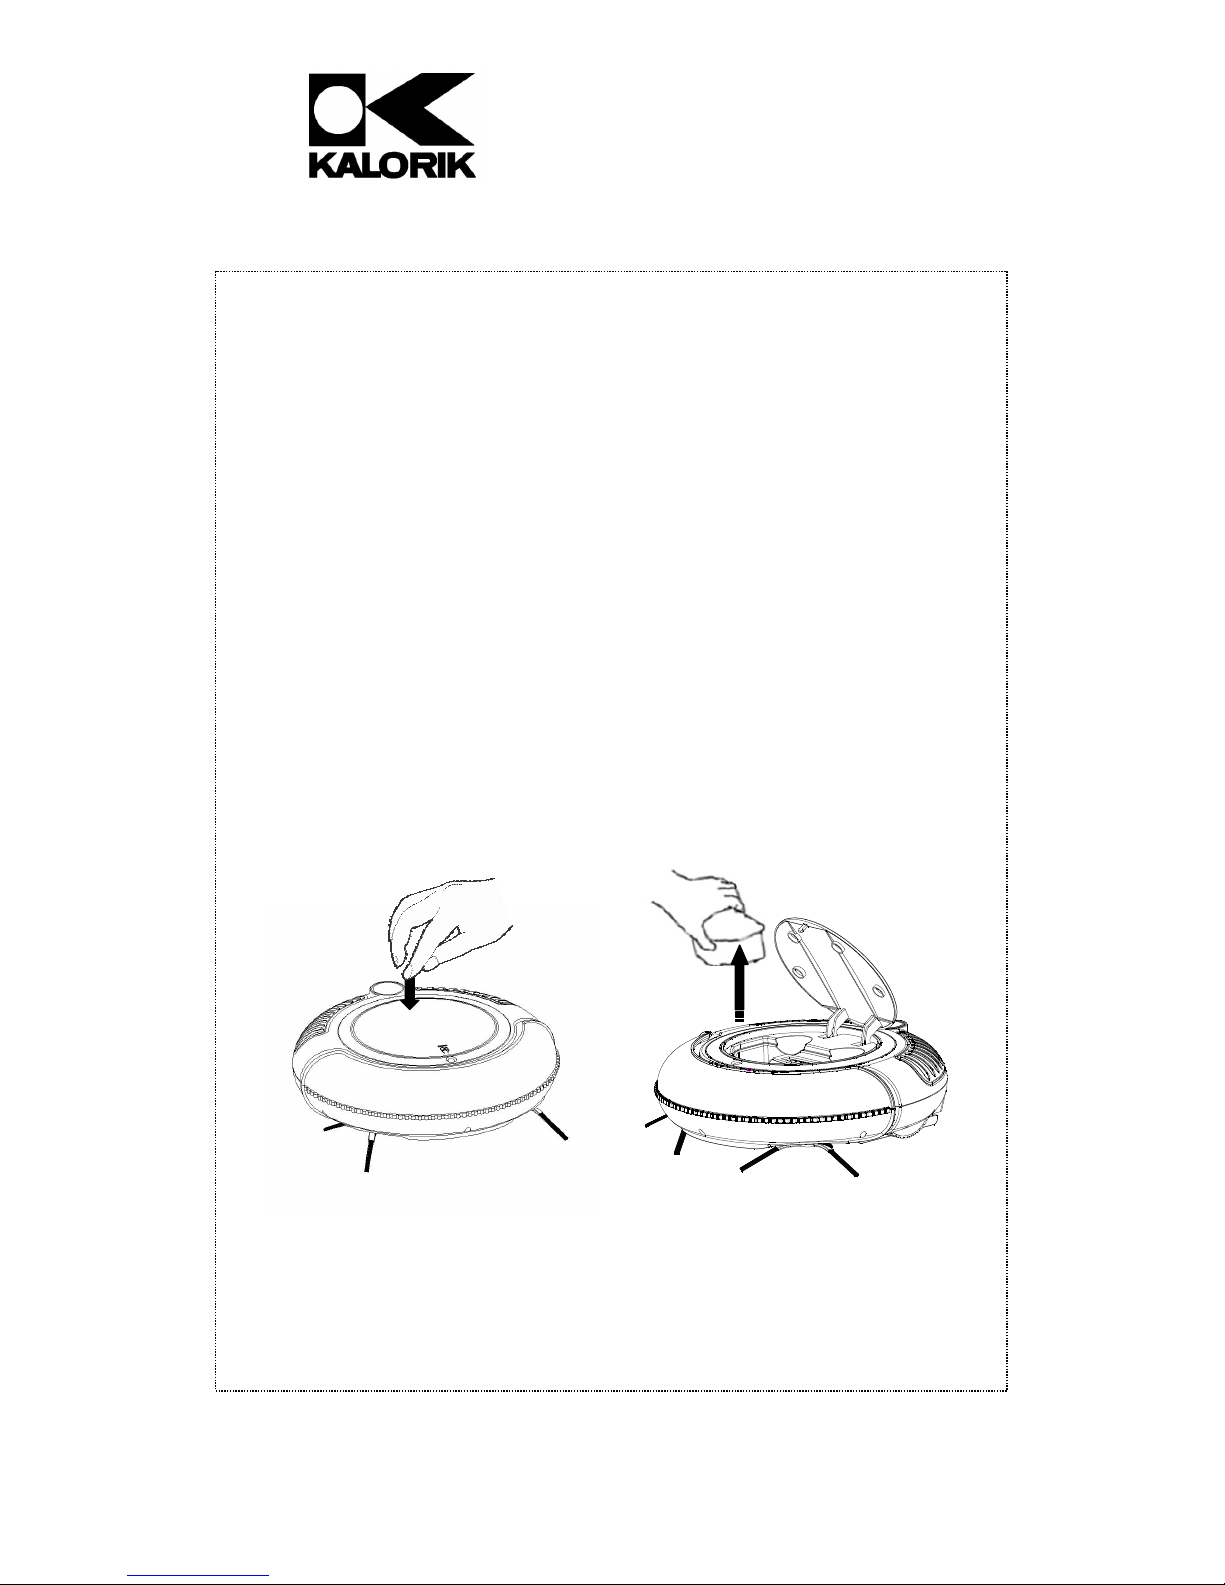
To clean the dust bin:
1. Open the upper cover by pressing the button “Push” as shown in
the picture. (FIG. 6)
2. Lift out the dust bin. (FIG. 7)
3. Place the dust box over a trash container or bag before
proceeding further.
FIG. 6
FIG. 7
10
Assembly page 10/32
RVC 40540 - 120501
 Loading...