

Page 1

SERVICE & INSTALLATION MANUAL
Manufactured by:
Cafection Ventures Inc.
2355, avenue Dalton, Québec (Québec) G1P 3S3 Canada
Tel.: 800-561-6162 Fax: 800-463-2739
[email protected] www.cafection.com
Images may vary from the actual product.
ETINSA - Revision3
Page 2

SERVICE & INSTALLATION MANUAL - Encore 29
www.cafection.com 800-561-6162
Table of Contents
1 SAFETY INSTRUCTIONS ........................................................................................................................ 5
1.1 Food-Contact Parts ................................................................................................................... 5
1.2 Warnings ....................................................................................................................................5
1.3 Power Supply ............................................................................................................................ 5
1.4 Disconnect the equipment if: ...................................................................................................... 5
2 WARRANTY ............................................................................................................................................. 6
2.1 Warranty Policy ..........................................................................................................................6
2.2 Warranty Return Procedure ........................................................................................................ 7
2.3 Shipping Liabilities ...................................................................................................................... 7
3 REFERENCE DRAWINGS .......................................................................................................................8
3.1 External View ............................................................................................................................. 8
3.2 Rear View .................................................................................................................................. 9
3.3 Internal View ............................................................................................................................ 10
3.4 Brew Group Assembly .............................................................................................................11
3.5 Brewing Process ...................................................................................................................... 12
3.6 Hot Water Tank ........................................................................................................................ 13
3.7 Bean Hopper Installation .......................................................................................................... 14
3.8 Water Temperature ................................................................................................................... 15
Table of Contents
4 INITIAL SETUP ...................................................................................................................................... 16
4.1 On-Site Installation Requirements .............................................................................................16
4.1.1 Operating Environment ............................................................................................ 16
4.1.2 Power Supply .......................................................................................................... 16
4.1.3 Water Supply ........................................................................................................... 16
4.1.4 Tools Required ......................................................................................................... 16
4.1.5 Clearance ................................................................................................................ 16
4.2 Brewer Specifications ...............................................................................................................17
4.2.1 Hopper & Canister Capacities .................................................................................. 17
4.2.2 Water Tank .............................................................................................................. 17
4.2.3 Electrical Specifications ............................................................................................ 17
4.3 Unpacking ............................................................................................................................... 18
4.4 Leveling the Equipment ............................................................................................................ 19
4.5 Drip Tray Installation ................................................................................................................. 19
4.6 Water Line Connection ............................................................................................................. 20
4.7 Electrical Connection ............................................................................................................... 21
4.8 Loading Products .....................................................................................................................22
4.8.1 Soluble Canisters ..................................................................................................... 22
4.8.2 Bean Hopper ........................................................................................................... 22
4.9 Filter Paper Installation ............................................................................................................. 23
4.10 Chute Kit Installation (Optional) ................................................................................................. 24
4.11 Installation Verification ..............................................................................................................25
5 User Interface ........................................................................................................................................ 26
5.1 Selection Interface.................................................................................................................... 26
5.2 Carafe Mode ........................................................................................................................... 27
5.3 Iced Coffee ..............................................................................................................................28
5.4 Selection Keyboard for People with Disabilities (Optional) ......................................................... 29
2
ENCORE 29 Rev. 3 09-2017
Page 3

SERVICE & INSTALLATION MANUAL - Encore 29
www.cafection.com 800-561-6162
6 SERVICE MODE ....................................................................................................................................30
6.1 Users Levels ............................................................................................................................30
6.2 Service Tab .............................................................................................................................. 31
6.3 Status Tab ................................................................................................................................ 33
6.4 Password Pop-Up ...................................................................................................................34
6.5 Recipes Tab ............................................................................................................................. 34
6.5.1 Customization Sub Tab ............................................................................................ 34
6.5.2 Information Sub Tab .................................................................................................35
6.5.3 Liquids & Ingr. (Ingredients) Sub Tab ........................................................................36
6.5.4 Brew Cycles & Fast Settings Sub Tab ...................................................................... 37
6.6 System Tab .............................................................................................................................. 39
6.6.1 System1 Sub Tab ...................................................................................................39
6.6.2 System2 Sub Tab ...................................................................................................40
6.6.3 Tools Sub Tab .......................................................................................................... 42
6.6.4 Network Sub Tab ..................................................................................................... 43
6.6.5 Screen Saver Sub Tab .............................................................................................47
6.6.6 Admin Sub Tab ........................................................................................................ 48
6.7 Media Tab ................................................................................................................................ 50
6.7.1 Current Playlist Sub Tab ........................................................................................... 50
6.7.2 Next Playlist Sub Tab ...............................................................................................50
6.7.3 Video Storage Sub Tab ............................................................................................ 51
6.8 Audit Tab.................................................................................................................................. 51
6.8.1 Permanent Sales Count ........................................................................................... 51
6.8.2 Erasable Sales Count ...............................................................................................51
6.8.3 Users Sales Count ................................................................................................... 52
6.9 Reset to Factory Settings ......................................................................................................... 53
Table of Contents
7 CLEANING AND SANITIZING ...............................................................................................................54
7.1 "Auto Rinse" Button .................................................................................................................54
7.2 "Cleaning & Sanitizing" Button ..................................................................................................54
7.3 Cleaning and Sanitizing Instructions .........................................................................................55
7.4 Recommended Cleaning Tools ................................................................................................. 56
7.5 Cleaning and Sanitizing Schedule .............................................................................................56
7.6 Overall Cleaning ....................................................................................................................... 57
7.7 Exterior Cleaning ...................................................................................................................... 57
7.7.1 Touch screen ........................................................................................................... 57
7.7.2 Drip Tray ..................................................................................................................57
7.7.3 Waste Bin ................................................................................................................ 58
7.8 Interior Parts Cleaning & Sanitizing ........................................................................................... 59
7.8.1 Bean Hopper ........................................................................................................... 59
7.8.2 Bean Hopper Funnel ................................................................................................ 60
7.8.3 Coffee Chute ...........................................................................................................60
7.8.4 Soluble Canisters ..................................................................................................... 61
7.8.5 Soluble Whipper Assembly ......................................................................................61
7.8.6 Brew Group ............................................................................................................. 62
ENCORE 29 Rev. 3 09-2017
3
Page 4

SERVICE & INSTALLATION MANUAL - Encore 29
www.cafection.com 800-561-6162
7.8.7 Fans ....................................................................................................................... 63
8 PREVENTIVE MAINTENANCE ............................................................................................................. 64
8.1 Preventive Maintenance (PM) Schedule .................................................................................. 64
8.2 Tools recommended for servicing the coffee brewer ................................................................ 64
8.3 Brew Group Assembly ............................................................................................................ 65
8.4 Outlet Valves .......................................................................................................................... 66
8.5 Hot Water Tank ....................................................................................................................... 67
8.6 Grinder .................................................................................................................................... 68
9 PARTS MAINTENANCE ........................................................................................................................ 69
9.1 Hot Water Tank Draining.......................................................................................................... 69
9.2 Shutdown and Storage ........................................................................................................... 70
9.2.1 Storing the Brew Group .......................................................................................... 70
9.3 Brew Group Assembly ............................................................................................................ 71
9.4 Main Board & computer .......................................................................................................... 72
9.5 Flash Card Replacement ......................................................................................................... 73
9.6 Grinder .................................................................................................................................... 74
Table of Contents
10 TROUBLESHOOTING ........................................................................................................................... 75
10.1 Warning Messages List ........................................................................................................... 75
10.2 Error Messages List ................................................................................................................ 76
ANNEX 1 WASTE CHUTE POSITION .................................................................................................. 77
ANNEX 2 REQUIRED CLEARANCE .................................................................................................... 78
ANNEX 3 MAIN BOARD ...................................................................................................................... 80
ANNEX 4 FULL MAINTENANCE SCHEDULE ..................................................................................... 82
ANNEX 5 MONTHLY MAINTENANCE SCHEDULE ............................................................................. 83
ANNEX 6 WEEKLY MAINTENANCE SCHEDULE ............................................................................... 84
This symbol is used to highlight a key step to anticipate a risk
for safety or a risk of damaging the equipment.
This symbol is used to indicate additional information or a
quick tip.
4
ENCORE 29 Rev. 3 09-2017
Page 5

SERVICE & INSTALLATION MANUAL - Encore 29
www.cafection.com 800-561-6162
1 SAFETY INSTRUCTIONS
Basic safety precautions should always be followed when using electrical appliances.
Read all instructions before using this brewing equipment.
1.1 Food-Contact Parts
Cafection recommends cleaning and sanitizing all parts in contact with food prior to installation and
use.
1.2 Warnings
To minimize the risk of fire or electric shock, do not expose this equipment to rain or moisture.
Do not immerse this equipment in water; it could lead to electric shock or other malfunctions.
Do not use this equipment other than for its intended use.
This equipment contains hot water. Never move it when full.
This brewing equipment is intended for indoor use only.
1.3 Power Supply
Always use a grounded 120V AC60Hz socket outlet rated for 15 A service.
Each brewing equipment must have its own electrical outlet, on a dedicated circuit.
Extension cords must not be used.
This brewer is equipped with a polarized alternating current line plug (one blade wider
than the other).
Only use this plug with an outlet in which the prongs can be fully inserted.
1.4 Disconnect the equipment if:
- Damage is done to the power cord.
- The equipment does not work properly.
- The temperature of the power cord or plug increases dramatically during use.
- Unusual conditions occur.
- Whenever a part has to be changed, plugged or unplugged.
Safety Instructions
FAILURE TO COMPLY CAN CAUSE EQUIPMENT DAMAGE,
FIRE OR SERIOUS INJURIES.
THE "INITIAL SETUP" SECTION OF THIS MANUAL MUST BE COMPLETED
BEFORE PLUGGING IN THE BREWER.
ENCORE 29 Rev. 3 09-2017
5
Page 6

2 WARRANTY
2.1 Warranty Policy
Warranty
SERVICE & INSTALLATION MANUAL - Encore 29
www.cafection.com 800-561-6162
Cafection hereby guarantees that the products it manufactured are, to the best of its knowledge,
free from all defects and faulty workmanship. The following warranties and conditions are
applicable:
• All parts in contact with water (outlet valves, heating element, temperature probe, level
probes, reference probe, inlet valve and thermostat) are warranted against material defects
for a period of 90days from the date of shipment.
• All remaining parts of the brewer are warranted against material and workmanship defects
for one(1)year from the date of shipment.
All warranted parts, services and returns must have prior authorization from Cafection. Please
contact Cafection’s Customer Service at 800-561-6162, ext.310.
The following circumstances will void the warranty policy:
• Use of substitute parts not manufactured or approved by Cafection.
• Improper installation or operation of the equipment.
• Abuse or neglect, including (but not limited to) failure to follow the preventive maintenance
schedule.
• Variation in equipment performance due to excessive mineral deposit or local water
conditions.
• Equipment altered in any way and/or dates, codes or serial numbers removed or modified.
• Equipment damaged in shipment from the customer to Cafection due to improper
packaging.
Please note that labor is not covered by the warranty and that the repair protocol is limited to
replacing the defective part(s). Should any additional repairs need to be done, they will be charged
to the customer.
Equipment or parts will not be accepted without a prior notification to Cafection.
2355, avenue Dalton, Québec (Québec) G1P 3S3
Tel.: 800-561-6162 - Fax: 800-463-2739
[email protected]
Customer Service Business Hours (EST):
Monday to Thursday: 8am to 8pm
Friday: 8am to 5pm
6
ENCORE 29 Rev. 3 09-2017
Page 7

SERVICE & INSTALLATION MANUAL - Encore 29
www.cafection.com 800-561-6162
2.2 Warranty Return Procedure
In order to always offer better, faster service, Cafection requests your cooperation for the return of
parts under warranty. Cafection thanks you in advance for taking the time to follow this procedure:
Contact the Customer Service Department to obtain a Return Merchandise Authorization(RMA)
number.
Send a copy of the original invoice to Cafection by fax at 800-463-2739 or by email at
[email protected] for approval.
No parts must be destroyed before receiving a written confirmation from Cafection about credit or
exchange possibilities.
Keep a copy of the original invoice for your records. A copy of the original invoice must be
included with your parts return.
Cafection will not be held responsible for any loss or damage occurring during transport.
MAKE SURE THE MERCHANDISE IS WELL PACKED!
Please use original packaging.
Warranty
Upon receipt, Cafection will check the merchandise and authorize the repair or replacement by
identical or equivalent parts if warranty is applicable. Only warranted parts are authorized for return.
Cafection suggests keeping replacement parts on hand.
The warranty covers regular shipping only. Overnight shipping charges will be applied to your order
when required. Orders must be received before noon (12:00pm EST) to be shipped the same day*.
All returned parts showing no sign of malfunctioning will be subject to
administrative and test fees of $35, plus freight charges associated with the return.
A part returned in unacceptable condition will also be subject to this $35fee and its
warranty may be refused.
*Some conditions may apply.
2.3 Shipping Liabilities
YOU ARE RESPONSIBLE, SHIPMENT MUST BE INSPECTED!
You can refuse delivery if a shipment is damaged. Do not sign the shipment without proper
inspection. Should you choose to accept the delivery, it is mandatory that you record any
significant information on the delivery slip. Remember that you take responsibility of the
merchandise once you have signed the delivery receipt.
You have 24 hours to report and file a claim for concealed damages to the transportation
company.
Failure to comply with this procedure could lead to a claim refusal by the carrier.
FOR MORE INFORMATION, PLEASE CALL CUSTOMER SERVICE AT 800-561-6162, ext.310.
ENCORE 29 Rev. 3 09-2017
7
Page 8

3 REFERENCE DRAWINGS
3.1 External View
Top lid
Product
loading door
Product
window
SERVICE & INSTALLATION MANUAL - Encore 29
www.cafection.com 800-561-6162
Product loading
door lock
Reference Drawings
Plastic front
(fascia)
Drip tray grill
Drip tray
Touch screen
Door lock
Back splash
Cup holder
8
ENCORE 29 Rev. 3 09-2017
Page 9

SERVICE & INSTALLATION MANUAL - Encore 29
www.cafection.com 800-561-6162
3.2 Rear View
Coffee beans
feeding motors
Grinder motor
Outlet valves
Water tank
Blower
Fan
Antenna
Reference Drawings
Back panel
ENCORE 29 Rev. 3 09-2017
Computer’s
motherboard
Main board
(hidden, see
Annex 3)
Adjustable legs
Breaker box
Overflow drip tray
Water inlet
9
Page 10

3.3 Internal View
SERVICE & INSTALLATION MANUAL - Encore 29
www.cafection.com 800-561-6162
Reference Drawings
Ground coffee
chute
Bean hopper
Filter paper
Milk powder
canister
Hot chocolate
canister
French vanilla
canister
Soluble whipping
chambers
Brew group
p
S
o
u
t
-
T
o
p
V
10
Side skirt
i
e
w
Coffee
Hot water
Vanilla
Chocolate
Milk
Waste bin
Accessories
storage area
ENCORE 29 Rev. 3 09-2017
Page 11

SERVICE & INSTALLATION MANUAL - Encore 29
www.cafection.com 800-561-6162
3.4 Brew Group Assembly
Funnel
Brew chamber
Manufacturing date
(on the back)
Cylinder
Coffee spillway
Piston
Aluminum frame
Yoke
Wheel
Reference Drawings
ENCORE 29 Rev. 3 09-2017
11
Page 12

3.5 Brewing Process
SERVICE & INSTALLATION MANUAL - Encore 29
www.cafection.com 800-561-6162
Reference Drawings
1
Step2 - Pause
Once the piston has reached its top point, it pauses to allow the
coffee to brew to the appropriate strength. At the end of the pause
time, a shot of water is dispensed to clean the brew chamber.
3
Step1 - Rise of the Piston
The ground coffee and the water are dispensed into the
brew chamber during the rising of the piston. This action
compresses the air in the cylinder and forces it through the
coffee mixture in the brew chamber, thereby agitating the
brewing coffee.
Step3 - Descent of the Piston
2
12
The descent of the piston creates a vacuum allowing to extract
the coffee from the grounds through the filter paper and into
the cylinder. The piston makes another pause time allowing
all the coffee to drain from the brew chamber.
4
Step4 - Coffee Delivery
The piston follows its course, heading to its lowest point. Distribution
of coffee through the spout begins once the piston has lowered below
the coffee spillway. Meanwhile, the brew chamber lifts to allow the
filter paper to move and discard the spent grounds into the internal
waste bin or coffee chute.
ENCORE 29 Rev. 3 09-2017
Page 13

SERVICE & INSTALLATION MANUAL - Encore 29
www.cafection.com 800-561-6162
3.6 Hot Water Tank
Access the water tank by removing the back panel.
Make sure the equipment is unplugged when servicing.
If the error message ''Low Water Level in Tank'' is frequently displayed or if the
heating element power supply has been cut out by the water tank safety part (it
happens when the heating element turns ON while there is no water in the tank), the
water tank needs to be opened to detect any damaged or defective part. Check the
following parts: motors behind the water tank, wires around the water tank, water
inlet and water tank parts (inside the tank).
Reference
probe
Reference Drawings
Heating
element
connectors
Thermal disc
(safety part)
Water level
sensor: low
Water level
sensor: high
Temperature
probe
ENCORE 29 Rev. 3 09-2017
13
Page 14

3.7 Bean Hopper Installation
The hopper is already installed in the brewer when shipped. To remove it for cleaning or servicing,
follow the steps below.
1. Open the brewer’s door.
2. Pull down the bean hopper retaining pin.
3. At the same time, pull the bean hopper forward.
4. To reinstall, slide the bean hopper back in place. The retaining pin does not need to be pulled
down.
SERVICE & INSTALLATION MANUAL - Encore 29
www.cafection.com 800-561-6162
Bean hopperRetaining pin
Reference Drawings
14
ENCORE 29 Rev. 3 09-2017
Page 15

SERVICE & INSTALLATION MANUAL - Encore 29
www.cafection.com 800-561-6162
3.8 Water Temperature
This equipment has a water temperature setpoint of 200°F to ensure a consistent beverage
quality. There is a +/- 2°F tolerance.
This data represents an average and will not correspond to the temperature of a manual
measurement. The actual water temperature fluctuates because cold water is added to the
tank after every beverage delivery and time is needed to heat the new incoming water up to the
setpoint.
Water’s brewing temperature can also be taken manually by ordering a cup of hot water and
measuring its temperature with a thermometer. There may be a slight difference from the tank
reading. This is normal.
If the temperature measurements show a large temperature differential, verify that the tank is clean
and not obstructed by mineral deposits and scale.
The electronic thermostat is managed by the main board.
Reference Drawings
Unit Safety Measures
In the event of a temperature probe failure, water in the tank might start to boil, causing it to
overflow into the overflow drip tray. The machine will be automatically shut off, but the screen will
remain ON.
If the heating element goes ON and there is no water in the tank, the heating element power
supply is cut out by the water tank safety part. The water tank needs to be opened to detect any
damaged or defective part. Check the following parts: motors behind the water tank, wires around
the water tank, water inlet and water tank parts (inside the tank).
Water tank
Main board
Overflow
drip tray
Temperature can be set by the user in Service mode, under the System1 tab.
ENCORE 29 Rev. 3 09-2017
Access by the back of the machine.
15
Page 16

SERVICE & INSTALLATION MANUAL - Encore 29
www.cafection.com 800-561-6162
4 INITIAL SETUP
Before the installation of the brewer on location, it is strongly suggested to unpack, inspect and bench test
the machine at the warehouse.
4.1 On-Site Installation Requirements
4.1.1 Operating Environment
Equipment is for indoor use only.
4.1.2 Power Supply
Make sure each unit has its own electrical circuit and is located within five (5) feet of the
dedicated electrical outlet.
Use only a polarized grounded receptacle.
Domestic 120V AC / 60Hz- 15 A circuit.
4.1.3 Water Supply
Use a plastic 1/4” or 3/8” (outside diameter) dedicated line branched off a larger line. An
easily accessible shut off valve upstream of the unit is highly recommended for ease of
installation.
Initial Setup
Cold tap water pressure should be at least 20 psi and no more than 80 psi.
4.1.4 Tools Required
- Adjustable wrench
- Level indicator
Other tools may be required depending on the type of water supply tubing and
location.
4.1.5 Clearance
Unit Clearances Allowance for
Height 29 1/4" 32" Antenna and opening top lid.
Width 22" 34" Accessing lock (right side) and opening door (left side).
Depth 24 1/2" 42" Opening door (front) and back clearance.
Back
Clearance
See Annex1 for waste chute positioning.
1 1/4" Clearance for water hookup, hoses and adequate air
circulation.
See Annex2 for a diagram illustrating required clearance.
16
ENCORE 29 Rev. 3 09-2017
Page 17

SERVICE & INSTALLATION MANUAL - Encore 29
www.cafection.com 800-561-6162
4.2 Brewer Specifications
4.2.1 Hopper & Canister Capacities
Whole bean hopper, left section ............. 4.2 lbs (1.9kg)
Whole bean hopper, middle section ....... 3.4 lbs (1.5kg)
Whole bean hopper, right section ........... 2.0 lbs (0.9kg)
Soluble milk ........................................... 1.2 lbs (0.6kg)
Soluble hot chocolate ............................ 3.7 lbs (1.7kg)
Soluble vanilla powder ........................... 2.4 lbs (1.1kg)
Initial Setup
4.2.2 Water Tank
Capacity ................................................ 0.74 gallons (2.8L)
Water valves .......................................... 5 simple valves
Heating element ..................................... 1250 watts
4.2.3 Electrical Specifications
120V AC
12 A circuit
60Hz
ENCORE 29 Rev. 3 09-2017
17
Page 18

4.3 Unpacking
To remove the unit from the box, carefully cut the straps holding the box in place on the skid.
Remove the top of the packaging, then pull up the unit’s box. Inspect the unit to see if any damage
occurred during shipment.
Some parts and accessories need to be installed on the equipment. Those were placed inside
the machine for shipment. Here is a list of all accessories and parts that should be found in the
machine.
SERVICE & INSTALLATION MANUAL - Encore 29
www.cafection.com 800-561-6162
Initial Setup
1
2
3
1. Internal Waste Bin
2. 3/8" Inlet Fitting
3. 3/8" to 1/4" Elbow Inlet Fitting
4. 3/8" to 3/8" Elbow Inlet Fitting
5. Gage Identification Stickers
Inside the machine:
4
7
6. "Milk" Sticker for Soluble Canister
7. Filter Paper Roll
8. Microfiber Cloth
9. Keychain
10. Service & Installation Manual
11. Initial Setup Instructions
12
Optional
12. Plastic Chute Kit (Chute Base and
Chute) (17CAB42 & 17CAB43)
One of the machine’s keys is located at the back of the brewer. A second key is
taped on the filter paper roll, located in the internal waste bin.
18
ENCORE 29 Rev. 3 09-2017
Page 19

SERVICE & INSTALLATION MANUAL - Encore 29
www.cafection.com 800-561-6162
4.4 Leveling the Equipment
For optimal performance of the equipment, it is important
to ensure that it is leveled. Avoiding to do so can create
variations in product delivery.
1. Open the brewer’s door and place a level on a flat surface
(coffee bean shelf or internal waste bin shelf).
2. Adjust the four (4) threaded level legs of the equipment
with an adjustable wrench to reach a leveled position.
4.5 Drip Tray Installation
Place the drip tray grill on the drip tray, then place it on its support.
Initial Setup
Drip tray
grill
Drip tray
ENCORE 29 Rev. 3 09-2017
Drip tray
support
19
Page 20

4.6 Water Line Connection
This equipment must be installed in compliance with applicable federal, state,
provincial and/or municipal plumbing codes having jurisdiction.
Make sure that the equipment is unplugged before proceeding with the water
supply installation. Also verify that the incoming water pressure is greater than
20psi and no more than 80psi.
1. Prior to installing the equipment, flush out the water line by running approximately 1 gallon of
water into a pail. This will ensure no sediment from a new installation gets in the equipment.
2. The incoming water supply must have a shut-off valve connected in-line. Water supply should
be a plastic 1/4” or 3/8” outside diameter dedicated line branched off a larger supply line.
3. Make sure the water source is turned off. Firmly secure the inlet fitting onto the inlet valve.
Do not overtighten.
SERVICE & INSTALLATION MANUAL - Encore 29
www.cafection.com 800-561-6162
Initial Setup
4. Make sure the equipment is unplugged. Connect the water line to the quick connect inlet
fitting.
5. Turn the water valve on, sending water to the brewer. If there are any leaks, tighten
connections to stop leakage.
This procedure does not take into consideration the installation of a water filtration
system. Please refer to the water filter manufacturer’s installation instructions and
incorporate them into the above procedures.
Water inlet
20
ENCORE 29 Rev. 3 09-2017
Page 21

SERVICE & INSTALLATION MANUAL - Encore 29
www.cafection.com 800-561-6162
4.7 Electrical Connection
This equipment must be installed in compliance with applicable federal, state,
provincial and/or municipal electrical codes having jurisdiction.
Make sure:
- The equipment is OFF before plugging it in.
- The equipment has its own electrical outlet.
- NO extension cord is used.
1. Locate the unit’s power cord.
2. Make sure the power switch at the back of the unit is in the OFF position before plugging it into
its own grounded electrical outlet.
Initial Setup
3. Toggle the power switch to the ON position. The front lights will turn on, and water will
automatically enter the machine to fill the tank. The water tank filling process should take a
maximum of three(3)minutes.
4. Once the tank is full, water will take 10-20 minutes to heat to brewing temperature.
5. Once the coffee machine is ready, the selection screen will appear.
OFF position
ALWAYS unplug the main power cord from the power outlet (AC line voltage) when
servicing any electrical components on the equipment.
ENCORE 29 Rev. 3 09-2017
21
Page 22

4.8 Loading Products
SERVICE & INSTALLATION MANUAL - Encore 29
www.cafection.com 800-561-6162
Product
loading
door lock
Initial Setup
4.8.1 Soluble Canisters
1. Unlock the product loading door and
remove it.
2. Fill the canisters with their appropriate
soluble. Remove the appropriate soluble
lid to avoid cross-contamination.
3. Do not overfill the canisters.
4. Reinstall the soluble lids and the product
loading door.
4.8.2 Bean Hopper
1. Unlock the product loading door and
remove it.
2. Fill the compartments with their
appropriate coffee blend.
3. Do not overfill the three (3) sections of
the hopper.
4. Reinstall the product loading door.
Products
loading door
Soluble lids
22
3 whole bean
coffees
Soluble 1 (milk powder)
Soluble 2 (hot chocolate)
Soluble 3 (French vanilla)
Caution! Flavored coffee beans can contain ethyl alcohol that could affect the bean
hopper’s longevity. Cafection do not recommend using flavored beans.
ENCORE 29 Rev. 3 09-2017
Page 23

SERVICE & INSTALLATION MANUAL - Encore 29
www.cafection.com 800-561-6162
4.9 Filter Paper Installation
Make sure the brewer is ON.
1. Place the filter paper roll on the bracket so it dispenses on the left-hand side (see the diagram
below).
2. Access Service mode by tapping in order on the top left, bottom left and bottom right corners
of the screen and enter NIP5657 (see section6). Press on the "Install Filter Paper" button and
follow the instructions on the screen.
3. Pass the filter paper under the left guide bracket of the brew group, under the brew chamber
and under the wheel guides by gently lifting them using the yoke.
4. Pull on the paper and carry it
into the internal waste bin or
through the chute hole and into
the waste bin (if the machine is
equipped with a chute kit).
Initial Setup
5. Make sure the paper is feeding
straight and stays within the
guide bracket.
Improper filter paper feeding
will cause a vacuum leak and
may cause grounds to spill
inside the equipment.
YokeGuide
bracket
ENCORE 29 Rev. 3 09-2017
23
Page 24

4.10 Chute Kit Installation (Optional)
1. Open the brewer’s door, remove the internal waste bin and remove the coffee spout.
2. Insert the chute base inside the chute hole of the cabinet. Make sure the shortest side points
to the back of the machine.
3. Insert the waste chute into the chute base.
4. Install the front panel by aligning its metal bracket with the metal bracket fixed on the brew
group assembly.
5. Reinstall the coffee spout, lock it in place and close the brewer’s door.
SERVICE & INSTALLATION MANUAL - Encore 29
www.cafection.com 800-561-6162
Short side
Initial Setup
Coffee spout lock
Coffee spout
Waste chute
Chute base
24
ENCORE 29 Rev. 3 09-2017
Page 25

SERVICE & INSTALLATION MANUAL - Encore 29
www.cafection.com 800-561-6162
4.11 Installation Verification
It is important to perform several brew cycles on the equipment before completing the installation. At
least two (2)cups of each product selection should be ordered to ensure that the brewer is operating
as per the specifications laid out in this manual. During this process, review the following checklist as a
reminder.
Make sure that the brewer is clean, safe and functioning once it is ready to be left on-site.
What to verify
Inlet valve is free of leaks. Verify that it is secured and not overtightened.
Brew chamber is empty of coffee. Verify that the unit is leveled.
Filter paper feeds without resistance and
goes straight into the waste bin or chute.
Soluble whipping chambers are free of leaks.
Water temperature is acceptable. Verify water temperature.
Products are loaded. Load products.
Brewer and area are clean and tidy. Clean and tidy up.
Verify that the chute is properly installed.
Repeat the installation procedure, if needed.
Verify that it is installed straight and that the
tube is secured.
Initial Setup
ENCORE 29 Rev. 3 09-2017
25
Page 26

5 USER INTERFACE
5.1 Selection Screen Interface
The selection screen interface is divided into three (3) steps:
1. Select a beverage.
2. Define beverage options (blend, strength, size and milk if applicable).
3. Brew.
SERVICE & INSTALLATION MANUAL - Encore 29
www.cafection.com 800-561-6162
1. Select Beverage.
User Interface
More beverages may be available
Press X to cancel and go back
to the selection screen.
2. Select Beverage Options.
-Blend, Strength, Size and
Milk (if applicable).
(Options may not all be
available according to the
selected beverage.)
3. Press "Enjoy Now" to
start the drink preparation.
26
ENCORE 29 Rev. 3 09-2017
Page 27
SERVICE & INSTALLATION MANUAL - Encore 29
www.cafection.com 800-561-6162
5.2 Carafe Mode
Carafe mode is only available for users with level2 access or above (see
section6.1) and for users that have been granted access in the Users List and
Rights Management section of the Admin sub tab (see section 6.6.6).
Carafe mode is always free, and each drink is counted as a free vend in the sales counters.
When pressing the "Fill up a Carafe" button in Service mode, the screen will automatically return to
the selection interface.
The notice "Carafe mode" (bottom left corner) confirms that the machine is in Carafe mode.
To quit Carafe mode, go back to Service mode and press the "Carafe Mode is ON" button. It will
turn back to white and display "Fill up a Carafe".
To fill a carafe, follow the steps below. If the order needs to be canceled while the brewing is in
process, press on the "Cancel" button. The machine will finish its current brewing cycle and will not
start another one.
User Interface
1. Select Beverage.
2. Select Beverage Options.
-Blend, Strength and Size, if applicable.
Quantity of drinks can be adjusted
using the + and - buttons.
(Options may not all be available
according to the selected beverage.)
Press "Prepare Carafe" to start
preparation of the beverage.
3. Wait until all drinks have been prepared.
ENCORE 29 Rev. 3 09-2017
27
Page 28
5.3 Iced Coffee
The coffee brewed by the machine is hot. It cools down in contact with ice.
The brewer does not make ice. To order this beverage, an ice machine is required.
The iced coffee is prepared in a 12oz size cup. The size of the drink can be modified by changing
the quantity of water in the beverage, but the screen interface will continue to suggest using a
12oz cup.
SERVICE & INSTALLATION MANUAL - Encore 29
www.cafection.com 800-561-6162
User Interface
If there is no ice machine on-site, follow these
steps to deactivate the Iced coffee recipe.
Access Service mode. Under the recipes tab,
select 250_IcedCoff from the drop-down menu.
Deactivate the "Enable" checkbox and press
Save (see section 6.5.2).
1
2
1. Select Iced Coffee.
2. Fill a 12oz cup with ice and place it on the
cup holder. Press on the "Next" button on the
screen.
3. Select blend and strength.
4. Press "Enjoy Now" to start preparation of the
beverage.
28
3
4
ENCORE 29 Rev. 3 09-2017
Page 29
SERVICE & INSTALLATION MANUAL - Encore 29
www.cafection.com 800-561-6162
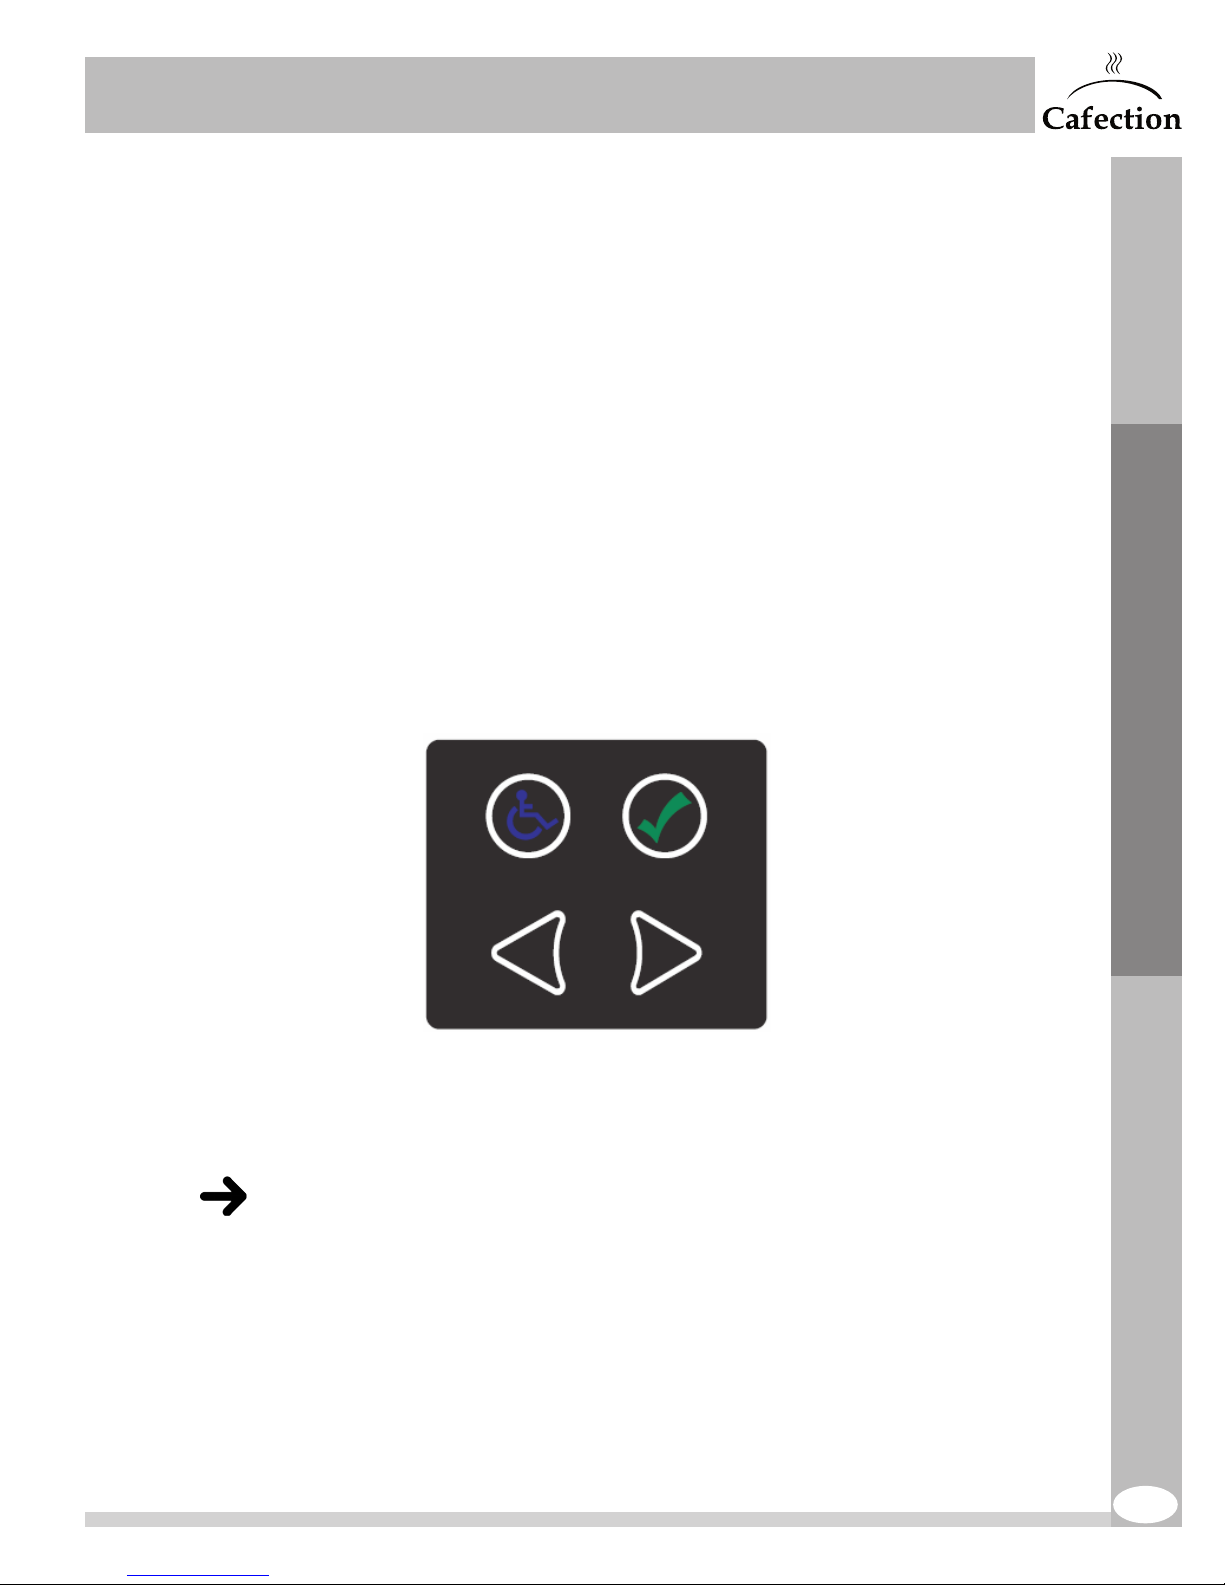
5.4 Selection Keyboard for People with Disabilities (Optional)
(Keyboard compliant with the ADA: Americans with Disabilities Act)
The adapted selection keyboard is located lower than the touch screen to help people who are not
able to reach the screen or are not comfortable using it to order coffee easily.
To activate this selection keyboard, customers need to press any of its keys.
Using the arrows, move the hand icon on the screen until it reaches the desired button, then press
on the green checkmark button to confirm the selection.
The touch screen remains activated all the time even when the lower keyboard is in use.
The icon remains lit all the time.
The other keys only light up when the keyboard is activated.
User Interface
ENCORE 29 Rev. 3 09-2017
29
Page 30
SERVICE & INSTALLATION MANUAL - Encore 29
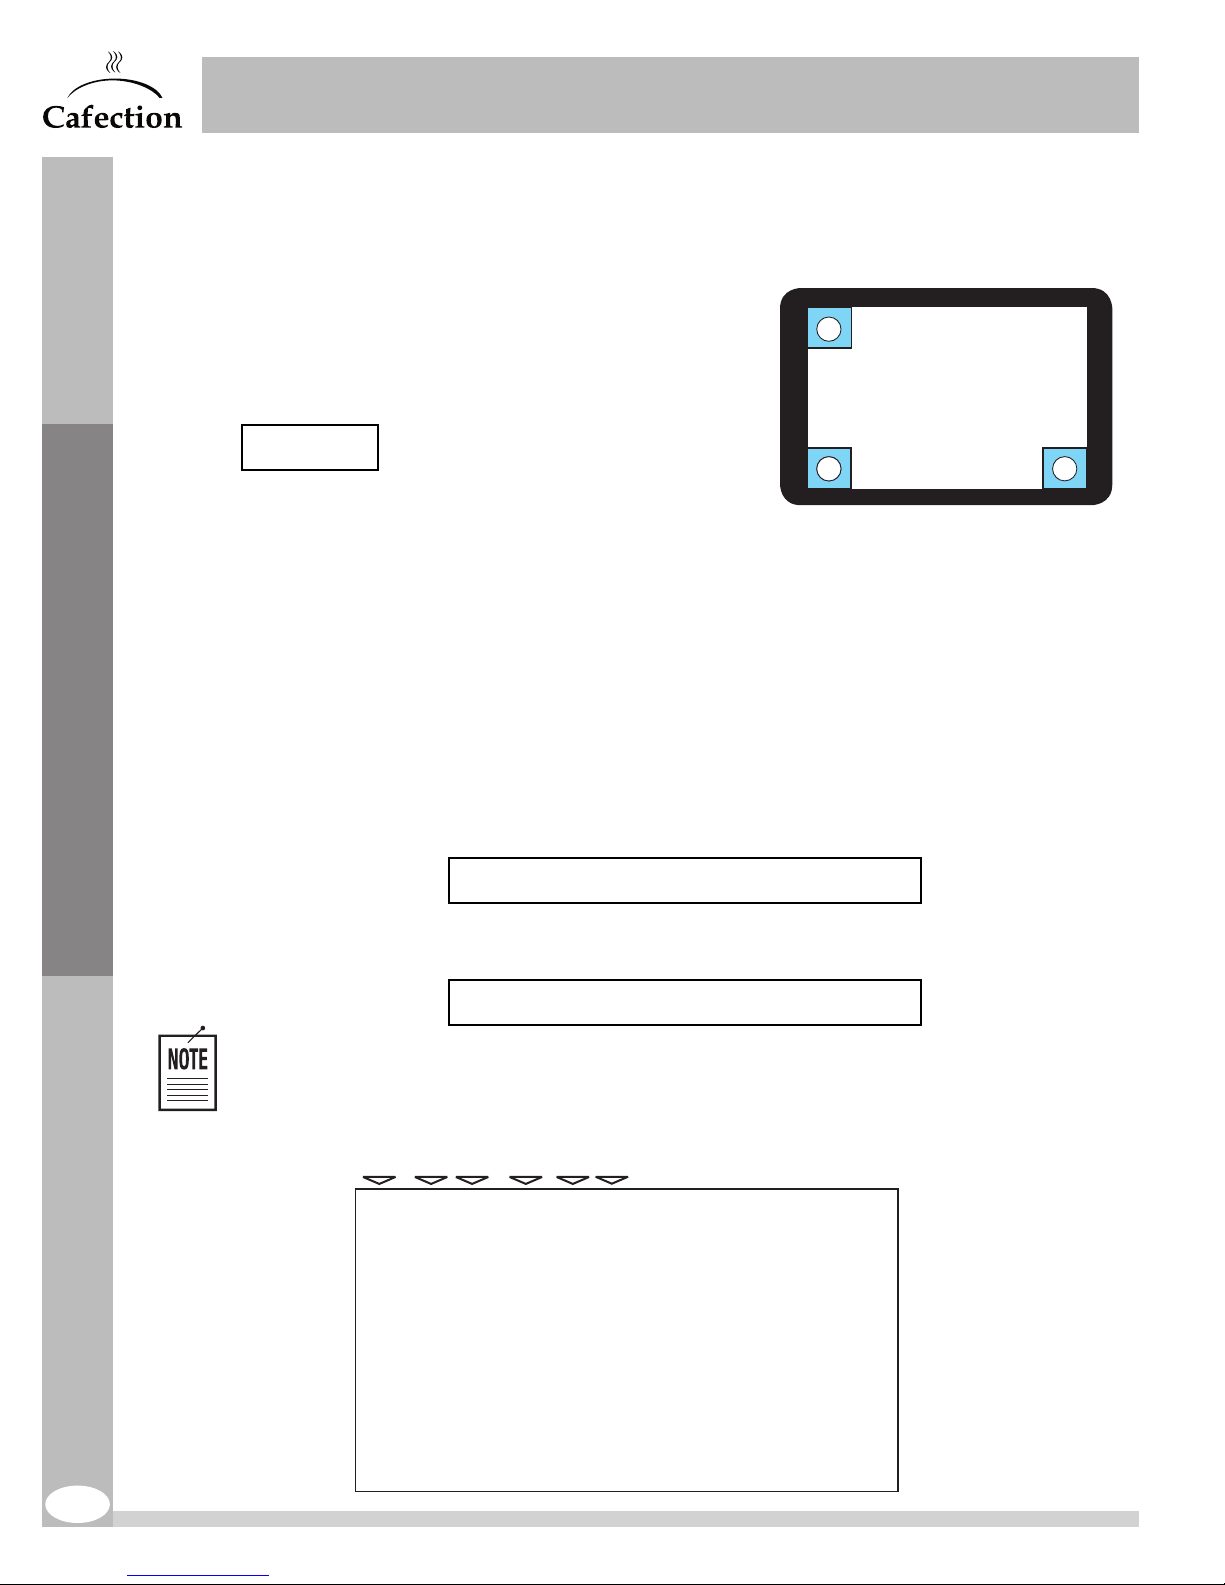
6 SERVICE MODE
Enter Service mode to change recipes, access drinks counters
or edit different options on the brewer. Tap on the top left,
bottom left and bottom right corners of the screen, in that
particular order to enter Service mode (as shown in this image).
www.cafection.com 800-561-6162
1
Service Mode
PIN: 5657
2 3
6.1 Users Levels
Level1: For the end user. Beverages selection and ordering only. Level1 users cannot access the
brewer’s settings.
Level2: For service personnel. Basic maintenance (no password required).
Level3: For service tasks. Recipes modification and system settings access. Level3 users have
access to all tabs and sub tabs in Service mode, with the exception of the Audit tab and the Admin
sub tab.
Factory password for this level: tech
Level4: For administrative tasks. Sales counters (audits) access and passwords modification.
Level4 users have access to all tabs and sub tabs in Service mode.
Factory password for this level: admin
Cafection highly recommends changing those passwords.
Access Levels:
30
2 2 3 3 3 4
ENCORE 29 Rev. 3 09-2017
Page 31
SERVICE & INSTALLATION MANUAL - Encore 29
www.cafection.com 800-561-6162
6.2 Service Tab
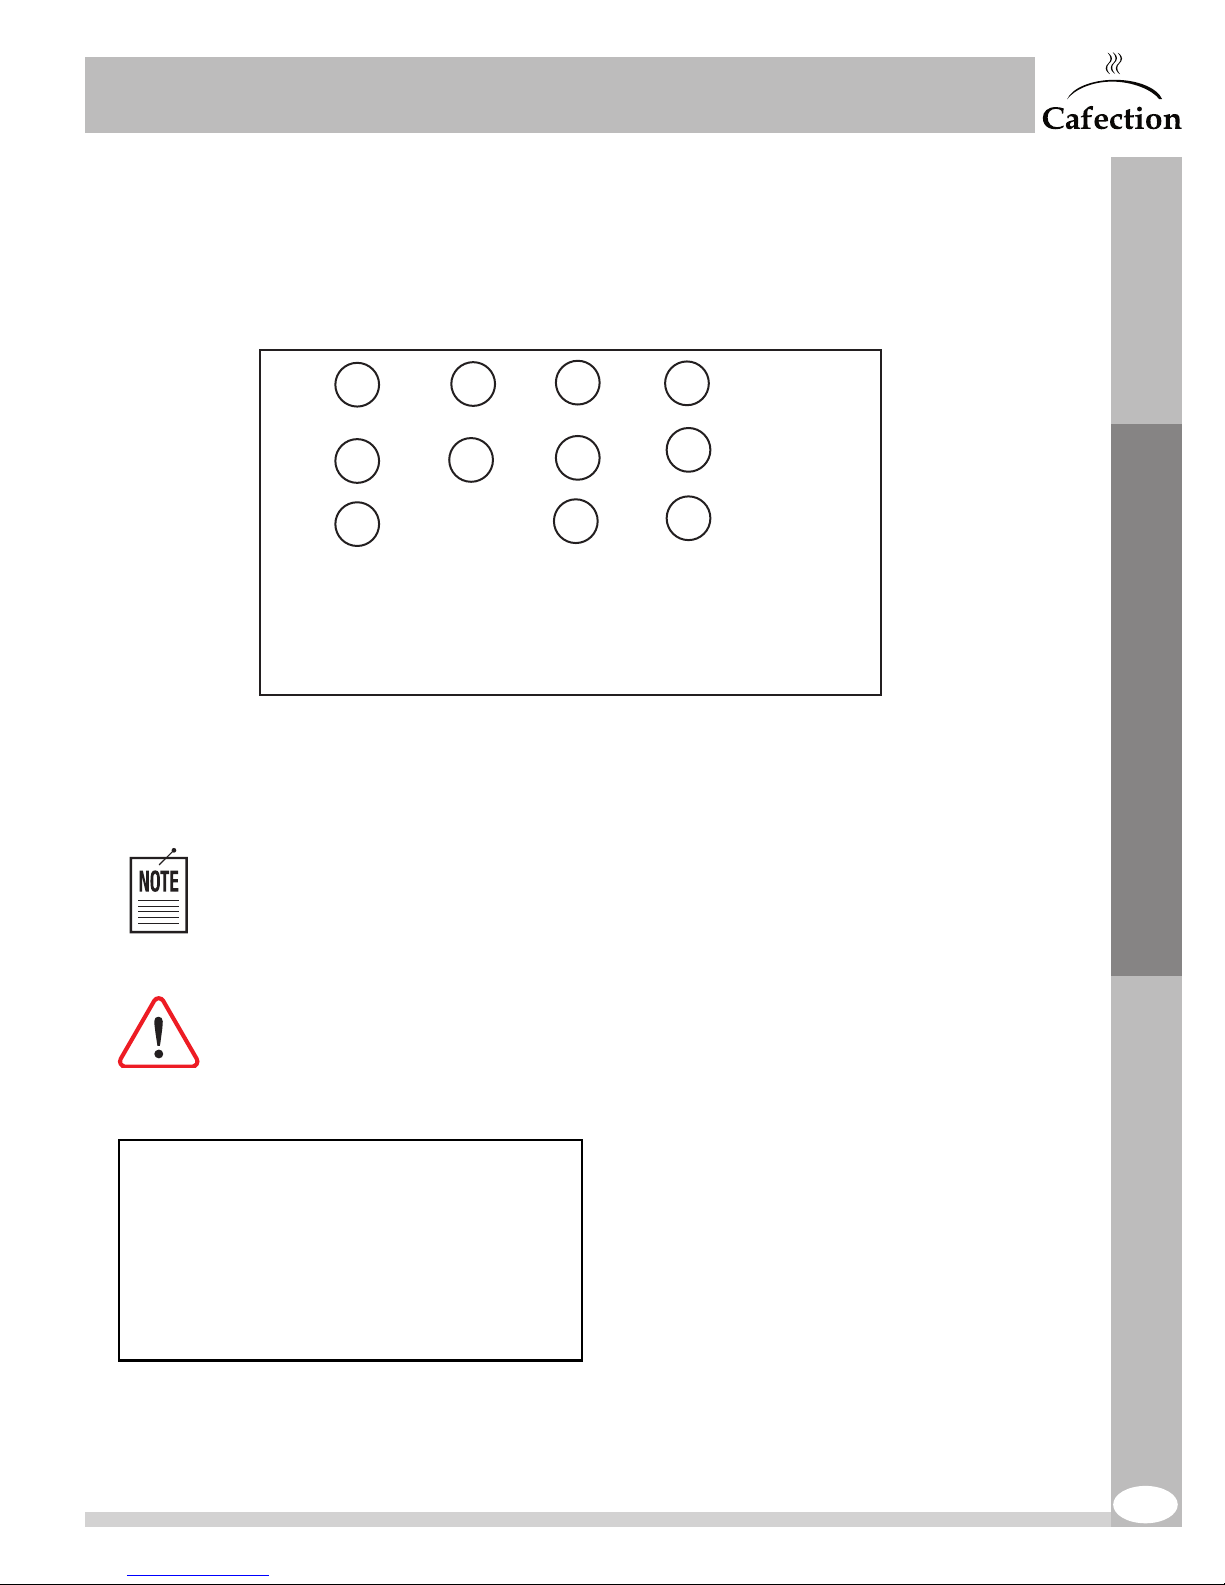
To access the screen below, tap in order on the top left, bottom left and bottom right corners of
the screen (see section6). The Service tab is the first screen to be displayed.
1
5
2
6
11
1. This button is used to change the filter paper. Press it and follow the instructions on the screen.
2. This button is used to activate Free Vend mode. When the brewer is in Free Vend mode, the
button will be enlightened in green and will show "ON" (in opposition to "OFF" when Free Vend
is not activated).
When Free Vend is enabled, the coin, bill and card payment devices will be disabled
automatically.
3. This button is used to rinse the brew group, the whipper chambers and the valves. Press it and
follow the instructions on the screen.
3
7
10
4
8
9
Service Mode
WARNING! Make sure to place a container large enough (size is specified on the
screen). BE CAREFUL! Water is VERY HOT!
ENCORE 29 Rev. 3 09-2017
4. This button gives access to the Email Sending
interface. It is only visible when the coffee brewer is
connected to a cellular or a wireless network.
The user must enter his email and the message
he wants to send to the owner of the brewer,
then press the "Send" button. When the user
presses one of the two text fields, an alphanumeric
keyboard appears. For more help, press the (?)
icon.
31
Page 32
Service Mode
SERVICE & INSTALLATION MANUAL - Encore 29
www.cafection.com 800-561-6162
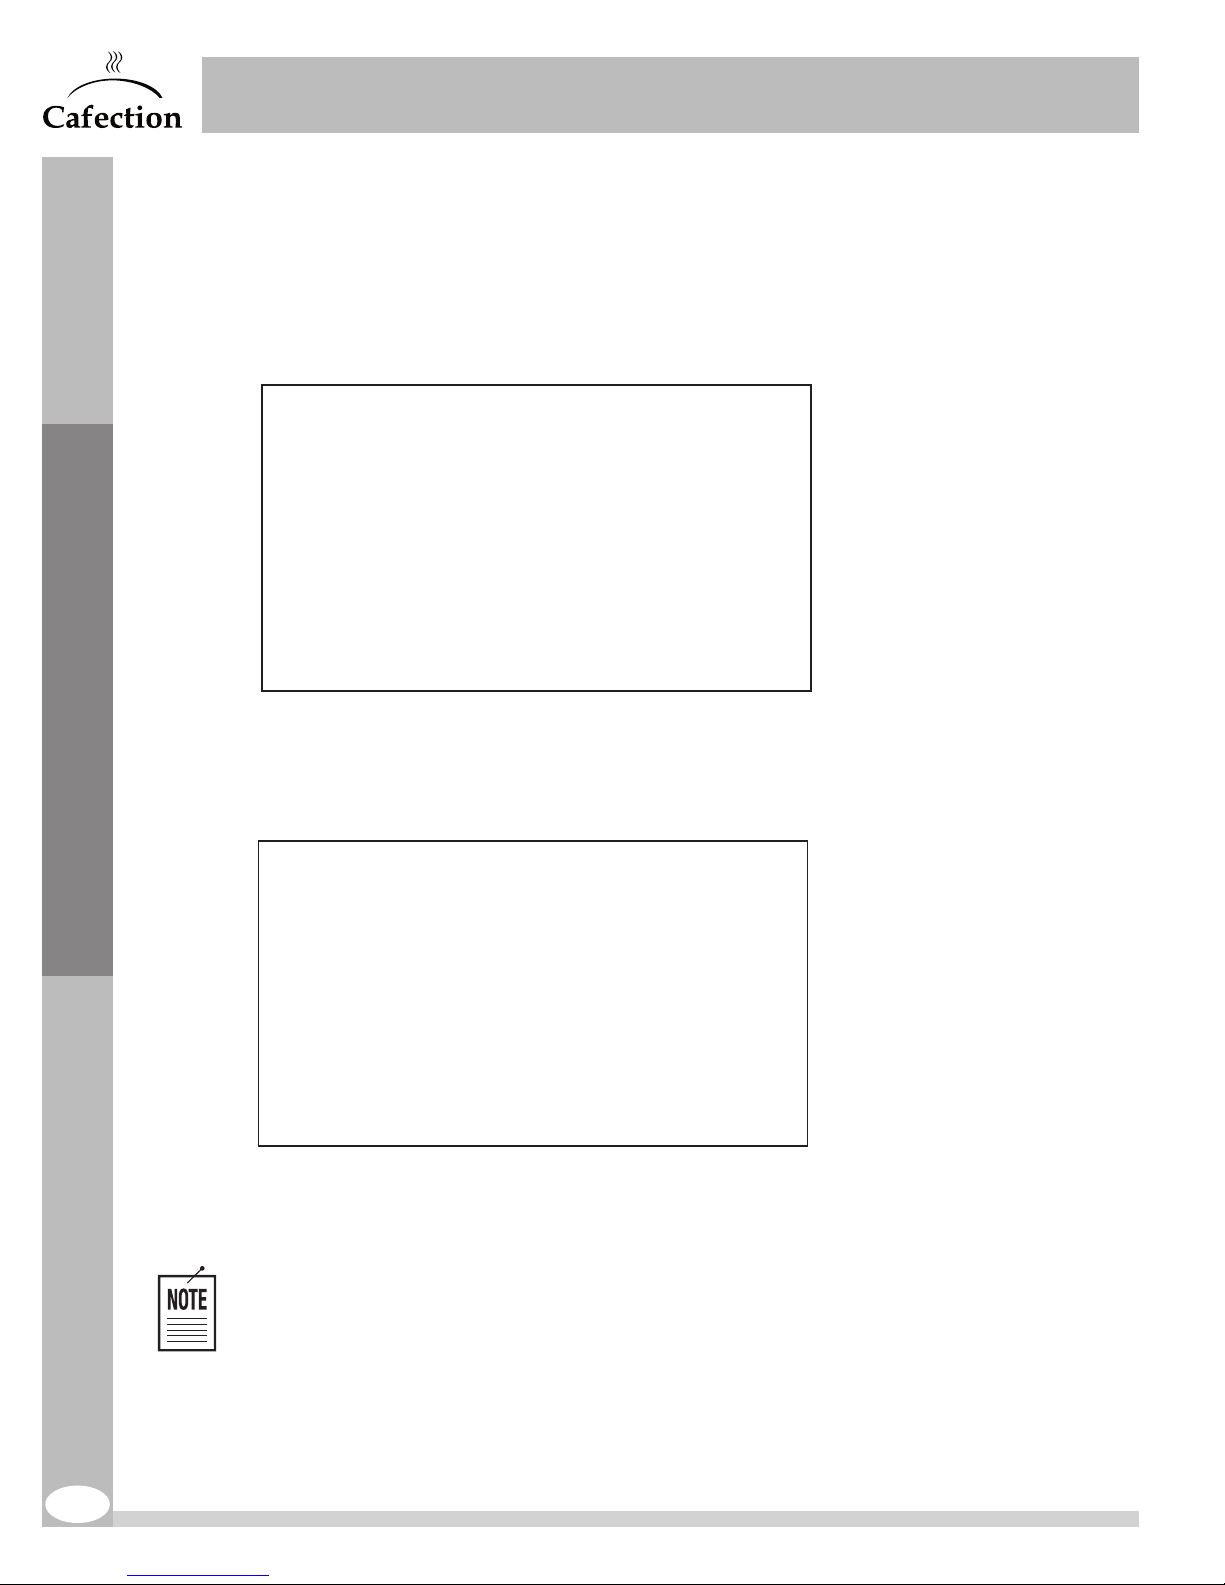
5. This button is used to enable Carafe mode (see section5.2 for details).
6. This button is used to lock the selection screen so no user can order beverages.
7. This button is used to reset the waste bin counter.
8. This button gives access to
the Online Ordering interface, to
send an order through Sophia
— Global Management
System. It is only available
when the coffee brewer is
connected to a cellular or a
wireless network.
The user must enter his email
and select the items he wishes
to order. A text field at the end
of the list allows him to add
items that are not yet on the
list. The owner of the coffee
brewer must confirm the order
thereafter. For more help, press
the (?) icon.
9. This button gives access to
the Products Levels interface.
The user first needs to estimate
the level of the corresponding
product in % (coffee beans,
soluble powders or filter
paper), then move the bean
icon accordingly. Once this
percentage has been set, the
product level will decrease
in accordance with its real
consumption.
Using the bell icon, the user
can also set the consumption level at which the machine will send an email notification for each
product. For more help, press the (?) icon.
Cafection recommends setting the alert at 25% for each product.
10. This button is used to clean and sanitize the brew group and the grinder using recommended
products. See section7.2 and follow instructions on the screen.
11. This button is used to exit Service mode.
32
ENCORE 29 Rev. 3 09-2017
Page 33
SERVICE & INSTALLATION MANUAL - Encore 29
www.cafection.com 800-561-6162
6.3 Status Tab
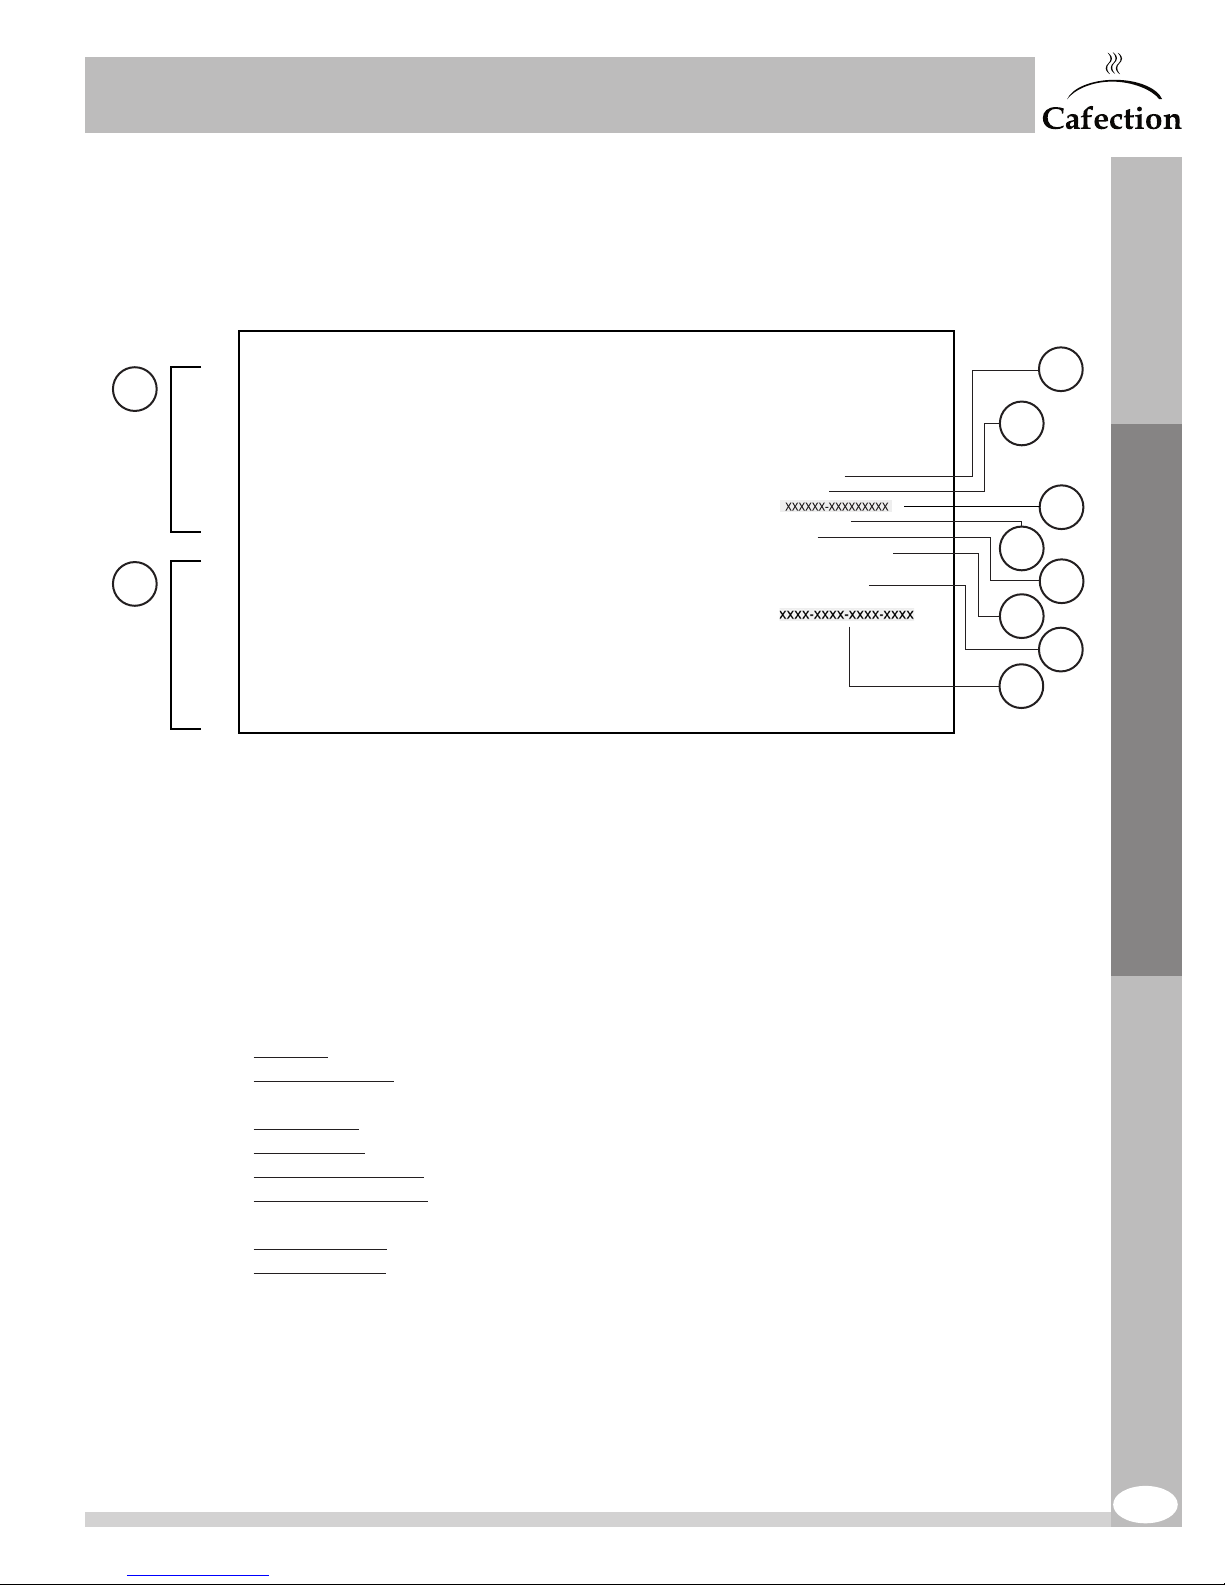
To access the screen below, tap in order on the top left, bottom left and bottom right corners of the
screen (see section6) and select the Status tab.
1
10
2
3
4
5
6
Service Mode
7
8
9
1. Service Notes. Allows the technician to enter the servicing that has been performed on the
machine. An alphanumeric keyboard will appear when pressing the text box.
2. Unit model.
3. Software version of the computer.
4. Serial number of the coffee brewer. Correct serial number is mandatory to use Sophia—
GlobalManagement System. Service users with level4 access can set the serial number
(seesection6.1).
5. Firmware version of the controller.
6. Actual water temperature in Fahrenheit.
7. Date and time. Date and time can be set in the Tools sub tab, under the System tab.
8. Network status. Many possible statuses:
Disabled: Network is offline.
Invalid serial num.: The serial number shown on screen is invalid. Verify the serial number
(seesection6.6.4).
Wi-Fi no link: Wi-Fi link is activated but the network is not functioning.
Wi-Fi link OK: Wi-Fi link is activated and coffee brewer is connected to the network.
Cell. Modem no link: Cellular modem link is activated but the network is not functioning.
Cell. Modem link OK: Cellular modem link is activated and the coffee machine is connected to the
network.
Ethernet no link: Ethernet link is activated but the network is not functioning.
Ethernet link OK: Ethernet link is activated and coffee machine is connected to the network.
9. Activation key of the brewer. It is used to register the machine on Sophia— Global Management
System.
10. Error log. Keeps the last 50 events in memory. Accessible remotely on Sophia— Global
Management System.
ENCORE 29 Rev. 3 09-2017
33
Page 34
6.4 Password Pop-Up
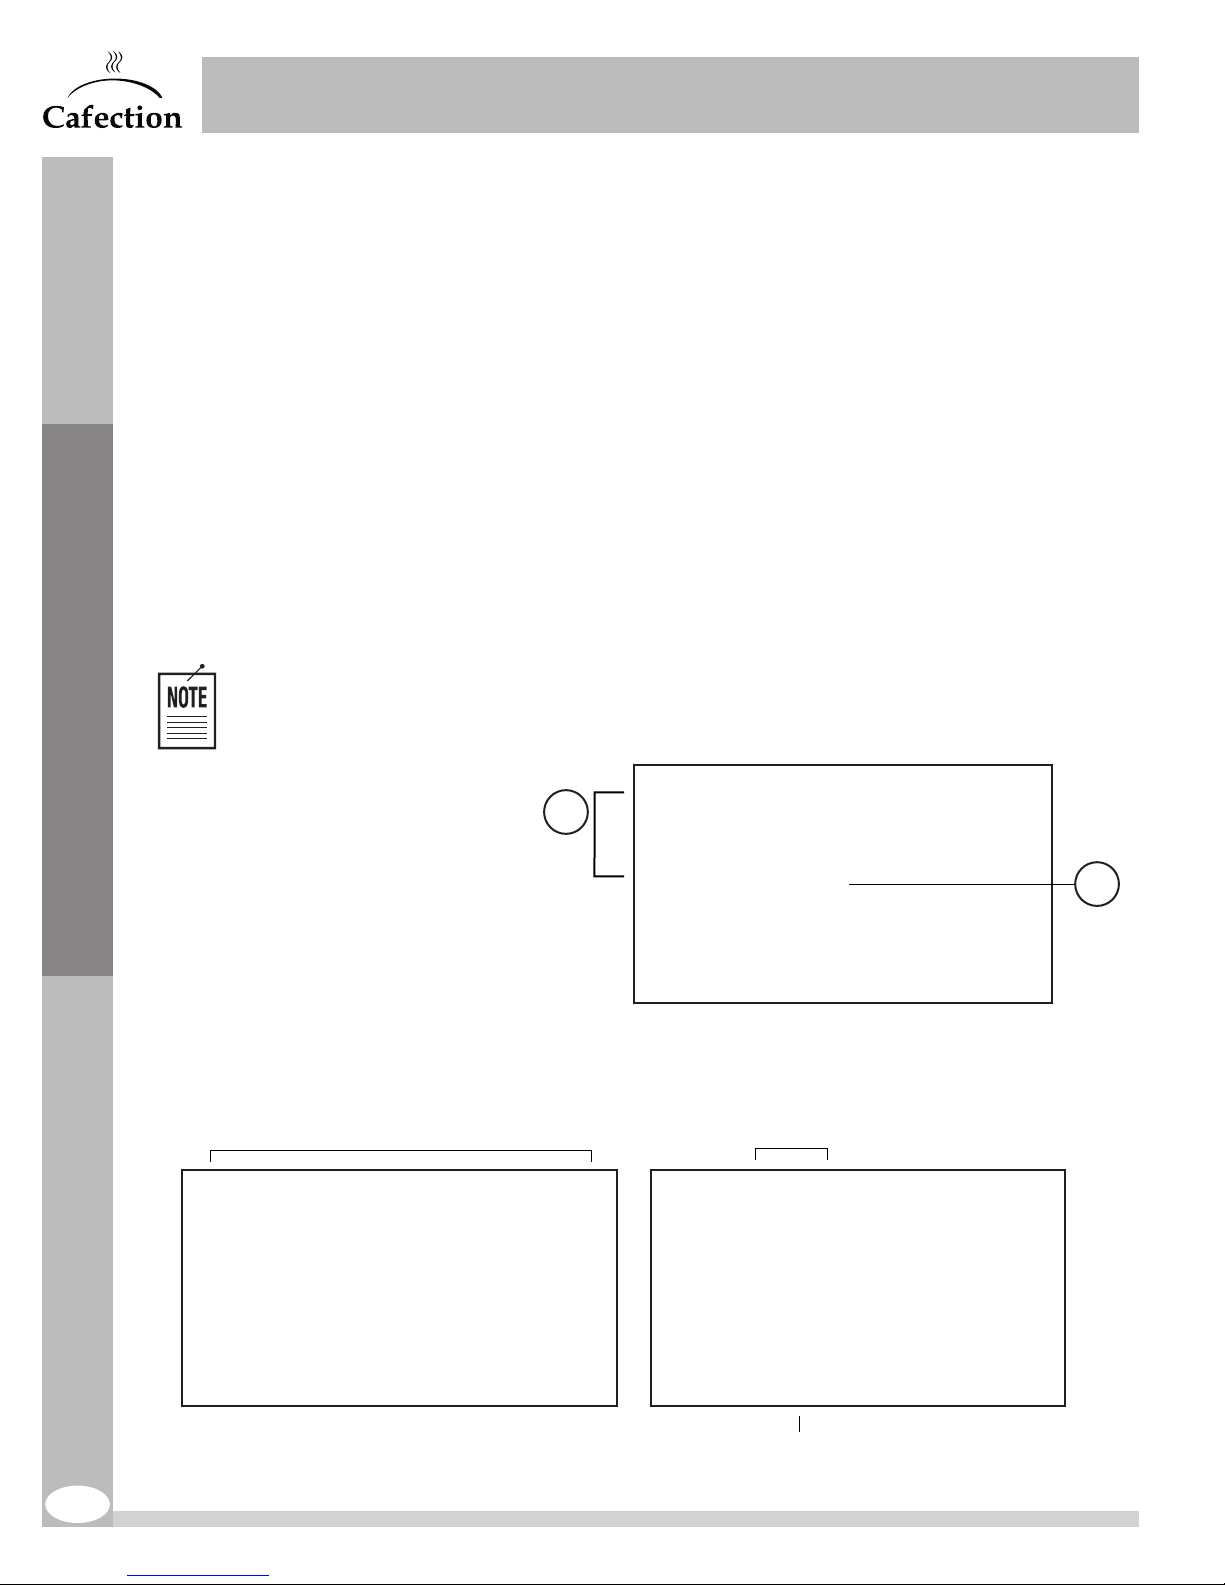
This pop-up window will appear when pressing the
Recipes, System, Media or Audit tabs. The user needs to
type in his password using the alphanumeric keyboard,
then press on ENTER. Depending on the password
entered, the user will gain access to different tabs.
6.5 Recipes Tab
To access this tab (see image on next page), tap in order on the top left, bottom left and bottom
right corners of the screen (see section6) and select the Recipes tab. The Information sub tab is
the first screen to be displayed.
6.5.1 Customization Sub Tab
The Customization sub tab allows the user to edit blends names or labels. For each blend,
it is possible to display only one option (name or label) on the selection screen. Default
blend names are Coffee1, Coffee2 and Coffee3.
SERVICE & INSTALLATION MANUAL - Encore 29
www.cafection.com 800-561-6162
Service Mode
Coffee names and labels can be edited with Sophia — Global Management System.
1. Use the "Tag" button
to select a tag for the
associated blend.
Use the "Name"
button to edit the
blend’s name using
the text box.
2. This button is used
to save any changes
to the customization
settings.
Any unsaved changes will be lost.
Label list
1
2
Blend name or label
34
Recipe name
ENCORE 29 Rev. 3 09-2017
Page 35
SERVICE & INSTALLATION MANUAL - Encore 29
www.cafection.com 800-561-6162
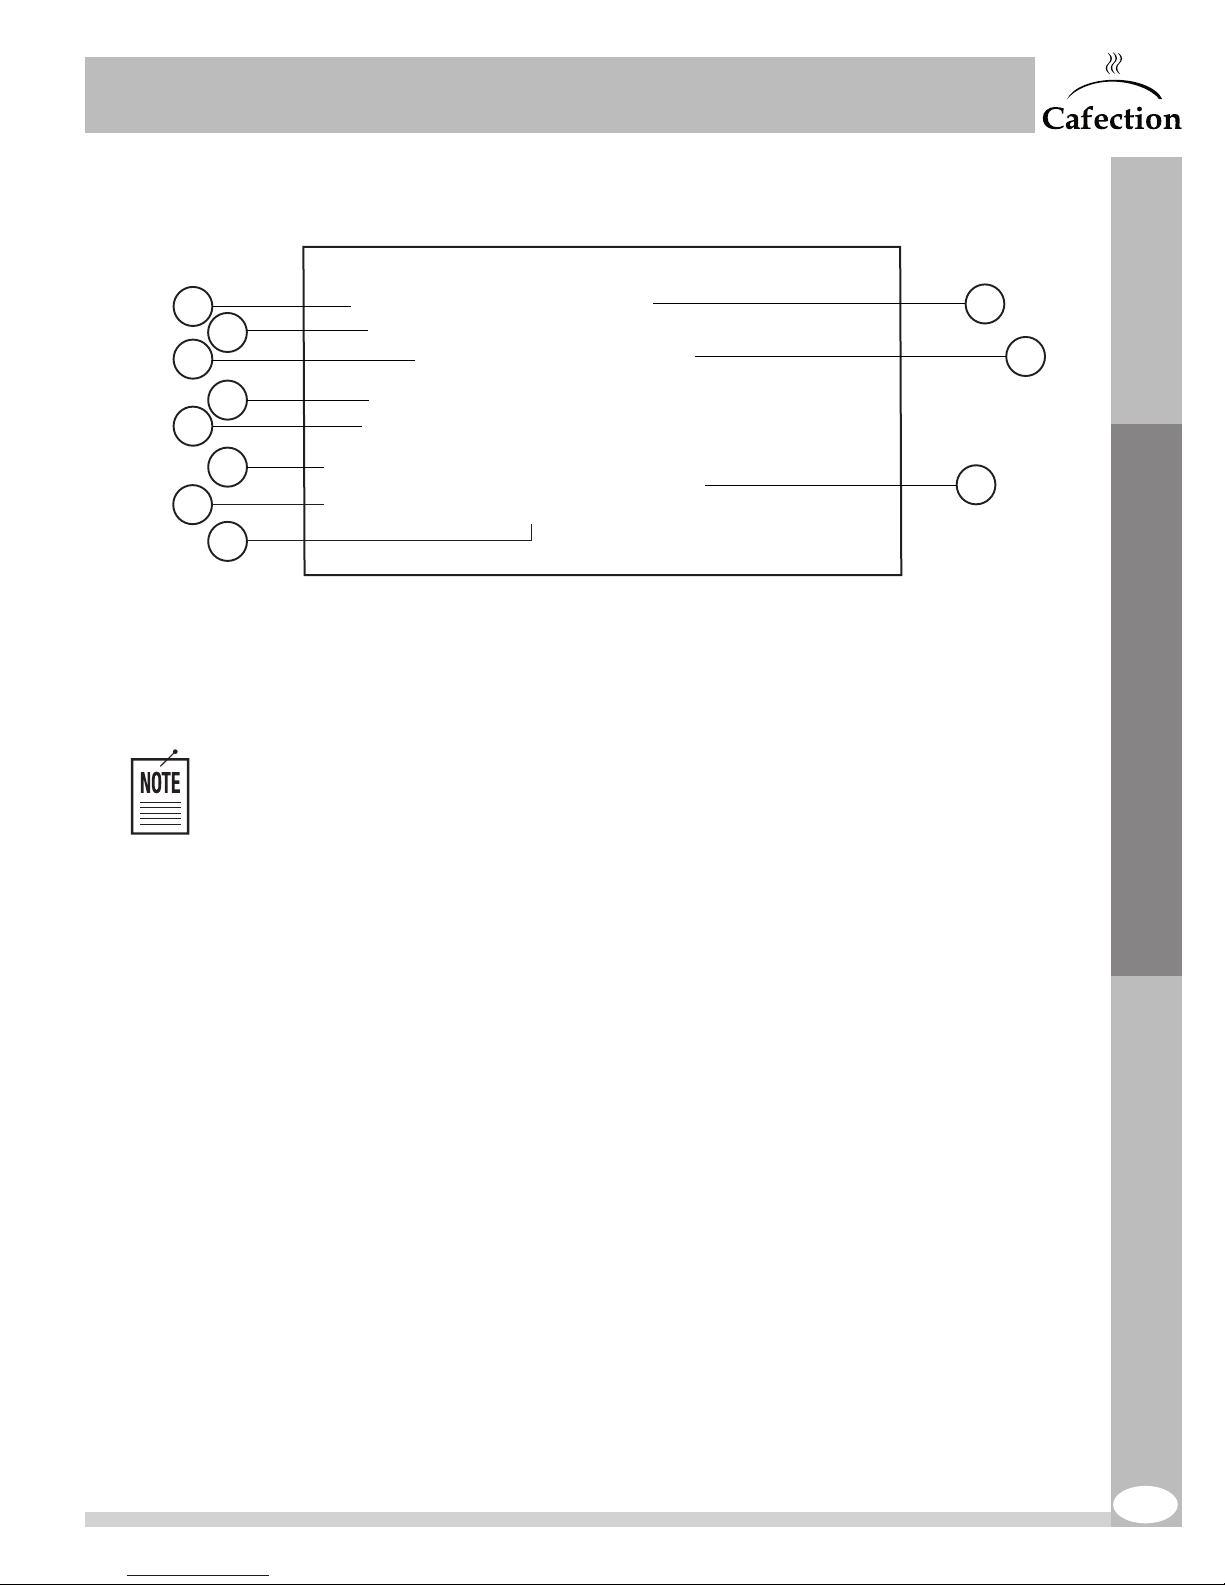
6.5.2 Information Sub Tab
1
2
3
4
5
6
7
8
1. This drop-down menu is used to choose the recipe requiring modifications. Coffee1, 2
and 3 refer to bean hopper sections1, 2 and 3 (from left to right).
2. This field is used to set the recipe name that will be shown on the selection screen
under the beverage’s illustration.
If the language of the system is changed, the name of the recipes will be reset to
factory settings.
3. This button will show the message displayed during the screen saver for the recipe.
The text can only be edited with Sophia — Global Management System.
4. This table is used to set the text displayed on the cup size buttons.
5. These checkboxes are used to enable or disable each size for the recipe.
6. This table is used to set the price of the recipe for each size.
7. This button is used to set the price for all recipes at once.
8. This button is used to fix a lost or corrupted recipe by resetting it to default settings.
9. This checkbox is used to enable or disable the drink on the selection screen.
10. This checkbox is used to add the "Pick Me" tag over the beverage on the selection
screen.
11. This button is used to save any changes to the current recipe. Any unsaved changes
will be lost.
9
10
11
Service Mode
ENCORE 29 Rev. 3 09-2017
35
Page 36
SERVICE & INSTALLATION MANUAL - Encore 29
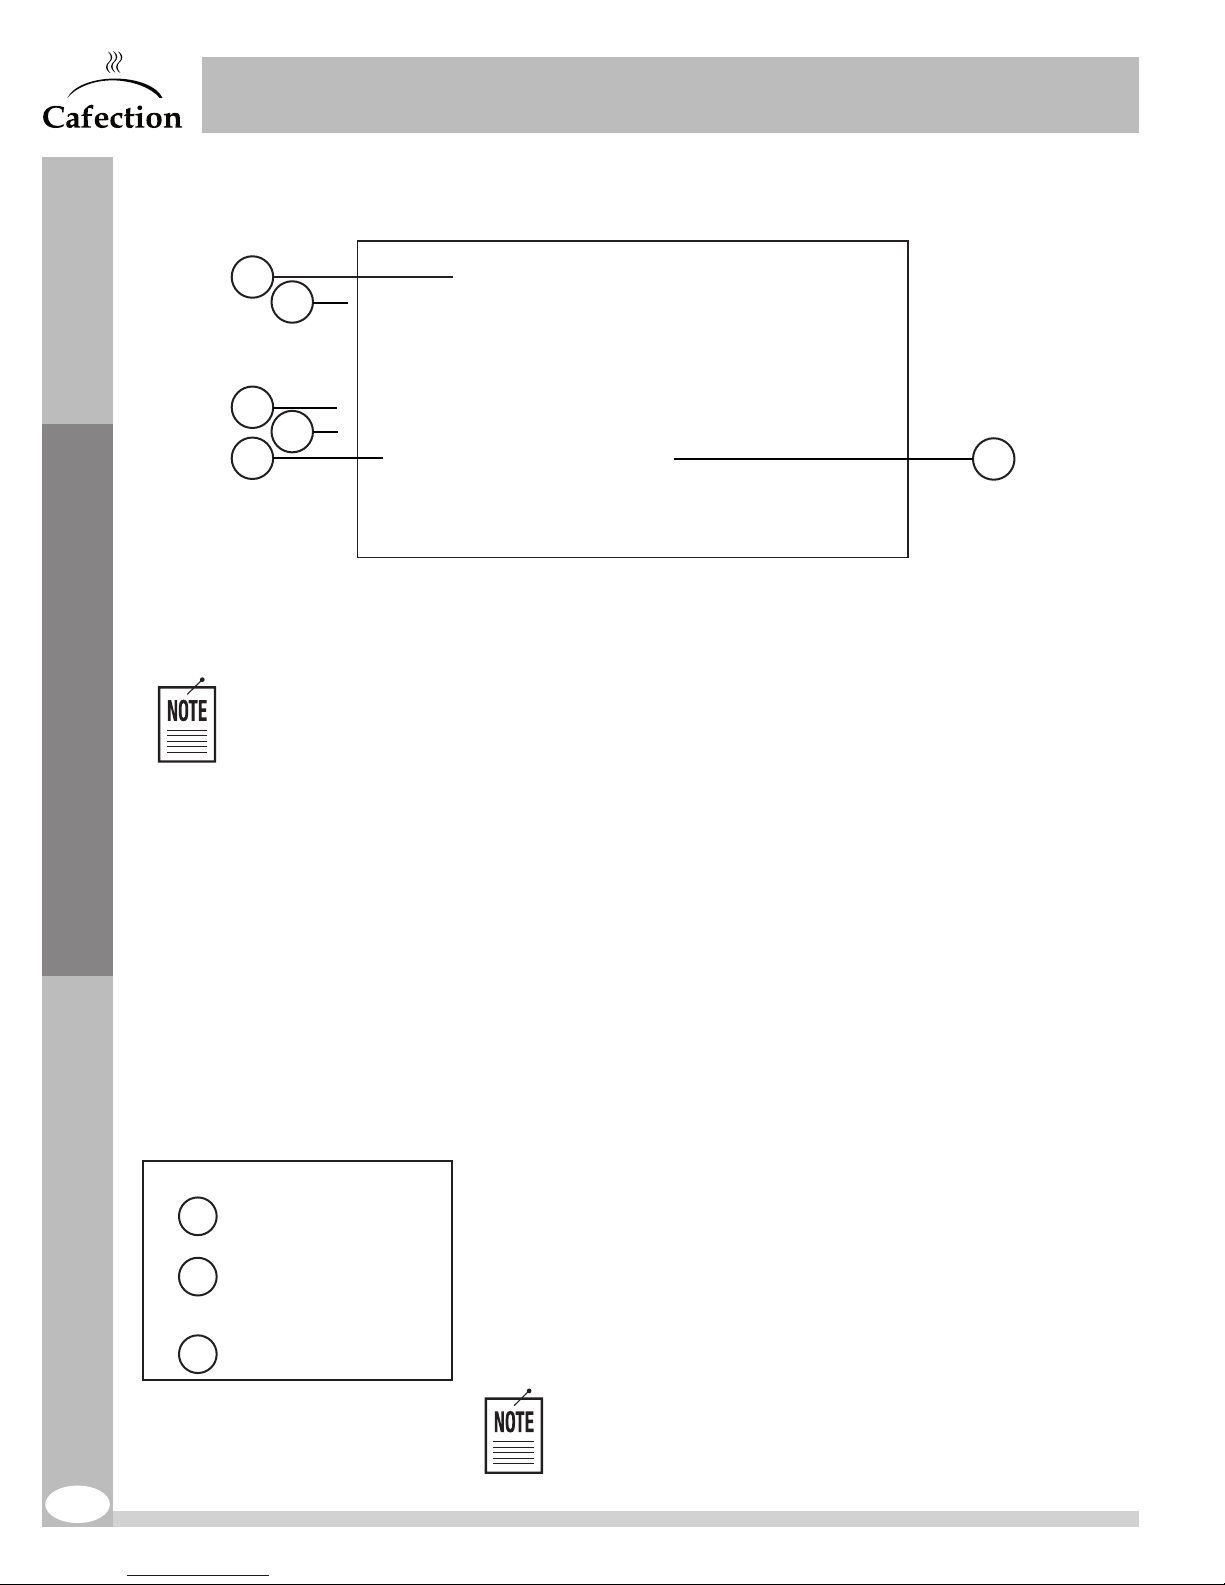
6.5.3 Liquids & Ingr. (Ingredients) Sub Tab
1
2
3
4
5
www.cafection.com 800-561-6162
6
Service Mode
A
B
C
All values used for the recipes are time values. The water quantity values represent
the amount of time the dispensing water valve is opened. The coffee or soluble
quantity values represent the amount of time the motor is running.
20 units = 1 second.
The right section of the numeric keypad indicates an estimated
conversion of the value in units to a milliliter (ml) and to a US ounce
fluid (oz) for liquids, or in grams (g) for the ingredients.
1. This line indicates which recipe is being modified.
2. This table is used to set the quantity of coffee required to brew
the recipe, if applicable.
3. This table is used to set the quantity of water required to brew the recipe.
4. This table displays the recipe’s brew cycle. It is automatically selected by the software.
5. These buttons are used to get samples of each size of the recipe.
6. This button is used to save any changes to the current recipe. Any unsaved changes will be lost.
"
Get a Sample" Interface
A
These buttons are used to get a sample of all the dry ingredients of the tested
recipe, in the desired strength.
In order to weigh the ingredients, make sure to place a container under
ALL product dispensers used for the tested recipe.
B
This button is used to get a sample of the recipe without the ingredients.
Make sure to place a recipient large enough under the dispensing nozzle.
C
These buttons are used to get a sample of the entire recipe, in the desired
strength.
36
Samples are not registered in the sales counters.
ENCORE 29 Rev. 3 09-2017
Page 37
SERVICE & INSTALLATION MANUAL - Encore 29
www.cafection.com 800-561-6162
6.5.4 Brew Cycles & Fast Settings Sub Tab
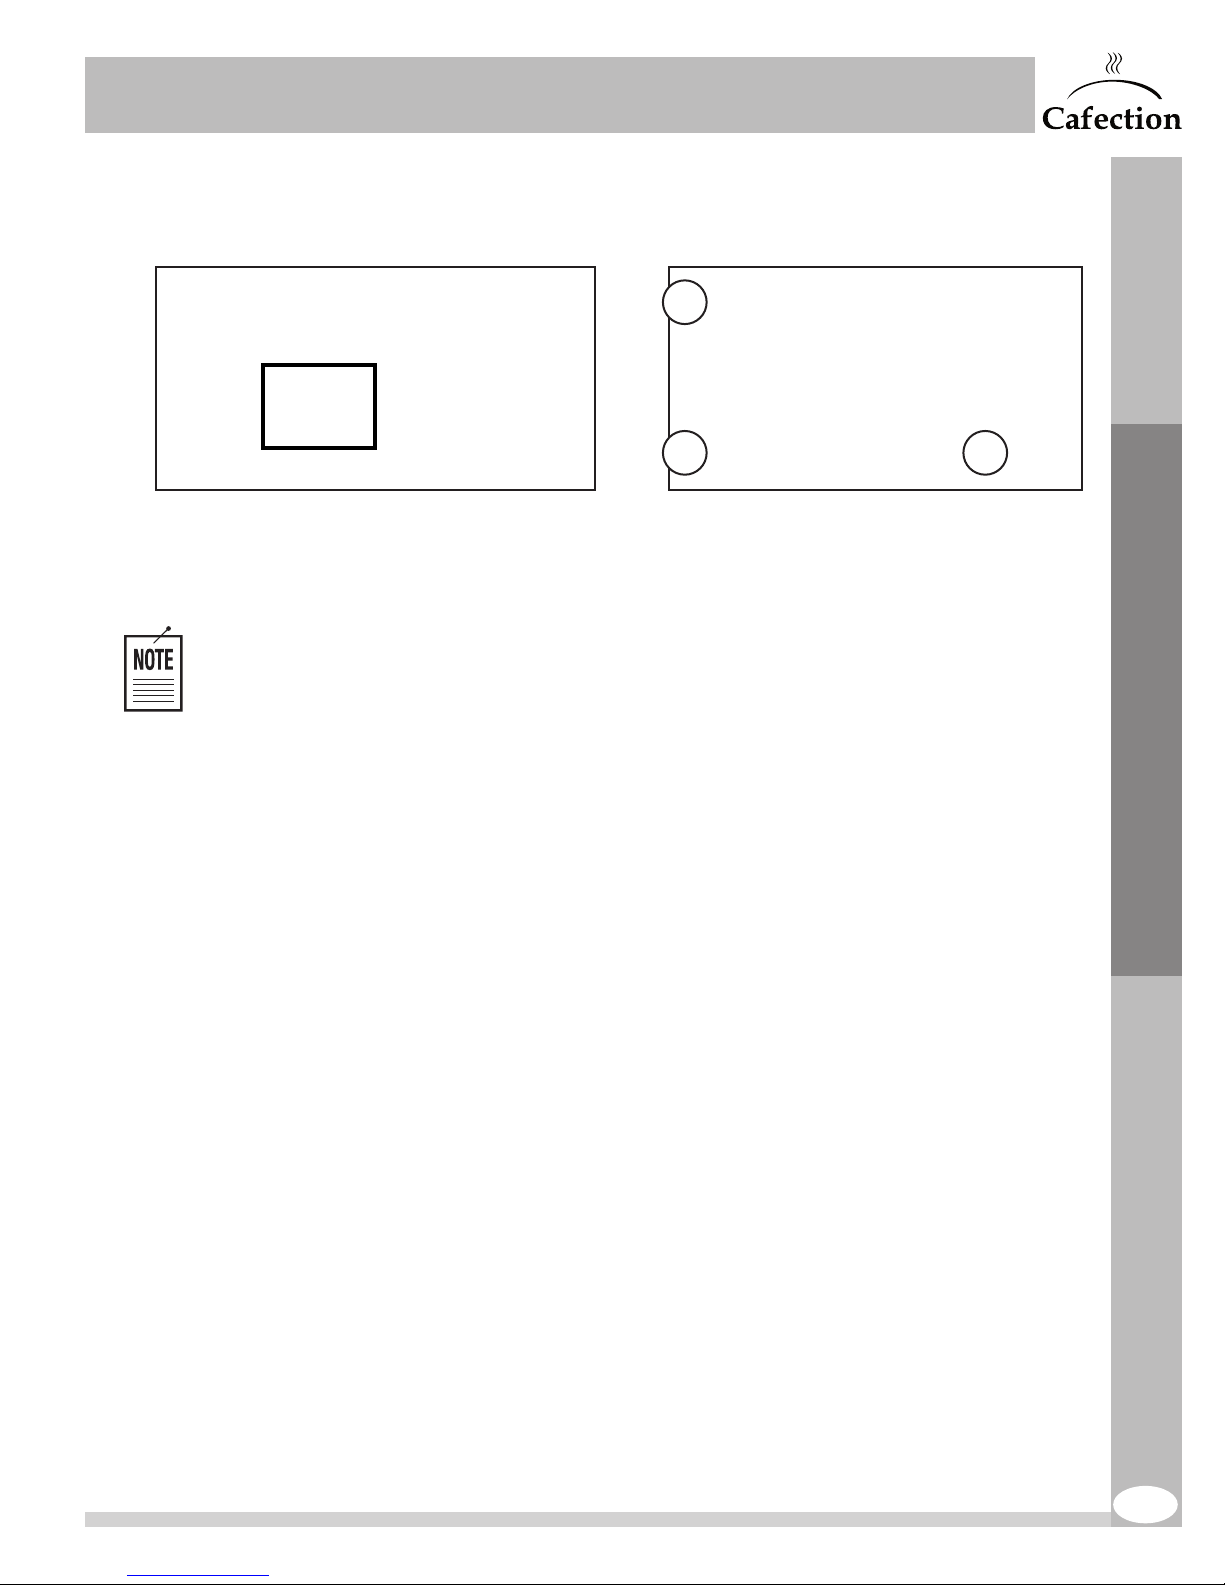
Brew Cycle Settings Interface
1
3
1. This table is used to set the brew cycles and extra grind time. Press on the quantity to
modify it and enter the desired number of units using the numeric keyboard.
2. This button is used to bring all brew cycles values back to factory settings.
3. This button is used to exit the brew cycles settings.
To save any parameters changes, press on the "Exit" button and accept
modifications.
The Encore 29 has four (4) different brew cycles. The brew cycle is automatically selected
in accordance with the coffee and water quantities in the coffee-based recipe.
Cycle #1 (101 to 187 water units)
Standard brew cycle.
Cycle #2 (188 to 269 water units)
Three (3) stirring cycles when the total quantity of water is dispensed in three (3) shots. The
mix is stirred three (3) times, ensuring that the coffee completely comes into contact with
water. Ideal for recipes with high water and coffee volumes.
Cycle #3 (270 water units and more)
Double brew cycle. The machine splits the water and ingredients quantities in half to
perform two (2) separate brew cycles.
2
Service Mode
Cycle #4 (100 water units or less)
Quick brew cycle. Ideal for recipes with low water level.
Extra Grind Time
The grind time is automatically calculated in accordance with the quantity of coffee grounds
set in the recipe. Older grinders might not grind all the beans. Therefore, extra grind time
may be added using these fields. 20 units = 1 second. Default setting: 0.
Pause1
First contact time between water and coffee grounds. To get more extraction, increase this
value. 20 units = 1 second.
Pause2
Second contact time between water and coffee grounds. To get more extraction, increase
this value. 20 units = 1 second.
ENCORE 29 Rev. 3 09-2017
37
Page 38
SERVICE & INSTALLATION MANUAL - Encore 29
www.cafection.com 800-561-6162
Move 3
Position where the piston stops before dispensing the coffee into the cup.
A setting too high will prematurely open the brew chamber, causing a mess of wet
coffee grounds inside the machine.
A setting too low will not pull all coffee through the filter.
This setting must be changed with care.
Pause3
Pause time before the brew chamber opens. If there are wet coffee grounds on the filter paper
at the end of the cycle, increasing this setting might solve the issue. 20 units = 1 second.
Pause4
Brew group drain time. This setting must be high enough to empty the brew group at the
end of the cycle. 20 units = 1 second.
This interface is used to set all coffee drinks’ brew cycles. There is no individual
setting table per recipe.
Service Mode
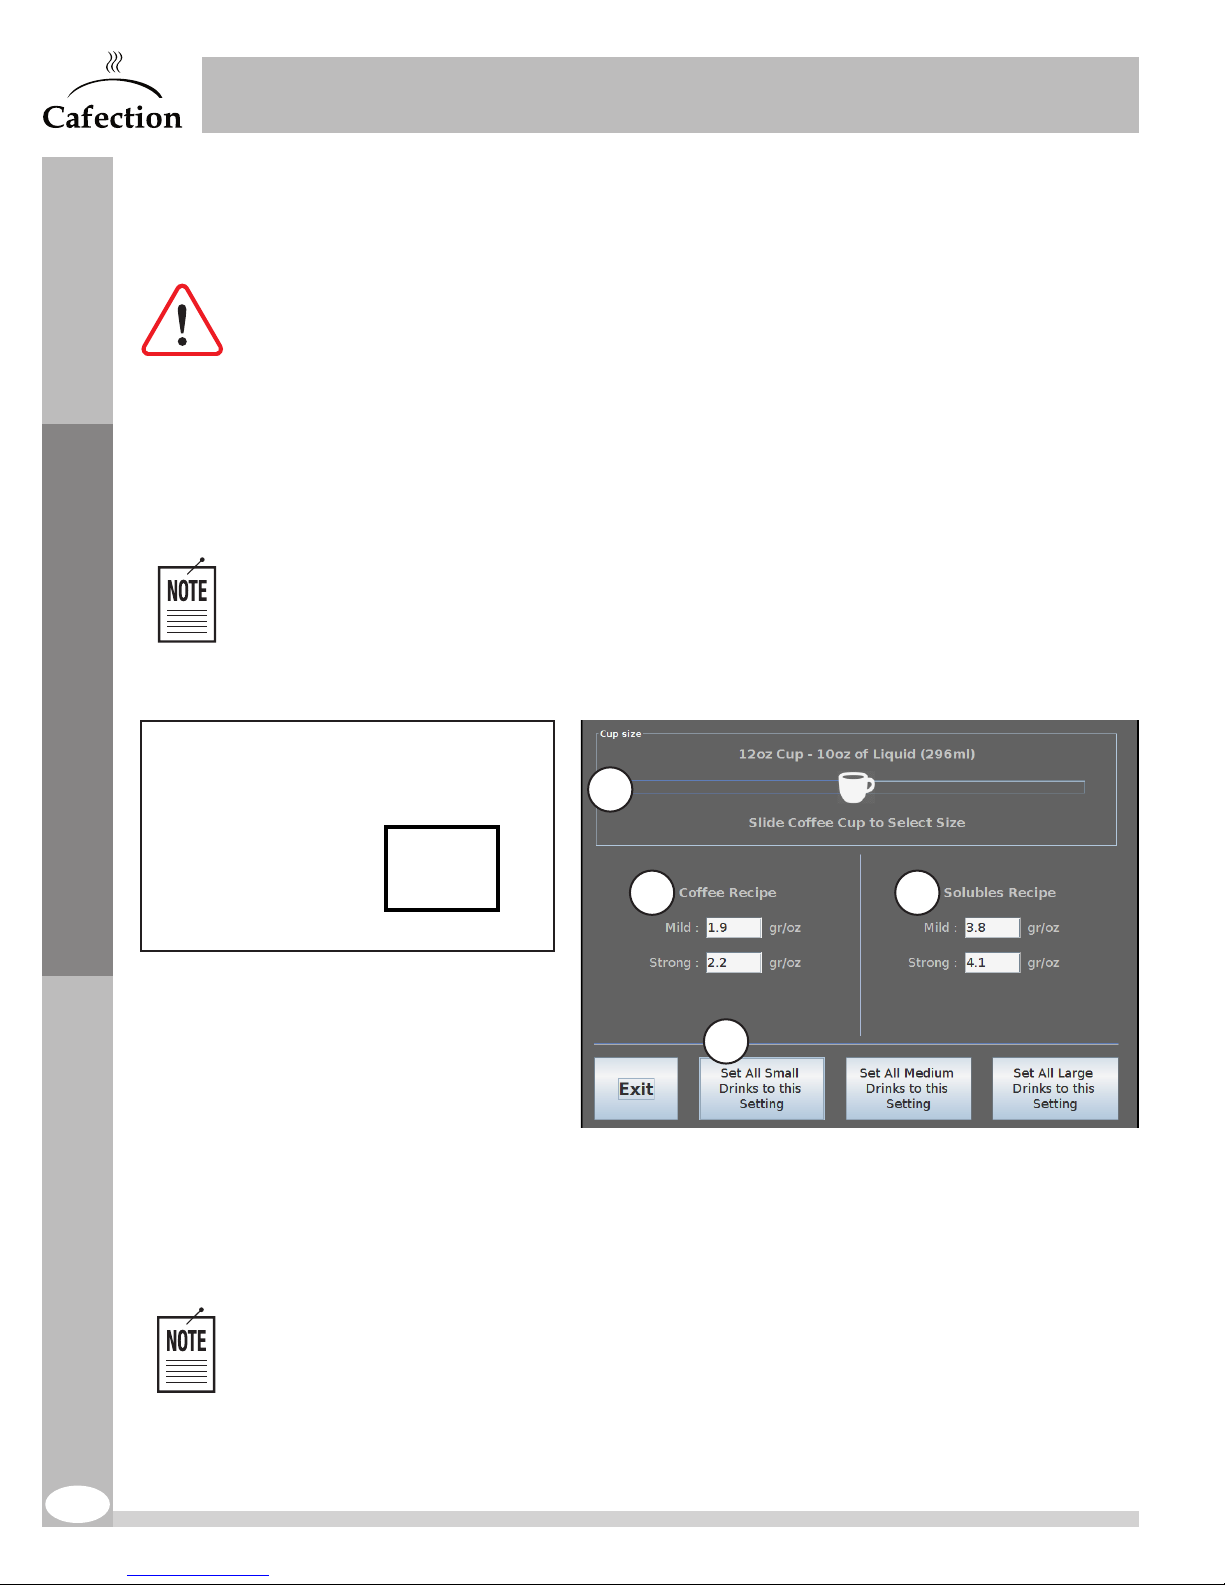
Automated Fast Settings of All Drinks Interface
1
2 3
1. This section is used to select
desired cup size. Slide the coffee
cup icon from 7oz to 20oz.
2. This table is used to set the
quantity of coffee (in grams) per
fluid ounce (oz).
3. This table is used to set the quantity of soluble powder (in grams) per fluid ounce.
4. These buttons are used to assign the settings to a cup size (small, medium and large). All drinks
will automatically be set under the Liquids & Ingr. sub tab.
4
The fast settings function does not affect the Iced Coffee, Long Espresso, Energy
Shot, HotShotBlend, Café Latte and Cappuccino drinks recipes, which can only be
edited manually.
38
ENCORE 29 Rev. 3 09-2017
Page 39
SERVICE & INSTALLATION MANUAL - Encore 29
www.cafection.com 800-561-6162
6.6 System Tab
To access the screen below, tap in order on the top left, bottom left and bottom right corners of
the screen (see section6) and select the System tab.
6.6.1 System1 Sub Tab
1
2
3
10
4
5
6
11
7
8
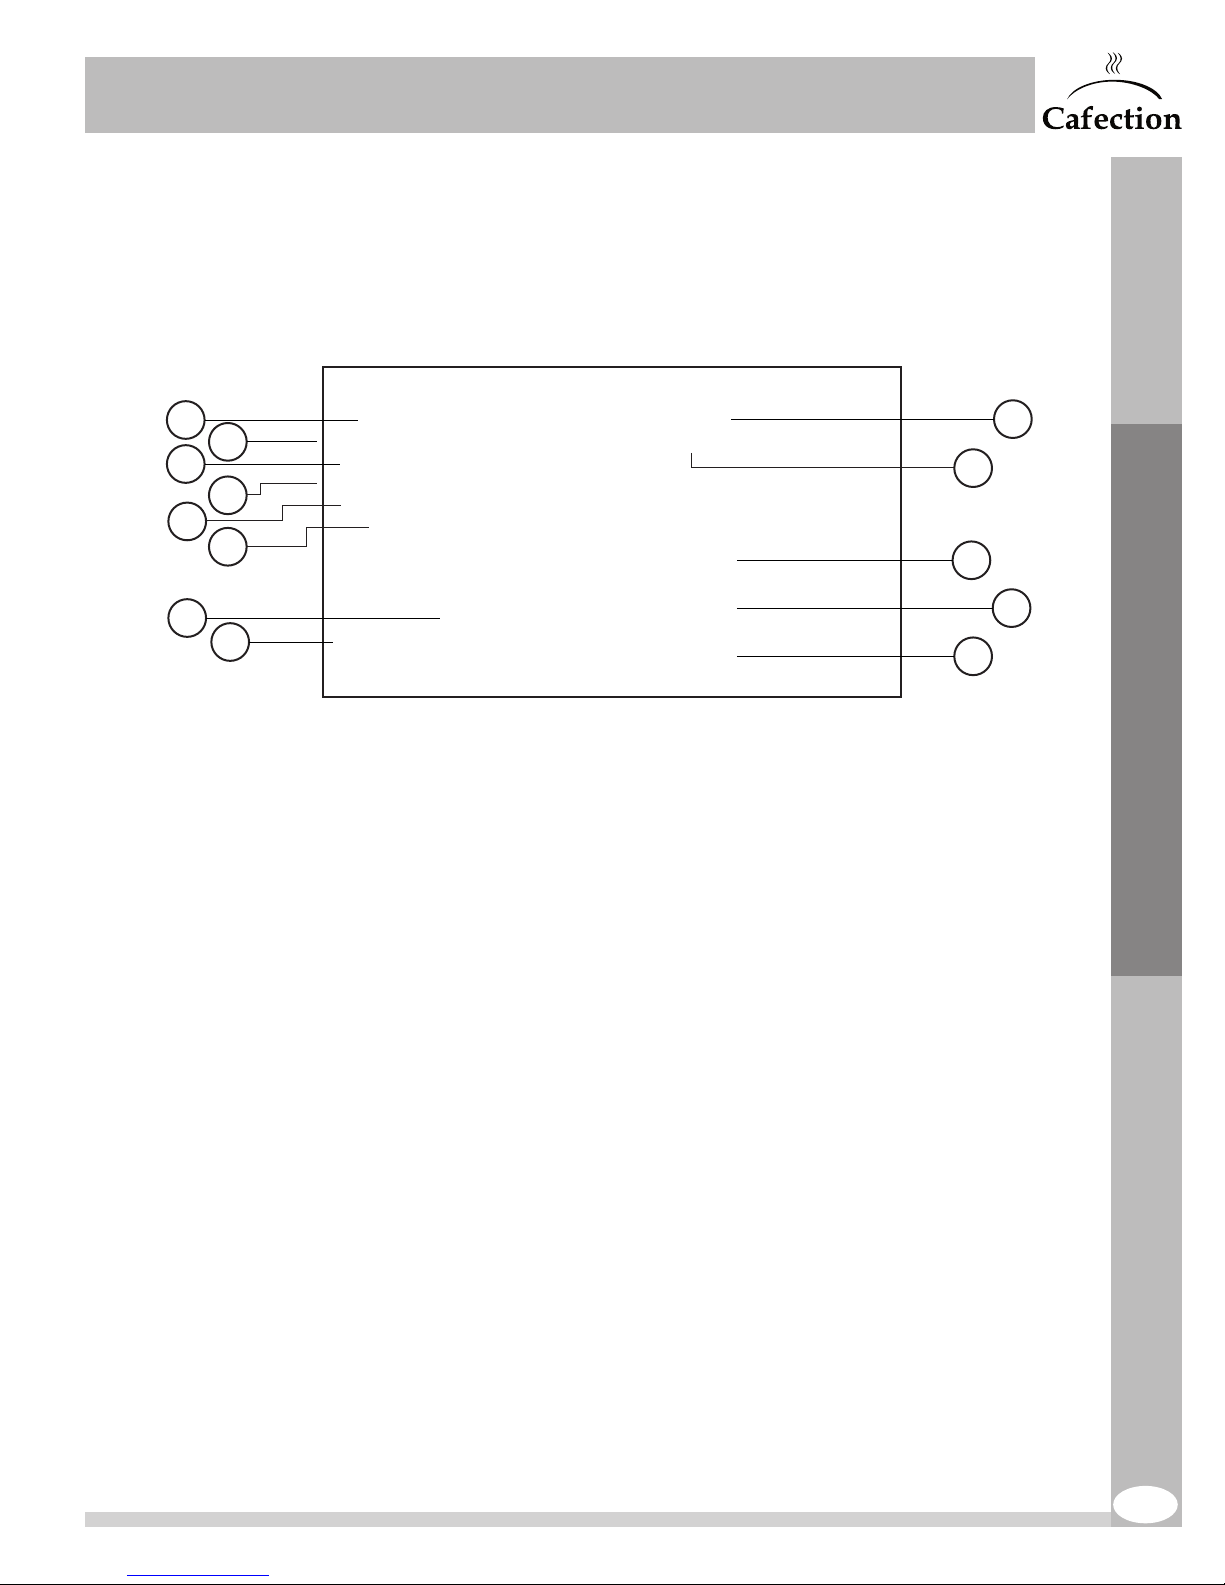
1. This drop-down menu is used to set the language of the system. If the language is changed,
the recipes’ names will be reset to default values.
2. This checkbox is used to allow any user to switch language directly from the selection screen.
3. This field is used to set the quantity of coffee drinks to brew before showing the "Waste Bin
Full" alert. To disable this alert, set the value to zero (0).
4. This field is used to set the water temperature in the tank, in Fahrenheit. Minimum setting is
150°F, maximum setting is 200°F and default setting is 200°F.
5. This field is used to set the minimum temperature of the water in the tank, in Fahrenheit. If the
water temperature drops below this setting, the coffee brewer will display an error message
until the temperature rises above this minimum. To disable this feature, set the value to zero (0).
6. This checkbox is used to enable or disable the milk option on selection screen for all drinks (if
applicable). Uncheck the box to remove the milk option on selection screen.
7. This drop-down menu is used to set the color theme of the user interface. The drip tray LED
light color will change accordingly.
8. This field is used to add fan running time (in seconds) after brew cycle. It may be useful in a
high humidity environment to avoid steam in the front window. To disable this feature, set the
value to zero (0).
9. This field is used to set the quantity of drinks to be ordered before a customer gets one for
free. To disable this function, set the value to zero (0). It is not recommended to use this feature
if the machine is equipped with an optional printer.
10. This field is used to set the quantity of drinks to be ordered before showing the "Rinse
Required Soon" alert. To disable this alert, set the value to zero (0).
11. This button is used to reset the System1 and System2 tabs back to factory settings. This
action does not affect the recipes.
12. This button resets all recipes back to factory settings (Information and Liquids & Ingr. sub tabs).
13. This button is used to save all parameters changes. Any unsaved changes will be lost.
13
9
Service Mode
12
ENCORE 29 Rev. 3 09-2017
39
Page 40
6.6.2 System2 Sub Tab
SERVICE & INSTALLATION MANUAL - Encore 29
www.cafection.com 800-561-6162
Service Mode
1
2
3
4
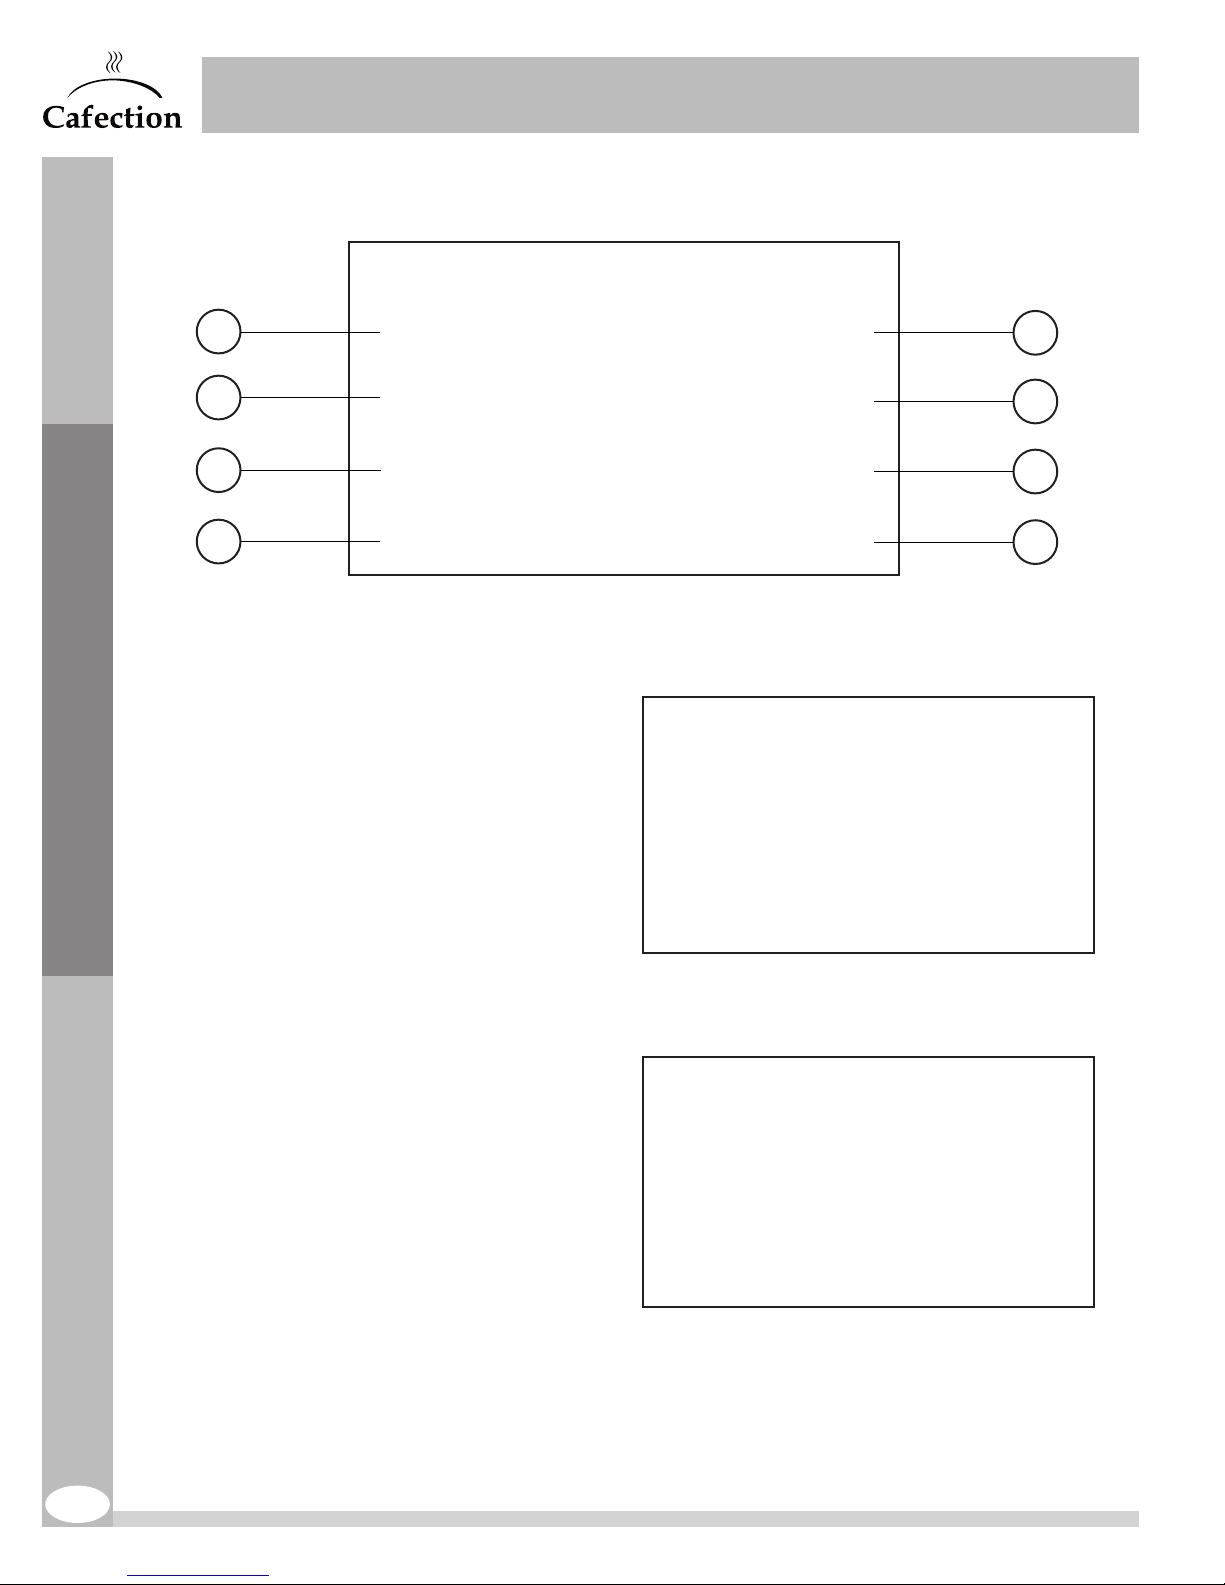
1. This button gives access to the Maintenance interface.
This interface displays the
maintenance counters
in which each use of a
component is recorded.
The components
requiring maintenance are
highlighted in red. To reset a
component’s counter, press
on the "Reset" button. For
more help, press the (?) icon.
5
6
7
8
2. This button gives access
to the valves self-cleaning
interface.
This checkbox allows the
user to enable or disable the
valves self-cleaning feature
during rinse cycles (enabled
by default).
40
ENCORE 29 Rev. 3 09-2017
Page 41
SERVICE & INSTALLATION MANUAL - Encore 29
www.cafection.com 800-561-6162
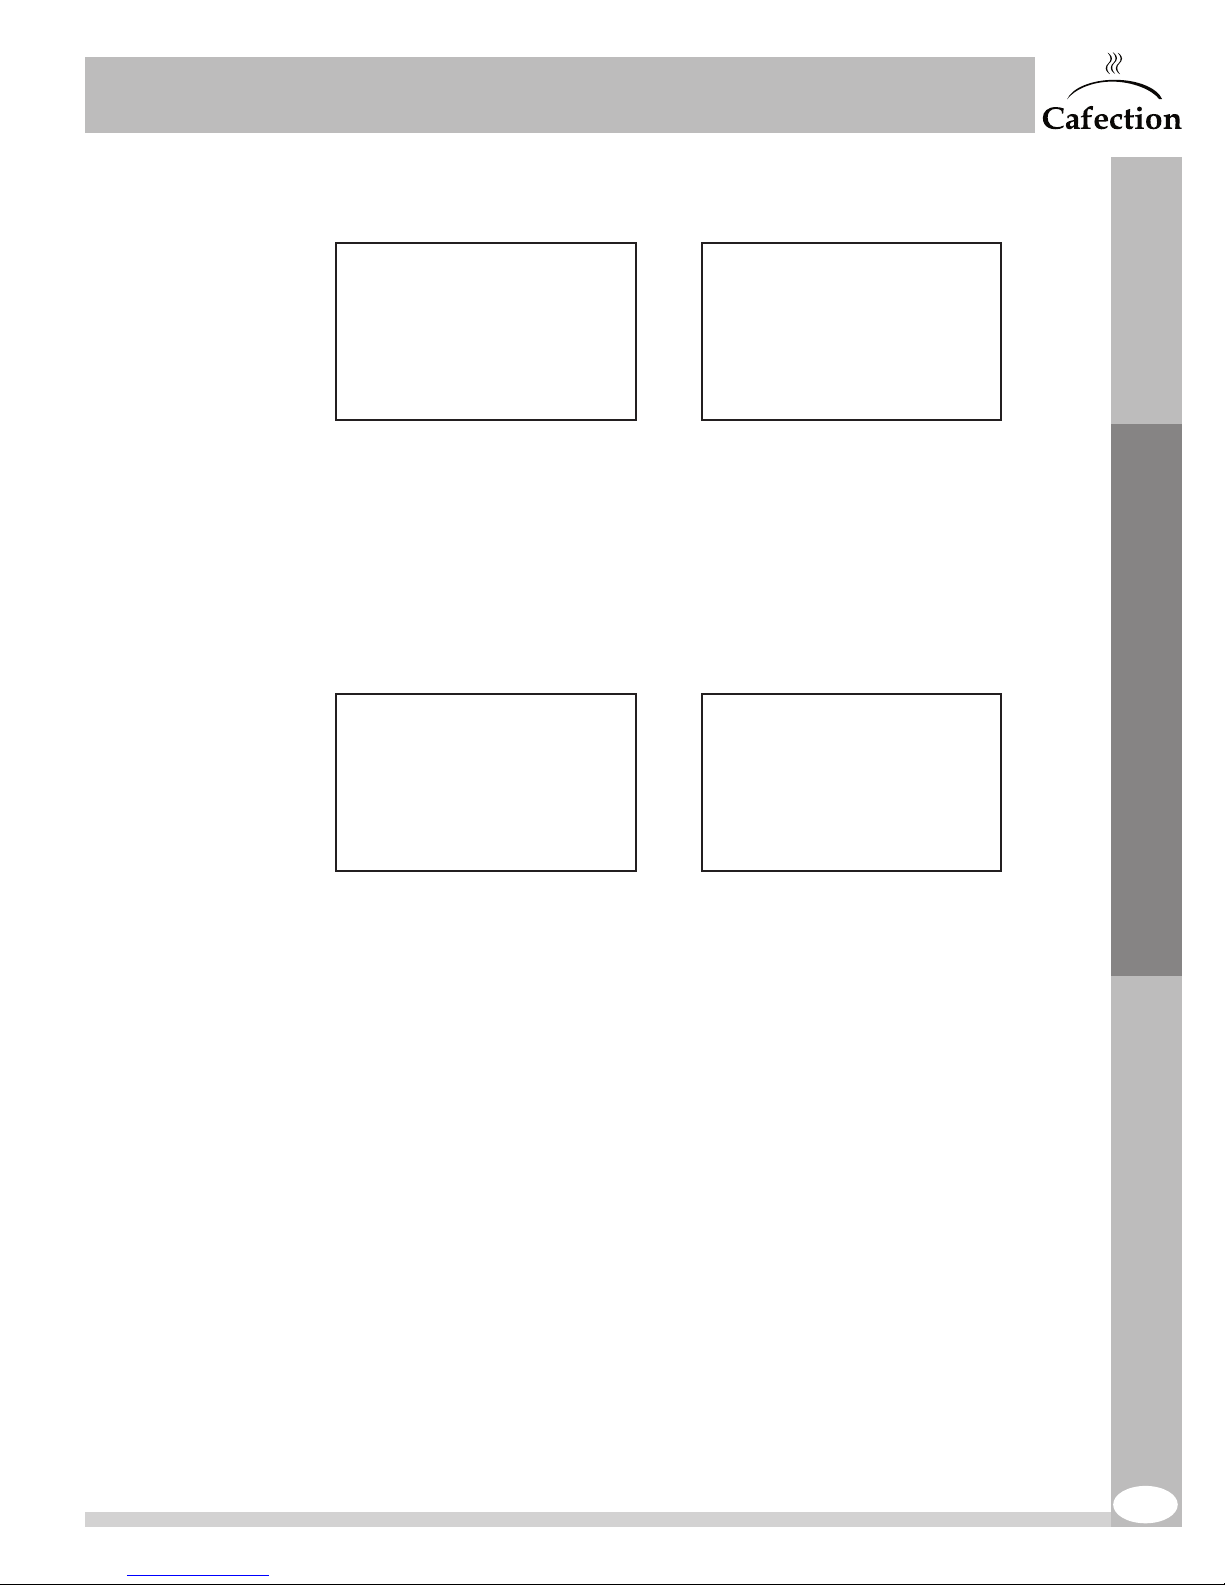
3. This button gives access to the Energy Saving Schedule interface.
This interface is used to plan sleep periods, reducing the brewer’s electricity
consumption. By pressing the (+) and (-) buttons, the user can set the time frames
during which the brewer will be sleeping. While in Energy Saving mode, the water
temperature of the tank is maintained at approximately 140°F. To order a drink while
Energy Saving mode is active, press anywhere on the screen. This wakes up the
brewer for one(1)hour. The water tank takes 4 to 10 minutes to heat up to the right
temperature. For more help, press the (?)icon.
4. This button gives access to the Free Vend Schedule interface.
Service Mode
5. This button creates a backup file on the coffee brewer. The following data are saved
6. This button restores the latest backup file created on the coffee brewer. All the data
7. This button creates an online backup file (the machine needs to be connected to a
8. This button restores the latest online backup file (the machine needs to be connected
ENCORE 29 Rev. 3 09-2017
This interface is used to plan Free Vend periods. By pressing the (+) and (-) buttons,
the user can set the time frames during which the drinks will be free. For more help,
press the (?) icon.
in the backup: values of each recipe, configurations, brew cycles, Energy Saving
schedules, Free Vend schedules, maintenance data and machine users list.
saved on the date indicated on the button will be restored.
cellular network) on Sophia — Global Management System. The following data are
saved in the backup: values of each recipe, configurations, brew cycles, Energy Saving
schedules, Free Vend schedules, maintenance data and machine users list.
to a cellular network) saved on Sophia — Global Management System. All the data
saved on the date indicated on the button will be restored.
41
Page 42
6.6.3 Tools Sub Tab
SERVICE & INSTALLATION MANUAL - Encore 29
www.cafection.com 800-561-6162
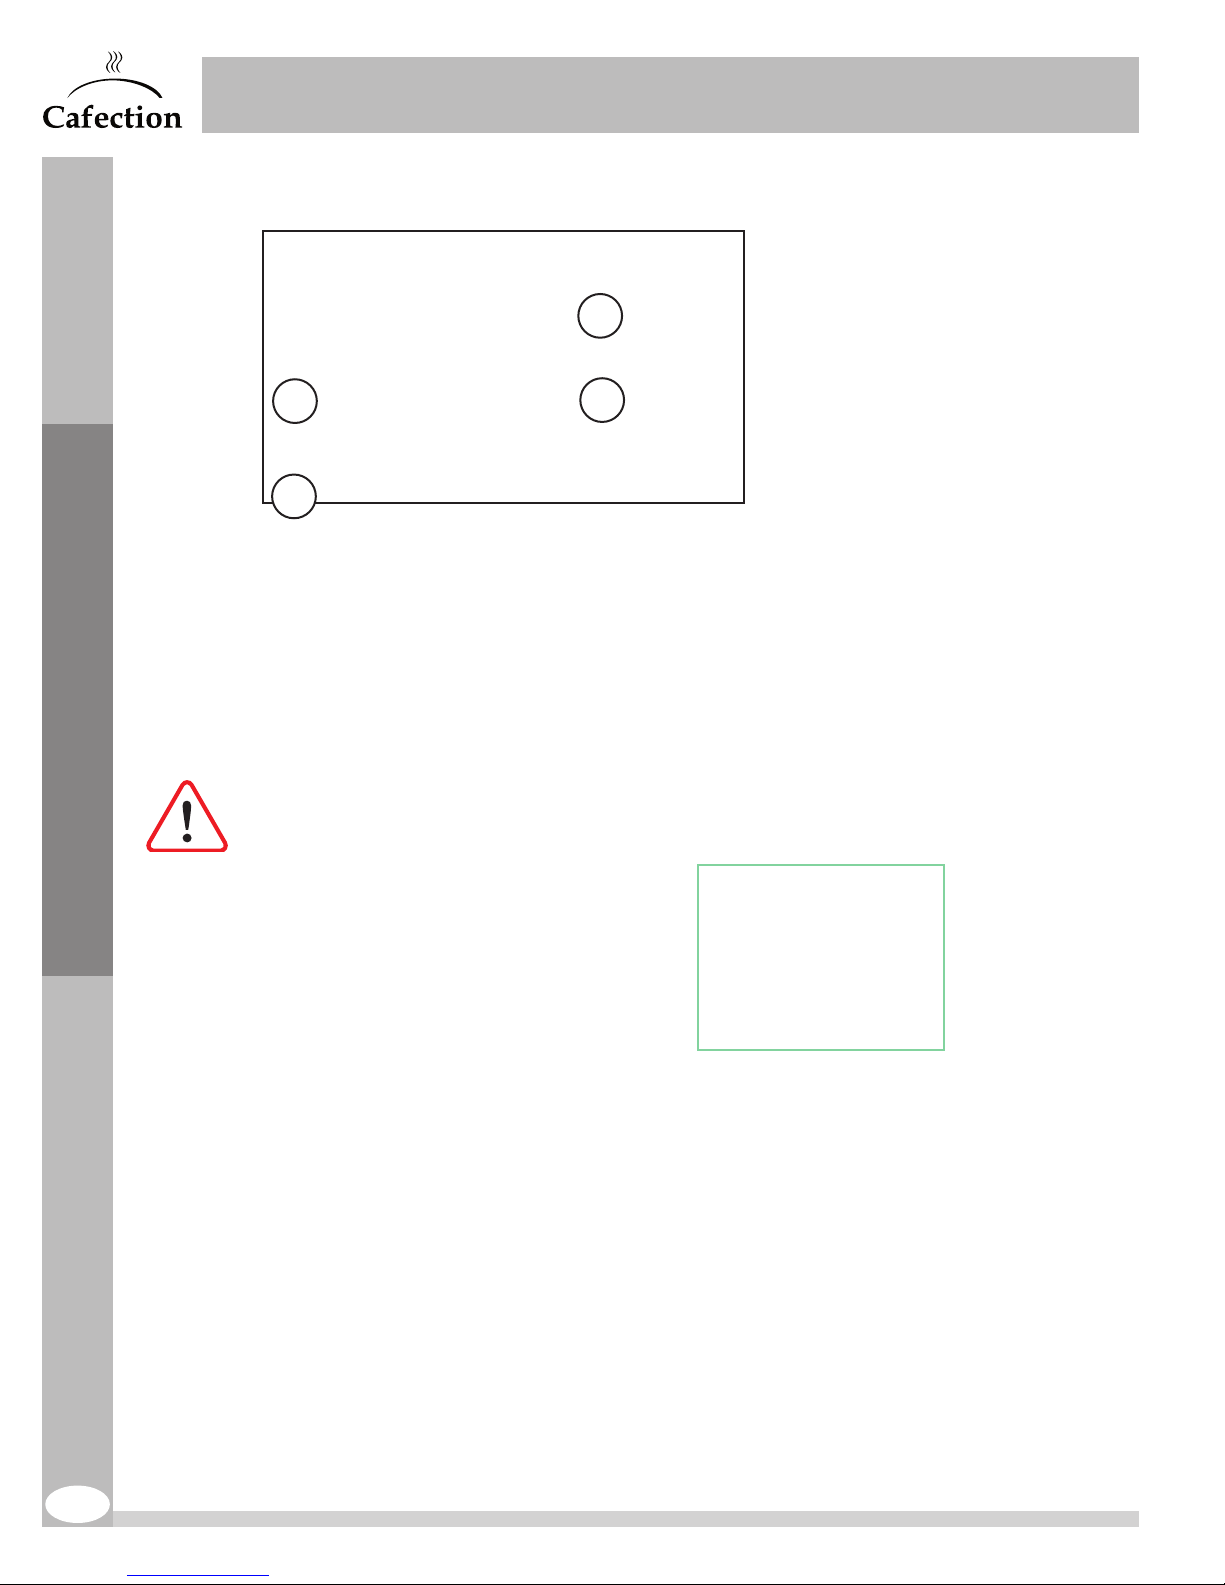
1. This button is used to set the time
and date of the brewer.
Service Mode
1
2
3
It is important to set the time
and date to ensure the proper
functioning of the following:
- Service Log.
- Email Alerts.
- Sophia - Global Management
System.
- Error Log.
4
2. This button is used to enter Manual Control mode and manually test the machine’s
components.
Warning! This mode is intended for advanced technicians. Risk of damages to the
machine or injuries.
3. This button is used for demo presentations. The user can go through drink selection, and
no coffee will be dispensed.
4. This button is used to configure the coffee brewer during the initial setup. It provides
installation tips and requirements.
42
ENCORE 29 Rev. 3 09-2017
Page 43
SERVICE & INSTALLATION MANUAL - Encore 29
www.cafection.com 800-561-6162
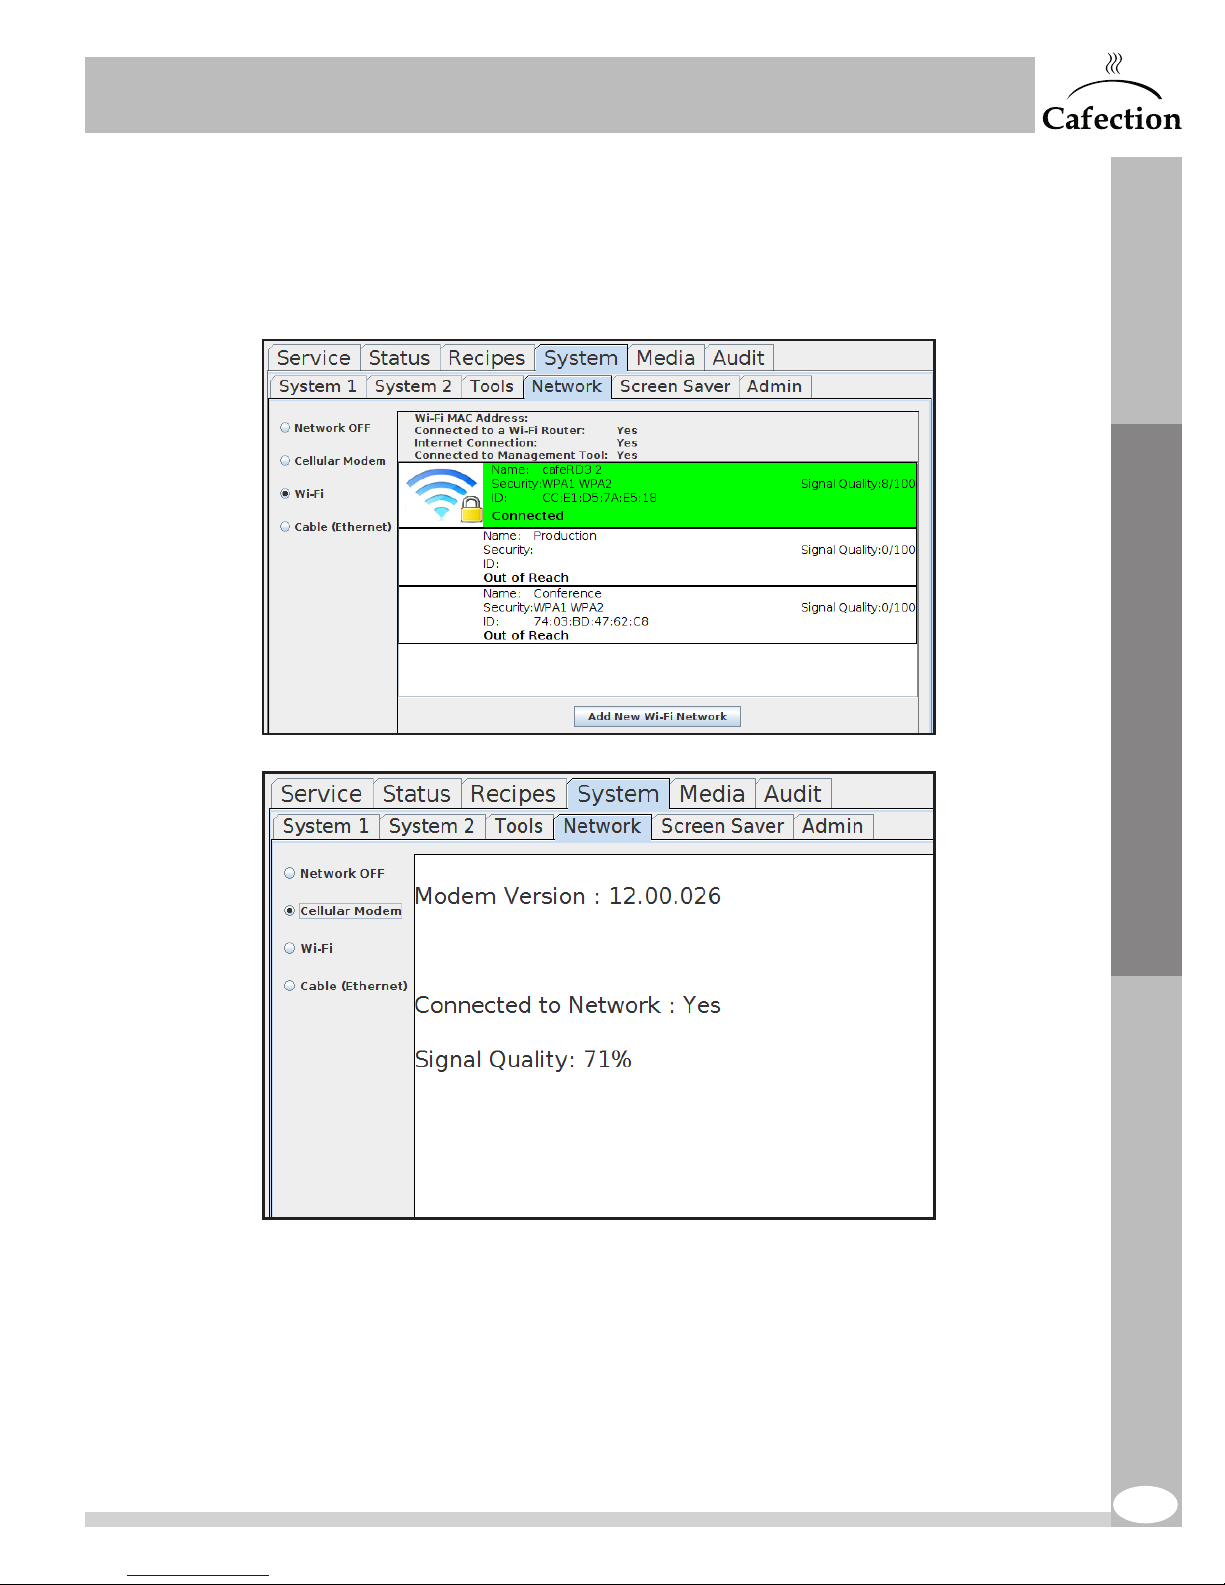
6.6.4 Network Sub Tab
This section is used to connect the brewer to the internet. Use the checkboxes on the left
to select the desired connection.
Service Mode
ENCORE 29 Rev. 3 09-2017
43
Page 44
SERVICE & INSTALLATION MANUAL - Encore 29
www.cafection.com 800-561-6162
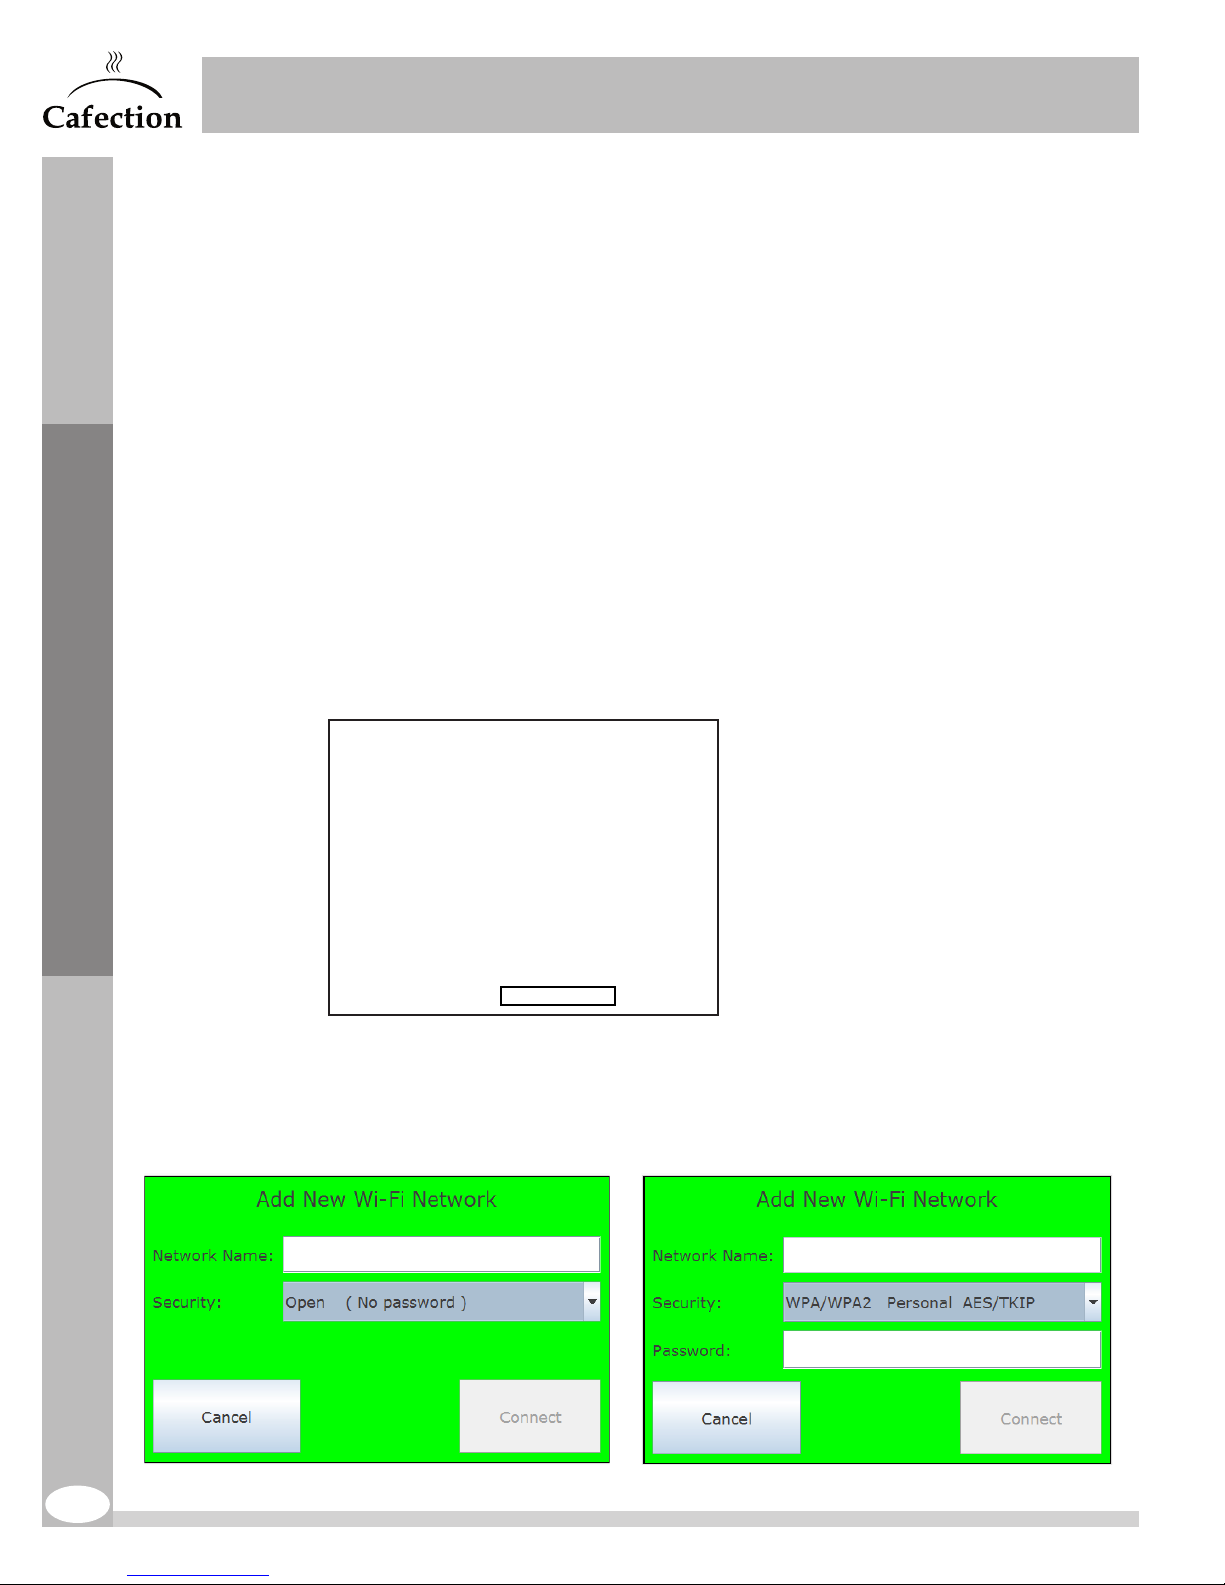
Wi-Fi (Wireless Network)
To connect the brewer to a wireless network (Wi-Fi), check the "Wi-Fi" box and select the
desired network in the list.
The security type of the network should automatically be determined by the brewer. If the
brewer cannot determine the type of security, select it manually. The person in charge of IT
on-site will be able to provide this information.
The coffee brewer is compatible with the following encryption methods:
No encryption (OPEN)
No password required. Press on the "Connect" button. The computer screen will
automatically restart.
WPA1/WPA2 Personal AES/TKIP
Enter the network password. Press on the "Connect" button. The computer screen
will automatically restart.
Service Mode
Add New Wi-Fi Network
If the wireless network is invisible or not showing in the list, press on the "Add New Wi-Fi
Network" button.
The network name (ESSID), its security type and its password (if applicable) are required.
44
ENCORE 29 Rev. 3 09-2017
Page 45
SERVICE & INSTALLATION MANUAL - Encore 29
www.cafection.com 800-561-6162
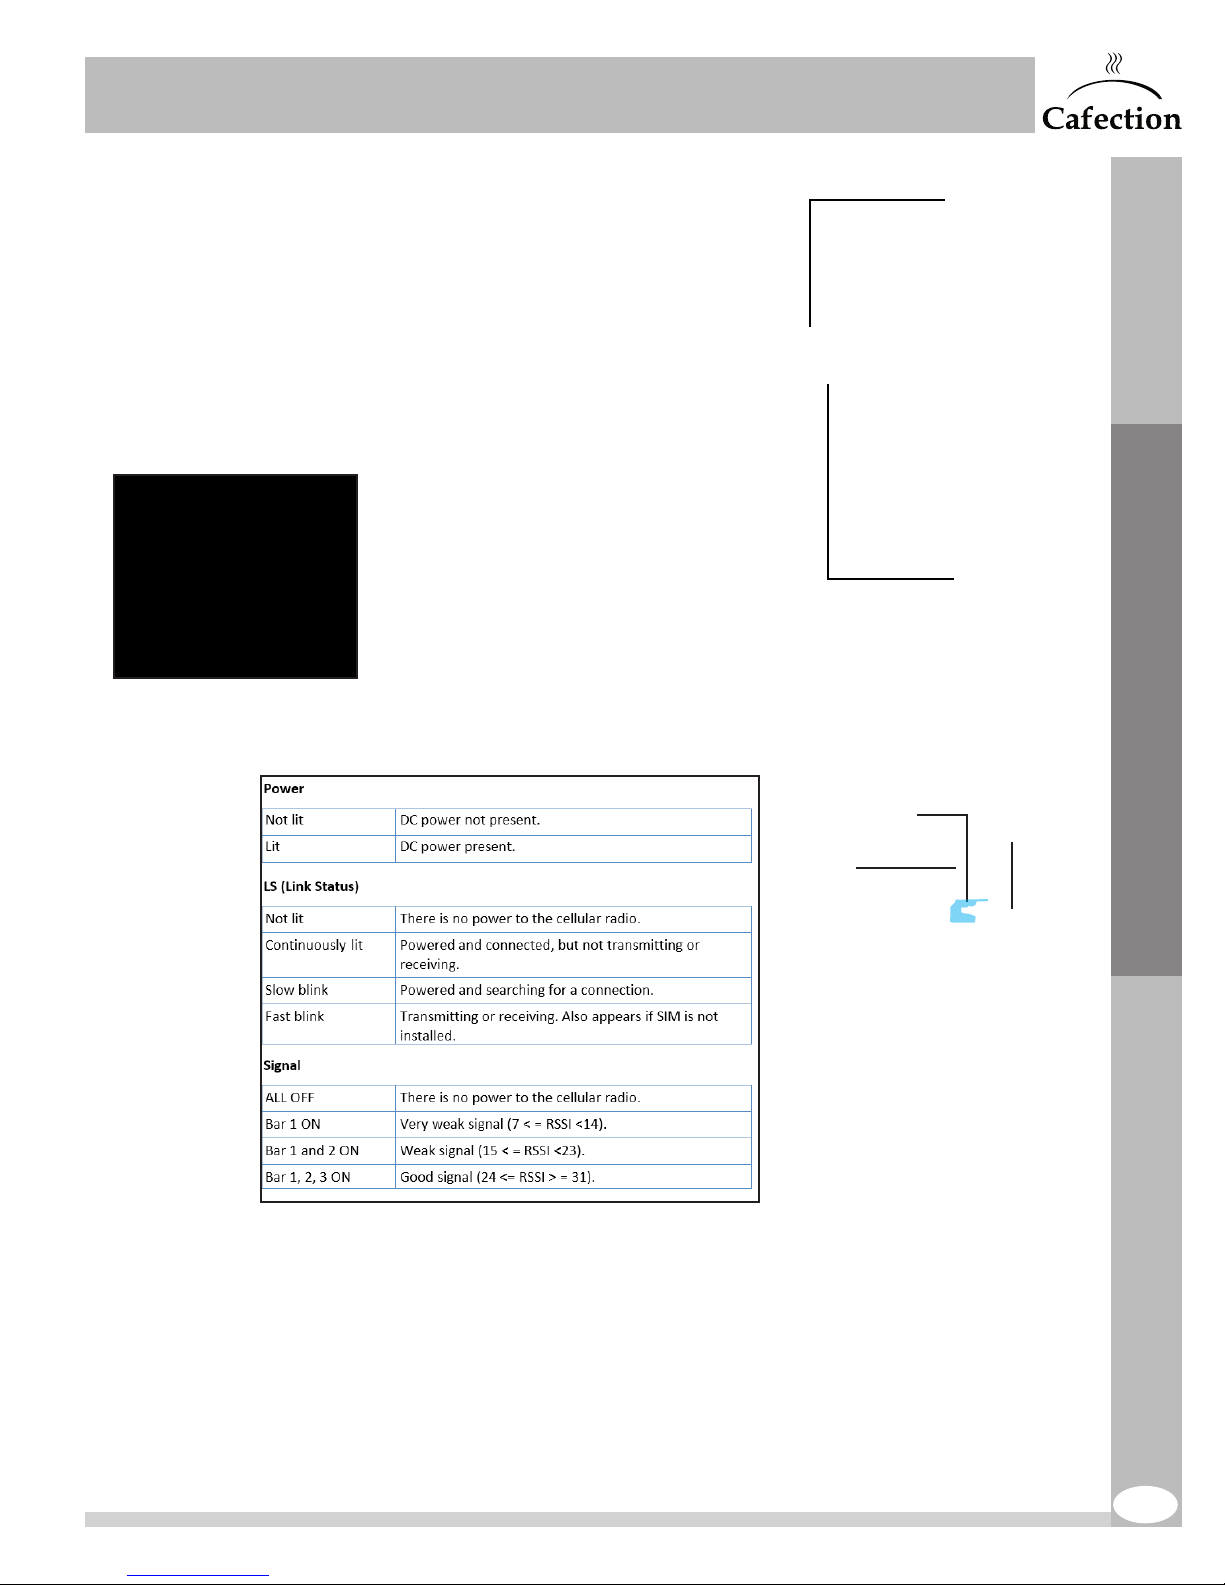
Cellular Modem
Green light
"Link Status" (LS)
The Encore 29 brewer is equipped
with a cellular modem. Therefore, it
can be remotely controlled through
Sophia — Global Management
System. Access Sophia at
www.sophiagms.cafection.com.
Log in and register the unit. If no
account has been created yet, use
the "Create New User" button.
The cellular modem is
located inside the machine,
behind the power supply.
Remove the back panel to
access the cellular modem.
Signal light
The antenna is located at the
back of the machine, on its support.
The following table provides information about each LED light’s signification.
Service Mode
Modem position
Antenna
Power supply
If the "LS" light is off (not lit nor blinking), the modem might not be correctly plugged to the
USB port.
Make sure that at least one of the signal lights is on.
If no signal is detected, move the antenna. If the problem persists, a high-gain antenna
can be ordered at Cafection. For more details, contact Cafection’s Customer Service
department at 800- 561-6162, ext.311, or at [email protected].
ENCORE 29 Rev. 3 09-2017
45
Page 46
SERVICE & INSTALLATION MANUAL - Encore 29
www.cafection.com 800-561-6162
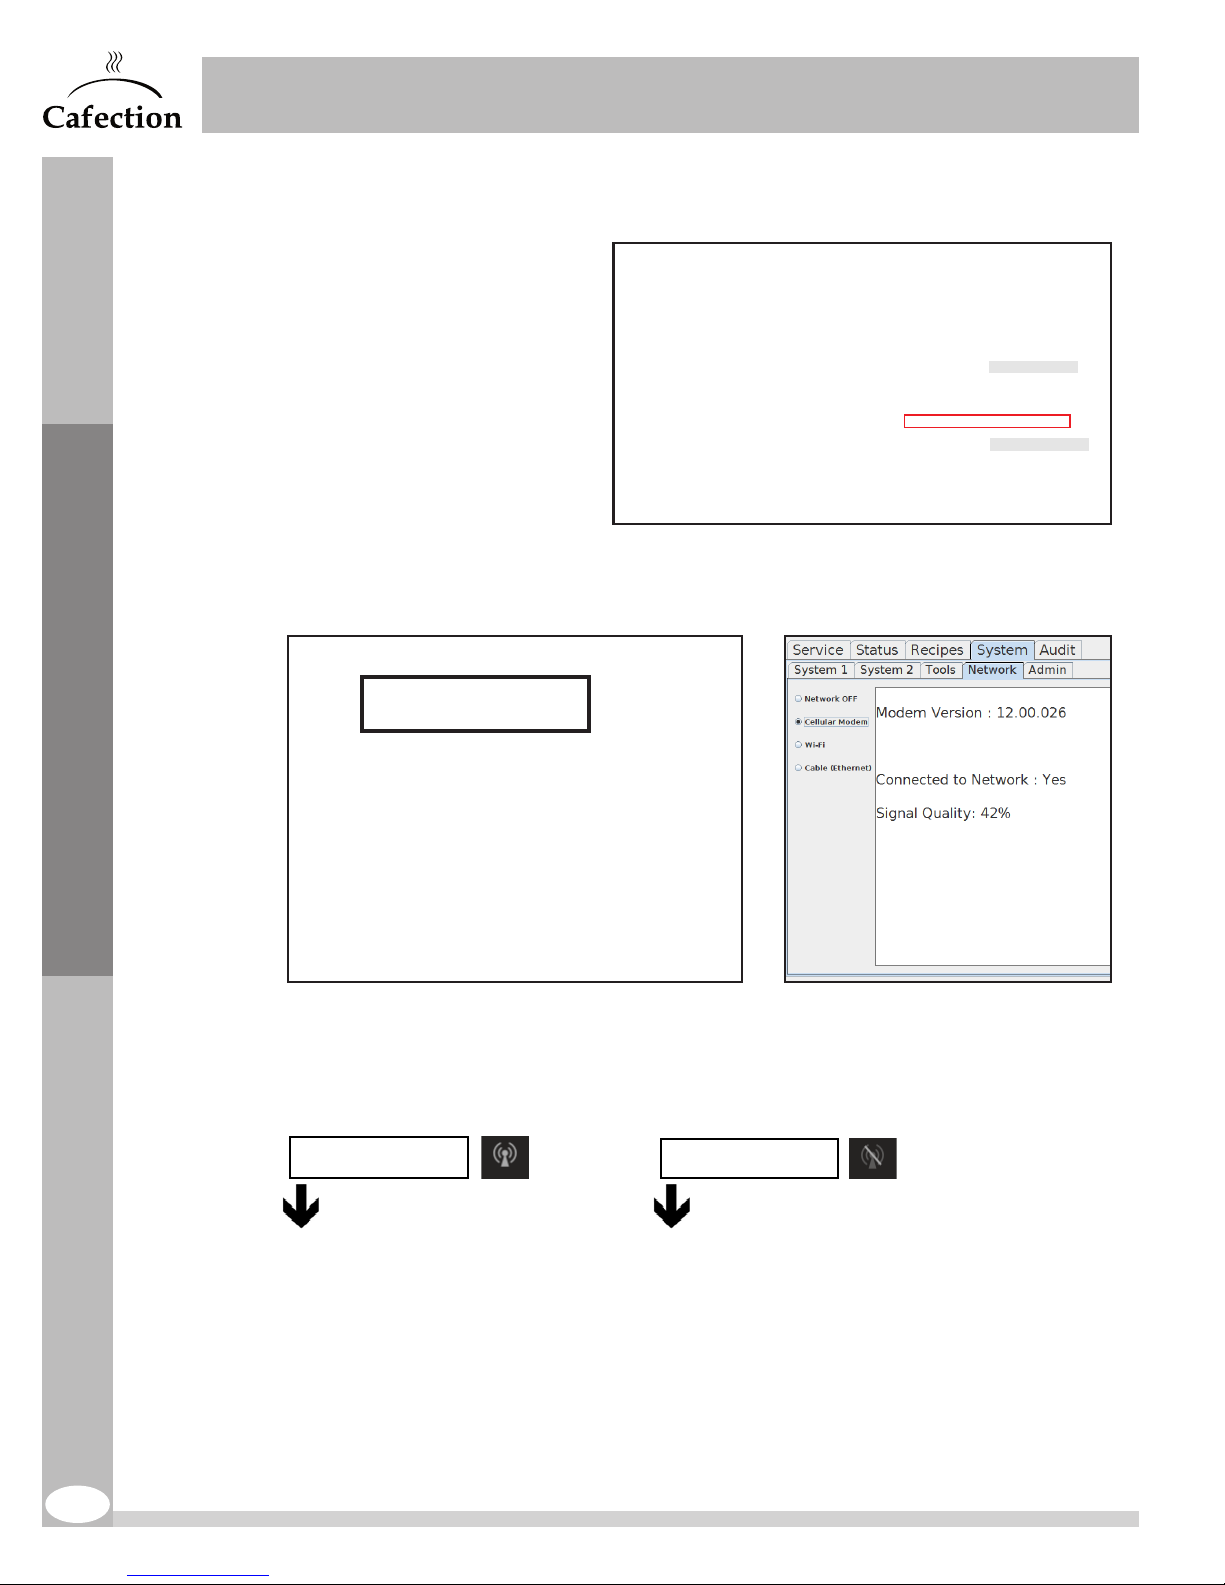
There are three (3) ways to verify if the brewer has successfully been connected.
1. Under the Status tab.
xxxxxx-xxxxxxxxx
Service Mode
The network status indicates
"Cell. Modem link OK"
or "Wi-Fi link OK"
2. In Service mode, under the System tab, in the Network sub tab.
xxxx-xxxx-xxxx-xxxx
3. On the selection screen, the icon of the cellular or wireless network signal is active (top
left corner).
Active, online
46
Inactive, offline
ENCORE 29 Rev. 3 09-2017
Page 47
SERVICE & INSTALLATION MANUAL - Encore 29
www.cafection.com 800-561-6162
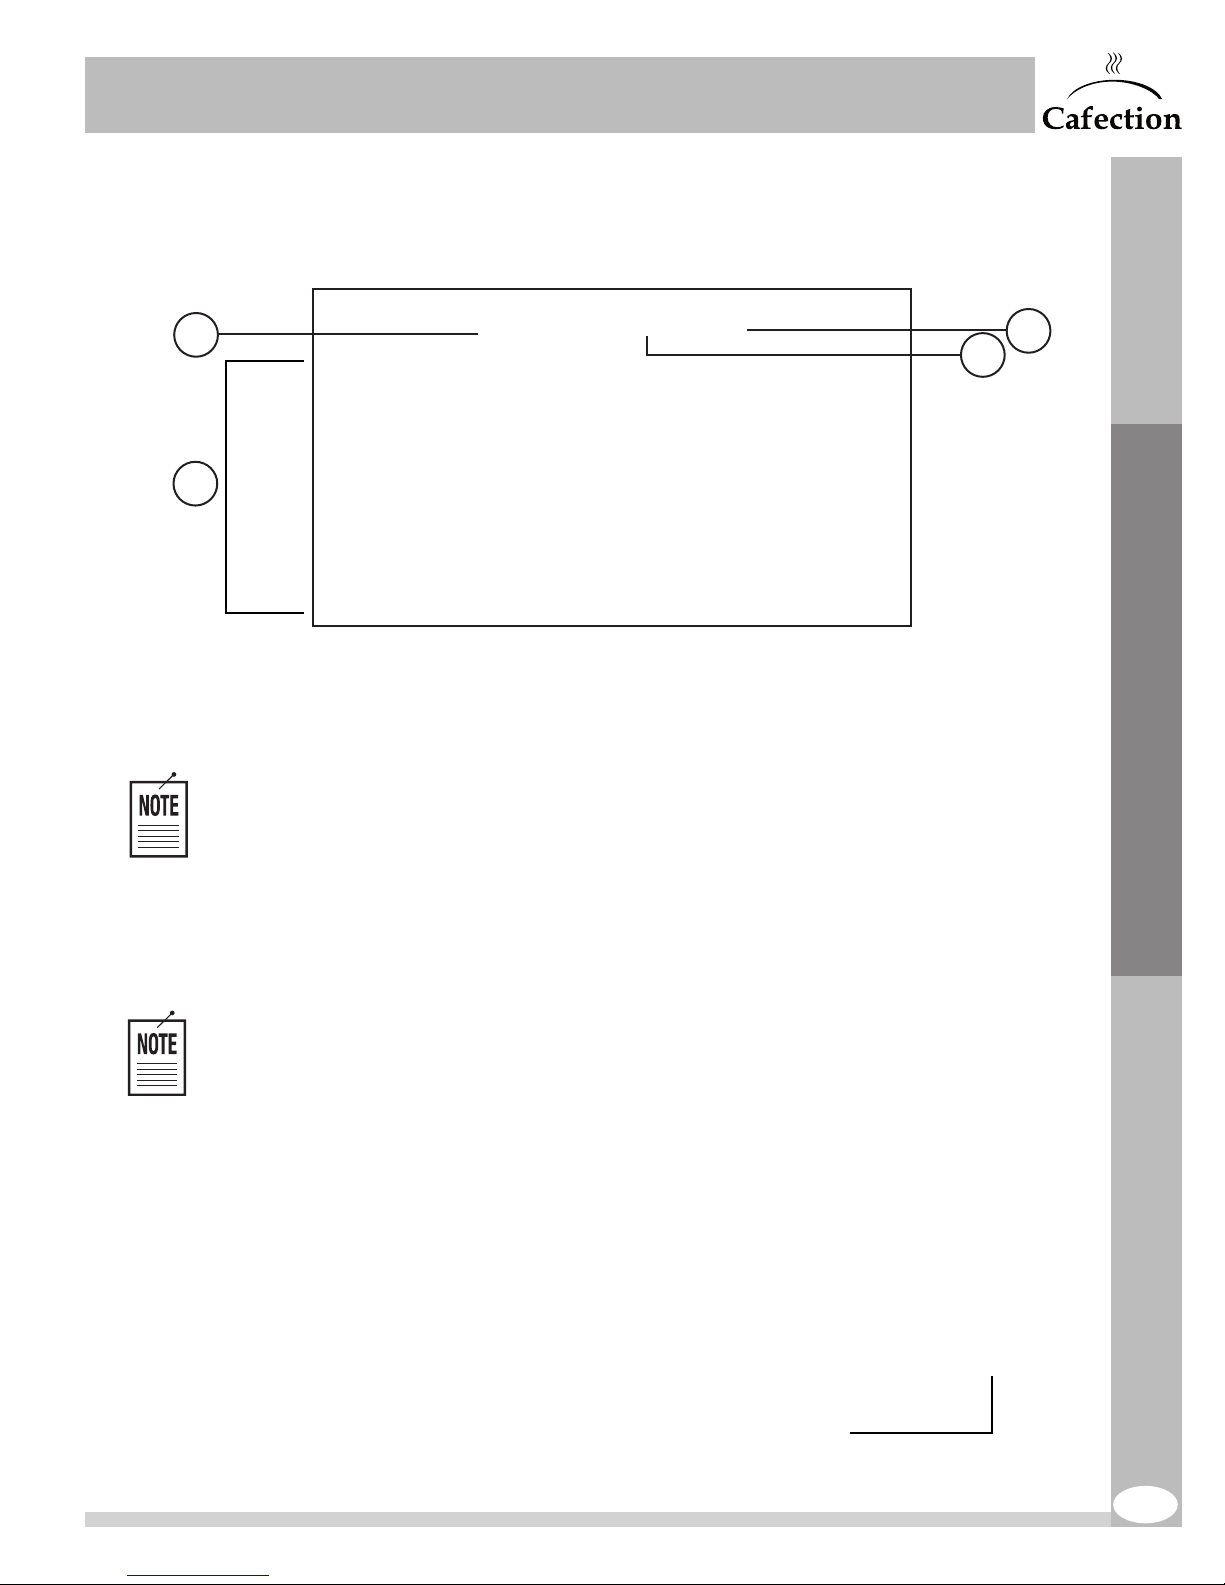
6.6.5 Screen Saver Sub Tab
The Screen Saver feature is used to promote the brewer’s available products when the
machine is not in use. It can be edited in the Screen Saver sub tab.
1
2
1. This checkbox is used to enable or disable the Screen Saver feature.
2. Select the beverage(s) to be displayed while the screen saver is ON. A green
checkmark over a selection means it is selected.
If a blend’s name has been modified in the Customization sub tab (see
section6.5.1), this name will automatically be updated in the Screen Saver sub tab.
3. This field is used to set the period of inactivity (in minutes) required before the Screen
Saver feature is displayed.
4. This button is used to save any changes to the Screen Saver. Any unsaved changes
will be lost.
4
3
Service Mode
Use Sophia — Global Management System to edit the screen saver videos and
interface.
Screen saver
example
ENCORE 29 Rev. 3 09-2017
Tap this button
to go back to the
selection screen.
47
Page 48
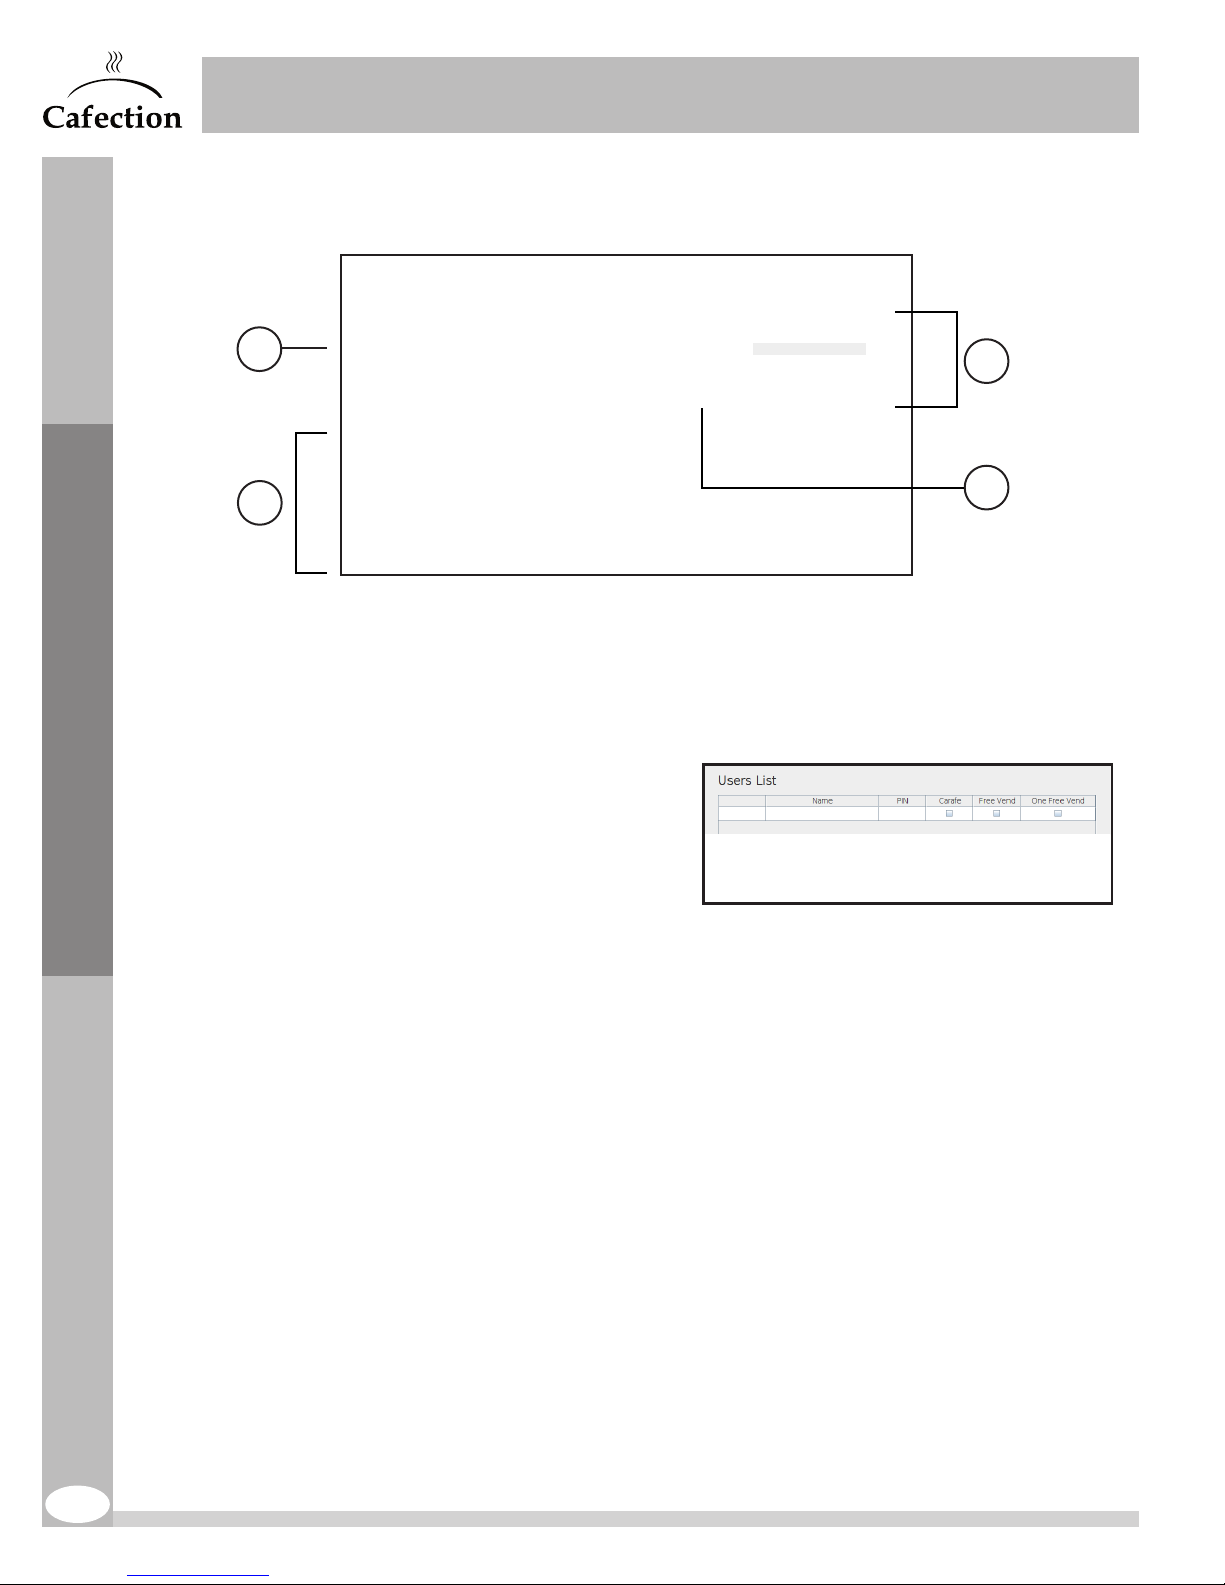
6.6.6 Admin Sub Tab
The Admin sub tab is available to level 4 users only (see section6.1).
SERVICE & INSTALLATION MANUAL - Encore 29
www.cafection.com 800-561-6162
Service Mode
1
xxxx-xxxx-xxxx-xxxx
2
3
4
1. This button is used to create a list of users authorized to activate Carafe mode,
FreeVend mode and/or order one free drink directly from the selection screen.
- To create a new user, click on a
blank field under the Name section
and enter the name of the user.
- Enter a PIN from 1 to 9999 (for
a minimum security, a PIN of
four(4)digits is recommended).
- Check the box of each
authorization that needs to be
granted to this user.
- Press on Save & Exit and save
changes.
If at least one (1) user is created, a user icon appears on the selection screen (top
right corner). When the user presses on this button, a pop-up window with a numeric
keyboard appears. Once the user has entered a correct PIN, he will be able to activate
the authorization(s) he has been granted. If the user enters an incorrect PIN five times
in a row, the user icon will be locked. To unlock it, enter and exit
Service mode by tapping in order on the top left, bottom left
and bottom right corners of the screen (see section6).
48
ENCORE 29 Rev. 3 09-2017
Page 49
SERVICE & INSTALLATION MANUAL - Encore 29
www.cafection.com 800-561-6162
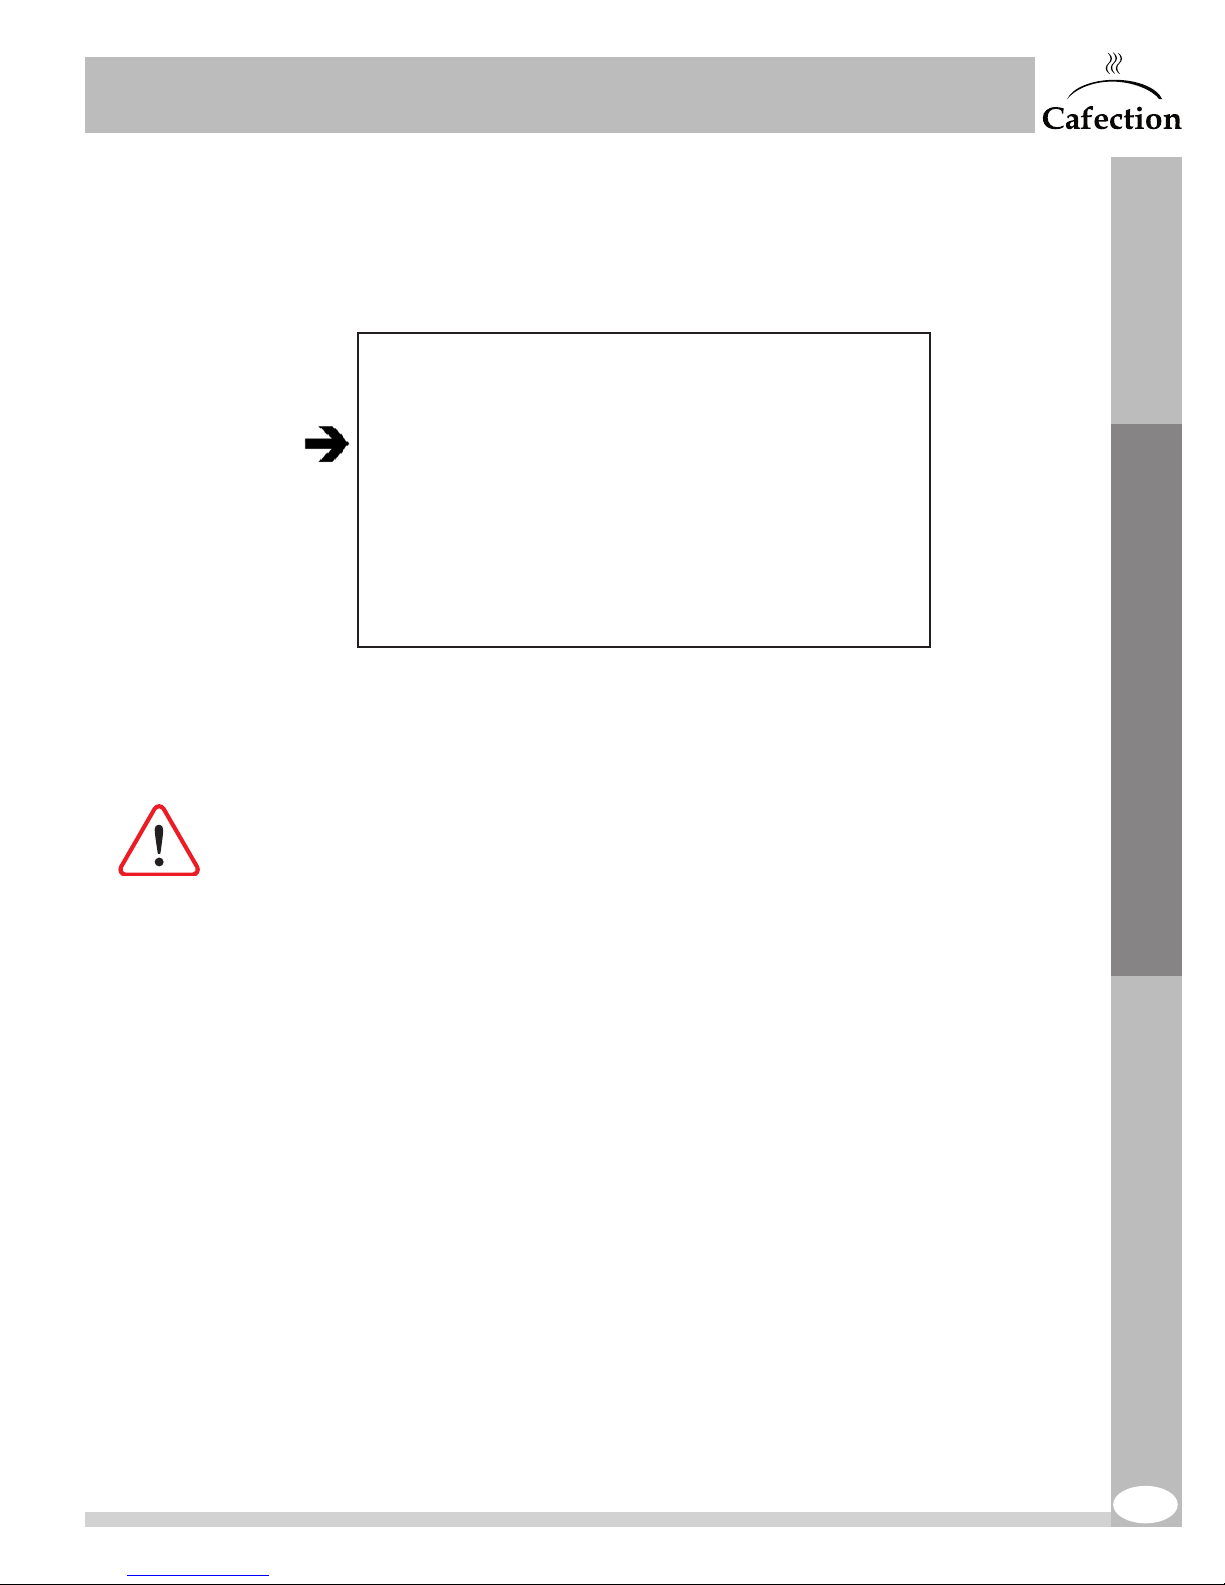
When a user activates the Free Vend or Carafe mode, the related button in Service mode
highlights and indicates the name of the user who set it.
Service Mode
2. This field is used to enter the serial number of the coffee brewer. For proper functioning
of Sophia - Global Management System, the serial number must be the same as
the one indicated on the sticker inside the machine, on the wall beside the third soluble
canister.
It is important to enter the serial number of the machine every time the flash card is
replaced.
3. This barcode is reserved for Cafection use.
4. These fields are used to modify the levels3 and 4 users’ passwords (see section6.1)
and the PIN used to enter Service mode.
If the passwords have been changed, lost or forgotten, a general reset must be
performed. Contact Cafection’s Technical Support team for the procedure. Performing
a general reset will reset all drink recipes, settings and passwords, but not the
permanent sales count, the users list and the serial number.
ENCORE 29 Rev. 3 09-2017
49
Page 50
6.7 Media Tab
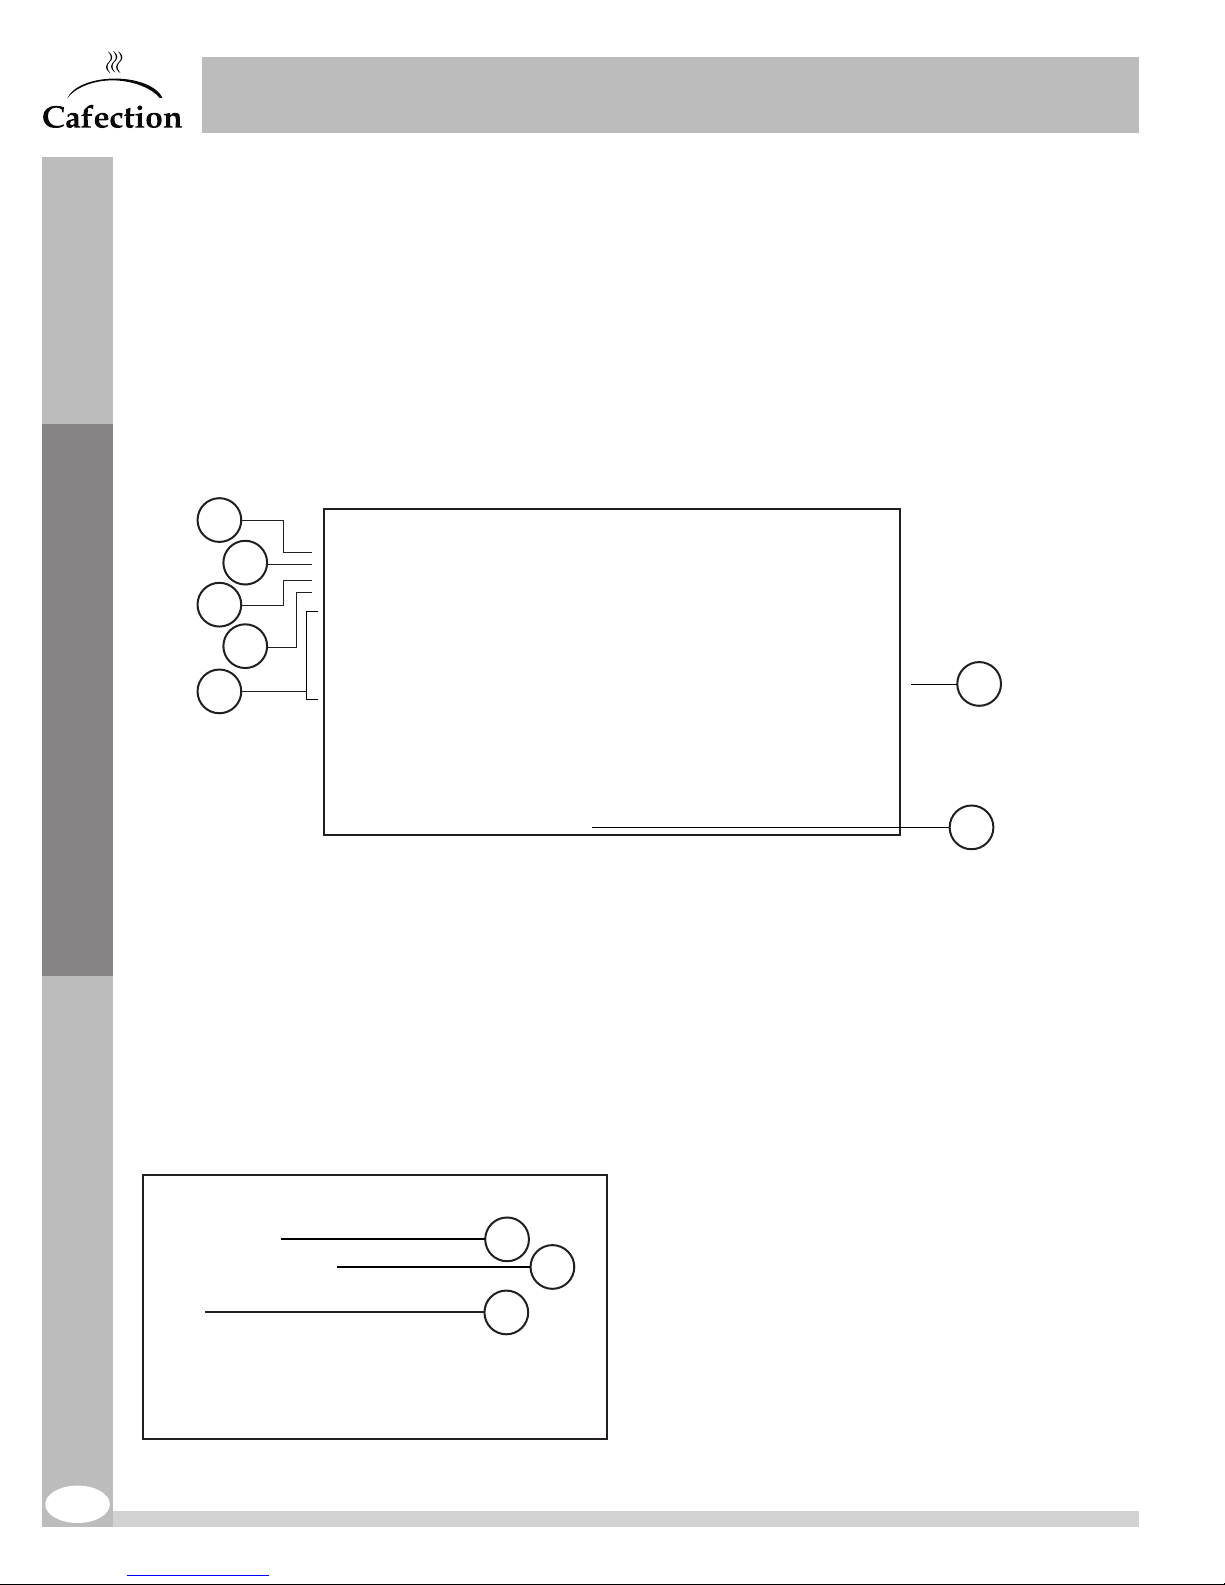
While a beverage is prepared, a video plays on screen. The Media tab is used to edit the video
playlists.
To access the screen below, tap in order on the top left, bottom left and bottom right corners of
the screen (see section6) and select the Media tab.
6.7.1 Current Playlist Sub Tab
The Current Playlist sub tab allows to edit the main playlist.
1
2
3
4
SERVICE & INSTALLATION MANUAL - Encore 29
www.cafection.com 800-561-6162
Service Mode
5
6
7
1. This checkbox is used to enable the current playlist.
2. This field is used to change the name of the playlist.
3. The source indicates where the playlist comes from. Personalized videos can be added
with Sophia — Global Management System (available only with a cellular modem
connection).
4. This checkbox is used to play videos in a random order. If the box is not checked,
videos will be playing in the order they are listed in the current playlist.
5. List of videos selected for the current playlist.
6. This button is used to see a preview of the video.
7. Press on the "Edit" button to apply any changes on this sub tab. A "Save" button will
appear. Use it to save any changes to the playlist.
6.7.2 Next Playlist Sub Tab
This sub tab is used to prepare the next
1
2
3
playlist and schedule it to become the current
playlist at a specific time. Parameters are
the same as in the Current Playlist sub tab.
However, a start date and time must be set.
50
1. Set the start date using the calendar.
2. Use the arrows to set the start time of the
playlist.
3. Add videos to the playlist from the Video
Storage.
ENCORE 29 Rev. 3 09-2017
Page 51
SERVICE & INSTALLATION MANUAL - Encore 29
www.cafection.com 800-561-6162
6.7.3 Video Storage Sub Tab
This sub tab contains the library of all videos downloaded on the brewer. Use Sophia —
Global Management System to upload new content on the brewer (license required).
Video preview
Service Mode
6.8 Audit Tab
To access this screen, tap in order on the top left,
bottom left and bottom right corners of the screen
(see section6) and select the Audit tab.
6.8.1 Permanent Sales Count
This counter records the quantity of
drinks sold since the machine has been
manufactured.
6.8.2 Erasable Sales Count
This counter records the quantity of drinks
sold since the last time the counters have
been erased. It also records the total
sales, free vends and vends in cash value.
To reset the Erasable Sales Count, press
on the "Erase Counter" button.
ENCORE 29 Rev. 3 09-2017
51
Page 52
6.8.3 Users Sales Count
This counter records the quantity of carafes and free vends ordered by each user authorized
under Users Lists and Right Management (see section 6.6.6).
SERVICE & INSTALLATION MANUAL - Encore 29
www.cafection.com 800-561-6162
Service Mode
To reset the Users Sales Count, press on the "Erase Counter" button.
How the Users Sales Count Works
When a user orders a drink, the Users Sales Count increases, as well as the Permanent and
Erasable Sales Counts.
Example #1
User1 fills a carafe with 8 large Mokaccino.
- The counter of User1 increases by 8 under "Large" in the Carafes Made section.
- The Erasable and Permanent Sales Counts of the Mokaccino increase by8under "Large"
in the Free section.
Example #2
User2 enables the Free Vend mode and orders:
10 x small Coffee #3
2 x medium Long Espresso
5 x large Hot Chocolate
- The counter of User2 increases by 10 under "Small" in the Free Vend Beverages Made section.
- The counter of User2 increases by
- The counter of User2 increased by 5 under "Large" in the Free Vend Beverages Made section.
- The Erasable and Permanent Sales Counts of the Coffee #3 drink increase by10under
"Small" in the Free section.
- The Erasable and Permanent Sales Counts of the Long Espresso drink increase by2 under
"Medium" in the Free section.
- The Erasable and Permanent Sales Counts of the Hot Chocolate drink increase by5 under
"Large" in the Free section.
2 under "Medium" in the Free Vend Beverages Made section.
52
ENCORE 29 Rev. 3 09-2017
Page 53
SERVICE & INSTALLATION MANUAL - Encore 29
www.cafection.com 800-561-6162
6.9 General Reset to Factory Settings
Resetting the brewer back to factory settings will erase all personalized parameters. Only the Audit
tab will remain unchanged to keep the brewer’s sales counters intact.
To perform a general reset of the brewer, access Service mode by tapping in order on the top left,
bottom left and bottom right corners of the screen (see section6). Then, tap three(3)times in the
top right corner of the screen and follow the instructions on the screen.
3x
Service Mode
No changes will be processed without entering the password provided by a
Cafection’s technical support agent, as requested on the screen.
See section 6.6.1 to reset System1 and System2 sub tabs back to factory settings
without affecting the recipes.
See section 6.6.1 to reset all recipes back to factory settings (Information and
Liquids & Ingr. sub tabs).
ENCORE 29 Rev. 3 09-2017
53
Page 54
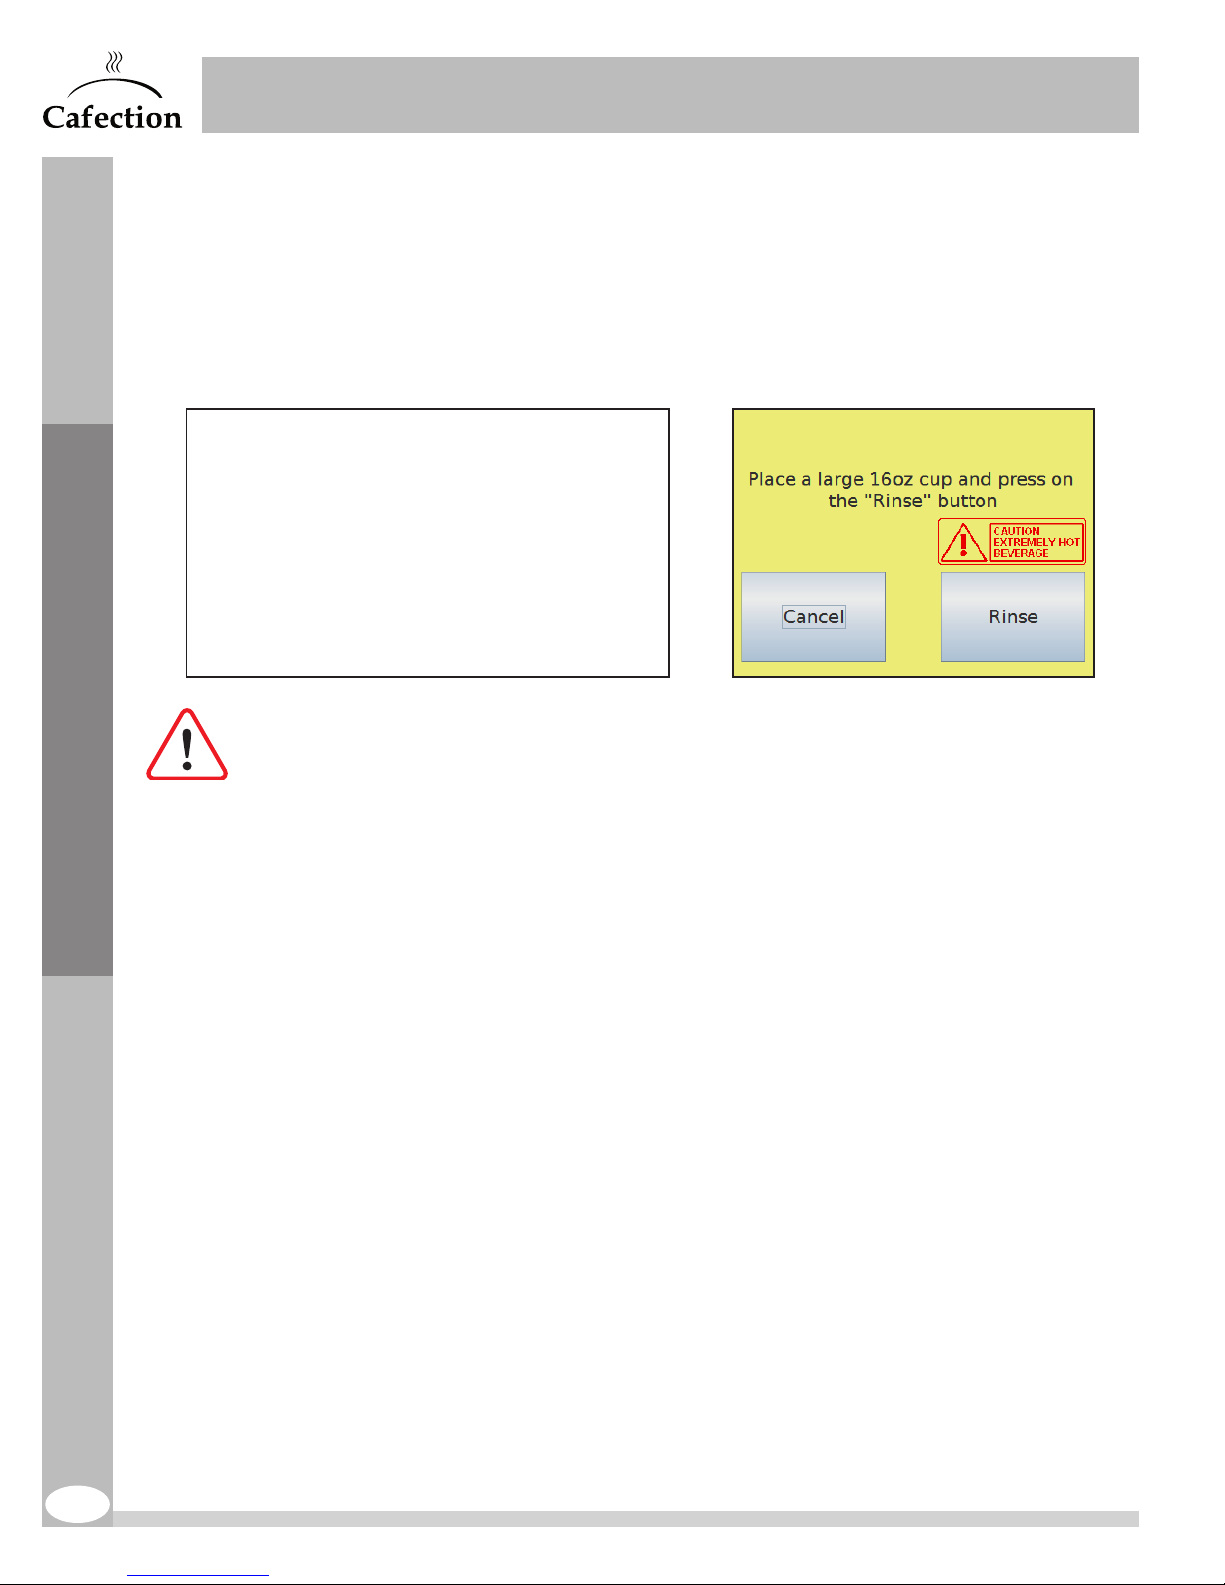
7 CLEANING AND SANITIZING
7.1 "Auto Rinse" Button
To perform a rinse, access the Service mode by tapping in order on the top left, bottom left and
bottom right corners of the screen (see section6), then press the "Auto Rinse" button and follow
the instructions on the screen.
SERVICE & INSTALLATION MANUAL - Encore 29
www.cafection.com 800-561-6162
Cleaning and Sanitizing
WARNING! Make sure to place a container large enough (size will be specified on the
screen). BE CAREFUL! Water is VERY HOT!
7.2 "Cleaning & Sanitizing" Button
This button is used to clean and sanitize the brew group and the grinder using the appropriate
products. Regular sanitation treatments of the brew group assembly prevent residue from affecting
the vacuum in the mechanism and altering the taste of the beverages.
Cafection highly recommends using Urnex products (Sani-PureTM, TabzTM tablets and GindzTM
tablets). Select the adequate option and follow the instructions on the screen. Refer to the
products’ label for details.
54
ENCORE 29 Rev. 3 09-2017
Page 55
SERVICE & INSTALLATION MANUAL - Encore 29
www.cafection.com 800-561-6162
7.3 Cleaning and Sanitizing Instructions
It is important to clean and sanitize the machine on a regular basis. In order to maintain the
highest beverage quality and to ensure the customers’ safety, all parts in contact with food must
be cleaned and sanitized regularly. Hands must be washed before handling any parts or other
commodities such as cups and stirrers.
Cleaning and sanitizing should be done in separate phases as prescribed by health regulations and
hygiene standards of the industry.
Cleaning: Remove any visible soil, stains or impurities, including food soils, oil or mineral deposits
that could alter the beverage taste and quality.
Sanitizing: Sanitizing ensures the customers’ health safety by killing bacteria remaining on the
surfaces after cleaning.
There are two (2) sanitation methods:
1. Chemical antibacterial treatment.
2. Hot water treatment (between 170°F and 212°F).
Cleaning and Sanitizing
Always unplug the unit before cleaning the machine. DO NOT spray water on
electrical parts.
For the sanitation process to work effectively, the parts must be cleaned and free of visible soil
before sanitizing them. The sanitized parts must then be completely rinsed and air dried. Wiping
the parts with towels or cloths might lead to recontamination of sanitized food-contact surfaces.
Frequency
Two (2) important variables need to be considered when evaluating the cleaning and sanitizing
frequency:
- Product consumption.
- Water quality.
The expected customer usage varies from one location to another. It is therefore
recommended to follow the cycle counts in order to prevent omissions. It is also
recommended to verify each part listed in this section upon each service visit and
clean them as needed.
ENCORE 29 Rev. 3 09-2017
55
Page 56
7.4 Recommended Cleaning Tools
In order to perform the cleaning procedure effectively, Cafection recommends having at least the
following tools on hands:
- Bucket.
- Small brush for tubes and nozzles, suitable for food-contact surfaces and hot water.
- Brush for coffee grounds, suitable for food-contact surfaces.
- Disposable towels, wet-strength and lint-free.
- Mild non-abrasive detergent for exterior cleaning.
- Urn cleaner for brew groups and grinders.
- Spare parts to swap with the ones that need to be sent to Cafection for extensive cleaning.
7.5 Cleaning and Sanitizing Schedule
The cleaning schedule and instructions outlined in this manual must be followed to honor the
warranty, ensure consistent product quality and maintain a high level of health safety.
SERVICE & INSTALLATION MANUAL - Encore 29
www.cafection.com 800-561-6162
Cleaning and Sanitizing
All parts must be visually inspected upon each service visit and cleaned as needed.
Daily Weekly Monthly Quarterly Details
EXTERIOR
Unit & Cabinet Cleaning As needed
Touch Screen Cleaning As needed
Drip Tray Cleaning As needed
Waste Bin Inspection As needed
INTERIOR / FOOD-CONTACT PARTS
Bean Hopper Inspection Cleaning 1,000 cycles
Soluble Canisters Inspection Cleaning 1,000 cycles
Soluble Whipper Cleaning 200 cycles
Coffee Chute Inspection Cleaning 1,000 cycles
Brew Chamber Sanitizing 200 cycles
Brew Group Sanitizing Cleaning Treatment 1,000 cycles
Fan Inspection Cleaning As needed
Coffee Funnel Cleaning 1,000 cycles
These recommendations are based on 1,000 monthly cycles, using medium roast
coffee and superior water quality. They need to be adjusted if recipes’ settings,
coffee blend strength or water quality are different.
56
ENCORE 29 Rev. 3 09-2017
Page 57
SERVICE & INSTALLATION MANUAL - Encore 29
www.cafection.com 800-561-6162
7.6 Overall Cleaning
The brewer and its area must be clean and tidy at all time. Both inside and outside of the machine
must be inspected upon each service visit and cleaned when needed. Make sure the unit is clean,
safe and functioning after it has been serviced.
7.7 Exterior Cleaning
Frequency: daily
To minimize scratching and preserve a neat appearance, Cafection recommends using a clean
damp sponge or soft cloth. Use a non-abrasive detergent to clean the exterior of the unit and the
base cabinet. After removing all food soils, thoroughly dry with a clean, soft cloth.
Non food-contact parts to be verified and cleaned:
- Touch screen.
- Drip tray.
- Waste bin.
- Plastic top lid.
- Cabinet (optional) or counter.
- Metal surfaces.
- Plastic door.
Cleaning and Sanitizing
Parts are NOT dishwasher safe.
7.7.1 Touch Screen
Frequency: daily or as needed
WARNING! Use a 100% cotton soft cloth only.
7.7.2 Drip Tray
Frequency: daily or as needed
The drip tray is not connected to a drain. Therefore, it should be inspected and emptied
periodically.
WARNING! Drip tray may be full of HOT liquid.
To remove the drip tray, lift it gently to avoid spilling and pull it out from its bracket. Rinse
the drip tray and dry it with a clean dry cloth. Reinstall the drip tray and make sure it is
stable and leveled. See section4.6 reference drawings.
ENCORE 29 Rev. 3 09-2017
57
Page 58
SERVICE & INSTALLATION MANUAL - Encore 29
www.cafection.com 800-561-6162
7.7.3 Waste Bin
Frequency: daily or every 200cycles
After each coffee cycle, the spent
grounds and used filter paper are
automatically discarded into the waste
bin. To prevent the bin from overflowing,
an automatic function disables coffeebased beverages and displays a
message on the screen (see image).
Default setting = 40
Maximum setting = 400
Minimum setting = 0
When using the internal waste bin provided with the unit, Cafection recommends
setting the counter to a maximum of 40cycles using standard 8, 10 and 12oz cups.
If the setting is too high, the wasted filter paper could jam in the brew group and
damages may occur.
Cleaning and Sanitizing
Setting the maximum counter to zero (0) disables the automatic function and may
cause an overflow issue if the waste bin is full.
The equipment will not dispense coffee beverages until the bin is emptied and the counter
is reset. The counter settings can be adjusted in accordance to the size of the waste bin in
the System1 sub tab, under the System tab in Service mode (see section 6.6.1).
How to empty the cabinet’s waste bin
1. Open the cabinet’s door, below the brewer.
2. Open the brewer’s door and remove the front panel.
3. Cut the filter paper4" below the brew group with scissors or tear gently. DO NOT
YANK ON THE PAPER!
4. Remove the filled garbage bag from the waste bin and replace it with a new one.
5. Reinstall the front panel and close the doors.
6. Access Service mode and press the "Reset Waste Bin" button.
How to empty the brewer’s internal waste bin
1. Open the brewer’s door.
2. Take off the front panel.
3. Cut the filter paper4” below the brew group with scissors or tear gently. DO NOT
YANK ON THE PAPER!
4. Disengage the spout so there is room to pull the waste bin out of the machine.
5. Remove the internal waste bin, empty it and replace it inside the machine.
6. Reinstall the front panel and the spout, then close the door.
7. Access Service mode and press the "Reset Waste Bin" button.
It is very important not to yank on the filter paper. Doing so may result in a
malfunction of the machine.
58
ENCORE 29 Rev. 3 09-2017
Page 59
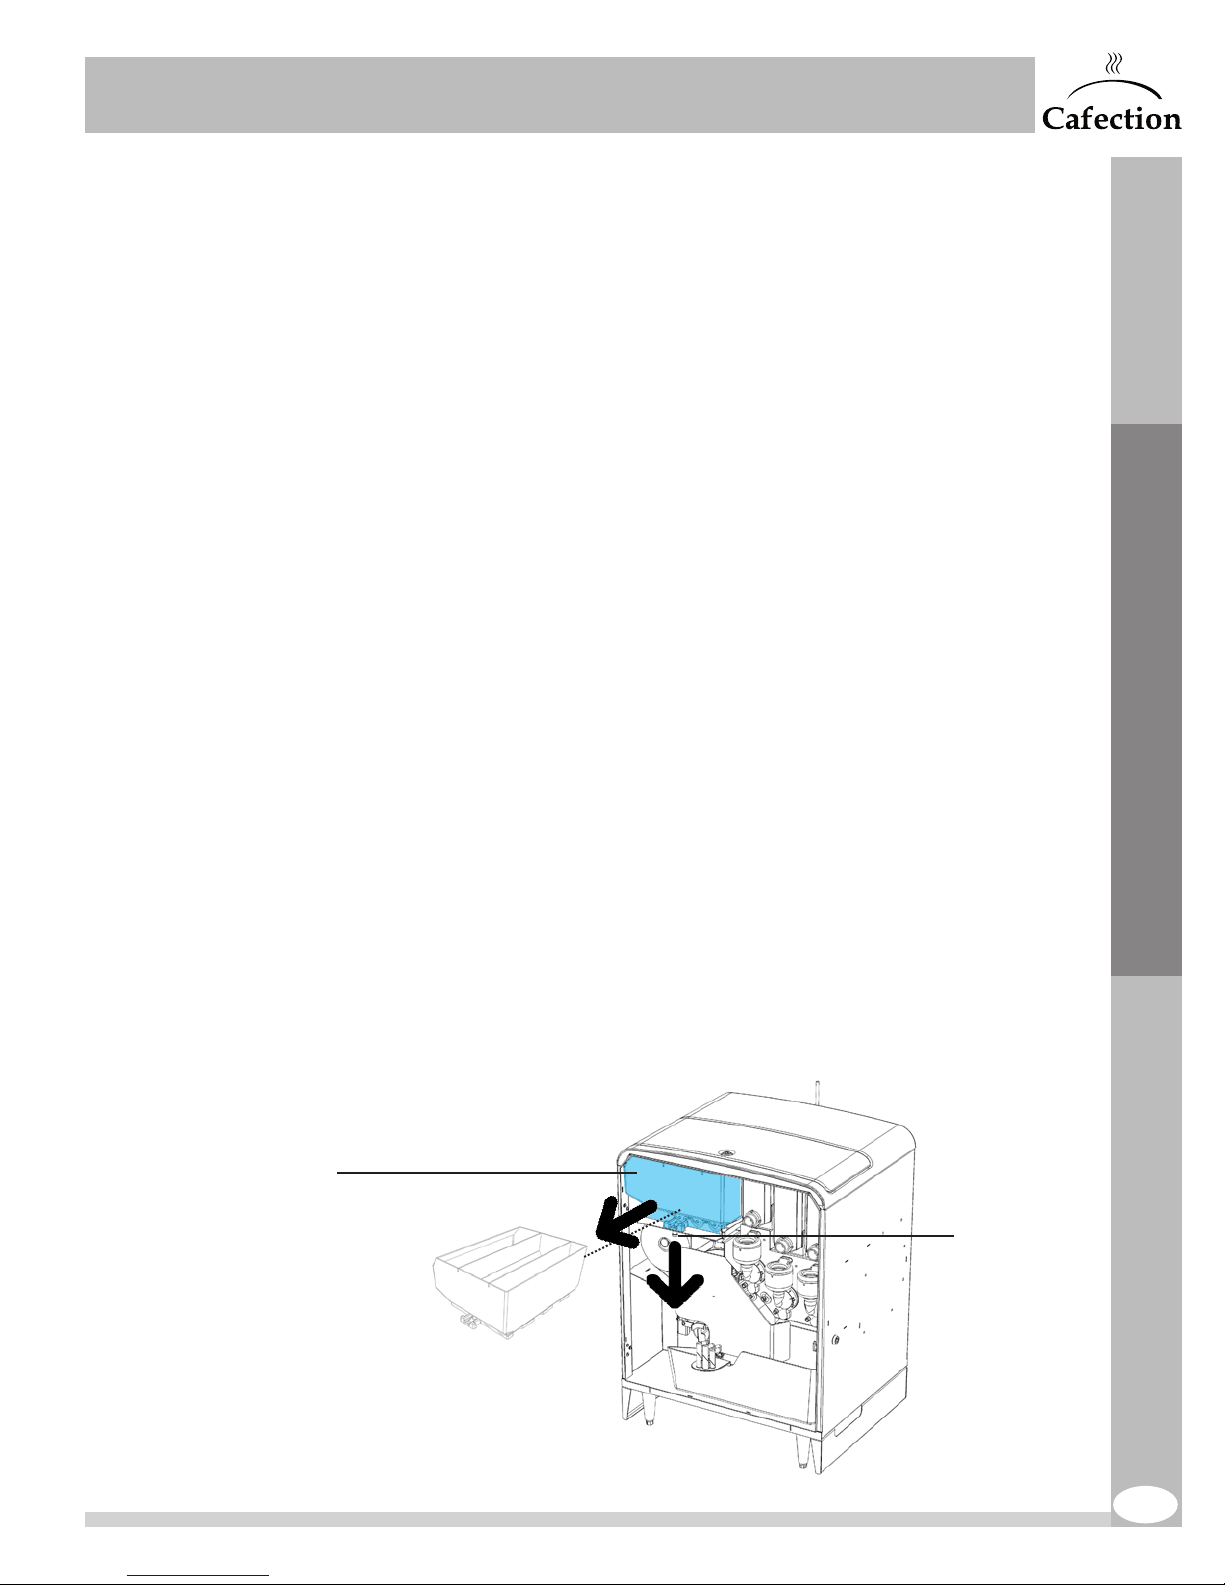
SERVICE & INSTALLATION MANUAL - Encore 29
www.cafection.com 800-561-6162
7.8 Interior Parts Cleaning & Sanitizing
For food safety reasons, do not use soap or detergent to clean the inside of the brewer. Use hot
water or chemical products recommended by the manufacturer. Wiping with towels or cloths can
recontaminate sanitized food-contact surfaces. Therefore, it is recommended to air dry completely
all sanitized food-contact surfaces before reinstalling them in the machine.
Brush away coffee grounds and particles inside the brewer using the brush for coffee grounds and
a small dust pan, then clean the inside with hot water.
Interior parts to be cleaned:
- Bean hopper.
- Bean hopper funnel.
- Coffee chute.
- Soluble canisters.
- Soluble whipper assembly.
- Brew group assembly.
- Fans.
7.8.1 Bean Hopper
Frequency: monthly or every 1,000cycles
It is recommended to remove, empty and clean the hopper every month to avoid coffee oil
and soils to accumulate on the walls of the hopper and alter the quality of the beverages.
1. Open the brewer’s door.
2. Pull down the bean hopper retaining pin.
3. At the same time, pull the bean hopper forward.
4. Clean and sanitize under hot water and air dry completely.
5. Repeat steps in reverse order to reinstall.
6. Order a large coffee to ensure that all parts and switches are working properly.
Cleaning and Sanitizing
Bean hopper
ENCORE 29 Rev. 3 09-2017
Retaining pin
59
Page 60
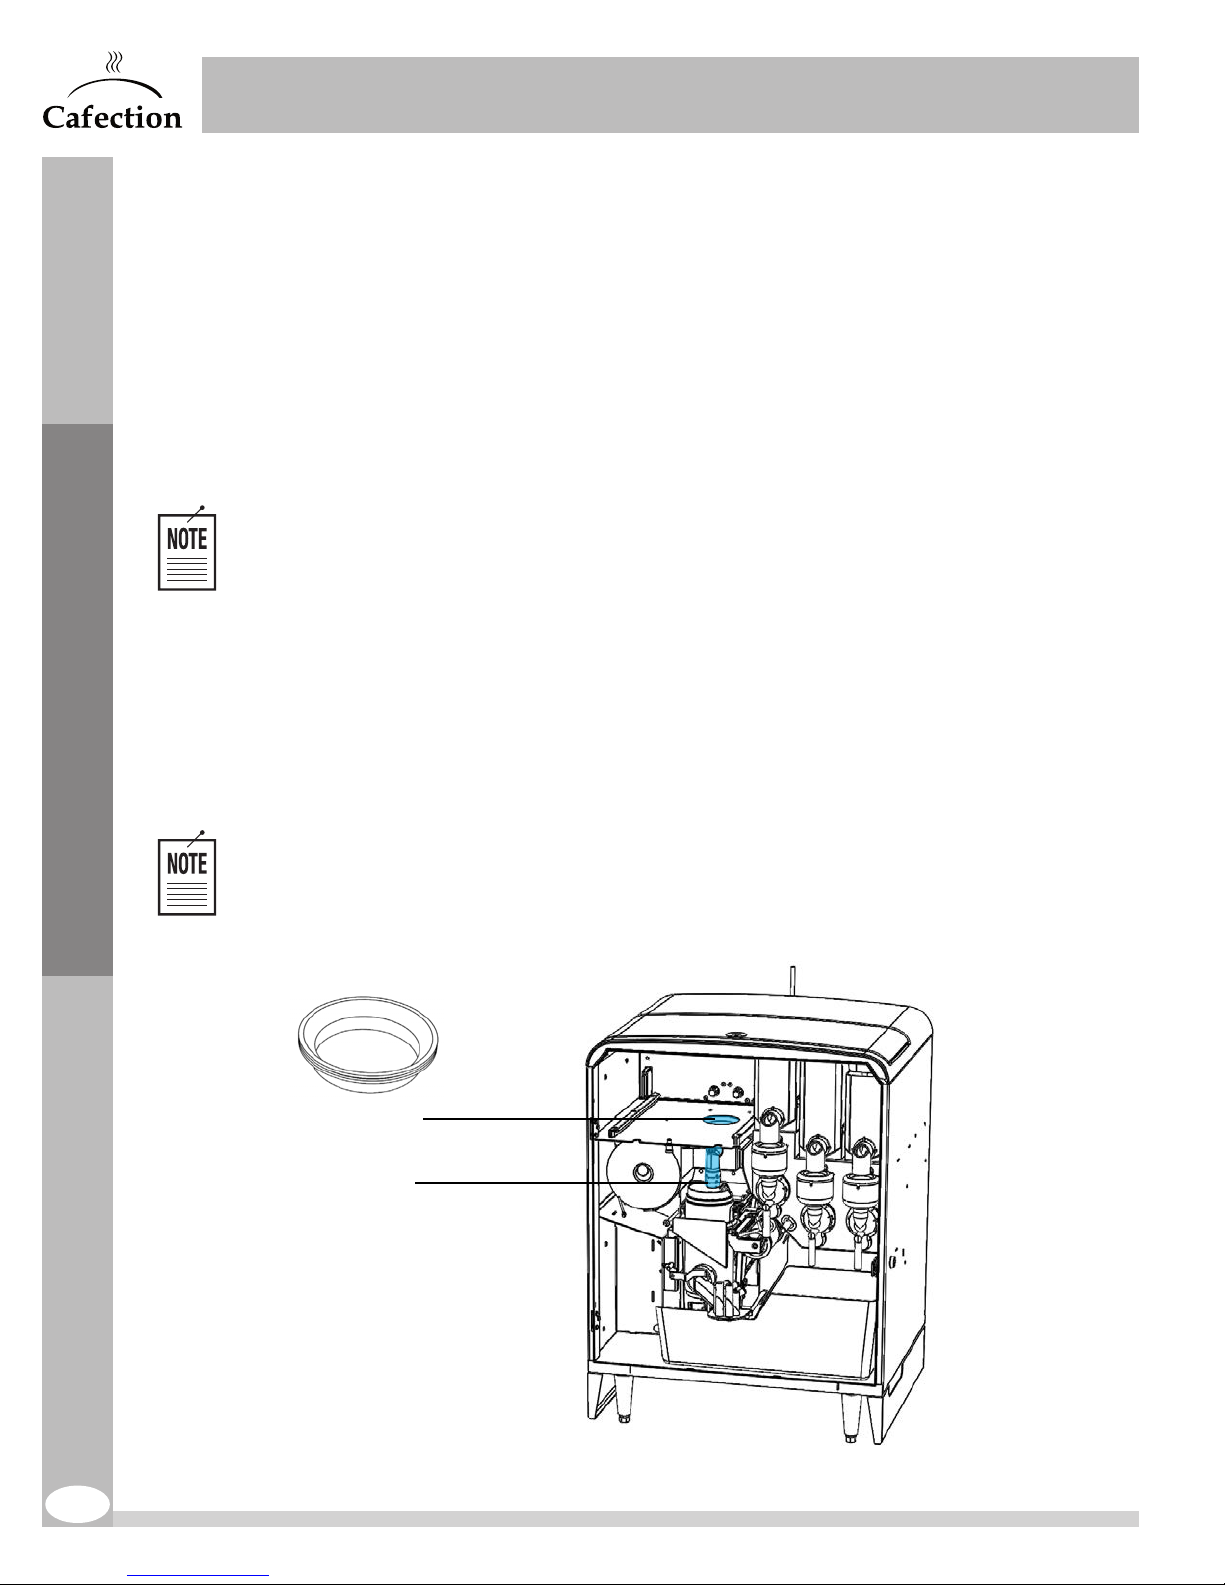
SERVICE & INSTALLATION MANUAL - Encore 29
www.cafection.com 800-561-6162
7.8.2 Bean Hopper Funnel
Frequency: monthly or every 1,000 cycles
1. Turn OFF the brewer. Open the brewer’s door.
2. Pull down the bean hopper retaining pin.
3. At the same time, pull the bean hopper forward.
4. Remove the rubber funnel.
5. Clean and sanitize the rubber funnel under hot water. Air dry it completely before
reinstalling parts.
6. Order a large coffee to ensure that all parts and switches are working properly.
Beans will not fall when removing the hopper. However, this step is easier to
complete if the hopper is empty.
7.8.3 Coffee Chute
Frequency: monthly or every 1,000 cycles
Cleaning and Sanitizing
1. Turn OFF the brewer. Open the door of the machine and remove the front panel.
2. Pull the coffee chute out from its socket.
3. Clean it thoroughly under hot water.
4. Air dry completely before reinstalling the parts.
5. Reinstall the front panel and close the door.
If the chute is not dry when reinstalled, coffee grounds may stick in the chute.
Rubber funnel
Coffee chute
60
ENCORE 29 Rev. 3 09-2017
Page 61
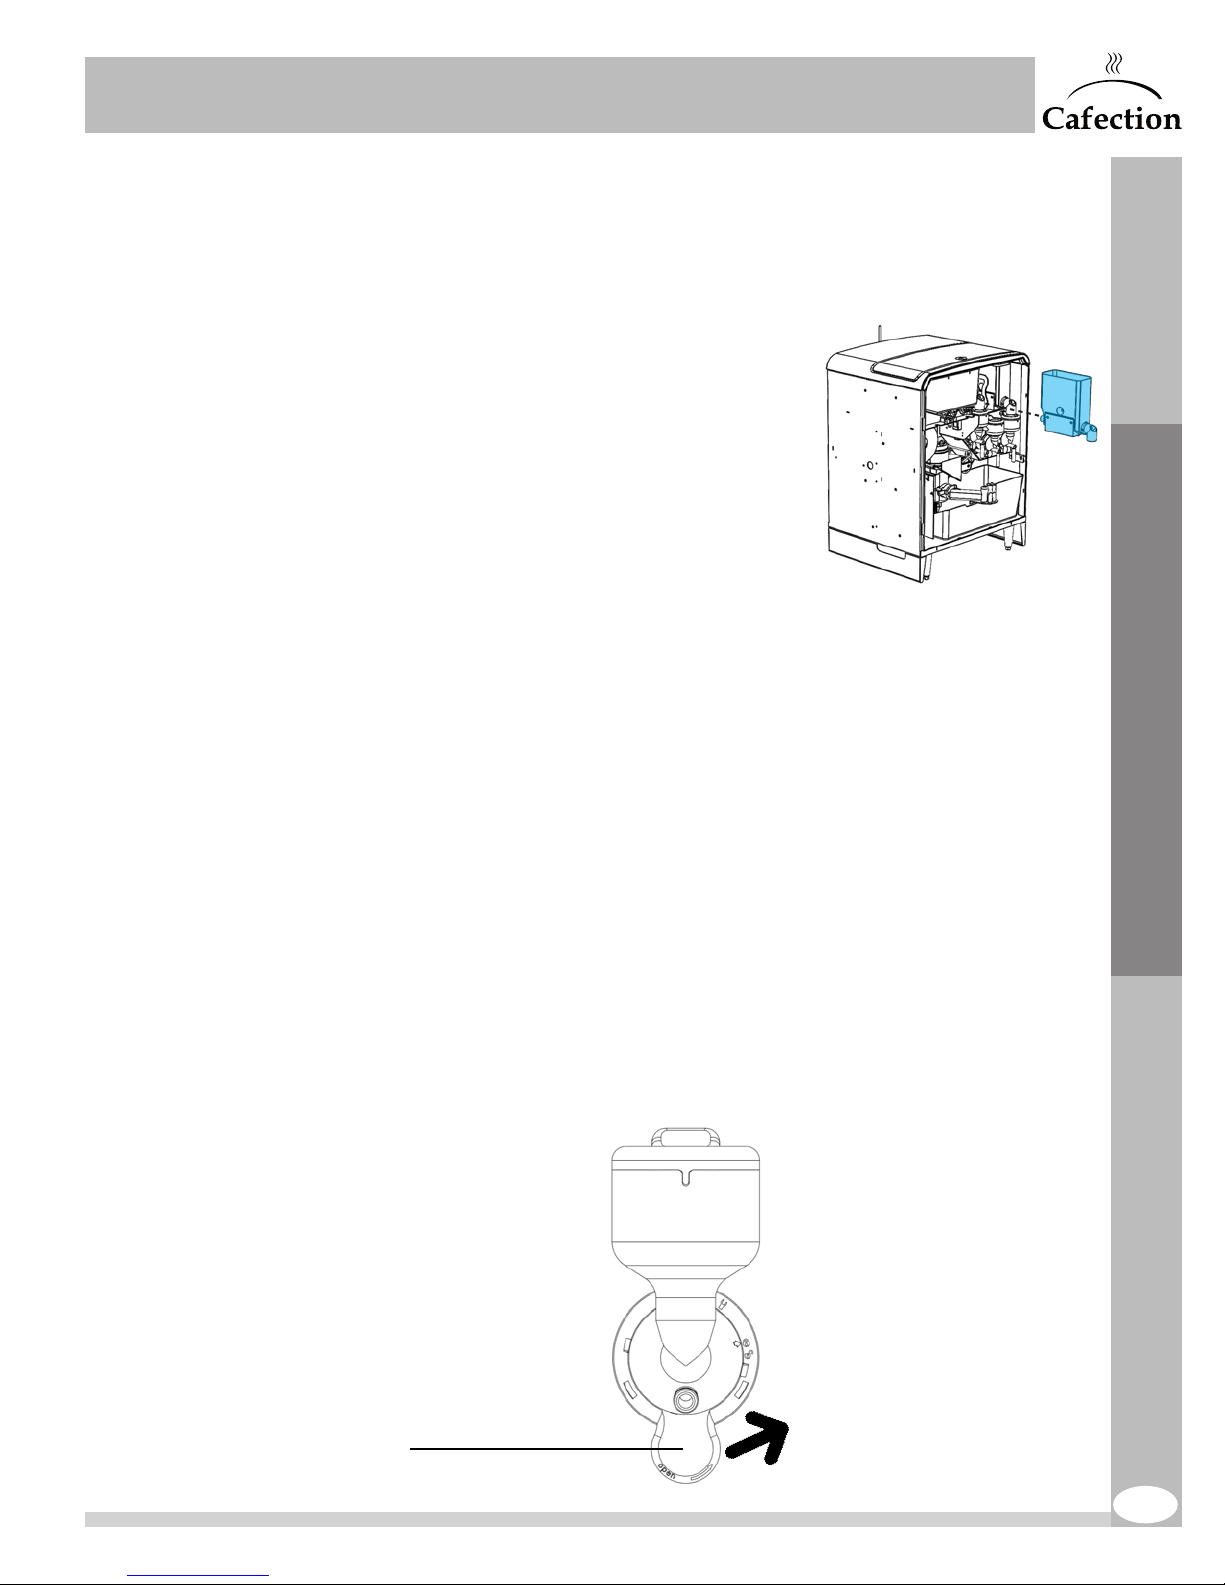
SERVICE & INSTALLATION MANUAL - Encore 29
www.cafection.com 800-561-6162
7.8.4 Soluble Canisters
Frequency: monthly or every 1,000 cycles
It is recommended to remove, empty and clean the
soluble canisters every month to avoid powder to
accumulate on the walls of the canisters and alter the
quality of the beverages.
1. Open the brewer’s door.
2. Pull the canisters out of the brewer to disengage
them from the motor and transmission.
3. Clean and sanitize under hot water and air dry
completely.
4. Reinstall all parts and reload products in the
canisters.
5. Order a large beverage of each soluble to confirm
that all parts and switches are working properly.
7.8.5 Soluble Whipper Assembly
Frequency: weekly or every 200 cycles
If there is product accumulation, remove the soluble whipper assembly for manual cleaning
under hot water.
1. Remove the tube from the base.
2. Twist off the whipper base counterclockwise to unlock the whipper chamber.
3. Pull the whipper chamber outward, then remove the whipping disk.
4. Clean all parts and gaskets with hot water. Use a small brush for tubes if necessary.
5. Air dry completely.
6. Reinstall all parts in reverse order. Make sure the whipper base is on lock position.
7. Order a large beverage of each soluble to ensure that all parts and switches are
working properly.
Cleaning and Sanitizing
Whipper base
ENCORE 29 Rev. 3 09-2017
61
Page 62
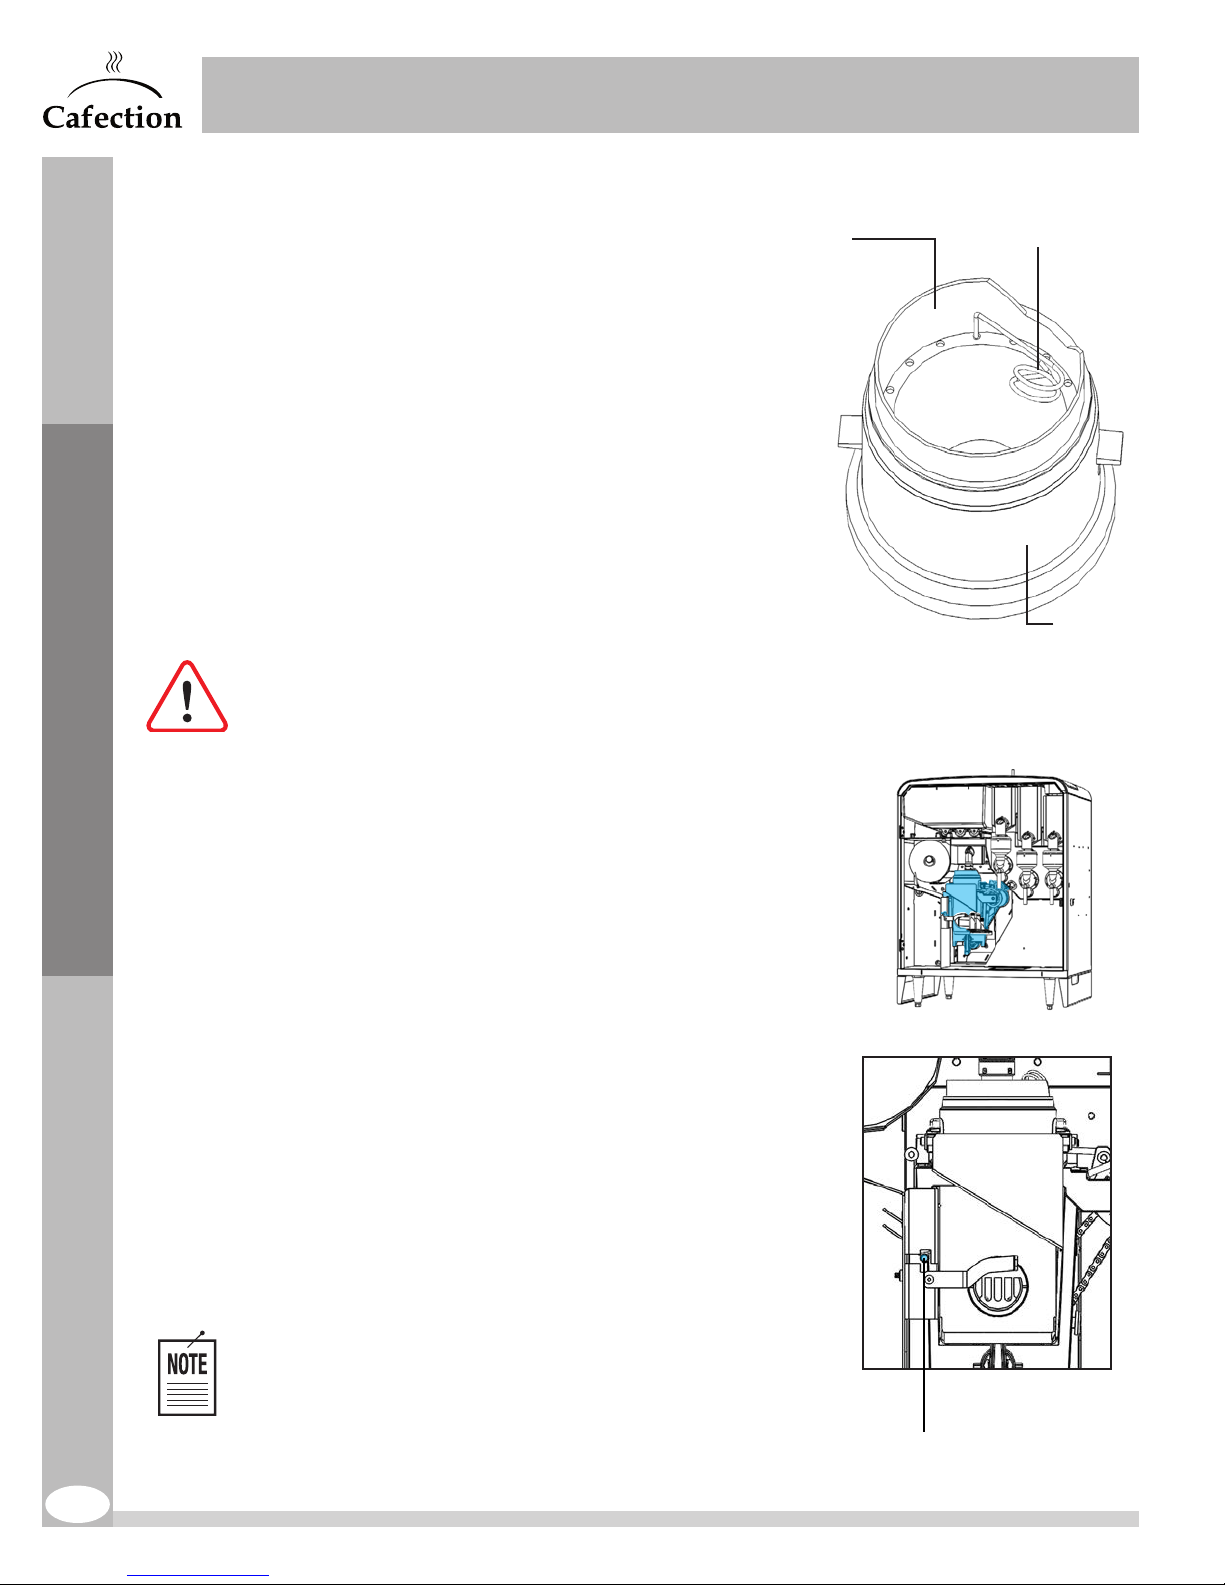
7.8.6 Brew Group
Brew Chamber and Funnel
Frequency: weekly or every 200 cycles
1. Place a large cup or container under the dispensing
nozzle to collect the hot rinse water.
2. Perform several rinse cycles (see section7.1).
3. Remove the brown tube from its support. Remove
the brew chamber’s funnel to dislodge coffee residue
trapped underneath it and rinse it under hot water.
4. Reinstall the funnel and the tube in its support.
Make sure the tube is against the wall of the funnel.
Water must form a circular motion when being
dispensed.
5. Order a large coffee to ensure that the brew
chamber is working properly.
SERVICE & INSTALLATION MANUAL - Encore 29
www.cafection.com 800-561-6162
Funnel Tube retainer
Brew
chamber
Cleaning and Sanitizing
Warning! Place a container large enough (size specified on the screen).
Water is VERY HOT.
Brew Group Assembly
Frequency: monthly or every 1,000 cycles
In order to maintain optimal performance of the brew group
assembly, it is recommended to remove it from the unit,
clean it and rinse it under hot water.
1. Open the brewer’s door and remove the front panel.
2. Cut the filter paper with scissors on both sides of the
brew chamber.
3. Remove the waste bin.
4. Unplug the black plastic spout from the brew group
spillway.
5. Push the locking pin down to release the brew group,
then on the right to keep it unlocked. Pull the brew
group outward.
6. Rinse the brew group thoroughly under hot water to
remove visible soil.
7. Remove the funnel from the brew chamber and rinse it
thoroughly under hot water.
8. Air dry completely before reinstalling the parts.
9. Order a large coffee to ensure that the brew group is
working properly.
The brew group assembly can also be cleaned using urn
cleaner. See section7.2 for cleaning instructions.
62
Locking pin
ENCORE 29 Rev. 3 09-2017
Page 63
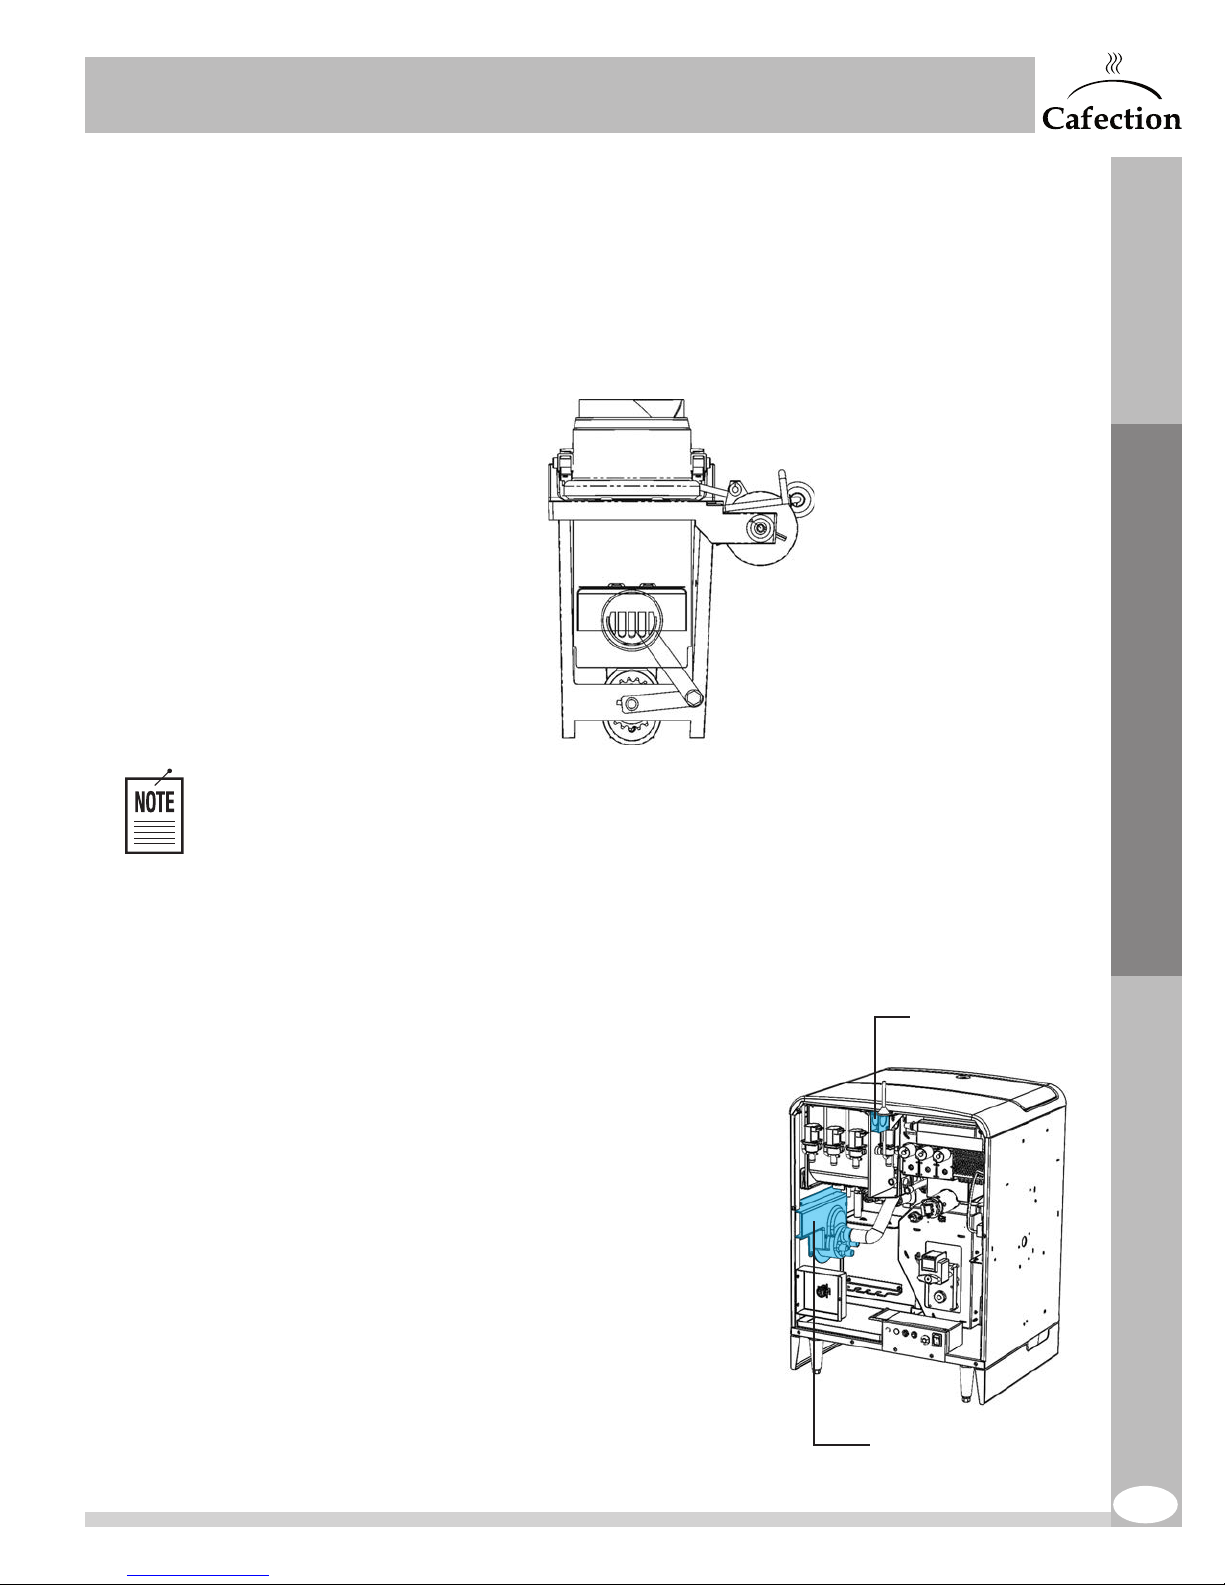
SERVICE & INSTALLATION MANUAL - Encore 29
www.cafection.com 800-561-6162
Brew Group Assembly Sanitizing Treatment
Frequency: quarterly or every 5,000 cycles
Regular sanitation treatments of the brew group assembly prevent residue from affecting
the vacuum in the mechanism and altering the taste of the beverages.
Cleaning and Sanitizing
Please refer to the section7.2 of this manual for sanitizing instructions.
7.8.7 Fans
Frequency: quarterly or as needed
Visually inspect the two (2) fans located at the back of the machine.
1. Turn OFF the unit and unplug it to stop the fan.
2. Remove the back panel.
3. Unplug the fan and remove it to access the fan
blades (2 bolts).
4. Unplug the blower, remove its guard and
remove the fan to access its blades (5 nuts).
5. Wipe the two (2) fans clean with a dry
disposable towel.
6. Reinstall parts, plug the fans and the machine
in, then turn the brewer back ON.
Fan
ENCORE 29 Rev. 3 09-2017
Blower
63
Page 64
SERVICE & INSTALLATION MANUAL - Encore 29
www.cafection.com 800-561-6162
8 PREVENTIVE MAINTENANCE
All important parts of the unit must be maintained as per the preventive maintenance schedule to honor
the warranty and to avoid possible defects. Adequate maintenance will extend the life of the coffee
machine and deliver a consistent high quality beverage.
The preventive maintenance schedule and instructions below must be followed to
honor the warranty.
8.1 Preventive Maintenance (PM) Schedule
All parts must be visually inspected upon each visit and cleaned as needed.
Inspection Preventive Maintenance See Section
Brew Group
Assembly
Monthly
25,000 cycles
or annually
8.3
Preventive Maintenance
Outlet Valves Quarterly 10,000 cycles 8.4
Hot Water Tank Quarterly 60,000 cycles 8.5
Grinder Quarterly 80,000 cycles 8.6
8.2 Recommended tools for servicing the coffee brewer
- #2 Phillips screwdriver
- Adjustable wrench
- Wrench (1/4", 5/16")
- Drive ratchet socket box 3/8" and 11/32"
64
ENCORE 29 Rev. 3 09-2017
Page 65
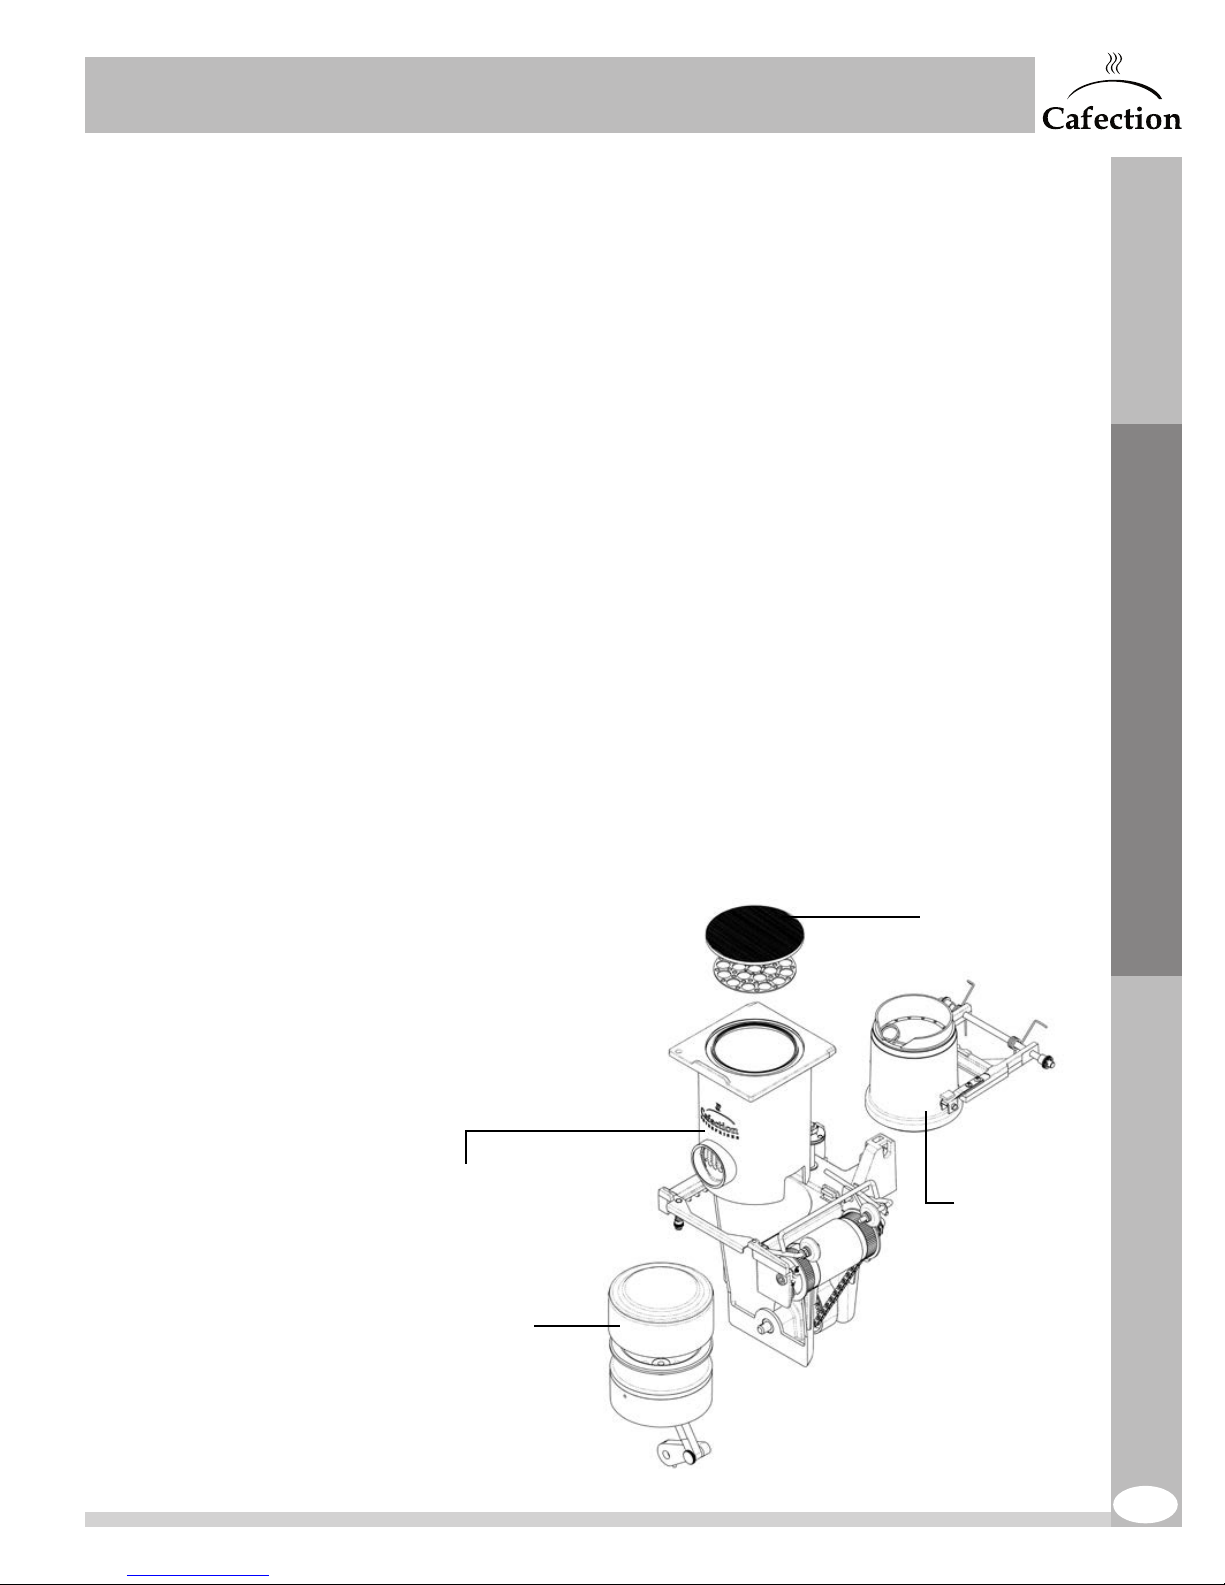
SERVICE & INSTALLATION MANUAL - Encore 29
www.cafection.com 800-561-6162
8.3 Brew Group Assembly
Preventive maintenance: yearly or every 25,000 coffee cycles
The brew group is the heart of the equipment and is responsible for the taste of every cup. It needs
to be serviced regularly to maintain the quality of the beverages served.
Cafection offers a Brew Group Exchange Program. This program ensures a constant running of
the machine by receiving a replacement brew group to use while maintenance is performed on
the actual brew group of the unit. Cafection will completely clean and replace all parts requiring
maintenance, including the screen and seal, the cylinder and the piston seal.
The cleaned brew group will be returned with a one (1)year warranty on defective parts.
Contact [email protected] or 800-561-6162, ext.311, to order parts or for additional
information.
Inspection
Frequency: monthly
Preventive Maintenance
The following are signs that the coffee extraction is not being performed adequately and that the
brew group may require preventive maintenance:
- Seal is damaged.
- Air gets into the cylinder from
around the piston seal and creates
bubbles in the coffee.
- There are coffee grounds in the
dispensed coffee.
Screen and seal
- Spent coffee grounds remain wet
on the filter paper.
Cylinder
Brew chamber
ENCORE 29 Rev. 3 09-2017
Piston seal
65
Page 66
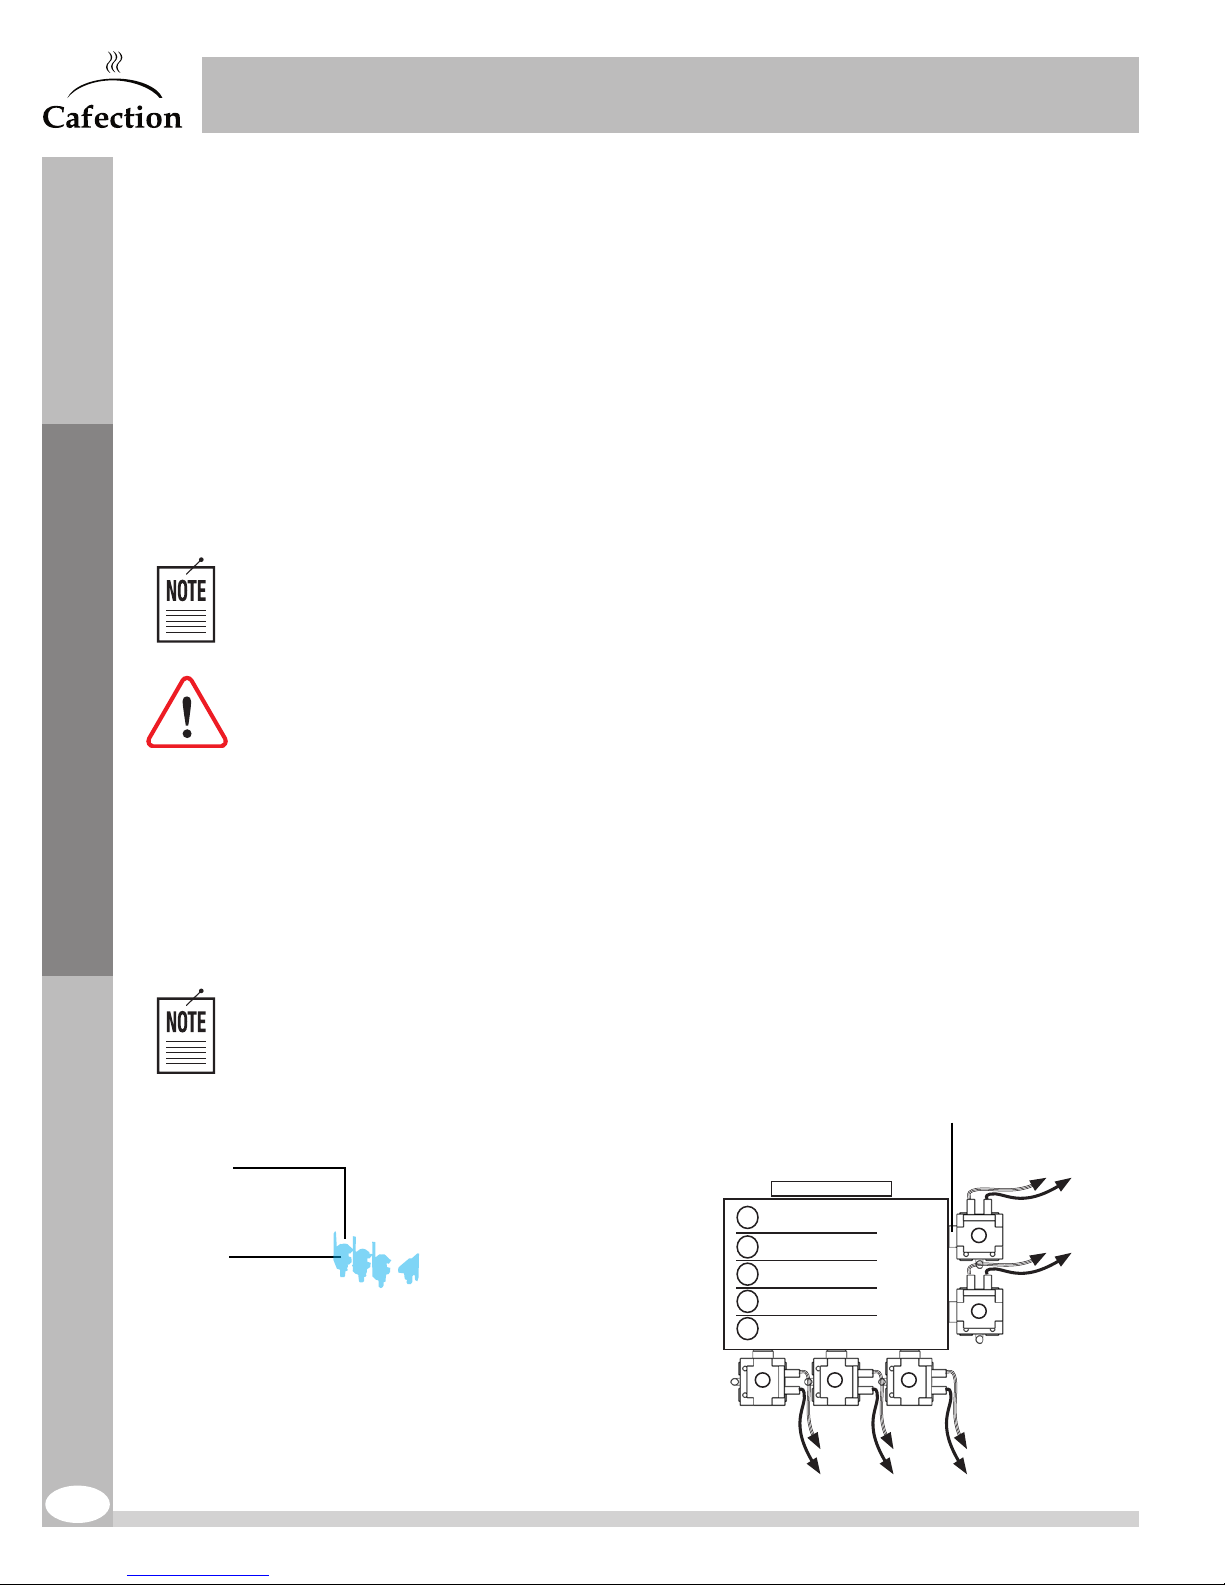
SERVICE & INSTALLATION MANUAL - Encore 29
17LAB26A
Heating Element Connector 1
Heating Element Connector 2
Ground Reference Probe
Temperature Probe
Thermal Disk Connector 1
Thermal Disk Connector 2
Low Water Level Sensor (S1)
High Water Level Sensor (S2)
2
1
4
3
5
8
7
6
S1
S2
GND / REF
BLACK SEW WIRE
WHITE
SEW WIRE
BLACK
SEW WIRE
TANK-GND
GREEN WIRE
BLUE
BLUE
WHITE
WHITE
TANK LID - TOP VIEW
www.cafection.com 800-561-6162
8.4 Outlet Valves
Inspection: quarterly
Preventive maintenance: every 10,000cycles
To avoid any issue related to mineral deposits, Cafection recommends rebuilding all outlet valves at
the same time.
Valve Leakage
Identify the leaking valve, change it or rebuild it.
If the leak originates from under the body of the valve or from the tank exit, try changing the conical
mounting seal in the first instance.
If the coffee valve is not watertight, water will accumulate in the brew chamber.
If it drips all night, the first coffee of the morning will be lukewarm.
A leakage will cause water to accumulate in the overflow tray, the flood will be
detected and an error message will be displayed on the screen.
Preventive Maintenance
Single valve
5X
Hot water
tank
WARNING! Water is VERY HOT!
Removing and Installing the Valves
If a water filtration system is installed on the brewer, it is recommended to inspect it
on a monthly basis.
1. Turn OFF the machine, then remove the back panel and the top hood.
2. Unplug the tank lid’s connectors and the valves’ connectors (see section8.5 for the
schema).
3. Completely drain water from the tank (see section9.1).
4. Remove the tubes.
5. Remove the hot water tank to access all valves (see section8.5).
6. Remove the valves. Replace or rebuild them.
7. Reinstall by repeating the steps in reverse order.
TANK LID - TOP VIEW
French Vanilla
1
Hot Water
2
Hot Chocolate
3
Milk Powder
4
Coffee
5
Conical mounting seals
RED WIRE
5
4
BLACK WIRE
66
1
2 3
RED WIRE
BLACK WIRE
ENCORE 29 Rev. 3 09-2017
Page 67
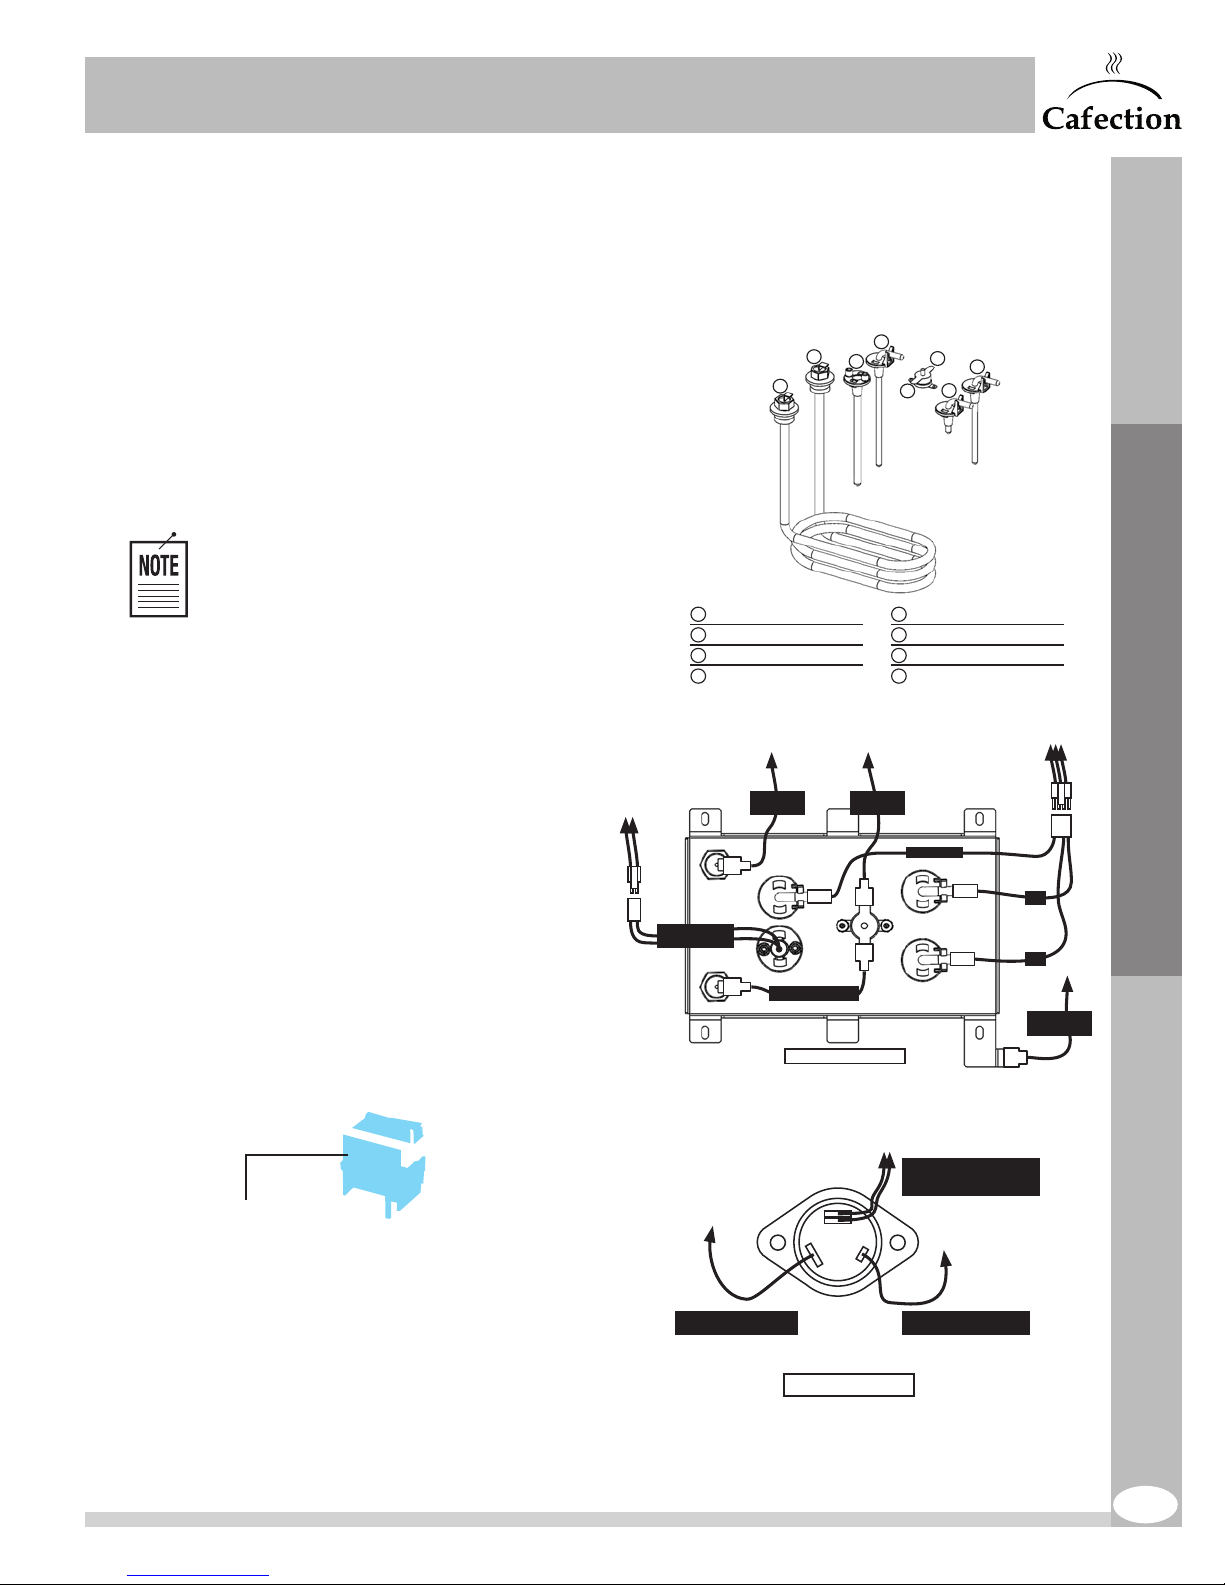
SERVICE & INSTALLATION MANUAL - Encore 29
17LAB26A
17LAB26A
Hot Water Tank
Heating Element Connector 1
Heating Element Connector 2
Ground Reference Probe
Temperature Probe
Thermal Disk Connector 1
Thermal Disk Connector 2
Low Water Level Sensor (S1)
High Water Level Sensor (S2)
1 5
3 7
2 6
4 8
2
1
4
3
5
8
7
6
17LAB26A
Heating Element Connector 1
Heating Element Connector 2
Ground Reference Probe
Temperature Probe
Thermal Disk Connector 1
Thermal Disk Connector 2
Low Water Level Sensor (S1)
High Water Level Sensor (S2)
2
1
4
3
5
8
7
6
S1
S2
GND / REF
BLACK SEW WIRE
WHITE
SEW WIRE
BLACK
SEW WIRE
TANK-GND
GREEN WIRE
BLUE
BLUE
WHITE
WHITE
TANK LID - TOP VIEW
TANK LID - TOP VIEW
2 3
4
5
RED WIRE
BLACK WIRE
French Vanilla
Hot Water
Hot Chocolate
Milk Powder
Coffee
1
2
4
5
3
1
www.cafection.com 800-561-6162
8.5 Hot Water Tank
Inspection: quarterly
Preventive maintenance: every 60,000 cycles
To avoid any issue related to mineral
deposits, Cafection recommends having
the water tank assembly delimed to
remove all scale in the unit. The heating
element, probes and sensors may also
need to be replaced.
Use a scale remover product such
as Scale Kleen by Everpure. See
the manufacturer’s instructions for
more details.
1. Turn off the machine and
remove the back panel.
2. Unplug the tank lid’s
connectors.
3. Completely drain water from
the tank (see section9.1).
4. Remove the tubes (valves
Single valve
and water tank).
5. Remove the tank (tight fit on
the tank shelf).
6. To reinstall, follow steps in
reverse order.
1
2
Heating Element Connector 1
1 5
2 6
Heating Element Connector 2
3 7
Ground Reference Probe
Temperature Probe
4 8
WHITE
SEW WIRE
WHITE
TEMPERATURE
PROBE WIRES
WHITE
BLACK SEW WIRE
TANK LID - TOP VIEW
3
4
6
Thermal Disk Connector 1
Thermal Disk Connector 2
Low Water Level Sensor (S1)
High Water Level Sensor (S2)
BLACK
SEW WIRE
GND / REF
BLUE
BLUE
A2 - DOUBLE CONNECTOR
BOTTOM CONN. : BLACK)
5
7
8
(TOP CONN. : RED
S1
S2
TANK-GND
GREEN WIRE
Preventive Maintenance
ENCORE 29 Rev. 3 09-2017
A1 - BLUE CONNECTOR
SEW WIRE
POWER TRIAC
GATE - RED CONNECTOR
SINGLE WIRE
67
Page 68
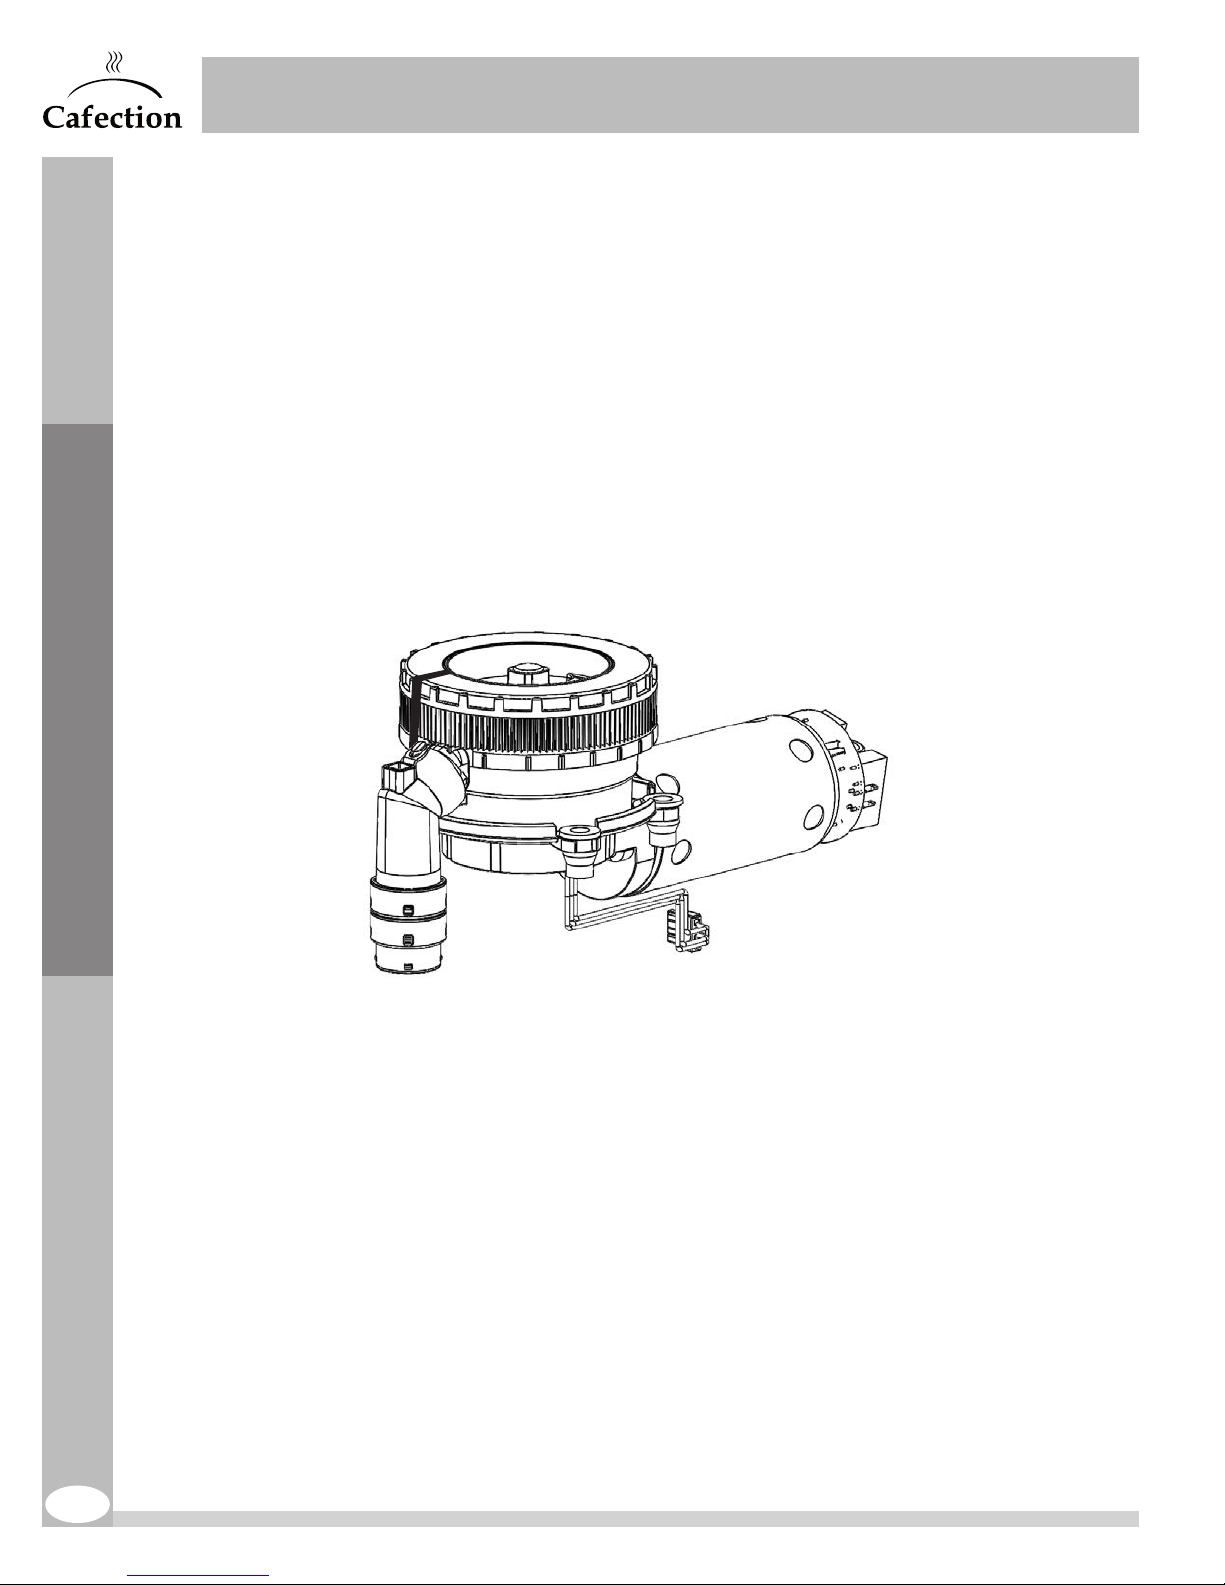
8.6 Grinder
Inspection: quarterly
Preventive maintenance: every 80,000 cycles
Cafection’s commercial grade burr grinder ensures perfect coffee grinding.
The ground coffee particles’ size playing a key role in the coffee extraction and taste, it is important
to change the grinder’s burrs in accordance with the preventive maintenance schedule.
Contact [email protected] or 800-561-6162, ext.311, to order parts or for additional
information.
SERVICE & INSTALLATION MANUAL - Encore 29
www.cafection.com 800-561-6162
Preventive Maintenance
68
ENCORE 29 Rev. 3 09-2017
Page 69
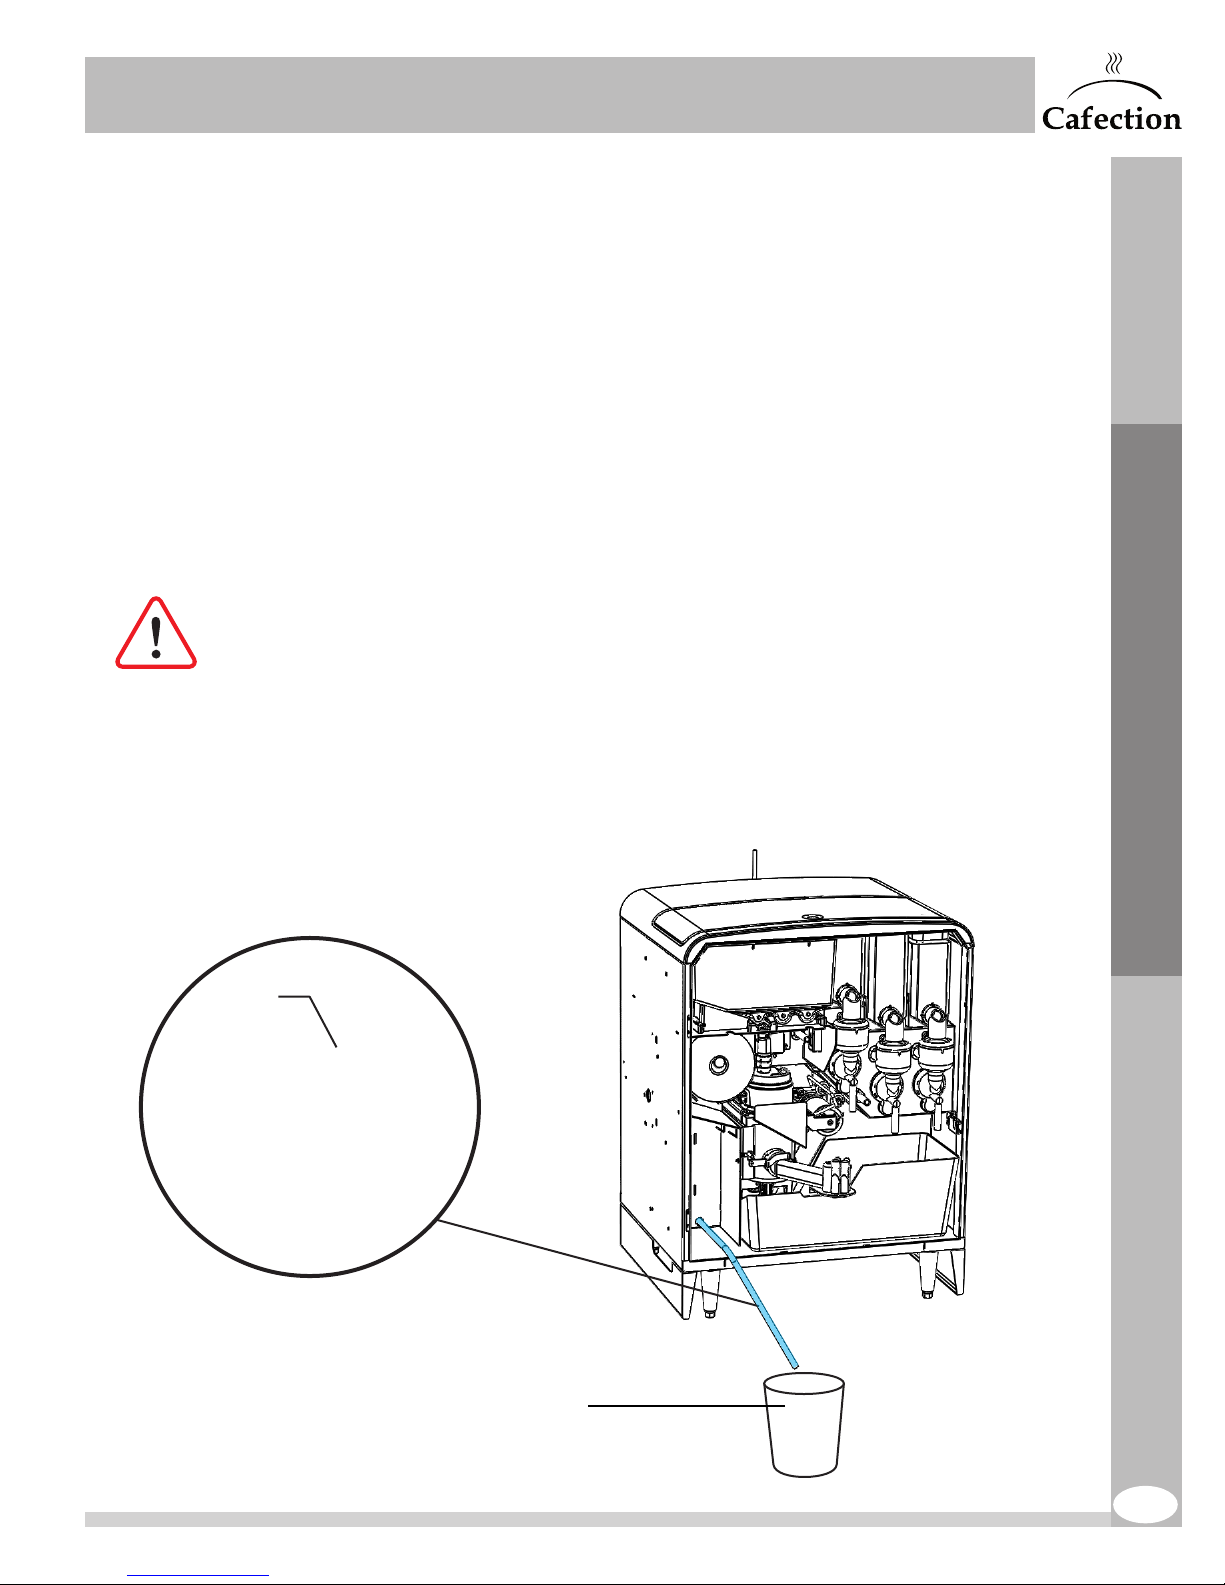
SERVICE & INSTALLATION MANUAL - Encore 29
www.cafection.com 800-561-6162
9 PARTS MAINTENANCE
This section covers the servicing of various parts of the unit.
9.1 Hot Water Tank Draining
Cafection recommends allowing three (3) hours for the water to cool down prior to emptying
the tank. Make sure a bucket of a minimum of 0.8 gallons (3L) suitable for holding hot water is
available.
1. Turn off the brewer and unplug it from the electrical outlet.
2. Cut off the main water supply of the machine.
3. Open the front door.
4. Locate the drain tube (red plug).
5. Place the tube into the bucket and remove the red plug.
WARNING! Water may be hot!
Parts Maintenance
6. Completely drain water from the tank.
7. Reinstall by repeating the steps in reverse order.
Red plug
Drain tube
ENCORE 29 Rev. 3 09-2017
Bucket
(0.8 gallon (3 L)
minimum)
69
Page 70
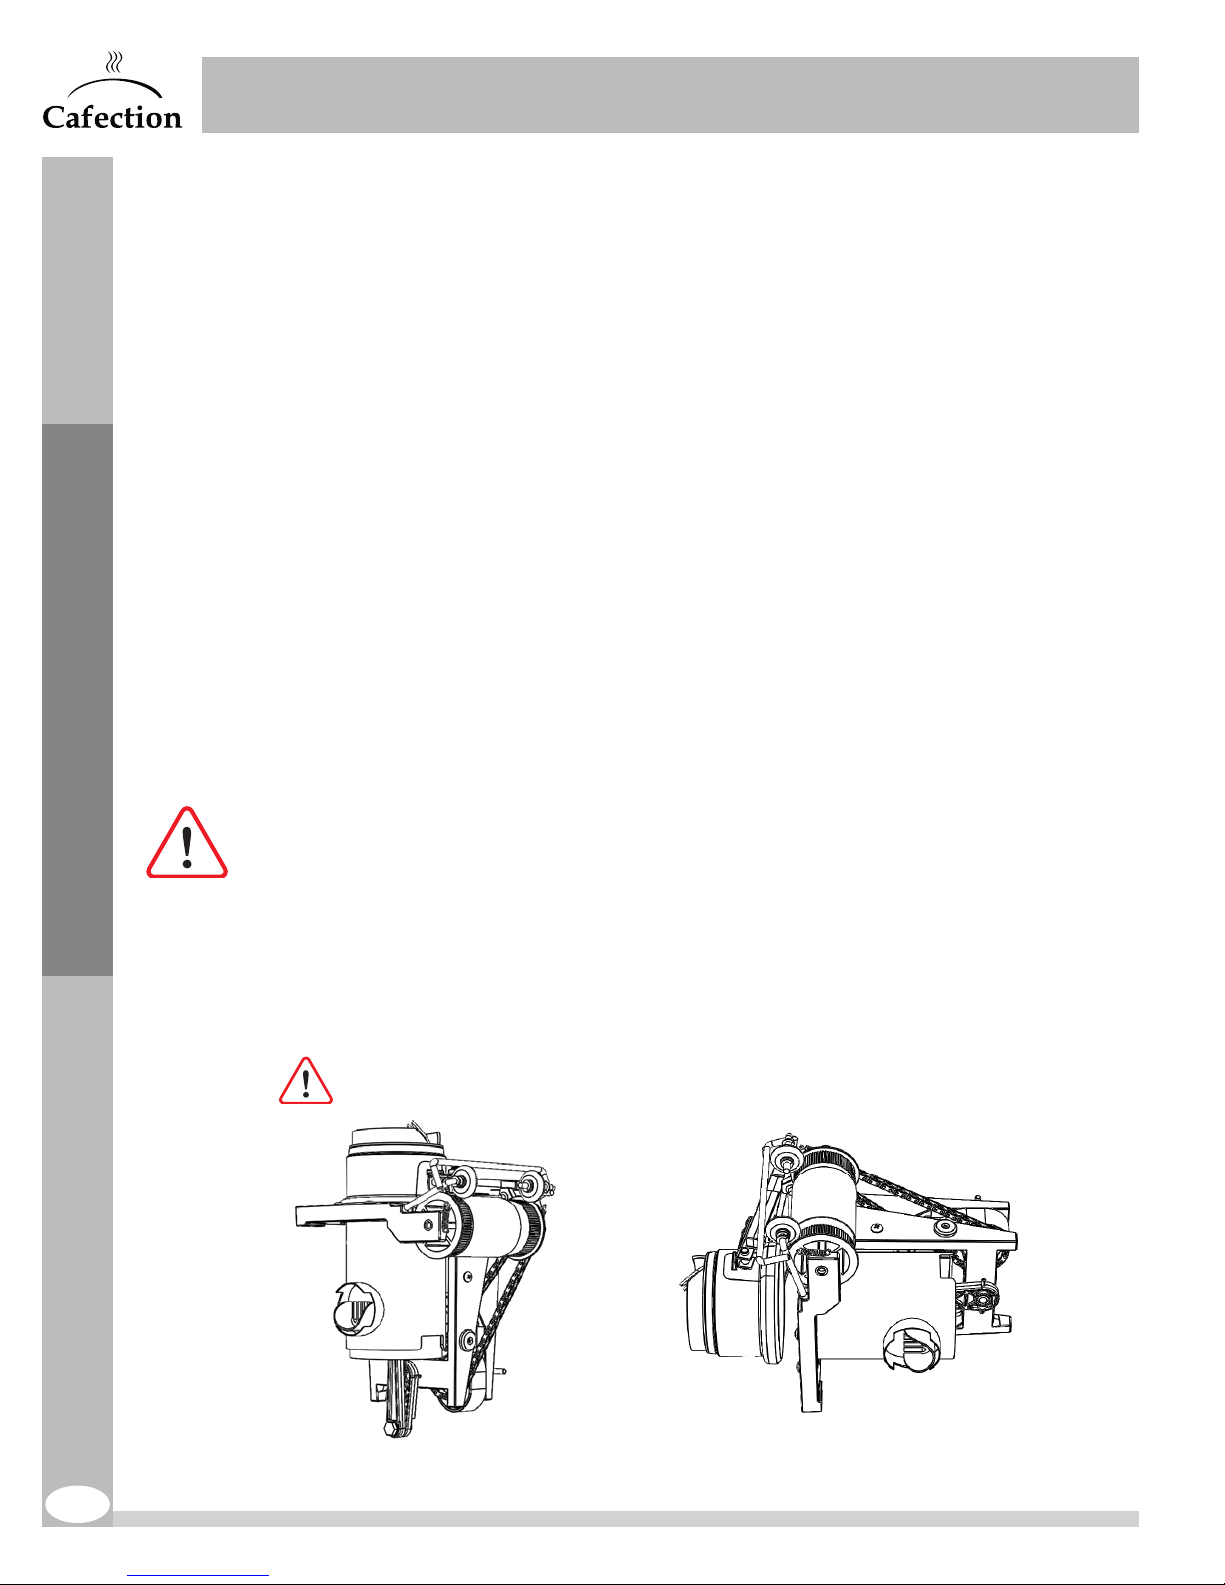
9.2 Shutdown and Storage
If this brewing equipment needs to be stored for an extended period of time, follow this procedure
to avoid any risk of damage to the machine.
1. Turn off the unit and unplug it from the power outlet.
2. Completely drain the hot water tank (see section9.1).
3. Empty the soluble canisters and the bean hopper.
4. Clean all parts of the unit (see section7).
5. Disconnect the white and the black SEW wires from the heating element (see section8.5).
9.2.1 Storing the Brew Group
It is important to store the brew group properly when it is not installed in the brewer. Always
disengage the brew group clutch. To do so, use the provided tool to turn the pin clockwise
until the brew chamber lifts up. This action will release the pressure on the screen and seal.
The brew group must be stored on its back or its left side.
SERVICE & INSTALLATION MANUAL - Encore 29
www.cafection.com 800-561-6162
Parts Maintenance
Do not sit the brew group on its right side (on the wheels and yoke) or straight up.
These positions make it unstable and could cause it to fall.
Store the brew group opened
and in a stable position.
70
ENCORE 29 Rev. 3 09-2017
Page 71
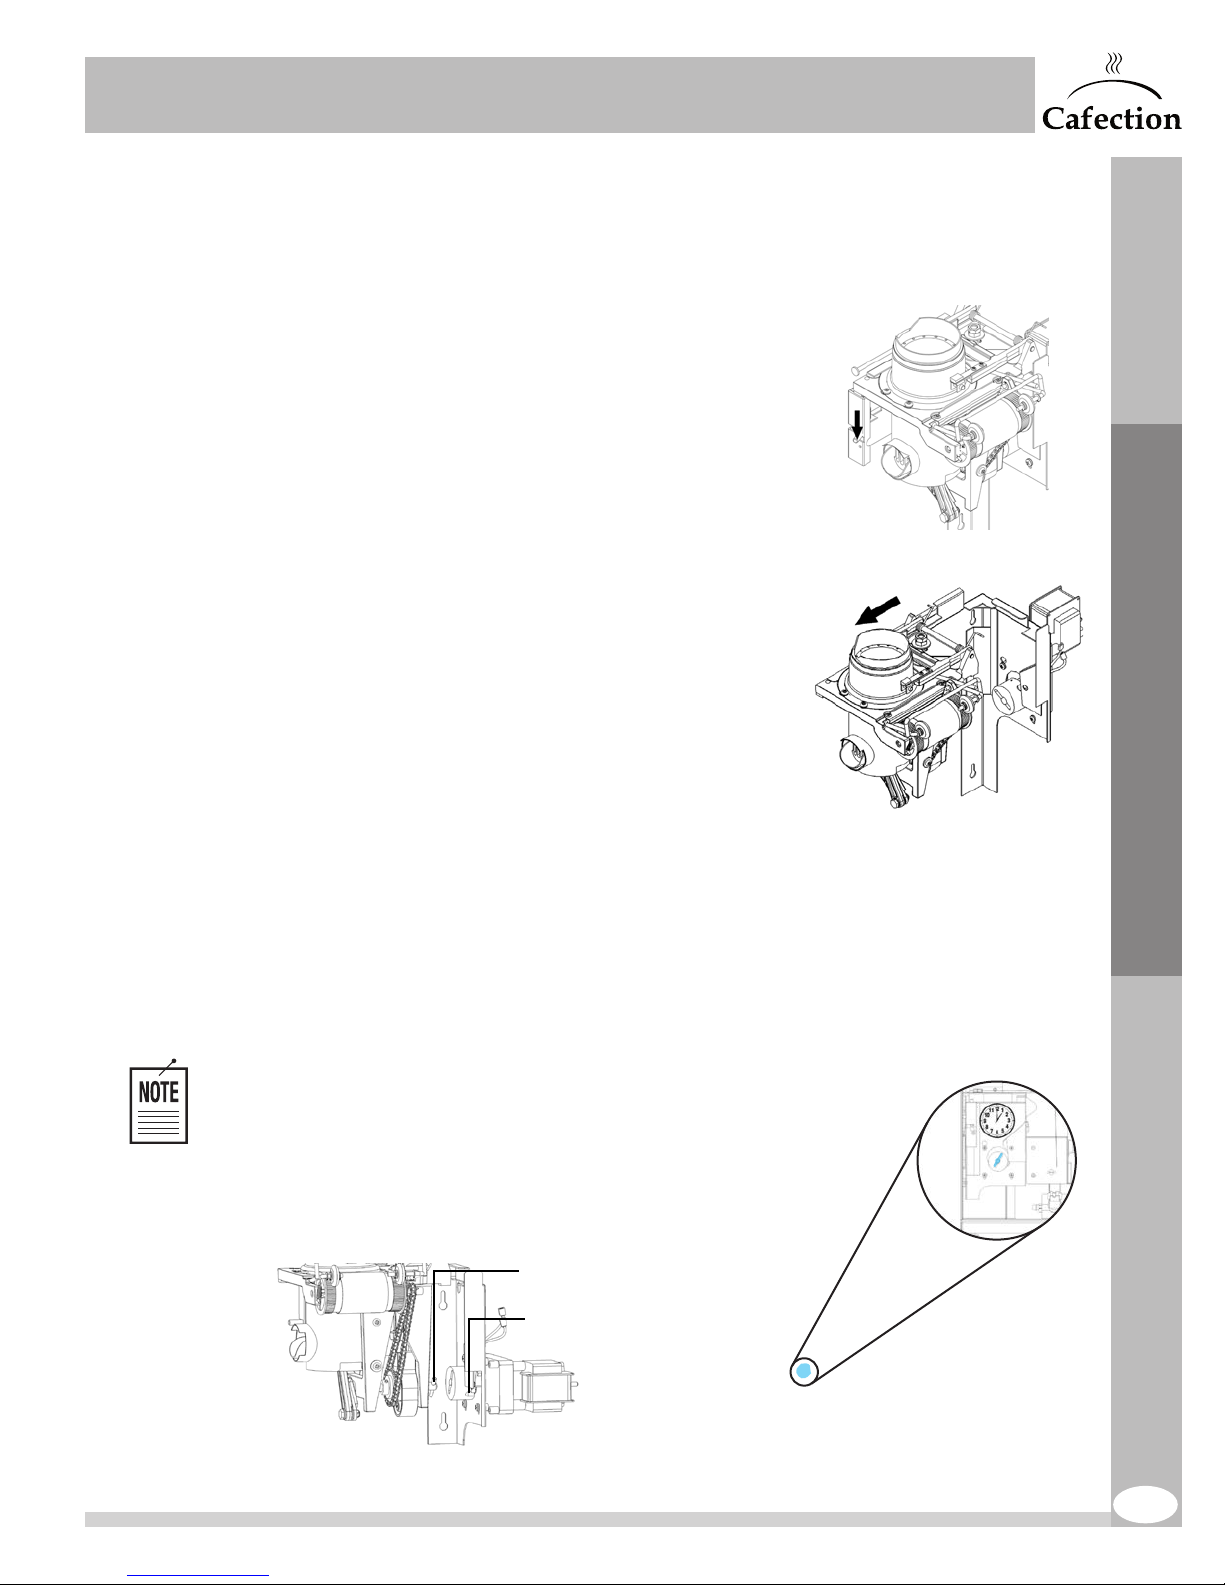
SERVICE & INSTALLATION MANUAL - Encore 29
www.cafection.com 800-561-6162
9.3 Brew Group Assembly
Removing the brew group
1. Open the brewer’s door.
2. Access Service mode (see section6).
3. Press on the "Filter Paper Install" button (see section6.2).
4. Wait for the brew chamber to open. Cut the filter paper with
scissors on both sides of the brew chamber.
5. Remove the coffee spout.
6. Support the brew group assembly by holding the aluminum
frame on the right side of the brew group assembly.
7. With the left hand, push the locking pin down, then right.
8. Pull the brew group assembly straight outward.
Installing the brew group
7.
Parts Maintenance
8.
1. Make sure that the dog drive pin in the back of the brew group is at 1 o’clock.
2. Align the left edge of the brew group on the left bracket support.
3. Push the brew group back completely into the dog drive motor.
4. Push the brew group’s retaining pin to the left, then up.
To clean the brew group, see section 7.8.6.
Pin
Dog drive
ENCORE 29 Rev. 3 09-2017
71
Page 72
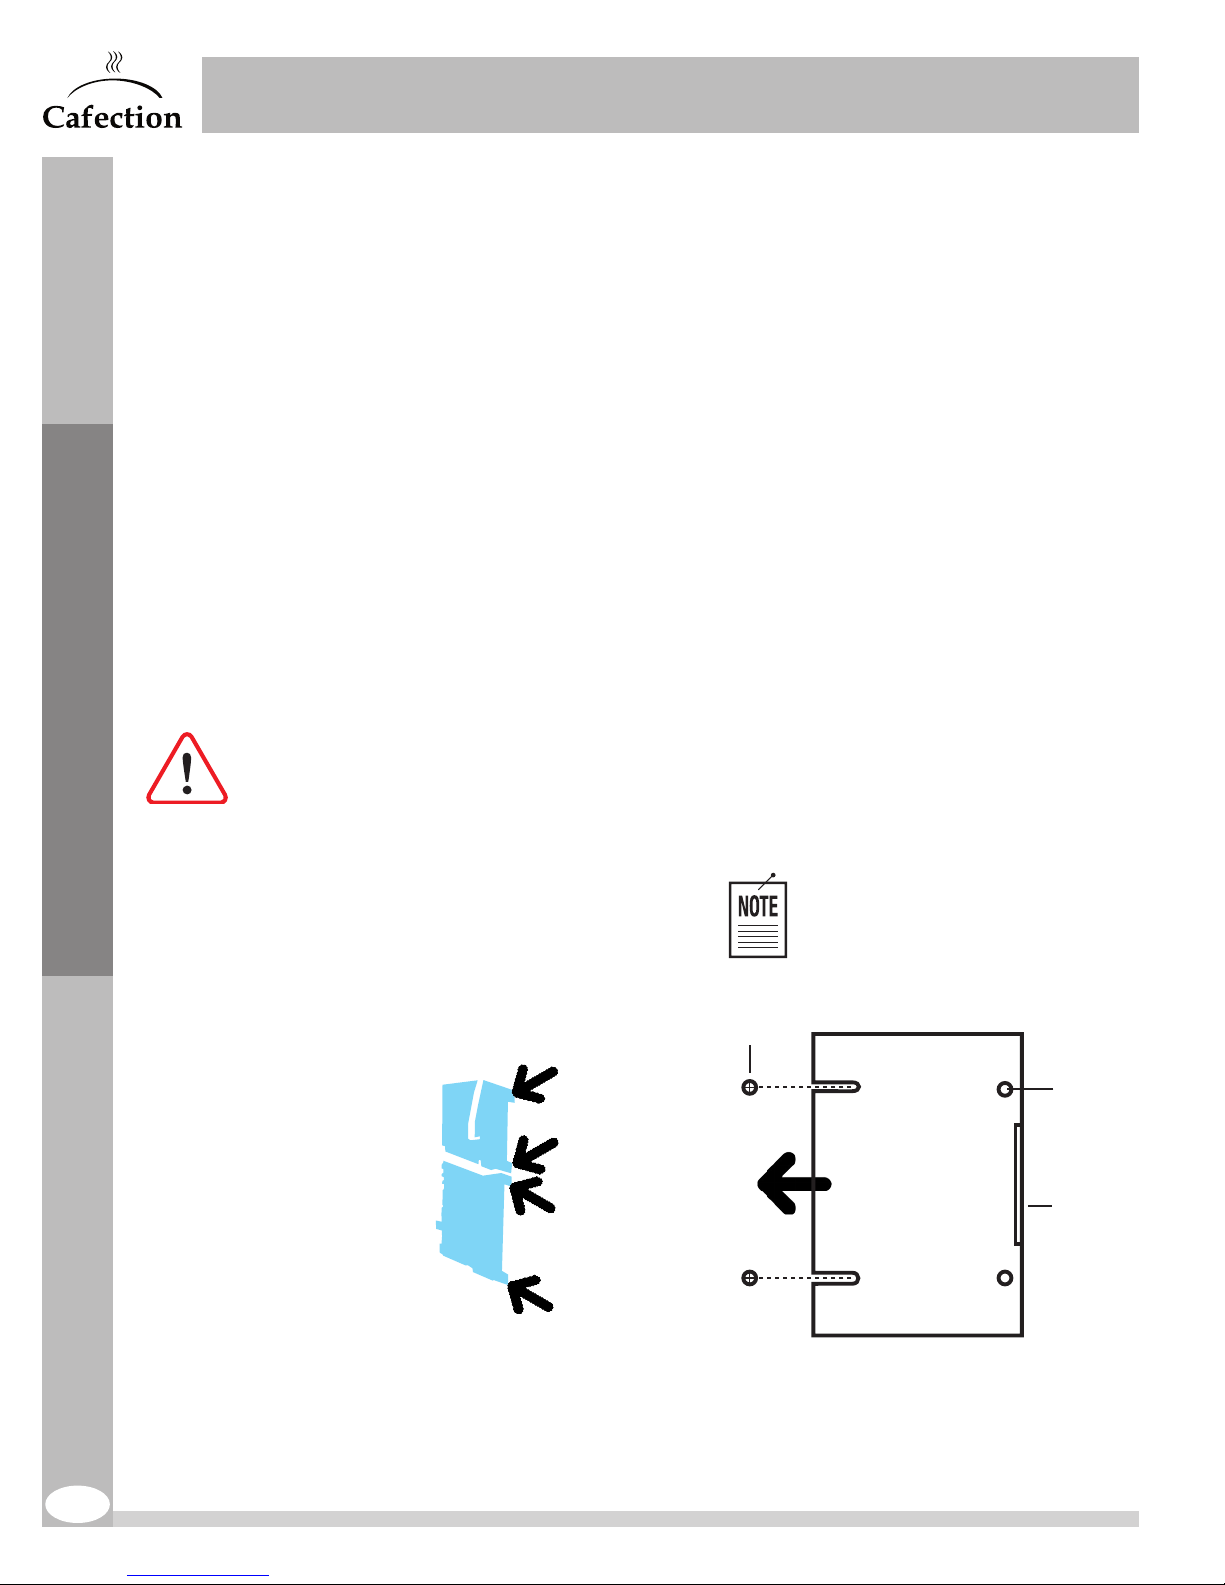
9.4 Main Board & Computer
Like any electronic main board, the one in this brewer is very sensitive to power surges inside
buildings. If an issue persists after changing the main board, verify the power source. Use the
necessary precautions for handling static sensitive devices.
Removing
1. Turn off the machine and unplug it from the outlet.
2. Remove the back panel.
3. Unplug the connections on the main board or the computer clockwise from the top left corner
(see annex3).
4. Unscrew the two (2) screws keeping the main board support or the computer support in place.
5. Pull the main board support or the computer support outward the unit.
6. Unscrew the six (6) screws keeping the main board on its support or the four (4) screws
keeping the computer on its support.
7. Remove the main board or computer.
8. To reinstall, follow the steps in reverse order.
SERVICE & INSTALLATION MANUAL - Encore 29
www.cafection.com 800-561-6162
Parts Maintenance
All cables must be reinstalled in the correct order and direction before turning the
power on. Otherwise, the board will fail and it may be damaged.
To reinstall, slide the support on the
back screws and lock the support
with the support screws.
Back
screws
Hole for
support
Supports
screws
Support
screws
Handle
72
ENCORE 29 Rev. 3 09-2017
Page 73
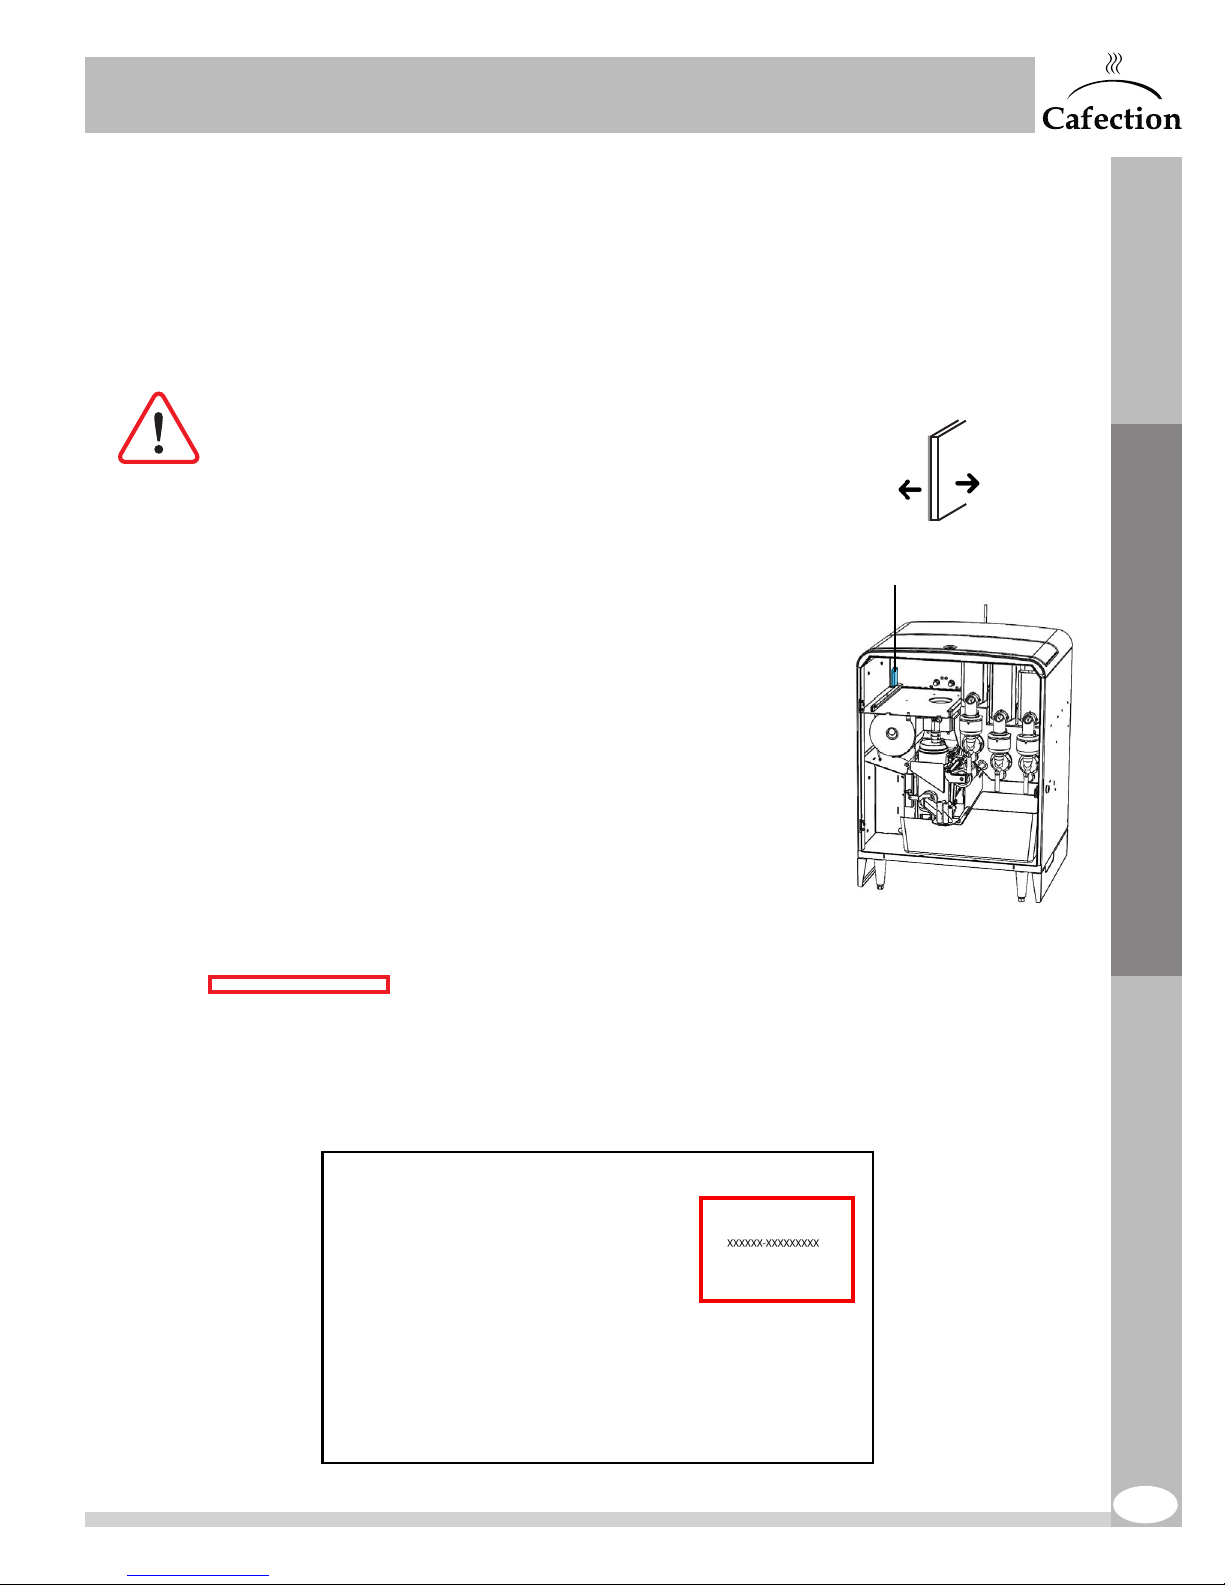
SERVICE & INSTALLATION MANUAL - Encore 29
www.cafection.com 800-561-6162
9.5 Flash Card Replacement
The flash card can be replaced in order to improve and update the machine’s software.
The flash card holds the GUI software (Graphical User Interface).
All drink recipes, sales counters and other settings are stored in the flash card.
Before beginning, turn power OFF.
To remove the flash card:
Colored
side
White side
1. Turn OFF the coffee brewer.
2. Open the main door and remove the bean hopper.
3. Pull the flash card outward.
To install the flash card:
1. Make sure the colored side of the card faces the left.
2. Insert the flash card and push it GENTLY to make sure no
damage is done (slide it on top and bottom tracks).
3. Reinstall the bean hopper and close the door.
4. Turn power back ON.
5. At the startup, the screen will indicate the flash card version.
Enter the serial number of the brewer under the Admin tab to ensure proper internet
network communication (see section 6.6.6).
Parts Maintenance
Flash card
ENCORE 29 Rev. 3 09-2017
73
Page 74
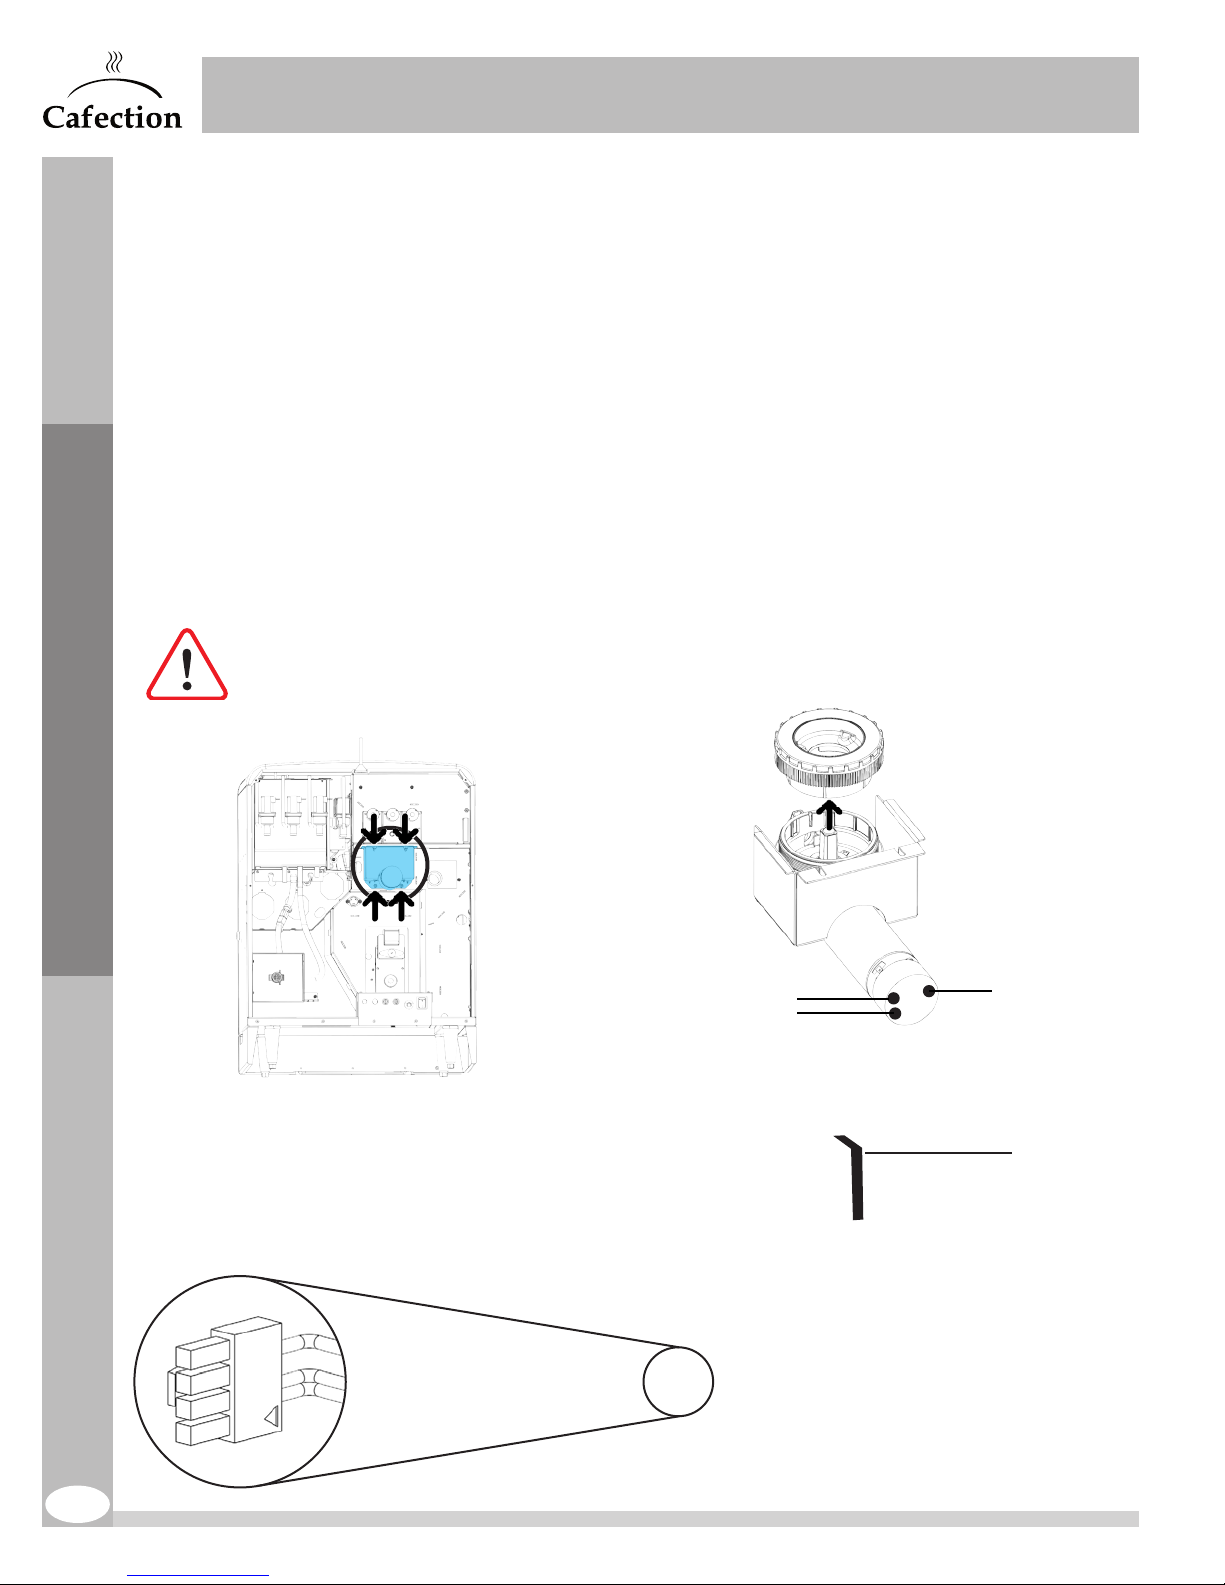
9.6 Grinder
Disassembling the coffee grinder
1. Unplug the main power cord.
2. Open the brewer’s door and remove the ground coffee chute.
3. Remove the back panel.
4. Unplug the grinder’s wires and unscrew the four (4) nuts securing the coffee grinder with a
3/8’’socket.
5. Pull out the coffee grinder assembly.
6. Unscrew the grinder’s top part.
7. Sweep the particles from the blades with a brush.
8. Follow steps in reverse order to reinstall the grinder.
9. To adjust the grinder milling, screw the top part to the end, then go back to align the red line.
Do not lose the metal spacer located between bottom part and top part.
When changing the burrs, do not lose the plastic spacer between the burrs and the
top part.
SERVICE & INSTALLATION MANUAL - Encore 29
www.cafection.com 800-561-6162
Parts Maintenance
Red wire
Space
Blue wire
Black wire
Black wire
White wire
Green wire
Index red line
74
ENCORE 29 Rev. 3 09-2017
Page 75
SERVICE & INSTALLATION MANUAL - Encore 29
www.cafection.com 800-561-6162
10 TROUBLESHOOTING
There are two (2) types of service messages: Warnings and Errors. Warnings will temporarily disable some
features, while errors put the coffee brewer out of order.
10.1 Warning Messages List
Filter Paper Roll Empty
The unit is out of filter paper. All coffee-based recipes will be temporarily disabled on the selection
screen. Only hot water and soluble drinks will be available. Install a new filter paper roll (see
section4.9).
Advanced tech tip: the status of the filter paper sensor can be monitored using the
green LED DS34 and 35 on the main board of the machine (see annex3).
Rinse Required Soon
The number of drinks served has reached the "Rinse at" parameter set in Service mode (see
section 6.6.1). All drinks will continue to be dispensed. The warning will be displayed on the screen
until a rinse cycle is performed on the machine (see section7.1).
Waste Bin Full
The number of coffee drinks served has reached the "Waste bin max" parameter set in Service
mode (see section 6.6.1). All coffee-based recipes will be temporarily disabled on the selection
screen. Only hot water and soluble drinks will be available. Empty the waste bin and reset its
counter (see section6.2).
Brew Group Starting Position Switch Error
The brew group failed to detect its starting position. The following parts might be defective:
- Brew group motor.
- Cam switch or pin of the dog drive wheel.
- Brew group starting position switch.
Remove the brew group assembly from the coffee machine. Press the "Activate Brew Group"
button on the error screen. The brew group motor will be activated and will stop when the brew
group starting position switch hits the hole in the cam switch. It will then be possible to verify if the
parts are working properly.
Troubleshooting
Advanced tech tip: the status of the brew group starting position switch can be
monitored using the green LEDDS33 on the main board of the machine. At starting
position (open contact), the light is off (see annex3).
ENCORE 29 Rev. 3 09-2017
75
Page 76
10.2 Error Messages List
Communication with the Main Board Has Been Lost.
The link between the computer screen and the coffee brewer is broken. The main board of the
brewer might be out of power.
- Check the overflow tray. It must be empty and dry.
- Check the 5 A and 15 A circuit breakers located on the back of the unit.
- Check the electrical connections (see annex3).
Broken Link Between Main Board and Thermostat.
The link between the thermostat (managed by the computer) and the coffee brewer is broken.
Check connection between computer and main board.
Water Temp. Sensor Defective (open contact).
The water tank temperature probe is defective or unplugged from the thermostat
(see section3.8).
Water Temp. Sensor Defective (short circuit).
The water tank temperature probe is defective due to a short circuit (see section3.8).
SERVICE & INSTALLATION MANUAL - Encore 29
www.cafection.com 800-561-6162
Troubleshooting
Water in the Overflow Tray.
Verify if there is water in the overflow tray and make sure no water is touching the two (2) water
probe wires.
Advanced tech tip: the status of the water probes can be monitored using the green
LEDDS30 (see annex3).
Low Water Level in the Tank.
The water tank failed to fill completely within the prescribed time. The water inlet valve is
deactivated for safety reasons.
- Maximum filling time is four (4) minutes when the power switch of the coffee brewer has been set
to the ON position.
- Maximum filling time is two (2) minutes after the first tank fill.
Check the water supply line to ensure that the pressure is adequate (between 20 psi and 80 psi). If
the machine uses a waterline filter, it might be worn out and needs to be replaced.
Press on the "Restart Filling" button on the error screen to restart the tank filling process.
Water Tank Not Full. Please Wait While Filling (1 to 3 minutes).
After setting the power switch of the machine to the ON position, this message will be displayed
until the water tank is full.
Water Temperature Not High Enough. Please Wait.
The machine will display this message and stop dispensing drinks if the water temperature of the
tank drops below the "Warming up (F)" temperature set in Service mode (see section 6.6.1). To
disable this feature, set the warming up temperature to 0.
76
ENCORE 29 Rev. 3 09-2017
Page 77
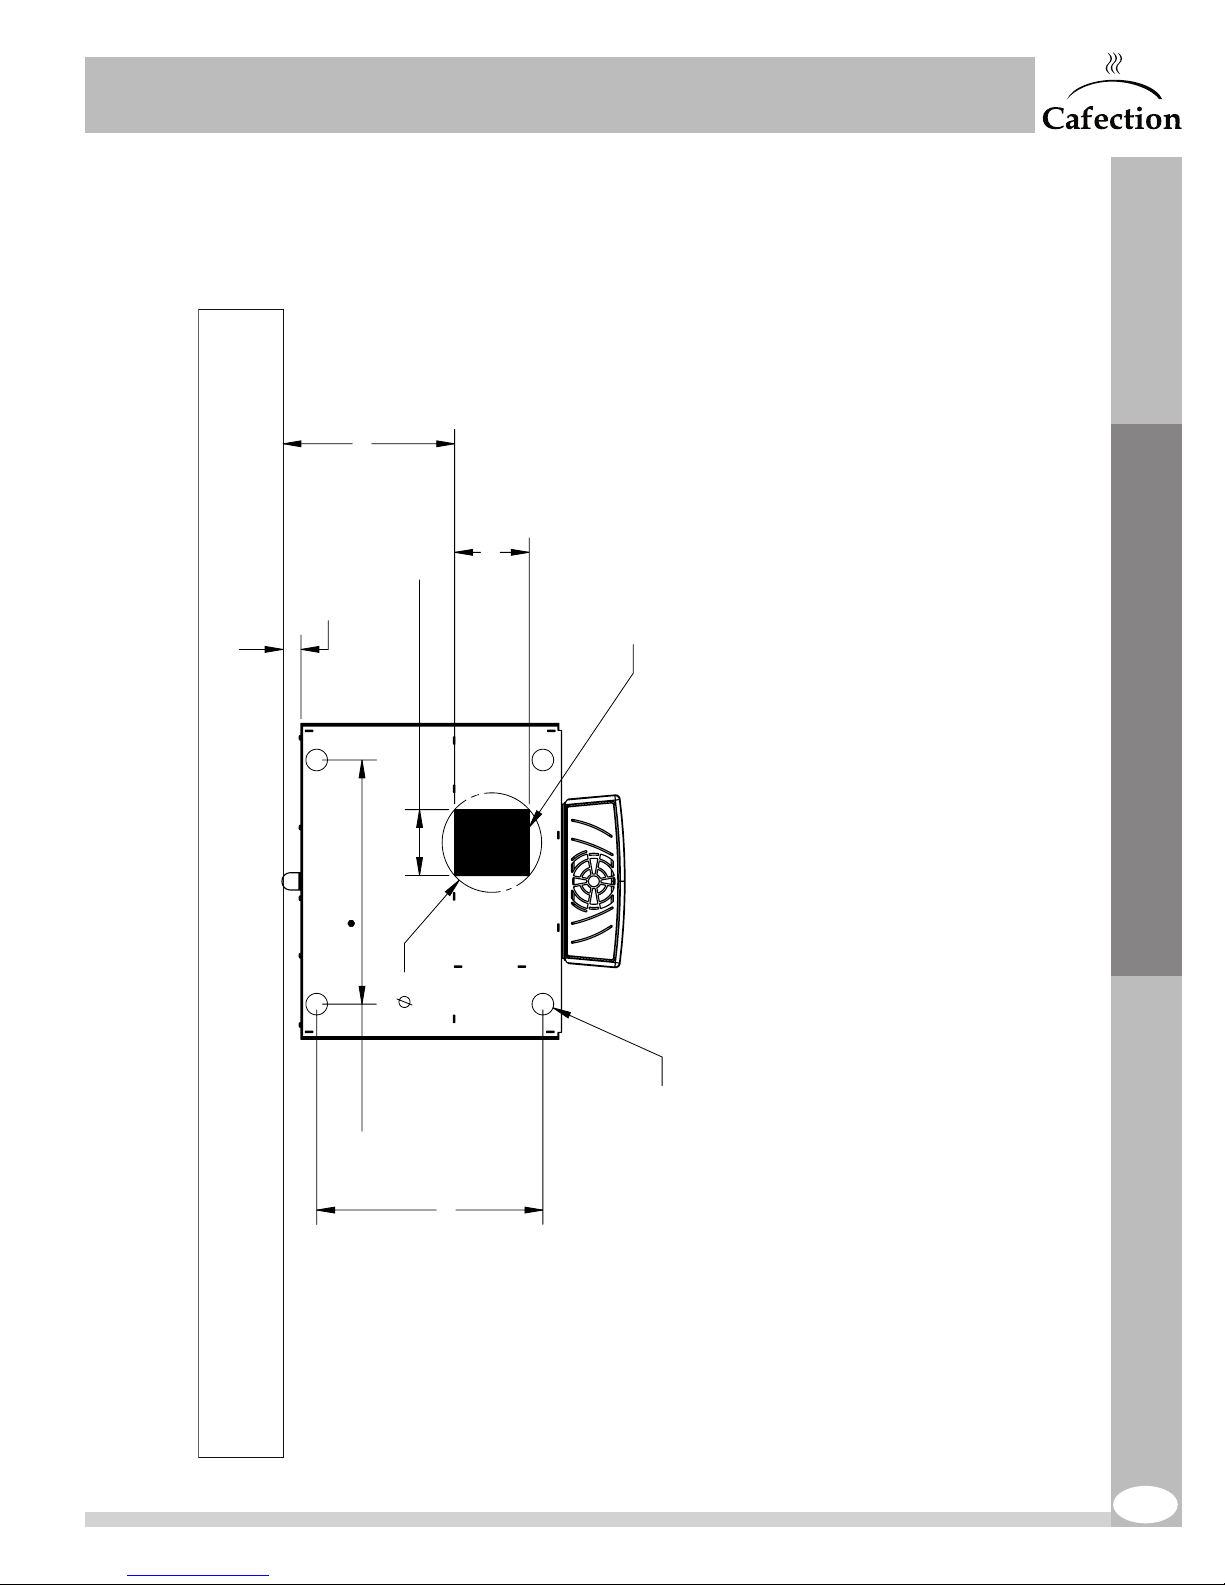
SERVICE & INSTALLATION MANUAL - Encore 29
LEVELLING FEET (4X)
''HOLE EDGES SHOULD BE SEALED WITH SILICONE OR AN APPROPRIATE
SEALANT FOR PROTECTION AGAINST WATER DAMAGE''
www.cafection.com 800-561-6162
ANNEX 1 WASTE CHUTE POSITION
12"
1 1/4"
MINIMAL
CLEARANCE
4 1/2"
7"
5 1/4"
CHUTE HOLE
Annex 1
17"
WALL WALL
ENCORE 29 Rev. 3 09-2017
15 3/4"
COUTERTOP COUTERTOP
77
Page 78
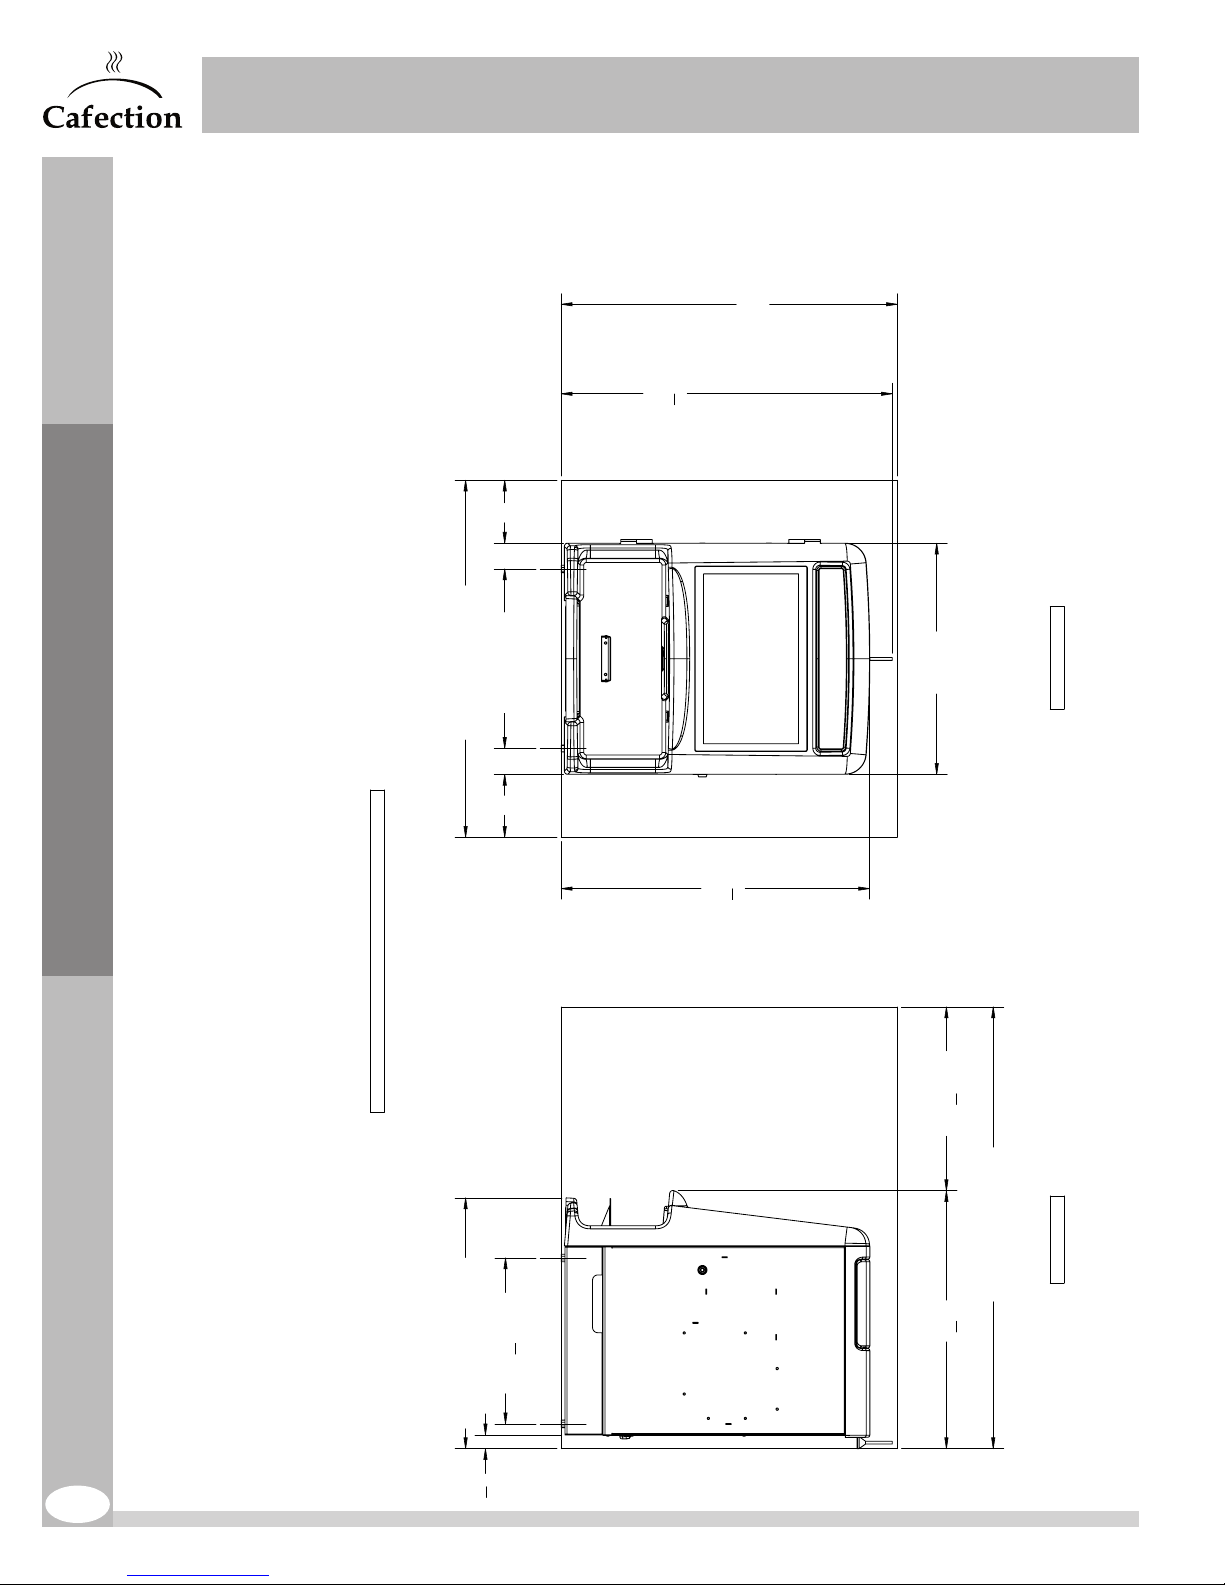
SERVICE & INSTALLATION MANUAL - Encore 29
www.cafection.com 800-561-6162
ANNEX 2 REQUIRED CLEARANCE
Annex 2
MAX 5 FEET DISTANCE OF ELECTRICAL OUTLET
6" 6"
REQUIRED CLEARANCE
BETWEEN FOOT
17"
34"
LEGS
REQUIRED CLEARANCE
32"
HEIGHT WITH ANTENNA
31
1
2
"
LARGEUR
WIDTH
22"
FRONT VIEW
MIN. COUNTERTOP DEPTH
BETWEEN FOOT
15
24"
3
4
"
LEGS
HEIGHT
29
1
4
"
DOOR OPEN
17
1
2
"
REQUIRED CLEARANCE
42"
DEPTH
24
1
2
"
SIDE VIEW
78
1
1
4
"
ENCORE 29 Rev. 3 09-2017
Page 79
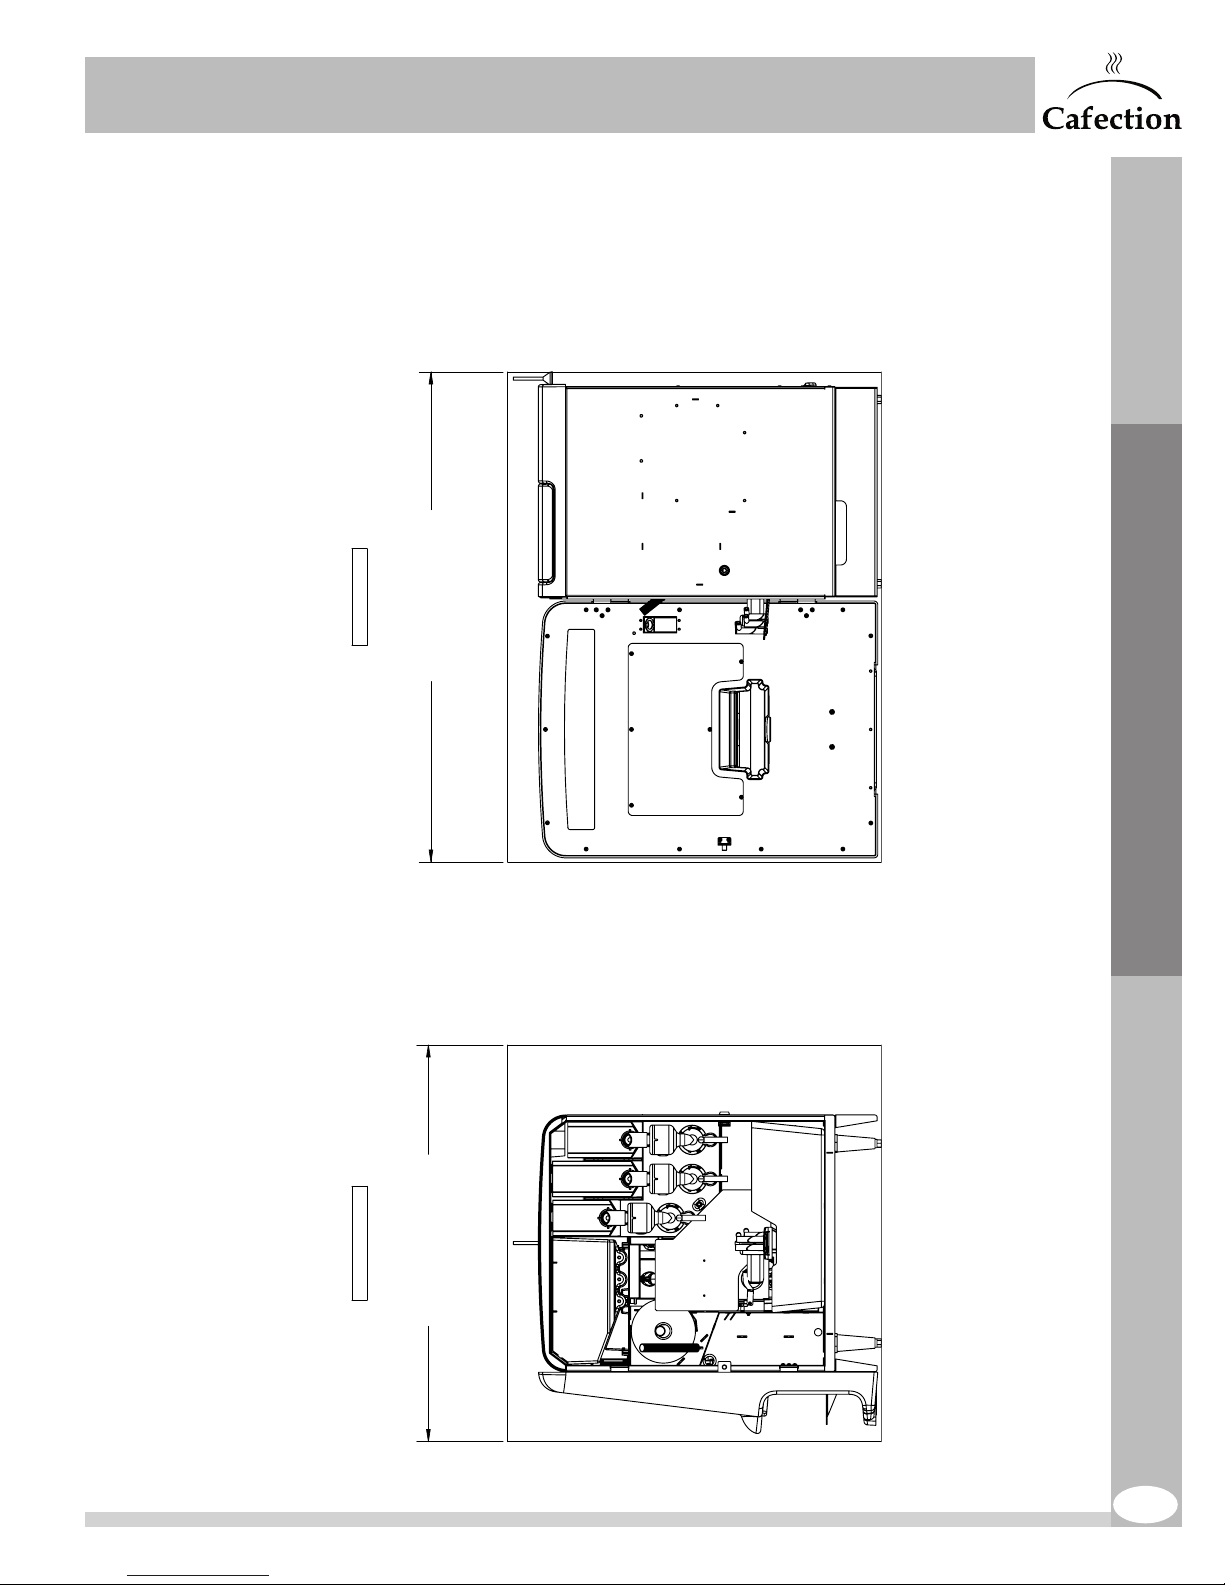
SERVICE & INSTALLATION MANUAL - Encore 29
REQUIRED CLEARANCE
www.cafection.com 800-561-6162
42"
SIDE VIEW
REQUIRED CLEARANCE
Annex 2
FRONT VIEW
ENCORE 29 Rev. 3 09-2017
34"
79
Page 80
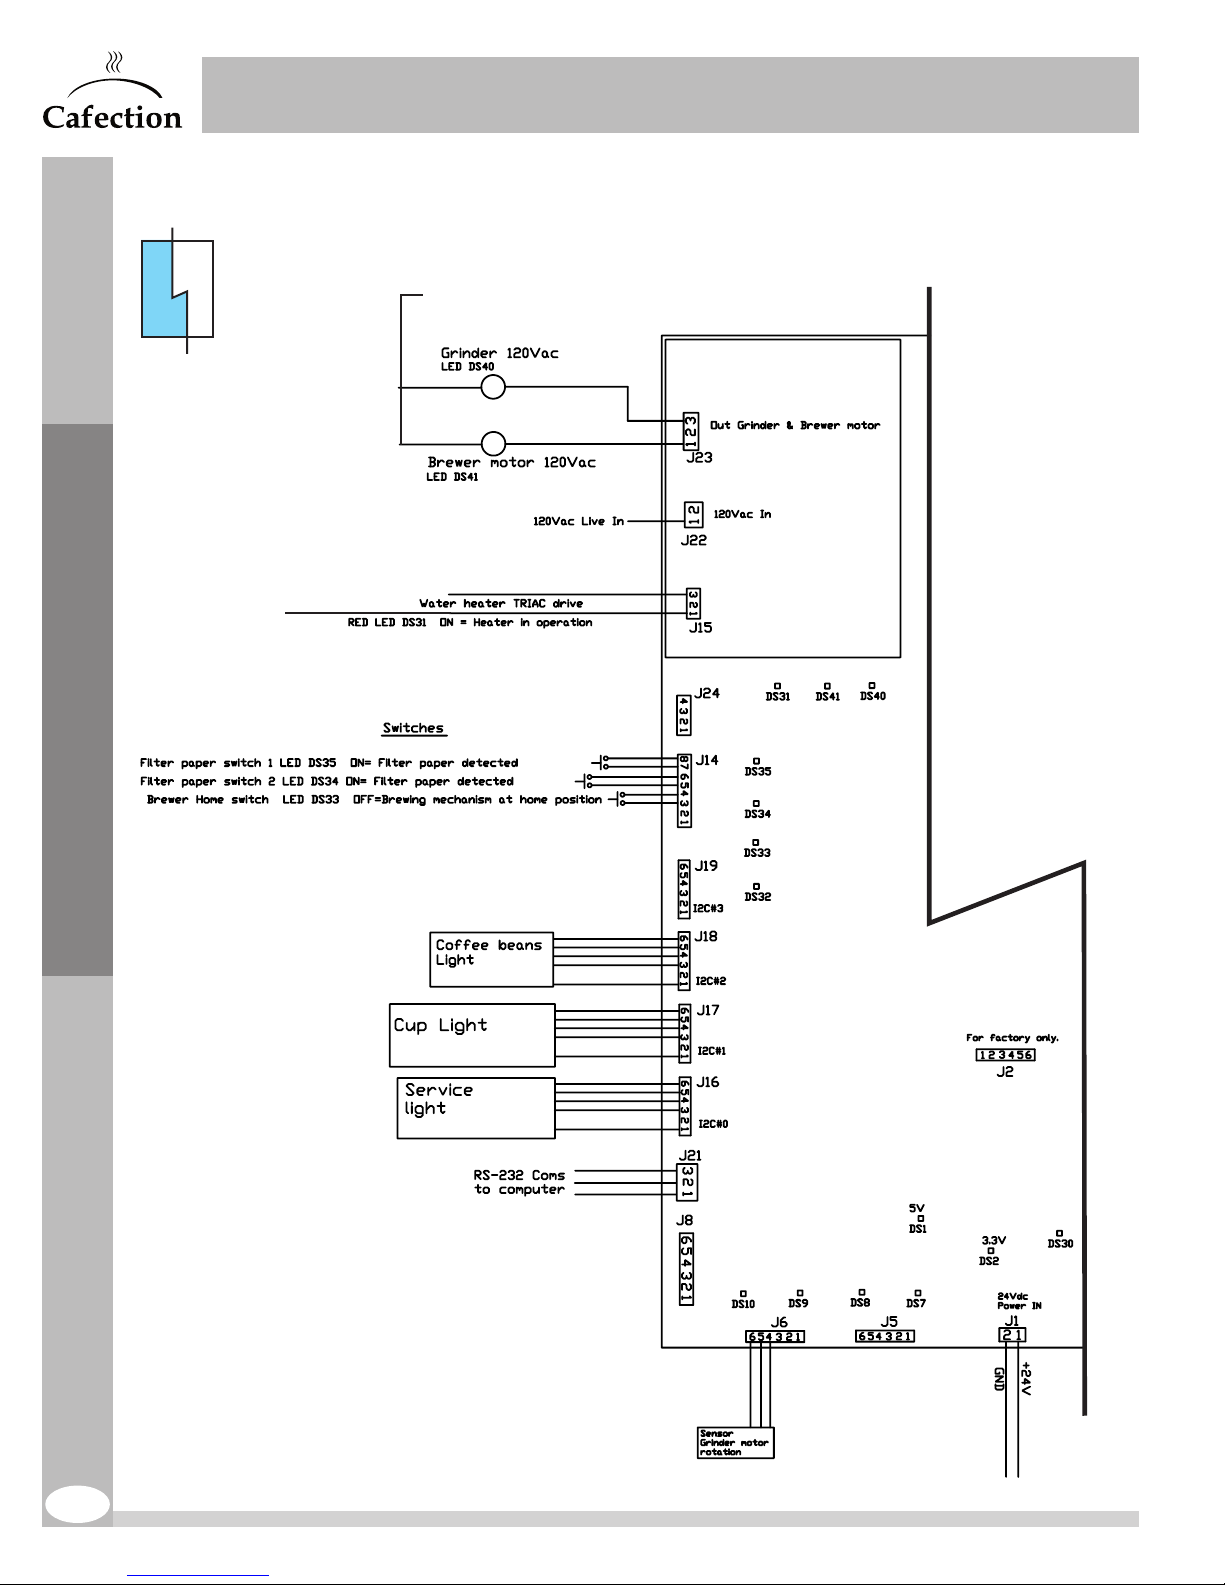
ANNEX 3 MAIN BOARD
SERVICE & INSTALLATION MANUAL - Encore 29
www.cafection.com 800-561-6162
Annex 3
1/2
120 Vac
120V AC
Return / Neutral
80
ENCORE 29 Rev. 3 09-2017
Page 81
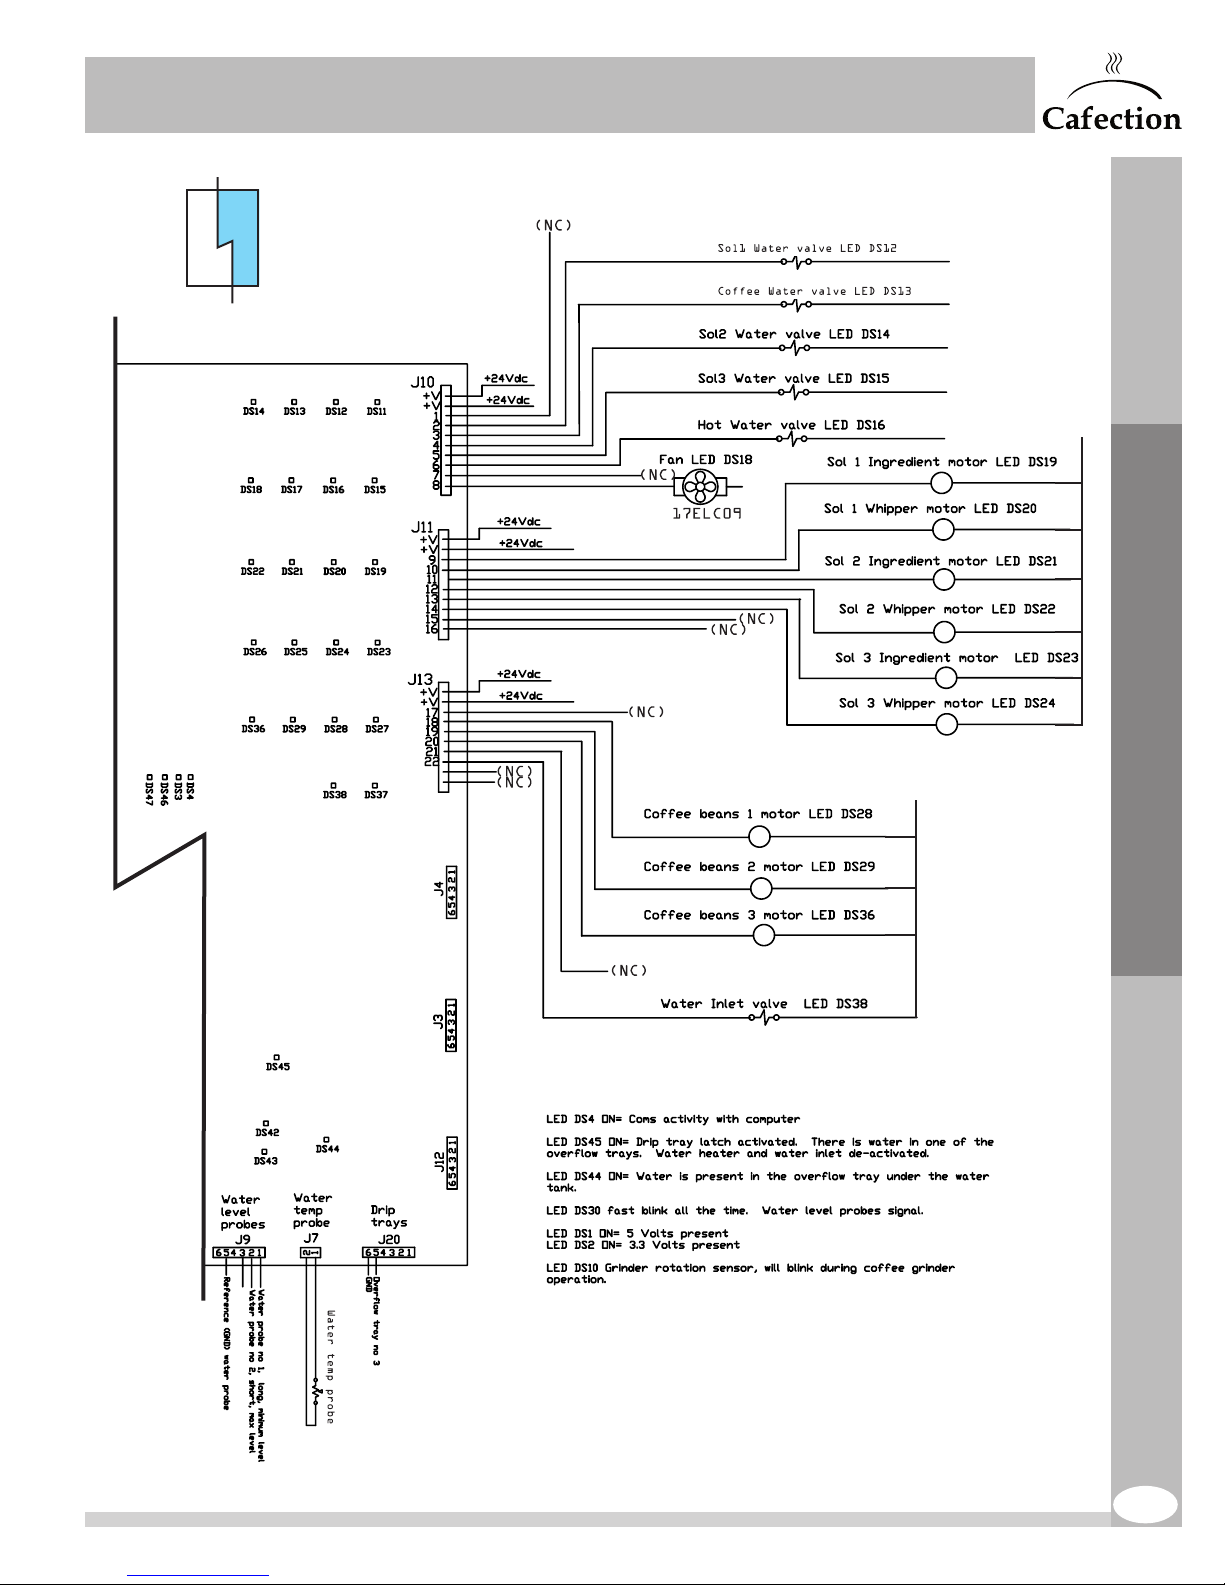
SERVICE & INSTALLATION MANUAL - Encore 29
www.cafection.com 800-561-6162
2/2
+24 V DC
Annex 3
+24 V DC
ENCORE 29 Rev. 3 09-2017
81
Page 82
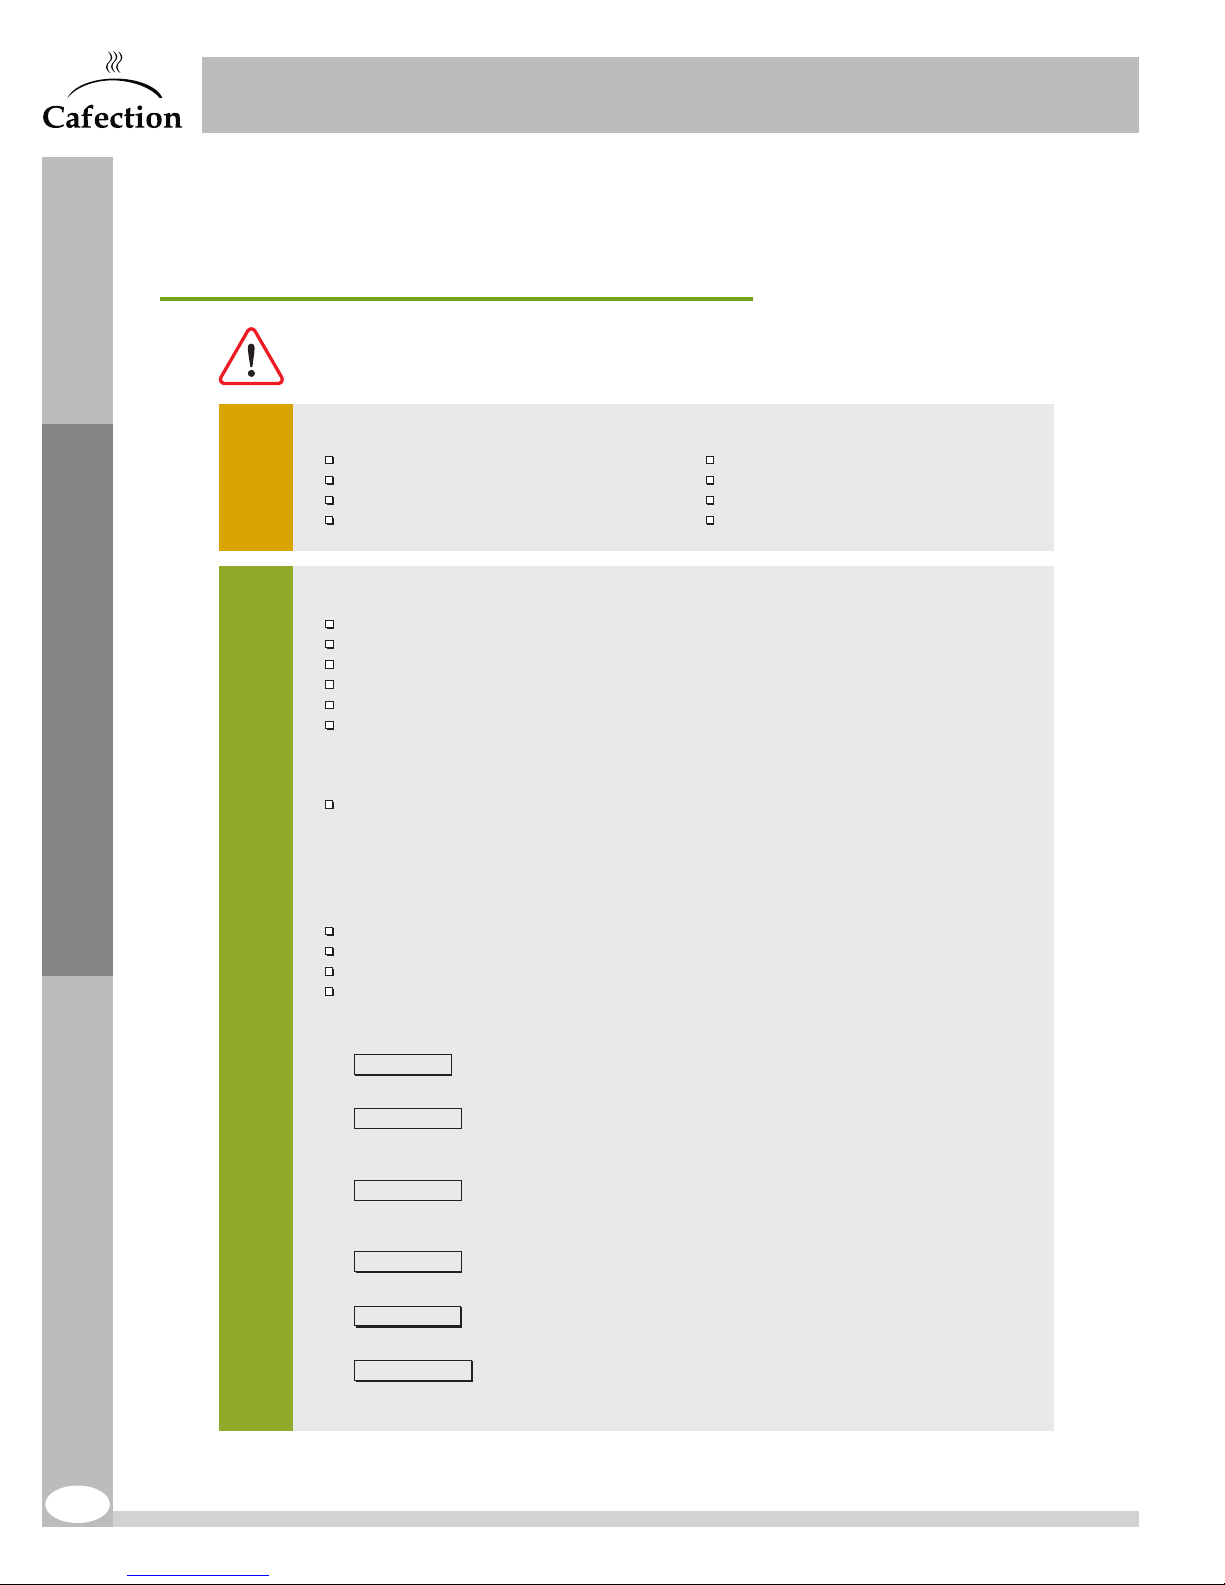
SERVICE & INSTALLATION MANUAL - Encore 29
ANNEX 4 FULL MAINTENANCE SCHEDULE
FULL MAINTENANCE SCHEDULE
All important parts of the unit must be maintained as per the Maintenance Schedule to honor the warranty and to
avoid possible defects. Adequate maintenance will extend the life of the coffee machine and deliver a consistent
high quality beverage.
DAILY MAINTENANCE
Verify products inventory.
Fill the solubles canisters & the bean hopper.
Empty the waste bin.
PERFORMED
BY THE OWNER
Perform a rinse cycle.
WEEKLY MAINTENANCE
Verify the filter paper level.
Sanitize the brew chamber with a hot water cycle.
Sanitize the solubles mixing bowl with a hot water cycle.
Capture data from the software.
Verify the overflow cup.
Verify the overflow tray.
www.cafection.com 800-561-6162
ENCORE Series
ENCORE 29
Clean the machine & tidy up surrounding area.
Empty the bill acceptor & the coin changer.
Clean the drip tray & its grill.
Clean the touchscreen.
Annex 4
MONTHLY MAINTENANCE
Clean the brew group with a commercial urn cleaner:
• Open the machine door.
• Add one (1) tablet of commercial urn cleaner in the brewing chamber. Leave the filter paper in place.
• In Service mode, press on the“Clean Brew Group (Tabz)” button.
• Follow the instructions on the screen.
• Order two (2) coffee drinks, then close the door.
Clean the soluble canisters.
Clean the bean hopper & its funnel.
Clean the stainless coffee chute.
Inspect the fan & clean as needed.
PREVENTIVE MAINTENANCE SCHEDULE AT DIFFERENT CYCLES
5,000 cycles
Clean the brew group with a commercial urn cleaner.
10,000 cycles
PERFORMED BY THE SERVICE PROVIDER
Check & replace the outlet valves.
Check & replace the water filter.
25,000 cycles
Replace the brew group via Cafection’s Brew Group Exchange Program.
Replace the whipping motor(s).
50,000 cycles
Delime the water tank & outlet valves.
80,000 cycles
Replace the grinder burrs.
100,000 cycles
Replace the water tank float, the heater switch & the water level switch.
82
ENCORE 29 Rev. 3 09-2017
Page 83
SERVICE & INSTALLATION MANUAL - Encore 29
www.cafection.com 800-561-6162
ANNEX 5 MONTHLY MAINTENANCE SCHEDULE
MONTHLY MAINTENANCE SCHEDULE
All important parts of the unit must be maintained as per the Maintenance Schedule to honor the warranty and to
avoid possible defects. Adequate maintenance will extend the life of the coffee machine and deliver a consistent
high quality beverage.
MONTHLY MAINTENANCE
Clean the brew group with a commercial urn cleaner:
• Open the machine door.
• Add one (1) tablet of commercial urn cleaner in the brewing chamber. Leave the filter paper in place.
• In Service mode, press on the“Clean Brew Group (Tabz)” button.
• Follow the instructions on the screen.
• Order two (2) coffee drinks to complete the filter paper installation, then close the door.
Clean the soluble canisters.
Clean the bean hopper & its funnel.
Clean the stainless coffee chute.
Inspect the fan & clean as needed.
ENCORE Series
ENCORE 29
Annex 5
PREVENTIVE MAINTENANCE SCHEDULE AT DIFFERENT CYCLES
5,000 cycles
Clean the brew group with a commercial urn cleaner.
10,000 cycles
Check & replace the outlet valves.
Check & replace the water filter.
25,000 cycles
PERFORMED BY THE SERVICE PROVIDER
Replace the brew group via Cafection’s Brew Group Exchange Program.
Replace the whipping motor(s).
50,000 cycles
Delime the water tank & outlet valves.
80,000 cycles
Replace the grinder burrs.
100,000 cycles
Replace the water tank float, the heater switch & the water level switch.
ENCORE 29 Rev. 3 09-2017
83
Page 84
SERVICE & INSTALLATION MANUAL - Encore 29
ANNEX 6 WEEKLY MAINTENANCE SCHEDULE
WEEKLY MAINTENANCE SCHEDULE
All important parts of the unit must be maintained as per the Maintenance Schedule to honor the warranty and to
avoid possible defects. Adequate maintenance will extend the life of the coffee machine and deliver a consistent
high quality beverage.
WEEKLY MAINTENANCE
Verify the filter paper level.
Sanitize the brew chamber with a hot water cycle.
Sanitize the solubles mixing bowl with a hot water cycle.
Capture data from the software.
Verify the overflow cup.
Verify the overflow tray.
PREVENTIVE MAINTENANCE SCHEDULE AT DIFFERENT CYCLES
5,000 cycles
Clean the brew group with a commercial urn cleaner.
Annex 6
PERFORMED BY THE SERVICE PROVIDER
10,000 cycles
Check & replace the outlet valves.
Check & replace the water filter.
25,000 cycles
Replace the brew group via Cafection’s Brew Group Exchange Program.
Replace the whipping motor(s).
50,000 cycles
Delime the water tank & outlet valves.
80,000 cycles
Replace the grinder burrs.
100,000 cycles
Replace the water tank float, the heater switch & the water level switch.
www.cafection.com 800-561-6162
ENCORE Series
84
ENCORE 29 Rev. 3 09-2017
 Loading...