

Cadillac CTS 2008 Navigation Manual

2008 Cadillac CTS Navigation System M
Overview
Overview
Features and Controls
Features and Controls
........................................................ 1-1
.................................................. 1-2
..................................... 2-1
................................ 2-2
Navigation Audio System
Navigation Audio System
Speech Recognition
Speech Recognition
................................................................ 1
Index
................................ 3-1
............................ 3-2
........................................ 4-1
................................... 4-2

GENERAL MOTORS, GM, the GM Emblem, CADILLAC,
the CADILLAC Crest & Wreath, and the name CTS are
registered trademarks of General Motors Corporation.
DTS and DTS Digital
surround are registered
trademarks of Digital
Theater systems, Inc.
Gracenote®is a registered trademark of Gracenote, Inc.
The Gracenote logo and logotype, and the “Powered
by Gracenote” logo are trademarks of Gracenote.
Litho in U.S.A.
Part No. 25813124 B Second Printing
ii
Dolby
®
is manufactured under license from Dolby
®
Laboratories. Dolby®, MLP Lossless, and the double-D
symbol are trademarks of Dolby®Laboratories.
©
2007 General Motors Corporation. All Rights Reserved.

This product incorporates copyright protection
technology that is protected by U.S. patents and other
intellectual property rights. Use of this copyright
protection technology must be authorized by
Macrovision, and is intended for home and other
limited viewing uses only unless otherwise authorized
by Macrovision. Reverse engineering or disassembly
is prohibited.
The information in this manual supplements the owner
manual. This manual includes the latest information
available at the time it was printed. We reserve the right
to make changes in the product after that time without
notice. For vehicles first sold in Canada, substitute
the name General Motors of Canada Limited for Cadillac
Motor Car Division whenever it appears in this manual.
Keep this manual with the owner manual in the
vehicle, so it will be there if it is needed. If the vehicle
is sold, leave this manual in the vehicle.
Canadian Owners
A French language copy of this manual can be obtained
from your dealer/retailer or from:
Helm, Incorporated
P.O. Box 07130
Detroit, MI 48207
1-800-551-4123
helminc.com
Propriétaires Canadiens
On peut obtenir un exemplaire de ce guide en français
auprès de concessionnaire ou à l’adresse suivante:
Helm Incorporated
P.O. Box 07130
Detroit, MI 48207
1-800-551-4123
helminc.com
iii

✍ NOTES
iv

Section 1 Overview
Overview .........................................................1-2
Navigation System Overview ............................1-2
Getting Started ...............................................1-4
Cleaning the Display .....................................1-11
1-1

Overview
Navigation System Overview
1-2

A. VOL/ O (Volume/Power Knob). See “Hard Keys”
under Using the Navigation System on page 2-2 for
more information.
B. TUNE/TONE Knob. See “Hard Keys” under Using
the Navigation System on page 2-2 for more
information.
C. NAV
D.
E. FAV (Favorite) key. See “Storing Radio Station
F.
G.
nm(Navigation Screen Up/Down). See “Hard
Keys” under Using the Navigation System on
page 2-2 for more information.
! (Dimming Change Button). See “Display” under
Configure Menu on page 2-30 for more information.
Presets” under Navigation Audio System on page 3-2
for more information.
utSEEK Key. See Navigation Audio System on
page 3-2 CD Player on page 3-10, DVD Player on
page 3-18, and Hard Drive Device on page 3-24 for
more information.
Z (CD/DVD Eject) Key. See CD Player on
page 3-10 and DVD Player on page 3-18 for more
information.
H. AUDIO key. See Navigation Audio System on
page 3-2 for more information.
I. NAV (Navigation) Key. See “Hard Keys” under
Using the Navigation System on page 2-2 for more
information.
J.
o MENU p SELECT Knob. See “Hard Keys”
under Using the Navigation System on page 2-2
for more information.
K. REC (Record) Key. See Hard Drive Device on
page 3-24 for more information.
L. CONFIG (Configure) Key. See Configure Menu
on page 2-30 for more information.
M.
k (Play/Pause) Key. See “Timeshift, USB, and
iPod” under Navigation Audio System on page 3-2,
Hard Drive Device on page 3-24, CD Player on
page 3-10, DVD Player on page 3-18, and Hard Drive
Device on page 3-24 for more information.
N. \ FWD (Forward) Key. See “Timeshift, USB, and
iPod” under Navigation Audio System on page 3-2,
CD Player on page 3-10, DVD Player on page 3-18,
Hard Drive Device on page 3-24 for more
information.
1-3

O. s REV (Reverse) Key. See “Timeshift, USB, and
iPod” under Navigation Audio System on page 3-2,
CD Player on page 3-10, DVD Player on page 3-18,
and Hard Drive Device on page 3-24 for more
information.
P. RPT (Repeat) Key. See “Hard Keys” under Using
the Navigation System on page 2-2 for more
information.
Q. DEST (Destination) Key. See Destination on
page 2-12 for more information.
R. CD/DVD Slot. See CD Player on page 3-10 and DVD
Player on page 3-18 for more information.
S. DEL (Delete) Key. See “XM™ Satellite Radio
Service” under Navigation Audio System on page 3-2
and Hard Drive Device on page 3-24 for more
information.
T. INFO (Information) Key. See Speech Recognition on
page 4-2 and Weather on page 4-4.
Getting Started
Read this manual thoroughly to become familiar with
how the navigation system operates.
Keeping your eyes on the road and your mind on the
drive is important for safe driving. The navigation system
has built-in features intended to help keep your eyes
on the road and mind on the drive. Some features may
be disabled while driving. Note that these functions
will be grayed-out. A grayed-out function indicates it is
not available when the vehicle is moving.
All functions are available when the vehicle is parked.
Do the following before driving:
• Become familiar with the navigation system
operation, hard keys on the faceplate, and
touch-sensitive screen buttons of the navigation
system.
• Set up the audio by presetting favorite stations,
setting the tone, and adjusting the speakers.
• Set up the navigation features before beginning
driving, such as entering an address or a preset
destination.
• Set up your phone numbers in advance so they can
be called easily with the press of a single button or
a single voice command (for navigation systems
equipped with phone capability).
1-4
{ CAUTION:
Taking your eyes off the road too long or too
often while using the navigation system could
cause a crash resulting in injury or death to
you or others. Focus your attention on driving.
{ CAUTION:
Avoid looking too long or too often at the
moving map on the navigation screen. This
could cause a crash and you or others can be
injured or killed. Use the turn-by-turn voice
guidance directions whenever possible.
Use the navigation system to:
• Plan a route.
• Select a destination using various methods and
choices.
• Follow turn-by-turn route and map guidance with
voice prompts, only if permitted by traffic laws,
controls, and conditions.
• Receive RDS broadcast announcements.
You should always be alert and obey traffic and roadway
laws and instructions, regardless of the guidance from
the navigation system. Because the navigation
system uses street map information that does not
include all traffic restrictions or the latest road changes,
it may suggest using a road that is now closed for
construction or a turn that is prohibited by signs at
the intersection. Because the system uses limited
information, you must always evaluate whether
following the system’s directions is safe and legal for
the current conditions.
1-5
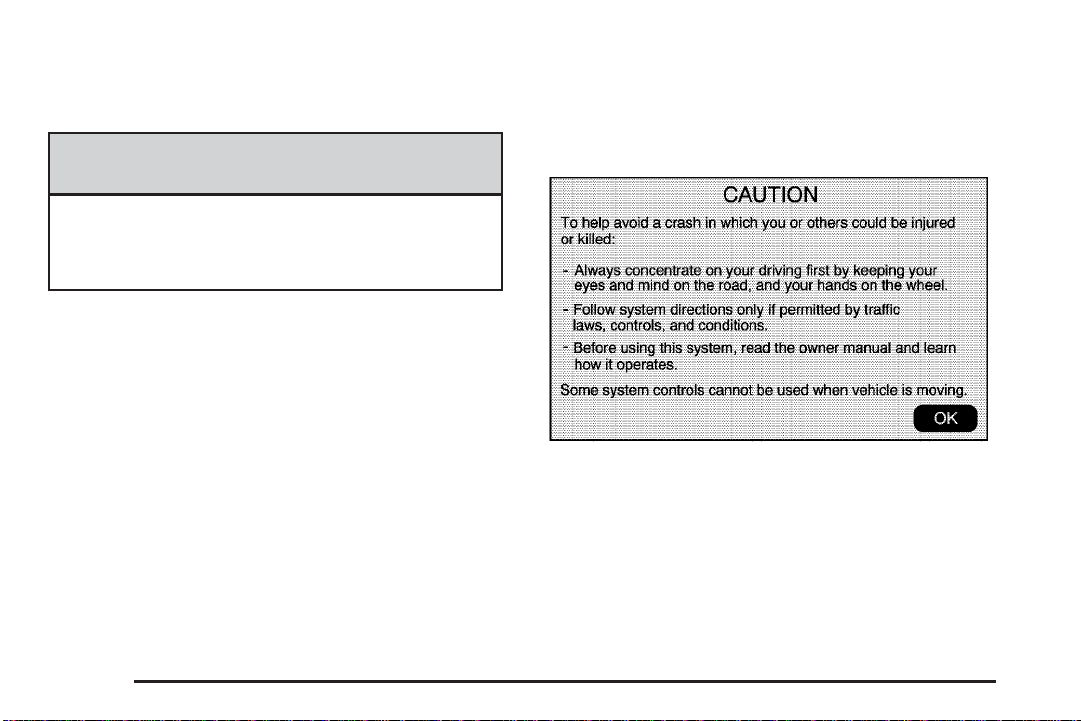
When the navigation system is turned on, a screen may
appear with the information below, and you must
read and acknowledge the information it contains.
{ CAUTION:
Taking your eyes off the road for extended
periods could cause a crash resulting in injury
or death to you or others.
To help avoid a crash in which you or others could be
killed:
• Always concentrate on your driving first by keeping
your eyes and mind on the road, and your hands
on the wheel.
• Follow system directions only if permitted by traffic
laws, controls, and conditions.
• Before using this system, read the owner’s manual
and learn how it operates.
• Some system controls cannot be used the when
vehicle is moving.
After you acknowledge the start up information you will
be able to access the NAV (navigation) and DEST
(destination) functions. Once accessed, you can enter
or delete information in the navigation system or access
other functions. See instructions later in this section.
Each time the vehicle is started and the navigation
system is turned on, the Caution screen will appear.
If the Caution screen appears, touch OK to accept the
Caution. If OK is not selected, all hard keys except
for NAV (navigation) and DEST (destination) can be
1-6

accessed. Once the NAV or DEST hard keys are
pressed, this Caution screen will appear and OK must
be pressed to access the navigation map.
When getting started you may set the navigation system
to your preference or delete information you may
have entered using various options.
Language — English/Metric
To change the language of the navigation screens,
see “DIC Vehicle Customization” in the Index of your
vehicles owner manual.
To change the navigation screens from English or
metric, see “DIC Operation and Displays” in the Index of
your vehicles owner manual.
Deleting Personal Information
This navigation system can record and store
destinations and personal information such as names
and addresses. At times, such as when you are
disposing of your vehicle, you may want to delete this
information. See “Previous Destinations — Deleting” and
“Address Book — Editing and Deleting Entries” under
Destination on page 2-12 for deleting this information.
Storing Radio Station Presets
This feature allows you to store up to 36 preset stations.
You can mix AM, FM, and XM (if equipped). To store
presets, do the following:
1. Press the
2. If viewing a map screen, touch the source
screen button, press the AUDIO key, or press the
FAV (favorite) key.
3. Select the band.
4. Seek or tune to the desired station, to select the
station.
5. Press and hold one of the preset screen buttons for
more than one and a half seconds.
6. Repeat the steps for each preset.
To change the number of preset pages, see “Number of
Preset Pages” under “Radio Menu” under Navigation
Audio System on page 3-2 for more information.
O (power) knob to turn the system on.
1-7

Entering an Address and Point of
Interest, and Storing Preset
Destinations
Your vehicle must be in PARK (P) to perform these
operations.
Entering an Address
If you are having trouble finding a city or a street name:
• Input the street name first instead of the city
name, or vice versa.
• Input more characters or reduce the amount of
characters to reduce or expand the available
options.
To set a destination by entering a street name, do the
following:
1. Press the
2. A caution may appear. Touch the OK screen button
to proceed.
3. Press the DEST hard key.
O (power) knob to turn the system on.
4. Select the Street screen button.
5. The Street name category will automatically be
selected for entry. Start entering the street name.
It is recommended that you do not enter directional
information or street type, and use the Space screen
button between street or city names. For example,
the street name N. Royal Oak Rd. should be
entered as royal(Space screen button)oak. Use the
backspace (
character has been entered.
If four or less names are available for the entered
characters, a list will display. If more than four
are available, there will be a match counter with a
number in it, it represents the number of available
streets. Select the List button to view the list
and select a street.
While the Street name category is empty, there is a
Last 5 Streets screen button that will display the
last five selected streets. Press this button to select
a street from the list.
q ) screen button if an incorrect
1-8

6. Enter the house number. The system will display
the house number range that is available for the
street.
7. If there is more than one city, the list of cities that
have that street name and house number will
display. Select a city from the list.
8. A confirmation screen will display with the address.
If the address is correct, select the Go screen
button. The system will calculate the route.
9. Select the route preference (Fastest, Shortest, or
Easy). The system will highlight the route.
10. Select the Start Guidance screen button. You are
now ready to start your route.
See “Address Entry” under Destination on page 2-12 for
more information.
Entering a Point of Interest (POI)
To set a destination by entering a Point of Interest (POI):
1. Press the
2. A caution may appear. Touch the OK screen button
to proceed.
3. Press the DEST hard key.
4. Press the Point of Interest screen button.
5. Enter the specific title of the POI in the POI name
space (i.e. Washington Monument).
If four or less names are available, a list will
display. If more than four are available, there will be
a match counter with a number in it, it represents
the number of available POI names. Select the
List button to view the list. Select the POI.
6. Select the Go screen button. The system will
calculate the route.
7. Select the route preference (Fastest, Shortest, or
Easy). The system will highlight the route.
8. Select the Start Guidance screen button. You are
now ready to start your route.
See “Point of Interest (POI)” under Destination on
page 2-12 for more information.
O (power) knob to turn the system on.
1-9

Storing Preset Destinations
1. Press the O (power) knob to turn the system on.
2. A caution may appear. Touch the OK screen button
to proceed.
3. Press the NAV or DEST hard key.
4. Enter a destination. See Destination on page 2-12
for information on how to enter a destination.
5. Press the Add screen button from the map screen to
add the current final destination to the address book.
The address book screen will appear.
6. Select the Name screen button. An alpha-keyboard
will display. Enter the name.
7. Press and hold one of the screen buttons at the
bottom of the screen until the text in the button
changes.
The address book entry name will appear in that
preset destination screen button and is now available
to select from the Select Destination screen.
See “Using Your Stored Preset Destinations” next in
this section to select it as a destination.
See “Adding or Changing Preset Destinations”
under Destination on page 2-12 for more information
on how to add preset destinations.
Using Your Stored Preset Destinations
These destinations are available for selection while
driving.
1. Press the
2. A caution may appear. Touch the OK screen button
to proceed.
3. Press the DEST hard key.
4. Select one of the available preset destination
screen buttons. The system will calculate the route.
5. Select the route preference (Fastest, Shortest, or
Easy). The system will highlight the route.
6. Select the Start Guidance screen button. You are
now ready to start your route.
See “Preset Destination” under Destination on page 2-12
for more information.
O (power) knob to turn the system on.
1-10

Canceling Guidance
Guidance will be canceled once you arrive at your final
destination. To cancel guidance prior to arrival at the
final destination:
1. Press the DEST hard key.
2. Press the Cancel Guidance screen button.
3. Press the Yes screen button to confirm cancellation.
Voice Guidance
To adjust the volume of voice guidance prompts:
1. Press the CONFIG hard key to enter the menu
options, then press the CONFIG key repeatedly
until Nav is selected or touch the Nav screen button.
2. Press the Voice Volume screen button.
3. Press the + (plus) or – (minus) screen buttons to
increase or to decrease the volume of the voice
prompts.
See “Voice Volume” under Configure Menu on
page 2-30 for more information.
Cleaning the Display
If the panel or the display is stained, wipe it with a dry,
soft cloth, such as a silicon cloth.
Notice: If you use abrasive cleaners when cleaning
glass surfaces, you could scratch the glass.
When cleaning the glass, use only a soft cloth and
do not spray cleaner directly on the system.
Do not apply spray cleaner directly to the system,
the cleaner could affect the mechanical parts.
Do not wipe the panel with a hard cloth or use a volatile
liquid such as thinner or alcohol, it could scratch the
surface or erase the characters.
1-11

✍ NOTES
1-12

Section 2 Features and Controls
Features and Controls ......................................2-2
Using the Navigation System ...........................2-2
Maps ............................................................2-5
Symbols ........................................................2-7
Destination ..................................................2-12
Configure Menu ............................................2-30
Global Positioning System (GPS) ....................2-42
Vehicle Positioning ........................................2-43
Problems with Route Guidance .......................2-44
If the System Needs Service ..........................2-44
Ordering Map DVDs ......................................2-45
Database Coverage Explanations ....................2-45
2-1

Features and Controls
Using the Navigation System
This section presents basic information needed to
operate the navigation system.
Use the hard keys located on the navigation system
along with the available touch screen buttons on
the navigation screen to operate the system. See
Navigation System Overview on page 1-2 for more
information.
Once the vehicle is moving, various functions will be
disabled to reduce driver distractions.
Hard Keys
The following hard keys are located on the navigation
system:
VOL/ O (Volume/Power): Press this knob to turn the
system on and off. Turn the knob to increase or decrease
the volume. The volume works for the features that are
currently being used; audio, OnStar
volume for the phone, voice guidance, and speech
recognition will change the volume of voice prompts.
®
will change the
TUNE/TONE: Turn this knob to go to the next or
previous radio station/channel, track, or chapter. Press
this knob to access the Sound screen to adjust bass,
midrange, treble, and Digital Signal Processing (DSP).
See Navigation Audio System on page 3-2, CD
Player on page 3-10, DVD Player on page 3-18, and
Hard Drive Device on page 3-24 for more information.
NAV
nm(Navigation Screen Up/Down): Press this key
to make the screen go up and down. In the up
position, you will be able to view and use all touch
screen buttons. In the down position, a portion of the
screen will be shown that will display the current audio
source and temperature.
FAV (Favorite): Press this key to access the preset
stations. See “Storing Radio Station Presets” under
Navigation Audio System on page 3-2 for more
information.
¨SEEK / ©SEEK: Press the seek arrows to seek
and scan radio stations, to seek tracks on a CD or MP3,
to seek chapters on a DVD, and to seek songs on the
HDD, USB, and iPod. See Navigation Audio System
on page 3-2, CD Player on page 3-10, DVD Player
on page 3-18, and Hard Drive Device on page 3-24 for
more information.
2-2

Z (CD/DVD Eject): Press the eject button to eject a
CD or a DVD.
AUDIO: Press this key to access the full Audio screen
to change AM, FM, XM™ Satellite Radio Service
(if equipped), CD, MP3, DVD, HDD, USB, and iPod,
and auxiliary input. See “Audio” under Navigation Audio
System on page 3-2, CD Player on page 3-10, DVD
Player on page 3-18, and Hard Drive Device on
page 3-24 for more information.
NAV (Navigation): Press this key to view your vehicle’s
current position on the map screen. Each press of
this key will cycle through Full Map and the tab that
displays the current audio source (AM, FM, CD,
etc.). Full Map displays the screen in full map view.
Selecting the audio tab will split the screen between the
map screen and the current audio source screen
menu. See “Audio” under Navigation Audio System on
page 3-2 for more information.
q MENU r SELECT: Turn the MENU knob to
highlight a feature. Press this knob to select the
highlighted feature.
REC (Record): Press this key to record a CD, MP3,
and USB to the hard drive. See Navigation Audio
System on page 3-2, CD Player on page 3-10, and Hard
Drive Device on page 3-24 for more information.
CONFIG (Configure): Press this key to adjust features
for sound, radio, navigation, the display, and clock.
See Configure Menu on page 2-30 for more information.
RPT (Navigation Repeat): Press this key to repeat
the last voice guidance prompt.
DEST (Destination): Press this key to access the
Route screen to plan a destination. If route guidance is
active, press this key to access the Route screen.
See Destination on page 2-12 for more information.
DEL (Delete): Press this key to delete XM categories
and information from the hard drive. See Navigation
Audio System on page 3-2 and Hard Drive Device
on page 3-24 for more information.
INFO (Information): Press this key for Speech Help
and Weather. See Speech Recognition on page 4-2
and Weather on page 4-4 for more information.
k (Play/Pause): Press this key to play and to
pause Timeshift, CD, MP3, DVD, HDD, USB, iPod.
See Navigation Audio System on page 3-2, CD Player
on page 3-10, DVD Player on page 3-18, and Hard
Drive Device on page 3-24 for more information.
2-3

[ FWD (Forward): Press this key to play and to
pause Timeshift, CD, MP3, DVD, HDD, USB, iPod.
See Navigation Audio System on page 3-2, CD Player
on page 3-10, DVD Player on page 3-18, and Hard
Drive Device on page 3-24 for more information.
r REV (Reverse): Press this key to play and to
pause Timeshift, CD, MP3, DVD, HDD, USB, iPod.
See Navigation Audio System on page 3-2, CD Player
on page 3-10, DVD Player on page 3-18, and Hard
Drive Device on page 3-24 for more information.
Touch Screen Buttons
Touch screen buttons are located on the screen.
Screen buttons are highlighted when a feature is
available. There are also some toggle screen buttons
that will be highlighted when active and grey when
inactive.
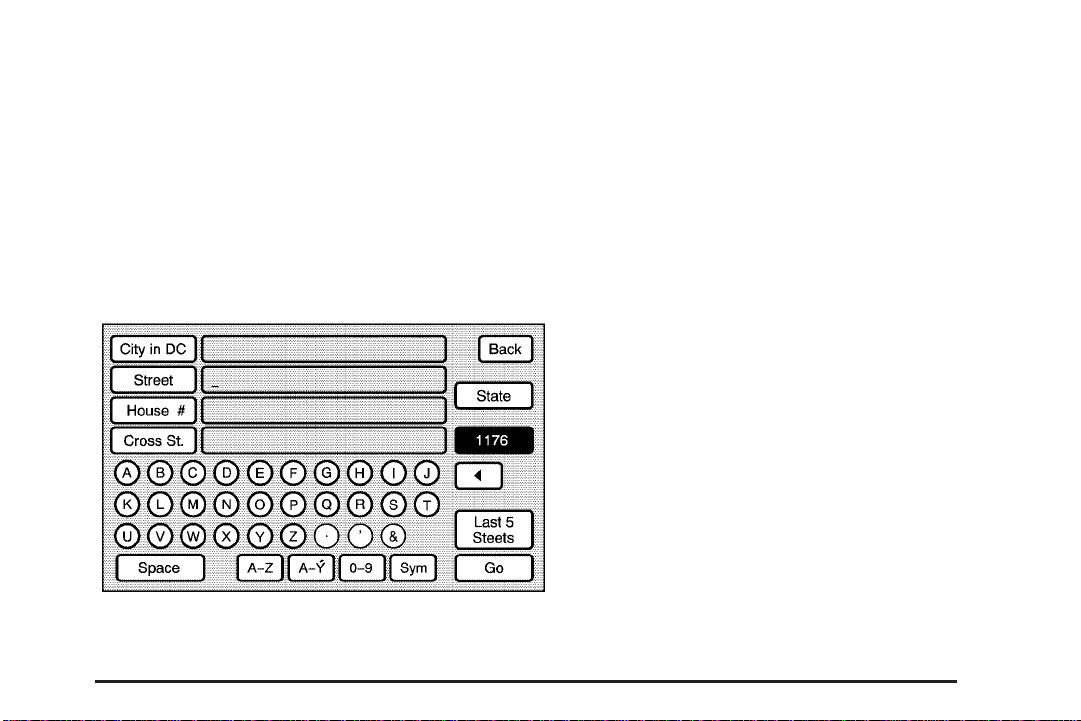
Alpha-Numeric Keyboard
Letters of the alphabet, symbols, punctuation, and
numbers, when available, will display on the navigation
screen as an alpha or numeric keyboard. The alpha
keyboard will display when the system requires entry
of a name.
All characters are touch screen buttons. Touch a
character to select it.
À-Ý (Accent Alphabet): Select this screen button to
select letters with accent symbols.
A-Z (Alphabet): Select this screen button to select
letters from the alphabet.
0-9 (Numbers): Select this screen button to select
numbers.
Sym (Symbols): Select this screen button to select
symbols.
Space: Select the space screen button to enter a
space between characters or the words of a name.
q (Backspace): Select the backspace screen button
if an incorrect character has been selected.
To make name selections easier, the system will only
highlight the characters that can follow the last one
entered. For example, if a Z is entered, a T may not be
available for selection.
If a name does not display after entry, it may need to be
entered differently since the map database may not
contain that information.
2-4

Maps
This section includes basic information needed to know
about the map database.
Map Coverage
The maps are stored on the HDD (Hard Drive).
It includes the 48 contiguous United States, Alaska,
Hawaii, portions of Canada, Puerto Rico, and the
US Virgin Islands.
See “City List” later in this section to view a detailed
explanation of map coverage and detailed city lists
in each region.
Installing the DVD Map Disc
Your dealer/retailer installed the map database
information on the HDD.
When you receive an updated map disc, you will need
to copy the information to the HDD. Read the
following steps completely before operating this feature.
1. Turn the ignition on.
2. Press the
O (power) knob to turn the system on.
3. Insert the update disc partway into the slot, label
side up. The player pulls it in.
4. Update Confirmation screen will be displayed with
version information, then press Update screen
button.
5. Input Authentication Code, then press Enter screen
button.
6. If correct code is entered, system will reboot and
start updating, the status bar displays.
7. The disc is automatically ejected after the map
database update is completed. The system will
reboot.
If the application update file is included in the disc,
the application update is also done.
The disc is not automatically ejected, press the
Z (eject) button after the application update is
completed.
Ejecting the DVD Map Disc
When the map disc has finished copying to the HDD,
press the
Z button.
2-5
Handling the DVD Map Disc
When handling the DVD map disc, be careful of the
following:
• Handle the disc very carefully to avoid
contamination or flaws. Signals may not read out
properly if the disc gets contaminated or flawed.
• If the disc gets soiled, use a soft cloth to gently wipe
it out from the center of the disc to the outside.
Do not use photographic record cleaner, solvents,
or other cleaners.
• Do not use the disc to rest on while writing or
drawing using any writing utensil or attach a seal
to any of the sides or the disc.
• Do not keep the disc in direct sunlight, high
temperatures, or humidity.
• After using the disc, place it back into the
original case.
Map Adjustments
The system allows you to adjust the scale of view on
the map. Also, as you drive, the map will scroll
automatically based on the direction of travel.
Map Scales
V
/ U (Zoom In/Zoom Out): Touch the zoom in or out
screen buttons or the scale on the bar to change the level
of map detail. The scale will appear on the screen once
the zoom in or zoom out screen buttons are selected.
The system will adjust the map accordingly. The scale
of a map can range from 1/32 of a mile (50 m) to
350 mi. (550 km). To change from English or metric,
see “DIC Operation and Displays” in the Index of your
vehicle’s owner manual.
Scrolling the Map
Touch anywhere on the
map screen and the scroll
symbol will appear.
Use this feature to scroll
across the map.
Move your finger in any direction on the map screen
and the map will continue to scroll in that direction
until you remove your finger. The rate of scrolling
2-6
depends on where the screen is being touched.
The rate will increase when touching closer to the
edge of the screen.
If you have used the scroll feature to scroll the map
and your vehicle icon becomes lost, press the NAV
(Navigation) key to return to the current vehicle location
on the map.
When scrolling on the map, the system will display the
address of the scroll symbol location.
You can use the scroll feature on the map to set a
destination. See “From Map” under Destination
on page 2-12 for more information.
When scrolling on the map without a planned route,
press the GO screen button to calculate the route from
your current position to the destination mark.
Symbols
The following symbols are the most common symbols
that will appear on a map screen.
Your vehicle is shown as
this symbol. It indicates
the current position
and heading direction of
your vehicle on the map.
The destination symbol
will appear on the map,
after a route has been
planned, marking your
final destination.
2-7
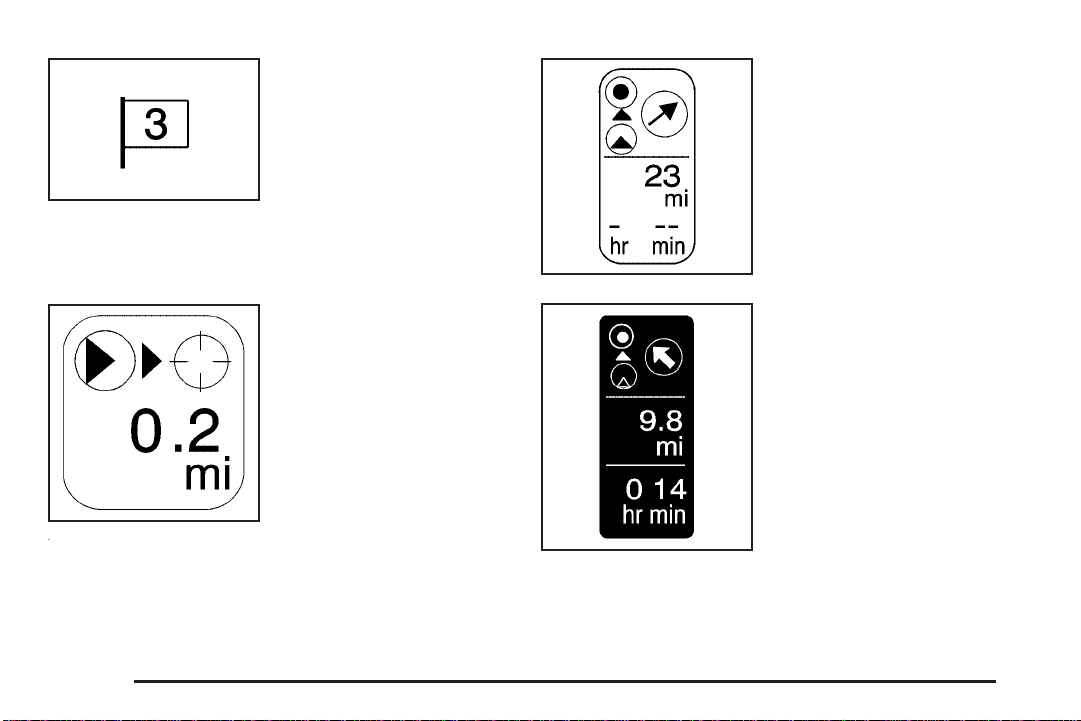
The waypoint number will
display on the map after a
waypoint has been
added to your route.
The waypoint symbol will be numbered from one
through three depending on how many intermediate
waypoints have been set.
This symbol only appears
when time is not available.
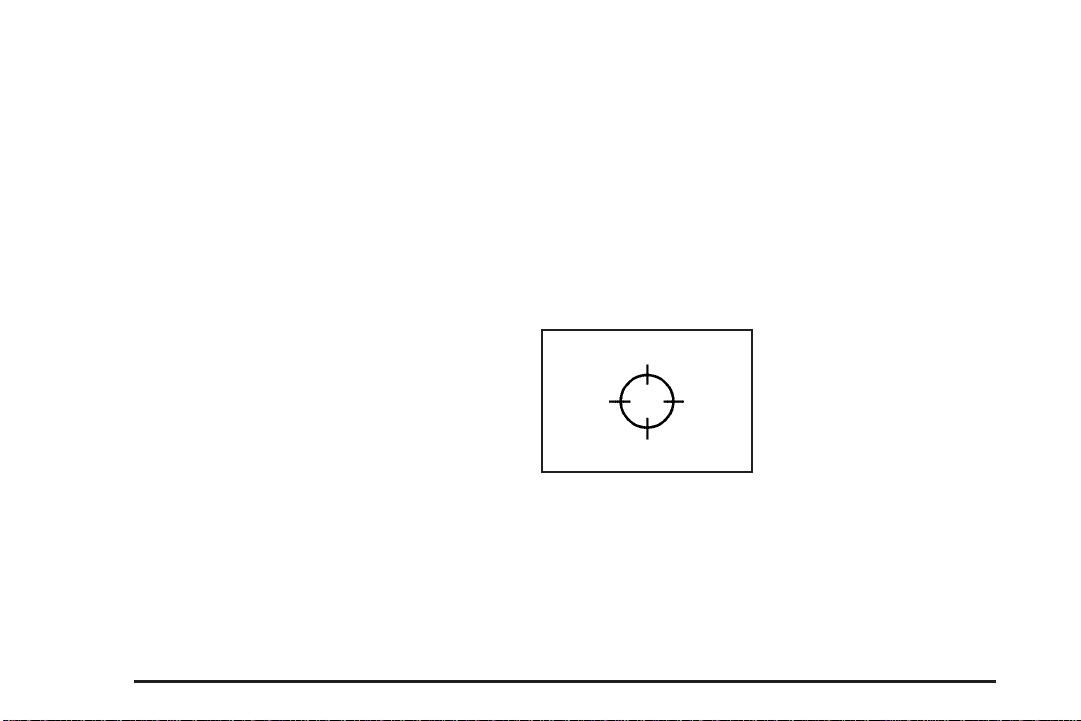
2-8
The distance to crosshairs
indicates the distance to
the crosshair area
displayed on the map
screen during map
scrolling.
The distance and time
to destination symbol
indicates the distance
and the estimated time
remaining to your final
destination or arrival time,
depending on the option
selected.
Press this screen button to change between viewing the
time of day and the arrival time. If waypoints have
been added to the current route, each waypoint
destination will appear giving the same information.
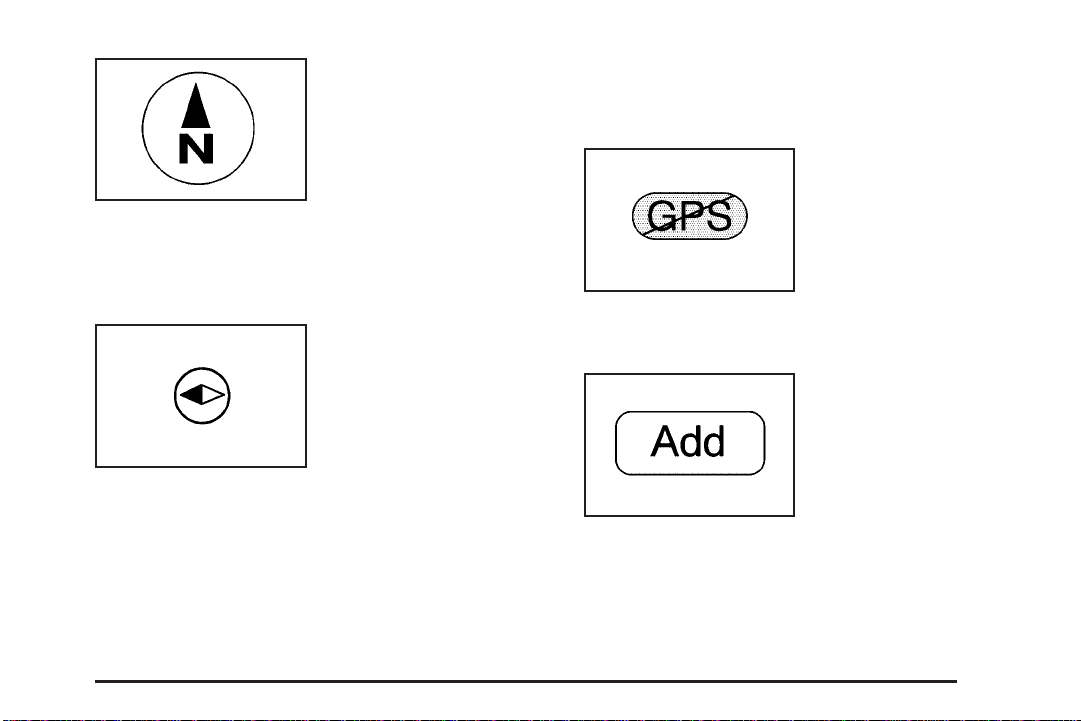
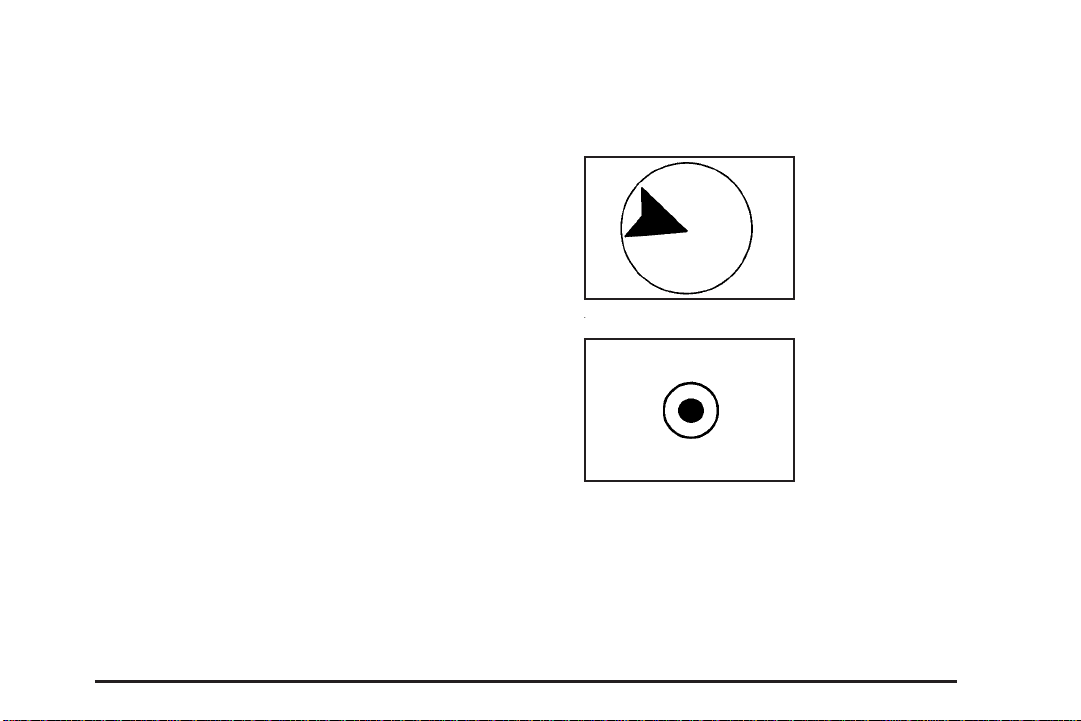
Select this screen symbol
to switch between
North Up, Heading Up,
and 3-D modes.
This north up symbol indicates the map with North Up,
known as North Up mode. While in North Up mode,
the vehicle icon will follow the north direction on the map
regardless of which direction the vehicle is traveling.
Select this screen symbol
to switch Heading Up,
North Up, and 3-D modes.
This heading up symbol indicates the map with the
vehicle travel direction up, known as Heading Up mode.
While in Heading Up mode, the direction your vehicle
is traveling will always be at the top of the map screen.
The shaded triangle indicates the North direction.
The vehicle icon will always be headed in the direction
your vehicle is traveling.
Press this screen symbol to change to 3-D mode.
The symbol for the 3-D function is the same as the
Heading Up symbol, but shows the map in a 3-D view.
The No GPS symbol will
appear when your vehicle
is acquiring or not
receiving a Global
Positioning System (GPS)
satellite signal.
See Global Positioning System (GPS) on page 2-42 for
more information.
Select the Add screen
button to store the location
on the screen in your
address book.
The system will automatically store the point in the
address book. See “Address Book” under Destination
on page 2-12 for more information.
2-9
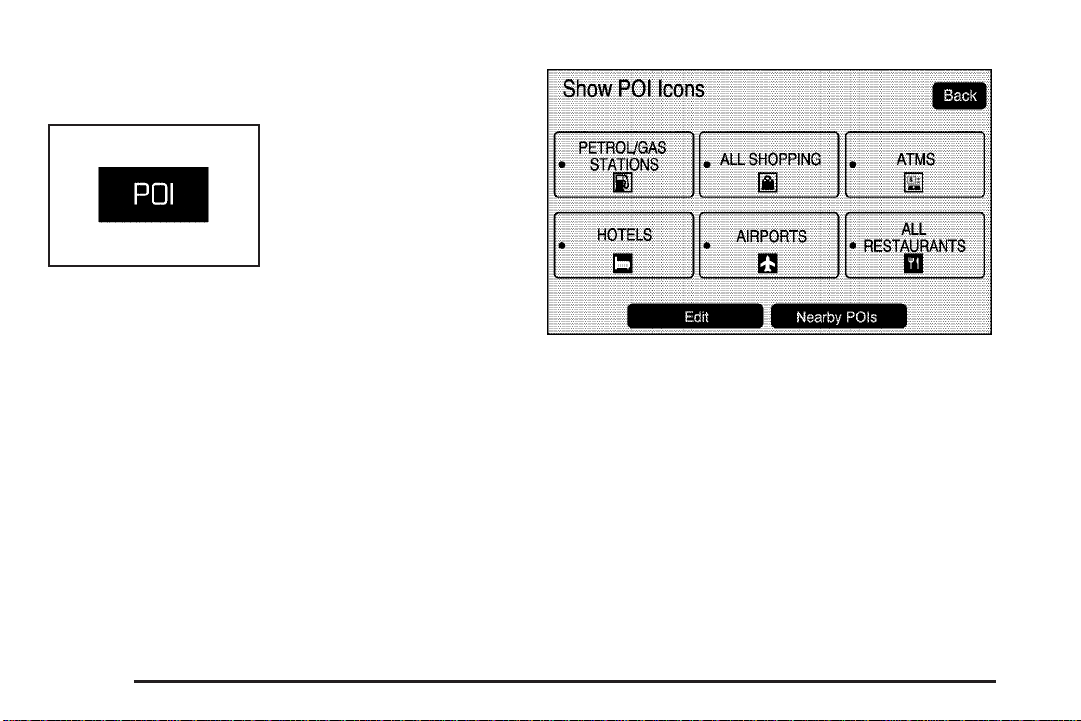
Displaying Points of Interest (POI) on the
Map Screen
Select the POI screen
button to display or
remove POI icons from
the map.
Displaying POI icons on the map let you know where
POIs (i.e. restaurants, gas stations, etc.) are located.
This screen will appear after selecting the POI screen
button.
Select one of the POI categories to display or to remove
POI icons from the map screen. When a category is
selected those POI icons will display on the map.
Edit: Select this screen button to change one of the
current POI categories. Press the Edit screen button,
select the POI category that you would like to change,
then select the new category.
2-10
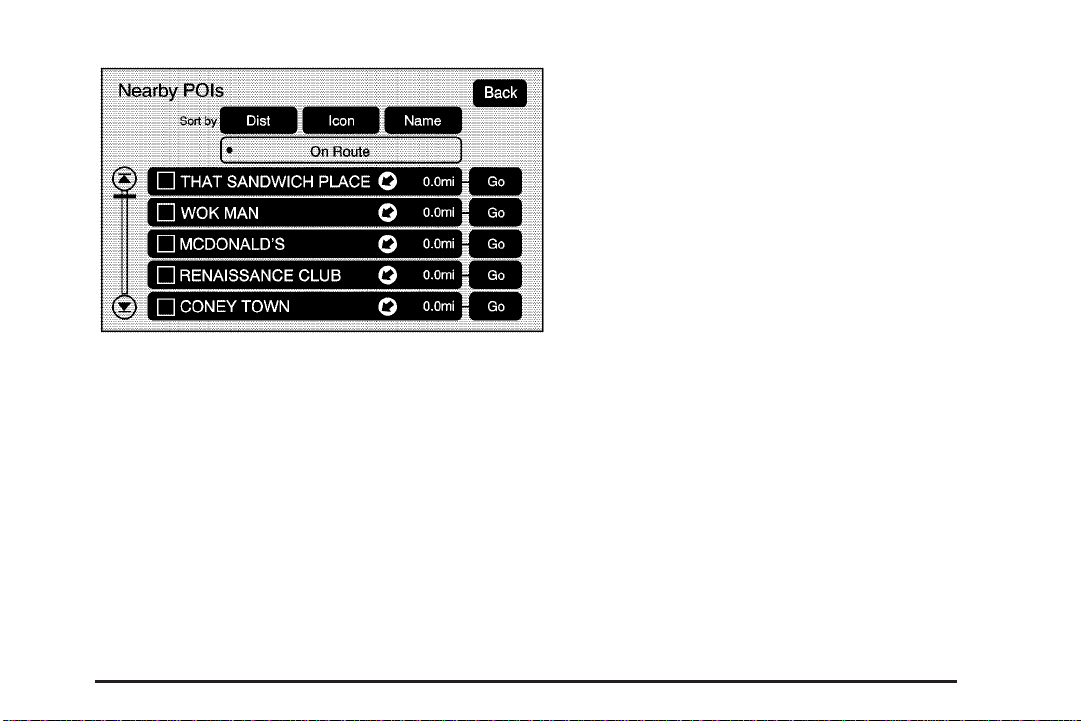
Nearby POIs: Select this screen button to display the
list of available POIs for the selected POI categories.
The list provides the POI icon, the name, the direction,
and the distance to the POI from your vehicles
current position. Use the scroll arrows to move up and
down the list. Use the Sort by Dist (distance), Icon,
Name, and, on Route as desired.
Go: Press this screen button, next to the desired POI,
to make this POI a destination or a waypoint.
Select a POI name to receive information about the
POI. From this screen you can select: Add, to add this
POI to the address book, Go, or Map.
Add: Press this screen button to add this POI to the
address book. See “Address Book” under Destination on
page 2-12 for information on address book entries.
Go: Press this screen button to make this POI a
destination or a waypoint.
Map: Press this screen button to display the map
showing the location of the POI.
2-11

Driving on a Route
When a destination has been routed and you are driving
on route, the map screen will automatically display
the next maneuver.
This next maneuver pop-up will display the next
maneuver direction and how many miles or kilometers
you are from it.
When you are approximately 1/4 mi (0.4 km) from the
next maneuver, the screen will display the name
and a detailed view of the next maneuver.
Auto Reroute
When your destination is set and you are off the planned
route, the system will automatically plan a new route and
begin to reroute. You will be able to see the new route
highlighted on the screen.
Destination
Press the DEST key to access the Select Destination
screen. From this screen, you can select from several
options to plan a route by entering destinations.
2-12
Address Entry
Street: The address entry destination method allows you
to enter an address by providing the system with a street
name, a city name, or the name of a state or province.
If you are having trouble finding a city or a street name,
do the following:
• Input the street name first instead of the city name,
or vice versa.
• Input more characters or reduce the amount of
characters to reduce or expand the available options.
Entering the Street Name First
1. Press the DEST hard key.
2. Select the Street screen button.
3. The Street category will automatically be selected
for entry. Start entering the street name.
It is recommended that you do not enter directional
information or street type, and use the Space screen
button between street or city names. For example,
the street name N. Royal Oak Rd. should be
entered as royal(Space screen button)oak. Use the
backspace (
character has been entered.
If four or less names are available for the entered
characters, a list will display. If more than four
are available, there will be a match counter with a
number in it, it represents the number of available
streets. Select the List button to view the list
and select a street.
While the Street name category is empty, there is a
Last 5 Streets screen button that will display the
last five selected streets. Press this button to select
a street from the list.
4. Select the street name.
5. Enter the house number. The system will display the
house number range that is available for the street.
q ) screen button if an incorrect
2-13

6. If there is more than one city, the list of cities that
have that street address will display. Select a city
from the list.
7. A confirmation screen will display with the address.
If the address is correct, select the Go screen
button. The system will calculate the route.
8. Select the route preference (Fastest, Shortest, or
Easy). The system will highlight the route.
9. Select the Start Guidance screen button. You are
now ready to start your route.
See “Getting Started on Your Route” later in this
section.
Entering the City Name First
1. Press the DEST hard key.
2. Select the Street screen button.
3. Select the City screen button and start entering the
city name.
If four or less names are available for the entered
characters, a list will display. If more than four
are available, there will be a match counter with a
number in it, it represents the number of available
cities. Select the List button to view the list and
select a city.
4. Start entering the street name.
It is recommended that you do not enter directional
information or street type, and use the Space screen
button between street or city names. For example,
the street name N. Royal Oak Rd. should be
entered as royal(Space screen button)oak. Use the
backspace (
character has been entered.
If four or less names are available for the entered
characters, a list will display. If more than four are
available, there will be a match counter with a
number in it, it represents the number of available
streets. Select the List button to view the list and
select a street.
While the Street name category is empty, there is a
Last 5 Streets screen button that will display the
last five selected streets. Press this button to select
a street from the list.
5. Select the street name.
6. Once a street has been selected, the numeric
keyboard will display, allowing you to enter the
house number. The system will display the house
number range that is available for the street.
7. A confirmation screen will display with the address.
If the address is correct, select the Go screen
button. The system will calculate the route.
q ) screen button if an incorrect
2-14
 Loading...