

Page 1

2005 Cadillac CTS Navigation System M
Overview
Overview
Features and Controls
Features and Controls
Navigation Audio System
Navigation Audio System
........................................................ 1-1
.................................................. 1-2
..................................... 2-1
................................ 2-2
................................ 3-1
............................ 3-2
Voice Recognition
Voice Recognition
Vehicle Customization
Vehicle Customization
................................................................ 1
Index
........................................... 4-1
...................................... 4-2
..................................... 5-1
................................. 5-2
Page 2

GENERAL MOTORS, GM, the GM Emblem, CADILLAC,
the CADILLAC Crest & Wreath, and the name CTS
are registered trademarks of General Motors
Corporation. Birdview™ is a trademark of Xanavi
Informatics Corporation.
The information in this manual supplements the owner
manual. This manual includes the latest information
available at the time it was printed. We reserve the
right to make changes in the product after that
time without notice.
Keep this manual with the owner manual in the vehicle,
so it will be there if it is needed. If the vehicle is sold,
leave this manual in the vehicle.
Litho in U.S.A.
Part No. 25769280 B First Edition
ii
©
2004 General Motors Corporation. All Rights Reserved.
Page 3

Section 1 Overview
Overview .........................................................1-2
Navigation System Overview ............................1-2
Screen Features .............................................1-4
Main Menu ....................................................1-6
Browser .......................................................1-10
Personal Choice Controls ...............................1-11
Getting Started .............................................1-12
1-1
Page 4
Overview
Navigation System Overview
1-2
Page 5

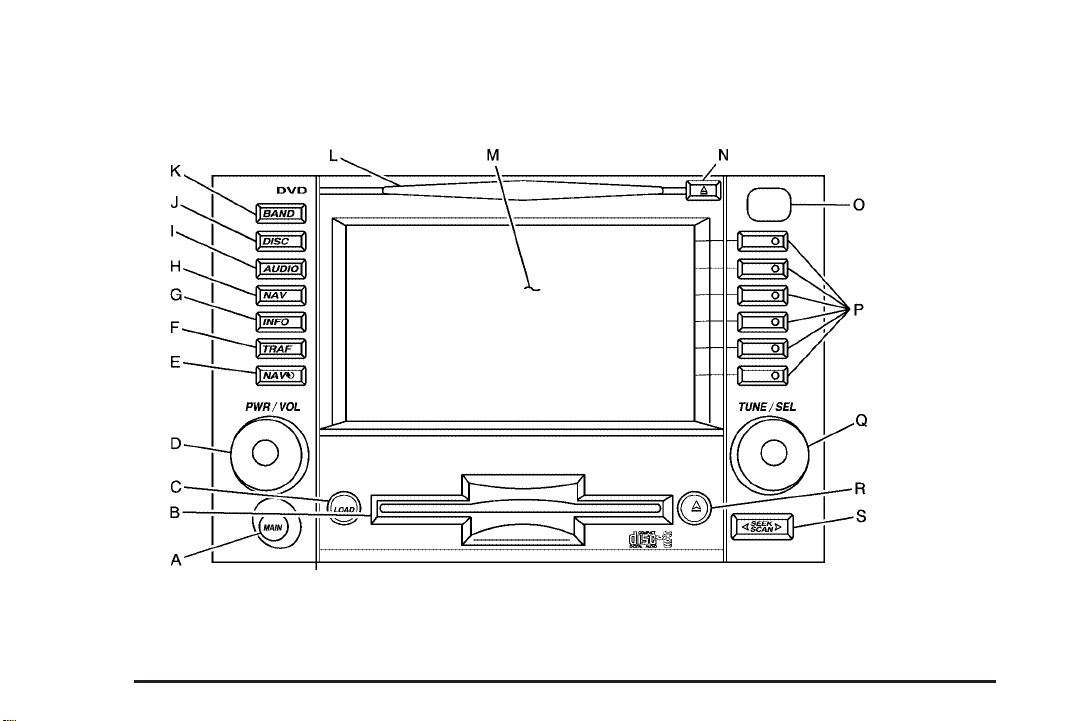
A. MAIN Key. See Main Menu on page 1-6.
B. CD Loading Slot.
C. LOAD Key. See “Playing a CD” under Navigation
Audio System on page 3-2.
D. PWR/VOL (Power/Volume) Knob. See “Hard Keys”
under Using the Navigation System on page 2-2.
E. NAV (Navigation Repeat) Key. See “Hard Keys”
under Using the Navigation System on page 2-2.
F. TRAF (Traffic) Key. See “Radio Station Information”
later in this section.
G. INFO Key. See “Vehicle Information” under Main
Menu on page 1-6.
H. NAV Key. See “Hard Keys” under Using the
Navigation System on page 2-2.
I. AUDIO Key. See “Setting the Tone” under Navigation
Audio System on page 3-2.
J. DISC Key. See “Playing a CD” under Navigation
Audio System on page 3-2.
K. BAND Key. See “Radio Screen” and “Finding a
Station” under Navigation Audio System on page 3-2.
L. DVD Loading Slot.
M. Navigation System Screen.
N. DVD Eject Key.
O. Beam Window for Infrared Data Transfer. See Main
Menu on page 1-6 for more information.
P. Reconfigurable Keys. See “Hard Keys” under Using
the Navigation System on page 2-2.
Q. TUNE/SEL (Tune/Select) Knob. See “Finding a
Station” under Navigation Audio System on page 3-2.
R. CD Eject Key.
S. SEEK/SCAN Key. See “Finding a Station” under
Navigation Audio System on page 3-2.
1-3
Page 6
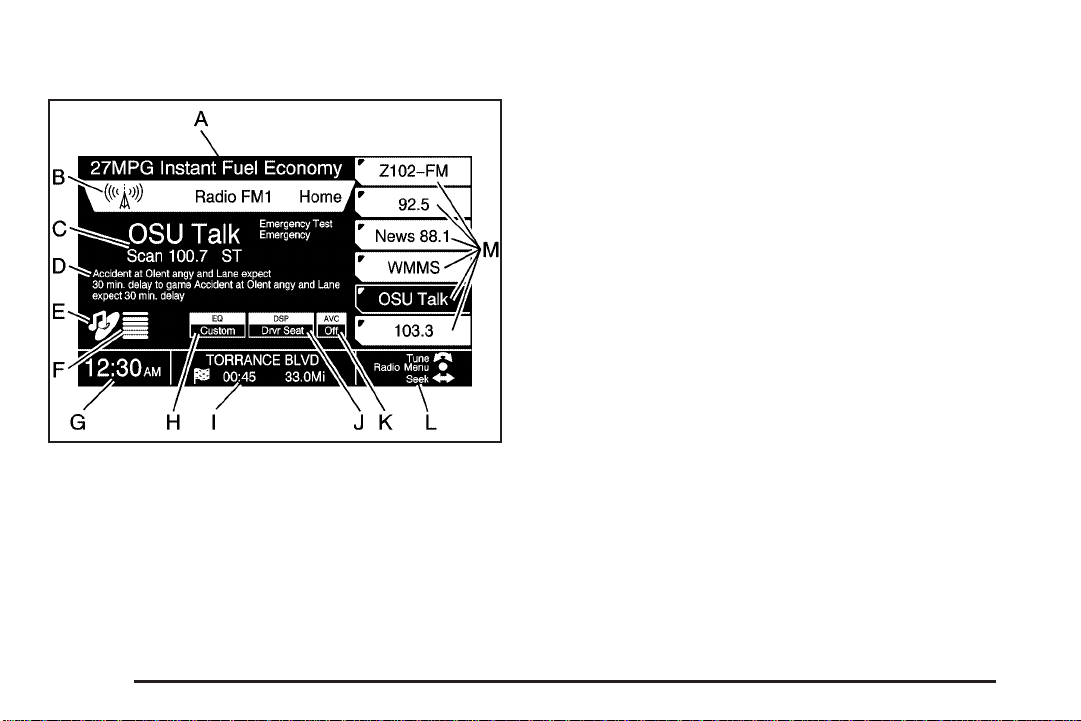
Screen Features
A. Driver Information Center (DIC) Line: See “Vehicle
Information” under Main Menu on page 1-6 Main
Menu and Driver Information Center (DIC) on page 5-15
of your vehicle’s owner manual for more information.
B. Banner: Here is where you will find the title for
most screens and menus. This information cannot be
edited.
C. Radio Station Information: Here is where you will
find current radio frequency and Radio Data System
(RDS) station identification information. The information
to the right of the frequency is RDS emergency alert,
traffic announcements, and program type (PTY).
You will see Emergency Test when the RDS station you
are tuned to conducts a test of the local emergency
broadcast system. If there is a real emergency, you will
see Emergency on the screen and further information
will be provided.
Traffic will appear next to the frequency when a station
supports the traffic feature. The traffic symbol will be
displayed in the lower left corner of the navigation
screen when traffic announcements have been enabled
by pressing the TRAF key.
D. Radio Data System (RDS): Here is where you will
find RDS broadcast information if the RDS Message
feature is on. See Navigation Audio System on page 3-2
Navigation Audio System for more information.
1-4
Page 7

E. DVD/Single CD Player Information: Here is where
you will find DVD/Single CD player information. A
CD symbol indicates there is a CD loaded in the DVD
player. A music note symbol next to the CD symbol
indicates it is a music CD. A small square symbol next
to the CD symbol indicates a DVD containing data
is loaded in the player. A film symbol next to the CD
symbol indicates a DVD movie is loaded in the player.
See Navigation Audio System on page 3-2 Navigation
Audio System for more information.
F. CD Changer Information: Here is where you will
find CD changer information. The six horizontal
lines represent the six slots of the CD changer starting
at the bottom with disc one, and so on. If a line is
green, a CD is loaded in that slot. If a line is yellow, the
CD in that slot is the currently selected CD. If a line
is gray, there is no CD in that slot.
G. Time/Radio/CD/CD Changer Information: Here is
where the time will be displayed. Radio frequency,
audio source, CD, or CD changer information will also
be displayed here briefly if any of the following occurs:
• The radio is on and the screen is not a radio,
CD, or CD changer main screen.
• The radio frequency has been changed in a
non-radio screen.
• The CD track or disc has been changed in a
non-CD or CD changer screen.
To display radio or CD information again briefly, press
the navigation repeat key.
The previously mentioned information will be displayed
on the screen or in the banner while a radio, CD, or
CD changer screen is active.
H. Equalizer Information: Here is where you will find
the currently active equalization information. See
“Setting the Tone” under Navigation Audio System on
page 3-2 Navigation Audio System for more information.
I. Navigation System Route Information: Here is
where you will find the status of a currently planned and
calculated route. The road you are currently traveling
on, the estimated time to destination, and the distance
remaining to destination will be displayed.
If you are not on a planned route, an arrow indicating
the general direction of your destination will be displayed
along with the distance remaining to destination. This
figure is based on straight line measurement and
may not be accurate. Once a planned route is entered,
the actual distance and time remaining to destination
will be calculated.
J. Digital Signal Processing (DSP) Information: Here
is where you will find Digital Signal Processing (DSP)
information. See “Setting the Tone” under Navigation
Audio System on page 3-2 Navigation Audio System for
more information.
1-5
Page 8

K. Automatic Volume Compensation (AVC)
Information: Here is where you will find Automatic
Volume Compensation (AVC) information. See “Setting
the Tone” under Navigation Audio System on page 3-2
Navigation Audio System for more information.
L. TUNE/SEL and SEEK/SCAN Functions: Here you
will find what functions are available for the TUNE/SEL
knob and SEEK/SCAN key. Only the highlighted
functions are available. The curved double arrow
represents the TUNE/SEL knob, the solid dot represents
pressing the TUNE/SEL knob, and the straight double
arrow represents the SEEK/SCAN key.
M. Reconfigurable Keys: These keys are
reconfigurable because their function can change with
the different screens and menus of the system.
These six reconfigurable keys control the prompts on
the right side of the navigation screen.
If you see a triangle or carat symbol in the upper right
corner of a prompt, it means that key is programmable.
Once the function you want is active, press and hold
the key until a beep sounds. The new function is
now programmed and will display as the prompt for that
reconfigurable key. See “Setting Preset Stations”
under Navigation Audio System on page 3-2 Navigation
Audio System for more information.
Main Menu
The Main Menu provides a brief overview of navigation
system functions. Press the MAIN key located to the
left of the CD loading slot to access the Main Menu.
The following items are available from this menu:
DVD
Select DVD to start playing a DVD movie if one is
loaded. See CD/DVD Player on page 3-25 for more
information.
Radio
Select Radio to display the radio screen. You can also
access the radio screen by pressing the BAND key.
See Navigation Audio System on page 3-2 for
more information.
CD
Select CD to display the CD changer screen. You can
also access the CD changer screen by pressing the
DISC key. If a CD is loaded in the CD changer, it will
begin to play. See “Playing a CD” under Navigation
Audio System on page 3-2 for more information.
1-6
Page 9

Audio
Select Audio to display the audio screen. You can also
access the Audio screen by pressing the AUDIO
key. From this screen you can adjust sound levels such
as bass and treble. See “Setting the Tone” under
Navigation Audio System on page 3-2 for more
information.
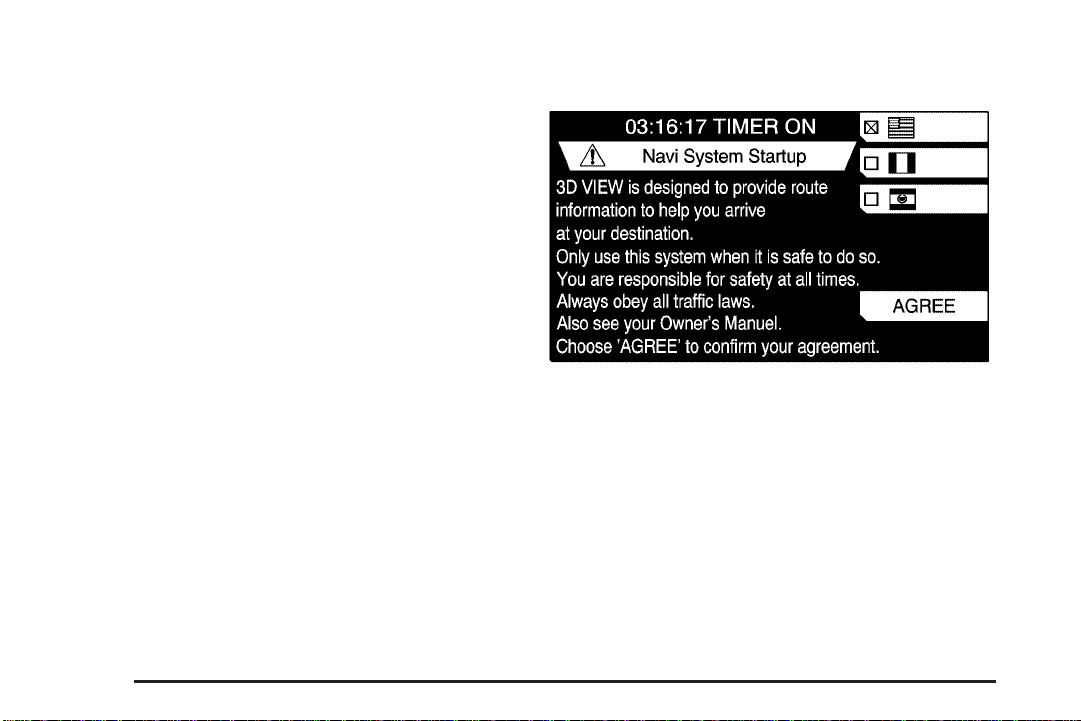
Navigation
Select Navigation to display the Navigation System
Startup screen if you have not previously accessed the
navigation system since you turned on the ignition.
You must press Agree in order to continue using the
navigation system.
If you have previously accessed the navigation system
since turning on the ignition, the current map will be
displayed.
You can also access the navigation screen by pressing
the NAV key. See Navigation System Overview on
page 1-2 for more information.
Address Book
Select Address Book to display the Address Book
screen. From this screen you can store names, phone
numbers, and addresses. Information will be stored
alphabetically.
To access previously stored information, do the
following:
1. Turn the TUNE/SEL knob until you reach the letter
grouping that contains the first letter of the person’s
last name. The grouping will be highlighted.
2. Press the TUNE/SEL knob once. All information
stored under that grouping will be listed.
3. Scroll to the name you want and press the
TUNE/SEL knob to select it. The information you
selected will be displayed on the screen.
New information can be entered manually or transferred
from a Palm™ hand-held computing device. See
“Receive” later in this section for more information.
New Entry
To enter information manually to the Address Book,
select New Entry, then, do the following:
1. Turn the TUNE/SEL knob to scroll to the
desired entry field and select Edit or press the
TUNE/SEL knob.
2. Turn the TUNE/SEL knob to select the first letter
required. Press the knob once to set the letter
and advance the cursor.
Continue entering letters and/or numbers until the
entry is complete.
1-7
Page 10

3. Select OK to return to the New Entry screen.
4. Turn the TUNE/SEL knob to scroll to the next field.
5. Press the TUNE/SEL knob once to enter this
field’s information.
6. Repeat these steps until all the desired fields are
entered.
7. Select Done to complete the entry.
The following reconfigurable keys are available from
the New Entry screen:
Receive: Select Receive to transfer information stored
in a Palm™ hand-held computing device. The Beam
screen will be displayed, and you will be prompted
to transfer the data. See “Enter Destination” under
Navigation Menu on page 2-12 for more information.
Edit: Select Edit to edit previously stored information.
Do the following to edit information stored in the
address book:
1. Perform Steps 1 through 3 listed previously to
access stored information.
2. Scroll to the area you want to edit and press the
TUNE/SEL knob to bring up the alpha-numeric
keypad.
3. Edit the desired information.
4. Select Done to save your changes and then
Back to exit the Edit menu.
Delete All
Select Delete All to delete all information stored in the
address book. The system will ask you to confirm
deletion. Press and hold the Yes reconfigurable key
until it beeps to delete all of the information, or select
No to cancel deletion and return to the Address
Book screen.
Setup
Select Setup to access the Setup Menu and adjust
basic features of the system to your preference.
See Setup Menu on page 2-7 for more information.
Feature Programming
Select Feat Prog to customize the programmable
features on your vehicle to your preference.
See Driver Information Center (DIC) on page 5-15
for more information.
1-8
Page 11
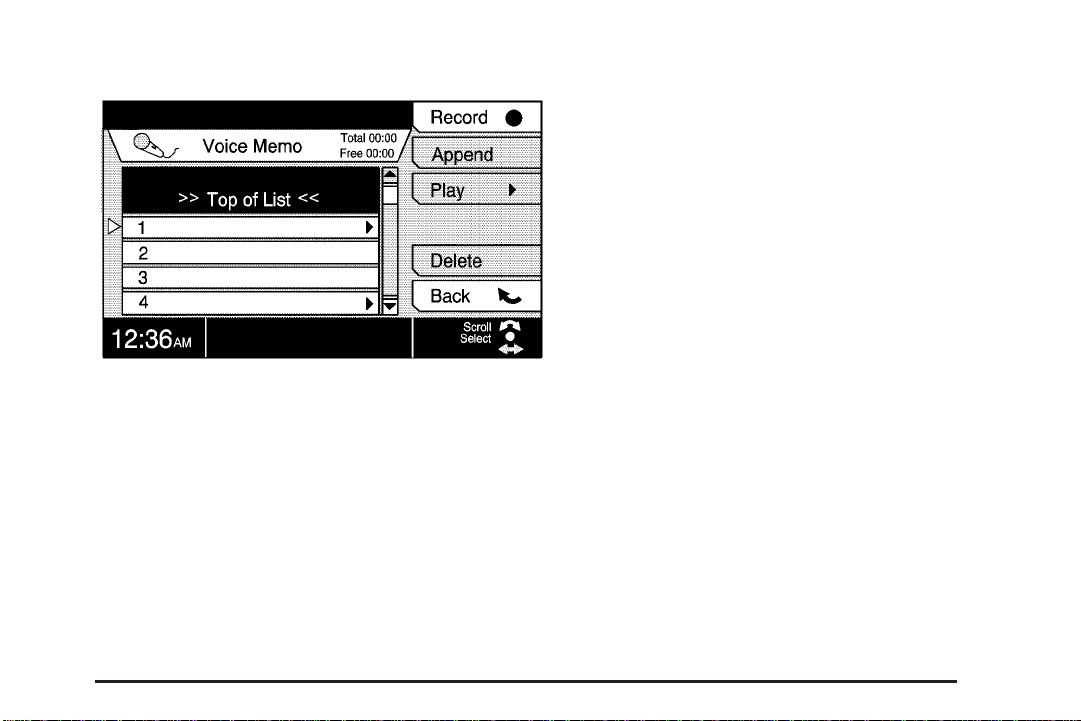
Voice Memorandum
Select Voice Memo to record and play back up to
10 personalized messages. The Voice Memo feature
is disabled while the vehicle is moving.
Turn the TUNE/SEL knob to scroll through any
previously recorded messages. Once the desired
memo is highlighted, press the knob to play it.
Record
message. It will start recording when you begin
speaking. It will cancel the recording if you do not
speak within 10 seconds.
O: Press this key to begin recording a
Append: Press this key to add to a previously recorded
message. To use this feature, do the following:
1. Turn the TUNE/SEL knob until the message you
want to add to is highlighted.
2. Press the Append key, then begin recording the
additional information.
Play
r: Press this key to play a previously recorded
message. Play is also used to resume playback of
a message after it has been paused. While the message
is playing, the Skip Fwd, Skip Back, Pause, and Stop
keys will be available.
Skip Fwd (Skip Forward): Press this key to fast
forward through a message. This key is only available
while a message is playing.
Skip Back: Press this key to reverse quickly through a
message. This key is only available while a message
is playing.
Pause: Press this key to stop playback of a message.
The system will remember where the message was
paused and will resume play at the same location when
the Play key is pressed. This key is only available
while a message is playing.
Stop: Press this key to stop playback of a message.
This key is only available while a message is playing.
Delete: Press this key to delete previously recorded
messages.
1-9
Page 12

Browser
Select Browser to view HTML files, 3.2 or newer, stored
on a DVD, DVD-R, or CD-ROM. See Browser on
page 1-10 for more information.
Vehicle Information
Select Vehicle Info to check the status of several of
your vehicle’s systems. You can also access this menu
by pressing the INFO key. See Driver Information
Center (DIC) on page 5-15 for more information.
Browser
With the browser function, you can display information
from discs containing HTML files, 3.2 or newer, on
the navigation screen. The files can be accessed and
viewed, but no input will be allowed using this system.
To access the Browser, do the following:
1. Press the MAIN key located to the left of the CD
loading slot.
2. Press the reconfigurable key next to the Browser
prompt. The Browser will appear on the screen.
You must have a DVD, DVD-R, or CD-ROM containing
HTML files in the player to access the Browser. If
the file has an index labeled index.htm, it will open
automatically. For files with any other kind of index, you
will need to enter the name of the file manually using
the alpha-numeric keypad. See Using the Navigation
System on page 2-2 for more information.
Once the file has been opened, you may use the
TUNE/SEL knob to move to the various links. Once you
have reached the end of the screen, you will be able
to move up and down.
The reconfigurable keys located to the right of the
navigation screen allow you to perform the following
functions:
Z (Back): Press this key to go back to the
previous page.
d (Scroll Up): Press this key to scroll upward on
the currently active page.
c (Scroll Down): Press this key to scroll down on
the currently active page.
f (Switch Frame): Press this key to switch from
one frame to another if the page shows frames.
1-10
Page 13

] (Exit): Select this item to exit the Browser.
Personal Choice Controls
a (Menu Items): Press this key to turn Browser menu
items on and off.
If this key is pressed, the Browser menu items will be
displayed at the bottom of the screen. To select a
browser menu item, turn the TUNE/SEL knob until the
menu item you want is highlighted, then press the
knob to select it.
The following Browser menu items may be selected:
Back: Select this item to go back to the previous page.
Forward: Select this item to go to the next page.
Reload: Select this item to read the currently active
page again.
Stop: Select this item to stop reading a file.
History: Select this item to display file history.
URL Jump: Select this item to change from one stored
web page to another using the Uniform Resource
Locator (URL) or the name of the web page you wish
to view.
This feature allows up to two drivers to store and
recall personal settings for the audio and navigation
systems. The following settings can be stored and
recalled:
• Navigation settings such as Day and Night screen
modes or route planning methods
• Audio settings such as preset stations and
equalization
Each time a driver chooses or changes audio or
navigation system settings, the changes will be stored in
the system. To recall these settings, press the unlock
button on the remote keyless entry transmitter or press
memory buttons 1 or 2 on the driver’s door.
1-11
Page 14

Getting Started
Before you begin to operate the navigation system,
read this manual thoroughly to become familiar with
it and to understand how the system works.
The navigation system allows you to do the following:
• Plan a route with provided turn-by-turn route
and map guidance with voice prompts.
• Select a destination using various methods and
choices.
• Receive broadcast announcements on traffic and
emergency alert communications.
The information in the system may not always be
complete. Road conditions such as prohibited turns,
detours, and construction zones, change frequently.
It is important to consider whether you can follow
the directions given by the system for the current
conditions.
When getting started, you may set the navigation
system to your preference using various options.
To do so, reference the following topics:
To adjust screen appearance, language, clock,
English/metric measurements, voice guidance volume,
or other options, see Setup Menu on page 2-7.
Quick Start Guide
Insert the Map DVD into the DVD slot on the navigation
system. Press the NAV hard key and press the Agree
button to show the navigation map screen.
Entering an Address
1. Press the TUNE/SEL knob to display the
Navigation Menu.
2. Press the Enter Dest reconfigurable soft key.
3. Press the Address reconfigurable soft key.
4. Press the State reconfigurable soft key. Use the
TUNE/SEL knob to enter and select the name of
the state where the address is located.
5. Press the City reconfigurable soft key. Use the
TUNE/SEL knob to enter the name of the city
where the address is located. Press the List
reconfigurable soft key to display a list of cities
that match the letters you entered and use
the TUNE/SEL knob to select the desired city.
Remember to use the same city that you would
when mailing a letter, for example, the postal
address city.
1-12
Page 15

6. Use the TUNE/SEL knob to enter and select the
street name for the address. Remember to enter
only the street name and not the direction, for
example, for N Civic Center Dr. only enter CIVIC
CENTER DR. Use the TUNE/SEL knob to enter
the address number for the address.
7. Press the Calc reconfigurable soft key and the
system will calculate a route. Once the route is
calculated, the system will display and voice turn
by turn guidance to the destination.
Entering a Point of Interest (POI) by
Name, Category, or City
1. Press the TUNE/SEL knob to display the
Navigation Menu.
2. Press the Enter Dest reconfigurable soft key.
3. Press the All POI reconfigurable soft key.
4. If you know the city where the POI is located press
the City reconfigurable soft key. Use the TUNE/SEL
knob to enter the name of the city where the
address is located. Press the List reconfigurable
soft key to display a list of cities that match
the letters you entered and use the TUNE/SEL
knob to select the desired city. Be sure to select the
city that has the appropriate state abbreviation
associated with it.
5. If you would like to limit your POI search to a
specific type or category of POIs, press the
Category reconfigurable soft key. Use the
TUNE/SEL knob to scroll through and select
the category.
6. If you know the name of the POI, use the
TUNE/SEL knob to enter the name of the POI.
7. You may also press the List reconfigurable soft key
at any time to display the POIs that match the
information you have entered. The system
will automatically display a list of POIs that match
the information that you have entered when
there are only a few matches in the database.
8. Use the TUNE/SEL knob to highlight the desired
POI. If you would like to see the information
associated with the highlighted POI, press the
Info reconfigurable soft key to have the phone
number, name and address displayed. If you would
like to have the POIs displayed in order from
closest to furthest, press the Sort reconfigurable
soft key.
9. After highlighting the desired POI, press the
TUNE/SEL knob to select the POI and calculate a
route. Once the route is calculated, the system
will display and voice turn by turn guidance to the
destination.
1-13
Page 16

Entering a Nearby POI
1. Press the TUNE/SEL knob to display the
Navigation Menu.
2. Press the Enter Dest reconfigurable soft key.
3. Press the Nearby POI reconfigurable soft key.
4. Use the TUNE/SEL knob to scroll and select the
desired category. The system will then show a list
of all POIs in the selected category that are located
within 30 miles of the car’s current position.
5. Use the TUNE/SEL knob to highlight the desired
POI. If you would like to see the information
associated with the highlighted POI, press the
Info reconfigurable soft key to have the phone
number, name and address displayed.
6. After highlighting the desired POI, you may press
the TUNE/SEL knob or the Calc reconfigurable
soft key and the system will calculate a route.
Once the route is calculated, the system will display
and voice turn by turn guidance to the destination.
1-14
Page 17

Section 2 Features and Controls
Features and Controls ......................................2-2
Using the Navigation System ...........................2-2
Setup Menu ...................................................2-7
Maps ..........................................................2-10
Symbols ......................................................2-11
Navigation Menu ...........................................2-12
Traveling Across Regions ...............................2-34
Colors on the Screen ....................................2-34
®
OnStar
Global Positioning System (GPS) ....................2-35
Vehicle Positioning ........................................2-36
Problems with Route Guidance .......................2-37
If the System Needs Service ..........................2-37
Ordering Map DVDs ......................................2-37
Database Coverage Explanations ....................2-37
System ...........................................2-35
2-1
Page 18
Features and Controls
Using the Navigation System
This section presents basic information you will need to
know to operate the navigation system.
The main navigation menu displays a number of options
which offer information on a variety of topics. See
Navigation Menu on page 2-12 for more information.
Use the keys located on both sides of the navigation
screen to operate the system.
Once the vehicle is moving, various functions will be
disabled to reduce driver distractions.
Navigation System Startup Screen
This screen will appear the first time you access the
navigation system. Press the Agree reconfigurable
soft key to use the navigation portion of the system.
You can also change the language of the system at
this time. To do so, press the reconfigurable soft
key associated with the desired language. An X will
appear next to your choice, and all system related
language will change.
2-2
Page 19

Hard Keys
The following hard keys are located to the left of the
navigation screen:
MAIN: Press this key to access the Setup menu.
See Setup Menu on page 2-7.
LOAD: Press this key to load a CD(s). See “Playing
a CD” under Navigation Audio System on page 3-2.
PWR/VOL Knob: Press the power/volume knob to
turn the audio and navigation systems on and off.
Turn the knob to increase or decrease the volume to
the audio system or the volume of a voice prompt while
the prompt is playing.
b: Press the navigation repeat key to repeat the
NAV
current voice guidance navigation prompt.
TRAF: Press this key to enable traffic announcements.
See “Screen Features” under Navigation System
Overview on page 1-2 for more information.
INFO: Press this key to access the Vehicle Information
screen and to check the status of several of your
vehicle’s systems. See Driver Information Center (DIC)
in Section 3 of your vehicle’s owner manual for more
information.
NAV: If you are in a menu and are not on the map
screen, press the NAV key to view the current
map showing vehicle position.
If a route has not been planned, pressing this key will
display the map screen and the following information:
• North Up, Heading Up, or Birdview™ symbols
• Audio source
• GPS icon
• Map scale
If a route has been planned, the first press of the NAV
key will also display the following information:
• Number of miles/kilometers between current vehicle
position and the destination
• Estimated travel time to the destination
• Highlighted route or turn-by-turn instructions
Each time the NAV key is pressed, the reconfigurable
soft key descriptions to the right of the navigation screen
will “expand” to show a detailed description of each.
The prompts will return to their normal appearance after
about 10 seconds.
You will find more information on each feature found on
a map screen later in this manual.
2-3
Page 20
AUDIO: Press the AUDIO key to access the Audio
menu. See “Setting the Tone” under Navigation Audio
System on page 3-2.
DISC: Press the DISC key to access the CD Changer
menu. See “Playing a CD” under Navigation Audio
System on page 3-2.
BAND: Press the BAND key to access the Radio
screen and switch between AM, FM1, FM2, XM1, or
XM2, if equipped. See “Finding a Station” under
Navigation Audio System on page 3-2.
The following hard keys are located to the right of the
navigation screen:
Z (Eject): Press one of the eject buttons to eject
either the map DVD or a CD(s). See Navigation System
Overview on page 1-2.
TUNE/SEL Knob: Press the tuning knob to go to the
next or previous radio station and stay there. See
“Finding a Station” under Navigation Audio System on
page 3-2. If you are currently viewing a map screen,
you may also press this knob to access the Navigation
Menu. See Navigation Menu on page 2-12.
o SEEK/SCAN p: Press the SEEK/SCAN right or
left arrows to go to the next or previous radio station and
stay there. See “Finding a Station” under Navigation
Audio System on page 3-2.
In addition to the hard keys, there are also
six reconfigurable soft keys located to the right of
the navigation screen. Use these keys to select the
following prompts:
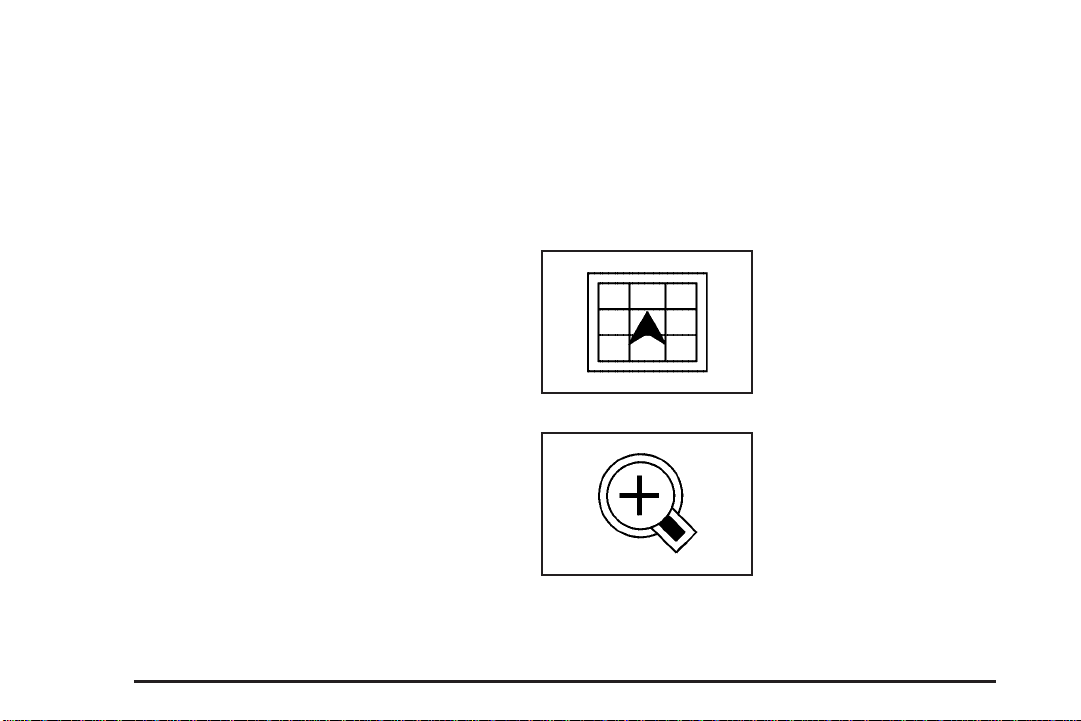
Press this key to switch
between a North Up,
Heading Up or Bird’s Eye
view of the map. This
symbol changes to reflect
the next available view.
Press this key to get a
closer look at a smaller
section of the map you
are traveling on.
2-4
Page 21
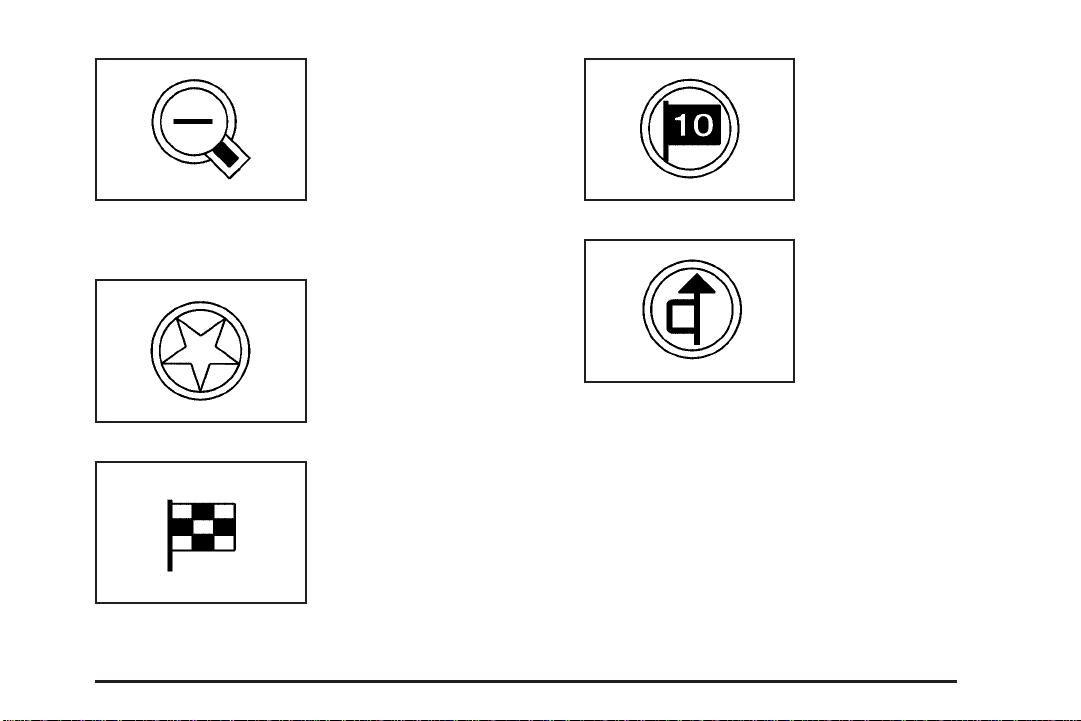
Press this key to see a
larger scale of the map
you are traveling on.
You can also view your
highlighted route. See
Navigation Menu on
page 2-12 for more
information.
Press this key to view a
list of all points of interest
(POI) close to the area
in which you are traveling.
Press this key to access
the Enter Destination
screen.
Press this key to
view a list of the last
10 destinations to which
you have traveled.
Press this key to detour
around a problem area
while you are traveling
on a planned route.
You can choose the
length of the detour.
2-5
Page 22

If you have a planned route and would like to see if
there is a possible option to your current heading, you
may also press this key to activate the auto-reroute
feature. The system may give you alternate routes to
the one currently planned.
Press this key to instruct
the system to plan a route
based on the criteria
that has been entered into
the system.
Alpha-Numeric Bar
Letters of the alphabet, symbols, punctuation, and
numbers, when available to you, will be displayed on
the navigation screen as an alpha or numeric bar.
The appropriate bar will automatically be displayed
whenever the system needs information from you.
The alpha bar will be displayed when the system needs
you to input a street or city name. The numeric bar
will be displayed when the system needs you to input a
phone number or house address.
Move through the list of characters by turning the
TUNE/SEL knob, then press the knob to select a
character. The numbers available to you are at the
end of the alpha-numeric bar.
U (Space): Select the space symbol to enter a
space between characters or the words of a name.
V (Backspace): Press the reconfigurable soft key
next to the backspace prompt if you have selected
an incorrect character.
To make your name selections easier, the system will
only allow you to select a character which can follow
the last one entered. For example, if you enter Z,
you would not be allowed to follow it with T. The system
will only display the available characters.
If you are unsuccessful when inputting a name, it may
need to be selected differently. It is also possible that the
map DVD database may not contain that information
or the correct search area has not been selected.
See Database Coverage Explanations on page 2-37 for
more information.
2-6
Page 23
Setup Menu
The Setup menu allows you to adjust the basic features
of the navigation system screen.
To access the Setup Menu, do the following:
1. Press the MAIN key located to the left of the
CD loading slot.
2. Press the Setup key.
The following items are available from the Setup menu:
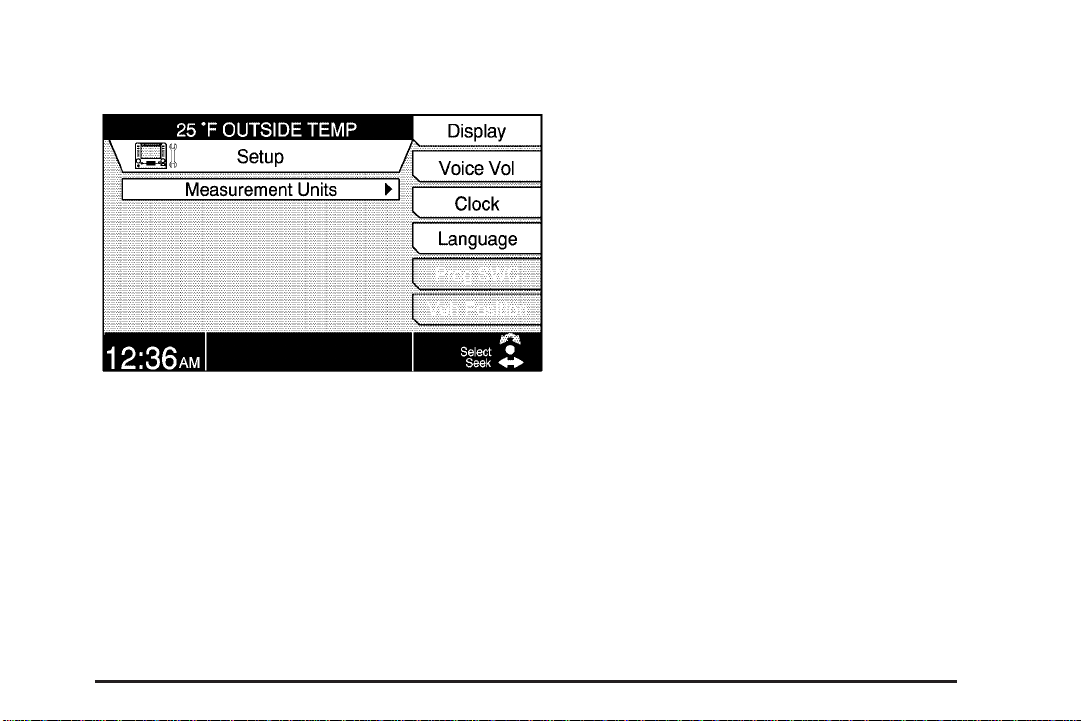
Measurement Units
Select Measurement Units to choose the units of
measurement for the vehicle’s systems. You can choose
between Mile/feet (Mi/ft), Mile/yard (Mi/yd), and
Kilometer/meter (Km/m).
Turn the TUNE/SEL knob to scroll through the choices.
Once your choice is highlighted, press the knob to
select it. An X will appear in the box next to the item to
show it has been selected. Once you set your choice,
all vehicle systems will change to those measurement
units. For example, if you choose kilometers, the climate
control panel will show degrees Celsius instead of
degrees Fahrenheit.
Press the Back key to return to the main Setup screen.
2-7
Page 24

Display
Select Display to adjust the appearance of the screen.
The following items are available for selection or
adjustment:
Auto: Auto mode allows the system to automatically
adjust the display for day or night, depending on
exterior lighting conditions. Press the key next to the
Auto prompt to select it. An X will appear to show it
has been selected.
Day: Day mode is best suited for daylight conditions.
The displays are brighter with a lighter background
so they can be seen better during daylight hours. Press
the key next to the Day prompt to select it. An X will
appear to show it has been selected. You can select this
mode regardless of exterior lighting conditions.
Night: Night mode is best suited for nighttime
conditions. The displays are more dim with a darker
background so they can be seen better during nighttime
hours. Press the key next to the Night prompt to
select it. An X will appear to show it has been selected.
You can select this mode regardless of exterior
lighting conditions.
Contrast: Press the key next to the Contrast prompt to
select it, then turn the TUNE/SEL knob to increase or
decrease the contrast. A bar graph on the screen
will reflect the change in contrast.
Brightness: Press the key next to the Brightness
prompt to select it, then turn the TUNE/SEL knob to
increase or decrease the brightness. A bar graph on the
screen will reflect the change in brightness.
Voice Volume
Select Voice Volume to adjust the volume level of
navigation voice prompts or to turn the prompts on and
off. See “Interrupt Volume” under Navigation Audio
System on page 3-2 for more information.
Clock
Select Clock to set the time and adjust other time
options. The following items are available for selection
or adjustment:
Hr +/−: Press the key next to Hr+ or Hr− to increase or
decrease the hour on the clock.
Min +/−: Press the key next to Min+ or Min− to increase
or decrease the minutes on the clock.
2-8
Page 25

Auto GPS Update: Select this item to set the
navigation system time to GPS time. See Global
Positioning System (GPS) on page 2-35 for more
information.
Daylight Savings Time: Select this item to observe
daylight savings time and advance the hour by one.
An X will appear to show this item has been turned on.
Select Time Zone: Select this item to choose the
correct time based on the time zone you live in. Choose
between Atlantic, Eastern, Central, Mountain, Pacific,
Alaskan, and Hawaiian.
Turn the TUNE/SEL knob to scroll through the choices
and press the knob to set your selection. The current
time for that time zone will appear on the display along
with an X to show it has been selected.
12h/24h: Select this item to choose between 12h for
standard time or 24h for military time.
Press the TUNE/SEL knob to switch between the
two choices, then press the key next to the OK prompt
to set your choice.
You must press the OK key to save any adjustments
you have made to the time options, or they will be lost.
Press the Back key to exit the Clock menu without
saving your changes.
Language
Select Language tochoosethe language you prefer for
information on the display, voice recognition, and voice
prompts. Choose between English, French, or Spanish.
To select a language, press the key next to the language
you prefer. An X will appear next to the language to
show it has been selected. All information on the display
will appear in the selected language.
Programmable Steering Wheel
Controls (CTS)
You may select Prog SWC to program steering wheel
controls 1, 2, 3, and 4. See “Audio Steering Wheel
Controls” in your vehicle’s owner manual for more
information.
Vehicle Position
Select Veh Position to correct an error in your vehicle’s
position or direction. Use the scroll arrows to adjust
the vehicle’s position. After adjusting, press the Set key.
See “Map Scroll” under Navigation Menu on page 2-12
for more information.
This item is only available if the map DVD is loaded and
the vehicle is in PARK (P) for an automatic transmission,
or the parking brake is engaged and the vehicle speed
is less than 5 mph (8 km/h) for a manual transmission.
2-9
Page 26

Maps
This section includes basic information that you need to
know about the map database.
The maps are stored on a DVD-ROM. The 48 contiguous
Unites States, Hawaii, and portions of Canada are
contained on one disc. The U.S. map database includes
interstate freeways, state highways, country roads, and
major and general streets.
Refer to the “Navigation System Map Disc” manual to
view the explanation of map coverage. The map
disc manual will be in your map DVD case when the
vehicle is delivered from the factory.
When your vehicle is delivered from the factory, the
dealer may have installed the map DVD. If the DVD was
not installed in your vehicle when first purchased, do
the following:
1. Turn the ignition on.
2. If already loaded, eject the map DVD or audio
CD from the slot.
3. Load the map DVD into the slot by inserting it
partway. The system will pull it in.
Once the map DVD is inserted correctly, you will have
the following two choices:
• Select a Language
• Agree
English is the default language, or you can choose to
select French or Spanish at this time. See “Language”
under Setup Menu on page 2-7 for more information.
You may also select Agree to go to the navigation
screen. The map will appear with your current vehicle
position on the map.
If your current vehicle position is incorrect on the map,
see “Vehicle Position” under Setup Menu on page 2-7.
Map Adjustments
The system allows you to adjust the scale of view on
the map. The map will scroll automatically based on the
direction you are traveling.
To view a larger or smaller scale of the map, press
the reconfigurable soft key next to the zoom in or
zoom out prompts. See “Hard Keys” under Using the
Navigation System on page 2-2 for more information.
Map Scales
The scale of a map can range from 1/64 of a mile
(25 km) to 80 miles (128 km).
2-10
Page 27
Symbols
The following symbols are the most common that
appear on a map screen.
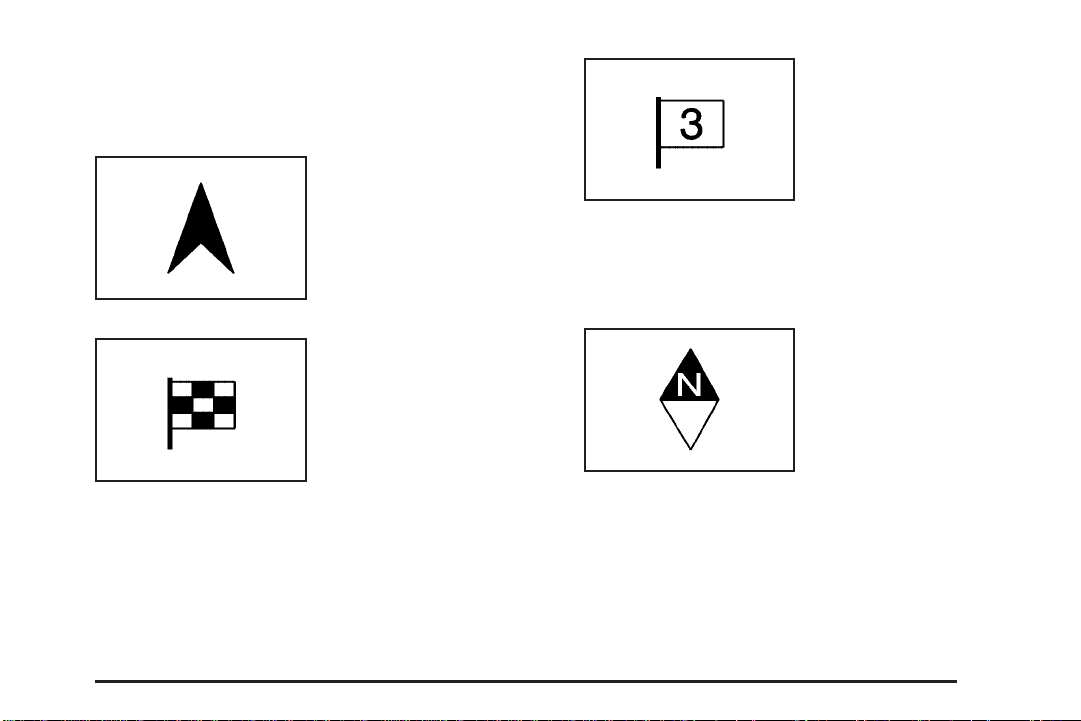
Your vehicle is shown as
this symbol. It indicates
the current position of your
vehicle on the map.
This symbol will appear on
the map when a waypoint
has been entered.
The number on the flag indicates the sequence of the
waypoint on the route. See “Creating a Trip with
Waypoints” under Navigation Menu on page 2-12 for
more information.
This symbol will appear
on the map to show
your destination after a
route has been planned.
See “Plan a Route” under Navigation Menu on
page 2-12 for more information on planning a route.
This symbol indicates the
map with North up, known
as North Up mode.
While in North Up mode, North will always be at the
top of the map screen regardless of which direction
the vehicle is traveling.
2-11
Page 28
This symbol indicates the
map with the vehicle travel
direction up, known as
Heading Up mode.
The shaded diamond with the N indicates North. While
in Heading Up mode, the direction your vehicle is
traveling will always be at the top of the map screen.
If a red stick pin appears along a highlighted route on
a map screen, it marks a place where turn guidance
is provided.
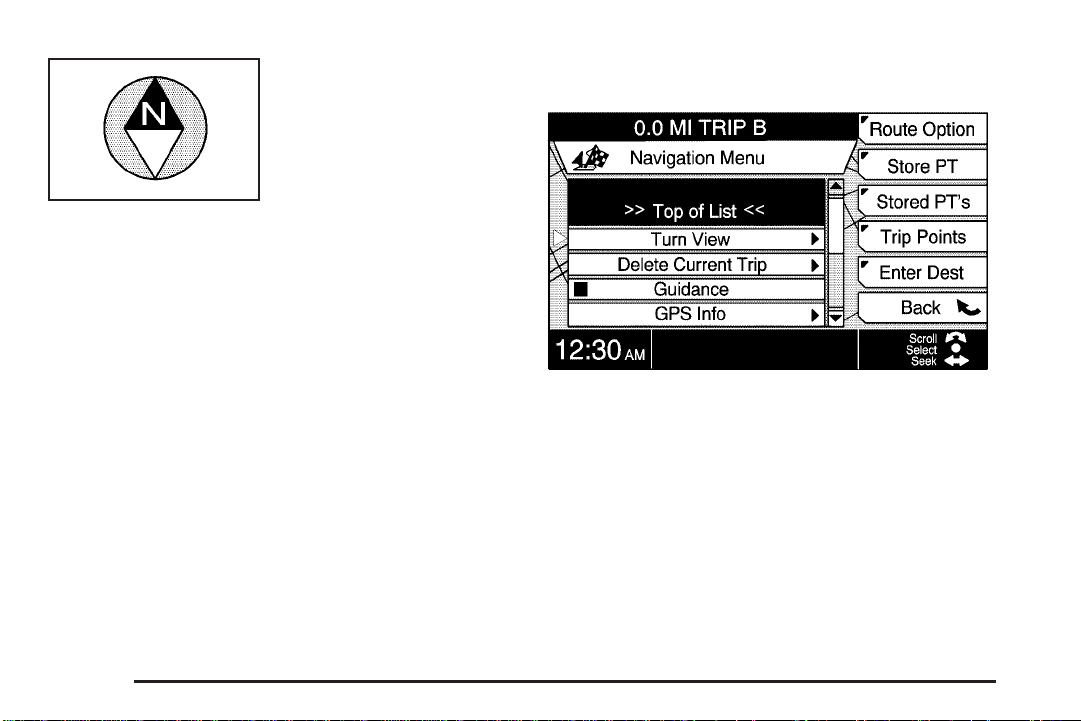
Navigation Menu
To access the Navigation Menu, press the TUNE/SEL
knob when viewing a map screen. Using this menu,
you can choose from several options and use the
reconfigurable soft keys to make adjustments to the
system and plan routes.
2-12
Page 29
Navigation Menu Options
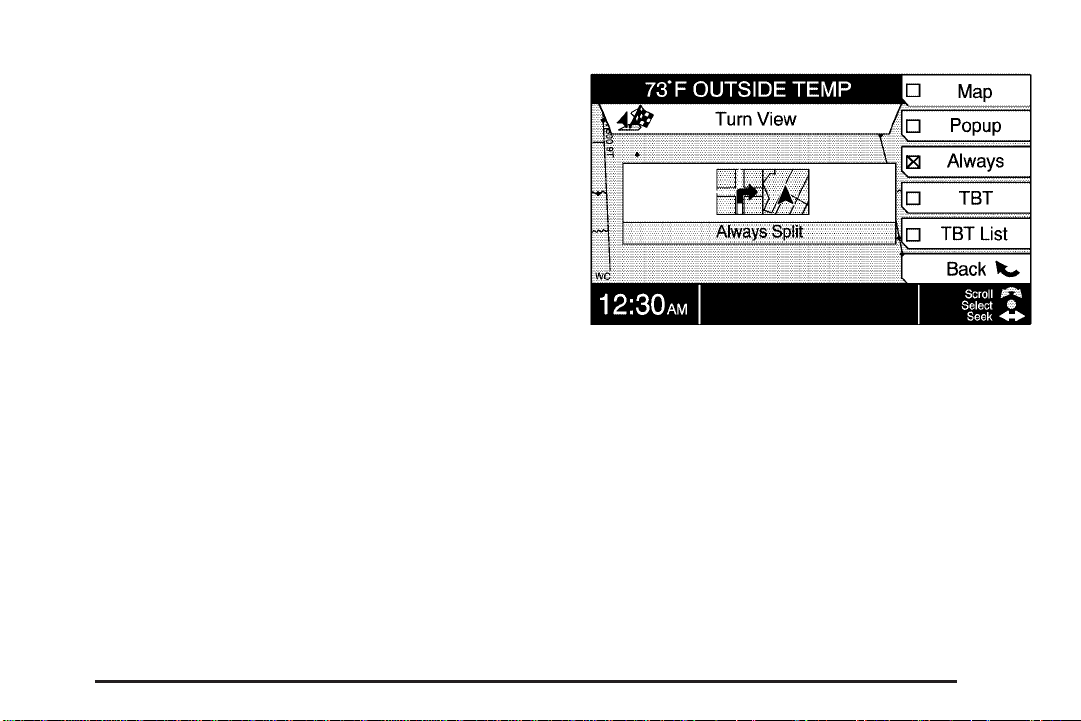
Turn View
Select this option to decide which view of the map
you will see as your trip progresses. The following
reconfigurable soft key options will be available with
this option:
Map: Press this key to display the map with the route
highlighted. The map will display street names and
you will see the progress of route travel on the map
as you follow the highlighted route.
Popup: Press this key to see a regular view of the
map and to have the next turn, represented by an
arrow pointing in the direction of the turn, pop up as
you approach it.
Always Split
Always: Press this key to see the regular view of the
map and the popup view on the screen together at
all times.
TBT (Turn-By-Turn): Press this key to see the route
as a series of turns. No map view will be offered
with this option. Instead, the entire intersection will
be displayed, along with the next maneuver that you
will be required to perform.
2-13
Page 30

The system will also supply street names when
available. The display will change to the next maneuver
when the vehicle completes the current maneuver.
Turn-By-Turn (TBT) List
Turn-By-Turn (TBT) List: Press this key to see all
the turns in the next 50 miles (80 km) of the planned
route listed in order on the screen. The turn list will
update to include new maneuvers as you move closer
to your destination. There will be an arrow to the
left of each turn indicating the direction of the turn.
Delete Current Trip
Select this option to delete the current trip. The
system will ask you to confirm your choice by selecting
Yes or No. Press the Yes key to delete the current
trip or the No key to continue with the planned route.
Guidance
Select this option to turn guidance on and off.
If guidance has been turned off, the navigation
repeat key can also be used to turn guidance on.
See Navigation System Overview on page 1-2 for
more information.
2-14
Page 31

GPS Information
Select GPS Info to see the latest GPS information
available for your vehicle. This can include latitude,
longitude, heading, etc. The last direction in which the
vehicle was heading while in motion will be displayed.
Voice Volume
Select Voice Volume to adjust the navigation and
voice recognition prompt volume level for the system.
Turn the TUNE/SEL knob to increase or decrease
the volume. When you stop turning the knob, the system
will respond with “Louder” or “Softer” to provide you
with an example of the new volume at each level.
You can also turn the navigation prompts on and off
using the NAV key.
Map Scroll
Select this option to move and adjust the map view.
This view can also be used to enter destinations,
waypoints, and stored points.
While in Map Scroll, turn the TUNE/SEL knob to
choose the direction in which you want to move the
map. Then, press the knob to move the map in
that direction. The map will continue to move as long
as the TUNE/SEL knob is pressed. See “Map Entry”
under “Enter Destination” later in this section for
more information.
2-15
Page 32

Map Icons
With this option, you can choose which icons you
want to appear on the map. These icons will appear
at the location of the point of interest (POI).
To set the icons, do the following:
1. Turn the TUNE/SEL knob until the icon is
highlighted.
2. Press the TUNE/SEL knob to select the icon.
When the icon is selected, an X will appear in
the box next to the icon.
If you prefer to see all the icons, press the Set All
reconfigurable soft key. This will select all five icons.
You can de-select all previously chosen icons by
pressing the Clear All reconfigurable soft key.
De-selecting all icons means that these five icons will
not appear on the screen while you are traveling
on a planned route.
Interstate America
®
: This feature allows the system
to inform you of the services available at each exit on
a major highway, such as restaurants, gas stations,
lodging, etc.
2-16
Page 33

Once you have a route planned and begin to travel on
an interstate, a box with a series of icons will appear
in the upper left corner of the screen. These icons
indicate what services are available at the next exit.
A smaller Interstate America icon will appear on the
map next to the referenced exit.
Tracking
Select this option to leave a trail showing where you
have been on the map. Your path will be represented by
bubbles that appear three-dimensional on the screen.
Tracking can be useful for the following reasons:
• When tracking is activated, you can see where you
have already traveled.
• When you wish to return to your point of origin
without planning another route, you can follow
the tracking bubbles back to where you started.
• When you drive into an area with few digitized roads
listed in the DVD database, you can follow the
tracking bubbles back to a digitized area.
To clear the trail left by tracking, turn off Tracking by
pressing the TUNE/SEL knob. This will erase the
bubbles. You may then choose to turn Tracking back
on again, in which case your trail will begin from
your current location.
The maximum length of a tracking trail is
50 miles (80 km). Once you exceed this distance,
the bubbles marking the beginning of your route begin
to disappear as new ones are created at the end of
your trail.
2-17
Page 34

Setup Menu Reconfigurable Soft Key
Options
Any reconfigurable soft keys shown here or shown
under the Enter Destination Menu later in this section
may be changed to help you personalize the system.
See “Hard Keys” Using the Navigation System on
page 2-2 for more information.
To change a menu item to a reconfigurable soft key,
do the following:
1. Scroll to and highlight the menu item using the
TUNE/SEL knob.
2. Press and hold the reconfigurable soft key you wish
it to replace for two seconds.
The menu item will now be a reconfigurable soft
key and will remain that way unless you choose
to change it. The item that was originally that
reconfigurable soft key will now be a menu item.
Back is the only reconfigurable soft key that cannot be
changed or moved.
Route Option
The five icons that appear at the bottom of the screen
indicate which route options have been selected.
These same icons appear on the navigation screen
when calculation is in progress.
2-18
Page 35

When you press the Route Option reconfigurable soft
key, you are able to select from the following options on
the route calculation methods list:
Shortest/Fastest Route: The system will calculate the
shortest route or fastest route possible. The system
determines the shortest route based on the shortest
distance. The fastest route is the route with the lowest
estimated travel time.
Use Freeway: The system will calculate the best route
using the freeways wherever possible.
Use Tollroad: The system will calculate the best route
using tollroads wherever possible.
Use Ferry: The system will calculate the best route
possible using ferries wherever possible.
Use Time Restricted Roads: The system will calculate
the best route possible using roads that are time
restricted. These include any roads where use is
prohibited by the time of day you are traveling, such
as no left turns before 3:00 p.m., etc.
Auto Recalc (Automatic Recalculation): If you have
selected this option and leave the original calculated
route, the system will automatically calculate a new
route without any further input from the driver.
To choose from the list of options, use the TUNE/SEL
knob. You may select all or none of the options listed
as route calculation options.
From the Route Option menu you will also be able to
use the following reconfigurable soft keys:
Whole Route: The system will go to the main
navigation map and zoom out so that the entire route
will be displayed.
Simulation: The system will simulate traveling along
the route.
Avoid Area: The system will allow you to choose
an area you want to avoid traveling through. When you
press this key, a map showing the travel area will be
displayed, along with arrows allowing you to scroll to the
area on the map you want to avoid. See “Map Scroll”
listed previously in this section for more information.
2-19
Page 36

Before you set the area to avoid, you may want to
select the FWY (Freeway) key so the system will allow
you to take the freeway through the avoidance area.
If you do not select it first, the system will avoid
the chosen area entirely.
You can enter up to 10 avoidance areas.
Calc (Calculate): The system will begin calculating the
chosen route using the route options you have
selected.
Back: Press this key to return to the previous screen.
Store Point
Press the Store PT key to save the current location to
a stored point in the system’s memory.
A total of 60 points can be stored. The first stored
point is reserved for your home location. If all 60 points
are entered, the system will notify you that there is
no available storage space left in memory. A currently
stored point must then be removed before another
can be stored.
Stored Points
Press the Stored PTs key to view a list of all points.
The list will show points stored, reserved, and empty
points. The first stored point will be considered Home.
You must store the location you would like to be Home.
2-20
Page 37

The list will also display the following reconfigurable
soft keys:
>More: Use this key to scroll through the complete
name of a stored point.
Sort: This key allows you to sort your stored points into
one of five available categories: Personal, Business,
Leisure, Special, and Uncategorized Point.
Once you have categorized the stored point, press
the Back key to return to the previous menu. Each
categorized stored point will have an icon in front of
it and will be highlighted a different color than other
marked points on the list. You may then press one of
the reconfigurable soft keys to sort your stored points
by that category.
Map: This key takes you to the map showing the
location of the selected stored point.
Q: This key allows you to lock the selected
Lock
stored point so it cannot be accidentally deleted.
Delete All: This key deletes all stored points which
have not been locked in.
Back: This key always returns you to the previous
screen.
Use the TUNE/SEL knob to move to the stored point
you want to edit. Once you make your selection
by pressing the TUNE/SEL knob, you will be able to
do the following:
Edit Name: Select this option to edit the name of a
stored point. The alpha-numeric bar will appear at the
bottom of the screen to allow you to input the new name
or address. See “Alpha-Numeric Bar” under Using the
Navigation System on page 2-2 for more information.
Categorized (Landmark): Select this option to
categorize and attach a landmark icon to your stored
point. Select the category with the reconfigurable
soft key, then use the TUNE/SEL knob to scroll and
select the desired landmark icon.
Delete: Select this option to delete stored points from
the list. If you select this option, the system will ask you
if you are sure you want to delete the stored point.
You may then press Yes or No and return to the
previous screen.
Change: Select this option to change a currently
stored point.
2-21
Page 38

Trip Points
Trips can be as simple as one destination, or in addition
to the destination, can have up to 10 waypoints.
Select this option to list, edit, and save the waypoints
and destination entered for your current trip. Once
you have entered all the points for the trip, press the
Store reconfigurable soft key to save the trip to memory.
The system will allow you to save up to 10 trips.
The following choices are available in the
Trip Points menu:
Route Option: This key is the same as Route Option
from the main Navigation Menu. See “Route Option”
listed earlier for more information.
Store: Press this key to save a trip to memory.
Stored Trips: Press this key to retrieve a list of all
stored trips.
The following prompts are available to you while in the
Stored Trips menu:
More: Press this key to scroll through the full name
of the stored trip when all of the information does not
fit on the display. Each time this key is pressed,
the scrolling speed is increased.
Info (Information): Press this key to list the destination
and any waypoint(s) for a stored trip.
Map: Press this key to view the map associated with
the stored trip.
Edit Name: Press this key to change some or all of
the information of the saved trip name.
2-22
Page 39

Delete: Press this key to delete a stored trip.
Back: Press this key to return to the previous menu.
Edit: Press this key to change your stored trips.
Use this function to change the order or delete any
or all waypoints or the destination within a trip.
To change the order of a stored trip, do the following:
1. Scroll to the waypoint or destination you want
to move using the TUNE/SEL knob.
2. Press the reconfigurable soft key next to the
Move prompt.
3. Turn the TUNE/SEL knob to move the point to
the desired location.
4. Press the reconfigurable soft key next to the
OK prompt to confirm the change.
Calc (Calculation): Press this key to start route
calculation.
Back: Press this key from the Trip Points Menu to
return to the main Navigation Menu.
Enter Destination
Press the Enter Dest key to display the Enter Destination
menu. This menu will give you more ways to plan a trip.
You may choose to enter a destination using one of the
items from the list on the screen. Use the TUNE/SEL
knob to choose from the following destination planning
options:
Go Home
This option will take you to the destination you stored
as Home. See “Stored PTs” earlier in this section
for more information.
2-23
Page 40

Stored Points
This option allows you to select a destination from your
stored points list.
Stored Trips
This option allows you to select a destination from your
stored trips list.
Intersection
This option allows you to select a destination by
inputting two intersecting roads. To do this, use the
following:
1. Press the State reconfigurable soft key and use the
TUNE/SEL knob to enter in the correct state.
2. Press the City reconfigurable soft key and use the
TUNE/SEL knob to enter the name of the city
where the intersection is located.
3. Press the List reconfigurable soft key to display
a list of cities that match the letters you entered
and use the TUNE/SEL knob to select the
desired city.
4. Use the TUNE/SEL knob to enter in the name of
the first intersecting street. Remember to enter
only the street name and not the direction,
for example, enter only Civic Center Dr, not
N. Civic Center Dr.
5. After entering in some of the letters, the system
will display a list of streets that match the entered
letters. Use the TUNE/SEL knob to scroll and select
the desired street.
6. The system will now prompt you to enter in the
name of the second intersecting street. Using
the same method as before, enter in and highlight
the second intersecting street.
7. You may press the Map multifunction key to see a
map of the intersection.
8. After highlighting the desired street, press the Calc
multifunction key or press the TUNE/SEL knob to
begin route calculation. Once the route is calculated,
the system will display and voice turn by turn
guidance to the intersection will begin.
2-24
Page 41

Phone
This option allows you to select a destination by
inputting the phone number of a POI on the map DVD.
Residential phone numbers are not available to be
entered.
When you select Phone, the alpha-numeric keypad will
appear to allow you to enter the phone number of
your destination. Once the phone number has been
entered, the Map reconfigurable soft key will display a
zoomed in map of the POI that matches the phone
number entered. The Set Dest reconfigurable soft key
will add the destination as the final waypoint to the
current trip. The info reconfigurable soft key will display
the POI name, address and telephone number
information. Press the Calc reconfigurable soft key to
begin route calculation. Once the route is calculated the
system will display and voice turn by turn guidance to
the destination will begin.
If a phone number cannot be found, “no phone number
is available” will be displayed.
Previous Origin
This option allows you to return to the place where you
started your last planned route. Only one previous
origin can be stored at a time by the system. Once you
enter a new route, the previous origin will be changed.
Map Entry
This option allows you to enter a destination by using
the map. Turn the TUNE/SEL knob to select a direction
to scroll. Press the TUNE/SEL knob to move the
map in the direction selected. Use the Set Dest
reconfigurable soft key to insert this location as your
new destination and take you to the Trip Points menu.
Once you have reached the desired destination,
press the Calculate key and a trip will be planned with
that as the only point in the trip. You will also hear
a voice prompt directing you to “Proceed to the
highlighted route.”
Use the zoom in and zoom out keys to view the map
as desired.
2-25
Page 42

While in the Enter Dest menu, you may also plan a
route using the following reconfigurable soft keys:
Beam
This option allows you to input addresses or telephone
numbers you may have stored in your Palm™ hand-held
computing device directly into the Navigation System.
When transmitting data to the unit, ensure the format is
the same as that on the screen. For the system to
be able to properly search for an address, standard
street and directional abbreviations should be used.
Instead of “West Hall Road” use “W Hall Rd.”
When you press the Receive key, the system will ask
you to send the data. Hold the Palm near the infrared
receiver located in the upper right corner of the
screen and transmit. When the information has been
successfully received, you will be able to use it to help
plan your route.
After receiving the beamed data, the screen will display
this data. A search must be performed to find the
matching data in the navigation database. Turn the
TUNE/SEL knob to select a field to search, then press
the Search key. Search will be highlighted if the
field is searchable.
You may be requested to select a city or street to narrow
the search. After successfully finding the match in the
navigation database, you can use the reconfigurable soft
keys to map, set the destination, or calculate the route.
If the data cannot be found in the navigation database,
“no data found” will be displayed. If this occurs, select
another field to search. Repeat this process until all
search fields have been checked or a match is found.
You may also select information from the All POI
(Points of Interest) or Nearby POI menus to send to
your Palm using the INFO button.
A second way to access the Beam screen is through
the Address Book screen. See “Address Book”
under Main Menu on page 1-6 for more information.
2-26
Page 43

All POI (Points of Interest)
This option allows you to choose a destination from
the all POI list.
There are four ways to limit a search for a POI from
this screen:
• Choose a city, village, township, or county.
• Choose a state.
• Choose a category.
• Enter the name of the POI.
To enter the city of a POI, the state of a POI, or a
POI category, do the following:
1. Press either the City, State, or Category key.
2. Enter the name of the city, state, or POI category
using the alpha-numeric keypad. To limit the
search of a POI, the city or category must be
entered first.
As you enter the item, the system will search for
a match. Select the correct POI from the list.
To search for a POI by name, enter the name of the
POI in the POI Name screen.
The POI Name screen allows you to perform the
following functions with the reconfigurable soft keys
on the currently selected POI:
More: Press this key to view the entire POI name.
Info (Information): Press this key to display the name,
address, and phone number of a POI. The database
may not contain information on some POIs.
Map: Press this key to view the location of the vehicle
on the map.
Set Dest (Destination): Press this key to add the
highlighted POI as the final waypoint for the current trip.
The system will route to all previously entered
waypoints before route guidance will begin to the
highlighted POI.
Sort: Press this key to sort the POI list by distance
from the current location.
Use the TUNE/SEL knob to scroll through the list. Press
the knob to calculate the route to the selected POI.
2-27
Page 44

POI Categories
There are many POI categories in the DVD database
that you can choose from when using the All POI
or Nearby POI options. When viewing this list, you will
notice the full names of some POIs will not be displayed
due to their length. These names will be followed by
three dots. If you wish to see the full name of the POI,
press the More key and the system will scroll to the
end of the name.
The POI for Restaurant is broken down into 51 distinct
categories. Select Restaurant from the POI choices and
press the List key. Cuisine Type will then appear as an
option. Press the List key again to view the restaurant
categories and select one to use as your POI.
Nearby POI
This feature allows you to limit your choices of a
Nearby POI to within a 30 mile (48 km) radius of
one of three locations: current location, waypoint
location, or destination location.
2-28
Page 45

After entering the Nearby POI screen, use the location
key to select which one of the three locations you
want to search for Nearby POIs. The location screen
shows a list of all points along your trip. Use the
TUNE/SEL knob to select the desired location. Press
the Back key to return to the Nearby POI screen.
The selected location will be shown at the bottom
of the screen.
Choose a category from the Nearby POI list using the
TUNE/SEL knob. Once a category is selected, a
list of available POIs will be displayed. The points are
listed in order of straight-line distance from the selected
location. If the selected location is the current location,
an arrow will show the direction of the Nearby POI.
Turn the TUNE/SEL knob to select the desired POI.
This point can be added to your trip or replace the
current trip. Press the TUNE/SEL knob to calculate a
route to the POI. This will also delete any trip that
may have been active.
Use the Set Dest key to add this POI to your current
trip as your destination without deleting your current trip.
This will take you to the Trip Points screen where this
POI can be moved to any location in your trip point list.
Top 1, 2, 3: The most commonly used categories can
be put at the top of the list for easy access. These
categories are the only available categories when the
vehicle is in motion. To move a category to one of
the Top 3 spots, turn the TUNE/SEL knob to the desired
category. Then, press the Top 1, Top 2, or Top 3
reconfigurable soft key to move the category to that
location.
Location: Press this key to select the location from
which you want to search for Nearby POIs. Use
the TUNE/SEL knob to scroll and select the search
area as the current position, current waypoints, or the
current destination. Press the Back key to return to
the list of POI categories.
Info (Information): Press this key to receive further
information about the chosen POI, such as the
address and phone number. When a Nearby POI is
not available within the search area, “No Facility Found
in This Area” will be displayed.
From this screen you may also transfer information to
your Palm™ hand-held computing device. See “Address
Book” under Main Menu on page 1-6 for more
information.
2-29
Page 46

Last 10
This feature allows you to select a destination from the
last 10 destinations entered. Press the Last 10 key
to bring up the list. Turn the TUNE/SEL knob to choose
a destination from this list.
While using the Last 10 feature, press the Store PT key
to add a location from the Last 10 list to the stored
points list. Press the Map key while using the Last
10 feature to go to the map screen and view the location
of the point you have chosen.
You can use the Set Dest, Delete, or Calculate
reconfigurable soft keys as described earlier for any
other destination. See “Enter Destination” listed
previously in this section for more information.
Address
This method allows you to enter a destination using the
postal address (entering the zip code is not required).
It is recommended that you enter the information in the
following order: state, city, street name, and address
number.
1. To enter the state name, press the State
reconfigurable soft key. Use the TUNE/SEL knob
to enter the name of the state using the alpha
numeric bar. As letters are entered, the system
will automatically display a list of matching states.
Use the TUNE/SEL knob to scroll and select
the desired state.
2-30
Page 47

2. Press the City reconfigurable soft key. Use the
TUNE/SEL knob to enter the name of the city
where the address is located. Press the List
reconfigurable soft key to display a list of cities
that match the letters you entered and use
the TUNE/SEL knob to select the desired city.
Remember to use the same city that you would use
when mailing a letter (the postal address city).
3. Use the TUNE/SEL knob to enter the street name.
Remember to enter only the street name and not
the direction, for example, enter Civic Center Dr,
not N. Civic Center Dr. You may press the List
reconfigurable soft key at any time to display a list of
street names that match the information that you
have entered thus far. The system will automatically
display a list of matching street names that match the
information that you have entered so far. The system
will automatically display a list of matching street
names once there are only a few matches remaining.
Use the TUNE/SEL knob to select the desired street
name. If the desired street name is not shown, it is
possible that the map DVD does not contain this
information. See Database Coverage Explanations
on page 2-37.
4. The system will now display the possible address
numbers for the street that was selected. Use the
TUNE/SEL knob to enter the address number
for the address. If the address number does not
fall into the address number range shown on
the system, it is possible that the map DVD does
not contain this information. See Database
Coverage Explanations on page 2-37.
5. Press the Calc reconfigurable soft key to calculate
a route to this destination. Any current trip will be
replaced with the new address you just entered.
6. Press the Map reconfigurable soft key to see a
zoomed in map of the address you entered.
7. Press the Set Dest reconfigurable soft key to add
the address that you just entered to the current list
of waypoints as the last waypoint.
2-31
Page 48

Creating a Trip with Waypoints
Once a destination has been entered, you can also add
waypoints. Trip waypoints are destinations you want
to arrive at before reaching your final destination. The
system will automatically guide you to each waypoint,
then on to your final destination. Up to 10 waypoints
can be entered for any trip.
To enter a waypoint, press the Trip Points reconfigurable
soft key on the Navigation Menu screen. Then, turn
the TUNE/SEL knob to scroll the trip points list. A
waypoint can be added at any location designated by
a blank flag. Press the TUNE/SEL knob to select
the location. The system will then allow you to enter a
waypoint using the same method as Enter Destination.
See “Enter Destination” listed previously in this
section for more information.
Once you have entered all desired waypoints for your
trip, press the Calculate key. The system will return you
to the map and will plan the route to your waypoints
and destination.
After the first waypoint, the color of the highlighted route
will change. See Colors on the Screen on page 2-34
later in this section for more information.
Editing a Trip
While at the Trip Point screen, press the Edit
reconfigurable soft key. This screen allows you
to delete or move points in a trip. If you wish to delete
a waypoint, scroll to that waypoint and press Delete.
You may also change the order of the waypoints
by scrolling to a waypoint and pressing Move. Then,
turn the TUNE/SEL knob to move it to the desired
location within the list. Once the waypoint is at
the desired location, press the TUNE/SEL knob or
the OK key.
Plan a Route
After a destination has been entered, you must press
the Calculate reconfigurable soft key. The system
will return you to the map and will plan the route to your
selected destination. While the system is planning the
route, the Route Option and Cancel keys will be
available. The Add Way Pt key will also appear if there
are less than 10 waypoints in the current trip.
When your route guidance has been planned, it will be
highlighted and a checkered flag will appear on the
map to show your destination. Symbols will also appear
for any waypoints that have been set, and “Route
Calculation Completed” will be displayed.
2-32
Page 49

Traveling on a Planned Route
After a route has been calculated and the route
highlighted, you may hear an audio prompt to proceed
to the highlighted route. When you are ready, drive
the vehicle to the highlighted route. Once you begin
driving on the route, the system will give additional
audio and visual prompts as you approach your next
maneuver. Each maneuver is indicated on the map
with a red maneuver pin.
Maneuver Pins
Maneuver pins are red stick pin icons on the map that
indicate changes in the road or special action that
must be taken by the driver to remain on the currently
traveled road. For example, the road may have a
sharp curve in it. The curve would not qualify as an
official turn on the planned route. However, the driver
must be aware of the curve so that he or she can
stay on the planned route. Maneuver pins are always
displayed along a planned route, but voice prompts and
screen popups will only be given if these features are
turned on.
As you are traveling, the current road is shown at the
bottom center of the map screen. In addition, the
next maneuver will be in the upper center of the map
screen. Anytime while on the route, you can press
the navigation repeat key to get an audio prompt of
your next maneuver.
There are two different types of roads in the map
database. Fully attributed roads allow for a destination
to be set and turn-by-turn guidance to be provided to the
exact location of the address. In Process Data (IPD)
roads contain only street name and address information.
Other information such as turn restrictions and
direction of travel is not included for these IPD roads.
2-33
Page 50

Therefore, turn-by-turn guidance cannot be provided
to the exact address. When trips are planned that
include an IPD destination, turn-by-turn guidance will be
provided on the fully attributed roads closest to the
destination. When nearing the end of the highlighted
route, the system will state “Enroute to your destination,
some roads contain incomplete data. Turn guidance
will not be provided in this area.” As you reach the end
of the highlighted route, the system will state “Turn
guidance will not be provided in this area. Please use
the direction arrow and distance indicator to proceed to
your destination.” You should refer to the direction
and distance information in the lower center area of
the screen to navigate to the destination or refer to
the information in the waypoint box for a waypoint.
A purple highlighted route will appear on the IPD roads.
This is only a suggested route due to the lack of
traffic restriction information on the IPD roads. Special
attention should be paid to the existing traffic conditions,
such as one-way streets and prohibited turns on IPD
and fully attributed roads. Always follow the existing
traffic restrictions in both IPD and fully attributed roads.
Once your vehicle is near your destination, the
system will state “You’ve arrived at your destination,
ending route guidance.”
Traveling Across Regions
If you plan a trip that exceeds 5,000 miles (8 046 km)
in straight line distance from the vehicle’s current
position, you will receive a message stating
Destination/waypoint exceeds maximum distance.
To avoid this, plan your trip in smaller segments.
Select a closer destination that you would like to
travel through on your way to your final destination.
Colors on the Screen
When a route has been planned, it will be highlighted
on the screen in blue. If you have set a waypoint(s) for
your route, the colors on the screen will change. The
highlighted route to the next waypoint or destination will
be blue. All highlighted routes to further waypoints or
destinations will be maroon.
Different colors are also used to distinguish between
interstate freeways, state highways, county roads,
major streets and secondary streets. Highways will be
shown as a thicker line than a general street will.
2-34
Page 51

OnStar®System
When using the OnStar®system, the audio system
will be muted and the navigation voice prompts will be
disabled during the call. The volume of the OnStar
call can be adjusted by using the steering wheel volume
controls. See “Audio Steering Wheel Controls” and
“OnStar
manual for more information.
®
System” in the index of your vehicle’s owner
®
Global Positioning System (GPS)
The navigation system determines the position of your
vehicle by using satellite signals, various vehicle signals,
and map data.
The Global Positioning System (GPS) locates the
current position of your vehicle using signals sent by
the United States Department of Defense GPS satellites.
While your vehicle is receiving signals from these
satellites, the GPS symbol will not appear on the
map screen.
However, at times, other interferences such as the
satellite condition, road configuration, the condition of
the vehicle, and/or other circumstances can interfere
with the system’s ability to determine the accurate
position of the vehicle. This is when the GPS symbol
will appear on the map screen.
This system may not be available or interferences may
occur if any of the following are true:
• Signals are obstructed by tall buildings, large
trucks, or a tunnel.
• Objects are located on the rear shelf.
• Satellites are being repaired or improved.
• After-market glass tinting has been applied to
the vehicle’s rear windshield.
Notice: Aftermarket glass tinting with metallic
material will interfere with the system’s ability to
receive GPS signals and cause the system to
malfunction. You might have to replace the rear
window to correct the problem. The repairs would
not be covered by your warranty. Do not apply
aftermarket glass tinting with metallic material to
the rear window of your vehicle.
If you are experiencing a problem, see Vehicle
Positioning on page 2-36 or Problems with Route
Guidance on page 2-37 for more information.
2-35
Page 52

Vehicle Positioning
At times, the position of the vehicle on the map may
be inaccurate due to one or more of the following
reasons:
• The road system has changed.
• The vehicle is traveling on slippery road surfaces
such as sand, gravel, and/or snow.
• The vehicle is being driven on winding roads.
• The vehicle is being driven on a long straight road.
• The vehicle is approaching a tall building or a
large vehicle.
• The surface streets run parallel to a freeway.
• The vehicle has just been transferred by a vehicle
carrier or a ferry.
• The current position calibration is set incorrectly.
• The vehicle is being driven at high speeds.
• The vehicle is repeating a change of direction by
going forward and backward, or turning on a turn
table in a parking lot.
• The vehicle is entering and/or exiting a parking lot
or garage with a roof.
• The vehicle has a roof carrier, ski, or bike rack
installed on it.
• The vehicle has tire chains on it.
• The tires have been replaced.
• The tire pressure is incorrect.
• The tires are worn.
• The battery is disconnected.
• The vehicle is driven in heavy traffic where driving
is at low speeds and the vehicle is stopped and
started repeatedly.
2-36
Page 53

Problems with Route Guidance
If the System Needs Service
Inappropriate route guidance may occur under any of
the following conditions:
• You have not turned onto the road indicated by
the system.
• Route guidance is not available for the next turn.
• The route is not changed during automatic rerouting.
• Plural names of places are displayed.
• You are driving at high speeds, which may cause
the automatic rerouting to operate more slowly.
• The route prohibits the entry of a vehicle due to a
regulation by time or season or any other regulation
which may be given.
• A route cannot be found.
• A road is new, was recently changed or is not listed
on the DVD. The route to the destination may not
be shown. See Ordering Map DVDs on page 2-37.
If you are still experiencing difficulty with the navigation
system after reading this information, see your
GM dealer for assistance.
Ordering Map DVDs
The map DVD in your vehicle is the most up-to-date
information available when your vehicle was purchased.
The map DVD is updated periodically, provided that
the map information has changed. To order a new map
DVD, contact your dealer.
Database Coverage Explanations
Coverage areas vary with respect to the level of map
detail available for any given area. Some areas will
feature greater levels of detail than others. If this
happens, it does not mean there is a problem with the
system. As the map DVD is updated, more detail
may become available for areas which previously had
limited detail. See Ordering Map DVDs on page 2-37.
2-37
Page 54

✍ NOTES
2-38
Page 55

Section 3 Navigation Audio System
Navigation Audio System ..................................3-2
CD/DVD Player ............................................3-25
3-1
Page 56

Navigation Audio System
The audio system has been designed to operate easily
and to give years of listening pleasure. You will get
the most enjoyment out of it if you acquaint yourself with
it first. Find out what your audio system can do and
how to operate all its features to be sure you’re getting
the most out of the advanced engineering that went
into it.
The ignition must be in a position other than OFF or
Retained Accessory Power (RAP) must be active
for your audio system to work. See “Retained Accessory
Power (RAP)” in the Index of your vehicle’s owner
manual for more information.
The audio system is operated using menus located
on the Navigation System screen. The audio menus
are explained in this section.
Radio Screen
To access the Radio screen, press the BAND button
located to the left of the display or choose Radio
from the Main Menu. See Main Menu on page 1-6
Main Menu for more information.
The Radio screen will have preset stations listed vertically
at the right side of the screen, and the currently selected
station frequency will appear in the center of the screen.
At the top of the screen the Driver Information Center
(DIC) status line will appear. See Driver Information
Center (DIC) on page 5-15 for more information.
3-2
Page 57

Directly below the DIC information, you will see the
banner with Radio and the currently selected band. For
example, Radio FM1 means that the presets for FM1 are
displayed at the right of the screen. You will also see
Autostore, Home, or Away. This will tell you which
set of presets are displayed. See “FM Menu” following
in this section and Screen Features on page 1-4 for
more information.
Near the bottom left of the screen, you will see six
horizontal lines. This is for the six-disc CD changer.
To the right of the CD changer information is the
equalizer, Digital Signal Processing (DSP) and
Automatic Volume Compensation (AVC) information.
See “Setting the Tone” and “Playing a CD” later in
this section for more information.
AM Menu
This menu allows you to customize the AM presets.
To access the AM Menu you must be in the Radio
screen with the AM band active. Pressing the
TUNE/SEL knob will bring up the AM Menu.
The following multi-function buttons are available:
• Home P-Sets
• Away P-Sets
• Autostore
• Back
For a description of each item, see “FM Menu” following.
FM Menu
This menu lets you customize the FM presets and
RDS presets. To access the FM Menu, you must be
on the Radio screen and the FM1 or FM2 band must be
active. Press the TUNE/SEL knob once. The following
menu will appear:
• Help Prompt
• RDS List
• Seek RDS List
• Region
• Alt Frequency
• Display RDS Messages
• Intrpt Volume
• Display Freq
3-3
Page 58

The following multi-function buttons will also be
available:
• Select
• Home P-Sets
• Away P-Sets
• Autostore
• Back
Help Prompt: This menu item displays system help
information at the bottom center of the screen if you are
currently in a submenu. If you are not in a submenu,
navigation system route information is displayed.
Press the TUNE/SEL knob to switch back and forth
between on and off. When this feature is turned on,
an X will appear in the box to the left.
RDS (Radio Data Systems) List: This menu item lets
you choose the type of radio station programs you
listen to by category rather than frequency. Press the
TUNE/SEL knob once to access the following menu:
• Adult Hits
• Classic Rock
• Classical
• College
• Country
• Information
• Jazz
• Language
• News
• Nostalgia
• Oldies
• Personality
• Public
• R&B
• Religious Music
• Religious Talk
• Rock
• Soft
• SoftR&B
• Soft Rock
• Sports
• Talk
• Top 40
3-4
Page 59

• Weather
• Set All (selects all categories)
• Clear All (clears all currently selected categories)
• Seek Selected (seeks to currently selected
categories)
To select a category, scroll to the menu item by turning
the TUNE/SEL knob. Once the category you want is
highlighted, press the knob once. When the category
is selected, an X will appear in the box to the left.
To seek to a station using the selected menu items,
see “Seek RDS List” following. For more information
on RDS, see “Radio Data Systems (RDS)” under
“Audio Systems” in your vehicle’s owner manual.
Seek RDS List: To seek to the selected categories
on the RDS list, press the TUNE/SEL knob once when
Seek RDS List is highlighted. The radio will immediately
begin seeking to an available radio station that
matches the categories selected.
Region: This menu item allows you to turn the
Region feature on and off. Press the TUNE/SEL knob
to switch back and forth between on and off. When
this feature is turned on, an X will appear in the box
to the left.
Alt (Alternate) Frequency: This menu item allows
the radio to automatically switch to a stronger station
with the same programming. Press the TUNE/SEL knob
to switch back and forth between on and off. When
this feature is turned on, an X will appear in the box to
the left.
Display RDS Messages: This menu item allows you
to see RDS messages broadcast by the currently
selected radio station. Press the TUNE/SEL knob to
switch back and forth between on and off. When
this feature is turned on, an X will appear in the box
to the left.
For XM™ (USA only, if equipped), this item will read
Show Msg (message). Use the TUNE/SEL knob to turn
this feature on and off. If the feature is on, messages
will automatically be displayed. If it is off, a Message
Available icon will be displayed when a message
has been received.
When turned on, any RDS messages broadcast will
appear in the bottom center of the screen. If no message
is available, this area will be blank. RDS messages
only appear on the Radio screen. See “Radio Data
Systems (RDS)” in your vehicle’s owner manual
for more information.
3-5
Page 60

The RDS message feature is available for the FM
bands and for RDS radio stations only. RDS messages
will only appear if the Message feature is turned on.
Intrpt (Interrupt) Volume: This menu item allows you
to set the volume level of the traffic announcements
you receive from the system.
To change the current volume level, do the following:
1. Press the TUNE/SEL knob once to access the
adjustment bar graph.
2. Turn the knob to increase or decrease the
volume level.
3. Once you reach the volume level you want,
press the knob once to set your selection.
Display Freq (Frequency): This menu item allows
you to display the frequency of the currently selected
RDS radio station under the station name. Press
the TUNE/SEL knob to switch back and forth between
on and off. When this feature is on, and X will appear
in the box to the left.
Select: Press this multi-function button to choose a
highlighted menu item from the FM Menu.
Home Presets: This multi-function button allows you
to display your home, or local, radio station presets.
Press the multi-function button next to Home P-Sets,
and the preset stations at the right of the screen will
change to your local presets. Home will appear on the
screen near the current station frequency. To store preset
radio stations, see “Setting Preset Stations” listed later
in this section.
Away Presets: This multi-function button allows you
to display the preset radio stations for when you are
traveling out of town. Press the multi-function button next
to Away P-Sets, and the preset stations at the right of the
screen will change to the preset stations stored for when
you travel. Away will appear on the screen near the
current station frequency. To store preset radio stations,
see “Setting Preset Stations” listed later in this section.
Autostore: This multi-function button allows you to
store the six radio stations with the strongest signals as
presets. Press the multi-function button next to Autostore
to activate this feature. The preset prompts at the right of
the screen will update once Autostore is finished. See
“Setting Preset Stations” listed later in this section.
Back: This multi-function button returns you to the
main Radio screen.
3-6
Page 61

XM™ Menu
When XM™ is active, the channel name and number,
song title, artist, and category will be displayed on
the screen.
To access the XM™ Menu you must be in the Radio
screen with the XM1 or XM2 band active. Pressing the
TUNE/SEL knob will bring up the XM™ Menu.
This menu allows you to seek or scan for stations
based on their category. While in this menu you can
turn the TUNE/SEL knob to scroll through the categories
and press it to select the category you want to seek
to. Use the SEEK/SCAN switch or press the TUNE/SEL
knob to seek to the first available channel in the
selected category.
XM™ Radio Satellite Service
(USA Only)
XM™ is a continental U.S. based satellite radio service
that offers 100 coast-to-coast channels including
music, news, sports, talk, and children’s programming.
XM™ provides digital quality audio and text information,
including song title and artist name. A service fee is
required in order to receive the XM™ service. For more
information, contact XM™ at www.xmradio.com or
call 1-800-852-XMXM (9696).
3-7
Page 62

Playing the Radio
The BAND button is located on the left side of the
Navigation System screen. Press this button once to
access the audio system. You can also access the audio
system from the Navigation Main Menu. See Main
Menu on page 1-6 Main Menu. Use the following
controls to operate the audio system:
PWR/VOL (Power/Volume): Press this knob located
to the lower left of the display to turn the Navigation
System on and off.
Turn the knob to increase or decrease the volume
level. You can also adjust the volume level using the
steering wheel controls, if equipped. See “Audio Steering
Wheel Controls” in your vehicle’s owner manual for
more information.
Finding a Station
BAND: After you access the main radio display, press
this button repeatedly to scroll through the bands:
AM, FM1, FM2, XM1 and XM2 (USA only, if equipped).
The one currently selected is shown near the top of
the display. For example, Radio FM2 will be displayed
when the FM2 screen is selected.
TUNE/SEL (Select): Use this knob located to the lower
right of the display to manually tune the radio, access
the radio menus, and scroll through the menu items.
See “FM Menu” listed previously in this section for more
information.
o SEEK/SCAN p: Press the left or right arrow to
seek to the previous or next station. The radio will go to
the next station with a strong signal only. If you wish
to continue seeking, press the arrow again. The volume
will mute while seeking.
To scan stations, press and hold the left or right
arrow for two seconds until you hear a beep. The
radio will go to the next or previous station, play for a
few seconds, then go on to the next station. The
radio will scan to stations with a strong signal only.
The volume will mute while scanning. Press either
arrow again to stop scanning.
To scan preset radio stations, press and hold the left or
right arrow for more than four seconds. You will hear
two beeps and Preset Scan will appear on the screen.
The radio will go to the first preset station stored,
play for a few seconds, then go on to the next preset
station. The radio will scan preset stations with a strong
signal only. The volume will mute while scanning.
Press the left or right arrow again to stop scanning
presets. See “Setting Preset Stations” later in this
section for more information.
3-8
Page 63

Setting the Tone
Press the AUDIO button located to the left of the screen
to access the Audio screen.
To manually adjust the tone, use the TUNE/SEL knob.
The system will begin with Balance. Turn the knob
to adjust the level. Once you find the level you want,
press the knob once to set it. The system will advance
to the right to Fade.
If you do not wish to change the current setting, press
the knob repeatedly to advance to the feature you
wish to adjust.
Balance: Turn the TUNE/SEL knob to adjust Balance
toward Right or Left.
Fade: Turn the TUNE/SEL knob to adjust Fade toward
Front or Back.
Bass: Turn the TUNE/SEL knob to increase or
decrease Bass.
Mid (Midrange): Turn the TUNE/SEL knob to increase
or decrease Midrange.
Treble: Turn the TUNE/SEL knob to increase or
decrease Treble.
EQ 1–3 (Equalizer): Once you adjust the bass,
midrange and treble, you can save them for future use.
You may store up to three customized equalizations.
To store equalizations, do the following:
1. Manually set the levels for Bass, Mid, and Treble.
2. Press and hold one of the three equalization
buttons.
You will hear a beep once the equalization is stored
successfully.
Equalization settings are unique to each source, and
they must be set individually for each source. For
example, if you select EQ1 for the CD changer and then
switch to a preset radio station, the equalization may
not be the same.
3-9
Page 64

You can save an equalization setting for each stored
preset radio station. See “Setting Preset Stations” listed
later in this section for more information.
DSP (Digital Signal Processing): This feature is only
available on the Bose®system. This feature is used
to provide a choice of five different listening experiences.
DSP can be used while listening to the radio or the
CD players.
A description of the five DSP choices follows:
• Normal: This setting provides the best overall audio
performance for all passengers.
• Talk: This setting is used when listening to
non-musical material such as news, talk shows, and
sports broadcasts. Talk makes spoken words
sound very clear.
• Driver Seat: This setting adjusts the audio to give
the driver the best possible sound qualities.
Driver Seat can be used at any time for any
material.
• Rear Seat: This setting adjusts the audio to give the
rear seat passengers the best possible sound
qualities. Rear Seat can be used at any time for
any material.
• Spacious: This setting is used to make the listening
area seem larger.
To change the current DSP settings, do the following:
1. Press DSP multi-function button to turn DSP on and
to access the DSP choices.
2. Continue to press the DSP multi-function button
until the desired DSP mode is selected.
3. Press the Back multi-function button to exit the
DSP menu.
Your choice will be displayed on the DSP prompt
at the right of the screen.
The DSP settings are unique to each source, and they
must be set individually for each source. For example,
you may have Talk selected for a preset radio
station, but if you change to the CD changer, Spacious
may be selected.
You can also store separate DSP settings for each preset
station. See “Setting Preset Stations” following and
“Playing a CD” later in this section for more information.
AVC (Automatic Volume Compensation): This feature
is only available on the Bose
monitors the noise in the vehicle. Then, AVC
automatically adjusts the volume level so that it always
sounds the same to you. AVC works best when
listening at low volume levels. At louder listening levels
there will be little or no effect.
To turn AVC on and off, press the AVC multi-function
button.
®
system. This feature
3-10
Page 65

Setting Preset Stations
The six multi-function buttons next to the display allow
you to store your favorite radio stations. You can set up
to 30 different preset stations, six per band, AM, FM1,
FM2, XM1, and XM2 (USA only, if equipped). The Home
and Away presets each have 30 separate presets.
For more information on the Home and Away feature,
see “FM Menu” listed previously in this section.
To store a radio station as a preset, use the
following steps:
1. Select the band where you want the preset stored
by pressing the BAND button.
2. Select either the Home or Away presets. See
“FM Menu” listed previously in the section for
more information on the Home and Away feature.
3. Tune to the desired station using the TUNE/SEL
knob or the SEEK/SCAN switch.
4. Choose the equalization and DSP settings
you want.
See “Setting the Tone” listed previously for more
information.
5. Press and hold the multi-function button next to
the preset you want.
You will hear a beep when the preset has been
stored, and the frequency of the stored station will
appear on the preset prompt at the right of the
display.
6. Repeat the steps to store other presets.
To select a stored preset station listed on the screen,
press the multi-function button next to the station
prompt. The station will change, and the new radio
station frequency will be displayed in the center of
the screen.
3-11
Page 66

XM™ Radio Messages
Radio Display
Message
XL (Explicit Language
Channels)
XM Updating Updating
No XM signal Loss of signal The system is functioning correctly, but the vehicle is in a
Loading XM Acquiring channel audio
Channel Off Air Channel not in service This channel is not currently in service. Tune in to another
Channel Unavail Channel no longer
No Artist Info Artist Name/Feature
Condition Action Required
XL on the radio display,
after the channel name,
indicates content with
explicit language.
encryption code
(after 4 second delay)
available
not available
These channels, or any others, can be blocked at a
customer’s request, by calling 1-800-852-XMXM (9696).
The encryption code in the receiver is being updated, and
no action is required. This process should take no longer
than 30 seconds.
location that is blocking the XM™ signal. When you move
into an open area, the signal should return.
The audio system is acquiring and processing audio and
text data. No action is needed. This message should
disappear shortly.
channel.
This previously assigned channel is no longer assigned.
Tune to another station. If this station was one of the
presets, choose another station for that preset button.
No artist information is available at this time on this channel.
The system is working properly.
3-12
Page 67

XM™ Radio Messages (cont’d)
Radio Display
Message
No Title Info Song/Program Title
No CAT Info Category Name
Not Found No channel available for
No Information No Text/Informational
XM Theftlocked Theft lock active The XM™ receiver in the vehicle may have previously been
XM Radio ID Radio ID label
Unknown Radio ID not known
Check XM Receiver Hardware failure If this message does not clear within a short period of time,
Condition Action Required
not available
not available
the chosen category
message available
(channel 0)
(should only be if
hardware failure)
No song title information is available at this time on this
channel. The system is working properly.
No category information is available at this time on this
channel. The system is working properly.
There are no channels available for the selected category.
The system is working properly.
No text or informational messages are available at this time
on this channel. The system is working properly.
in another vehicle. For security purposes, XM™ receivers
cannot be swapped between vehicles. If this message is
received after having your vehicle serviced, check with your
GM dealer.
If tuned to channel 0, this message will alternate with the
XM™ Radio 8 digit radio ID label. This label is needed to
activate the service.
If this message is received when tuned to channel 0, there
may be a receiver fault. Consult with your GM dealer.
the receiver may have a fault. Consult with your GM dealer.
3-13
Page 68

XM NavTraffic™ (USA Only)
Your vehicle’s navigation system may have an XM
NavTraffic™ receiver. XM NavTraffic™ is a subscription
service provided via XM™ Satellite Radio. XM
NavTraffic™ provides real-time traffic information fully
integrated to the navigation system to display current
traffic conditions for a driver’s chosen route. XM
NavTraffic™ allows drivers to make the most informed,
timesaving routing decisions.
XM NavTraffic™ is powered by NAVTEQ Traffic™ data
which provides aggregate, quality tested information from
the leading commercial and public traffic data providers
including government departments of transportation,
police, and emergency services, road sensors, cameras,
and airborne reports. Three types of traffic information for
major roadways are displayed on the navigation system:
• Unscheduled traffic incident data, such as accidents
and disabled vehicles
• Scheduled traffic incident data, such as road
construction and road closures
• Traffic flow information (rate of speed data)
Traffic information is delivered to the vehicle by the XM™
Radio satellites. XM NavTraffic™ makes it possible for
the navigation system to provide continuously updated
traffic information personalized for a driver’s needs.
XM NavTraffic™ currently broadcasts the traffic
information for 20 markets nationally: Atlanta,
Baltimore*, Boston, Chicago, Dallas/Ft Worth*,
Detroit, Houston, Los Angeles, Miami-Ft. Lauderdale*,
Minneapolis-St. Paul, New York City, Philadelphia,
Phoenix, Pittsburgh, San Diego, San Francisco/Oakland,
San Jose, Seattle, St. Louis*, and Washington, D.C.
The service may be available in more cities in the future.
Visit www.xmnavtraffic.com for more details on local
coverage.
A service fee is required in order to receive the
XM NavTraffic™ service.
*Flow data not currently reported in these markets.
Turning XM NavTraffic™ On and Off
To turn traffic on or off:
1. When viewing a map screen, press the TUNE/SEL
knob, or if not viewing a map screen, press the
MAIN hard key, then press the TUNE/SEL knob.
2. Turn the knob to Traffic Setup.
3. Press the TUNE/SEL knob.
4. Turn the knob to Enable Traffic.
3-14
Page 69

5. Press the TUNE/SEL knob to select it. An X will
appear when it is selected.
Selecting Approaching Event Alert will also enable
the system to show a pop-up screen of the next
approaching traffic condition. If currently driving
using a planned route, the pop-up screen will
appear on the display when this has been selected.
When traffic is enabled, a TRF icon will appear at
the top left corner of the display. The TRF icon is
color coded, as follows:
• Green indicates that the system is working and
the traffic condition is far away.
• Yellow indicates that a minor traffic condition is
approaching.
• Gray indicates that there is currently no traffic
data being received by the system.
Traffic flow conditions will appear on the route, as
follows:
• Green indicates free traffic flow.
• Yellow indicates a congestion.
• Red indicates heavy or stopped traffic.
3-15
Page 70

Locations and Information of Traffic
Conditions
The system may take some time to sort the information.
If you are currently driving on a planned route, the
system will show traffic conditions, for approximately
62 miles (100 km) with a maximum of 250 traffic
conditions. If you are not traveling on a planned route,
the system will show traffic conditions for approximately
31 miles (150 km), with a maximum of 250 traffic
conditions. The list of conditions will appear in order,
from closest to furthest distance, from the vehicles
current location.
To view the traffic condition location and information
on the map:
1. Press the TRAF hard key.
2. Turn the TUNE/SEL knob to highlight the traffic
condition.
3. Press the TUNE/SEL knob to select the highlighted
traffic condition.
If traveling on a planned route; a red square will
appear around the traffic condition symbol, the
street name of the traffic condition location,
the distance from your vehicles current location
to the traffic condition, and the distance of the
traffic condition will appear on the display.
If not traveling on a planned route; a red square
will appear around the traffic condition symbol and
the street name of the traffic condition location
will appear on the display.
3-16
Page 71

4. Turn the TUNE/SEL knob to receive the information
for the next traffic condition.
Scrolling Map
While scrolling the map, traffic condition icons may
appear. To receive information about the traffic
condition, place the cross hairs over the traffic condition
icon and press the TUNE/SEL knob. The type of
traffic condition, the average speed, and the street
name of the traffic condition will appear on the display.
See “Map Scroll” under Navigation Menu on page 2-12
for more information.
3-17
Page 72

Approaching Event Alert
Selecting Approaching Event Alert will enable the
system to show a pop-up screen of the next approaching
traffic condition, when driving using a planned route.
To turn this feature on:
1. When viewing a map screen, press the TUNE/SEL
knob, or if not viewing a map screen, press the
MAIN hard key, then press the TUNE/SEL knob.
2. Turn the knob to Traffic Setup.
3. Press the TUNE/SEL knob.
4. Turn the knob to Approaching Event Alert.
5. Press the TUNE/SEL knob to select it.
An X will appear when it is selected.
When driving on a planned route a pop-up display will
appear of the next approaching traffic condition. The
display will let you know; in how many miles (kilometers)
the event will occur, how long in miles (kilometers)
the event will last, what the event is, and which road
the event is on. The display will last for approximately
30 seconds.
3-18
Page 73

Alternate Route
The alternate route key is
available at two separate
instances.
• When the pop-up display appears on the screen
when approaching a traffic condition, you can
select an alternate route, to detour around the traffic
condition. Press the alternate route key and the
system will automatically calculate a new route.
XM NavTraffic™ information may not be provided
for the alternate route, depending on what type
of road the system will have you traveling on.
• When traveling on a planned route, the alternate
route key is always available. Press the alternate
route key and a list will appear. Select TRF
Detour to be re-routed around the approaching
traffic condition(s), select from the list of miles
(kilometers). This option will re-route the route
that many miles (kilometers) off of the current
planned route, or select Back to go back to the
last route the system calculated.
3-19
Page 74

XM NavTraffic™ information may not be provided
for the alternate route, depending on what type
of road the system will have you traveling on.
To select from the list:
1. Turn the TUNE/SEL knob until the desired
option is highlighted.
2. Press the TUNE/SEL knob to select the
highlighted option.
Traffic Condition Symbols
The following are traffic condition symbols that can
appear on the display:
Stopped traffic.
Traffic jam.
Accident.
Closed road.
3-20
Page 75

Narrow lanes.
Road condition.
Road works. Construction.
Alert.
Road visibility.
Other.
3-21
Page 76

Playing a CD
CD changer screen shown, single CD player similar
You can play a single CD by sliding the CD into the
slot located above the audio system screen or by using
the six-disc CD changer located below the screen.
The following controls are used for both CD players
unless otherwise noted:
DISC: Press this button located to the left of the screen
to access the CD changer screen. The CD changer
will begin playing the currently loaded CD, the disc and
disc number, the track and the track number, and
the TIME and the elapsed time of the track will be
displayed on the screen.
The single CD player screen will be displayed if a music
CD is loaded in the player and no discs are loaded in
the CD changer.
If you have a CD text disc and are using the single CD
player, any information stored on the CD will appear
on the screen. Possible text includes the title of
the song, the artist, and the title of the CD. Text will not
appear on the screen if you are using the CD changer.
LOAD (Six-Disc CD Changer Only): Press this button
before loading a CD into the CD changer. One beep will
sound, and you will be prompted to load the CD.
To load all six discs at one time, press and hold the LOAD
button until two beeps sound. You will then be prompted
to load six discs into the CD changer.
3-22
Page 77

Repeat: Press the multi-function button next to the
Repeat prompt to turn this feature on.
For the CD changer, the first press of the Repeat
multi-function button will turn on Repeat Disc. The CD
changer will play the currently selected disc again
once the last track has ended. When Repeat Disc is
turned on, it will be highlighted on the Repeat prompt at
the right of the screen. Press the Repeat multi-function
button again to switch to Repeat Track. This feature
allows the CD changer to play the currently selected
track again once the track has ended. When Repeat
Track is turned on, it will be highlighted on the Repeat
prompt at the right of the screen. Press the button a
third time while using the CD changer to turn off
the Repeat feature.
For the CD player, the first press of the Repeat button
will turn Repeat Track on. The second press will
turn Repeat Track off.
Random: Press the multi-function button next to the
Random prompt to turn this feature on.
For the CD changer, the first press of the Random
multi-function button will turn on Random Disc. Random
Disc allows the CD player to play the discs loaded in
the CD changer in random, rather than sequential, order.
When Random Disc is turned on, it will be highlighted
on the Random prompt at the right of the screen. Press
the Random multi-function button again to switch to
Random Track. This feature allows the CD changer to
play the tracks on the current disc in random, rather than
sequential, order. When Random Track is turned on,
it will be highlighted on the Random prompt at the right
of the screen. Press the button a third time while
using the CD changer to turn off the Random feature.
For the CD player, the first press of the Random button
will turn Random Track on. The second press will
turn Random Track off.
Pause: To pause the playback of a CD, press the
TUNE/SEL knob once. Press it again to resume
playback.
Forward
next to Forward to quickly advance within the current
track. As the CD advances, the elapsed time will
be displayed to help you find the correct passage.
Reverse
next to Reverse to quickly go backward within the
current track. As the CD reverses, the elapsed time will
be displayed to help you find the correct passage.
[: Press and hold the multi-function button
r: Press and hold the multi-function button
3-23
Page 78

Next l: Press the multi-function button next to the
Next prompt to advance to the next track on the current
CD. You can also use the steering wheel controls to
change tracks. See “Audio Steering Wheel Controls”
in your vehicle’s owner manual.
If you press and hold this button for two or three seconds
while in single CD mode, the system will scan the tracks.
If more than one CD is loaded in the CD changer,
pressing the Next multi-function button will advance the
CD changer to the next loaded CD. If it is the last track on
the current CD, the next CD will begin playing at track
one.
Previous g: Press the multi-function button next to
the Previous prompt to skip to the track immediately
before the current track on the current CD, if less than
eight seconds have played. If the current track has
been playing for more than eight seconds, pressing the
Previous button will take you to the beginning of the
current track. You can also use the steering wheel
controls to change tracks. See “Audio Steering Wheel
Controls” in your vehicle’s owner manual.
If more than one CD is loaded in the CD changer and
you press the Previous multi-function button when
less than eight seconds have played, the CD changer
will skip to the CD loaded immediately before the current
CD. If it has been less than eight seconds, the changer
will skip to the beginning of the current CD. The
new CD will begin playing at track one.
o SEEK/SCAN p (Six-Disc CD Changer Only):
Use the left or right arrow to skip to the previous or next
CD loaded in the CD changer. The new CD will begin
playing at track one.
Z (Eject): Press the button with this symbol on it to
eject a CD. There is a separate eject button for each
player next to the CD slot. You will hear a beep once the
CD is removed from the slot.
If you press the eject button next to the CD changer,
the current disc will be ejected and the next one
will begin playing. Press and hold the eject button to
eject all of the discs loaded in the changer. You will hear
a double beep.
BAND: Press this button located to the left of the
screen once to switch to the radio while playing a CD.
The audio system screen will appear. See “Radio
Screen” listed previously for more information.
3-24
Page 79

Loading the CD Changer
You can load up to six kc/s in the CD changer. To load
discs, use the following steps:
1. Press the LOAD button. You will hear one beep
and will be prompted to load the CD. The system
will switch to CD and begin playing the disc.
If you press and hold the LOAD button until
two beeps sound, you will be prompted to load
all six discs.
2. Slide discs one at a time, label side up, into the
slot located below the screen.
After each one is loaded, you will hear a beep.
As the discs are loaded, the horizontal lines located
in the lower left of the screen will change colors.
If a line is gray, it means that no CD is loaded in
that slot. If a line is green, it means that a CD
is loaded in the slot. The slot with the currently
active CD is yellow.
XM™ Satellite Radio Antenna
Your XM™ Satellite Radio antenna is located on
the roof of your vehicle. Keep this antenna clear of
snow and ice build up for clear radio reception.
CD/DVD Player
The player that is used for the Navigation map DVD
can also be used as a single music CD player or a
video DVD player.
CD Player
To use the player as a single music CD player see the
information for “CD Player” under Navigation Audio
System on page 3-2.
DVD Player
To use the player as a video DVD player, you must first
remove the Navigation map DVD or music CD. While
playing a video DVD, the Navigation system is not
available.
This feature will not operate unless the vehicle is in
PARK (P) for an automatic transmission, or the parking
brake is engaged and the vehicle speed is less than
5 mph (8 km/h) for a manual transmission. If these
conditions are not met, a message will be displayed on
the screen stating that the DVD is not available while
driving. The audio will continue to play, the Play/Pause
and Stop buttons will work and the voice commands
will be available. See Voice Recognition (CTS)
on page 4-2.
3-25
Page 80

To remove the Navigation map DVD and load a video
DVD, use the following steps:
1. With the ignition on and the vehicle in PARK (P)
for an automatic transmission, or the parking
brake engaged and the vehicle speed less than
5 mph (8 km/h) for a manual transmission,
press and hold the eject button next to the top slot.
2. If a map DVD or a music CD is loaded, the system
will eject it. Gently remove it from the slot and
return it to its case.
3. Load the video DVD label side up into the slot.
The system will pull the DVD into the player.
Once the video DVD is loaded, the system will go to
the main menu on most discs.
Playing a DVD
Once the disc is loaded press the first multi-function
button to start play.
While a movie is playing, if the disc allows, you can
use the SEEK/SCAN switch to move to the next
or previous chapter on the disc. When the TUNE/SEL
knob is turned clockwise the disc will fast forward.
The farther the knob is turned the quicker the disc will
advance. When the knob is turned counterclockwise,
the first four detents will play the disc in slow motion.
As the knob is turned farther counterclockwise the disc
will begin reversing. The farther the knob is turned
the quicker the disc will reverse.
To resume normal play, press the first multi-function
button.
DVD Menus
Each DVD has its own main menu. To display the
DVDs main menu, press the TUNE/SEL knob.
Press one of the top four multi-function buttons to bring
up the on-screen display. The following multi-function
buttons will be available while a DVD is playing:
Play/Pause: Pressing this button will pause a disc if it
is playing or start play if the disc is paused.
Stop: Pressing this button will stop the disc.
Display Format: This will change the display format
between Full (image stretched horizontally to fill
the screen), Cinema (image is stretched on the outside
edges), Zoom (image is enlarged, this may cut off
information on the top/bottom/sides of the screen)
and Normal.
3-26
Page 81

Function Menu: Pressing this button activates the
function menu which includes the following choices:
• Multi-function Button 1: Turns off the function
menu and pauses the disc.
• Multi-function Button 2: Stops the disc.
• Multi-function Button 3: Display format.
• Multi-function Button 4: Turns off the function
menu display.
While the function menu is active the timer is displayed
on top along with the chapter and title number.
The SEEK/SCAN switch is used to change the
highlighted item in the bottom display.
|: The bottom display shows the camera angle,
if available. Turn the TUNE/SEL knob to choose
the camera angle number.
{: The bottom display also includes the subtitle
language select. Turn the TUNE/SEL knob to choose
the language.
The next item allows you to turn the subtitles on and off.
Turn the TUNE/SEL knob to toggle between on and off.
The last item on the bottom display is the audio track
selection. This allows you to choose to hear the DVD
in different languages or listen to commentary. The
choices available are dependant on the DVD itself.
Turn the TUNE/SEL knob to choose the track.
Stopping and Ejecting a DVD
To stop a DVD from playing press the second
multi-function button. While the disc is stopped you
can press the first multi-function button to start the
disc again.
Also while the disc is stopped, you can turn the
TUNE/SEL knob to activate the title select function.
Turn the TUNE/SEL knob and then press the
SEEK/SCAN switch to enter the title number. When the
number you want is displayed, press the TUNE/SEL
knob. If the disc supports this feature, it will begin play
at that title number.
Press the eject button next to the top slot to eject the
DVD. The system will switch to radio mode.
3-27
Page 82

✍ NOTES
3-28
Page 83

Section 4 Voice Recognition
Voice Recognition ............................................4-2
Voice Recognition (CTS) .................................4-2
4-1
Page 84

Voice Recognition
Voice Recognition (CTS)
If your vehicle is equipped with this feature, the
navigation system’s voice recognition allows for
hands-free operation of navigation and audio system
features. Voice recognition can be used when the
ignition is on or when Retained Accessory Power (RAP)
is active.
To use navigation voice recognition, do the following:
1. Press the talk symbol
steering wheel control
and release it when
you hear a beep.
The audio system,
if on, will mute.
2. Clearly state one of the commands listed on the
following pages. When the system recognizes the
command, it will either perform the function or issue
an error message, such as “invalid command” or
“command not recognized.”
The invalid command message indicates that the
command cannot be used in the currently active
screen. For example, if you say “Next Track” while
listening to the radio, you will receive the invalid
command message because the command is for the
DVD player or CD changer, not the radio.
If you experience difficulty with the system recognizing a
command, try saying it more softly.
Voice Recognition Commands
The following list shows all of the voice commands
available for the navigation system with a brief
description of each. To use the voice commands,
refer to the instructions listed previously.
Universal Commands
These commands can be said from any screen.
The system will respond accordingly.
What Can I Say?: This command instructs the system
to respond with a list of verbal commands available
to you. The list of commands will vary depending
on which screen is currently active.
4-2
Page 85

Acknowledge/OK: This command instructs the system
to clear a Driver Information Center (DIC) warning
message from the screen when displayed. See “DIC
Warnings and Messages” in Section 3 of your vehicle’s
owner manual for more information.
Radio: This command instructs the system to display
the Radio screen. Once the screen is displayed, you can
use other radio commands. See “Radio Commands”
later in this section for more information.
Audio Mode: This command instructs the system to
display the Audio screen. See “Setting the Tone” under
Navigation Audio System on page 3-2 for more
information.
CD Player: This command instructs the system to
display the CD player screen. Once the screen is
displayed, you can use other CD player commands.
See “CD Commands” later in this section for more
information.
CD Changer: This command instructs the system to
display the CD changer screen. Once the screen
is displayed, you can use other CD changer commands.
See “CD Commands” listed later in this section for
more information.
DVD: This command instructs the system to display
the DVD player screen. Once the screen is displayed,
you can use other DVD commands. See “DVD
Commands” later in this section for more information.
Navigation: This command instructs the system
to display the navigation startup screen. This screen will
only be displayed the first time navigation is accessed.
Once the navigation system is active, you can use other
navigation commands. See “Navigation Commands”
later in this section for more information.
Setup: This command instructs the system to display
the Setup menu. See Setup Menu on page 2-7.
Main Menu: This command instructs the system to
display the Main Menu screen. Once the screen
is displayed, you can use other Main Menu commands.
Information: This command instructs the system to
display the Vehicle Information menu. See Driver
Information Center (DIC) on page 5-15 for more
information.
Voice Memo: This command instructs the system to
display the Voice Memo screen. Once the screen
is displayed, you can use other Voice Memo commands.
See “Voice Memo Commands” later in this section for
more information.
4-3
Page 86

Address Book: This command instructs the system to
display the Address Book screen. Once the screen
is displayed, you must operate the system manually.
See Main Menu on page 1-6.
Mute, Unmute: The Mute command instructs the
system to turn off all sound. The Unmute command
will return the sound to its previous level.
DSP Off: This command instructs the system to turn
off DSP for the current audio source.
DSP Talk: This command instructs the system to
change the DSP to Talk for the current audio source.
DSP Driver Seat: This command instructs the system
to change the DSP to Driver Seat for the current
audio source.
DSP Rear Seat: This command instructs the system
to change the DSP to Rear Seat for the current
audio source.
DSP Spacious: This command instructs the system
to change the DSP to Spacious for the current
audio source.
Set Day: This command instructs the system to
change the screen appearance to Day mode.
Set Night: This command instructs the system to
change the screen appearance to Night mode.
Set Day/Night Auto: This command instructs the
system to change the screen appearance to Auto mode.
Set Units English: This command instructs the
system to set measurement units to feet/miles.
Set Units Metric: This command instructs the system
to set measurement units to meters/kilometers.
Set Units Imperial: This command instructs the system
to set measurement units to yards/miles.
Load Disc: This command instructs the system that
you will be loading a CD into the CD changer.
Load All: This command instructs the system that you
will be loading six CDs into the CD changer.
Eject Disc: This command instructs the system to eject
the currently active CD from the CD changer.
Radio Commands
AM: This command instructs the system to change the
audio source to AM.
FM1: This command instructs the system to change the
audio source to FM1.
4-4
Page 87

FM2: This command instructs the system to change
the audio source to FM2.
XM1: This command instructs the system to change
the audio source to XM1.
XM2: This command instructs the system to change
the audio source to XM2.
RDS Message On, RDS Display Message On: This
command instructs the system to turn on the RDS
Message feature.
RDS Message Off, RDS Display Message Off: This
command instructs the system to turn off the RDS
Message feature.
RDS Traffic On: This command instructs the system to
turn on the RDS traffic feature.
RDS Traffic Off: This command instructs the system to
turn off the RDS traffic feature.
RDS Alternate Frequency On: This command instructs
the system to turn on the RDS alternate frequency
feature.
RDS Alternate Frequency Off: This command instructs
the system to turn off the RDS alternate frequency
feature.
Radio Tune: This command instructs the system to
change the current radio station by saying the command
and then the frequency of the radio station. For
example, if you say “radio tune ninety four point seven,”
the station will switch to 94.7 FM. If you are changing
the station for the AM band, say “radio tune ten seventy”
for 1070 instead of “one zero seven zero.” If the
station frequency has two or three zeros, such as
600 or 1000 AM, say “radio tune six hundred” or
“radio tune one thousand.” The exception is a station
frequency that includes a zero between other numbers.
In this case, say “oh” instead of zero as in “radio
tune one oh seven point nine” for frequency 107.9 FM.
This feature does not work with XM™.
Seek Up, Seek Down: These commands instruct the
system to seek up or down to the next or previous
station and stay there.
Scan Up, Scan Down: These commands instruct the
system to preview stations either forward or backward.
To stop this feature, say “Scan” again.
Preset X: This command instructs the system to
change the current radio station to one of the preset
stations on the active audio source.
To use this command, you must know the number of the
preset you wish to hear. For example, if you want to hear
the station saved to preset three, say “preset three.”
4-5
Page 88

CD Commands
CD Player: This command instructs the system to
display the CD player screen. If a music CD is loaded,
it will begin playing.
CD Changer: This command instructs the system to
display the CD changer screen.
Pause: This command instructs the system to stop
play on a CD.
Play: This command instructs the system to resume
play of a CD.
Play Track X: This command instructs the system
to play a specific track. To use this command, you must
know the number of the track you wish to hear. For
example, if you want to hear the second track on
the current CD, say “play track two.”
Next Track: This command instructs the system to
advance the current CD to the next track.
Previous Track: This command instructs the system to
go to the previous track or re-start the current track.
Next Disc: This command instructs the system
to advance the CD changer to the next CD loaded.
Previous Disc: This command instructs the system
to go back to the previous disc.
Disc X: This command instructs the CD changer
to play a specific CD. To use this command, you must
know the number of the CD you wish to hear. For
example, if you want to hear the CD loaded in slot two,
say “disc two.”
Random Track On: This command instructs the CD
changer to play the tracks on the current CD in random,
rather than sequential, order.
Random Track and Disc On: This command instructs
the CD changer to play the tracks on the current CD
in random, rather than sequential, order. Once the
current CD is finished, the next CD to play will be
chosen randomly.
Random Off: This command instructs the system to
turn off random play.
Repeat Track On: This command instructs the system
to play the currently selected track again.
Repeat Disc On: This command instructs the CD
changer to play the current CD again once all the tracks
have played.
Repeat Off: This command instructs the system to turn
off the repeat feature.
4-6
Page 89

DVD Commands
Play: This command instructs the system to play a
DVD from the disc menu screen or if the movie
has been stopped or paused.
Pause: This command instructs the system to pause
a DVD.
Next Track: This command instructs the system to
advance to the next chapter on a DVD.
Previous Track: This command instructs the system
to reverse to the previous chapter on a DVD or to
re-start the current chapter if it has been less than
five seconds since the current chapter started.
Eject Disc: This command instructs the system to
eject the DVD.
Voice Memo Commands
The following are verbal commands that can be used
when the Voice Memo screen is active.
Memo Play: This command instructs the system to
play the memo currently highlighted on the screen.
Memo Play X: This command instructs the system to
play a memo saved to a specific location that is not the
memo currently highlighted on the screen. To use this
command, you must know the location of the memo you
wish to hear. For example, if you want to hear the memo
saved to location three, say “memo play three.”
Memo Stop: This command instructs the system to
stop playback of a memo.
Memo Record: This command instructs the system to
begin recording a memo.
Memo Append: This command instructs the system to
add to the memo currently highlighted on the screen.
Memo Append X: This command instructs the system
to add to a previously recorded memo that is not the
memo currently highlighted on the screen. To use
this command, you must know the location of the
previously recorded memo to which you want to add
information. For example, if you want to add to the
memo stored in location two, say “memo append two.”
Memo Delete: This command instructs the system
to delete the memo currently highlighted on the screen.
4-7
Page 90

Memo Delete X: This command instructs the system to
delete a previously recorded memo saved to a specific
location. To use this command, you must know the
location of the memo that you want to delete. For
example, if you want to delete the memo saved in
location one, say “memo delete one.”
Yes: This command confirms choices made while using
the Voice Memo screen.
No: This command cancels choices made while using
the Voice Memo screen.
Navigation Commands
North Up: This command instructs the system to
switch from the current map view to North Up.
Heading Up: This command instructs the system
to switch from the current map view to Heading Up.
Bird View: This command instructs the system to
switch from the current map view to the bird view.
Split View: This command instructs the system to
switch from the current map view to a regular view of
the map with a pop-up view of upcoming turns.
Single Screen: This command instructs the system to
switch back from the split view screen to the regular
map view.
Zoom In: This command instructs the system to
provide a closer scale view of the current map.
Zoom Out: This command instructs the system to
provide a larger scale view of the current map.
4-8
Page 91

Section 5 Vehicle Customization
Vehicle Customization ......................................5-2
Personalization ...............................................5-2
Driver Information Center (DIC) .......................5-15
5-1
Page 92

Vehicle Customization
Personalization
Your vehicle is equipped with personalization that allows
you to program certain features to a preferred setting
for up to two people. The number of programmable
features varies depending upon which model of
the vehicle is purchased.
On all vehicles, features such as climate control
settings, radio preset settings, exterior lighting at unlock,
remote lock and unlock confirmation, and automatic
door locks have already been programmed for
your convenience.
Some vehicles are equipped with additional features
that can be programmed including the seat and outside
rearview mirror position. The navigation system
screen preferences will remain at the last set position.
If your vehicle is equipped with the ability to program
additional personalization features, the driver’s
preferences are recalled by pressing the unlock button
on the remote keyless entry transmitter, 1 or 2, or
by pressing the appropriate memory button, 1 or 2,
located on the driver’s door. Certain features can
be programmed not to recall until the key is placed
in the ignition. To change feature preferences you
must use one of the following procedures.
Entering the Personalization Menu
To enter the feature programming mode, do the
following:
1. Turn the ignition on without the engine running.
Make sure an automatic transmission is in
PARK (P) or a manual transmission has the
parking brake set.
2. If your vehicle has memory settings, press the
appropriate memory button, 1 or 2, located on
the driver’s door armrest. The DIC display will show
either Driver 1 or 2 depending on which button
was selected.
3. Press the power/volume knob to turn on the
navigation and audio systems.
4. Press the MAIN hard key to access the DIC
main menu.
5. Press the reconfigurable key next to Feat Prog to
access the Feature Programming menu.
6. Press the TUNE/SEL knob to turn on the
Personalization features. An X will appear in the
box to the left when Personalization is turned on.
5-2
Page 93

Personalization Features
The following choices are available for programming:
Personalization Name
This feature allows you to type in a name that will
appear on the DIC display whenever the corresponding
remote keyless entry transmitter is used or one of
the buttons on the driver’s door armrest (1 or 2) is
pressed.
If a customized name is not programmed, the system
will show Driver 1 or Driver 2 to correspond with
the numbers on the back of the remote keyless entry
transmitters.
To program a name, do the following:
1. Enter the Personalization menu following the
instructions listed previously.
2. Turn the TUNE/SEL knob until Personalization
Name is highlighted. Press the knob once to
access the Edit Name screen.
3. Use the alpha-numeric keypad at the bottom of the
screen. Turn the TUNE/SEL knob to scroll through
the available letters, numbers and symbols.
Press the knob to select the highlighted character.
As each character is selected, it will appear on the
screen and the system will advance one character
to the right. If you make a mistake, press the
Backspace reconfigurable key to erase the last
character entered. You can then re-enter another
character. If you want to completely erase the entire
name, press the Delete reconfigurable key.
If you prefer lower case letters, press the Lower
reconfigurable key. The reconfigurable key will then
change to Upper. Press the Upper reconfigurable
key to change the letters back to upper case.
4. Repeat Step 3 until the name entry is complete.
You can enter up to 26 characters.
5. Press the OK reconfigurable key when the name is
complete to save it.
The name you selected is now set. You can either exit
the programming mode by following the instructions
later in this section or program the next feature available
on your vehicle.
5-3
Page 94

Recall Driving Positions
If your vehicle has the optional memory package, you
will have this feature. When this feature is turned on,
you can recall any previously programmed seat
and mirror controls when the unlock button on the
remote keyless entry transmitter is pressed. The
following modes are available for selection:
Mode 1: ON
Mode 2: OFF
Before your vehicle was shipped from the factory,
it was programmed to Mode 2. The mode to which the
vehicle was programmed may have been changed
since it left the factory. To program the vehicle to
a different mode, do the following:
1. Enter the Personalization menu following the
instructions listed previously.
2. Scroll to Remote Keyless Options to highlight it.
3. Press the TUNE/SEL knob to view the modes.
4. Scroll to Recall Driving Positions and press the
knob once to select it.
When the mode is turned on, an X will appear in
the box to the left.
This feature cannot be selected if Remote Exit Recall
or Key In Recall Memory is selected. If either of
these was previously selected, you must first de-select
it in order to be able to select Remote Recall
Memory/Recall Driving Positions.
The mode you selected is now set. You can either exit
the programming mode by following the instructions
later in this section or program the next feature available
on your vehicle.
Remote Exit Recall
If your vehicle has the optional memory package, you
will have this feature. When this feature is turned on,
you can recall any previously programmed exit position
for the driver’s seat when the unlock button on the
remote keyless entry transmitter is pressed. The
following modes are available for selection:
Mode 1: ON
Mode 2: OFF
5-4
Page 95

Before your vehicle was shipped from the factory,
it was programmed to Mode 2. The mode to which the
vehicle was programmed may have been changed
since it left the factory. To program the vehicle to
a different mode, do the following:
1. Enter the Personalization menu following the
instructions listed previously.
2. Scroll to Remote Keyless Options to highlight it.
3. Press the TUNE/SEL knob to view the modes.
4. Scroll to Remote Exit Recall and press the
knob once to select it.
When the mode is turned on, an X will appear in
the box to the left.
This feature cannot be selected if Remote Recall
Memory/Recall Driving Positions is selected. If it was
previously selected, you must first de-select it in order
to be able to select Remote Exit Recall.
The mode you selected is now set. You can either exit
the programming mode by following the instructions
later in this section or program the next feature available
on your vehicle.
Key in Recall Memory
If your vehicle has the optional memory package, you
will have this feature. When this feature is turned on,
you can recall any previously programmed seat
and mirror positions when the key is inserted into the
ignition. The following modes are available for selection:
Mode 1: ON
Mode 2: OFF
Before your vehicle was shipped from the factory,
it was programmed to Mode 2. The mode to which the
vehicle was programmed may have been changed
since it left the factory. To program the vehicle to
a different mode, do the following:
1. Enter the Personalization menu following the
instructions listed previously.
2. Scroll to Remote Keyless Options to highlight it.
3. Press the TUNE/SEL knob to view the modes.
4. Scroll to Key In Recall Memory and press the
knob once to select it.
When the mode is turned on, an X will appear in
the box to the left.
This feature cannot be selected if Remote Recall
Memory/Recall Driving Positions is selected. If it was
previously selected, you must first de-select it in order
to be able to select Key In Recall Memory.
5-5
Page 96

The mode you selected is now set. You can either exit
the programming mode by following the instructions
later in this section or program the next feature available
on your vehicle.
The mode you selected is now set. You can either exit
the programming mode by following the instructions
later in this section or program the next feature available
on your vehicle.
Auto Exit Seat
If your vehicle has the optional memory package, you
will have this feature. When this feature is turned on, you
can recall any previously programmed exit position for
the driver’s seat when the key is removed from the
ignition and the driver’s door is opened. The following
modes are available for selection:
Mode 1: ON
Mode 2: OFF
Before your vehicle was shipped from the factory,
it was programmed to Mode 2. The mode to which the
vehicle was programmed may have been changed
since it left the factory. To program the vehicle to
a different mode, do the following:
1. Enter the Personalization menu following the
instructions listed previously.
2. Scroll to Auto Exit Seat using the TUNE/SEL knob
to highlight it.
3. Press the TUNE/SEL knob to switch back and forth
between on and off.
When the mode is turned on, an X will appear in
the box to the left.
5-6
Twilight Delay
This feature allows you to set the amount of time you
want the exterior lamps to remain on after you exit
the vehicle. The following modes are available for
selection:
Mode 1: 0:00 seconds
Mode 2: 0:15 seconds
Mode 3: 0:30 seconds
Mode 4: 1:00 minute
Mode 5: 1:30 minutes
Mode 6: 2:00 minutes
Mode 7: 2:30 minutes
Mode 8: 3:00 minutes
Page 97

Before your vehicle was shipped from the factory,
it was programmed to Mode 1. The mode to which the
vehicle was programmed may have been changed
since the vehicle left the factory. To determine the mode
to which the vehicle is programmed or to program the
vehicle to a different mode, do the following:
1. Enter the Personalization menu following the
instructions listed previously.
2. Scroll to Twilight Delay using the TUNE/SEL knob
to highlight it.
3. Press the TUNE/SEL knob to scroll through the
available delay settings. When the delay time
you want is highlighted, press the TUNE/SEL knob
once to select it.
When the mode is turned on, an X will appear in
the box to the left.
If you choose Mode 1, the exterior lamps will not
illuminate when you exit the vehicle. Only one mode
can be selected at a time.
4. Press the Back reconfigurable key to exit the
Twilight Delay menu and return to the
Personalization menu.
The mode you selected is now set. You can either exit
the programming mode by following the instructions
later in this section or program the next feature available
on your vehicle.
Lights Flash at Unlock
This feature flashes the exterior lamps when the remote
keyless entry transmitter is used to unlock the vehicle.
The lamps will flash for approximately 20 seconds
unless a door is opened, the ignition is turned to
ACCESSORY, ON or START or the remote keyless
entry transmitter is used to lock the vehicle. The
following modes are available for selection:
Mode 1: ON
Mode 2: OFF
Before your vehicle was shipped from the factory,
it was programmed to Mode 1. The mode to which the
vehicle was programmed may have been changed
since it left the factory. To program the vehicle to
a different mode, do the following:
1. Enter the Personalization menu following the
instructions listed previously.
2. Scroll to Remote Keyless Options to highlight it.
3. Press the TUNE/SEL knob to view the modes.
4. Scroll to Lights Flash At Unlock and press the
knob once to select it.
When the mode is turned on, an X will appear in
the box to the left.
5-7
Page 98

The mode you selected is now set. You can either exit
the programming mode by following the instructions
later in this section or program the next feature available
on your vehicle.
Lights Flash at Lock
This feature allows the exterior lamps to flash once
when the remote keyless entry transmitter is used to
lock the vehicle. All doors must be closed for this feature
to work, and the lamps will not flash if the parking
lamps or headlamps are on. The following modes are
available for selection:
Mode 1: ON
Mode 2: OFF
Before your vehicle was shipped from the factory,
it was programmed to Mode 1. The mode to which the
vehicle was programmed may have been changed
since it left the factory. To program the vehicle to
a different mode, do the following:
1. Enter the Personalization menu following the
instructions listed previously.
2. Scroll to Remote Keyless Options to highlight it.
3. Press the TUNE/SEL knob to view the modes.
4. Scroll to Lights Flash At Lock and press the knob
once to select it.
When the mode is turned on, an X will appear in
the box to the left.
You can select this feature by itself, or you can combine
it with Horn Sounds At Lock so that both the lights
flash and the horn chirps when you lock your vehicle.
The mode you selected is now set. You can either
exit the programming mode by following the instructions
later in this section or program the next feature
available on your vehicle.
Horn Sounds at Lock
This feature sounds the horn once when the remote
keyless entry transmitter is used to lock the vehicle.
All doors must be closed for this feature to work.
The following modes are available for selection:
Mode 1: ON
Mode 2: OFF
Before your vehicle was shipped from the factory,
it was programmed to Mode 2. The mode to which the
vehicle was programmed may have been changed
since it left the factory. To program the vehicle to
a different mode, do the following:
1. Enter the Personalization menu following the
instructions listed previously.
2. Scroll to Remote Keyless Options to highlight it.
5-8
Page 99

3. Press the TUNE/SEL knob to view the modes.
4. Scroll to Horn Sounds At Lock and press the knob
once to select it.
When the mode is turned on, an X will appear in
the box to the left.
If you select this feature to be on, Lights Flash At Lock
will also be on. You can choose Lights Flash At Lock
by itself, but Horn Sounds At Lock will always have
Lights Flash At Lock enabled when it is selected.
The mode you selected is now set. You can either exit
the programming mode by following the instructions
later in this section or program the next feature available
on your vehicle.
Exterior Lights at Unlock
This feature turns on the exterior lamps when the
remote keyless entry transmitter is used to unlock the
vehicle. The lamps will remain on for about 20 seconds
unless a door is opened, the ignition is turned to
ACCESSORY, ON or START or the remote keyless
entry transmitter is used to lock the vehicle. The
following modes are available for selection:
Mode 1: ON
Mode 2: OFF
Before your vehicle was shipped from the factory,
it was programmed to Mode 1. The mode to which the
vehicle was programmed may have been changed
since it left the factory. To program the vehicle to
a different mode, do the following:
1. Enter the Personalization menu following the
instructions listed previously.
2. Scroll to Remote Keyless Options to highlight it.
3. Press the TUNE/SEL knob to view the modes.
4. Scroll to Exterior Lights At Unlock and press the
knob once to select it.
When the mode is turned on, an X will appear in
the box to the left.
The mode you selected is now set. You can either exit
the programming mode by following the instructions
later in this section or program the next feature available
on your vehicle.
5-9
Page 100

Driver Unlock in Park
(Automatic Transmission)
The feature allows the driver’s door to automatically
unlock when the transmission is shifted into PARK (P).
The following modes are available for selection:
Mode 1: ON
Mode 2: OFF
Before your vehicle was shipped from the factory,
it was programmed to Mode 2. The mode to which the
vehicle was programmed may have been changed
since it left the factory. To program the vehicle to
a different mode, do the following:
1. Enter the Personalization menu following the
instructions listed previously.
2. Scroll to Door Lock Options to highlight it.
3. Press the TUNE/SEL knob to view the modes.
4. Scroll to Driver Unlock In Park and press the knob
once to select it.
When the mode is turned on, an X will appear in
the box to the left.
This feature cannot be selected if Driver Unlock Key
Out/Off, Doors Unlock Key Out/Off or Doors Unlock in
Park is selected. If any of these was previously
selected, you must first de-select it in order to be able
to select Driver Unlock in Park.
The mode you selected is now set. You can either exit
the programming mode by following the instructions
later in this section or program the next feature available
on your vehicle.
Driver Unlock Key Out/Off
This feature allows the driver’s door to automatically
unlock when the key is removed from the ignition
on automatic transmission vehicles or when the ignition
is turned to OFF for manual transmission vehicles.
The following modes are available for selection:
Mode 1: ON
Mode 2: OFF
Before your vehicle was shipped from the factory,
it was programmed to Mode 2. The mode to which the
vehicle was programmed may have been changed
since it left the factory. To program the vehicle to
a different mode, do the following:
1. Enter the Personalization menu following the
instructions listed previously.
2. Scroll to Door Lock Options to highlight it.
5-10
 Loading...