

Page 1
2004
CUSTOMER CONVENIENCE/PERSONALIZATION GUIDE
Page 2

CTS
TABLE OF CONTENTS
DRIVER INFORMATION
• Instrument Panel
•Lights, Gauges and Indicators
• Driver Information Center
• DVD Navigation System Controls
COMFORT/CONVENIENCE
•Daytime Running Lamps
•Wipers/Washers
• Power Window Controls
•HomeLink®Transmitter
• Sunroof
• Dual Climate Control System
SEATS & MIRRORS
•Manual Adjustment
• Power Adjustment
• Heated Front Seats
• Electrochromic Day/Night Rearview
Mirror With Optional Compass
• Power Outside Rearview Mirrors
• Curb View Assist Mirror
• Memory Seat and Mirrors
AUDIO/PERSONALIZATION/
COMMUNICATION
•Audio Systems
• DVD Navigation/Audio System
•Programming and Personalization
• OnStar
•XM Satellite Radio
®
POWERTRAIN & MAINTENANCE
• Engine
•Transmission
•Traction & Stability
OWNER PRIVILEGES™
• Roadside Service
•Trip Interruption
• Courtesy Transportation
• Customer Assistance
Page 3
Driver
Information
1 1 1
2
3 4
7
8
11
1
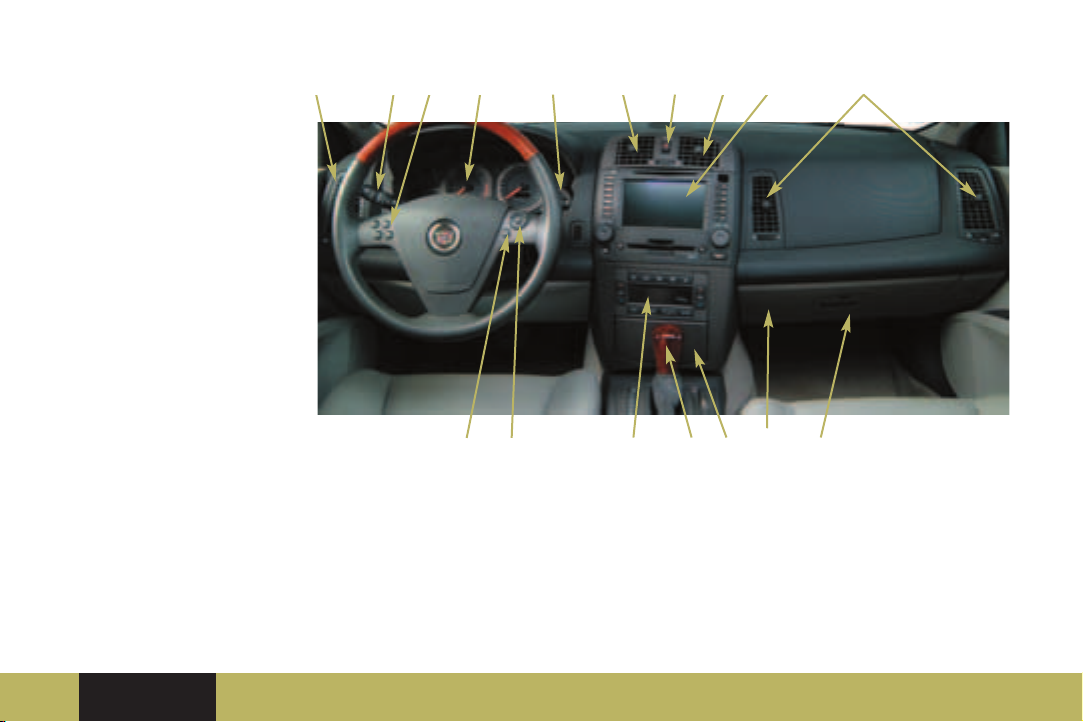
INSTRUMENT PANEL
1. Air Outlets
2. Turn Signal/Multifunctional
Lever and Cruise Control Switch
3. Configurable Steering Wheel
Controls
4. Instrument Cluster
Driver
Information
Comfort/
Convenience
5 6
5. Audio Mute Button (Base Radio)
or Voice Recognition Button
(Navigation System)
6. Audio Volume Knob and
Source Button
7. Windshield Wiper Lever
8. Hazard Warning Flasher Button
9. Transmission Shift Lever
Seats & Mirrors Audio/
Personalization/
Communication
12
14
1310
9
10. Climate Control System
11. Audio System or
Navigation/Audio System
(Option)
12. Lighter (if equipped) or
Power Outlet
13. Glove Box
14. Traction Control Button
(Inside Glove Box)
❏ Reviewed with Customer (Please Check Box)Refer to Owner Manual for further information.
Powertrain &
Maintenance
Owner
Privileges
TM
Page 4
CTS
19
3
16201518
17
2
1
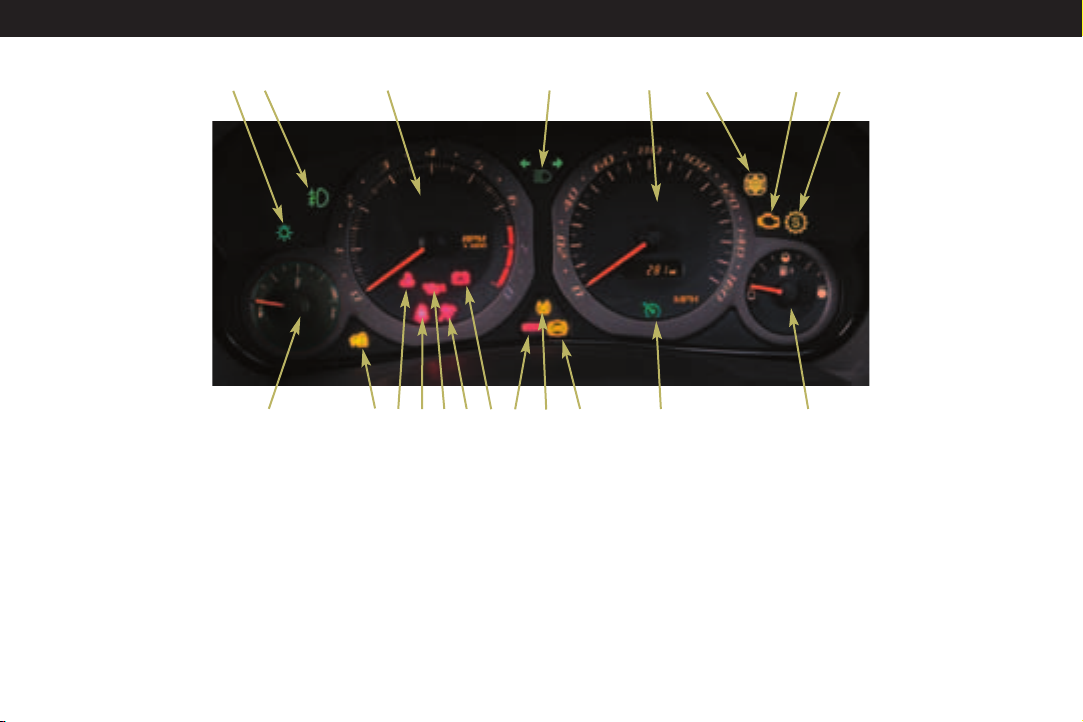
LIGHTS, GAUGES AND INDICATORS
1. Lamps On Reminder
2. Fog Lamp Light
3. Tachometer
4. High Beam On Light
5. Speedometer/Odometer
6. Winter Driving Mode Light
7. Malfunction Indicator (Check
Engine) Lamp
8. Sport Mode Light
9. Fuel Gauge
10. Cruise Control Light
11. ABS System Warning Light
12. Traction Control Warning Light
13. Brake System Warning Light
14. Charging System Light
15. Air Bag Readiness Light
14
13
12
4
11
5
6
10
8
7
9
16. Oil Pressure Light
17. Safety Belt Reminder Light
18. Engine Coolant Temperature
Warning Light
19. Security Light
20. Temperature Gauge
Page 5
IMPORTANT: The instrument cluster
is designed to let you know many
important aspects of your vehicle’s
operation. Some of the gauges and
indicators may differ from the
illustration presented.
The message center can provide
critical information to prevent
damage to your vehicle. It is
important for you to read your
Owner Manual and become familiar
with the information that is being
relayed to you by the lights, gauges
and indicators, particularly the
message center, and what action can
be taken to ensure your safety and to
prevent damage.
DRIVER INFORMATION CENTER
(DIC)
The DIC displays the status of many
of the vehicle’s systems. It is also
used to display driver personalization
features and warning/status
messages. All information will appear
on the audio system display. If the
vehicle is equipped with the optional
Navigational System, the audio
display system will be used to
display DIC messages.
Driver
Information
Comfort/
Convenience
The following procedures are
provided only to acquaint you with
the DIC. It is strongly recommended
that you refer to the Owner Manual
to become familiar with the various
messages and how to access and/or
reset them.
DIC Main Menu
The DIC main menu serves the audio
systems. To access the main menu,
perform one of the following:
• For the base audio system, press
the TUNE/SEL knob once and turn
the knob in either direction to
scroll through the menu items.
Refer to your Owner Manual for
detailed descriptions and
procedures for menu items.
Vehicle System Status
You can use the DIC to check the
status of several vehicle systems.
Seats & Mirrors Audio/
Personalization/
Communication
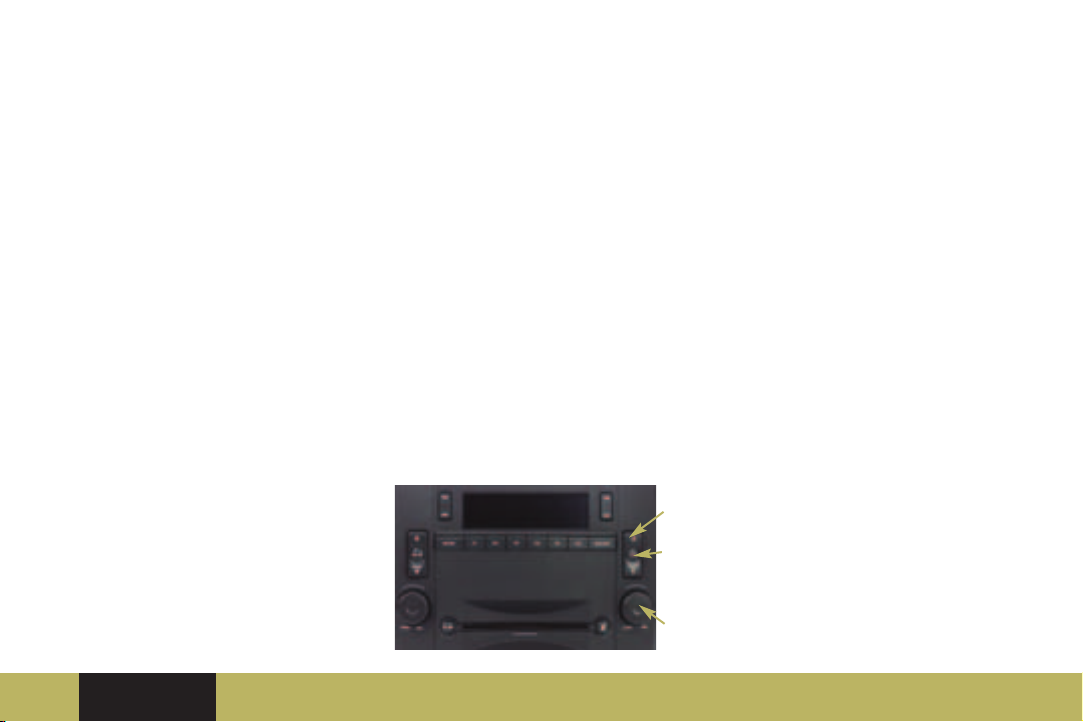
DIC Controls
If the vehicle is equipped with the
base audio system, implement the
following controls to access the
vehicle status menu.
1. INFO (information): Use the UP or
DOWN arrow on the button to
scroll through the status
information.
2. CLR (Clear): Press this button to
clear and/or reset DIC items to
zero. (Note: You must
acknowledge a message to clear it
from the screen for further use.)
3. TUNE/SEL: Once a menu is
displayed, turn the knob located
to the lower right of the display to
the left or right to scroll through
menu items. Press the knob to
select a menu item.
DIC Menu
1
• BLANK LINE
• OUTSIDE TEMPERATURE
2
• MI TRIP A
• MI TRIP B
• MILES RANGE
3
❏ Reviewed with Customer (Please Check Box)Refer to Owner Manual for further information.
Powertrain &
Maintenance
Owner
Privileges
TM
Page 6
CTS
•MPG AVG
• MPG INST
• GAL FUEL USED
•AVG MPH
• TIMER
•BATTERY VOLTS
• ENGINE OIL LIFE
• TRANS FLUID LIFE
You can view any item at any time
(but only one item at a time), by
pressing the INFO button. Refer to
Section 2 of your Owner Manual for
detailed descriptions of the menu
items and how to reset them.
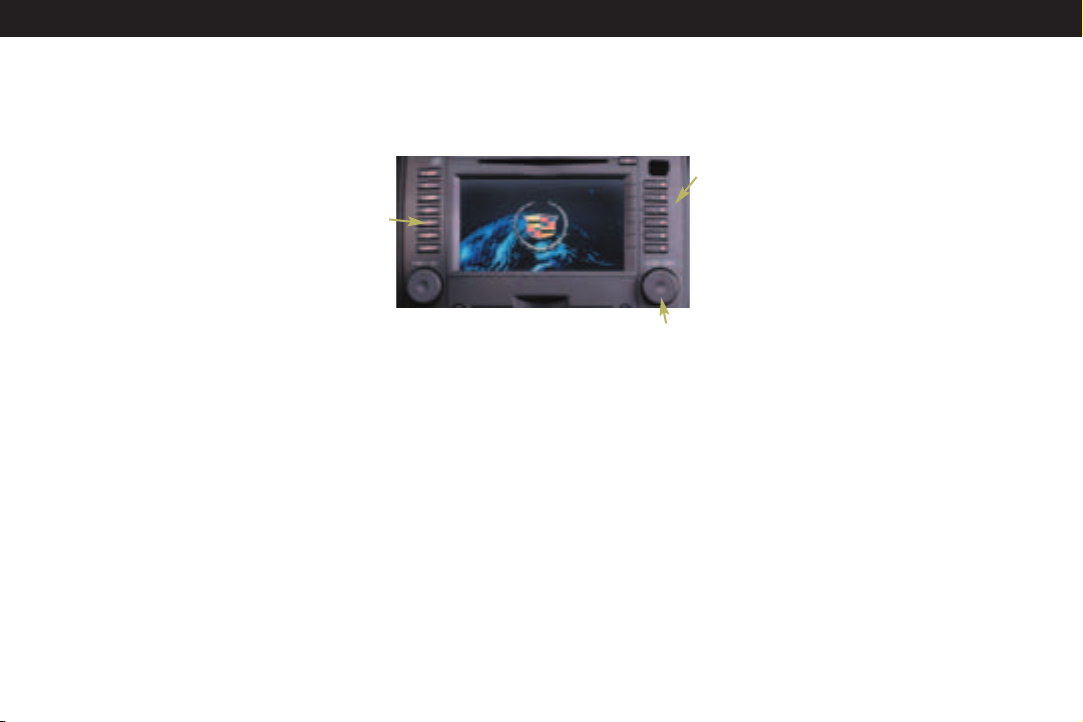
DVD NAVIGATION SYSTEM
CONTROLS
If your CTS has the optional DVD
Navigation/Audio system, use the
following controls to access the
vehicle status menu. Note: You can
now play DVD movies while your
vehicle is in PARK.
1. INFO (Information): Press this
button to access the menu.
2. TUNE/SELECT: Turn the lower right
knob to the left or right to scroll
through the menu. Press the knob
to select a menu item.
3.Press the bulleted button (
the right side of the display to
select a menu item or to
acknowledge a prompt.
1
Navigation System Menu
• OUTSIDE TEMPERATURE
• TRIP ODOMETER A
• TRIP ODOMETER B
•FUEL RANGE
•AVERAGE FUEL ECONOMY
• INSTANTANEOUS FUEL
ECONOMY
• FUEL USED
•AVERAGE VEHICLE SPEED
• TIMER
•BATTERY VOLTAGE
• ENGINE OIL LIFE
• BLANK DISPLAY
• TRANSMISSION FLUID LIFE
•
) on
Refer to Section 2 of your Owner
Manual for additional information on
Navigation Menu Items.
DIC Messages
These messages will appear if there
3
is a problem sensed in one of your
vehicle’s systems. The text messages
are the same basically for both the
base audio and navigation/audio
systems. The navigation/audio
system will also display an icon with
the message.
You must acknowledge a message to
clear it from the screen for further
2
use. To clear a message from the
DIC:
•Press the button with the dot on it
(to the right of the screen) next to
the OK prompt.
IMPORTANT: Removing the message
does not remove the sensed
problem or condition. Refer to your
Owner Manual for a list of messages
and accompanying icons, a
description of the condition and the
recommended action. Be sure to
regard seriously any message that
appears and take the appropriate
action.
Page 7

Comfort/Convenience
DAYTIME RUNNING LAMPS
(DRL)
Your vehicle’s Daytime Running
Lamps (DRL) automatically illuminate
the turn signal lights at reduced
brightness when:
• It is still daylight and the ignition
is in the ON or START position.
• The headlight lever is in the OFF or
AUTO position and the headlights
are off.
• An automatic transmission is not
in PARK, or the parking brake is
not set on a manual transmission.
Refer to Owner Manual for further information.
Driver
Information
Comfort/
Convenience
The sensor that activates the DRL and
the headlights automatically is
located on the top of the instrument
panel. Avoid covering the sensor to
ensure proper light operation.
WIPERS/WASHERS
The lever to operate the windshield
wipers and washers is located at the
right side of the steering column.
Wiper Controls
(Mist): Pull the lever down
and release for a single wiping cycle;
hold the lever down for more cycles.
O (Off): Place the lever in this
position to turn off the wipers.
(Delay): Place the lever in
this position to set a delay
between wipes.
(Delay Adjustment):
Rotate the band on the lever to
adjust the length of the delay
between wipes. The closer you
move the band toward Mist,
the longer the delay.
(Low Speed): Place the
lever in this position for slow
steady wiping cycles.
Seats & Mirrors Audio/
Personalization/
Communication
(High Speed): Place the lever in
this position for rapid wiping cycles.
Washers: Press the button located at
the end of the wiper lever to cycle
the windshield washer.
Headlamp Washers (if equipped)
Standard with the high-intensity
discharge (HID) headlamps, the
headlamp washers are activated
when the windshield washer is
activated. This occurs only when the
headlamps are on. To wash the
headlamps, press the washer button
located at the end of the windshield
washer lever.
❏ Reviewed with Customer (Please Check Box)
Powertrain &
Maintenance
Owner
Privileges
TM
Page 8

CTS
POWER WINDOW CONTROLS
Express Down
All of your vehicle’s windows are
equipped with an “Express Down”
feature. Press the switch’s down
arrow to the second position to
activate the express-down feature.
Press the up arrow to stop the
window.
Express Up
This feature is on both front power
windows. Press the switch’s up
arrow to the second position to
activate the express-up feature. Press
the switch again to stop the window.
BATTERY DRAIN
When using an accessory power
outlet always turn off any electrical
equipment that is not being used.
Leaving this equipment on for
extended periods can cause battery
drain. Also, leaving your keys in the
ignition when the engine is turned
off keeps the vehicle’s electrical
modules active and can drain the
battery.
HOMELINK®TRANSMITTER
(if equipped)
Programming
The engine must be turned off to
program the transmitter.
•Press and hold the channel button
you wish to program through the
following instructions:
• When the HomeLink indicator
light begins to blink slowly (may
take up to 30 seconds), hold the
hand-held transmitter about 1 to 3
inches (3 to 8 cm) away from
HomeLink and then press and
hold the transmit button on the
hand-held transmitter. Continue to
hold both buttons until the
indicator light on HomeLink
begins to flash rapidly (may take
up to 90 seconds).
Refer to your Owner Manual for
additional programming and
operating instructions.
Caution: Do not use the HomeLink
transmitter with any garage door opener
that does not have the “stop-and-reverse”
feature or any opener manufactured before
April 1, 1982.
Page 9

tilt the sunroof
open. (The
sunshade must
3
2
1
4
5
be opened
manually.)
(5) (Close): Turn
the control to
this position to
close the
sunroof.
SUNROOF
The sunroof control knob is located
on the overhead console. The
sunshade will always open with the
sunroof, but must be closed
manually.
(1) (Half-Open): Turn the control
knob clockwise to this position to
open the sunroof half-way.
(2) (Comfort Stop): Turn the control
to this position to move the glass
panel about three-quarters of the
way open.
(3) (Full Open): Turning the control to
this position opens the glass panel all
the way.
(4) (Vent): Turn the control
counterclockwise to this symbol to
Driver
Information
Comfort/
Convenience
DUAL
CLIMATE
CONTROL
SYSTEM
Your vehicle’s climate control system
can be operated manually or
automatically. With a dual climate
control system, both you and your
front seat passenger can choose
different temperature settings.
AUTO: Press this button to
automatically control the inside
temperature, the air delivery mode
and the fan speed.
(Mode): Press this button to
control the system manually. To clear
fog from your windshield, press this
button until the Floor/Defog icon
Seats & Mirrors Audio/
Personalization/
Communication
( ) appears on the display. The
Floor/Defog mode directs air
between the windshield, floor outlets
and side windows. Press AUTO again
to return to automatic operation.
PWR: Press this button on either side
of the control panel to turn the driver
or passenger climate control system
on. Press the up or down arrow to
increase or decrease the temperature
for that system.
See your Owner Manual for complete
operating instructions.
❏ Reviewed with Customer (Please Check Box)Refer to Owner Manual for further information.
Powertrain &
Maintenance
Owner
Privileges
TM
Page 10

Seats & Mirrors
CTS
MANUAL ADJUSTMENT
(passenger side only)
Lift the bar under the front of the
seat and slide
the seat to the
desired position
and then
release the bar.
Try to move the
seat back and
forth to make
sure it locks
into place.
Manual Recliner
(passenger side
only)
The recliner lever
is located on the
outboard sides
of the front
seats. Lift the
lever to release the seatback; move
to the desired position; and release
the lever to lock in place. To return
the seatback to upright, lean forward
and pull up on the lever.
POWER ADJUSTMENT
The eight-way power seat controls
are located on the outboard sides of
the front seats.
1. Move the front or rear part of the
control lever up or down to raise
or lower the front or rear of the
cushion.
2. Push down or pull up at the center
of the control lever to raise or
lower the entire seat.
3. Slide the control lever forward or
rearward to move the entire seat
in that direction.
2
1
1
3
4
Power Recliner
The power recliner controls are
located to the rear of the adjustment
controls.
4. Move the top of the control lever
forward or rearward to recline or
return the seatback.
Power Adjustable Lumbar
(if equipped)
The power adjustable lumbar feature
is controlled by a two-way switch
located below the power seat switch.
Press the switch in either direction to
adjust the lumbar in the seatback to
your most comfortable position.
Power Recliner
The power recliner controls are
located to the rear of the adjustment
controls.
4. Move the top of the control lever
forward or rearward to recline or
return the seatback.
Page 11

HEATED FRONT SEATS (if equipped)
The buttons to heat the driver and
passenger seats are located at each
end of the top row of buttons on the
Climate Controls panel. The ignition
must be ON to heat
the seats. When the
ignition is turned off,
this feature is also
turned off.
•To set the heat to LO, press the
button twice for the selected seat
(approximately normal body
temperature). Press the button
once for the HI setting. Press the
button a third time to turn the
heat feature OFF.
•Your selection will appear in the
climate control system display
panel.
ELECTROCHROMIC DAY/NIGHT
REARVIEW MIRROR WITH
OPTIONAL COMPASS
Mirror Operation
The electrochromic (automatic
dimming) feature becomes active
every time the vehicle is started.
1.To turn the electrochromic mirror
off or back on while driving, press
Driver
Information
Comfort/
Convenience
2
1
and hold the ON/OFF button for
about three seconds. The symbol
on the button will illuminate when
automatic dimming is active.
Optional Compass Operations
If you have the mirror with the
optional compass, the ignition must
be on for the compass to operate.
1.Press the ON/OFF button once to
turn the compass on or off.
2. When the compass is turned on,
the upper-right corner of the
mirror will display two characters
for about two seconds, then the
compass heading.
Notice: The compass feature may need to
be adjusted for compass variance or
calibrated if the reading is wrong or does
not appear. Refer to your Owner Manual
for procedures.
Seats & Mirrors Audio/
Personalization/
Communication
POWER OUTSIDE REARVIEW
MIRRORS
The controls for both outside
rearview mirrors are located on the
driver’s side armrest.
1.Press the left or right side of the
rocker switch to operate the
desired outside mirror. The neutral
position will turn the power
operation capability off.
2
1
2.Press the directional arrow on the
control button to move the mirror
in that direction and adjust the
mirror.
❏ Reviewed with Customer (Please Check Box)Refer to Owner Manual for further information.
Powertrain &
Maintenance
Owner
Privileges
TM
Page 12

CTS
The mirrors can be folded manually
inward to prevent damage in car
washes or garages. Return the
mirrors to their normal positions
before driving. The mirrors also are
heated to clear fog, snow or ice
when the rear defogger is on.
CURB VIEW ASSIST MIRROR
(if equipped)
If your CTS is equipped with the
Memory Seat and Mirrors option, it
will also have the Curb View Assist
Mirror. When activated through the
Driver Information Center (DIC), this
feature will cause the passenger’s
mirror to tilt to a pre-selected
position when the vehicle is shifted
into reverse to assist the driver when
parallel parking. If further adjustment
is needed, the standard power
controls can be used. Five seconds
after shifting out of reverse, the
mirror will return to its original
position. The curb view assist feature
can be enabled/disabled through the
DIC.
MEMORY SEAT AND MIRRORS
Setting Driver’s Position
The buttons to set the seat and
mirror memory are on the driver’s
armrest. To set the memory, first
ensure that seats and mirrors are
“On” in the Personalization section of
the DIC. Then, adjust the driver’s
seat, including the seatback recliner
and both outside mirrors.
1.Press and hold button 1 until two
beeps are heard to confirm
memory setting.
2. Repeat the procedure using button
2 to store memory for a second
driver.
1
2
3
Setting Exit Position
1.Press button 1 or the unlock
symbol on the keyless entry fob
with number 1 on the back.
Adjust the driver’s seat to the
desired exit position.
3.Press and hold the exit button
until two beeps are heard to
confirm exit memory setting.
Repeat the procedure for a second
driver using button 2 or the unlock
symbol on the keyless entry fob
with 2 on the back.
To recall stored exit positions, press
and release the exit button. A beep
will sound and the seat will move to
the memory exit position for the
identified driver. If no exit position is
stored, the seat will move all the way
back.
Vehicles with automatic transmission
must be in PARK to recall exit
positions. For manual transmissions,
the parking brake must be set if the
engine is running.
Page 13

Audio/Personalization/Communication
AUDIO SYSTEMS
Your CTS is equipped with one of the
following audio systems:
Base Audio System
This system includes an AM/FM
stereo radio with RDS, and singledisc CD player.
1.5 Bose Audio System
This system includes a Bose AM/FM
stereo radio with RDS & DSP, and
integral six-disc CD changer.
DVD NAVIGATION/
AUDIO SYSTEM
This system contains an integrated
navigation system utilizing a DVD
player, a Bose AM/FM stereo radio
with RDS and DSP, and integral sixdisc CD changer. If your CTS is
equipped with this option, a
supplement manual is provided for
operating instructions.
PROGRAMMING AND
PERSONALIZATION
The audio system in your CTS
features the latest technology and
provides you the maximum in
Driver
Information
Comfort/
Convenience
Navigation/Audio System
listening pleasure. Many of its
features can be programmed and
personalized through the audio
system itself or via the configurable
steering wheel controls. Specific
functions for seats, mirrors, door
locks and lights can be programmed
and personalized to accommodate
two different drivers when they
enter, exit or drive the vehicle.
Because of the extensive range of
features available with your audio
system, the selection, activation and
programming of these features could
not be adequately covered within the
Seats & Mirrors Audio/
Personalization/
Communication
pages of this Convenience Guide. It
is strongly suggested that you spend
time to familiarize yourself with the
available audio, convenience and
personalization features and the
procedures to select, activate or
program them. Please refer to your
Owner Manual and/or the
Personalization Instructional Guide
provided with this Convenience
Guide for detailed descriptions and
instructions.
Base Audio System
❏ Reviewed with Customer (Please Check Box)Refer to Owner Manual for further information.
Powertrain &
Maintenance
Owner
Privileges
TM
Page 14

CTS
OnStar®(if equipped)
OnStar®is a hands-free
communications link between the
vehicle and the OnStar Center. Your
vehicle comes with a specified oneyear service plan that allows you to
use some or all of the following
services.
Services
• Contact you and/or dispatch
emergency service if an air bag is
deployed.
•Notify the authorities and track
your vehicle if it is reported stolen
to OnStar.
• Contact and dispatch appropriate
help when notified of vehicle
breakdown.
4213
• Perform remote diagnostics and
recommend proper action when
an instrument panel light comes
on.
•Provide step-by-step guidance
following an accident.
• Can remotely unlock or sound the
horn and/or flash the lights to
locate your car when provided
with proper security information.
•Provide route directions and
locate the nearest lodging,
restaurant or other services.
•Provide concierge services.
• Locate alternate transportation in
the event you are unable to drive.
Operation
Contact
1.Press this button (or the
OnStar/Voice Recognition button
on your steering wheel) to contact
an OnStar advisor for needed
services.
Emergency Button
2. When this button is pressed in an
emergency, the center will locate
your vehicle, assess the situation,
and alert and dispatch the nearest
service provider.
Communication Button
3.Press this button to contact a
Virtual Advisor, answer an
incoming call, or end a call. It will
also cancel an accidental call to
OnStar and the automatic redial
function. This button can also be
used to access additional services
such as Personal Calling.
Page 15

Telltale Light
4. The telltale light will be solid
green when the system is on and
ready to make or receive calls. It
will flash when an incoming or
outgoing call is in progress. Press
the COMMUNICATION button to
answer incoming calls. If the light
changes to red to indicate a
system malfunction, press the
OnStar button to contact an
advisor and receive assistance to
ensure the system is functioning
properly. If an advisor cannot be
contacted, take your vehicle to
your dealership for assistance.
Refer to Owner Manual for OnStar
System limitation of subscriber
agreement.
Driver
Information
Comfort/
Convenience
Antenna
The exterior OnStar antenna is critical
to effective communication. Keep the
antenna mast straight up for
optimum reception.
XM SATELLITE RADIO
(if equipped)
Two subscription service bands are
available: XM1 and XM2. To access
them on equipped radios, press the
BAND button until XM1 or XM2
appears on the display. An extra-cost
subscription to XM Satellite Radio
service brings you the quality of
digital audio and text reception from
coast to coast. Available only in the
continental U.S., XM offers 100
channels of music, news, sports, talk
and children’s programming. For
more information, contact XM on the
Internet at www.XMradio.com or call
1-800-852-XMXM (9696).
Seats & Mirrors Audio/
Personalization/
Communication
❏ Reviewed with Customer (Please Check Box)Refer to Owner Manual for further information.
Powertrain &
Maintenance
Owner
Privileges
TM
Page 16

Powertrain & Maintenance
CTS
ENGINE
Fuel
Your CTS is equipped with an 18gallon fuel tank. When approximately
two gallons are remaining in the
tank, a low fuel warning light will
illuminate in the Driver Information
Center.
IMPORTANT
The grade of gasoline you use can affect
the performance of your vehicle and
may even cause damage. Please refer to
your Owner Manual for complete
information regarding suggested octane
ratings for optimum performance.
The fuel door is located on the right
side of the vehicle and can be
opened by pressing the forward
edge of the door with your fingers.
Coolant Heater (if equipped)
The engine coolant heater can make
starting the engine easier at
temperatures below 0°F (-18°C).
For best results, the coolant heater
should be plugged in at least four
hours before starting your vehicle.
TRANSMISSION
Automatic Overdrive
Automatic Overdrive is best used for
normal driving. To activate passing
gear when going less than 35 mph
(55 km/h), push the accelerator
about halfway down; when doing
more than 35 mph (55 km/h), push
the accelerator all the way down. For
further information regarding gear
selection for various driving
conditions, refer to your Owner
Manual.
Sport Mode (automatic only)
When Sport Mode is activated, your
CTS will provide increased and more
responsive performance parameters.
You will also feel firmer shift
characteristics.
1. The Sport Mode button is located
at the bottom of the shift
designation panel. Press the
button once to turn the Sport
Mode on or off. Sport Mode does
not turn off when the ignition is
turned off. An indicator light in the
instrument cluster will light when
Sport Mode is active.
1
Page 17

Winter Driving Mode
(automatic transmissions only)
The Winter Driving Mode enables
the transmission to start the vehicle
moving in third gear. Third-gear
takeoff reduces torque applied to
the rear wheels, which reduces
wheelspin during slippery conditions.
The vehicle’s acceleration capability
will be reduced when this system is
activated. Consequently, this feature
is not intended for continuous use.
The Winter Driving Mode can be
activated only when the transmission
is in Drive (D) gear and the vehicle
speed is below 28 mph (44.8 km/h).
Refer to your Owner Manual for
further information.
2. The Winter Driving Mode button is
located at the top of the shift
designation panel. Press the
button once to turn the Winter
Driving Mode on or off. An
indicator light in the instrument
cluster will light when the mode is
active and will turn off when the
ignition is turned off.
Driver
Information
Comfort/
Convenience
2
TRACTION & STABILITY
Traction Control System
The traction control system comes on
every time you start your vehicle.
When one or more of the drive
wheels begin to spin from traction
loss, the Traction Control System will
apply braking to the spinning
wheel(s) and may reduce engine
power until traction is regained.
Seats & Mirrors Audio/
Personalization/
Communication
If your vehicle becomes stuck, and
rocking the vehicle is required, the
system should be turned off.
• Press the button located inside the
glove box.
StabiliTrak System (standard)
StabiliTrak is an advanced computercontrolled system that assists with
directional control of the vehicle
during sudden maneuvers or low
traction situations. It is normal to
hear the system working, and the
system will automatically disengage
cruise control when activated.
❏ Reviewed with Customer (Please Check Box)Refer to Owner Manual for further information.
Powertrain &
Maintenance
Owner
Privileges
TM
Page 18

CTS
Owner Privileges
ROADSIDE SERVICE
(1-800-882-1112)
Roadside Service provides every
Cadillac owner with the advantage of
contacting a Cadillac advisor and,
when appropriate, a Cadillac-trained
dealer technician who can provide
on-site services (where available):
•Towing
• Battery Jump-Starting
• Lockout Assistance
• Fuel Delivery
• Flat Tire Change
(covers change only)
TRIP INTERRUPTION – If your trip is
interrupted due to a component
failure covered under warranty,
incidental expenses may be
reimbursed including hotel, meals
and rental car.
TM
COURTESY TRANSPORTATION may
also be provided for warranted
repairs including shuttle service for
same day repairs and loaner
transportation for overnight repair.
Roadside Service is also available to
Cadillac customers beyond the
warranty period for a charge.
CUSTOMER ASSISTANCE –
1-800-458-8006
In Canada, call 1-800-263-3777
(English) or 1-800-263-7854 (French).
Should you need to ask questions,
make a comment, or request
additional information, the exclusive
Cadillac Customer Assistance Center
is staffed around the clock with
professionals to serve you.
When you call Cadillac Roadside
Service or Customer Assistance, if
possible, please provide the phone
advisor with:
•Your telephone number
•Your location
•Your Cadillac’s location
•A description of the problem
•Vehicle ID number
• Make and year of your Cadillac
•Delivery date
• Current mileage
This book contains the latest
information available to Cadillac at
the time of this printing. Cadillac
reserves the right to make changes in
the product after that time without
further notice.
CTS is a registered trademark of
Cadillac Motor Car Division and
General Motors Corporation.
Copyright 2003 by Cadillac Motor
Car Division. All rights reserved.
Page 19

04CTSGTK
Driver
Information
Comfort/
Convenience
Seats & Mirrors Audio/
Personalization/
Communication
Powertrain &
Maintenance
Owner
Privileges
Page 20

 Loading...