

Page 1
Page 2

Cadillac CT6 CUE Infotainment System (GMNA-Localizing-U.S./Canada-
9245669) - 2016 - crc - 4/6/16
Contents
Introduction . . . . . . . . . . .. . . . . . . . . . 2
Radio . . . . . . . . . . . . . . . . . . . . . . . . . . 17
Audio Players . . . . . . . . . . . . . . . . . 27
OnStar System . . . . . . . . . . . . . . . . 33
Rear Seat Infotainment . . . . . . . . 34
Navigation . . . . . . . . . . . . . . ... . . . . 53
Voice Recognition ... . . . . . . . . . . 85
Phone . . . . . . . . . . . . . . . . . . . . . ... . 93
Settings . . . . . . . . .. . . . . . . . . .. . . 101
Trademarks and License
Agreements . . . . . . . . . . . . . . . . 104
Index . . . . . . . . . . . . . . . . . . . 115
Page 3
Cadillac CT6 CUE Infotainment System (GMNA-Localizing-U.S./Canada-
9245669) - 2016 - crc - 4/6/16
2 Introduction
Introduction
The names, logos, emblems,
slogans, and vehicle body designs
appearing in this manual including,
but not limited to, GM, the GM logo,
CADILLAC, CADILLAC Emblem and
CADILLAC CT6 are registered
trademarks of General Motors LLC.,
its subsidiaries, affiliates,
or licensors.
For vehicles first sold in Canada,
substitute the name General Motors
of Canada Limited for Cadillac
Motor Division, whenever it appears
in this manual.
Litho in U.S.A.
Part No. 23291012 B Second Printing
This manual describes features that
may or may not be on the vehicle
because of optional equipment that
was not purchased on the vehicle,
model variants, country
specifications, features/applications
that may not be available in your
region, or changes subsequent to
the printing of this manual.
Keep this manual with the owner
manual in the vehicle, so it will be
there if it is needed. If the vehicle is
sold, leave this manual in the
vehicle.
Overview
Read the following pages to
become familiar with the
infotainment system features.
Warning
{
Taking your eyes off the road for
too long or too often while using
any infotainment feature can
Warning (Continued)
cause a crash. You or others
could be injured or killed. Do not
give extended attention to
infotainment tasks while driving.
Limit your glances at the vehicle
displays and focus your attention
on driving. Use voice commands
whenever possible.
The infotainment system has built-in
features intended to help avoid
distraction by disabling some
functions when driving. These
functions may gray out when they
are unavailable. Many infotainment
features are also available through
the instrument cluster and steering
wheel controls.
Before driving:
.
Become familiar with the
operation, faceplate buttons, and
screen buttons.
(Continued)
©
2016 General Motors LLC. All Rights Reserved.
Page 4
Cadillac CT6 CUE Infotainment System (GMNA-Localizing-U.S./Canada-
9245669) - 2016 - crc - 4/6/16
Introduction 3
.
Set up the audio by presetting
favorite stations, setting the
tone, and adjusting the
speakers.
.
Set up phone numbers in
advance so they can be called
easily by touching a single
button or by using a single voice
command if equipped with
Bluetooth phone capability.
See “Defensive Driving” in the
owner manual.
To play the infotainment system with
the ignition off, see “Retained
Accessory Power (RAP)” in the
owner manual.
Customer Assistance
Assistance is available to help with
Bluetooth pairing, other mobile
device interface, and operation
support of the CT6 infotainment
system. Specialists are available
when calling this Customer
Assistance number.
U.S.: 1-855-428-3669
(855 4 CUE NOW)
Canada: 1-888-446-2000 (Canadian
Cadillac Customer Care Centre)
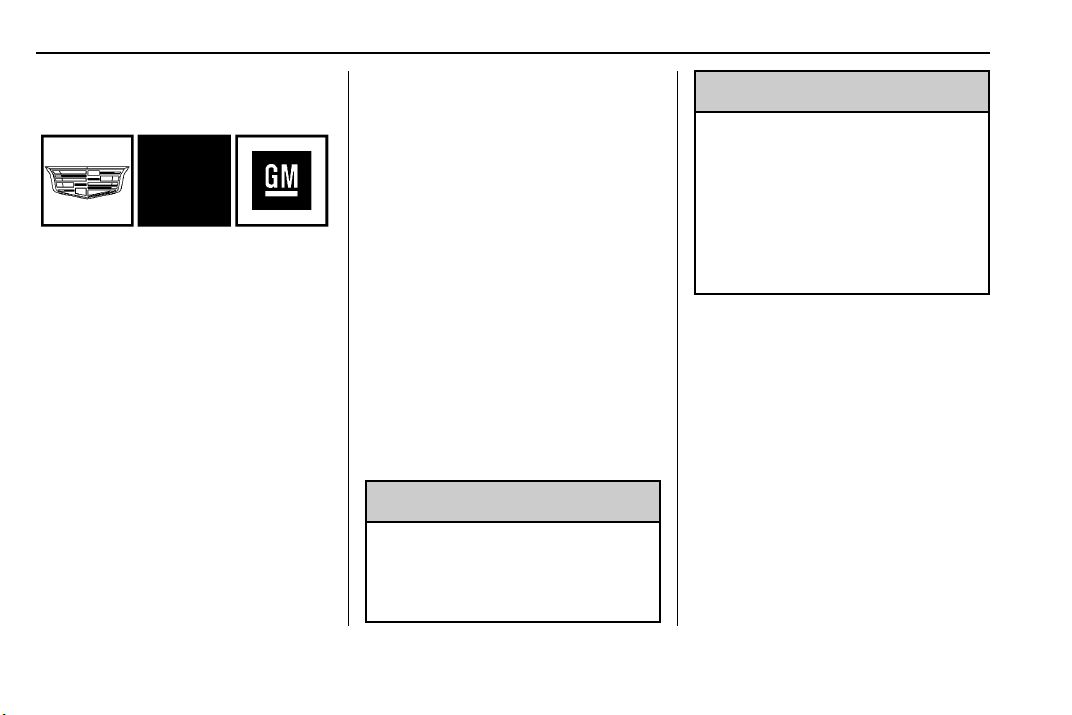
Infotainment System
The infotainment system is
controlled by using the touchscreen,
the buttons below the touchscreen,
steering wheel controls, and voice
recognition.
1. > (Mute and Power)
2. VOLUME
{ (Home Page)
3.
Power (On/Off/Mute)
.
When off, press
the system on. Press and hold to
turn off.
.
When on, press
system. Press
unmute the system.
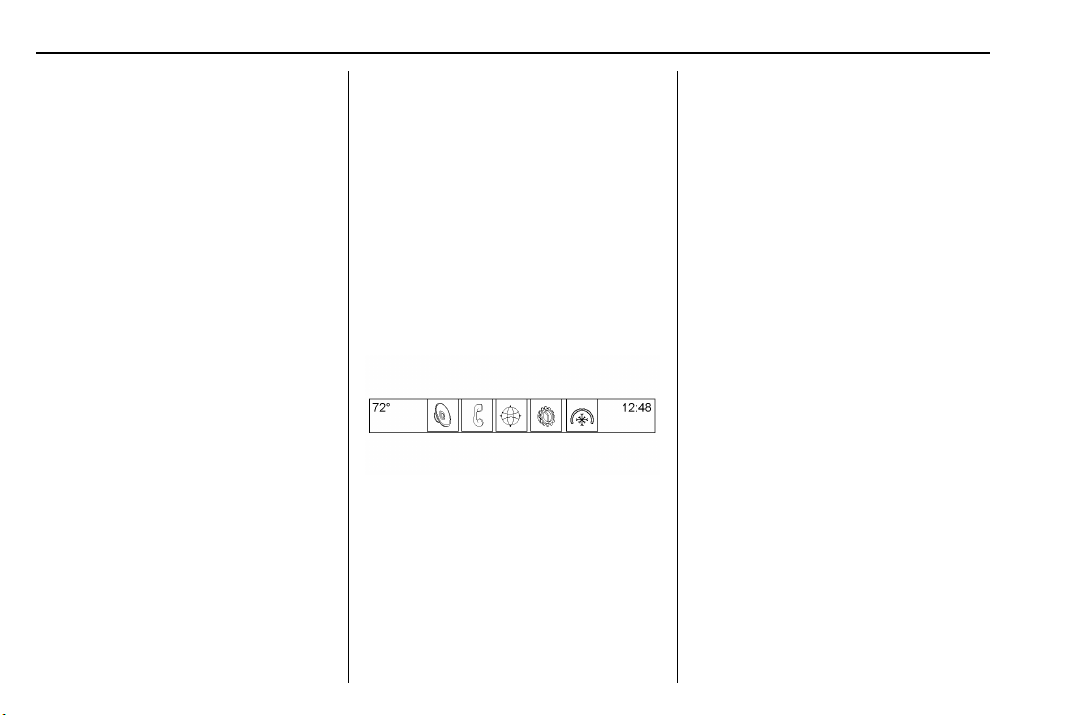
When the power is on and the
system is not muted, a quick status
pane will display when
pressed. Pressing
system and trigger this pane to
show a long press is required to
actually power down the system.
> (1) to turn
> to mute the
> again to
> is
> will mute the
Volume
Press the volume bar until it is seen
on the display. Slide a finger across
VOLUME to increase or decrease
the volume. Another way is to tap
up or tap down by pressing
one tap at a time.
S or T
Page 5

Cadillac CT6 CUE Infotainment System (GMNA-Localizing-U.S./Canada-
9245669) - 2016 - crc - 4/6/16
4 Introduction
Home Page
The Home Page is where
application icons are accessed.
Some features are disabled when
the vehicle is moving.
The Home Page can be set up to
have up to 10 icons per page.
u or v, or slide a finger left/
Touch
right across the screen to access
the pages of icons.
v (Next) : Touch to go to the next
Home Page.
u (Previous) : Touch to go to the
previous Home Page.
k (Interaction Selector) : Touch to
display the favorites list.
Touch and hold a location within the
favorites area to begin the process
of saving a favorite application.
Touch the application icon to store
as a favorite, and the name of the
application will be shown in
favorites.
Managing Home Page Icons
1. Touch and hold any of the
Home Page icons to edit
that icon.
2. Drag the icon to a new location
on the Home Page or to save it
to the applications tray.
3. Press
{ to exit edit mode.
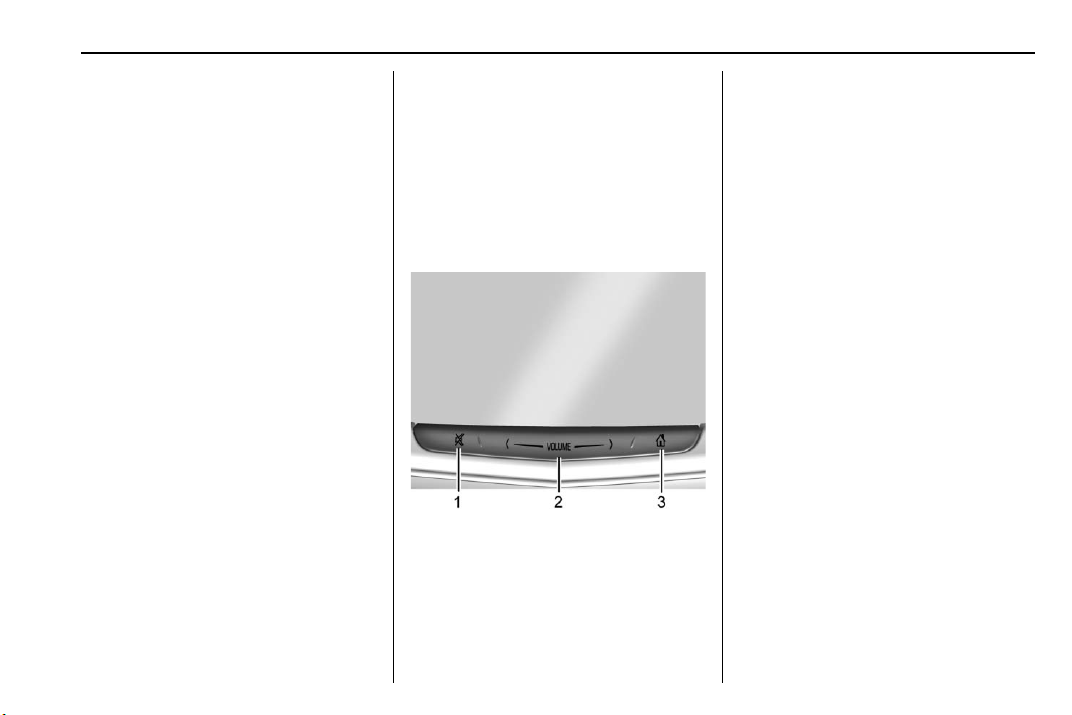
Steering Wheel Controls
The infotainment steering wheel
controls can be used to control the
infotainment features displayed in
the instrument cluster.
When in Valet Mode (if equipped),
access to the infotainment functions
is disabled. See Settings 0 101.
g (Press to Talk) : Press to answer
an incoming call or to start a voice
recognition. See Bluetooth
(Overview) 0 93 or Bluetooth
(Infotainment Controls) 0 94 or
Bluetooth (Voice Recognition) 0 97
and “OnStar Overview” in the owner
manual.
c (End Call) : Press to decline an
incoming call, or end a current call.
Press to mute or unmute the
infotainment system when not on
a call.
Page 6
Cadillac CT6 CUE Infotainment System (GMNA-Localizing-U.S./Canada-
9245669) - 2016 - crc - 4/6/16
Introduction 5
S or T : Press the five-way control
to the left or right to go to the
previous or next area in the display
or to the previous or next menu.
y or z : Press the five-way
control up or down to go up or down
in a list or page.
SEL : Press to select a highlighted
menu item.
x + or x − (Volume) : Press to
increase or decrease volume.
C or B (Next or Previous
Favorite) : Press to go to the next
or previous favorite when listening
to the radio. Press to go to the next
or previous track when listening to a
media source.
Using the System
Touchscreen Buttons
Touchscreen buttons show on the
screen when available. When a
function is unavailable, the button
may gray out. When a function is
selected, the button may highlight.
Home Page Features
Touch the icons on the Home Page
screen to launch an application.
Audio
If equipped, Touch the AUDIO icon
to display the active audio source
page. Available sources are AM,
FM, SXM, My Media, USB,
Bluetooth, and AUX Input.
Phone
Touch the PHONE icon to display
the Phone main page. See
Bluetooth (Overview) 0 93 or
Bluetooth (Infotainment Controls)
0 94 or Bluetooth (Voice
Recognition) 0 97.
Traffic
Touch TRAFFIC icon to access the
traffic information directly from the
Home Page.
Front Camera
Touch the FRONT/CAMERA icon to
display the Front Camera + 360°
Camera screen. See “Driver
Assistance Systems” in the owner
manual.
NAV/ OnStar NAV
Touch the NAV icon to display the
navigation map or OnStar
Turn-by-Turn Navigation. See Using
the Navigation System 0 53 or
“OnStar Navigation” in the owner
manual.
®
Page 7
Cadillac CT6 CUE Infotainment System (GMNA-Localizing-U.S./Canada-
9245669) - 2016 - crc - 4/6/16
6 Introduction
Settings
Touch the SETTINGS icon to
display the Settings menu. See
Settings 0 101.
Pandora (If Equipped)
Touch the PANDORA icon to begin
Pandora
Radio 0 23.
®
. See Pandora Internet
Weather (If Equipped)
Touch the WEATHER icon to
display the Weather main page. See
“SiriusXM Travel Link (If Equipped)”
under Destination 0 62.
Rear Climate (If Equipped)
Touch the R. CLIMATE icon to
display the Rear Climate main page.
See “Rear Climate Control System”
in the owner manual.
Video (If Equipped)
Touch the VIDEO icon to display the
video Rear Seat Entertainment main
page. See Rear Seat Infotainment
(RSI) System 0 34.
Applications Tray
OnStar
Touch the ONSTAR icon to display
the OnStar main page and start
OnStar voice recognition. See
“OnStar Overview” in the owner
manual.
Climate
Touch the CLIMATE icon to display
the Climate main page. See “Dual
Automatic Climate Control System”
in the owner manual.
The applications tray is at the top
center of the screen. The
applications tray can have three to
five applications.
To add an application from the
Home Page to the applications tray:
1. Touch and hold any icon on the
Home Page to enter edit mode.
2. Drag the icon to the
applications tray.
To remove an item from the
applications tray, drag the icon
from the applications tray back
to the Home Page.
Adding or removing applications
from the applications tray will not
remove them from the Home Page.
The application tray can be
customized for each person signing
into the system. For example:
.
User #1 is signed in and
customizes the application tray.
.
User #1 signs out to allow User
#2 to sign in and customize the
application tray to their
preference.
.
User #2 signs out and User #1
signs in. The application tray will
now display the preferences of
User #1.
Proximity Sensing
The infotainment system uses
proximity sensing for Maps. When
turned On, certain screen buttons
and features will become visible
Page 8
Cadillac CT6 CUE Infotainment System (GMNA-Localizing-U.S./Canada-
9245669) - 2016 - crc - 4/6/16
Introduction 7
when a hand approaches the
screen. When the hand is removed,
these features fade. Proximity
sensing can be turned Off in the
Settings applications in the Display
menu options.
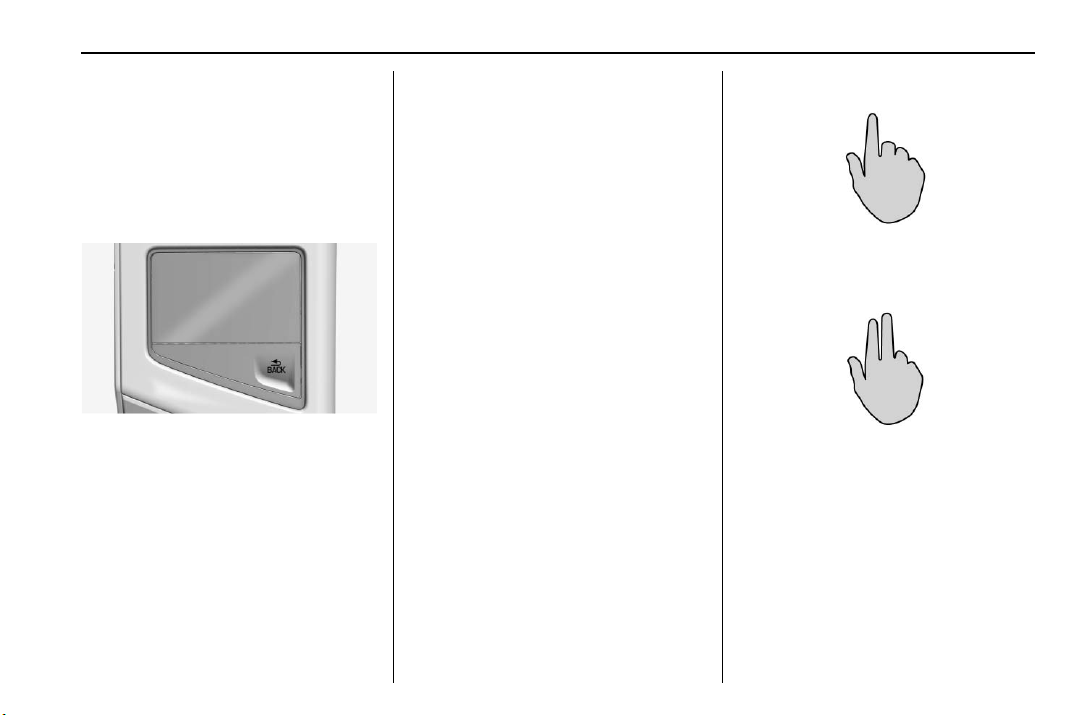
Touchpad
The touchpad is integrated into the
center console of the vehicle, in
front of the armrest. It provides an
alternative way to select features on
the infotainment system by using a
console mounted remote controller
instead of a touch screen.
The touchpad remote controller has
a BACK button.
3 BACK : Press to return to the
previous screen. Press and hold to
return to the main menu.
Benefits of using the touchpad:
.
Quick gestures to cycle through
media and radio sources or seek
to the next station or song.
.
Handwriting recognition for
quicker entry of address or
points of interest.
.
Control of the system while the
arm is resting on the console.
.
Haptic feedback is felt on the
fingertips while the cursor is
moving across the screen.
.
Once using the touchpad
becomes more familiar, the
dependence on looking at the
infotainment screen may
decrease.
.
The three finger gestures will
help give a quicker interaction
while raising and lowering the
favorites bar, and paging
between them.
Gestures
Use a single finger on the touchpad
to move the highlight and select
buttons on the screen.
Use the two finger gesture to control
the features on a sourced area. For
example, while in a list, move two
fingers up and down on the
touchpad to scroll a list.
Page 9
Cadillac CT6 CUE Infotainment System (GMNA-Localizing-U.S./Canada-
9245669) - 2016 - crc - 4/6/16
8 Introduction
characters instead of picking them
out from the keyboard. It is
designed to allow quick and smooth
character entry.
After the system displays the first
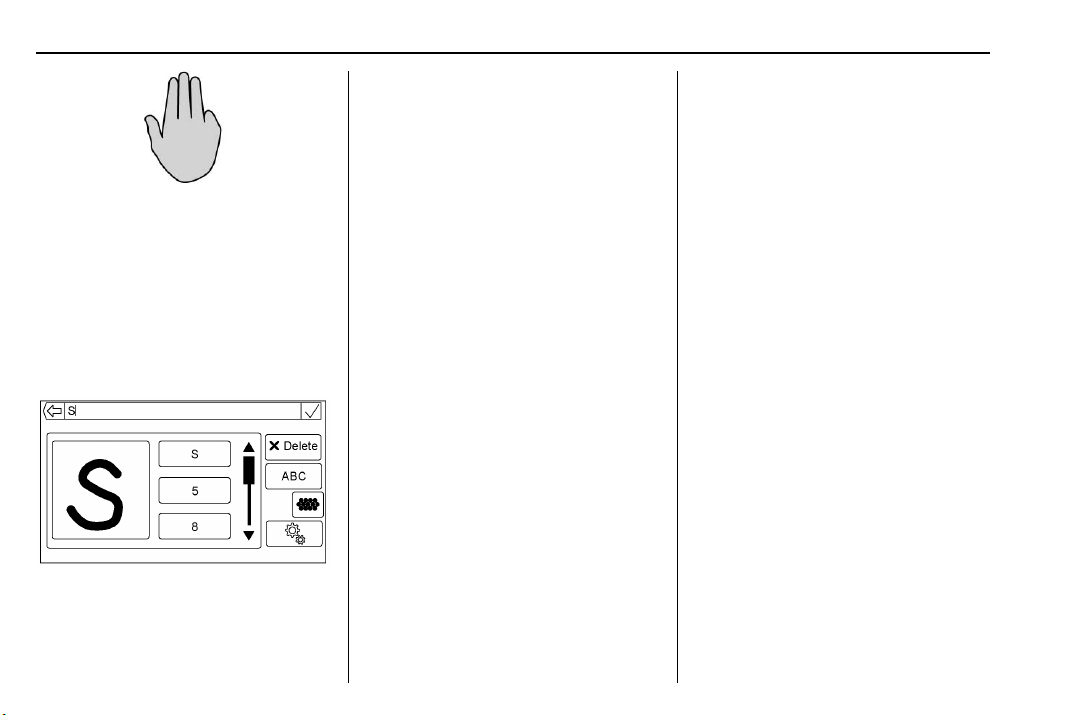
Use the three finger gesture to
select favorites.
Other examples for using the hand
gestures are explained later in this
section. See AM-FM Radio 0 17,
USB Port 0 27, and Using the
Navigation System 0 53.
Character Recognition
Character Recognition or
Handwriting Recognition is offered
as an alternative to using a
keyboard. This method of character
input allows the drawing of
drawn character with audio
feedback, the drawing of the next
character can begin. Check the list
next to the drawn character if the
system announces it incorrectly.
Use the scroll bar up or down to
select the correct one.
Handwriting Recognition has two
main modes:
.
Upper Case : Used for
Destination Entry.
.
Mixed Case : Used for all other
character entry modes.
Touch the globe button from the
alpha-numeric keyboard to open the
Handwriting Recognition screen.
Another way is to use the two finger
gesture by swiping to the left on a
keyboard screen or in a list view.
The Handwriting Recognition screen
is split into four major zones:
.
Drawing Pad
.
Character Entry Field
.
List of Possible Characters
.
Option Settings
.
Drawing Pad — Draw a
character in the display area.
This is where the drawing can
be seen on the touchpad.
When the first character is
complete, a representation of
that character can be seen, as
well as an audible response.
If the character is correct, the
next character can be started
immediately.
‐ Delete the last entered
character by drawing a line
across the character field.
‐ To create a space, draw a line
from left to right across the
character field.
.
Character Entry Field — This
section is an area across the top
of the screen. The Character
Entry section can look different
depending on which feature is
being used. When finished with
the input, press and hold using
two fingers to exit character
Page 10
Cadillac CT6 CUE Infotainment System (GMNA-Localizing-U.S./Canada-
9245669) - 2016 - crc - 4/6/16
Introduction 9
recognition and confirm the
input, or press with two fingers
to exit and return to the
keyboard.
.
List of Possible Characters —
The best guess character will be
at the top of the list. If character
recognition displays the incorrect
character, look at this list and
see if the desired character is
available to select. Move the
highlight up or down the list
using two fingers to select the
desired character. Highlighting a
character from the list will
replace the incorrect character
with the desired character. The
character is displayed in the
character entry section of the
screen while an audio response
is triggered.
.
Option Settings — This section
is an area on the right side of
the Character Recognition
screen. This section will look
different depending if the
recognition mode is Upper Case
or Mixed.
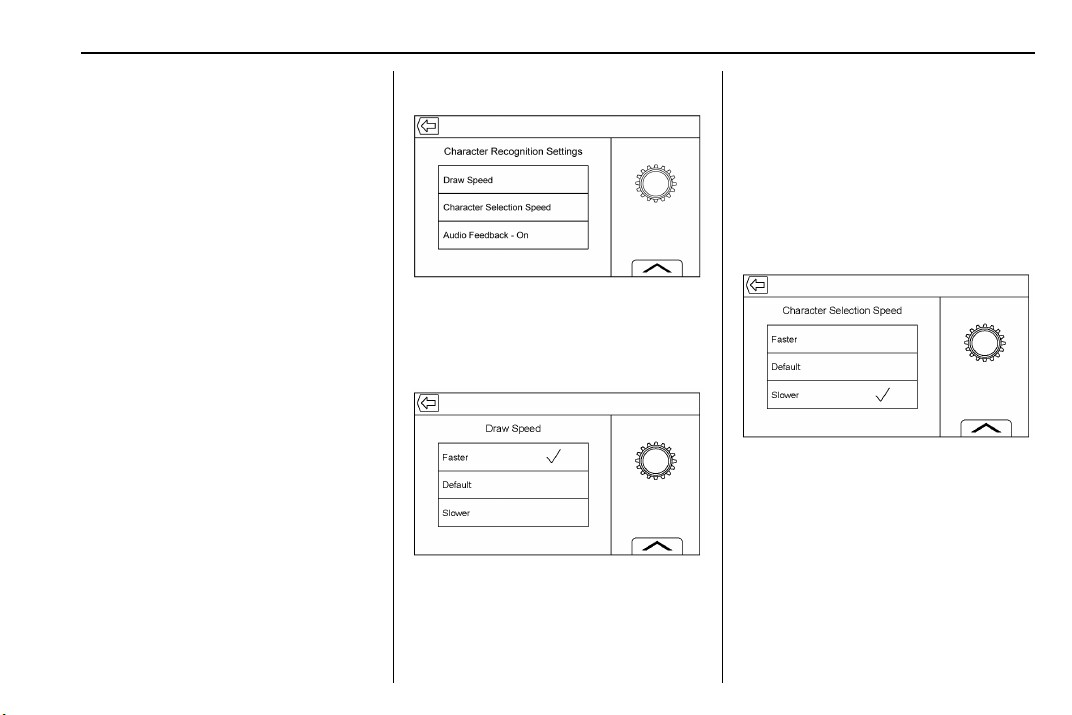
Character Recognition Settings
Touch the option settings icon to
display the Character Recognition
Settings menu. Touch an option to
adjust the speed preference.
Draw Speed: The Draw Speed
setting adjusts the speed of the
character recognition feature.
For example, draw the first / of an X
on the screen. Lift the finger off the
screen to finish the other side of the
X. Change the speed setting by
selecting Faster, Default, or Slower.
Depending on the selection the
amount of time allowed to draw
multiple strokes will increase or
decrease.
Character Selection Speed: The
Character Selection Speed adjusts
the overall speed of going through
the character recognition.
Depending on the selection, the
amount of time allowed to draw and
to pick a correct character on the list
of best guesses. The options are
Faster, Default, and Slower.
Page 11
Cadillac CT6 CUE Infotainment System (GMNA-Localizing-U.S./Canada-
9245669) - 2016 - crc - 4/6/16
10 Introduction
Audio Feedback : Audio feedback
is an audible response to an action
that has occurred while using the
Character Recognition. An example
is when a character is complete on
the drawing pad, a representation of
that character displays and an
audible response is heard. The
audible response confirms the
system has identified the character
and to proceed with the next
character.
ABC/abc (Character Set) : Select
from the touch screen to view the
available character sets and select
to change. Some regions may not
support multiple character sets. This
button also displays the upper or
lower case characters that are
currently active in a mixed
case mode.
If mixed case characters mode is
supported, press
between upper and lower case.
Q to toggle
Interacting with the System
There are two ways to interact with
the system:
.
Highlight Elements — The
highlight element works like a
cursor but is optimized for the
vehicle by snapping from
element to element available on
the screen. Not all of the
interactive elements of the
touchscreen are available from
the touchpad. While moving from
element to element, a haptic
bump vibration is felt.
Touch the touchpad to select or
activate a currently highlighted
object. A click will be felt to
confirm the action was
performed.
.
Multi-touch Gestures — The
touchpad has hot-key features
for some of the main
applications and lists. These are
available using two fingers
across the surface of the
touchpad.
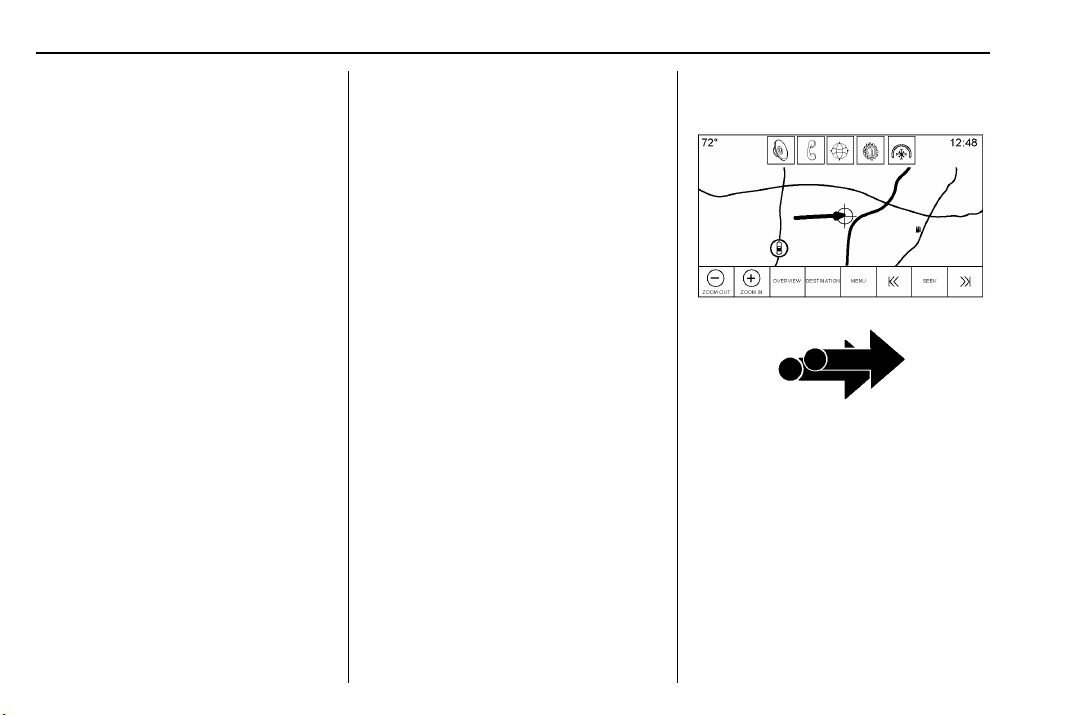
A few examples using
multi-touch gestures:
Two Fingers Revealing Map to the
Right
Page 12
Cadillac CT6 CUE Infotainment System (GMNA-Localizing-U.S./Canada-
9245669) - 2016 - crc - 4/6/16
Introduction 11
Pinch two fingers, such as the
index finger and thumb to zoom
out in a map.
Spread two fingers, such as the
index finger and thumb to zoom
in on a portion of a map.
‐ Audio
Scroll any list by moving two
fingers up and down on the
touchpad.
Move two fingers up or down
the touchpad to cycle through
all available audio sources.
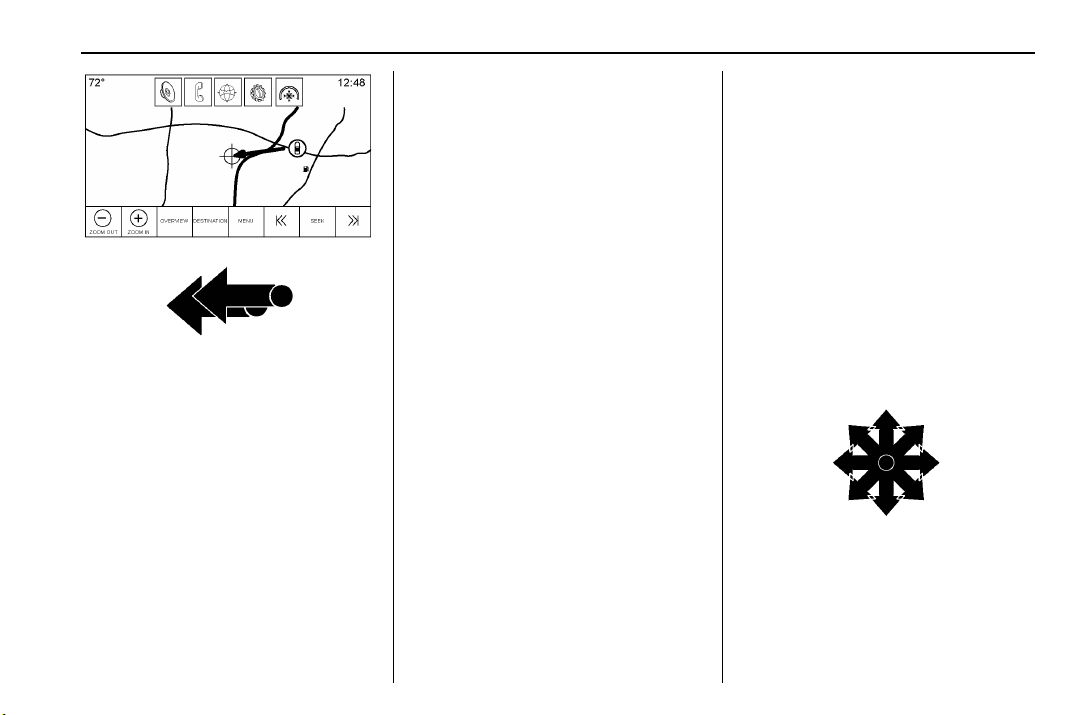
Two Fingers Revealing Map to
the Left
.
Navigation
Move two fingers around the
screen to pan the map.
Press two fingers to activate the
callout menu such as pressing
on a location from the
touchscreen to highlight the
address. Clicking with two
fingers again will hide the
callout menu.
Move two fingers left or right
across the touchpad to seek
up or down in broadcast radio.
In media, these gestures will
seek tracks up or down.
Press two fingers to activate
the content browse feature.
‐ Character Recognition
Press two fingers to exit
character recognition.
Use a two finger long press to
exit character recognition and
proceed to the next step.
‐ Favorites
Move three fingers up or down
on the touchpad to raise or
lower the favorites; a
maximum of three rows of
favorites can be displayed at
one time.
Move three fingers left or right
on the touchpad to page the
favorites.
Touchpad Gestures
Use the following finger gestures on
the touchpad to control the
infotainment system.
Slide a single finger across the
surface of the touchpad to move the
cursor around selectable elements.
The cursor will automatically jump
from one active element to another
active element throughout the
current page.
Page 13
Cadillac CT6 CUE Infotainment System (GMNA-Localizing-U.S./Canada-
9245669) - 2016 - crc - 4/6/16
12 Introduction
If desired, select the Touchpad
menu from the Settings application
to invert this setting.
Press the touchpad to select or
activate the currently highlighted
object.
Press and hold over an empty
favorites location to store a favorite.
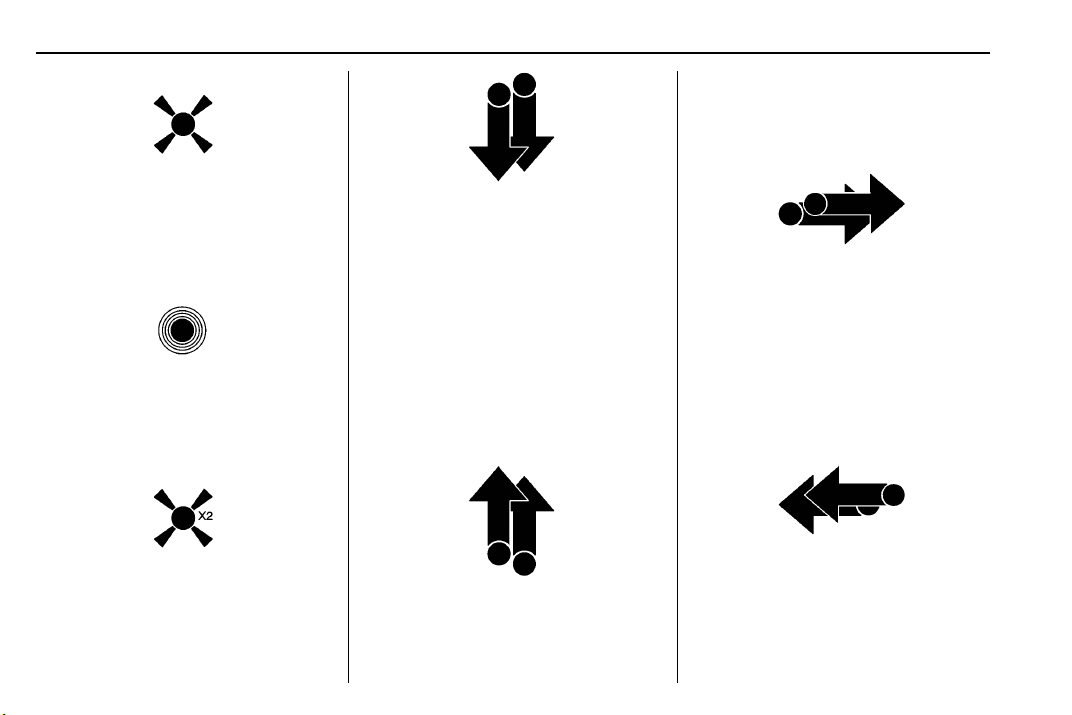
Tap twice in the same location of the
touchpad to activate “shift” while in
character recognition mode.
Glide two fingers across the surface
of the touchpad to scroll down a list
or reveal down a map. If this two
finger gesture setting has been
inverted, the scroll behavior
reverses
Because of personal preferences for
scrolling, and gesture direction, the
settings for this function can be
inverted. Select the Touchpad menu
from the Settings application to
invert this setting.
Glide two fingers across the surface
of the touchpad to scroll up a list or
reveal up a map.
Glide two fingers across the surface
of the touchpad to pan left on a map
or go to the next media track or
favorite page.
If desired, select the Touchpad
menu from the Settings application
to invert this setting.
Glide two fingers across the surface
of the touchpad to pan right on a
map or go to the previous media
track or favorite page.
Page 14
Cadillac CT6 CUE Infotainment System (GMNA-Localizing-U.S./Canada-
9245669) - 2016 - crc - 4/6/16
Introduction 13
If desired, select the Touchpad
menu from the Settings application
to invert this setting.
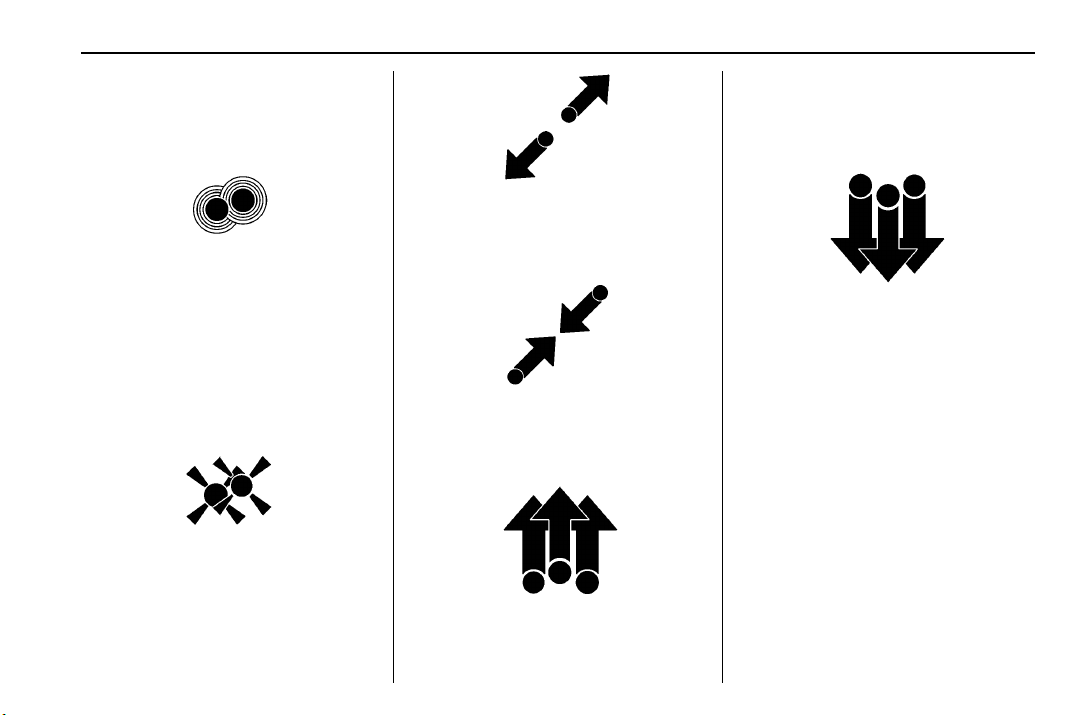
Spread two fingers, such as the
index finger and thumb to zoom in
on a portion of the map.
While in character recognition
mode, press and hold two fingers to
close the character recognition pane
and execute the pane’s current
function. Some of these functions
are to search a destination or name
a contact.
This gesture is only available while
in character recognition mode.
Press to close the character
recognition pane and return to the
previous screen.
Pinch two fingers, such as the index
finger and thumb to zoom out on
a map.
Slide three fingers across the
surface of the touchpad to raise one
or three rows of favorites onto the
screen.
Slide three fingers across the
surface of the touchpad to lower
one or three rows of favorites from
the screen.
Infotainment Gestures
Use the following finger gestures to
control the infotainment system.
Page 15
Cadillac CT6 CUE Infotainment System (GMNA-Localizing-U.S./Canada-
9245669) - 2016 - crc - 4/6/16
14 Introduction
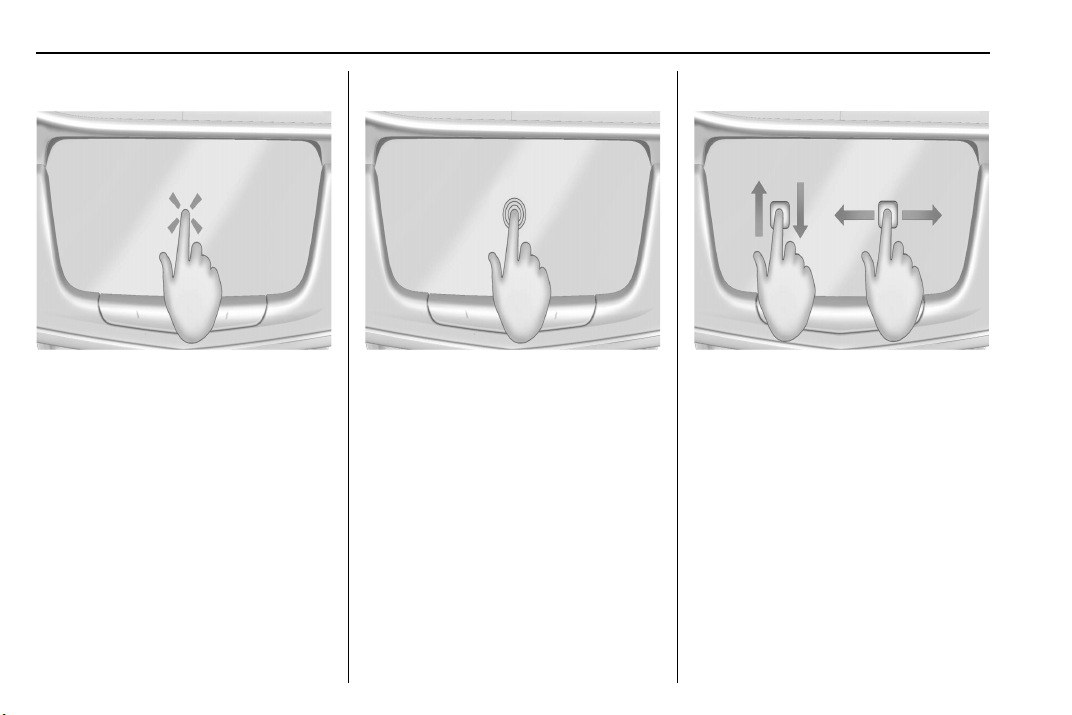
Touch/Tap
Touch/Tap is used to select a button
or option, activate an application,
or change the location inside a map.
Touch and Hold
Touch and hold can be used to start
another gesture, or to move or
delete an application.
Drag
Drag is used to move applications
on the Home Page, or to pan the
map. To drag the item, it must be
held and moved along the screen to
the new location. This can be done
up, down, right, or left.
Page 16
Cadillac CT6 CUE Infotainment System (GMNA-Localizing-U.S./Canada-
9245669) - 2016 - crc - 4/6/16
Introduction 15
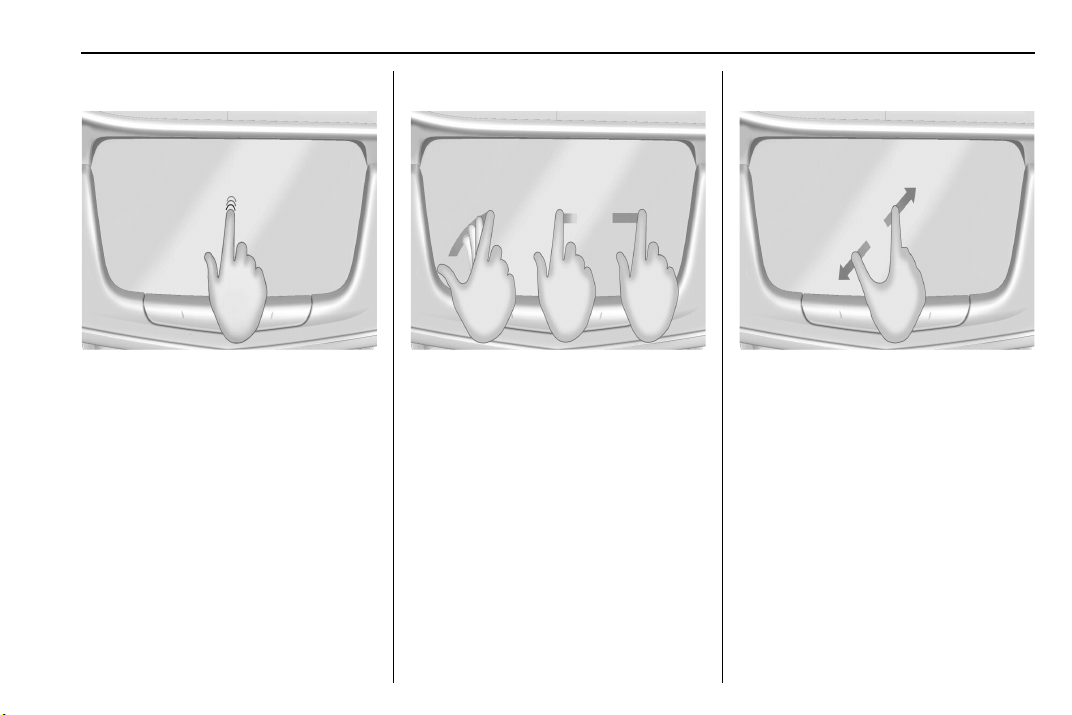
Nudge
Nudge is used to move items a
short distance on a list or a map. To
nudge, hold and move the selected
item up or down to a new location.
Fling or Swipe
Fling or swipe is used to scroll
through a list, pan the map,
or change page views. Do this by
placing a finger on the screen then
moving it rapidly up and down or
right and left.
Spread
Spread is used to zoom in on a
map, certain images, or a web
page. Place finger and thumb
together on the screen, then move
them apart.
Page 17

Cadillac CT6 CUE Infotainment System (GMNA-Localizing-U.S./Canada-
9245669) - 2016 - crc - 4/6/16
16 Introduction
Pinch
Pinch is used to zoom out on a
map, certain images, or a web
page. Place finger and thumb apart
on the screen, then move them
together.
Cleaning High Gloss Surfaces
and Vehicle Information and
Radio Displays
For vehicles with high gloss
surfaces or vehicle displays, use a
microfiber cloth to wipe surfaces.
Before wiping the surface with the
microfiber cloth, use a soft bristle
brush to remove dirt that could
scratch the surface. Then use the
microfiber cloth by gently rubbing to
clean. Never use window cleaners
or solvents. Periodically hand wash
the microfiber cloth separately,
using mild soap. Do not use bleach
or fabric softener. Rinse thoroughly
and air dry before next use.
Software Updates
Website Information
See the following websites for
information:
Cadillac
In the U.S., see www.cadillac.com.
In Canada, see www.cadillac.ca.
Page 18
Cadillac CT6 CUE Infotainment System (GMNA-Localizing-U.S./Canada-
9245669) - 2016 - crc - 4/6/16
Radio 17
Radio
AM-FM Radio
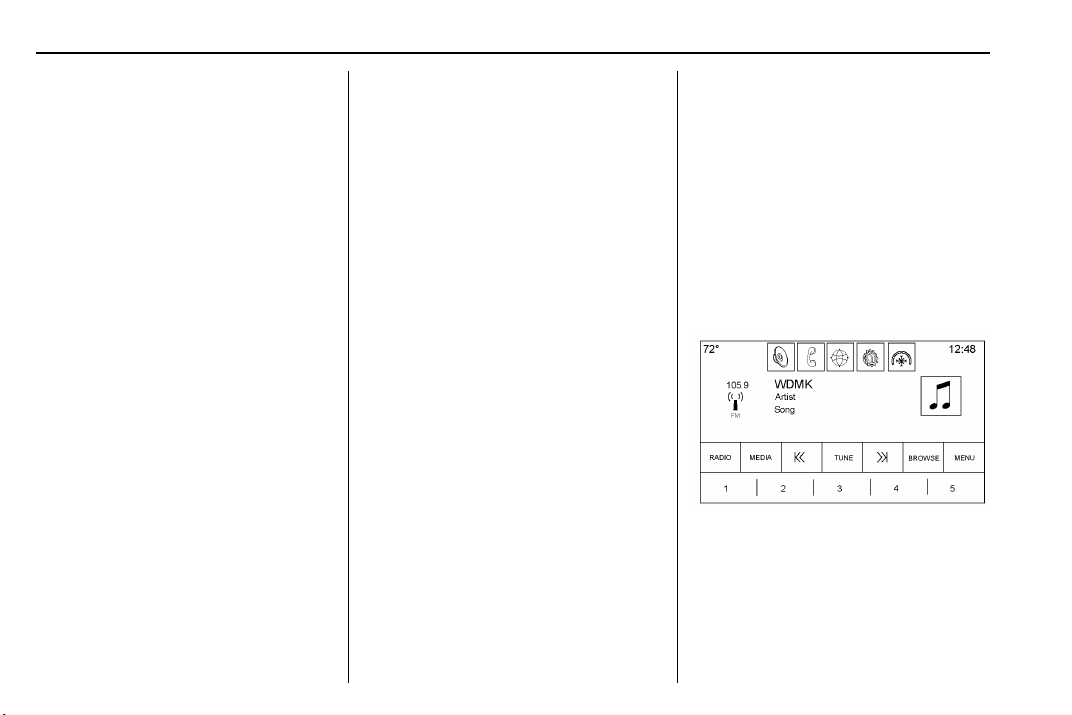
Playing the Radio
While on the audio main page the
available sources are: AM, FM,
SiriusXM (if equipped), My Media,
USB, Bluetooth, and AUX Input.
.
Touch the RADIO screen button
to scroll through AM, FM,
or SXM (if equipped).
.
Touch the MEDIA screen button
to scroll through My Media,
USB, Bluetooth, and AUX Input.
Infotainment System Settings
Touch the RADIO screen button to
access broadcast sources.
Touch the MENU screen button to
display the following menus:
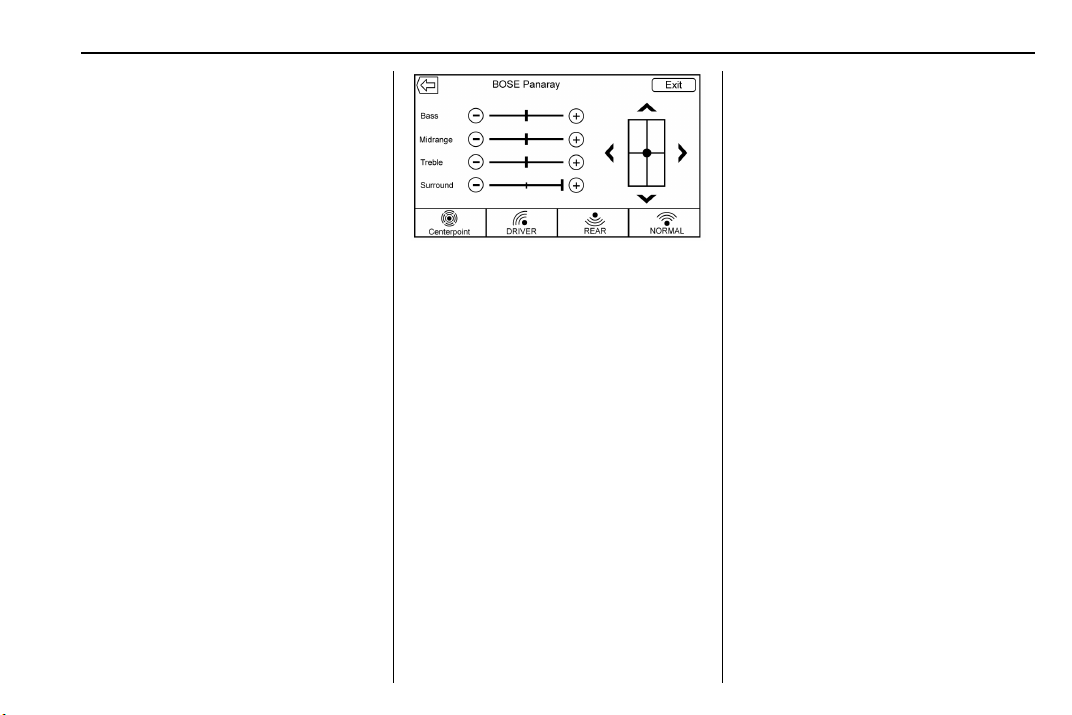
Tone Settings :
.
Bass, Midrange, and Treble :
Touch + or − to adjust.
.
Surround (if equipped):
Touch + or − to adjust. Surround
control adjusts the headrest or
seat speaker volume only.
.
Balance: Touch
sound from the left or right
speakers. The middle position
balances the sound between the
left and right speakers.
.
Fade: Touch
sound from the front or rear
speakers. The middle position
balances the sound between the
front and rear speakers.
S or T for more
y or z for more
EQ (Equalizer) Settings : The
available choices are Custom
or Talk.
DSP Modes (If Equipped) :
.
®
Bose
Panaray®system and
Bose Centerpoint
sound systems have four DSP
modes:
‐ Normal: Adjusts the audio to
provide the best sound for all
seating positions.
‐ Driver: Adjusts the audio to
provide the best sound for the
driver.
‐ Rear: Adjusts the audio to
provide the best sound for the
rear seat occupants.
‐ Centerpoint: Turns on the
Bose Centerpoint surround
technology. This setting
creates a surround sound
listening experience from
nearly any audio source;
existing stereo, satellite radio,
and MP3 players. For more
information on Bose
®
Surround
Page 19
Cadillac CT6 CUE Infotainment System (GMNA-Localizing-U.S./Canada-
9245669) - 2016 - crc - 4/6/16
18 Radio
®
Centerpoint surround
technology, visit
www.bose.com/centerpoint.
Categories : Touch Categories
under the Audio menu to access the
categories list for AM/FM. The list
contains names associated with the
AM/FM channels. Touch on a
category name to display a list of
channels for that category. Selecting
a station from the list, tunes the
radio to that channel and returns the
display to the Now Playing.
Auto Volume Control (If
Equipped) : This feature adjusts
the volume based on vehicle speed.
Select the level between off, low,
medium - low, medium, medium -
high, or high. Touch
back to the previous menu.
Some vehicles may be equipped
with the Bose
cases, the Auto Volume main menu
item is replaced with the Bose
AudioPilot menu item. AVC or Bose
AudioPilot is available to use with
any source mode.
[ Back to go
®
AudioPilot®. In these
Bose
AudioPilot®noise
compensation technology (If
Equipped) : This feature adjusts
the volume based on the noise in
the vehicle and speed. When turned
ON, AudioPilot technology detects
ambient noise and vehicle speed to
continuously adjust many aspects of
the audio signal so that your music
will sound the same at a set volume
level.
The options are ON and OFF.
This feature is most effective at
lower radio volume settings where
background noise can affect how
well you hear the music being heard
through your vehicle‘s audio
system. At higher volume settings,
where the music is much louder
than the background noise, there
may be little or no adjustments by
AudioPilot.
For more information on Bose
AudioPilot noise compensation
technology, visit www.bose.com/
audiopilot.
HD Radio™ : For AM and FM only,
touch to turn HD reception on or off.
Touch
[ Back to go back to the
previous menu.
Update Station List : For AM and
FM only, touch to update the station
list. Touch
previous menu.
[ Back to go back to the
Finding a Station
Seeking a Station
Touch t or u to search for the
previous or next strongest station.
Tuning a Station
Touch the SEEK screen button to
switch to TUNE. Touch again to
change back. Touch
manually search for a station.
t or u to
Page 20
Cadillac CT6 CUE Infotainment System (GMNA-Localizing-U.S./Canada-
9245669) - 2016 - crc - 4/6/16
Radio 19
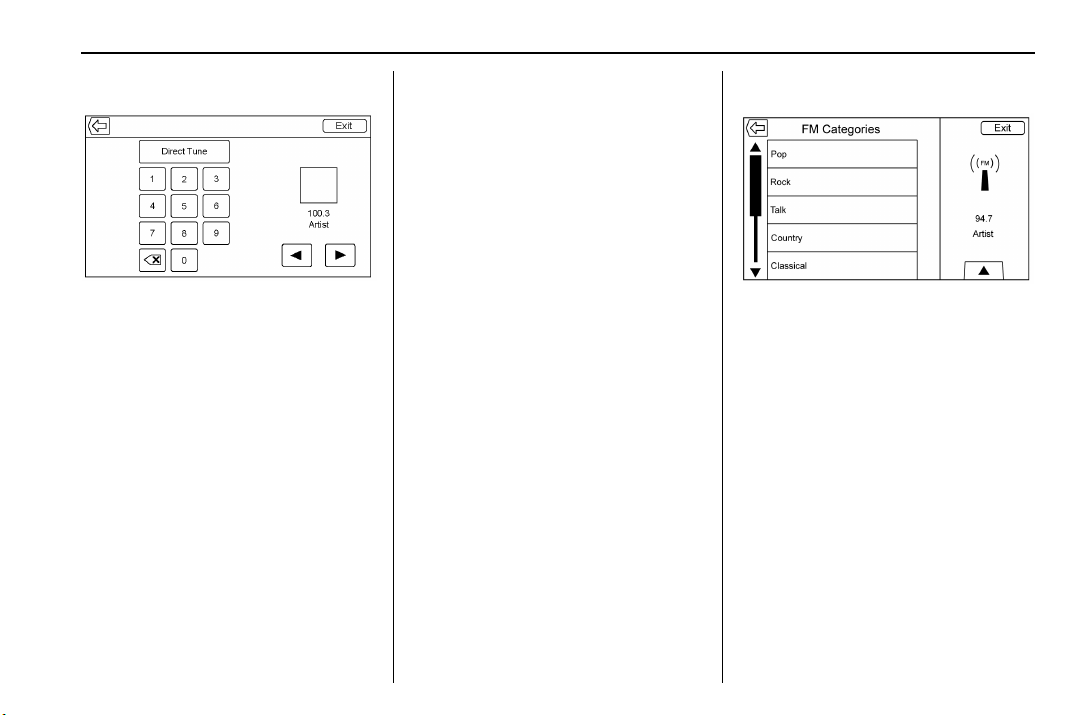
Direct Tune
Access Direct Tune by touching the
interaction selector TUNE screen
button to bring up the keypad.
Navigate up and down through all
frequencies or directly enter a
station using the keypad. When a
new station is entered the
information about that station
displays on the right hand side. This
information will update with each
new valid frequency tuned to.
The keypad will gray out entries that
do not contribute to a valid
frequency and will automatically
place a decimal point within the
frequency number, as needed.
A valid station will automatically
tune to the new frequency but not
close the direct tune window. Touch
the Back or Exit screen buttons.
The tune arrows on the right side of
the direct tune display tunes through
the complete station list one station
step at a time per touch. A touch
and hold advances 10 frequency
steps per second.
Touch the (X) arrow delete screen
button to delete one character at a
time. Touch and hold the (X) delete
screen button to delete all
characters.
In AM-FM modes, touch the
for the radio to go to the next or
previous strong station. Touch
Direct Tune to advance to the next
or previous frequency step in AM or
FM mode or directly enter or tune to
the frequency on the keypad.
s or t
AM-FM Categories
AM-FM Categories are available
under the AM-FM audio menu.
Touch AM-FM Categories to gain
access to the AM-FM
Categories list.
The categories list contains
category names associated with
AM-FM Channels. Selecting a given
category name displays a list of
channels for that category.
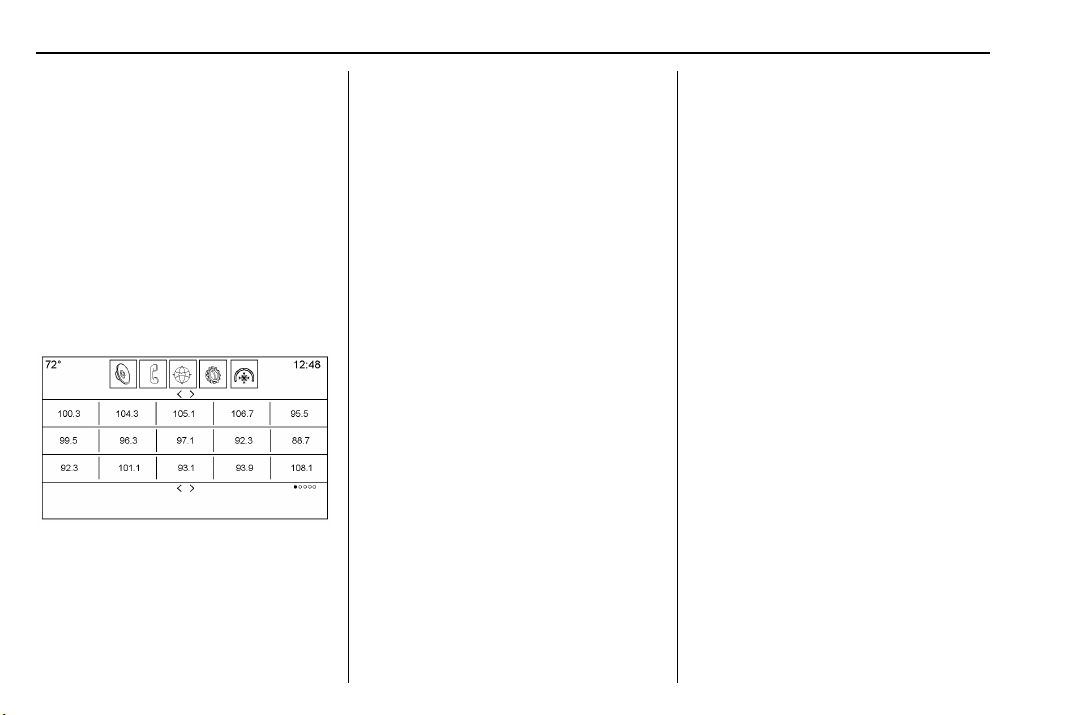
Storing Radio Station Presets
Favorites are stored in the area at
the bottom of the screen.
Up to 60 preset stations can be
stored under the following:
Page 21
Cadillac CT6 CUE Infotainment System (GMNA-Localizing-U.S./Canada-
9245669) - 2016 - crc - 4/6/16
20 Radio
.
AM, FM, SXM (if equipped), HD
Radio Stations : Touch and hold a
favorite button to save the current
station as a favorite. Touch a
favorite button to recall a favorite
station.
Mixed-Audio Favorites
Favorites that can be stored include
radio stations, navigation,
applications, contacts, tone settings,
artists, songs, albums,
podcasts, etc.
To scroll through the favorites:
.
Drag up along the top of the
favorites. To close the favorites,
drag them down.
Slide a finger to the right or left
to scroll through each page of
favorites. A
page is being viewed.
Tone Settings : While viewing the
tone settings and lifting up the
favorite buttons, touch and hold to
store a tone setting. Touch a screen
button in the favorite area to recall a
favorite tone setting.
Pandora Radio Stations : Touch
and hold a screen button to store
the Pandora application. Pandora
favorite stations work when Pandora
is launched.
The number of favorites displayed is
automatically adjusted by default,
but can be manually adjusted in the
Settings menu under Radio and
then Number of Favorites Shown.
V indicates which
HD Radio Technology
HD Radio™ Technology is a free
service with features such as
static-free sound, more stations built
onto the frequency such as
HD2 and HD3, and on-screen
information such as artist and song
title.
Channel Access
To access HD Radio channels:
1. Tune the radio to the channel.
If the channel is broadcasting
HD Radio Technology, the
radio will automatically switch
to digital audio, indicated with
an HD logo if HD Radio is
turned on.
2. Touch
There may be a delay before the
channel starts playing.
The HD Radio channel number is
indicated next to the logo.
HD Radio channels can be saved
as favorites. Songs can be tagged
for download.
When connected to iTunes
Sync button on the device may
need to be touched to transfer the
tags to iTunes.
t or u to tune to the
previous or next HD Radio
channel.
®
, the
Page 22
Cadillac CT6 CUE Infotainment System (GMNA-Localizing-U.S./Canada-
9245669) - 2016 - crc - 4/6/16
Radio 21
See AM-FM Radio 0 17 or USB
Port 0 27.
For a list of all channels, see
www.hdradio.com.
Troubleshooting
Digital Audio Delay : Wait for the
signal to process. This can take
several seconds.
Volume Change, Audio Skip,
Echo, Digital Audio Lost : Channel
signal strength may be weak or the
channel is out of range. Verify
proper reception on another
channel.
If the HD Radio signal loses
reception while listening to channel
HD1, the radio will go back to the
main non-HD Radio channel.
If the HD Radio signal loses
reception while listening to channels
HD2 to HD8, the radio mutes until
the signal can be recovered or until
the channel is changed.
HD can be disabled if driving in a
weak signal area. Touch Menu from
the AM/FM screens, then touch HD
Radio to toggle HD on and off.
Satellite Radio
SiriusXM Satellite Radio
Service (If Equipped)
Vehicles with a valid SXM satellite
radio subscription can receive
SiriusXM programming.
SiriusXM satellite radio has a wide
variety of programming and
commercial-free music, coast to
coast, and in digital-quality sound.
See www.siriusxm.com or call
1-866-601-6296 in the U.S. In
Canada, see www.siriusxm.ca or
call 1-877-438-9677.
When SXM is active, the station
name, number, category name,
song title, and artist display on the
screen.
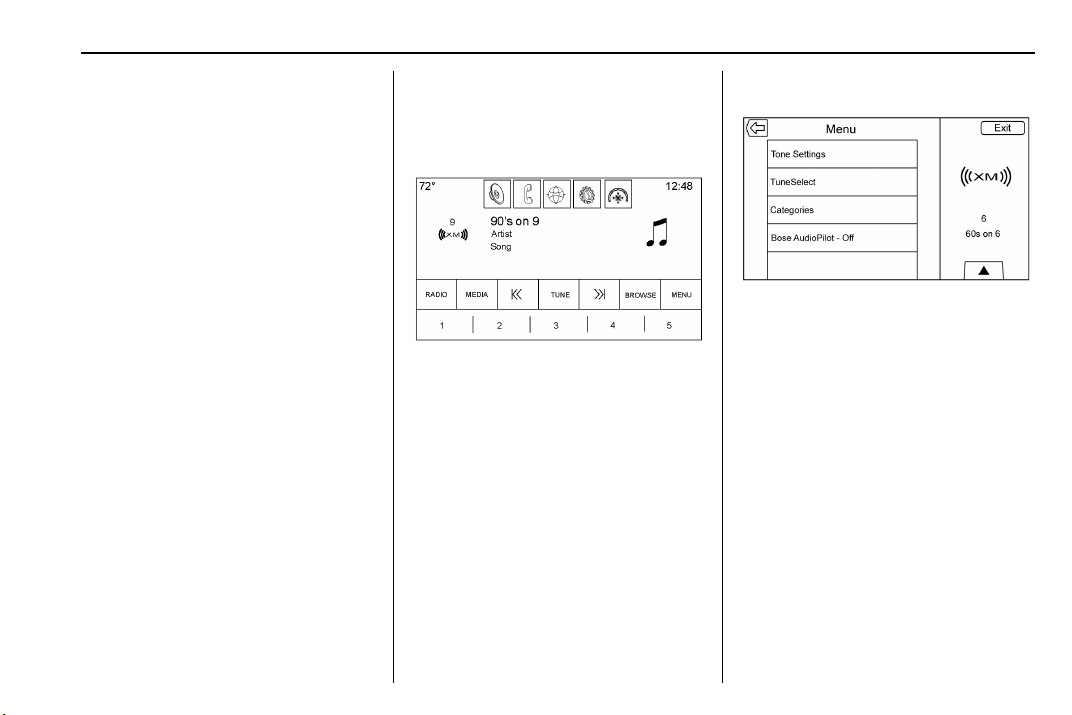
SiriusXM Menu
Touching the MENU screen button
may display the following:
Tone Settings : Touch + or − to
adjust the tone settings. See AM-FM
Radio 0 17.
TuneSelect : For SiriusXM only, this
feature allows alerts to be set for
artists or songs that are played on
any other channel. Touch
TuneSelect on the menu during
playback of a desired song or artist
to set an alert. Touch Manage
TuneSelect to turn the alerts On and
Off or manage the saved selection
of Artists or Songs. To unselect an
alert, touch the Song or Artist. To
Page 23

Cadillac CT6 CUE Infotainment System (GMNA-Localizing-U.S./Canada-
9245669) - 2016 - crc - 4/6/16
22 Radio
delete an alert, touch −. Touch [
Back to go back to the
previous menu.
Auto Volume : If equipped, this
feature adjusts the volume based on
the vehicle speed. See AM-FM
Radio 0 17.
®
AudioPilot®noise
Bose
compensation technology (If
Equipped) : This feature adjusts
the volume based on the noise in
the vehicle. See AM-FM Radio 0 17.
Radio Reception
Unplug electronic devices from the
accessory power outlets if there is
interference or static in the radio.
FM
FM signals only reach about 16 to
65 km (10 to 40 mi). Although the
radio has a built-in electronic circuit
that automatically works to reduce
interference, some static can occur,
especially around tall buildings or
hills, causing the sound to fade in
and out.
AM
The range for most AM stations is
greater than for FM, especially at
night. The longer range can cause
station frequencies to interfere with
each other. Static can also occur
when things like storms and power
lines interfere with radio reception.
When this happens, try reducing the
treble on the radio.
SiriusXM Satellite Radio
Service
If equipped, SiriusXM Satellite
Radio Service provides digital radio
reception. Tall buildings or hills can
interfere with satellite radio signals,
causing the sound to fade in and
out. In addition, traveling or standing
under heavy foliage, bridges,
garages, or tunnels may cause loss
of the SiriusXM signal for a period
of time.
Cell Phone Usage
Cell phone usage, such as making
or receiving phone calls, charging,
or just having the phone on may
cause static interference in the
radio. Unplug the phone or turn it off
if this happens.
Backglass Antenna
The AM-FM antenna is integrated
with the rear window defogger in the
rear window. Do not scratch the
inside surface or damage the lines
in the glass. If the inside surface is
damaged, it could interfere with
radio reception. For proper radio
reception, the antenna connector
needs to be properly attached to the
post on the glass.
If attaching a cell phone antenna to
the glass, attach it between the grid
lines.
Caution
Using a razor blade or sharp
object to clear the inside rear
window can damage the rear
window antenna and/or the rear
window defogger. Repairs would
(Continued)
Page 24
Cadillac CT6 CUE Infotainment System (GMNA-Localizing-U.S./Canada-
9245669) - 2016 - crc - 4/6/16
Radio 23
Caution (Continued)
not be covered by the vehicle
warranty. Do not clear the inside
rear window with sharp objects.
Caution
Do not apply aftermarket glass
tinting with metallic film. The
metallic film in some tinting
materials will interfere with or
distort the incoming radio
reception. Any damage caused to
the backglass antenna due to
metallic tinting materials will not
be covered by the vehicle
warranty.
Multi-Band Antenna
The roof antenna is for OnStar,
SiriusXM Satellite Radio (U.S. and
Canada only), and GPS (Global
Positioning System). Keep clear of
obstructions for clear reception.
If the vehicle has a sunroof, and it is
open, reception can also be
affected.
Pandora Internet Radio
If equipped, Pandora®is a free
Internet radio service that streams
personalized radio stations based
on artists, tracks, genres, and
comedians. Create stations using
the Pandora website or Smartphone
application, then use
, (thumbs down) to personalize
or
stations. To set up an account, or for
more information, go to
www.pandora.com.
A phone or tablet with an Internet
connection and the Pandora
application installed is required.
When no internet connection or no
bluetooth signal is detected the
interaction Selector button will be
grayed out. If one of these buttons
are touched, a pop-up displays,
“Action unavailable. Please check
device connection.” Personal cell
phone data plans are used. Make
sure the latest version is installed
on the device.
- (thumbs up)
Launching Pandora
Connect the iPhone to the USB
port, or connect Android™ or
BlackBerry
Auxiliary Jack 0 31 or Bluetooth
(Overview) 0 93 or Bluetooth
(Infotainment Controls) 0 94 or
Bluetooth (Voice Recognition) 0 97.
For first time use, set up the stations
before connecting to the vehicle.
The Pandora icon will be available
on the Home Page.
When Pandora is chosen, the
Pandora logo will populate on the
screen and will display “Acquiring
Pandora Radio Station.” Launch
times can be significant.
®
through Bluetooth. See
Page 25
Cadillac CT6 CUE Infotainment System (GMNA-Localizing-U.S./Canada-
9245669) - 2016 - crc - 4/6/16
24 Radio
Using the iPhone
1. Plug the device into the USB
port. The phone screen must
be unlocked.
2. Touch PANDORA on the Home
Page to launch Pandora.
3. If nothing happens when the
available Pandora screen
button is touched, download
the latest Pandora application
and retry.
The login screen may display on the
device.
Using an Android or BlackBerry
Phone
The BlackBerry phone must be
unlocked to launch Pandora service.
1. Pair the phone using Bluetooth.
2. Launch Pandora directly from
the Home Page by touching
PANDORA.
If nothing happens when the
available PANDORA screen button
is touched, download the latest
Pandora application and retry.
The login screen may display on the
device.
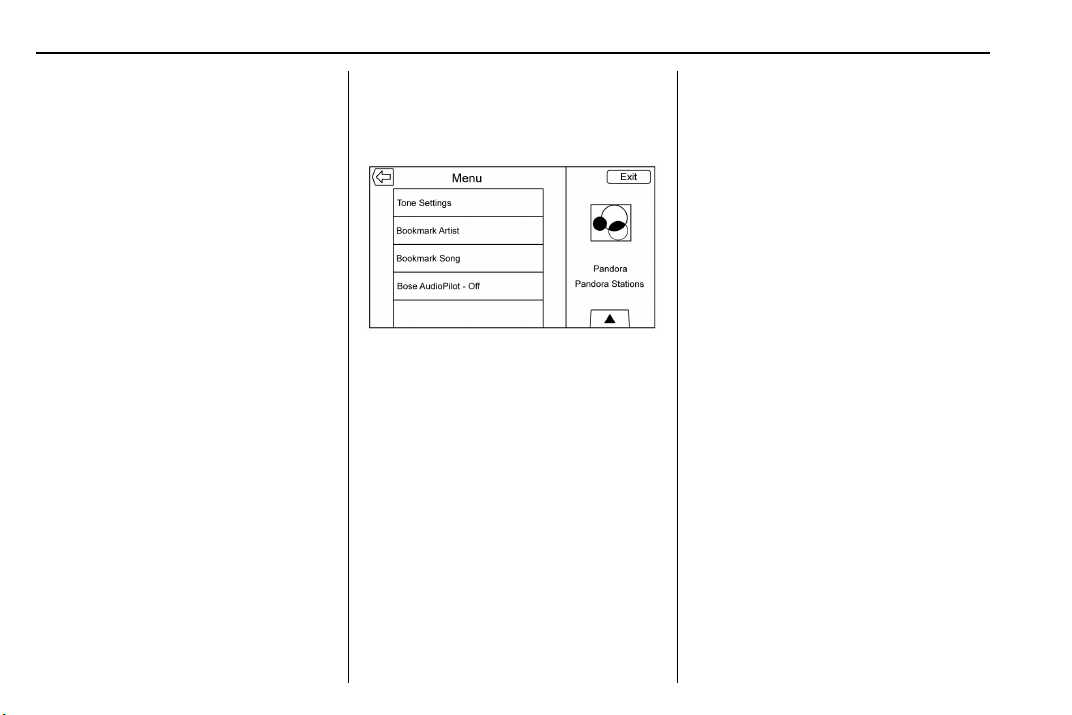
Pandora Menu
Touch Menu on the Pandora
main page.
Pandora has a menu system with
the following:
Tone Settings : Touch to adjust the
tone settings. See AM-FM
Radio 0 17.
Bookmark Artist : Touch to
bookmark the artist.
Bookmark Song : Touch to
bookmark the song.
Auto Volume Control (If
Equipped) : This feature sets the
auto volume based on the speed of
the vehicle and noise in the vehicle.
Some vehicles may be equipped
with the Bose AudioPilot system. In
these cases, the Auto Volume main
menu item is replaced with the Bose
AudioPilot menu item. The AVC or
Bose AudioPilot is available to use
with any source mode.
Bose AudioPilot : If equipped, this
feature adjusts the volume based on
the noise in the vehicle. See AM-FM
Radio 0 17.
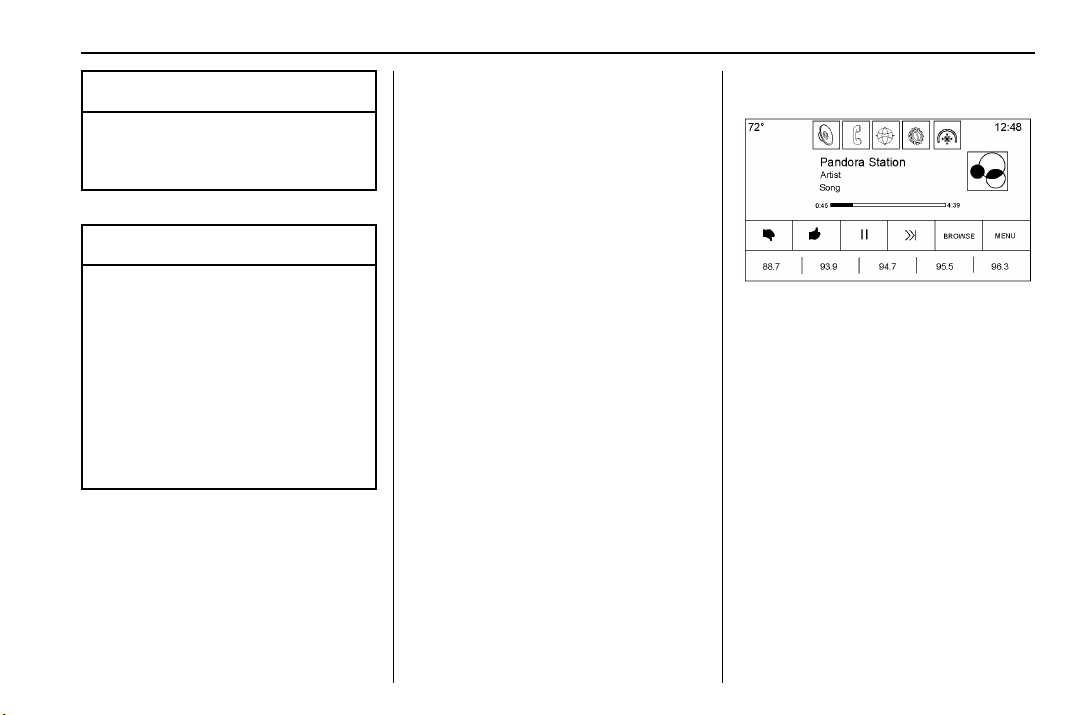
Pandora Features
Pandora service has features to rate
tracks, skip tracks, or change
stations.
, (Thumbs Down) : When
touched, Pandora stores this
information, changes to the next
track, and does not play this track
on this station again. This helps
Pandora choose which tracks
should not play on this station. This
feature is only available on user
created stations.
Page 26

Cadillac CT6 CUE Infotainment System (GMNA-Localizing-U.S./Canada-
9245669) - 2016 - crc - 4/6/16
- (Thumbs Up) : When touched,
Pandora stores this information and
- is highlighted for the remainder
of the track. This helps Pandora
choose which tracks should play on
this station.
u (Next Track) : When touched,
Pandora changes to the next track.
r or c (Play/Stop) : Touch to play
or stop playback.
Pandora Skip Limit
Pandora limits the number of skips
allowed on their service. When the
skip limit is reached,
not skip the currently playing track,
but the
recorded.
Advertisements on Pandora
Pandora may display
advertisements. The artist name
and track title will not be displayed
and the skip track button will not be
available.
, feedback will be
, or u will
Pandora Troubleshooting
Unable to Connect Device to
Vehicle
If the device is unable to connect
through the USB or Bluetooth:
1. Turn the vehicle off.
2. Take the Remote Keyless Entry
(RKE) transmitter at least 6 m
(20 ft) away from the vehicle.
3. Wait about 30 seconds, and try
to connect the device again.
See Bluetooth (Overview) 0 93
or Bluetooth (Infotainment
Controls) 0 94 or Bluetooth
(Voice Recognition) 0 97.
Unable to Start Pandora
If the device is unable to launch
Pandora:
.
Check that the latest version of
Pandora is installed.
.
Check that there is an active
account logged into Pandora.
.
Have at least one station
created.
Radio 25
.
For Android and BlackBerry
devices, check that the device is
paired with the vehicle, and
whether the device displays in
the Connected phone sources
list under the Phone icon from
the Home Page.
.
For an iPhone, check that the
USB cable is connected to the
USB port and the screen is
unlocked.
.
Close Pandora on the device
and launch again. Devices that
allow multitasking may require
an extra step to quit the Pandora
application. See the cell phone
manufacturer's user guide.
Thumbs Up or Thumbs Down
Error
If there is an error trying to rate a
track with the
message “Thumbs Down Error” or
“Thumbs Up Error” will display.
Touch OK to dismiss.
, or - buttons, the
Page 27

Cadillac CT6 CUE Infotainment System (GMNA-Localizing-U.S./Canada-
9245669) - 2016 - crc - 4/6/16
26 Radio
Loss of Audio
Loss of Pandora audio can happen
in different ways:
.
Weak or lost data connection.
.
Device needs to be charged.
.
Application needs to be
relaunched.
.
Connection between phone and
radio was lost.
.
An iPhone is connected to both
Bluetooth and the USB port.
If there is a loss of audio, playback
can be resumed by changing the
audio flow from Bluetooth to USB
cable.
Common Pandora Messages
Pandora Error/Please Check
Device : Not signed in or Pandora
is down for maintenance.
No Stations Available : No stations
are available on the Pandora server
through the connected device.
No Internet Connection : A few
reasons for loss of Internet
connection are:
.
The connected device loses its
cellular connection.
.
The device does not support
Internet connectivity.
.
The device is not in the vehicle.
No Bluetooth Signal : The
Bluetooth signal is lost.
No skips remaining for this
station or permitted during
advertisements :
.
The maximum Pandora skip limit
has been reached according to
the plan that was obtained.
.
Skipping an advertisement was
tried.
See www.pandora.com/help. If the
service will not work, see a dealer
for assistance.
Page 28

Cadillac CT6 CUE Infotainment System (GMNA-Localizing-U.S./Canada-
9245669) - 2016 - crc - 4/6/16
Audio Players 27
Audio Players
Avoiding Untrusted Media Devices
When using media devices such as
CDs, DVDs, Blu-Ray Discs
cards, USB drives, and mobile
devices, consider the source.
Untrusted media devices could
contain files that affect system
operation or performance. Avoid use
if the content or origin cannot be
trusted.
USB Port
Audio from videos stored on USB
cards may be listened to while the
vehicle is in a forward gear. Videos
can be watched while the vehicle is
in P (Park). Use play/pause or next/
previous to control the video or
touch the browse screen to display
a list of the current video filters.
This vehicle has two USB ports in
the center console. These ports are
for data and charging. There are
®
, SD
also two USB ports on the rear seat
trim panel. These rear seat ports
are for charging only.
If equipped with Rear Seat
Infotainment (RSI), there may be
two USB ports in the rear media
console storage area.
Playing from a USB
A USB mass storage device can be
connected to the USB port.
Audio extensions supported by the
USB are:
.
MP3
.
WMA
.
AAC
.
OGG
.
AIFF
.
3GPP
Touch on the time bar with a finger
and drag it across to a certain point
in the song that is being listened to
currently. This feature is only
available with media playing
devices.
Gracenote
When plugging in a USB device,
Gracenote service builds voice tags
for music. Voice tags allow artists,
albums with hard to pronounce
names, and nicknames to be used
to play music through voice
recognition.
While indexing, infotainment
features are available.
My Media Library
My Media is only available when
more than one indexed device is
connected. It allows access to
content from all indexed media
sources. Touch the MEDIA screen
button to scroll through the options
until My Media is selected. Touch
anywhere in the central area of the
screen to browse the content.
USB MP3 Player and USB Drives
The USB MP3 players and USB
drives connected must comply with
the USB Mass Storage Class
specification (USB MSC).
To play a USB device:
1. Connect the USB.
®
Page 29

Cadillac CT6 CUE Infotainment System (GMNA-Localizing-U.S./Canada-
9245669) - 2016 - crc - 4/6/16
28 Audio Players
2. Touch MEDIA until the
connected device is shown.
Use the following when playing an
active USB source:
r (Play) : Touch to play the current
media source.
j (Pause) : Touch to pause play of
the current media source.
t (Previous/Reverse) :
.
Touch to seek to the beginning
of the current or previous track.
If the track has been playing for
less than five seconds, the
previous track plays. If playing
longer than five seconds, the
current track restarts.
.
Touch and hold to reverse
quickly through playback.
Release to return to playing
speed. Elapsed time displays.
u (Next/Fast Forward) :
.
Touch to seek to the next track.
.
Touch and hold to advance
quickly through playback.
Release to return to playing
speed. Elapsed time displays.
Z (Shuffle) : Touch the shuffle icon
on the Interaction Selector to shuffle
through the available media.
/ (Replay) : Touch the replay icon
on the Interaction Selector to
display the timebar. Move the
timebar to interact with the currently
playing song.
TONE : Touch TONE on the
Interaction Selector to access the
Tone Settings screen. Set the Bass,
Midrange, Treble, Balance,
and Fade.
USB Menu
Touch Menu to display the USB
menu. The following may be
available:
Shuffle : Touch to play the tracks
randomly. Touch again to stop
shuffle.
®
AudioPilot®: If equipped,
Bose
touch to turn Bose AudioPilot on or
off. AudioPilot is an On/Off selection
on the list entry from the Main
menu. See AM-FM Radio 0 17.
Tone Settings : Touch + or − to
adjust Bass, Midrange, Treble,
or Surround. See AM-FM
Radio 0 17.
USB Browse Menu
Touch the browse screen button to
view the browse menu and the
following options are displayed
along the bottom of the screen:
Playlists :
Supported Playlist extensions are:
m3u, pls, wpl, asx, b4s, and xspf.
1. Touch to view the playlists
stored on the USB.
2. Select a playlist to view the list
of all songs in that playlist.
3. Select a song from the list to
begin playback.
Artists :
1. Touch to view the list of artists
stored on the USB.
2. Select an artist name to view a
list of all albums by the artist.
3. To select a song, touch All
Songs or touch an album and
then select a song from the list.
Page 30
Cadillac CT6 CUE Infotainment System (GMNA-Localizing-U.S./Canada-
9245669) - 2016 - crc - 4/6/16
Audio Players 29
Albums :
1. Touch to view the albums on
the USB. The artist name will
display under the list of
albums.
2. Select the album to view a list
of all songs on the album.
3. Select a song from the list to
begin playback.
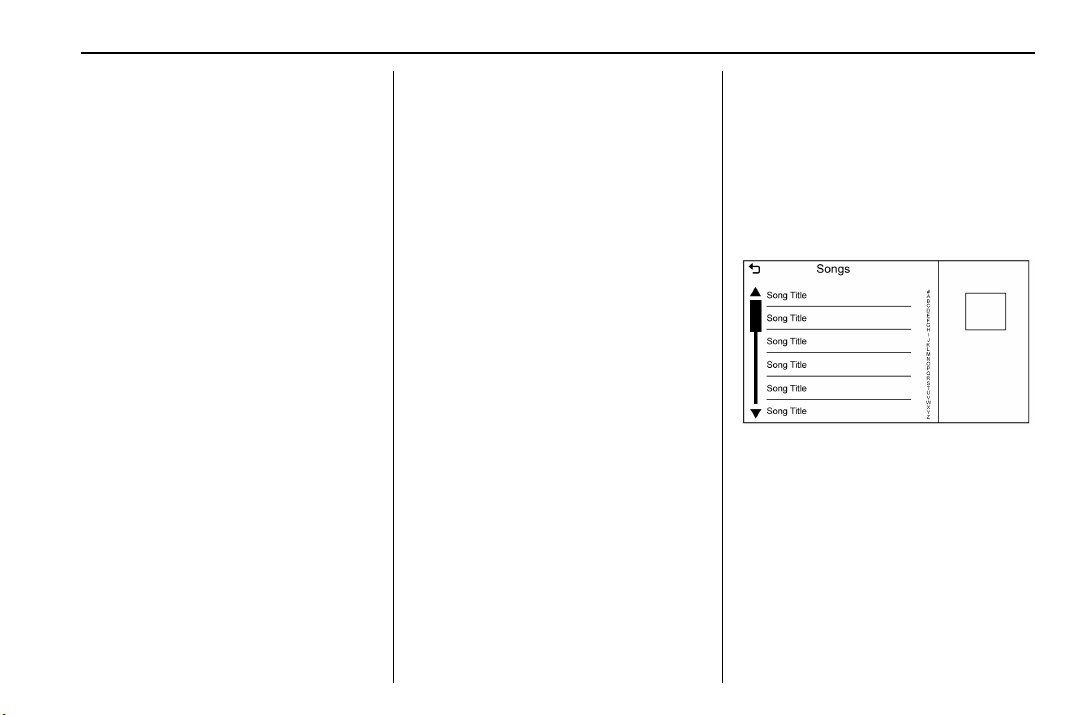
Songs :
1. Touch to display a list of all
songs on the USB.
2. To begin playback, select a
song from the list.
Genres :
1. Touch to view the genres on
the USB.
2. Select a genre to view a list of
artists.
3. Select an artist to view albums
by that artist.
4. Select an album to view songs
on the album.
5. Select a song to start playback.
Podcasts, Composers, Audiobooks,
Videos, and Folder View are shown
when More is selected from the
bottom of the screen.
Podcasts :
1. Touch to view the podcasts on
the USB.
2. Select Podcast to get a list of
podcast episodes.
Composers :
1. Touch to view the composers
on the USB.
2. Select Composer to view a list
of albums by that composer.
Select an album or all songs to
view a list of songs.
3. Select a song from the list to
begin playback.
Audiobooks :
1. Touch to view the audiobooks
stored on the device. Select an
audiobook to get a list of
chapters.
2. Select the chapter from the list
to begin playback.
Folder View (If Equipped) :
1. Touch to view the directories
on the USB.
2. Select a folder to view a list of
all files.
3. Select a file from the list to
begin playback.
When a list of songs, albums,
artists, or other types of media
display, a vertical keyboard appears
on the left side of the list and a
scroll bar will appear on the right.
When using the vertical keyboard
touch the beginning character of the
desired name to display the zoom
bubble of that character. Another
way is to activate character
recognition at this screen by gliding
two fingers to the left across the
Page 31

Cadillac CT6 CUE Infotainment System (GMNA-Localizing-U.S./Canada-
9245669) - 2016 - crc - 4/6/16
30 Audio Players
surface of the touchpad. Release
the finger from the touch screen and
the zoom bubble disappears.
File System and Naming
File systems supported by the
USB are:
.
FAT32
.
NTFS
.
HFS+
The songs, artists, albums, and
genres are taken from the file’s
song information and are only
displayed if present. The radio
displays the file name as the track
name if the song information is not
available.
Supported Apple
®
Devices
To view supported devices in the
U.S., see www.my.cadillac.com/
learn.
To view supported devices in
Canada, see www.cadillacowner.ca.
Loss of Audio
Do not pair the Bluetooth of an
iPhone that is connected and using
the iPod feature under vehicle
media sources. If an attempt to pair
the Bluetooth of the same
connected phone is made, the
system will automatically mute the
iPhone audio.
If there is a loss of audio, playback
can be resumed by changing the
audio flow from Bluetooth to USB
cable.
Source USB from the Audio MEDIA
screen button to resume playback.
Other phones such as the Droid
phones may have a similar reaction.
Storing and Recalling Media
Favorites
To store media favorites, touch and
hold an open favorite during media
playback to display a list of media
types. Select from this list.
The media types that may
display are:
Genres : Touch to store the current
genre as a favorite. Touch a screen
button in the favorite area to recall a
favorite genre. The first song of the
genre begins to play.
Artists : Touch to store the current
artist as a favorite. Touch a screen
button in the favorite area to recall a
favorite artist. The first song in the
artist list begins to play.
Albums : Touch to store the current
album as a favorite. Touch a screen
button in the favorite area to recall a
favorite album. The first song in the
album list begins to play.
Playlists : Touch to store the
current playlist as a favorite. Touch
a screen button in the favorite area
to recall a favorite playlist. The first
song in the playlist begins to play.
Songs : Touch to store the current
song as a favorite. Touch a screen
button in the favorite area to recall a
favorite song.
Page 32

Cadillac CT6 CUE Infotainment System (GMNA-Localizing-U.S./Canada-
9245669) - 2016 - crc - 4/6/16
Audio Players 31
Podcasts or Podcast Episode :
Touch and hold a screen button to
store the current podcast as a
favorite. Touch a screen button in
the favorite area to recall a favorite
podcast or podcast episode. The
podcast or podcast episode begins
to play.
Audiobooks : Touch and hold a
screen button to save the current
audiobook as a favorite. Touch a
screen button in the favorite area to
recall a favorite audiobook; the first
chapter in the audiobook begins
to play.
Videos : Touch and hold a screen
button to store the current video as
a favorite. Touch a screen button in
the favorite area to recall a favorite
video; the first episode in the video
begins to play. Not all formats are
supported.
Media Playback and Mute
USB playback will be paused if the
system is muted. If the steering
wheel mute button is pressed again,
playback will resume.
If the source is changed while in
mute, playback resumes and audio
will unmute.
Auxiliary Jack
This vehicle has an auxiliary input
jack in the center console under the
armrest and in the rear media
console if equipped with Rear Seat
Infotainment (RSI). Possible
auxiliary audio sources include:
.
Laptop computer
.
Audio music player
This jack is not an audio output. Do
not plug headphones into the
auxiliary input jack. Set up an
auxiliary device while the vehicle is
in P (Park).
Connect a 3.5 mm (1/8 in) cable
from the auxiliary device to the
auxiliary input jack. When a device
is connected, the system can play
audio from the device over the
vehicle speakers.
If an auxiliary device has already
been connected, but a different
source is currently active, touch the
MEDIA screen button to scroll
through audio source screens, until
AUX Input source screen displays.
Shuffle is not available in the AUX
source menu.
Bluetooth Audio
If equipped, music may be played
from a paired Bluetooth device. See
Bluetooth (Overview) 0 93 or
Bluetooth (Infotainment Controls)
0 94 or Bluetooth (Voice
Recognition) 0 97 for help pairing a
device.
Volume and song selection may be
controlled by using the infotainment
controls or on the phone/device.
If Bluetooth Audio is selected and
no volume is present, check the
volume setting on both your phone/
device and the infotainment system.
Music can be launched by touching
the MEDIA screen button on the
Home Page.
To play music via Bluetooth:
1. Power on the device, and pair
to connect the device.
Page 33

Cadillac CT6 CUE Infotainment System (GMNA-Localizing-U.S./Canada-
9245669) - 2016 - crc - 4/6/16
32 Audio Players
2. Once paired, go into the audio
application from the Home
Page or via the applications
tray. Select MEDIA until
Bluetooth displays.
Bluetooth Audio Menu
Touch the MENU screen button to
display the Bluetooth Audio menu.
The following may be available:
Bose AudioPilot : If equipped,
touch to turn Bose AudioPilot on or
off. AudioPilot is an On/Off selection
on the list entry from the Main
menu. See AM-FM Radio 0 17.
Tone Settings : Touch + or − to
adjust Bass, Midrange, Treble,
or Surround. See AM-FM
Radio 0 17.
[ Back to go back to the
Touch
previous menu.
Manage Bluetooth Devices :
Touch to go to the Bluetooth page to
add or delete devices or to pair.
When selecting Bluetooth audio, the
radio may not be able to launch the
audio player on the connected
device to start playing. When the
vehicle is not moving, use the
phone to begin playback.
All devices launch audio differently.
When selecting Bluetooth audio as
a source, the radio may show as
paused on the screen. Touch play
on the device or touch
screen to begin playback.
Some phones support sending
Bluetooth music information to
display on the radio. When the radio
receives this information, it will
check to see if any is available and
display it. For more information
about supported Bluetooth features,
see www.gm.com/bluetooth.
r on the
Page 34

Cadillac CT6 CUE Infotainment System (GMNA-Localizing-U.S./Canada-
9245669) - 2016 - crc - 4/6/16
OnStar System 33
OnStar System
OnStar®with 4G LTE
If equipped with OnStar 4G LTE, up
to seven devices, such as
smartphones, tablets, and laptops,
can be connected to high-speed
Internet through the vehicle’s built-in
Wi-Fi hotspot.
Call 1-888-4-ONSTAR
(1-888-466-7827) to connect to an
OnStar Advisor for assistance. See
www.onstar.com for a detailed
instruction guide, vehicle availability,
details, and system limitations.
Services and apps vary by make,
model, year, carrier, availability, and
conditions. 4G LTE service is
available in select markets. 4G LTE
performance is based on industry
averages and vehicle systems
design. Some services require a
data plan.
Page 35

Cadillac CT6 CUE Infotainment System (GMNA-Localizing-U.S./Canada-
9245669) - 2016 - crc - 4/6/16
34 Rear Seat Infotainment
Rear Seat Infotainment
Rear Seat Infotainment (RSI) System
If equipped, the system includes a
Blu-ray/DVD/CD player, two USB
ports, HDMI/MHL input, two wireless
headphones, and a remote control.
The remote control is used to select
the same or a different source for
each screen from the rear seats.
Video can be viewed from the front
by touching the Video screen icon,
if the vehicle is in P (Park). Audio
will be heard over the speakers.
If another screen icon is selected,
the video on the rear screen will
continue to play but the audio on the
speakers will change to the source
selected.
To resume play of the video where it
left off, Pseudo Resume must be
on. See “Player Setup BD/DVD"
later in this section.
The RSI system may not operate
properly until the temperature is
above −20 °C (−4 °F) and below
55 °C (131 °F).
System Operation
The video screens are in the back
of the driver and front passenger
seats.
To use:
1. Slide screen switch left or right
on the remote control for the
desired screen.
2. Press the power button on
remote control to raise and turn
on the video display.
If Remember Status has been
selected in the menu, the
screens will return to the same
position when the vehicle was
turned off.
3. Select Screen Tilt from any
menu to move the screen
viewing position.
The screen will always return
to the selected position until a
new position is selected.
The system can also be turned on
from the front infotainment system
by touching the VIDEO icon and
then touching the On/Off button.
The screens lower automatically
when the vehicle is turned off.
If RSI audio is desired without video
being displayed, go to the Settings
Menu and select Display OFF. The
display will turn back on with the
press of any button on the remote.
Caution
Avoid directly touching the video
screen, as damage may occur.
Sources
Sources include AM, FM, SXM (if
equipped), HDMI/MHL, CD/DVD/
Blu-Ray, and USB.
Menus and Features
AM/FM Menu
Press the
remote, select RADIO, then select
AM or FM.
{ (Home) button on the
Page 36

Cadillac CT6 CUE Infotainment System (GMNA-Localizing-U.S./Canada-
9245669) - 2016 - crc - 4/6/16
Rear Seat Infotainment 35
Press y (Menu) to select All Strong
Stations, All Stations, Favorites,
Categories, Wired Headphones,
or other RSI functions.
Only one tuner source may be
active at a time.
SXM Menu (If Equipped)
Press the
remote, select RADIO, then
select SXM.
Press
List, Categories, Favorites, SXM
View, Wired Headphones, or other
RSI functions.
Only one tuner source may be
active at a time.
Disc Menu BD
With a Blu-ray disc in the player,
press
control and then select BD.
{ (Home) button on the
y (Menu) to select Channel
{ (Home) on the remote
Press y (Menu) on the remote
control once to display menus
based on the media.
.
POP UP MENU (BD Only)
.
TOP MENU
.
COLOR
.
KEYPAD
.
DISC CONTROL
.
Select from: MORE (SETTINGS,
PREVIOUS, NEXT,
STILLS OFF)
To close, press the
or wait for the time out.
y (Menu) button
Disc Menu DVD
Press
y (Menu) on the remote
control once to select from:
.
TOP MENU
.
KEYPAD
.
STOP DISC
.
BACK
.
PHOTO
.
SETTINGS
To close, press
(back), or wait for the time out.
CD Menu
Press y (Menu) on the remote
control once to select from:
.
Track List
y (Menu), press S
Page 37

Cadillac CT6 CUE Infotainment System (GMNA-Localizing-U.S./Canada-
9245669) - 2016 - crc - 4/6/16
36 Rear Seat Infotainment
.
Shuffle
.
Disc Information (if available)
.
Wired Headphones
.
Brightness
.
Player Setup: Audio
Compression, Auto Enter (if
available)
.
Title Search (if available)
.
DivX (if available)
.
Display Off
.
Screen Tilt
.
Remember RSE Status
.
Software Information
If no disc is present, not all choices
are available.
To close, press
the time out.
Pop Up Menu (BD Only)
Select to display the on-screen
menu options. To exit the Pop Up
menu, make a selection or wait for
the timeout. When the Pop Up menu
is opened, the overlay/interaction
selector menu will be closed.
S (back) or wait for
Top Menu BD/DVD
Select to display the DVD or BD
menu. Make a selection to exit the
Top menu. TOP MENU is not
available for BDAV, DVD-VR, and
AVCREC.
Color (BD Only)
Select COLOR to display the four
color button options: blue, yellow,
red, and green. Highlight a color
and press ENTER and the
appropriate action will be carried
out. Press the
(Menu), or wait for the 15-second
time out to close the menu. Press
the down arrow on the yellow color
to keep the overlay menu up, but
close the color menu. The color
S (back) or y
menu is disc dependent; selecting
colors for discs that do not support
this feature will have no function.
Keypad BD/DVD
Select to display. To close, select
Exit or MENU, wait for the menu to
time out, or press the down arrow
from the 0 or Done buttons. The
keypad is disc dependent and may
have no function.
The keypad input is limited to four
digits.
Select Clear to clear one digit at a
time. Touch and hold to clear all
entered digits.
Page 38

Cadillac CT6 CUE Infotainment System (GMNA-Localizing-U.S./Canada-
9245669) - 2016 - crc - 4/6/16
Rear Seat Infotainment 37
Disc Control (BDAV and
BDMV Only)
Select to display the disc options
Subtitles, Play, Pause, Next,
Previous, and Stop. Press
(Menu) or wait for the time out to
close. Press the down arrow from
Stop, Play, or Next to keep the
overlay up but close the menu. The
Disc Control menu is disc
dependent and may have no
function.
Stop Disc (DVD Only)
Select to close the overlay menu.
Select Menu on the screen to open
the Disc Stopped menu.
y
Select from:
.
Resume Playback: Returns to
the current position on the disc
and resumes play.
.
Title Search (if available)
.
Restart Disc
.
Screen Mode
.
Wired Headphones
.
Brightness
.
Player Setup: Audio
Compression, Auto Enter (if
available)
.
DivX (if available)
.
Display Off
.
Screen Tilt
.
Remember RSE Status
.
Software Information
Not all options are available while
the disc is playing.
Browse Media (AVCREC, BDAV,
DVD-A, DVD-VR only) allows the
media on the disc to be searched in
a list format.
More
The MORE submenu includes
SETTINGS and items related to still
pictures.
Previous/Next/Stills Off
Select PREVIOUS to turn off or
advance to the next still picture.
NEXT advances to the next picture.
Select STILLS OFF to return to the
home still, if available. Press
(Previous/Reverse/Decrease) or y
(Menu), or wait for the time out to
close the menu. Press the down
arrow on the bottom option to close
the next still pop-up. This feature is
disc dependent.
This feature can also be accessed
by selecting Photo on the DVD
Disc menu.
S
Page 39

Cadillac CT6 CUE Infotainment System (GMNA-Localizing-U.S./Canada-
9245669) - 2016 - crc - 4/6/16
38 Rear Seat Infotainment
.
Settings BD/DVD
Select to access:
.
Browse Media (BDAV, AVCREC,
DVD-A, DVD-VR only): Allows
browsing by Video List or
Playlist.
.
Resume Playback: Restarts disc
where left off.
.
Title Search (AVCHD, DVD-V,
BDMV only): Allows the titles
provided by the disc to be
searched. Select this option to
bring up a keypad to search for
specific titles.
.
Top Menu
.
Restart Disc: Restarts the disc
from the beginning.
.
Disc Information (if available)
Audio Tracks
.
Subtitles
.
Angle (BDMV, DVD-V, DVD-A
only): Select an angle by using
the up and down arrows to
highlight the option and press
ENTER or the right arrow.
.
Screen Mode: Adjusts the
framing on the RSI display.
Select Normal, Wide, or Zoom.
Screen Mode only applies to
video sources and should be
maintained if the disc is ejected.
.
Wired Headphones: Use to listen
to audio on the wired
headphones. The headphone
audio plays depending on which
screen is selected. The default is
screen 1 audio.
.
Brightness: Increase the
brightness by using the up or
right arrow and decrease the
brightness by using the down or
left arrow. Each screen
brightness can be adjusted
separately.
.
Player Setup: See "Player Setup
BD/DVD" following.
.
DivX (if available)
.
Display Off: Lowers the screen
but selected audio will continue
to play.
.
Screen Tilt: Adjusts screen tilt
angle.
.
Remember RSE Status: Returns
the screens to the same position
when the vehicle was turned off.
.
Software Information
Player Setup BD/DVD
Player Setup may include:
.
Default Menu Language: With no
disc inserted, select from a list of
languages or enter a
language code.
Page 40

Cadillac CT6 CUE Infotainment System (GMNA-Localizing-U.S./Canada-
9245669) - 2016 - crc - 4/6/16
Rear Seat Infotainment 39
.
Default Audio Language: With
no disc inserted, select from a
list of languages or enter a
language code.
.
Default Subtitle Language: With
no disc inserted, select from a
list of languages or enter a
language code.
.
Audio Compression: When on,
the RSI will attempt to reduce
the difference between the audio
highs and lows. CUSTOM will
increase dialog volume.
.
Pseudo Resume: When on, the
RSI will attempt to resume play
of the video where it left off after
the vehicle has been restarted.
This can be turned on or off.
.
Auto Enter: When on, the RSI
will attempt to start play of the
video when the disc is inserted.
This feature can be turned on or
off. Not all discs support this
feature.
.
Audio Channel (AVCREC,
DBAV, DVD-VR only) contains:
Stereo, Left Mono, and Right
Mono. Audio Channel is
available from the Settings
menu. Default will be determined
by the disc.
.
Format Internal User Memory:
Only shown when no disc is
inserted.
To close, press
S (back) button.
Errors
Errors can occur if the local storage
area has been broken or if the
ignition is turned off during
formatting. If the screen is closed
during formatting, this will not
interrupt the formatting. If the screen
is opened again, the current state of
format will be displayed. If an error
occurs, the Error screen will display
when the ignition is turned on.
Enter Language Code
Enter the desired language code.
Language/Code User
Japanese JPN 7465
English ENG 6978
y (Menu) or press
Code
French FRA 7082
German DEU 6869
Italian ITA 7384
Spanish SPA 6983
Dutch NLD 7876
Russian RUS 8285
Chinese ZHO 9072
Korean KOR 7579
Greek ELL 6976
Afar AAR 6565
Abkhazian ABK 6566
Afrikaans AFR 6570
Amharic AMH 6577
Arabic ARA 6582
Assamase ASM 6583
Aymara AYM 6589
Azerbaijani AZE 6590
Bashkir BAK 6665
Byelorussian BEL 6669
Bulgarian BUL 6671
Page 41

Cadillac CT6 CUE Infotainment System (GMNA-Localizing-U.S./Canada-
9245669) - 2016 - crc - 4/6/16
40 Rear Seat Infotainment
Bihari BIH 6672
Bislama BIS 6673
Bengali BEN 6678
Tibetan BOD 6679
Breton BRE 6682
Catalan CAT 6765
Corsican COS 6779
Czech CES 6783
Welsh CYM 6789
Danish DAN 6865
Bhutani DZO 6890
Esperanto EPO 6979
Estonian EST 6984
Basque EUS 6985
Persian FAS 7065
Finnish FIN 7073
Fiji FIJ 7074
Faroese FAO 7079
Friesian FRY 7089
Irish GLE 7165
Scots-Gaelic GLA 7168
Galician GLG 7176
Guarani GRN 7178
Gujarati GUJ 7185
Hausa HAU 7265
Hindi HIN 7273
Croatian HRV 7282
Hungarian HUN 7285
Armenian HYE 7289
Interlingua INA 7365
Interlingue ILE 7369
Inupiak IPK 7375
Indonesian IND 7368
Icelandic ISL 7383
Hebrew HEB 7269
Yiddish YID 8973
Javanese JAV 7487
Georgian KAT 7565
Kazakh KAZ 7575
Greenlandic KAL 7576
Cambodian KHM 7577
Kannada KAN 7578
Kashmiri KAS 7583
Kurdish KUR 7585
Kirghiz KIR 7589
Latin LAT 7665
Lingala LIN 7678
Laothian LAO 7679
Lithuanian LIT 7684
Latvian LAV 7686
Malagasy MLG 7771
Maori MRI 7773
Macedonian MKD 7775
Malayalam MAL 7776
Mongolian MON 7778
Moldavian MOL 7779
Marathi MAR 7782
Malay MSA 7783
Maltese MLT 7784
Burmese MYA 7789
Page 42

Cadillac CT6 CUE Infotainment System (GMNA-Localizing-U.S./Canada-
9245669) - 2016 - crc - 4/6/16
Rear Seat Infotainment 41
Nauru NAU 7865
Nepali NEP 7869
Norwegian NOR 7879
Occtian OCI 7967
Oromo ORM 7977
Oriya ORI 7982
Panjabi PAN 8065
Polish POL 8076
Pashto, Pushto PUS 8083
Portuguese POR 8084
Quechua QUE 8185
Rhaeto-Romance ROH 8277
Kirundi RUN 8278
Romanian RON 8279
Kinyarwanda KIN 8287
SanSkrit SAN 8365
Sindhi SND 8368
Sangho SAG 8371
Serbo-Croatian SCR 8372
Singhalese SIN 8373
Slovak SLK 8375
Uzbek UZB 8590
Vietnamese VIE 8673
Volapuk VOL 8679
Wolof WOL 8779
Xhosa XHO 8872
Yoruba YOR 8979
Zulu ZUL 9085
Slovenian SLV 8376
Samoan SMO 8377
Shona SNA 8378
Somali SOM 8379
Albanian SQI 8381
Serbian SRP 8382
Siswaiti SSW 8383
Sesotho SOT 8384
Sundanese SUN 8385
Swedish SWE 8386
Swahili SWA 8387
Tamil TAM 8465
Telugu TEL 8469
Tajik TGK 8471
Thai THA 8472
Tigrinya TIR 8473
Turkmen TUK 8475
Tagalog TGL 8476
Setswana TSN 8478
Tonga TON 8479
Turkish TUR 8482
Tsonga TSO 8483
Tatar TAT 8484
Twi TWI 8487
Ukrainian UKR 8575
Urdu URD 8582
Wired Headphones
Select from the Settings menu, then
select the headphone audio for the
wired headphone jack based on
screen 1 or screen 2 and press
ENTER or the right arrow. Press
(back) button to exit.
S
Page 43

Cadillac CT6 CUE Infotainment System (GMNA-Localizing-U.S./Canada-
9245669) - 2016 - crc - 4/6/16
42 Rear Seat Infotainment
The headphones are set to screen 1
by default.
Title Search (CD-DA Only)
If available, this displays a list of
titles to select by using the up and
down arrows.
Disc Information (CD-DA Only)
If the inserted disc is a BDMV,
BDAV, AVCHD, AVCREC,
DVD-Video, or DVD-VR, the disc
title should display. If the inserted
disc is DVD-Audio, DTS-CD, CDDA,
or Mixed-CD, the track number will
display.
Software Information
This allows access to Version
Information, Save Vehicle Info to
USB, and View Open Source.
Save Vehicle Info to USB allows the
current version to be saved to a
jump drive, which must be done
before an update can be performed.
View Open Source indicates where
software information can be found.
RSI Controls Available from
the Front Screen
To access the RSI, select Video
from the HOME screen. The Video
app may also be selected from the
applications tray if it has been
stored in one of the five locations.
Sourcing to DVD/BD
This allows for watching a DVD/BD
video on the front screen when the
vehicle is in P (Park).
After a disc is inserted, it will
automatically begin playing. To
resume play of the video where it
left off, Pseudo Resume must be
on. See "Player Setup BD/DVD"
previously in this section.
With the vehicle in P (Park), icons
display along the bottom of the front
infotainment display. When a DVD,
VCD, USB, or HDMI device is
inserted:
When a BD is inserted:
Rear Media
This allows for transitioning between
Disc, USB, and HDMI sources for
the rear screens. Sources selected
will be automatically sourced for
both rear screens and will begin
playback from the first available file.
The video will only appear on the
front infotainment display with the
vehicle in P (Park). In any other
gear, the front infotainment display
indicates the active media source.
Page 44

Cadillac CT6 CUE Infotainment System (GMNA-Localizing-U.S./Canada-
9245669) - 2016 - crc - 4/6/16
Rear Seat Infotainment 43
DVD/BD Disc Menu
With the vehicle in P (Park), touch
DISC MENU to access the DVD/BD
disc menu.
Next Track/Previous Track
| to skip ahead or { to skip
Use
back chapters. Touch
five seconds into the current track to
start at the beginning of the
previous track. Touch
five seconds into the current track to
start at the beginning of the current
track.
Fast Forward/Fast Rewind
With the vehicle in P (Park), hold
or { for approximately one and
one-half seconds to fast forward or
fast rewind. If
approximately six seconds, the rate
of fast forward or fast rewind will
increase.
Play/Pause
r to play or j to pause,
touch
depending on the current selection.
| or { are held for
{ less than
{ more than
Keypad for DVD/VCD/USB
With the vehicle in P (Park), select
to display the DVD keypad. DVD
keypad functionality is disc
dependent and may not be available
on all DVDs. Up to four digits can
be entered. Select Clear to remove
one digit in the entry field. Press
and hold Clear to remove all digits
in the entry field.
Pop Up Menu (BD Only)
This displays the pop up menu
contents for the BD. Make a
selection, use the interaction
selector, or wait for the timeout to
exit pop up menu view.
|
Cursor
Use to navigate and select items in
the disc menu. Touch the up, down,
right, or left arrows, or ENTER.
Touch cursor to close the interaction
selector and display a vertical menu
of cursor buttons. The cursor will
time out and close.
Sourcing USB/VCD/HDMI with
Video
This allows for watching videos on
the front screen from devices
plugged into the rear module when
in P (Park).
With the vehicle in P (Park), icons
display:
These features will function the
same as in DVD/BD sources, with
the following exceptions:
.
KEYPAD is only available for
VCD in P (Park).
.
DISC MENU is only available for
disc sources such as VCD. The
system displays the menu
provided by the disc.
Page 45

Cadillac CT6 CUE Infotainment System (GMNA-Localizing-U.S./Canada-
9245669) - 2016 - crc - 4/6/16
44 Rear Seat Infotainment
Sourcing DVD/BD/USB/VCD/HDMI
With the vehicle in D (Drive), the
following icons display along the
bottom of the front screen when one
of these sources is active:
DVD/BD/USB/VCD: All buttons are
available.
HDMI: Only REAR MEDIA and
MENU are available.
Rear Media
Use to select Disc, USB, or HDMI
sources. Both rear screens will be
sourced and will begin playback of
the first available file. The video will
only display on the front screen if
the vehicle is in P (Park). In any
other gear, the front infotainment
display indicates the active media
source.
Previous Track/Next Track
{ or | to select the
Touch
previous or next track on the current
media.
Play/Pause
Touch
r to play or j to pause,
depending on the current selection.
Menu (DVD/BD/USB/HDMI/VCD)
Only available in D (Drive). Press
(Menu) to display these options:
.
Tone Settings: Use to set bass,
mid, and treble on speakers
only. Once set, tone settings are
for all sources.
.
Auto Volume: Adjusts the
volume of the audio based on
the speed or ambient noise of
the vehicle. Some vehicles may
be equipped with the Bose
AudioPilot system. In these
cases, the Auto Volume main
menu item is replaced with the
Bose AudioPilot menu item. AVC
or Bose AudioPilot is available to
use with any source mode.
.
Traffic Announcements: Displays
traffic alerts in the RSI system.
The video will continue to play
and the audio will mute,
depending on the alert.
Closing the Menu (DVD/BD)
Touch Back or Exit to close a menu.
This will return to the previously
viewed screen.
Power
y
Press the power button on the front
screen to turn the RSI screen on or
off. The front screen will continue to
operate when the overhead screen
is turned off. A red lit power button
indicates the rear screens are on.
A white lit power button indicates
the rear screens are off.
Page 46

Cadillac CT6 CUE Infotainment System (GMNA-Localizing-U.S./Canada-
9245669) - 2016 - crc - 4/6/16
Rear Seat Infotainment 45
Headphones
1. Power Indicator Light
2. Channel 1 or 2 Switch
3. Volume Control
4. Power Button
5. Battery Cover
RSI includes two 2-channel new
digital wireless headphones. The
headphones are used to listen to
various multimedia. The wireless
headphones have a power button,
Channel 1 or 2 switch, and a
volume control. The Digital
headphones cannot be
interchanged with previous models
of GM headphones.
Press the power button to turn on
the headphones. A light on the
headphones comes on. A flashing
light indicates the headphones are
not in range. Move them closer to
the left side screen until light stops
flashing. If the light does not come
on, check the batteries. Intermittent
sound or static can also indicate
weak batteries. See “Battery
Replacement” later in this section.
Turn the headphones off when not
in use.
Press the center of the right side of
the headphone to change the
channel. Channel 1 will provide
audio associated with screen 1 and
channel 2 will provide audio
associated with screen 2.
Infrared transmitters are on the top
of the left seatback video screen.
The headphones shut off
automatically to save the battery
power if the RSI system is off or if
the headphones are out of range of
the transmitters for more than
three minutes. Moving too far
forward or stepping out of the
vehicle can cause the headphones
to lose the signal or have static.
Use the volume control wheel on
the right side of the headphones to
adjust the volume.
For best audio performance, wear
the headphones as indicated with
L (Left) and R (Right) on the ear
pads. Do not let anything cover the
ear pads.
Caution
Do not store the headphones in
heat or direct sunlight. This could
damage the headphones and
repairs will not be covered by the
warranty. Storage in extreme cold
can weaken the batteries. Keep
the headphones stored in a cool,
dry place.
If the foam ear pads become worn
or damaged, the pads can be
replaced separately. To purchase
replacement ear pads, call
1-888-293-3332 or contact your
dealer.
Page 47

Cadillac CT6 CUE Infotainment System (GMNA-Localizing-U.S./Canada-
9245669) - 2016 - crc - 4/6/16
46 Rear Seat Infotainment
Battery Replacement
To change the batteries:
1. Loosen the screw to the battery
door on the left side of the
headphones using a coin or
flat-head screw driver.
2. Slide the battery door open.
3. Replace the two AAA batteries.
4. Replace the battery door and
tighten the screw.
Remove the batteries if the
headphones will not be used for a
long time.
Rear Seat Infotainment
(RSI) Wi-Fi
If equipped, the RSI Wi-Fi allows:
.
Miracast™ to display a smart
device directly on the RSI
screen.
.
Accessing music, videos, and
pictures that are saved or taken
with a smart device to the RSI
system through Digital Living
Network Alliance (DLNA)
applications.
.
Playing games made for your
Android™ device directly on the
RSI screens.
.
Only one smart device to be
connected to the RSI at
one time.
Device Support
Android 4.2 or later and Windows
8.1 or later devices will support
Miracast. To operate correctly, the
smart device must support Miracast,
Screen Mirroring, or Android
Wireless Display.
The RSI Wi-Fi complies with the
Wi-Fi Miracast specification to
communicate with other Wi-Fi
Miracast wireless devices. The RSI
Wi-Fi supports High-bandwidth
Digital Content Protection (HDCP)
1.0, 2.0, and 2.1.
HDCP is a form of digital copy
protection developed to prevent
copying of digital audio and video
content as it travels across
connections.
For more information, see
www.my.cadillac.com.
Placement for Optimal
Performance
The RSI Wi-Fi antenna is near the
RSI disc player. The smart device
connection is stronger when it is
near the Wi-Fi antenna.
If the network is not operating at its
maximum effectiveness, try the
following:
.
Disconnect the smart device
from any other connected
network to improve the audio/
video performance.
.
Switch the band. While in any
Wi-Fi screen, select Menu, then
select Switch Band to access a
band that is available.
Operation
From the Home Menu, select the
Wireless Display icon to connect to
an Android device through Miracast,
as a DLNA device, or to view the
other screen that is already
connected through Wi-Fi.
Page 48

Cadillac CT6 CUE Infotainment System (GMNA-Localizing-U.S./Canada-
9245669) - 2016 - crc - 4/6/16
Rear Seat Infotainment 47
Miracast™ (If Equipped)
.
Make sure the Android smart
device Wi-Fi is enabled.
.
From the RSI Wireless Display
menu, select Miracast.
.
From the Android smart device,
enter Miracast, Screen Mirroring,
or Android Wireless Display
application.
.
The Android smart device
displays “Rear Seat” as
available, and the RSI screen
displays the smart device is
available.
.
If the RSI does not show up on
the Android smart device, a
manual Wi-Fi scan may have to
be done from the smart device.
.
From the smart device, connect
to the RSI.
After the connection has completed,
the screen from the smart device
will be duplicated on the RSI
screen. Any audio associated with
the screen shown will be available
through the RSI headphones.
Once the connection process is
done for the first time, the smart
device should appear on the RSI as
available whenever this device is
near the vehicle and the Wi-Fi is
turned on. From the smart device,
make the connection as before.
Accessing the Miracast function
varies from device to device.
Usually this function can be found in
the Settings menu, under Display or
Wireless & Networks.
Digital Living Network Alliance
(DLNA) (If Equipped)
.
Make sure the device’s Wi-Fi is
turned on.
.
From the smart RSI Wireless
Display menu, select DLNA. The
RSI screen will display a name
such as “DIRECT-xx-CUE” on
the smart device as an available
Wi-Fi network.
.
From the smart device, select
the “DIRECT-xx-Rear Seat”
network.
.
From the RSI screen, select
Credentials to display a
Passphrase. The displayed
Passphrase must be entered
into the smart device. Once
entered, the “DIRECT-xx-CUE”
network will display as
connected.
From the smart device’s DLNA
application, select Rear Seat 1 or 2
as the screen to display the desired
video, audio, or picture files on
the RSI.
Once the connection process is
done for the first time, the Wi-Fi
connection will always be made
whenever the device is within Wi-Fi
range or the smart device Wi-Fi is
turned on.
From any Miracast or DLNA screen,
select Menu from the remote
control. The Wi-Fi band can be
switched to access the options to
disconnect from the RSI Wi-Fi, or to
remove all DLNA passwords that
have been saved.
Supported DLNA media types are:
.
Video: .mp4 and .mpg
.
Audio: .mp3 and .aac
.
Picture: .jpeg and .jpg
Page 49

Cadillac CT6 CUE Infotainment System (GMNA-Localizing-U.S./Canada-
9245669) - 2016 - crc - 4/6/16
48 Rear Seat Infotainment
Viewing the Other Display
While the left or right screen is
connected by Miracast or DLNA, the
other screen can access the same
source by selecting View Screen 1
or View Screen 2 in the Wireless
Display menu.
Connecting Wireless Apple™
Devices
Apple does not support the Miracast
standard. Apple will support various
DLNA apps to allow the device to
connect to the RSI wirelessly.
Search the iTunes
applications to install on the Apple
device.
HDMI Input
An HDMI cable is required to
connect an HDMI device to the RSI
hub. The RSI HDMI input allows
connection to:
.
Video games, disc players,
cameras, smartphones, tablets,
and A/V dongles that have HDMI
(version 1.4a) outputs.
®
store for DLNA
.
Smart devices that support
Mobile High-Definition Link
(MHL) version 2.0.
The smart device may require an
adapter cable to support MHL. Refer
to your device owners guide.
Most RSI remote control commands
will be available to a smart device
connected through MHL.
Auxiliary Inputs
Rear Media Connections
1. Volume Control for Wired
Headphones
2. Wired Headphone Jack
3. USB Ports
4. HDMI Input
If equipped with RSI, features above
will be inside the rear armrest or
above the right shoulder of the rear
left passenger.
HDMI
The HDMI jack allows an HDMI A/V
cable to be connected from an
auxiliary device such as a
camcorder, video game system,
or Apple device. A cable from Apple
is required for Apple devices.
Power for the auxiliary devices is
not supplied by the infotainment
system.
To use the HDMI input of the RSI
system:
1. Connect the auxiliary device
with an HDMI cable.
2. Power on both the auxiliary
device and the RSI video
screen.
3. Press
{ (Home) on the remote
control and use the arrows to
change the source to HDMI.
Page 50

Cadillac CT6 CUE Infotainment System (GMNA-Localizing-U.S./Canada-
9245669) - 2016 - crc - 4/6/16
USB
There are two USB ports to provide
the RSI system audio/video from
supported devices, as well as to
provide device charging.
Audio from these ports can only be
heard and controlled by the rear
seat passengers. Video can be
heard, shown, and controlled by the
rear and front passengers.
To use the USB ports:
1. Insert the device in one of the
two ports.
2. Select the source (USB 1 or
USB 2) via the rear screen
menu with the remote control
{ (Home) button.
3. Select the source via the front
by touching on the Video
application on the home
screen.
Audio Output
Audio from a Blu-ray/DVD/CD
player or auxiliary inputs can be
heard through:
.
Wireless headphones: Available
for any source depending on the
selected channel.
.
Vehicle speakers: Touch the
VIDEO screen button. Select
any other source to stop the
speaker audio. Rear audio will
continue to play.
.
Vehicle wired headphone jack:
See “Wired Headphone Jack”
following.
The RSI system transmits the audio
signal to the wireless headphones if
an audio signal is available. See
“Headphones” earlier in this section.
Front seat passengers can listen to
playback from an attached rear
device through the vehicle speakers
by selecting that source from the
Video App on the front.
Wired Headphone Jack
Press
y (Menu) on the remote
control, then select Settings and
then Wired Headphones to listen to
audio on the wired headphones.
The headphone audio plays
Rear Seat Infotainment 49
depending on which screen is
selected. The default is screen 1
audio.
Remote Control
Page 51

Cadillac CT6 CUE Infotainment System (GMNA-Localizing-U.S./Canada-
9245669) - 2016 - crc - 4/6/16
50 Rear Seat Infotainment
Remote Control Buttons
1.
O (Power)
.
Press to turn the selected
video screen on and off.
y (Up Arrow)
2.
.
Press to scroll up a list.
3.
{ (Home)
.
Press to return to the Home
screen.
r /ENTER
4.
.
Press to select the
highlighted choice in
any menu.
.
Press and hold for quick
play (disc dependent).
5.
T (Next/Forward/Increase)
.
Radio and disc: Press to go
to the next station or track.
.
Press to go to the
next menu.
J (Play/Pause)
6.
.
Press to start playing.
Press to pause. Press
again to continue playing.
z (Down Arrow)
7.
.
Press to go down a list.
y (Seek Up)
8.
.
Radio: Press to seek the
next radio station.
.
CD: Press to seek the next
track.
.
Blue-ray/DVD: Press to
seek the next chapter.
z (Seek Down)
9.
.
Radio: Press to seek the
previous radio station.
.
CD: Press to seek the
previous track.
.
Blue-ray/DVD: Press to
seek the previous chapter.
10.
z /T (Screen 2)
.
Slide to select screen 2 to
be controlled by the remote.
11.
z /S (Screen 1)
.
Slide to select screen 1 to
be controlled by the remote.
12. VOL/
13. VOL/
14.
15.
To use the remote control, aim it at
the transmitter window at either
seatback console and press the
buttons firmly. Direct sunlight or very
z (Volume Down)
.
Press to reduce the
speaker’s audio volume.
y (Volume Up)
.
Press to increase the
speaker’s audio volume.
y (Menu)
.
Press to go to the menu of
any now playing screen.
S (Previous/Reverse/Decrease
or Back)
.
Radio and disc: Press to go
to the previous station or
track.
.
Press to go to the
previous menu.
.
Use as back command.
Page 52

Cadillac CT6 CUE Infotainment System (GMNA-Localizing-U.S./Canada-
9245669) - 2016 - crc - 4/6/16
Rear Seat Infotainment 51
bright light could affect the ability of
the RSI transmitter to receive
signals from the remote control.
Check the batteries if the remote
control does not seem to be
working. See “Battery Replacement”
following. Objects blocking the line
of sight could also affect the
function of the remote control.
Caution
Storing the remote control in a hot
area or in direct sunlight can
damage it, and the repairs will not
be covered by the warranty.
Storage in extreme cold can
weaken the batteries. Keep the
remote control stored in a cool,
dry place.
Battery Replacement
To change the remote control
batteries:
1. Press the indented area on the
back of the remote and slide
the cover off.
2. Insert tip of flathead screw
driver into slot marked with
arrows to eject batteries.
3. Replace the two coin cell
batteries.
4. Replace the battery cover.
Remove the batteries from the
remote control if it will not be used
for an extended period of time.
RSI Troubleshooting
No power : The ignition might not
be in ON/RUN or ACC/
ACCESSORY.
The picture does not fill the
screen. There are black borders
on the top and bottom or on both
sides or it looks stretched out :
Press
y (Menu) on the remote
control to change the display mode
setting.
In auxiliary mode, the picture
moves or scrolls : Check the
auxiliary input connections at both
devices.
The remote control does not
work : Check to make sure the
remote control is programmed to the
correct screen. Make sure there is
no obstruction between the remote
control and the transmitter window
and check the batteries to make
sure they are not dead or installed
incorrectly.
There is no sound from the
headphones with the indicator
light on : If the batteries are good,
make sure the headphones are
programmed to the correct screen
and on the correct channel for the
screen being viewed.
The auxiliary source is running
but there is no picture or sound :
Check that the RSI video screen is
in the auxiliary source mode by
pressing MEDIA on the remote
control. Check the auxiliary input
connections at both devices.
Sometimes the wireless
headphone audio cuts out or
buzzes : Check for obstructions,
low batteries, reception range, and
interference from cell phone towers
or from cellular telephone use in the
vehicle. Check that the headphones
are on correctly using the L (Left)
and R (Right) on the headphones.
Page 53

Cadillac CT6 CUE Infotainment System (GMNA-Localizing-U.S./Canada-
9245669) - 2016 - crc - 4/6/16
52 Rear Seat Infotainment
Check that the headphones are
positioned properly with the
headband across the top of
the head.
I lost the remote and/or the
headphones : See your dealer for
assistance.
The Blu-ray/DVD is playing, but
there is no picture or sound :
Check that the RSI video screen is
sourced to the Blu-ray/DVD player
by pressing MEDIA on the remote
control.
Video Display Error Messages
The video screen may display one
of the following:
Disc Error : There are disc load or
eject problems, the disc is inserted
with the disc label wrong side up,
the disc is damaged, or the disc is
not from the correct region.
No Disc Inserted : No disc is
present.
Disc Player Error : The
temperature is outside the operating
range of the RSI system. If the
temperature is within range, see
your dealer.
Video Distortion
Video distortion can occur when
operating cellular phones, scanners,
CB radios, Global Positioning
Systems (GPSs), two-way radios,
mobile faxes, or walkie talkies.
It might be necessary to turn off the
video player when operating one of
these devices in or near the vehicle.
Page 54

Cadillac CT6 CUE Infotainment System (GMNA-Localizing-U.S./Canada-
9245669) - 2016 - crc - 4/6/16
Navigation 53
Navigation
Using the Navigation System
Touch the NAV button on the Home
Page or the Nav icon in the
applications tray to access the
navigation application.
Touch MENU from the map view to
access the Navigation Menu.
Features displayed in the
Navigation Menu can be selected to
adjust navigation preferences.
It is advised to set up preferences
before setting a destination. To set a
destination, see Destination 0 62.
The buttons on the infotainment
screen display will time out when
not interacting. Tap anywhere on the
screen to reveal the controls, then
select the desired control.
Additional navigation features are:
.
Cancel/Resume To
.
Navigation Voice Preferences
.
Current Location
.
Traffic
.
Map View
.
Routing Preferences
.
Display “Places of Interest”
Icons
.
Personal Data
Cancel Route/Resume To
.
While under route guidance, this
screen button displays Cancel
Route. Touch Cancel Route to
cancel route guidance. No
further prompts will be given.
The list item then changes to
Resume Route.
.
Touch the Resume Route screen
button to resume route guidance
to the last entered destination.
.
The last location that the system
has provided guidance to can be
resumed by touching on this
list item.
.
If the route includes waypoints,
the entire route can be
suspended using the Cancel
Guidance list item. When
Resume Guidance is touched,
all waypoints are resumed for
guidance.
Navigation Voice Preferences
Touch the Navigation Voice
Preferences list item to adjust the
voice preferences.
Page 55

Cadillac CT6 CUE Infotainment System (GMNA-Localizing-U.S./Canada-
9245669) - 2016 - crc - 4/6/16
54 Navigation
Prompts During Phone Calls
When enabled, the system plays a
shorter prompt while on a phone
call. This setting can be configured
as to whether a prompt would be
heard during a phone conversation.
When this setting is Off, only the
short alert tone is played when
The following options can be
adjusted:
.
Voice Prompts On/Off
.
Voice Volume
.
Prompts During Phone Calls
On/Off
Voice Prompts
Touch the Voice Prompts list item to
toggle voice prompts On and Off.
Voice Volume
Adjust the loudness of the audio
feedback by touching the − or +
button. If a maneuver prompt is
being played, and the main volume
is adjusted, the prompt volume will
update and be saved.
approaching the maneuver.
Current Location
Touch the Current Location list item
to display a Current Location list.
The following information is
displayed on the Current
Location list:
.
Nearest Address
.
Lat/Long
.
Nearest Hospital
.
Nearest Police
.
Nearest Fuel
.
Nearest Service
Touch on any of the options to
display the destination details view
for the selected location to begin
guidance.
Touch the Nearest Address button
and then the Save screen button to
store the current location to the
Contacts List.
Display Places of Interest Icons
Places of Interest (POI) icons can
be displayed on the map using
this view.
Page 56

Cadillac CT6 CUE Infotainment System (GMNA-Localizing-U.S./Canada-
9245669) - 2016 - crc - 4/6/16
Navigation 55
.
The POI icons can be turned On
and Off. Touch the check box
next to the POI icon to display
the icon.
.
Touch Clear All to reset the
icons that are displayed on
the map.
.
A subcategory can be selected
instead of the entire category.
Touch the list item rather than
the check box. The
subcategories will display. Select
any of those categories to
navigate down the hierarchy.
.
When a higher-level category
has some of its subcategories
selected, the checkmark next to
it is grayed out. This indicates
that only some of the categories
below are shown. Touch the
grayed-out checkmark to turn all
of the icons for that category on
or off.
.
Touch the SAFETY CAMERAS
icon to turn the category On or
Off. This POI category is turned
off by default, but can be
calibrated depending on the
location. This option may be
completely turned off if it is not
allowed in a particular area.
Map View
Touch to select the desired map
view. A checkmark appears to
indicate a view has been selected.
3D View
The 3D View is a Heading Up view
but it includes perspective. Map
items will appear larger as the
vehicle comes closer.
Heading Up View
The Heading Up View keeps the
vehicle's current heading at the top
of the view. The vehicle icon always
faces the top of the view as the map
rotates.
North Up View
The North Up View keeps north at
the top of the view. The vehicle icon
is placed in the center of the view
and rotates to indicate the heading
for the vehicle.
Audio Information On/Off
Touch to turn the audio information
view on or off from the main map
view. When ON, the audio
information becomes an audio
status screen. This allows for two
lines of audio information in the
status pane and enables the use of
some Interaction Selector controls.
The audio status screen contains
the following elements:
.
Station Frequency
.
Artist Information
.
Song Information
.
r / j or t / u Station and
Channel Controls
Touch the
go to the next or previous strong
signal station or digital channel.
t / u Station controls to
Page 57

Cadillac CT6 CUE Infotainment System (GMNA-Localizing-U.S./Canada-
9245669) - 2016 - crc - 4/6/16
56 Navigation
When the audio status pane
displays Artist and Song
Information, touch the
controls to go to the next or
previous track based on the current
media mode.
Day/Night Mode
Touch to access the Day/Night
Mode menu.
The options are:
.
Day Mode: Brightens the map
background.
.
Night Mode: Darkens the map
background.
.
Automatic: Adjusts the screen
background automatically
depending on the exterior
lighting conditions.
t / u
3D Buildings On/Off
When 3D building information is
available for a particular area, the
icons are shown at a zoomed level.
If the current vehicle position would
be hidden by another building, the
building is shown as translucent so
the vehicle ion is visible. Touch to
turn the 3D Buildings feature On
or Off.
Autozoom On/Off
At certain zoom levels, street detail
is removed to keep the view
uncluttered. Touch to turn the
Autozoom feature On or Off.
Routing Preferences
Touch the Routing Preferences list
item to access the Routing
Preferences menu. Options on how
the routes are created for route
guidance are listed on this menu.
Route Style
Touch this list item to change the
route type preferences.
The options are:
.
Fast (default)
.
Eco Friendly (if equipped)
.
Short
.
Edit Eco Profile
The Edit Eco Profile can be used to
configure two parameters for the
Eco Friendly route. These
parameters are Roof Load and
Trailer. For each parameter, the
options are None, Small, Medium,
and Large. Touch to scroll through
the list. The default for both is None.
These preferences are used for all
routes generated.
Route segment preferences are
other options showing on the
Routing Preferences menu.
Page 58

Cadillac CT6 CUE Infotainment System (GMNA-Localizing-U.S./Canada-
9245669) - 2016 - crc - 4/6/16
Navigation 57
This includes:
.
Use Toll Roads On/Off
.
Use Freeways On/Off
.
Use Carpool Lanes On/Off
.
Avoid Slow Traffic On/Off
.
Use Tunnels On/Off
.
Use Time Restricted Roads
On/Off
Traffic (If Equipped)
Touch to browse the traffic in the
area as well as adjust the traffic
settings. Where traffic information is
available, it is displayed on the map.
Where live traffic flow data is
available, it is displayed as a solid
line adjacent to the road. The road
is displayed in colors to show the
flow rate as:
.
Black – Stopped or Closed
.
Red – Poor
.
Yellow – Slow
.
Green – Normal
There are several options on the
Traffic menu:
.
Show Nearby Traffic Incidents
.
Show Flow On Map On-Off
.
Show Icons On Map On-Off
.
Traffic Routing Preferences
.
Traffic Types
1. Touch Show Nearby Traffic
Incidents to access the Traffic
List menu. This menu displays
the incident symbol and
highway name, along with the
distance and heading to the
incident.
2. Touch on the incident to display
additional details about the
incident as well as an option to
avoid that particular incident if
it is along the current route.
Traffic Routing Preferences
The system can be configured as to
how it reacts when receiving traffic
information. Touch Traffic Routing
Preferences to access the Traffic
Routing menu.
Page 59

Cadillac CT6 CUE Infotainment System (GMNA-Localizing-U.S./Canada-
9245669) - 2016 - crc - 4/6/16
58 Navigation
When this setting is Off, the system
will never take traffic conditions into
account when creating routes. In
addition, the two options below are
grayed out. If one of the grayed-out
options is touched, it automatically
turns the traffic avoidance feature
On and performs the desired
selection.
The two options, Ask Me Before
Avoiding and Automatically Avoid
Traffic will adjust the system as
follows:
.
If the Automatically Avoid Traffic
list item is touched, the system
will automatically adjust the
route based on traffic without
notifying the driver.
.
If the Ask Me Before Avoiding
list item is touched, the system
will always use Alerts to show
when there is an incident and
allow it to be avoided by
touching the avoid button.
If the Traffic list item is touched from
the Map Menu and Traffic is not
available because the SiriusXM
subscription is not valid, a pop-up
will display with information on how
to reactivate the subscription along
with the SiriusXM radio ID.
Traffic Types
Touch to access the Traffic
Types menu.
The system can be configured to
filter out certain types of traffic
events. If a particular type has been
turned off, the system does not
display it on the map, and does not
alert the driver.
Personal Data
Data that the system has saved
during the course of using the
navigation system can be managed
through:
.
Contacts
.
Recent Destinations
.
My POIs (if equipped)
.
Upload Saved Locations
.
Delete Autocomplete
Contacts
1. Touch Delete All Entries to
delete the entire list of
contacts. A pop-up displays to
confirm.
2. Touch Edit Contacts List to
display the Contacts to edit.
Page 60

Cadillac CT6 CUE Infotainment System (GMNA-Localizing-U.S./Canada-
9245669) - 2016 - crc - 4/6/16
Navigation 59
Recent Destinations
.
Touch Delete All Destinations to
delete the entire recent
destination list. A pop-up
displays asking to confirm the
deletion.
.
Touch Delete Individual
Destinations to display a recent
destinations list. Select the
individual entry to delete.
My POIs
.
Touch My POIs to display a
menu of other options.
.
Select Delete Individual
Categories. A My POIs category
list displays.
.
Select the individual entry to
delete.
.
Touch Delete All My POIs to
delete the entire list of
categories. A pop-up displays
asking to confirm the deletion.
.
To exit out of a list, touch the
Exit screen button in the top
right corner of the map to return
to the main map view.
Upload Saved Locations : Touch
to upload any saved locations such
as downloaded POIs and all entries
in the vehicle contacts list to the
USB device.
.
Touch Upload screen button on
the Upload Saved Locations
menu to save the Vehicle
Contacts list and any My POIs
that have been saved to the
vehicle.
.
Once saved locations have been
uploaded to a USB, they can be
transferred to a different vehicle
or restored to the current
contacts list.
Delete Autocomplete : Touch
Delete screen button on the Delete
Autocomplete History menu to clear
personal data from the keyboard.
A popup displays a message to
Delete all keyboard autocomplete
history. The system clears all
navigation addresses, POIs, etc.
The autocomplete will not delete
recent destinations. Touch Cancel to
stop the process.
Map Adjustments
ZOOM −/+ can be used to adjust
the scale of view on the map. When
the end of the zoom level is
reached, ZOOM −/+ will gray out.
Use the pinch/spread hand gesture
to zoom the scale of view on
the map.
.
ZOOM − (minus): Pinch fingers
together to zoom out.
.
ZOOM + (plus): Spread fingers
apart to zoom in.
The zoom scales can be configured
for English or metric units. To
change from English to metric, see
“Instrument Cluster” in the owner
manual.
Page 61

Cadillac CT6 CUE Infotainment System (GMNA-Localizing-U.S./Canada-
9245669) - 2016 - crc - 4/6/16
60 Navigation
.
Scroll Features
.
To scroll within the map, touch
anywhere on the map screen.
.
Nudge or slide a finger on the
map; the map moves in the
direction of the finger.
.
Fling a finger on the map; the
map will start scrolling in a short
continuous scroll.
.
Touch a finger on the location on
the map; the map recenters to
the location that was
touched on.
.
Touch a finger twice on a
location on the map; the map
zooms in one level to the
location that was touched
twice on.
When the map is recentered
away from being locked to the
vehicle position, the crosshairs
will show in the center of the
map. As the map continues to
be recentered, the crosshairs
will remain on the screen. When
the crosshairs are shown on the
screen, a callout with more
information displays. If the map
is moved from the current
location, the crosshairs will
disappear along with the callout.
.
Touch a finger on the callout
next to the crosshairs and the
destination details view displays.
From this view, route guidance
can be received or saved to the
vehicle's contact list.
.
When the map is recentered, the
straight-line distance from the
vehicle to the selected point is
displayed in the callout. In
addition, a heading direction in
the form of an arrow is displayed
to indicate the direction. The
arrow is shown in relation to the
current vehicle heading.
.
Touch a finger on a POI icon
shown on the map; the name of
the POI is shown in the address
callout, along with the city name
and state. If the callout is
selected, the destination details
view for the POI is shown.
.
After panning the map away
from the vehicle, touch RESET
to return the map to the current
position.
.
Touch the Overview button to
quickly get a view of the entire
route. The route Overview button
takes the place of the RESET
button while under route
guidance. Touch the RESET
button to return the map to the
current position.
Page 62

Cadillac CT6 CUE Infotainment System (GMNA-Localizing-U.S./Canada-
9245669) - 2016 - crc - 4/6/16
Navigation 61
Maps
The map database is stored in the
internal flash memory that is used in
the navigation system.
Detailed Areas
Road network attributes are
contained in the map database for
detailed areas. Attributes include
information such as street names,
street addresses, and turn
restrictions. A detailed area includes
all major highways, service roads,
and residential roads. The detailed
areas include Places of Interest
(POIs) such as restaurants, airports,
banks, hospitals, police stations,
gas stations, tourist attractions, and
historical monuments. The map
database may not include data for
newly constructed areas or map
database corrections that are
completed after production. The
navigation system provides full
route guidance in the detailed map
areas.
Navigation Symbols
Following are the most common
symbols that appear on a map
screen.
or
The vehicle symbol indicates the
current position and heading
direction of the vehicle on the map.
When under route guidance, a circle
with an arrow is added to the
vehicle symbol which indicates the
direction to the destination.
Vehicle Address Callout
Tap on the vehicle icon, to have the
current address of the vehicle
overlaid on the map next to the
vehicle icon in a callout. Another tap
hides the information.
Any address information about the
vehicle’s current location will be
shown, including the street, city, and
state names.
Tap on this callout to save the
current address to the vehicle
address book.
The destination symbol marks the
final destination after a route has
been planned.
Page 63

Cadillac CT6 CUE Infotainment System (GMNA-Localizing-U.S./Canada-
9245669) - 2016 - crc - 4/6/16
62 Navigation
This symbol indicates the
recommended maneuver that
should be performed. Touch it to
display the turn list or waypoint list.
The waypoint symbol marks one or
more set waypoints.
A waypoint is a stopover destination
point added to the planned route.
The No GPS symbol appears when
there is no Global Positioning
System (GPS) satellite signal. When
the GPS is gone, the vehicle
position on the map may not be
accurate.
The estimated time to the
destination displays. Touch the
Arrival button to toggle to duration
and to the distance of the
destination.
Autozoom
As a maneuver is being
approached, the map automatically
zooms in to give greater detail.
If lane guidance is available for the
maneuver, this is also shown.
When the system begins to
autozoom, it zooms in to its
minimum level. After the maneuver
is performed, the system slowly
zooms back out.
Destination
If route guidance is not active, touch
the NAV screen button on the Home
Page to access the map view.
Touch the Destination icon from the
map view to enter a destination.
Available methods of entering a
destination are Address,
Intersection, POIs, Recent,
Contacts. Several options can be
selected to plan a route. Some
destination items may be grayed out
if no destination was previously
entered or saved.
Another way to enter a destination
is to connect to the OnStar
(if equipped) and ask an OnStar
Advisor to download a destination
into the embedded navigation
system. See OnStar
®
system
®
System 0 80.
Page 64

Cadillac CT6 CUE Infotainment System (GMNA-Localizing-U.S./Canada-
9245669) - 2016 - crc - 4/6/16
Navigation 63
Touch on any of the icons to enter a
method of search, or touch on the
input field along the top to go to the
keyboard and enter a search term.
Navigation Next Turn Maneuver
Alert
The navigation system may need to
get the attention of the driver in
Touch the DESTINATION button to
go to the destination entry views.
Available Methods of Search
.
Address (entries by hierarchy)
.
Intersection
.
Points of interest (POIs)
.
Recent (destinations)
.
Contacts
certain situations.
If not in the navigation application
when a near maneuver prompt is
given, it is shown as an alert. The
alert contains the turn indicator and
button to display the main
navigation view or dismiss the alert.
Auto-Capitalization
The shift key is automatically
enabled when a period is entered
on the keyboard. Once the first
character is typed after the period,
the next character will change to
lower-case.
Alpha-Numeric Keyboard
The keyboard is used in multiple
locations throughout the system and
can be used with many features.
The navigation system uses the
alpha-numeric system keyboard
which includes 1 through 0, A
through Z in QWERTY layout,
hyphen, comma, period, Space, and
Sym which would show additional
characters needed..
The keyboard can also be modified
to include characters appropriate for
the region configured in the vehicle
settings.
@ GO : Touch to search for the
destination details of an address or
place of interest entered in the text
field. Once the GO screen button is
touched, the activity indicator
displays in the list of possible
matches.
| : Touch to display a list of
matches.
When there are multiple matches, a
dropdown arrow is shown after the
autocomplete text. This dropdown
displays an entire list of matches.
Touch the appropriate match without
having to enter more text.
z : Touch to delete the last typed
character. Touch and hold this
screen button to clear the entire text
Page 65

Cadillac CT6 CUE Infotainment System (GMNA-Localizing-U.S./Canada-
9245669) - 2016 - crc - 4/6/16
64 Navigation
field. If the entire text field has been
deleted, this screen button becomes
an Undo button. Touching Undo will
restore the deleted text.
EXIT : Touch to return to the
previous Map view.
Sym : Touch to show the symbol
keyboard.
Space : Touch to enter a space
between characters or the words of
a name.
characters, slide a finger left or right
to adjust the highlight of the special
character.
When the alternate keyboard is
used, the system remembers it the
next time it is viewed.
Special Character List
The following characters have
special characters beneath them:
Q : Touch to display the Interaction
Selector.
E : Touch to switch between
Alpha-Numeric Keyboard and
Character Recognition.
Special Characters
As the characters are typed on the
keyboard, a pop-up of the letter
touched displays above the key that
was touched.
Continue to touch and hold, and any
additional special characters
associated with that letter are
displayed around the current letter.
To select one of the special
One-Shot Search
Enter a full or partial Address,
Contact, or POI into the search bar
and the system will search and
display all of the matches.
The contacts that are searched
includes both connected phone’s
contacts list and the vehicle’s
contacts list.
Search Process
The process of prioritizing the
search is to help shorten the length
of time at finding the results. If there
is a 100% match found when a
search type is carried out, the
remaining searches abort.
The system conducts the search in
the following order:
1. Vehicle Contacts List
2. Connected Phone
Contacts List
3. POIs
4. Addresses
The Contacts are done first because
the list will be relatively short and
can be done quickly.
POIs are done next because the
amount of time it takes for search
for the average POI is consistent.
The less deviation during a search
would mean an average of less time
taken.
The Addresses are last because the
standard deviation for an address
search is very large. Some address
searches are very quick, but others
Page 66

Cadillac CT6 CUE Infotainment System (GMNA-Localizing-U.S./Canada-
9245669) - 2016 - crc - 4/6/16
Navigation 65
may take very long. Because of this,
the address search would not be
conducted unless a good match
could not be found in either
Contacts or POIs.
Autocomplete
The autocomplete is preloaded with
all recent destinations and POI
category names. Previous POI
name searches are remembered.
If only one type of result is found,
the single type result screen is
shown. Within each group, they are
listed in confidence order. This
means the highest confidence result
will be at the top.
If multiple types of matches are
found, the result list with the highest
confidence match displays.
Address and Contact matches are
shown in full width list format. The
match results will display unique
icons for full addresses, streets,
intersections, cities, states, and
countries.
POIs show in a split list format with
the map on the right displaying the
locations of the matches. The brand
icon or category icon will display for
the match results.
When a list displays, the results for
a particular type can be filtered by
touching the filter buttons along the
top of the screen. If there are no
particular results for a selected type,
a message is indicated in the list.
For example:
.
For no addresses: “No
Addresses Found Within <state/
region>”
.
For no POIs: “No POIs Found
Within<75 km/50 mi/800 km/
500 mi>.” This distance is shown
depending on what radius is
completed and what current
units are selected.
.
For no contacts: “No Contacts
Found.”
The system performs partial
searches on contacts, so typing a
first name or last name would find a
match. The entire contact name
does not need to be entered for it to
be found in a search.
Touching a contact listed on the
results list displays the standard
contact details view to select an
item, such as an address to start
routing, or a phone number to place
a call.
Address
.
A destination can be searched
by typing out the address,
intersection, highway, or freeway
entrance ramps on the
keyboard. This information is
typed and displayed in the
information field. Touch the
search icon to start the search.
Page 67

Cadillac CT6 CUE Infotainment System (GMNA-Localizing-U.S./Canada-
9245669) - 2016 - crc - 4/6/16
66 Navigation
For example:
City: Crawford
Street: Main Rd
House #: 12334
.
State information does not have
to be included in the search field
if entering an address that is
located in the same state.
.
Whenever the keyboard view is
entered, the last text that was
typed, even if it was not
searched on, will display.
.
A partial or complete address
can be typed in the search field.
If a partial address is typed, the
system attempts to use local
knowledge to fill in additional
information. For example, if no
city name or state are given, the
system assumes a search for
something in the current city or a
nearby city in the current state.
The system is also capable of
recognizing address formats
according to other regions.
If a destination address or location
being entered is outside of the
country, the country abbreviation
must be added after the address.
Spelling Mistakes
The system is able to offer
alternatives if the searched term is
not found exactly. The system uses
the closest term it finds and
provides those results.
The system first searches the
entered term exactly. If no matches
are found, partial words are used.
Search in Process
Touch the Search button, the results
screen displays with the activity
indicator. There is a non-selectable
List item in the list that says
“Searching” to indicate that it is in
process.
Once the results are found, the
correct list screen will display.
No Results Found
If no results are found from an
entered search term, a popup
displays indicating there are no
results found. Touch the OK screen
button to return to the
keyboard view.
Results Display
If only a single match is found at the
end of a search, the list is not
shown but the Destination Details
view is shown. Touch Back from the
Destination Details view to go back
to the results list screen. If it was a
POI search, the Continue POI
Search button is available in case
that was not the desired POI.
Places of Interest (POI)
While at the Home Page, touch the
Nav screen button to display a view
of the map. Touch the
DESTINATION screen button to go
to the destination entry views.
Page 68

Cadillac CT6 CUE Infotainment System (GMNA-Localizing-U.S./Canada-
9245669) - 2016 - crc - 4/6/16
Navigation 67
When a list displays, it can be
filtered for a particular type by
touching the filter button along
the top of the screen. If there
are no particular results for a
selected filter type, it is
indicated in the list.
5. Pan or zoom the map using the
1. Touch the POIs screen button
to display a list of POI
categories.
The first list item in every POI
list is a search function. For the
highest level of categories,
touch the Spell Name screen
button or select a category and
search within that selection.
2. Select a POI category to
display subcategories.
3. If a selected subcategory has
no results in the surrounding
area, the search is expanded
until a result is found.
4. If a high-level category is
selected, such as restaurants,
the map zooms in to the region
near the vehicle’s position to
show the nearest matches.
finger gestures to minimize the
POI list and to interact with the
map. The icons that were
shown before continue to be
displayed and updated. The list
is also updated based on
where the map was panned or
zoomed. The search for POIs
is constrained to where the
map has been moved to.
6. If the search map is touched to
recenter, the crosshairs are
shown to indicate the center of
the new search location. If a
POI icon is touched on while in
the full expanded map, a
callout for that location
displays. Touch the callout to
display the destination
details view.
7. Touch the map reset button to
return the map to automatic
zooming and searching. It is
recentered around the vehicle’s
position, the route, the
destination, or another location
that was specified for the
search. The map RESET
button is only displayed if the
map was manually adjusted.
If multiple types of matches are
found, the All list is shown with the
results sorted by confidence order
with the highest confidence result at
the top.
Using the Keyboard
The POI can be searched by
entering a POI name, category,
name and category, or phone
number on the keyboard.
Page 69

Cadillac CT6 CUE Infotainment System (GMNA-Localizing-U.S./Canada-
9245669) - 2016 - crc - 4/6/16
68 Navigation
For example, enter the
information as:
POI Name: Worldwide Food
POI Category: Restaurants
POI Name and Category:
Worldwide Food Restaurants
POI Phone Number: 0001222555
Additionally, a location may be
entered if the POI is not nearby.
This search will then be made
around the location that is given.
For example, enter the
information as:
POI Name and Location:
Worldwide Food Chicago IL
The POI keyboard search results
will display in the order in which
they were found.
POI Search Location
If browsing for POIs or searching for
results on a keyboard in a different
location than what was searched
previously, touch the Search
Options button on the mapview to
specify a different location.
Touch an option displayed on the
Select Search Area menu.
.
POIs Along Route
.
POIs Nearby
.
POIs Near Destination
.
POIs at Another Location
Favorite POIs
Locations, categories, or a particular
POI chain ID can be saved as
Favorites in the POIs view.
Tap on the
Interaction Selector, then drag up on
it to reveal the Favorites locations.
Touch and hold on a favorite
location, then touch on the category
to be saved. Whenever a set of
POIs is grouped, such as in a
category, the whole category is
saved in the favorites for recall.
Whenever a set of POIs that belong
to the same chain ID is saved in the
favorites, a POI chain saving pop up
message displays asking to save
only that location, or to save the
entire chain. POIs are only grouped
by chain when the sorting order is
Alphabetical. Touch the Sort button
to change the sorting order.
Recalling a POI Category or
Chain
If a POI category or chain favorite is
recalled, the system displays a list
of matching results defaulting to
nearby, but allows a search of other
locations. Touch the Search Options
button to specify a different location.
Q up arrow to reveal the
Page 70

Cadillac CT6 CUE Infotainment System (GMNA-Localizing-U.S./Canada-
9245669) - 2016 - crc - 4/6/16
Navigation 69
Creating and Downloading
Predefined POIs (My POIs)
In addition to the POIs already
stored in the Infotainment system,
predefined POIs can be created.
While creating a predefined POI, the
GPS coordinates for longitude and
latitude of the POI’s location and a
descriptive name will need to be
entered.
After creating the predefined POIs,
they can be downloaded to the
infotainment system from a USB
stick.
Once downloaded, the POI data
becomes a selectable destination in
the My POIs menu.
Creating a Text File with
Information
Create a text file by using a simple
text editor software. Save this file
with a name and extension of .csv,
for example, “TomsPOI.csv.”
Enter the POI information into the
text file in the following format:
.
Longitude coordinate, Latitude
coordinate, “Name of POI,”
“Additional information,” “Phone
number.”
Example: 7.0350000,
50.6318040, “Michaels Home,”
“123 Maple Lane,”
“02379234567.”
.
The GPS coordinates must be
expressed in decimal degrees
and can be taken from a
geographical map. The
additional information and phone
number strings are optional.
.
The POI name and the
additional information string may
not exceed 60 characters.
.
POI information for each
destination address must be
entered in a single separate line.
Storing the POI on a USB Drive
In the root directory of a USB drive,
create a folder name “myPOIs.” For
example, “F:\” is the root directory of
the USB drive.
In the “myPOIs” folder, store the
text file with your POIs, for example,
“F:\myPOIs\TomsPOIs.csv.”
Downloading the POI to the
Infotainment System
Connect the USB drive containing
the POI information to the USB port
of the infotainment system.
A message displays prompting
whether or not to download the POI
information from the USB stick. All
POIs found are saved even if they
are in multiple folders.
Subfolders can also be created to
organize the POIs into categories,
for example, “F:\myPOIs\
Restaurants\TomsPOIs.csv.”
If the message is dismissed or
ignored, no POI information is
downloaded. This prompt will not
reoccur for the current ignition cycle.
When the system is finished
downloading, a pop-up displays
asking to specify a category for the
new POIs, if desired.
Page 71

Cadillac CT6 CUE Infotainment System (GMNA-Localizing-U.S./Canada-
9245669) - 2016 - crc - 4/6/16
70 Navigation
Importing and Overwriting
Categories
When POIs are found on a media
device, the date of the file is
examined and compared to the date
for the files already in the system.
If the file being downloaded is
newer than the one on the system,
that particular category of POIs is
overwritten. Any other POIs that had
previously been saved in other
categories are not affected.
Address Book Download
If an Address Book is found on the
connected USB device, the same
alert is used to indicate that
locations have been found and they
can be downloaded. If there is
already content in the vehicle
Contacts List, the system prompts if
the stored content should be
overwritten. Select Save to
overwrite the existing Contacts
information. Select Cancel to abort
the import of information.
Browsing Downloaded POIs
Access the downloaded POIs by
selecting My POIs under Personal
Data from the Menu list.
Edit My POIs
Downloaded POIs can be edited at
a category level. These POIs can
either be deleted as an entire
category or reassigned as another
category. To edit the categories:
.
Select the Edit button at the
main category view to edit the
POIs. Edit buttons display next
to each category name. There is
no POI browsing in this mode;
only edit functions are available.
.
Once an action such as deleting
or reassigning has been
selected, the changes are saved
immediately.
Changing POI Categories
POI categories can be assigned to a
different category by using the same
method as assigning a category for
a Contact entry. When editing, the
right side of the screen displays the
current category name.
Deleting POI
POI categories can be deleted by
selecting Edit and then Delete.
A pop-up displays to confirm the
deletion.
Saved Destinations
Select a saved destination from the
Contacts or Recent screen.
Contacts
Select the CONTACTS button to
view the vehicle’s contact list or a
connected Bluetooth device. If a
particular contact has a single
address associated with it, that
contact has a Quick Route list item
function button next to it. Contacts
without this Quick Route button
either have multiple addresses or no
address at all. Touch the Quick
Route button to go to the
Destination Details view.
Touch on an address, either from
the Quick Route on the contact list
or a specific address from the
contact detail list, to go to the
destination view showing that
address on the map.
Page 72

Cadillac CT6 CUE Infotainment System (GMNA-Localizing-U.S./Canada-
9245669) - 2016 - crc - 4/6/16
Navigation 71
Trips from Contacts can be saved
and recalled. The order is based on
when the trip was last used. When
the trips are saved, they are given a
default title of the final destination
name. If there are no saved trips,
this list item is hidden.
Favorite Destinations
.
Destinations can be saved as
Favorites for recall later.
Depending on the favorite, when
an address or POI favorite is
recalled, the Destination Details
View is shown.
.
When a favorite address is being
routed to, it is shown active.
Touch on the active favorite to
suspend that route.
.
Save locations as Favorites for
recall later in the Destination
Details View.
.
Save trips from the
Contacts List.
Storing Favorites from the Contact
Details List
A contact name or any of the
contact’s information such as phone
number, e-mail address, or address
from Contact Details can be stored
as a Favorite.
.
Touch and drag up on the row of
Interaction Selector buttons to
reveal the Favorite buttons.
.
Touch and hold on the favorite
location while viewing a contact
on the Contact Details List. The
contact name and all contact
information can be stored.
.
Touch to save as a favorite. The
favorite label will be the name of
the contact.
.
Touch on the Favorite to display
the destination view.
Storing Favorites from Map
Favorite locations can be stored
from the Map View.
If not under route guidance, the
current vehicle location will be
saved as a Favorite. If under route
guidance, the final destination will
be saved.
Touch and drag up on the row of
Interaction Selector buttons to
reveal the Favorite buttons. Touch
and hold on the favorite location
from the Map View to save it.
Page 73

Cadillac CT6 CUE Infotainment System (GMNA-Localizing-U.S./Canada-
9245669) - 2016 - crc - 4/6/16
72 Navigation
Route Guidance
.
Touch GO to go to the main
navigation view and to start
route guidance.
.
If the system has an active
route, a pop-up will display,
“What would you like to do with
this destination?” The options
are: Add As Waypoint, Set New
Destination, or Cancel.
.
If a waypoint is added, it is
placed in the location that leads
to the most efficient route.
.
There is a maximum number of
waypoints that can be added to
the system. When the maximum
number of waypoints has been
reached, a pop-up displays
indicating that a waypoint must
first be deleted before a new one
can be added. The system will
hold this waypoint into a
Pending Waypoints list and will
automatically be added to the
route once a position is
available, either by arriving at a
waypoint, or by deleting one.
.
To save a location, tap on the
to display the Favorite buttons.
Touch and hold on a favorite
location to save the shown
location as a Favorite.
Estimated Time of Arrival (ETA)
and Distance
.
When under route guidance, the
system shows the ETA or travel
time, or the driving distance.
.
The ETA and travel time are
calculated using any available
traffic information.
.
If in a waypoint trip, the ETA,
travel time, and driving distance
are all shown relative to the final
destination.
.
The final ETA is shown taking
into consideration any time zone
crossings that the route has
traveled through.
.
Touch the ETA information area
to switch between the estimated
arrival time, total driving time
resulting, and driving distance.
Q
Current Street Name
The current street name that the
vehicle is driving on is displayed
along the bottom center of the
display.
When driving off-road or on an
unknown road, “Off Road Location”
displays.
City Lane Guidance
Page 74

Cadillac CT6 CUE Infotainment System (GMNA-Localizing-U.S./Canada-
9245669) - 2016 - crc - 4/6/16
Navigation 73
When a maneuver is approached
that has city lane guidance
information, it replaces the normal
maneuver indicator.
The arrows will expand toward the
center of the screen so that the
maneuvers can be identified in an
easier way.
Highway Lane Guidance
The junction view image displays on
the right edge of the screen and
temporarily covers the Distance
information. The current vehicle
position and street name is moved
left and centered in the available
map display when this is displayed.
Off-Road Mode
When the vehicle is off-road, the
system displays the off-road arrow
in the turn indicator and displays
“Off Road Location” in the street
name field.
Destination Arrival
The route review information
displays in the turn indicator location
and the destination address
displays in the street name field.
Audio Information
The audio information remains in
the same position in the lower right
corner of the display.
The current street name information
remains in the same location, but
will truncate if needed.
Turn List
Touch on the next turn indicator
shown on the map to display the
turn list or waypoint list. The
Interaction Selector is minimized
automatically. Touch
following options:
Destination
Touch the Destination screen button
to add a waypoint or change the
destination while viewing the turn
list. When the Destination screen
button is touched, the display shows
the Destination screens.
End Guidance
Touch the End screen button to
suspend the current route in the turn
list. When the End screen button is
touched, the turn list is exited and
the display returns to the main
map view.
Avoid Areas
Touch the Avoid Areas screen
button to select the highway name
that is to be avoided. The system
shows a pop-up asking how many
miles or if the entire road should be
avoided.
Q to reveal the
Page 75

Cadillac CT6 CUE Infotainment System (GMNA-Localizing-U.S./Canada-
9245669) - 2016 - crc - 4/6/16
74 Navigation
Turn List
.
When under a waypoint trip,
touch on the Turn List Interaction
Selector button to show the turn
list. When entering a turn list, the
next maneuver instruction is
spoken.
.
The turn list title is the name or
address of the destination.
Touch on the information button
next to the name of the
destination to display the
destination information.
.
The turn list is sorted in order
with the next maneuver at the
top of the list and the
subsequent maneuvers listed
below it. The next maneuver is
always highlighted upon entry
into the Turn List to quickly show
what the next maneuver is.
.
Each maneuver indicates the
distance between it and the
previous maneuver or the
vehicle’s current location. The
next maneuver at the top will
count down until the maneuver
is reached, and then the next
maneuver will begin to
count down.
.
Each maneuver has an
estimated time of arrival based
on the current driving conditions.
Saved Trips
Waypoint trips can be saved for
later recall. Touch the Add button in
the waypoints list to save the trip to
the Saved Trips list in the vehicle’s
contacts list. When trips are saved,
they are given a default title of the
final destination. Saved trips can be
edited by selecting the Edit list item
button to access the edit screen for
the saved entry. The only field that
can be edited is the name field.
Touch on the name field to access
the keyboard view. Type the name
change. This change is
automatically saved when executed
by the keyboard.
The saved trip can also be deleted
from the edit mode. Touch the
delete button and a delete
confirmation pop-up will display.
Waypoints
.
When under a waypoint trip,
touch on the next turn indicator
to bring up the waypoint list. The
last waypoint view is shown,
which could be Waypoints, Turn
List, or Edit.
.
The waypoint list is sorted in
order with the next waypoint at
the top of the list. Each waypoint
Page 76

Cadillac CT6 CUE Infotainment System (GMNA-Localizing-U.S./Canada-
9245669) - 2016 - crc - 4/6/16
.
is indicated with a numbered
icon, starting with the next
waypoint.
.
To indicate what segment of the
route is for the next waypoint,
and what is for the remainder of
the route, they appear in
different colors.
Optimized Route
.
Touch the Optimize screen
button to optimize the current
waypoint trip.
.
The optimization is done
according to how the
preferences are set for new
routes; for example, fastest
route, shortest distance, or eco
friendly.
.
While the system is optimizing
the route, the waypoint trip has
the activity indicator displayed
over top of it. If the system is
calculating the ETA and travel
distance for a waypoint, the
activity indicator is displayed in
the list header.
When either a waypoint trip is
first created, or additional
waypoints are added to an
existing waypoint trip, they are
added in the location that would
lead to an optimized route.
.
If a destination is already
planned and a waypoint is
added, it is either added before
or after the current destination,
whichever leads to the most
optimal route.
.
If under an existing waypoint trip
consisting of two or more
destinations, any additional
waypoints are added in the
location that would lead to the
most optimal route.
Edit Route
.
Touch the Edit screen button to
modify the order or remove a
waypoint from the route. Touch
the delete screen button to
remove a waypoint from the
route.
.
A pop-up displays asking for
confirmation of the waypoint
deletion.
Navigation 75
SiriusXM Travel Link Weather
(If Equipped)
SiriusXM Travel Link Weather is
available on the navigation system
through a service fee subscription.
From the Home Page, touch
Weather. The system displays a
weather page with a default view of
the hourly frecast. The other
available views are tabs in the
interaction selector on the bottom of
the display.
These weather option displays are:
1. Hourly: The Hourly Forecast
view shows the current day’s
forecast split into 3-hour
increments.
2. 5-day: The 5-day view shows
the current day’s forecast as
well as the next four days.
3. On Route: The On Route view
shows the forecasted weather
for the route. This feature is
only available while under
route guidance.
Page 77

Cadillac CT6 CUE Infotainment System (GMNA-Localizing-U.S./Canada-
9245669) - 2016 - crc - 4/6/16
76 Navigation
4. Location: The Location view is
where the city can be selected
to receive and display
weather data.
5. Map: The Map view shows
three levels of zoom on the left
side of the map. These zoom
views are Near, Mid, and Far.
Touch any one to change the
zoom level.
6. Menu
Allow approximately 15 minutes for
the current weather in the area to
display.
Weather Screen Not Under
Guidance
The weather application uses the
navigation system to provide the
appropriate information for the
guidance route. When not under
guidance, it defaults to the current
location.
City and State : The city and state
are displayed for the view currently
shown. The default is the current
city and state that the vehicle is in.
Forecast Information
.
The map can be panned to
another location. The forecast
information is updated to the
new location.
.
The city and state update to
reflect the current location.
Location
Under the Location view there are
options to select for displaying the
desired location.
These options are:
1. Search
Touch the Search screen
button to access the keyboard.
The city or zip code can be
typed in. If there is a single
match, the map view returns to
the last known view before
clicking on the location tab.
If there are multiple matches,
there is a list with the possible
choices. Select one to return to
the last known view.
Page 78

Cadillac CT6 CUE Infotainment System (GMNA-Localizing-U.S./Canada-
9245669) - 2016 - crc - 4/6/16
Navigation 77
2. Recent
Recent locations are a
standard list. The Recent
Locations are chronologically
ordered.
3. Nearby
Nearby locations are a
standard list. The Nearby
Locations are based on how
many miles away.
Map
The Map view shows three levels of
zoom on the left side of the map.
There is also a play screen button to
start the weather map moving. For
the moving map, the other
interaction elements will fade away
except or the time an a pause
button. Touch anywhere on the
display to return the view to pause.
There is a reset button in the lower
left corner of the map. Touch the
reset button to reset back to the
current vehicle position.
Weather Menu
Touch MENU on the Weather
Interaction Selector along the
bottom of the map screen to display
the Weather Menu.
The options are:
.
Weather Advisories: Any
weather advisories that are in
effect for the local area or while
on route are displayed in a list.
Touch on an advisory from the
list to display a screen that gives
additional details about the
advisory and shows the advisory
location on the map.
.
Configure Weather Alerts: Touch
to access the Weather Alerts
menu. Touch the Weather Alerts
line item to turn the alerts On or
Off. Touch to select any one of
the other line items such as High
Alert, Low Alert, Informational
Alert to filter the selected alerts
for display, while the others will
be suppressed.
.
Map Legend: Touch to display
the Map Legend.
Interaction Selector
The Interaction Selector at the
bottom of the screen can be used to
switch between different views
within the weather screen.
These buttons are:
.
ZOOM: Touch to zoom the map
in or out.
Page 79

Cadillac CT6 CUE Infotainment System (GMNA-Localizing-U.S./Canada-
9245669) - 2016 - crc - 4/6/16
78 Navigation
.
HOURLY: Touch to display the
hourly forecast for the current
vehicle location. A forecast icon
is shown for each period
available.
.
5 DAY: Touch to display the
current weather, six-hour
forecast, and tomorrow’s
weather. A forecast icon is
shown for each period available.
.
LOCATION: Touch to select a
city to receive and display
weather data..
.
MAP: Touch to display a map
view of the current weather
around the area of the vehicle’s
position.
.
MENU: Touch to display the
current advisories, turn weather
alerts on or off, and view the
map legend.
The map legend explains each type
of color or symbol on the map.
SiriusXM NavTraffic (If
Equipped)
The infotainment system may have
SiriusXM NavTraffic
subscription service provided
through SiriusXM Satellite Radio.
A service fee is required to receive
the SiriusXM NavTraffic service.
Detailed traffic information is
delivered to the vehicle’s navigation
system by the SiriusXM Radio
satellites. SiriusXM NavTraffic
provides continuously updated
traffic information.
The service may be available in
more cities in the future. Visit
www.siriusxm.com/navtraffic for
more details on local coverage.
To access the traffic features, touch
the Traffic screen button on the
Map Menu.
If traffic is not available because
there is no valid SiriusXM
subscription, a pop-up displays
information on how to reactivate the
subscription and SiriusXM radio ID.
®
. It is a
Traffic Alert While Under Guidance
If data is received about a traffic
development on the route ahead, a
search for a better route is
performed. If a better route is found,
information may be displayed in an
alert. This alert displays the route
information and how much time may
be saved. If the alternative route is
accepted, the current route will be
altered.
If the alert is not acknowledged, the
alert automatically times out and
does not modify the route.
The detail view of the incident
shows any data about the incident
as well as how much time could be
saved by avoiding it. The map view
shows the incident, the original
route, and the suggested route.
Page 80

Cadillac CT6 CUE Infotainment System (GMNA-Localizing-U.S./Canada-
9245669) - 2016 - crc - 4/6/16
Navigation 79
If voice prompts are enabled, the
incident information is spoken.
Touch the TAKE NEW ROUTE
screen button to change to the new
route.
Traffic Alert While Not Under
Guidance
While driving and not under
guidance, the system can receive
data indicating an accident or slow
traffic flow. The information about
the incident or slow traffic is
displayed as an alert when the
incident is 5 km (3 mi) ahead. The
incident can be viewed on the map.
Touch the DISMISS screen button
to return to the previous map.
SiriusXM Travel Link Movie
Listings
A movie theater POI can be
searched through a POI search or
browsed through the POI category
structure. When SiriusXM Travel
Link Movie Listings information is
available for the selected theater,
this detailed information is shown in
the additional details area of the
display.
The details that are shown depend
on the source of the information.
Details shown include:
.
Movie Names
.
Parental Ratings (G, PG-13,
R, etc.)
.
Showtimes
.
Runtime
SiriusXM Travel Link Fuel
Pricing
When SiriusXM Travel Link Fuel
Pricing information is available for a
particular fuel station, the price
displays for the regular unleaded or
diesel fuel, depending on the fuel
type configured in the system.
This fuel station POI can either be
searched for through a POI search
or browsed through the POI
category structure.
.
Touch the Sort button to change
the sort method. The default sort
method is based on distance
with the closest fuel stations
shown at the top of the list.
.
Touch the Sort button to cycle
through the sorting options of
distance, price, or name. The
last viewed sorting method is
displayed and is retained over
ignition cycles.
If the sorting method of price has
been selected, the fuel stations in
the list will appear from the lowest to
the highest price based on the fuel
type selected. For gasoline, the
price shown is for regular unleaded.
When diesel is selected as the fuel
type, the diesel price is shown.
Page 81

Cadillac CT6 CUE Infotainment System (GMNA-Localizing-U.S./Canada-
9245669) - 2016 - crc - 4/6/16
80 Navigation
.
OnStar®System
With an OnStar®subscription, an
OnStar Advisor can download a
destination to the vehicle or into the
built-in navigation system. If an
OnStar Turn-by-Turn route is in
progress, all other internal
navigation functions are disabled
until the route is completed.
When navigation is selected, the
OnStar Turn-by-Turn screens
display.
Turn-by-Turn Navigation
Touch the MENU button to go to the
Turn-by-Turn Menu.
The following options display:
.
Plan Route (if the vehicle is off
the route)
Directory
.
Store Destination
.
Cancel
Plan Route
Select My Destination to display a
special version of the Maneuver
View. The Destination Address is
displayed in the Street Name and
the total distance to the destination
is displayed in the Distance to
Maneuver View. Touch the DONE
button to return to the
Maneuver View.
Directory
.
Touch List to display a list of
saved turn-by-turn routes.
.
Touch Store to save another
route.
.
Touch Delete to delete a stored
route.
.
Touch Delete ALL Nametags to
delete all stored routes.
.
Touch Cancel to back out of a
current selection.
Cancel a Route
If a route is in progress using either
the vehicle navigation system or the
OnStar Turn-by-Turn route, and a
new route is requested, the current
route in progress will be canceled.
An OnStar Advisor can cancel the
vehicle navigation system route.
Route guidance can be resumed by
selecting the Resume To screen
button in the Map Menu.
Page 82

Cadillac CT6 CUE Infotainment System (GMNA-Localizing-U.S./Canada-
9245669) - 2016 - crc - 4/6/16
Navigation 81
Settings
Driving Mode
If equipped, touch the Driving/Mode
Home Page icon to access the
Driving Mode visualization screen.
From the visualization screen,
Driving Mode shows the current
driving configuration. See “Driving
Mode” in the owner manual.
Voice
Touch SETTINGS on the Home
Page to adjust features and
preferences, such as Time and
Date, Driving Mode, Language,
Valet Mode, or Radio. For setting
options, see Settings 0 101.
A few of the setting options change
the way the navigation system
displays or reacts while in use.
1. Touch the SETTINGS screen
button on the Home Page.
2. Touch the scroll bar until the
desired option displays. Select
the desired settings to change.
Voice recognition allows for
hands-free operation within the
navigation, audio, phone, and
weather applications. See Voice
Recognition 0 85.
Touch the voice screen button to
display the Voice menu.
Confidence Threshold : Touch to
change the sensitivity of the voice
recognition system.
Prompt Length : Touch to change
the prompt length to Short or Long.
Audio Feedback Speed : Touch to
change the audio feedback speed to
Slow, Medium, or Fast.
Display
Touch Display to access display
options:
Proximity Sensing : Touch
Proximity Sensing to turn the
sensing On and Off, or to turn
sensing On for Map Only.
.
Touch the Calibrate Touchscreen
setting adjusts the calibration of
the touchscreen.
.
Touch the Turn Display Off to
turn the display option off.
Calibrate Touchscreen : Touch to
display the Touchscreen Calibration
Screen.
Turn Display Off : Touch to turn the
Display option off.
Rear Camera
Touch to access the rear camera
options:
.
Guidance Lines – Touch to turn
the guidance lines option On
or Off.
.
Rear Park Assist Symbols –
Touch to turn the rear park assist
symbols option On or Off.
Page 83

Cadillac CT6 CUE Infotainment System (GMNA-Localizing-U.S./Canada-
9245669) - 2016 - crc - 4/6/16
82 Navigation
.
Return to Factory Settings –
Touch to access options
such as:
‐ Restore Vehicle
‐ Clear All Private Data
‐ Restore Radio Settings
See the owner manual.
Low Fuel Alert
If the vehicle reaches a low fuel
level, the system displays an alert
about the low fuel condition. Touch
the More Info screen button to view
nearby gas stations and start
guidance, if desired.
If the remaining driving distance is
available from the system, this is
included in the alert.
Global Positioning System (GPS)
The position of the vehicle is
determined by using satellite
signals, various vehicle signals, and
map data.
At times, other interference such as
the satellite condition, road
configuration, condition of the
vehicle, and/or other circumstances
can affect the navigation system's
ability to determine the accurate
position of the vehicle.
The GPS shows the current position
of the vehicle using signals sent by
GPS satellites. When the vehicle is
not receiving signals from the
satellites, a symbol appears on the
map screen. See Navigation
Symbols 0 61.
This system might not be available
or interference can occur if any of
the following are true:
.
Signals are obstructed by tall
buildings, trees, large trucks,
or a tunnel.
.
Satellites are being repaired or
improved.
For more information if the GPS is
not functioning properly, see
Problems with Route Guidance 0 83
and If the System Needs
Service 0 83.
Vehicle Positioning
At times, the position of the vehicle
on the map could be inaccurate due
to one or more of the following
reasons:
.
The road system has changed.
.
The vehicle is driving on slippery
road surfaces such as sand,
gravel, or snow.
.
The vehicle is traveling on
winding roads or long, straight
roads.
.
The vehicle is approaching a tall
building or a large vehicle.
.
The surface streets run parallel
to a freeway.
.
The vehicle has been transferred
by a vehicle carrier or a ferry.
Page 84

Cadillac CT6 CUE Infotainment System (GMNA-Localizing-U.S./Canada-
9245669) - 2016 - crc - 4/6/16
Navigation 83
.
The current position calibration
is set incorrectly.
.
The vehicle is traveling at high
speed.
.
The vehicle changes directions
more than once, or the vehicle is
turning on a turn table in a
parking lot.
.
The vehicle is entering and/or
exiting a parking lot, garage, or a
lot with a roof.
.
The GPS signal is not received.
.
A roof carrier is installed on the
vehicle.
.
Tire chains have been installed.
.
The tires are replaced or worn.
.
The tire pressure for the tires is
incorrect.
.
This is the first navigation use
after the map data is updated.
.
The 12-volt battery has been
disconnected for several days.
.
The vehicle is driving in heavy
traffic where driving is at low
speeds, and the vehicle is
stopped and started repeatedly.
Problems with Route Guidance
Inappropriate route guidance can
occur under one or more of the
following conditions:
.
The turn was not made on the
road indicated.
.
Route guidance might not be
available when using automatic
rerouting for the next right or
left turn.
.
The route might not be changed
when using automatic rerouting.
.
There is no route guidance when
turning at an intersection.
.
Plural names of places might be
announced occasionally.
.
It could take a long time to
operate automatic rerouting
during high-speed driving.
.
Automatic rerouting might
display a route returning to the
set waypoint if heading for a
destination without passing
through a set waypoint.
.
The route prohibits the entry of a
vehicle due to a regulation by
time or season or any other
regulation which may be given.
.
Some routes might not be
searched.
.
The route to the destination
might not be shown if there are
new roads, if roads have
recently changed, or if certain
roads are not listed in the map
data. See Maps 0 61.
To recalibrate the vehicle's position
on the map, park with the vehicle
running for two to five minutes, until
the vehicle position updates. Make
sure the vehicle is parked in a
location that is safe and has a clear
view of the sky and away from large
obstructions.
If the System Needs Service
If the navigation system needs
service and the steps listed here
have been followed but there are
still problems, see Problems with
Route Guidance 0 83.
Page 85

Cadillac CT6 CUE Infotainment System (GMNA-Localizing-U.S./Canada-
9245669) - 2016 - crc - 4/6/16
84 Navigation
Map Data Updates
The map data in the vehicle is the
most up-to-date information
available when the vehicle was
produced. The map data is updated
periodically, provided that the map
information has changed.
For questions about the operation of
the navigation system or the update
process, contact the GM Nav Disc
Center toll-free phone number,
1-877-NAV-DISC (1-877-628-3472)
or go to the center’s website,
www.gmnavdisc.com. If updates are
needed, call the GM Nav Disc
Center or order online.
To order, have the vehicle’s Vehicle
Identification Number (VIN)
available to ensure the correct and
most up-to-date map data for the
vehicle is sent. See “Vehicle
Identification Number (VIN)” in the
owner manual.
Database Coverage Explanations
Coverage areas vary with respect to
the level of map detail available for
any given area. Some areas feature
greater levels of detail than others.
If this happens, it does not mean
there is a problem with the system.
As the map data is updated, more
detail can become available for
areas that previously had limited
detail. See Map Data Updates 0 84.
Page 86

Cadillac CT6 CUE Infotainment System (GMNA-Localizing-U.S./Canada-
9245669) - 2016 - crc - 4/6/16
Voice Recognition 85
Voice Recognition
Voice recognition allows for
hands-free operation within the
navigation, audio, phone, and
weather applications. This feature
can be started by pressing either
the
g button on the steering wheel
g on the touchscreen display.
or
However, not all features within
these areas are supported by voice
commands. Generally, only complex
tasks that require multiple manual
interactions to complete are
supported by voice commands.
For example, tasks that take more
than one or a two button touch such
as selecting a song or artist to play
from a media device would be
supported by voice commands.
Other tasks, like adjusting the
volume or seeking up or down, are
audio features that are easily
performed by touching one or two
buttons, and are not supported by
voice commands.
In general there are flexible ways to
speak commands for completing the
tasks. Most of them, except
destination entry and voice keypad,
can be completed in a single
command. If the task takes more
than one command to complete, the
first command should be to indicate
the kind of task to be performed, like
“ NavigationDestination Entry.” The
system replies with prompts that
lead you through a dialog to enter
the necessary information. For
example, if a destination for route
guidance is needed, say
“Navigation” or “Destination Entry.”
If your language supports it, try
stating a One Shot command, such
as “Navigate to Address one two
three Main Street, Lansing
Michigan.” This type of destination
entry command is supported in
some languages. Another example
of a One Shot Destination Entry
command is, “Navigate to Place Of
Interest – Hotels.” If these
commands don’t work, try saying,
“Navigate to Place of Interest” or
“Navigate to Address” and the
system will for the rest.
Voice recognition can be used when
the ignition is on or when Retained
Accessory Power (RAP) is active.
See “Retained Accessory Power
(RAP)” in the owner manual.
Using Voice Recognition
Voice recognition becomes available
once the system has been
initialized. This begins when the
ignition is turned on. Initialization
may take a few moments.
1. Touch
g on the steering wheel
control to activate voice
recognition, or touch
infotainment touchscreen on
the center stack.
.
If voice recognition is
started from the steering
wheel control, the
instrument cluster displays
the selections and visual
dialog content.
.
If voice recognition is
started from the
infotainment touchscreen ,
the selections and visual
dialog content are
g on the
Page 87

Cadillac CT6 CUE Infotainment System (GMNA-Localizing-U.S./Canada-
9245669) - 2016 - crc - 4/6/16
86 Voice Recognition
displayed on both the
center stack display and the
instrument cluster display.
2. The audio system mutes and
the system plays a prompt
followed by a beep.
3. Wait until after the beep
completes, then clearly speak
one of the commands
described in this section.
A voice recognition system
prompt can be interrupted while
it is playing by pressing
again.
For example, if the prompt
seems to be taking too long to
finish, press
beep should happen
right away.
There are two voice prompt modes
supported:
.
Long verbal prompts: The longer
prompts provide more
information regarding the
supported actions.
g again and the
g
.
Short prompts: The short
prompts provide simple
instructions about what can be
stated.
If a command is not spoken, the
voice recognition system says a
help prompt.
Prompts and Screen Displays
While a voice recognition session is
active, there will be corresponding
buttons on screens displayed.
Manual interaction in the voice
recognition session is permitted.
Interaction during a voice session
may be completed entirely using
voice commands, or some
selections may expedite a session.
If a selection is made using a
manual control, the dialog will
progress in the same way as if the
selection was made through a voice
command. Once the system is able
to complete the task, or the session
is terminated, the voice recognition
dialog stops.
An example of this type of manual
intervention is touching on an entry
of a displayed number list instead of
speaking the number associated
with the entry desired.
Canceling Voice Recognition
.
Touch the Home screen button.
Touching this button will
terminate the voice recognition
session.
.
Touch or say “Cancel” or “Exit”
to terminate the voice
recognition session and display
the screen from which voice
recognition was initiated.
.
Press
i on the steering wheel
controls to terminate the voice
session and display the screen
from which voice recognition
was initiated.
Most languages do not support
natural language commands in
sentence form. For those
languages, use direct commands
like the examples shown on the
display.
Page 88

Cadillac CT6 CUE Infotainment System (GMNA-Localizing-U.S./Canada-
9245669) - 2016 - crc - 4/6/16
.
Helpful Hints for Speaking
Commands
Voice recognition can understand
commands that are either naturally
stated in sentence form or direct
commands that state the application
and the task.
For best results:
.
Listen for the prompt and wait
for the beep before saying a
command or reply.
.
Say “Help” or look at the screen
display for example commands.
.
A voice recognition system
prompt can be interrupted while
it is playing by pressing
For example, if the prompt
seems to be taking too long to
finish, to speak the command
without waiting for the prompt to
complete, press
wait for the beep.
.
Speak the command naturally,
not too fast, not too slow. Use
direct commands without a lot of
extra words.
g again and
g again.
Usually Phone and Audio
commands can be spoken in a
single command.
For example, “Call Dave Smith
at work,” “Play” followed by the
artist or song name, or “Tune”
followed by the radio station
number.
.
Navigation destinations are too
complex for a single command.
First, state a command that
explains the type of destination
needed, such as I want
directions to an “Address,”
“Navigate to an intersection,” “I
need to find a Place of Interest
or POI,” or “Directions to a
Contact.” The system responds
with requesting more details.
After saying “Place of Interest,”
only major chains are available
by name. Chains are businesses
with at least 20 locations. For
other POIs, say the name of a
category like “Restaurants,”
“Shopping Malls,” or “Hospitals.”
Some languages support complete
destination requests in a single
command. If your language
Voice Recognition 87
supports it, try stating a One Shot
command such as, “Navigate to
Address one two three Main Street,
Lansing Michigan.” Another
example of a One Shot Destination
Entry command is, “Navigate to
Place Of Interest – Hotels.” If these
commands do not work, try saying
“Navigate to Place Of Interest” or
“Navigate to Address” and the
system will come back and ask for
details of your destination.
Most languages do not support
natural language commands in
sentence form. For those
languages, use direct commands
like the examples shown on the
display.
There is no need to memorize
specific command words. Direct
commands might be more clearly
understood by the system. An
example of a direct command would
be “Call 555-1212.” Examples of
these direct commands are
displayed on most of the screens
while a voice session is active.
If “Phone” or “Phone Commands,” is
stated, the system understands that
Page 89

Cadillac CT6 CUE Infotainment System (GMNA-Localizing-U.S./Canada-
9245669) - 2016 - crc - 4/6/16
88 Voice Recognition
a phone call is requested and will
respond with questions until enough
details are gathered.
If the phone number has been
saved with a name and a place, the
direct command should include
both, for example “Call Dave Smith
at work.”
Using Voice Recognition for
List Options
When a list is displayed, a voice
prompt will ask to confirm or select
an option from that list. A selection
can be made by manually selecting
the item, or by speaking the line
number for the item to select.
When a screen contains a list, there
may be options that are available
but not displayed. The list on a
voice recognition screen functions
the same as a list on other screens.
Scrolling or flinging can be used to
help display other entries from
the list.
Manually scrolling or paging the list
on a screen during a voice
recognition session suspends the
current voice recognition event and
plays the prompt “Make your
selection from the list using the
manual controls, touch the Back
screen button to try again.”
If manual selection takes more than
15 seconds, the session terminates
and prompts that it has timed out.
The screen returns back to the
screen where voice recognition was
initiated.
The Back Command
Say “Back” or touch the Back
screen button to go to the previous
screen.
If in voice recognition, and “Back” is
stated all the way through to the
initial screen, then “Back” is stated
one more time, the voice recognition
session will cancel.
Help
Say “Help” on any voice recognition
screen and the help prompt for the
screen is played. Additionally, a
pop-up displays a text version of the
help prompt. Depending on how
voice recognition was initiated, the
Help pop-up will either display on
the instrument cluster or the
infotainment touchscreen. Touch the
Dismiss button to make the pop-up
go away.
Touching
playing will terminate the prompt
and a beep will be heard. Doing this
will stop the help prompt so that a
voice command can be used.
g while the help prompt is
Voice Recognition for the
Radio
All audio screens have a voice
recognition button (
audio voice recognition. If the voice
button is touched in a radio screen,
the voice commands for radio and
media features are available.
“Switch to AM” : Switch bands to
AM and tune to the last AM radio
station.
“Switch to FM” : Switch bands to
FM and tune to the last FM radio
station.
“Switch to SXM” : Switch bands to
SiriusXM and tune to the last
SiriusXM channel.
g) to launch
Page 90

Cadillac CT6 CUE Infotainment System (GMNA-Localizing-U.S./Canada-
9245669) - 2016 - crc - 4/6/16
Voice Recognition 89
“Tune to <AM frequency> AM” :
Tune to the radio station whose
frequency is identified in the
command (like “nine fifty”).
“Tune to <FM frequency> FM” :
Tune to the radio station whose
frequency is identified in the
command (like “one oh one
point one”).
“Tune to <AM frequency> AM
HD” : Tune to the HD Radio station
whose frequency is identified in the
command.
“Tune to <FM frequency> FM
HD” : Tune to the HD Radio station
whose frequency is identified in the
command.
“Tune to <FM frequency> FM HD
<HD channel number>” : Tune to
the HD Radio station whose
frequency and HD channel is
identified in the command.
“Tune to SXM <SXM channel
number>” : Tune to the SiriusXM
radio station whose channel number
is identified in the command.
“Tune to SXM <SXM channel
name>” : Tune to the SiriusXM
radio station whose channel name
is identified in the command.
Voice Recognition for Audio
My Media
If browsing My Media when the
voice button is selected, the voice
recognition commands for My Media
features are available.
“Play Artist” : Begin a dialog to
enter a specific artist name.
“Play Artist <artist name>” :
Begin playback of the media
selection identified in the command.
“Play Album” : Begin a dialog to
enter a specific album name.
“Play Album <album name>” :
Begin playback of the identified
album name in the command.
“Play Song” : Begin a dialog to
enter a specific song name.
“Play Song <song name>” : Begin
playback of the identified song
name in the command.
“Play Genre” : Begin a dialog to
enter a specific genre.
“Play Genre <genre name>” :
Begin playback of the media
selection identified in the command.
“Play Playlist” : Begin a dialog to
enter a specific playlist name.
“Play Playlist <playlist name>” :
Begin playback of the identified
playlist in the command.
“Play <device name>” : Play
music from a specific device
identified by name. The device
name is the name displayed on the
screen when the device is first
selected as an audio source.
“Play Chapter” : Begin a dialog to
enter a specific name.
“Play Chapter <chapter name>” :
Begin playback of the media
selection identified in the command.
“Play Audiobook” : Begin a dialog
to enter a specific name.
“Play Audiobook <audiobook
name>” : Begin playback of the
media selection identified in the
command.
Page 91

Cadillac CT6 CUE Infotainment System (GMNA-Localizing-U.S./Canada-
9245669) - 2016 - crc - 4/6/16
90 Voice Recognition
“Play CD Track <track
number>” : Begin playback of the
CD at the track identified in the
command.
“Play Episode” : Begin a dialog to
enter a specific name.
“Play Episode <episode
name>” : Begin playback of the
media selection identified in the
command.
“Play Podcast” : Begin a dialog to
enter a specific name.
“Play Podcast <podcast
name>” : Begin playback of the
media selection identified in the
command.
“Play Video” : Begin a dialog to
enter a specific name.
“Play Video <video name>” :
Begin playback of the media
selection identified in the command.
“My Media” : Begin a dialog to
enter the desired media content.
Handling Large Amounts of Media
Content
It is expected that large amounts of
media content will be brought into
the vehicle. It may be necessary to
handle large amounts of media
content in a different way than
smaller amounts of media. The
system may limit the options of
voice recognition by not allowing
selection of song titles by voice at
the highest level if the number of
songs exceeds the maximum limit.
Voice command option changes
through media content limits are:
.
Song files including other
individual files of all media types
such as audiobook chapters,
podcast episodes, and videos.
.
Album type folders including
types such as albums and
audiobooks.
There are no restrictions if the
number of song files and albums is
less than 4,000. When the number
of song files connected to the
system is between 4,000 and 8,000,
the content cannot be accessed
directly with one command like
“Play <song name>.”
The restriction is that the command
“Play Song” must be spoken first;
the system will then ask for the song
name. The reply command would be
to say the name of the song to play.
Similar limits exist for album
content. If there are more than
4,000 albums, but less than 8,000,
the content cannot be accessed
directly with one command like,
“Play <album name>.” The
command “Play Album” must first be
spoken; the system will then ask for
the album name. The reply would
be to say the name of the album
to play.
Once the number of songs has
exceeded approximately 8,000,
there is no support for accessing the
songs directly through voice
commands. There will still be
access to the media content by
using commands for playlists,
artists, and genres.
Page 92

Cadillac CT6 CUE Infotainment System (GMNA-Localizing-U.S./Canada-
9245669) - 2016 - crc - 4/6/16
Voice Recognition 91
The access commands for playlists,
artists, and genres are prohibited
after the number of this type of
media exceeds 4,000.
The system will provide feedback
the first time voice recognition is
initiated if it has become apparent
that any of these limits are reached
during a device initializing process.
Voice Recognition for
Navigation
“Navigation” : Begin a dialog to
enter specific destination
information.
“Navigation Commands” : Begin a
dialog to enter specific destination
information.
“Destination Address” : Begin a
dialog to enter a specific destination
address, which includes the entire
address consisting of the house
number, street name, and city and
state.
“Destination Intersection” : Begin
a dialog to enter a specific
destination intersection.
“Destination Place of Interest” :
Begin a dialog to enter a destination
Place of Interest category or major
brand name (if equipped).
Not all brand names of businesses
are available for voice entry. Most
major chains, such as chains with
more than 20 locations, should be
available to search for by name, but
the name must be precisely spoken.
Nicknames or short names for the
businesses will not likely be found.
Lesser known businesses might
have to be located by category,
such as fast food, hotels, or banks.
“Destination Contact” : Begin a
dialog to enter a specific destination
contact name.
“Cancel Route” : End route
guidance.
If your language supports it, try
stating a One Shot command to
enter a destination address one two
three Main Street, Lansing
Michigan.” Another example of a
One Shot Destination Entry
command is “Navigate to Place Of
Interest – Hotels.” If these
commands do not work, try saying
“Navigate to Place Of Interest” or
“Navigate to Address” and the
system will come back and ask for
details of your destination
Voice Recognition for the
Phone
“Call <contact name>” : Initiate a
call to an entered contact. The
command may include location if
the contact has location numbers
stored.
“CallAt Home <contact name> ,”
“At Work,” “On Mobile,” or “On
Other” : Initiate a call to an entered
contact and location at home, at
work, on mobile device, or on
another phone.
“Call <phone number>” : Initiate a
call to a standard phone number
seven or 10 digits in length, and
also 911, 411, or 611.
“Pair Phone” : Begin the Bluetooth
pairing process. Follow instructions
on the radio display.
“Redial” : Initiate a call to the last
dialed number.
Page 93

Cadillac CT6 CUE Infotainment System (GMNA-Localizing-U.S./Canada-
9245669) - 2016 - crc - 4/6/16
92 Voice Recognition
“Switch Phone” : Select a different
phone for outgoing calls.
“Voice Keypad” : Begin a dialog to
enter special numbers like
international numbers. The numbers
can be entered in groups of digits
with each group of digits being
repeated back by the system. If the
group of digits is not correct, the
command “Delete” will remove the
last group of digits and allow them
to be re-entered. Once the entire
number has been entered, the
command “Call” will start dialing the
number.
“Voice mail” : Initiate a call to voice
mail numbers.
Voice Pass-Thru
Voice pass-thru/Siri®Eyes Free
allows access to the voice
recognition commands on the cell
phone, for example, Siri or Voice
Command. See the cell phone
manufacturer's user guide to see
whether the cell phone supports this
feature. To activate the phone voice
recognition system, press and hold
g on the steering wheel for a few
seconds.
This enhances the normal use of
Siri. Siri allows access to text
messages, calendars, and audio
sources such as Pandora or iTunes.
Voice Recognition for OnStar
(If Equipped)
“OnStar” : Begin OnStar Voice
Recognition.
Voice Recognition for Weather
(If Equipped)
“Weather” : Begin a dialog to enter
a weather location.
Page 94

Cadillac CT6 CUE Infotainment System (GMNA-Localizing-U.S./Canada-
9245669) - 2016 - crc - 4/6/16
.
Phone
Bluetooth (Overview)
The Bluetooth-capable system can
interact with many cell phones,
allowing:
.
Placement and receipt of calls in
a hands-free mode.
.
Sharing of the cell phone’s
address book or contact list with
the vehicle.
To minimize driver distraction,
before driving, and with the vehicle
parked:
.
Become familiar with the
features of the cell phone.
Organize the phone book and
contact lists clearly and delete
duplicate or rarely used entries.
If possible, program speed dial
or other shortcuts.
.
Review the controls and
operation of the infotainment
system.
Pair cell phone(s) to the vehicle.
The system may not work with
all cell phones. See “Pairing” in
this section.
Vehicles with a Bluetooth system
can use a Bluetooth-capable cell
phone with a Hands-Free Profile to
make and receive phone calls. The
infotainment system and voice
recognition are used to control the
system. The system can be used
while in ON/RUN or ACC/
ACCESSORY. The range of the
Bluetooth system can be up to 9.1 m
(30 ft). Not all phones support all
functions and not all phones work
with the Bluetooth system. See
www.gm.com/bluetooth for more
information about compatible
phones.
Controls
Use the buttons on the infotainment
system and the steering wheel to
operate the Bluetooth system.
Steering Wheel Controls
g (Push to Talk) : Touch to answer
incoming calls and start voice
recognition.
Phone 93
c (End Call) : Press to end a call,
decline a call, or cancel an
operation. Press to mute or unmute
the infotainment system when not
on a call.
Infotainment System Controls
For information about how to
navigate the menu system using the
infotainment controls, see
Introduction 0 2.
PHONE : Touch this screen button
to enter the phone main menu.
Audio System
When using the Bluetooth phone
system, sound comes through the
vehicle's front audio system
speakers and overrides the audio
system. Press just above the
chrome volume bar during a call to
change the volume level. The
adjusted volume level remains in
memory for later calls. The system
maintains a minimum volume level.
Page 95

Cadillac CT6 CUE Infotainment System (GMNA-Localizing-U.S./Canada-
9245669) - 2016 - crc - 4/6/16
94 Phone
.
Bluetooth (Infotainment Controls)
For information about how to
navigate the menu system using the
infotainment controls, see
Introduction 0 2.
Pairing
A Bluetooth-enabled cell phone
must be paired to the Bluetooth
system and then connected to the
vehicle before it can be used. See
the cell phone manufacturer's user
guide for Bluetooth functions before
pairing the cell phone.
Pairing Information
.
A Bluetooth phone with music
capability can be paired to the
vehicle as a phone and a music
player at the same time.
.
Up to 10 devices can be paired
to the Bluetooth system.
.
The pairing process is disabled
when the vehicle is moving.
Pairing only needs to be
completed once, unless the
pairing information on the cell
phone changes or the cell phone
is deleted from the system.
.
If multiple paired cell phones are
within range of the system, the
system connects to the paired
cell phone in the order that they
were last used in the system. To
link to a different paired phone,
see “Linking to a Different
Phone” later in this section.
Pairing a Phone
1. Touch the PHONE screen
button.
2. Select PHONES and select
Pair Device.
3. A four-digit Personal
Identification Number (PIN)
appears on the display. The
PIN, if required, may be used
in Step 5.
4. Start the pairing process on the
cell phone to be paired to the
vehicle. See the cell phone
manufacturer's user guide for
information on this process.
5. Locate “Cadillac CUE” on the
display. Follow the instructions
provided in Step 3 on the cell
phone to enter the PIN or
confirm the six-digit code
shown on the display. After the
PIN is successfully entered or
the code is confirmed, the
system responds with “<Device
name> has been successfully
paired” when the pairing
process is complete.
6. If “Cadillac CUE” does not
appear, turn the phone off or
remove the phone battery and
retry.
7. If the phone prompts to accept
connection or allow phone
book download, select Always
Accept and Allow. The phone
book may not be available if
not accepted.
8. Repeat Steps 1−7 to pair
additional phones.
Listing All Paired and Connected
Phones
1. Touch the PHONE screen
button.
Page 96

Cadillac CT6 CUE Infotainment System (GMNA-Localizing-U.S./Canada-
9245669) - 2016 - crc - 4/6/16
Phone 95
2. Select PHONES.
Disconnecting a Connected Phone
1. Touch the PHONE screen
button.
2. Select PHONES.
3. Touch the
to disconnect.
Deleting a Paired Phone
Only disconnected phones can be
deleted.
1. Touch the PHONE screen
button.
2. Select PHONES.
3. Touch the
to delete and follow the on
screen prompts.
Linking to a Different Phone
To link to a different phone, the new
phone must be in the vehicle and
paired to the Bluetooth system.
1. Touch the PHONE screen
button.
2. Select PHONES.
z next to the phone
M next to the phone
3. Select the new phone to link to
from the not connected
device list.
Switching to Handset or
Handsfree Mode
To switch between handset or
handsfree mode, touch the PHONE
icon on the Home Page to display
“Call View.”
.
While the active call is
hands-free, touch the Handset
screen button to switch to the
handset mode. The screen
button changes to Handsfree
once the Bluetooth device
confirms it is operating as
handset.
.
While the active call is on the
handset, touch the Handsfree
screen button to switch to the
hands-free mode. The screen
button changes to Handset once
the Bluetooth device confirms it
is operating as hands-free.
Making a Call Using Contacts
and Recent Calls
Calls can be made through the
Bluetooth system using personal
cell phone contact information for all
phones that support the Phone
Book feature. Become familiar with
the phone settings and operation.
Verify the cell phone supports this
feature.
When supported, the Contacts and
Recent Calls menus are
automatically available.
The Contacts menu accesses the
phone book stored in the cell phone.
The Recent Calls menu accesses
the recent call list(s) from your cell
phone.
To make a call using the
Contacts menu:
1. Touch the PHONE screen
button.
2. Select CONTACTS.
3. Select the name to call.
4. Select the desired contact
number to call.
Page 97

Cadillac CT6 CUE Infotainment System (GMNA-Localizing-U.S./Canada-
9245669) - 2016 - crc - 4/6/16
96 Phone
To make a call using the Recent
Calls menu:
1. Touch the PHONE screen
button.
2. Select RECENT.
3. Select the name or number
to call.
4. If necessary, select between
Missed, Recent, and Sent calls
by selecting the View button in
the top right corner of the list.
Making a Call Using the
Keypad
To make a call by dialing the
numbers:
1. Touch the PHONE screen
button.
2. Select KEYPAD and enter a
phone number.
3. Select Call to start dialing the
number.
Accepting or Declining a Call
When an incoming call is received,
the infotainment system mutes and
a ring tone is heard in the vehicle.
Accepting a Call
There are three ways to accept
a call:
.
.
.
Declining a Call
There are three ways to decline
a call:
.
.
.
g on the steering wheel
Press
controls.
Touch Answer on the center
stack display.
Touch Answer on the instrument
cluster using the select button.
Press
c on the steering wheel
controls.
Touch Ignore on the center stack
display.
Touch Ignore on the instrument
cluster using the select button.
Call Waiting
Call waiting must be supported on
the Bluetooth phone and enabled by
the wireless service carrier to work.
Accepting a Call
There are three ways to accept a
call-waiting call:
.
.
.
Declining a Call
There are three ways to decline a
call-waiting call:
.
.
.
Switching Between Calls (Call
Waiting Calls Only)
To switch between calls, touch the
phone icon on the Home Page to
display “Call View.” While in Call
View, touch the call information of
the call on hold to change calls.
g on the steering wheel
Press
controls.
Touch Switch on the center
stack display.
Touch Switch on the instrument
cluster using the select button.
Press
c on the steering wheel
controls.
Touch Ignore on the center stack
display.
Touch Ignore on the instrument
cluster using the select button.
Page 98

Cadillac CT6 CUE Infotainment System (GMNA-Localizing-U.S./Canada-
9245669) - 2016 - crc - 4/6/16
Phone 97
.
Three-Way Calling
Three-way calling must be
supported on the Bluetooth phone
and enabled by the wireless service
carrier to work.
To start a three-way call while in a
current call:
1. In the Call View, select Add to
add another call.
2. Initiate the second call by
selecting from RECENT,
CONTACTS, or KEYPAD.
3. When the second call is active,
touch the merge icon to
conference the three-way call
together.
4. Once all calls are merged, the
merge icon button becomes an
unmerge icon button. Touch to
unmerge the calls.
Some wireless service carriers
may not allow a merged call to
become unmerged.
Ending a Call
.
Press
c on the steering wheel
controls.
Touch End on the center stack
display to end all existing calls,
or touch End next to a call to
end only that call.
.
Touch End on the instrument
cluster using the select button.
Dual Tone Multi-Frequency
(DTMF) Tones
The in-vehicle Bluetooth system can
send numbers during a call. This is
used when calling a menu-driven
phone system.
1. Touch the PHONE screen
button.
2. While in the Call View, touch
the up arrow to raise the
Interaction Selector.
3. Select KEYPAD and enter the
number.
Voice Mail
The default voice mail number is the
phone number of the outgoing
phone source. The voice mail
number can be changed in
Bluetooth settings.
To dial a voice mail number:
1. Touch the PHONE screen
button.
2. Select VOICE MAIL.
3. Select Call.
4. Enter the DTMF tones using
the keypad if needed.
Bluetooth (Voice Recognition)
Using Bluetooth Voice
Recognition
To use voice recognition, press the
g button on the steering wheel. Use
the commands below for the various
voice features. For additional
information, say “Help” while in a
voice recognition menu. See Voice
Recognition 0 85 for help using
voice recognition commands.
Making a Call
Calls can be made using the
following commands.
Page 99

Cadillac CT6 CUE Infotainment System (GMNA-Localizing-U.S./Canada-
9245669) - 2016 - crc - 4/6/16
98 Phone
Using the “Dial” or “Call”
Command
To call a number:
1. Press
2. Say “Dial” or “Call” followed by
Use the “Voice Keypad” command
for international numbers or special
numbers which include * or #.
Once connected, the person called
will be heard through the audio
speakers.
To call using a contact from your
phone book:
1. Press
2. Say “Dial” or “Call” and then
Once connected, the person called
will be heard through the audio
speakers.
g. The system responds
“Command Please,” followed
by a tone.
the complete phone number.
g. The system responds
“Command Please,” followed
by a tone.
say the contact name. For
example, say “Call John
at Work.”
Calling 911 Emergency
1. Press
2. Say “Call 911.”
Once connected, the person called
will be heard through the audio
speakers.
Using the “Switch Phone”
Command
1. Press
2. After the tone, say “Switch
Using the “Voice Keypad”
Command
1. Press
2. After the tone, say “Voice
g. The system responds
“Command Please,” followed
by a tone.
g. The system responds
“Command Please,” followed
by a tone.
Phone.” The system displays a
list of phones to select.
g. The system responds
“Command Please,” followed
by a tone.
Keypad.” The system allows
entry of special numbers and
characters.
Using the “Voice Mail” Command
1. Press
2. After the tone, say “Voice mail.”
g. The system responds
“Command Please,” followed
by a tone.
The system dials the voice mail
number of the connected
phone.
System Updater
When a media device which
contains a system update file such
as a software update or map
update, the system prompts to
perform the update. If multiple
updates are found, the system will
automatically process. Once an
update file is found, a popup
displays to confirm and continue the
update or cancel.
The estimated time to update
displays in this popup. The time is
shown in minutes format.
Before starting a system update, all
controls are unavailable and the
audio will mute during the update
process.
Page 100

Cadillac CT6 CUE Infotainment System (GMNA-Localizing-U.S./Canada-
9245669) - 2016 - crc - 4/6/16
Phone 99
The update status view indicates its
status with the current update file
number out of the total file numbers.
Clearing the System
Unless information is deleted out of
the vehicle Bluetooth system, it will
be retained. This includes phone
pairing information. For directions
on how to delete this information,
see “Deleting a Paired Phone.”
Text Messaging
If equipped, the infotainment system
may allow text messages to be
received and replied to. Received
messages can also be read aloud.
Before using the text messaging
feature, check to see if the phone is
compatible.
To view compatible phones in USA,
see my.cadillac.com.
To view compatible phones in
Canada, see gmtotalconnect.ca.
Text Menu
Inbox : Press to display incoming
messages. To view a message,
touch on the name of the sender.
Touch
> to listen to the text
message. Touch the
button to go back to the
previous menu.
Settings : See “Text Settings” later
in this section.
Reply : Touch to reply using a
predefined text message. See “Text
Settings.”
Call : Touch to place a call to the
sender of the text message.
[ Back screen
Viewing a Text Message
While viewing a text message:
.
Touch Reply to reply using a
predefined text message.
.
Touch Call to place a call to the
sender of the text message.
Viewing Sender Information
If equipped, touch the name of the
sender to view sender information if
this information matches contact
information already stored.
Select a Predefined Message :
Touch to select from a set of quick
messages. Touch the message
to send.
Predefined Messages
These are short text messages that
can be used to send so responses
will not have to be typed.
The messages can be deleted or a
new message can be added.
To add a new message:
1. Touch Text Settings, then touch
Manage Predefined Messages.
2. While in the predefined
messages list view, select Add
New Predefined Message and
a keyboard displays.
 Loading...