

Cadillac BLS Owner's Manual
1
Owner’s Manual
Cadillac BLS
© Copyright General Motors Corporation 2008
All Rights Reserved
Printed in Sweden
Safety 15
Locks and car alarm 45
Instruments and controls 61
Interior equipment 95
Starting and driving 123
Car care 173
Technical data 235
Index 255
460_OM_MY09.book Page 1 Wednesday, April 2, 2008 10:32 AM

2
Introduction
This manual provides practical guidance on
driving and caring for your Cadillac.
Although this manual describes the most
important differences between model variants, it does not include their precise specifications. Some differences also occur to
meet national legal requirements.
This manual contains important warning
texts that must always be observed:
We recommend that you read through this
manual before taking the car out for the first
time and that you keep it in the car for future
reference.
Finding your way around this manual is
simple. To find a specific item, use the
search pages at the start of the manual.
A list of contents is provided at the beginning of each section and there is a comprehensive alphabetical index at the back of
the manual.
A Warranty and Service Book is supplied
when the car is delivered. This specifies
the regular maintenance to be carried out
and also contains important information on
warranty conditions.
Since the policy at Cadillac is one of continual improvement, we retain the right to
incorporate modifications and to alter specifications during production without prior
notice.
3 Asterisk means: equipment not fitted in all
cars (can depend on model variant, engine
variant, market specification, options or
accessories).
An authorised Cadillac dealer would be
glad to help with any queries you may have
concerning your car’s functions, care,
warranty, etc.
Best wishes,
Cadillac
Cadillac does not assume responsibility for any
damage that may arise from the use of spare
parts, replacement parts or accessories that have
not been approved by Cadillac.
The specifications, design particulars and illustrations included in the manual are not binding.
WARNING
WARNING texts warn against the danger
of injury if the specified instructions are
not followed.
NOTICE
NOTICE texts warn of potential damage
to your car if the recommendations are
not followed.
460_OM_MY09.book Page 2 Wednesday, April 2, 2008 10:32 AM
3
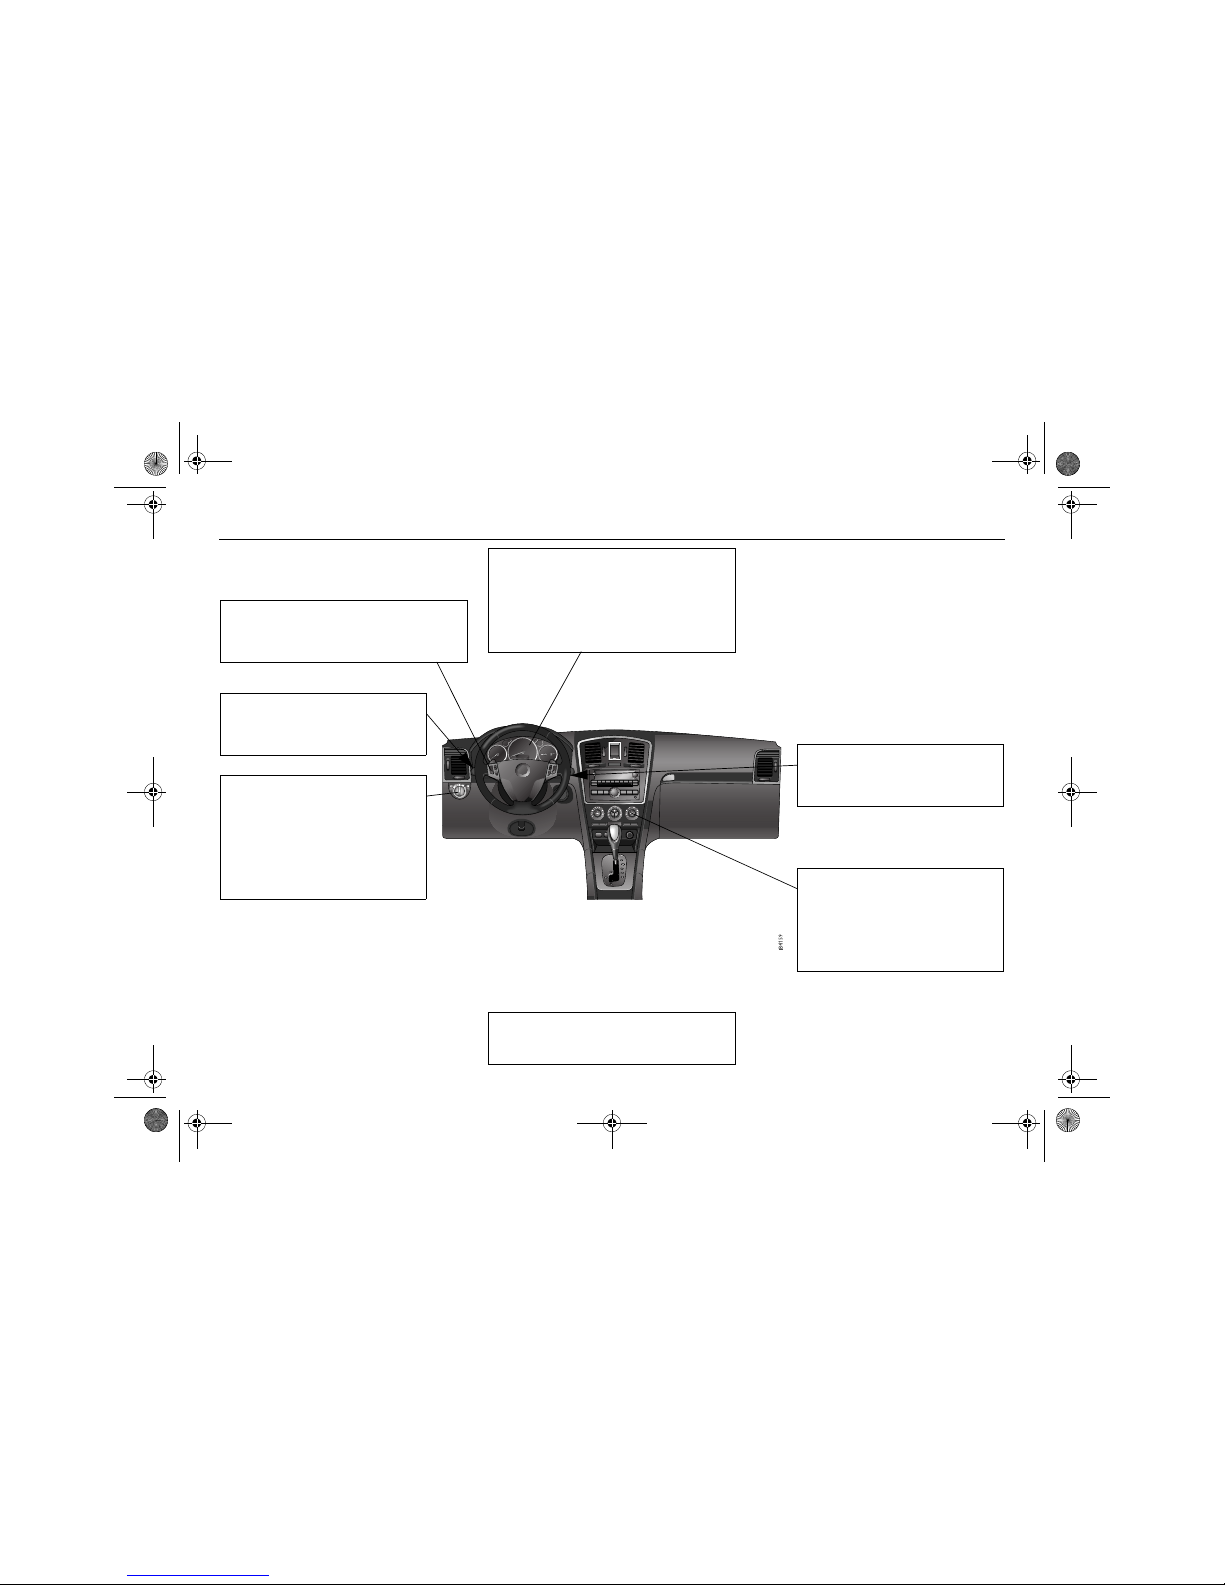
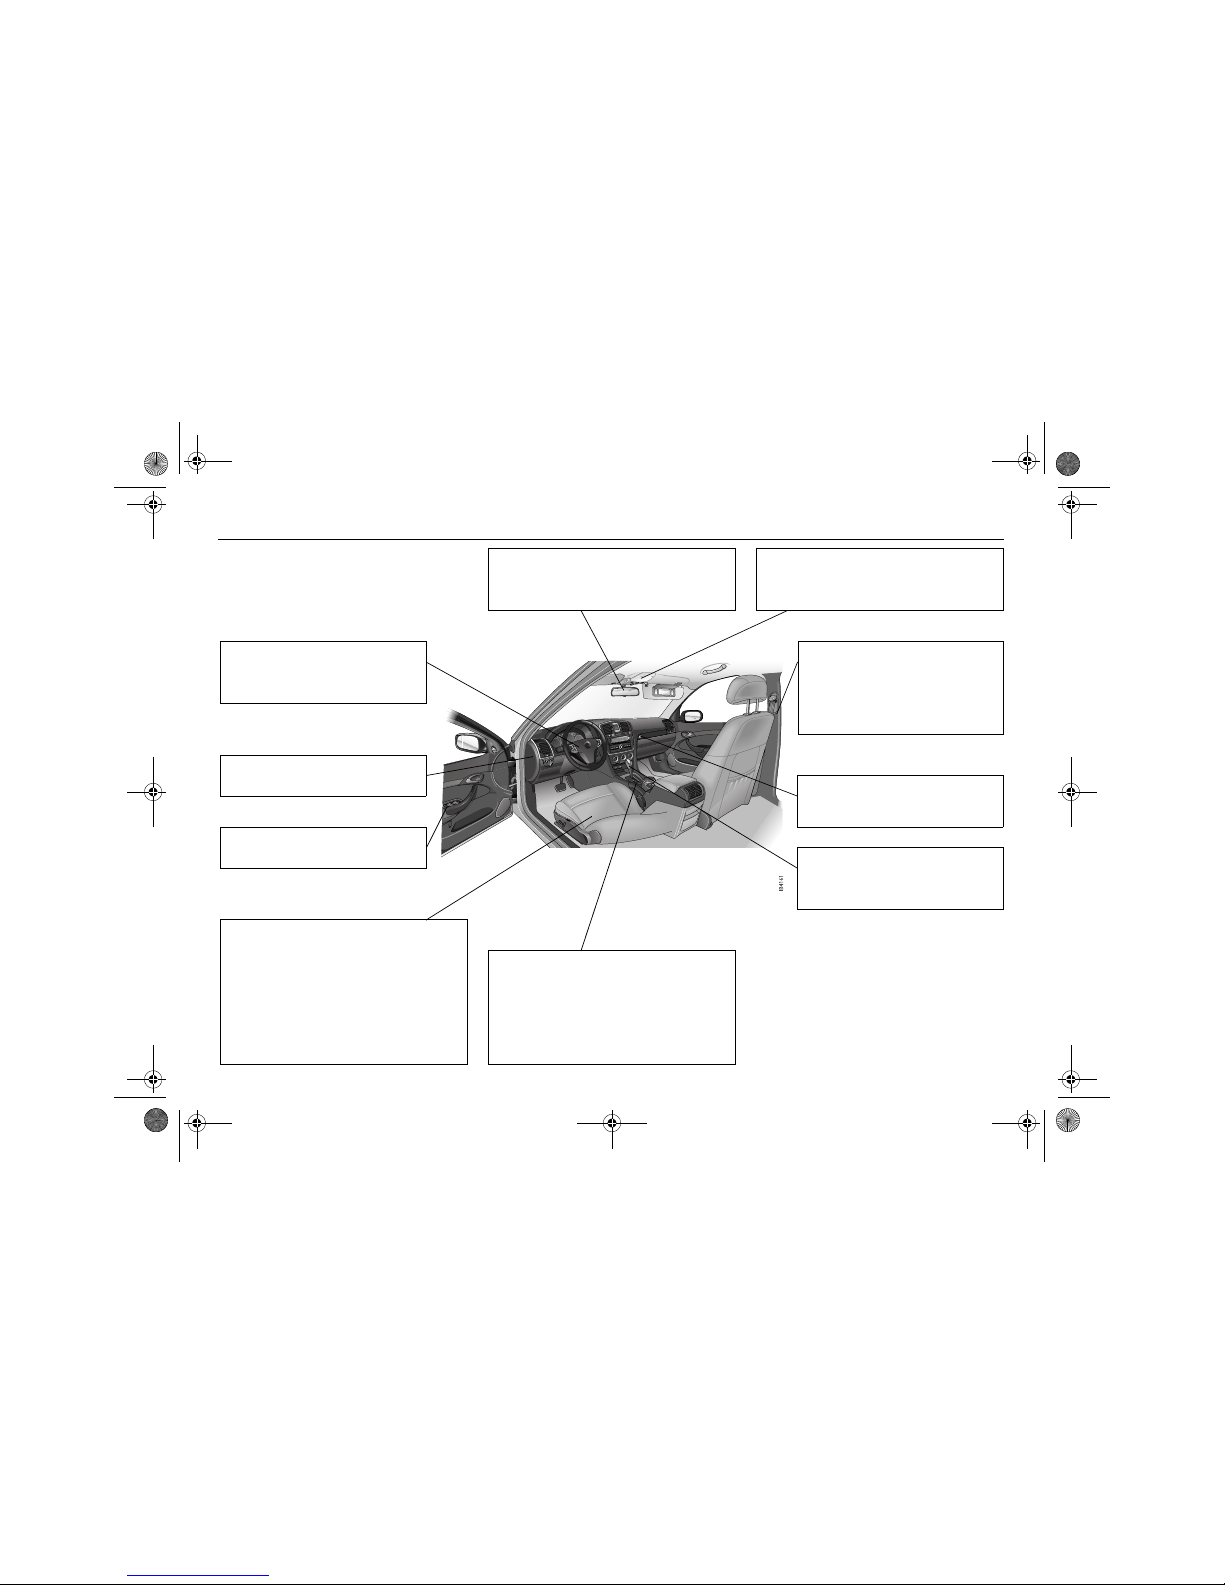
Instrument panel, LHD
Rear fog light ____________ 80
Front fog lights___________ 81
Main/dipped beam________ 78
Changing bulbs __________ 190
Headlight levelling ________ 79
Position lights ___________ 78
Dim-dipped beam ________ 78
Direction indicators _______ 81
Cruise control ___________ 144
Dip switch ______________ 78
Fuel gauge___________________ 70
Speedometer_________________ 69
Temperature gauge ____________ 69
Warning and indicator lights _____ 62
Rev counter __________________ 69
Milometer and trip meter ________ 71
Ashtray _____________________ 107
Cigarette lighter _______________ 107
Settings _____________________ 75
DIC ________________________ 71
Changing wiper blades ____ 188
Wash/wipe _____________ 83
Washer fluid ____________ 189
Automatic climate control __ 87
Car care and maintenance _ 233
Seat heating ____________ 93
Hazard warning lights _____ 82
460_OM_MY09.book Page 3 Wednesday, April 2, 2008 10:32 AM
4
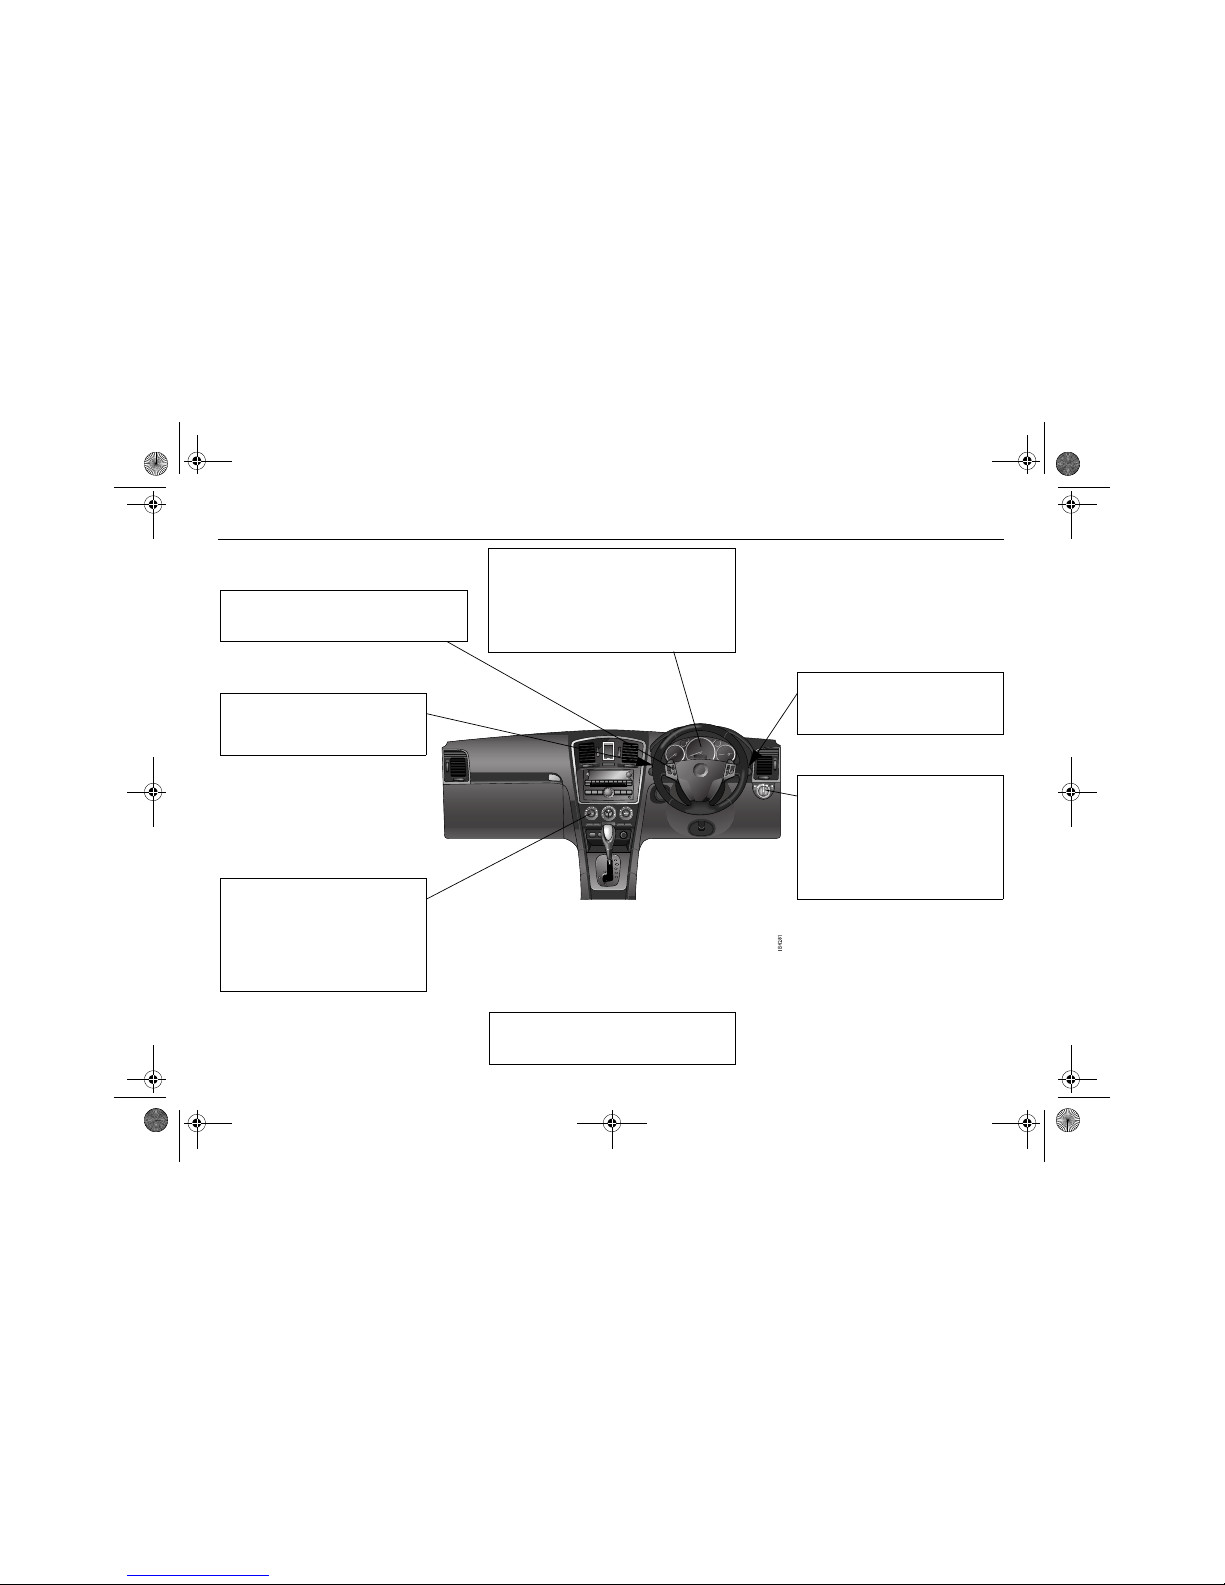
Instrument panel, RHD
Fuel gauge___________________ 70
Speedometer_________________ 69
Temperature gauge ____________ 69
Warning and indicator lights _____ 62
Rev counter __________________ 69
Milometer and trip meter ________ 71
Changing wiper blades ____ 188
Wash/wipe _____________ 83
Washer fluid ____________ 189
Automatic climate control __ 87
Car care and maintenance _ 233
Seat heating ____________ 93
Hazard warning lights _____ 82
Ashtray _____________________ 107
Cigarette lighter _______________ 107
Rear fog light ___________ 80
Front fog lights __________ 81
Main/dipped beam _______ 78
Changing bulbs__________ 190
Headlight levelling _______ 79
Position lights ___________ 78
Dim-dipped beam ________ 78
Direction indicators _______ 81
Cruise control ___________ 144
Dip switch ______________ 78
Settings _____________________ 75
DIC ________________________ 71
460_OM_MY09.book Page 4 Wednesday, April 2, 2008 10:32 AM
5
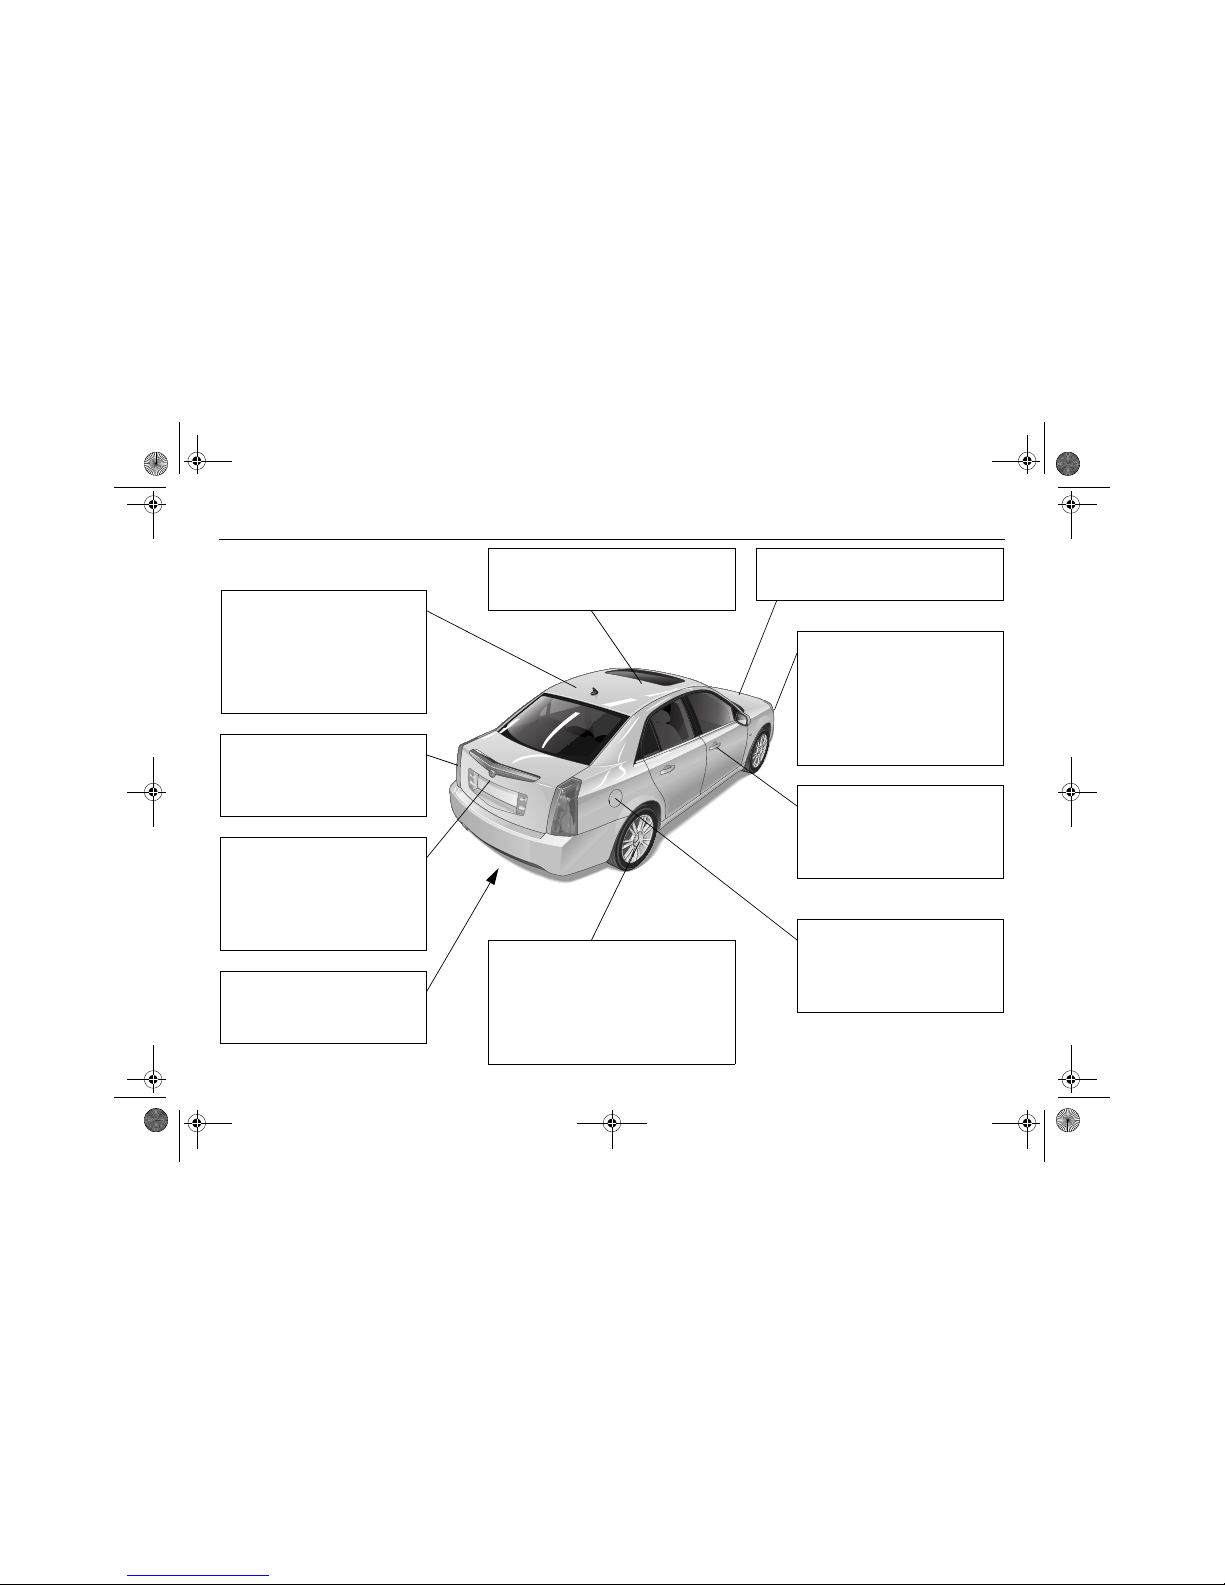
Exterior
Body __________________ 230
Touching up paintwork_____ 230
Anti-corrosion treatment ___ 231
Service programme_______ 232
Sunroof ________________ 102
Washing _______________ 228
Waxing and polishing _____ 230
Tail lights _______________ 198
Brake lights _____________ 198
Changing bulbs __________ 190
Light switches ___________ 78
Towing_________________ 167
Towing eyes_____________ 167
Towing a caravan or trailer__ 163
Luggage compartment ____ 110
Lighting ________________ 198
Folding down the rear seat _ 110
Load-through hatch _______ 111
Spare wheel ____________ 113
Tools __________________ 113
Maximum loads _______________ 236
Mounting holes for roof carriers ___ 166
Roof load ____________________ 166
Bonnet ______________________ 174
Washing the engine bay_________ 230
Central locking __________ 46
Luggage compartment
lock __________________ 50
Lock buttons ____________ 46
Child safety locks ________ 51
Front lights _____________ 193
Direction indicators_______ 81
Changing bulbs__________ 190
Headlight levelling _______ 79
Dip switch ______________ 78
Headlight switches _______ 78
Headlight washers _______ 189
Fuel grade _____________ 239
Fuel gauge _____________ 70
Economical motoring _____ 158
Fuel filler flap ___________ 133
Refuelling ______________ 133
Braking _____________________ 146
Tyres _______________________ 210
Tyre pressure ________________ 245
Wheels______________________ 241
Changing wheels ______________ 219
Spare wheel__________________ 216
Winter driving_________________ 160
460_OM_MY09.book Page 5 Wednesday, April 2, 2008 10:32 AM
6
Interior
Airbag _________________ 34
Steering wheel adjustment _ 96
Interior rear view mirror _________ 101
Vanity mirror _________________ 106
Door mirrors__________________ 100
Airbag_________________ 34
Child seats _____________ 27
Seat belts ______________ 16
Seat belt care ___________ 227
Child safety locks ________ 51
Glove compartment ______ 108
Storage compartments ____ 108
Automatic transmission ___ 138
Manual gearbox _________ 137
Changing gears _________ 137
Rear seat____________________ 110
Child seats __________________ 27
Seat belts ___________________ 16
Folding down the rear seat ______ 110
Upholstery care _______________ 228
Seat adjustment ______________ 21
Seat heating _________________ 93
Interior lighting: changing bulbs ___ 202
Interior light switches ___________ 105
Sunroof _____________________ 102
Running-in ___________________ 137
Driving in hot/cold climates ______ 160
Parking _____________________ 153
Starting the engine ____________ 126
Ignition switch ________________ 124
Handbrake___________________ 152
Fuses _________________ 204
Electric windows _________ 97
460_OM_MY09.book Page 6 Wednesday, April 2, 2008 10:32 AM

7
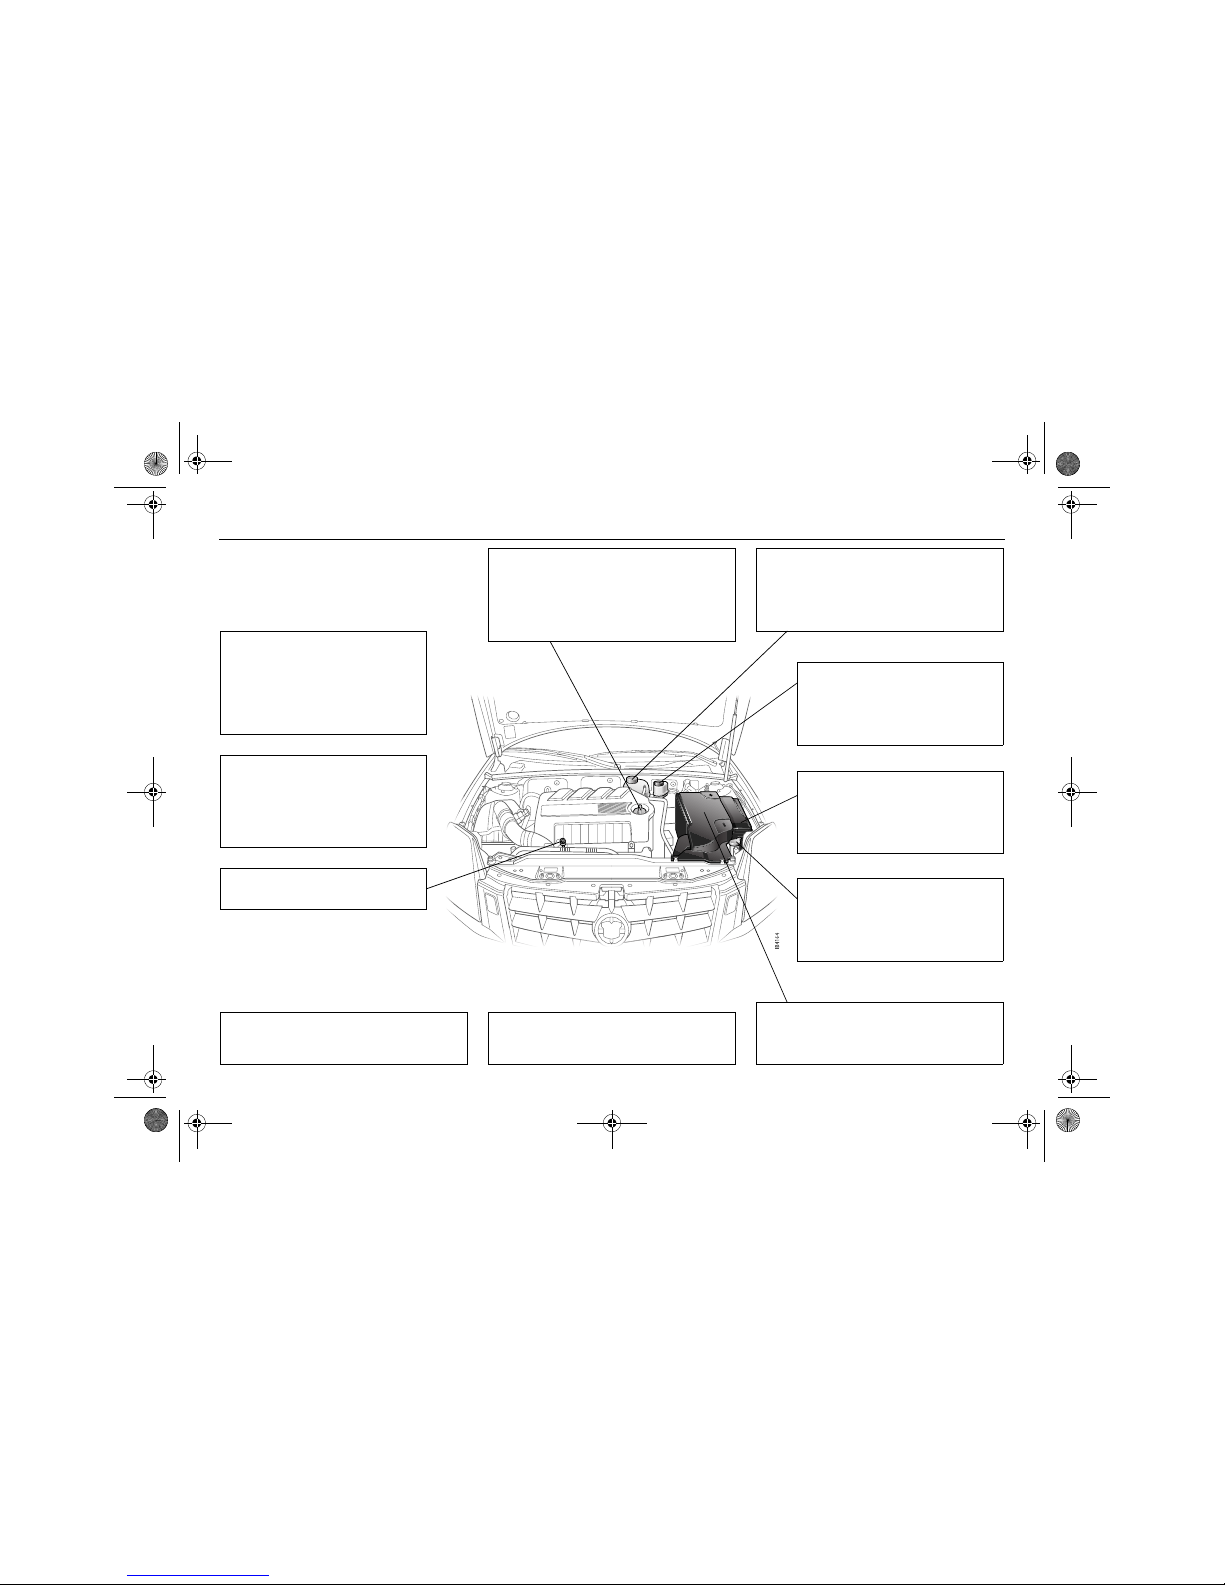
Engine bay,
turbo petrol engine
Vehicle identification
number________________ 247
Colour code_____________ 247
Engine number __________ 247
Warning labels___________ 11
Gearbox number _________ 247
Exhaust emission control __ 130
Drive belt _______________ 188
Simple troubleshooting
(A/C, ACC) _____________ 233
Alternator_______________ 188
Spark plugs _____________ 240
Ignition system __________ 240
Engine oil: checking level __ 180
Automatic transmission _________ 138
Manual gearbox_______________ 137
Battery ______________________ 186
Battery charge ________________ 186
Jump starting _________________ 170
Engine: description ____________ 175
Engine oil: topping up __________ 180
Engine: technical data __________ 238
Important considerations for
driving______________________ 129
Wash/wipe stalk switch____ 83
Topping-up fluid _________ 189
Washer jets_____________ 190
Washer fluid ____________ 189
Power steering________________ 185
Fluid: checking/topping up_______ 185
Coolant: checking/topping-up ____ 182
Driving in hot climates __________ 162
Radiator_____________________ 238
Temperature gauge ____________ 69
Changing a fuse _________ 204
Fuses _________________ 204
Relays ________________ 208
Fuse table______________ 208
ABS brakes_____________ 146
Braking lining ___________ 184
Brake system ___________ 240
Brake fluid______________ 184
460_OM_MY09.book Page 7 Wednesday, April 2, 2008 10:32 AM

8
Engine bay,
petrol engine V6
Vehicle identification
number________________ 247
Colour code_____________ 247
Engine number __________ 247
Warning labels___________ 11
Gearbox number _________ 247
Exhaust emission control __ 130
Drive belt _______________ 188
Simple troubleshooting
(A/C, ACC) _____________ 233
Alternator_______________ 188
Spark plugs _____________ 240
Ignition system __________ 240
Engine oil: checking level________ 180
Automatic transmission _________ 138
Manual gearbox_______________ 137
Power steering___________ 185
Fluid: checking/topping up__ 185
Battery ______________________ 186
Battery charge ________________ 186
Jump starting _________________ 170
Engine: description ____________ 177
Engine oil: topping up __________ 180
Engine: technical data __________ 238
Important considerations for
driving______________________ 129
Cooling system, coolant capacity__ 238
Coolant: checking/topping-up ____ 182
Driving in hot climates __________ 162
Temperature gauge ____________ 69
ABS brakes_____________ 146
Braking lining ___________ 184
Brake system ___________ 240
Brake fluid______________ 184
Changing a fuse _________ 204
Fuses _________________ 204
Relays ________________ 208
Fuse table______________ 208
Wash/wipe stalk switch____ 83
Topping-up fluid _________ 188
Washer jets_____________ 190
Washer fluid ____________ 189
460_OM_MY09.book Page 8 Wednesday, April 2, 2008 10:32 AM
9
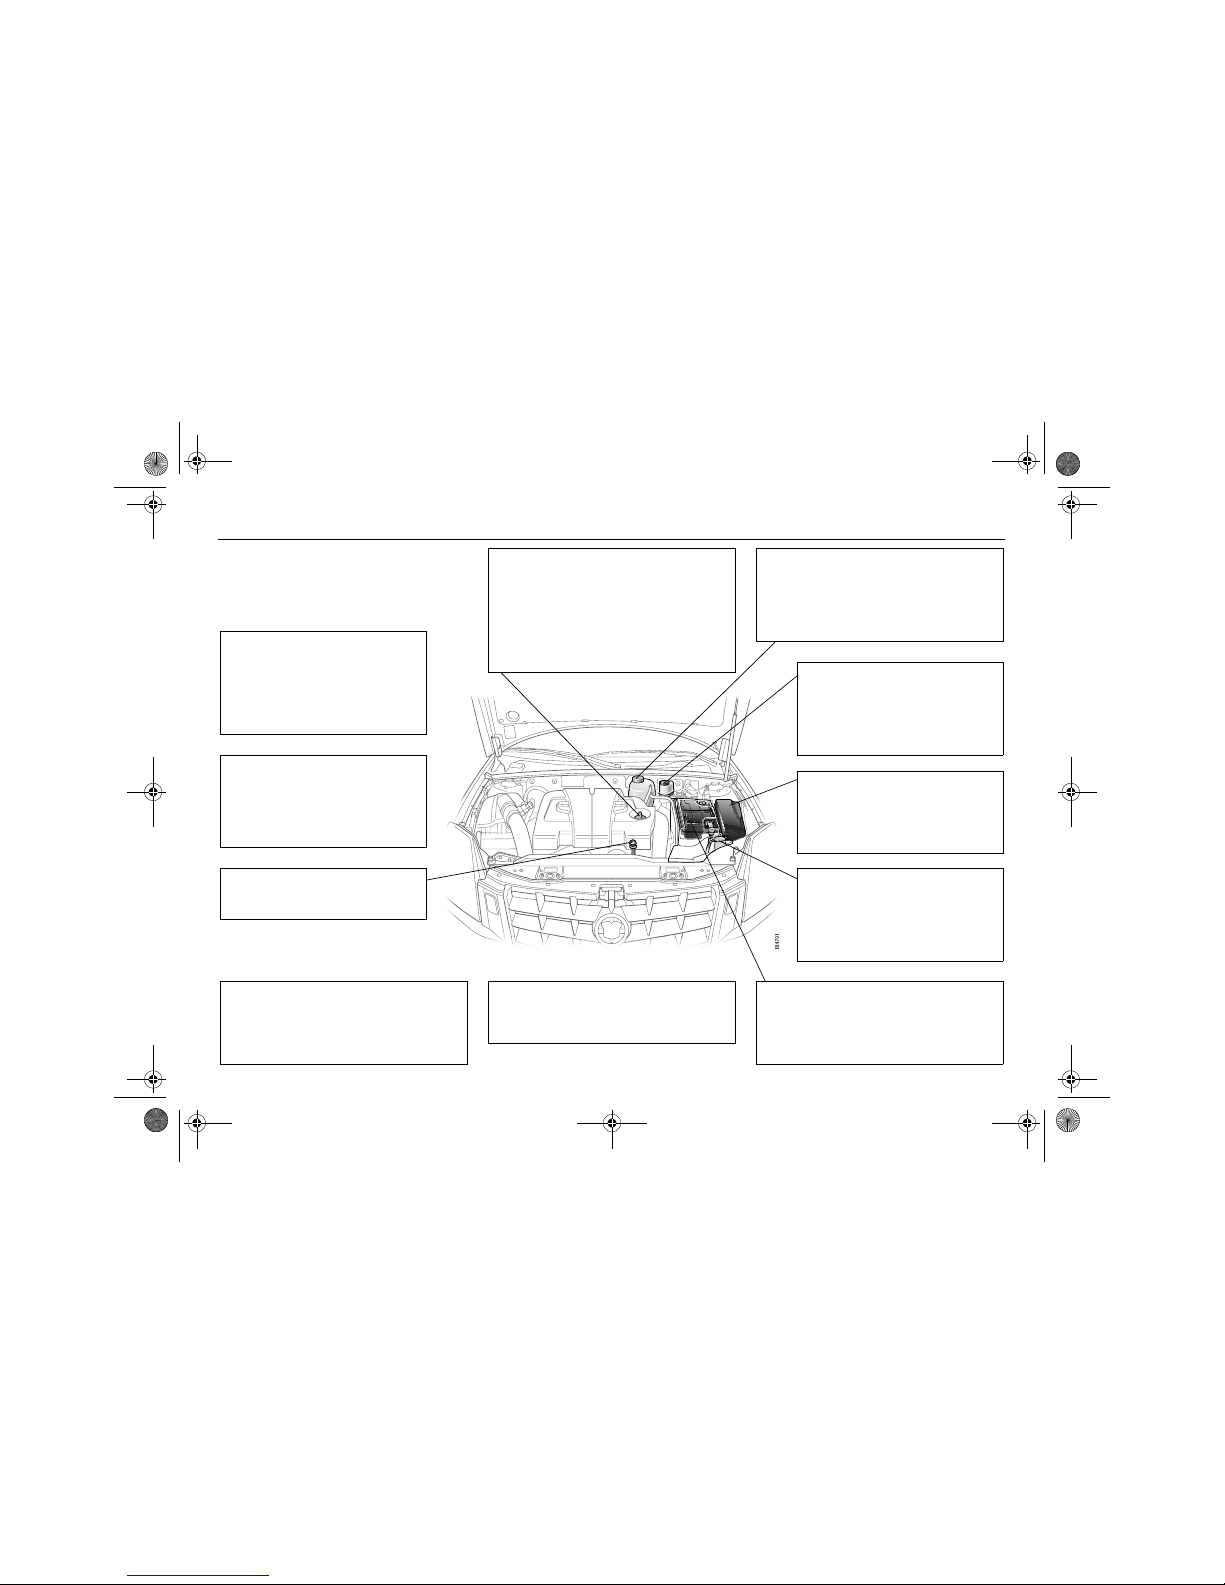
Engine bay,
diesel engine TiD 3
Vehicle identification
number________________ 247
Colour code_____________ 247
Engine number __________ 247
Warning labels___________ 11
Gearbox number _________ 247
Engine: description ____________ 175
Engine oil: topping up __________ 180
Engine: technical data __________ 238
Important considerations for
driving______________________ 129
ABS brakes_____________ 146
Braking lining ___________ 184
Brake system ___________ 240
Brake fluid______________ 184
Changing a fuse _________ 204
Fuses _________________ 204
Relays ________________ 208
Fuse table______________ 208
Exhaust emission control __ 130
Drive belt _______________ 188
Simple troubleshooting
(A/C, ACC) _____________ 233
Alternator_______________ 188
Coolant: checking/topping-up ____ 182
Driving in hot climates __________ 162
Radiator_____________________ 238
Temperature gauge ____________ 69
Power steering________________ 185
Fluid: checking/topping up_______ 185
Manual gearbox_______________ 137
Battery ______________________ 186
Battery charge ________________ 186
Jump starting _________________ 170
Wash/wipe stalk switch____ 83
Topping-up fluid _________ 189
Washer jets_____________ 190
Washer fluid ____________ 189
Engine oil: checking level __ 180
460_OM_MY09.book Page 9 Wednesday, April 2, 2008 10:32 AM
10
Engine bay,
diesel engine, TTiD 3
Vehicle identification
number________________ 247
Colour code_____________ 247
Engine number __________ 247
Warning labels___________ 11
Gearbox number _________ 247
Exhaust emission control __ 130
Drive belt _______________ 188
Simple troubleshooting
(A/C, ACC) _____________ 233
Alternator_______________ 188
Engine oil: checking level __ 180
Manual gearbox_______________ 137
Engine: description ____________ 175
Engine oil: topping up __________ 180
Engine: technical data __________ 238
Important considerations for
driving______________________ 129
Power steering________________ 185
Fluid: checking/topping up_______ 185
Coolant: checking/topping-up ____ 182
Driving in hot climates __________ 162
Radiator_____________________ 238
Temperature gauge ____________ 69
ABS brakes_____________ 146
Braking lining ___________ 184
Brake system ___________ 240
Brake fluid______________ 184
Changing a fuse _________ 204
Fuses _________________ 204
Relays ________________ 208
Fuse table______________ 208
Wash/wipe stalk switch____ 83
Topping-up fluid _________ 189
Washer jets_____________ 190
Washer fluid ____________ 189
Battery ______________________ 186
Battery charge ________________ 186
Jump starting _________________ 170
460_OM_MY09.book Page 10 Wednesday, April 2, 2008 10:32 AM
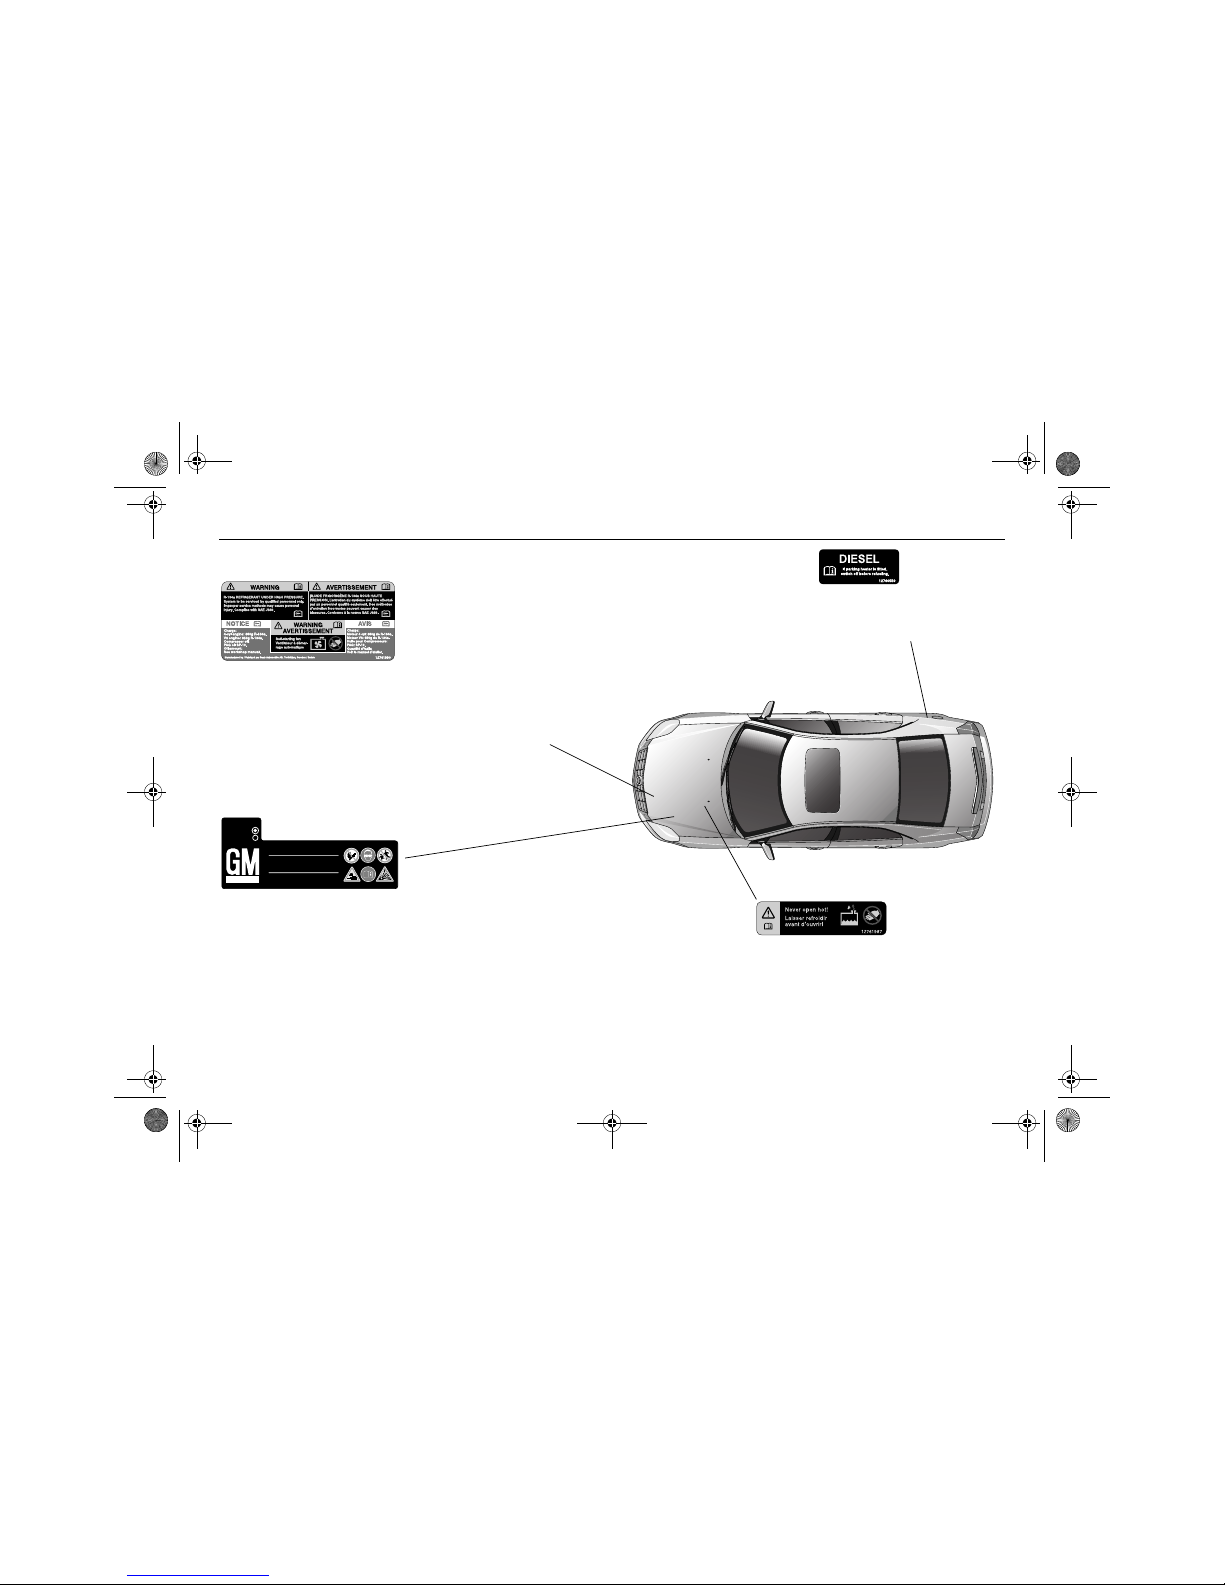
11
Coolant
Never open hot!
Radiator fan
Radiator fan may start at any time.
Battery
• No sparks, naked flames or smoking
• Always shield eyes. Explosive gases can cause blindness or injury
• Keep the battery out of reach of children
• The battery contains sulphuric acid which could cause blindness or serious burn injuries
• See the Owner’s Manual for further information
• Explosive gas may be present in the vicinity of the battery.
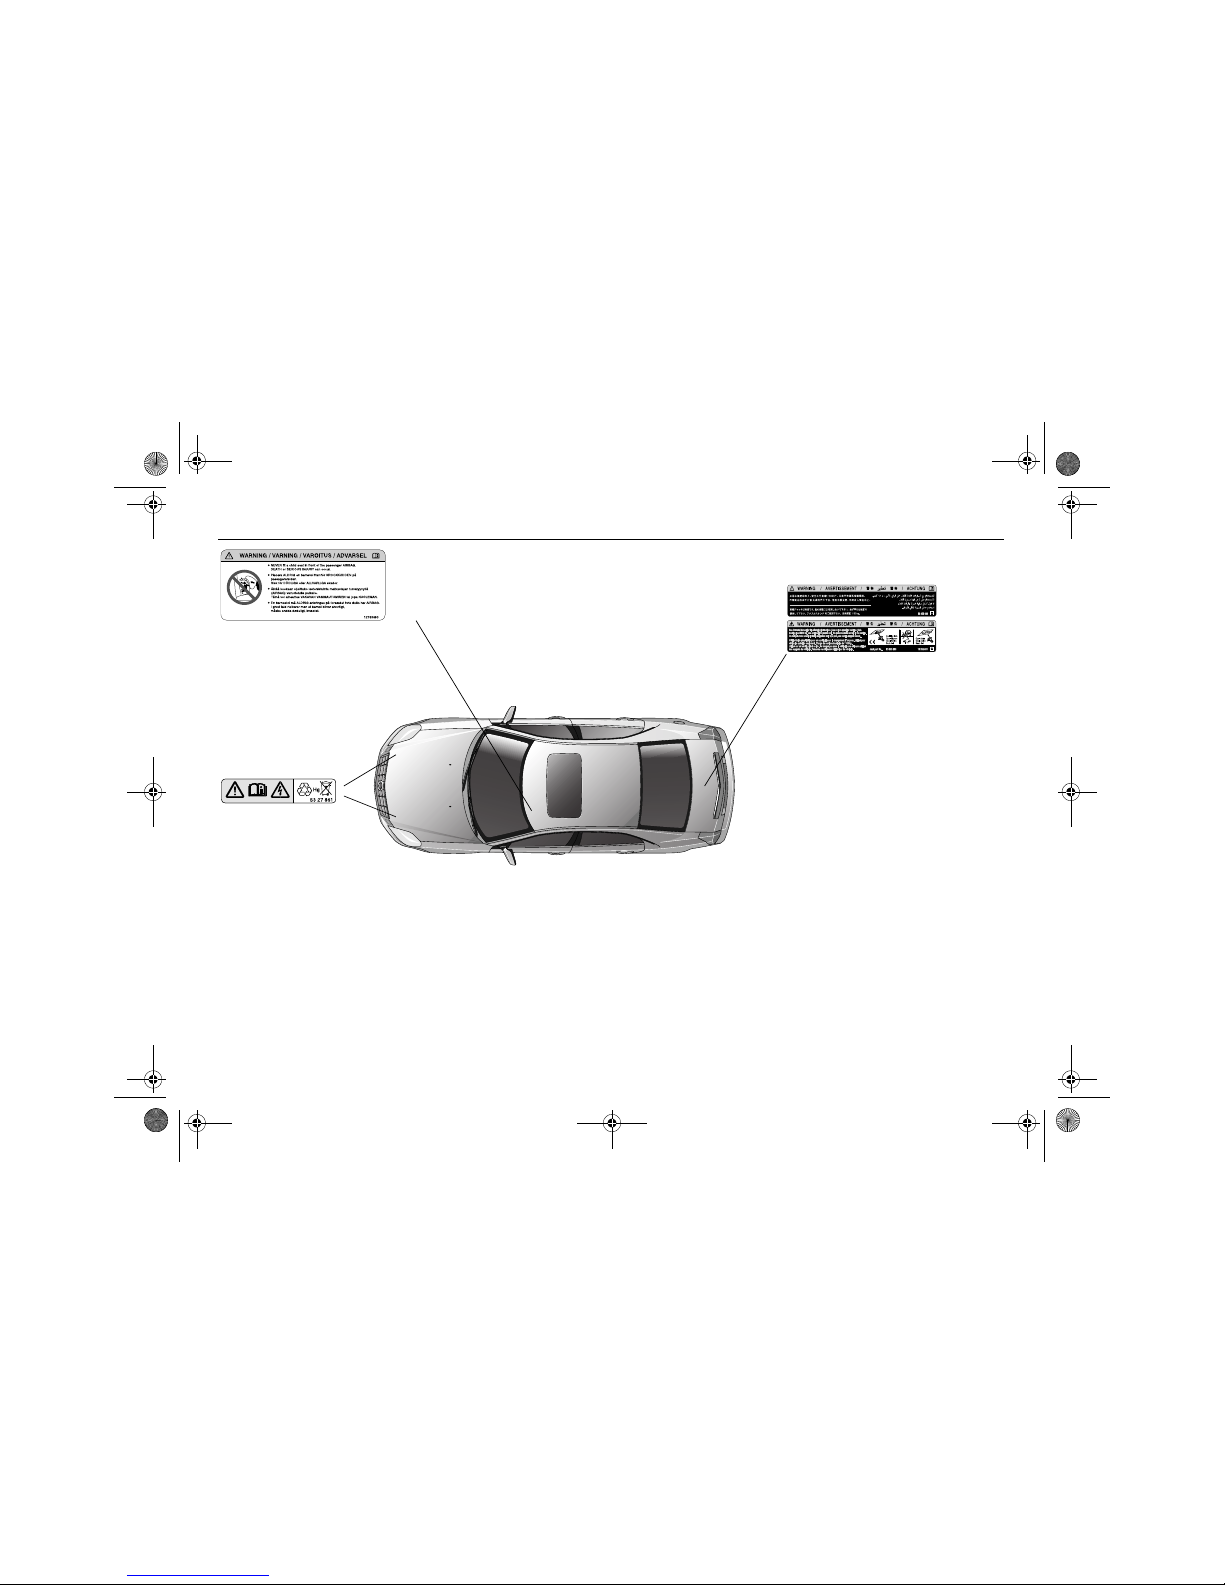
Warning labels
A/C system
Refrigerant at high pressure.
Do not loosen or remove the A/C system fittings before discharging the A/C
system. Improper service methods may cause personal injury. System to be
serviced by qualified personnel only. For instructions consult workshop
manual.
The A/C system complies with SAE J639.
Charge: 680 g R134a.
Compressor oil: PAG Oil SP-10.
Maintenance Free
P/N 127 93 955
12V 60Ah 580A (EN)
000 A-12102-EP
LEVEL INDICATOR
DARK OK
CLEAR LOW
Fuel-driven heater 3
Switch off the parking heater before
adding fuel.
460_OM_MY09.book Page 11 Wednesday, April 2, 2008 10:32 AM
12
Changing wheels
• Only use the jack for the models specified.
• Load the jack with a maximum of 1100 kg.
• Only use the jack on a level and firm surface.
• Do not crawl under a car raised by a jack; use
axle stands.
• There must no one inside the car.
We recommend that you
contact an authorised
Cadillac workshop for
Xenon bulb replacement 3.
• NEVER fit a child seat in front of the passenger AIRBAG.
• DEATH or SERIOUS INJURY can occur.
460_OM_MY09.book Page 12 Wednesday, April 2, 2008 10:32 AM

13
No sparks,
flames or
smoking
Buckle up
Refer to the
Owner’s
Manual
Airbag
Shield eyes
Never place a
rear-facing
child seat in
this seat
Keep out of
reach of
children
Electric
windows
Battery acid
contains
sulphuric acid
Deactivation
of rear window
switches
Risk of
explosive gas
Central
locking, lock
Central
locking,
unlock
Boot lid,
unlock
Headlights
Windscreen
wipers
Direction
indicators
Windscreen
washers
Position lights Defroster
Hazard
warning lights
Rear window
heating
Front fog lights Cabin fan
Rear fog light
Coolant
temperature
Radiator fan
No charge to
battery
Fuel
Foot brake
Automatic tyre
pressure monitoring 3
Coolant level
Engine oil
pressure
ABS brakes
TCS/
StabiliTrak
®
Preheater plug
(cars with
diesel engine)
Example of symbols that can be found in your car
460_OM_MY09.book Page 13 Wednesday, April 2, 2008 10:32 AM

14
(This page has been left blank.)
460_OM_MY09.book Page 14 Wednesday, April 2, 2008 10:32 AM
15Safety
Seat belts_____________ 16
Seats ________________ 21
Head restraints ________ 26
Child safety ___________ 27
Airbag________________ 34
Safety
3 Asterisk means: equipment not fitted in all cars
(can depend on model variant, engine variant,
market specification, options or accessories).
460_OM_MY09.book Page 15 Wednesday, April 2, 2008 10:32 AM
16 Safety
Seat belts
Three-point inertia reel seat belts are provided for all seats.
Research has established that it is equally
as dangerous for rear seat passengers not
to wear their seat belts as for front seat passengers.
Bear in mind that in certain countries it is a
legal requirement for all occupants of the
car to wear a seat belt.
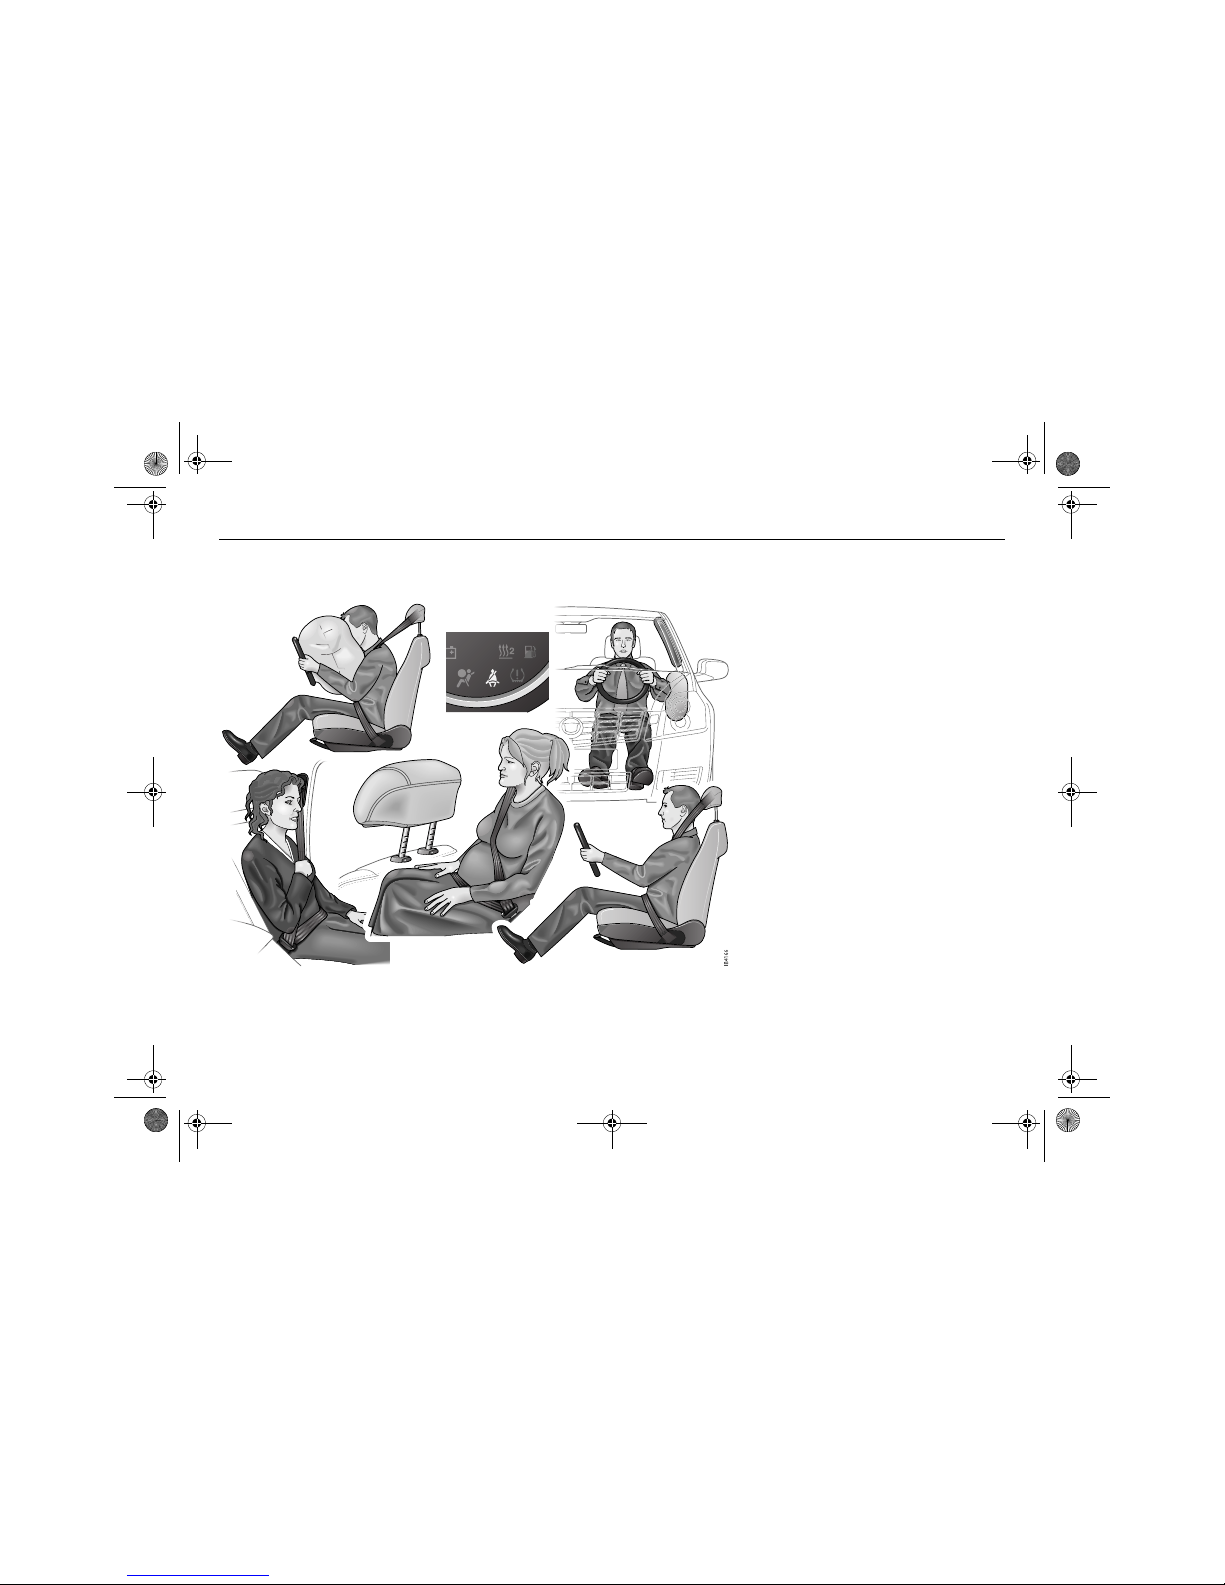
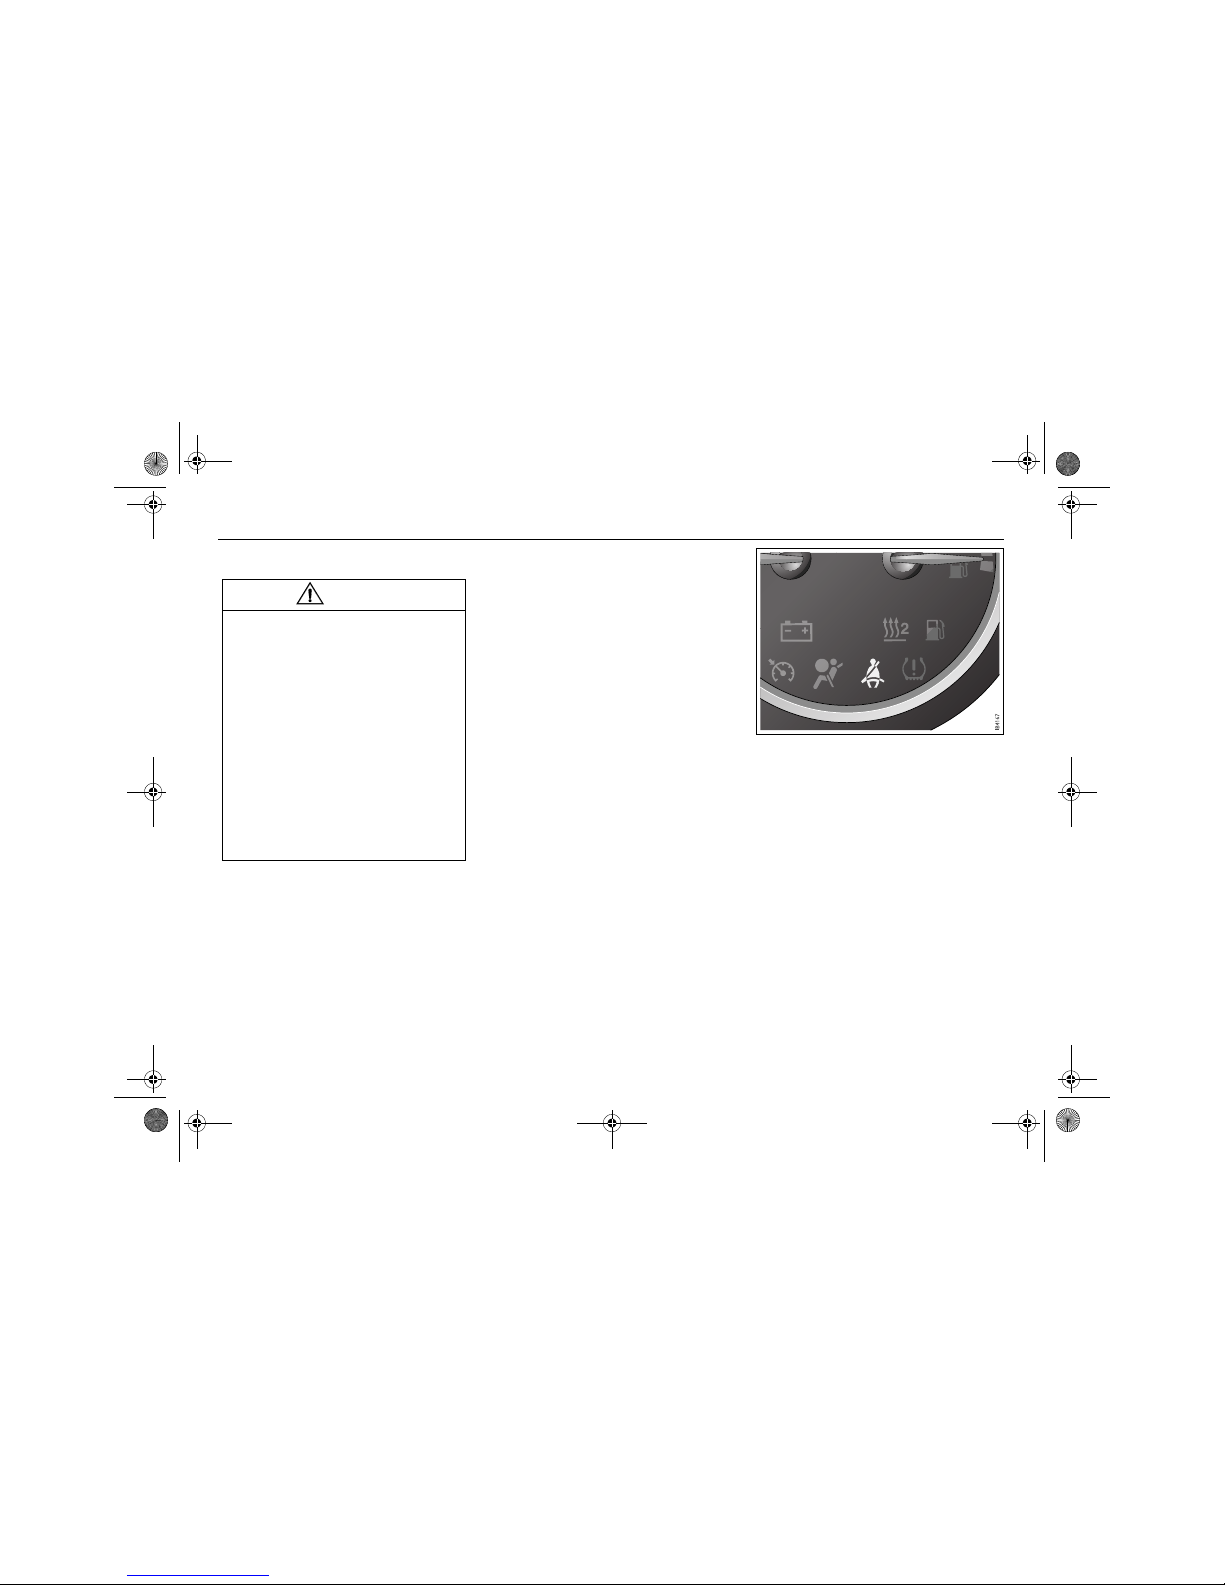
Seat belt reminder
When the ignition is switched on, the seat
belt reminder in the main instrument panel
illuminates and the message Use your
seatbelt. appears in DIC if the driver has not
buckled his/her seat belt.
The seat belt reminder for the passenger
appears in the centre portion of the instrument panel.
The seat belt reminder for the driver and any
front passenger will re initiate when vehicle
speed exceeds 25 km/h.
If you still do not buckle up, a "ding-dong"
reminder will sound after a further
30 seconds.
Some seat belt reminders may differ from
that which is described above depending on
market requirements, etc.
WARNING
• Buckle up and adjust your seat belt
before driving off so that you can pay
full attention to the traffic.
• Seat belts must be worn at all times
by all car occupants. Child safety, see
page 27.
• Check that the belt tongue engages
securely in the belt lock.
• In the event of a collision, rear seat
passengers not wearing seat belts will
be thrown forward against the front
seat backrests. This will multiply the
stresses imposed on the front seat
passengers and belts and can result in
needless injury or even death to all car
occupants.
Driver seat belt reminder
460_OM_MY09.book Page 16 Wednesday, April 2, 2008 10:32 AM
17Safety
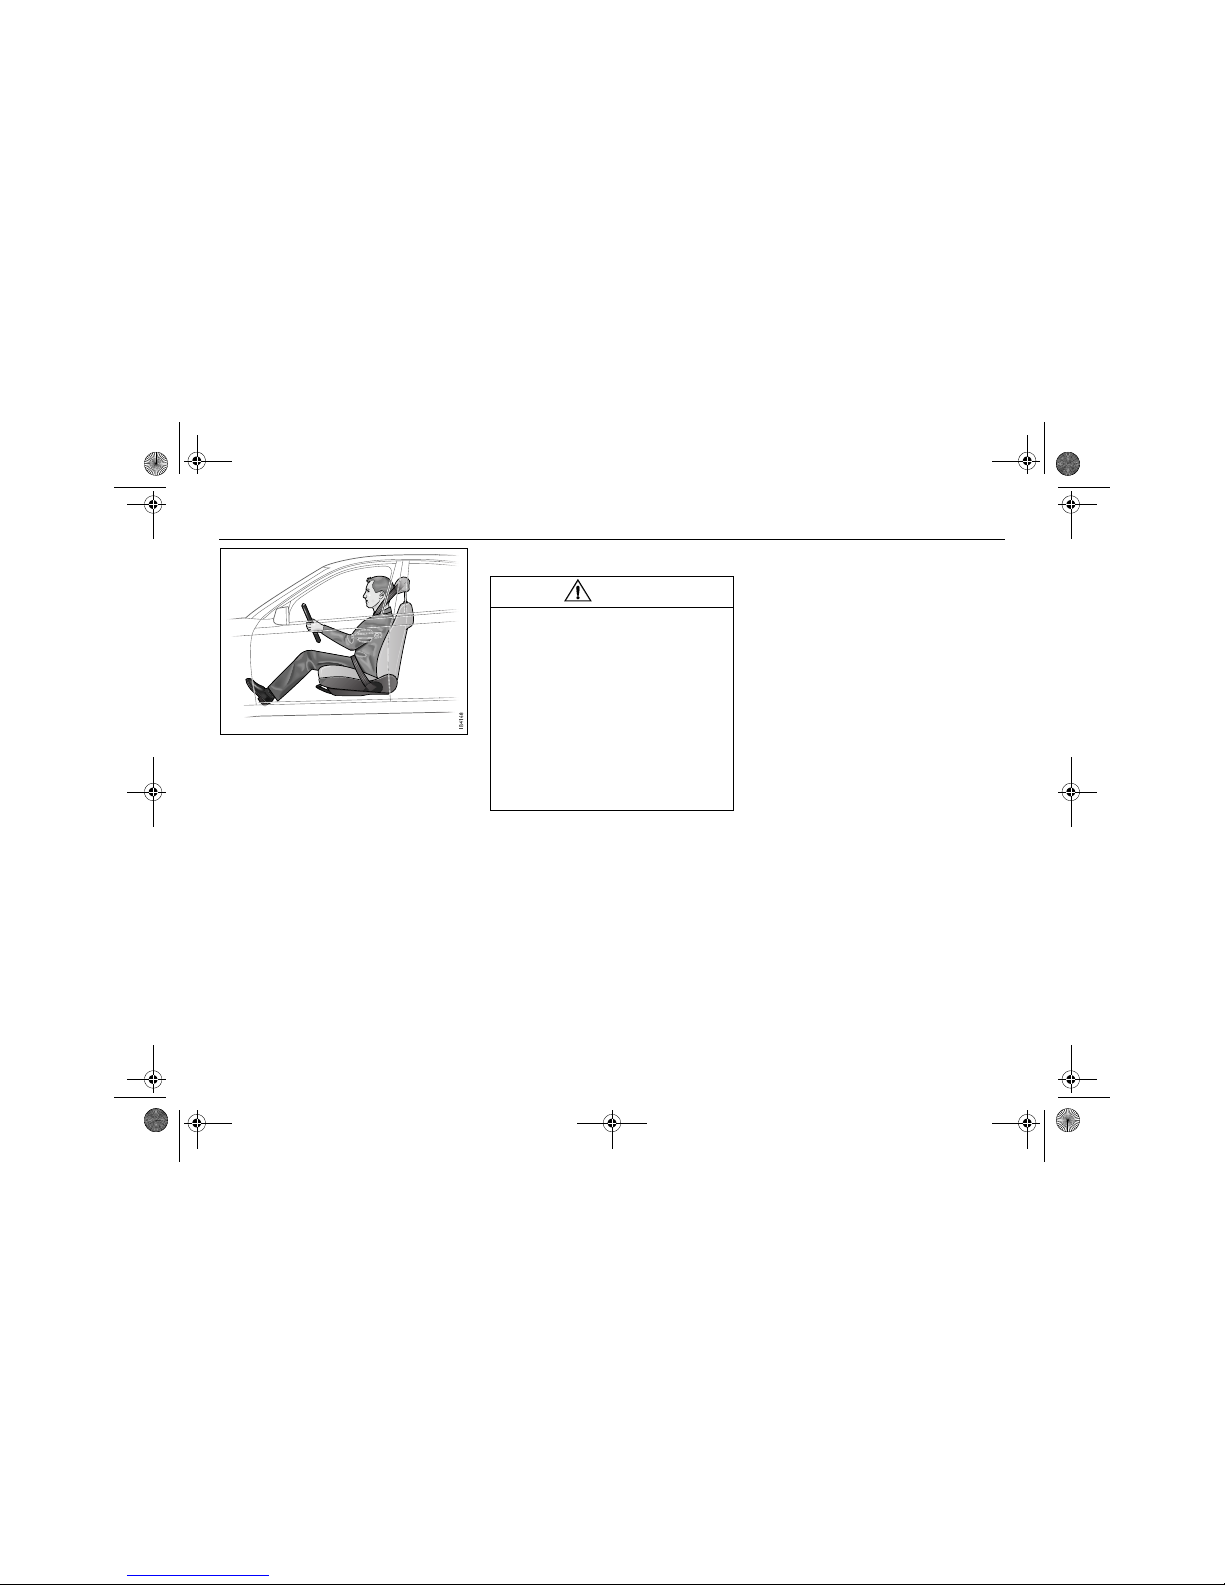
Correct position for seat belt
• Position the hip strap snugly and low
across the hips so that it just touches the
thighs. The diagonal strap must be as far
in on the shoulder as possible.
• Check to ensure that the belt is not twisted
or rubbing against any sharp edges.
• There should not be any slack in the belt.
Pull the strap tight - particularly important
when thick outdoor clothing is worn.
• Refrain from tilting the backrest too far
back as the seat belt provides best protection when the seat is in the normal, upright
position.
• Only one person per seat belt!
• For most of the time a seat belt is worn,
the reel will allow the wearer freedom of
movement. The reel locks up automatically if the strap is jerked or withdrawn
sharply, the car tilts heavily, the brakes are
applied hard or a collision occurs.
• Specially adapted safety equipment
should be used until the child is 140 cm
tall.
• Children who have grown out of child
seats should use the car’s standard threepoint seat belts.
WARNING
• If the wearer slides underneath the
belt in a collision, injury may result
from the hip strap cutting into the
abdomen. Make sure that the hip strap
is properly tensioned.
• Two people must never share one
seat belt. In the event of a collision
those sharing a belt risk being crushed
together and injured.
• Never fasten the seat belt with the
diagonal strap behind the body, pull
the strap off the shoulder or place the
strap under the arm.
Correct seating position
460_OM_MY09.book Page 17 Wednesday, April 2, 2008 10:32 AM
18 Safety
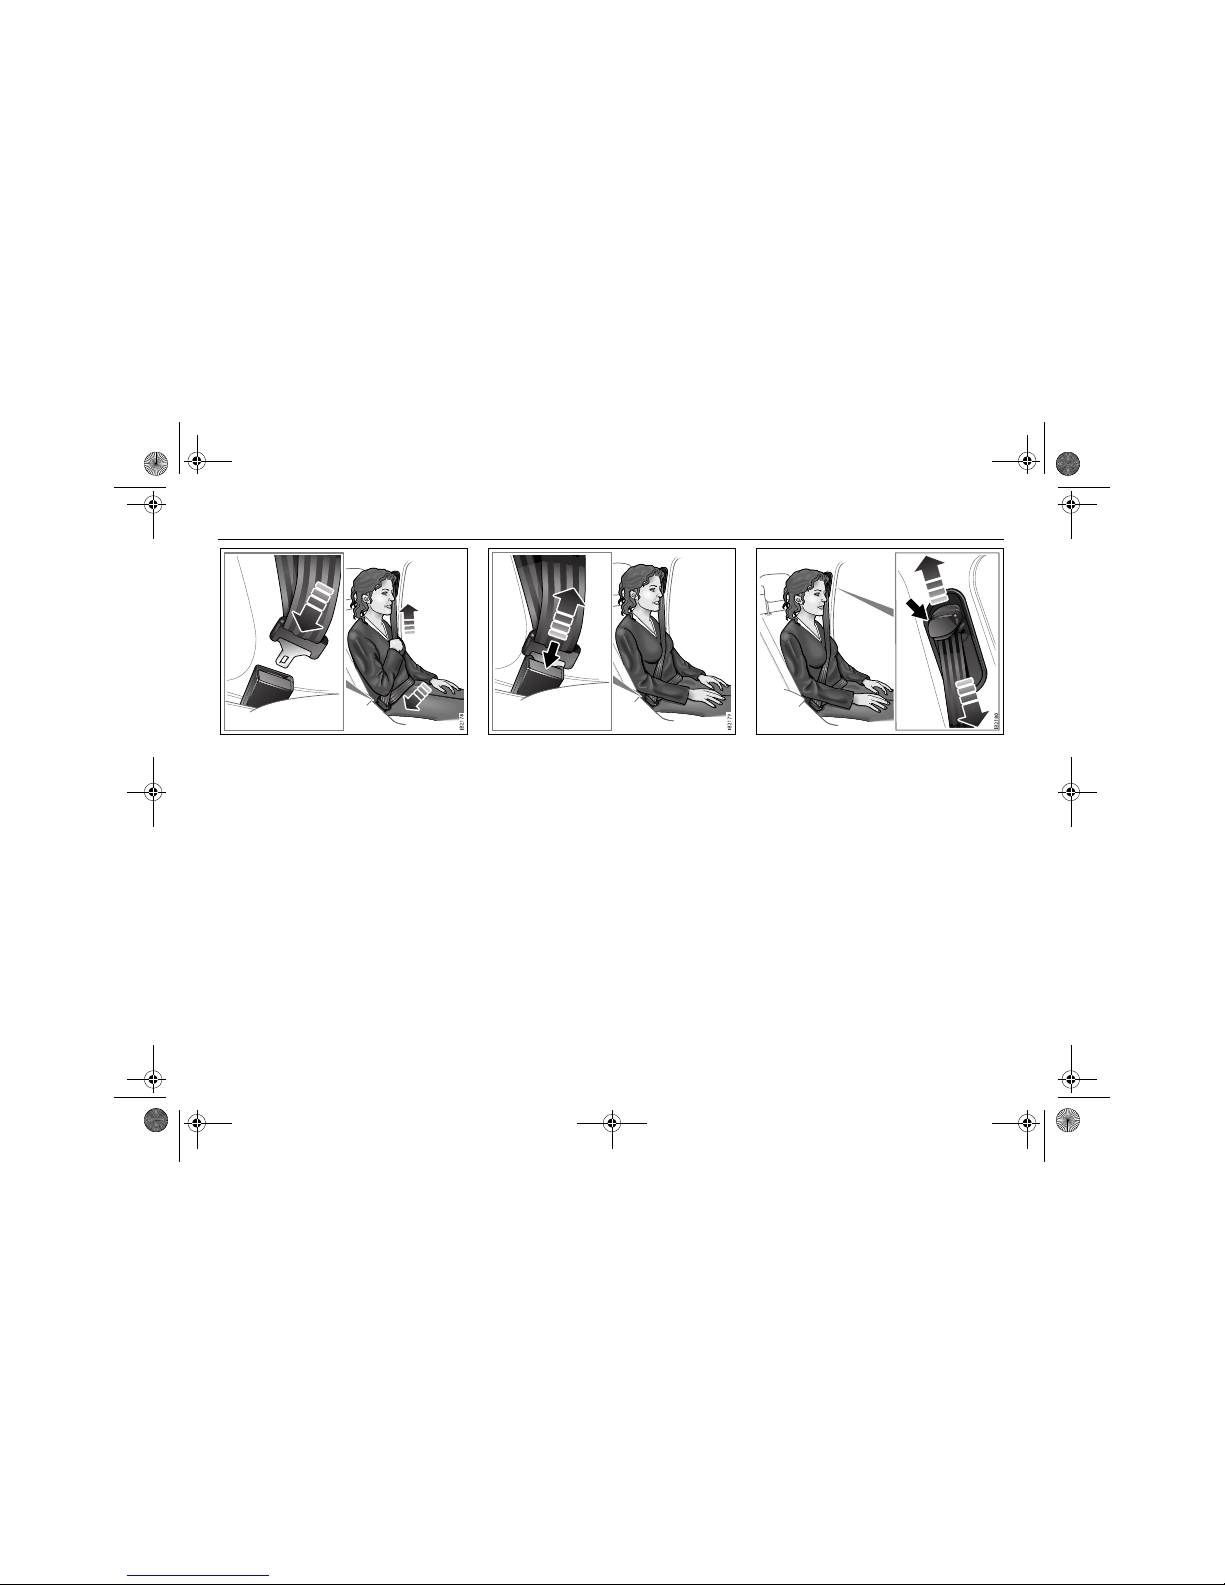
Front seat belts
Fasten the belt by smoothly pulling out the
strap and inserting the tongue into the
buckle. Check that the tongue is securely
fastened in the belt buckle.
Position the hip strap low across the hips.
Take hold of the diagonal strap close to the
buckle and pull the belt up towards the
shoulder to tighten the hip strap.
Position the diagonal strap as far in on the
shoulder as possible.
Press the red button on the buckle to
release the belt.
The front seat belts have their lower
anchorage points on the seats. The seat
belts follow the seats when the legroom is
adjusted.
Refer to page 227 for how to check the function of the seat belts, cleaning and suchlike.
Belt guide
The belt guide for the front seat belts can be
adjusted to different heights.
Adjust the belt so that it is as high up as possible. To avoid chaffing in the case of a short
person, the guide can be lowered until the
belt is a few centimetres from the neck while
still providing safe restraint.
Buckling up Press the red button to release the belt Front belt guide
460_OM_MY09.book Page 18 Wednesday, April 2, 2008 10:32 AM
19Safety
Raise the belt guide by pushing it upwards
to the desired position. To lower it, depress
the catch release button while lowering the
guide. Check that the guide locks in its new
position.
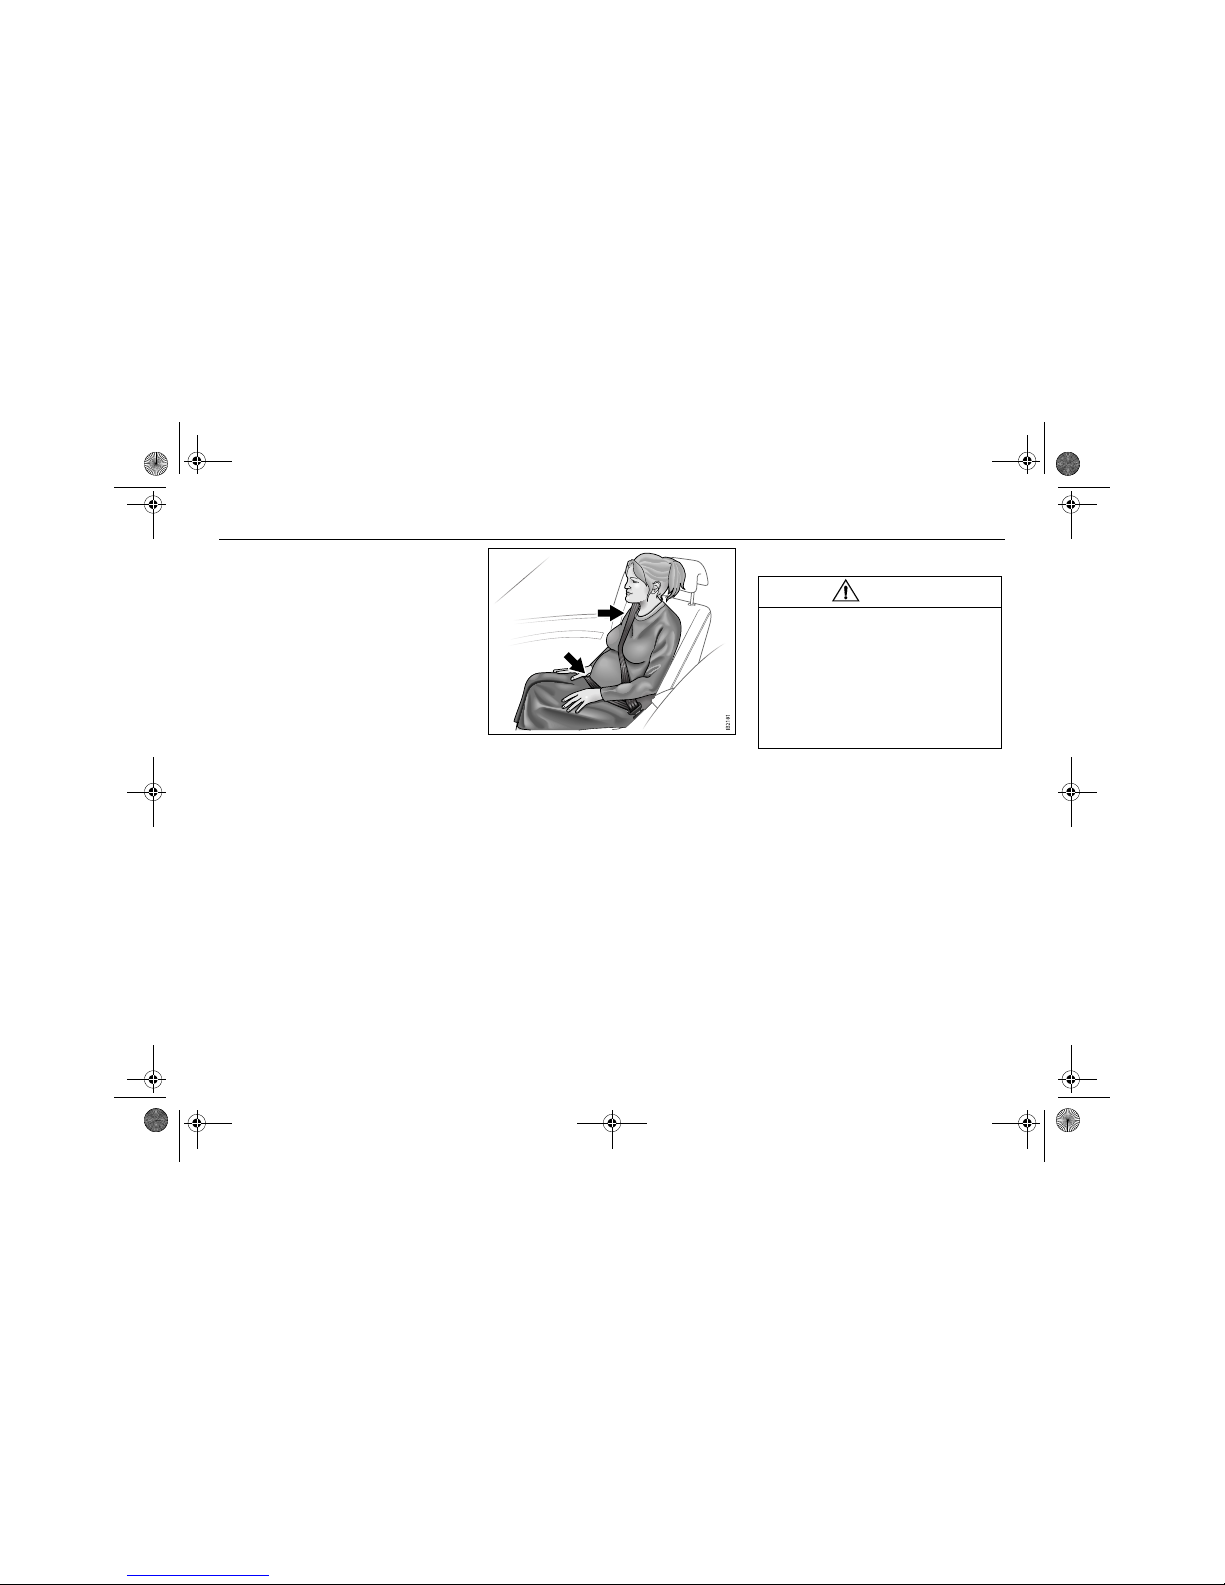
Expectant mothers
Expectant mothers should position the belt
in such a way that it never exerts pressure
on the stomach. The hip strap should be
placed as low as possible across the hips.
Seat belt pretensioners
The seat belts of the front seats have pretensioners and force limiters. These are
deployed in the event of a severe head-on
collision or in a side-on collision. The seat
belt pretensioners are only deployed if the
seat belt is buckled.
The seat belt pretensioners are not activated should the car roll over.
The seat belt pretensioners serve to reduce
the forward movement of the body by tensioning the belt. The force limiters reduce
belt loads on the body by "slackening" the
seat belt slightly to absorb the body’s kinetic
energy as gradually as possible.
WARNING
If the car is involved in a collision, the seat
belts, seat belt pretensioners and other
components must be inspected at a workshop. We recommend that you contact an
authorised Cadillac workshop.
Never make any alterations or repairs to
the seat belts yourself. We recommend
that you contact an authorised Cadillac
workshop.
460_OM_MY09.book Page 19 Wednesday, April 2, 2008 10:32 AM
20 Safety
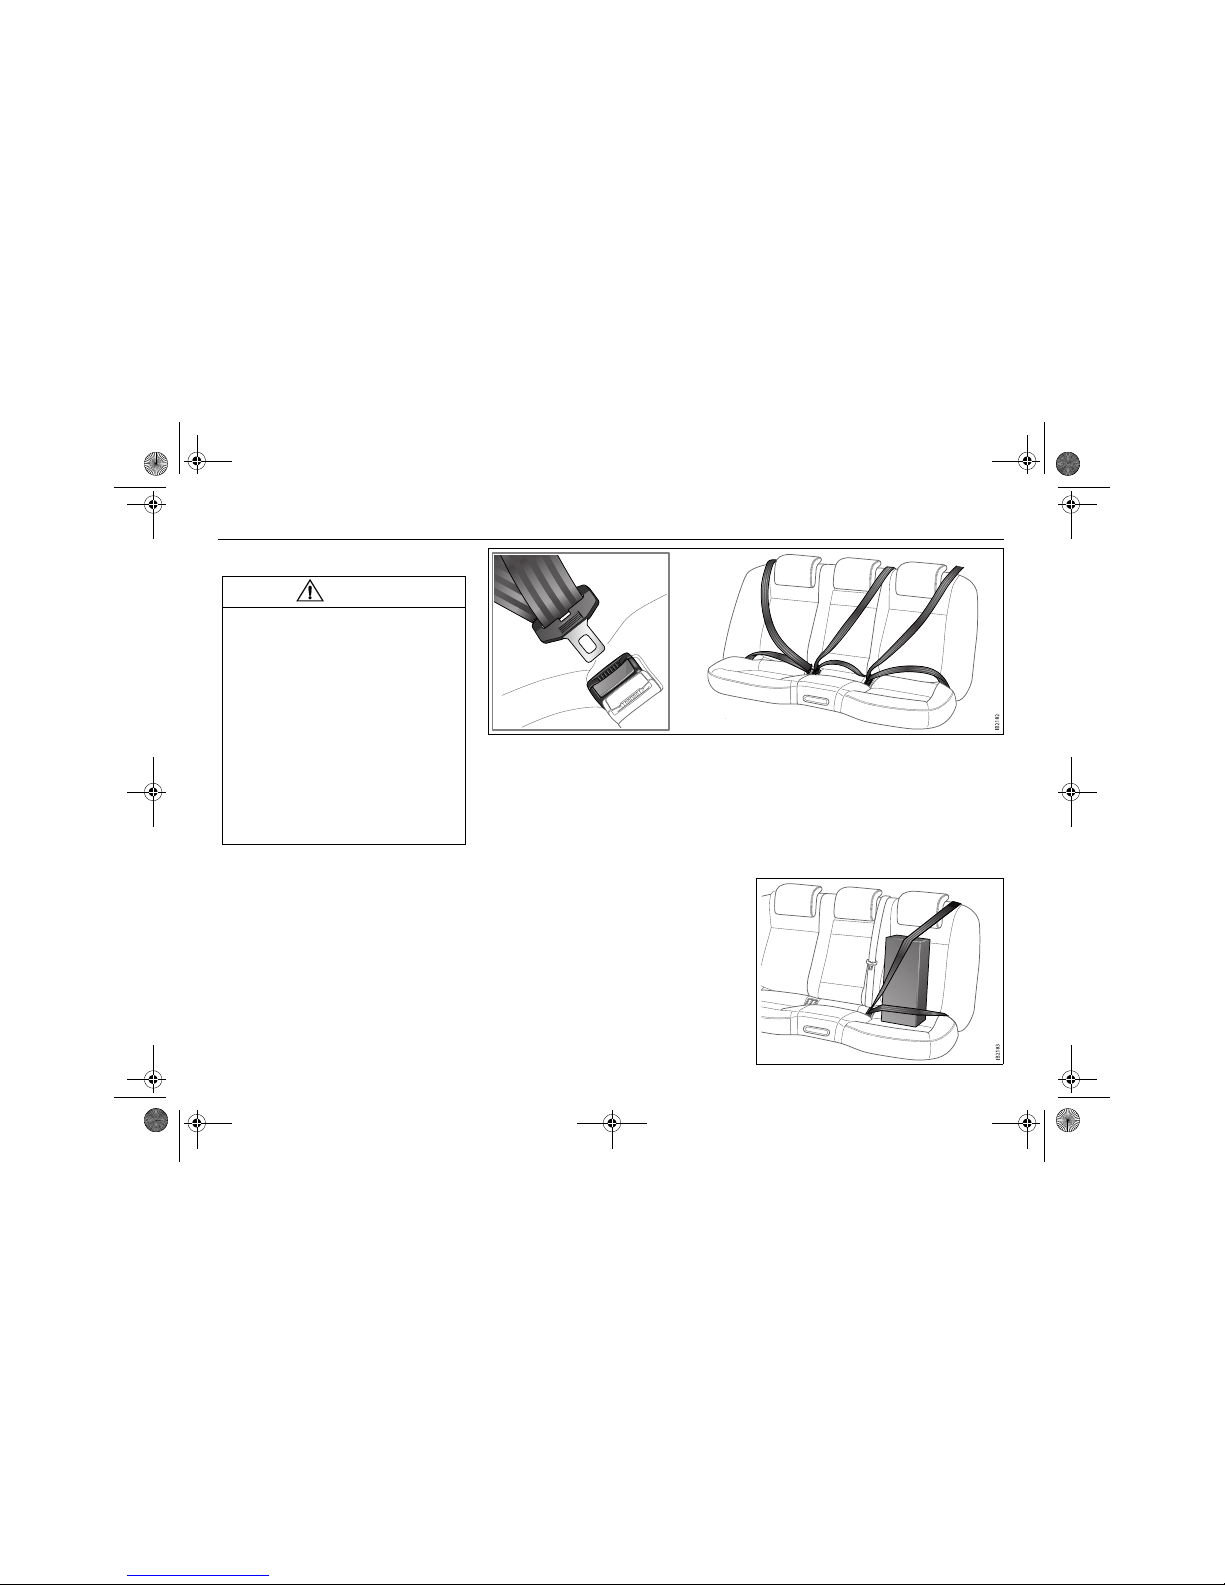
Seat belts, rear seat
The three rear seats all have three-point
seat belts with inertia reels.
Fasten the belt by smoothly pulling out the
strap and inserting the tongue into the
buckle. Check that the tongue is securely
fastened.
Take hold of the diagonal strap close to the
buckle and pull the belt up towards the
shoulder to tighten the hip strap. Position
the hip strap low across the hips.
Position the diagonal strap as far in on the
shoulder as possible.
Press the red button on the buckle to
release the belt.
Refer to page 227 for how to check the function of the seat belts, cleaning and suchlike.
WARNING
• Take care that the belt does not
become trapped when the backrest is
folded down or raised, see page 110.
• If you must place an item of luggage
on a seat, ensure that it is secured
properly with the seat belt. This
reduces the risk of its being sent flying
and causing injury in the event of a collision.
• Protect the belt from sharp edges.
• Make sure you use the correct seat
belt buckle. The buckles for the centre
and left-hand rear seats are close
together.
Seat belts, rear seat. The centre head restraint is optional
Securing an item on the rear seat
460_OM_MY09.book Page 20 Wednesday, April 2, 2008 10:32 AM

21Safety
Seats
Manually adjusted front seats
The following seat adjustments can be
made to achieve a comfortable seating
position:
• Height 3
•Legroom
• Backrest rake angle
• Lumbar support firmness 3
• Head restraint height
We recommend that you adjust the driver’s
seat in the following order:
1 Height
2 Legroom
3 Backrest rake angle
4 Head restraint height
Lastly, adjust the position of the steering
wheel, see page 96.
Electrically adjustable front seats 3
See page 23.
Electric heating, front seats 3
See pages 93.
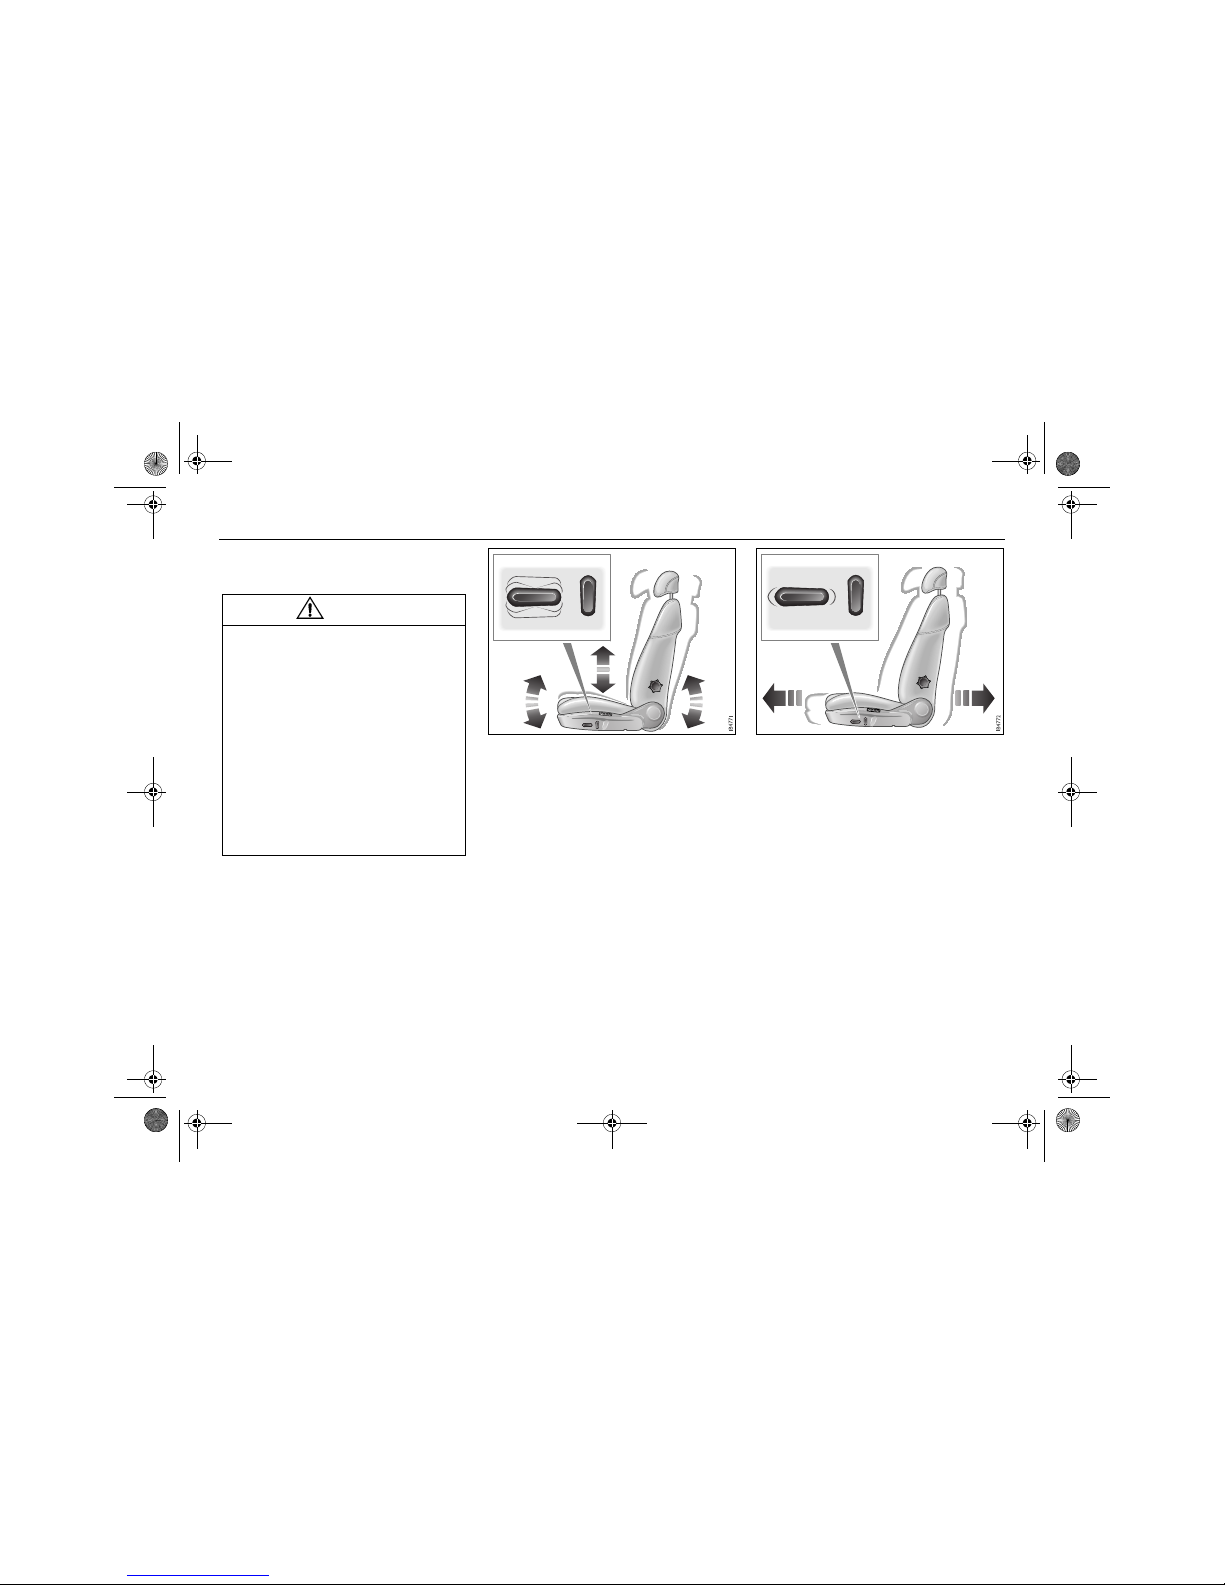
Height setting 3
Adjust the height of the seat with the lever
on the side of the seat.
Raise the lever repeatedly to raise the seat.
Press down the lever repeatedly to lower
the seat.
WARNING
Only adjust the driver’s seat when the car
is stationary.
Height adjustment
460_OM_MY09.book Page 21 Wednesday, April 2, 2008 10:32 AM

22 Safety
Legroom adjustment
Adjust the legroom with the lever on the
front edge of the seat.
Backrest rake angle
Adjust the rake angle of the backrest by
turning the wheel.
Lumbar support 3
Adjust the firmness of the lumbar support by
turning the wheel.
WARNING
Check that the seat is locked in its new
position. If not, the seat may move while
the car is being driven and cause injury to
car occupants in the event of a collision.
WARNING
The backrest should be upright for
driving, so that the seat belt, airbag and
backrest can provide optimum protection
in the event of emergency braking or a
collision, particularly from the rear.
Adjusting the backrestLegroom adjustment Lumbar support adjustment
460_OM_MY09.book Page 22 Wednesday, April 2, 2008 10:32 AM
23Safety
Electrically adjustable front
seats 3
For safety reasons, the seats can only be
adjusted when the ignition is in position 3.
To facilitate getting into the car, both seats
can be adjusted when either of the front
doors is open. The seats can also be
adjusted up to 2 minutes after both doors
have been closed (applicable only to
cars without window and sunroof pinch
protection).
Height adjustment and seat
angle
Adjust the height of the seat with the rear
section of the front lever.
Adjust the angle of the seat with the front
section of the front lever.
Legroom adjustment
Adjust the legroom with the front lever.
WARNING
• The seats are actuated by powerful
motors. Make sure that nothing can be
trapped or damaged when adjusting
the seat.
• Bear in mind that children can be
injured if they play with the electrically
adjustable seats.
• Always remove the ignition key
(remote control) when you leave the
car to prevent personal injury caused
by the operation of the electrically
adjustable seats, for example, due to
children playing. Refer to page 24 for
information on the electrically operated seat with memory.
Legroom adjustmentHeight and angle adjustment
460_OM_MY09.book Page 23 Wednesday, April 2, 2008 10:32 AM

24 Safety
Backrest rake angle
Adjust the rake angle of the backrest with
the rear lever.
Lumbar support 3
Adjust the firmness of the lumbar support by
turning the wheel.
Memory function 3
WARNING
The backrest should be upright for
driving, so that the seat belt, airbag and
backrest can provide optimum protection
in the event of emergency braking or a
collision, particularly from the rear.
WARNING
The legroom of the electrically operated
driver’s seat can always be adjusted,
whether or not a front door is open and
irrespective of the position of the ignition
switch.
Adjusting the backrest Lumbar support adjustment Memory function buttons
460_OM_MY09.book Page 24 Wednesday, April 2, 2008 10:32 AM

25Safety
When the ignition is ON, all seat settings
can be adjusted. When the door is open and
before the remote control has been inserted
into the ignition switch, all seat settings can
be adjusted for up to 20 minutes.
The memory also includes the door mirror
settings.
Storing and restoring settings
1 Adjust the seat and the door mirrors.
The lumbar support is not included by
the memory function.
2 Press and hold the M-button and then
press one of the preset buttons (1, 2
or 3). A chime will sound to confirm that
the settings have been saved.
To recall programmed settings, press and
hold the required preset button while the
seat and door mirrors adopt their programmed positions. The memory function
also includes the door mirror settings.
To facilitate reversing, the passenger-side
door mirror can be angled down, refer to
page 100.
460_OM_MY09.book Page 25 Wednesday, April 2, 2008 10:32 AM
26 Safety
Head restraints
The front seats are equipped with active
head restraints, which reduce the risk of
whiplash injury in the event of a rear-end
collision.
The active head restraints are mechanical
and are activated by boy weight. The mechanism is integrated in the backrest and is
connected to the head restraint.
In the event of a rear-end collision, the body
is forced back against the backrest. This,
in turn, causes the mechanism to press
the head restraint forwards and upwards,
thus limiting the backward movement of
the head.
The active head restraints do not normally
require replacement after a rear-end collision.
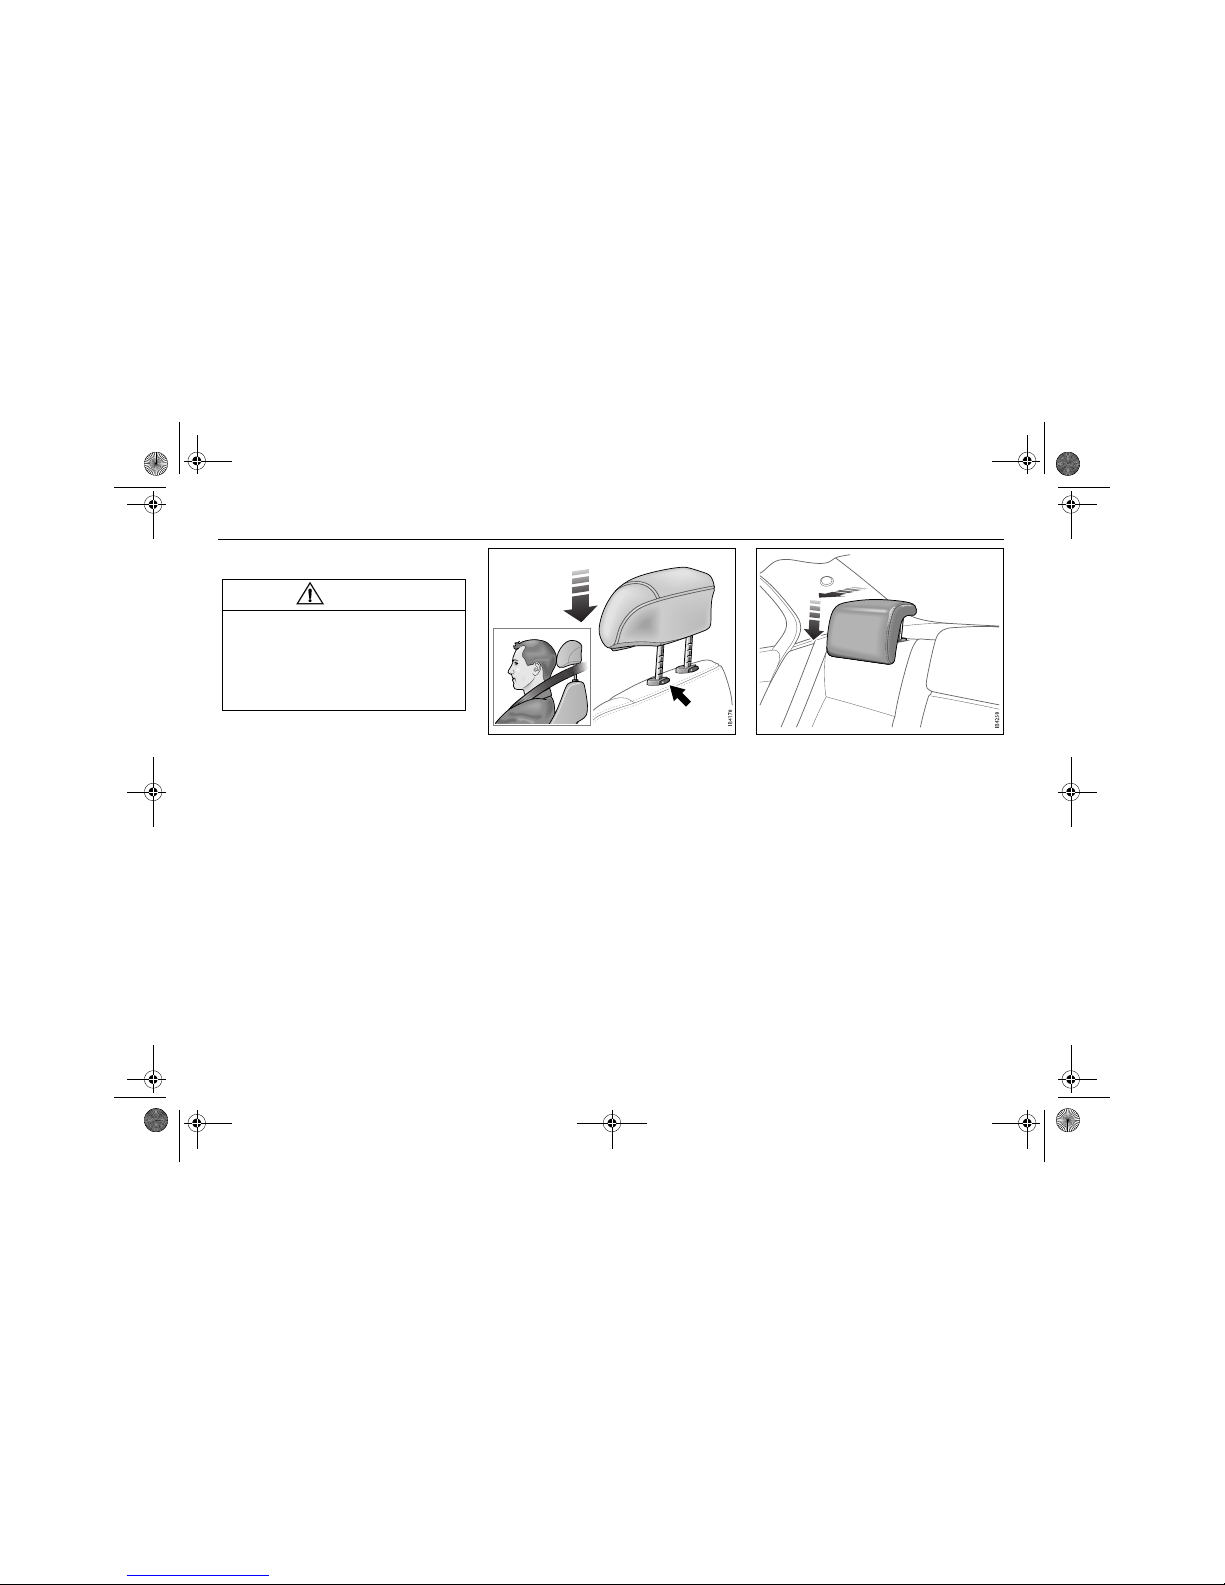
The front and rear head restraints can be
raised and lowered to a number of positions.
• To raise:
take hold of the head restraint on both
sides and pull it straight up.
• To lower:
front head restraint: press in and hold the
left catch depressed while lowering the
head restraint.
rear head restraint: press the head
restraint forwards and downwards.
To improve rearward visibility, the rear head
restraints can be lowered when the seats
are unoccupied.
WARNING
• Adjust the head restraint he ight so that
your head is optimally supported, thus
reducing the likelihood of whiplash
injury in the event of an accident.
• Raise the head restraint of the seats
that are occupied.
Lowering the rear head restraintsLowering the front head restraints
460_OM_MY09.book Page 26 Wednesday, April 2, 2008 10:32 AM
27Safety
Child safety
WARNING
• Children must always be suitably
restrained in the car.
• NEVER fit a child seat in
front of the passenger
AIRBAG.
• DEATH or SERIOUS
INJURY can occur.
WARNING
• Never leave children unattended in
the car, not even for a short period of
time.
– Children and animals can suffer heat
stroke, and even die, in a very short
space of time.
– Children can cause the car to move
and injure themselves and others.
• Remove the remote control from the
car when refuelling.
• Do not let children climb onto or under
the car.
• Make sure no children are standing
behind the car when reversing into or
out of a garage or driveway.
• Never let the car idle in a garage due
to the risk of carbon monoxide poisoning.
• Keep an eye on children while
washing the car. Small children can
drown in a matter of minutes in only
small quantities of water.
WARNING
Make sure children do not get locked
in the luggage compartment
• Teach children not to play in or around
cars.
• Keep an eye on children when loading
or unloading the luggage compartment to prevent inadvertently locking
children in the car.
• Always lock the car and keep the
remote control out of reach of children.
• Keep the rear sea t backrests raised to
prevent children from crawling into the
luggage compartment from the cabin.
460_OM_MY09.book Page 27 Wednesday, April 2, 2008 10:32 AM
28 Safety
General information on child
safety
The safety of children in the car is just as
important as that of adults.
Children must use specially adapted safety
equipment. The equipment must be
adapted to the size of the child.
We recommend that you contact an authorised Cadillac dealer before fitting a carrycot,
child seat or booster cushion.
Make sure you are acquainted with the
legal requirements for seating children
in the car.
Specially adapted safety equipment should
be used until the child is 140 cm tall.
Child seats 3
Child seats are available in different revisions to suit the child’s weight. See the table
on page 30.
The car seats available from authorised
Cadillac dealers are fitted using the car’s
standard 3-point seat belt.
Always follow the fitting instructions
supplied with the child seat.
Use a child seat approved for the weight
of the child and suitable for its height,
see page 30.
460_OM_MY09.book Page 28 Wednesday, April 2, 2008 10:32 AM

29Safety
Rear seat - fitting a child seat
The underside anchorage straps of a rearfacing 3 child seat must be attached to the
attachment points that are found under the
driver and passenger seats (see illustration).
For how to fit an ISOFIX seat, see page 32.
Attach each underside anchorage straps to
the nearest attachment eye.
Anchorage eyes for underside child seat
anchorage straps.
Example of child seat positions in the
rear seat.
The child seat illustrated is just an
example. Some child seats have a
different appearance.
460_OM_MY09.book Page 29 Wednesday, April 2, 2008 10:32 AM
30 Safety
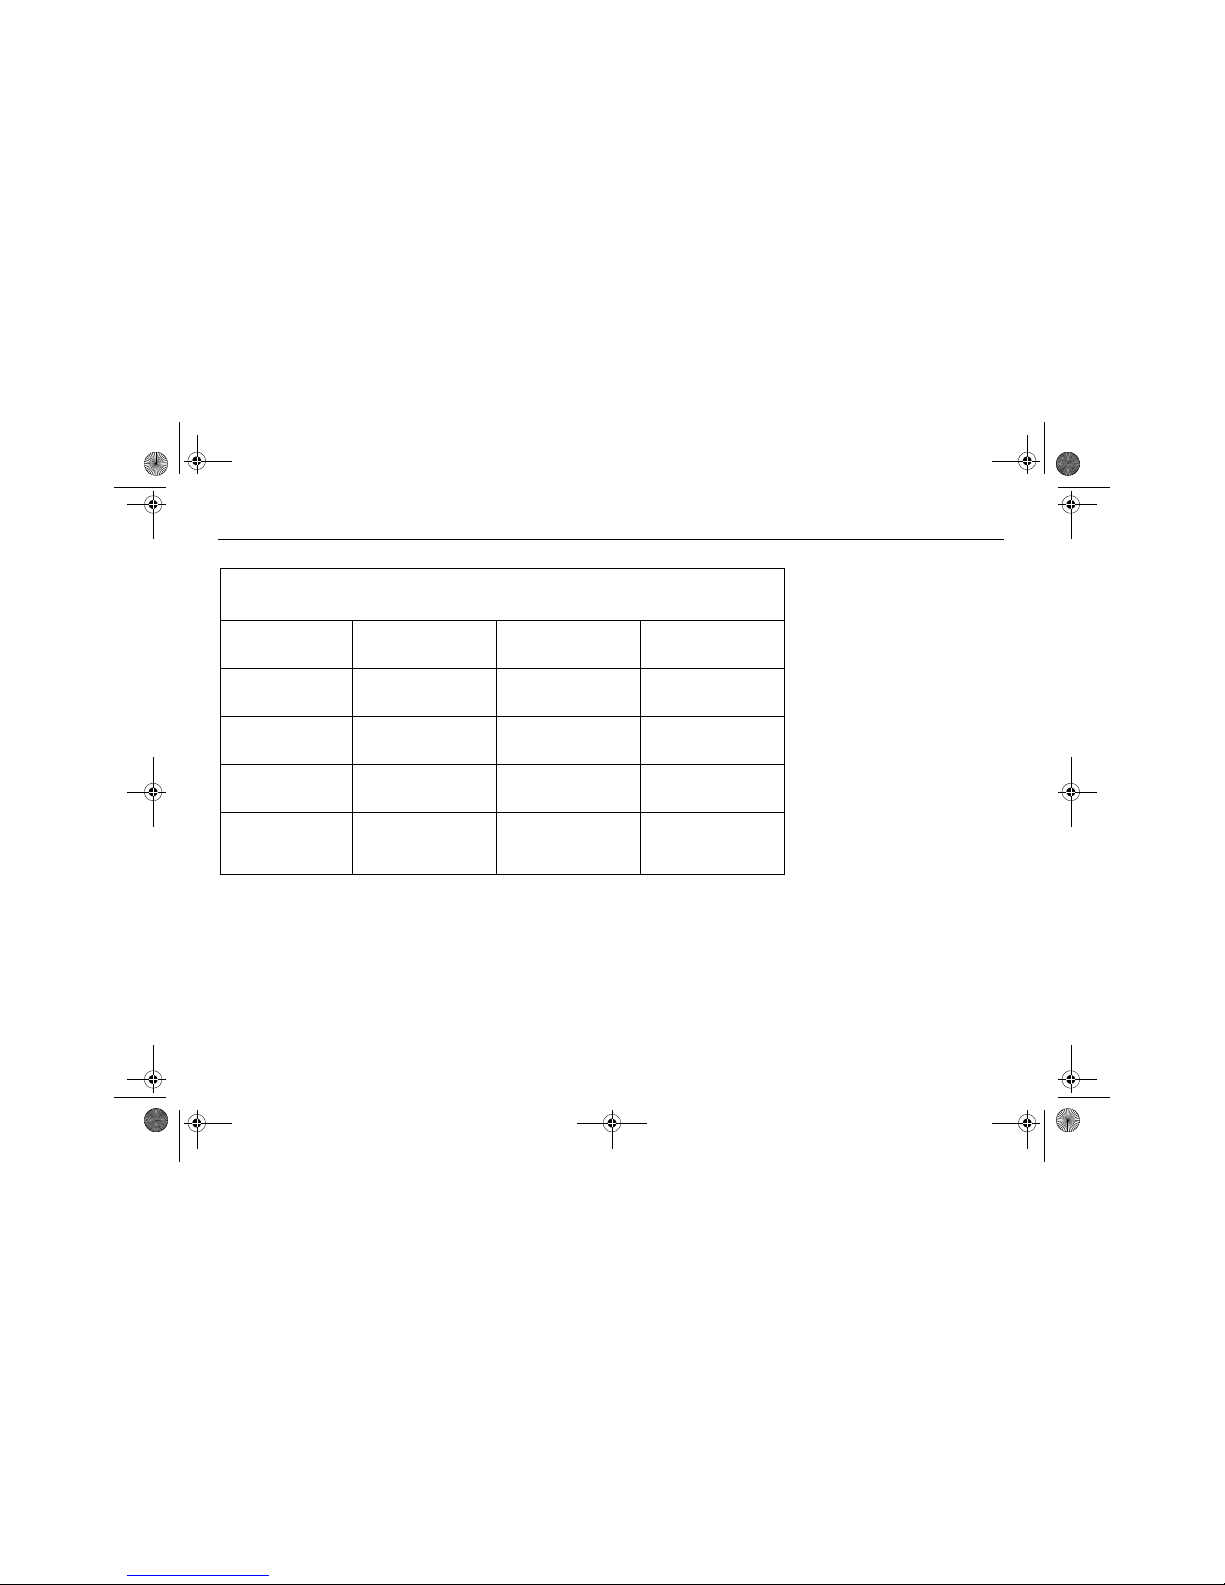
How long a child seat may be used is not just
determined by the weight of the child but
also by its height.
Cadillac recommends
that child seats 3 be placed in the rear seat of the car.
The various seats are approved as follows:
Weight
(age)
Height
Front
passenger seat
Outer rear
seat
Centre rear
seat
Up to 10 kg
(up to approx.
9months)
XUL
Up to 13 kg
(up to approx.
2years)
XUL
9 to 18 kg
(approx. 9 months
to 4 years)
XUL
15–36 kg
(approx.
3–12 years)
shorter than 140 cm
XUL
X: children shorter than 140 cm are not allowed to sit here.
U: Universally approved seat.
L: see next page for recommended child seats.
460_OM_MY09.book Page 30 Wednesday, April 2, 2008 10:32 AM
 Loading...