

Page 1
Benets You Can Depend On
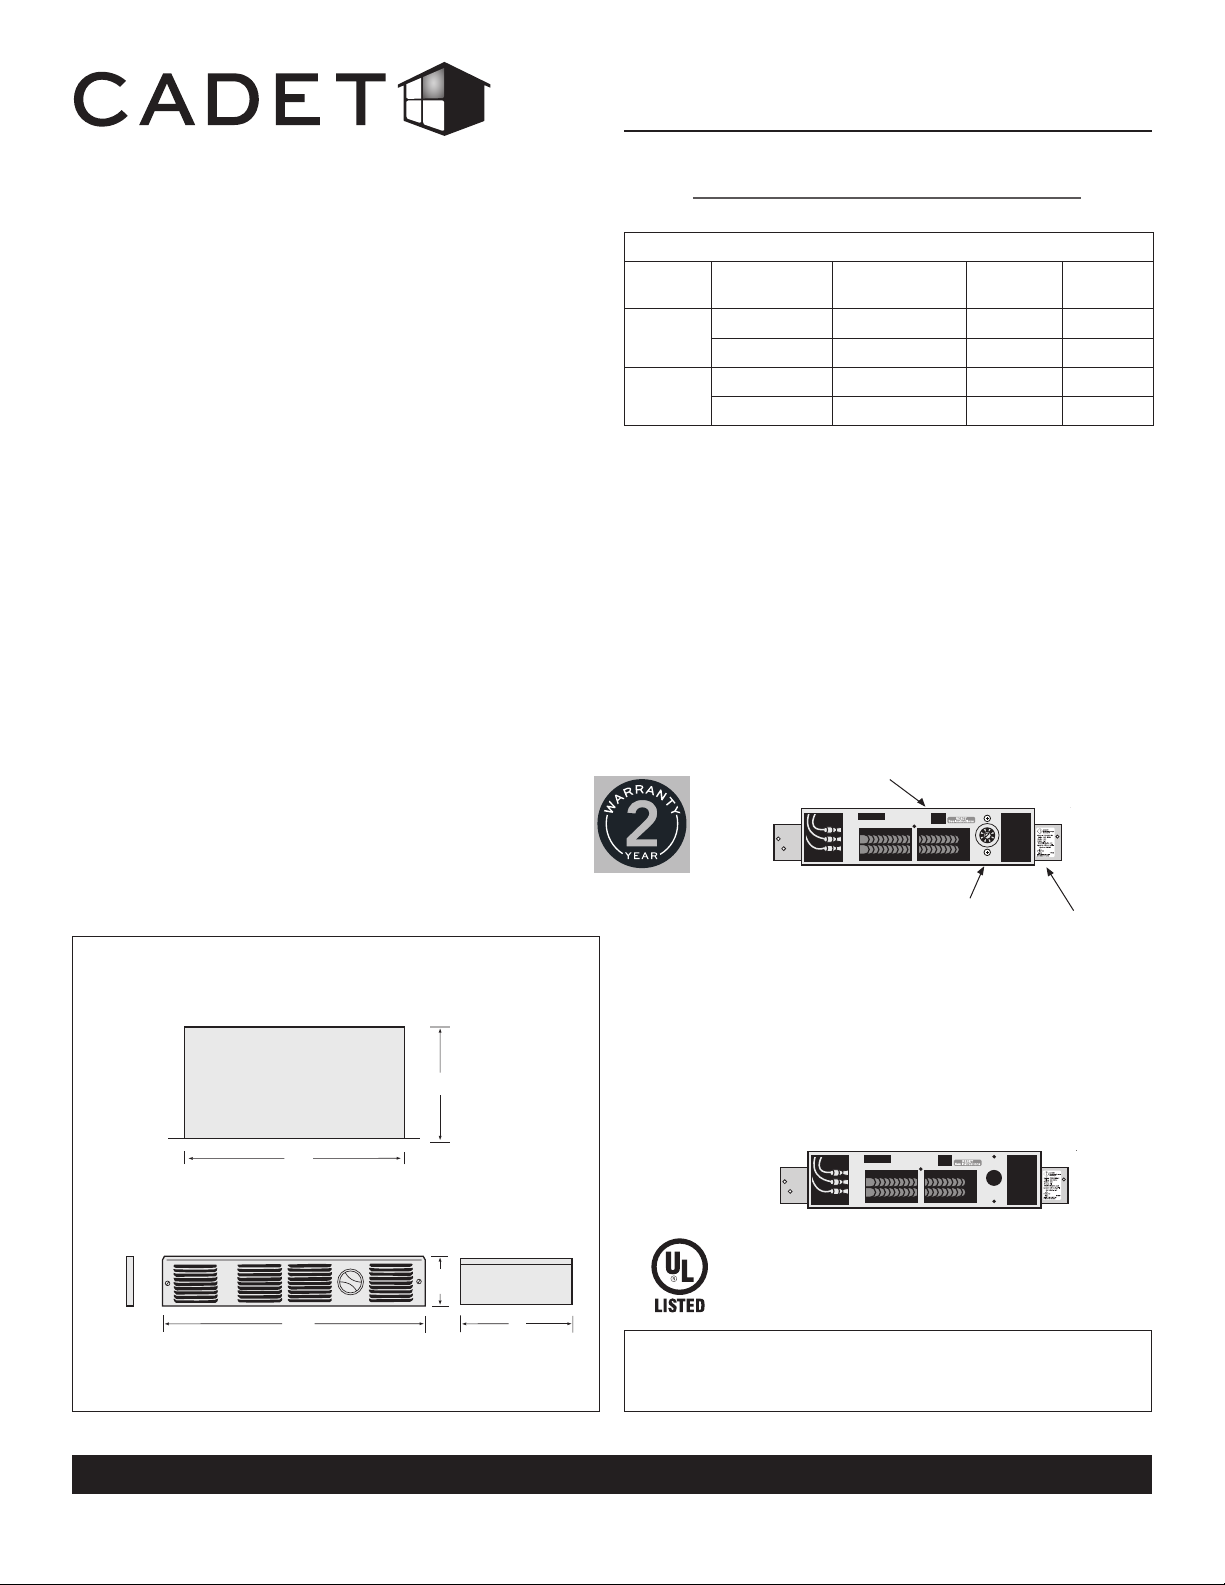
3½”
8.89
Grill Front
3½”
8.89
Grill Front
• Slim design with space saving comfort for:
Toekick areas in your kitchen and bath cabinets
Recreational vehicles
Stairwells
Fireplace Hearths
• Safe for you and your family
Peace of mind with automatic high
temperature shutoff feature
• Common sense components designed with you
in mind
1. NO sharp edges
2. Corrosion resistant
3. Rugged, reliable element for instant warmth
4. Easy to install
Perfectoe Heater
Owner’s Manual
http://www.cadetheat.com/wall-heaters/perfectoe
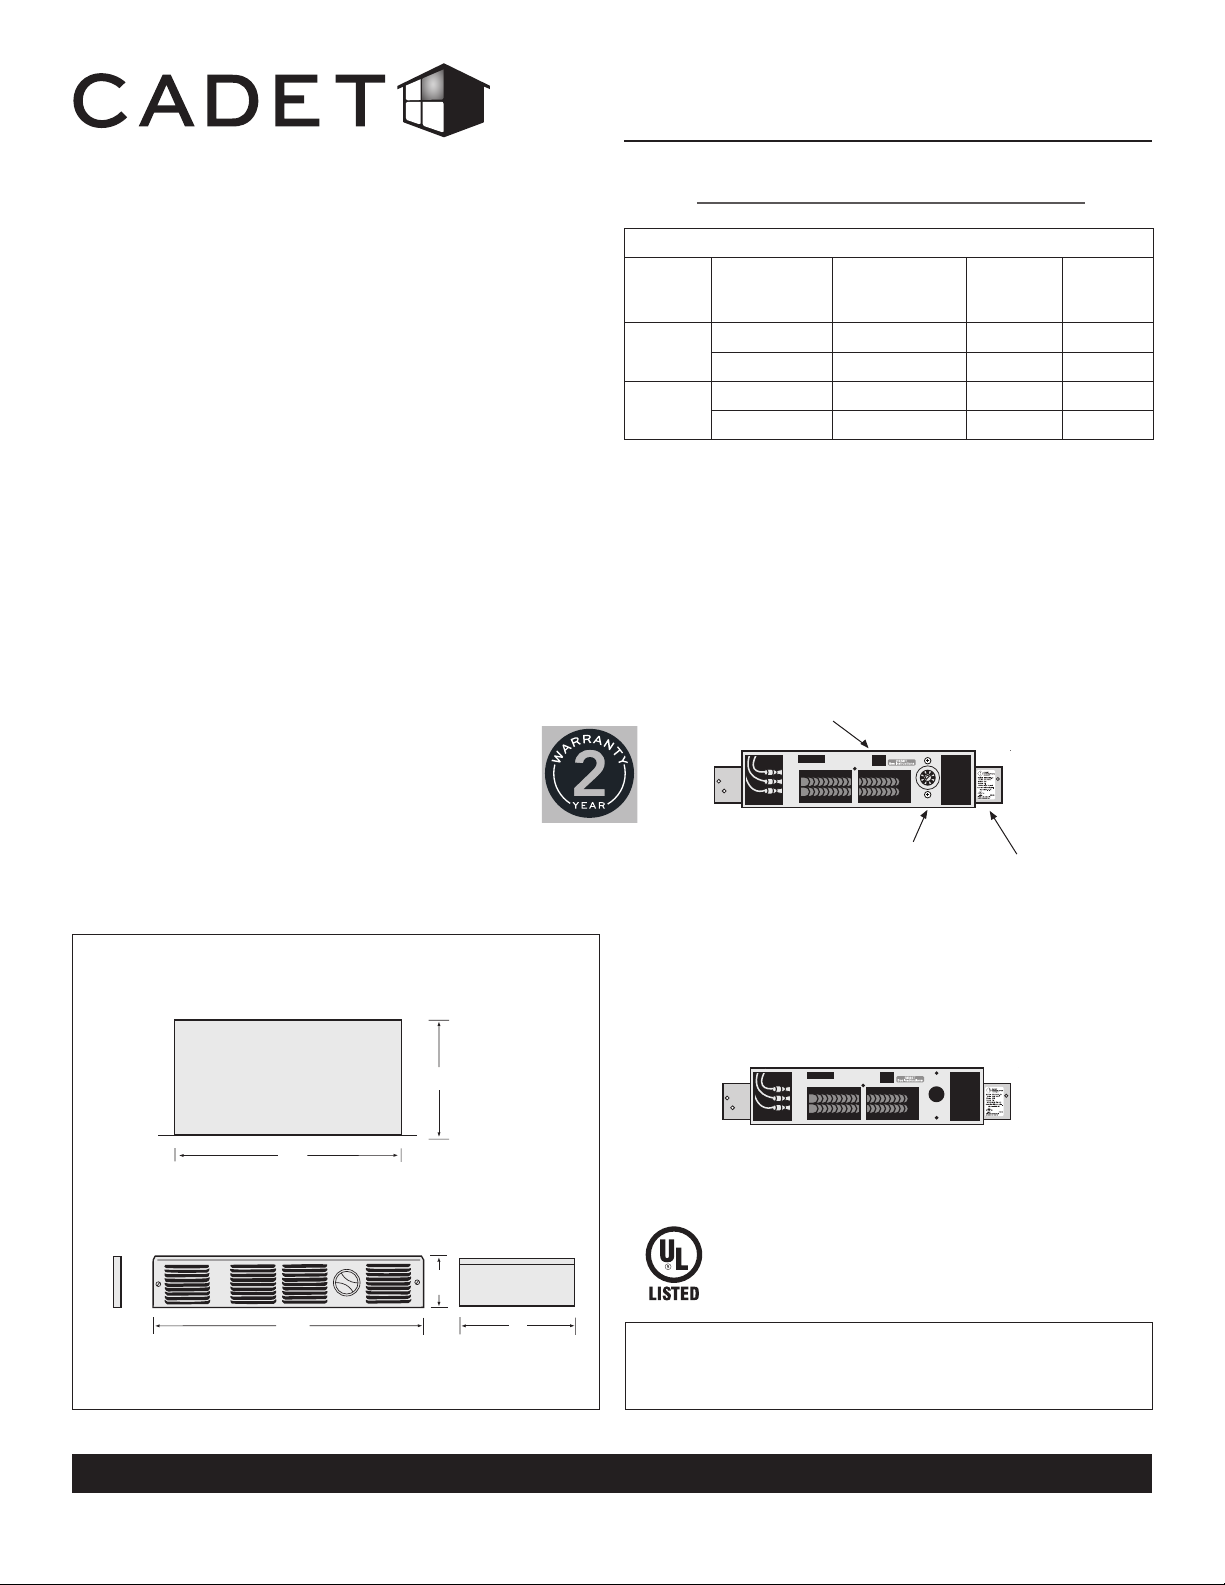
Perfectoe Models
Line
Voltage
240
120
(1)
Standard built-in thermostat is single pole and has no “OFF” position.
(2)
240 volt models can be used at 208 volts. Wattage equals 75% of 240v rated
wattage.
(3)
For installations above 7000 feet, highest wattage recommended is 750 watts.
Note: Optional built-in thermostat kits sold separately
(2)
Model w/o
Thermostat
UC072 750 3.13
UC102
(3)
UC051 500 4.17
UC101
(3)
Model w/
Thermostat
(1)
UC101T
(3)
Watts Amps
1000 4.17
1000 8.33
• Your Cadet heater has been thoroughly tested
and is guaranteed with a 2 year extended
warranty
Wall Can To p
8¼”
21
14½”
36.83
Perfectoe Models With Thermostat
*Wall Thermostat Not Required
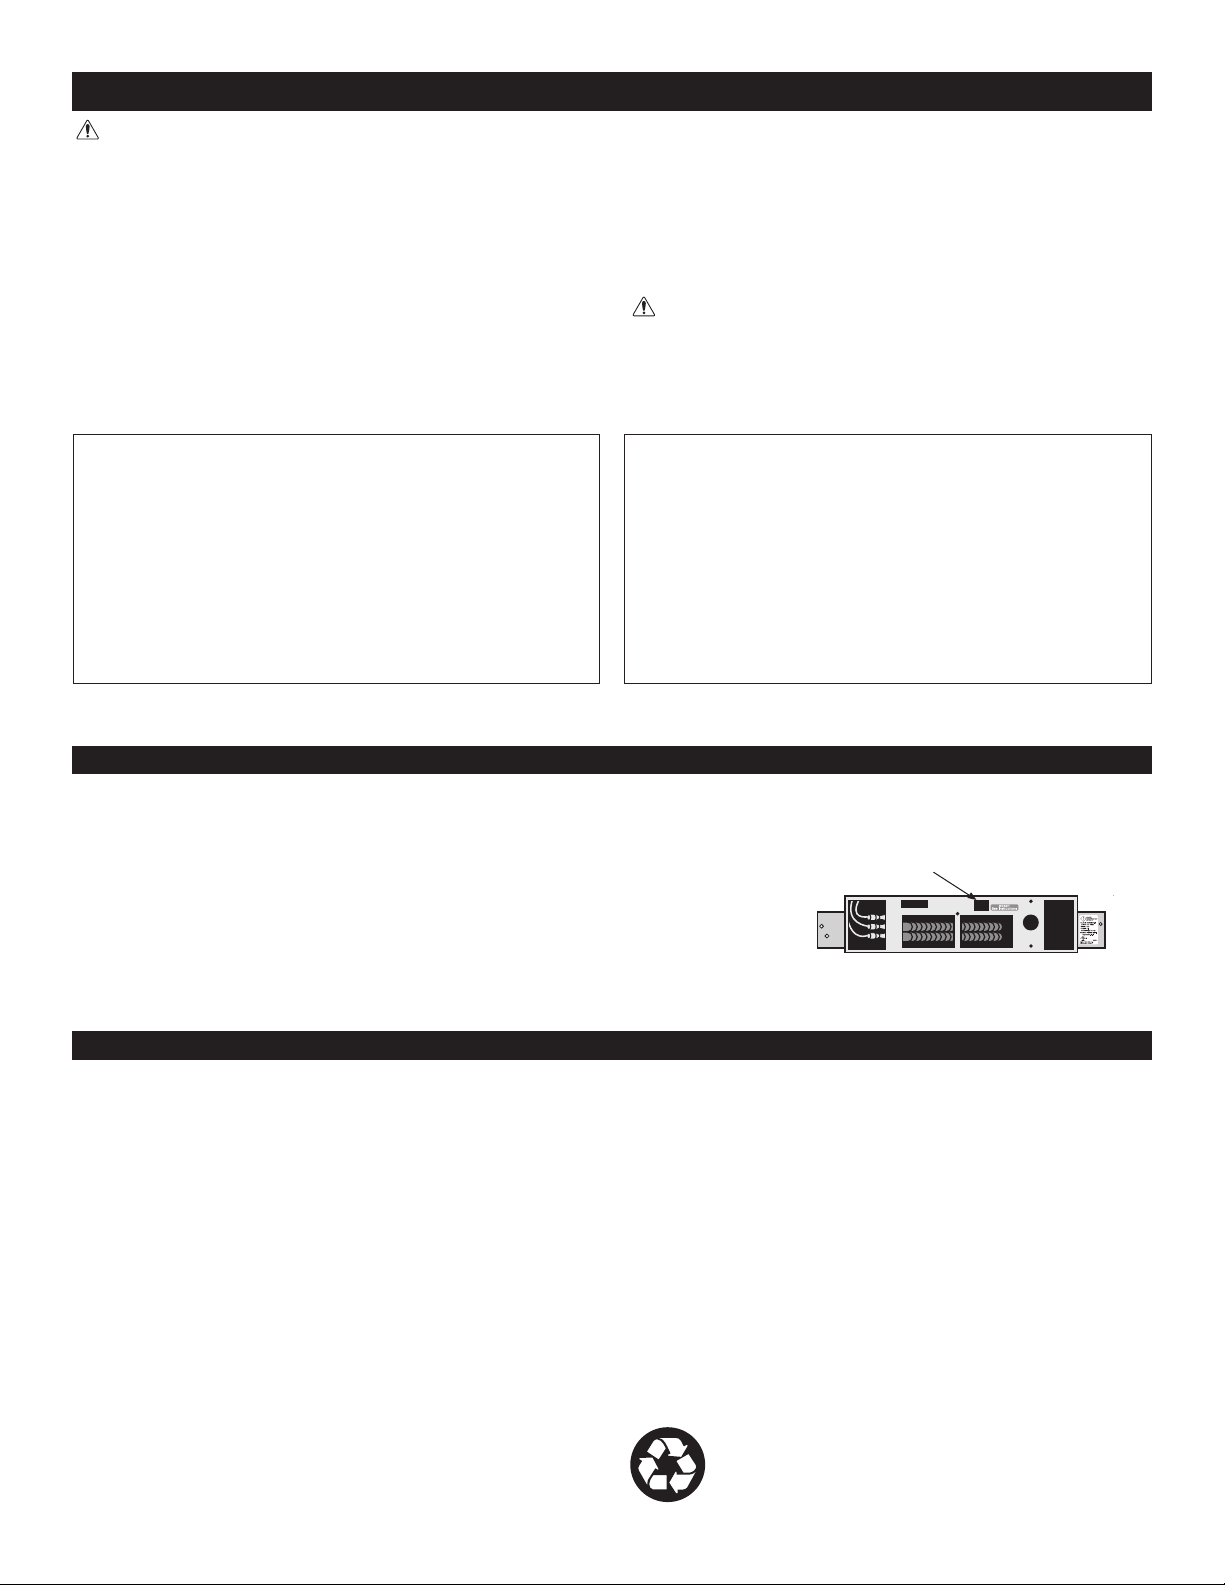
Reset Button
Built-in Thermostat
Perfectoe Models Without Thermostat
*Wall Thermostat Required
Rating Label
Grill Side
.375”
.952
Grill Front
18”
45.7
3½”
8.9
Wall Can Side
8¼”
21
TOOLS REQUIRED:
• Phillips Screwdriver
• Straight Screwdriver
• Wire Strippers
• Utility Knife
• (4) 1 1/2“ Wood Screws
• Insulated Wire Connectors
• (1) Strain Relief Connector
SAVE THESE INSTRUCTIONS
cadetheat.com Tel: 360-693-2505 PO Box 1675 Vancouver, WA 98668-1675
Page 1
Page 2
IMPORTANT INSTRUCTIONS
WARNING
When using electrical appliances, basic precautions should always be followed to reduce the risk of re,
electric shock, and injury to persons, including the following:
1. Read all instructions before installing or using
this heater.
2. WARNING
Risk of Fire. This heater is hot when in use.
Caution—High Temperature. Risk of Fire. Keep
electrical cords, drapery, furnishings, and other
combustibles at least 3 feet from the front of the
heater and 6 inches above and on both sides.
3. WARNING
Burn Hazard. To avoid burns, do not let bare skin
touch hot surfaces. Extreme caution is necessary
when any heater is used by or near children or
invalids and whenever the heater is left operating
and unattended.
4. WARNING
Risk of Electrical Shock. Do not operate any
heater after it malfunctions. Disconnect power
at service panel and have heater inspected by a
qualied electrician before reusing.
5. WARNING
Do not use outdoors.
6. To disconnect heater, turn controls to off, and
turn off power to heater circuit at main disconnect
panel.
7. WARNING
Risk of Electrical Shock. Do not insert or allow
foreign objects to enter any ventilation or exhaust
opening as this may cause an electric shock or
re, or damage the heater.
8. WARNING
Risk of Fire. To prevent a possible re, do not
block air intakes or exhaust in any manner.
9. WARNING
Fire or explosion may occur. A heater has hot and
arcing or sparking parts inside. Do not use it in
areas where gasoline, paint, or ammable vapors
or liquids are used or stored.
10. Use this heater only as described in this
manual. Any other use not recommended by the
manufacturer may cause re, electrical shock, or
injury to persons.
11. The heater must be properly installed before
it is used.
12. WARNING
Risk of Electrical Shock and Fire. Do not operate
without grill.
13. Save these instructions.
Page 2
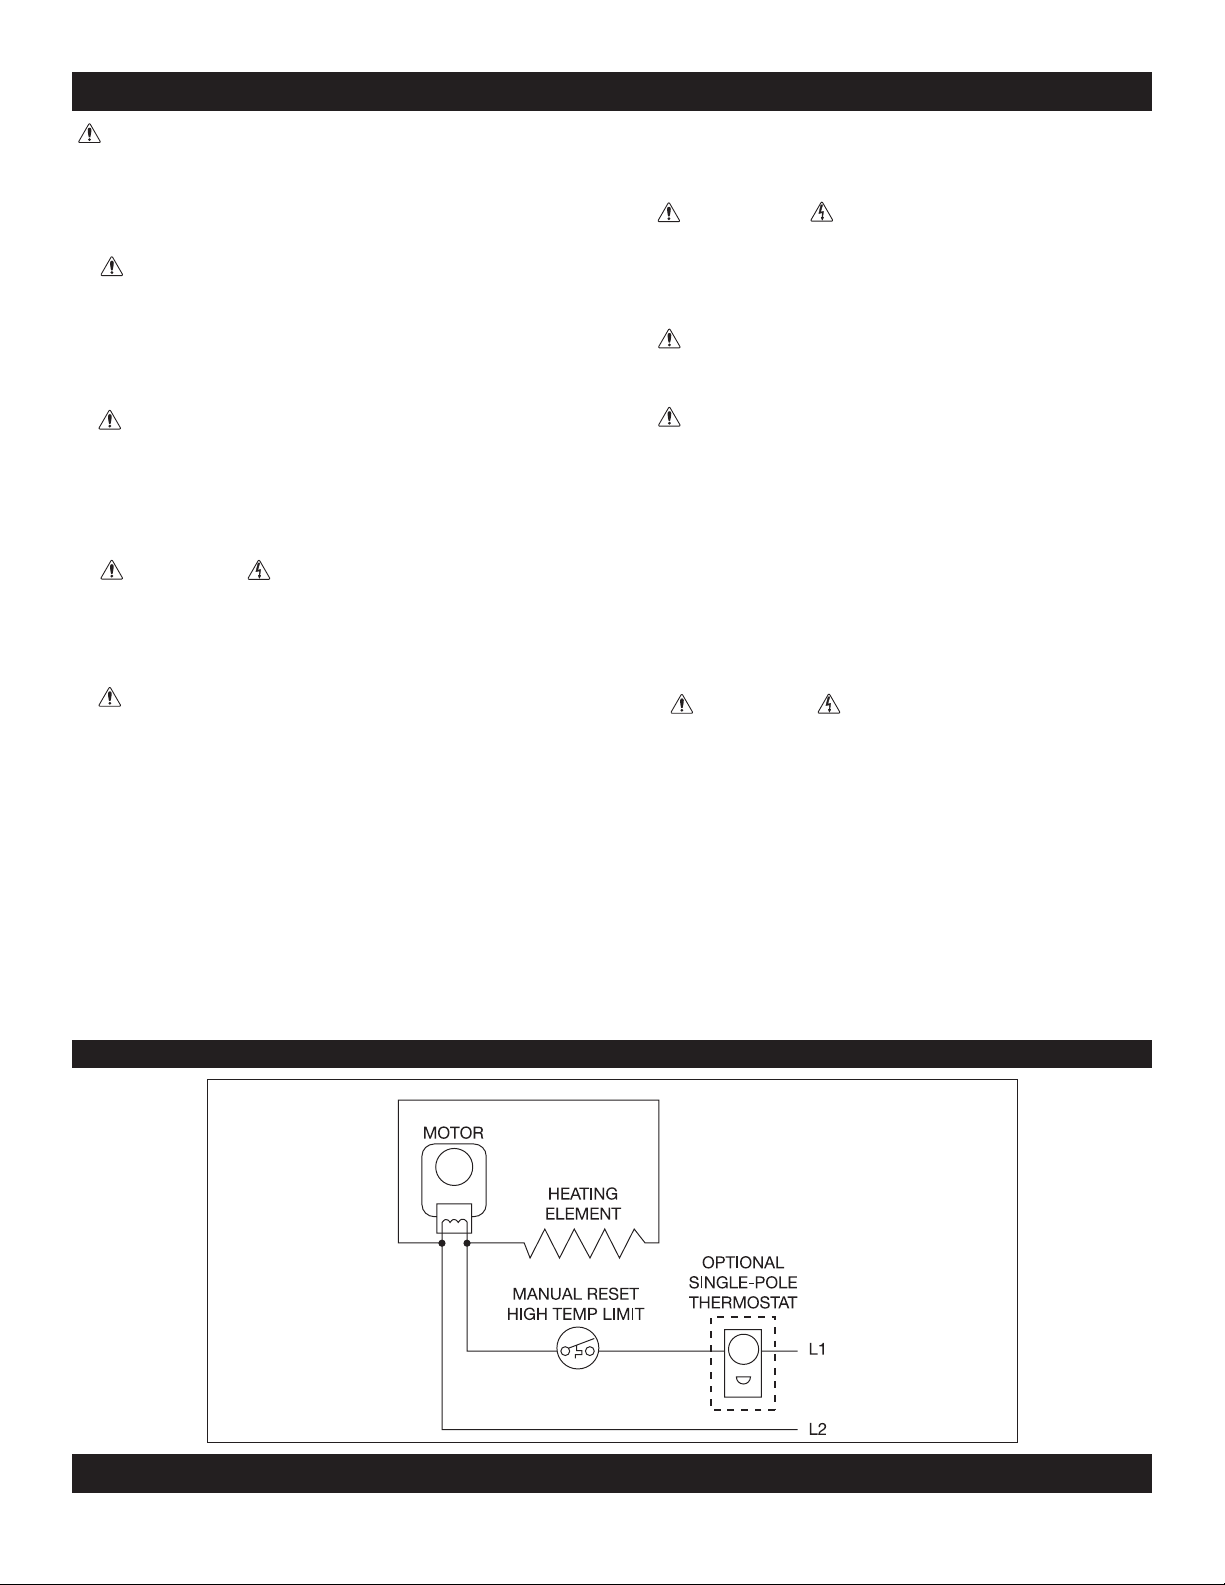
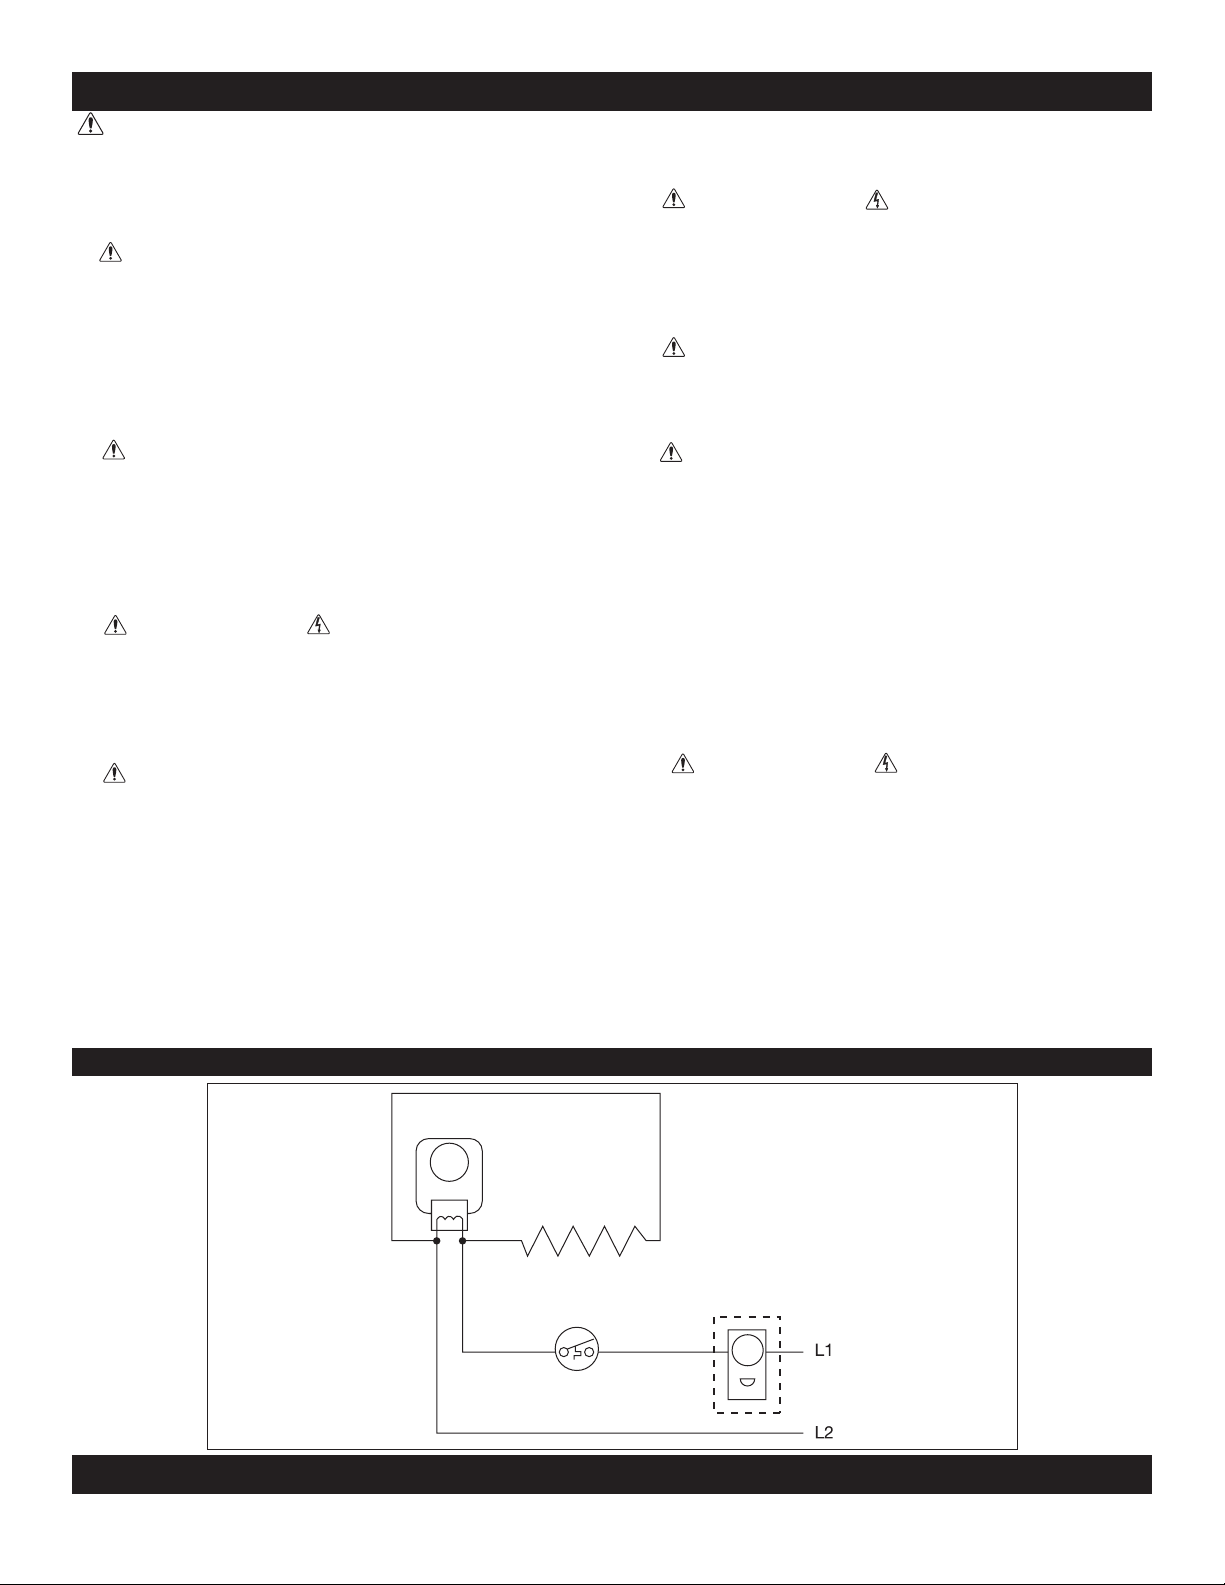
Wiring Diagrams
SAVE THESE INSTRUCTIONS
cadetheat.com Tel: 360-693-2505 PO Box 1675 Vancouver, WA 98668-1675
Page 3
INSTALLATION INSTRUCTIONS
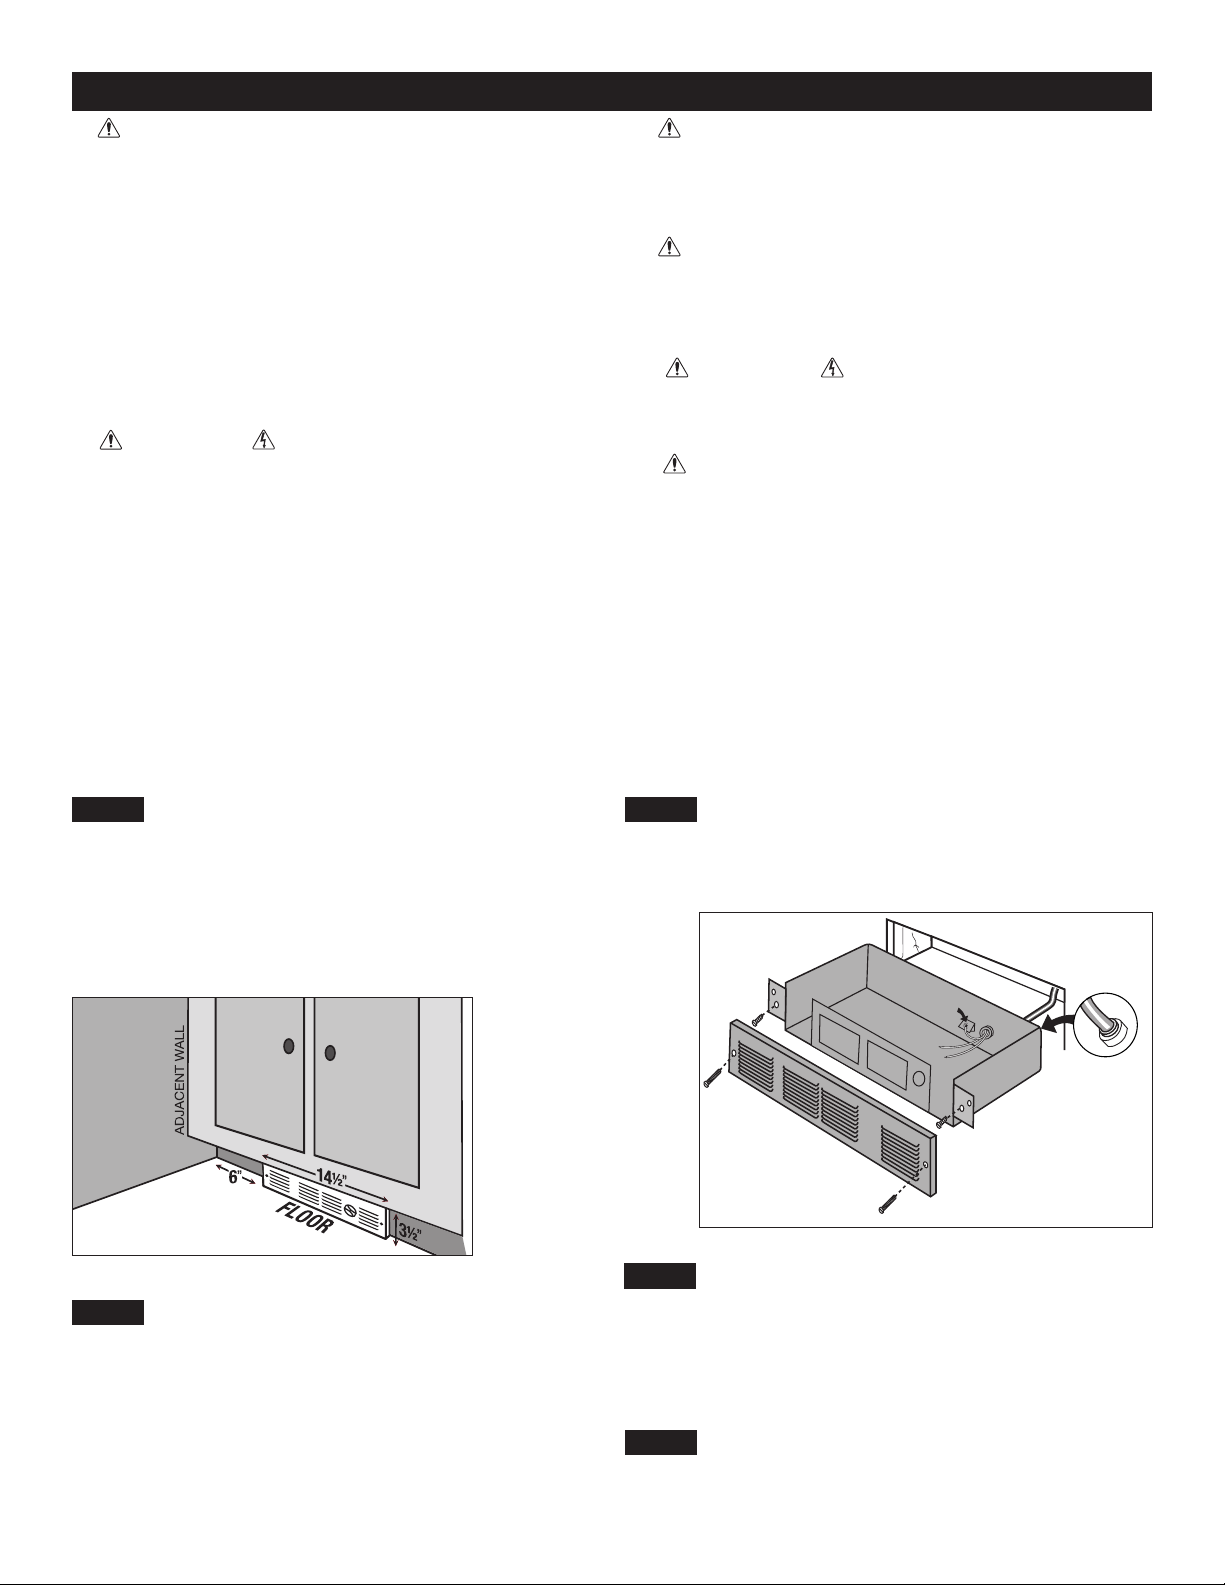
STRAIN RELIEF
CONNECTOR
GROUNDING
SCREW
1. WARNING
Verify that the electrical supply wires are the same
voltage as the heater.
2. If replacing an existing heater, check the label
of the old heater.
3. All electrical work and materials must comply
with the National Electric Code (NEC), the Occupational Safety and Health Act (OSHA), and all
state and local codes.
4. If you need to install a new circuit or need additional wiring information, consult a qualied electrician.
5. Use copper conductors only.
6. WARNING
Risk of Electrical Shock. DO NOT install the heater directly above bathtub or sink. DO NOT install
in shower stall area (Manufacturer recommends a
minimum 2 foot clearance).
7. Heater must be installed in the wall can
included.
__________________________
PLACEMENT: For best results, install heater beneath a cabinet in the toe kick area. Install the Perfectoe (Model UC)
horizontally. Do not install the UC heater in the oor. Headers and bracing are not necessary. Heater must be installed per
the directions indicated on the lid.
WARNING! Vinyl oor manufacturers warn that some vinyl may discolor from temperatures in excess of 110° F. See your
vinyl oor manufacturer for temperature specications for your vinyl oor covering.
CONTROLS: A thermostat is required. A Cadet electronic thermostat is recommended for ultimate control and comfort.
Optional single or double pole eld mount thermostat kits are also available: Model numbers UCT1 and UCT2.
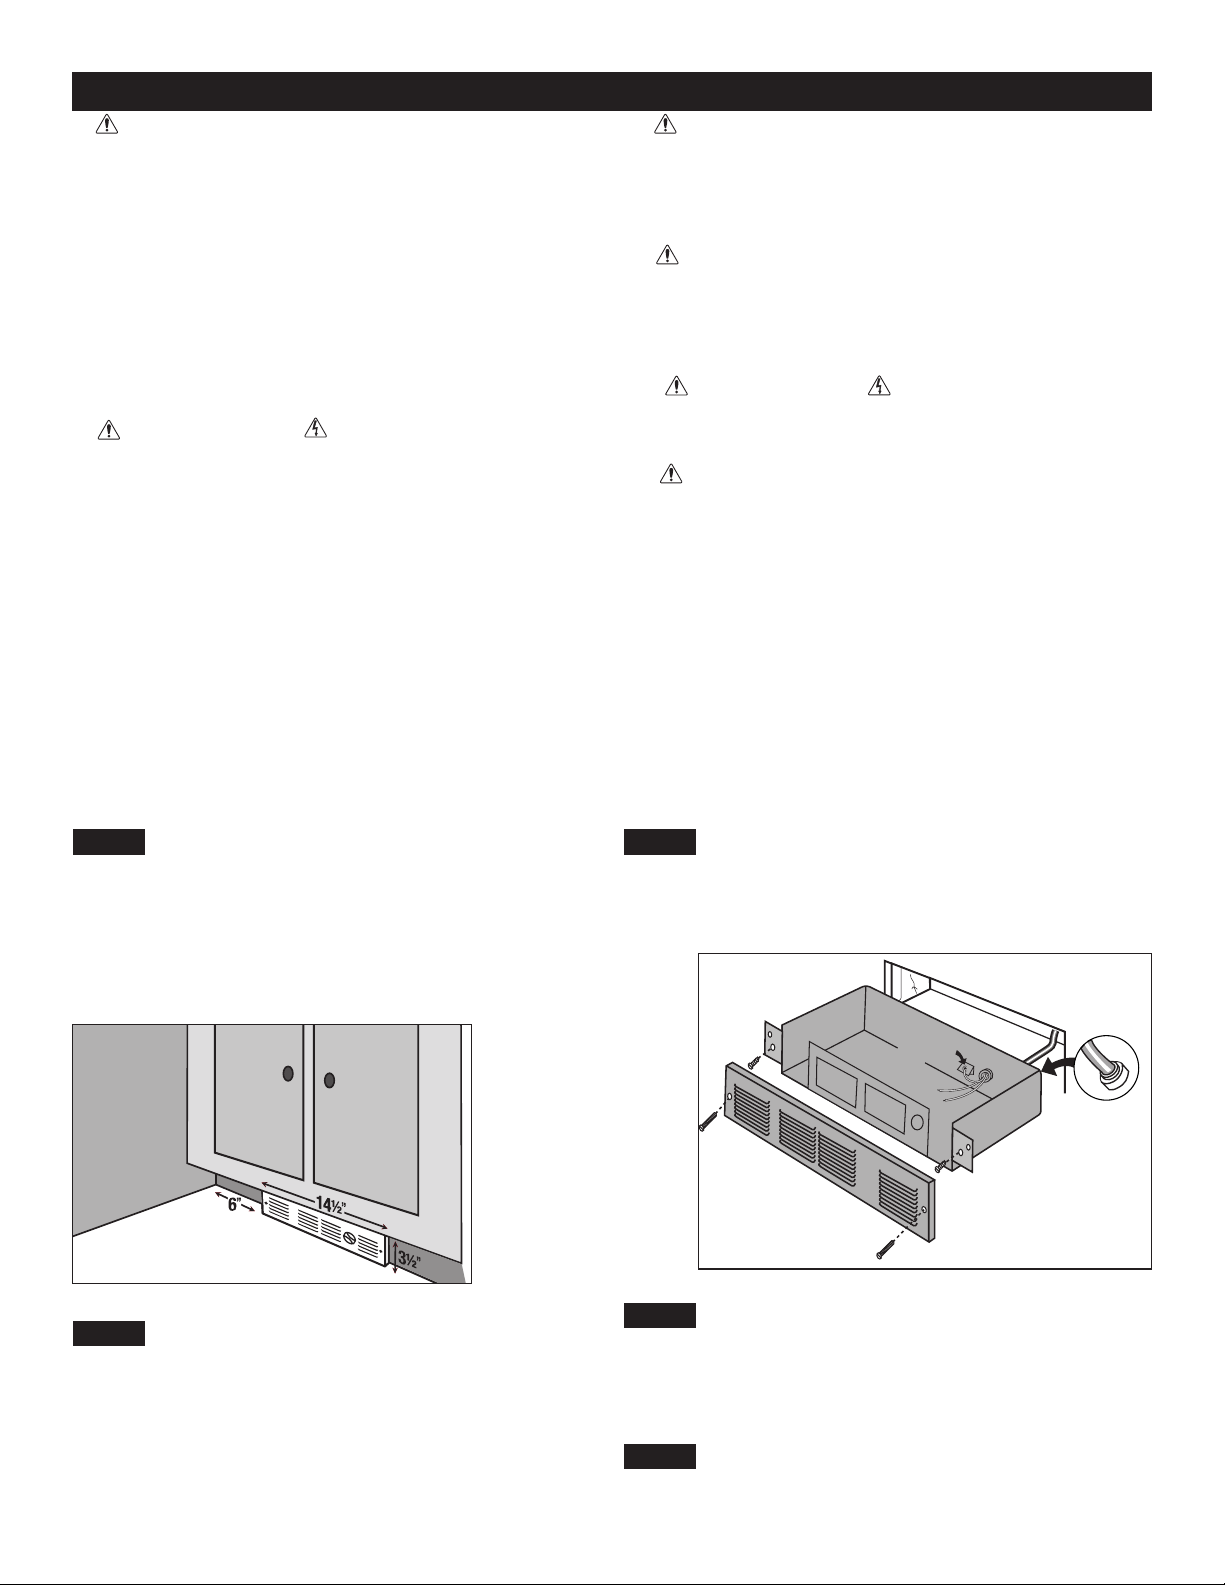
STEP 1
The UC Series heater REQUIRES A MINIMUM distance of 6
inches from adjacent surfaces (see Figure 1). However, Cadet
RECOMMENDS 12 inches from all adjacent surfaces for longer
and cleaner performance. Heaters must be spaced at least 3 feet
apart.
For installation in an existing wall/cabinet, cut a rough opening
14½ inches wide by 3½ inches high. Opening must be 8½ inches
deep.
Determine Area of Installation
Part One
8. WARNING
Risk of Fire. DO NOT install the heater in a oor,
in the ceiling, below a towel bar, behind a door,
or anywhere the air discharge may be blocked in
any manner.
9. WARNING
Fire or Explosion May Occur. A heater has hot
and arcing or sparking parts inside. Do not use it
in areas where gasoline, paint, or ammable vapors or liquids are used or stored.
10. WARNING
Risk of Electrical Shock. Connect grounding lead
to grounding screw provided. Keep all foreign objects out of heater.
11. WARNING
Risk of Fire. This heater is hot when in use.
Caution—High Temperature. Risk of Fire. Keep
electrical cords, drapery, furnishings, and other
combustibles at least 3 feet from the front of the
heater and 6 inches above and on both sides.
__________________________
STEP 3
Connect the supply ground wire to the green grounding screw
provided (See Figure 2). Connect each supply wire to one heater
wire with wire connectors. Note: All wire connections must be
made inside the heater.
Connect Supply Wires
Figure 1
STEP 2
For wall thermostat applications, route supply wire from circuit
breaker to thermostat to rough opening. For models with an
optional eld mount thermostat kit, route supply wire from circuit
breaker to rough opening. Allow enough wire to extend 12 inches
beyond the opening. Place heater lid aside. Remove the knockout
and attach the supply wire with a strain relief connector, leaving 6
inches wire lead for later use (See Figure 2).
Route Supply Wires
Figure 2
STEP 4
Reinstall heater lid and attach using four screws provided. Slide
heater into opening. Fasten heater to cabinet with screws (not
provided) going through the lower holes located on the anges.
Fasten grill to heater with screws provided going through the
upper holes located on the anges.
STEP 5
Turn the electrical power back on at the electrical panel board
(circuit breaker or fuse box).
Mount the Heater
Turn the Electrical Power ON
Page 3
Page 4
OPERATING INSTRUCTIONS
3½”
8.89
Grill Front
WARNING Risk of Electrical Shock and Fire.
The heater must be properly installed before it is
used.
1. Do not operate without grill.
2. Keep electrical cords, drapery, furnishings and
other combustibles at least 3 feet away from the
front of the heater and 6 inches away from the
sides.
3. Do not tamper with the over temperature limit
control.
4. If the heater over temperature limit trips more
than once per day, the heater must be replaced.
How to operate your heater
The room temperature is controlled by a line voltage thermostat
located either on the wall or built-in to the heater.
1. Once installation is complete and power has been restored,
turn the thermostat knob fully clockwise.
2. When the room reaches your comfort level, turn the thermostat knob counterclockwise until the heater turns off. The heater
will automatically cycle around this preset temperature.
3. To reduce the room temperature, turn the knob counterclockwise. To increase the room temperature, turn the knob clockwise.
5. Clean heater at least every six months.
6. After allowing the heater to cool, turn power off
at circuit breaker panel before removing grill.
7. Use a hair dryer or vacuum on blow cycle to
blow debris through the top element (do not touch
element).
8. Install the grill before turning on power.
WARNING: Any other service not detailed in
this Owner’s Guide should be performed by an
authorized service representative.
About the Manual Reset Temperature Limit Control
The heater is protected by a temperature-limiting control. The
manual reset temperature limit control is designed to open the
heater circuit when excessive operating temperatures are detected. The problem must be assessed and the limit must be reset to
resume operation.
Resetting the Manual Reset Limit Control
Resetting the Manual Reset Temperature Limit Control
If the manual reset limit control has opened the heater circuit due to excessive operating
temperatures, the heater will not work until the manual reset limit button is pressed.
After allowing the unit to cool for at least 15 minutes and resolving the problem causing
the limit to trip (typically the heater is blocked or needs cleaning-see Maintenance
Instructions); use a narrow object such as a ball-point pen to access the manual reset
button through the heater grill. Press FIRMLY and be sure to listen and feel for a click,
indicating it has been reset.
Warranty
For more effective and safer operation and to prolong the life of
the heater, read the Owner’s Guide and follow the maintenance
instructions. Failure to properly maintain the heater will void any
warranty and may cause the heater to function improperly. Warranties are non transferable and apply to original consumer only.
Warranty terms are set out below.
LIMITED TWO-YEAR WARRANTY: Cadet will repair or replace
any Perfectoe (UC) heater found to be defective within two years
after the date of purchase.
These warranties do not apply:
1. Damage occurs to the product through improper installation or
incorrect supply voltage;
2. Damage occurs to the product through improper maintenance,
misuse, abuse, accident, or alteration;
3. The product is serviced by anyone other than Cadet;
4. If the date of manufacture of the product cannot be determined;
5. If the product is damaged during shipping through no fault of
Cadet.
6. CADET’S WARRANTY IS LIMITED TO REPAIR OR REPLACEMENT AS SET OUT HEREIN. CADET SHALL NOT BE
LIABLE FOR DAMAGES SUCH AS PROPERTY DAMAGE OR
FOR CONSEQUENTIAL DAMAGES AND/OR INCIDENTAL EXPENSES RESULTING FROM BREACH OF THESE WRITTEN
WARRANTIES OR ANY EXPRESS OR IMPLIED WARRANTY.
Page 4
7. IN THE EVENT CADET ELECTS TO REPLACE ANY PART
OF YOUR CADET PRODUCT, THE REPLACEMENT PARTS
ARE SUBJECT TO THE SAME WARRANTIES AS THE PRODUCT. THE INSTALLATION OF REPLACEMENT PARTS DOES
NOT MODIFY OR EXTEND THE UNDERLYING WARRANTIES.
REPLACEMENT OR REPAIR OF ANY CADET PRODUCT OR
PART DOES NOT CREATE ANY NEW WARRANTIES.
8. These warranties give you specic legal rights, and you may
also have other rights which vary from state to state. Cadet neither assumes, nor authorizes anyone to assume for it, any other
obligation or liability in connection with its products other than as
set out herein.
If you believe your Cadet product is defective, please contact
Cadet Manufacturing Co. at 360-693-2505, during the warranty
period, for instructions on how to have the repair or replacement
processed. Warranty claims made after the warranty period has
expired will be denied. Products returned without authorization
will be refused.
Parts and Service
Visit cadetheat.com/parts-service for information on where to
obtain parts and service.
Reduce-Reuse-Recycle
This product is made primarily of recyclable materials. You can reduce
your carbon footprint by recycling this product at the end of its useful
life. Contact your local recycling support center for further recycling
instructions.
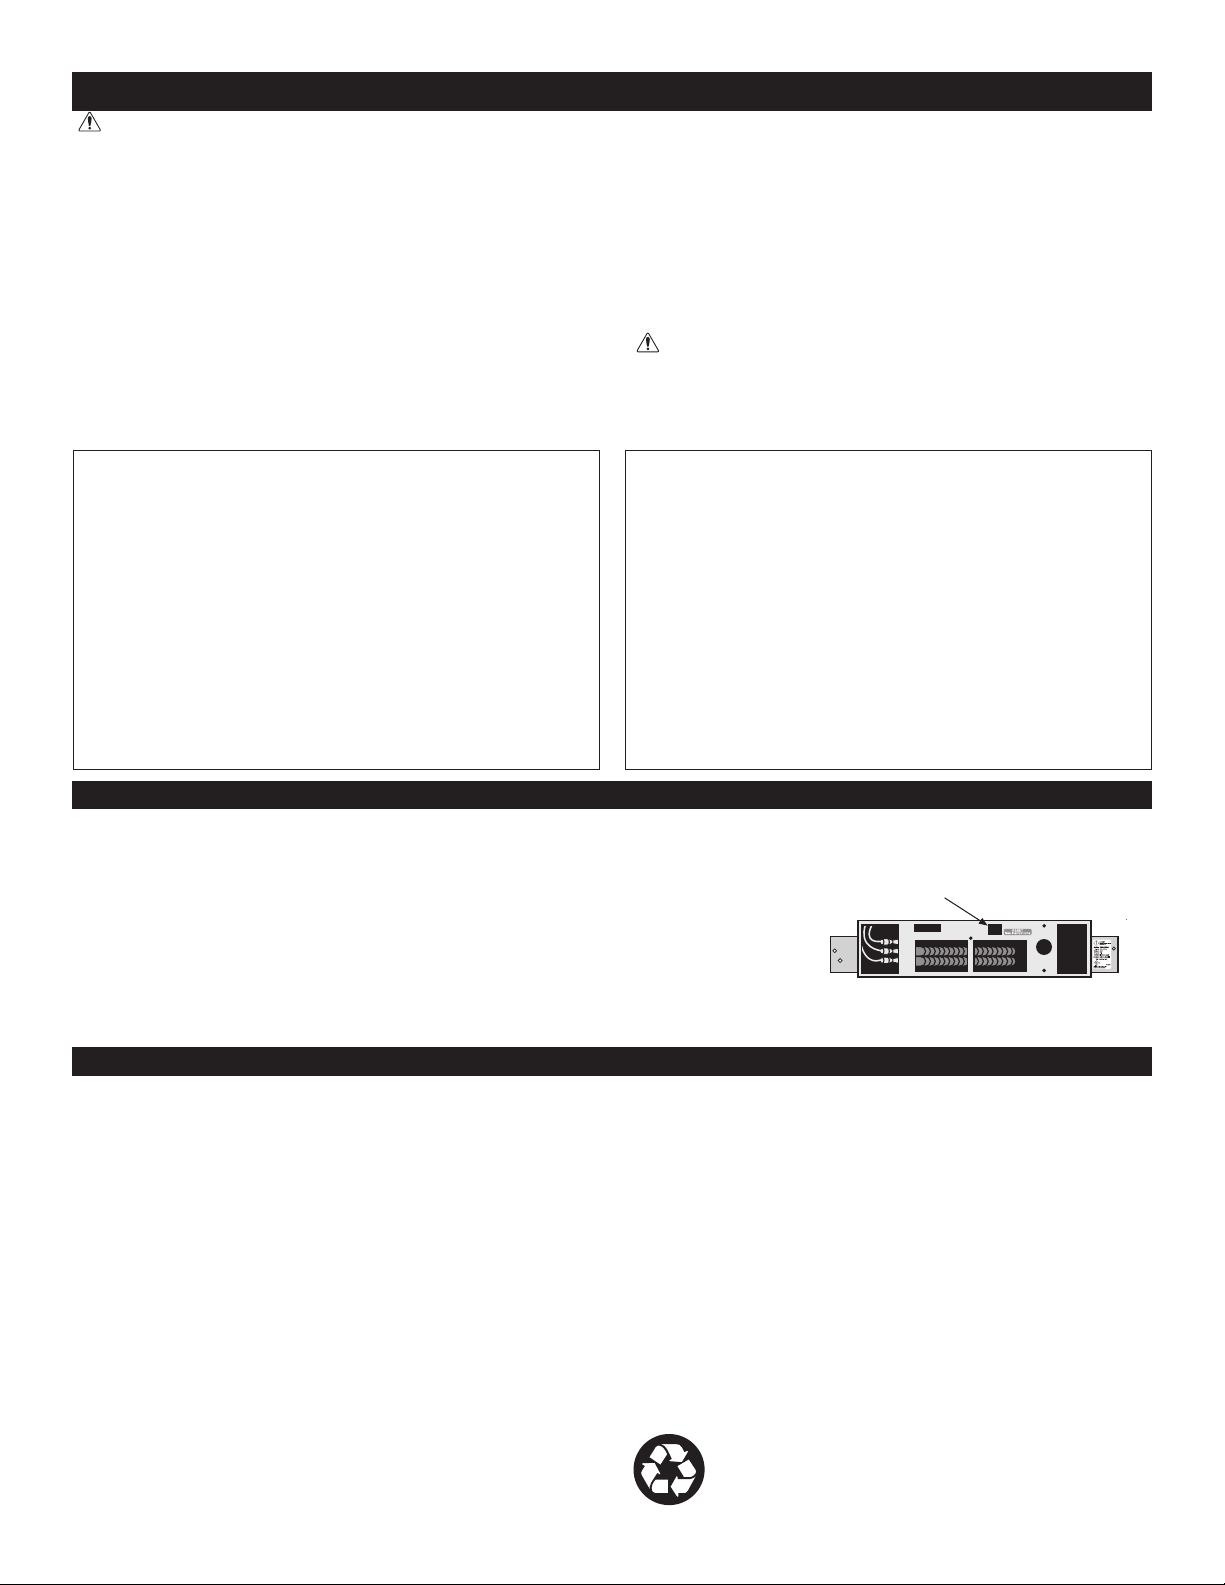
Manual Reset
Limit Button
inside here
Page 5
MAINTAINING YOUR HEATER
Maintenance As Needed, or every six months minimum.
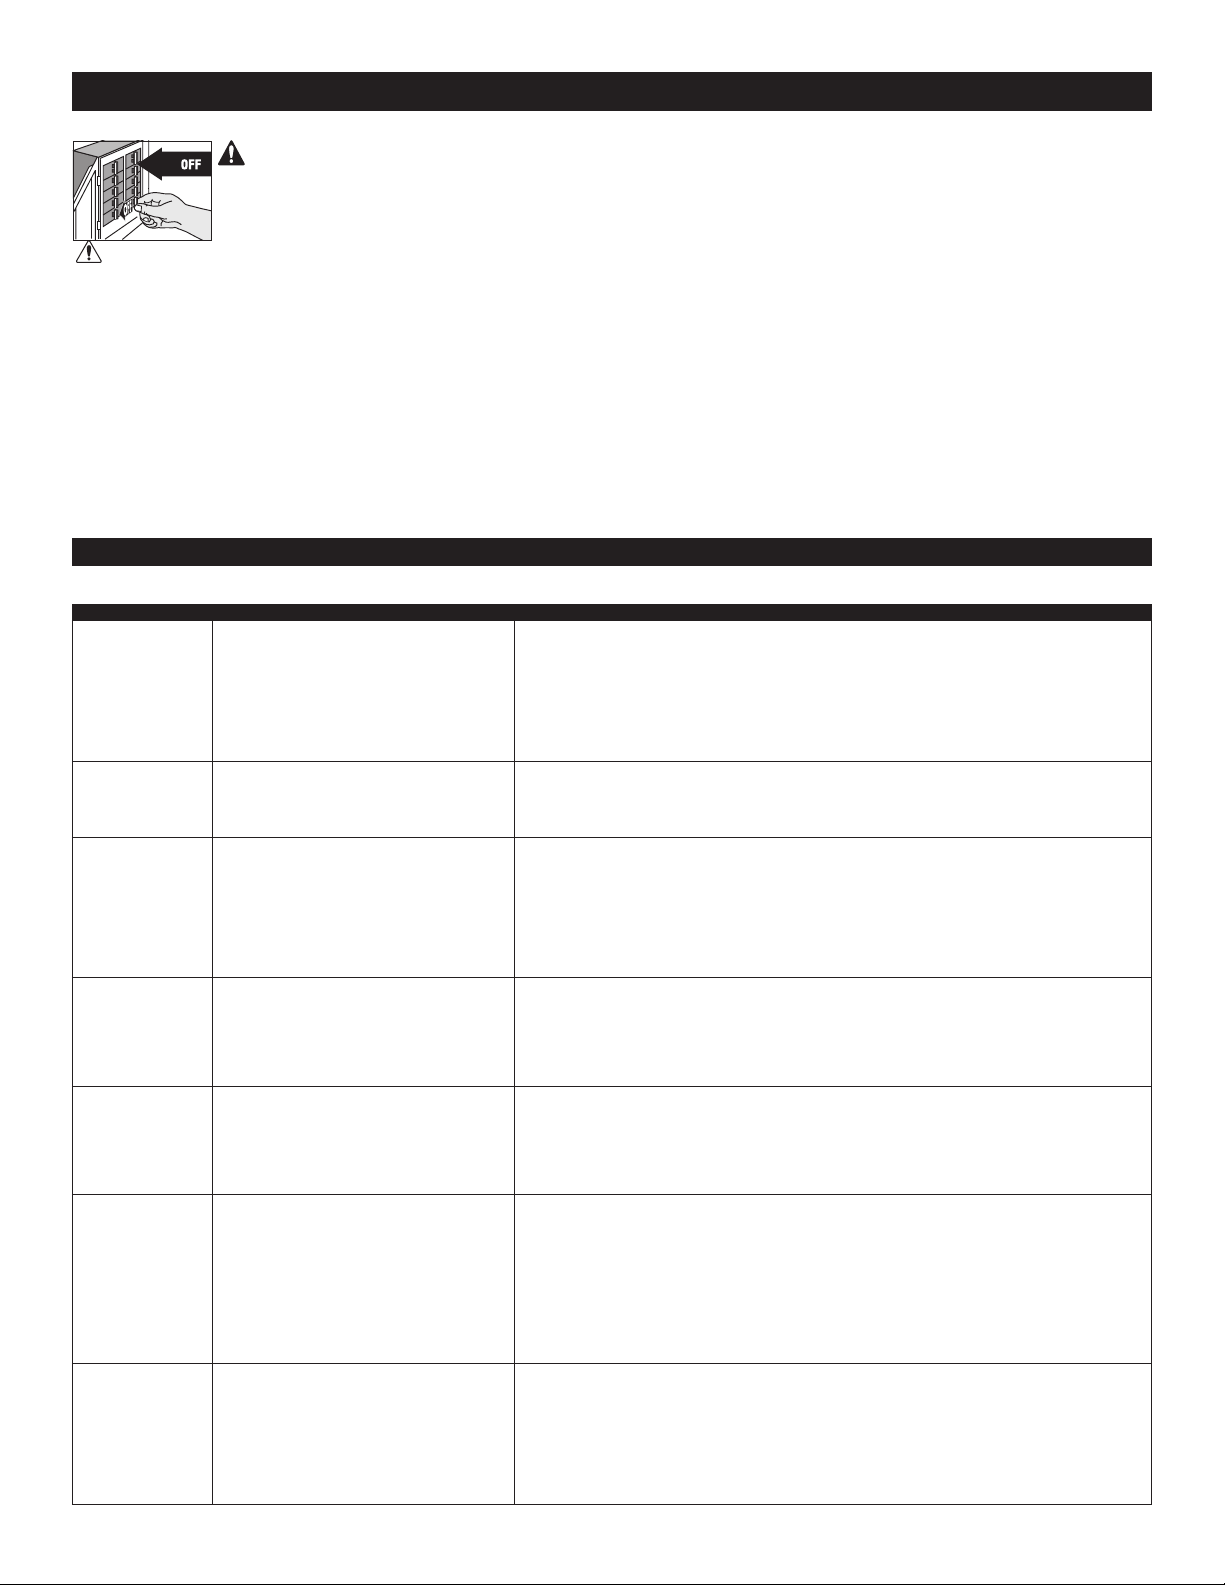
WARNING! Before removing grill, turn the electrical power off at the electrical panel
board (circuit breaker or fuse box). Lock or tag the panel board door to prevent someone
from accidentally turning the power on while you are working on the heater. Failure to do
so could result in serious electrical shock, burns, or possible death.
WARNING: Any other service not detailed in this Owner’s Guide should be performed by an autho-
rized service representative.
1. It is important that you verify power has been turned off and no
power is going to the heater before proceeding. Circuit breakers
are often not marked correctly and turning the wrong breaker off
could mean electricity is owing to the heater, even if the heater
does not appear to be working. If you are uncomfortable working
with electrical appliances, unable to follow these guidelines, or do
not have the necessary equipment, consult a qualied electrician.
2. Once you verify the power has been turned off correctly, proceed to the next step.
3. Remove thermostat knob (if any), screws and take off grill.
4. Wash grill with hot soapy water and dry immediately.
5. Remove the screws securing the heater assembly to the opening, then pull heater out of opening.
Troubleshooting Chart
*CONSULT LOCAL ELECTRICAL CODES TO DETERMINE WHAT WORK MUST BE PERFORMED BY QUALIFIED
Symptom Problem Solution
Breaker trips
immediately
upon energizing
heater.
Heater fan operates, but does
not discharge
warm air.
Heater will not
shut off.
Heater discharges smoke
or emits a burnt
odor.
Element heats
for a moment
without the fan
turning, then immediately stops
heating.
Heater does not
run.
1. Incorrect supply voltage.*
2. Overloaded circuit.*
3. A short circuit exists in the supply
or heater wiring.*
4. Defective circuit breaker.*
1. Insufcient element temperature.
2. Incorrect supply voltage.*
3. Element has failed.*
1. Heat loss from room is greater than
heater capacity.*
2. Defective thermostat.
3. Thermostat wired incorrectly to
heater.*
1. Dust, lint or other matter has
accumulated inside heater.
2. Poor or loose electrical connections.
1. Defective motor or internal
connection.*
2. Fan or motor jammed.
1. Thermostat set too low.
2. Heater has tripped the manual
reset temperature limit control.
3. Power not on at the circuit breaker.
4. Broken or poorly connected wire(s)
to heater.
5. Defective thermostat.
ELECTRICAL SERVICE PERSONNEL.
1. Verify that supply voltage matches the heater rating.
2. The total amperage of all heaters on a branch circuit must not be more than
80% of the amperage rating of the circuit breaker and supply wire ratings. Use a
lower wattage heater, or reduce the number of heaters on the circuit.
3. Shorted supply or heater wires may be accompanied by severe sparking.
Inspect all supply and heater wiring insulation for damage. Do not reset the circuit
breaker until all electrical shorts have been repaired.
4. Replace the circuit breaker.
1. Allow a few moments for element to reach operating temperature.
2. Verify that supply voltage matches the heater rating.
3. Replace element.
1. Close doors and windows. Provide additional insulation, or install a higher
wattage heater or multiple heaters if necessary. (If your circuit is rated for more
capacity.)
2. Adjust thermostat to its lowest setting. If heater continues to run (allow two
minutes for the thermostat to respond), and room temperature is greater than 50˚;
replace the thermostat.
3. Refer to thermostat documentation and correct wiring.
1. Clean heater (see “Maintenance” section above for instructions).
2. Turn off power at circuit breaker. Inspect all supply and heater wire connections
to make sure nothing is loose or poorly connected. Secure or reconnect all loose
connections. Do not reset circuit breaker until all connections have been checked
and repaired.
1. Heater or fan motor requires replacement.
2. Remove obstruction and press heater manual reset button (see “Operating”
section for instructions).
1. Adjust thermostat to a higher temperature until heater operates (see Problem #5
if the problem persists).
2. Press the manual reset button (see “Operating” section for instructions).
3. Turn on the correct circuit breaker in the main panel.
4. Turn off power at circuit breaker. Check supply wire continuity and proper connection to heater wires.
5. The entire heater, or any of its components may be checked for continuity to
determine the cause of any problems. Repair or replace the heater or thermostat.
6. Remove the four screws securing the lid to the top of the heater
assembly, remove lid.
7. Thoroughly vacuum accumulated dust, lint or other debris from
blower wheel and heater outlet. Important: Be careful not to damage the blower wheel, and do not allow the blower wheel to spin
freely when vacuuming.
8. Do not lubricate motor.
9. Install lid and slide heater assembly back into opening. Secure
heater assembly to opening, then install grill and thermostat knob
(if equipped).
10. Turn power back on at the electrical panel board.
Heater continually trips the
manual reset
temperature
limit control.
Page 5
1. Dust, lint or other matter has accumulated inside heater.
2. Airow is blocked.
3. Fan or motor is jammed.
4. None of the above.
1. Clean heater (see “Maintenance” section for instructions).
2. Remove obstruction. Maintain a minimum distance of 6 inches from any inside
corner or adjacent surfaces, and 3 feet from furniture or other objects placed
directly in front of the heater.
3. Remove obstruction, and press heater manual reset button (see “Operating”
section for instructions).
4. Replace heater assembly.
©2014 Cadet Printed in USA Rev 05/14 #720085
Page 6
Benecios En Las Que Puede Conar
3½”
8.89
Grill Front
3½”
8.89
Grill Front
• Diseño delgado para brindar comodidad y ahorrar
espacio en:
Zonas bajo los gabinetes de cocina y baño
Vehículos recreativos
Huecos de escaleras
Hogares Chimenea
• Seguro para usted y su familia
Tranquilidad gracias a la función de apagado
automático por alta temperatura
• Componentes con sentido común diseñados pen-
sando en usted
1. SIN bordes losos
2. Resistentes a la corrosión
3. Elemento resistente y conable para brindar
calor instantáneo
4. Fácil de instalar
• Su calentador Cadet ha sido completamente
probado y cuenta con una garantía extendida de
2 años
(1)
(OFF)
(2)
75% de la potencia nominal de 240 v.
(3)
750 vatios.
Nota: Kits del termostato opcionales se venden por separado
El Calentador Perfectoe
Manual del Propietario
http://www.cadetheat.com/wall-heaters/perfectoe
Modelos Perfectoe
Voltaje
Línea
240
120
Termostato estándar incorporado de un solo polo y sin posición de apagado
Los modelos de 240 voltios pueden usarse a 208 voltios. El vatiaje es igual al
Para instalaciones a más de 7000 pies, el vatiaje más alto recomendado es de
Modelos Perfectoe con Termostato
*No requieren termostato mural
(2)
Modelo sin
Termostato
Modelo con
Termostato
Vatios Amps
(1)
UC072 750 3.13
UC102
(3)
1000 4.17
UC051 500 4.17
UC101
(3)
UC101T
(3)
1000 8.33
Botón de límite de
Reglaje Manual
Rejilla costado
.375”
.952
Termostato Incorporado
Cámara de pared superior
14½”
36.83
Rejilla Frente
18”
45.7
8¼”
21
3½”
8.9
Cámara de
pared costado
8¼”
21
Modelos Perfectoe sin Termostato
*Requieren termostato mural
HERRAMIENTAS NECESARIAS:
• Destornillador Phillips
• Destornillador plano
• Pelacables
CONSERVE ESTAS INSTRUCCIONES
cadetheat.com Tel: 360-693-2505 PO Box 1675 Vancouver, WA 98668-1675
Etiqueta
Calicación
• Cuchillo multiuso
• (4) tornillos de 1½” para madera
• Conectores de alambre aislados
• (1) conector de alivio de tensión
Página 6
Page 7
INSTRUCCIONES IMPORTANTES
ADVERTENCIA
Al utilizar artefactos eléctricos, siempre se deben adoptar precauciones básicas para reducir el riesgo
de incendios, electrocución y lesiones personales, incluyendo lo siguiente:
1. Lea todas las instrucciones antes de instalar o
usar este calentador.
2. ADVERTENCIA
Riesgo de incendio. Este calentador se calienta
mucho cuando está en uso. Precaución – Alta
temperatura. Riesgo de incendio. Mantenga los
cables eléctricos, cortinas, muebles, y demás
materiales combustibles a por lo menos 3 pies por
delante y a 6 pulgadas por encima y por ambos
costados del calentador.
3. ADVERTENCIA
Riesgo de quemaduras. Para evitar quemaduras,
no lo toque con su piel descubierta. Tenga
mucho cuidado cuando algún tipo de calentador
sea usado por o cerca de niños o de personas
inválidas, y cada vez que lo deje funcionando sin
vigilancia.
4. ADVERTENCIA
Riesgo de electrocución. No opere ningún
calentador después de una avería. Desconecte
la alimentación en el panel de servicio y pida a un
técnico electricista calicado que lo revise antes
de volver a usarlo.
5. ADVERTENCIA
No lo use a la intemperie.
6. Para desconectarlo, ponga los controles en
OFF, y apague la alimentación del circuito del
calentador en el panel de desconexión principal.
7. ADVERTENCIA
Riesgo de electrocución. No introduzca ni
permita que ingresen objetos en las aberturas
de la ventilación o escape, ya que ello puede
causar electrocución o incendio, o bien dañar el
calentador.
8. ADVERTENCIA
Riesgo de incendio. Para evitar posibles
incendios, no bloquee las tomas de aire ni el
escape de manera alguna.
9. ADVERTENCIA
Podrían producirse explosiones o incendios.
Todo calentador contiene piezas que se calientan
y pueden producir arcos voltaicos o chispas.
No lo use en áreas donde se utilice o almacene
gasolina, pintura o vapores o líquidos inamables.
10. Use este calentador sólo como se describe en
este manual. Todo otro uso no recomendado por
el fabricante puede causar incendios, descargas
eléctricas o lesiones personales.
11. El calentador debe instalarse correctamente
antes de usarlo.
12. ADVERTENCIA
Riesgo de electrocución e incendio. No lo opere
sin la rejilla.
13. Conserve estas instrucciones.
Página 7
Diagramas de cableado
MOTOR
ELEMENTO
CALENTADOR
LÍMITE DE ALTA
TEMPERATURA DE
REGLAJE MANUAL
TERMOSTATO
OPCIONAL DE
POLO ÚNICO
CONSERVE ESTAS INSTRUCCIONES
cadetheat.com Tel: 360-693-2505 PO Box 1675 Vancouver, WA 98668-1675
Page 8
INSTRUCCIONES PARA LA INSTALACIÓN
PARED ADYACENTE
PISO
CONECTOR
DE ALIVIO
DE TENSIÓN
TORNILLO
DE PUESTA
A TIERRA
1. ADVERTENCIA
Verique que todos los cables de suministro eléctrico sean del mismo voltaje que el calentador.
2. Si va a reemplazar un calentador existente, revise la etiqueta del calentador antiguo.
3. Todo trabajo y materiales eléctricos deben
cumplir con el Código Eléctrico Nacional (“NEC”,
por su sigla en inglés), con la Ley de Seguridad
y Salud Ocupacional (“OSHA”, por su sigla en inglés) y con todos los códigos estatales y locales.
4. Si se debe instalar un nuevo circuito o se
necesita información adicional sobre el cableado,
consulte a un electricista calicado.
5. Use conductores de cobre solamente.
6. ADVERTENCIA
Riesgo de electrocución. NO instale el calentador directamente sobre la tina o lavamanos. NO
lo instale en la zona de la ducha (el fabricante
recomienda un espacio mínimo de 2 pies).
7. El calentador se debe instalar en la cámara de
pared incluida.
_________________________
UBICACIÓN: Para obtener mejores resultados, instale el calentador debajo de un armario en el área del hueco del zócalo. Instale
horizontalmente la unidad Perfectoe (modelo UC). No instale el calentador UC en el suelo. No se necesitan brochales ni soportes. El
calentador debe instalarse según las instrucciones indicadas en la tapa.
¡ADVERTENCIA! Los fabricantes de pisos de vinilo advierten que algunos de sus productos pueden decolorarse a temperaturas supe-
riores a 110° F. Consulte al fabricante correspondiente las especicaciones de temperatura para el piso de vinilo suyo.
CONTROLES: Se requiere un termostato. Se recomienda usar un termostato electrónico Cadet para una comodidad y un control
óptimos. Se ofrecen también juegos de termostato opcionales de polo único o doble para montaje en terreno: Números de los modelos
UCT1 y UCT2.
PASO 1
La distancia MÍNIMA REQUERIDA es de 6 pulgadas desde las
supercies adyacentes y 6 pulgadas desde el piso (consulte la
gura 1). Sin embargo, Cadet RECOMIENDA 12 pulgadas desde
las supercies adyacentes y el piso para lograr un rendimiento
más prolongado y limpio. Si se instalan varios calentadores, deje
al menos tres pies entre ellos.
Para la instalación en una pared/armario existente, corte una
abertura sin acabar de 14½ pulgadas de ancho por 3½ pulgadas
de alto. La abertura debe tener 8½ pulgadas de profundidad.
Determine el área de instalación
Parte Uno
8. ADVERTENCIA
Riesgo de incendio. NO instale el calentador en
el piso, en el cielo raso, bajo la barra de la toalla,
detrás de una puerta ni en ningún otro lugar en
el que la descarga de aire se pueda bloquear de
alguna manera.
9. ADVERTENCIA
Podrían producirse explosiones o incendios.
Todo calentador contiene piezas que se calientan
y pueden producir arcos voltaicos o chispas. No
lo use en áreas donde se utilice o almacene gas-
olina, pintura o vapores o líquidos inamables.
10. ADVERTENCIA
Riesgo de electrocución. Conecte el conductor a
tierra al tornillo de puesta a tierra suministrado.
Evite que entren objetos extraños al calentador.
11. ADVERTENCIA
Riesgo de incendio. Este calentador se calienta
mucho cuando está en uso. Precaución – Alta
temperatura. Riesgo de incendio. Mantenga los
cables eléctricos, cortinas, muebles, y demás
materiales combustibles a por lo menos 3 pies por
delante y a 6 pulgadas por encima y por ambos
costados del calentador.
_________________________
PASO 3
Conecte el alambre de puesta a tierra del suministro al cable
en espiral verde de tierra proporcionado (consulte la gura 2).
Empalme cada alambre del suministro a un alambre del calentador usando conectores de cables. Nota: Todas las conexiones de
alambres deben hacerse dentro del calentador.
Conecte los alambres de suministro
Figura 1
PASO 2
Para instalaciones con termostatos murales, dirija el cable de
suministro desde el cortacircuito a la abertura pasando por el
termostato. Para modelos con un juego de termostato opcional
para montaje en terreno, dirija el cable de suministro desde el
cortacircuito a la abertura. Use suciente cable como para que
se extienda 12 pulgadas más allá de la abertura. Ponga la tapa
del calentador a un lado. Quite el destapadero y je el cable de
suministro mediante un conector de alivio de tensión dejando 6
pulgadas de cable de conexión para utilizarlo más adelante (con-
sulte la gura 2).
Dirija los alambres de suministro
Figura 2
PASO 4
Vuelva a instalar la tapa del calentador y aáncela con los cuatro
tornillos que se proporcionan. Deslice el calentador al interior de
la abertura. Aance el calentador al armario con tornillos (no se
proporcionan) por los oricios inferiores situados en las bridas.
Aance la rejilla al calentador con los tornillos que se proporcionan por los oricios superiores situados en las bridas.
PASO 5
Vuelva a conectar la electricidad en el tablero del panel eléctrico
(cortacircuito o caja de fusibles).
Monte el calentador
Conecte la electricidad
Página 8
Page 9
OPERACIÓN DEL CALENTADOR
3½”
8.89
Grill Front
ADVERTENCIA Riesgo de electrocución e
incendio.
El calentador debe instalarse correctamente
antes de usarlo.
1. No lo opere sin la rejilla.
2. Mantenga los cables eléctricos, cortinas, muebles, y demás materiales combustibles a por lo
menos 3 pies por delante y a 6 pulgadas de los
costados del calentador.
3. No manipule el control limitador de sobretemperatura.
4. Si los limitadores de sobretemperatura se disyuntan más de una vez al día, se debe reemplazar el calentador.
Cómo hacer funcionar el calentador
La temperatura ambiente es controlada por un termostato de
voltaje de línea situado ya sea en la pared o incorporado en el
calentador.
1. Una vez que se haya realizado la instalación y reestablecido
la energía eléctrica, gire totalmente la perilla del termostato en el
sentido de las manecillas del reloj.
2. Cuando la habitación haya alcanzado un nivel cómodo, gire
la perilla del termostato en sentido contrario a las manecillas
del reloj hasta que el calentador se apague. El calentador se
encenderá y apagará automáticamente según esta temperatura
preestablecida.
3. Para reducir la temperatura del ambiente, gire la perilla en
sentido contrario a las manecillas del reloj. Para aumentar la
temperatura del ambiente, gire la perilla en el sentido de las
manecillas del reloj.
5. Limpie el calentador por lo menos cada seis
meses.
6. Después de dejar que el calentador se enfríe,
desconecte la electricidad en el panel de cortacircuitos antes de retirar la rejilla.
7. Use una secadora o aspiradora en el ciclo de
soplado para quitar la suciedad en el elemento
superior (sin tocarlo).
8. Instale la rejilla antes de conectar la energía.
ADVERTENCIA: Toda otra labor no detallada
en esta Guía para el propietario la debe efectuar
un representante de servicio autorizado.
Acerca del control de límite de temperatura de reglaje
manual
El calentador está protegido por un control limitador de temperatura con reglaje manual, el cual está diseñado para abrir el
circuito del calentador cuando se detectan temperaturas de funcionamiento excesivas. El problema debe evaluarse y el límite
debe restablecerse para que el calentador vuelva a funcionar.
Cómo restablecer el control de límite de reglaje manual
Cómo restablecer el control limitador de temperatura de reglaje manual
Si el control limitador de reglaje manual ha abierto el circuito del calentador debido a
temperaturas de funcionamiento excesivas, el calentador no funcionará sino hasta que
se oprima el botón de límite de reglaje manual.
Después de dejar que la unidad se enfríe durante unos 15 minutos y resolver
el problema que causa que se disyunte el interruptor de límite (generalmente el
calentador está bloqueado o necesita limpieza), utilice un objeto puntiagudo como un
bolígrafo para acceder al botón de reglaje a través de la rejilla del calentador. Oprima
el botón FIRMEMENTE y asegúrese de escuchar y sentir un chasquido indicando que
se ha restablecido.
Garantía
Para lograr una operación más ecaz y segura y prolongar la vida útil del
calentador, lea la Guía del propietario y siga las instrucciones de mantenimiento. Si no le da el mantenimiento adecuado al calentador invalidará
la garantía y puede hacer que el aparato funcione incorrectamente. Las
garantías no son transferibles y rigen sólo para el comprador original. Los
términos de la garantía se indican a continuación.
GARANTÍA LIMITADA DE DOS AÑOS: Cadet reparará o reemplazará
todo calentador Perfectoe (UC) que se determine esté averiado en un
plazo de dos años a partir de la fecha de compra.
Estas garantías no son pertinentes para:
1. Daños que sufra el producto por instalación o voltaje de suministro
incorrectos;
2. Daños que sufra el producto por mantenimiento incorrecto, uso indebido, abuso, accidente o alteraciones;
3. Servicio que se le haya dado al producto por parte de personas o
entidades ajenas a Cadet.
4. Casos en que no se pueda determinar la fecha de fabricación del
producto;
5. Casos en que el producto resulte dañado durante el embarque por
causas ajenas a Cadet.
6. LA GARANTÍA DE CADET SE LIMITA A LA REPARACIÓN O REEMPLAZO, TAL COMO SE ESTABLECE EN ESTE DOCUMENTO.
CADET NO SE HARÁ RESPONSABLE POR DAÑOS A LA PROPIEDAD
O DAÑOS CONSECUENTES, COMO TAMPOCO POR GASTOS ACCIDENTALES DEBIDO AL INCUMPLIMIENTO DE ESTAS GARANTÍAS
ESCRITAS O DE CUALQUIER GARANTÍA EXPRESA O IMPLÍCITA.
Página 9
7. EN CASO DE QUE CADET DECIDA REEMPLAZAR ALGUNA PIEZA
DEL PRODUCTO CADET, LOS REPUESTOS SE REGIRÁN POR LAS
MISMAS GARANTÍAS DEL PRODUCTO. LA INSTALACIÓN O REEMPLAZO DE LOS REPUESTOS NO MODIFICA NI PROLONGA LAS
GARANTÍAS VIGENTES. EL REEMPLAZO O REPARACIÓN DE TODO
PRODUCTO O PIEZA CADET NO ORIGINA NINGÚN TIPO DE NUEVA
GARANTÍA.
8. Estas garantías le otorgan derechos legales especícos y es posible
que usted tenga otros derechos que varíen de un estado a otro. Cadet
no asume ni autoriza a nadie que lo haga en su nombre, ninguna otra
obligación o responsabilidad en relación con sus productos que no sean
las que se establecen en este documento.
Si durante el período de garantía usted considera que su producto Cadet
presenta defectos, comuníquese con Cadet Manufacturing Co. llamando al 360-693-2505 para obtener instrucciones sobre cómo tramitar la
reparación o el reemplazo del producto. Los reclamos de garantía pre-
sentados después de la nalización del período no serán acogidos. Los
productos que se devuelvan sin autorización serán rechazados.
Repuestos y servicio
En cadetheat.com/parts-service encontrará información sobre dónde
obtener repuestos y servicio.
Reduzca-Reutilice-Recicle
Este producto está hecho principalmente de materiales reciclables.
Puede reducir la cantidad de carbono que contribuye al medio ambiente reciclando este producto al término de su vida útil. Comuníquese
con su centro local de reciclaje para obtener mayores instrucciones al
respecto.
Botón de límite de
Reglaje Manual
aquí dentro
Page 10
MANTENIMIENTO DEL CALENTADOR
Mantenimiento Según sea necesario, o cada seis meses como mínimo.
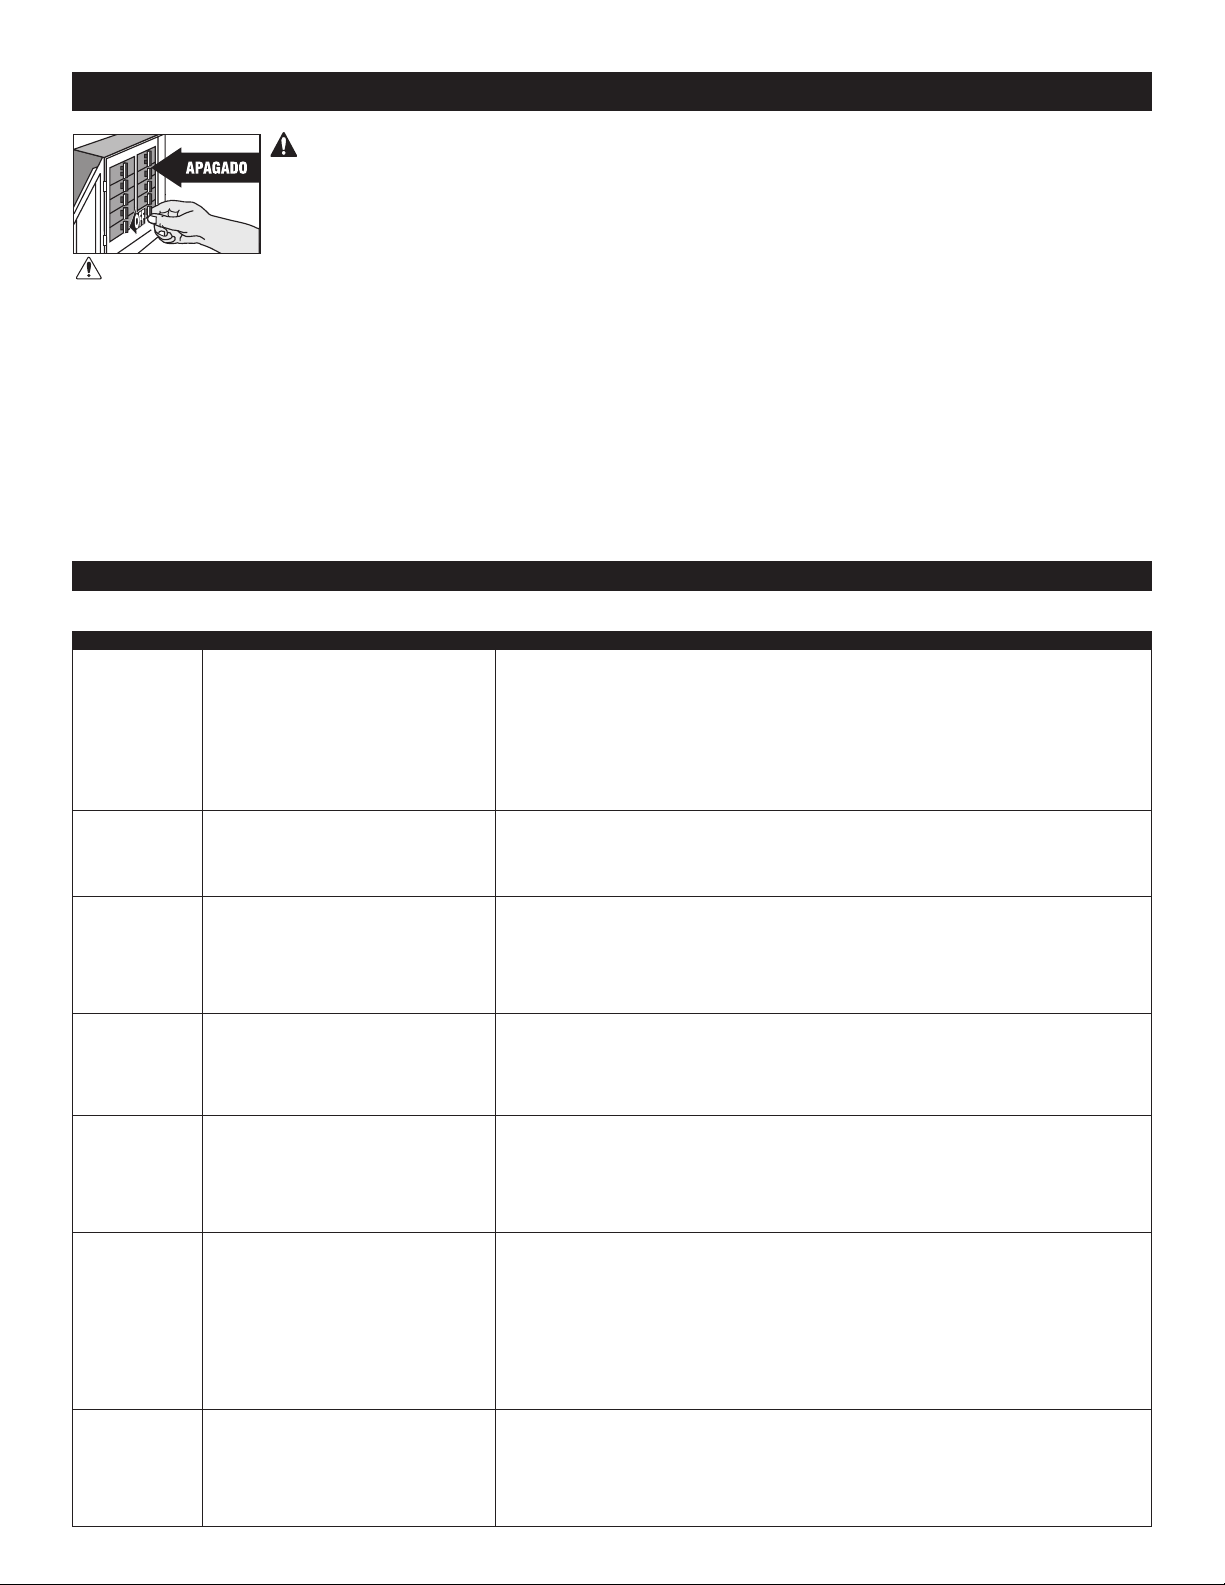
¡ADVERTENCIA! Desconecte la electricidad en el tablero del panel eléctrico
(caja de cortacircuitos o fusibles) y trabe o coloque un cartel en la puerta del tablero
del panel para evitar que alguien vuelva a conectar la energía mientras se esté
trabajando en el calentador. De lo contrario podrían producirse graves golpes
eléctricos, quemaduras e incluso la muerte.
ADVERTENCIA: Toda otra labor no detallada en esta Guía para el propietario la debe efectuar un
representante de servicio autorizado.
1. Antes de proceder, es importante que usted verique que se
haya desconectado la alimentación y que el calentador no reciba
energía. Los cortacircuitos no suelen estar correctamente mar-
cados, y apagar el incorrecto podría signicar que sigue uyendo
electricidad al calentador, aun cuando éste parezca no estar
funcionando. Si no se siente cómodo al trabajar con artefactos
eléctricos, no está en condiciones de acatar estas pautas o no
cuenta con los equipos necesarios, solicite los servicios de un
técnico electricista calicado.
2. Una vez que verique que se ha apagado la alimentación
correctamente, prosiga con el paso siguiente.
3. Retire la perilla del termostato (si la hubiera), los tornillos y
extraiga la rejilla.
4. Lave la rejilla con agua caliente y jabón, y séquela de inmediato.
Tabla de resolución de problemas
*CONSULTE LOS CÓDIGOS ELÉCTRICOS LOCALES PARA DETERMINAR QUÉ TRABAJOS DEBEN SER
Síntoma Problema Solución
El interruptor
se disyunta
inmediatamente
al encenderse el
calentador.
El ventilador
del calentador
funciona pero
no envía aire
caliente.
El calentador no
se apaga.
El calentador
emite humo o un
olor a quemado.
El elemento
calienta por un
momento sin
que gire el ventilador y luego
deja de calentar
inmediatamente.
El calentador no
funciona.
El calentador
disyunta continuamente el control limitador de
temperatura de
reglaje manual.
REALIZADOS POR PERSONAL DE SERVICIO ELÉCTRICO CALIFICADO.
1. Voltaje de suministro incorrecto.*
2. Circuito sobrecargado.*
3. Hay un cortocircuito en los cables de
suministro o del calentador.*
4. Cortacircuito defectuoso.*
1. Temperatura insuciente del elemento.
2. Voltaje de suministro incorrecto.*
3. El elemento ha fallado.*
1. La fuga de calor de la habitación es
superior a la capacidad del calentador.*
2. Termostato defectuoso.
3. Termostato cableado al calentador de
forma incorrecta.*
1. Se han acumulado polvo, pelusas u
otros materiales dentro del calentador.
2. Conexiones eléctricas decientes o
sueltas.
1. Motor o conexión interna defectuosos.*
2. Ventilador o motor trabado.
1. El termostato se ha graduado muy
bajo.
2. El calentador ha disyuntado el control
limitador de temperatura de reglaje
manual.
3. La energía no está conectada en el
interruptor de circuito.
4. Los cable(s) que va(n) al calentador
están rotos o mal conectados.
5. Termostato defectuoso.
1. Se han acumulado polvo, pelusas u
otros materiales dentro del calentador.
2. El ujo de aire está bloqueado.
3. El ventilador o el motor está trabado.
4. Ninguna de las anteriores.
1. Compruebe que el voltaje de suministro coincida con la calicación del calentador.
2. El amperaje total de todos los calentadores en un circuito de rama no debe sobrepasar el
80% de la calicación de amperaje del cortacircuito y de las calicaciones de los cables de
suministro. Utilice un calentador de vatiaje inferior o reduzca la cantidad de calentadores en el
circuito.
3. Los cables de suministro o del calentador que presentan cortocircuitos pueden ocasionar
chispas peligrosas. Revise el aislamiento de todos los cables de suministro y del calentador
para comprobar que no estén dañados. No reestablezca el cortacircuito sino hasta que se
hayan reparado todos los cortocircuitos eléctricos.
4. Reemplace el cortacircuito.
1. Espere unos momentos para que el elemento alcance la temperatura de funcionamiento.
2. Compruebe que el voltaje de suministro coincida con la calicación del calentador.
3. Reemplace el elemento.
1. Cierre las puertas y ventanas. Coloque aislamiento adicional, o instale un calentador de
mayor vatiaje o múltiples calentadores si fuera necesario. (Si su circuito tiene mayor capacidad).
2. Ajuste el termostato a la graduación más baja. Si el calentador continúa funcionando (espere
un par de minutos para que el termostato tenga tiempo de responder al ajuste) y la temperatura
del ambiente es superior a 50 grados, reemplace el termostato.
3. Consulte la documentación del termostato y cableado correcto.
1. Limpie el calentador (consulte las instrucciones en la sección “Mantenimiento del Calentador”).
2. Desconecte la energía en el cortacircuito. Inspeccione todas las conexiones de alambres
del suministro y del calentador para cerciorarse de que no haya nada suelto ni mal conectado.
Aance o reconecte todas las conexiones sueltas. No restablezca el cortacircuito sino hasta
haber revisado y reparado todas las conexiones.
1. Debe reemplazarse el calentador o el motor del ventilador.
2. Quite la obstrucción y oprima el botón de reglaje manual del calentador tras dejar que la
unidad se enfríe (vea las instrucciones en la sección “Operación del Calentador”).
1. Ajuste el termostato a una temperatura más alta hasta que el calentador funcione (vea el
Problema No. 5 si el problema persiste).
2. Oprima el botón de restablecimiento manual (vea las instrucciones en la sección “Operación
del Calentador”).
3. Conecte el cortacircuito correcto en el panel principal.
4. Desconecte la energía en el cortacircuito. Revise la continuidad del cable de suministro y la
conexión apropiada a los cables del calentador.
5. Se debe revisar la continuidad de todo el calentador, o bien de sus componentes a n de
determinar la causa de cualquier problema. Repare o reemplace el calentador o termostato.
1. Limpie el calentador (vea las instrucciones en la sección “Mantenimiento del Calentador”).
2. Retire la obstrucción. Mantenga una distancia mínima de 6 pulgadas de las supercies adyacentes, y 3 pies de los muebles u otros objetos situados directamente delante del calentador.
3. Retire la obstrucción y oprima el botón de reglaje manual del calentador (vea las instrucciones en la sección “Operación del Calentador”).
4. Reemplace el conjunto del calentador.
5. Retire los tornillos que jan el conjunto del calentador a la
abertura, y luego tire de él por la abertura.
6. Retire los cuatro tornillos que aanzan la tapa a la parte superior del conjunto del calentador y retire la misma.
7. Aspire totalmente el polvo, pelusas y demás suciedad acumulados en la rueda del soplador y el tomacorriente del calentador.
Importante: Tenga cuidado de no dañar la rueda del soplador, y
no permita que ésta gire libremente al aspirar.
8. No lubrique el motor.
9. Instale la tapa y vuelva a deslizar el conjunto del calentador
al interior de la abertura. Aance el conjunto del calentador en la
abertura, luego instale la rejilla y la perrilla del termostato (si la
hubiere).
10. Vuelva a conectar la alimentación en el tablero del panel
eléctrico.
©2014 Cadet Impreso en EE UU Rev 05/14 #720085Página 10
 Loading...