

Cadence CEQ-777 Owner's Manual

4 BAND PARAMETRIC EQUALIZER // OWNERS MANUAL
CeQ-777


2
Thank you for purc has ing the Cadence Model CEQ-777 4 Band Parametric Equalizer. With prop er i nst all ati on a nd care the CEQ-777
will prov ide yo u w ith ye ars of pe rfo rma nce an d reliability.
The CE Q-7 77 is i nte nde d for t hos e who v alu e the a cou sti c benefits of a m ult i-b and parametric e qua liz er coupled wi th the power of
contro lli ng fou r a mpl ifi er cha nne ls and tw o i nde pen den t s ub woo fer ch ann els di rectly from the automobile dash board .
The CEQ -77 7 is a pas siv e pre-amp eq ual ize r requiring ext ernal a mpl ifi cat ion to power speakers. It provides 2 cha nne ls of front
output, 2 channels of re ar out put , a nd 2 c han nel s o f s ubw oof er out put .
PARA GRA PHI C G RAP HIC EQ UAL IZATION
Every car i nte rio r prod uce s at least one sharp peak or di p in the frequency response t hat re sul ts in highly unnatural sou nd red uction. But th e exact frequ enc y and its level of intensity depend on un predictable factors su ch as the size a nd volume of the in ter ior,
type of material used for the interior (cloth, leather, vinyl), whether a window is open or how many passengers are o nbo ard.
Because o f these va ria ble s, even a multi-band gr aph ic equalizer will not be able to control a particular fre que ncy without u nne ces sarily affecting others. The listener is the refore faced with eit her unw ant ed alterations of fre que nci es or having unnatural peaks an d
dips, which might res ult in bo omy ba ss, mu ddi ed voc al ran ge or har sh treble response.
This unit is the first p roduction pre-amplifier to incorporate a sp eci fic bandwidth parametric e qua liz er with 12dB b oos t or cut on its
seven ban ds. It can compensate for the seven aco ust ic anomalies unique to the au tom oti ve environment. This unit eas ily becomes
the “mission control cen ter ” o f a ny hig h e nd aut omo tiv e s oun d s yst em.
When increas ing th e b oos t of any frequency you are actually increasing the ou tpu t v olt age of th e equalizer to the amplifier. Please
be s ure that you r amplifier has eno ugh “head room” and i s capable of handling the source incre ase with out clipping. It is also
important that yo ur spe ake rs are capable of reprod uci ng the frequ enc y range which you ha ve cho sen to boost without be ing over
driven. For example, do no t att emp t to boost a 60Hz signal to a small m idr ang e dri ver, th is wi ll on ly cause the midrange to burn
out. The prope r procedure for a successful installation is to incorporate either an el ect ronic crossover or passive cross ove rs t o he lp
contro l w hic h f requencies will actually reach the prope r s pea ker s.
For bas ic installations in a vehicle wit h larger speakers in the rear and sma lle r speakers in the fro nt, utilize the fad er cont rol to
adjust t he amount of power rea chi ng the s pea ker s. By turning the fader more to the rear po sit ion , more power will b e distributed
to the re ar spe ake rs, th ereby protecting the smaller speakers in the fron t o f t he veh icl e.

SPECIFICATIONS/FEATURES
3
• Active gain equalizer with adjustable input sensitivity
• Master volume control with up to 7 volts RMS of
output
• Individual left and right sensitivity controls
• Four band parametric equalizer with 12dB boost/cut
• USB 2.0 full speed host function
• On-board 30V bipolar switching power supply
• Subwoofer level control
• Adjustable subwoofer frequency
• Gold-plated RCA input/output connectors
• Input MAIN/AUX select switch
• Night illumination
• Specific bandwidth for each band plus high
frequency shelving
• 4 band graphic equalizer
• Equalizer line driver
• Front/rear outputs with fader control
• Adjustable subwoofer frequency (40Hz - 250Hz)
• Separate subwoofer frequency and level controls
• Center-dented boost/cut controls for each band
• Independent left and right input gain adjustments
FEATURES AND SPECIFICATIONS SUBJECT TO CHANGE AND OR IMPROVEMENT WITHOUT NOTICE
4 BAND PARAMETRIC EQUALIZER WITH USB OUTPUT/MP3 PLAY
CEQ-777
SUB REAR FRONT
INPUT GAIN
MAIN
R L R L R L R L R L
OUTPUT OUTPUT INPUT
SUB FREQ
R L
AUX
R L
MAIN AUX
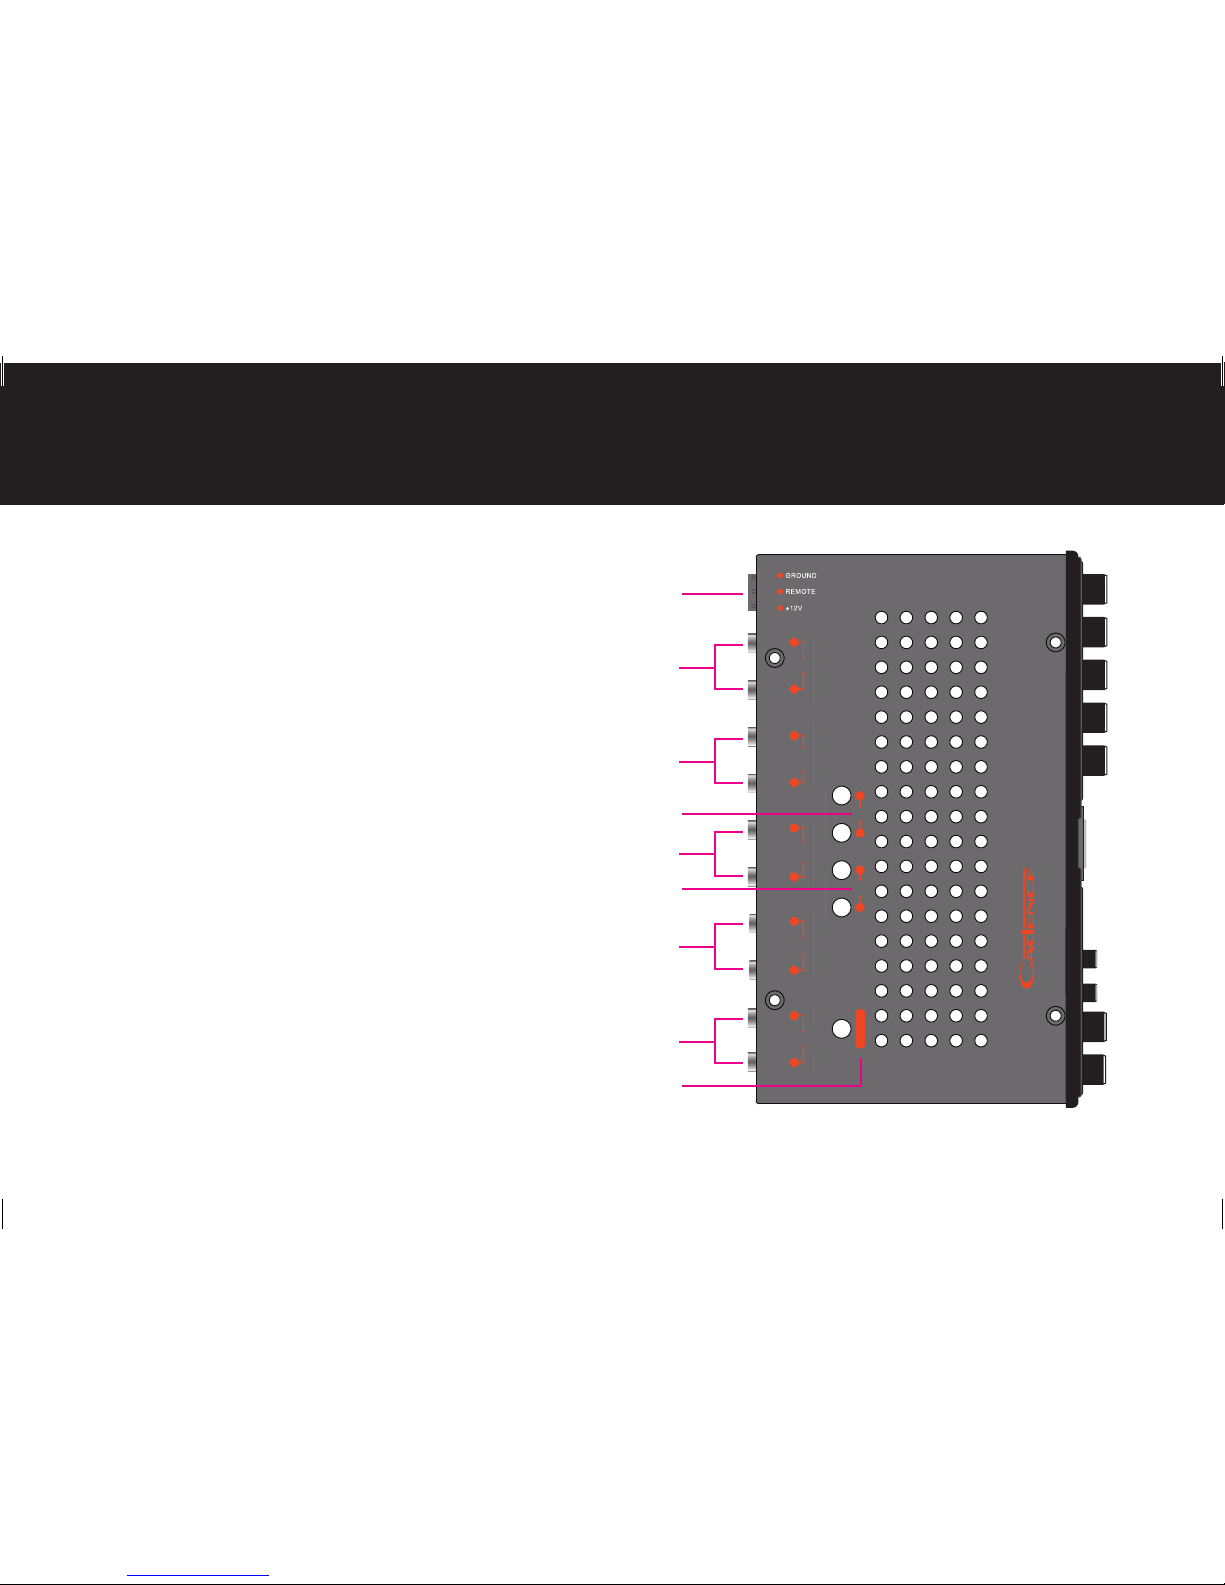
BACK PANEL CONNECTIONS
4
1
2
3
4
5
6
7
8
9
1. POWER: A fte r connecting the Ground , R emote, and Power
wires, plug i n t he Power Lock con nec tor here.
2. AUX INPU T: Plug i n t he RCA cables from the AUX
source here (RCA to Mi ni- Jack adapter can be
used wi th Mini-Jack equippe d M P3 Players).
3. MAIN INP UT: Plug in the RCA cables from the MAIN source
unit he re.
4. LEFT AND RIGH T GAIN CONTROLS FOR THE AUX SOURCE:
Sets l eft an d righ t inpu t gain to match the output level from
the sou rce un it.
5. FRONT OUTP UT: Plug i n th e RCA cables to your front chan nel amp lif ier here.
6. LEFT AND RIGHT GAIN CONTROLS FOR THE SOURCE INPUT:
Sets l eft an d righ t inpu t gain to match the output level from
the sou rce un it.
7. REAR OUT PUT: Plu g in the RCA cabl es to your rear chan nel amp lif ier here.
8. SUBWOOFER OUTPUT: Plug in the RCA cables to your sub woofer amp lifier here.
9. SUB FREQU ENC Y: This control ad jus ts subwoo fer frequen cy from 40Hz to 250Hz.
 Loading...