

Page 1

Installation
instructions
for
Plenum-mounted
add-on
electric heaters
Aug. 2008
Version 4
Page 2

THESE INSTALLATION INSTRUCTIONS COVER:
Please refer to CSA Standard B139, installation code for oil burning equipment and to the Canadian Electrical Code,
MODEL
T-4 to T-30
(4 Kw to 30 Kw)
GENERAL NOTES
Part 1, for recommended installation practices.
- The installation of this unit should be in accordance with the regulations of the authorities having jurisdiction.
CAUTIONS
1. Before installation, ensure that the local electrical inspection authority will accept connection of this equipment
to the existing panel.
2. This equipment may only be installed and tested by qualified personnel.
3. The electrical power supply should be checked for adequacy for the proposed additional load.
4. Ensure that the heat output capacity of the installed electrical Add-on Heaters does not exceed the rated output
capacity of the furnace burner.
5. This heater is for use with an in-line (hi-boy) or up-flow (lo-boy) oil or gas fired furnace.
OPERATING INSTRUCTIONS
The controls provided with this unit prevent simultaneous operation of the add-on heater and the oil burner. In the case
of malfunction, shut down the equipment and call a qualified electrician.
Page 1
Page 3
FIELD TESTS:
Run burner to ensure that the blower starts soon enough to prevent the manually resettable temperature limiting
A. BEFORE Installation of the Add-on Heater:
1. Ensure that the burner does not cycle due to repeated operation of the furnaces high limit control.
2. Determine whether stabilized outlet air temperature during burner operation is below 66°C (150°F) in the main
outlet duct. If it does exceed 66°C (150°F) make the following adjustments to the Ventilation System in
progressive steps:
Note: In most cases, only steps A & B will be necessary.
a) Check if filters are clogged.
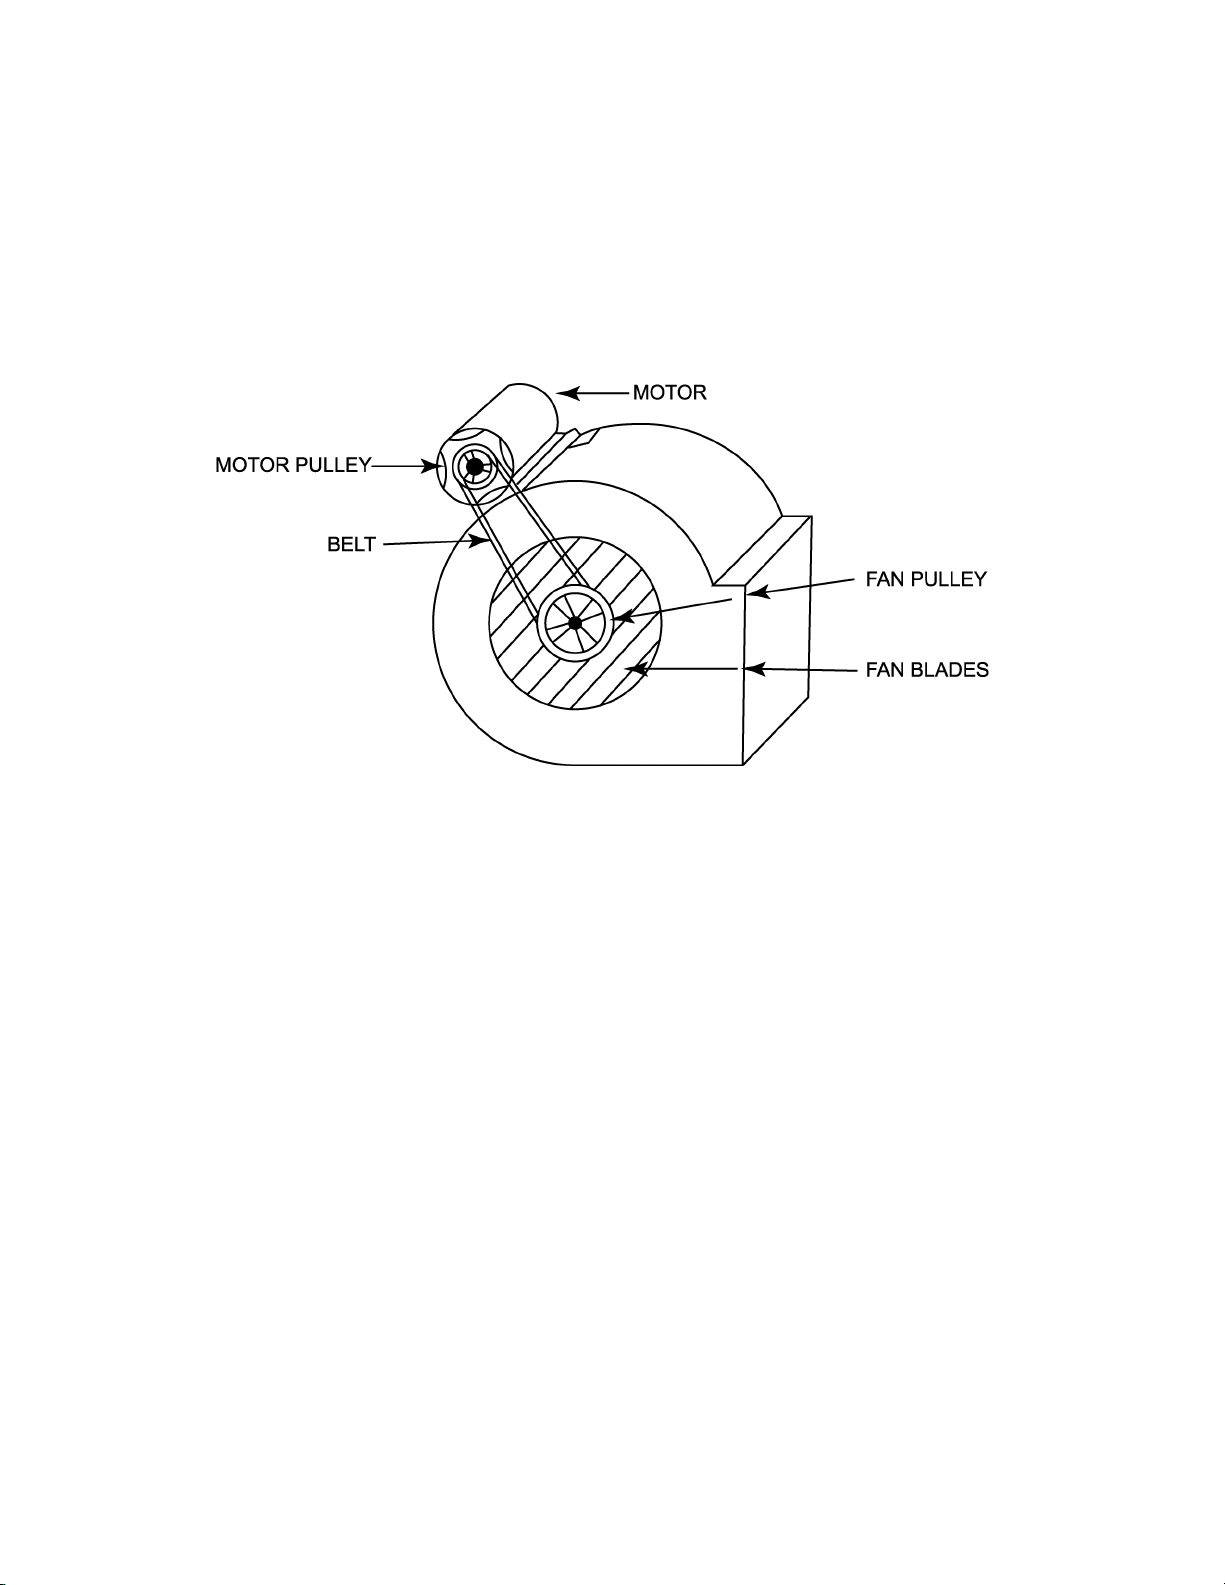
b) Check if fan blades are clean. If not, remove the blower from its compartment and clean with a brush.
c) Adjust the motor pulley to increase its diameter.
d) Change the fan pulley for a smaller size.
e) Change the motor pulley for a larger size.
f) Change the motor and make sure that the fan control and wiring are adequate.
Note: If steps c), d) & e) are necessary, make sure that the existing motor is adequate. The current drawn must not
exceed the nameplate specifications.
Important: The blower must not be changed. If the system cannot provide sufficient airflow after changing the motor,
do not install the add-on heater in that furnace.
B. AFTER installation of the Add-on Heater:
1. Ensure that the burner does not cycle due to repeating operation of the furnace's high limit control.
2. Ensure that stabilized outlet air temperature during burner operation does not exceed 72°C (160°F) in the main
outlet duct.
3.
control on the Add-on Heater from tripping.
4. Operate the Add-on Heater to ensure satisfactory operation without overheating.
Note: Where a cooling coil is present, additional checks should be made to ensure adequate airflow exists for cooling
system operation.
Page 2
Page 4

MECHANICAL SECTION
The position of the add-on heater must be as indicated on the front of the heater control box (Please see Fig. 1).
A. Product Inspection
1) Inspect the carton and heater and report any damage at once.
NEVER INSTALL A DAMAGED HEATER
2) Content of carton:
- One Add-on plenum heater
- Three (3) sheet metal baffles to adapt heater to plenum.
3) File claim with shipping company if shipment is damaged or incomplete.
B. Installation Instructions:
"Cautions" - The installation, location, position and orientation of the add-on heater must conform to the following:
1) This heater must be installed downstream of the furnace in the warm air plenum.
2) This heater must be installed downstream of the furnace safety limit control.
3) No deformation, removal or displacement of any part of the furnace is permitted.
4)
5) The heater axis must be in line with the plenum axis.
6) Do not install heater from top or bottom of duct. (Please see Fig. 2).
STANDARD INSTALLATION CLEARANCE
The heater must be installed in the warm air plenum. A minimum distance of 14 inches is required from the furnace to
the elbow, Tee or plenum end take-off of the main supply duct (Please see Fig. 3).
Page 3
Page 5

If a cooling coil is installed in the warm air plenum a
minimum distance of 3" or 7" is required between
the top of the cooling coil and the add-on heater
(depending from which side of the plenum
the add-on heater is inserted). (Please see Fig. 4)
In both cases, a minimum distance of 2" must be
kept between the top of the add-on heater
and the elbow, Tee or plenum-end take off
of the main supply duct.
1
The heater may be installed on any available side of the
plenum. An installation and service clearance of 28 inches is
required from the heater control box to a wall, partition or any
other obstruction.
If the heater is installed on the same side as the flue pipe a
minimum clearance of 10 inches must be maintained between
the flue pipe and the heater control box. (Please see Fig. 5)
Select the plenum side, which offers the most space for
installation and service.
VERY IMPORTANT
BAFFLES MUST ASSURE MAXIMUM AIR FLOW OVER THE HEATING ELEMENTS.
- Screw the baffles to bottom flanges of casing, as shown in Fig. 6.
- Cut baffles to size allowing only 1/8" clearance for insertion of heater.
AIR FLOW
All the air from the furnace must pass through the heater element. If the heater element casing is smaller than the
plenum the space between the plenum and the element casing must be blocked off with baffles. (Please see Fig. 7)
Page 4
Page 6

HE ATER MOUNTING
Cut out heater opening at a minimum distance of 6 inches from the furnace. Center the opening on the plenum. Provide
slots for insertion if baes are installed. (Please see Fig. 8).
The 6 inch minimum dimension from the top of the furnace to the heater opening in the plenum may be increased.
If increased, 14 inch minimum dimensions in Fig. 3 must be increased accordingly.
Slip the heater element into the opening. Make sure that the opening and slots are entirely covered by the heater
mounting anges. Secure the heater to the plenum by means of metal screws.
HUMIDIFIER
DO NOT USE PAN & PL ATE TYPE HUMIDIFIERS WITH THE WATER RESERVOIR INSIDE THE WARM AIR SUPPLY
PLENUM.
Only "Pressure Dierential" type humidiers (preferably a power humidier) should be used. If the round inlet duct of the
humidier is connected on the hot side of the heater, it is strongly recommended to insert a reducing ring between the
round inlet duct of the humidier and the opening in the plenum such that the eective opening for the humidier will
approximate 4" in diameter. This will reduce the volume of short-circuited air through the humidier connection
(Please see Fig. 9).
WARRANTY
The Manufacturer warrants the heating elements of its "Series T" Plenum Heaters against any defect in material and workmanship
for a period of ten years, and all others components for a period of two years starting from the date of installation of the heater.
The Manufacturer will repair or replace without charge in its factory or in the eld, at its sole discretion, the heater or part thereof
which shall in the Manufacturer's opinion prove defective. Misuse of this product or repairs made by persons other than the
Manufacturer's authorized personnel without the Manufacturer's written approval will void this warranty.
The Manufacturer shall not be held responsible for any incidental or consequential damage or delays and shall not be held liable
for any damages resulting from the removal or replacement of the allegedly defective heater.
Page 5
Page 7

ELECTRICAL SECTION (ALL MODELS)
A. Disconnect all power sources before opening electrical boxes and working within.
B. Read the nameplate and markings carefully and consult the wiring diagram before you start wiring.
C. Wires and protective equipment should be sized according to the National Electrical Code requirements.
D. Use only wires suitable for at least 75°C.
E. Disconnect room thermostat connection to furnace and connect to C and W1 terminals of heater.
F. Connect two (2) wires from BB control terminals of plenum heater to furnace room thermostat connection.
G. Connect the fan relay supplied with the heater (terminals F F) to the existing fan controls in order to permit
the functionnning of the fan in the electric mode.
H. Anticipation. Set the room thermostat heat anticipator at 0.2. Perform start-up and required field tests.
(Please see fig. 10) or schematic wiring.
I. Outdoor thermostat. If required install an outdoor thermostat on an exterior north wall and connect to terminals
S1 and S2 in the plenum heater to allow for automatic transfer in the dual energy mode.
Page 6
Page 8

START UP AND SEQUENCE OF OPERATION
In the "electric" mode the room thermostat will call upon the electric heater to maintain the house temperature at the
level desired by the user. In the "oil" mode the oil furnace is ready to respond to the house thermostat's call for heat.
The third position or "Dual-Energy" mode gives automatic control to the outdoor thermostat or other switching signal
1 - The heater is supplied with a built-in 3 position mode selector switch.
« » position - Electric heat.
« » position - Heating by means of original furnace.
« » position - Dual-energy mode.
for dual-energy control. When the contacts are closed, the electric mode is selected. When the contacts are open,
the oil mode is selected. A green pilot light indicates the mode in operation.
2-
a. Do required fields tests after installation of the Add-on Heater as detailed on page 2.
b. Turn ON the disconnect switch controlling the heater.
c. Simulate a heating demand by setting the room thermostat above the room temperature.
d. Switch the mode selector to position « ». The fan will start and the heating elements will come on in
sequence at 5 seconds interval (wait approx. 2 minutes) .
e. Measure the amperage drawn by the heater and compare it with the one shown on the nameplate.
f. Lower the heating demand by setting the room thermostat. All the relays will disconnect and the amperage
should go down to zero (wait approx. 2 minutes).
g. Switch the mode selector to position « » and check if the burner responds to thermostat demand.
h.
Switch the mode selector to the dual-energy position « ». If you jump terminals S1 and S2 the electric mode
is selected and if you disconnect terminals S1 and S2 the oil / gas mode should be selected.
i. Switch the mode selector to the desired position and set the room thermostat to the desired set point.
Your heater is now ready and functional.
Page 7
Page 9

Characteristics
Characteristics
Models kW @ 240V
T-5 5 1 20.8 30 30 10
T-9 9 2 37.5 50 50 8
T-15 15 4 62.5 80 100 4
T-18 18 4 75.0 100 100 3
T-20 20 4 83.3 110 125 3
T-25 25 4 104.0 150 150 1
T-30 30 4 124.0 175 175 0
Heating Current (Amps)
Sequences Plenum Heaters Fuses Breakers
AWG
Page 8
 Loading...