

Page 1
R
ELECTRIC
CONVECTION
OVENS
OV-250
OV-250
(XAOO6 “Mini Roberta”)
(XAOO6 “M
OV-350
OV-350
(XA015 “Mini Arianna
w / finishing control”)
OV-400
OV-400
INSTRUCTION MANUAL
This booklet contains important
information about your CadcoUnox Convection Oven. Keep it in
a safe place.
ENGLISH
For Information
on the Cadco Oven by UNOX
Contact:
(XA030 ”Arianna”)
OV-500
OV-500
(XA085 “Elena”)
OV-600
OV-600
(XA090 “Rossella”)
202281
CADCO, LTD.
145 Colebrook River Road,
Winsted, CT 06098
Phone: 860-738-2500
Fax: 860-738-9772
E-mail: info@cadco-ltd.com
07 /
2003
OVENS PLANET
Page 2
ENGLISH
INDEX:
I. Instructions for the Installer Page 3
1. Data Plate Page 3
2. Certifications Page 3
3. Installation -Preliminary
operations Page 3
3.1 Feet Assembly Page 3
3.2 Installation Location Page 4
3.3 Remove Protective
Film Page 4
4. Installation Page 4
4.1 Electrical Connection Page 4
4.2 Water Connection
(OV-500 & OV-600 only) Page 5
4.3 Maintenance Page 5
II. Instructions for the User Page 6
WELCOME TO CADCO!
We want you to have immediate success with your new
Cadco-Unox Convection Oven.
These state of the art convection ovens are manufactured for Cadco by Unox SPA of Padua, Italy, to the highest standards. By following the guidelines and reading
the tips contained in this instruction manual you will be
convection cooking like an ol’ pro in no time. Cadco will
help you find the perfect oven for your needs, and provide
customer support after the purchase.
The Cadco website, at www.cadco-ltd.com, provides a
wealth of information relating to service and food issues.
All our Cadco staff e-mail addresses will be listed on the
website.
The Cadco toll free number gives you access to our on
staff Certified Executive Chef. Most calls are answered
within 24 hours. To reach any of the Cadco professionals
call 877.603.7393.
1. “Burn In” Oven Before First Use Page 6
2. Features and controls Page 6
2.1 Preheat Indicator Light Page 6
2.2 Temperature Control Page 6
2.3 Timer Dial Page 6
3. Special Cadco-Unox Oven
Features Page 6
3.1 “End Of Cycle” Alarm Tone Page 6
3.2 Interior Light Page 6
3.3 Finishing Feature
(only OV-350) Page 6
4. Cleaning & Maintenance Page 7
5. Door Removal Instructions Page 8
6. Troubleshooting Page 8
III. Convection Cooking Page 9
1. Cooking Principles Page 9
2. Cooking Page 9
3. Times and Temperatures Page 10
IV. Technical Data: Electrical
Schematics, Drawings Page 12
1. XA006 - OV250 Page 12
2. XA015 - OV350 Page 13
3. XA030 - OV400 Page 14
4. XA085 - OV500 Page 15
5. XA090 - OV600 Page 16
2
ENGLISH
Page 3
ENGLISH
I. INSTRUCTIONS FOR
THE INSTALLER
Dear customer, we thank you and compliment you for having purchased one of our
products.
The warnings and suggestions that follow
concern the phases for proper installation,
use and maintenance for your safety and for
the best use of the appliance.
1. DATA PLATE
The data plate is positioned on the right side
panel.
The technical characteristics are identified in
the enclosed page “technical data”.
2. CERTIFICATIONS
CSA C-US BRAND
SERIE XA
Certificate of Compliance
N.202281-1008284
Applicable Requirements:
CAN/CSA-C22.2 No. 100-1995 - Motors and
Generators.
CSA Std C22.2 No. 109-M1981 – Commercial
Cooking Appliances.
UL Std No. 197 - Commercial Electric Cooking
Appliances.
UL Std No. 1004 - Electric Motors
“ The “C” and “US” indicator adjacent to the
CSA Mark signifies that the product has been
evaluated to the applicable ANSI/UL and
CSA Standards, for use in the U.S. and
Canada. This includes products eligible to
bear the NRTL indicator. NRTL, i.e. Nationally
Recognized Testing Laboratory, is a designation granted by the U.S. Occupational Safety
and Health Administration (OSHA) to laboratories which have been recognized to perform certification to U.S. Standards.
NSF BRAND
SERIE XA
Certificate N. 79610/79610B
N. 79610/79611/B
NSF International recognizes UNOX SPA
products as complying with ANSI/NSF 04.
Standard 004 - Commercial Cooking,
Rethermalization and Powered Hot Food.
3. INST
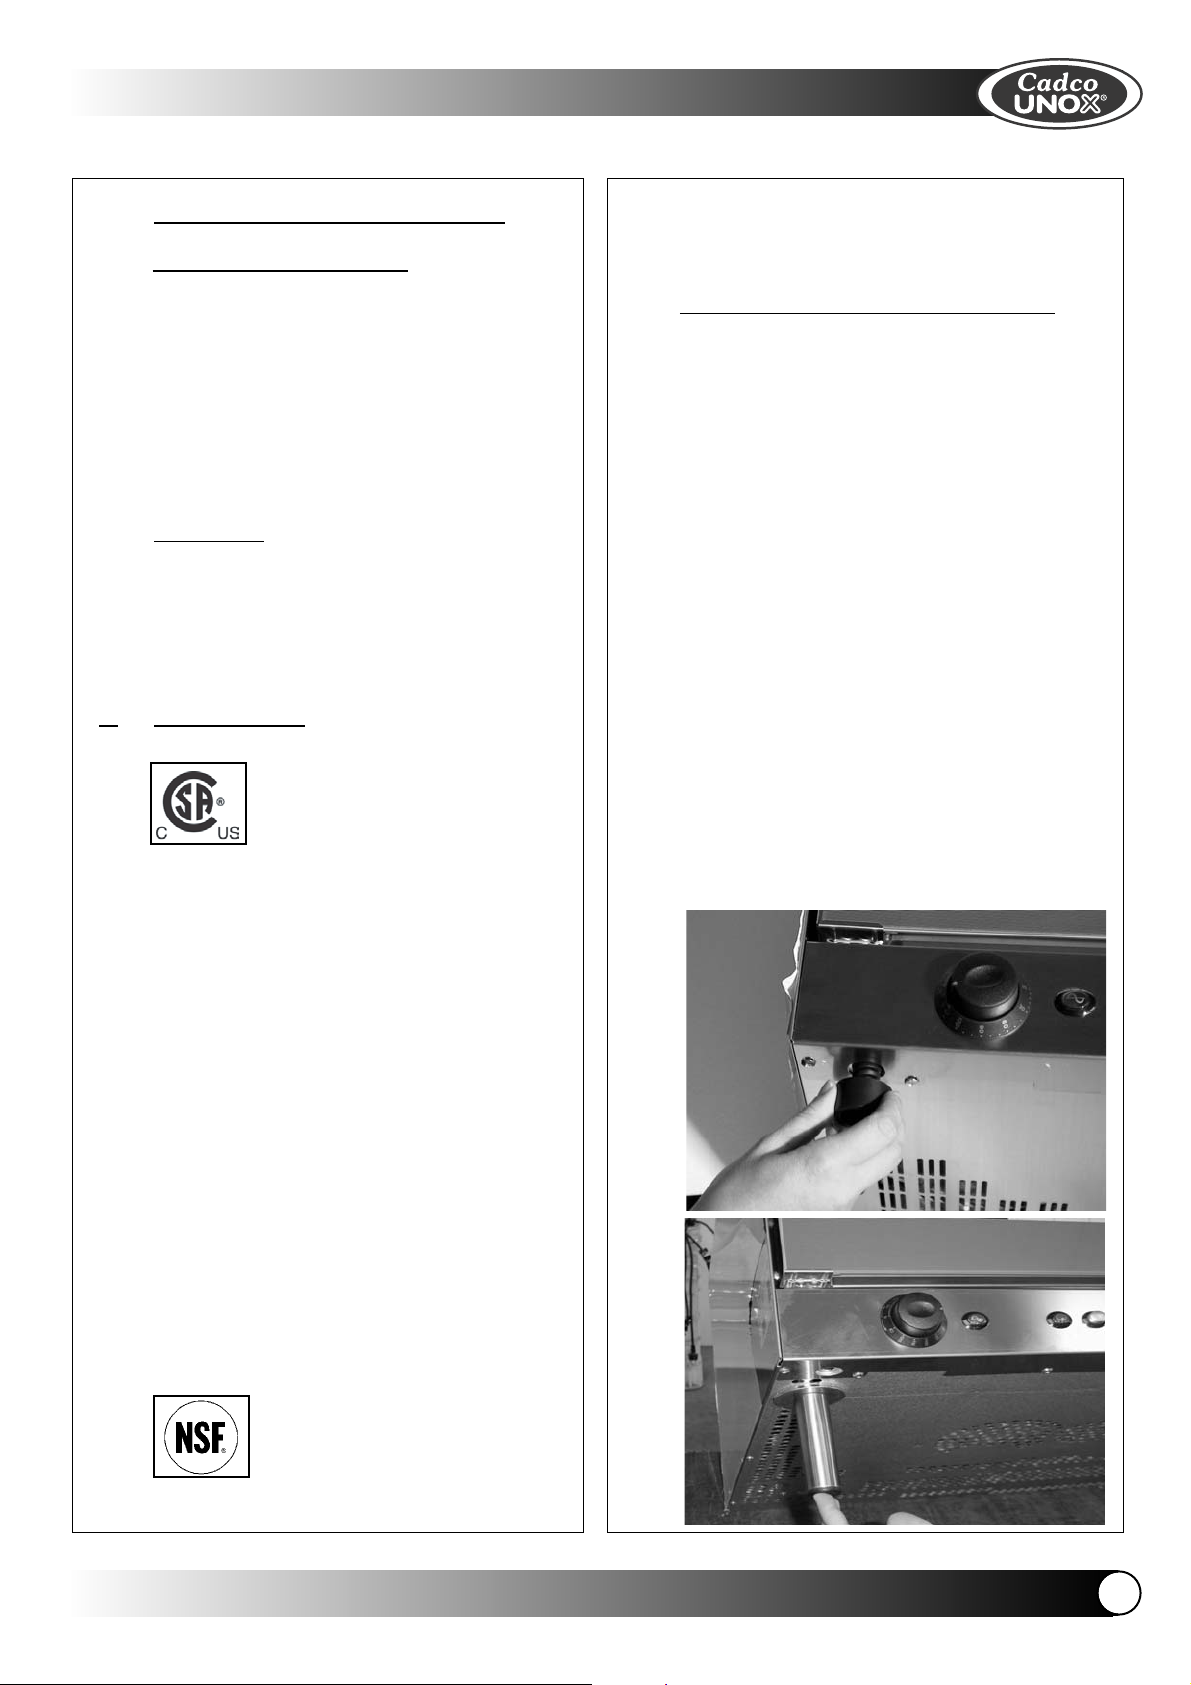
3.1 FEET ASSEMBLY (If applicable)
NOTE - DO NOT USE YOUR OVEN
ALLATION – Preliminary Operations
All the electrical connections and installations
must be done by qualified personnel in compliance with all local codes.
The Cadco-Unox models OV-250 and OV350 are shipped with feet installed. Some
other model ovens are shipped without the
feet being installed, and must be assembled.
If your convection oven has feet, do not install
or use the oven without them. The feet are
shipped in the cooking cavity and must be
assembled.
Screw the support feet into the bottom of the
oven as shown in the illustration. After
assembling the feet, the oven’s height may
be adjusted by screwing or unscrewing the
feet to level the unit.
The models OV-500 and OV-600 require
washers when the feet are assembled.
WITHOUT INSTALLING THE FEET.
ENGLISH
3
Page 4
ENGLISH
208-240V
3.2 INSTALLATION LOCATION
Make sure you have the correct power supply for the oven model you have purchased.
Check the technical data sheets at the back
of this manual if you are in doubt.
Do not install any Cadco-Unox Convection
Oven directly on the floor. Cadco has oven
stands to perfectly elevate your oven as well
as provide pan storage.
OST-34A for models OV-350 and OV-400
OST-56A for models OV-500 and OV-600
If the oven must be placed near walls,
dividers, or moldings Cadco recommends
they be made of non-combustible materials.
Be sure to observe all safety and fire codes
when positioning your convection oven.
All of our convection ovens have a vapor vent
in the back of the unit. When installing your
convection oven, leave a space of 4” [minimum] between the back of the oven and the
wall, and 2” minimum on the top and sides.
Where applicable, ventilation hood requirements vary according to local codes.
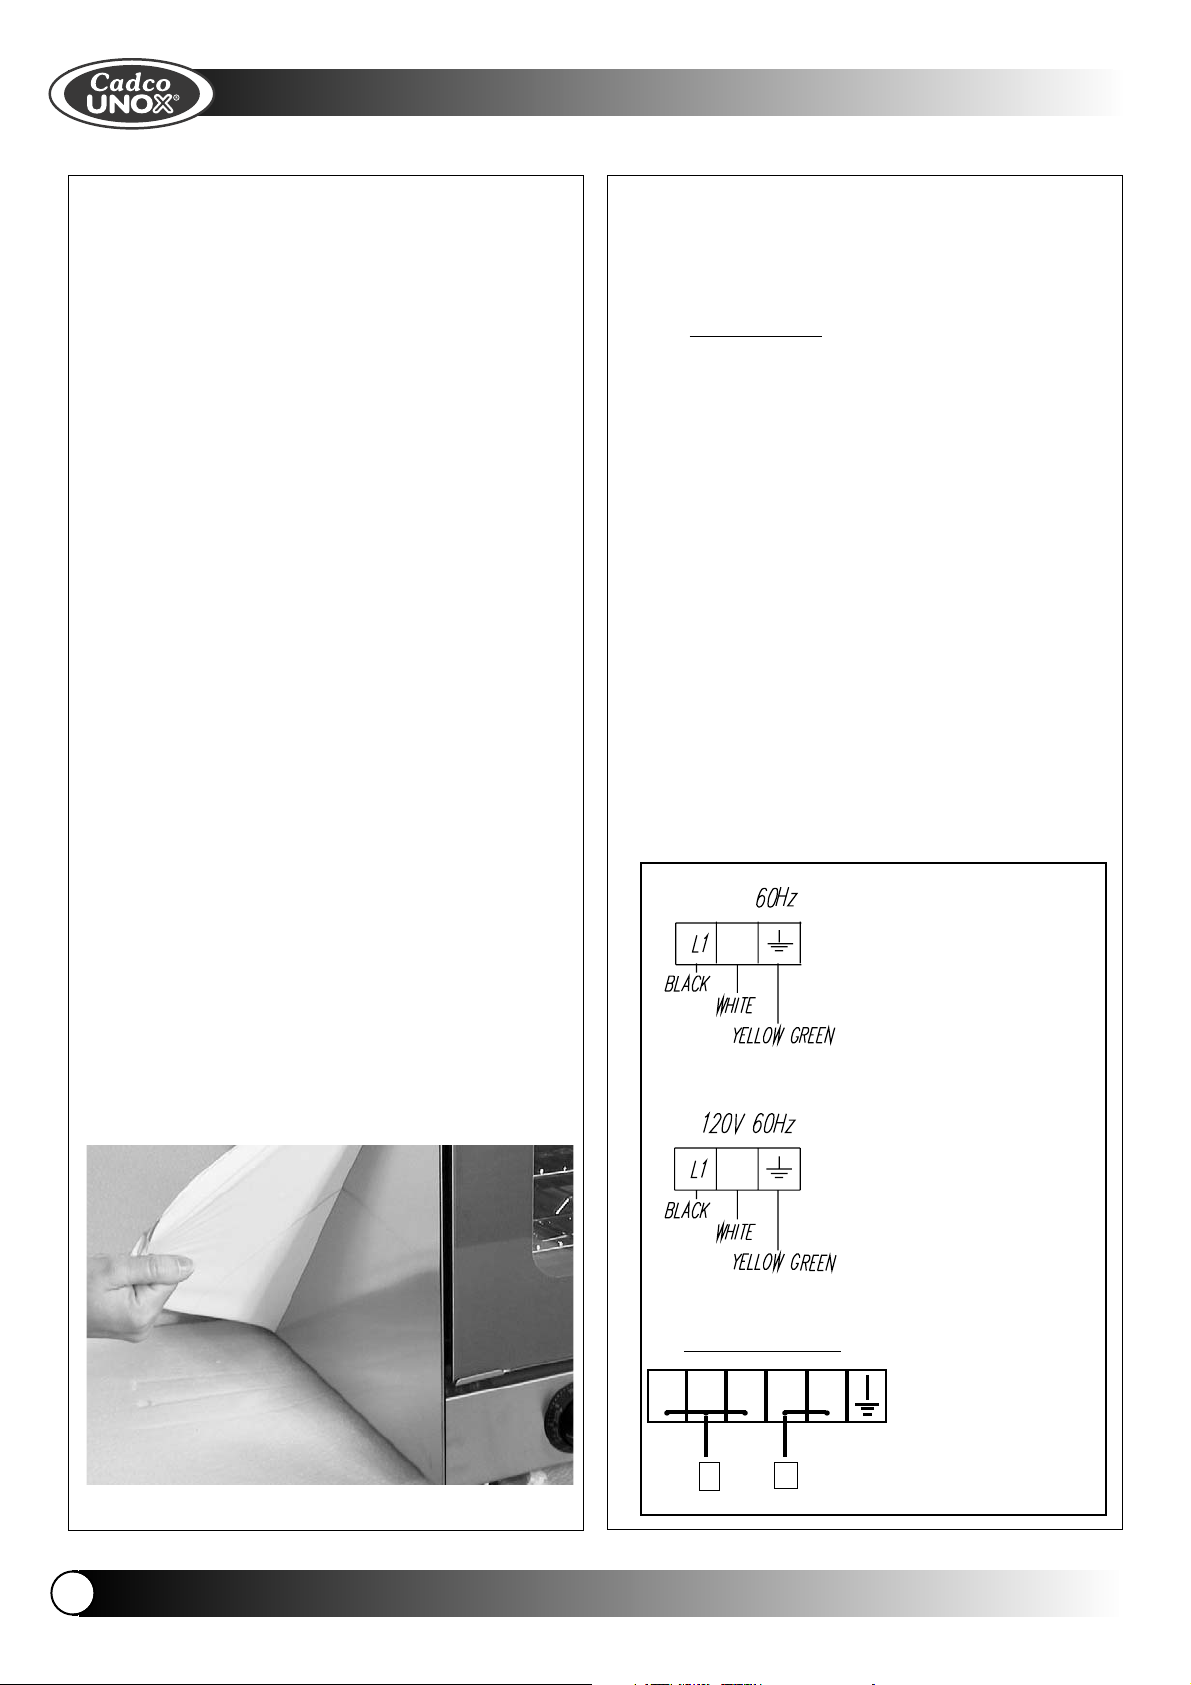
exterior walls before you begin cooking food
in your new Cadco convection oven. Most
solvents or degreasers will remove any
residue.
4. INSTALLATION
4.1 ELECTRICAL CONNECTION
The connection to the electrical power supply
network must be done according to the standards in force.
Before connecting make sure that the voltage
and the frequency correspond to that stated
on the data plate on the oven.
Place a bi-polar switch between the oven
and the network accessible after installation,
whose contacts have a minimum opening
distance of 0.1 inches, with an appropriate
input (for example, magnetothermal switch).
When the oven is in operation, the power
supply voltage must not vary from the value
of the nominal voltage by more than ± 10%.
The oven must be connected to the
ground line of the network.
We do not suggest using the Cadco-Unox
Convection Ovens for built in applications.
Measure to make sure that your new oven
will fit in your available space.
3.3 REMOVE THE PROTECTIVE FILM
Be sure to remove the laser film from the
L2
L2
208 - 240V
220-230 V ~
21 3 54
L L
XA030/OV-400
XA085/OV-500
XA006/OV-250
XA015/OV-350
XA090/OV-600
Use only AWG10 cords
4
ENGLISH
Page 5
ENGLISH
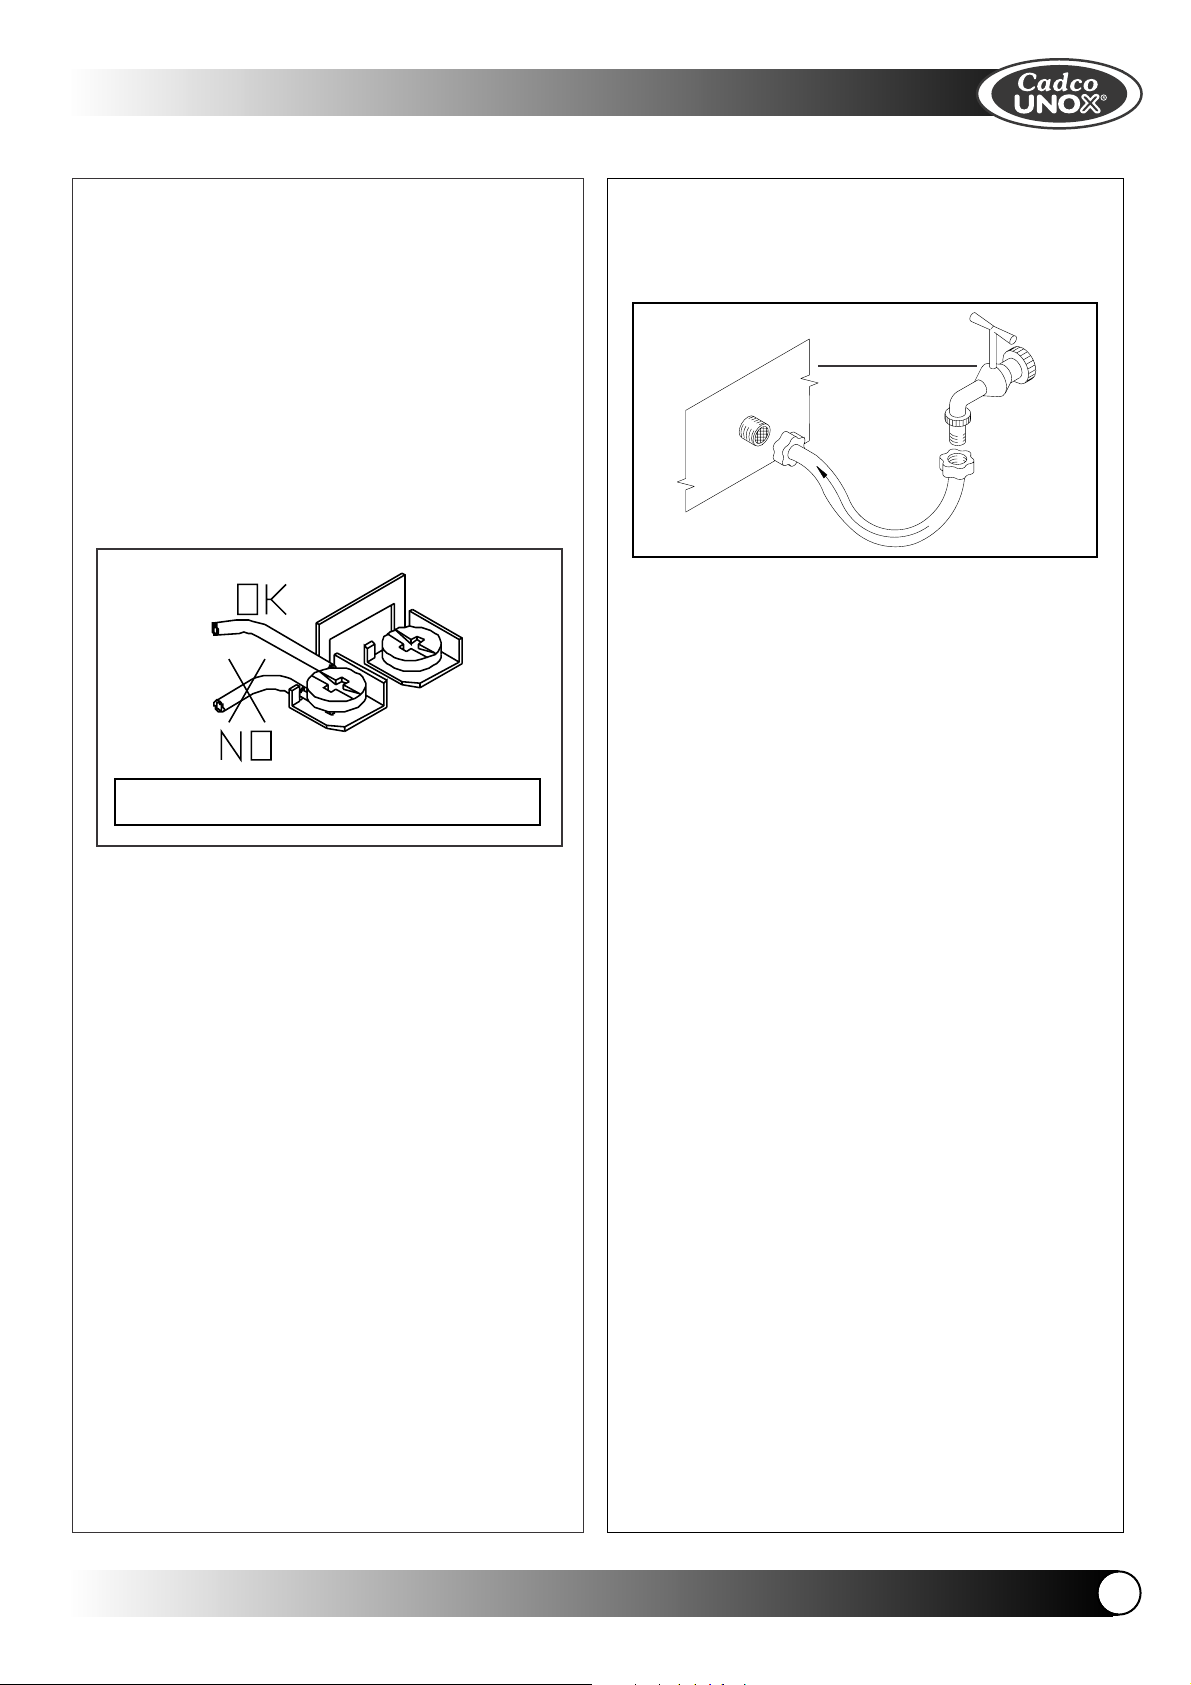
WARNING:
Connect the electrical cable to the terminalboard as indicated in the drawing: insert
screw-wise the copper bridge and the electrical cable together under the screw (see
diagram below.)
Tighten the screw taking care that the cable
and the copper bridge are well gripped
under the screw.
A wrong connection can cause an overheating of the terminal board and burn it.
(7.25 – 30 psi.) Due to variations in water
composition in different areas, you may want
to consider using a commercial water filter.
MAX 2 bar
(30 psi)
4.3 MAINTENANCE
Before carrying out any type of maintenance
it is necessary to disconnect the electrical
power supply and wait for the oven to cool
down.
OV-600 ONLY
Electrical connection must be a proper outlet
for the 3 pronged cord. Before connecting
power, make sure the voltage and frequency
correspond to the data plate on the oven
(120 volts/60hz.), and that your electrical circuit can handle the12.5 amps used by the
oven in addition to any other appliances
operating on the same circuit.
4.2 WATER CONNECTION - Applies only to OV-
500 and OV-600
WATER CONNECTION TO THE NETWORK:
Connect the decalcified water inlet ducts
placed on the back of the oven to the specific distribution network by means of a
mechanical filter and a cut-off cock. Before
connecting the filters, let a certain quantity of
water flow to clean the duct from any ferrous
slag. The water must have a hardness
between 0.5°-5°F (this in order to reduce the
formation of limestone deposits inside the
electro-valve and inside the cooking chamber) and a pressure value between 0.5-2 bar
ENGLISH
5
Page 6

ENGLISH
II. INSTRUCTIONS
FOR THE USER
1. “BURN IN” OVEN BEFORE FIRST USE
Before you start cooking with your new
Cadco-Unox Convection Oven you will want
to “burn in” the oven. This simple procedure
will get the new oven smell out of your oven
and off your food.
- Clean the oven with a mild detergent inside
and out.
- Turn the temperature control dial to 400F.
- Set the timer for 30 minutes and you’ll be
ready to start cooking at the end of the
cycle.
2. FEA
TURES AND CONTROLS
2.3 TIMER DIAL
Turning the timer
dial clockwise
allows you to set
the cooking time for
up to 120 minutes.
When the dial is
turned counterclockwise you are in manual
mode with infinite cooking time.
3. SPECIAL CADCO-UNOX OVEN FEATURES
3.1 “END OF CYCLE” ALARM TONE
All Cadco-Unox ovens indicate the end of the
cooking cycle with an alarm tone with the
exception of the models OV-250 and OV-350
2.1 PREHEAT INDICATOR LIGHT
The preheat indicator light
will be illuminated when
there is heat being added to
the cooking chamber. The
preheat indicator light will be
illuminated periodically throughout the cooking cycle as the oven controls call for more
heat.
2.2 TEMPERATURE
CONTROL
Cadco-Unox temperature controls
are extremely
accurate. The dial
will be turned
clockwise and
used to set your oven cooking temperature in
a range 175F to 500F degrees.
3.2 INTERIOR LIGHT
Models OV-250 and OV-350 do not have a
light in the cooking cavity.
3.3 FINISHING FEATURE - ONLY on Model OV-350
Model OV-350 has
a special top heating element to
enable either
browning or broiling functions. The
broiler/browning
function is activated by turning the
temperature control knob clockwise to its
most extreme right position. To activate the
broiler/browning feature, simply turn the
control dial beyond 500F to the furthest point.
You will feel a slight resistance as you turn the
dial. Beyond this resistance point the browning feature is activated. The browning/broiling feature should be used for no more than
45-60 minute cycles. It is not designed for
constant operation. Note: The oven fan
operates in browning/broiling mode.
6
ENGLISH
Page 7

ENGLISH
3.4 HUMIDITY FEATURE - ONLY on Models OV-500
and OV-600
Models OV-500 and OV-600
have a manual humidity
injection feature. The humidity
indicator light will illuminate
when the humidity feature is
being used. Pressing the silver humidity button introduces
a spritz of water to the cooking cavity creating a moist
cooking environment.
Warning!
To keep from damaging the motors, the
humidity injection button should only be
pressed for short [5-10 seconds] intermittent
periods.
4. CLEANING AND MAINTENANCE
WARNING:
Work safely, disconnect the oven and allow it
to cool before cleaning or maintenance.
Available On All Models)
To replace the internal lamp do as follows:
- Disconnect the oven from the power supply
and and let it cool.
- Take out the side rack supports.
- Unscrew the glass cover counterclockwise
and replace the lamp with one with the
same characteristics (240V-15W-300°C /
572°F).
- To reassemble, follow the reverse order.
4.1 CLEANING
The oven is not to be cleaned with pressurized water. You could damage the electrical
components and an unsafe condition could
occur.
Clean the cooking chamber with soap and
water. Never use harsh, caustic products or
acids.
The rack system is cleaned by removing the
retaining screws by the front of the cooking
chamber. The racks can then be easily
removed and washed.
4.2 REPLACEMENT OF THE INTERNAL LAMP (Not
ENGLISH
7
Page 8

5. OVEN DOOR REMOVAL
ENGLISH
Side of
Oven
Bottom
Hook
(To attach the door, reverse the directions,starting with Step 3)
Convection Oven Door Removal Instructions
Side of
Oven
open flat)
Open the door fully.
Door (fully opened; does not
Step 2
(side view)
Rotate the Hinge Lock
to up position.
Hinge Lock- must be in
up/locked position)
Side of
Oven
To p
Bottom
Hook
Top Hook Roller
Hinge Lock- in
up/locked position)
Step 1
(side view)
Hinge lock - in “down/unlocked”
position
Step 3
(side view)
)
2
(
Hinge Arm
(1)
1) Tilt door up at about 45oangle until the Top Hook
on the Hinge Arm is lower than the Top Hook Roller,
2) then pull out of the Hinge Slots.
PLEASE NOTE: Hinge Locks may become jostled into the unlocked position by rough handling of the carton during shipping,
causing the door to be unhinged from the oven when the carton is opened. If this occurs, follow the directions for attaching the door.
6. TROUBLESHOOTING
1
2
ice on your oven.
Your Cadco-Unox Convection Oven has an
automatic high temperature breaker that
protects the oven from overheating or power
fluctuations.
If your oven shuts down when you are operating at high temperatures, the following
steps will allow you to reset the breaker and
resume safe operation.
REMOVE/REPLACE BLACK CAP PUSH THE RESET
BUTTON
- Unscrew the black reset knob safety cover
at the rear of the oven next to the power
cord.
Work safely, disconnect the power and allow
- Press the reset button to the “in” position.
the oven to cool before performing any serv-
8
ENGLISH
Page 9

ENGLISH
- Securely replace the black safety cover.
- Begin food preparation after the oven is
preheated.
If the thermal breaker shuts your oven off,
before turning your oven on, be sure to
check your entire circuit to verify that the
total amps being drawn by all the appliances, lights, etc. on that circuit do not
exceed the amps available on that circuit.
All repairs should be performed by a Cadco
authorized service technician using only genuine Cadco-Unox parts.
III. CONVECTION
COOKING
Your Cadco-Unox oven is designed to prepare food, and it should be used for that purpose only.
1. COOKING PRINCIPLES
Accurate times and temperatures assure
perfectly cooked foods. Cooking is an art, not
a science. People will never agree on the
meaning of “done”, or “perfectly cooked”.
Here are some tips that will help ensure success with your convection cooking.
temperatures.
- The oven operates between 175°F and
500°F.
Proper air circulation is necessary for successful convection cooking in all convection
ovens. We suggest you allow a proper clearance of 1-3 inches between pans when cooking for best results.
Never salt foods while they are in the oven.
Salt can damage the interior surfaces of your
oven and affect the efficiency of the electrical
components.
2. COOKING
Convection ovens work by moving the air
inside the cooking chamber to create even
heat throughout the oven. This circulating air
simply removes the [cool] insulating barrier of
air between the cold food and the hot air in
the cooking chamber allowing the food to
cook more quickly. In essence, the moving air
makes heat hotter, as wind chill makes cool
colder.
You will want to rely on an instant read, pocket probe while you are getting used to convection cooking. Your probe will help you
standardize times and temperatures as well
as assuring safe internal food temperatures
have been reached.
- The temperature of the food going into the
oven will affect the cooking time. Frozen
foods take longer to cook than refrigerated
foods.
- Three trays of chicken will take longer to
cook than three pieces of chicken.
- To convert your conventional oven recipes to
convection oven production simply reduce
the cooking temperature by 25F-30F
degrees.
- Most recipes can be converted by having
shorter cooking times and/or reducing your
cooking temperatures.
- We suggest that you use an instant read
probe to help you determine the actual
internal temperature of your foods. This will
help you safely determine correct times and
Preheat your oven to 30F-50F degrees higher than you the temperature you want to cook
at. After you have loaded the product into the
oven and the door is closed turn the temperature back to your intended cooking temperature.
Check cakes and cupcakes with a toothpick
to determine if they are done. If the toothpick
comes out “clean” [no batter on it] when
pushed into the center of the product, it’s
done!
We recommend roasting meats on a cooking
rack, in a shallow sided pan to allow air to
circulate all around the roast.
ENGLISH
9
Page 10

Salt pulls moisture out of meats. Season your
entire roast but only salt the fat portion.
3. TIMES AND TEMPERA
Products vary greatly. These times and temperatures may need minor modifications to
meet your particular standards. Use your
pocket probe to determine what’s right for
you.
- Rare roast beef – 130F
- Medium roast beef – 140F
- Medium well roast beef – 150F
- Well done roast beef – 160F
- Hamburger – 165F
- Pork – 160F - 170F
- Chicken – 185F done and no “red bone”.
- Fish/Seafood – 160F
TURES
ENGLISH
boneless fresh chicken breasts – 400F for 15
minutes.
- Fish sticks [frozen, browned] – 350F for
15/18 minutes.
- Shrimp [fresh 26-30 ct.] 350F for 10 minutes.
- Salmon fillet [6 oz. fresh] 325F for 12/15 min
utes.
- Potatoes [90 ct. baked] 375F for 45/60 minutes.
- Pizza [frozen 14”] 400F for 18 minutes.
- “Pocket” type sandwiches 350F for 18/20
minutes.
- Mozzarella sticks 350F for 10 minutes.
Here is a handy “Rule of Thumb” for roasting
meats at 325F
- Rare roast beef – 15/20 minutes per pound.
- Medium roast beef – 20/25 minutes per
pound.
- Well done roast beef – 30/35 minutes per
pound.
- Pork – 20/25 minutes per pound.
- Poultry – 20/25 minutes per pound.
- Ham [cured, not fresh] – 12/18 minutes per
pound. [Cured hams are already cooked so
all we have to do is heat them to 140F]
Here are some common products and their
approximate cooking times.
- Cookies 310F-325F for about 10-20 minutes,
depending on recipe and cookie size.
- Pies [10”] 350F for 45/60 minutes.
- Cakes [2-8” pans] – 325F for 25/30 minutes.
10
Check with a tooth pick.
- Pork roast [4lb.] - 325F for 1 hour 20 minutes.
- Hamburgers [1/4 lb. frozen] or 5 oz. skinless
ENGLISH
Page 11

ENGLISH
NOTES:
_________________________________________________________
_________________________________________________________
_________________________________________________________
_________________________________________________________
_________________________________________________________
_________________________________________________________
_________________________________________________________
_________________________________________________________
_________________________________________________________
_________________________________________________________
_________________________________________________________
_________________________________________________________
_________________________________________________________
_________________________________________________________
_________________________________________________________
_________________________________________________________
_________________________________________________________
_________________________________________________________
_________________________________________________________
_________________________________________________________
_________________________________________________________
_________________________________________________________
_________________________________________________________
_________________________________________________________
_________________________________________________________
_________________________________________________________
ENGLISH
11
Page 12

R
UNOX S.p.A.
CADCO Ltd.
MINI ROBERTT
MINI ROBER
XA006
XA006
A MANUAL
ENGLISH TECHNICAL DATA
POWER - AMPERAGE kW 1,440 - 12A
FREQUENCY 60 Hz
POWER SUPPLY CABLE TYPE SJTOW
POWER SUPPLY CABLE EXTERNAL Ø 10 ÷ 16 mm
VOLTAGE / CABLE SECTION 120 V~ / AWG 14 x 3
A MANUAL
model: OV-250
03-2003
07-2003
ESPAÑOL DATOS TECNICOS
POTENCIA - AMPERES kW 1,440 - 12A
FRECUENCIA 60 Hz
TIPO CABLE DE ALIMENTACION SJTOW
Ø EXTERNO CABLE DE ALIMENTACION 10 ÷ 16 mm
TENSION / SECCION CABLE DE ALIMENT. 120 V~ / AWG 14 x 3
L1
L2
ENGLISH - LEGEND
DRAWINGS - ELECTRICAL SCHEMAS
1. TERMINAL BOARD
2. EQUIPOTENTIAL TERMINAL SITE
3. TECNICAL DATA PLATE
4. HOT SMOKE DISCHARGE
LM OVEN INTERNAL LAMP
MO TERMINAL BOARD
R HEATING ELEMENT
S PILOT LIGHT
SIC OVERRIDE THERMOSTAT
T TIMER
TE THERMOSTAT
V1 MOTOR FAN
NETWORK GROUND LINE
ESPAÑOL - LEYENDA
DISEÑOS - ESQUEMAS ELECTRICOS
1. CAJA CONEXIONES-REGLETA
2. SEDE BORNE EQUIPOTENCIAL
3. TARJETA CARACT. TECNICAS
4. DESCARGA HUMOS CALIENTES
LM LAMPARA HORNO
MO CAJA CONEXIONES-REGLETA
R RESISTENCIA
S PILOTO ESPIA
SIC TERMOSTATO DE SEGURIDAD
T TIMER
TE TERMOSTATO
V1 MOTO-VENTILADOR
LINEA DE TIERRA DE LA RED EL.
202281
UL Std N° 197 Commercial Electric
Cooking appliances.
UL Std. No. 1004 Electric Motors.
Page 13

UNOX S.p.A.
2
CADCO Ltd.
R
MINI ARIANNA MANUAL
MINI ARIANNA MANUAL
XA015
XA015
model: OV-350
03-2003
07-2003
ENGLISH TECHNICAL DATA
POWER - AMPERAGE kW 1,440 - 12A
FREQUENCY 60 Hz
POWER SUPPLY CABLE TYPE SJTOW
POWER SUPPLY CABLE EXTERNAL Ø 10 ÷ 16 mm
VOLTAGE / CABLE SECTION 120 V~ / AWG 14 x 3
ESPAÑOL DATOS TECNICOS
POTENCIA - AMPERES kW 1,440 - 12A
FRECUENCIA 60 Hz
TIPO CABLE DE ALIMENTACION SJTOW
Ø EXTERNO CABLE DE ALIMENTACION 10 ÷ 16 mm
TENSION / SECCION CABLE DE ALIMENT. 120 V~ / AWG 14 x 3
L
L1
ENGLISH - LEGEND
DRAWINGS - ELECTRICAL SCHEMAS
1. TERMINAL BOARD
2. EQUIPOTENTIAL TERMINAL SITE
3. TECNICAL DATA PLATE
4. HOT SMOKE DISCHARGE
LM OVEN INTERNAL LAMP
MO TERMINAL BOARD
R HEATING ELEMENT
S PILOT LIGHT
SIC OVERRIDE THERMOSTAT
T TIMER
TE THERMOSTAT
V1 MOTOR FAN
NETWORK GROUND LINE
ESPAÑOL - LEYENDA
DISEÑOS - ESQUEMAS ELECTRICOS
1. CAJA CONEXIONES-REGLETA
2. SEDE BORNE EQUIPOTENCIAL
3. TARJETA CARACT. TECNICAS
4. DESCARGA HUMOS CALIENTES
LM LAMPARA HORNO
MO CAJA CONEXIONES-REGLETA
R RESISTENCIA
S PILOTO ESPIA
SIC TERMOSTATO DE SEGURIDAD
T TIMER
TE TERMOSTATO
V1 MOTO-VENTILADOR
LINEA DE TIERRA DE LA RED EL.
202281
UL Std N° 197 Commercial Electric
Cooking appliances.
UL Std. No. 1004 Electric Motors.
Page 14

UNOX S.p.A.
2
208-240V
CADCO Ltd.
R
ARIANNA MANUAL
ARIANNA MANUAL
XA030
XA030
model: OV-400
03-2003
07-2003
ENGLISH TECHNICAL DATA
POWER - AMPERAGE kW 2,650 - 12A
FREQUENCY 60 Hz
POWER SUPPLY CABLE TYPE SJTOW
POWER SUPPLY CABLE EXTERNAL Ø 10 ÷ 16 mm
VOLTAGE / CABLE SECTION 220 V~ / AWG 14 x 3
- 1 Phase
208-240 V~ / AWG 14
ESPAÑOL DATOS TECNICOS
POTENCIA - AMPERES kW 2,650 - 12A
FRECUENCIA 60 Hz
TIPO CABLE DE ALIMENTACION SJTOW
Ø EXTERNO CABLE DE ALIMENTACION 10 ÷ 16 mm
TENSION / SECCION CABLE DE ALIMENT. 220 V~ / AWG 14 x 3
L
L1
- 1 Face
208-240 V~ / AWG 14
ENGLISH - LEGEND
DRAWINGS - ELECTRICAL SCHEMAS
1. TERMINAL BOARD
2. EQUIPOTENTIAL TERMINAL SITE
3. TECNICAL DATA PLATE
4. HOT SMOKE DISCHARGE
LM OVEN INTERNAL LAMP
MO TERMINAL BOARD
R HEATING ELEMENT
S PILOT LIGHT
SIC OVERRIDE THERMOSTAT
T TIMER
TE THERMOSTAT
V1 MOTOR FAN
NETWORK GROUND LINE
ESPAÑOL - LEYENDA
DISEÑOS - ESQUEMAS ELECTRICOS
1. CAJA CONEXIONES-REGLETA
2. SEDE BORNE EQUIPOTENCIAL
3. TARJETA CARACT. TECNICAS
4. DESCARGA HUMOS CALIENTES
LM LAMPARA HORNO
MO CAJA CONEXIONES-REGLETA
R RESISTENCIA
S PILOTO ESPIA
SIC TERMOSTATO DE SEGURIDAD
T TIMER
TE TERMOSTATO
V1 MOTO-VENTILADOR
LINEA DE TIERRA DE LA RED EL.
202281
UL Std N° 197 Commercial Electric
Cooking appliances.
UL Std. No. 1004 Electric Motors.
Page 15

UNOX S.p.A.
208-240 V~ / AWG 12
CADCO Ltd.
R
ELENA MANUAL
ELENA MANUAL
XA085
XA085
model: OV-500
03-2003
07-2003
ENGLISH TECHNICAL DATA
ELECTRICAL POWER kW 3,26
FREQUENCY 50 - 60 Hz
POWER SUPPLY CABLE TYPE SJTOW
POWER SUPPLY CABLE EXTERNAL Ø 10 ÷ 16 mm
VOLTAGE / CABLE SECTION 220 - 230 V~ /AWG12
WATER PRESSURE kPa 50 - 200
41
20
20
740
5
450 10
60 Hz 1 Phase
208-240 V~ / AWG 12
420
460
752
4
75
90
187
245
832
80
3
150
1
250
2
ESPAÑOL DATOS TECNICOS
POTENCIA kW 3,26
FRECUENCIA 50 - 60 Hz
TIPO CABLE DE ALIMENTACION SJTOW
Ø EXTERNO CABLE DE ALIMENTACION 10 ÷ 16 mm
TENSION / SECCION CABLE DE ALIMENT. 220 - 230 V~ /AWG12
PRESION AGUA kPa 50 - 200
L2
60 Hz 1 Face
ENGLISH - LEGEND
DRAWINGS - ELECTRICAL SCHEMAS
1. TERMINAL BOARD
2. EQUIPOTENTIAL TERMINAL SITE
3. TECNICAL DATA PLATE
4. HOT SMOKE DISCHARGE
LM OVEN INTERNAL LAMP
MO TERMINAL BOARD
R HEATING ELEMENT
S PILOT LIGHT
SIC OVERRIDE THERMOSTAT
T TIMER
TE THERMOSTAT
V1 MOTOR FAN
NETWORK GROUND LINE
ESPAÑOL - LEYENDA
DISEÑOS - ESQUEMAS ELECTRICOS
1. CAJA CONEXIONES-REGLETA
2. SEDE BORNE EQUIPOTENCIAL
3. TARJETA CARACT. TECNICAS
4. DESCARGA HUMOS CALIENTES
LM LAMPARA HORNO
MO CAJA CONEXIONES-REGLETA
R RESISTENCIA
S PILOTO ESPIA
SIC TERMOSTATO DE SEGURIDAD
T TIMER
TE TERMOSTATO
V1 MOTO-VENTILADOR
LINEA DE TIERRA DE LA RED EL.
202281
UL Std N° 197 Commercial Electric
Cooking appliances.
UL Std. No. 1004 Electric Motors.
Page 16

UNOX S.p.A.
CADCO Ltd.
R
ROSSELLA MANUAL
ROSSELLA MANUAL
XA090
XA090
model: OV-600
03-2003
07-2003
ENGLISH TECHNICAL DATA
ELECTRICAL POWER kW 5,4
FREQUENCY 50 - 60 Hz
POWER SUPPLY CABLE TYPE SJTOW
POWER SUPPLY CABLE EXTERNAL Ø 10 ÷ 16 mm
VOLTAGE / CABLE SECTION 220 - 230 V~ /AWG12
WATER PRESSURE kPa 50 - 200
60 Hz 1 Phase
208-240 V~ / AWG 10
ESPAÑOL DATOS TECNICOS
POTENCIA kW 5,4
FRECUENCIA 50 - 60 Hz
TIPO CABLE DE ALIMENTACION SJTOW
Ø EXTERNO CABLE DE ALIMENTACION 10 ÷ 16 mm
TENSION / SECCION CABLE DE ALIMENT. 220 - 230 V~ /AWG12
PRESION AGUA kPa 50 - 200
L2
60 Hz 1 Face
208-240 V~ / AWG 10
ENGLISH - LEGEND
DRAWINGS - ELECTRICAL SCHEMAS
1. TERMINAL BOARD
2. EQUIPOTENTIAL TERMINAL SITE
3. TECNICAL DATA PLATE
4. HOT SMOKE DISCHARGE
LM OVEN INTERNAL LAMP
MO TERMINAL BOARD
R HEATING ELEMENT
S PILOT LIGHT
SIC OVERRIDE THERMOSTAT
T TIMER
TE THERMOSTAT
V1 MOTOR FAN
NETWORK GROUND LINE
ESPAÑOL - LEYENDA
DISEÑOS - ESQUEMAS ELECTRICOS
1. CAJA CONEXIONES-REGLETA
2. SEDE BORNE EQUIPOTENCIAL
3. TARJETA CARACT. TECNICAS
4. DESCARGA HUMOS CALIENTES
LM LAMPARA HORNO
MO CAJA CONEXIONES-REGLETA
R RESISTENCIA
S PILOTO ESPIA
SIC TERMOSTATO DE SEGURIDAD
T TIMER
TE TERMOSTATO
V1 MOTO-VENTILADOR
LINEA DE TIERRA DE LA RED EL.
202281
UL Std N° 197 Commercial Electric
Cooking appliances.
UL Std. No. 1004 Electric Motors.
 Loading...