

Page 1

LIVE THE BRAAI LIFE
MODEL No: 8910
USER INSTRUCTIONS
503-0320 LEV26
Page 2

CAUTION
GB
For Outdoor use only!
This appliance may not be used in an exterior enclosed balcony, porch or entertainment area!
IMPORTANT
Read these instructions for use carefully so as to familiarize yourself with the appliance before connecting it to
its gas container. Keep these instructions for future reference.
1. Introduction
• This appliance has been designed to be used for outdoor cooking, specically for people who go camping to enjoy outdoor life and can also
be used on a patio.
• Various food types can be prepared on this appliance. The Carri Chef 2 is designed to utilise various cooking surfaces.
• Gas is supplied to the unit via a hose and regulator. The hose and regulator can be connected to gas cylinder, a gas cartridge, a CADAC
Power Pak 1000 which is a unit that takes two gas cartridges or a Vertical EN417 Regulator assembly connected to a EN417 threaded gas
cartridge. (Not supplied with the appliance).
• The unit is easy to switch on, and to operate (Described below in section 6) and the user can control the heat input with an adjustable valve.
• A recipe book is supplied with this appliance to give the rst time user an introduction to outdoor cooking options.
2. General information
• This appliance complies with EN498:2012, EN484:1997 and SANS 1539:2012
• This appliance may only be used with an approved hose and regulator (hose and regulator supplied with this unit in South Africa)
• Warning: Accessible parts may be very hot. Keep young children away.
• The Powerpak 1000 / Rellable cylinder / Vertical EN417 Regulator assembly is to be used only in the upright position.
(Optional accessory-not supplied).
• Note: To ensure satisfactory operation when using a PowerPak 1000 always start up with full cartridges and only when the intended period of
continuous operation is less than approximately one hour.
• Only to be used with a gas cylinder that does not exceed 500mm in height.
• Gas appliances require ventilation for efcient performance and to ensure the safety of users and other persons in close proximity, therefor do
not use the appliance in an unventilated area. It is intended for use outdoors only.
• Read these instructions carefully before using the appliance.
• Use outdoors only!
BE, CY, DK, EE,
Country of Use
Appliance Catagories I
Allowable gasses Butane Propane Butane, Propane or their mixture
Gas Pressure 28-30mBar 37mBar 37mBar
Jet Number 0.92 0.82
Nominal Usage 270g/hr 313g/hr 270g/hr 270g/hr
Gross nom. heat input 3.7kW 4.3kW 3.7kW 3.7kW
Gas Supply Sources
AE = United Arab Emirates AL = Albania AT = Austria BE = Belgium CH = Switzerland
CZ = Czech Republic DE = Germany DK = Denmark ES = Spain FI = Finland
FR = France GB = United Kingdom GR = Greece HR = Croatia IT = Italy
JP = Japan KR = Korea NL = Netherlands NO = Norway PL = Poland
PT = Portugal RO = Romania RU = Russia RS = Serbia SI = Slovenia
SK = Slovakia SE = Sweden TR = Turkey ZA = South Africa
BE, CH, CY, CZ, ES, FR, GB, GR, IE,
IT, LT, LU, LV, PT, SK & SI
3+(28-30/37)
An approved hose and regulator connected to a rellable gas container not exceeding 9kg and
Country Name and Abbreviations
complying with local regulation in force
PL
I
3B/P (37)
FR, FI, HU, IT,
LT, NL, NO, SE,
SI, SK, RO, HR,
TR, BG, IS,LU,
MT, & ZA
I
3B/P (30)
28-30mBar
(2.8kPa for South
Africa)
AT, CH, DE & SK
I
3B/P (50)
50mBar
11
Page 3

3. Safety Information
Hose
• This appliance may only be used outdoors.
• A hose and regulator is supplied with this appliance (South Africa Only)
• The hose must be checked for wear or damage before every use and before
connecting to the gas container.
• Do not use the appliance if it has a damaged or worn hose. Replace the hose.
• Do not use the appliance if it is leaking, damaged or which does not operate properly.
Gas Container
• Only use a cylinder that is approved by your countries regulations.
• Ensure that the gas container is tted or changed in a well-ventilated location,
preferably outdoors, away from any sources of ignition such as naked ames, pilots,
electric res and away from other people.
• Keep gas containers away from heat and ame. Do not place on a stove or any other
hot surface.
• Gas cartridges/rellable cylinders are to be used only in the upright position so as to
ensure proper fuel withdrawal. Failure to adhere to this may cause liquid discharge
from the gas container resulting in a dangerous operating condition.
• Do not try to remove the cylinder whilst the unit is in operation.
• A space has been provided in the centre of the utility tray to place a gas cartridge
into.
• The gas cylinder must be disconnected from the appliance after use or when in
storage.
Assembly and use
• The appliance is designed to be portable, therefore the legs and the utility tray is
easily removable / assembled the ease of transport and use.
• User assembly / dis-assembly is limited to the tment of the legs, utility tray, and
the installation / removal of cooking surfaces.
• When assembling the legs, always make sure that the leg securing rings have been
securely fastened and that the assembled product is stable and does not rock.
Do not use the appliance without tting the Accessories Tray as it also plays an
important role in ensuring the overall sturdiness of the appliance.
• Use only on a rm level surface.
• Do not move the appliance whilst the unit is in operation.
• Should the Heat Shield, Fat Pan or Burner Pan become damaged in such a way
that permanent contact between the Heat Shield and the Fat Pan occurs during
use, do not use the appliance. Return it to your Cadac stockist for repair.
• Do not cover up or change the Air Holes in the Valve Box Cover as this will affect
the performance of the product
and may lead to an unstable ame.
• Ensure the appliance is used away from ammable materials. Minimum safe
distances are: Above the appliance 1.2m. At the rear and sides 600mm. (See Fig.
2)
• Caution: When using the appliance, we recommend the use of protective gloves
when removing and applying the dome, as the dome handle may become hot.
• Caution: Accessible parts may become very hot, the use of protective gloves is
recommended.
• Keep young children away from the appliance.
• Use Outdoors Only
• NOTE! If the appliance is used in windy conditions, the dome must be used as a
wind shield, and placed in position as shown in Fig. 4.
Light back
• In the event of light back (where the ame burns back and ignites inside the
burner or venturi housing), immediately turn off the gas supply by rstly closing the
control valve on the gas container and then the appliance valve. After the ame is
extinguished, remove the regulator and check the condition of the seal; replace the
seal if in doubt. Re-light the appliance as described in Section 6 below. Should the
ame persistently light back, return the product to your authorised CADAC repair
agent.
Leaks
• If there is a leak on your appliance (smell of gas), immediately close the control knob on the gas cylinder. If you wish to check for leaks on your
appliance, do it outside. Do not try to detect leaks using a ame; use soapy water.
• The correct way is to smear the joints with soapy water. If a bubble or bubbles form then there is a gas leak. Immediately turn off the gas supply
rstly by closing the control valve on the gas container and then the appliance valve. Check that all the connections are properly tted. Re-check
with soapy water. If a gas leak persists, return the product to your CADAC dealer for inspection / repair.
• Check for leaks on the tailpiece by the valve and on the cylinder regulator tting with gas open on cylinder but not open or switched on by the
appliance control knob.
Fit hose
clamp
here
Only applicable to
8910-10, 8910-20,
8910-30, 8910-40,
8910-50, 8910-70
& 8910-80
RegulatorHose
Seal
Cylinder Valve
Fig. 1
Fig. 2
Fig. 3
WIND
Fig. 4
22
Page 4

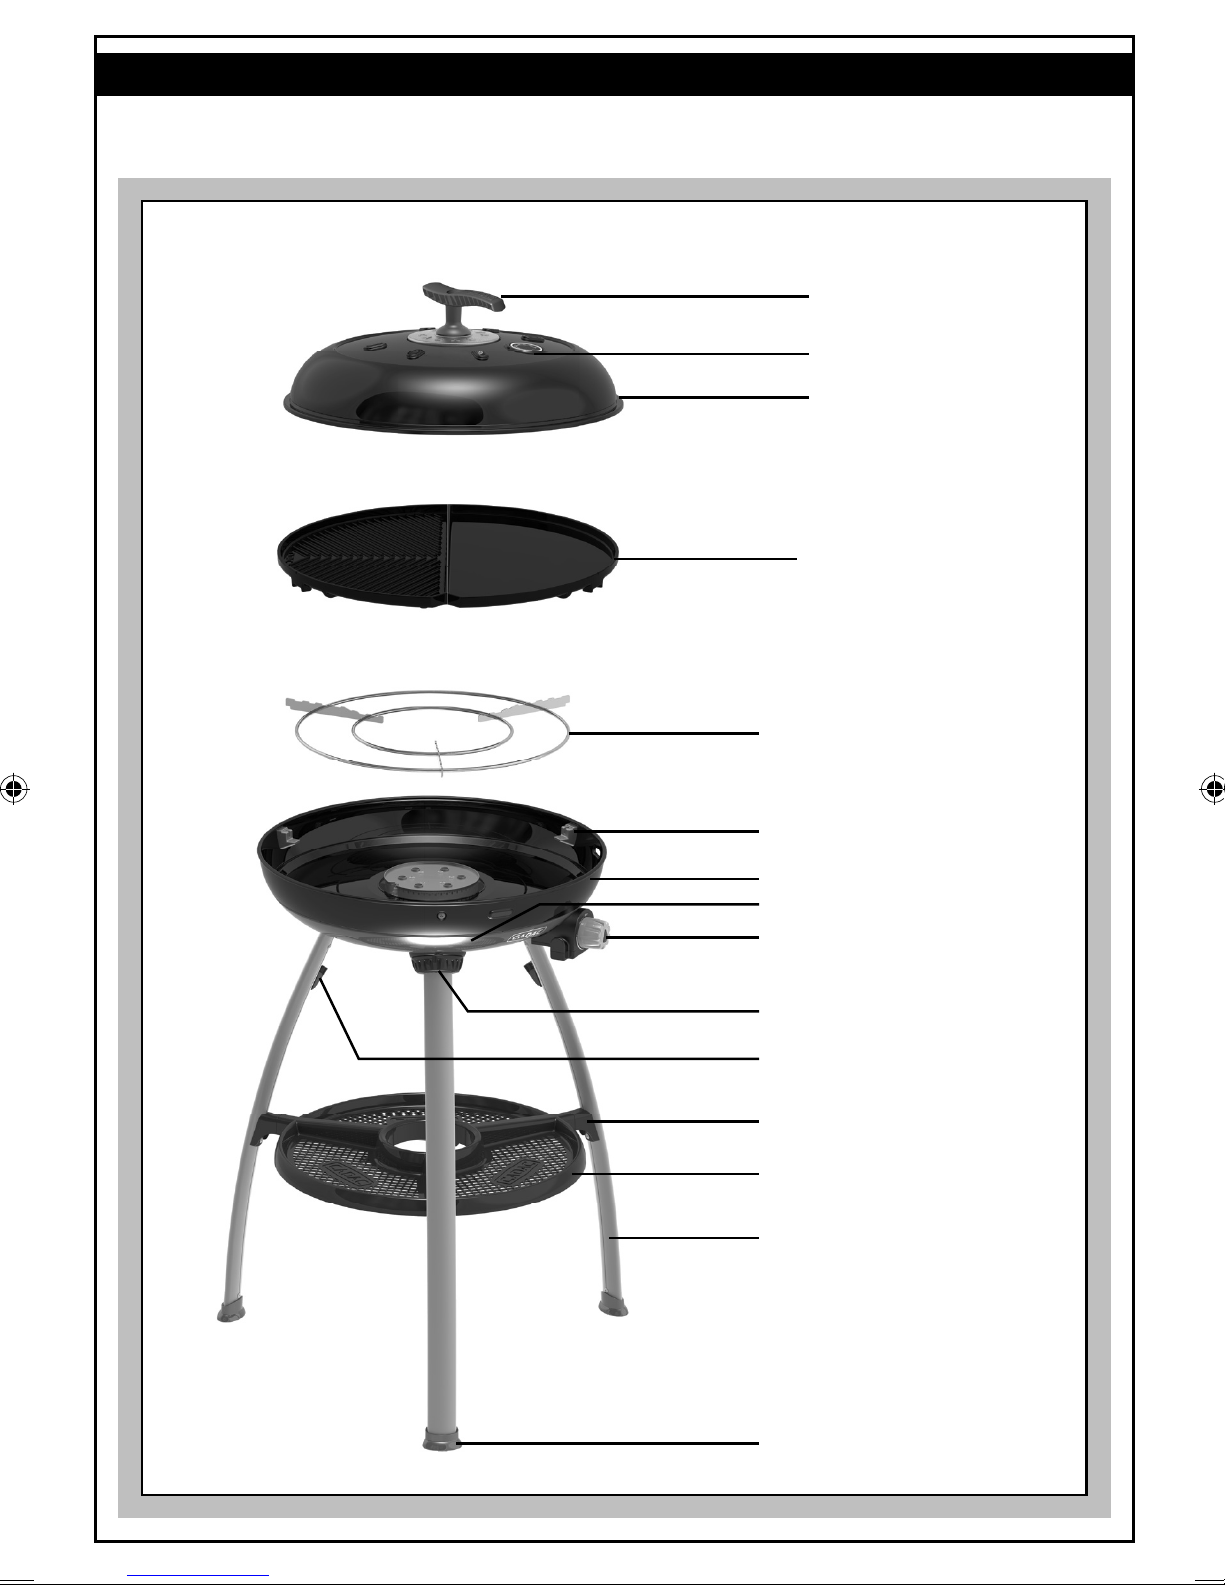
4. Combos
Carri Chef 2 Skottel Combo 1 (Product Code: 8910-10)
Dome Handle
Thermometer
Dome
Skottel
Pot Stand
Locator
Fat Pan
Burner Pan
Control Knob
Outer Leg Securing Ring
Dome Support Clip
Utility Tray Bracket
Utility Tray
Leg
Foot
Fig. 5a
33
Page 5

4. Combos
Carri Chef 2 Skottel Combo 2 (Product Code: 8910-11)
Skottel
Pot Stand
Locator
Fat Pan
Burner Pan
Control Knob
Outer Leg Securing Ring
Dome Support Clip
Utility Tray Bracket
Utility Tray
Leg
Foot
Fig. 5b
44
Page 6

4. Combos
Carri Chef 2 BBQ Combo 1 (Product Code: 8910-20)
Dome Handle
Thermometer
Dome
BBQ Grid
Pot Stand
Locator
Fat Pan
Burner Pan
Control Knob
Outer Leg Securing Ring
Dome Support Clip
Utility Tray Bracket
Utility Tray
Leg
Foot
55
Fig. 6a
Page 7

4. Combos
Carri Chef 2 BBQ Combo 2 (Product Code: 8910-21)
BBQ Grid
Pot Stand
Locator
Fat Pan
Burner Pan
Control Knob
Outer Leg Securing Ring
Dome Support Clip
Utility Tray Bracket
Utility Tray
Leg
Foot
66
Fig. 6b
Page 8

4. Combos
Carri Chef 2 BBQ / Skottel Combo (Product Code 8910-30)
Dome Handle
Thermometer
Dome
Skottel
BBQ Grid
Pot Stand
Locator
Fat Pan
Burner Pan
Control Knob
Outer Leg Securing Ring
Dome Support Clip
Utility Tray Bracket
Utility Tray
Leg
Foot
Fig. 7
77
Page 9

4. Combos
Carri Chef 2 BBQ / Chef Pan Combo (Product Code: 8910-40)
Dome Handle
Thermometer
Dome
Non-Stick Chef Pan
BBQ Grid
Pot Stand
Locator
Fat Pan
Burner Pan
Control Knob
Outer Leg Securing Ring
Dome Support Clip
Utility Tray Bracket
Utility Tray
Leg
Foot
Fig. 8
88
Page 10

4. Combos
Carri Chef 2 BBQ / Grill 2 Braai-Combo 1 (Product Code 8910-50)
Dome Handle
Thermometer
Dome
Grill 2 Braai
BBQ Grid
Pot Stand
Locator
Fat Pan
Burner Pan
Control Knob
Outer Leg Securing Ring
Dome Support Clip
Utility Tray Bracket
Utility Tray
Leg
Foot
Fig. 9a
99
Page 11

4. Combos
Carri Chef 2 BBQ / Grill 2 Braai-Combo 2 (Product Code 8910-51)
Grill 2 Braai
Pot Stand
Locator
Fat Pan
Burner Pan
Control Knob
Outer Leg Securing Ring
Dome Support Clip
Utility Tray Bracket
Utility Tray
Leg
Foot
Fig. 9b
1010
Page 12

4. Combos
Carri Chef 2 BBQ / Grill 2 Braai-Combo 3 (Product Code 8910-52)
Grill 2 Braai
BBQ Grid
Pot Stand
Locator
Fat Pan
Burner Pan
Control Knob
Outer Leg Securing Ring
Dome Support Clip
Utility Tray Bracket
Utility Tray
Leg
Foot
Fig. 9c
1111
Page 13

4. Combos
Carri Chef 2 Gourmet Combo (Product Code 8910-70)
Dome Handle
Thermometer
Dome
Paella Pan 47
BBQ Grid
Pot Stand
Locator
Fat Pan
Burner Pan
Control Knob
Outer Leg Securing Ring
Dome Support Clip
Utility Tray Bracket
Utility Tray
Leg
1212
Foot
Fig. 9d
Page 14

4. Combos
Carri Chef 2 BBQ Plancha Combo (Product Code 8910-80)
Dome Handle
Thermometer
Dome
BBQ Plancha
Pot Stand
Locator
Fat Pan
Burner Pan
Control Knob
Outer Leg Securing Ring
Dome Support Clip
Utility Tray Bracket
Utility Tray
Leg
Foot
Fig. 9e
1313
Page 15

5. Fitting and Changing the Hose and Gas Cylinder
• NOTE! When installing the tailpiece, ensure it is held straight while tightening the tailpiece nut, in
order to prevent a possible gas leak. Tighten with a suitable spanner. (Fig. 10)
• I 3B/P (30), I 3B/P (37) and I 3+ (28-30/37) Appliance categories: Fit the valve tailpiece onto
the valve by screwing it on in an anti-clockwise direction. Push an approved hose onto the valve
tailpiece until it is properly seated. On the other end, attach a suitable low pressure regulator
(I3B/P (30) : 30mbar Butane/Propane con gurations regulator; I3+(28-30/37): 30mbar Butane
regulator or 37mbar Propane regulator); I3B/P(37): 37mbar Butane/Propane con gurations
regulators). Again making sure that the hose is well seated. The type of hose used shall comply
with the relevant EN standard and locate requirement. In South Africa the regulator used must
comply with SANS 1537.
• I 3B/P (50) Appliance category: Screw a Hose with the correct threaded ttings on each end, onto
the left hand ¼“ BSP thread of the Valve. Attach a suitable 50mbar low-pressure regulator on the
other end of the hose. The hose assembly used must comply with DIN 4815 part 2 or equivalent.
• The hose length should be no less than 800mm and shall not exceed 1.5m. Check the
manufacture date on the hose and replace when necessary or when national regulations require it.
• Do not twist or pinch hose. Ensure the hose does not come into contact with any surfaces that
would become hot during use.
• Before tting the regulator to a gas container, ensure that the seal on the regulator is in position
and in good condition. This should be done with every connection and before every use.
• Before tting your gas cylinder, ensure that the Valves are all in the “OFF” position by turning the Control Knob clockwise to its stop.
• Ensure that the gas container is tted or changed in a well-ventilated location, preferably outdoors, away from any source of ignition such as
naked ames or electric res and away from other people.
• Making sure that the gas container is kept upright, screw the regulator onto the container until it is fully engaged. Hand-tighten only.
• If there is a leak on your appliance (smell of gas), close the cylinder valve immediately and follow the procedure to detect and stop a leak
under Section 3. If you wish to check for leaks on your appliance, do it outside using soapy water only, which is applied to the joints. A
formation of bubbles will indicate the gas leak.
• Check that all the connections are securely tted and re-check with soapy water. If you cannot rectify the gas leak, do not use the
appliance. Contact your local CADAC stockist for assistance.
• When changing a gas container, rstly close the container valve (if tted) and then turn the Control Knob clockwise to its stop position.
• Ensuring that the ame is extinguished, unscrew the regulator. Re t a full container following the same precautions as described above.
Fig. 10
6. Lighting the appliance
Precautions to observe before lighting.
• After prolonged storage, inspect the Air Holes in the Valve Cover for insects, which may affect gas ow. Inspect the inlet of the Venturi for
insects. After checking, re t all components into the prescribed position.
• Use this appliance only on a rm level surface.
Using the control knob
The control knob is tted with two positive stop positions, one at low, and one at Ignite / High. This limits the adjustment of the ame to
between these two points.
Lighting up using the Piezo Igniter
• To light up the appliance using the piezo igniter, push in and turn the control knob in an anti-clockwise direction until you hear a click. If
the gas does not ignite on the rst spark, push in, and turn the control knob fully clockwise. Try again, by pushing in and turning the control
knob anti-clockwise until you hear a click. If the gas has not ignited in the rst two to three seconds you should close the control valve by
pushing in the control knob, and turning it fully clockwise. Wait approximately thirty seconds to let any accumulated gas within the burner
pan assembly escape. Repeat the above process if necessary until the ame ignites. The ame should normally light up within the rst one or
two seconds.
Lighting up using a BBQ lighter
• When starting cold, the appliance may be lit from the top prior to tting the desired cooking surface onto the fat pan. When lighting up a hot
appliance however, it is recommended that this be done by sticking barbecue lighter through one of the Vent Holes underneath the Burner,
until it is in line with the burner(DO NOT place the BBQ lighter through the large hole directly underneath the burner). Ignite the BBQ lighter.
Whilst the BBQ lighter is lit, push in and turn the control knob anti-clockwise to light the burner.
General
• Once the appliance is lit, the ame intensity may be adjusted by turning the valve knob anti-clockwise to reduce the ame, or clockwise to
increase the ame.
• The fully closed position is at the furthest clockwise position. To rotate the valve from the fully closed position it is necessary to rst depress
the knob just enough to move out of the lock mechanism. While holding the knob in, turn it in an anti-clockwise direction. Once the spindle
has moved out of the lock position it is no longer necessary to keep the control knob depressed and it can be rotated freely to the desired
ame setting.
• The ame may be observed through the Inspection Hole provided for this purpose on the side of the fat pan.
• When cooking food with a high fat content, aring may occur if the selected heat setting is too high. Should this happen, turn the heat down
until the aring ceases.
• Do not move the appliance when in use as, apart from being an unsafe practice, to move the appliance whilst lit, may cause aring.
• After use, rst close the valve on the gas container (where applicable). When the ame has extinguished, close the valve on the appliance by
pushing in and turning the Control Knob fully clockwise.
1414
Page 16

7. Using the Appliance and its cooking surfaces
Medium Hot CoolLocators
Fig. 13
Fig. 14
Fig. 15
Fig. 11
Fig. 12
BBQ Grid (Fig. 13)
• Included with 8910-20, 9810-21, 8910-30, 8910-40, 9810-50,
8910-52 and 8910-70
• The BBQ Grid locates on three die-cast locators in the fat pan(Fig. 11).
• Available as an additional accessory and spare
• Non-Stick coated cooking surface
• Do not use metal cooking utensils as this will cause damage to the nonstick coating.
• Ideal for grilling meat, sh, chicken and vegetables
• A convenient carry bag is included with this cooking surface.
• WARNING: We recommend the use of gloves when handling the BBQ Grid.
Skottel (Fig. 14)
• Included with 8910-10, 8910-11 and 8910-30
• The Skottel sits on its own locators in the fat pan.
• Available as an additional accessory and spare
• Porcelain enamel-coated cooking surface.
• Ideal for wok-style cooking, stir-fries, pasta dishes, and breakfasts
• A convenient carry bag is included with this cooking surface.
• WARNING: We recommend the use of gloves when handling the Skottel.
Non-Stick Chef Pan (Fig. 15)
• Included with 8910-40
• The Chef Pan locates on three die-cast locators in the fat pan (Fig. 11).
• Available as an additional accessory and spare
• Non-Stick coated cooking surface.
• Do not use metal cooking utensils as this will cause damage to the non-stick
coating.
• WARNING: When pre-heating, do not use the Chef Pan on a high ame
setting with the dome for more than 15 minutes as this can damage the
non-stick coating and the Pan .
• WARNING: We recommend the use of gloves when handling the Chef Pan.
Fig. 16
Fig. 17
Fig. 18
Grill 2 Braai (Fig. 16)
• Available as an additional accessory and spare (Included with 8910-50,
9810-51 and 9810-52)
• The Grill2Braai locates on three die-cast locators in the fat pan (Fig. 11).
• Non-Stick coated cooking surface.
• Do not use metal cooking utensils as this will cause damage to the nonstick coating.
• The at half is ideal for cooking sh, breakfasts, and pancakes, whilst the
ribbed half is ideal for grilling meat, sh, chicken, and vegetables.
• A convenient carry bag is included with this cooking surface.
• WARNING: We recommend the use of gloves when handling the
Grill 2 Braai.
Roasting Pan (Fig. 17)
• Available as an additional accessory and spare (Not Included)
• Porcelain enamel-coated cooking surface
• Ideal for preparing roast chicken, lamb, vegetables, etc.
• Porcelain enamel-coated cooking surface
• WARNING: We recommend the use of gloves when handling the Roast Pan.
1515
Page 17

Fig. 19
Fig. 19.1
Fig. 19.2
Pizza Stone (Fig. 18)
• Available as an additional accessory and spare (Not Included)
• 10mm thick baking stone that can withstand temperatures of up to 500C
• Includes nickel-plated wire holder.
• WARNING: We recommend the use of gloves when handling the baking
Stone. Please read pizza stone manual carefully before use.
Pot Stand (Fig. 19)
• Included with 8910-10, 8910-11, 8910-20, 8910-21, 8910-30, 891040, 8910-50, 8910-51, 8910-52, 8910-70 and 8910-80.
• Nickle-plated pot stand, to support most standard size pots.
• WARNING: We recommend the use of gloves when handling the Pot Stand.
Paella Pan 47 (Fig. 19.1)
• Included with 8910-70.
• This 47cm lightweight but thick aluminium non-stick coated pan is easy to
use and clean.
• Stainless steel handles allow for easy handling.
• The underside of the pan is a clear, steel machined nish.
• A convenient carry bag is included.
• WARNING: We recommend the use of gloves when handling the Paella Pan.
BBQ Plancha (Fig. 19.2)
• Included with 8910-80.
• The BBQ Plancha gives maximum versatility with open grill BBQ on one side
and at grill pan on the other.
• The ceramic coated top is easy to use and clean.
• A convenient carry bag is included.
• WARNING: We recommend the use of gloves when handling the BBQ
Plancha.
• IMPORTANT! To ensure validity of your warranty, use only dedicated cooking surfaces
• NOTE! Always use the wind shield if you use the appliance in windy conditions
8. General Maintenance
• The onus of maintaining this appliance solely rests on the consumer from date of purchase.
This appliance does not require scheduled maintenance.
Replacing a Blocked Jet:
• Your Carri Chef is tted with a speci c size jet to regulate the correct amount of gas.
• Should the hole in the Jet become blocked, this may result in a small ame or no ame at all. Do not attempt to clean the Jet with a pin or
other such device as this may damage the ori ce, which could make the appliance unsafe.
• To replace the Jet: Remove the three screws from the heat shield plate (Fig. 21). Remove the Heat shield plate (Fig. 22), taking care not
to damage the piezo electrode. The Jet (B) can now be removed using a suitable spanner (Fig. 23). Do not use pliers on the jet as this may
damage the jet, making it unusable or impossible to remove. Screw the new jet into the valve. Do not over-tighten as this may damage the jet.
• Reverse the above procedure to re-assemble the unit.
Replacing the Hose:
• The tting of a hose is described in Section 4 - Fitting and replacing the hose and gas cylinder.
Fig. 20 Fig. 21
1616
Page 18

Fig. 23Fig. 22
9. Cleaning
• Note: For Parts Reference (See Section 7)
• Skottel BBQ: After cooking, leave the burner on low with soapy water in the cooking dish to soften cooking residue. When satised that
excess fat has been removed, wash the Skottel BBQ in warm water using a suitable non-abrasive detergent. Do not use sharp metal
objects or abrasive detergents on the vitreous enamel coated surface.
• BBQ: Remove the fat from the moat at the bottom of the Fat Pan and clean as described for the Skottel BBQ. Wash the Grid and Deector
Plate in warm water with non-abrasive detergent after wiping off any excess fat left after cooking.
• BBQ Lid: Wash the BBQ Lid in warm water using a suitable non-abrasive detergent. Do not use sharp metal objects or abrasive
detergents, as this will damage the surface coating.
• Note: For stubborn stains, oven cleaner may be used.
Care of Non-Stick Cooking surfaces:
• The Non-stick cooking surfaces are coated with a PTFE non-stick coating that has been used with great success on some of the best cookware
in the world. Nevertheless, taking care of it can help you to enjoy extra years of healthy, easy, non-stick cooking.
• Use only low or medium heat settings to help retain the valuable nutrients in the food and maintain the non-stick cooking surface.
• The non-stick coating can easily be damaged by the use of metal cooking utensils.
• NB! It is recommended that only plastic or wooden utensils be used when cooking.
• Do not overheat the Non-stick cooking surfaces and always add a little cooking oil to the surface before use.
• Always allow the Non-stick surfaces to cool before immersing it in water.
• The non-stick coating is perfectly safe in the dishwasher, but the non-stick surface is so easy to clean that a quick hand-wash does the
trick. The use of abrasive detergents is not recommended, as this will permanently damage the non-stick surface.
• After cleaning recondition the surface with a light wipe of vegetable oil.
• After every use, remove the fat from the Fat Pan and clean as described for the BBQ above.
10. Storing and Carrying
• Your CADAC Carri Chef is supplied with a variety of Carry Bags that offer portability and allow you to conveniently store all components
included with your model within the supplied bags.
• Store your Carri Chef in the following manner:
• Main Bag holds the following parts:
• Burner Pan
• Fat Pan (resting on top of the Burner Pan)
• The Pot Stand
• BBQ Lid ts on the rear of the bag with the support straps that are provided.
• Skottel bag ts the Skottel Dish.
• BBQ Grid bag ts the BBQ Grid
• Non-Stick Chef Pan bag ts the Non-Stick Chef Pan.
• Grill 2 Braai bag ts the Grill 2 Braai.
• Paella Pan 47 bag ts the Paella Pan 47.
• BBQ Plancha bag ts the BBQ Plancha.
• The Leg assemblies t on the rear of the main bag, with the support straps that are provided.
• Always store your CADAC Carri Chef in the supplied bags, in a dry environment, preferably off the ground. This is especially important for
the Burner pan stored in the Main bag so as to prevent the ingress of dirt or insects that may affect the gas ow.
• Always allow the unit to cool down before packing any part into its bag.
• Should the appliance operate abnormally after storage and all checks referred to in Sections 5 & 8 have not isolated any problem, the
Venturi may be blocked. A blocked Venturi would be indicated by a weaker yellowish ame or no ame at all in extreme cases. Under
these circumstances it will be necessary to remove the Burner as described under Section 8 - General Maintenance, and to check and
thoroughly clean out any foreign matter which may have gathered in the Venturi.
1717
Page 19

11. Returning the appliance for repair or service.
• Do not modify the appliance, as this could be dangerous.
• If you cannot rectify a fault by following these instructions, contact your local CADAC distributor for details on how to return the product for
attention.
• Your CADAC Carri Chef is guaranteed by CADAC for a period of 2 years against factory fault.
12. Spares and Accessories
• Always use genuine CADAC spares as they have been designed to give optimum performance.
Description Part No. Description Part No. Description Part No.
Jet No. 0.92 (28/37mBar) 8910-SP001 Non-Stick Chef Pan 8910-102 Roasting Pan 8910-105
Jet No. 0.82 (50mBar) 8910-SP002 Grill 2 Braai 8910-100 Pizza Stone 8910-106
BBQ Grid 8910-101 Skottel 8910-103 Pot Stand 8910-SP003
Skottel Food Warmers* 8910-SP031* Non-stick liner* 8631* Paella Pan 47 5758
BBQ Plancha 8910-108
*sold in certain regions only
1818
Page 20

VORSICHT
DE
Nur im Außenbereich verwenden! Dieses Gerät darf nicht in umschlossenen Räumen
(wie z. B. Balkon, Veranda oder Bewirtungsbereich) verwendet werden!
WICHTIG
Lesen Sie diese Gebrauchsanweisung sorgfältig und machen Sie sich mit dem Gerät vertraut, bevor Sie den
Gasbehälter anschließen. Bewahren Sie diese Anleitung zum späteren Nachschlagen auf.
1. Einführung
• Dieses Gerät wurde für das Kochen im Außenbereich entwickelt, insbesondere für Camping-Anhänger, die das Leben im Freien genießen. Es
kann auch auf einer Terrasse verwendet werden.
• Verschiedene Arten von Lebensmitteln können mit diesem Gerät zubereitet werden. Der Carri Chef 2 ist für verschiedene Kochoberächen
ausgelegt.
• Über einen Schlauch und einen Regler wird dem Gerät Gas zugeführt. Schlauch und Regler können an eine Gasasche, eine Gaspatrone, oder
ein CADAC Power Pak 1000 angeschlossen werden (letzteres nimmt zwei Gaspatronen auf). (Nicht im Lieferumfang des Geräts enthalten).
• Das Gerät ist einfach einzuschalten und zu betreiben (dies wird unten in Abschnitt 6 beschrieben), und der Benutzer kann die Wärmezufuhr
mit einem Regler kontrollieren.
• Zusammen mit dem Gerät wird ein Rezeptbuch geliefert, welches Erstanwendern eine Einführung in die Möglichkeiten des Kochens im Freien
gibt.
2. Allgemeine Informationen
• Dieses Gerät entspricht den Normen EN498:2012, EN484:1997 und SANS 1539:2012. BS EN 498:2012,
• Dieses Gerät darf nur mit einem zugelassenen Schlauch und Regler verwendet werden (Schlauch und Regler werden in Südafrika mit dem
Gerät geliefert).
• Warnung: Zugängliche Teile können sehr heiß werden. Kleine Kinder vom Gerät fernhalten.
• PowerPak 1000 bzw. nachfüllbare Gasasche nur in aufrechter Position verwenden. (Optionales Zubehör – nicht im Lieferumfang).
• Hinweis: Um zufriedenstellenden Betrieb mit dem PowerPak 1000 sicherzustellen, immer mit vollen Patronen beginnen und nur wenn die
vorgesehene Dauer der ununterbrochenen Nutzung weniger als eine Stunde beträgt.
• Darf nur mit einer Gasasche verwendet werden, die nicht höher ist als 500 mm.
• Gasgeräte benötigen für efziente Leistung ausreichend Belüftung, um die Sicherheit der Benutzer und anderer Personen in unmittelbarer
Nähe zu gewährleisten. Deshalb darf das Gerät nicht in unbelüfteten Bereichen betrieben werden. Es ist nur zur Verwendung im Freien
vorgesehen.
• Lesen Sie diese Anleitung sorgfältig, bevor Sie das Gerät in Betrieb nehmen.
• Nur im Außenbereich verwenden!
BE, CY, DK, EE, FR,
Verwendungsland
Geräteklassen I
Zulässige Gase Butan Propan Butan, Propan oder deren Gemisch
Betriebsdrücke 28-30mBar 37mBar 37mBar
Anzahl Düsen 0.92 0.82
Nenn-Verbrauch 270g/hr 313g/hr 270g/hr 270g/hr
Nominale Bruttowärmezufuhr 3.7kW 4.3kW 3.7kW 3.7kW
Gasversorgungsquellen
AE = United Arab Emirates AL = Albania AT = Austria BE = Belgium CH = Switzerland
CZ = Czech Republic DE = Germany DK = Denmark ES = Spain FI = Finland
FR = France GB = United Kingdom GR = Greece HR = Croatia IT = Italy
JP = Japan KR = Korea NL = Netherlands NO = Norway PL = Poland
PT = Portugal RO = Romania RU = Russia RS = Serbia SI = Slovenia
SK = Slovakia SE = Sweden TR = Turkey ZA = South Africa
BE, CH, CY, CZ, ES, FR, GB, GR, IE, IT,
LT, LU, LV, PT, SK & SI
3+(28-30/37)
zugelassener Schlauch und Regler, an einen nachfüllbaren Gasbehälter angeschlossen
(nicht mehr als 9 kg); unter Einhaltung der örtlichen Vorschriften.
Landesnamen und Abkürzungen:
PL
I
3B/P (37)
FI, HU, IT, LT, NL,
NO, SE, SI, SK, RO,
HR, TR, BG, IS,LU,
MT, & ZA
I
3B/P (30)
28-30mBar
(Südafrika
2.8 kPa)
AT, CH, DE & SK
I
3B/P (50)
50mBar
1919
Page 21

3. Sicherheitsinformationen
Schlauch
• Dieses Gerät darf nur im Außenbereich verwendet werden.
• Zusammen mit dem Gerät werden ein Schlauch und ein Regler geliefert
(nur Südafrika).
• Vor jeder Verwendung und vor dem Anschließen an den Gasbehälter muss der Schlauch
auf Verschleißspuren oder Beschädigungen überprüft werden.
• Verwenden Sie das Gerät nicht, wenn der Schlauch beschädigt oder verschlissen ist.
Tauschen Sie den Schlauch aus.
• Verwenden Sie das Gerät nicht, wenn es Leckagen oder Beschädigungen aufweist oder
Schlauchschelle hier
anbringen
nicht ordnungsgemäß funktioniert.
Gasbehälter
• Verwenden Sie nur Gasaschen, die in Ihrem Land zugelassen sind.
• Stellen Sie sicher, dass der Gasbehälter an einem gut belüfteten Ort angeschlossen
oder ausgewechselt wird, vorzugsweise im Außenbereich, fern von Entzündungsquellen
wie zum Beispiel offenen Flammen, Kontrollammen, elektrischen Heizgeräten sowie
von anderen Personen.
• Gasbehälter von Hitze und Flammen fernhalten. Nicht auf einem Herd oder anderen
heißen Oberächen abstellen.
• Gaspatronen/nachfüllbare Flaschen dürfen nur in aufrechter Position verwendet werden,
damit eine ordnungsgemäße Brennstoffentnahme gewährleistet ist. Nichteinhaltung
kann zum Austreten von Flüssigkeit aus dem Gasbehälter führen, was gefährliche
Betriebsbedingungen zur Folge haben kann.
• Versuchen Sie nicht, die Gasasche zu entfernen, während das Gerät in Betrieb ist.
• In der Mitte des Zubehörtabletts ist Platz für die Aufnahme einer Gaspatrone
vorgesehen.
• Die Gasasche muss nach dem Gebrauch und bei der Lagerung vom Gerät getrennt
werden.
Aufbau und Verwendung
• Das Gerät ist auf Transportierbarkeit ausgelegt. Deshalb sind die Beine und das
Zubehörtablett leicht abzunehmen bzw. anzubringen.
• Der Aufbau bzw. Abbau durch den Benutzer beschränkt sich auf das Anbringen
der Beine und des Zubehörtablett, sowie auf das Einsetzen bzw. Abnehmen der
Kochoberächen.
• Beim Anbringen der Beine ist immer darauf zu achten, dass die Ringe zur Sicherung
der Beine gut xiert sind und dass das aufgebaute Gerät stabil ist und nicht wackelt.
Verwenden Sie das Gerät nicht, ohne das Zubehörtablett anzubringen, da diese auch
wesentlich zur allgemeinen Stabilisierung des Geräts beiträgt.
• Nur auf festem, ebenem Untergrund betreiben.
• Während des Betriebs darf das Gerät nicht bewegt werden.
• Wenn Hitzeschild, Fettpfanne oder Brennerpfanne derart beschädigt werden, dass beim
Betrieb permanenter Kontakt zwischen dem Hitzeschild und der Fettpfanne entsteht,
darf das Gerät nicht verwendet werden. Bringen Sie es zur Reparatur zu Ihrem CADACVertriebshändler.
• Die Luftlöcher im Ventildeckel dürfen nicht abgedeckt oder modiziert werden, weil
dies die Funktion des Produkts beeinträchtigt
und zu einer instabilen Flamme führen kann.
• Vergewissern Sie sich, dass das Gerät nicht in der Nähe von entzündlichen Materialien
betrieben wird. Mindestsicherheitsabstände: über dem Gerät 1,2 m. Hinten und an den
Nur verwendbar für die Modelle:
8910-10, 8910-20,
8910-30, 8910-40,
8910-50, 9810-70
& 9810-80
Seiten 600 mm. (Siehe Abb. 2)
• Vorsicht: Wenn das Gerät in Betrieb ist, empfehlen wir die Verwendung von
Schutzhandschuhen beim Abnehmen und Aufsetzen der Haube. Der Handgriff der
Haube kann heiß werden.
• Vorsicht: Zugängliche Teile können sehr heiß werden. Es wird empfohlen,
Schutzhandschuhe zu verwenden.
• Halten Sie kleine Kinder vom Gerät fern.
• Nur im Außenbereich verwenden
• HINWEIS! Wenn das Gerät bei windigem Wetter verwendet wird, muss die Haube als
Windschutz genutzt und in eine Position wie in Abb. 4 dargestellt gebracht werden.
Flammenrückschlag
• Im Falle eines Flammenrückschlags (wenn die Flamme zurückschlägt und sich das Gas im Brenner oder Venturigehäuse entzündet), müssen Sie
sofort das Gas abdrehen, indem Sie zuerst das Regelventil am Gasbehälter und anschließend das Ventil am Gerät schließen. Wenn die Flamme
erloschen ist, den Regler entfernen und den Zustand der Dichtung prüfen. Im Zweifelsfall die Dichtung erneuern. Entzünden Sie das Gerät
wieder, wie untenstehend in Abschnitt 6 beschrieben. Falls die Flamme nach wie vor zurückschlägt, ist das Gerät zu einem autorisierten CADACReparaturdienst zu bringen.
Lecks
• Im Falle eines Lecks an Ihrem Gerät (Gasgeruch) sofort den Drehknopf an der Gasasche schließen. Wenn Sie Ihr Gerät auf Lecks prüfen wollen,
machen Sie dies bitte im Freien. Versuchen Sie nicht, Lecks mit Hilfe einer Flamme ausndig zu machen. Verwenden Sie dazu Seifenwasser.
• Bestreichen Sie die Verbindungsstellen mit Seifenwasser. Wenn sich Blasen bilden, deutet dies auf ein Gasleck hin. Drehen Sie die
Gasversorgung sofort ab, indem Sie zuerst das Regelventil am Gasbehälter und anschließend das Ventil am Gerät schließen. Überprüfen Sie alle
Verbindungen auf ordnungsgemäßen Zustand. Prüfen Sie erneut mit Seifenwasser. Wenn weiterhin ein Gasleck auftritt, bringen Sie das Gerät zur
Inspektion/Reparatur zu Ihrem autorisierten CADAC-Fachhändler.
• Überprüfen Sie die Anlage auf Lecks am Schlauchstutzen beim Ventil und am Regler der Gasasche. Dabei ist der Gashahn an der Flasche
geöffnet, der Regler am Gerät jedoch geschlossen.
ReglerSchlauch
Dichtung
Flaschenventil
Abb. 1
Abb. 2
Abb. 3
WIND
Abb. 4
2020
Page 22

4. Kombinationen
Carri Chef 2 Skottel Combo 1 (Produktcode: 8910-10)
Hauben-Handgriff
Thermometer
Haube
Skottel
Topf-Untersetzer
Positionierter
Fettpfanne
Brennerpfanne
Bedienknopf
Äußerer Beinsicherungsring
Hauben-Stützklemme
Zubehörtablett-Stütze
Zubehörtablett
Bein
Fuß
Abb. 5a
2121
Page 23

4. Kombinationen
Carri Chef 2 Skottel Combo 2 (Produktcode: 8910-11)
Skottel
Topf-Untersetzer
Positionierter
Fettpfanne
Brennerpfanne
Bedienknopf
Äußerer Beinsicherungsring
Hauben-Stützklemme
Zubehörtablett-Stütze
Zubehörtablett
Bein
Fuß
Fig. 5b
2222
Page 24

4. Kombinationen
Carri Chef 2 BBQ Combo 1 (Produktcode: 8910-20)
Hauben-Handgriff
Thermometer
Haube
BBQ-Grill
Topf-Untersetzer
Positionierter
Fettpfanne
Brennerpfanne
Bedienknopf
Äußerer Beinsicherungsring
Hauben-Stützklemme
Zubehörtablett-Stütze
Zubehörtablett
Bein
2323
Fuß
Abb. 6a
Page 25

4. Kombinationen
Carri Chef 2 BBQ Combo 2 (Produktcode: 8910-21)
BBQ-Grill
Topf-Untersetzer
Positionierter
Fettpfanne
Brennerpfanne
Bedienknopf
Äußerer Beinsicherungsring
Hauben-Stützklemme
Zubehörtablett-Stütze
Zubehörtablett
Bein
2424
Fuß
Abb. 6b
Page 26

4. Kombinationen
Carri Chef 2 BBQ / Skottel Combo (Produktcode: 8910-30)
Hauben-Handgriff
Thermometer
Haube
Skottel
BBQ-Grill
Topf-Untersetzer
Positionierter
Fettpfanne
Brennerpfanne
Bedienknopf
Äußerer Beinsicherungsring
Hauben-Stützklemme
Zubehörtablett-Stütze
Zubehörtablett
Bein
Fuß
Abb. 7
2525
Page 27

4. Kombinationen
Carri Chef 2 BBQ / Kochpfanne-Combo (Produktcode: 8910-40)
Hauben-Handgriff
Thermometer
Haube
Antihaftbeschichtete
Kochpfanne
BBQ-Grill
Topf-Untersetzer
Positionierter
Fettpfanne
Brennerpfanne
Bedienknopf
Äußerer Beinsicherungsring
Hauben-Stützklemme
Zubehörtablett-Stütze
Zubehörtablett
Bein
Fuß
Abb. 8
2626
Page 28

4. Kombinationen
Carri Chef 2 BBQ / Grill 2 Braai-Combo 1 (Produktcode: 8910-50)
Hauben-Handgriff
Thermometer
Haube
Grill 2 Braai
BBQ-Grill
Topf-Untersetzer
Positionierter
Fettpfanne
Brennerpfanne
Bedienknopf
Äußerer Beinsicherungsring
Hauben-Stützklemme
Zubehörtablett-Stütze
Zubehörtablett
Bein
Fuß
Abb. 9a
2727
Page 29

4. Kombinationen
Carri Chef 2 BBQ / Grill 2 Braai-Combo 2 (Produktcode: 8910-51)
Grill 2 Braai
Topf-Untersetzer
Positionierter
Fettpfanne
Brennerpfanne
Bedienknopf
Äußerer Beinsicherungsring
Hauben-Stützklemme
Zubehörtablett-Stütze
Zubehörtablett
Bein
Fuß
Abb. 9b
2828
Page 30

4. Kombinationen
Carri Chef 2 BBQ / Grill 2 Braai-Combo 3 (Produktcode: 8910-52)
Grill 2 Braai
BBQ-Grill
Topf-Untersetzer
Positionierter
Fettpfanne
Brennerpfanne
Bedienknopf
Äußerer Beinsicherungsring
Hauben-Stützklemme
Zubehörtablett-Stütze
Zubehörtablett
Bein
Fuß
Abb. 9c
2929
Page 31

4. Kombinationen
Carri Chef 2 Gourmet Combo (Produktcode 8910-70)
Hauben-Handgriff
Thermometer
Haube
Paella Pan 47
BBQ-Grill
Topf-Untersetzer
Positionierter
Fettpfanne
Brennerpfanne
Bedienknopf
Äußerer Beinsicherungsring
Hauben-Stützklemme
Zubehörtablett-Stütze
Zubehörtablett
Bein
3030
Fuß
Fig. 9d
Page 32

4. Kombinationen
Carri Chef 2 Plancha Combo (Produktcode: 8910-80)
Hauben-Handgriff
Thermometer
Haube
BBQ Plancha
Topf-Untersetzer
Positionierter
Fettpfanne
Brennerpfanne
Bedienknopf
Äußerer Beinsicherungsring
Hauben-Stützklemme
Zubehörtablett-Stütze
Zubehörtablett
Bein
Fuß
Abb. 9e
3131
Page 33

5. Anbringen und Auswechseln des Schlauchs und der Gas asche
• HINWEIS! Beim Installieren des Schlauchstutzens müssen Sie darauf achten, dass er beim
Anziehen der Schlauchstutzenmutter gerade gehalten wird, um ein mögliches Gasleck zu
verhindern. Mit einem passenden Schlüssel anziehen. (Abb. 10)
• Geräteklassen I 3B/P (30), I 3B/P (37) und I 3+ (28-30/37): Bringen Sie den VentilSchlauchstutzen am Ventil an, indem Sie ihn gegen den Uhrzeigersinn aufschrauben. Schieben
Sie einen zugelassenen Schlauch auf den Ventil-Schlauchstutzen, bis er ordnungsgemäß sitzt.
Am anderen Ende, eine passende Niederdruck-Regler (I3B / P (30): 30mbar Butan / PropanKon gurationen Regler; I3 + (28-30/37): 30mbar Butan Regler oder 37mbar Propan-Regler);
I3B / P (37) : 37mbar Butan / Propan-Kon gurationen Regler).. Achten Sie auch hier darauf, dass
der Schlauch gut sitzt. Die Art der Schlauch verwendet werden mit den einschlägigen EN-Norm und
suchen Anforderung. In Südafrika muss der Regler der Norm SANS 1537 genügen.
• Geräteklasse I 3B/P (50): Schrauben Sie einen Schlauch mit korrekten Gewindeanschlüssen an
beiden Enden auf das viertelzöllige BSP Linksgewinde am Ventil. Bringen Sie am anderen Ende
des Schlauchs einen geeigneten 50 mbar Niederdruck-Regler an. Die Schlauchleitung verwendet
werden, müssen mit DIN 4815 Teil 2 oder gleichwertig erfüllen.
• Die Schlauchlänge soll nicht weniger als 800 mm betragen und 1,5 m nicht übersteigen. Prüfen
Sie das Verfallsdatum am Schlauch und ersetzen Sie ihn falls erforderlich bzw. wenn nationale
Vorschriften dies vorschreiben.
• Den Schlauch nicht verdrehen oder quetschen. Stellen Sie sicher, dass der Schlauch nicht in Kontakt mit Ober ächen kommt, die beim Betrieb
heiß werden.
• Bevor Sie den Regler an einen Gasbehälter anschließen, müssen Sie sicherstellen, dass die Dichtung am Regler guten Sitz hat und in gutem
Zustand ist. Dies muss bei jedem Anschließen und vor jeder Verwendung geschehen.
• Bevor Sie die Gas asche anschließen, stellen Sie sicher, dass alle Ventile geschlossen sind. Drehen Sie dazu den Bedienknopf im Uhrzeigersinn
bis zum Anschlag.
• Stellen Sie sicher, dass der Gasbehälter an einem gut belüfteten Ort angeschlossen oder ausgewechselt wird, vorzugsweise im Außenbereich, fern
von Entzündungsquellen wie zum Beispiel offenen Flammen, Kontroll ammen, elektrischen Heizgeräten sowie von anderen Personen.
• Achten Sie darauf, dass der Gasbehälter in aufrechter Position ist, und schrauben Sie den Regler auf den Behälter, bis er vollständig befestigt
ist. Nur handfest anziehen.
• Im Falle eines Lecks an Ihrem Gerät (Gasgeruch) sofort den Drehknopf am Gasbehälter schließen und das in Abschnitt 3 beschriebenen
Verfahren zum Aufspüren und Schließen von Lecks ausführen. Wenn Sie Ihr Gerät auf Lecks überprüfen wollen, müssen Sie dies im Freien mit
Seifenwasser tun, welches auf die Verbindungen aufgebracht wird. Bilden sich Blasen, so deutet dies auf ein Gasleck hin.
• Überprüfen Sie, ob alle Anschlüsse fest angezogen sind, und wiederholen Sie die Prüfung mit der Seifenlauge. Falls Sie das Gasleck nicht
aus ndig machen können, darf das Gerät nicht verwendet
werden. Wenden Sie sich in diesem Fall an Ihren CADAC-Vertriebshändler.
• Wenn Sie einen Gasbehälter auswechseln, schließen Sie zunächst das Ventil am Behälter (falls montiert), und drehen Sie dann den Bedienknopf
im Uhrzeigersinn bis zum Anschlag.
• Vergewissern Sie sich, dass die Flamme erloschen ist, und schrauben Sie den Regler ab. Schließen Sie einen vollen Behälter an. Beachten Sie
dabei die oben beschriebenen Vorsichtsmaßnahmen.
Abb. 10
6. Entzünden des Geräts
Vor dem Entzünden zu beachtende Vorsichtsmaßnahmen
• Nach längerer Lagerung müssen die Luftlöcher im Ventildeckel daraufhin überprüft werden, ob der Gasstrom durch Insekten beeinträchtigt
wird. Überprüfen Sie den Einlass des Venturis auf Insekten. Bringen Sie nach diesen Überprüfungen alle Komponenten wieder in ihre
vorgeschriebene Position.
• Das Gerät darf nur auf einem stabilen, ebenen Untergrund verwendet werden.
Verwendung des Bedienknopfes
Der Bedienknopf hat zwei positive Endpositionen: Kleine Flamme und Anzünden / große Flamme. Dadurch wird die Einstellung der Flamme
auf den Bereich zwischen diesen beiden Punkten eingeschränkt.
Entzünden mit dem Piezo-Anzünder
• Um das Gerät mit dem Piezo-Anzünder zu entzünden, drücken Sie den Bedienknopf ein und drehen ihn entgegen dem Uhrzeigersinn, bis
Sie ein Klick-Geräusch hören. Wenn Sich das Gas nicht mit dem ersten Funken entzündet, drücken Sie den Bedienknopf ein und drehen
ihn im Uhrzeigersinn bis zum Anschlag. Versuchen Sie es erneut, indem Sie den Bedienknopf eindrücken und entgegen dem Uhrzeigersinn
drehen, bis Sie ein Klick-Geräusch hören. Wenn sich das Gas nicht innerhalb der ersten zwei bis drei Sekunden entzündet hat, müssen Sie
das Regelventil schließen, indem Sie den Bedienknopf eindrücken und im Uhrzeigersinn bis zum Anschlag drehen. Warten Sie ca. dreißig
Sekunden, damit Gas, dass sich ggf. in der Brennerpfanne angesammelt hat, entweichen kann. Wiederholen Sie erforderlichenfalls den oben
beschriebenen Vorgang, bis sich die Flamme entzündet. Die Flamme sollte sich normalerweise innerhalb der ersten ein bis zwei Sekunden
entzünden.
Entzünden mit einem Grillanzünder
• Wenn das Gerät kalt ist, kann es von oben entzündet werden, bevor die gewünschte Kochober äche auf die Fettpfanne montiert wird.
Beim Entzünden des Geräts im heißen Zustand wird jedoch empfohlen dies zu tun, indem ein Grillanzünder so weit durch eine der
Belüftungsöffnungen unterhalb des Brenners gesteckt wird, bis er mit dem Brenner auf gleicher Höhe ist. (Stecken Sie den Grillanzünder
NICHT durch die große Öffnung direkt unterhalb des Brenners.) Zünden Sie den Grillanzünder. Drücken Sie, während der Grillanzünder
brennt, den Bedienknopf hinein und drehen Sie ihn entgegen dem Uhrzeigersinn, um den Brenner zu entzünden.
3232
Page 34

6. Entzünden des Geräts...
Allgemeines
• Wenn die Flamme entzündet ist, kann die Intensität der Flamme durch Drehen des Bedienknopfes eingestellt werden: gegen den
Uhrzeigersinn zum Reduzieren der Flamme, bzw. mit dem Uhrzeigersinn zum Hochregeln der Flamme.
• Am Anschlag im Uhrzeigersinn ist das Ventil vollständig geschlossen. Um das Ventil aus der vollständig geschlossenen Position zu
drehen, muss der Knopf zuerst so weit eingedrückt werden, dass sich die Verriegelung löst. Drehen Sie den eingedrückten Knopf entgegen
dem Uhrzeigersinn. Sobald die Verriegelung gelöst ist, ist es nicht mehr nötig, den Knopf gedrückt zu halten. Er kann jetzt frei bis zur
gewünschten Flammeneinstellung gedreht werden.
• Die Flamme kann durch das hierfür vorgesehene Schauloch an der Seite der Fettpfanne betrachtet werden.
• Beim Zubereiten von Speisen mit hohem Fettgehalt kann es zum Auf ackern kommen, wenn die Hitze zu hoch eingestellt ist. Regeln Sie in
diesem Fall die Hitze herunter, bis das Flackern aufhört.
• Während des Betriebs darf das Gerät nicht bewegt werden. Abgesehen davon, dass dies gefährlich ist, kann das Bewegen des Geräts
während des Betriebs zum Auf ackern führen.
• Nach der Verwendung schließen Sie zuerst das Ventil am Gasbehälter (falls zutreffend). Wenn die Flamme erloschen ist, schließen Sie das
Ventil am Gerät, indem Sie den Bedienknopf eindrücken und im Uhrzeigersinn bis zum Anschlag drehen.
7. Verwenden des Geräts und seiner Kochober ächen
Mittel Heiß KaltPositionierer
Abb. 13
Abb. 14
Abb. 15
Abb. 16
Abb. 11
Abb. 12
BBQ-Grill (Abb. 13)
• Im Lieferumfang bei 8910-20, 9810-21, 8910-30, 8910-40, 981050, 9810-52 und 8910-70
• Der BBQ-Grill ruht auf drei Druckguss-Positionierern in der Fettpfanne
(Abb. 11).
• Verfügbar als zusätzliches Zubehör und Ersatzteil
• Antihaftbeschichtete Kochober äche
• Verwenden Sie keine Kochutensilien aus Metall, da diese die
Antihaftbeschichtung beschädigen würden.
• Ideal zum Grillen von Fleisch, Fisch, Hähnchen und Gemüse
• Diese Kochober äche wird mit einer praktischen Tragetasche geliefert.
• WARNUNG: Wir empfehlen die Verwendung von Schutzhandschuhen bei
der Handhabung des BBQ-Grills.
Skottel (Abb. 14)
• Im Lieferumfang bei 8910-10, 9810-11 und 8910-30
• Der Skottel liegt auf seinen eigenen Positionierern in der Fettpfanne auf.
• Verfügbar als zusätzliches Zubehör und Ersatzteil
• Porzellanemaillierte Kochober äche
• Ideal für Wokgerichte, pfannengerührte Gerichte, Pastagerichte und
Frühstück
• Diese Kochober äche wird mit einer praktischen Tragetasche geliefert.
• WARNUNG: Wir empfehlen die Verwendung von Schutzhandschuhen bei
der Handhabung des Skottels.
Antihaftbeschichtete Kochpfanne (Abb. 15)
• Im Lieferumfang bei 8910-40
• Die Kochpfanne ruht auf drei Druckguss-Positionierern in der Fettpfanne
(Abb. 11).
• Verfügbar als zusätzliches Zubehör und Ersatzteil
• Antihaftbeschichtete Kochober äche
• Verwenden Sie keine Kochutensilien aus Metall, da diese die
Antihaftbeschichtung beschädigen würden.
• WARNUNG: Benutzen Sie die Kochpfanne beim Vorheizen nicht länger
als 15 Minuten mit der Haube, da dies die Antihaftbeschichtung und die
Pfanne beschädigen kann.
• WARNUNG: Wir empfehlen die Verwendung von Schutzhandschuhen bei
der Handhabung der Kochpfanne.
3333
Page 35

Abb. 17
Abb. 18
Abb. 19
Abb. 19.1
Abb. 19.2
Grill 2 Braai (Abb. 16)
• Verfügbar als zusätzliches Zubehör und Ersatzteil
(Im Lieferumfang bei 8910-50, 9810-51 und 9810-52)
• Der Grill 2 Braai ruht auf drei Druckguss-Positionierern in der Fettpfanne
(Abb. 11).
• Antihaftbeschichtete Kochober äche
• Verwenden Sie keine Kochutensilien aus Metall, da diese die
Antihaftbeschichtung beschädigen würden.
• Die ache Hälfte ist ideal zum Zubereiten von Fisch, Frühstück und
Pfannkuchen geeignet, während die gerippte Hälfte ideal zum Grillen von
Fleisch, Fisch, Hähnchen und Gemüse geeignet ist.
• Diese Kochober äche wird mit einer praktischen Tragetasche geliefert.
• WARNUNG: Wir empfehlen die Verwendung von Schutzhandschuhen bei
der Handhabung des Grill 2 Braai.
Bratpfanne (Abb. 17)
• Verfügbar als zusätzliches Zubehör und Ersatzteil (nicht im Lieferumfang)
• Porzellanemaillierte Kochober äche
• Ideal zum Zubereiten von Brathähnchen, Lamm, Gemüse usw.
• Porzellanemaillierte Kochober äche
• WARNUNG: Wir empfehlen die Verwendung von Schutzhandschuhen bei
der Handhabung der Bratpfanne.
Pizza-stein (Abb. 18)
• Verfügbar als zusätzliches Zubehör und Ersatzteil (nicht im Lieferumfang)
• 10 mm dicker Backstein, der Temperaturen von bis zu 500°C standhält
• Mit einem Handgriff aus vernickeltem Draht
• WARNUNG: Wir empfehlen die Verwendung von Schutzhandschuhen bei
der Handhabung des Backsteins.
Top-Untersetzer (Abb. 19)
• Im Lieferumfang bei 8910-10, 8910-11, 8910-20, 8910-21, 8910-30,
8910-40, 8910-50, 8910-51, 8910-52, 8910-70 und
8910-80
• Vernickelter Topf-Untersetzer für die meisten Standard-Topfgrößen
• WARNUNG: Wir empfehlen die Verwendung von Schutzhandschuhen bei
der Handhabung des Topf-Untersetzers.
Paella Pan 47 (Abb. 19.1)
• Im Lieferumfang bei 8910-70.
• Diese 47cm leicht aber stark Aluminium Antihaft -Pfanne beschichtet ist
einfach zu bedienen und zu reinigen.
• Edelstahl-Griffe für eine einfache Handhabung ermöglichen.
• Die Unterseite der Pfanne ist eine klare, Stahl gefräste Ober äche.
• Ein praktischer Tragetasche ist im Lieferumfang enthalten.
• WARNUNG: Wir empfehlen die Verwendung von Schutzhandschuhen bei
der Handhabung des Paella Pan.
BBQ Plancha (Abb. 19.2)
• Im Lieferumfang bei 8910-80.
• Der Grill Plancha sorgt für maximale Vielseitigkeit mit offenem Grill BBQ auf
der einen Seite und achen Grillpfanne auf der anderen.
• Die keramisch beschichtete Spitze ist leicht zu bedienen und zu reinigen.
• Ein praktischer Tragetasche ist im Lieferumfang enthalten.
• WARNUNG: Wir empfehlen die Verwendung von Schutzhandschuhen bei
der Handhabung des Grill Plancha.
• WICHTIG! Benutzen Sie nur die vorgesehenen -Kochober ächen, um die Gültigkeit der Garantie nicht zu gefährden.
• HINWEIS! Verwenden Sie immer den Windschutz, wenn Sie das Gerät bei windigen Wetter benutzen.
3434
Page 36

8. Allgemeine Wartung
• Die Last der Wartung dieses Geräts liegt ab dem Tag des Kaufs einzig beim Verbraucher.
Dieses Gerät bedarf keiner planmäßigen Wartung.
Austausch einer verstopften Düse:
• Ihr Carri Chef ist mit einer Düse in spezieller Größe ausgestattet, um die korrekte Gasmenge zu regulieren.
• Verstopft die Bohrung in der Düse, kann dies dazu führen, dass sich nur eine kleine oder gar keine Flamme bildet. Versuchen Sie nicht, die
Düse mit einer Nadel o. Ä. zu reinigen, da dies die Bohrung beschädigen und den sicheren Betrieb des Geräts gefährden könnte.
• Vorgehensweise: Entfernen Sie die drei Schrauben der Hitzeschildplatte (Abb. 21). Entfernen Sie die Hitzeschildplatte (Abb. 22). Achten Sie
darauf, dass die Piezo-Elektrode nicht beschädigt wird. Die Düse (B) kann jetzt mithilfe eines geeigneten Schlüssels entfernt werden (Abb.
23). Keine Zange verwenden! Dies kann die Düse beschädigen, so dass sie unbrauchbar wird oder sich nicht mehr entfernen lässt. Schrauben
Sie die neue Düse in das Ventil. Die Düse nicht zu fest anziehen, da dies die Düse beschädigen könnte.
• Beim Wiedereinbau in umgekehrter Reihenfolge vorgehen.
Austausch des Schlauchs
• Das Anbringen eines Schlauchs wird in Abschnitt 5 - Anbringen und Auswechseln des Schlauchs und der Gasasche - beschrieben.
Abb. 20
Abb. 21
Abb. 23Abb. 22
3535
Page 37

9. Reinigung
• Hinweis: Zu den Komponenten und ihrer Bezeichnung (siehe Abschnitt 7)
• Skottel BBQ: Den Brenner nach dem Zubereiten auf kleiner Stufe weiterbrennen lassen und Seifenwasser in die Kochschale füllen, damit sich
Angesetztes lösen kann. Wenn Sie sich davon überzeugt haben, dass
überschüssiges Fett entfernt wurde, waschen Sie den Skottel BBQ in warmem Wasser unter Verwendung eines geeigneten nicht scheuernden
Reinigungsmittels ab. Verwenden Sie keine scharfen Metall-
Gegenstände oder Scheuermittel zum Reinigen der mit einer Emailleschicht überzogenen Oberäche.
• BBQ: Entfernen Sie das Fett aus der Rinne im Boden der Fettpfanne und reinigen Sie diese wie für den Skottel BBQ beschrieben. Wischen
Sie nach dem Kochen verbliebenes überschüssiges Fett ab und waschen Sie den Grill und das Umlenkblech mit einem nicht scheuernden
Reinigungsmittel in warmem Wasser.
• BBQ-Deckel: Waschen Sie den BBQ-Deckel mit einem geeigneten nicht scheuernden Reinigungsmittel in warmem Wasser. Verwenden Sie
keine scharfen Metall-Gegenstände oder Scheuermittel, denn diese würde die Oberächenbeschichtung beschädigen.
• Hinweis: Für hartnäckige Flecken kann Ofenreiniger verwendet werden.
Pege der antihaftbeschichteten Kochoberächen:
• Die antihaftbeschichteten Kochoberächen sind mit einem PTFE-Antihaftbelag beschichtet, der mit großem Erfolg bei einigen der weltbesten
Kochgeräte verwendet wird. Dennoch kann sorgfältige Behandlung Ihnen zusätzliche Jahre gesunden, problemlosen, anbrennfreien Kochens
schenken.
• Verwenden Sie nur niedrige oder mittlere Hitzeeinstellungen, um die wertvollen Nährstoffe in den Nahrungsmitteln zu erhalten und die
antihaftbeschichteten Kochoberächen instand zu halten.
• Die Antihaftbeschichtung kann durch die Verwendung metallener Kochutensilien leicht beschädigt werden.
• HINWEIS! Es wird empfohlen, zum Kochen nur Utensilien aus Kunststoff oder Holz zu verwenden.
• Überhitzen Sie die antihaftbeschichteten Kochoberächen nicht, und tragen Sie vor der Verwendung immer ein wenig Speiseöl auf die
Oberäche auf.
• Lassen Sie die antihaftbeschichteten Oberächen immer abkühlen, bevor Sie sie in Wasser tauchen.
• Die Antihaftbeschichtung ist absolut Geschirrspülfest, aber die antihaftbeschichtete Oberäche ist so einfach zu reinigen, dass eine schnelle
Handwäsche es auch tut. Die Verwendung scheuernder Reinigungsmittel wird nicht empfohlen, weil dadurch die Antihaftbeschichtung
dauerhaft beschädigt wird.
• Nach dem Reinigen die Oberäche durch Bestreichen mit etwas Panzenöl auffrischen.
• Nach jeder Verwendung das Fett aus der Fettpfanne entfernen und diese, wie oben für das BBQ beschrieben, reinigen.
10. Aufbewahrung und Transport
• Ihr CADAC Carri Chef wird mit einer Anzahl von Tragetaschen geliefert, die Transportierbarkeit ermöglichen und Ihnen erlauben, alle zu Ihrem
Modell gehörenden Komponenten
in den mitgelieferten Taschen praktisch aufzubewahren.
• Bewahren Sie Ihren Carri Chef wie folgt auf:
• Die Haupttasche nimmt folgende Teile auf:
• Brennerpfanne
• Fettpfanne (auf der Brennerpfanne liegend)
• Topf-Untersetzer
• Der BBQ-Deckel passt auf die Rückseite der Tasche mit den mitgelieferten Halteriemen.
• Skottel-Tasche nimmt Skottel-Teller auf.
• BBQ Grill-Tasche nimmt BBQ-Grill auf
• Flachpfannen-Tasche nimmt Flachpfanne auf.
• Grill 2 Braai-Tasche nimmt Grill 2 Braai auf.
• Paella Pan-Tasche nimmt Paella Pan auf.
• BBQ Plancha-Tasche nimmt BBQ Plancha auf.
• Die Beine passen auf die Rückseite der Haupttasche mit den mitgelieferten Halteriemen.
• Bewahren Sie Ihren CADAC Carri Chef immer in den zugehörigen Taschen auf, und zwar in einer trocken Umgebung, vorzugsweise über
Bodenniveau. Dies ist besonders wichtig für die im der Haupttasche aufbewahrte Brennerpfanne, damit das Eindringen von Schmutz oder
Insekten verhindert wird, wodurch wiederum der Gasdurchuss beeinträchtigt werden könnte.
• Lassen Sie die Komponenten immer abkühlen, bevor Sie sie in den Taschen verstauen.
• Sollte das Gerät nach der Aufbewahrung unnormal arbeiten und alle in den Abschnitten 5 und 8 aufgeführten Prüfungen nicht die Ursache
des Problems aufgezeigt haben, kann das Venturi blockiert sein. Ein blockiertes Venturi würde sich in einer schwächeren gelblichen Flamme
oder in extremen Fällen darin äußern, dass überhaupt keine Flamme brennt. Unter diesen Umständen wird es erforderlich sein, den Brenner
wie in Abschnitt 8 - Allgemeine Wartung - beschrieben, auszubauen und eventuelle Verschmutzungen, die sich im Venturi angesammelt
haben, gründlich zu beseitigen.
3636
Page 38

11. Das Gerät zur Reparatur oder zur Inspektion einliefern
• Modizieren Sie das Gerät nicht, denn das könnte gefährlich sein.
• Wenn es nicht gelingt, einen Fehler anhand dieser Anleitung zu beheben, erkundigen Sie sich bei Ihrem örtlichen CADAC-Vertriebshändler
danach, wie das Produkt zur Reparatur eingeliefert werden kann.
• Ihr CADAC Carri Chef wird von CADAC mit einer Garantie von 2 Jahren gegen werksseitige Fehler geliefert.
12. Ersatzteile und Zubehör
• Verwenden Sie immer Originalersatzteile von CADAC, denn diese sind für optimale Funktion ausgelegt.
Beschreibung Teile-Nr. Beschreibung Teile-Nr. Beschreibung Teile-Nr.
Düse Nr. 0.92
(28/37mbar)
Düse Nr. 0.78 (50 mbar) 8910-SP002 Grill 2 Braai 8910-100 Pizza-Stein 8910-106
BBQ-Grill 8910-101 Skottel 8910-103 Topf-Untersetzer 8910-SP003
Skottel Speisenwärmer* 8910-SP031* Antihaft-Liner* 8631* Paella Pan 47 5758
BBQ Plancha 8910-108
8910-SP001
Antihaftbeschichtete
Kochpfanne
*In bestimmten Regionen nur verkauft
8910-102 Bratpfanne 8910-105
3737
Page 39
WAARSCHUWING
NL
Alleen voor gebruik buitenshuis!
Dit apparaat mag niet worden gebruikt op een afgesloten balkon, veranda of terras!
BELANGRIJK
Lees deze gebruiksinstructies zorgvuldig door om vertrouwd te raken met het apparaat voordat u het aansluit op
de gases. Bewaar deze instructies voor toekomstig gebruik.
1. Inleiding
• Dit apparaat is bedoeld als kooktoestel voor buitengebruik, in het bijzonder voor kampeerders die van het buitenleven genieten. Het apparaat
kan ook worden gebruikt op een veranda.
• Dit apparaat kan worden gebruikt voor de bereiding van verschillende soorten gerechten. De Carri Chef 2 kan worden uitgerust met
verschillende kookplaten.
• Gas wordt via een slang en een drukregelaar naar het apparaat gevoerd. De slang en drukregelaar kunnen worden aangesloten op een gases,
een gascartridge of op de CADAC PowerPak 1000, een apparaat waarin twee gascartridges passen (niet meegeleverd).
• Het apparaat is eenvoudig in te schakelen en te bedienen (zie de beschrijving hieronder in sectie 6). De hittetoevoer kan door de gebruiker
worden afgesteld met een regelbaar ventiel.
• Een kookboek wordt meegeleverd om nieuwe gebruikers te laten kennismaken met de mogelijkheden van buitenshuis koken.
2. Algemene informatie
• Dit apparaat voldoet aan EN498:2012, EN484:1997 en SANS 1539:2012
• Dit apparaat mag alleen worden gebruikt met een goedgekeurde slang en drukregelaar (in Zuid-Afrika zijn de slang en drukregelaar
meegeleverd met het apparaat).
• Waarschuwing: aanraakbare onderdelen kunnen erg heet zijn. Houd kleine kinderen uit de buurt van het apparaat.
• De Power Pak 1000/hervulbare gases mag alleen rechtopstaand worden gebruikt (optioneel accessoire; niet meegeleverd).
• Let op: voor een juiste werking bij het gebruik van een PowerPak 1000 moeten de cartridges bij aanvang altijd helemaal vol zijn en mag het
apparaat niet langer dan een uur ononderbroken worden gebruikt.
• Alleen te gebruiken met een gases die niet hoger is dan 500 mm.
• Gasapparaten hebben ventilatie nodig voor een efciënte werking en om de veiligheid van gebruikers en andere personen in de buurt te
garanderen. Gebruik het apparaat daarom niet in een ongeventileerde ruimte. Het apparaat is uitsluitend bedoeld voor gebruik buitenshuis.
• Lees deze instructies zorgvuldig door voordat u het apparaat gebruikt.
• Alleen buitenshuis gebruiken!
BE, CY, DK, EE,
Land van gebruik
Apparaatcategorieën I
Toegestane gassen Butaan Propaan Butaan, Propaan of hun mengsels
Bedrijfsdruk 28-30mBar 37mBar 37mBar
Nummer straalpijp 0.92 0.82
Nominaal verbruik 270g/hr 313g/hr 270g/hr 270g/hr
Bruto nominaal vermogen 3.7kW 4.3kW 3.7kW 3.7kW
Gasbronnen
AE = United Arab Emirates AL = Albania AT = Austria BE = Belgium CH = Switzerland
CZ = Czech Republic DE = Germany DK = Denmark ES = Spain FI = Finland
FR = France GB = United Kingdom GR = Greece HR = Croatia IT = Italy
JP = Japan KR = Korea NL = Netherlands NO = Norway PL = Poland
PT = Portugal RO = Romania RU = Russia RS = Serbia SI = Slovenia
SK = Slovakia SE = Sweden TR = Turkey ZA = South Africa
BE, CH, CY, CZ, ES, FR, GB, GR, IE,
IT, LT, LU, LV, PT, SK & SI
3+(28-30/37)
Een goedgekeurde slang en drukregelaar aangesloten op een hervulbare gases die niet zwaarder
is dan 9 kg en die voldoet aan de lokale voorschriften.
Landnamen en afkortingen
PL
I
3B/P (37)
FR, FI, HU, IT,
LT, NL, NO, SE,
SI, SK, RO, HR,
TR, BG, IS,LU,
MT, & ZA
I
3B/P (30)
28-30mBar
(Zuid-Afrika 2.8
kPa)
AT, CH, DE & SK
I
3B/P (50)
50mBar
3838
Page 40

3. Veiligheidsinformatie
Slang
• Dit apparaat mag alleen buitenshuis worden gebruikt.
• Een slang en drukregelaar zijn meegeleverd met dit apparaat (alleen ZA)
• Controleer de slang voor ieder gebruik en voordat u die aansluit op de gases op
slijtage en beschadigingen.
• Gebruik het apparaat niet als de slang beschadigd of versleten is. Vervang de slang.
• Gebruik het apparaat niet als het lekt, beschadigd is of niet naar behoren werkt.
Gases
• Gebruik alleen essen die zijn goedgekeurd overeenkomstig de wetgeving in uw land.
• Plaats of vervang de gases altijd in een goed geventileerde ruimte, bij voorkeur
buiten, uit de buurt van mogelijke ontstekingsbronnen, zoals open vuur,
waakvlammen en radiatoren, en niet in de buurt van andere mensen.
• Houd gasessen uit de buurt van hitte en open vuur. Niet op een fornuis of ander heet
oppervlak plaatsen.
• Gascartridges/hervulbare gasessen dienen alleen in rechtopstaande positie te worden
gebruikt, zodat de brandstof op correcte wijze wordt onttrokken. Het niet naleven van
deze instructie kan leiden tot het weglekken van vloeistof uit de gases. Hierdoor
kunnen gevaarlijke gebruiksomstandigheden ontstaan.
• Probeer de gases niet te verwijderen wanneer het apparaat in gebruik is.
• In het midden van de gereedschapsplank is een uitsparing gemaakt waarin een
gascartridge kan worden geplaatst.
• Na gebruik of wanneer het apparaat wordt opgeborgen, moet de gases worden
losgekoppeld.
Montage en gebruik
• Het apparaat is draagbaar en zowel de poten als de gereedschapsplank kunnen
eenvoudig worden verwijderd en gemonteerd.
• Montage/demontage door de gebruiker is beperkt tot het plaatsen/verwijderen van de
poten, de gereedschapsplank en kookplaten.
• Let er bij het monteren van de poten altijd op dat de zekeringsringen goed zijn
aangedraaid. Het apparaat moet stabiel staan en niet wankelen. Gebruik het apparaat
niet zonder dat de accessoireplank is bevestigd. Deze plank is belangrijk voor de
stevigheid van het apparaat.
• Gebruik het apparaat alleen op een stevige, vlakke ondergrond.
• Verplaats het apparaat niet wanneer het in gebruik is.
• Als het hitteschild, de vetopvangbak of branderbak dermate beschadigd raken dat het
hitteschild en de vetopvangbak elkaar raken tijdens het gebruik, kunt u het apparaat
niet gebruiken. Breng het apparaat ter reparatie naar uw CADAC-leverancier.
• Blokkeer of verander de luchttoevoeropeningen van de ventielklep niet. Dit kan de
prestaties van het product beïnvloeden en een onstabiele vlam geven.
• Gebruik het apparaat niet in de buurt van brandbare materialen. De minimale veilige
afstanden zijn: Boven het apparaat 1,2 m. Aan de achterkant en zijkanten 600 mm
(Zie afbeelding 2.)
• Waarschuwing: wij raden u aan bij het verwijderen en plaatsen van de deksel tijdens
gebruik van het apparaat ovenwanten te dragen. Het handvat kan erg heet zijn.
• Waarschuwing: aanraakbare onderdelen kunnen erg heet worden. Het gebruik van
ovenwanten is raadzaam.
• Houd kleine kinderen uit de buurt van het apparaat.
• Alleen buitenshuis gebruiken
• LET OP! Als het apparaat wordt gebruikt bij winderig weer, moet het deksel worden
gebruikt als windscherm in de positie zoals getoond op afbeelding 4.
Terugslag (vlam).
• In het geval van terugslag (waarbij de vlam terugslaat en in de brander of de Venturibehuizing ontbrandt), dient u de gastoevoer onmiddellijk af te sluiten door eerst het
regelventiel op de gases dicht te draaien en daarna het ventiel op het apparaat.
Nadat de vlam is gedoofd, verwijdert u de drukregelaar en controleert u de conditie
van de pakking. Vervang de pakking als u niet zeker weet of die nog goed is. Steek
het apparaat opnieuw aan zoals beschreven in sectie 6 hieronder. Als de vlam blijft
terugslaan, brengt u het apparaat naar een bevoegde CADAC-reparateur.
Lekkage
• Als het apparaat gas lekt (gaslucht), draait u onmiddellijk de regelknop op de gases dicht. Als u het apparaat wilt controleren op lekkage, doet u dit
buiten. Probeer lekkages niet op te sporen met behulp van vuur, maar gebruik zeepwater.
• De juiste manier om dit te doen, is zeepwater aan te brengen op de aansluitingen. Als zich belletjes vormen, is er sprake van een gaslek. Sluit
de gastoevoer onmiddellijk af door eerst het regelventiel op de gases dicht te draaien en daarna het ventiel op het apparaat. Controleer of alle
aansluitingen goed vastzitten en controleer opnieuw met zeepwater. Als u het gaslek niet kunt verhelpen, brengt u het product ter inspectie/reparatie
naar een CADAC-leverancier.
• Controleer op lekkage aan het sluitstuk van het ventiel en bij de drukregelaaraansluiting van de gases met de gastoevoer van de gases geopend,
maar met de regelknop van het apparaat gesloten.
Slangklem
hier
plaatsen
Alleen van toepassing op modellen
8910-10, 8910-20,
8910-30, 8910-40,
8910-50, 8910-70
& 8910-80
DrukregelaarSlang
Pakking
Gasesventiel
Afb. 1
Afb. 2
Afb. 3
WIND
Afb. 4
3939
Page 41

4. Combinaties
Carri Chef 2 Skottel Combo 1 (productcode: 8910-10)
Handvat
Thermometer
Deksel
Skottel
Pandrager
Steun
Vetopvangbak
Branderbak
Regelknop
Buitenste pootzekeringsring
Steunclip
Steun voor gereedschapsplank
Gereedschapsplank
Poot
Voet
Afb. 5a
4040
Page 42

4. Combinaties
Carri Chef 2 Skottel Combo 2 (productcode: 8910-11)
Skottel
Pandrager
Steun
Vetopvangbak
Branderbak
Regelknop
Buitenste pootzekeringsring
Steunclip
Steun voor gereedschapsplank
Gereedschapsplank
Poot
Voet
Afb. 5b
4141
Page 43

4. Combinaties
Carri Chef 2 BBQ Combo 1 (productcode: 8910-20)
Handvat
Thermometer
Deksel
Barbecuerooster
Pandrager
Steun
Vetopvangbak
Branderbak
Regelknop
Buitenste pootzekeringsring
Steunclip
Steun voor gereedschapsplank
Gereedschapsplank
Poot
4242
Voet
Afb. 6a
Page 44

4. Combinaties
Carri Chef 2 BBQ Combo 2 (productcode: 8910-21)
Barbecuerooster
Pandrager
Steun
Vetopvangbak
Branderbak
Regelknop
Buitenste pootzekeringsring
Steunclip
Steun voor gereedschapsplank
Gereedschapsplank
Poot
4343
Voet
Afb. 6b
Page 45

4. Combinaties
Carri Chef 2 BBQ / Skottel Combo (productcode 8910-30)
Handvat
Thermometer
Deksel
Skottel
Barbecuerooster
Pandrager
Steun
Vetopvangbak
Branderbak
Regelknop
Buitenste pootzekeringsring
Steunclip
Steun voor gereedschapsplank
Gereedschapsplank
Poot
Voet
Afb. 7
4444
Page 46

4. Combinaties
Carri Chef 2 BBQ / Chef Pan Combo (productcode: 8910-40)
Handvat
Thermometer
Deksel
Anti-aanbak Chef Pan
Barbecuerooster
Pandrager
Steun
Vetopvangbak
Branderbak
Regelknop
Buitenste pootzekeringsring
Steunclip
Steun voor gereedschapsplank
Gereedschapsplank
Poot
Voet
Afb. 8
4545
Page 47

4. Combinaties
Carri Chef 2 BBQ / Grill 2 Braai Combo 1 (productcode 8910-50)
Handvat
Thermometer
Deksel
Grill 2 Braai
Barbecuerooster
Pandrager
Steun
Vetopvangbak
Branderbak
Regelknop
Buitenste pootzekeringsring
Steunclip
Steun voor gereedschapsplank
Gereedschapsplank
Poot
Voet
Afb. 9a
4646
Page 48

4. Combinaties
Carri Chef 2 BBQ / Grill 2 Braai Combo 2 (productcode 8910-51)
Grill 2 Braai
Pandrager
Steun
Vetopvangbak
Branderbak
Regelknop
Buitenste pootzekeringsring
Steunclip
Steun voor gereedschapsplank
Gereedschapsplank
Poot
Voet
Afb. 9b
4747
Page 49

4. Combinaties
Carri Chef 2 BBQ / Grill 2 Braai Combo 3 (productcode 8910-52)
Grill 2 Braai
Barbecuerooster
Pandrager
Steun
Vetopvangbak
Branderbak
Regelknop
Buitenste pootzekeringsring
Steunclip
Steun voor gereedschapsplank
Gereedschapsplank
Poot
Voet
Afb. 9c
4848
Page 50

4. Combinaties
Carri Chef 2 Gourmet Combo (Productcode 8910-70)
Handvat
Thermometer
Deksel
Paella Pan 47
Barbecuerooster
Pandrager
Steun
Vetopvangbak
Branderbak
Regelknop
Buitenste pootzekeringsring
Steunclip
Steun voor gereedschapsplank
Gereedschapsplank
Poot
4949
Voet
Afb. 9d
Page 51
4. Combinaties
Carri Chef 2 Plancha Combo (productcode 8910-80)
Handvat
Thermometer
Deksel
BBQ Plancha
Pandrager
Steun
Vetopvangbak
Branderbak
Regelknop
Buitenste pootzekeringsring
Steunclip
Steun voor gereedschapsplank
Gereedschapsplank
Poot
Voet
Afb. 9e
5050
Page 52

5. De slang en gas es plaatsen en vervangen
• LET OP! Houd bij het aandraaien van de sluitstukmoer het sluitstuk recht om gaslekken te voorkomen.
Draai de moer aan met een passende moersleutel (afbeelding 10).
• Apparaatcategorieën I 3B/P (30)
het linksom op het ventiel te schroeven. Schuif een goedgekeurde slang over het sluitstuk totdat de
slang goed vastzit. Aan de andere kant, bevestig een geschikte lage drukregelaar (I3B / P (30): 30mbar
Butaan / Propaan con guraties regelgever; I3 + (28-30/37): 30mbar Butaan regelaar of 37 mbar
propaan regulator); I3B / P (37) : 37 mbar butaan / propaan con guraties toezichthouders). Controleer
opnieuw of de slang goed vastzit. Het type slang wordt gebruikt moet voldoen aan de relevante EN-norm
en zoek eis. In Zuid-Afrika dient de gebruikte drukregelaar te voldoen aan SANS
• Apparaatcategorie I 3B/P (50): schroef een slang, met de correcte draad ttingen aan elk uiteinde,
op de linker ¼” BSP- tting van het ventiel. Bevestig een geschikte 50 mbar lagedrukregelaar aan
het andere uiteinde van de slang. De gebruikte slang moet voldoen aan de DIN 4815 deel 2 of
gelijkwaardig.
• De slang mag niet korter zijn dan 800 mm en niet langer dan 1,5 m. Controleer de vervaldatum op de
slang en vervang indien nodig of wanneer dat overeenkomstig nationale wetgeving is vereist.
• Draai de slang niet en zorg dat deze niet beklemd raakt. Voorkom dat de slang in aanraking komt met
onderdelen die tijdens gebruik van het apparaat heet worden.
• Controleer voordat u de drukregelaar aansluit op een gas es of de rubberen pakking van de drukregelaar
goed geplaatst is en in goede staat verkeert. Doe dit telkens wanneer u de drukregelaar aansluit en voor elk gebruik.
• Voordat u de gas es aansluit, dient u ervoor te zorgen dat alle ventielen in de “UIT”-stand staan door de regelknop tot de stop naar rechts te draaien.
• Plaats of vervang de gas es altijd in een goed geventileerde ruimte, bij voorkeur buiten, uit de buurt van mogelijke ontstekingsbronnen, zoals open
vuur en radiatoren, en niet in de buurt van andere mensen.
• Zorg dat de gas es rechtop staat en draai de drukregelaar goed vast op de gas es. Draai de drukregelaar alleen met de hand vast.
• Als het apparaat gas lekt (gaslucht), draait u onmiddellijk het ventiel op de gas es dicht en volgt u de procedure voor het vaststellen en stoppen van
een lek in sectie 3. Als u het apparaat wilt controleren op lekkage, doet u dit buiten met behulp van zeepwater dat u aanbrengt op de aansluitingen.
De vorming van belletjes duidt op een gaslek.
• Zorg ervoor dat alle aansluitingen goed vastzitten en controleer dit opnieuw met zeepwater. Gebruik het apparaat niet als u het gaslek niet kunt
herstellen. Neem contact op met uw lokale CADAC-leverancier voor hulp.
• Wanneer u de gas es wilt verwisselen, draait u eerst het ventiel op de es dicht (indien aanwezig). Draai vervolgens de regelknop naar rechts tot de
stoppositie.
• Controleer of de vlam uit is en schroef dan de drukregelaar los. Plaats een volle gas es. Neem daarbij de hierboven beschreven voorzorgsmaatregelen
in acht.
, I 3B/P (37) en I 3+ (28-30/37): bevestig het ventielsluitstuk door
1537.
Afb. 10
6. Het apparaat aansteken
Voorzorgsmaatregelen bij het aansteken.
• Als het apparaat langere tijd niet is gebruikt, controleert u de luchttoevoeropeningen van het ventiel op insecten die de gastoevoer kunnen
belemmeren. Controleer ook de inlaat van de Venturi op insecten. Monteer na controle alle onderdelen weer in de voorgeschreven positie.
• Gebruik het apparaat alleen op een stevige, vlakke ondergrond.
Gebruik van de regelknop
De regelknop is uitgerust met twee positieve stopposities, één bij Laag en één bij Aansteken/Hoog. De vlam kan tussen deze twee punten worden
afgesteld.
Aansteken met behulp van de piëzo-ontsteking
• Als u het apparaat wilt aansteken met de piëzo-ontsteking, drukt u de regelknop in en draait u die linksom totdat u een klik hoort. Als het gas niet
bij de eerste vonk ontbrandt, drukt u de regelknop in en draait u deze volledig naar rechts. Probeer het opnieuw door de regelknop in te drukken en
deze naar links te draaien totdat u een klik hoort. Als het gas niet binnen twee of drie seconden ontbrandt, sluit u de regelklep door de regelknop
in te drukken en deze volledig naar rechts te draaien. Wacht ongeveer dertig seconden om het gas dat zich in de branderbak heeft verzameld, te
laten ontsnappen. Herhaal zo nodig de bovenstaande procedure totdat de vlam ontbrandt. De vlam moet binnen een of twee seconden ontbranden.
Aansteken met behulp van een barbecueaansteker
• Bij koud starten kan het apparaat aan de bovenzijde worden aangestoken voordat de gewenste kookplaat wordt bevestigd aan de vetopvangbak. Als
het apparaat heet is wanneer u het aansteekt, is het beter de barbecueaansteker door een van de ventilatiegaten aan de onderkant van de brander
te steken tot naast de brander (steek de barbecueaansteker NIET door de grote opening direct onder de brander). Doe de barbecueaansteker aan.
Druk, terwijl de aansteker aan is, de regelknop in en draai deze naar rechts om de brander aan te steken.
Algemeen
• Nadat het apparaat is aangestoken, kan de vlamintensiteit worden aangepast. Draai de regelknop naar links voor een lagere vlam of naar rechts
voor een hogere vlam.
• De volledig gesloten positie bevindt zich uiterst rechts. Als u het ventiel uit de volledig gesloten positie wilt draaien, moet u de knop eerst ver
genoeg indrukken om de vergrendeling op te heffen. Houd de knop ingedrukt en draai die naar links. Wanneer de vergrendeling eenmaal is
opgeheven, hoeft u de regelknop niet meer ingedrukt te houden en kunt u die naar de gewenste vlaminstelling draaien.
• De vlam kan worden gecontroleerd via de inspectieopening die hiervoor is aangebracht aan de zijkant van de vetopvangbak.
• Bij het bereiden van voedsel met een hoog vetgehalte kan de vlam oplaaien als de geselecteerde hitte-instelling te hoog is. Als dit gebeurt, draait u
de vlam lager totdat die niet meer oplaait.
• Verplaats het apparaat niet wanneer het in gebruik is. Dit is niet alleen gevaarlijk, maar kan ook het oplaaien van de vlam veroorzaken.
• Draai na gebruik eerst het ventiel op de gas es dicht (indien van toepassing). Wanneer de vlam gedoofd is, sluit u het ventiel van het apparaat
door de regelknop in te drukken en deze helemaal naar rechts te draaien.
5151
Page 53

7. Gebruik van het apparaat en de kookplaten
Middelhoog Heet KoudSteunen
Afb. 13
Afb. 14
Afb. 15
Afb. 16
Afb. 11
Afb. 12
Barbecuerooster (Afb. 13)
•
Meegeleverd met model 8910-20, 8910-21, 8910-30, 8910-40, 891050, 8910-52 en 8910-70.
• Het barbecuerooster rust op drie gietaluminium steunen in de
vetopvangbak (afb.11).
• Verkrijgbaar als extra accessoire en reserveonderdeel.
• Kookplaat met antiaanbaklaag.
• Gebruik geen metalen keukengerei omdat u daarmee de antiaanbaklaag
permanent beschadigt.
• Ideaal voor het grillen van vlees, vis, kip en groenten.
• Een handige draagtas wordt meegeleverd met deze kookplaat.
• WAARSCHUWING: we raden u aan ovenwanten te dragen bij gebruik van
het barbecuerooster.
Skottel (Afb. 14)
•
Meegeleverd met model 8910-10, 8910-11 en 8910-30.
• De skottel rust op eigen steunen in de vetopvangbak.
• Verkrijgbaar als extra accessoire en reserveonderdeel.
• Porselein geëmailleerde bakplaat.
• Ideaal voor wokken, roerbakken en de bereiding van pasta- en
ontbijtgerechten.
• Een handige draagtas wordt meegeleverd met deze kookplaat.
• WAARSCHUWING: we raden u aan ovenwanten te dragen bij gebruik van de
skottel.
Anti-aanbak Chef Pan (Afb. 15)
•
Meegeleverd met model 8910-40.
• De Chef Pan rust op drie gietaluminium steunen in de vetopvangbak
(afb.11).
• Verkrijgbaar als extra accessoire en reserveonderdeel.
• Kookplaat met antiaanbaklaag.
• Gebruik geen metalen keukengerei omdat u daarmee de antiaanbaklaag
permanent beschadigt.
• WAARSCHUWING: laat bij voorverwarmen de Chef Pan niet langer dan 15
minuten met gesloten deksel op een hoge vlam staan, omdat u hiermee de
antiaanbaklaag en de plaat kunt beschadigen.
• WAARSCHUWING: we raden u aan ovenwanten te dragen bij gebruik van de
Chef Pan.
Afb. 17
Afb. 18
Grill 2 Braai (Afb. 16)
•
Verkrijgbaar als extra accessoire en reserveonderdeel
(Meegeleverd met model 8910-50, 8910-51 en 8910-52).
• De Grill2Braai rust op drie gietaluminium steunen in de vetopvangbak (afb.11)
• Kookplaat met antiaanbaklaag.
• Gebruik geen metalen keukengerei omdat u daarmee de antiaanbaklaag
permanent beschadigt.
• Het vlakke deel van de plaat is ideaal voor het bereiden van vis,
ontbijtgerechten en pannenkoeken; het geribbelde deel is uitstekend geschikt
voor het grillen van vlees, vis, kip en groenten.
• Een handige draagtas wordt meegeleverd met deze kookplaat.
• WAARSCHUWING: we raden u aan ovenwanten te dragen bij gebruik van de
Grill 2 Braai.
Braadbak (Afb. 17)
•
Verkrijgbaar als extra accessoire en reserveonderdeel (niet meegeleverd).
• Porselein geëmailleerde kookplaat.
• Ideaal voor het bereiden van gebraden kip, lamsvlees, groenten, enzovoort.
• Porselein geëmailleerde kookplaat.
• WAARSCHUWING: we raden u aan ovenwanten te dragen bij gebruik van de
braadbak.
5252
Page 54

Pizzasteen (Afb. 18)
•
Verkrijgbaar als extra accessoire en reserveonderdeel (niet meegeleverd).
• 10 mm dikke steengrillplaat bestand tegen temperaturen tot 500C
• Inclusief vernikkelde houder.
• WAARSCHUWING: we raden u aan ovenwanten te dragen bij gebruik van de
steengrillplaat.
Pandrager (Afb. 19)
•
Afb. 19
Meegeleverd met model 8910-10, 8910-11, 8910-20, 8910-21, 8910-30,
8910-40, 8910-50, 8910-51, 8910-52, 8910-70 en 8910-80.
• Vernikkelde pandrager geschikt voor de meeste standaard panmaten.
• WAARSCHUWING: we raden u aan ovenwanten te dragen bij gebruik van de
pandrager.
Paella Pan 47 (Afb. 19.1)
•
Meegeleverd met model 8910-70.
• Dit 47cm lichtgewicht maar dik aluminium met antiaanbaklaag pan is
eenvoudig te gebruiken en schoon.
Afb. 19.1
• Roestvrij staal handgrepen zorgen voor eenvoudige bediening.
• De onderkant van de pan is een heldere, staal machinaal afwerking.
• Een handige draagtas is inbegrepen.
•
WAARSCHUWING: we raden u aan ovenwanten te dragen bij gebruik van de
Paella Pan.
BBQ Plancha (Afb. 19.2)
•
Meegeleverd met model 8910-80.
• De BBQ Plancha geeft maximale veelzijdigheid met open grill BBQ aan de
ene kant en platte grillpan op de andere.
Afb. 19.2
• BELANGRIJK! Gebruik uitsluitend de daarvoor bedoelde -kookplaten om uw garantie te behouden.
• LET OP! Gebruik altijd de deksel als windscherm als u het apparaat gebruikt bij winderig weer.
• De keramische gecoate top is gemakkelijk te gebruiken en schoon.
• Een handige draagtas is inbegrepen.
•
WAARSCHUWING: we raden u aan ovenwanten te dragen bij gebruik van de
BBQ Plancha.
8. Algemeen onderhoud
• De verantwoordelijkheid voor het onderhoud van dit apparaat berust vanaf de aankoopdatum uitsluitend bij de consument.
Dit apparaat behoeft geen gepland onderhoud.
Een verstopte straalpijp vervangen
• De Carri Chef is uitgerust met een speci eke straalpijp voor het reguleren van de gastoevoer.
• Wanneer de opening in de straalpijp verstopt raakt, kan dit resulteren in een kleine vlam of helemaal geen vlam. Probeer de straalpijp niet met een
pin of soortgelijk instrument te reinigen. Dit kan de opening beschadigen waardoor het apparaat onveilig kan worden.
• De straalpijp kan als volgt worden vervangen: verwijder de drie schroeven uit de hitteschildplaat (afbeelding 21). Verwijder de hitteschildplaat
(afbeelding 22) en zorg er daarbij voor de piëzo-elektrode niet te beschadigen. De straalpijp (B) kan nu worden verwijderd met behulp van een
passende moersleutel (afbeelding 23). Gebruik geen tang op de straalpijp. De schade die u hier mogelijk mee veroorzaakt, maakt de straalpijp
onbruikbaar of leidt ertoe dat deze niet meer kan worden verwijderd. Schroef de nieuwe straalpijp in het ventiel. Draai niet te strak aan, omdat dit
de straalpijp kan beschadigen.
• Voer de procedure in omgekeerde volgorde uit om het apparaat weer in elkaar te zetten.
De slang vervangen
• Het aanbrengen van de slang is beschreven in sectie 5 - De slang en gas es plaatsen en vervangen.
Afb. 20 Afb. 21
5353
Page 55

Afb. 22
Afb. 23
9. Reinigen
• Let op: zie sectie 7 voor onderdelen
• Skottel BBQ: Vul de kookplaat na gebruik met zeepwater en zet de plaat op laag vuur om aanbaksels los te weken. Nadat het teveel aan vet is
verwijderd,
reinigt u de Skottel BBQ in warm water met een geschikt, niet schurend schoonmaakmiddel. Gebruik geen scherpe metalen
voorwerpen of schuurmiddelen op de geëmailleerde laag.
• Barbecue: verwijder het vet uit de sleuf onderaan de vetopvangbak en reinig zoals beschreven voor de Skottel BBQ. Reinig het rooster en de
deectorplaat in warm water met een niet schurend schoonmaakmiddel nadat u achtergebleven vetresten heeft weggeveegd.
• Barbecuedeksel: reinig de barbecuedeksel in warm water met een geschikt, niet schurend schoonmaakmiddel. Gebruik geen scherpe metalen
voorwerpen of schuurmiddelen, omdat u hiermee de beschermlaag beschadigt.
• Let op: hardnekkige vlekken kunt u verwijderen met ovenreiniger.
Onderhoud kookplaten met een antiaanbaklaag
• De antiaanbakkookplaten zijn voorzien van een PTFE-antiaanbaklaag die met veel succes wordt toegepast op het beste kookgerei ter wereld.
Goed onderhoud draagt bij aan verlenging van de levensduur van de antiaanbaklaag, zodat u jarenlang gezond en gemakkelijk blijft koken zonder
aanbakken.
• Kook alleen op laag of middelhoog vuur om de waardevolle voedingsstoffen van uw gerechten te behouden en de antiaanbaklaag te beschermen.
• De antiaanbaklaag kan gemakkelijk beschadigd raken door het gebruik van metalen kookmaterialen.
• LET OP! Het is raadzaam bij het koken uitsluitend gebruik te maken van kunststof of houten kookmaterialen.
• Voorkom oververhitting van de antiaanbaklaag en vet de kookplaat voor gebruik altijd in met wat olie.
• Laat de antiaanbaklaag altijd afkoelen voordat u die onderdompelt in water.
• De kookplaat met antiaanbaklaag is geschikt voor de vaatwasser, maar is zo gemakkelijk schoon te maken dat een snelle handwas
volstaat. Het gebruik van schuurmiddelen wordt afgeraden, omdat u daarmee de antiaanbaklaag permanent beschadigt.
• Vet de kookplaat na het schoonmaken lichtjes in met plantaardige olie.
• Verwijder na elk gebruik het vet uit de vetopvangbak en reinig zoals hierboven beschreven voor de barbecue.
10. Opbergen en transport
•
De CADAC Carri Chef wordt geleverd met een reeks draagtassen waarin u alle onderdelen van uw model eenvoudig kunt
vervoeren en opbergen.
• Berg de Carri Chef als volgt op:
• De hoofdtas bevat de volgende onderdelen:
• Branderbak
• Vetopvangbak (rust boven op de branderbak)
• Pandrager
• De barbecuedeksel kan met de meegeleverde banden aan de achterzijde van de tas worden bevestigd.
• Een speciale tas bevat de skottelplaat.
• Een speciale tas bevat het barbecuerooster.
• Een speciale tas bevat de Chef Pan.
• Een speciale tas bevat de Grill 2 Braai
• Een speciale tas bevat de Paella Pan 47.
• Een speciale tas bevat de BBQ Plancha.
• De poten kunnen met de meegeleverde banden aan de achterzijde van de tas worden bevestigd.
• Berg uw CADAC Carri Chef altijd op in de meegeleverde tassen en in een droge omgeving, bij voorkeur niet op de grond. Dit is met name
belangrijk voor de branderbak in de hoofdtas, omdat vuil en insecten de gastoevoer kunnen belemmeren.
• Laat het apparaat altijd afkoelen voordat u onderdelen ervan in de bijbehorende tas plaatst.
• Als het apparaat na te zijn opgeslagen een afwijkende werking vertoont, voert u de controles in secties 5 & 8 uit. Als u het probleem daarmee
niet kunt verhelpen, is mogelijk de Venturi verstopt. Een verstopte Venturi wordt gekenmerkt door een zwakke, gelige vlam of, in uitzonderlijke
gevallen, door het uitblijven van een vlam. Onder deze omstandigheden is het noodzakelijk dat u de brander verwijdert zoals beschreven in sectie
8 - Algemeen onderhoud. Controleer en verwijder zorgvuldig eventuele rommel die zich in de Venturi kan hebben verzameld.
5454
Page 56

11. Het apparaat terugsturen voor reparatie of service.
•
Pas het apparaat niet aan. Dit kan gevaarlijk zijn.
• Als het niet lukt de problemen volgens de instructies op te lossen, neemt u contact op met uw plaatselijke CADAC-leverancier voor informatie
over het terugsturen van het product.
• Voor uw CADAC Carri Chef geldt een CADAC-fabrieksgarantie van twee jaar.
12. Reserveonderdelen en accessoires
• Gebruik altijd originele CADAC-reserveonderdelen omdat deze gemaakt zijn om het apparaat optimaal te laten functioneren.
Omschrijving Onderdeel nu. Omschrijving Onderdeel nu. Omschrijving Onderdeel nu.
Straalpijp nu. 0.92
(28/37mbar)
Straalpijp nu. 0.78 (50 mbar) 8910-SP002 Grill 2 Braai 8910-100 Pizzasteen 8910-106
Barbecuerooster 8910-101 Skottel 8910-103 Pandrager 8910-SP003
Skottel Voedingopwarmers* 8910-SP031* Niet-klevende voering* 8631* Paella Pan 47 5758
BBQ Plancha 8910-108
8910-SP001 Anti-aanbak Chef Pan 8910-102 Braadbak 8910-105
*Verkocht alleen in bepaalde regio’s
5555
Page 57

AVERTISSEMENT
FR
Cet appareil ne doit être utilisé qu’à l’extérieur.
Cet appareil ne peut pas être utilisé sur un balcon extérieur clos, sous un porche ou dans un espace de loisirs.
IMPORTANT
Lire attentivement les présentes instructions d’utilisation an de vous familiariser avec l’appareil avant de le
raccorder à sa bouteille de gaz. Conserver ces instructions pour référence ultérieure.
1. Introduction
• Le Carri Chef 2 est conçu pour cuisiner à l’extérieur. Il ravira les amoureux du camping et du grand air et peut également être utilisé dans un
patio.
• Cet appareil permet de préparer différents types de mets. Il met à votre disposition différentes surfaces de cuisson.
• L’appareil est alimenté en gaz par l’intermédiaire d’un tuyau et d’un détendeur. Le tuyau et le détendeur peuvent être raccordés à une
bouteille de gaz, à une cartouche de gaz ou à un CADAC Power Pak 1000 (une unité contenant deux cartouches de gaz), (non fournis avec
l’appareil).
• L’appareil est facile à allumer et à utiliser (voir la section 6) et l’utilisateur peut régler la chaleur produite grâce à une valve réglable.
• Un livre de recettes est fourni avec l’appareil. Il présente aux utilisateurs débutants les différentes options de cuisine en extérieur.
2. Informations générales
• Cet appareil est conforme aux normes EN498:2012, EN484:1997 et SANS 1539:2012.
• Cet appareil ne doit être utilisé qu’avec un tuyau et un détendeur homologués (fournis avec l’appareil en Afrique du Sud).
• Attention : les parties accessibles peuvent être extrêmement chaudes. Tenir les jeunes enfants à l’écart.
• Le Power Pak 1000 ou la bouteille de gaz rechargeable doivent uniquement être utilisés en position debout (accessoires en option, non
fournis).
• Remarque : pour garantir un fonctionnement satisfaisant avec un Power Pak 1000, toujours commencer avec des cartouches pleines et
prévoir une période d’utilisation continue inférieure à une heure environ.
• L’appareil doit uniquement être utilisé avec une bouteille de gaz ne dépassant pas 50 cm de haut.
• Pour des performances optimales et pour la sécurité des utilisateurs et des autres personnes à proximité immédiate, les appareils à
gaz nécessitent une ventilation. Pour cette raison, ne pas utiliser l’appareil dans un endroit non ventilé. Cet appareil doit être utilisé
uniquement à l’extérieur.
• Lire attentivement les présentes instructions an de vous familiariser avec l’appareil.
• Utiliser à l’extérieur uniquement.
BE, CY, DK, EE, FR,
Pays d’utilisation
Catégories d’appareils I
Gaz admissibles Butane Propane Butane, Propane ou leurs mélanges
Pression de service 28-30mBar 37mBar 37mBar
Calibre d’injecteur 0.92 0.82
Consommation nominale 270g/hr 313g/hr 270g/hr 270g/hr
Apport nominal brut de chaleur 3.7kW 4.3kW 3.7kW 3.7kW
Sources d’alimentation en gaz
AE = United Arab Emirates AL = Albania AT = Austria BE = Belgium CH = Switzerland
CZ = Czech Republic DE = Germany DK = Denmark ES = Spain FI = Finland
FR = France GB = United Kingdom GR = Greece HR = Croatia IT = Italy
JP = Japan KR = Korea NL = Netherlands NO = Norway PL = Poland
PT = Portugal RO = Romania RU = Russia RS = Serbia SI = Slovenia
SK = Slovakia SE = Sweden TR = Turkey ZA = South Africa
BE, CH, CY, CZ, ES, FR, GB, GR, IE, IT,
LT, LU, LV, PT, SK & SI
3+(28-30/37)
Un tuyau et un détendeur homologués et raccordés à une bouteille de gaz rechargeable d’un poids
maximal de 9 kg et conforme à la réglementation locale en vigueur
Nom de pays et abréviations
PL
I
3B/P (37)
FI, HU, IT, LT, NL,
NO, SE, SI, SK, RO,
HR, TR, BG, IS,LU,
MT, & ZA
I
3B/P (30)
28-30mBar
(Südafrika
2.8 kPa)
AT, CH, DE & SK
I
3B/P (50)
50mBar
5656
Page 58

3. Informations relatives à la sécurité
Tuyau
• Cet appareil doit être utilisé à l’extérieur uniquement.
• Un tuyau et un détendeur sont fournis avec l’appareil (pour l’Afrique du Sud
uniquement)
• L’état d’usure et de détérioration du tuyau doit être vérié avant chaque utilisation et
avant de raccorder la bouteille de gaz.
• Ne pas utiliser l’appareil si le tuyau est endommagé ou usé. Remplacer le tuyau.
• Ne pas utiliser l’appareil s’il est endommagé, s’il fuit ou s’il ne fonctionne pas
correctement.
Bouteille de gaz
• N’utiliser qu’une bouteille approuvée par la réglementation de votre pays.
• Veiller à installer ou à remplacer la bouteille de gaz dans un espace bien ventilé,
de préférence à l’extérieur et à l’écart d’autres personnes, loin de toute source
d’inammation telle que : amme nue, veilleuse, cheminée électrique.
• Maintenir les bouteilles de gaz à l’abri de la chaleur et des ammes. Ne pas les
placer sur un fourneau ou toute autre surface chaude.
• Les cartouches ou les bouteilles de gaz doivent être utilisées en position debout
uniquement pour garantir la bonne circulation du gaz. En cas contraire, du gaz
sous forme liquide peut s’échapper de la bouteille et entraîner un fonctionnement
dangereux.
• Ne pas essayer de retirer la bouteille de gaz alors que l’appareil fonctionne.
• Un espace est prévu au centre du plateau à accessoires pour y placer une cartouche
de gaz.
• La bouteille de gaz doit être déconnectée de l’appareil après utilisation ou pour le
stockage.
Montage et utilisation
• L’appareil est conçu pour être transportable, les pieds et le plateau à accessoires sont
facilement démontables et remontables, ce qui facilite le transport et l’utilisation.
• Le montage / démontage par l’utilisateur se limite aux pieds, au plateau à accessoires
et à l’installation / au retrait des surfaces de cuisson.
• Lors du montage des pieds, toujours veiller à ce que les bagues de xation des
pieds soient bien serrées et à ce que le produit monté soit stable et non bancal. Ne
pas utiliser l’appareil sans assembler le plateau à accessoires, car il joue un rôle
important dans la rigidité de l’appareil.
• Utiliser cet appareil uniquement sur une surface plane et stable.
• Ne pas déplacer l’appareil alors qu’il fonctionne.
• Si l’écran thermique, le collecteur de graisse ou le plateau brûleur est endommagé
de telle sorte qu’en cours d’utilisation il y a un contact permanent entre l’écran
thermique et le collecteur de graisse, ne pas utiliser l’appareil. Le retourner à votre
distributeur Cadac pour réparation.
• Ne pas couvrir ou modier les orices d’admission d’air du boîtier de valve car cela
pourrait modier les performances du produit et causer l’apparition d’une amme
instable.
• Veiller à utiliser l’appareil loin de tout matériau inammable. Les distances minimales
de sécurité sont de 1,2 m au-dessus de l’appareil et de 60 cm à l’arrière et sur les
côtés de l’appareil (voir Fig. 2).
• Avertissement: lors de l’utilisation de l’appareil, nous recommandons d’utiliser des
gants de protection pour retirer et mettre en place le dôme, qui peut devenir chaud.
• Avertissement: des pièces accessibles peuvent devenir très chaudes, nous
recommandons d’utiliser des gants de protection.
• Tenir les jeunes enfants à l’écart de l’appareil.
• Utiliser à l’extérieur uniquement.
• ATTENTION! Si l’appareil est utilisé alors qu’il y a du vent, le dôme doit être utilisé
comme pare-vent et positionné tel qu’indiqué dans la Fig. 4.
Retour de amme
• Si un retour de amme se produit (la amme remonte dans le brûleur ou le logement
du diffuseur), couper immédiatement l’alimentation en gaz en fermant d’abord le
robinet de régulation de la bouteille de gaz, puis le robinet de l’appareil. Une fois
la amme éteinte, retirer le détendeur et vérier l’état du joint ; en cas de doute,
remplacer le joint. Rallumer l’appareil tel qu’indiqué au chapitre 6 ci-dessous. Si le
retour de amme se reproduit, renvoyer le produit à votre centre de réparation CADAC agréé.
Fuites
• Si l’appareil présente une fuite (odeur de gaz), fermer immédiatement le robinet de la bouteille de gaz. Tout contrôle de la présence de fuites sur
l’appareil doit s’effectuer à l’extérieur. Ne pas essayer de détecter la présence de fuites à l’aide d’une amme, utiliser de l’eau savonneuse.
• La bonne méthode consiste à enduire les joints d’eau savonneuse. Si une ou plusieurs bulles se forment, il y a une fuite de gaz. Couper
immédiatement l’alimentation en gaz en fermant le robinet de régulation de la bouteille de gaz puis le robinet de l’appareil. Vérier que tous les
raccordements sont correctement établis. Vérier à nouveau à l’aide d’eau savonneuse. S’il y a toujours une fuite de gaz, retourner le produit à votre
distributeur CADAC pour inspection / réparation.
• Vérier s’il y a des fuites au niveau de l’about à côté de la valve de l’appareil et au niveau du détendeur de la bouteille de gaz, avec le gaz ouvert sur
la bouteille mais fermé sur l’appareil.
Tuyau
Placer le
collier de
serrage
ici
Uniquement applicable aux modèles
8910-10, 8910-20,
8910-30, 8910-40,
9810-50, 8910-70
& 8910-80
Détendeur
Joint
Robinet de
la bouteille
de gaz
Fig. 3
VENT
Fig. 4
Fig. 1
Fig. 2
5757
Page 59

4. Combinaisons
Combinaison 1 Carri Chef 2 plaque de cuisson « Skottel » (code produit : 8910-10)
Poignée du dôme
Thermomètre
Dôme
Plaque de cuisson
« Skottel »
Support de casserole /
marmite
Support de positionnement
Collecteur de graisse
Plateau brûleur
Bouton de régulation
Bague extérieure de
xation de pied
Clip de support du dôme
Support du plateau à
accessoires
Plateau à accessoires
Pied
Embout de pied
Fig. 5a
5858
Page 60

4. Combinaisons
Combinaison 2 Carri Chef 2 plaque de cuisson « Skottel » (code produit : 8910-11)
Plaque de cuisson
« Skottel »
Support de casserole /
marmite
Support de positionnement
Collecteur de graisse
Plateau brûleur
Bouton de régulation
Bague extérieure de
xation de pied
Clip de support du dôme
Support du plateau à
accessoires
Plateau à accessoires
Pied
Embout de pied
Fig. 5b
5959
Page 61

4. Combinaisons
Combinaison 1 Carri Chef 2 barbecue (code produit : 8910-20)
Poignée du dôme
Thermomètre
Dôme
Grille barbecue
Support de casserole /
marmite
Support de positionnement
Collecteur de graisse
Plateau brûleur
Bouton de régulation
Bague extérieure de
xation de pied
Clip de support du dôme
Support du plateau à
accessoires
Plateau à accessoires
Pied
6060
Embout de pied
Fig. 6a
Page 62

4. Combinaisons
Combinaison 2 Carri Chef 2 barbecue (code produit : 8910-21)
Grille barbecue
Support de casserole /
marmite
Support de positionnement
Collecteur de graisse
Plateau brûleur
Bouton de régulation
Bague extérieure de
xation de pied
Clip de support du dôme
Support du plateau à
accessoires
Plateau à accessoires
Pied
6161
Embout de pied
Fig. 6b
Page 63

4. Combinaisons
Combinaison Carri Chef 2 barbecue / Skottel (code produit : 8910-30)
Poignée du dôme
Thermomètre
Dôme
Plaque de cuisson
« Skottel »
Grille barbecue
Support de casserole /
marmite
Support de positionnement
Collecteur de graisse
Plateau brûleur
Bouton de régulation
Bague extérieure de
xation de pied
Clip de support du dôme
Support du plateau à
accessoires
Plateau à accessoires
Pied
Embout de pied
Fig. 7
6262
Page 64

4. Combinaisons
Combinaison Carri Chef 2 barbecue / plaque « Chef » (code produit : 8910-40)
Poignée du dôme
Thermomètre
Dôme
Plaque « Chef »
antiadhérente
Grille barbecue
Support de casserole /
marmite
Support de positionnement
Collecteur de graisse
Plateau brûleur
Bouton de régulation
Bague extérieure de
xation de pied
Clip de support du dôme
Support du plateau à
accessoires
Plateau à accessoires
Pied
Embout de pied
Fig. 8
6363
Page 65

4. Combinaisons
Combinaison 1 Carri Chef 2 barbecue / Grill 2 Braai (code produit : 8910-50)
Poignée du dôme
Thermomètre
Dôme
Grill 2 Braai
Grille barbecue
Support de casserole /
marmite
Support de positionnement
Collecteur de graisse
Plateau brûleur
Bouton de régulation
Bague extérieure de xation de
pied
Clip de support du dôme
Support du plateau à accessoires
Plateau à accessoires
Pied
Embout de pied
Fig. 9a
6464
Page 66

4. Combinaisons
Combinaison 2 Carri Chef 2 barbecue / Grill 2 Braai (code produit : 8910-51)
Grill 2 Braai
Support de casserole /
marmite
Support de positionnement
Collecteur de graisse
Plateau brûleur
Bouton de régulation
Bague extérieure de xation de
pied
Clip de support du dôme
Support du plateau à accessoires
Plateau à accessoires
Pied
Embout de pied
Fig. 9b
6565
Page 67

4. Combinaisons
Combinaison 3 Carri Chef 2 barbecue / Grill 2 Braai (code produit : 8910-52)
Grill 2 Braai
Grille barbecue
Support de casserole /
marmite
Support de positionnement
Collecteur de graisse
Plateau brûleur
Bouton de régulation
Bague extérieure de xation de
pied
Clip de support du dôme
Support du plateau à accessoires
Plateau à accessoires
Pied
Embout de pied
Fig. 9c
6666
Page 68

4. Combinaisons
Carri Chef 2 Gourmet Combo (code produit 8910-70)
Poignée du dôme
Thermomètre
Dôme
Paella Pan 47
Grille barbecue
Support de casserole /
marmite
Support de positionnement
Collecteur de graisse
Plateau brûleur
Bouton de régulation
Bague extérieure de xation
de pied
Clip de support du dôme
Support du plateau à accessoires
Plateau à accessoires
Pied
6767
Embout de pied
Fig. 9d
Page 69

4. Combinaisons
Combinaison Carri Chef 2 Plancha (code produit : 8910-80)
Poignée du dôme
Thermomètre
Dôme
BBQ Plancha
Support de casserole /
marmite
Support de positionnement
Collecteur de graisse
Plateau brûleur
Bouton de régulation
Bague extérieure de xation de
pied
Clip de support du dôme
Support du plateau à accessoires
Plateau à accessoires
Pied
Embout de pied
Fig. 9e
6868
Page 70

5. Installation et remplacement du tuyau et de la bouteille de gaz
• ATTENTION ! Lors de l’installation de l’about, veiller à ce qu’il soit bien droit lors du serrage de son
écrou, a n d’éviter toute fuite de gaz. Serrer à l’aide d’une clé adaptée. (Fig. 10)
• Catégories d’appareils I 3B/P (30)
valve en le vissant dans le sens antihoraire. Enfoncer un tuyau homologué sur l’about de valve jusqu’à
ce qu’il soit bien en place. À l’autre extrémité, xez un régulateur de pression approprié basse (I3B
/ P (30): 30 mbar Butane / Propane régulateur de con gurations; I3 + (28-30/37): Butane 30mbar
régulateur ou régulateur de propane 37mbar); I3B / P (37) : Butane 37mbar / con gurations propane
régulateurs), en veillant toujours à enfoncer le tuyau bien en place. Le type de tuyau utilisé doit
être conforme à la norme EN et localiser exigence. En Afrique du Sud, le détendeur utilisé doit être
conforme à SANS
• Catégorie d’appareils I 3B/P (50) : visser un tuyau doté des bons raccords letés à chaque extrémité sur
le letage inversé ¼” BSP de la valve. Raccorder un détendeur basse pression 50 mbar adapté à l’autre
extrémité du tuyau. Le tuyau utilisé doit être conforme à la norme DIN 4815 partie 2 ou équivalent.
• La longueur du tuyau doit être comprise entre 80 cm et 1,50 m. Véri er la date d’expiration du tuyau et
le remplacer au besoin ou lorsque les réglementations nationales le nécessitent.
• Ne pas tordre ni pincer le tuyau. Veiller à ce que le tuyau ne rentre pas en contact avec une surface qui
chauffe lors de l’utilisation.
• Avant de raccorder l’appareil à une bouteille de gaz, véri er que le joint du détendeur est bien
positionné et en bon état. Cette véri cation doit être effectuée à chaque raccordement et avant chaque
utilisation.
• Avant de raccorder la bouteille de gaz, s’assurer que tous les robinets sont en position « OFF » (Arrêt), en tournant le bouton de régulation dans le
sens horaire jusqu’en butée.
• Veiller à installer ou à remplacer la bouteille de gaz dans un espace bien ventilé, de préférence à l’extérieur et à l’écart d’autres personnes, loin de
toute source d’in ammation comme des ammes nues ou des cheminées électriques.
• S’assurer que la bouteille de gaz est bien debout et visser à fond – à la main – le détendeur sur la bouteille.
• Si votre appareil présente une fuite (odeur de gaz), fermer immédiatement le robinet de la bouteille de gaz et suivre la procédure de détection
et de réparation d’une fuite décrite à la section 3. Tout contrôle de la présence de fuites sur l’appareil doit s’effectuer à l’extérieur à l’aide d’eau
savonneuse appliquée sur les joints. Une formation de bulles indique une fuite de gaz.
• Véri er que tous les raccordements sont convenablement établis et contrôler à nouveau avec de l’eau savonneuse. Si la fuite de gaz ne peut être
éliminée, ne pas utiliser l’appareil. Contacter votre distributeur CADAC local.
• Lors du changement de la bouteille de gaz, commencer par fermer le robinet de la bouteille (le cas échéant), puis tourner le bouton de régulation
dans le sens horaire jusqu’en butée.
• Véri er que la amme est bien éteinte, puis dévisser le détendeur. Installer une bouteille pleine en suivant les mêmes précautions que décrites
précédemment.
1537.
, I 3B/P (37) et I 3+ (28-30/37) : placer l’about de valve sur la
Fig. 10
6. Allumage de l’appareil
Précautions à observer avant l’allumage.
• Après un stockage prolongé, inspecter les ori ces d’admission d’air du boîtier de valve, pour voir s’il y a des insectes qui affectent le débit de gaz.
Inspecter l’entrée du diffuseur à la recherche d’insectes. Après inspection, replacer tous les composants dans leur position prescrite.
• Utiliser cet appareil uniquement sur une surface plane et stable.
Utilisation du bouton de régulation
Le bouton de régulation est doté de deux positions de butée : l’une à feu bas, l’autre en position d’allumage / feu fort. L’ajustement de la amme
est limité entre ces deux positions.
Allumage à l’aide de l’allumeur piézo-électrique
• Pour allumer l’appareil à l’aide de l’allumeur piézo-électrique, enfoncer et tourner le bouton de régulation dans le sans antihoraire jusqu’à
entendre un clic. Si le gaz ne s’en amme pas dès la première étincelle, enfoncer à nouveau le bouton et le tourner à fond dans le sens
horaire. Réessayer, en enfonçant et en tournant le bouton de régulation dans le sens antihoraire jusqu’à entendre un clic. Si le gaz ne s’est pas
en ammé dans les deux ou trois premières secondes, fermer la valve en enfonçant le bouton de régulation et en le tournant à fond dans le sens
horaire. Attendre environ trente secondes pour laisser s’échapper le gaz qui s’est accumulé dans le plateau brûleur. Répéter le processus décrit
précédemment, si nécessaire, jusqu’à ce que le gaz s’en amme. La amme doit normalement apparaître dans les deux premières secondes.
Allumage à l’aide d’un allume-barbecue
• Pour un allumage à froid, l’appareil peut être allumé par le dessus avant installation de la surface de cuisson désirée sur le collecteur de graisse.
Pour allumer l’appareil déjà chaud, il est recommandé d’insérer un allume-barbecue dans l’un des trous de ventilation situés sous le brûleur, et
de l’aligner avec le brûleur (NE PAS passer l’allume-barbecue par le grand trou situé directement sous le brûleur). Allumer l’allume-barbecue.
L’allume-barbecue étant allumé, enfoncer et tourner le bouton de régulation dans le sens antihoraire pour allumer le brûleur.
Généralités
• Une fois l’appareil allumé, l’intensité de la amme peut être ajustée en tournant le bouton de régulation dans le sens antihoraire pour réduire la
amme, ou dans le sens horaire pour augmenter la amme.
• Pour éteindre complètement, tourner à fond dans le sens horaire. Pour pouvoir tourner le bouton à partir de la position « valve complètement
fermée », il faut d’abord enfoncer le bouton a n de libérer le mécanisme de verrouillage. Tout en maintenant le bouton enfoncé, tourner dans le
sens antihoraire. Une fois le mécanisme de verrouillage libéré, il n’est plus nécessaire de maintenir enfoncé le bouton de régulation, celui-ci peut
être tourné librement et placé dans la position correspondant au réglage de amme souhaité.
• La amme peut être observée par le trou d’inspection prévu à cet effet, situé sur le côté du collecteur de graisse.
• Lors de la cuisson d’aliments très gras, des montées de ammes peuvent se produire si le réglage de température est trop élevé. Dans ce cas,
réduire la température jusqu’à ce qu’il n’y ait plus de montées de ammes.
• Ne pas déplacer l’appareil allumé, car en plus d’être dangereux, des montées de ammes peuvent se produire.
• Après utilisation, fermer en premier le robinet de la bouteille de gaz (le cas échéant). Une fois la amme éteinte, fermer la valve de l’appareil en
enfonçant et en tournant le bouton de régulation à fond dans le sens horaire.
6969
Page 71

7. Utilisation de l’appareil et de ses surfaces de cuisson
Moyen Chaud FroidSupports de positionnement
Fig. 13
Fig. 14
Fig. 15
Fig. 16
Fig. 17
Fig. 18
Fig. 11
Fig. 12
Grille barbecue (Fig. 13)
•
Incluse avec les ensembles 8910-20, 9810-21 8910-30, 8910-40,
9810-50, 9810-52 et 8910-70.
• La grille barbecue se place sur les trois supports de positionnement
moulés du collecteur de graisse (Fig. 11).
• Disponible comme accessoire supplémentaire et comme pièce de
rechange.
• Surface de cuisson à revêtement antiadhérent.
• Ne pas utiliser d’ustensiles de cuisine en métal, qui endommageraient le
revêtement antiadhérent.
• Idéale pour griller la viande, le poisson, le poulet et les légumes.
• Un sac de transport pratique est inclus avec cette surface de cuisson.
• ATTENTION : nous recommandons d’utiliser des gants lors de la
manipulation de la grille barbecue.
Skottel (Fig. 14)
• Incluse avec les ensembles 8910-10, 9810-11 et 8910-30.
• La plaque de cuisson « Skottel » se place sur ses propres supports de
positionnement dans le collecteur de graisse.
• Disponible comme accessoire supplémentaire et comme pièce de rechange.
• Surface de cuisson en émail.
• Idéale pour la cuisson de type wok, pour « faire sauter » les aliments, pour les
plats de pâtes et les breakfasts à l’anglo-saxonne.
• Un sac de transport pratique est inclus avec cette surface de cuisson.
• ATTENTION : nous recommandons d’utiliser des gants lors de la manipulation
de la plaque de cuisson « Skottel ».
Plaque « Chef » antiadhérente (Fig. 15)
•
Incluse avec l’ensemble 8910-40
• La plaque « Chef » se place sur les trois supports de positionnement
moulés du collecteur de graisse (Fig. 11).
• Disponible comme accessoire supplémentaire et comme pièce de rechange.
• Surface de cuisson à revêtement antiadhérent.
• Ne pas utiliser d’ustensiles de cuisine en métal, qui endommageraient le
revêtement antiadhérent.
• ATTENTION : lors du préchauffage, ne pas utiliser la plaque « Chef » sur
une grande amme avec le dôme pendant plus de 15 minutes, car cela
pourrait endommager le revêtement antiadhérent et la plaque.
• ATTENTION : nous recommandons d’utiliser des gants lors de la
manipulation de la plaque « Chef ».
Grill 2 Braai (Fig. 16)
•
Disponible comme accessoire supplémentaire et comme pièce de rechange
(Incluse avec les ensemble 8910-50, 9810-51 et 9810-52).
• La plaque « Grill 2 Braai » se place sur les trois supports de positionnement
moulés du collecteur de graisse (Fig. 11).
• Surface de cuisson à revêtement antiadhérent.
• Ne pas utiliser d’ustensiles de cuisine en métal, qui endommageraient le
revêtement antiadhérent.
• La moitié plate est idéale pour cuire le poisson, les breakfasts et les
pancakes, et la moitié striée est parfaite pour griller la viande, le poisson, le
poulet et les légumes.
• Un sac de transport pratique est inclus avec cette surface de cuisson.
• ATTENTION : nous recommandons d’utiliser des gants lors de la manipulation
de la plaque Grill 2 Braai.
Rôtissoire (Fig. 17)
•
Disponible comme accessoire supplémentaire et comme pièce de rechange
(non inclus).
• Surface de cuisson en émail.
• Idéale pour rôtir du poulet, de l’agneau, des légumes, etc.
• Surface de cuisson en émail.
• ATTENTION : nous recommandons d’utiliser des gants lors de la manipulation
de la rôtissoire.
7070
Page 72

Fig. 19
Fig. 19.1
Fig. 19.2
Pierre à pizza (Fig. 18)
•
Disponible comme accessoire supplémentaire et comme pièce de rechange
(non inclus).
• Pierre de cuisson de 10 mm d’épaisseur résistant à une température de 500 °C
maximum.
• Fournie avec un support en l nickelé.
• ATTENTION : nous recommandons d’utiliser des gants lors de la manipulation
de la pierre de cuisson.
Support de casserole / marmite (Fig. 19)
•
Incluse avec les ensembles 8910-10, 8910-11, 8910-20, 8910-21,
8910-30, 8910-40, 8910-50, 8910-51, 8910-52, 8910-70 et 8910-80.
• Support de casserole / marmite nickelé, adapté à la plupart des casseroles
et marmites standard.
• ATTENTION : nous recommandons d’utiliser des gants lors de la
manipulation du support de casserole / marmite.
Paella Pan 47 (Fig. 19.1)
•
Incluse avec les ensembles 8910-70.
• Ce enduit poêle antiadhésive 47cm en aluminium léger mais épais est facile
à utiliser et à nettoyer.
• Poignées en acier inoxydable permettent une manipulation aisée.
• Le dessous de la casserole est un acier nition usinée clair.
• Un sac de transport pratique est inclus.
•
ATTENTION : nous recommandons d’utiliser des gants lors de la
manipulation du
Paella Pan.
BBQ Plancha (Fig. 19.2)
•
Incluse avec les ensembles 8910-80.
• Le barbecue Plancha donne une polyvalence maximale avec l’open barbecue
grill sur un côté et poêle à griller à plat sur l’autre.
• Le sommet revêtu de céramique est facile à utiliser et à nettoyer.
• Un sac de transport pratique est inclus.
•
ATTENTION : nous recommandons d’utiliser des gants lors de la
manipulation du
BBQ Plancha.
• IMPORTANT ! Pour que la garantie soit valide, n’utiliser que les surfaces de cuisson .
• ATTENTION ! Toujours utiliser le pare-vent lors d’une utilisation de l’appareil alors qu’il y a du vent.
8. Entretien général
• À partir de la date d’achat, la responsabilité d’entretenir l’appareil n’incombe qu’au consommateur.
Cet appareil ne requiert pas de maintenance programmée.
Remplacement d’un injecteur obstrué :
• Votre appareil Carri Chef est équipé d’un injecteur de taille spéci que qui régule correctement le débit de gaz.
• Si l’ori ce de l’injecteur est obstrué, cela peut avoir pour conséquence une petite amme, voire pas de amme du tout. Ne pas essayer de
nettoyer l’injecteur avec une épingle ou autre objet similaire, car cela pourrait endommager l’ori ce, rendant l’appareil dangereux.
• Pour remplacer l’injecteur : retirer les trois vis de l’écran thermique (Fig. 21). Retirer l’écran thermique (Fig. 22) en prenant soin de ne pas
endommager l’électrode piézo-électrique. L’injecteur (B) peut à présent être retiré à l’aide d’une clé adaptée (Fig. 23). Ne pas utiliser de
pince sur l’injecteur car elle pourrait l’endommager et le rendre inutilisable ou impossible à retirer. Visser le nouvel injecteur dans la valve. Ne
pas trop serrer car cela pourrait endommager l’injecteur.
• Pour le remontage, suivre en sens inverse la procédure ci-dessus.
Remplacement du tuyau :
• L’installation d’un tuyau est décrite en section 5 « Installation et remplacement du tuyau et de la bouteille de gaz ».
Fig. 20 Fig. 21
7171
Page 73

Fig. 23Fig. 22
9. Nettoyage
• Remarque : pour la référence des pièces, voir la section 7.
• Plaque de cuisson « Skottel » : après la cuisson, laisser le gaz à feu bas et mettre de l’eau savonneuse dans la plaque de cuisson pour ramollir les
résidus de cuisson. Une fois l’excédent de graisse retiré, laver la plaque de cuisson « Skottel » à l’eau tiède avec un détergent non abrasif adapté.
Ne pas utiliser d’objets pointus en métal ni de détergents abrasifs sur le revêtement en émail vitrié.
• Grille barbecue : retirer la graisse du fond du collecteur de graisse et nettoyer selon les indications pour la plaque de cuisson « Skottel ». Laver la
grille et le déecteur à l’eau tiède avec un détergent non abrasif après avoir enlevé l’excédent de graisse issu de la cuisson.
• Couvercle du barbecue : laver le couvercle du barbecue à l’eau tiède avec un détergent non abrasif. Ne pas utiliser d’objets pointus en métal ni de
détergents abrasifs, qui abimeraient le revêtement.
• Remarque : pour les tâches résistantes, il est possible d’utiliser du nettoyant pour four.
Précautions relatives aux surfaces de cuisson antiadhérentes :
• Les surfaces de cuisson antiadhérentes sont revêtues d’un PTFE antiadhérent qui a été utilisé avec un grand succès dans la fabrication de
certains des meilleurs ustensiles de cuisine du monde. Cependant, certaines précautions permettront d’apprécier des années supplémentaires de
cuisson saine, facile et antiadhérente.
• N’utiliser que des réglages bas ou moyens de la température pour conserver les précieux nutriments de la nourriture et préserver la surface de
cuisson antiadhérente.
• Le revêtement antiadhérent peut facilement être endommagé par l’utilisation d’ustensiles en métal.
• Attention ! Il est recommandé de n’utiliser que des ustensiles en plastique ou en bois pour cuisiner.
• Ne pas surchauffer les surfaces de cuisson antiadhérentes et toujours ajouter un peu d’huile de cuisine sur la surface avant utilisation.
• Toujours laisser refroidir les surfaces antiadhérentes avant de les immerger dans l’eau.
• Il est parfaitement sûr de passer le revêtement antiadhérent au lave-vaisselle, mais cette surface est si facile à nettoyer qu’un lavage rapide à la
main suft. L’utilisation de détergents abrasifs est déconseillée, car elle pourrait endommager dénitivement la surface antiadhérente.
• Une fois nettoyée, reconditionner la surface en y passant un peu d’huile végétale.
• Après chaque utilisation, retirer la graisse du collecteur de graisse et nettoyer selon les indications ci-dessus relatives au barbecue.
10. Stockage et transport
•
Votre CADAC Carri Chef est fourni avec une variété de sacs de transport pratiques qui permettent de ranger tous les composants inclus avec votre
modèle.
• Ranger le Carri Chef de la manière suivante :
• Le sac principal abrite les pièces suivantes :
• Plateau brûleur
• Collecteur de graisse (placé sur le plateau brûleur)
• Support de casserole / marmite
• Le couvercle du barbecue est xé à l’arrière du sac avec les sangles fournies.
• La plaque de cuisson « Skottel » est rangée dans son propre sac.
• La grille barbecue est rangée dans son propre sac.
• La plaque plate est rangée dans son propre sac.
• La Grill 2 Braai est rangée dans son propre sac.
• La Paella Pan est rangée dans son propre sac.
• La BBQ Plancha est rangée dans son propre sac.
• Les pieds sont xés à l’arrière du sac principal avec les sangles fournies.
• Toujours ranger le CADAC Carri Chef dans les sacs fournis, dans un endroit sec et de préférence en évitant le contact avec le sol. Il est
particulièrement important de ranger le plateau brûleur dans le sac principal an d’empêcher toute pénétration de saleté ou d’insectes qui
pourraient affecter le débit de gaz.
• Toujours laisser refroidir l’appareil avant de ranger les pièces dans leur sac.
• Si l’appareil fonctionne anormalement après une période de stockage, et que toutes les vérications recommandées dans les sections 5 et 8
n’ont pas isolé le problème, il se peut que le diffuseur soit obstrué. Le signe d’un diffuseur obstrué est une amme faible et jaunâtre, ou pas de
amme du tout dans le pire des cas. Dans ces circonstances, il est nécessaire de retirer le brûleur selon les explications de la section 8
« Entretien général », de rechercher et nettoyer consciencieusement tout corps étranger qui peut se trouver dans le diffuseur.
7272
Page 74

11. Retour de l’appareil pour réparation ou entretien
•
Ne pas modier l’appareil, ceci peut être dangereux.
• S’il s’avère impossible de corriger un problème en suivant les présentes instructions, contacter votre distributeur CADAC local pour connaître la
procédure détaillée de retour du produit.
• Votre CADAC Carri Chef est garanti par CADAC pendant 2 ans contre tout défaut d’usine.
12. Pièces détachées et accessoires
• N’utiliser que des pièces détachées authentiques CADAC. Celles-ci ont été conçues pour des performances optimales.
Description N° de pièce Description N° de pièce Description N° de pièce
Calibre injecteur 0,92
(28/37 mbar)
Calibre injecteur 0,78 (50 mbar) 8910-SP002 Grill 2 Braai 8910-100 Pierre à pizza 8910-106
Grille barbecue 8910-101
Skottel Warmers alimentaire*
BBQ Plancha 8910-108
8910-SP001
8910-SP031*
Plaque « Chef »
antiadhérente
Plaque de cuisson «
Skottel »
evêtement antiadhésif*
R
*Vendu dans certaines régions seulement
8910-102 Rôtissoire 8910-105
8910-103
8631*
Support de casserole /
marmite
Paella Pan 47 5758
8910-SP003
7373
Page 75

ADVARSEL
DK
Kun til udendørs brug!
Dette apparat må ikke anvendes på en udendørs lukket altan, veranda eller et legeområde!
VIGTIGT
Læs denne brugervejledning omhyggeligt og gør dig bekendt med apparatet inden du tilslutter det til gasasken.
Opbevar denne vejledning til fremtidigt brug.
1. Indledning
• Apparatet er blevet fremstillet til udendørs madlavning og specielt med henblik på camping så man kan nyde udendørslivet men også til brug
på en veranda.
• Man kan tilberede forskellige typer mad på dette apparat. Carri Chef 2 er beregnet til anvendelse af forskellige kogeplader.
• Gas tilføres apparatet via en slange og en reguleringsanordning. Slangen og reguleringsanordningen kan tilsluttes en gasaske, en gaspatron
eller en CADAC Power Pak 1000, der er et apparat der indeholder to gaspatroner. (Medfølger ikke med apparatet).
• Apparatet er nemt at tænde og bruge (Omtalt nedenfor i afsnit 6) og brugeren kan regulere varmen med en justerbar ventil.
• Der følger en bog med opskrifter med apparatet, der introducerer nybegynderen til udendørs madlavning
.
2. Generel information
• Apparatet er i overensstemmelse med EN498:2012, EN484:1997 og SANS 1539:2012.
• Dette apparat må kun anvendes med en godkendt slange og reguleringsanordning (slange og reguleringsanordning med apparat i SA).
• Advarsel: Dele på apparatet kan blive meget varme. Hold børn på afstand af apparatet.
• Den genopfyldelige Power Pak 1000 beholder må kun bruges i stående position. (Valgfrit tilbehør - medfølger ikke).
• Bemærk: For at sikre tilfredsstillende betjening når du bruger Power Pak 1000 skal du altid starte med nye gaspatroner og kun når den
tiltænkte tilberedningstid er mindre en ca. en time
• Må kun anvendes med en gasbeholder der ikke er over 500 mm i højden.
• Gasapparater kræver ventilation til effektiv betjening og for at beskytte brugeren og andre personer der opholder sig i nærheden og man skal
derfor undgå at benytte apparatet på et sted med ringe ventilation. Det er udelukkende beregnet til udendørs brug.
• Læs denne vejledning omhyggeligt før apparatet tages i brug.
• Kun til udendørs brug!
BE, CY, DK, EE,
Land
Apparatkategorier I
Godkendte gasser Butan Propan Butan, propan eller deres blanding
Driftstryk 28-30mBar 37mBar 37mBar
Blusnummer 0.92 0.82
Nominelt brug 270g/hr 313g/hr 270g/hr 270g/hr
Brutto nom. varmeinput 3.7kW 4.3kW 3.7kW 3.7kW
Gastilførselskilder
AE = United Arab Emirates AL = Albania AT = Austria BE = Belgium CH = Switzerland
CZ = Czech Republic DE = Germany DK = Denmark ES = Spain FI = Finland
FR = France GB = United Kingdom GR = Greece HR = Croatia IT = Italy
JP = Japan KR = Korea NL = Netherlands NO = Norway PL = Poland
PT = Portugal RO = Romania RU = Russia RS = Serbia SI = Slovenia
SK = Slovakia SE = Sweden TR = Turkey ZA = South Africa
BE, CH, CY, CZ, ES, FR, GB, GR, IE,
IT, LT, LU, LV, PT, SK & SI
3+(28-30/37)
En godkendt slange og reguleringsanordning der er tilsluttet en genopfyldelig gasaske der ikke
overstiger 9 kg og som opfylder de lokale gældende vedtægter
Navn på land og forkortelser:
PL
I
3B/P (37)
FR, FI, HU, IT,
LT, NL, NO, SE,
SI, SK, RO, HR,
TR, BG, IS,LU,
MT, & ZA
I
3B/P (30)
28-30mBar
(Sydafrika
2.8 kPa)
AT, CH, DE & SK
I
3B/P (50)
50mBar
7474
Page 76

3. Sikkerhedsinformation
Slange
• Dette apparat må kun bruges udendørs.
• Der medfølger en slange og en reguleringsanordning med dette apparat (kun SA).
• Slangen skal kontrolleres for slid og skader hver gang inden ibrugtagning og før
tilslutning af gasasken.
• Undlad at bruge apparatet hvis slangen er beskadiget eller slidt. Udskift slangen.
• Undlad at bruge apparatet hvis det er utæt, beskadiget eller ikke fungerer korrekt.
Gasaske
• Brug kun en aske der er godkendt ifølge dit lands vedtægter.
• Sørg for at gasasken påsættes eller udskiftes på et sted med god ventilation helst
udendørs og væk fra eventuelle antændelsekilder såsom ammer, vågeblus, elektrisk
ild og ikke i nærheden af mennesker.
• Opbevar gasasker på behørig afstand fra varmekilder og åben ild. Undlad at anbringe
på et komfur eller en anden varm overade.
• Gaspatroner/genopfyldelige beholdere må kun anvendes i stående position for at sikre
ordentlig brændstoftilførsel. Manglende overholdelse af dette kan medføre udledning
af væske fra gasasken der kunne resultere i en farlig situation.
• Undlad at forsøge at ytte beholderen mens apparatet er i brug.
• Der ndes plads til en gaspatron i midten af tilbehørsbakken.
• Gasasken skal frakobles apparatet når det ikke er i brug eller når det stilles til
opbevaring.
Samling og brug
• Apparatet er beregnet til at være transportabelt og benene samt tilbehørsbakken kan
nemt på- og afmonteres.
• På- og afmontering er begrænset til benene, tilbehørsbakken og den aftagelige
kogeplade.
• Når du monterer benene skal du altid sørge for at sikkerhedsringene til benene sidder
ordentligt fast og at apparatet er stabilt og ikke rokker. Undlad at benyttet apparatet
uden tilbehørsbakken monteret, da den spiller en afgørende rolle i at sikre stabiliteten
af apparatet.
• Brug udelukkende på en stabil og jævn overade.
• Undlad at ytte apparatet mens det er i brug.
• Såfremt varmeafskærmningen, fedtstofpanden eller brænderpanden er blevet
beskadiget på en måde der betyder at der er kontakt mellem varmeafskærmningen og
fedtpanden under brug, skal du undlade at benytte apparatet. Returner apparatet til
din Cadac forhandler med henblik på reparation.
• Undgå at tildække eller ændre lufthullerne på ventilboksdækslet eftersom dette vil
påvirke produktets ydeevne
og kan resultere i en ustabil amme.
• Sørg for at apparatet anvendes på behørig afstand af brandbare materialer.
Minimumsafstanden er: Ovenover apparatet 1,2 m På bagsiden og siderne 600 mm
(Se g. 2).
• Advarsel: Når du benytter apparatet anbefaler vi at du bruger beskyttelseshandsker
hvis du skal fjerne låget eftersom håndtagene på låget kan blive meget varme.
• Advarsel: Dele på tilbehøret kan blive meget varme, så brugen af beskyttelseshandsker
anbefales.
• Hold små børn på afstand af apparatet.
• Kun til udendørs brug
• BEMÆRK! Hvis du bruger apparatet på steder hvor det blæser meget, skal låget
anvendes som afskærmning og anbringes i positionen der er vist på g. 4.
Flammetilbageslag
• I tilfælde af ammetilbageslag (hvor ammen brænder bagud og antænder den
indvendige brænder eller venturihuset), skal du omgående slukke for gassen ved at
afbryde for tilførslen på gasasken og derefter på apparatets ventil. Efter ammen er
slukket, fjernes reguleringsanordningen og pakningen kontrolleres. Hvis du er i tvivl
skal du udskifte pakningen. Tænd apparatet igen som beskrevet i afsnit 6 nedenfor.
Hvis ammetilbageslag forekommer gentagne gange, bedes du returnere produktet til
en autoriseret CADAC forhandler.
Utætheder
• Hvis der forekommer utætheder på dit apparat (lugt af gas), bedes du omgående lukke for kontrolhåndtaget på gasasken. Hvis du ønsker at
kontrollere for utætheder på dit apparat, skal det foregå udendørs. Undlad at benytte en amme til at kontrollere for utætheder men brug istedet
sæbevand.
• Den korrekte procedure er at påføre sæbevand på samlingerne. Hvis der forekommer bobler ndes der en utæthed. Afbryd omgående gastilførslen ved
at lukke kontrolhåndtaget på gasasken og derefter ventilen på apparatet. Kontroller at alle tilslutningerne er ordentligt strammede. Kontroller igen
med sæbevand. Hvis der fortsat er en utæthed, bedes du returnere apparatet til din CADAC forhandler med henblik på inspektion/reparation.
• Kontroller om der ndes utætheder på slangeforskruningen ved ventilen og på reguleringsanordningen på asken med gastilførslen åben på asken
men ikke slået til på apparatets kontrolhåndtag.
Slange
Gælder kun for modellerne:
8910-10, 8910-20,
8910-30, 8910-40,
9810-50, 9810-70,
& 8910-80
Reguleringsanordning
Monter
klemme på
slange her
Pakning
Flaskeventil
Fig. 1
Fig. 2
Fig. 3
VIND
Fig. 4
7575
Page 77

4. Kombination
Carri Chef 2 Skottel Combo 1 (Produktkode: 8910-10)
Håndtag på låg
Termometer
Låg
Skottel
Alm. gasblus
Støtte
Fedtpande
Brænderpande
Kontrolhåndtag
Udvendig fastgørelsesring
på ben
Støtteklemme på låg
Beslag til tilbehørsbakke
Tilbehørsbakke
Ben
Fod
Fig. 5a
7676
Page 78
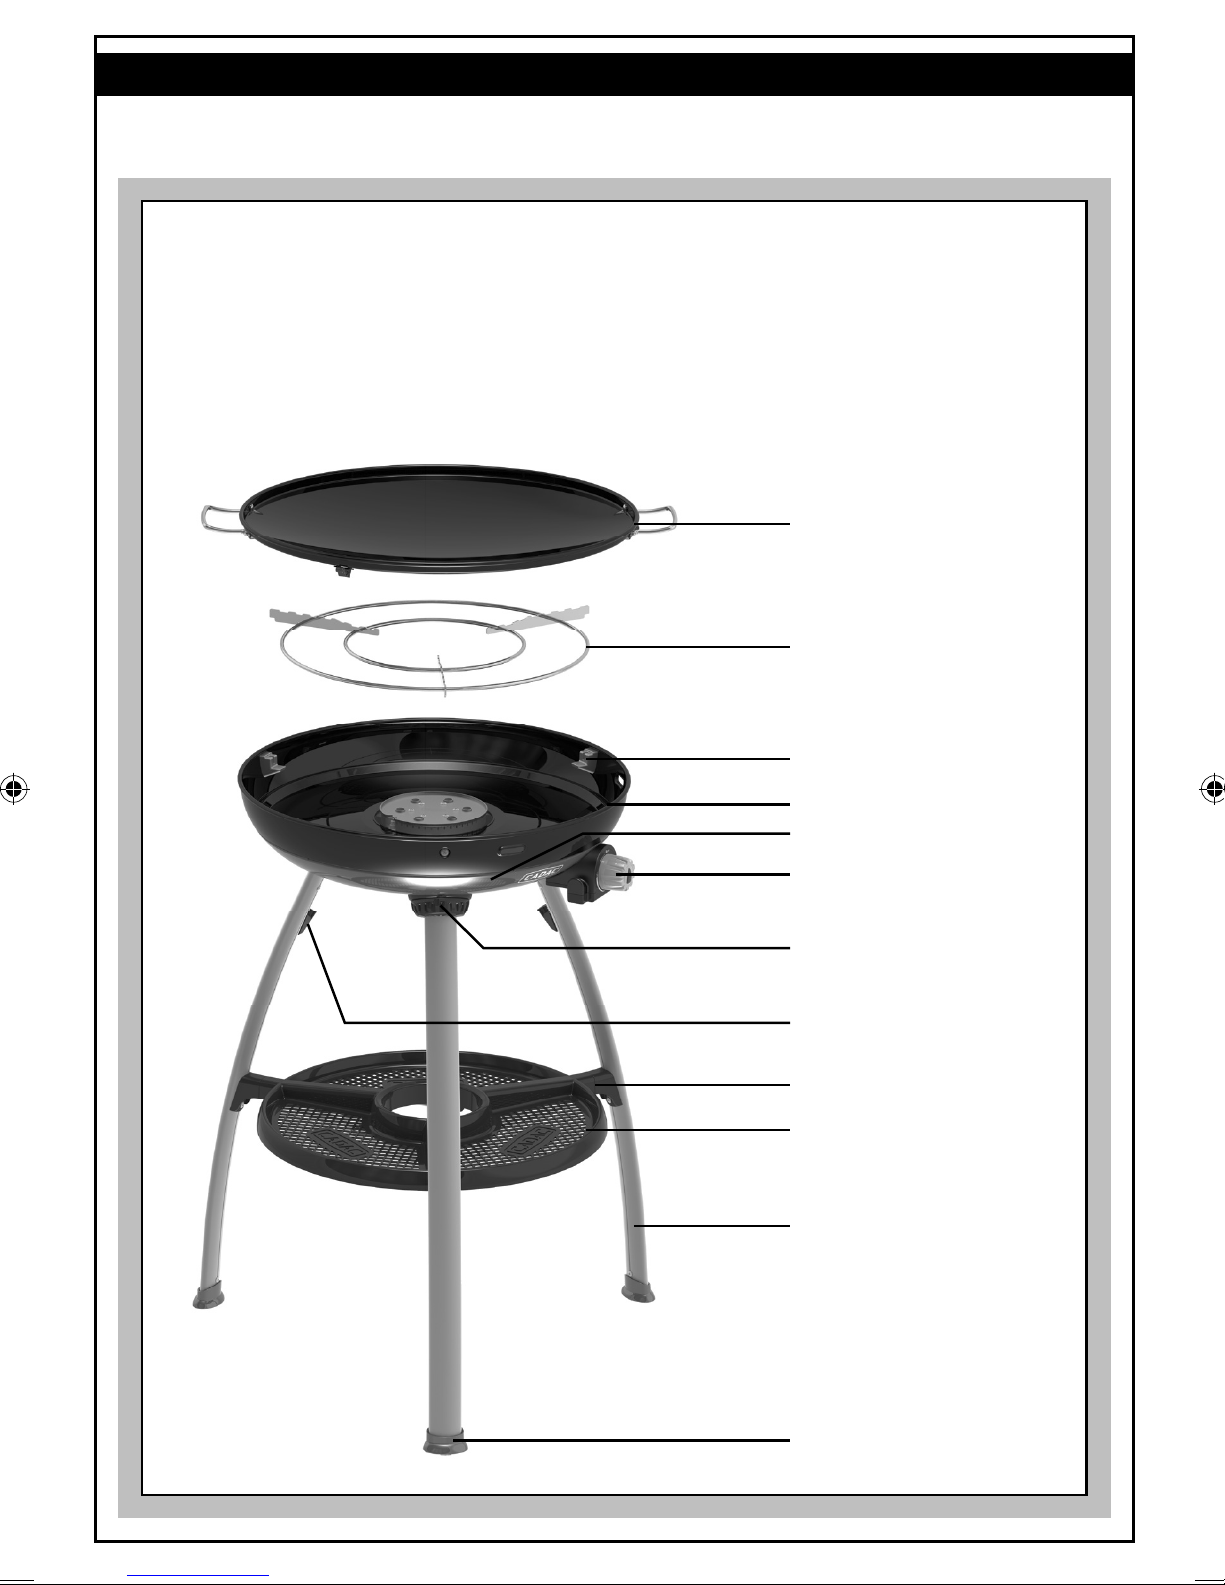
4. Kombination
Carri Chef 2 Skottel Combo 2 (Produktkode: 8910-11)
Skottel
Alm. gasblus
Støtte
Fedtpande
Brænderpande
Kontrolhåndtag
Udvendig fastgørelsesring
på ben
Støtteklemme på låg
Beslag til tilbehørsbakke
Tilbehørsbakke
Ben
Fod
Fig. 5b
7777
Page 79

4. Kombination
Carri Chef 2 BBQ Combo 1 (Produktkode: 8910-20)
Håndtag på låg
Termometer
Låg
Grillrist
Alm. gasblus
Støtte
Fedtpande
Brænderpande
Kontrolhåndtag
Udvendig fastgørelsesring
på ben
Støtteklemme på låg
Beslag til tilbehørsbakke
Tilbehørsbakke
Ben
7878
Fod
Fig. 6a
Page 80

4. Kombination
Carri Chef 2 BBQ Combo 2 (Produktkode: 8910-21)
Grillrist
Alm. gasblus
Støtte
Fedtpande
Brænderpande
Kontrolhåndtag
Udvendig fastgørelsesring
på ben
Støtteklemme på låg
Beslag til tilbehørsbakke
Tilbehørsbakke
Ben
7979
Fod
Fig. 6b
Page 81

4. Kombination
Carri Chef 2 BBQ / Skottel Combo (Produktkode 8910-30)
Håndtag på låg
Termometer
Låg
Skottel
Grillrist
Alm. gasblus
Støtte
Fedtpande
Brænderpande
Kontrolhåndtag
Udvendig fastgørelsesring på
ben
Støtteklemme på låg
Beslag til tilbehørsbakke
Tilbehørsbakke
Ben
Fod
Fig. 7
8080
Page 82

4. Kombination
Carri Chef 2 BBQ / Stegepande Combo (Produktkode: 8910-40)
Håndtag på låg
Termometer
Låg
Slip-let stegepande
Grillrist
Alm. gasblus
Støtte
Fedtpande
Brænderpande
Kontrolhåndtag
Udvendig fastgørelsesring
på ben
Støtteklemme på låg
Beslag til tilbehørsbakke
Tilbehørsbakke
Ben
Fod
Fig. 8
8181
Page 83

4. Kombination
Carri Chef 2 BBQ / Grill 2 Braai Combo 1 (Produktkode 8910-50)
Håndtag på låg
Termometer
Låg
Grill 2 Braai
Grillrist
Alm. gasblus
Støtte
Fedtpande
Brænderpande
Kontrolhåndtag
Udvendig fastgørelsesring på
ben
Støtteklemme på låg
Beslag til tilbehørsbakke
Tilbehørsbakke
Ben
Fod
Fig. 9a
8282
Page 84

4. Kombination
Carri Chef 2 BBQ / Grill 2 Braai Combo 2 (Produktkode 8910-51)
Grill 2 Braai
Alm. gasblus
Støtte
Fedtpande
Brænderpande
Kontrolhåndtag
Udvendig fastgørelsesring på
ben
Støtteklemme på låg
Beslag til tilbehørsbakke
Tilbehørsbakke
Ben
Fod
Fig. 9b
8383
Page 85

4. Kombination
Carri Chef 2 BBQ / Grill 2 Braai Combo 3 (Produktkode 8910-52)
Grill 2 Braai
Grillrist
Alm. gasblus
Støtte
Fedtpande
Brænderpande
Kontrolhåndtag
Udvendig fastgørelsesring på
ben
Støtteklemme på låg
Beslag til tilbehørsbakke
Tilbehørsbakke
Ben
Fod
Fig. 9c
8484
Page 86

4. Kombination
Carri Chef 2 Gourmet Combo (Produktkode 8910-70)
Håndtag på låg
Termometer
Låg
Paella Pan 47
Grillrist
Alm. gasblus
Støtte
Fedtpande
Brænderpande
Kontrolhåndtag
Udvendig fastgørelsesring på
ben
Støtteklemme på låg
Beslag til tilbehørsbakke
Tilbehørsbakke
Ben
8585
Fod
Fig. 9d
Page 87

4. Kombination
Carri Chef 2 Plancha Combo (Produktkode 8910-80)
Håndtag på låg
Termometer
Låg
BBQ Plancha
Alm. gasblus
Støtte
Fedtpande
Brænderpande
Kontrolhåndtag
Udvendig fastgørelsesring på
ben
Støtteklemme på låg
Beslag til tilbehørsbakke
Tilbehørsbakke
Ben
Fod
Fig. 9e
8686
Page 88

5. Montering og udskiftning af slangen og gas asken
• BEMÆRK! Når du monterer slangeforskruningen, skal du sørge for at du holder den lige mens du strammer
møtrikken for at undgå utætheder. Stram med en passende skruenøgle. (Fig. 10)
• I 3B/P (30), I 3B/P (37) og I 3+ (28-30/37) apparatkategorier: Monter ventilen på slangeforskruningen
på ventilen ved at skrue den på modsat urets retning. Tryk en slange af passende størrelse fast på ventilen
på slangeforskruningen indtil den sidder ordentligt fast. På den anden ende, vedhæfte et passende lavt
trykregulator (I3B / P (30): 30mbar butan / propan kon gurationer regulator, I3 + (28-30/37): 30mbar
Butan regulator eller 37mbar Propan regulator), I3B / P (37) : 37mbar butan / propan kon gurationer
tilsynsmyndigheder). Idet du igen sikrer dig at slangen sidder ordentligt fast. Den type slange anvendes,
i overensstemmelse med den relevante EN-standard og nd krav. I Sydafrika skal reguleringsanordningen
være i overensstemmelse med SANS
• I 3B/P (50) apparatkategori: Skru en slange med de korrekte gevindskårne ttings på hver ende fast på det
venstre ¼ tomme BSP gevind på ventilen. Monter en passende 50 mbar lavtryksreguleringsanordning på
den modsatte ende af slangen. Slangen anvendte samling skal overholde DIN 4815 del 2 eller tilsvarende.
• Længden på slangen skal være mellem 0,8 m og 1,5 m. Kontroller slangens udløbsdato og udskift den om
nødvendigt eller når de nationale vedtægter kræver det.
• Undgå at sno eller klemme slangen. Sørg for at slangen ikke kommer i kontakt med nogen over ader der
kunne blive varme under betjening.
• Inden du fastgører reguleringsanordningen på gas asken, bedes du sikre at pakningen på
reguleringsanordningen sidder rigtigt og er i ordentlig stand. Dette skal man sikre sig med alle tilslutninger
og før brug hver gang.
• Inden du monterer din gas aske, bedes du sørge for at alle ventiler be nder sig i “FRA” position ved at dreje kontrolhåndtaget med uret indtil det stopper.
• Sørg for at gas asken påsættes eller udskiftes på et sted med god ventilation helst udendørs og væk fra eventuelle antændelsekilder såsom ammer,
vågeblus, elektrisk ild og ikke i nærheden af mennesker.
• Samtidig med at du sørger for at gas asken holdes i stående position, påskrues reguleringsanordningen på asken indtil den ikke kan komme længere.
Stram udelukkende med håndkraft.
• Hvis der ndes en utæthed på apparatet (lugt af gas), lukkes askeventilen omgående og følg proceduren for at nde og stoppe en utæthed under
afsnit 3. Når du ønsker at kontrollere utætheder på dit apparat, skal du gøre det udendørs ved hjælp af sæbevand der påføres forbindelserne. Der opstår
bobbeldannelse hvis der er en utæthed.
• Kontroller alle forbindelserne er ordentligt strammede og kontroller igen med sæbevand. Hvis du ikke formår at udbedre utætheder, skal du ikke bruge
apparatet. Kontakt din lokale CADAC forhandler for assistance.
• Når du skal udskifte en gas aske, skal du først lukke askeventilen (om muligt) og derefter dreje kontrolhåndtaget med uret indtil det ikke kan komme
længere.
• Idet du sikrer dig at ammen er slukket, skrues reguleringsanordningen af. Erstat med en fuld aske og følg de samme sikkerhedsforanstaltninger som
beskrevet ovenover.
1537.
Fig. 10
6. Tænding af apparatet
Sikkerhedsforanstaltninger der skal overholdes inden tænding
• Efter længere tids opbevaring, skal lufthullerne på ventildækslet kontrolleres, hvilket kan påvirke gas owet. Kontroller Venturi-indtaget for insekter
Efter kontrol placeres alle komponenter på de foreskrevne placeringer.
• Brug dette apparat udelukkende på en stabil og jævn over ade.
Brug af kontrolhåndtaget
Kontrolhåndtaget er udstyret med to positive positioner, den ene er lav og den anden er tænding / høj. Dette begrænser justeringen af ammen til
et sted imellem disse to punkter.
Tænding ved hjælp af Piezo-tændsats
• For at tænde apparatet ved hjælp af Piezo-tændsatsen, trykkes kontrolhåndtaget ind og drejes mod uret indtil der høres et klik. Hvis gassen ikke
antændes ved første gnist, så tryk ind og drej kontrolhåndtaget en hel omdrejning med uret. Forsøg igen ved at trykke ind og dreje kontrolhåndtaget
mod uret indtil der høres et klik. Hvis gassen ikke er blevet antændt i løbet af de første 2-3 sekunder, bør du lukke kontrolventilen ved at trykke
ind på kontrolhåndtaget og dreje det en hel omdrejning med uret. Vent i ca. 30 sekunder indtil evt. resterende gas inden i brænderen er sevet ud.
Gentag ovenstående procedure om nødvendigt indtil ammen antændes. Flammen antændes under normale omstændigheder inden for de første
par sekunder.
Tænding ved hjælp af en grilllighter
• Når du starter et koldt apparat, kan det forekomme at det tændes fra toppen inden du anbringer den ønskede kogeplade på fedtpanden. Når du
tænder et varmt apparat anbefales det imidlertid at dette gøres ved at stikke en grilllighter igennem det ene af ventilationshullerne neden under
brænderen indtil den ugter med brænderen (UNDLAD at komme grilllighteren gennem det store hul direkte under brænderen). Tænd grilllighteren
Mens grilllighteren er tændt, trykkes kontrolhåndtaget ind og drejes mod uret for at tænde brænderen.
Generelt
• Når først apparatet er blevet tændt, kan man justere ammen ved at dreje ventilen mod uret for at mindske ammen eller med uret for at øge
ammen.
• Når kontrolhåndtaget be nder sig i den yderste position med uret er apparatet helt slukket. For at dreje ventilen fra den helt lukkede position er
det nødvendigt først at trykke håndtaget ned, således at det kan yttes væk fra låsemekanismen. Samtidig med at du trykker håndtaget ind, drejes
det mod uret. Når først spindelen har bevæget sig bort fra låsepositionen, er det ikke længere nødvendigt at holde kontrolhåndtaget trykket ned og
det kan frit drejes til den ønskede ammeindstilling.
• Flammen kan ses igennem inspektionshullet på siden af fedtpanden.
• Når du tilbereder fødevarer med en høj fedtprocent, kan opblussen forekomme hvis den valgte varmeindstilling er for høj. Hvis dette skulle ske
skal du mindske varmen indtil opblussen ophører.
• Undlad at ytte apparatet under brug da det både er farligt og der let kan forekomme opblussen.
• Efter endt brug, luk først ventilen på gas asken (når det er relevant). Når ammen er slukket lukkes ventilen på apparatet ved at trykke ind på
kontrolhåndtaget og dreje det helt med uret.
8787
Page 89

7. Betjening af apparatet og kogeplader
Medium Varm KoldStøtter
Fig. 13
Fig. 14
Fig. 15
Fig. 16
Fig. 17
Fig. 18
Fig. 11
Fig. 12
Grillrist (Fig. 13)
• Leveres med 8910-20, 8910-21, 8910-30, 8910-40,9810-50, 981052 og 8910-70.
• Grillristen ndes på de tre sprøjtestøbte støtter på fedtpanden (Fig. 11).
• Findes som ekstraudstyr og reservedele.
• Slip-let overtrukken kogeplade.
• Undlad at benytte metalkøkkenredskaber eftersom disse kan beskadige
belægningen.
• Ideel til grillstegning af kød, sk, kylling og grøntsager.
• Der følger en praktisk bærepose med kogepladen.
• ADVARSEL: Vi anbefaler at bruge handsker når man håndterer
grillristen.
Skottel (Fig. 14)
• Følger med 8910-10, 9810-11 og 8910-30.
• Skottel er monteret med sine egne støtter på fedtpladen.
• Findes som ekstraudstyr og reservedele.
• Porcelæns emaljeovertrukket kogeplade.
• Ideel til wok-tilberedning, sautering, pastaretter og morgenmad.
• Der følger en praktisk bærepose med kogepladen.
• ADVARSEL: Vi anbefaler at bruge handsker når man håndterer Skottel.
Slip-let stegepande (Fig. 15)
• Følger med 8910-40.
• Stegepanden er udstyret med tre sprøjtestøbte støtter på fedtpanden
(Fig. 11).
• Findes som ekstraudstyr og reservedele.
• Slip-let overtrukken kogeplade.
• Undlad at benytte metalkøkkenredskaber eftersom disse kan beskadige
belægningen.
• ADVARSEL: Når du forvarmer bedes du undgå at bruge stegepanden
på en høj ammeindstilling med låget på i over 15 min. idet dette kan
beskadige slip-let belægningen på panden.
• ADVARSEL: Vi anbefaler at bruge handsker når man håndterer
stegepanden.
Grill 2 Braai (Fig. 16)
• Findes som ekstraudstyr og reservedele (Leveres med 8910-50, 8910-51
og 8910-52).
• Grill 2 Braai er udstyret med tre sprøjtestøbte støtter på fedtpanden
(Fig. 11).
• Slip-let overtrukken kogeplade.
• Undlad at benytte metalkøkkenredskaber eftersom disse kan beskadige
belægningen.
• Den falde halvdel er ideel til tilberedning af sk, morgenmåltider
og pandekager, mens den ri ede stege ade er særdeles velegnet til
grillstegning af kød, sk, kylling og grøntsager.
• Der følger en praktisk bærepose med kogepladen.
• ADVARSEL: Vi anbefaler at bruge handsker når man håndterer
Grill 2 Braai.
Stegepande (Fig. 17)
• Findes som ekstraudstyr og reservedele (Medfølger ikke).
• Porcelænsemaljeret kogeplade.
• Ideel til forberedelse af stegt kylling, lam, grøntsager m.m.
• Porcelænsemaljeret kogeplade.
• ADVARSEL: Vi anbefaler at bruge handsker når man håndterer
stegepanden.
8888
Page 90
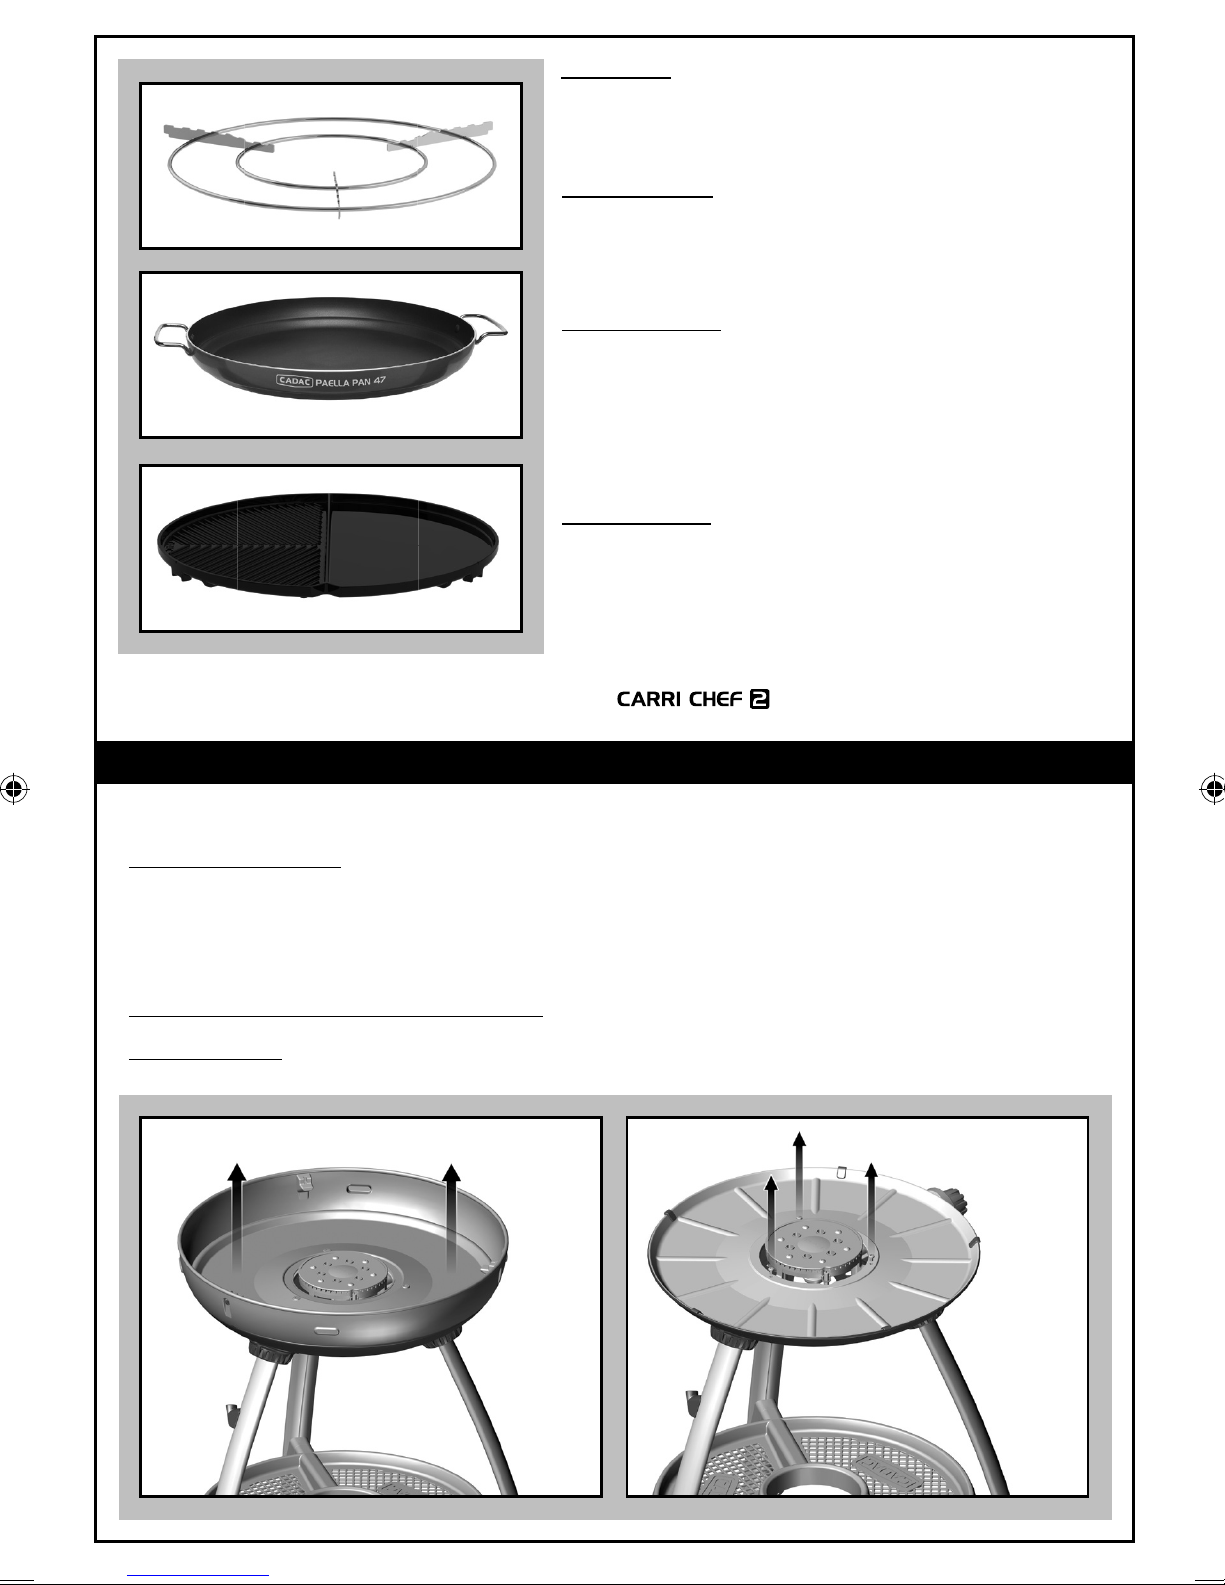
Fig. 19
Fig. 19.1
Fig. 19.2
Pizzasten (Fig. 18)
• Findes som ekstraudstyr og reservedele (Medfølger ikke).
• 10 mm tyk bagesten der kan modstå temperaturer på op til 500º C.
• Indeholder nikkelbeklædt wireholder.
• ADVARSEL: Vi anbefaler at bruge handsker når man håndterer bagestenen.
Alm. gasblus (Fig. 19)
• Leveres med 8910-10, 8910-11, 8910-20, 8910-21, 8910-30, 8910-
40, 8910-50, 8910-51, 8910-52, 8910-70 og 8910-80.
• Nikkelbelagt gasblus der passer til de este grydestørrelser.
• ADVARSEL: Vi anbefaler at bruge handsker når man håndterer alm.
gasblus.
Paella Pan 47 (Fig. 19.1)
• Leveres med 8910-70.
• Dette 47cm letvægts men tyk aluminium non-stick belægning pan er nem at
bruge og ren.
• Rustfrit stål håndtag tillader nem håndtering.
• Undersiden af panden er en klar, stål bearbejdes over ade.
• En bekvem bærepose er inkluderet.
• ADVARSEL: Vi anbefaler at bruge handsker når man håndterer Paella Pan.
BBQ Plancha (Fig. 19.2)
• Leveres med 8910-80.
• BBQ Plancha giver maksimal alsidighed med åben grill BBQ på den ene side
og ad grillpande på den anden.
• Den keramiske belægning toppen er let at bruge og ren.
• En bekvem bærepose er inkluderet.
• ADVARSEL: Vi anbefaler at bruge handsker når man håndterer BBQ
Plancha.
• VIGTIGT! For at bevare garantien, skal du udelukkende benytte køkkenredskaber.
• BEMÆRK! Anvend altid vindafskærmningen hvis du bruger apparatet under forhold med stærk vind.
8. Generel vedligeholdelse
• Det er udelukkende brugerens eget ansvar at vedligeholde dette apparat fra købstidspunktet.
Dette apparat kræver ikke rutinemæssig vedligeholdelse.
Udskiftning af et blokeret blus
• Din Carri Chef er udstyret med en bestemt størrelse blus til regulering af den korrekte mængde gas.
• Såfremt hullet i blusset bliver blokeret, kunne dette resultere i en lille amme eller slet ingen amme overhovedet. Undlad at rengøre blusset
med en stift eller anden genstand da dette kunne beskadige åbningen og bevirke at apparatet bliver farligt at benytte.
• Udskiftning af blus: Udskift de tre skruer på varmeafskærmningen (Fig. 21). Afmonter varmeafskærmningen (Fig. 22) og pas på ikke at
beskadige Piezo-elektroden. Blusset (B) kan nu afmonteres ved hjælp af en passende skruenøgle (Fig. 23). Undlad at bruge en tang på
blussene eftersom dette kan beskadige blusset, hvilket gør dem ubrugelige eller umulige at afmontere. Skru det nye blus fast på ventilen.
Undgå at overstramme idet dette kunne beskadige blusset.
• Udfør ovenstående procedure i omvendt rækkefølge for at samle apparatet.
Udskiftning af slange:
• Montering af en slange er beskrevet i afsnit 5 - Montering og udskiftning af slangen og gas asken.
Fig. 20 Fig. 21
8989
Page 91

Fig. 23Fig. 22
9. Rengøring
• Bemærk: Reservedele (se afsnit 7)
• Skottel grill: Efter endt brug bør brænderen efterlades på lavt blus med sæbevand i tilberedningsskålen for at blødgøre madrester. Når du er
tilfreds med mængden af fedt der er blevet fjernet, vaskes Skottel grillen i varmt vand med et egnet ikke skurende opvaskemiddel. Undlad at
benytte skarpe metal genstande eller skuremidler på den glasagtige emaljebelagte overade.
• Grill: Fjern fedtet fra bunden af fedtpanden og rengør som beskrevet for Skottel grillen. Vask risten og varmeskjoldet i varmt vand med et ikke
skurende opvaskemiddel efter du har fjernet al overskydende fedt efter tilberedningen.
• Grill-låg: Vask grill-låget i varmt vand med et egnet ikke skurende opvaskemiddel. Undlad at bruge skarpe metalredskaber eller skuremidler
eftersom det vil ødelægge belægningen.
• Bemærk: Til vanskelige pletter kan man bruge ovnrens.
Vedligeholdelse af slip-let belægninger:
• Slip-let kogeplader er overtrukket med en PTFE slip-let belægning der er blevet anvendt med stor succes på nogle af de bedste kogegrejer i
verden. Ikke desto mindre hjælper det hvis man tager hensyn, så kan man nyde glæde af slip-let kogegrejerne i mange år.
• Brug kun lav eller medium varmeindstillinger til at hjælpe med at beholde de vigtige næringsstoffer i fødevarerne og bevare slip-let kogepladen.
• Slip-let belægningen kan nemt blive beskadiget hvis man anvender køkkenredskaber af metal.
• Bemærk! Det anbefales at man udelukkende bruger plastik- eller træredskaber til madlavning.
• Undlad at overhede slip-let kogeplader og brug altid en smule olie inden madlavningen påbegyndes.
• Lad slip-let kogepladen afkøle inden du nedsænker den i vand.
• Slip-let belægningen kan uden problemer vaskes i opvaskemaskine men slip-let belægningen er så nem at rengøre at en hurtig håndafvaskning er
tilstrækkelig. Brugen af skuremidler anbefales ikke eftersom det vil permanent beskadige slip-let belægningen.
• Efter rengøring skal overaden smøres med en smule vegetabilsk olie.
• Efter hver brug skal man fjerne fedtet fra fedtpanden og rengøre som beskrevet ovenfor for grill.
10. Opbevaring og transport
• Din CADAC Carri Chef er udstyret med ere forskellige opbevaringsposer der giver stor bevægelighed og muliggør at du nemt kan opbevare
alle dele
der følger med din model i de medfølgende poser.
• Opbevar din Carri Chef på denne måde:
• Hovedposen kan rumme følgende dele:
• Brænderpande
• Fedtpande (hviler ovenpå brænderpanden)
• Det almindelige gasblus
• Grill-låget passer på bagsiden af posen med de medfølgende støttestropper.
• Skottel-posen kan rumme Skottel-skålen.
• Grill-ristposen rummer grill-risten.
• Posen til bradepanden rummer bradepanden.
• Grill 2 Braai rummer Grill 2 Braai
• Paella Pan rummer Paella Pan
• BBQ Plancha rummer BBQ Plancha
• Benene passer på bagsiden af hovedposen med de medfølgende støttestropper.
• Opbevar altid din CADAC Carri Chef i den medfølgende pose, på et tørt sted og om muligt ikke på jorden. Dette er særligt vigtigt når det
gælder brænderpanden der opbevares i hovedposen, for at kunne forhindre indtrængen af snavs og insekter der kan påvirke gasowet.
• Lad altid apparatet afkøle først inden du kommer det i en pose.
• Hvis apparatet ikke fungerer normalt efter opbevaring og du har udført alle kontroller der er omtalt i afsnittene 5 og 8, så er det muligt at
Venturien er blokeret. En blokeret Venturi opdgaes pga. en svag gullig amme eller slet ingen amme i ekstreme tilfælde. Under disse
omstændigheder er det nødvendigt at fjerne brænderen som beskrevet under afsnit 8 - Generel vedligeholdelse og for at kontrollere og
omhyggeligt rengøre Venturien for eventuelle urenheder der har hobet sig op.
9090
Page 92

11. Returnering af apparatet til reparation eller service
• Undlad at ændre på apparatet idet dette kunne udgøre en fare.
• Hvis du ikke er i stand til at udbedre en fejl ved at følge disse instruktioner, bedes du kontakte din lokale forhandler for oplysninger om
hvordan man returnerer produktet.
• Din CADAC Carri Chef er omfattet af garanti der er gældende i 2 år og dækker fabrikationsfejl.
12. Reservedele og tilbehør
• Brug altid originale CADAC reservedele da de er blevet fremstillet til at give den bedste ydeevne.
Beskrivelse Delnummer. Beskrivelse Delnummer. Beskrivelse Delnummer.
Blusnummer 0,92 (28/37mbar) 8910-SP001 Slip-let stegepande 8910-102 Stegepande 8910-105
Blusnummer 0,78 (50 mbar) 8910-SP002 Grill 2 Braai 8910-100 Pizza-sten 8910-106
Grillrist 8910-101 Skottel 8910-103 Alm. blus 8910-SP003
Skottel madvarmere* 8910-SP031* Non-stick liner* 8631* Paella Pan 47 5758
BBQ Plancha 8910-108
*Solgt i visse regioner kun
9191
Page 93
FORSIKTIG
NO
Kun til utendørs bruk!
Dette produktet kan ikke brukes i en utvendig balkong, veranda eller underholdningsområde!
VIKTIG
Les denne bruksanvisningen nøye for å gjøre deg kjent med produktet før du kobler det til gassbeholderen.
Ta vare på disse instruksjonene for fremtidig referanse.
1. Innledning
• Dette produktet er laget for å bli brukt til utendørs matlaging, spesielt for folk som liker camping for å nyte friluftslivet og kan også brukes på
en gårdsplass.
• Ulike typer mat kan tilberedes på dette apparatet. Carri Chef 2 er utformet for å utnytte ulike matlagingsoverater.
• Gass tilføres til enheten via en slange og regulator. Slangen og regulatoren kan kobles til gassaske, en gassylinder, eller en CADAC Power Pak
1000 som er en enhet som tar to gasspatroner. (Følger ikke med apparatet).
• Enheten er enkel å slå på, og bruke (beskrevet nedenfor i punkt 6) og brukeren kan styre varmetilførselen med en justerbar ventil.
• En oppskriftsbok følger med apparatet for å gi førstegangsbrukeren en introduksjon til utendørs matlaging.
2. Generell informasjon
• Dette apparatet er i samsvar med EN498:2012, EN484:1997 og SANS 1539:2012.
• Dette apparatet må kun brukes med godkjent slange og regulator (slange og regulator følger med enheten i SA).
• Advarsel: Tilgjengelige deler kan bli svært varme. Hold små barn unna.
• Powerpak 1000/gjenfyllbar sylinder skal brukes bare i stående stilling. (Tilleggsutstyr - medfølger ikke).
• Merk: For å sikre tilfredsstillende drift ved bruk av en PowerPak 1000 skal den alltid startes opp med fulle patroner og bare når den tiltenkte
periode med kontinuerlig drift er mindre enn ca. en time.
• Kun til bruk med en gassylinder som ikke overstiger 500 mm i høyden.
• Gassapparater krever ventilasjon for effektiv ytelse og for å ivareta sikkerheten for brukere og andre personer i umiddelbar nærhet. Bruk derfor
ikke apparatet i et uventilert område. Den er beregnet for utendørs bruk.
• Les disse instruksjonene nøye før bruk.
• Bruk bare ute!
BE, CY, DK, EE,
Bruksland
Produktkategorier I
Tillatte gasser Butane Propane Butan, propan eller deres blanding
Driftstrykk 28-30mBar 37mBar 37mBar
Jet-nummer 0.92 0.82
Nominell bruk 270g/hr 313g/hr 270g/hr 270g/hr
Brutto nom. varmetilførsel 3.7kW 4.3kW 3.7kW 3.7kW
Gassforsyningskilder
AE = United Arab Emirates AL = Albania AT = Austria BE = Belgium CH = Switzerland
CZ = Czech Republic DE = Germany DK = Denmark ES = Spain FI = Finland
FR = France GB = United Kingdom GR = Greece HR = Croatia IT = Italy
JP = Japan KR = Korea NL = Netherlands NO = Norway PL = Poland
PT = Portugal RO = Romania RU = Russia RS = Serbia SI = Slovenia
SK = Slovakia SE = Sweden TR = Turkey ZA = South Africa
BE, CH, CY, CZ, ES, FR, GB, GR, IE,
IT, LT, LU, LV, PT, SK & SI
3+(28-30/37)
En godkjent slange og regulator koblet til en gjenfyllbar gassbeholder som ikke overstiger 9 kg og
Landets navn og forkortelser:
overholder lokale bestemmelser.
PL
I
3B/P (37)
FR, FI, HU, IT,
LT, NL, NO, SE,
SI, SK, RO, HR,
TR, BG, IS,LU,
MT, & ZA
I
3B/P (30)
28-30mBar
(2.8kPa for South
Africa)
AT, CH, DE & SK
I
3B/P (50)
50mBar
9292
Page 94

3. Sikkerhetsinformasjon
Slange
• Dette apparatet kan bare brukes utendørs.
• En slange og regulator leveres med dette apparatet (bare SA).
• Slangen må kontrolleres for slitasje eller skader før hver bruk og før du kobler til
gassbeholderen.
• Ikke bruk apparatet hvis det har en skadet eller slitt slange. Bytt ut slangen.
• Ikke bruk apparatet hvis det lekker, er skadet eller ikke fungerer som det skal.
Gassbeholder
• Bruk bare en sylinder som er godkjent av landets forskrifter.
• Sørg for at gassbeholderen er montert eller byttes på et godt ventilert rom, helst
utendørs, vekk fra alle antennelseskilder som for eksempel åpen ild, piloter,
elektriske branner og bort fra andre mennesker.
• Hold gassbeholdere unna varme og amme. Ikke sett det på en komfyr eller andre
varme overater.
• Gasspatroner/gjenfyllbare sylindere skal bare brukes i oppreist stilling for å
sikre riktig tilbaketrekning av drivstoff. Unnlatelse av å følge dette kan føre til
væskeutslipp fra gassbeholderen som resulterer i en farlig driftstilstand.
• Ikke prøv å fjerne sylinderen mens enheten er i bruk.
• Et mellomrom har blitt gitt i midten av skuffen for plass til en gassylinder.
• Gassasken må kobles fra apparatet etter bruk eller når den er i lagring.
Montering og bruk
• Apparatet er konstruert for å være bærbart, derfor kan bena og skuffen lett fjernes/
festes.
• Brukermontering/demontering er begrenset til montering av beina, verktøyskuffen,
og installasjon/fjerning av matlagingsoverater.
• Når du monterer beina må du alltid sørge for at sikringsringene er skikkelig festet
og at det sammensatte produktet er stabilt og ikke vipper. Ikke bruk apparatet uten
å feste skuffen da det også spiller en viktig rolle i å sikre den totale stabiliteten på
apparatet.
• Bruk den bare på et fast underlag.
• Ikke prøv å ytt apparatet mens enheten er i bruk.
• Dersom varmeskjoldet, fettpannen eller brennerpannen blir skadet på en slik måte
at permanent kontakt mellom varmeskjoldet og fettpannen oppstår under bruk, må
du ikke bruke apparatet. Returnere den til din Cadac forhandler for reparasjon.
• Ikke dekk til eller endre luftehullene i ventildekslet da dette vil påvirke produktets
ytelse og kan føre til en ustabil amme.
• Sørg for at apparatet ikke brukes i nærheten av brennbare materialer. Minstekrav til
trygg avstand er: Over apparatet 1,2 m. På baksiden og sidene 600 mm. (Se g. 2)
• Forsiktig: Når du bruker apparatet, anbefaler vi bruk av vernehansker ved fjerning
og bruk av kuppelen, siden kuppelens håndtak kan bli varmt.
• Forsiktig: Tilgjengelige deler kan bli svært varme, bruk av vernehansker anbefales.
• Hold små barn borte fra apparatet.
• Bruk bare ute
• MERK! Hvis apparatet brukes i vind, må kuppelen brukes som vindskjerm, og settes
på plass som vist i g. 4.
Tilbakelys
• I tilfelle tilbakegnist (der ammen brenner tilbake og tenner inne i brenneren eller
venturi), slå umiddelbart av gasstilførselen ved å først lukke reguleringsventilen på
gassbeholderen og deretter apparatets ventil. Etter at ammen er slukket, fjerne
regulatoren og sjekk tilstanden til tetningen. Skift tetningen hvis du er i tvil. Tenn
apparatet på nytt som beskrevet i punkt 6 nedenfor. Hvis ammen lyser tilbake
igjen, returnere produktet til en autorisert CADAC serviceverksted.
Lekkasjer
• Hvis det er en lekkasje på apparatet (lukten av gass), umiddelbart lukk bryteren på
gassasken. Hvis du ønsker å sjekke for lekkasjer på apparatet, gjør det utenfor.
Ikke prøv å oppdage lekkasjer ved hjelp av en amme, bruk såpevann.
• Den korrekte måten er å smøre leddene med såpevann. Hvis en boble eller bobler
dannes så er det en gasslekkasje. Slå av gasstilførselen umiddelbart først ved å lukke reguleringsventilen på gassbeholderen og deretter apparatets
ventil. Kontroller at alle tilkoblinger er riktig montert. Kontroller med såpevann igjen. Hvis en gasslekkasje vedvarer, kan du returnere produktet til
din CADAC forhandler for inspeksjon/reparasjon.
• Kontroller for lekkasjer på halen av ventilen og på sylinderens regulatormontering med gassen åpen på sylinderen, men ikke åpen eller slått på med
apparatets kontrollbryter.
Monter
slangeklemme
her
Gjelder bare modellene:
8910-10, 8910-20,
8910-30, 8910-40,
9810-50, 9810-70
& 8910-50
RegulatorSlange
Forsegle
Flaskeventil
Fig. 1
Fig. 2
Fig. 3
VIND
Fig. 4
9393
Page 95

4. Kombo
Carri Chef 2 Skottel Combo 1 (Produktkode: 8910-10)
Kuppelhåndtak
Termometer
Kuppel
Skottel
Holder
Lokasjon
Fettpanne
Brennerpanne
Kontrollbryter
Ytre sikringsring
Støtteklips for kuppel
Skuffebrakett
Verktøyskuff
Legg
Fot
Fig. 5a
9494
Page 96

4. Kombo
Carri Chef 2 Skottel Combo 2 (Produktkode: 8910-11)
Skottel
Holder
Lokasjon
Fettpanne
Brennerpanne
Kontrollbryter
Ytre sikringsring
Støtteklips for kuppel
Skuffebrakett
Verktøyskuff
Legg
Fot
Fig. 5b
9595
Page 97

4. Kombo
Carri Chef 2 BBQ Combo 1 (Produktkode: 8910-20)
Kuppelhåndtak
Termometer
Kuppel
BBQ rutenett
Holder
Lokasjon
Fettpanne
Brennerpanne
Kontrollbryter
Ytre sikringsring
Støtteklips for kuppel
Skuffebrakett
Verktøyskuff
Legg
9696
Fot
Fig. 6a
Page 98

4. Kombo
Carri Chef 2 BBQ Combo 2 (Produktkode: 8910-21)
BBQ rutenett
Holder
Lokasjon
Fettpanne
Brennerpanne
Kontrollbryter
Ytre sikringsring
Støtteklips for kuppel
Skuffebrakett
Verktøyskuff
Legg
9797
Fot
Fig. 6b
Page 99

4. Kombo
Carri Chef 2 BBQ / Skottel Combo (Produktkode 8910-30)
Kuppelhåndtak
Termometer
Kuppel
Skottel
BBQ rutenett
Holder
Lokasjon
Fettpanne
Brennerpanne
Kontrollbryter
Ytre sikringsring
Støtteklips for kuppel
Skuffebrakett
Verktøyskuff
Legg
Fot
Fig. 7
9898
Page 100

4. Kombo
Carri Chef 2 BBQ / Panne med belegg Combo (Produktkode: 8910-40)
Kuppelhåndtak
Termometer
Kuppel
Panne med belegg
BBQ rutenett
Holder
Lokasjon
Fettpanne
Brennerpanne
Kontrollbryter
Ytre sikringsring
Støtteklips for kuppel
Skuffebrakett
Verktøyskuff
Legg
Fot
Fig. 8
9999
 Loading...