

Page 1

AF45 Auto Electronic Flash
Instruction Manual
Harvest One Limited
9D On Shing Ind. Bldg.,
2-16 Wo Liu Hang Road,
Fotan, Hong Kong
www.cactus-image.com
Printed in Hong Kong © Harvest One Limited
Page 2
Type P
Type N, O, S
Type C
Type O
Mounting
foot
Type S
Mounting
foot
1
2
3
4
5
6
7
8
25
26
27
28
9
10
11 12 13
14
15
16
17
18
19
20
21 22
23
24
29
Page 3

1
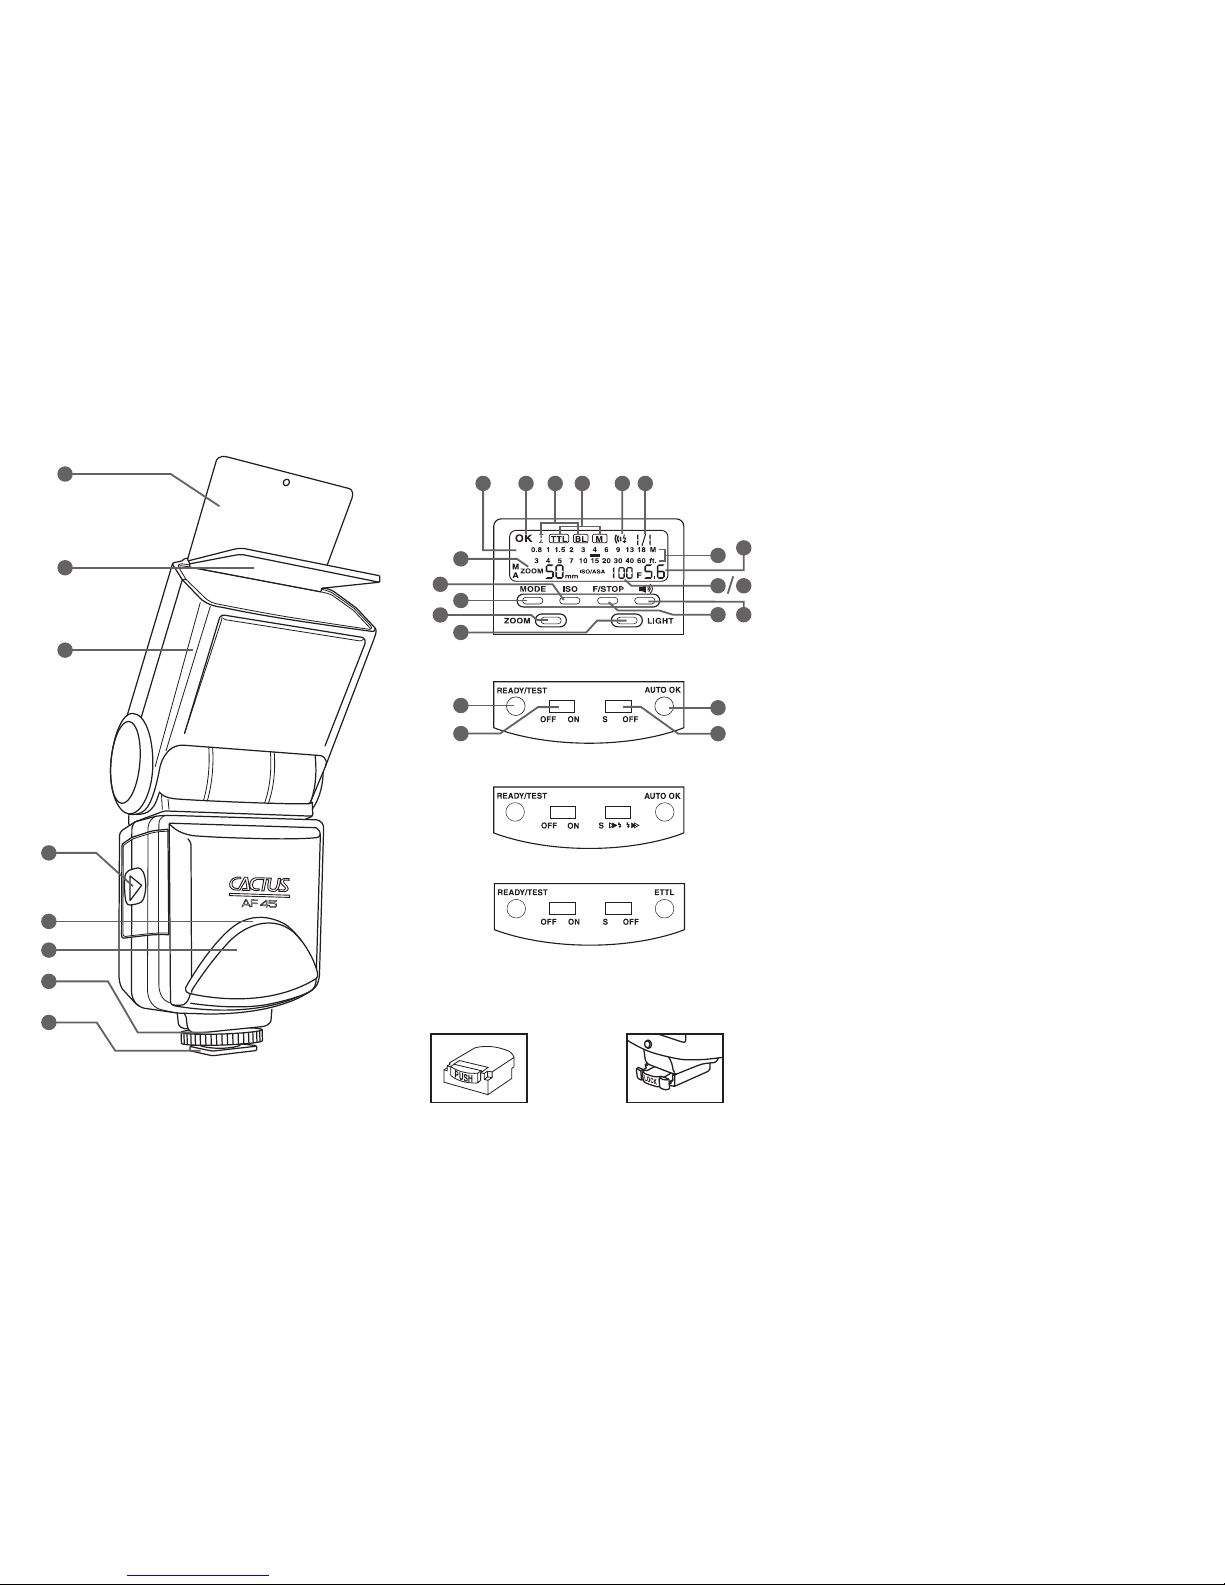
NOMENCLATURE
Reflecting Plate
Diffuser
Flash Head
Battery Compartment Cover
Slave Sensor
AF Red Light
Lock Ring
Mounting Foot
LC Display
Auto Check Indicator
Mode Indicator
Beeper Indicator
Power Level Setting
Flash Range Distance Bar
Power Off Indicator
Zoom Position
Film Speed Indicator
F-Stop Indicator
Mode Selector
Film Speed Selector
F/Stop Selector
Beeper On/Off
Zoom Selector
Back Light
Ready / Test
Power On/Off Switch
Slave Mode Switch
Auto OK
Mode Indicator (Type N only)
1.
2.
3.
4.
5.
6.
7.
8.
9.
10
11.
12.
13.
14.
15.
16.
17.
18.
19.
20.
21.
22.
23.
24.
25.
26.
27.
28.
29.
Page 4

2
IMPORTANT SAFEGUARDS
!
When using your photographic equipment,
follow the following basic safety precautions:
Do not fire flashes from a short distance
directly into the eyes of a person or animal.
This can cause damage to the retina and
may even lead to blindness.
Use only the power sources specified in the
operation instructions.
Never attempt to open or short-circuit
batteries.
Never expose dry or rechargeable batteries
to excessive temperature such as intensive
sunlight or fire.
Always switch off the flashgun before
changing batteries.
Do not attempt to open the flashgun
because the electronic circuit contains high
voltage.
In case the flashgun is so badly damaged
that the internal components are exposed,
the flashgun may not be used until it has
been repaired. Remove the batteries to
prevent inadvertent use.
Never try to repair the flashgun by yourself.
If there are any problems, contact the
customer service.
1.
2.
3.
4.
5.
6.
7.
8.
Page 5

3
TABLE OF CONTENTS
Introduction
4
Inserting Batteries
4
Attaching the Flash to the Camera
5
Removing the Flashgun from the Camera
5
On/Off Switch and Flash Test Operation
6
Automatic Flash Sync Speed Control
Auto-focus "AF" Measuring Flash
Shooting
6
TTL Flash Control
Manual Flash Mode at Full Light Output
Illumination of LC Display
6
Front and Rear-curtain Synchronization
8
Power Zooming
10
Bounce and Swivel Flash
9
Reflecting Plate and Diffuser
Off Camera Direct and Bounce Flash
Automatic Motor-zoom Control
Slave Function
11
Manual Motor-zoom Control
Power Saving Function
12
Troubleshooting
12
Specifications
13
Warranty
14
Optional Accessories
16
Page 6
4
Introduction
Thank you for purchasing Cactus AF45. This is an
innovative electronic flashgun for both digital cameras and
film cameras. Advanced technology is used in the flashgun
to control the correct amount of light output. Please take
few minutes to read the instruction manual before using.
The Cactus AF45 flash comes in 5 versions for different
camera brands:
C -
N -
O P S -
Canon Digital E-TTL, E-TTL II cameras & E-TTL film
cameras
Nikon Digital TTL, i-TTL cameras & TTL, i-TTL film
cameras
Olympus & Panasonic Digital TTL cameras
Pentax P-TTL Digital & film cameras
Sony Alpha & Minolta Digital ADI, D Lenses cameras &
TTL film cameras
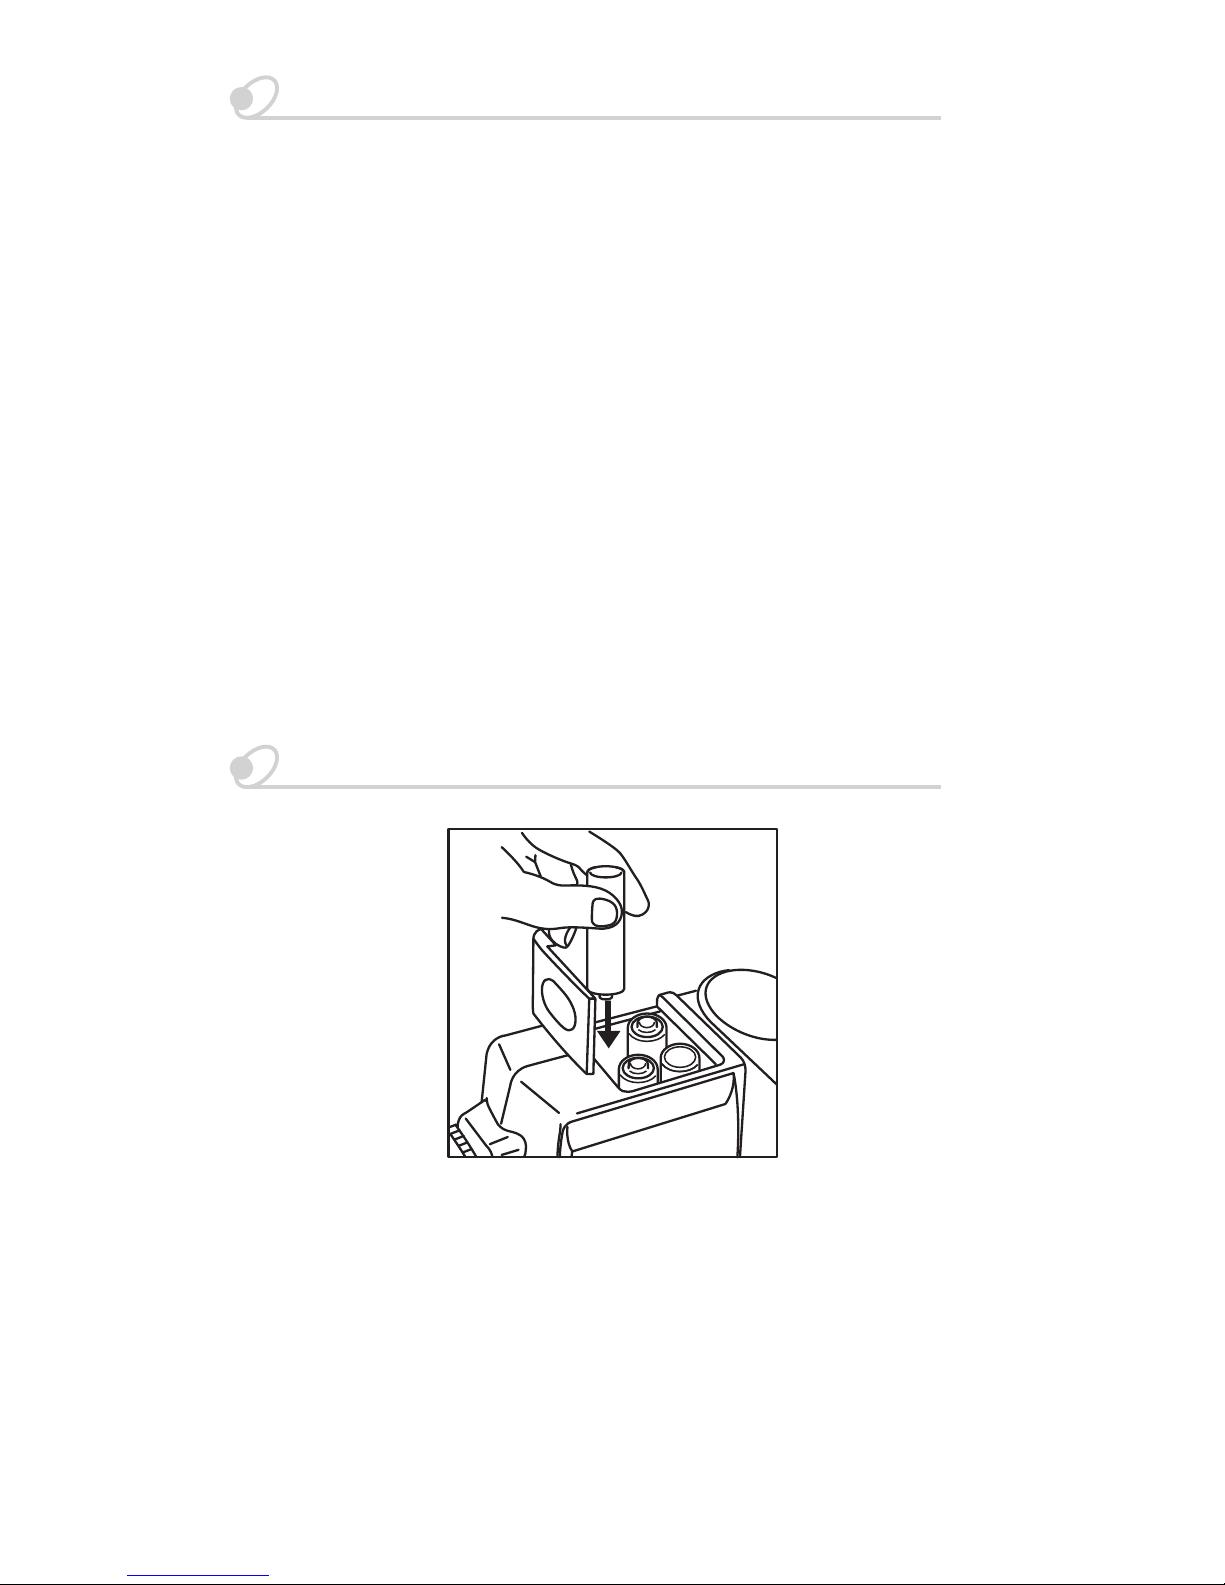
Inserting Batteries
Make sure the power switch is at "OFF" position.
Slide the battery compartment cover forward to open.
Insert batteries according to the indicated polarity.
Close the compartment cover and slide it back to lock in
place.
Ensure all batteries be of same make with the same
charge level, alkaline batteries are preferable.
1.
2.
3.
4.
5.
Page 7

5
Attaching the Flash to the Camera
Removing the Flashgun from the Camera
For Type C, N & P:
(for - S)
Loosen the lock ring.
Slide the flash into camera accessory shoe.
Tighten the flash with the lock ring.
1.
2.
3.
For Type O:
Insert the mounting foot of the flash to the camera
accessory shoe.
Press "LOCK" to lock the flash in place.
1.
2.
For Type S:
Insert the mounting foot of the flash to the camera
accessory shoe. The flash is then locked in place.
1.
For Type C, N & P: Loosen the lock ring and remove
the flash off backward.
For Type O: Press both sides of the Lock/Release
button towards the directions indicated then pull the
flashgun off backward.
For Type S: Push the Shoe Release button and pull the
flashgun off backward.
Page 8

6
On/Off Switch and Flash Test Operation
To switch on the flashgun, slide the power switch to "ON"
position. The "READY" indicator will light up as soon as
the flash is ready for shooting. Press the Test button to
ensure the flashgun works properly.
If the flashgun discharges completely, wait until the
"READY" indicator glows again. To switch off, slide the
power switch to "OFF" position.
Illumination of LC Display
LC display is used to show general information of the
camera and current status of the flashgun. LC display will
be illuminated for about 5 seconds every time the "LIGHT"
key is lightly tapped.
Shooting
Automatic Flash Sync Speed Control
When the flashgun is ready, the camera will automatically
adjust flash sync speed from program mode or
aperture-priority mode selected. The sync speed depends
on camera model and usually ranges from 1/30 sec to
1/250 sec. When a shot has been taken, "OK" symbol
flashes shortly on the LC display to confirm correct
exposure.
Page 9

7
TTL Flash Control
When the flashgun is switched on, it will automatically set
at TTL mode and the LC display will indicate "TTL". When
"Ready" indicator lights up, press the shutter release firmly
to shoot.
The advanced programming and computerized circuitry of
the flashgun provide correct amount of flash light output
according to the camera’s exposure measurement through
the lens (TTL). If you need to change mode, simply press
the mode selector.
For Type C flash: The ETTL indicator will light while
connected with ETTL cameras.
For Type N flash: The LC Display will show TTL, I-TTL or
BL in different way while connected to different camera
models. Please refer to the camera’s manual.
Manual Flash Mode at Full Light Output
Auto-focus "AF" Measuring Flash
The integrated "AF" red light beam of the flashgun
supports automatic focusing of auto-focus TTL cameras.
When prevailing light is insufficient for automatic focusing,
the flashgun will project a red light beam onto the object as
soon as the camera’s shutter is lightly touched. The
camera’s auto-focus system then focuses the object by
this spot of red light beam.
To use the flashgun at full light output in manual mode, the
mode selector must be set to M (Manual). A full-power
flash will be fired each time the flashgun is triggered. The
LC display automatically shows the flash-to-subject
distance required for a correct exposure. An adaptation to
individual shooting situation can be achieved by changing
the lens aperture or focal length (on the camera).
5 level "Power Ratio" of 1/1, 1/2, 1/4, 1/8 and 1/16 could
be selected by slightly tapping the Mode selector when it is
at the manual position.
Page 10

8
Front and Rear-curtain Synchronization
Some
cameras offer the option of rear curtain synchronization
(Rear mode) that triggers the flash unit at the end of the
exposure time. Rear curtain synchronization is particularly
advantageous when using slow shutter speed (slower than
1/30 sec.) or when shooting moving objects that has their
own source of light. Rear curtain synchronization gives a
more realistic impression of movement because the light
streaks behind the light source instead of building up in
front of it, as is the case when the flash is synchronized
with the front shutter curtain.
For Type P: Select the synchronization mode as front
curtain or rear curtain at the back of the flash. The flash
will fire according to the mode selected to match with the
camera shutter.
For Type C, N, O and S: The camera controls front or
rear-curtain synchronization, therefore no setting is
required to be done on the flash.
Note: Rear curtain synchronization is only possible on
cameras with this feature. See your camera’s
instruction manual for details.
Page 11

9
Bounce and Swivel flash
Using direct flash to illuminate a subject will result in harsh,
unnatural and unattractive shadows. This can be avoided
by bounce and/or swivel flash. The flash head of Cactus
AF45 can be tilted to an angle of 45°, 60°, 75°, or 90° and
rotated horizontally 180° to the left and 90° to the right.
You can tilt or rotate the flash head to bounce the light off
the ceiling or walls. When shooting indoor, this technique
can help create more natural-looking pictures of people
with softer shadows. While using bounce or swivel flash,
zooming position will be locked in 50mm except in manual
mode.
In order to have your pictures correctly exposed using
bounce or swivel flash:
Select white or reflective surfaces to bounce the light
off. Otherwise your pictures will come with unnatural
color cast similar to that of the reflecting surface.
1.
Set the camera’s exposure mode to Aperture Priority
Auto ("A") or Manual ("M").
2.
Use wider aperture than normally do, as 2 or 3 stops of
light can be lost when using bounce or swivel flash.
3.
Reflecting Plate and Diffuser
The flashgun has built-in reflecting plate and diffuser. You
can slide out the reflecting plate or diffuser from the top of
flash head. Bouncing the flash head and using reflecting
plate can produce more professional looking pictures. The
diffuser can reduce strong light to create soft effects.
Page 12

10
Off Camera Direct and Bounce Flash
Cactus AF45 can be operated wirelessly with Cactus
Wireless Flash Trigger. Off camera flash provides better
lighting control of your subject by placing AF45 at various
angles and distances without being hindered by wire. The
flash can be aimed either directly at the subject or at many
different types of reflective surfaces such as ceilings, walls
or photo umbrellas and still maintain fully automatic
exposure control and manual control.
Power Zooming
Automatic Motor-zoom Control
If you use a zoom lens, it could transmit focal length
information to the camera. The camera will pass this
information to the flashgun. The flashgun then
automatically adjusts its zoom position to comply with the
focal length of the lens. Automatic motor zoom control is
only possible with cameras that allow digital data
transmission to the flashgun.
The LC display on the flashgun indicates zooming position
of 24-28-35-50-70-85mm. When the flashgun is first
switched on, the zoom position is set to 35mm. As soon as
the camera’s shutter is lightly touched, the focal length of
the flashgun is automatically adapted to the focal length of
the lens. If the flash head is at bounce or swivel position,
the zooming position of the flash will be adjusted to 50mm
and indicated in the LC display as auto mode 50mm.
Page 13

11
Manual Motor-zoom Control:
The "Zoom" key permits you to change the zoom
reflector’s position that is independent of the focal length of
the lens.
By slightly tapping the "Zoom" key you can select the
zoom position in the following sequence:
Auto Zoom position → 24mm → 28mm → 35mm→ 50mm
→ 70mm → 85mm → Auto Zoom position
Slave Function
This flashgun can perform as a wireless slave by switching
Mode to "S". The flashgun will automatically switch to M
mode with power ratio 1:1. When the sensor detects a
flash from an external source, the flash will be triggered to
fire. The amount of light output can be controlled by
selecting the power ratio. The power ratio ranges from 1/1
to 1/16. If multiple flashes are used as slave unit, you must
adjust the light output from each flash in order to get the
correct exposure for your photos. When the slave mode is
on, the power saving mode does not function.
Page 14

12
Power Saving Function
If there is no communication between the flash and the
camera for around 3 minutes, the flash will automatically
switch to power saving mode in order to save battery
power. "OFF" sign will appear in the LCD. The Ready light
will be off while in power saving mode. To reactivate the
flashgun, press any push buttons underneath the LC
display panel or switch the main switch off and on again.
The flashgun is not completely switched off in power
saving mode. However, power consumption is drastically
reduced. If you are not going to use your flashgun for a
while, we recommend you to turn the flash off.
Troubleshooting
Check that AA Alkaline battery is used (not mercury or
lithium-ion) and that the batteries have not run out.
Make sure that the flash’s On/Off button has been
switched to "On".
Double check that all plastic battery wrapping has been
removed and that the battery is installed to the correct
polarity.
Switch the power dial to 1/16 power and press the Test
button for test fire.
Page 15

13
Specifications
Guide Number (ISO 100): 45(m)/148(ft) at 85mm
position
Motor Zooming Reflector: 24 - 28 - 35 - 50 - 70 - 85mm
Power Source: 4 x 1.5V AA size alkaline batteries
Flash Duration: 1/1,000 - 1/20,000 second
Recycling Time: 0.5 - 9 seconds
Number of Flashes: 80 times with fresh alkaline
batteries
Color Temperature: Daylight
Dimensions: Approx. 72 x 100 x 125 mm
Net Weight: Approx. 270 grams (w/o batteries)
Product specifications and external appearance are
subject to change without prior notice.
5 Level of Power Ratio: 1/1, 1/2, 1/4, 1/8 and 1/16
Front and Rear Curtain Synchronization
Red Eye Reduction for N, O, P only
Built-in Slave Function
Built in Reflecting Plate and Diffuser
Page 16

14
Warranty
The limited warranty set forth below is given by Harvest
One Limited in the world with respect to the Cactus brand
Flash AF45 purchased with this limited warranty.
Your Cactus Flash AF45 or other contents, when delivered
to you in new condition in its original container, is
warranted against defects in materials or workmanship as
follows: for a period of one (1) year from the date of
original purchase, defective parts or a defective Cactus
Flash AF45 returned to our authorized dealers, as
applicable, and proven to be defective upon inspection, will
be repaired with new or comparable rebuilt parts or
exchanged for a new Flash AF45 as determined by
Harvest One Limited or the authorized dealers.
This limited warranty shall only apply if the flash is used in
conjunction with compatible camera and flash equipment,
as to which items, Harvest One Limited, shall have no
responsibility.
This limited warranty covers all defects encountered in
normal use of Cactus Flash AF45 and does not apply in
any of the following cases:
Loss of or damage to the Flash due to abuse,
mishandling, improper packaging by you, alteration,
accident, electrical current fluctuations.
(a)
Failure to follow operating, maintenance or
environmental instructions prescribed in Cactus
user’s manual.
(b)
Receive services performed by someone other than
Harvest One Limited or authorized dealers.
(c)
Without limiting the foregoing, water damage,
sand/corrosion damage, battery leakage, dropping the
flash, scratches, abrasions or damage to the body, or
damage to the hot shoe or PC cables, will be presumed
to have resulted from misuse, abuse or failure to
operate the flash as set forth in the operating
instructions.
(d)
Page 17

15
NO IMPLIED WARRANTY, INCLUDING ANY IMPLIED
WARRANTY OF MERCHANTABILITY OR FITNESS FOR
A PARTICULAR PURPOSE, APPLIES TO THE FLASH
AFTER THE APPLICABLE PERIOD OF THE EXPRESS
LIMITED WARRANTY STATED ABOVE, AND NO OTHER
EXPRESS WARRANTY OR GUARANTY, EXCEPT AS
MENTIONED ABOVE, GIVEN BY ANY PERSON OR
ENTITY WITH RESPECT TO THE FLASH SHALL BIND
HARVEST ONE LIMITED. HARVEST ONE LIMITED
SHALL NOT BE LIABLE FOR
LOSS OF REVENUES OR
PROFITS, INCONVENIENCE, EXPENSE FOR SUBSTITUTE
EQUIPMENT
OR SERVICE, STORAGE CHARGES, LOSS
OR CORRUPTION OF DATA, OR ANY OTHER SPECIAL,
INCIDENTAL OR CONSEQUENTIAL DAMAGES CAUSED
BY THE USE OR MISUSE OF, OR INABILITY TO USE,
THE FLASH, REGARDLESS OF THE LEGAL THEORY
ON WHICH THE CLAIM IS BASED, AND EVEN IF
HARVEST ONE LIMITED HAS BEEN ADVISED OF THE
POSSIBILITY OF SUCH DAMAGES. IN NO EVENT
SHALL RECOVERY OF ANY KIND AGAINST HARVEST
ONE LIMITED GREATER IN AMOUNT THAN THE
PURCHASE PRICE OF THE CACTUS FLASH AF45 SOLD
BY HARVEST ONE LIMITED OR ITS AUTHORIZED
DEALERS AND CAUSING THE ALLEGED DAMAGE.
WITHOUT LIMITING THE FOREGOING, YOU ASSUME
ALL RISK AND LIABILITY FOR LOSS, DAMAGE OR
INJURY TO YOU AND YOUR PROPERTY AND TO
OTHERS AND THEIR PROPERTY ARISING OUT OF USE
OR MISUSE OF, OR INABILITY TO USE, THE CACTUS
FLASH AF45 NOT CAUSED DIRECTLY BY THE
NEGLIGENCE OF HARVEST ONE LIMITED. THIS
LIMITED WARRANTY SHALL NOT EXTEND TO ANYONE
OTHER THAN THE ORIGINAL PURCHASER OF
HARVEST ONE LIMITED, OR THE PERSON FOR WHOM
IT WAS PURCHASED AS A GIFT, AND STATES YOUR
EXCLUSIVE REMEDY.
Page 18

Optional Accessories
Cactus Wireless Flash Trigger Set V4
Compatible to Cactus AF45
Working radio frequency: 433Mz
16 channels selectable
Responding time: 1/500 - 1/1000 second
Support sync speed: up to 1/500 second (depending on
sync speed limitation of the flash unit)
Maximum effective area: 30 meters / 98 feet (open area
without interference)
Operating temperature: above -10°C (14°F) and below
45°C (113°F)
16
 Loading...