


2005
KITE MANUAL
CONTRA • NITRO • CO2 • ELEMENT

RELEASE OF LIABILITY
AND ASSUMPTION OF RISK
DO NOT USE THIS PRODUCT UNLESS YOU AGREE
WITH THE FOLLOWING TERMS AND CONDITIONS
IMPORTANT
WARNING!
THIS WARNING IS FOR YOUR OWN SAFETY
AND PROTECTION. IF YOU DO NOT AGREE
WITH THESE TERMS AND CONDITIONS, DO
NOT USE THIS PRODUCT. KINDLY RETURN
THIS PRODUCT BEFORE USING IT, AND
YOUR PURCHASE PRICE WILL BE
REFUNDED IN FULL. THE INFORMATION
CONTAINED IN THIS MANUAL IS FOR YOUR
REFERENCE AND MAY BE SUBJECT TO
CHANGE AT ANYTIME.
YOU MUST READ THE
INCLUDED USER MANUAL
BEFORE USING THIS
PRODUCT
IF YOU ARE BELOW THE AGE OF 18, YOU
SHOULD LET YOUR PARENT OR GUARDIAN
READ THE ABOVE STATEMENT AND THIS
MANUAL AND SHOULD NOT USE THIS
PRODUCT UNLESS UNDER PROPER GUIDANCE
AND SUPERVISION OF SUCH PERSON OR
PERSONS WHO HAVE READ THIS MANUAL.
FOR CURRENT UPDATES TO THIS MANUAL,
PLEASE VISIT OUR WEBSITE AT:
www.cabrinhakites.com
The purchaser/user of this product (if they
are not the same person) and the parent
and guardian of the user (if user is below
the age of 18) understands that the use of
this product may expose the user to certain
unavoidable risks, dangers, and hazards.
The purchaser/user of this product
voluntarily assumes these risks. Before
using this product, the purchaser/user has
carefully reviewed, understood, and agrees
to comply with the terms of the User's
Manual. The purchaser/user of this product
understands and agrees to comply with the
terms of the sale. The purchaser/user of
this product understands that the seller is
not responsible for any damage to property
or injury caused by negligent operation of
this product by the purchaser or user, and
the purchaser/user releases the seller from
all such liability. Kiteboarding is an adult
sport. Power kites and their lines and
control equipment can be dangerous to
flyers and to anyone in the vicinity of their
use. Kiteboarding must be taken seriously
and we recommend that, at least in the
early stages of your use, you seek the
guidance of professional instructors and
experienced kiteboarders. Improper and/or
negligent use of this kite may result in
serious injury or death to yourself and
others. Do not use your kite near power
lines, airports or streets, and keep your kite
fly lines away from people and obstacles.
Always fly in an open area, observe wind
and weather conditions, particularly in
circumstances where you may encounter
offshore winds or strong winds. Do not
attempt to use your kite on water until you
are confident and comfortable with the use
of a trainer kite on land. Spend time to
become familiar with the operation of your
kite and remember that you are responsible
for its safe operation and for the safety of
those around you. As you learn the sport,
work within your own limitations and do not
exceed them. If you intend to use the kite on
water, always use appropriate safety and
flotation devices and do not attach yourself
or tie yourself permanently to the kite lines.
The kite is not intended for use as a flying
device nor indeed is it intended as a means
of flotation.

2005 KITE MANUAL
CONTENTS
WARNING
CONTENTS
INTRODUCTION
SAFETY
Safety Information / Safety Gear / Weather Condition
Wind Range Chart
Know Your Ability Level / Kiteboarding Locations
KITE OVERVIEW
Kite with Recon Generation 2 Control System
Kite with Recon Generation 1 Control System
RECON SECURITY LEASH
& RELAUNCH SYSTEM
Important Information / Tips
Security Pin / Engaging / Releasing
TAP OUT™
Switching Modes
Launch Mode / Ride Mode
Important Recon System Care Tips
Resetting Your Recon System
Re-Launching With Your Recon System
BYPASS™ Leash / Tips
SET UP
Quick Release System (QRS)
Quick Release Operation / Resetting
SET UP - STEP 1
Set Up the Recon Generation 2 Powerlock Control System
Set Up the Powerlock Classic Control System
1.1 Check Your Line Lengths Before Going on The Water
1.2 Line Length Corrections
SET UP - STEP 3
Attaching Control Lines
Downwind Launch Setup
Upwind Launch Setup
SET UP
Tuning the Kite / Tips
KITEBOARDING BASICS
Area of Operation
Kite Positions, Zones, and Power
STEERING LAUNCHING & LANDING
Steering
Planning Your Launch
Launching with a Partner
Self-Launching
Landing a Kite to Your Partner
Re-Launching
REPAIRS
Replacing Flying Lines
Kite Fabric Repairs
Key Points to Remember
Repairing Strut Bladders
Repairing Leading Edge Bladders
IMPORTANT INFORMATION
Beach Etiquette
Kite Care
GLOSSARY
SET UP - STEP 2
2.1 Inflating the Struts
2.2 Inflating the Leading Edge
2.3 Tips for Securing Your Kite
2.4 Deflating the Leading Edge

2005 KITE MANUAL
INTRODUCTION
THANK YOU for purchasing a Cabrinha kite and
welcome to the sport of kiteboarding.
As you may know, the excitement of kiteboarding
is attracting people of all ages from all corners of the
globe. It's one of the most dynamic and fastest
growing sports of the new decade.
It can also be overwhelming if not approached in
an educated and safe manner. That's why we have
supplied this extensive user's manual. It will help to
educate you about your new kite and about the safe
ways in which to use it. It also contains information
regarding the set-up, care and maintenance of your
new kite so that you can spend as much time on the
water as possible.
Please read this user's manual carefully and
entirely before using this kite. This manual is not
intended to replace proper kiteboarding instruction,
but rather to supplement it. Do not attempt to
kiteboard without appropriate instruction. It will
make this sport safer, not only for yourself, but for
those around you.

SAFETY
SAFETY INFORMATION / SAFETY GEAR / WEATHER CONDITIONS
SAFETY INFORMATION
KITEBOARDING is an extremely diverse sport, with many disciplines and ability levels. As with
all sports, there can be certain inherent risks. The following contains key safety points to
remember when operating your Cabrinha kite.
• Be familiar with the set up and use of the supplied security systems:
the Recon Release with TAP OUT and the Quick Release systems.
• Make sure your Recon System is rigged and used according to the supplied instructions and that your
Recon compatible kite is used with a Recon compatible control bar system.
• Always use your Cabrinha kite with a security system.
• NEVER permanently attach yourself to this kite, the control bar, or lines.
• NEVER use this kite as a flying device.
• NEVER touch the kite lines while they are under tension; do not catch the kite using these lines.
• When inflated but not in use, secure your kite with sand or with something heavy and non-abrasive;
the more weight the better (see “Kite Care” for more information). An inflatable power kite will still fly,
even without a rider, so be mindful of those around you and secure your kite. Your kite may cause
serious injury or death if it launches unexpectedly.
• Do not lend your gear to someone who has not been fully instructed on the use of inflatable kites. Other
users should also read this user's manual and be proficient in all its points.
• Check your gear before going on the water. Insure that your flying lines, safety systems, kite, board, etc. are all rigged properly and are in working order.
WIND, WATER, AND WEATHER CONDITIONS
• Do not underestimate the power of the wind.
• Be aware of unpredictable and changing weather conditions.
• Avoid "offshore" wind conditions and use extreme caution in "onshore" wind conditions.
• Avoid strong, gusty wind.
• Be careful of wave conditions, especially when learning.
• Be educated about tides and rip currents.
• Be mindful of your ability level. Do not kiteboard if conditions are beyond your ability level.
• Be educated about air and water temperatures and wear appropriate protection against the elements.
• Do not use this product in thunderstorms.
• Consult an anemometer to determine wind speeds if necessary.
• Do not use an oversized kite. Consult your Wind Range Chart for the correct recommended size. Use your common sense. If in doubt about what
kite size to use, choose smaller rather than bigger.
SAFETY GEAR
WE STRONGLY RECOMMEND THE USE
OF THE FOLLOWING PROTECTIVE GEAR:
•HELMET
•LIFE JACKET, IMACT VEST,
OR FLOTATION VEST
•NEOPRENE WET SUIT
•GLOVES
•FOOT PROTECTION
•EYE PROTECTION
•SAFETY KNIFE
•SUNSCREEN

SAFETY
WIND RANGE CHART
This wind range chart is only to be used as a point of reference. It is based upon a rider who is approximately 170 lbs. (75 kg).
Actual use may vary based on your body weight, ability level, water conditions, board size , and riding style. When choosing a kite
size, please use your personal experience, common sense, and always check what other riders are using on the water for a size
reference.
CONTRA
NITRO
CO2 16
ELEMENT
RECON SIM
4 MPH 8 MPH 20 MPH12 MPH 16 MPH
3.5 KNOTS 6.9 KNOTS 17.3 KNOTS10.4 KNOTS 13.9 KNOTS 20.8 KNOTS
23.5
19.5
16.5
14
12
10
8
6.5
5
18
14
12
10
8
6
20
17
14
12
10
8
6
4
3
2
24 MPH
+++ +++
* How to read: Dark = best suited for. Gray = usable. White = not recommended.

SAFETY
KNOW YOUR ABILITY LEVEL / KITEBOARDING LOCATIONS
KNOW YOUR ABILITY LEVEL KITEBOARDING LOCATION
• Do not attempt kiteboarding without appropriate
instruction.
• Do not kite alone.
• Launch, land, and ride together with a partner or have
someone on shore who can keep an eye on you.
• Make sure you are in good physical condition before using
this product.
• Practice flying a small, traction kite or a "trainer kite"
before flying this kite.
• The more time spent on the "trainer kite", the safer and the
faster you will learn.
• Make sure you are a proficient swimmer before using this
product in or near the water.
• Make sure the wind and water conditions are within your
ability level and that you have made the correct equipment
choices.
• Never kiteboard further from shore than you are able to
swim back.
• Always save a reserve of energy; end your kiteboarding
session before you are exhausted.
• Make sure you've done your homework and that you know
the safety precautions of all aspects of the sport: rigging,
launching, landing, flying, riding, kiting among other water
users, self rescuing, etc.
• Understand your safety systems before ever launching your
kite.
• Understand the technique of self-rescue before using this
product in or near the water.
• Never let someone who is not familiar with inflatable kites
launch, catch, or use your kite. You will endanger them, as
well as yourself and those around you.
• You are responsible for the safe operation of your kite.
•Observe local laws and regulations regarding this
product and the usage area.
•Talk to the local riders about the weather conditions
and beach rules.
•Check your area thoroughly before launching your kite.
•Make sure you have considerable space in which to
launch, land, and use this product.
•You should have at least 100 meters of space on both
sides and downwind of you. Be especially aware of
your downwind area.
•Be mindful and aware of the wind direction in relation
to your launch area.
•Avoid areas with rocks and/or shallow or exposed
reefs.
•Be mindful of tide changes. As water levels change,
you may be exposed to new obstructions.
•Avoid launching, landing or using this product near
power lines, telephone poles, trees, people, pets,
buildings, automobiles, streets, sharp objects and
airports.
•Avoid crowded beaches and waterways.
•Make sure your lines do not cross a walkway or
passage.
•Do not let others walk between you and your kite.
•Be careful and mindful of other water users, including
windsurfers, boaters, jet skiers, swimmers, floating
objects, etc.
•Before launching, make sure you have scouted a safe
landing area, in case you do not make it back to your
launch spot.

1
0
KITE OVERVIEW
WITH RECON GENERATION 2 CONTROL SYSTEM
1
9
3 3
13 13
17 17
18
11
10
2
14
16
15
31
12
1. 4-LINE KITE
2. RECON BRIDLE ASSEMBLY
7
3. RECON REAR PIGTAIL
4. RECON TENSION FITTING (FRONT/REAR)
5. RECON LOAD TRANSFER TIP
4
6. RECON TENSION BULLET
8
7. RECON ACTIVATION LINE (ON TRAILING EDGE)
8. RESCUE HANDLES
6
5
4
9. TRUE MATCH 3-D BATTENS
10. DACRON LEADING EDGE
11. AIRLOCK HIGH VOLUME VALVE
12. STANDARD INFLATION VALVES
13. STEERING LINES (REAR CONTROL LINES)
19
18
21
22
20
23
14. DE-POWER LINES (FRONT CONTROL LINES)
15. CENTERLINE ADJUSTMENT STRAP
16. LINE STOPPERS
17. LEADER LINES
18. RE-LAUNCH ASSISTANCE BALL GRIPS
19. EVA QUICK RELEASE BEAD
24
25
2929
20. QUICK CONNECT RING
21. RELEASE PIN
22. LOCK SLIDE
23. RELEASE CAGE
24. RELEASE PLATE
25. LOCK BARREL
26. POWERLOCK LOOP
26
28
33
30
*diagram not to scale
27
30
32
27. POWERLOCK HOOK
28. SWIVEL BODY
29. BAR FLOATS
30. MULTI-FUNCTIONAL BAR ENDS
31. DE-POWER LINE
32. HARNESS LOOP QUICK RELEASE
33. RECON HARNESS LOOP W/ SECURITY PIN

KITE OVERVIEW
WITH RECON GENERATION 1 CONTROL SYSTEM
11
1
18
10
9
2
3 3
14
13
17 17
16
21 21
23
25
15
19
20
24
*diagram not to scale
12
7
4
8
6
4-LINE KITE
1.
RECON BRIDLE ASSEMBLY
2.
RECON REAR PIGTAIL
13
18
2222
3.
RECON TENSION FITTING (FRONT/REAR)
4.
RECON LOAD TRANSFER TIP
5.
RECON TENSION BULLET
6.
RECON ACTIVATION LINE (ON TRAILING EDGE)
7.
RESCUE HANDLES
8.
TRUE MATCH 3-D BATTENS
9.
MULTI-SEGMENTED DACRON LEADING EDGE
10.
AIRLOCK HIGH VOLUME VALVE
11.
STANDARD INFLATION VALVES
12.
STEERING LINES (REAR CONTROL LINES)
13.
DE-POWER LINES (FRONT CONTROL LINES)
14.
RECON CENTER LEADER LINE
15.
CENTERLINE ADJUSTMENT STRAP W/ RECON QR SYSTEM
16.
LEADER LINES
17.
RE-LAUNCH ASSISTANCE BALL GRIPS
18.
LINE STOPPER
19.
RECON RELEASE HANDLE
20.
BAR FLOATS
21.
MULTI-FUNCTIONAL BAR ENDS
22.
POWERLOCK FITTING
23.
POWERLOCK DE-POWER LINE WITH QUICK RELEASE
24.
RECON HARNESS LOOP W/ SECURITY PIN
25.
4
5

RECON GENERATION 2
RECON SECURITY LEASH & RELAUNCH SYSTEM
RECON GENERATION 2 - IMPORTANT INFORMATION
The Recon Security Leash & Relaunch System (RECON) is standard equipment on all of the 2004 & 2005 Cabrinha
inflatable kites. This patent pending system is both a unique security leash and a relaunch system, which allows the
rider to immediately turn off the power of the kite by activating the Recon's quick release handle. The same features that
de-power the kite also assist in quicker relaunching.
The Recon Security Leash and Relaunch System allows the rider to:
• Shut down the kite instantly by activating the Recon release handle.
• Water relaunch with ease.
• Spin the bar.
Tips
• All 2004 & 2005 Cabrinha kites must be used with Recon compatible control systems in order for the Recon's
IMMEDIATE DEPOWER™ feature to work properly.
• Furthermore, if a Recon compatible control bar is used with a kite that does not have the integrated Recon System
(e.g. a 2003 kite), it is dangerous to activate the Recon Release to de-power the kite. You may still use a Recon
control system on an older kite, but activating the Recon Release will actually power up the kite (not de-power it) on
a kite not equipped with the integrated Recon System.
• Using an older control bar system with the 2004 & 2005 Cabrinha kites will allow you to enable the relaunch feature
of the kite, but will not accommodate the IMMEDIATE DEPOWER™ feature.
• NOTE: We suggest that the Recon only be activated when considered necessary or when landing your kite.
• Before using the Recon, make sure your Recon system is set up correctly. It is important that you use the control bar
recommended for the kite.
• Before each session, check that the Recon is in working order.
• You should be familiar with the operation of the Recon in the event of a situation in which you wish to activate the
system. (see “TAP OUT™” & "TAP OUT™ (OPERATION)").
• Once the Recon is released, your kite will not fly until you manually reset the Recon on the center line.
(see “RESETTING THE RECON SYSTEM”).

RECON GENERATION 2
SECURITY PIN
SECURITY PIN
This security leash is Recon's Security Spinning Leash, and is active only when the rider
is hooked into the Harness Loop. Therefore it is important that a secure connection is
made between the Harness Hook and the Harness Loop. This system allows you to depower the kite completely, spin your bar freely, and re-launch your kite easily, all while
still being safely connected to your kite.
• You must be hooked into the Quick Release (QR) Harness Loop in order to activate
the Recon's IMMEDIATE DEPOWER™ feature.
• Insert the Security Pin into the Harness Hook under the Loop. (Fig.1)
• Make sure your Quick Release and Recon Systems are set up properly before
launching or engaging the Security Pin on your Harness Loop.
• We suggest that you engage the Security Pin only when on the water, not while on
land.
NOTE: Be advised that when the Security Pin is engaged, you have a semi-permanent connection to the kite. As a safety precaution, know where your
Quick Release Handle is and be educated on how to activate it before engaging the Security Pin.
SECURITY PIN - ENGAGING
1. Double check that your QR and Recon systems are set up
properly.
2.Hook into your harness loop. (Fig.2)
3.Once hooked into the harness loop, only engage the Security
Pin once you are safely on the water and at a safe distance
from any obstructions.
4. Insert the Security Pin into the center of the harness hook,
making sure it is below the harness loop. Your harness loop
must be between the harness hook and the Security Pin in
order for this feature to work properly. (Fig.3)
5.Make sure that the Security Pin is secure. This will keep your harness loop from accidentally dropping out of your harness hook. Your Security Pin
is now ready for use.
(Fig.2)
(Fig.1)
(Fig.3)
SECURITY PIN - RELEASING
You may disengage from the Security Pin in two ways:
A. With your hands, slide the Security Pin out of the harness
hook. (Fig.4)
B. Release the Quick Release Handle on your harness loop.
(Fig.5)
(Fig.4)
(Fig.5)

RECON GENERATION 2
TAP OUT™
TAP OUT™
Recon Generation 2 has added an important security feature by taking one step out of the release
activation equation. The new Tap Out™ feature allows the rider to simply push the control bar to
activate the Immediate DEPOWER™ function.
This second generation of Recon allows the rider to immediately turn off the power of the kite, even
while riding, by tapping the control bar against the release handle. The rider then stays connected
to the de-powered kite by a leash that is integrated into the harness loop. As long as the rider is
hooked into the harness loop, they are connected to the leash.
(Fig.1) (Fig.2) (Fig.3) (Fig.4)
Recon Generation 2 allows the rider to enable, or turn on the Tap Out™ security function prior to launching, landing, or at anytime while riding. This is
simply done by selecting the “Launch” mode on the Recon release. (Fig.1)
Whenever the rider is safely on the water they can choose to select the “Ride” mode on the release. (Fig.2) The “Ride” mode disables the Tap Out™
function and allows the rider to let go of the bar to un-spin his lines if necessary. (Fig.3)
The IMMEDIATE DEPOWER™ function can still be activated anytime in either the Launch mode or Ride mode, by lifting the release handle in the direction
of the kite. (Fig.4)
TAP OUT™ - Launch Mode The Tap out function is only
operable while in the Launch mode.
Prior to the launching of your kite, select LAUNCH on the mode selector
by pulling down on the lock barrel to align the arrow with the word
LAUNCH on the red release handle. The Tap Out™ function is now
enabled and can be activated by pushing the control bar against the
bottom of the release mechanism.
NOTE: In LAUNCH mode, it is not possible to let go of the control system
to spin the bar. Letting go of the bar may activate the Tap Out™ release
and trigger an immediate de-powering of the kite.
TAP OUT™ - Ride Mode This mode is to be used when you want
to be free to let go of the bar and un-spin the bar.
NOTE: When the RIDE mode is selected, the Tap Out™ function is
CAUTION! Know which mode you are in at all times in order to prevent an unintentional release of the Recon.
disabled. This means that you must manually activate the IMMEDIATE
DEPOWER™ release by pushing the red release handle in the direction
of the kite. Pushing the control bar against the release system will not
activate the Tap Out™ function.
Once safely on the water you may choose to select the Ride mode or
you can keep the Tap Out™ enabled by remaining in the LAUNCH mode.
To select the RIDE mode, pull down on the lock barrel and turn clockwise
or counter clockwise until the arrow lines up with the word RIDE on the
red release handle.
TIP: Hold the upper release plate and rotate the lock barrel. You will
see the bungee at an angle as an extra indicator that the system is in
RIDE mode. Be aware that until the system is in RIDE, the release can
be unintentionally activated by applying upward force to the system.

RECON GENERATION 2
TAP OUT™ (OPERATION)
(Fig.1a) (Fig.2) (Fig.3) (Fig.4) (Fig.1b) (Fig.2) (Fig.3) (Fig.4)
TAP OUT™ - while in LAUNCH MODE
1. To activate the IMMEDIATE DEPOWER™ function while in Launch
Mode, simply push the bar against the Recon Release Handle,
located at the base of the Centerline Adjustment Strap (CAS).
(Fig.1a)
2.This will release the Tap Out™ quick release below the Centerline
Adjustment Strap (CAS). (Fig.2)
3.Once the Tap Out™ quick release is activated, the CAS will slide up
the side leaders.
4.This will cause increased tension in the steering (back) fly lines and
create slack in the de-power (front) fly lines.
5.The Recon Bullet will then disengage from the Recon Tension Fitting
(RTF) on the wing tip of the kite. (Fig.3)
6. When the Bullet is disengaged from the RTF, the Recon Activation
Line will tighten around the trailing edge of the kite and collapse the
foil, effectively turning off the power of the kite.
7.The kite will fully de-power and will drop out of the sky toward the
water. (Fig.4)
If you activated the Recon while on the water, follow the steps of self-rescue and swim to shore. You may also reset the Recon (see “Resetting the
Recon”) and resume your session, if you choose, but note that this is an intermediate-advanced technique. If you activated the Recon system when
landing your kite, have your partner safely secure your kite on shore, reset the Recon, and then wind your lines on the control bar.
NOTE: The Recon System is intended to be used for landing your kite and for emergency situations only.
NOTE: The kite will not fly again until you manually reset the Recon on the CAS. (see “Resetting the Recon Release System”).
TAP OUT™ - while in RIDE MODE
1.To activate the IMMEDIATE DEPOWER™ function while in Ride Mode,
simply push the Recon Release Plate, located at the base of the
Centerline Adjustment Strap (CAS). (Fig.1b)
2.This will release the Tap Out™ quick release below the Centerline
Adjustment Strap (CAS). (Fig.2)
3.Once the Tap Out™ quick release is activated, the CAS will slide away,
while being contained by the side leaders.
4.This will cause increased tension in the steering (back) fly lines and
create slack in the de-power (front) fly lines.
5.The Recon Bullet will then disengage from the Recon Tension Fitting
(RTF) on the wing tip of the kite. (Fig.3)
6. When the Bullet is disengaged from the RTF, the Recon Activation
Line will tighten around the trailing edge of the kite and collapse the
foil, effectively turning off the power of the kite.
7.The kite will fully de-power and will drop out of the sky toward the
water. (Fig.4)

RECON GENERATION 2
SYSTEM CARE TIPS
IMPORTANT SYSTEM CARE TIPS
• When your kite is not in use, make sure to
reset the Bullet into the RTF on the wing tip of
the kite. This helps prevent the bridle lines
from becoming tangled with the Bullet. (Fig.1)
• Before winding your lines onto your bar, make
sure to reset your Recon System.
• When stowing your kite on the beach between
sessions, make sure to weigh your kite down
with sand in order to keep your kite from
flapping in the wind. This not only prevents
unnecessary wear on the kite fabric, but also
helps prevent your bridle lines and Recon
system from becoming tangled.
• Be sure to completely clear the RTF of all sand
and debris prior to launching or storing your
kite.
(Fig. 1)
• Contain your kite leaders on the attached
Velcro holders on the wing tips. (Fig.2)
(Fig. 2)

RECON GENERATION 2
RESETTING THE RECON SYSTEM
RESETTING THE RECON SYSTEM
Your Recon System can and should be reset before winding your lines on your control bar at the end of your session. The Recon can also be reset on
the water, if you choose, but please note this is an intermediate-advanced technique.
(Fig.1) (Fig.2a (Fig.2b) (Fig.1) (Fig.2) (Fig.3)
Instructions to reset your Recon (on water):
• While remaining hooked into your QR Harness Loop, swim or pull
yourself along the side leader lines toward the Centerline
Adjustment Strap (CAS).
Instructions
to reset your Recon
(on land):
• Reach forward and grab the CAS.
NOTE: DO NOT wrap the leader line, flying line, etc. around your hand.
Simply grab the CAS and pull it back toward you.
• Pull the CAS back toward the RECON release at the top of the depower line.
• Insert the release pin into the release cage. (Fig.1)
• Fold the release pin through the lock slide. (Fig.2 a & b)
• Pull down on the lock slide to allow the release pin to clear the top of
the release cage. (Fig.3)
•Make sure the release cage is over the release pin. NOTE: This step
is very important, because if you do not replace the release cage
correctly, the Recon may reactivate when you relaunch.
• Your Recon Release System is now reset.
• You are now ready to either relaunch your kite from the water or to
wind your lines onto your control bar.
(Fig.3)
NOTE: Make sure to keep yourself free of your flying lines.
• Reach forward and grab the CAS.
NOTE: DO NOT wrap the leader line, flying line, etc. around your
hand. Simply grab the CAS and pull it back toward you.
• Pull the CAS back toward the RECON release at the top of the de-power
line.
• Insert the release pin between the de-power lines. (Fig.1)
• Fold the release pin through the de-power lines. (Fig.2)
• Push the stainless steel ring up to allow the release pin to pass it,
pull down on the ring to make sure it contains the pin. (Fig.3)
• Make sure the ring is over the release pin.
NOTE: This step is very important, because if you do not replace
the release cage correctly, the Recon may reactivate when you
relaunch.
• Your Recon Release System is now reset.
• You are now ready to relaunch your kite from the water. Immediately
return to shore and reset the system. This reset is intended to get
you back to the beach and is not intended for long term flying. If
you get into further trouble, be ready to push up on the ring or pull
your QRS.

RECON GENERATION 2
RELAUNCHING WITH THE RECON SYSTEM
RELAUNCHING WITH THE RECON SYSTEM
The same features that de-power the kite also assist in quicker relaunching. The Recon's two key components are tightly integrated
into the construction of the kite as well as the control system to
reduce the added lines and tethers normally associated with
conventional leashes or reverse launch systems. There is no 5th
line, external wrist or harness leash, or a complex bridling system.
When the kite is leading edge down on the water, it can be rolled
into a side launch position by following these steps:
• Attached to each of your back (steering) leader lines you will
find Re-launch Assistance Ball Grips that will assist you in
re-launching your kite.
• Reach up on one of the back leader lines and pull the ball
and leader line toward your body. Pull sharply to disengage the Recon Bullet from the Recon Tension Fitting (RTF). Maintain
constant tension on this leader line. NOTE: Make sure not to wrap the leader line around your hand or to allow your body to get
entangled in it. (Fig.1)
• Once the bullet is disengaged, the trailing edge of the kite will then contract, and the kite will soon roll onto its side. (Fig.2,3,4)
• Once on its side, the kite will begin to move toward the edge of the wind window. You may have to finesse the kite to the edge of
the window; to do this, continue to hold onto the same leader line until the kite wants to re-launch. (Fig.5)
• When the kite is ready to re-launch, release the leader line, slowly steer the kite up into the sky, and level out your bar.
• Once you begin riding again, tension on your flying lines will reset the Recon Bullet into place in the RTF on the wingtip of the
kite.
1
2
3
4
5

RECON GENERATION 2
BYPASS LEASH
BYPASS™ LEASH (optional)
All 2005 Cabrinha kites can be used with the optional BYPASS™ Leash. This security leash is an optional feature and is
recommended for first time users and kiteboarding schools, and for riders who kiteboard without being hooked into the
harness loop.
The BYPASS™ Leash System leaves your hands free for board handling and comfort.
If you choose not to ride with the BYPASS™ Leash, follow the instructions on using the security pin to make sure you
have a positive connection to your kite.
TIPS
• Make sure you set up your BYPASS™ Leash properly before going on the water.
• When using your Cabrinha kite with the optional BYPASS™ Leash, you may activate the shutdown feature of the kite
by simply letting go of the control bar, as long as you are NOT hooked into the harness loop.
• If hooked into the harness loop when using the BYPASS™ Leash, you must first either unhook or activate the quick
release on your harness loop in order to utilize the BYPASS™ Leash System as a means of shutting the kite down.
NOTE: It is intended that when riding with the BYPASS™ Leash, the rider should not be hooked into the harness loop.

SET UP
QUICK RELEASE SYSTEM (QRS)
QUICK RELEASE SYSTEM (QRS)
• Make sure your QRS PULL TAB is facing you.
TIPS
• To avoid confusion, always ride with the Pull Tab facing the same direction. In the case of an emergency, you will know where it is.
• You should be familiar with the operation of the QRS in the event of a situation where you wish to activate the QRS feature.
(Fig. 1)
QRS - OPERATION
Grab the release tab and pull until
the curved pin is free. Under tension,
the Velcro will release the harness
loop. (Fig. 1)
QRS - SETTING / RESETTING
1. Slide the Velcro through the stainless steel D-ring. (Fig.2)
2. Fold the flap back over itself. (Fig.3)
3. Guide the grommet over the QR pin retainer. (Fig.4)
4. Slide the QR pin through the retainer. (Fig.5)
(Fig. 2) (Fig. 3) (Fig. 4)
5. Flatten the Velcro over the top of the QR pin. (Fig.6)
6. Close the thin Velcro around the system. (Fig.7)
7. Your QR system is now ready for use again.
(Fig. 5) (Fig. 6) (Fig. 7)
We supply a variety of Quick Release Systems (QRS) to aid you in your ability to release completely from your kite.

SET UP 1 - CONTROL SYSTEM
RECON GENERATION 2 POWERLOCK CONTROL SYSTEM
THE POWERLOCK CONTROL SYSTEM
The Powerlock Control System is a control system for 4-LINE kites.
The Powerlock Control System allows the rider to interactively lock
and unlock the power of the kite when hooked into the QRS Powerlock
Harness Loop.
The Powerlock fitting eliminates the need to have two harness loops
on the control bar. The rider has the benefits of both de-power and
fixed 4-line control with a single harness loop.
Tips
• Your kite should be tuned so that when the rider is unhooked
from the harness line the kite is fully sheeted in (powered), but
not over sheeted.
• You may fine-tune the power of the kite with the Centerline
Adjustment Strap.
• See the section on 4-Line Tuning for more explanation of 4-line
kite tuning capabilities.
CONTROL SYSTEM - OPERATION
PowerLock Hook
ENGAGED.
Kite is powered
and locked
TO LOCK
Pull the bar toward
you and engage the
PowerLock Hook into
Powerlock Fitting.
*Components
• CONTROL BAR with end fittings and Powerlock Fitting
• De-power Line with QRS
• 30cm Recon Harness Loop with Security Pin
(27cm, 33cm, and 36cm also available)
• Leader Lines (2) with INSTANT RE-LAUNCH™
Ball Grips (yellow = left ; black = right)
• Centerline Adjustment Strap with Recon Release Handles
• Bar Floats
PowerLock Hook
DISENGAGED.
Kite is de-powered
TO UNLOCK
Pull the bar slightly
toward your body
and using your
wrists, twist the
top of the bar
toward your body,
disengaging the
hook from the
Powerlock fitting.

SET UP 1 - CONTROL SYSTEM
POWERLOCK CLASSIC CONTROL SYSTEM
THE POWERLOCK CONTROL SYSTEM
The Powerlock Control System is a control system for 4-LINE kites.
The Powerlock Control System allows the rider to interactively lock
and unlock the power of the kite when hooked into the QRS Powerlock
Harness Loop.
The Powerlock fitting eliminates the need to have two harness loops
on the control bar. The rider has the benefits of both de-power and
fixed 4-line control with a single harness loop.
Tips
• Your kite should be tuned so that when the rider is unhooked
from the harness line the kite is fully sheeted in (powered), but
not over sheeted.
• You may fine-tune the power of the kite with the Centerline
Adjustment Strap.
• See the section on 4-Line Tuning for more explanation of 4-line
kite tuning capabilities.
CONTROL SYSTEM - OPERATION
PowerLock Hook
ENGAGED
Kite is powered
and locked
TO LOCK
Pull the bar toward you and engage
the PowerLock Hook into Powerlock
Fitting.
TO UNLOCK
Pull the bar slightly toward your body
and using your wrists, twist the top of
the bar toward your body, disengaging
the hook from the Powerlock fitting.
PowerLock Hook
DISENGAGED
Kite is de-powered
*Components
• CONTROL BAR with end fittings and Powerlock Fitting
• De-power Line with QRS
• 30cm Recon Harness Loop with Security Pin
(27cm, 33cm, and 36cm also available)
• Leader Lines (2) with INSTANT RE-LAUNCH™
Ball Grips (yellow = left ; black = right)
• Centerline Adjustment Strap with Recon Release Handles
• Bar Floats

SET UP 1 - CONTROL SYSTEM
1.1 CHECK YOUR LINE LENGTHS / 1.2 LINE LENGTH CORRECTIONS
1.1 CHECK YOUR LINE LENGTHS
The 2005 Powerlock control bars come set up with the flying lines attached;
however, it is wise to check your line lengths before going on the water. To do so,
follow the directions below:
• Loop a piece of line (any rope or cord) around a
tree or fence post.
• Tie the line in a knot around the tree, leaving a
piece long enough to attach all four lines.
• Roll out the flying lines from the post and set the
control bar on the ground, facing up, with the
yellow control lines on the left and the black control
lines on the right (looking from your bar to the
post). Make sure there are no obstructions in
between your bar and the post.
• Make sure your flying lines are not twisted or crossed.
• At the ends of the flying lines nearest the post you
will notice that there are eyelets on the rear
steering lines and front de-power lines. The
overhand knots on the front (de-power) lines are
there to eliminate incorrect connection to the kite.
• Take the rope attached to the post and feed it
through the eyelets on all four lines, with the yellow
on the left and the black on the right.
• Tie a bowline knot, with all four lines inside the loop.
• Walk back to the control bar.
• Make sure that the centerline adjustment strap is fully
extended, so that the kite is set up at full power.
• Standing directly in line with the post, pull back
hard and steady on the control bar by pulling straight back toward
yourself.
• Your control bar should be in line with your shoulders and should be
straight and not at an angle.
• All of the lines should have even tension under pressure.
(ie. no slack in the de-power lines or steering lines).
• If your control bar is even, your Powerlock Control System is ready to
attach to your inflated kite.
If your control bar is even, proceed to SET UP 2 - INFLATING YOUR KITE
If your control bar is NOT even, follow the instructions in
SET UP 1.2 - LINE LENGTH CORRECTIONS
1.2 LINE LENGTH CORRECTIONS
Adjustments are made by moving one or both of the knots on the ends of the
leader lines. Your goal is to have all four of your flying lines the same length.
• If one of the steering lines is too long, loosen the knot (located inside
of the Re-launch Ball on the long side) and move it toward the
control bar.
• If one of the steering lines is too short, loosen the knot (located
inside of the Re-launch Ball on the short side) and move it toward
the kite.
• Re-tighten the knot and check your line length again. (Fig.1) Adjust
again if necessary until the control bar is balanced.
• DO NOT put knots in your FLYING LINES. Knots in the flying lines
compromise the life of the line. Put knots only in your LEADER LINES.
• It is highly unlikely that your center (de-power) lines are uneven. If
they are, you may make the correction by adjusting the knots on the
Recon Center Leader Assembly. If the yellow-sheathed de-power line
is too long, move the knot on the left center leader line toward the
control bar. If this same de-power line is too short, move the knot
away from the control bar. If the black-sheathed de-power line is too
long, move the knot on the right center leader line toward the control
bar. If this same de-power line is too short, move the knot away from
the control bar.
• Once you've made the proper adjustment, check the bar again. All
four lines should be the same length and the bar should be
balanced. (Fig.1)
CORRECT
Control bar is even and parallel with
your shoulders.
INCORRECT
If your bar is at an
angle, your leader line
needs adjustment.
1
2

SET UP 2 - INFLATING YOUR KITE
STEP 2.1 - INFLATING THE STRUTS
INFLATING THE STRUTS
Hold the pump at a
perpendicular angle to
the valve. Use one hand
to hold the valve steady
and the other hand to
operate the pump.
1 2
See the section on Kite Care before inflating the struts of your kite.
• Unroll your kite with the struts facing up.
• Make sure your back is to the wind and that the leading edge of the kite is closest to your body. Secure the wingtips
with sand to keep the kite from flapping in the wind.
• Partially inflate the center strut, then the two middle struts, followed by the end struts.
• When inflating, hold the pump at a perpendicular angle to the kite valve. Use one hand to hold the valve steady and
the other hand to operate the pump. (Fig.1) This will help maintain the life of the internal bladder.
• When all struts are partially inflated, go back to each strut, making sure the internal bladders are lined up correctly.
• Confirm that the corners of each strut under the leading edge are able to fully inflate. Lightly push air around in the
bladders until the corners are free and correctly lined up.
• Now fully inflate each strut.
Secure Velcro covering
over each strut valve.
• When the strut is fully inflated, secure the valve plug and attach the Velcro covering across each valve. (Fig.2)
• Do not over-inflate the struts. You may damage the internal bladder by over-inflating it. If the strut is fairly solid to
the touch, it is fully inflated.
• Do not under-inflate the struts. This will cause poor performance and re-launching problems.

SET UP 2 - INFLATING YOUR KITE
STEP 2.2 - INFLATING THE LEADING EDGE
INFLATING THE LEADING EDGE
All Cabrinha kites feature the 2-part, high-volume Airlock Valve
as well as a standard valve on the leading edge bladder. The
Airlock Valve is for inflating and deflating your kite. The
standard valve's primary purpose is to keep the Airlock Valve
from twisting.
• Make sure that the release valve is seated firmly by turning clockwise. Do not over tighten
the release valve when the kite is not inflated. Doing so may twist and damage the
bladder.
• Check that the standard valve plug and Velcro covering are secure before inflating the bladder.
• Open the inflation cap by turning it counter-clockwise. Insert pump (use the adapter
tubing if using a hand pump) and inflate the leading edge.
• When the leading edge is fully inflated, remove pump valve and screw the inflation cap
back on. Lightly turn/tighten until inflation cap is firmly secure. Check that the release
valve is also still secure.
The Upper Section
is The Inflation Cap
The Lower Section
is the Release Valve
Under-Inflated KiteProperly-Inflated Kite
• Do not under-inflate or over-inflate the leading edge. Proper inflation will make it difficult
but not impossible to bend the ends of the kite in. If it is very easy to bend the wing tips
in, the leading edge is under-inflated. Your kite should be firm enough that while on its
back, the wing tips should extend into the air and the kite should retain its bowed shape.
If the leading edge is under-inflated, it may cause poor performance and re-launching
problems.
• Once the leading edge is properly inflated, turn the kite over and secure with sand.
(see SET UP|STEP 2.3 TIPS ON SECURING YOUR KITE)

SET UP 2 - INFLATING YOUR KITE
STEP 2.3 - TIPS FOR SECURING YOUR KITE
TIPS FOR
SECURING YOUR KITE
•Never leave an inflated kite unattended on the beach for
a long period of time. Winds may shift or change and the
kite may become unsecured and fly off.
• Always secure your kite with sand, using more weight
than you think you need. An unmanned kite is
dangerous.
• Never secure your kite with rocks or sharp objects
(including your board); they will compromise the life of
the kite. If you do not have a sandy beach launch,
consider sand bags.
• Do not leave an inflated kite (secured or not), directly
exposed to the wind for any length of time. This allows
the trailing edge to flutter excessively, which can
damage the kite or tangle the Recon System. If you must
leave the kite exposed to the wind on the beach, place
sufficient amounts of sand between each strut and near
the trailing edge to minimize or stop the fluttering. Also,
if possible, leave the kite in a shaded area.
• Make sure your Recon “Bullet” is reset in the Recon
Tension Fitting (RTF) (on the wingtip) when the kite is
not in use.
•Keep in mind other beach users and make sure your kite
and lines will not be a danger to others.
•Wind your lines onto the bar when you are not kiting. This
will keep the beach free of lines and will prevent other
beach users from becoming tangled in your equipment.

SET UP 2 - INFLATING YOUR KITE
STEP 2.4 - DEFLATING THE LEADING EDGE
DEFLATING THE LEADING EDGE
To deflate the Leading Edge, you must unscrew the release valve and not the
inflation cap. The release valve is the lower portion of the AIRLOCK.
After deflating, clear the valve of any sand or debris; then seal the valve before
stowing kite to prevent debris from getting inside internal bladder.
Important Note
When closing valve on deflated kite, hold bladder in place to prevent twisting the
bladder. Do not over tighten valve when kite is deflated. You may tighten it further
when kite is partially inflated again.

SET UP 3 - CONNECT & LAUNCH
STEP 3.1 - ATTACHING CONTROL LINES
ATTACHING CONTROL LINES
Once you have completed SET UP 1 & 2, you are ready to connect your control system to
your inflated kite.
1.With your lines laid out, carry the kite to the end of the flying lines farthest from your
control bar. Make sure the leading edge is facing into the wind.
2 Secure the kite with sand or sand bags. Do not secure kite with anything sharp or
abrasive.
3.You will notice four connection bridles on your kite (two on each wingtip). There are
three knots on each rear bridle and one larks head loop on each front bridle. Utilize the
middle knot on the rear bridle; the other knots are there for tuning purposes.
4.Slip the knot on your yellow-sheathed de-power (center) line into the larks head loop
on the yellow bridle on the left wing tip of the kite. Give the knot a tug to secure.
5.Using a larks head knot on the sheath of your flying line, attach your yellow steering
(outside) line to the yellow bridle on the left wing tip of the kite. Give the knot a tug to
secure.
6.Slip the knot on your black-sheathed de-power (center) line into the larks head loop on
the black bridle on the right wing tip of the kite. Give the knot a tug to secure.
7.Using a larks head knot on the sheath of your flying line, attach your black steering
(outside) line to the black bridle on the right wing tip of the kite. Give the knot a tug
to secure.
NOTE: See "KITE OVERVIEW" as reference
*diagram not to scale

SET UP 3 - CONNECT & LAUNCH
STEP 3.2 - DOWNWIND LAUNCH SET UP
DOWNWIND LAUNCH SET UP
1. Lay the bar 30 meters downwind of the kite so that the wing tips are facing the
control bar (the leading edge of the kite should be facing into the wind). When
setting the bar up downwind of the kite, you must turn the bar upside down before
walking the lines out. This means that as you are looking toward the kite from
behind, the yellow-sheathed lines will be on the right, while the black-sheathed
lines will be on the left.
2. Walk out the steering (outside) lines and using a larks head knot, attach them to
the middle knots on the trailing edge or back bridles (remember, yellow-to-yellow;
black-to-black).
3. Walk out the white de-power (center) lines and slip each knot into the larks head
loops on the corresponding leading edge or front bridles (remember, yellow-toyellow; black-to-black). Make sure that the de-power lines do not cross the steering
lines.
4. The lines should not cross each other or be twisted.
5. Your kite is now ready to fly. Please see the sections of this manual that relate to
safety and make sure you are familiar with the conditions before getting on the
water. Kite tuning tips are located in this manual under Tuning.
Your kite is now ready to fly
Please see the sections of this manual that relate to safety and make sure you are
familiar with the conditions before getting on the water. Kite tuning tips are located in
this manual under Tuning.
*diagram not to scale
SET UP 3 - CONNECT & LAUNCH
STEP 3.3 - UPWIND LAUNCH SETUP
UPWIND LAUNCH SETUP
This is the necessary set up when performing a self-launch.
1. Lay the bar 30 meters upwind of the kite. The leading edge will be pointed toward
the bar and into the wind. The wing tips of the kite will be facing away from the bar.
The control bar should be right side up.
2. Walk out the steering (outside) lines and place them parallel to each other on the
ground about 4 feet apart near the kite (remember, yellow-sheathed lines on the left
and black-sheathed lines on the right).
3. Place the steering lines far apart, so the kite will lie between them.
4. Walk out the de-power (center) lines and place them in between the steering lines,
parallel to each other, so that all four lines are lined up as follows (left to right):
yellow-sheathed yellow line, yellow-sheathed white line, black-sheathed white line,
black-sheathed black line. The lines should not cross each other or be twisted.
5. Place the kite on top of the de-power lines so the wing tips of the kite are pointing
downwind and are near the ends of your steering lines.
6. Make sure the kite is still secured with sand or sand bags.
7. From outside of the kite, attach the steering lines to the corresponding back bridles
on the wing tips (remember, yellow-to-yellow; black-to-black). Using larks head
knots, attach the steering lines to the middle knots on the bridles. Give each knot a
tug to secure.
8. From inside the kite, slip the knots on each of the de-power lines into the larks head
loops on the corresponding leading edge bridles (remember, yellow-to-yellow; blackto-black). Give each knot a tug to secure.
9. Again, double check to make sure that your lines do not cross each other, and are
not twisted.
Your kite is now ready to fly
Please see the sections of this manual that relate to safety and make sure you are
familiar with the conditions before getting on the water. Kite tuning tips are located in
this manual under Tuning.
*diagram not to scale

SET UP 4 - TUNING THE KITE
TUNING THE KITE - CONTRA / NITRO / CO2 / ELEMENT
TUNING THE KITE
Proper tuning of your CONTRA, NITRO, CO2 and ELEMENT kite is essential for best performance. A properly tuned kite
increases its efficiency, speed, and allows the kite to de-power correctly. The following guidelines will help you to properly
tune the kite to suit your style of riding.
1. All models have a desired sweet spot that is achieved by
the correct tension of the steering (back) and de-power
(front) lines. Fine-tuning of the kite may be done by
making small adjustments to the Centerline Adjustment
Strap (CAS.).
2. Do not 'over sheet' the kite. The first objective is to set the
kite's maximum power while allowing it to fly efficiently
across the sky. More power and quicker turning is
achieved by tensioning the steering (back) lines. This is
called 'sheeting in the kite'. There is however, a point of
diminishing returns. Too much back line tension will
cause the kite to fly slowly across the sky and not allow it
to fly to the edge of the power window.
View of kite from riders perspective.
Kite in the neutral position
directly above the rider.
fig.1
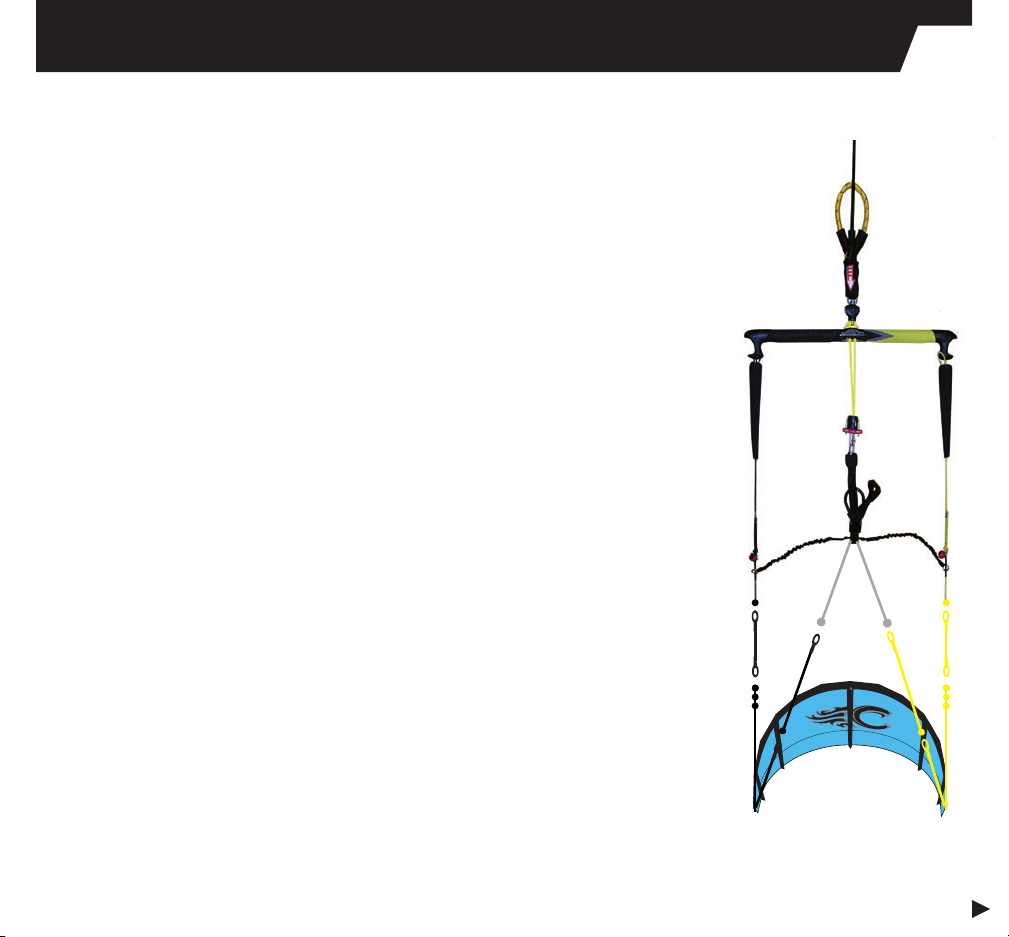
3. With the kite directly overhead, hook into the harness loop
and fully sheet in (power up) the kite. Observe the angle of
the wingtips in relation to the other inflated battens. A
common turning position is achieved when the wing tips
are parallel to the inflated battens and the steering (back)
lines are taught. (Fig.1) If the wing tips are flared outward
at the leading edge, the kite will be over sheeted. (Fig.2)
4. De-power the kite by pulling on the CAS until the desired
effect is achieved. The more you pull on the CAS the less
power the kite will have. Keep in mind that you will still be
able to de-power the kite through the Powerlock Loop, so
do not de-power too much with the CAS. To increase
power, pull down on the large plastic loop on the CAS.
Oversheeted wingtip
(too much back line tension)
fig.2
Correct Trim

KITEBOARDING BASICS
AREA OF OPERATION
AREA OF OPERATION
This is the 100 meters of area to each side and downwind of the rider. Do not launch your kite if you do not have this safe
distance between yourself and other people, or obstructions.
WIND DIRECTION
100 METERS
100 METERS
100 METERS 100 METERS

KITEBOARDING BASICS
KITE POSITIONS, ZONES & POWER
It is important to understand kiteboarding's basic zones of
power before you launch a kite. Many of the accidents that
happen in kiteboarding happen on land, and many also
happen when kiteboarders put their kites in what is called
neutral position. Unfortunately, people often think that the kite
is stable in neutral position. However, wind fluctuates-it gusts
and lulls-and in neutral position, something known as lofting
can occur when wind fluctuates. When a kite luffs (or receives
less wind in its foil), the kite will move slightly away from the
pilot. When a gust hits, the kite receives a surge of power, and
often that surge of power is too much for a kiteboarder
standing with the kite high overhead. As a result, the
kiteboarder may be lofted (lifted) into the air. Lofting can be
serious, but you may reduce the chances of lofting by
understanding the power zones, and by avoiding putting your
kite in the neutral position while on land.
Neutral Position - This is the position just above the pilot's
head in the sky. If the pilot levels out the bar, the kite will
gravitate to the neutral position. However, it is difficult and
dangerous to keep the kite in this position. Although in this
position the kite may feel steady and may feel like it has
the least amount of power or pull, it is also the position in
which on land the pilot is most susceptible to lofting. On
the water, the neutral position can be utilized to rest while
you reel in your board, but on land, we strongly suggest you
do not utilize the neutral position. After launching, it is best
to make your way to the water without delay. Do NOT linger
on land with the kite in neutral position. It is VERY
dangerous.
Neutral Zone - This is the area that includes the neutral
position and the area to the left and right of the pilot. It
encompasses the most upwind or windward positions in
which to fly the kite. When flown here, the kite has less
power or pull than when it is in the power zone. However,
use caution when the kite is in this zone, especially when
on land, and especially in gusty wind conditions.
Power Zone - This is the area in front and to the sides of
the pilot, but excluding the neutral position and zones. It is
the area in which the kite has the most power and pull.
When flown in this area, the kite can be powerful and
dangerous, so avoid flying your kite in this zone when
learning. Use extreme caution when flying the kite in this
zone.
Generating Power - One way to generate power from your
kite is by steering your kite from low to high or from high to
low in the sky. The movement of your kite in the sky creates
lift, which creates power. Keep this in mind, especially
when learning. When bringing the kite from a low position
up to the neutral position, the movement of the kite
actually creates power and generates speed, so be
prepared.
When under-powered, you may use this ability of the kite to
your advantage by creating power and speed to get
planing.

HOW TO: STEER / LAUNCH / LAND
STEERING
STEERING
Key Points to Remember
• When practicing steering a kite on land, always remember that your kite has extreme power. Be prepared and be
safe. We suggest you develop your kite handing skills on land with a Cabrinha trainer kite, and then move to the
water for further practice using the “body dragging” techniques with your power kite.
• When first learning to fly your kite, always keep your eyes on the kite.
• Steer slowly. Do not make any abrupt motions with the control bar.
• Keep in mind the power of the kite.
• Never turn the control bar like a car steering wheel. It is ineffective for steering the kite and may actually cause the
kite to become out of control.
Steering the Kite to the Left Steering the Kite to the Right
1. Hold the bar with both hands,
shoulder distance apart.
2. With your eyes on the kite,
slightly pull on the control bar
with your left hand, pulling it
toward your body.
3. This will allow your left arm to
bend and your right arm to extend. Keeping one arm
extended is important; do not pull both arms toward
your body at the same time.
4. Pull slowly. The quicker your movements, the faster
the kite will turn and the more power it will create.
5. Once the kite starts to turn, it will continue to turn
left unless you “tell it” otherwise.
6. Be ready to steer the kite in the other direction.
1. Hold the bar with both hands,
shoulder distance apart.
2. With your eyes on the kite,
slightly pull on the control bar
with your right hand, pulling it
toward your body.
3. This will allow your right arm to
bend and your left arm to extend. Keeping one arm
extended is important; do not pull both arms toward
your body at the same time.
4. Pull slowly. The quicker your movements, the faster
the kite will turn and the more power it will create.
5. Once the kite starts to turn, it will continue to turn
right unless you tell it otherwise.
6. Be ready to steer the kite in the other direction.

HOW TO: STEER / LAUNCH / LAND
PLANNING YOUR LAUNCH
PLANNING YOUR LAUNCH
• Choose an area where you have at least 100 meters of space to your left and right and especially downwind of you.
• Set up your equipment so that your kite is downwind of where you will be launching, but most importantly, so that it
is at an angle off of the wind.
• DO NOT SET UP YOUR KITE FOR A STRAIGHT DOWNWIND LAUNCH! The kite will launch with too much power and you
will endanger the lives of yourself and those around you if you launch in this manner.
• Basically, if the wind is at your back, and straight downwind is at a 180°, then you will want to set your kite at about
a 100° off the wind, either to the left or to the right of you.
• The more the kite is positioned into the wind when you launch, the less power it will have when it goes up, and the
safer your launch will be.
• Your partner will stand with the kite while you will stand 30 meters away at your control bar.
• Make sure you launch slowly and safely, and launch the kite at an angle, NOT STRAIGHT DOWNWIND!
180º
150º
150º
135º135º
DO NOT SET YOUR KITE
FOR A STRIGHT DOWNWIND LAUNCH
SAFE SAFE
30 METERS 30 METERS
RIDER
WIND DIRECTION
120º120º
90º90º

HOW TO: STEER / LAUNCH / LAND
LAUNCHING WITH A PARTNER
LAUNCHING WITH A PARTNER
1. Before launching, re-familiarize yourself with your Recon
Release System with TAP OUT, and your QR System in the
event that you must engage them. Make sure you have them
properly set up.
2. Next, thoroughly check your lines, your gear, and your
launching and landing sites; if all is okay, you are ready to
launch your kite.
3. Before you launch, organize a clearly defined release signal
that you and your partner both understand.
4. Set Tap Out to Launch Mode.
5. Next, engage the security pin.
6. Have your partner stand with the kite at 100° off of the
wind.
7. Your partner should hold the kite in the middle of the
leading edge, with the leading edge vertical and pointing
into the wind.
8. Your partner should stand behind the kite and not to the
side or in front of the kite.
9. Also, your partner SHOULD NOT touch the bridle or flying
lines.
10. With the control bar in your hands and at chest height, take
a few steps back to take the slack out of the flying lines.
11. If you are using the ByPass Leash, DO NOT hook into the
harness loop when launching. If you are NOT using the
ByPass Leash, then hook into your harness loop, but be
ready to activate the Recon Release System with TAP OUT or
to engage the QRS on your harness loop if necessary.
12. Signal your partner to let go of your kite. It is important that
your partner lets you steer the kite out of his or her hands.
13. Your partner SHOULD NOT throw the kite into the air.
Instruct him/her against doing this BEFORE you launch.
When the kite is thrown into the air, it hinders the ability of
the kite to launch properly. When thrown, the kite may either
launch too abruptly and powerfully or it may not launch at
all. It is a very dangerous way to launch.
14. Once your partner lets go of the kite, have him/her move
upwind of you and out of your way.
15. SLOWLY steer the kite to the edge of the power window. DO
NOT make any abrupt motions. The slower you steer the kite,
the safer and the more in control you will be.
16. With the kite at the edge of the power window and the wind
at your back, walk slowly to the water's edge, keeping in
constant check with the kite. You should know what the kite
is doing at all times.
17. If anything goes wrong with the launch, you should be ready
to first utilize the Recon Release System with TAP OUT, and
second to utilize the QRS.
18. WARNING: the more wind there is during your launch, the
faster everything will happen. That is why it is important
that you launch the kite slowly and safely.
19. Be sure your Recon Release System with TAP OUT is in
Launch mode.
20. When you are on the water and at a safe distance from any
obstacles, you may switch the Recon Release System with
TAP Out to Ride Mode. This will disable the TAP OUT
function. You must then manually shut down or de-power
the kite by moving the release plate in the direction of the
kite.

HOW TO: STEER / LAUNCH / LAND
SELF LAUNCHING
SELF LAUNCHING
1. First set your kite face down, with the leading
edge into the wind, at 100° to 110° off of the
wind.
2. Secure the kite with sand or sand bags. Do not
secure kite with anything sharp or abrasive.
3. Next, wind your lines out from the kite to the place
from where you will launch the kite.
4. Before launching, re-familiarize yourself with your
Recon Release System with TAP OUT and the QR
System in the event that you must engage them.
Make sure you have them properly set up.
5. Next, thoroughly check your lines, your gear, and
your launching and landing sites; if all is okay,
you are ready to launch your kite.
6. Check to make sure your lines are connected
properly and are not twisted or crossed.
7. Once you have thoroughly checked your lines, your
gear, and your launching and landing sites, you
are ready to set your kite up for self-launch. Turn
the kite on its side, with the leading edge facing
into the wind. (Fig.1)
8. Fold the bottom wing tip (the one closest to the
ground) over onto the kite. Make the fold at the
first strut. (Fig.2)
9. Weigh this wing tip down heavily with sand or
sand bags. (Fig.3)
10. Make sure that the flying lines and bridles are
free and will not catch on the struts when you
self-launch.
11. Avoid packing the Recon Tension Fittings with
sand or debris that may affect their normal
operation.
12. Quickly walk back to your bar, walking upwind
and staying free of the kite lines.
13. If you are using the BYPASS™ Leash, attach it at
this time. If you are not using the BYPASS™
Leash, proceed directly to Step 14.
14. Put the Recon Release System in Launch mode.
15. Hook into your de-power loop, but be ready to
activate the Recon Release System with TAP OUT.
16. With the control bar in both hands and at chest
height, take a few steps back to take the slack
out of the flying lines.
17. This will release the sand or sand bags from the
wing tip of the kite. (Fig.4)
18. As you take a few steps backward and steer the
kite up into the sky, the kite will fill with wind and
begin to rise. (Fig.5)
19. SLOWLY steer the kite to the edge of the power
window. DO NOT make any abrupt motions. The
slower you steer the kite, the safer and the more
in control you will be. (Fig.6)
20. With the kite at the edge of the power window and
the wind at your back, walk slowly to the water's
edge, keeping in constant check with the kite. You
should know what the kite is doing at all times.
21. If anything goes wrong with the launch, you
should be ready to first utilize the Recon Release
System with TAP OUT, and second to utilize the
QRS.
WARNING: the more wind there is during your launch,
the faster everything will happen. That is why it is
important that you launch the kite slowly and safely.
DO NOT set your kite up for self-launch and then wind
out your lines. Make sure your lines are laid out and are
correct before you set your kite in self-launch position.
The kite may launch accidentally while you are winding
out your lines.
Be sure your Recon Release System with TAP OUT is in
Launch mode.
TIP: Take special care to avoid packing the Recon
Tension Fittings with sand or debris that may affect its
normal operation.
When you are on the water and at a safe distance from
any obstacles, you may switch the Recon Release
System with TAP Out to Ride Mode. This will disable the
TAP OUT function. You must then manually shut down
or de-power the kite by moving the release plate in the
direction of the kite.
1
2
3
4
5
6

HOW TO: STEER / LAUNCH / LAND
LANDING A KITE TO YOUR PARTNER
LANDING A KITE TO YOUR PARTNER
1. Prior to launching, make sure your partner has been
instructed on how to land your kite properly.
2. Also, you should always determine adequate landing
spots before you launch your kite.
3. Having done that, make sure that when you are
heading toward shore, that your landing location is
still safe, un-crowded and un-obstructed.
4. Never land your kite over, on top of, or near others,
especially if they are downwind of you. You should
have an area clear of people, pets, power lines, trees,
and other obstructions.
5. As you approach shore, keep your kite low near the
water, at the edge of the power window.
6. Drop down (or step) off your board and body drag the
final distance to shore. Do not approach the shoreline
with speed.
7. Slowly steer your kite into the wind and to your partner.
8. Your partner should be on the windward side of your
kite as he/she approaches it.
9. Once the kite is nearly touching the ground, your
partner should grab the kite at the middle of the
leading edge strut. He/she should grab the kite in the
same location on the kite as when it was launched.
cause it to flip or spin; the kite will also be hard to
manage.
12. Once your partner has the kite's leading edge, he/she
should walk the kite away from the water's edge.
13. Your partner may either continue to hold the kite or
he/she may secure the kite by turning it over, with the
struts down and the leading edge pointed into the
wind, and securing it with sand or sand bags.
14. Once on land, with your kite secured, you may wind up
your lines.
10. Your partner SHOULD NOT grab the kite bridles or
flying lines.
11. Your partner should AVOID grabbing the kite by either
wing tip or the trailing edge of the kite. Grabbing the
kite by the wing tip or the trailing edge will often

HOW TO: STEER / LAUNCH / LAND
RELAUNCHING
RELAUNCHING
Important Note: Proper inflation of the struts, especially the leading edge, is imperative for water re-launchability of your
kite. Make sure your kite struts are properly inflated before entering the water.
1. When your kite goes down on the water, know that the
kite may re-launch on its own, often when you do not
expect it to, so be prepared.
2. If your kite goes down on its face, with the leading
edge and struts facing the water, you must steer the
kite onto its side in order to re-launch.
3. Attached to each of your steering (outside) leader lines
you will find Re-launch Assistance Ball Grips that will
assist you in re-launching your kite.
4. Reach up on one of the outside leader lines and pull
the ball and leader line toward your body. Pull sharply
to disengage the Recon Bullet from the Recon Tension
Fitting (RTF). Maintain constant tension on this leader
line. NOTE: Make sure not to wrap the leader line
around your hand and do not allow your body to get
entangled in the lines.
5. Once the bullet is disengaged, the trailing edge of the
kite will then contract, and the kite will soon roll onto
its side.
6. Once on its side, the kite will begin to move toward the
edge of the wind window. You may have to finesse the
kite to the edge of the window; to do this continue to
hold onto the same leader line until the kite wants to
re-launch.
wind window. Do not get impatient and start pulling
on both sides of the bar. This only confuses the kite.
Continue to work the kite to the original side you
chose.
8. When the kite is ready to re-launch, release the leader
line and steer the kite up into the sky. Slowly steer your
kite into the sky and level out your bar.
9. Once you begin riding again, tension on your flying
lines will reset the Recon Bullet into place in the RTF
on the wingtip of the kite.
7. Sometimes, especially in light wind, you must be
patient as the kite works its way to the edge of the

REPAIRS
REPLACING YOUR FLYING LINES - CONTROL SYSTEM
REPLACING YOUR FLYING LINES - THE POWERLOCK CONTROL SYSTEM
In order to replace your control system's flying lines, you must first remove the existing flying lines from the leader lines.
You may then attach new flying lines to the current leader lines, assuming the leader lines are in an acceptable
condition.
Connect Your New Flying Lines To The Leader Lines
1. Lay your Powerlock Control System face up on the ground approximately
30 meters away from a post or tree to which you will be attaching your
lines in order to check that the lengths are even (see Step 1.2).
2. Unwind and lay out the color-coded FLYING LINES between the post and
the control bar. You will have two sets of lines-the front (or inside) DEPOWER LINES and the back (or outside) STEERING LINES
3. Make sure your flying lines are not twisted or crossed. Do this by walking
down your lines, separating them from each other. Once you have them
separated, lay them down in this order from left to right while looking
from your control bar toward the end of the lines: yellow steering line,
yellow-sheathed white de-power line, black-sheathed white de-power line,
black steering line.
4. You will connect the steering lines to the leader with a "larks head to
larks head" connection. (Fig.1) Slide the leader through the loop on the
end of the control line. Then thread the end of the control line trough the
loop on the leader. By pulling the control line all the way though in this
manner you will end up with the proper connection. (Fig.2)
5. Pull the connection tight for a secure connection (Fig.3).
6. In order to replace your center lines, you must first create a larks head
loop with each of the de-power flying lines. You will then place the yellowsheathed loop over the knot on the left leader line on the Centerline
Adjustment Strap (CAS). Pull the connection tight to secure. Then place
the black-sheathed loop over the knot on the right leader line on the CAS.
Pull the connection tight to secure
7. Your flying lines are now connected to your leader lines, and you are ready
to make sure that all of your lines are even.
(Fig.1)
(Fig.2)
(Fig.3)

REPAIRS
KITE FABRIC REPAIRS
KITE FABRIC REPAIRS
Major Tears
For a major tear in the kite fabric, consult your dealer for a
reputable kite repair loft.
Minor Tears
For a minor tear in the kite fabric, you may repair the tear
with kite repair tape. Your kite has been supplied with an
adhesive kite repair material.
1. Clean and dry your kite.
2. Lay the kite flat on a clean, dry, smooth surface.
3. Cut two pieces of repair tape the same size, making sure
they are each big enough to cover the entire tear.
4. Carefully cover one side of the tear with a piece of the
repair tape. Gently rub the tape smoothly onto the surface
of the kite.
5. Next, cover the opposite side of the tear with the second
piece of repair tape, in the same manner as before.
6. Make sure the tape is secure.

REPAIRS
REPAIRING STRUT BLADDERS
KEY POINTS TO REMEMBER
• Before attempting to repair one of your kite bladders, make sure your kite is clean and dry. Always keep your kite pump, valves and bladders
free of sand, water and other things that will dirty them.
• Make sure the bladders are deflated.
• Avoid repairing your kite on the beach or in dirty, dusty, windy, or abrasive areas. It is best to find a clean, dry spot out of the wind. A grassy
spot is ideal.
• You will need a set of flying lines and a bladder repair kit (supplied with kite) before you begin to repair the bladder.
REPAIRING STRUT BLADDERS
1. First, lay the kite out with the struts facing up.
2. Detach the Velcro closure at the base of the
damaged strut. This will open up the sleeve of the
strut and will allow you access to the internal
bladder. (Fig.1)
3. Next, separate the valve plug from the Velcro closure
so that the valve is free from the strut's sleeve. This
will essentially disconnect the bladder from the
sleeve. Keep track of the valve plug for later use.
4. Tie one flying line around the valve. Cinch it down
well on the valve. Do not tie the knot through the
hole on the valve or you may damage it.
5. Gently insert the valve down into the strut sleeve.
6. Go to the base of the sleeve and gently pull the
bladder out of the sleeve, leaving the flying line
through the sleeve. Having the flying line through
the sleeve will allow you to easily replace the
bladder once it is repaired. (Fig.2)
7. Inflate the bladder and plug the valve so that it
maintains air. Do not over inflate the bladder.
8. Submerge the bladder in water to locate the hole. A
bathtub or large sink full of water is best.
9. Look for bubbles to locate the hole.
10.Once you have located the leak, dry the area and
mark the hole with a circle. A permanent marker
works best for this. (Fig.3)
11.Dry and clean the rest of the bladder with a soft
towel.
12.Again, deflate the bladder.
13.Decide whether to use the glue or a patch supplied
in your bladder repair kit.
14.If the hole is on a seam, you will need to glue the
area.
15.If the hole is on a flat area of the bladder, remove
the backing on one of the patches and press it onto
the bladder, covering the hole.
16.Set the bladder aside for approximately 20 minutes
to dry.
17.Again, inflate the bladder and check to make sure it
is now holding air.
18.If you have repaired the holes in the bladder, coat
the entire bladder in talcum powder to assist
insertion back into the sleeve.
19.Deflate once again.
20.Tie the flying line from the end of the strut opening
onto the valve.
21.Lay the bladder flat at the end of the strut, so that
you may now feed it back into the sleeve.
22.Gently feed the valve, followed by the rest of the
bladder, into the sleeve.
23.From the valve opening of the sleeve, you will pull
the flying line out of the sleeve, while pulling the
bladder back into place.
24.Once the bladder is replaced, pull the valve back
into the hole of the sleeve and remove the flying line
from its base.
25.Re-attach the Velcro at the base end of the sleeve.
(Fig.4)
26.Re-attach the valve plug.
27.Inflate the strut partially to make sure the bladder
fits into all four corners of the sleeve.
28.Inflate the strut entirely or deflate it if you are going
to store the kite.
(Fig.1)
(Fig.2)
(Fig.3)
(Fig.4)

REPAIRS
REPAIRING LEADING EDGE BLADDERS
1 2 3 4
5 6 7 8
REPAIRING LEADING EDGE BLADDERS
1. First, lay the kite out with the struts facing up.
2. Each end of the Leading Edge (LE) bladder is folded over and secured with a
Velcro closure. You will also find a zipper access pocket at the center of the
LE. Undo each Velcro closure and unzip the center access pocket. This will
open up the sleeve of the strut and will allow you access to the bladder.
(Fig.1,2)
3. Separate the Airlock Valve Assembly from the leading edge. Carefully lift the
retainer ring from the bladder. Keep track of the assembly for later use.
(Fig.3,4,5)
4. Next, on the standard valve, separate the valve plug from the Velcro closure
so that the valve is free from the strut's sleeve. This will essentially disconnect the bladder from the sleeve. Keep track of the valve plug for later use.
5. For the next step, you will need two flying lines. Starting with one end of the
leading edge, tie one line around the wing tip end of the bladder. Cinch the
line down well. Using the second line, follow the same procedure with the
other end of the leading edge bladder. (Fig.6)
6. Next, gently push the valves down into the strut sleeve.
7. Now, access the leading edge bladder through the zippered access pocket
near the leading edge valve. (Fig.7)
8. Gently pull one side of the bladder out of the sleeve at a time, leaving the flying line through both sides of the sleeve. Having the flying line through the
sleeve will allow you to easily replace the bladder once it is repaired.
9. Once out of the sleeve, inflate the bladder and plug both valves so that it
maintains air. Do not over inflate the bladder.
10. Submerge the bladder in water to locate the hole. A bathtub or large sink full
of water is best. You will need to submerge one section of the bladder at a
time in order to locate the hole. Look for air bubbles to locate the hole.
11. Once you have located the leak, dry the area and mark the hole with a circle.
A permanent marker works best for this. (Fig.8)
12. Dry and clean the rest of the bladder with a soft towel.
13. Again, deflate the bladder.
14. Decide whether to use the glue or a patch supplied in your bladder repair kit.
15. If the hole is on a seam, you will need to glue the area.

REPAIRS
REPAIRING LEADING EDGE BLADDERS
9 10 11
REPAIRING LEADING EDGE BLADDERS (Cont.)
16. If the hole is on a flat area of the bladder, remove the backing on one of the
patches and press it onto the bladder, covering the hole.
17. Set the bladder aside for approximately 20 minutes to dry.
18. Again, inflate the bladder and check to make sure it is now holding air.
19. Deflate once again.
20. Tie each flying line to the corresponding ends of the bladder.
21. Lay the bladder flat near the center access pocket and fold it, accordion
style, so that you may feed each end back into the sleeve without twisting the
bladder.
22. tarting with one end, feed the bladder into the access pocket.
23. Walk to one end of the leading edge and gently pull on the flying line, while
holding the end of the sleeve. Slowly feed the bladder back into this side of
the sleeve.
24. Next, follow the same instructions with the other side of the bladder, until the
valve is near the hole and the bladder is fully inserted.
25. Tuck the ends of the bladder into the corresponding tips. (Fig.9)
26. Once the bladder is replaced, pull the valve back into the hole of the sleeve.
(Fig.10)
27. Next, place the standard valve back into position and replace the valve plug
in the Velcro. (Fig.11)
28. Making sure not to catch the internal bladder in the zipper, close the center
LE zipper pocket. Next, fold over wingtip access pockets and secure the Velcro
strips.
29. Re-attach the Airlock Valve Assembly.
30. Partially inflate the Leading Edge to make sure the bladder fits into all four
corners of the sleeve.
31. Inflate the Leading Edge entirely or deflate it if you are going to store the kite.

IMPORTANT INFORMATION
KITE CARE
KITE CARE
Due to the often-extreme nature of kiteboarding, a thorough approach should be taken when caring for your kite and all
its associated rigging, as well as your safety gear.
PREPARING FOR YOUR SESSION
• Thoroughly check your safety equipment
(helmet, etc.) to make sure it is in
working order.
• A frequent inspection of the kite and
the control system should be made in
order to identify punctures, tears, or
abrasions in the canopy, struts, or
Recon System. It is also necessary to
check the fly lines for wear and for
unwanted knots, which may reduce the
strength of the fly lines.
• Do not rig on asphalt, cement, gravel,
or other abrasive surfaces; doing so
may damage your equipment. It is best
to rig on sand or grass. Damage done
to your equipment by rigging on
abrasive surfaces will not be covered
under warranty.
• Do not rig among sharp objects that
could tear the canopy or puncture the
struts and leading edge bladder.
• Take care not to expose your Recon
System or flying lines to sharp objects
that may wear through them.
• While setting up, secure your kite with
sand or sand bags. Do not secure your
kite with rocks or other sharp or
abrasive objects that may damage your
kite.
BETWEEN SESSIONS
• Never leave an inflated kite unattended
on the beach for a long period of time.
Winds may shift or change and the kite
may become unsecured and fly off.
• Do not leave an inflated kite (secured or
not), directly exposed to the wind for
any length of time. This allows the
trailing edge to flutter excessively,
which can damage the kite or tangle
the Recon System. If you must leave the
kite exposed to the wind on the beach,
place sufficient amounts of sand
between each strut and near the
trailing edge to minimize or stop the
fluttering
• Make sure your Recon “Bullet” is reset
in the Recon Tension Fitting when the
kite is not in use.
• Be sure to completely clear the RTF of
all sand and debris prior to launching
or storing your kite.
• Do not leave your kite exposed to
sunlight for long periods of time.
Between sessions, choose a shaded
area to secure your kite. When not in
use, stow away.
9 10 11
PROPER STORAGE
• It is recommended to wash your kite
with fresh water and dry thoroughly
before rolling and storing.
• Do not roll up kite when wet.
• Clear the kite of sand or other foreign
objects before stowing.
• Once it is clean and dry, stow your kite
in the supplied bag in a clean, dry, cool
place.
• Do not place heavy objects on the bag
containing the kite because the carbon
rods may be damaged.
• Do not leave your kite inflated in your
car or car rack box; exposing the kite to
extreme temperatures while inflated
may damage the internal bladders.
• Wash your control system with fresh
water from time to time by placing the
entire control system (with lines wound
onto the bar) into a bucket of fresh
water and let it sit for 5 minutes. Allow
to dry thoroughly before storing in a dry
location.
• Once it is clean and dry, stow your
control bar in the supplied bag in a
clean, dry, cool place.

IMPORTANT INFORMATION
BEACH ETIQUETTE
BEACH ETIQUETTE
Here are some basic things to consider when sharing beaches and water accesses with other users:
SAFETY SETTING UP
• Follow the safety instructions outlined in this manual.
• Follow the safety instructions and rules and regulations
posted at the beaches you use.
• Check with local kiteboarding associations or shops
prior to launching in a new area. There may be local
rules and regulations to follow which are not posted.
• Utilize common sense safety.
• Do not touch other people's gear, unless instructed to
do so by the owner. Picking up their bars, kites, etc. may
disrupt a setup ritual they have.
• Always secure your kite with sand or sand bags. An
unmanned kite is dangerous.
• Never leave an inflated kite unattended. Winds may
shift and cause the kite to become unsecured and fly
off.
• Set up only the gear that you plan on using
immediately. Deflate and put away your kites when
not in use.
• Set up in an area where you have plenty of space.
• Set up in a manner conducive to having multiple
users in the area.
• Roll up your lines when not in use.
• Always keep other beach and water access users in
mind when launching, landing, and kiteboarding.
• Yield to other beach users. Be courteous and
cooperative.
• Always be ready to lend assistance to other
kiteboarders. The favor may be returned sooner than
you think.
9 10 11

GLOSSARY
FREQUENTLY USED KITEBOARDING & WIND TERMINOLOGY
TRAINER KITE - a kite that may be used on land to simulate the motions
used in kiteboarding. It is an excellent instructional and learning tool.
Despite its small size, this kite still has power, so be alert.
INFLATABLE KITE - a kite with inflatable tubes designed to float the kite
and to facilitate water re-launchability.
FOUR-LINE INFLATABLE KITE - a water-re-launchable kite with four flying
lines and inflatable tubes.
STRUTS - the outer fabric tubes found on your kite. They house the inner
inflatable bladders, which are filled with air to give structure to the kite.
BLADDER - the inner inflatable tube found within the leading edge and
the struts of the kite. (Imagine a bike-it has both a tire on the outside
and an inner tube which holds air).
RECON SECURITY LEASH & RE-LAUNCH SYSTEM - Cabrinha's patented
system that is fully integrated into the 2004 & 2005 kites. Both a
unique security leash and a re-launch system, the Recon allows the
rider to immediately turn off the power of the kite by activating the
Recon quick release. It also assists in quicker re-launching
QRS-QUICK RELEASE SAFETY - connection points on the control systems
that the pilot may release in an emergency. QRS Harness Leash (Patent)
that is attached to the rider and kite, designed to disconnect you in an
emergency.
BYPASS™ LEASH SYSTEM - an optional security leash feature that is
recommended for first time users and kiteboarding schools, and for
riders who kiteboard without being hooked into the harness loop. This
leash system leaves your hands free for board handling and comfort.
CONTROL BAR - the steering device the pilot uses to steer the kite.
BRIDLES - the lines that hang from the wing tips of the kite. The flying
lines will be attached from the control bar to these bridle lines in order
to connect control bar to kite.
LEADER LINES - The lines that attach directly to the control bar. You will
attach these lines to the flying lines in order to connect them to your bar.
RE-LAUNCH ASSISTANCE BALL GRIPS - The plastic ball found on each of
the two steering leader lines. The ball assists you in getting a better
grip on your leader line when re-launching your kite.
FLYING LINES - a term used to describe all four of the lines included with
your kite package. These lines connect the bridle lines on the kite to the
leader lines on the control bar and are typically 20-30 meters in length.
STEERING LINES - the two outside flying lines that attach to the trailing
edge bridles on the kite-one to the left wing tip and the other to the right
wing tip.
DE-POWER LINES - the two center flying lines that attach to the leading
edge bridles on the kite-one to the left wing tip, the other to the right
wing tip. These lines assist in de-powering the kite.
HARNESS - a piece of equipment used to temporarily attach the rider to
the control bar harness line. This enables the rider to save energy by
utilizing their body weight and all of their muscles to hang on to the
kite. Most common are the waist harness (attaches around the torso)
and the seat harness (attaches to the waist and around the legs)
KITEBOARDING - the term used to describe the sport of power kiting on
water.
KITESURFING - another term used to describe the sport of power kiting
on water, but in waves.
NEUTRAL POSITION - This is the position just above the pilot's head in
the sky. If the pilot levels out the bar, the kite will gravitate to the
neutral position. However, it is difficult and dangerous to keep the kite
in this position. Although in this position the kite may feel steady and
may feel like it has the least amount of power or pull, it is also the
position in which on land the pilot is most susceptible to lofting. On the
water, the neutral position can be utilized to rest while you reel in your
board, but on land, we strongly suggest you do not utilize the neutral
position. After launching, it is best to make your way to the water
without delay. Do NOT linger on land with the kite in neutral position. It
is VERY dangerous.
NEUTRAL ZONE - This is the area that includes the neutral position and
the area to the left and right of the pilot. It encompasses the most
upwind or windward positions in which to fly the kite. When flown here,
the kite has less power or pull than when it is in the power zone.
However, use caution when the kite is in this zone, especially when on
land, and especially in gusty wind conditions.
POWER ZONE - This is the area in front and to the sides of the pilot, but
excluding the neutral position and zones. It is the area in which the kite
has the most power and pull. When flown in this area, the kite can be
powerful and dangerous, so avoid flying your kite in this zone when
learning. Use extreme caution when flying the kite in this zone.
LAUNCHING - the motion in which the pilot steers the kite from their
partner's hands into the sky.
9 10 11

GLOSSARY
FREQUENTLY USED KITEBOARDING & WIND TERMINOLOGY
LAUNCHING - the motion in which the pilot steers the kite from their
partner's hands into the sky.
SELF LAUNCHING - a technique in which the pilot launches the kite
without assistance, usually by weighting down a wing tip with sand
until he/she is ready to launch.
RE-LAUNCHING - the motion in which the pilot steers the kite off of the
water and back into the sky.
BODY DRAGGING - this is an instructional tactic / step in which the pilot
flies the kite while in the water, but without the board. The pilot will
launch, then walk to the water, and basically drag in the water while
practicing flying, re-launching and self-rescue techniques.
WATER STARTING - the motion of the pilot in which he/she goes from
sitting or lying in the water to standing on the board.
GYBING - the motion in which the pilot changes the direction of the
board he/she is riding. The pilot switches from a starboard tack to a port
tack or vice versa.
PLANING - the point in time in which the pilot gets the board skimming
on the water.
LANDING - the motion in which the pilot steers the kite into their
partner's hands on shore.
OVER-POWERED - a situation in which the pilot has a kite too powerful
for his/her ability level, weight, strength, and/or wind conditions.
UNDER-POWERED - a situation in which the pilot has a kite not powerful
enough for his/her weight, strength, and/or wind conditions.
REACH - a direction of travel relative to the wind direction. Generally 90160 degrees off the wind.
LULL - a term used to describe wind when it lessens in strength, for any
amount of time. A term also used to describe the complete de-powering
of a kite.
LUFF - a term used to describe what happens to the kite in a lull.
SIDESHORE - wind is blowing from the left or from the right, parallel to
the shore. Ideal wind direction for kiteboarding.
ONSHORE - wind is blowing directly or to a great extent directly from the
water toward the land. Utilize caution when operating your kite in or
near water in this wind direction.
SIDE ONSHORE - wind is blowing from either the left or the right and
from the water toward the land. This is a combination of onshore and
sideshore wind. Utilize caution when operating your kite in or near water
in this wind direction.
OFFSHORE - wind is blowing from the shore directly or to a great extent
out to the water. Do not operate your kite in or near water in this wind
direction.
SIDE OFFSHORE - wind is blowing from either the left or the right and
from the shore out to the water. This is a combination of offshore and
sideshore wind. Do not operate your kite in or near water in this wind
direction.
GUSTY WIND - wind is inconsistent and varies considerably from one
wind strength to another.
DOWNWIND - the direction in which the wind is traveling.
UPWIND - the direction from which the wind is blowing.
LEEWARD - the downwind side of the kiteboarder.
WINDWARD - the upwind side of the kiteboarder.
KNOTS - a measure of speed based on nautical miles.
1 knot = 1 nautical mile per hour.
1 knot = 1.15 miles per hour.
1 knot = 1.85 kilometers per hour.
MPH - Miles Per Hour. A measure of speed.
1 mph = 1.6 kilometers per hour.
BEAUFORT SCALE - a system for estimating wind strength based on the
effects wind has on the physical environment (eg. the behavior of
waves, smoke, etc.). Instruments are not used to determine wind
strengths in this point scale (O = calm to 12 = hurricane).
9 10 11
 Loading...