

Page 1

2018 CONTROL SYSTEM
USER MANUAL ENGLISH
Page 2

DO NOT USE THIS PRODUCT UNLESS YOU HAVE READ AND UNDERSTAND
THESE WARNINGS, CAUTIONS, AND INSTRUCTIONS WHICH ARE FOR YOUR
SECURITY AND PROTECTION. THIS INFORMATION MAY BE SUBJECT TO
CHANGE AT ANY TIME. FOR CURRENT UPDATES, PLEASE VISIT OUR WEBSITE
AT: WWW.CABRINHAKITES.COM
IF YOU ARE BELOW THE AGE OF 18, YOU SHOULD HAVE YOUR PARENT OR
GUARDIAN READ THESE WARNINGS, CAUTIONS AND INSTRUCTIONS AND
SHOULD NOT USE THIS PRODUCT UNLESS YOU ARE UNDER THE PROPER
GUIDANCE AND SUPERVISION OF SUCH A PERSON.
The use of this product exposes the user to many unavoidable and unexpected risks, injury,
DANGERS and HAZARDS. The suppliers of this product are not responsible for any damage to
property or any personal injury caused by any use, misuse, abuse or irresponsible use of this
product by the user.
Kiteboarding is a HAZARDOUS sport. Power kites and their lines and control equipment can be
DANGEROUS to flyers and to anyone in the vicinity of their use. Kiteboarding must be taken
seriously and we recommend that, at least in the early stages of your use, you seek the guidance
of professional instructors and experienced kiteboarders. Improper and/or unreasonable use of
this kite may result in DEATH or SERIOUS INJURY to ANY part of your body and to OTHERS. Do
NOT use your kite near power lines, airports, buildings, automobiles, trees, streets, parking lots,
rocks, piers, breakwaters, buoys, etc. and keep your kite fly lines away from people and ALL
obstacles. Always fly in an open area and observe wind and weather conditions, particularly in
circumstances where you may encounter offshore, onshore, variable or strong winds. Do NOT attempt to use your kite on water until you are confident and comfortable with the use of a trainer
kite on land. Spend time to become familiar with the operation of your kite and remember that
you are responsible for its operation and for the security of those around you. As you learn the
sport, work within your own limitations and do NOT exceed them. If you intend to use the kite on
water, always use appropriate protective gears and flotation devices and do NOT attach yourself
or tie yourself permanently to the kite lines. The kite is NOT intended for use as a flying device
nor indeed is it intended as a means of flotation.
Page 3

RECOMMENDED KITEBOARDING PRACTICE:
Kiteboarding is an extremely diverse sport, with many disciplines and ability
levels. As with all sports, there can be certain inherent risks. The following contains key security points to remember when operating your Cabrinha kite.
• Kiteboarding is a HAZARDOUS activity and the use of Kiteboarding equipment involves the
risk of serious personal injury to any part of the user’s body, or death.
• Injuries are an INHERENT RISK of kiteboarding and the participation in kiteboarding implies the user’s acceptance and assumption of those risks.
• Children should ALWAYS be under adult supervision.
• It is strongly recommended that beginners take lessons.
• ALWAYS inspect your equipment for signs of wear and tear each time before use, particularly all lines, canopy, bladders, screws and fittings.
• If ANY products are found to show signs of wear & tear, STOP using the product immediately and repair or replace before further use. If in doubt about any signs of wear & tear,
please contact your local vendor. Contact details are available from www.cabrinhakites.com
• NEVER place yourself in a situation where breakage of any one of the various kiteboarding
components would pose a risk to yourself or others, or make it difficult to return to the shore
securely & unassisted.
• Make sure you use properly designed and manufactured parts from reputable suppliers.
• Take time to study the conditions including sea state, tides, currents, weather conditions and
forecasts before you decide to go sailing. Beware of sailing in offshore, onshore, variable or
strong winds.
• Familiarize yourself with any new location before venturing onto the water. Ask the locals to
tell you about any hazards.
• Watch out for other beach users, especially swimmers and small children. Make sure you
keep your board and rig under control at all times and that they don’t get blown about on the
beach or in the water.
• Always use appropriate protective gear and flotation devices. Wear the correct protective
clothing for the conditions such as a wetsuit or a UV top.
• We STRONGLY recommend wearing a kiteboarding specific helmet
• Make sure someone knows where you’ve gone & when you are expected back – always sail
with a buddy.
• Be aware of the conditions as they change. ALWAYS return to the beach if there is a significant change in the conditions. i.e. wind dropping or wind & waves increasing.
• As you learn the sport, work within your own limitations and do NOT exceed them.
• Do NOT alter, modify or change this product.
• This product is designed and manufactured only for kiteboarding on water or snow.
• Keep these warnings, cautions and instructions for future reference.
• The following contains key security points to remember when operating your Cabrinha kite,
and associated kiteboarding equipment on water, land or snow.
Page 4

SNOW USE GENERAL GUIDELINES
• The points listed under the Recommended Kiteboarding Practice also apply to the use of this
product on the snow. Please read the previous paragraphs even if you intend to use this
product primarily on the snow.
• These kites are intended for use on the snow as a traction device to propel a rider across
wide open snow fields in a controlled and appropriate manner.
• Do NOT attempt to use this kite as a flying device. Do NOT use this kite to soar from ridges,
cliffs or slopes.
• Do NOT attempt to launch yourself into the air in any manner which can create excessive
impact to the rider upon landing.
• EXTREME caution must be taken when using this kite in any mountainous region, uneven terrain
or glacier. Wind conditions in these areas are notoriously unstable and can change in velocity
and direction without notice.
• ALWAYS use appropriate protective gear. We STRONGLY recommend wearing a
snowboarding specific helmet.
• Do NOT tether yourself to any stationary or moving object such as a stake, snowmobile, or
car while flying this kite.
• ALWAYS stay in control and be able to stop or avoid other people or objects
• SNOWKITE: People downwind or down slope have right of way. It is your responsibility to
avoid them
• SNOWBOARD: People down slope have right of way. It is your responsibility to avoid them
• You must NOT stop where you obstruct others or are not visible.
• Whenever starting or merging with others look upwind/up hill and yield to others.
• Always use retention devices while riding to help prevent runaway equipment. If you remove
he retention device for any reason, turn snowboard upside down and push the bindings into
the snow to prevent runaways.
• Observe any and all posted signs and warnings
• Keep out of closed areas
• SNOWBOARD: Prior to using any lift you must have the knowledge and ability to load, ride
and unload safely.
• Do NOT snowboard/snowkite when tired or under the influence of alcohol or drugs.
• Snow terrain and snowboarding/snowkiting conditions VARY CONSTANTLY--AVOID ANY
man made structures, trees, tree-wells, rocks, debris, variations in terrain or slopes,
avalanche areas, crevasse, cliffs, power lines, lift lines, water hazards, changes in snow
surfaces or texture due to altitude and sun exposure, wind and weather changes, and any other
conditions which could affect your ability to properly control your snowboard/snowkite.
Page 5

1
2018 CONTROL SYSTEM USER MANUAL
1X
2 Introduction
3 Important Information
4 Wind, Water, & Weather Conditions
5 Know Your Ability Level/Kiteboarding Location
6 Kite Care
7 Beach Etiquette
8 Area of Operation
QUICKLOOP 1X WITH OVERDRIVE
9 Fixed/Chaos Bar W/ Trimlite
10 OVERDRIVE 1X W/ Recoil
SETUP
11 Check Your Line Lengths
12 Line Length Corrections
13 Downwind Launch Setup
14 Upwind Launch Setup
OPERATION
15 Quick Release System
16 Security Pin
18 Fireball Release System
20 BYPASS™ Leash
21 Centreline Trim System
22 Security Line
24 Overdrive Bar Adjustment
25 Steering
26 PAUSE
27 Launching
28 Landing
29 Relaunching
30 Tuning
31 Glossary
CONTENTS
Page 6

2
2018 CONTROL SYSTEM USER MANUAL
Thank you for purchasing this Cabrinha product and welcome to the sport of kiteboarding.
As you may know, the excitement of Kiteboarding is attracting people of all ages from all
corners of the globe. It’s one of the most dynamic and fastest growing sports in the world.
Please read this user’s manual carefully and entirely before using this kite. This manual is
not intended to replace proper kiteboarding instruction, but rather to supplement it. Do not
attempt to kiteboard without appropriate instruction. It will make this sport more enjoyable,
not only for yourself, but for those around you.
INTRODUCTION
CAUTION:
Kiteboarding can be overwhelming if not approached in an educated
manner. That’s why we have supplied this extensive user’s manual. It will
help to educate you about your new kite and about the ways in which to
use it. It contains information regarding the setup, care and maintenance
of your control system. Please note that only compatible Cabrinha kites
will benefit from all of the security and performance functions associated with this control system. Consult www.cabrinhakites.com for a list
of compatible kites for use with this Control System.
Page 7

3
2018 CONTROL SYSTEM USER MANUAL
IMPORTANT INFORMATION
Kiteboarding is a hazardous sport, with many disciplines and ability levels. As
with all sports, there are inherent risks of injury. The following contains key
points to remember when operating your Cabrinha kite.
• Be familiar with the set up and use of the supplied security systems: Quickloop / Fireball 1x
and all the Quick Release systems.
• Make sure your control system is rigged and used according to the supplied instructions.
• Make sure your kite is compatible with the control system.
• Always use your Cabrinha kite with a bypass leash.
• NEVER permanently attach yourself to this kite, the control bar, or lines.
• NEVER use this kite as a flying device.
• NEVER touch the kite lines while they are under tension; do not catch the kite using these
lines.
• When inflated but not in use, secure your kite with sand or with something heavy and nonabrasive; the more weight the better (see “Kite Care” for more information). An inflatable
power kite will still fly, even without a rider, so be mindful of those around you and secure your
kite. Your kite may cause serious injury or death if it launches unexpectedly.
• Do not lend your gear to someone who has not been fully instructed on the use of inflatable
kites. Other users should also read this user’s manual and be proficient in all its points.
• Check your gear before going on the water. Insure that your flying lines, security systems, kite,
board, etc. are all rigged properly and are in working order.
PROTECTIVE GEAR
We strongly recommend the use of the following protective gear:
• Kiteboarding specific helmet
• Life Jacket, Impact Vest, or Flotation Vest
• Neoprene Wet Suit
• Gloves
• Foot Protection
• Eye Protection
• Knife
• Sunscreen
Page 8

4
2018 CONTROL SYSTEM USER MANUAL
IMPORTANT INFORMATION
WIND, WATER, AND WEATHER CONDITIONS
• Do NOT under estimate the power of the wind.
• Be aware of unpredictable and changing weather conditions.
• Avoid “offshore” or “onshore” wind conditions.
• Avoid strong, gusty wind.
• Be careful of wave conditions, especially when learning.
• Be educated about tides and rip currents.
• Be mindful of your ability level. Do NOT kiteboard if conditions are beyond your ability level.
• Be educated about air and water temperatures and wear appropriate protection against the
elements.
• Do NOT use this product in thunderstorms.
• Consult an anemometer and weather stations to determine wind speeds if necessary.
• Do NOT use an oversized kite. Consult your Wind Range Chart for the correct recommended
size. Use your common sense. If in doubt about what kite size to use, choose smaller rather
than bigger.
• Make certain that you are physically capable of operating the security Quick Release (QR) and
1X devices provided with this kite. This kite and control system has been designed around a
typical rider weight of 40 to 110kg.
Riders with a weight greater than 110kg may need to use more force to operate the QR than
lighter riders. Increases in wind strength may also result in greater force being required to operate the QR. Be certain to seek the advice of a professional such as your Authorized Cabrinha
Dealer about the performance of the security systems in relation to body weight.
Page 9

5
2018 CONTROL SYSTEM USER MANUAL
IMPORTANT INFORMATION
KNOW YOUR ABILITY LEVEL
• Do NOT attempt kiteboarding without
appropriate instruction.
• Do NOT kite alone.
• Launch, land, and ride together with a partner
or have someone on shore who can keep an
eye on you.
• Make sure you are in good physical condition
before using this product.
• Practice flying a small, traction kite or a
“trainer kite” before flying this kite.
• The more time spent on the “trainer kite”, the
faster you will learn.
• Make sure you are a proficient swimmer
before using this product in or near the water.
• Make sure the wind and water conditions
are within your ability level and that you have
made the correct equipment choices.
• NEVER kiteboard further from shore than you
are reasonably able to swim back.
• ALWAYS save a reserve of energy; end
your kiteboarding session before you are
exhausted.
• Make sure you’ve done your homework and
that you know the security precautions of
all aspects of the sport: rigging, Launching,
landing, flying, riding, kiting among other
water users, self rescuing, etc.
• Understand and practice operating your
security systems before ever launching your
kite.
• Understand the technique of self-rescue
before using this product in or near the water.
• NEVER let someone who is not familiar with
inflatable kites launch, catch, or use your kite.
You will endanger them, as well as yourself
and those around you.
• You are responsible for the proper operation
of your kite.
KITEBOARDING LOCATION
• Observe ALL local laws and regulations
regarding this product and the usage
area.
• Talk to the local riders about the
weather conditions and beach rules.
• Check your area thoroughly before
launching your kite.
• Make sure you have considerable
space in which to launch, land, and use
this product.
• You should have at least 100 meters
of space from all objects on both sides
and downwind of you. Be especially
aware of your downwind area.
• Be mindful and aware of the wind
direction in relation to your launch area.
• Avoid areas with rocks and/or shallow
or exposed reefs.
• Be mindful of tide changes. As water
levels change, you may be exposed to
new obstructions.
• Avoid launching, landing or using this
product near power lines, telephone
poles, trees, people, pets, buildings,
automobiles, streets, sharp objects
and airports.
• Avoid crowded beaches and
waterways.
• Make sure your lines do not cross a
walkway or passage.
• Do NOT let others walk between you
and your kite.
• Be careful and mindful of other water
users, including windsurfers, boaters,
jet skiers, swimmers, floating objects,
etc.
• Before launching, make sure you have
scouted a backup landing area, in case
you do not make it back to your launch
spot.
Page 10

6
2018 CONTROL SYSTEM USER MANUAL
KITE & CONTROL SYSTEM CARE
Due to the often extreme nature of kiteboarding, a thorough approach should be taken when
caring for your kite and all its associated rigging, as well as your protective gear.
PREPARING FOR YOUR SESSION
• Thoroughly check your protective
equipment (helmet, etc.) to make sure it is
in working order and in good condition.
• A frequent inspection of the kite and the
control system should be made in order
to identify punctures, tears, or abrasions
in the canopy, struts, or security systems.
It is also necessary to check the fly lines
for wear and for unwanted knots, which
may reduce the strength of the fly lines.
Check bridle lines and pulleys for wear
and replace when necessary.
• Do NOT rig on asphalt, cement, gravel,
or other abrasive surfaces; doing so may
damage your equipment. It is best to rig
on sand or grass. Damage done to your
equipment by rigging on abrasive surfaces
will not be covered under warranty.
• Do NOT rig among sharp objects that
could tear the canopy or puncture the
struts and leading edge bladder.
• Take care NOT to expose your flying lines
to sharp objects that may wear through
them.
• While setting up, secure your kite with
sand or sand bags. Do NOT secure your
kite with rocks or other sharp or abrasive
objects that may damage your kite.
BETWEEN SESSIONS
• NEVER leave an inflated kite unattended
on the beach for a long period of time.
Winds may shift or change and the kite
may become unsecured and fly off.
• Do NOT leave an inflated kite (secured
or not) directly exposed to the wind
for any length of time. This allows the
trailing edge to flutter excessively. Any
excessive fluttering may quickly break
down the finish properties of the material
and reduce it’s longevity. If you must leave
the kite exposed to the wind on the beach,
place sand or sand bags onto the areas of
the kite, near the trailing edge until the flutter
is stabilized. Do not use rocks or other sharp
objects.
• Do NOT leave your kite exposed to
sunlight for long periods of time. Between
sessions, choose a shaded area to secure
your kite. When not in use, stow away.
PROPER STORAGE
• DO NOT store your control system in an
area of high heat (such as inside a vehicle)
or in direct UV light. To do so may result in
deformation of the EVA components and
functionality of the control system.
• ALWAYS dry your kite prior to rolling or
folding. Folding or rolling a kite when wet may
affect the color clarity and longevity.
• Clear the system of sand or other foreign
objects before stowing.
• Once it is clean and dry, stow your control
system in a clean, dry, cool place.
• Do NOT place heavy objects on the control
system while storing.
• Wash your control system with fresh water
from time to time by placing the entire control
system (with lines wound onto the bar) into
a bucket of fresh water and let it sit for 5
minutes. Allow to dry thoroughly before
storing in a dry location.
• Once it is clean and dry, stow your control
system in a clean, dry cool place.
• Do NOT leave your kite inflated in your car
or car rack box; exposing the kite to extreme
temperatures while inflated may damage the
internal bladders.
IMPORTANT INFORMATION
Page 11

7
2018 CONTROL SYSTEM USER MANUAL
BEACH ETIQUETTE
Here are some basic things to consider when sharing beaches and water accesses with
other users:
SAFETY
• Follow ALL of the instructions outlined in this manual, other manuals and installation guides.
• Follow the instructions and rules and regulations posted at the beaches you use.
• Check with local kiteboarding associations and shops prior to launching in a new area. There
may be local rules and regulations to follow which are not posted.
• Utilize common sense.
• Do NOT touch other people’s gear, unless instructed to do so by the owner. Picking up their
bars, kites, etc. may disrupt a setup ritual they have.
• ALWAYS secure your kite with sand or sand bags. An unmanned kite is dangerous.
• NEVER leave an inflated kite unattended. Winds may shift and cause the kite to become
unsecured and fly off.
SETTING UP
• Set up only the gear that you plan on using immediately. Deflate and put away your kites
when not in use.
• Set up in an area where you have plenty of space.
• Set up in a manner conducive to having multiple users in the area.
• Roll up your lines when not in use.
• ALWAYS keep other beach and water access users in mind when launching, landing, and
kiteboarding.
• Yield to other beach users. Be courteous and cooperative.
• ALWAYS be ready to lend assistance to other kiteboarders. The favor may be returned
sooner than you think.
IMPORTANT INFORMATION
Page 12

8
2018 CONTROL SYSTEM USER MANUAL
RIDER
SAFER SAFER
POTENTIALLY HAZARDOUS
:
DO NOT SET YOUR KITE FOR A
STRAIGHT DOWNWIND LAUNCH.
IMPORTANT INFORMATION
PLANNING YOUR LAUNCH
• Choose an area where you have at least 100 meters of space from all obstacles to your left
and right and especially downwind of you.
• Set up your equipment so that your kite is downwind of where you will be launching, but most
importantly, so that it is at an angle off of the wind.
• DO NOT SET UP YOUR KITE FOR A STRAIGHT DOWNWIND LAUNCH! The kite will
launch with too much power and you will endanger the lives of yourself and those around you
if you launch in this manner.
• Basically, if the wind is at your back, and straight downwind is at a 180°, then you will want to
set your kite at about a 100° off the wind, either to the left or to the right of you.
• The more the kite is positioned into the wind when you launch, the less power it will have when
it goes up, and the easier your launch will be.
• Your partner will stand with the kite while you will stand 30 meters away at your control bar.
• Make sure you launch slowly, and launch the kite at an angle, NOT STRAIGHT DOWNWIND!
AREA OF OPERATION
This is the 100 meters of area with no obstacles to each side and downwind of the rider. Do not
launch your kite if you do not have this distance between yourself and other people, or obstructions.
Page 13
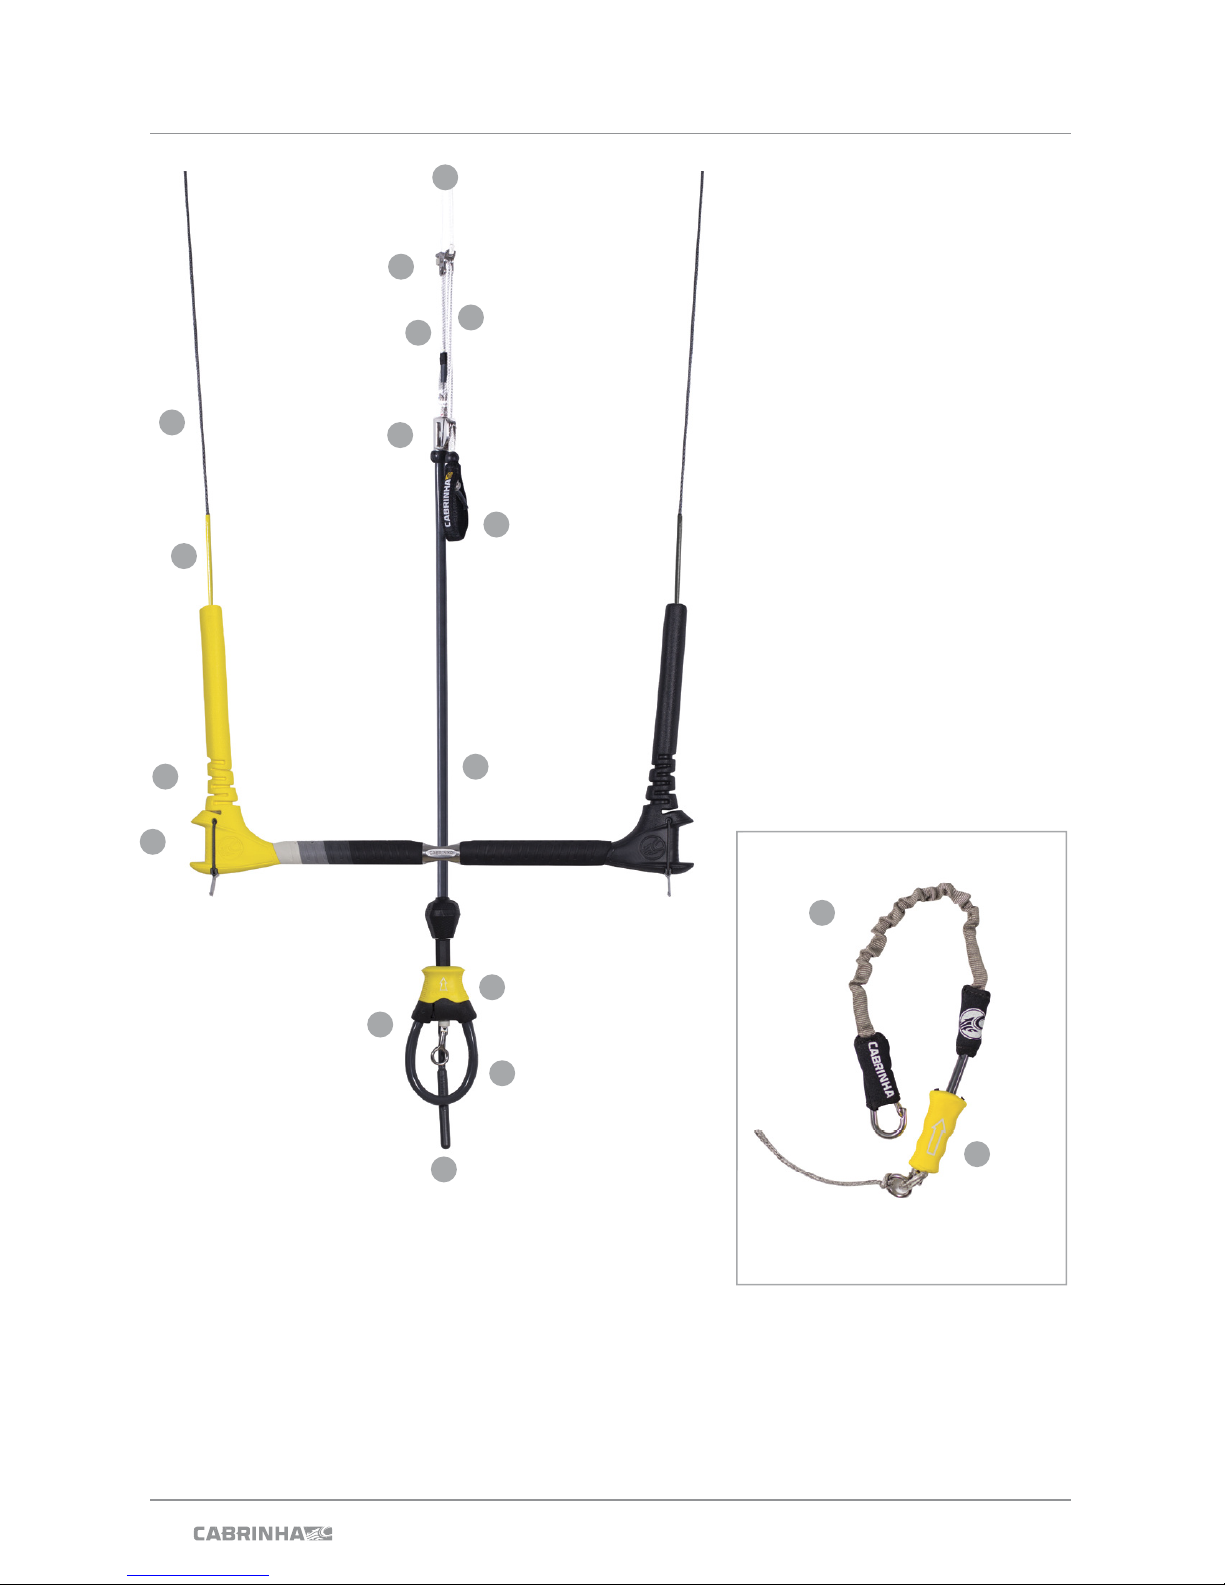
9
2018 CONTROL SYSTEM USER MANUAL
9
IMPORTANT INFORMATION
1X FIXED/CHAOS + TRIMLITE
REFERENCE GUIDE
1) Rear Steering Lines
2) Color Coded PU Line Sleeve
3) EVA Floating Bar Ends
4) Line Winders
5) Quickloop Harness Loop
6) Removable Security Pin
7) Bypass Leash Connector
8) Quick Release (QRS)
9) Depower Mainline
10) Trim Lite Handle
11) Trim Lite Cleat
12) Security Line
13) Trim Line Line
14) Trim Lite Power Bracket
15) Front Control Lines
16) Bypass Leash
17) Bypass Leash Quick Release
1
2
3
4
11
13
12
14
10
15
16
17
5
6
9
7
8
Page 14
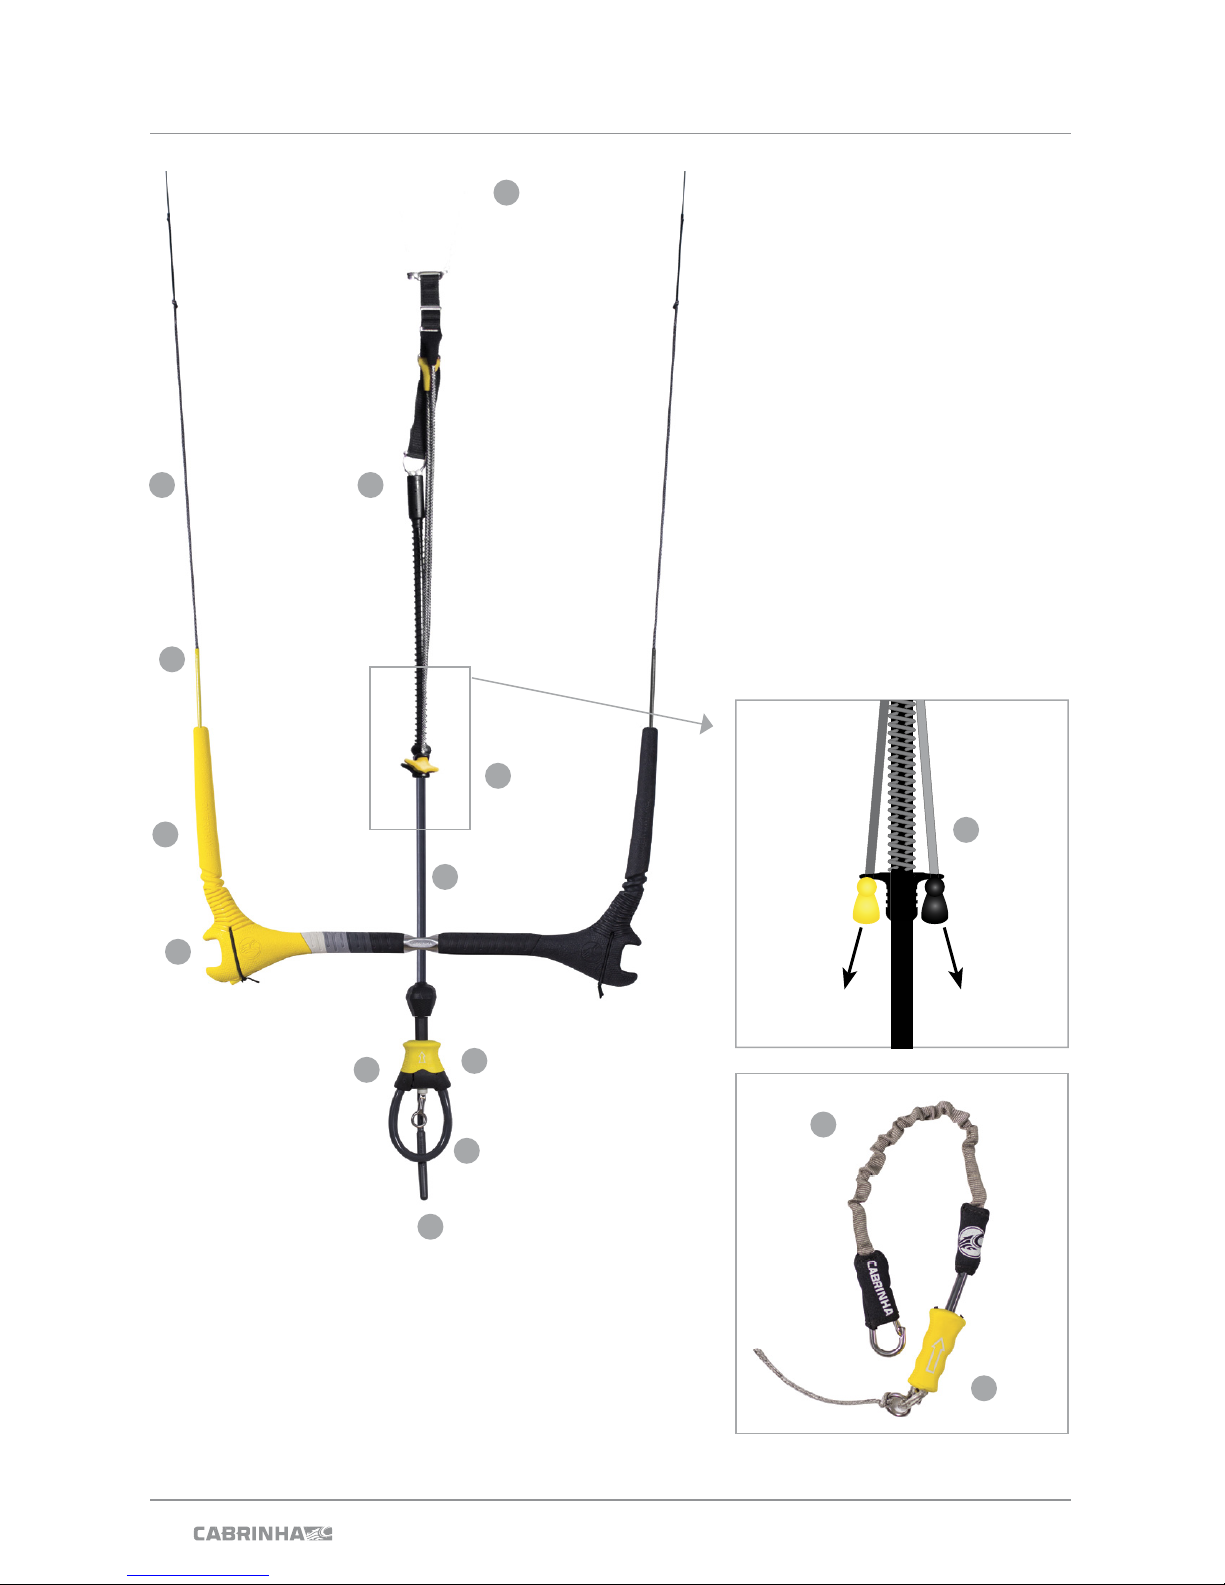
10
2018 CONTROL SYSTEM USER MANUAL
OVERDRIVE + RECOIL
REFERENCE GUIDE
1) Rear (Steering) Lines
2) Color Coded PU Line Sleeve
3) EVA Floating Bar Ends
4) Line Winders
5) QuickLoop Harness Loop
6) Removable Security Pin
7) Bypass Leash Connector
8) Quick Release (QRS)
9) Depower Mainline
10) Centreline Trim System
11) Trim Line
12) Security Line
13) Front Control Line
14) Bypass Leash
15) Bypass Leash Quick Release
OVERVIEW
11
REPOWERDEPOWER
1
2
3
4
12
13
10
14
5
6
9
7
8
15
Page 15
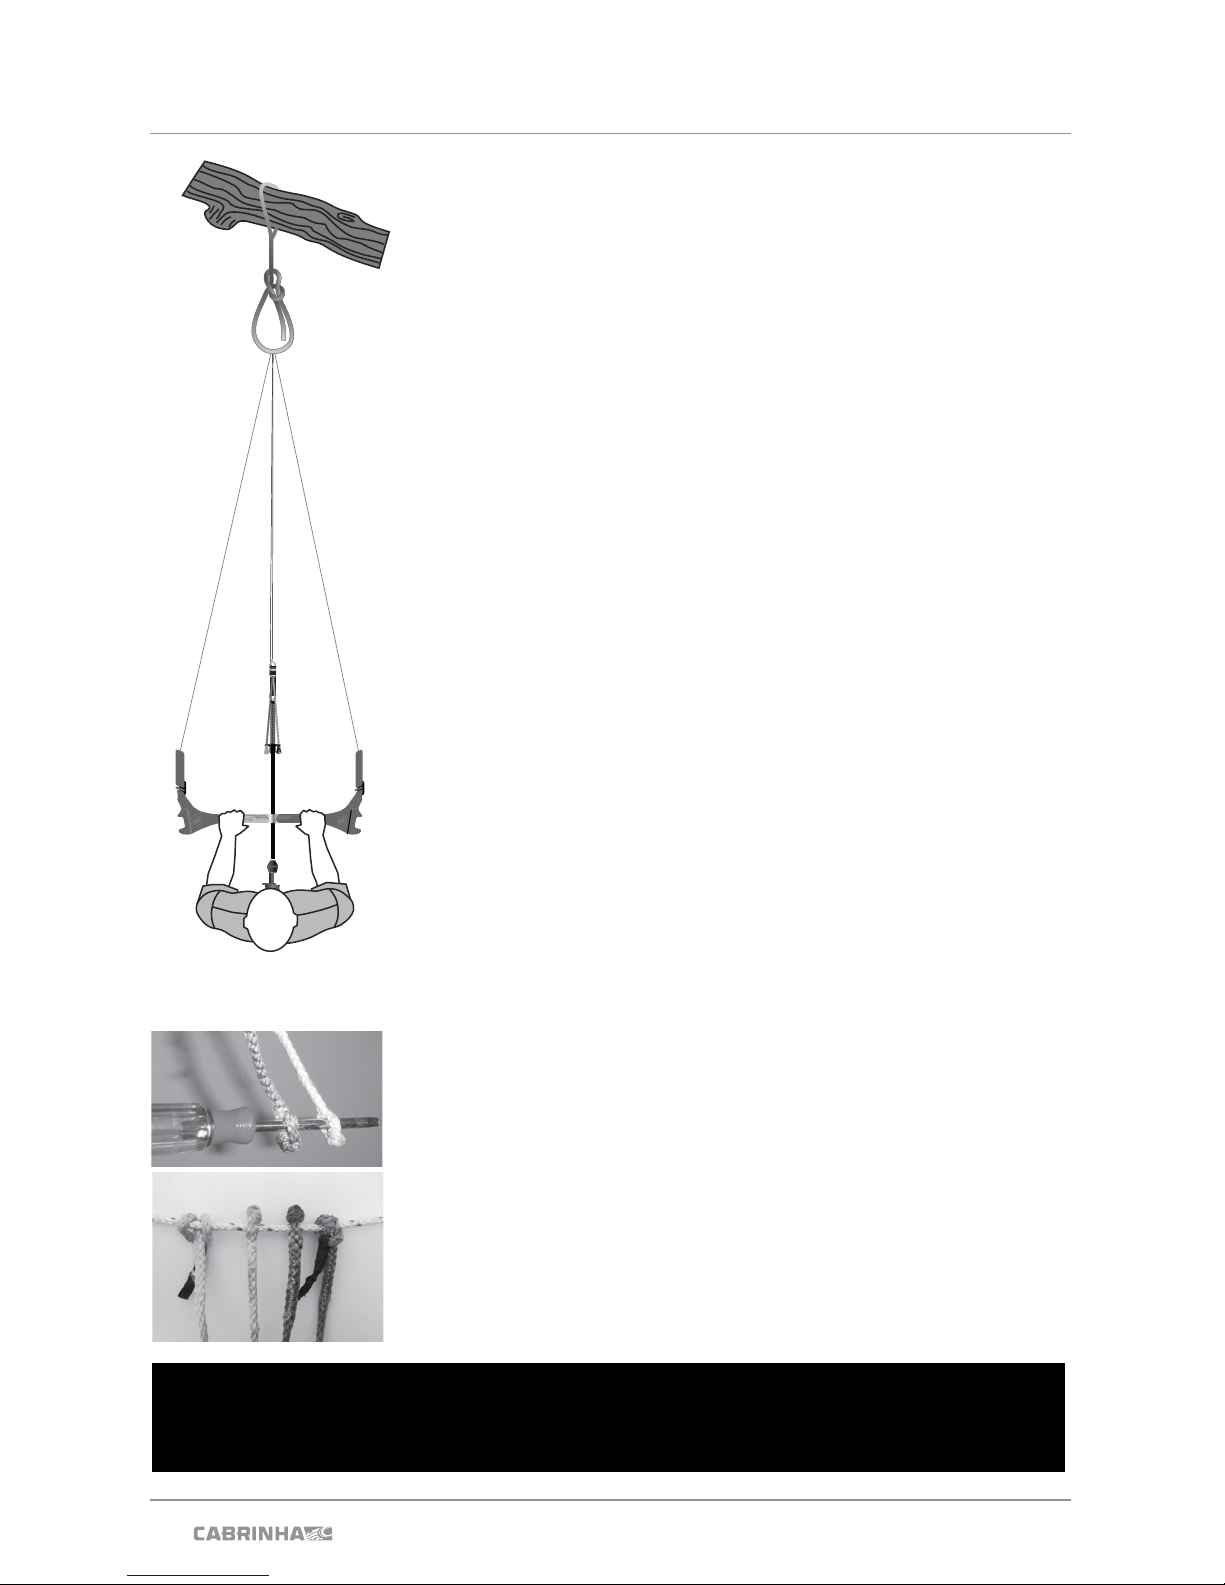
11
2018 CONTROL SYSTEM USER MANUAL
CHECK YOUR LINE LENGTHS
The Cabrinha control bars come set up with the fl ying lines attached; however, it is wise to check your line lengths before
going on the water, and after use To check the 1X line lengths
use the method described below.
• Loop a piece of line (any rope or cord) around a tree or fence
post.
• Tie the line in a knot around the tree, leaving a piece long enough
to attach all lines.
• Roll out the fl ying lines from the post and set the control bar on
the ground, facing up, with the Orange side of the control system
on the left and the black side of the control system on the right.
Make sure there are no obstructions in between your bar and the
post.
• Make sure your fl ying lines are not twisted or crossed.
• At the ends of the fl ying lines nearest the post you will notice that
there are eyelets on the rear steering lines and front de-power
lines. The overhand knots on the front (de-power) lines are there
to eliminate incorrect connection to the kite. The eyelet on the
front lines is just below the overhand knot. You may need to gently
pry the eyelet open on the front line pigtails using the screwdriver
in your kite bag. See FIG 1.
• Take the rope attached to the post and feed it through the eyelets
on all four lines, with the red on the left and the black on the right.
See FIG 2.
• Tie a bowline knot, with all four lines inside the loop.
• Walk back to the control bar.
• Make sure that the centerline adjustment strap/cleat line is fully
extended, so that the kite is set up at full power.
• Standing directly in line with the post, pull back hard and steady
on the control bar by pulling straight back toward yourself.
• Your control bar should be in line with your shoulders and should
be straight and not at an angle.
• All of the lines should have even tension under pressure. (I.e. no
slack in the de-power lines, steering lines).
• If your control bar is even, your control system is ready to attach
to your infl ated kite.
SETUP
If your control bar is even, proceed to: SETUP - INFLATING YOUR KITE
If your control bar is NOT even, follow the instructions in:
SETUP - LINE LENGTH CORRECTIONS
FIG 1
FIG 2
Page 16
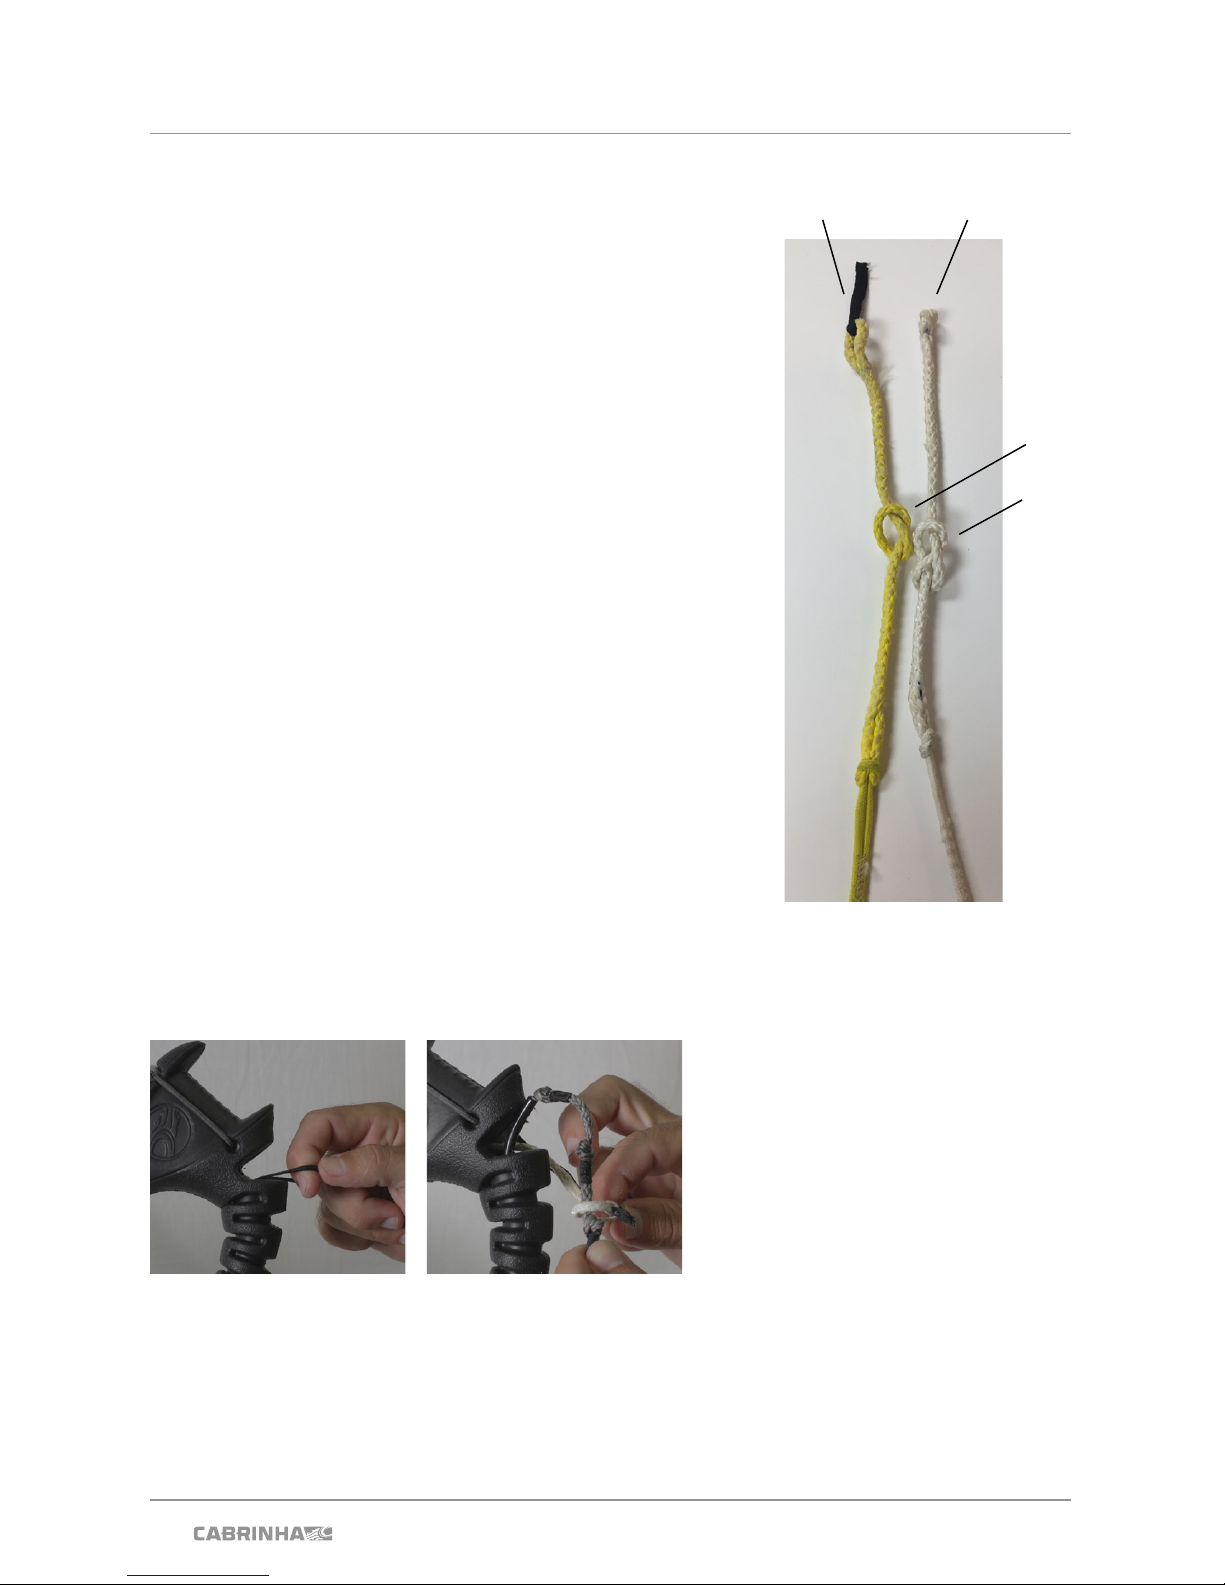
12
2018 CONTROL SYSTEM USER MANUAL
FIG 1 FIG 2
LINE LENGTH CORRECTIONS
• The steering adjustments can be made on the front
lines where they connect to the kite or on the rear
lines in the bar float* (*Fixed bar Only).
• If one of the front lines is too long, tie either an
overhand knot (25mm adjustment) or a figure 8
knot (40mm). If the line is too short tie a knot in the
opposite line. (This can also be done on the Rear
Line connectors if the Overdrive bar is used).
• Rear Line adjustment on the fixed bar is made as
follows.
• Fold the bar end in and grasp the webbing loop. (Fig.
1)
• Pull out the loop until the knots are shown.
Adjustment can be made by loosening the larkshead
and moving it above the required knot. (FIG 2)
• Pull the leader line back through the bar end and
check the line length again.
• Adjust again if necessary until the control bar is
balanced.
• Re-tighten the knot and check your line length again.
Adjust again if necessary until the control bar is
balanced.
• DO NOT put knots in your FLYING LINES. Knots in
the flying lines compromise the life of the line.
SETUP
Rear line
connector
Front line
connector
Overhand
Figure 8
Page 17
13
2018 CONTROL SYSTEM USER MANUAL
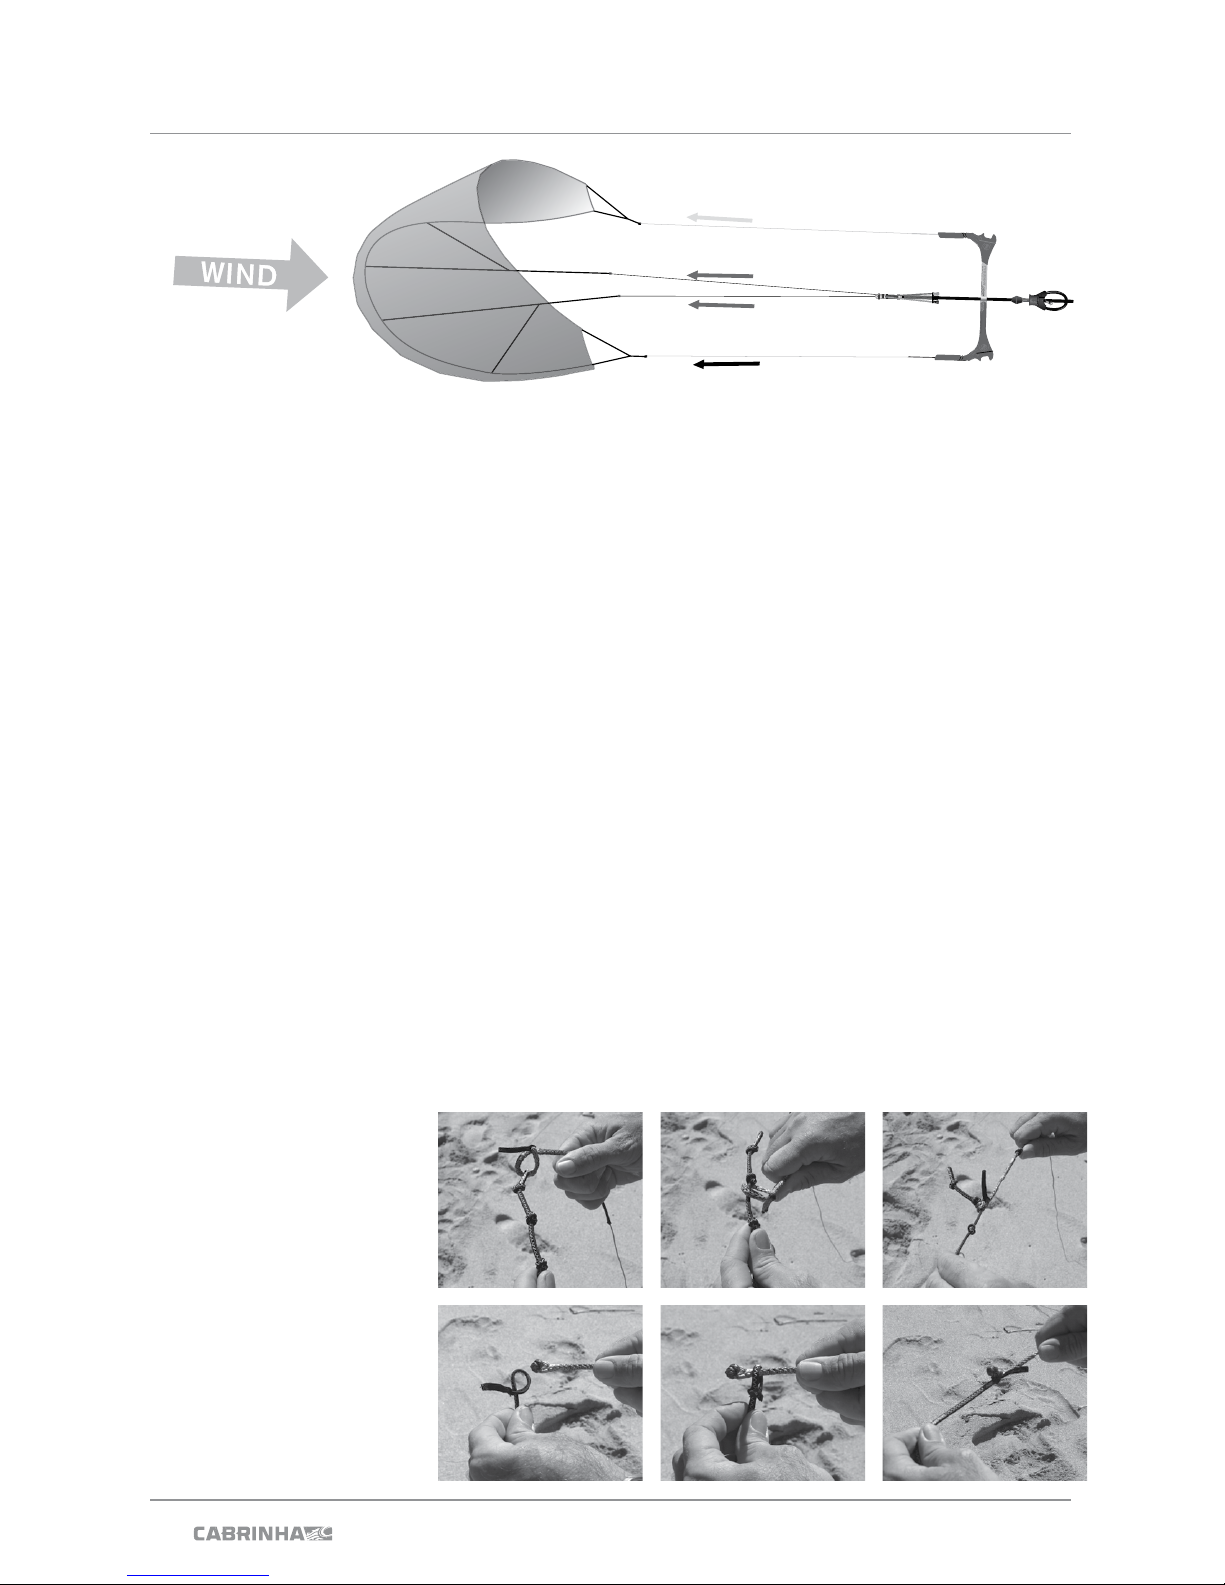
DOWNWIND SET UP (BAR DOWNWIND OF KITE)
• Lay the bar 30 meters downwind of the kite so that the wing tips are facing the control bar (the
leading edge of the kite should be facing into the wind). When setting the bar up downwind
of the kite, you must turn the bar upside down before walking the lines out. The orange side of
the control system should be on the right and the black side of the control system on the left.
• Lay out and clear the bridle making sure all pulleys are cleared of any sand or debris and that
they are in good working order.
• Walk out the steering (outside) lines and using a larks head knot, attach them to the middle
knots on the rear line attachment points. (FIG 1-3). This setting assumes you’ve already
checked and properly tuned your control system to ensure all 4 fl ying lines are completely
even when the bar is sheeted in to full power.
• Walk out the Center De-Power (center) lines. Attach the centre Line with the 1X Designation
to the corresponding front Pigtail connector based on the side you wish to fl ag out the kite.
Connect to the Left side of the kite (same side of the bridle as the Red Rear Pigtail) if you want
to fl ag the kite to the right. Connect to the right side (same side of the bridle as the Black Rear
Pigtail) if you want to fl ag the kite to the left. (FIG 4-6).
• The lines should not cross each other or be twisted.
• Your kite is now ready to fl y.
Please see the sections of this manual that relate to safety and make sure you are familiar
with the conditions before getting on the water.
FIG 1 FIG 2 FIG 3
REAR (STEERING)
LINES
FIG 4 FIG 5 FIG 6
FRONT (DEPOWER)
LINES
SETUP
Page 18
14
2018 CONTROL SYSTEM USER MANUAL
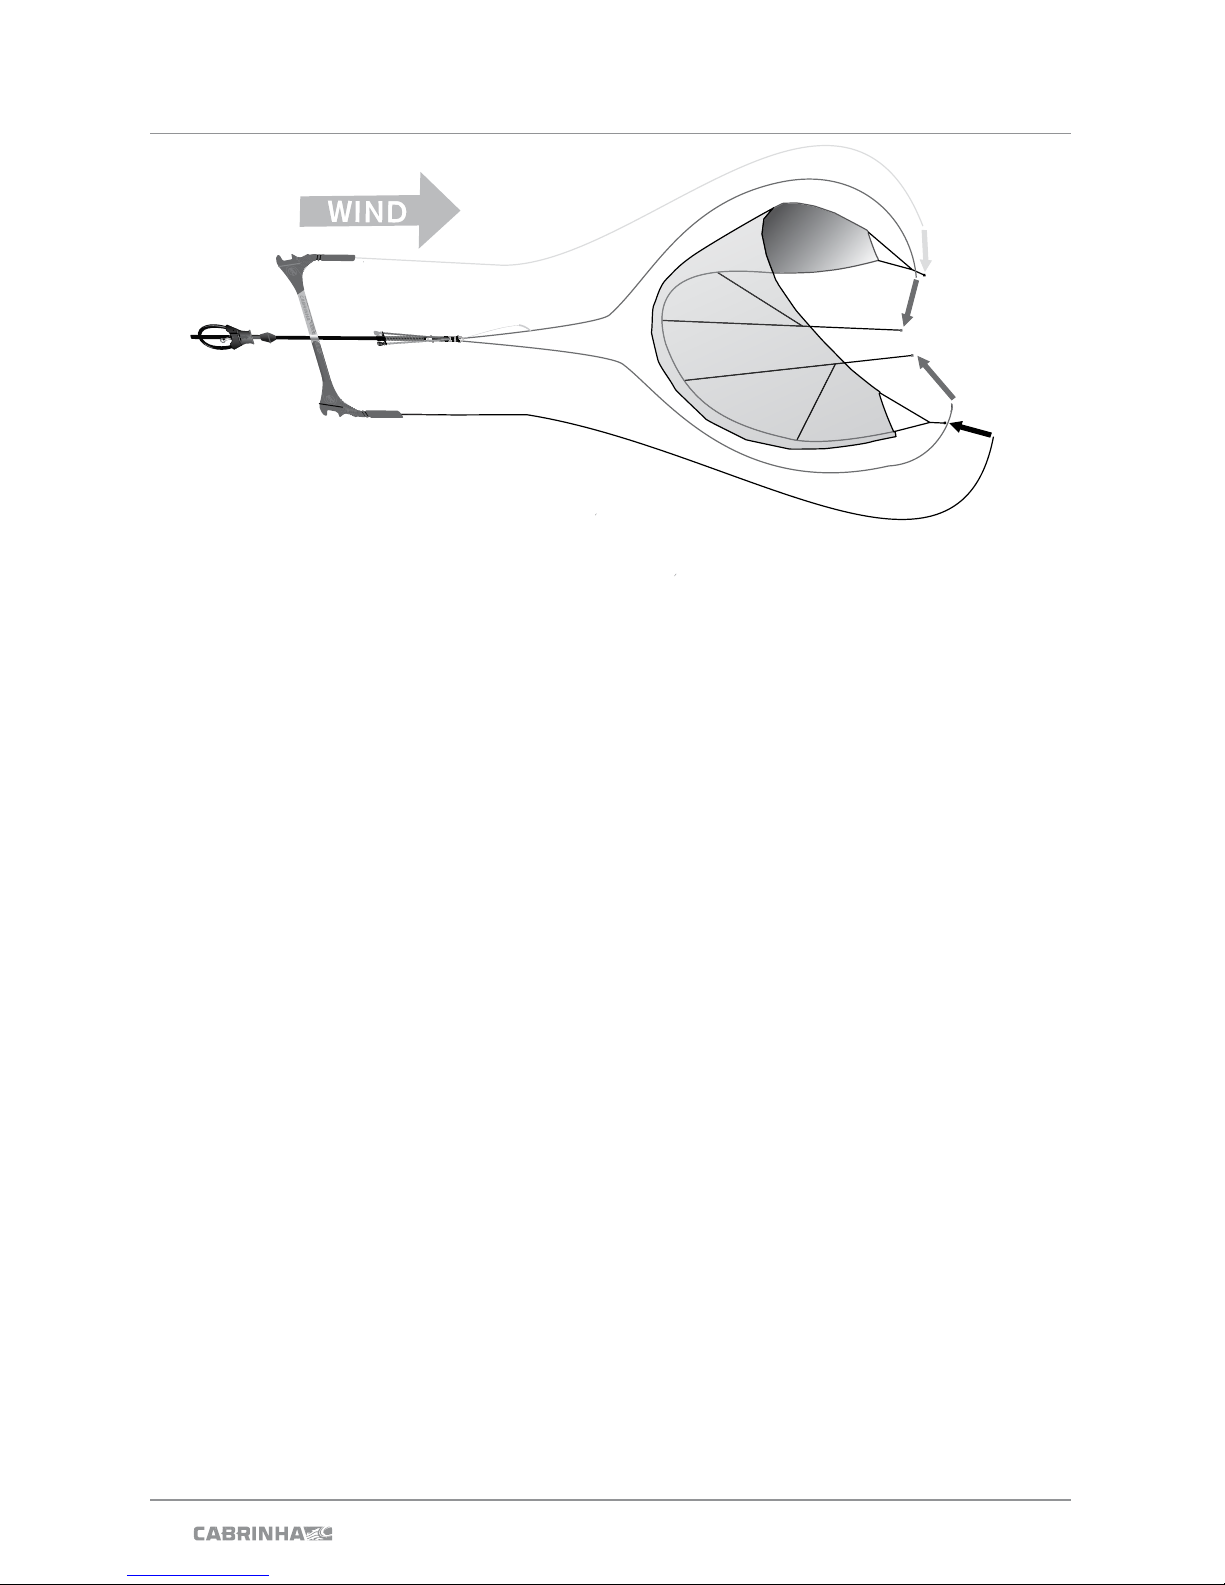
• Lay the bar 30 meters upwind of the kite. The leading edge will be pointed toward the bar and
into the wind. The wing tips of the kite will be facing away from the bar. The control bar should be
right side up. The orange side of the control system on the left and the black side of the control
system on the right.
• Lay out and clear the bridle making sure all pulleys are cleared of any sand or debris and that they
are in good working order.
• Walk out the steering (outside) lines and place them parallel to each other on the ground about 4
feet apart near the kite (remember, red-sheathed lines on the left and black-sheathed lines on the
right).
• Place the steering lines far apart, so the kite will lie between them.
• Walk out the de-power (center) lines and place them in between the steering lines, parallel to
each other, so that all four lines are lined up as follows (left to right). The lines should not cross
each other or be twisted.
• Place the kite leading edge down so the wing tips of the kite are pointing downwind and are near
the ends of our steering lines.
• Make sure the kite is still secured with sand or sand bags.
• From outside of the kite, attach the steering lines to the corresponding back bridles on the wing
tips. Using larks head knots, attach the steering lines to the middle knot on the back bridles. Give
each knot a tug to secure. This setting assumes you’ve already checked and properly tuned your
control system to ensure all 4 fl ying lines are completely even when the bar is sheeted in to full
power.
• From the inside of the kite, attach the centre Line with the 1X Designation to the corresponding
front Pigtail connector based on the side you wish to fl ag out the kite. Connect to the Left side
of the kite (same side of the bridle as the Red Rear Pigtail) if you want to fl ag the kite to the right.
Connect to the right side (same side of the bridle as the Black Rear Pigtail) if you want to fl ag the
kite to the left. (FIG 4-6).
• Again, double check to make sure that your lines do not cross each other, and are not twisted.
• Your kite is now ready to fl y.
Please see the sections of this manual that relate to safety and make sure you are familiar with the
conditions before getting on the water. Kite tuning tips are located in this manual under Tuning.
SETUP
UPWIND LAUNCH SETUP (BAR UPWIND OF KITE)
Page 19
15
2018 CONTROL SYSTEM USER MANUAL
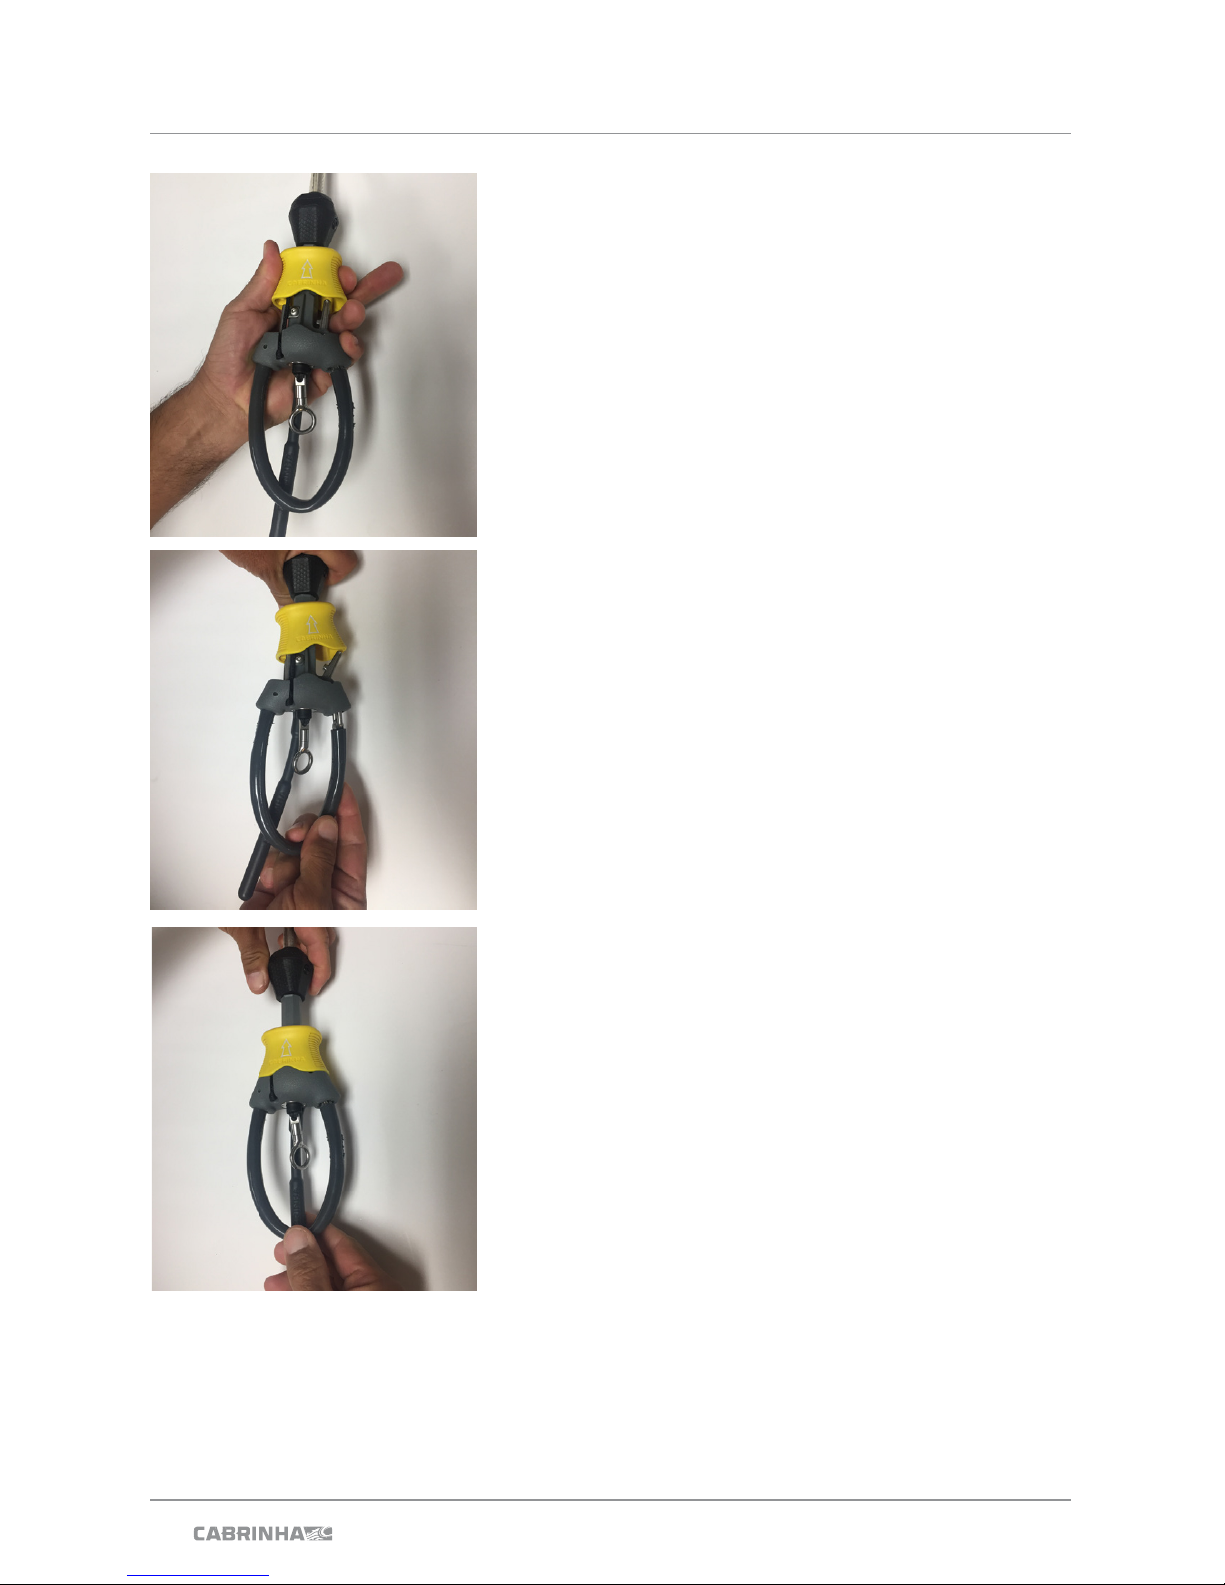
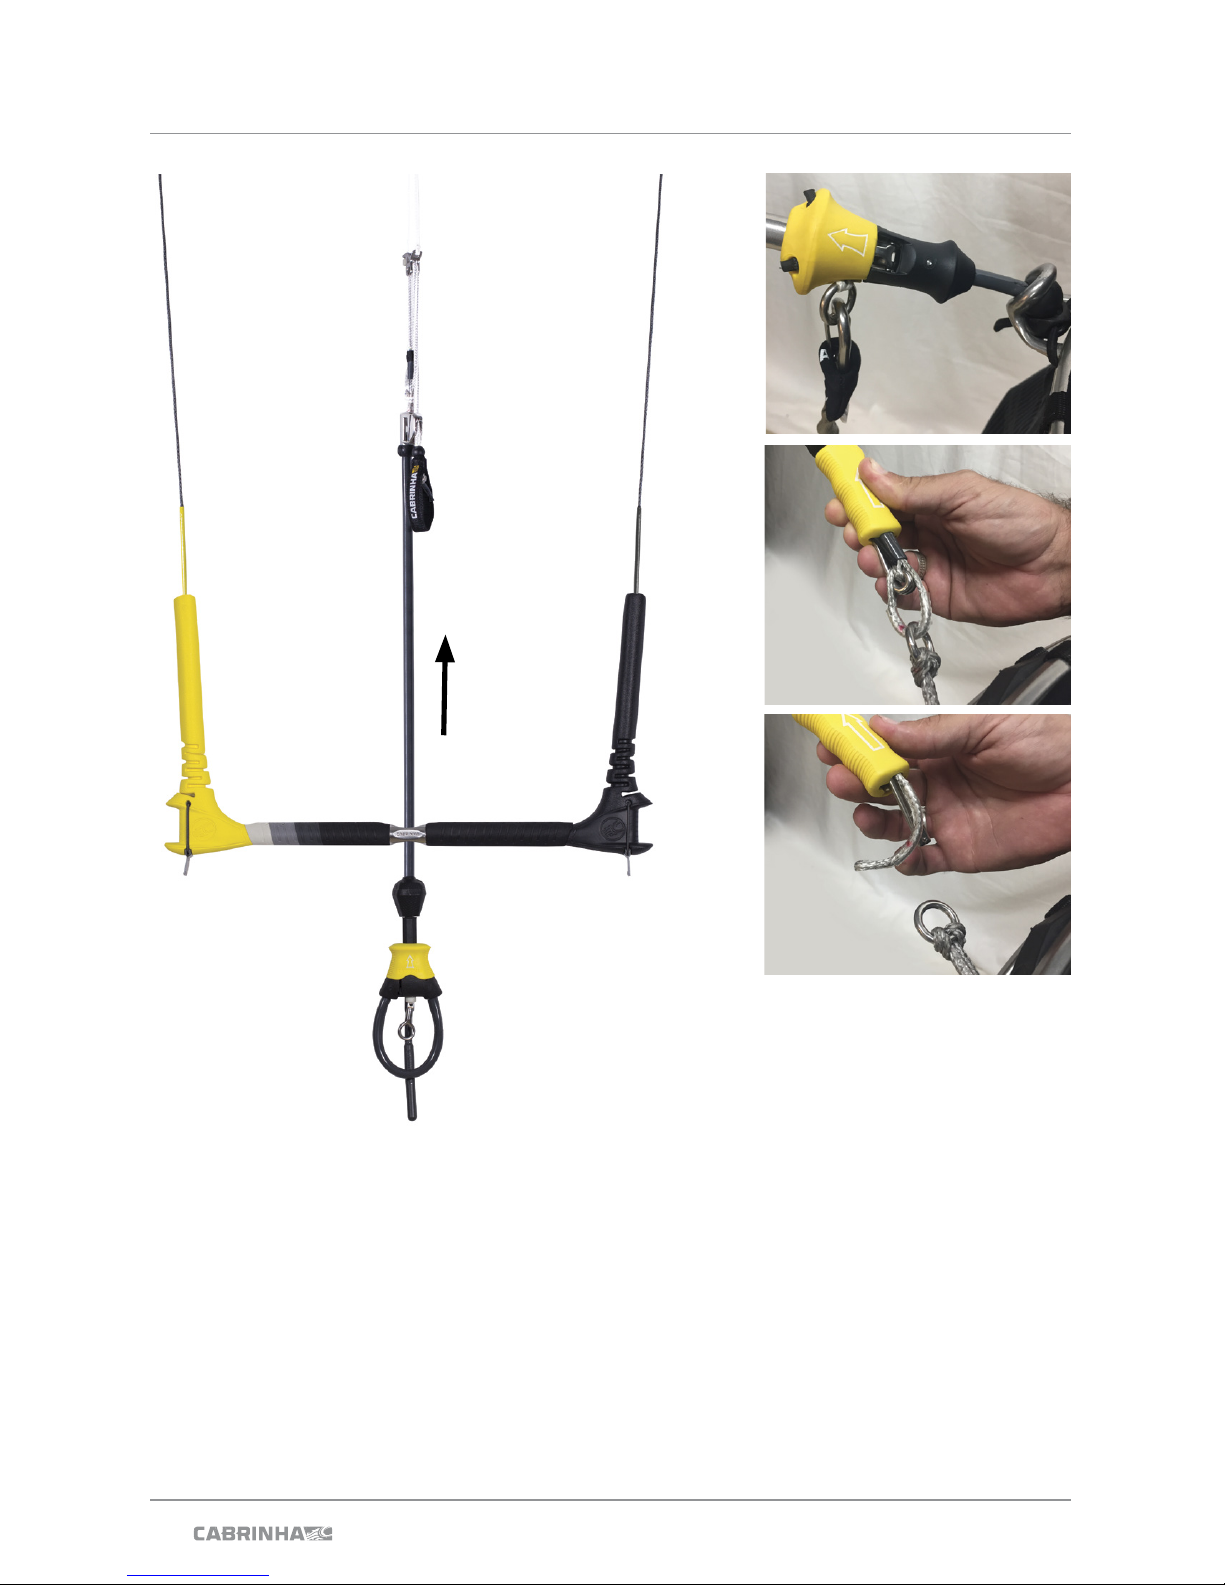
QUICKLOOP RELEASE SYSTEM
QUICK RELEASE SYSTEM (QRS)
You should be familiar with the operation of the QRS
in the event of a situation where you wish to activate
the QRS feature.
QRS - OPERATION
Grab the release body and firmly push away from
your body (in the direction of the arrow) until it
meets the bottom of the spinning handle (FIG
1). Activating this primary quick release (QR1)
will still leave you attached to your kite via the 1X
Security line.
For complete separation from your kite, you will need
to activate Quick Release Handle on your bypass
leash. This is covered in detail in the Bypass Leash
Operation Page 18.
QRS - SETTING / RESETTING
• Lift the QR1 body up the spinning handle shaft
until it sits and latches on the side of the QR1
Hinge body. (FIG 2)
• Take the open end of the loop and insert it into
the upper receiver section of the harness Loop
Body, until it stops. (FIG 2)
• Release the QR1 Body from the Catch.
• Lower the QR1 body back down the shaft until it
rests flush with the Harness Loop Body. Do this
by straightening out and centering the QR Body
to disengage the catch on the side. (FIG 3)
• Your QR System is now ready for use.
OPERATION
FIG 1
FIG 3
FIG 2
Page 20
16
2018 CONTROL SYSTEM USER MANUAL
CAUTION: Be advised that when the Security
Pin is engaged, you have a semi-permanent
connection to the kite. As a precaution, know
where your Quick Release Handle is and
be educated on how to activate it before
engaging the Security Pin.
FIG 1
FIG 2
FIG 3
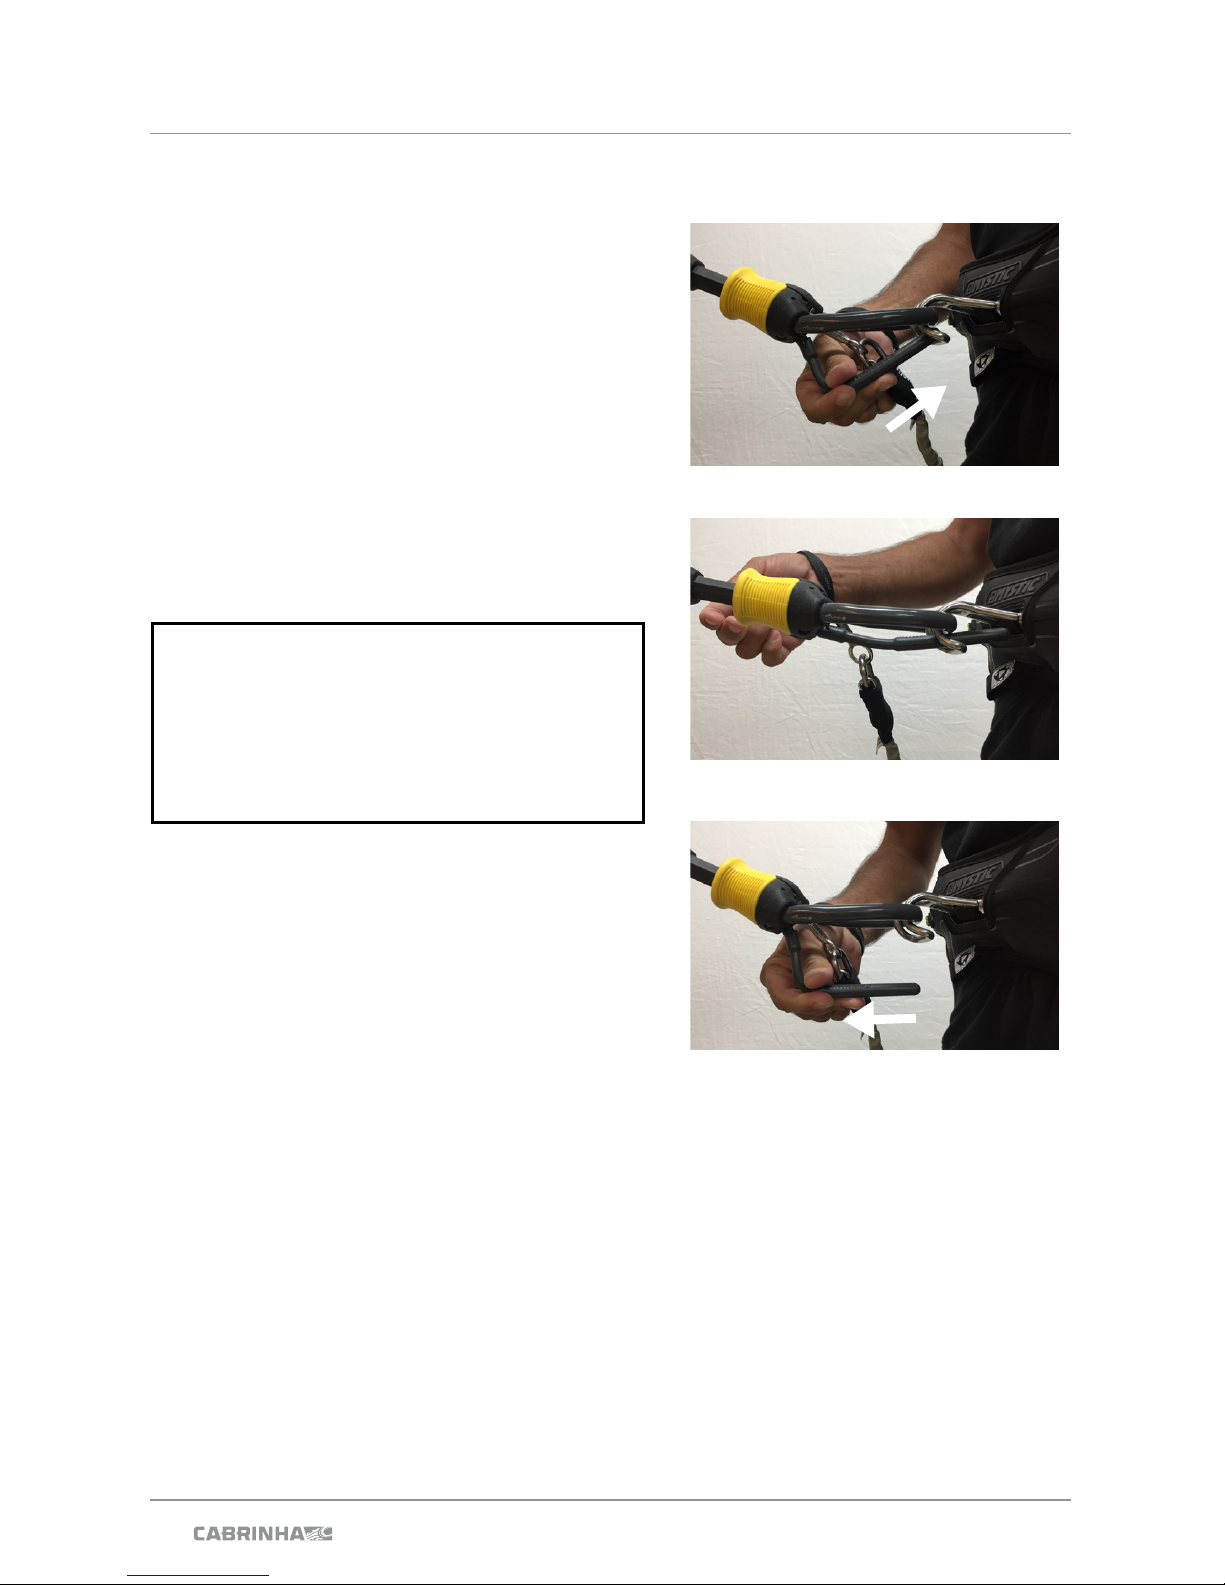
SECURITY PIN
The harness loop is the rider’s primary connection
to the depower system, as long as it is equipped
with a security pin. This security pin is active only
when the rider is hooked into the harness loop.
Therefore, it is important that a secure connection is made between the Harness Hook and the
Harness Loop. This critical connection allows
you to depower the kite, spin your bar freely, and
re-launch your kite easily, all while still being connected to your kite.
• We suggest that you engage the Security Pin
only when ready to launch and/or the Bypass
Leash is connected.
SECURITY PIN – ENGAGING
• Double check that your QR and control system
are set up properly.
• Hook into your harness loop.
• Once hooked into the harness loop, only
engage the Security Pin once you are ready to
launch.
• Insert the Security Pin into the center of the
harness hook, making sure it is below the
harness loop. Your harness loop must be
between the harness hook and the Security
Pin in order for this feature to work properly.
(FIG 1 & 2)
• Make sure that the Security Pin is secure. This
will keep your harness loop from accidentally
dropping out of your harness hook.Your Security Pin is now ready for use.
SECURITY PIN – RELEASING
With your hands, slide the Security Pin out of the
harness hook. (FIG 3)
OPERATION
Page 21
17
2018 CONTROL SYSTEM USER MANUAL
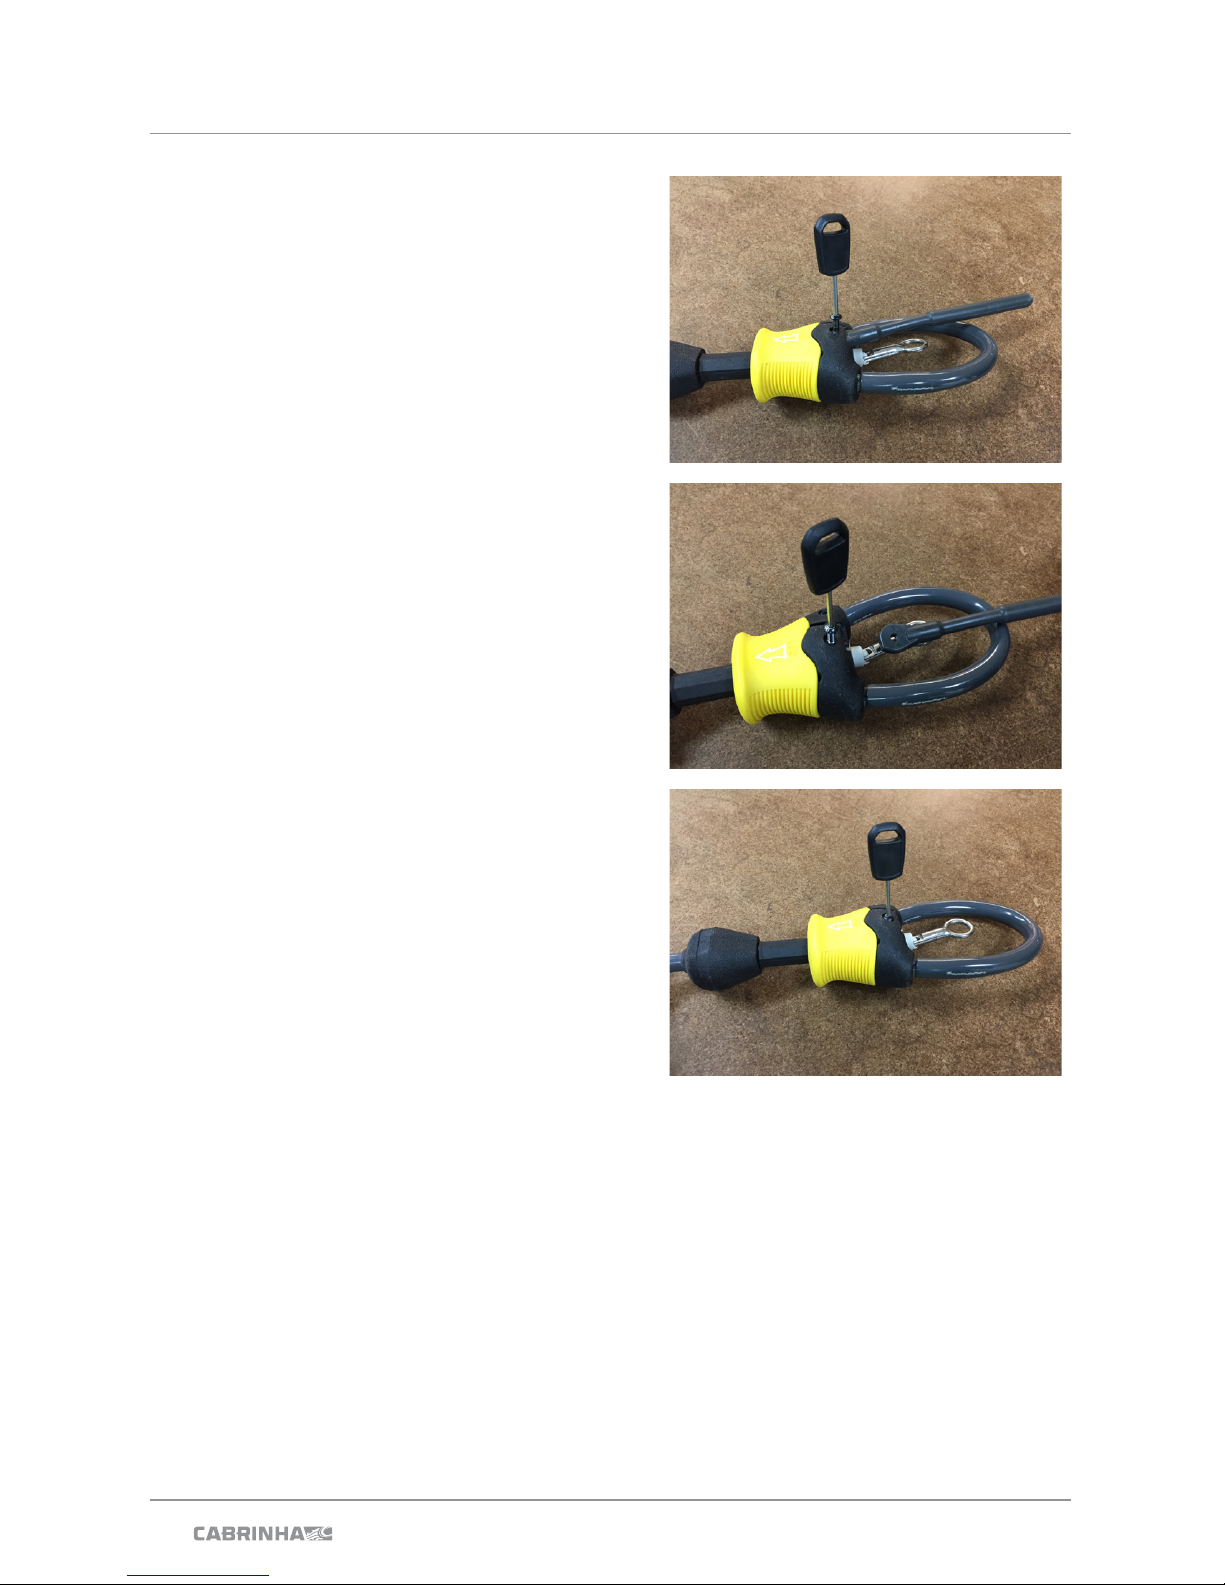
SECURITY PIN REMOVAL
• Using a 2mm Allen Key loosen and remove the
Security Pin Screw by rotating in a counter
clockwise direction. (FIG 4)
• Pull the Security Pin in a downwards motion
(from the Quickloop Body), this may require
some force and may need left to right move
ment. This will remove the Security Pin from
the Quickloop Body. (FIG 5).
• Reinsert the Security Pin Screw and tighten
into the Quickloop Body to avoid loosing it
(FIG 6).
SECURITY PIN – CONNECTION
• Using a 2mm Allen Key, loosen and remove
the Security Pin Screw.
• Insert the Security Pin into the cavity on the
bottom of the Quickloop body making sure
that the index dot is facing downwards.
• Using a 2mm Allen Key Re insert the Security Pin Screw and using a Clockwise rotation,
tighten.
FIG 4
FIG 5
FIG 6
OPERATION
Page 22
18
2018 CONTROL SYSTEM USER MANUAL
FIREBALL
QUICK RELEASE SYSTEM (QRS)
You should be familiar with the operation of the
QRS in the event of a situation where you wish to
activate the QRS feature.
QRS - OPERATION
Grab the release body and fi rmly push away from
your body (in the direction of the arrow) until it
meets the bottom of the spinning handle (FIG 1).
Activating this primary quick release (QR1) will
still leave you attached to your kite via the 1X
Security line.
For complete separation from your kite, you will
need to activate Quick Release Handle on your
bypass leash. This is covered in detail in the
Bypass Leash Operation Page 18.
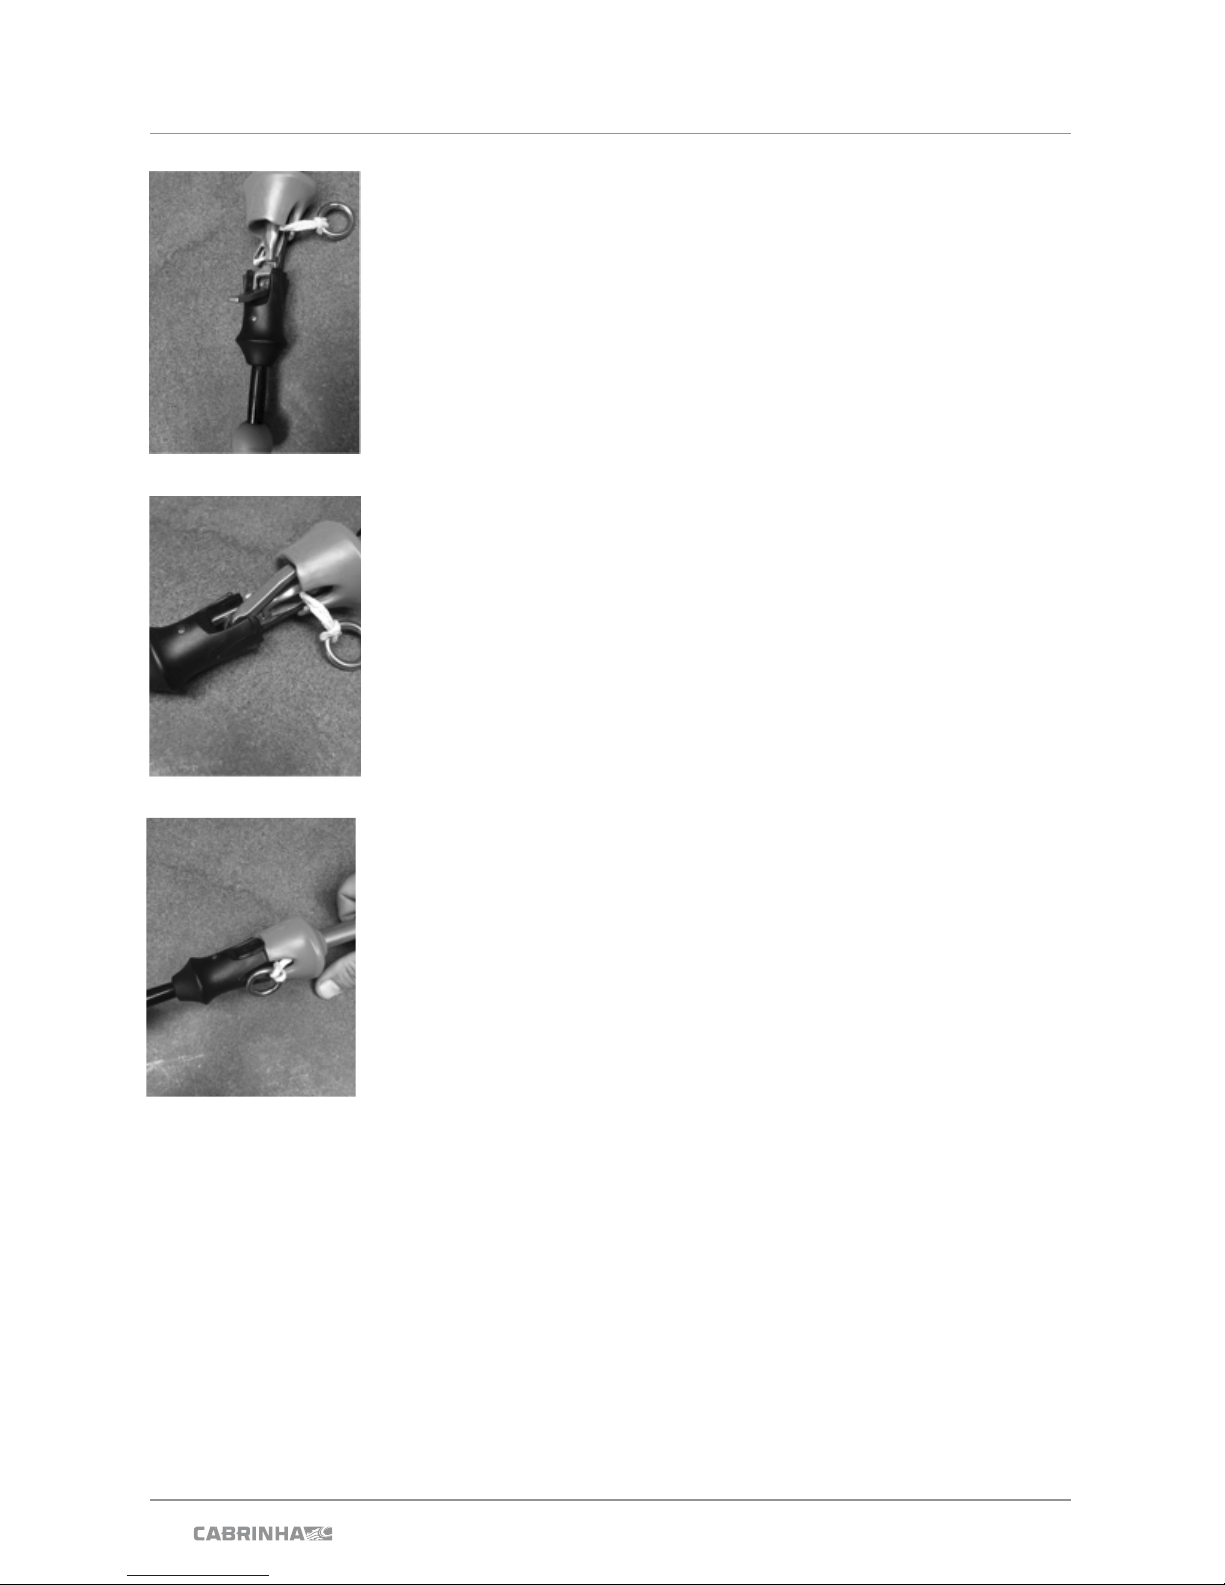
QRS - SETTING / RESETTING
• Slide the QR Pin through the Fireball Body
Trapezoid. (Fig. 1)
• Fold the pin back over itself. (Fig. 2)
• Lift the QR Body up the Handle Shaft. (Fig. 2)
• Lower the QR Body over the QR Pin. (Fig. 3)
• Your QR system is now ready for use.
OPERATION
FIG 4
FIG 1
FIG 2
FIG 3
Page 23
19
2018 CONTROL SYSTEM USER MANUAL
FIREBALL
AUTOLOCK™
The Fireball is the riders primary connection to the
depower system, as long as it is connected to the
Fireball Harness. It is important that a secure connection is made between the Fireball Harness and
the Fireball. This critical connection allows you to
depower the kite, spin your bar freely and re-launch
your kite easily.
We suggest that you engage the Fireball Autolock™
only when ready to launch and/or the Bypass Leash
is connected.
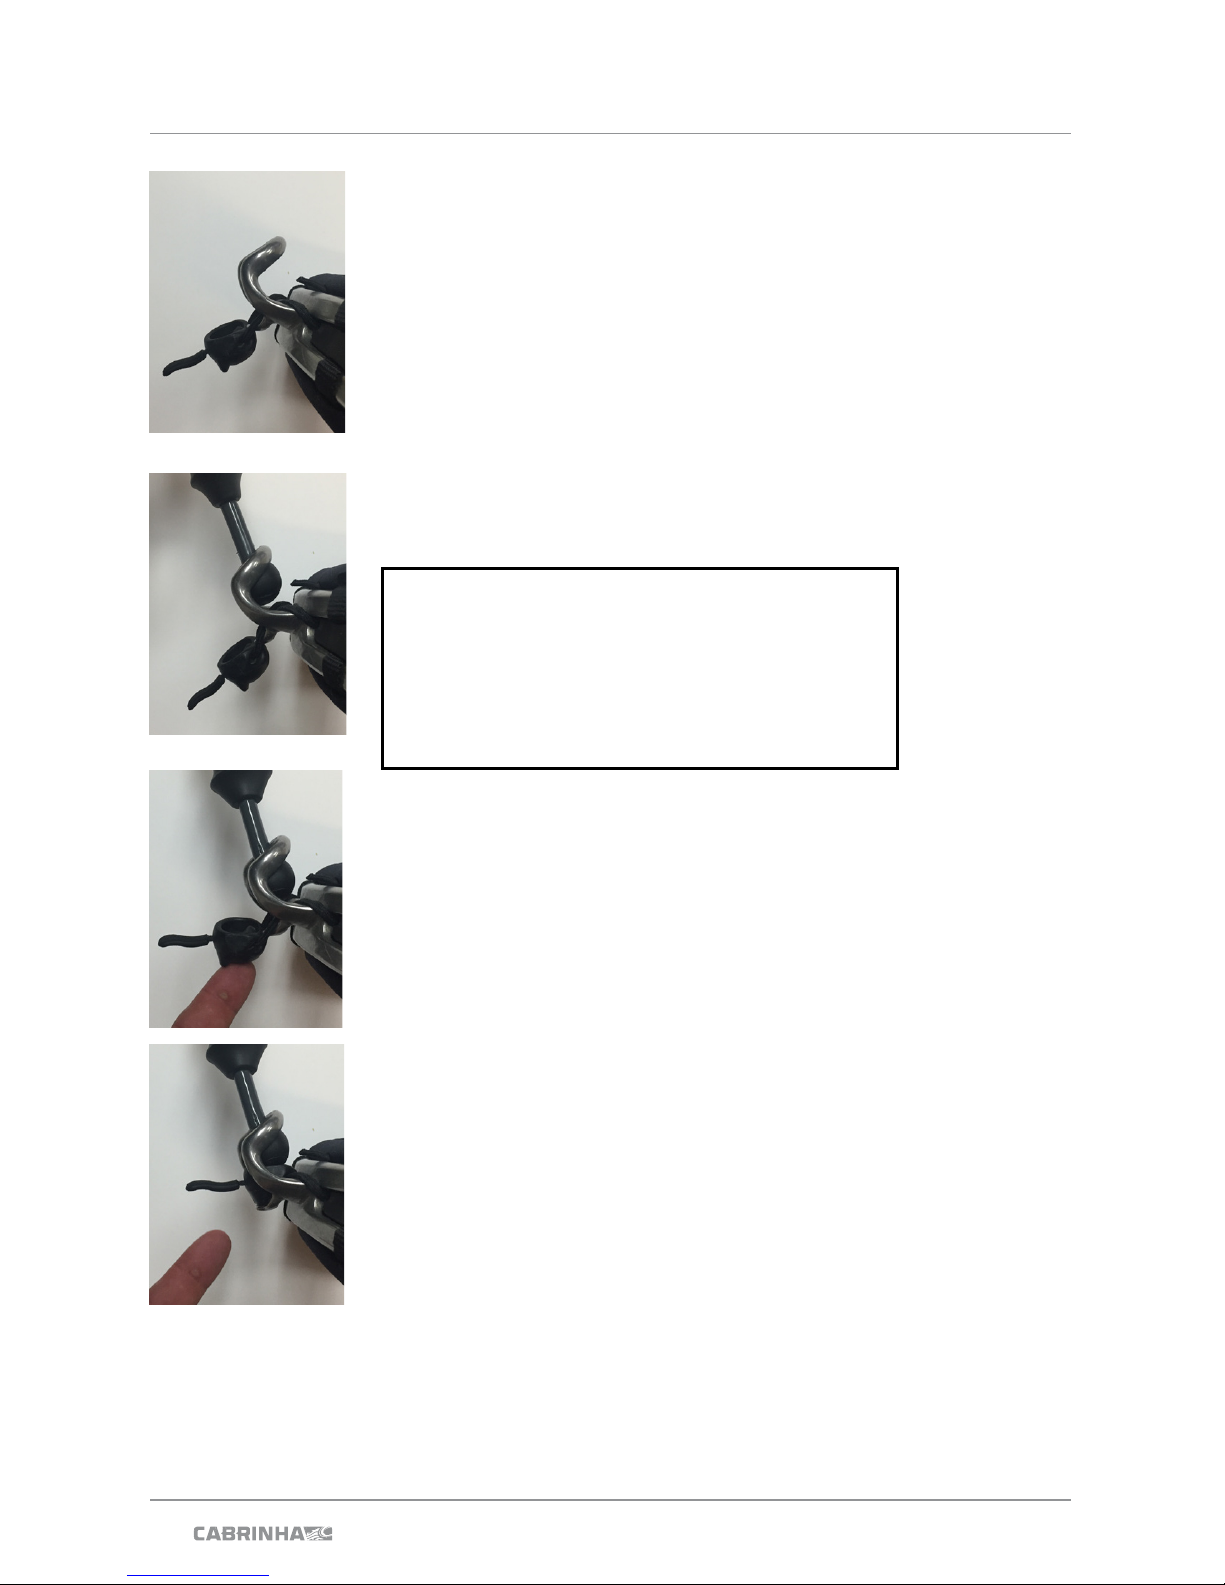
FIREBALL AUTOLOCK™ ENGAGING.
• Double check that your QR and control system are
set up correctly.
• Pull the Autolock™ outwards so that it sits on the
Socket Bar. (fig 1)
• Hook the Fireball into the Fireball Spreader Socket.
(fig 2)
• Once sitting in the Socket push the Autolock
upwards so that it auto-engages (fig 3).
• Make sure that the Fireball Gate is secure, and that
the Fireball is free to move around in the socket. (fig
4)
FIREBALL GATE - RELEASING
With your fingers either pull the Autolock™ outwards
and downwards so that it sits on the Socket Bar.
CAUTION: Be advised that when the Fireball
Autolock™ is engaged , you have a semipermanent connection to the kite. As a
precaution, know where your Quick Release
Handle is and be educated on how to activate
it prior to engaging the Fireball Gate.
OPERATION
FIG 1
FIG 2
FIG 3
FIG 4
Page 24
20
2018 CONTROL SYSTEM USER MANUAL
BYPASS™ LEASH
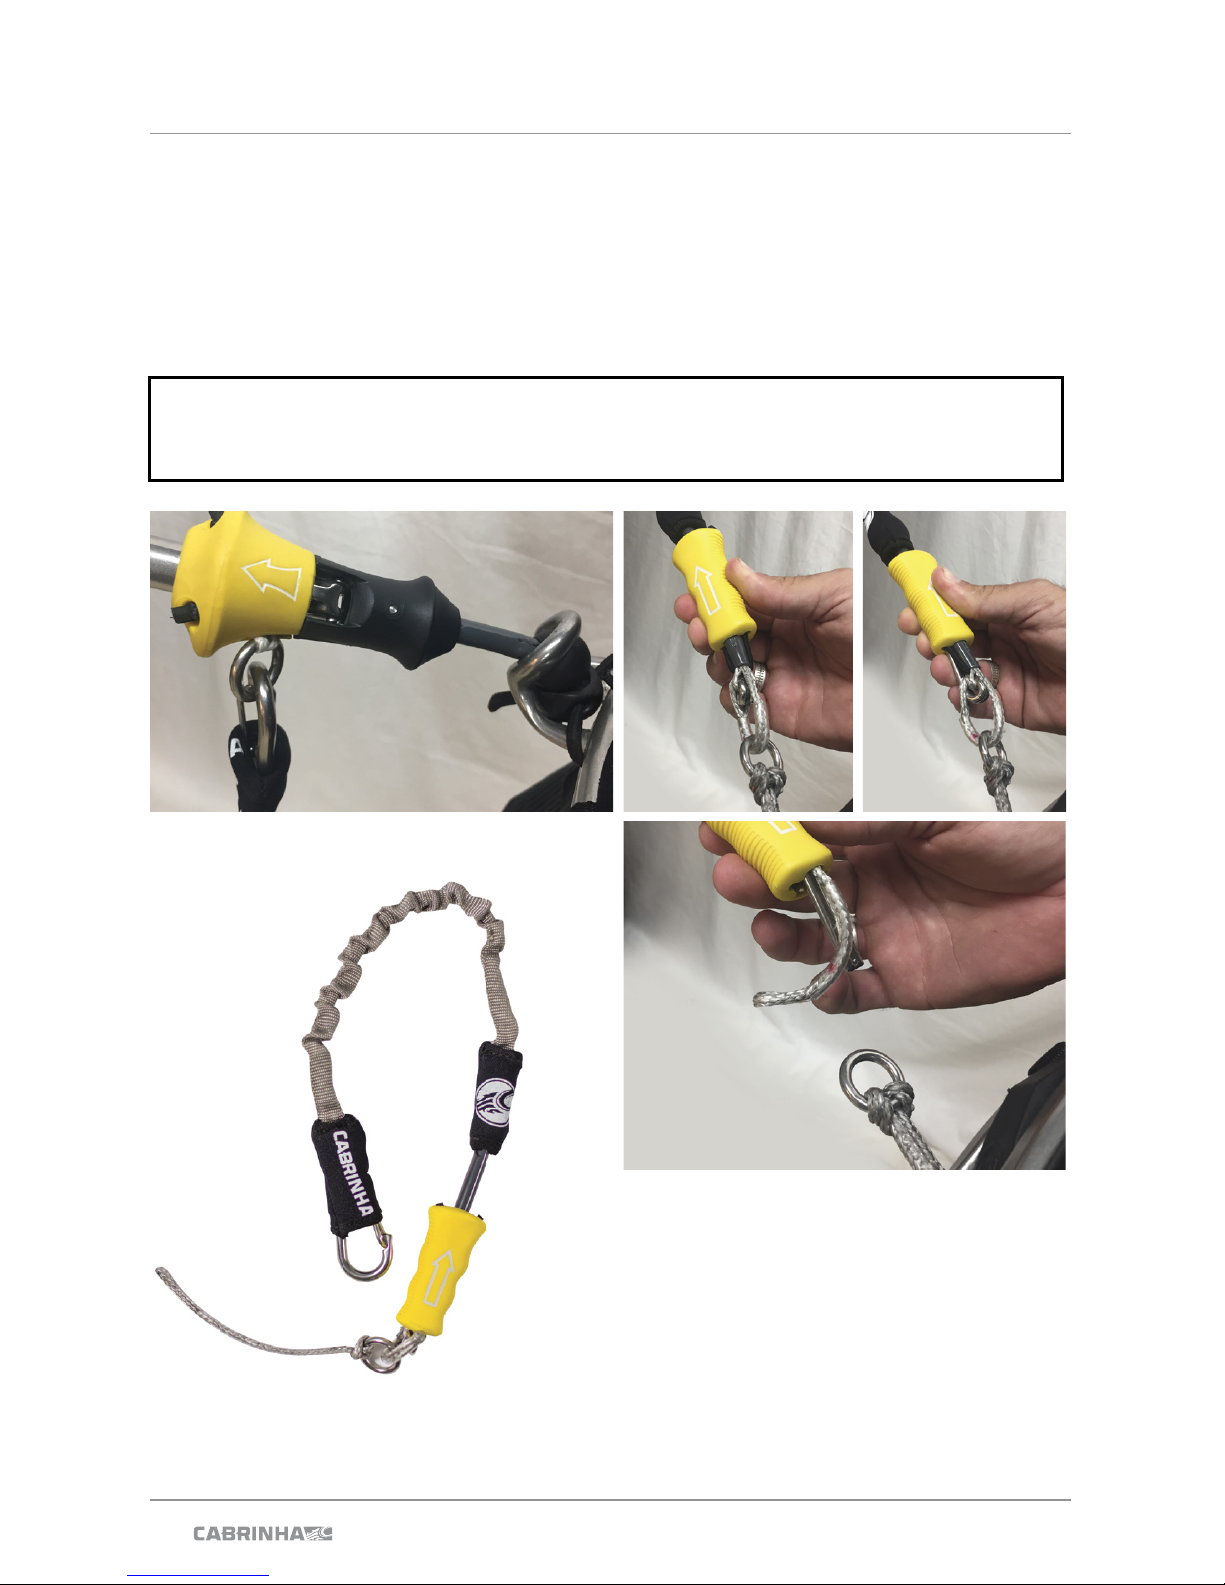
The Bypass Leash QR also acts as a QR2, which after deployment of the QR1 activation of
the QR2 will completely separate the rider from the Kite.
Connecting the Bypass™ Leash
• The Carabiner end of the Bypass Leash must at all times, be attached to the Leash Connection Ring, that is attached to the bottom of the 1x Landing Line. (FIG 2)
CAUTION:
To disconnect yourself from the Bypass leash you must activate the QR at the end of the
leash by pushing the QR away from your body (FIG 3-5).
Disconnecting from your kite may cause
your kite to blow downwind unaccompanied.
Avoid at all costs, disconnecting in a situation
where your loose kite may endanger others.
Disconnecting from your kite at sea may
also mean the possibility of not being able to
retrieve your kite. Use extreme caution and
judgement when disconnecting from your
kite. Familiarize yourself with the operation
of the QR and all security systems prior to
using this equipment.
FIG 1
FIG 2
FIG 3 FIG 4
FIG 5
OPERATION
Page 25
21
2018 CONTROL SYSTEM USER MANUAL
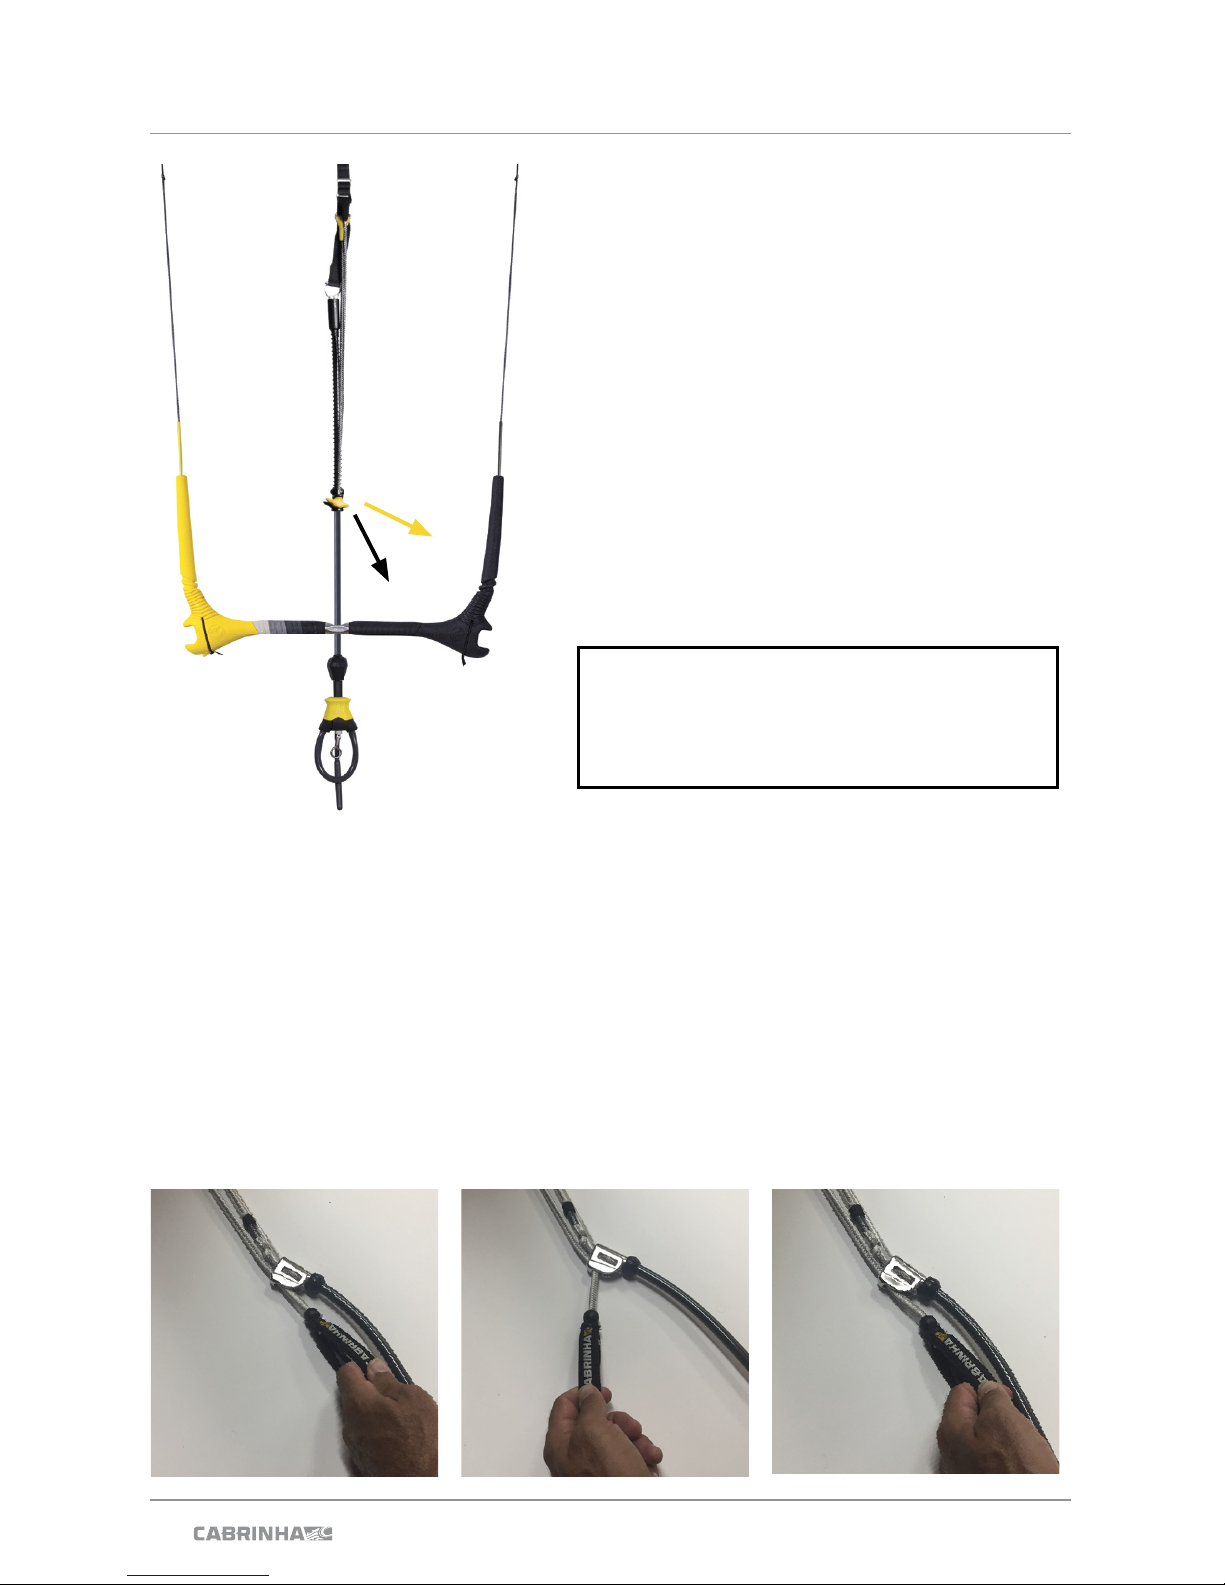
Both the CAS (Centreline Adjustment Strap) and
the Trim Lite Cleat System effectively change the
length of your front lines (referred to as trim).
By pulling on the CAS Yellow Handle, or the Trim
Lite Webbing handle you shorten the line ( depowers the kite slightly). To repower the kite you need to
lengthen the front lines by either pulling on the CAS
Black Handle, or by releasing the Cleat Line from
the Trim Lite system.
CENTERLINE ADJUSTMENT STRAP (CAS)
• Pull on the Yellow T Handle to depower.
• Pull on the Black T Handle to re – power.
REPOWER
DEPOWER
NOTE: The CAS is meant to provide a limited
amount of trim and is not to be confused
with, or used in place of the 1X depowering
function (see next section).
TRIM SYSTEMS.
To Depower:
• Pull the webbing handle towards your body, until the required trim is reached. (FIG1)
• When desired trim is reached pull the handle down in parallel to the Depower Mainline to
set the line in the cleats teeth. (FIG 2)
To Re-Power
• Pull the Webbing Handle towards your body to release the line from the cleat. (FIG 1)
• Lift the rope outwards slightly so that the Trim line is free from the cleats teeth. (FIG 3)
• Let the line feed through till the desired position is found.
• Move the webbing handle back to a parallel position to the DPML to set the line in the
cleats teeth. (FIG 2)
FIG 1 FIG 2 FIG 3
OPERATION
Page 26
22
2018 CONTROL SYSTEM USER MANUAL
SECURITY LINE: OPERATION
Once the kite has safely landed, you can pull
yourself towards the kite by “walking” up the
SLF security line and control Line. When you
come to the bar, it’s important that you continue
up towards the kite without grabbing the control
system or the depower mainline. Do so will result
in having the SLF Security Line and control line
paying back out and possibly powering the kite
back up. Only handle the landing line itself until
you get to the leading edge of the kite. If at any
point throughout this process, the kite begins to
pull and you resist, the kite may pull back harder.
The best thing to do here is to take a step or
two towards the kite in an effort to get it to flag
out completely. Continue up the SLF line until
you reach the leading edge. From there you can
secure the kite with sand (if you are on land) or
perform a self rescue (if you are on water).
Disconnecting from the kite
If at anytime during the Stage 2 Depower process (after QR1 has been activated), you absolutely need to completely separate yourself from
the kite, you must also activate the quick release
located on your bypass leash. (
FIG 3/4)
Important: Disconnecting from your kite may
cause your kite to blow downwind unaccompanied. Avoid at all costs, doing this in a situation
where your loose kite may endanger others. Disconnecting from your kite at sea may also mean
the possibility of not being able to retrieve your
kite. Use extreme caution and judgement when
disconnecting from your kite.
Resetting the SLF landing line
Once you have recovered your equipment safely
on the beach, you will need to reset the Security
line to use it again. Stretch your lines out as if you
were going to attach them to your kite. Separate
the lines from each other so that each individual
line is lying parallel to the next one. Make sure
that the security line is not would around any
other line. Reset the QR1 as stated on Page 15
of this manual.
SLF is a simplified bridle and control system that
seamlessly provides 2 stages of depower. Interactive Depower on Demand (Stage1) while riding, and a Stage 2 Depower (Stage 2) method
to shut down your kite.
Stage 2 Depower Functions by transferring the
kites power onto 1 single line upon deployment,
allowing the kite to ‘Flag Out’. Our SLF equipped
kites use only 4 lines for a simple, uncluttered
method of control and Security.
Depower on Demand: Stage 1 depower
Operation: Depower on demand is the simplest
way to quickly depower your kite in an instant.
By pushing the control bar away from the rider,
the kite will immediately begin to depower. The
further you push the bar away from the rider the
more the kite will depower. By pushing the bar
up near the CAS (FIG 1), it will depower to the
point where it will fall from the sky. This is your
best defense to immediately diffuse the power of
the kite so you can quickly regain control. Once
the kite has safely landed on the water, it will be
in a position where you can easily perform an Instant Relaunch.
Stage 2 Depower:
Stage 2 Depower should only be used in situations where you would like to shut down your
kite and end your session, whether it be on water
or land. It should be noted that relaunching your
kite using this method is slightly more difficult
than the Depower on Demand method. Stage
2 Depower is designed to release the residual
power from your kite by allowing it to ‘Flag’ out
on one of the Front Control lines.
Operation: In order to use Stage 2 Depower,
you must have your Bypass Leash attached to
the Leash Connection ring attached to the 1X
Flagging Line. It is also important that you familiarize yourself with the location and operation of
all QR’s prior to going on the water.
Stage 2 Depower can only be achieved by activating (pushing away) QR1 in the direction of
the arrow (FIG 2). By activating QR1, the harness loop will open up, releasing you from your
spreader bar and transfer the load onto the
Single Line Flag security line. The kite can now
achieve maximum depower, and will flag itself on
the water or land.
OPERATION
Page 27
23
2018 CONTROL SYSTEM USER MANUAL
FIG 3
FIG 4
FIG 1
FIG 2
OPERATION
Page 28
24
2018 CONTROL SYSTEM USER MANUAL
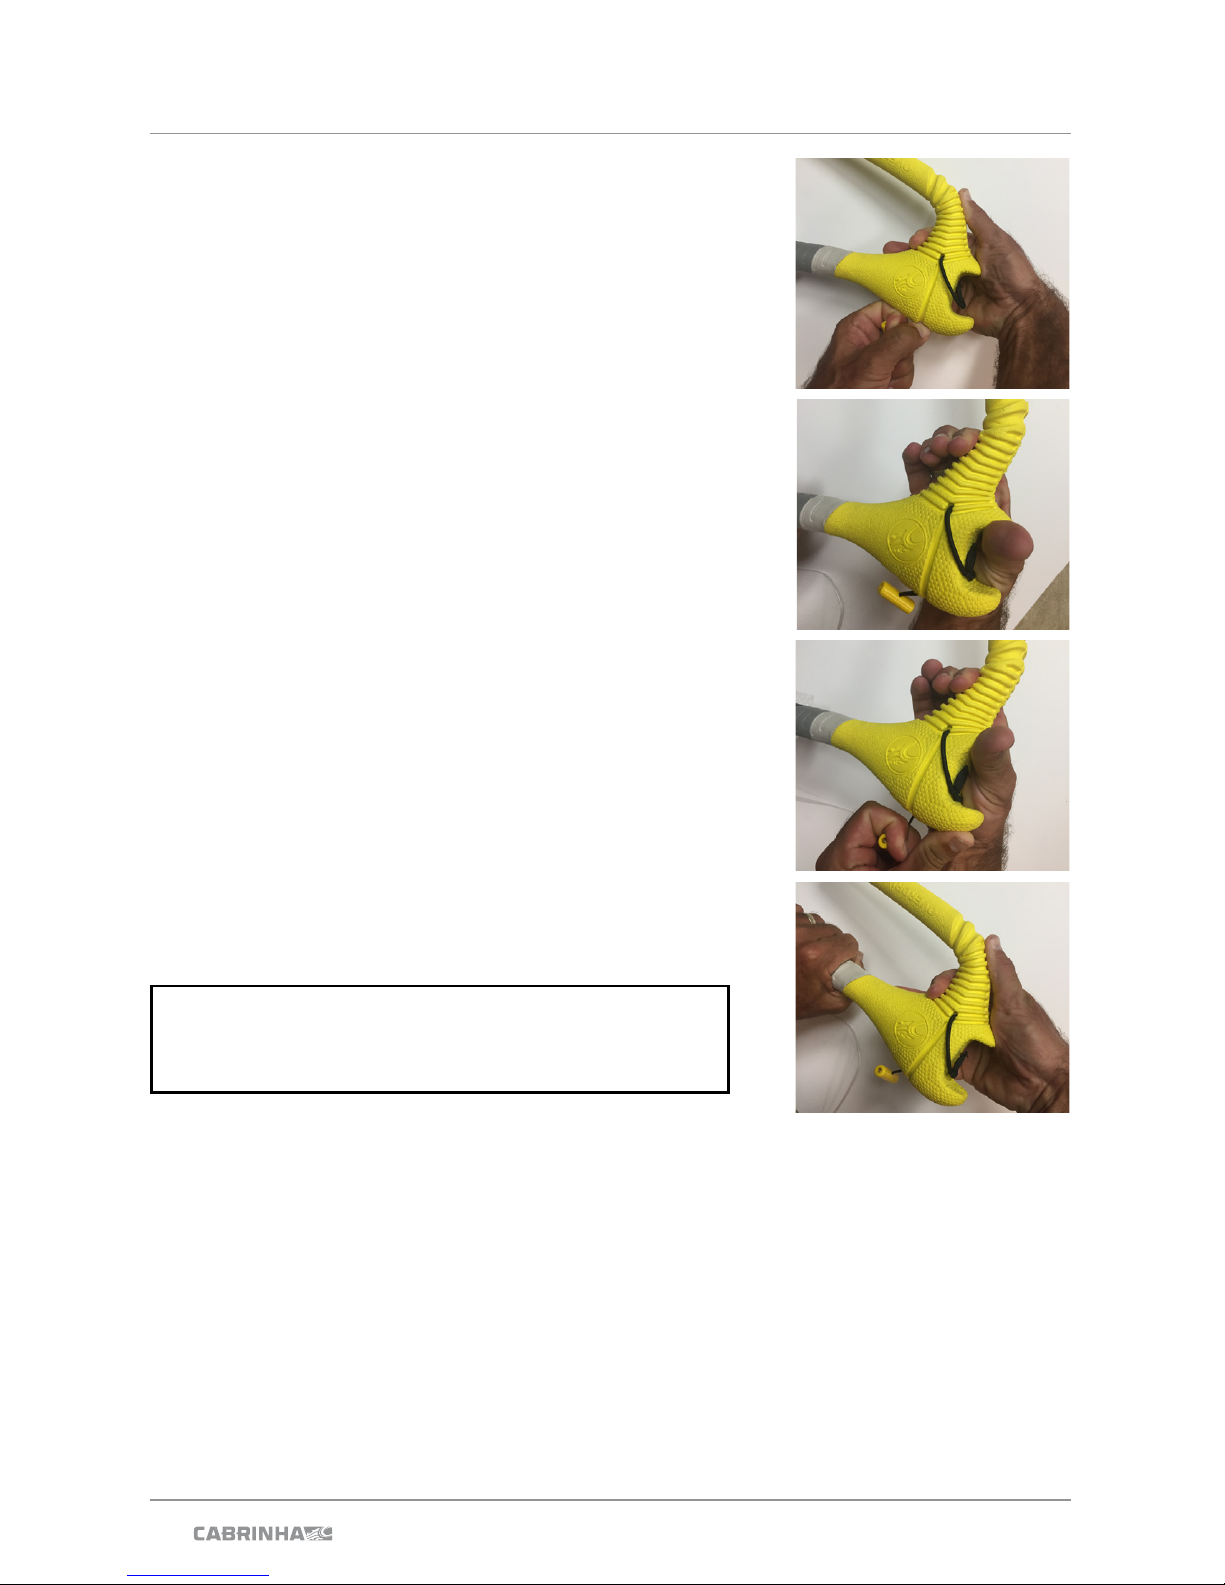
OVERDRIVE BAR ADJUSTMENT.
The Overdrive Bar has a method of changing the bar length, to
suit different riding styles, or different sized kites.
OVERDRIVE OPERATION.
Adjustment from inside to Outside Setting.
• Lightly Push the upper end of the bar end in slightly.
This in turn releases the load on the catch mechanism.
• With the Upper section pushed in, pull down the Overdrive
Catch, and release the upper end of the bar end (FIG 1)
• Pull the upper end of the bar end outwards until you hear the
Catch connect. As a visual guide you will also see the catch
has now moved upwards into the bar end. (FIG 2)
• Repeat this process for the other end of the bar before flight.
Adjustment from Outside to Inside Setting.
• Lightly Push the upper end of the bar end outwards. This in
turn releases the load on the catch mechanism.
• With the Upper Section Pushed outwards, pull down on the
Overdrive Catch, and release the upper end of
the bar. (FIG 3)
• Push the Upper Section of the Bar end inwards until you hear
the Catch connect. As a visual guide you will also see the
catch has now moved upwards into the bar end. (FIG 4)
• Repeat this process for the other end of the bar before flight.
OVERDRIVE BAR ADJUSTMENT
• Wash the Overdrive 1X System frequently in fresh water. Do this by placing the complete bar
in a bucket of fresh water and allow it to sit for 5 minutes. While in the fresh water rotate the
Overdrive Harness Loop, and also operate the Overdrive Bar ends. Allow the Overdrive 1X
System to dry thoroughly before storing.
• Make sure that all sand is rinsed off from the Overdrive System before riding.
• Ensure that the Security Pin is firmly attached to the Overdrive Bridge (as mentioned on Page
17 FIG 8).
• Use the correct leash attachement point on the Overdrive System (as mentioned on page 18
FIG 2).
• Routinely operate the QR2 release.
• To aid in the longevity of the Overdrive Bar Ends, routinely flush water through the bar end
from the upper section down.
CAUTION: Be adivised to check that the bar ends
are functioning correctly before use, and both ends
are locked in the required position. (out/out or in/in).
OVERDRIVE CARE AND MAINTENANCE.
FIG 1
FIG 2
FIG 3
FIG 4
Page 29
25
2018 CONTROL SYSTEM USER MANUAL
HOW TO
STEERING
This is a partial list of techniques to be remembered and applied. Be certain to always take
instruction from a professional.
KEY POINTS TO REMEMBER
• When practicing steering a kite on land, always remember that your kite has extreme
power. Be prepared. We suggest you develop your kite handing skills on land with a
trainer kite, and then move to the water for further practice using the “body dragging”
techniques with your power kite.
• When fi rst learning to fl y your kite, always keep your eyes on the kite.
• Steer slowly. Do not make any abrupt motions with the control bar.
• Keep in mind the power of the kite.
• Never turn the control bar like a car steering wheel. It is ineffective for steering the kite and
may actually cause the kite to become out of control.
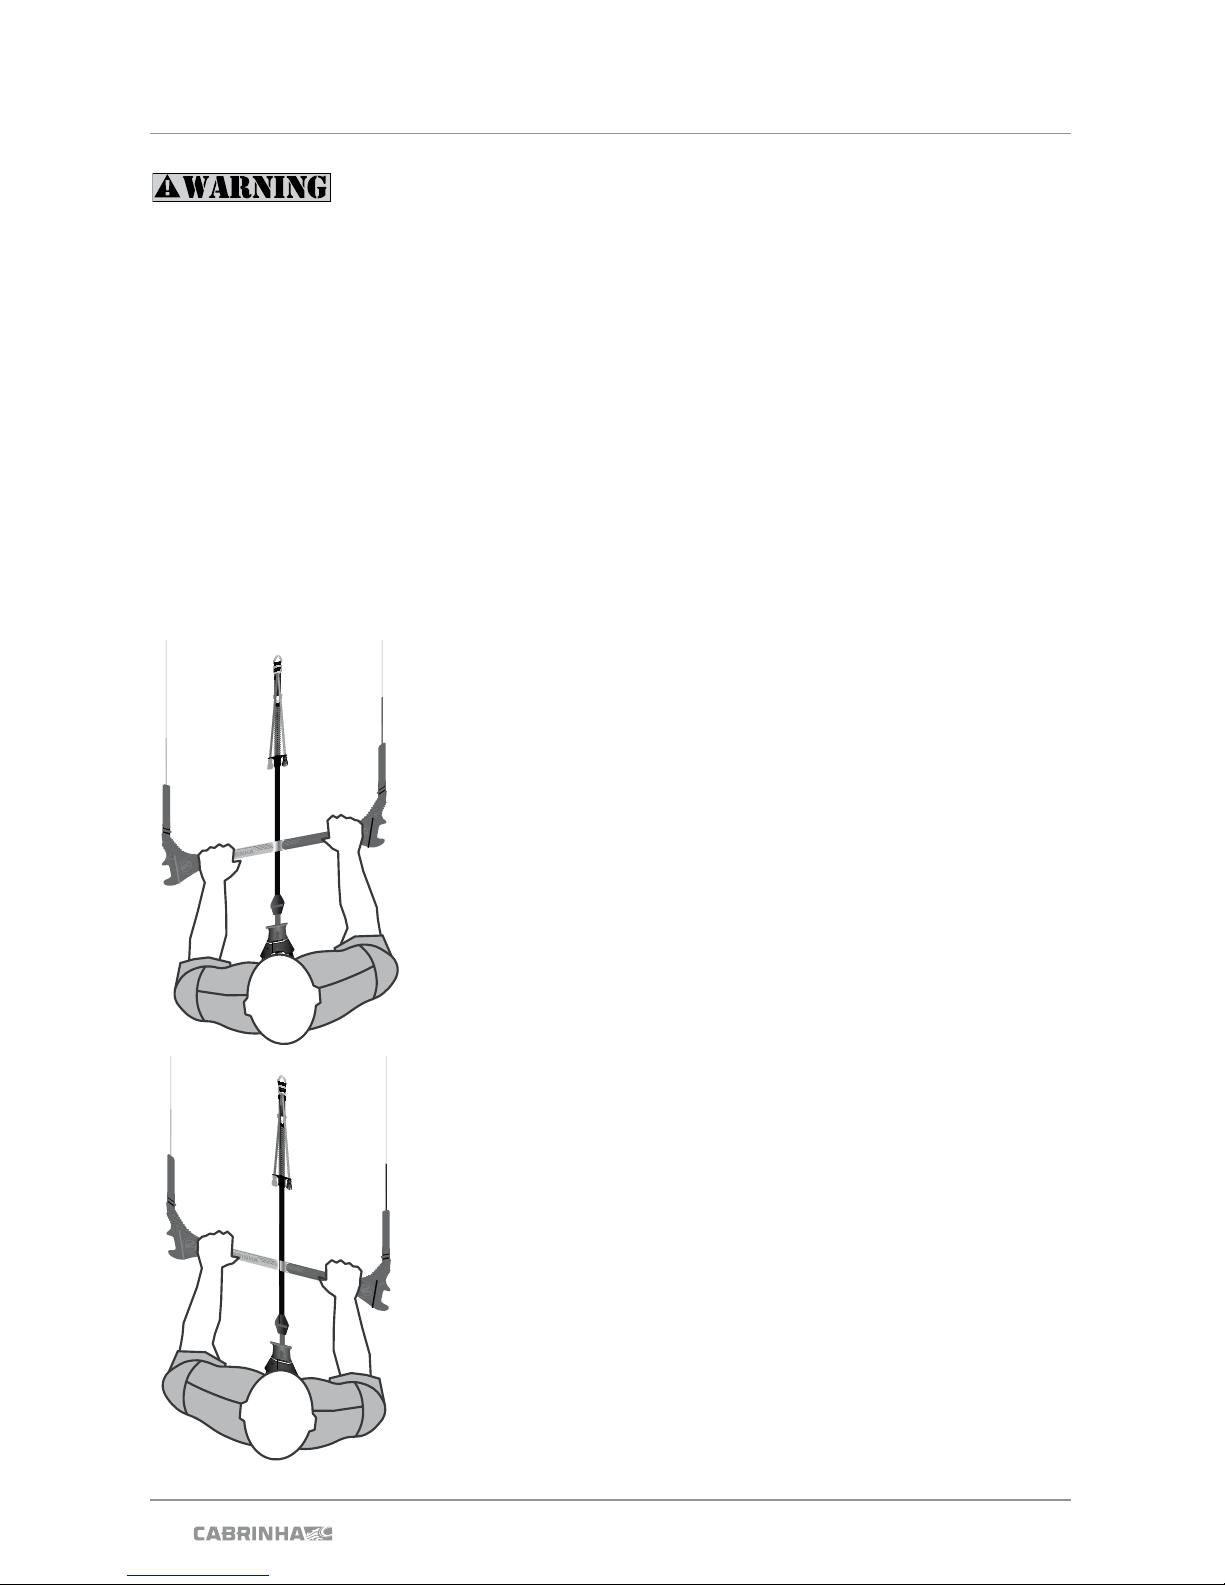
Steering the Kite to the Left
• Hold the bar with both hands, shoulder distance apart.
• With your eyes on the kite, slightly pull on the control bar with
your left hand, pulling it toward your body.
• This will allow your left arm to bend and your right arm to extend. Keeping one arm extended is important; do not pull both
arms toward your body at the same time.
• Pull slowly. The quicker your movements, the faster the kite will
turn and the more power it will create.
• Once the kite starts to turn, it will continue to turn left unless
you “tell it” otherwise.
• Be ready to steer the kite in the other direction.
Steering the Kite to the Right
• Hold the bar with both hands, shoulder distance apart.
• With your eyes on the kite, slightly pull on the control bar with
your right hand, pulling it toward your body.
• This will allow your right arm to bend and your left arm to extend. Keeping one arm extended is important; do not pull both
arms toward your body at the same time.
• Pull slowly. The quicker your movements, the faster the kite will
turn and the more power it will create.
• Once the kite starts to turn, it will continue to turn right unless
you tell it otherwise.
• Be ready to steer the kite in the other direction.
Page 30
26
2018 CONTROL SYSTEM USER MANUAL
IMPORTANT!
FOR SETUP OF YOUR CABRINHA KITE, REFER TO YOUR SUPPLIED
KITE USER MANUAL.
IF YOU ARE UNSURE AS TO WHICH KITES ARE COMPATIBLE
WITH THIS CONTROL SYSTEM, PLEASE REFER TO THE KITE/
CONTROL SYSTEM COMPATIBILITY CHART AVAILABLE ONLINE
AT WWW.CABRINHAKITES.COM.
PAUSE!
Page 31
27
2018 CONTROL SYSTEM USER MANUAL
LAUNCHING
LAUNCHING WITH A PARTNER
1. Before launching, re-familiarize yourself with your Quick Release System in the event that you
must engage them. Make sure you have them properly set up.
2. Next, thoroughly check your lines, your gear, and your launching and landing sites; if all is okay,
you are ready to launch your kite. Be certain your kite is properly inflated; this is imperative to
the re-launchability of your kite.
3. Before you launch, organize a clearly defined release signal that you and your partner both
understand.
4. Connect your Bypass™ leash to the leash attachment point
5. Next, engage the security pin.
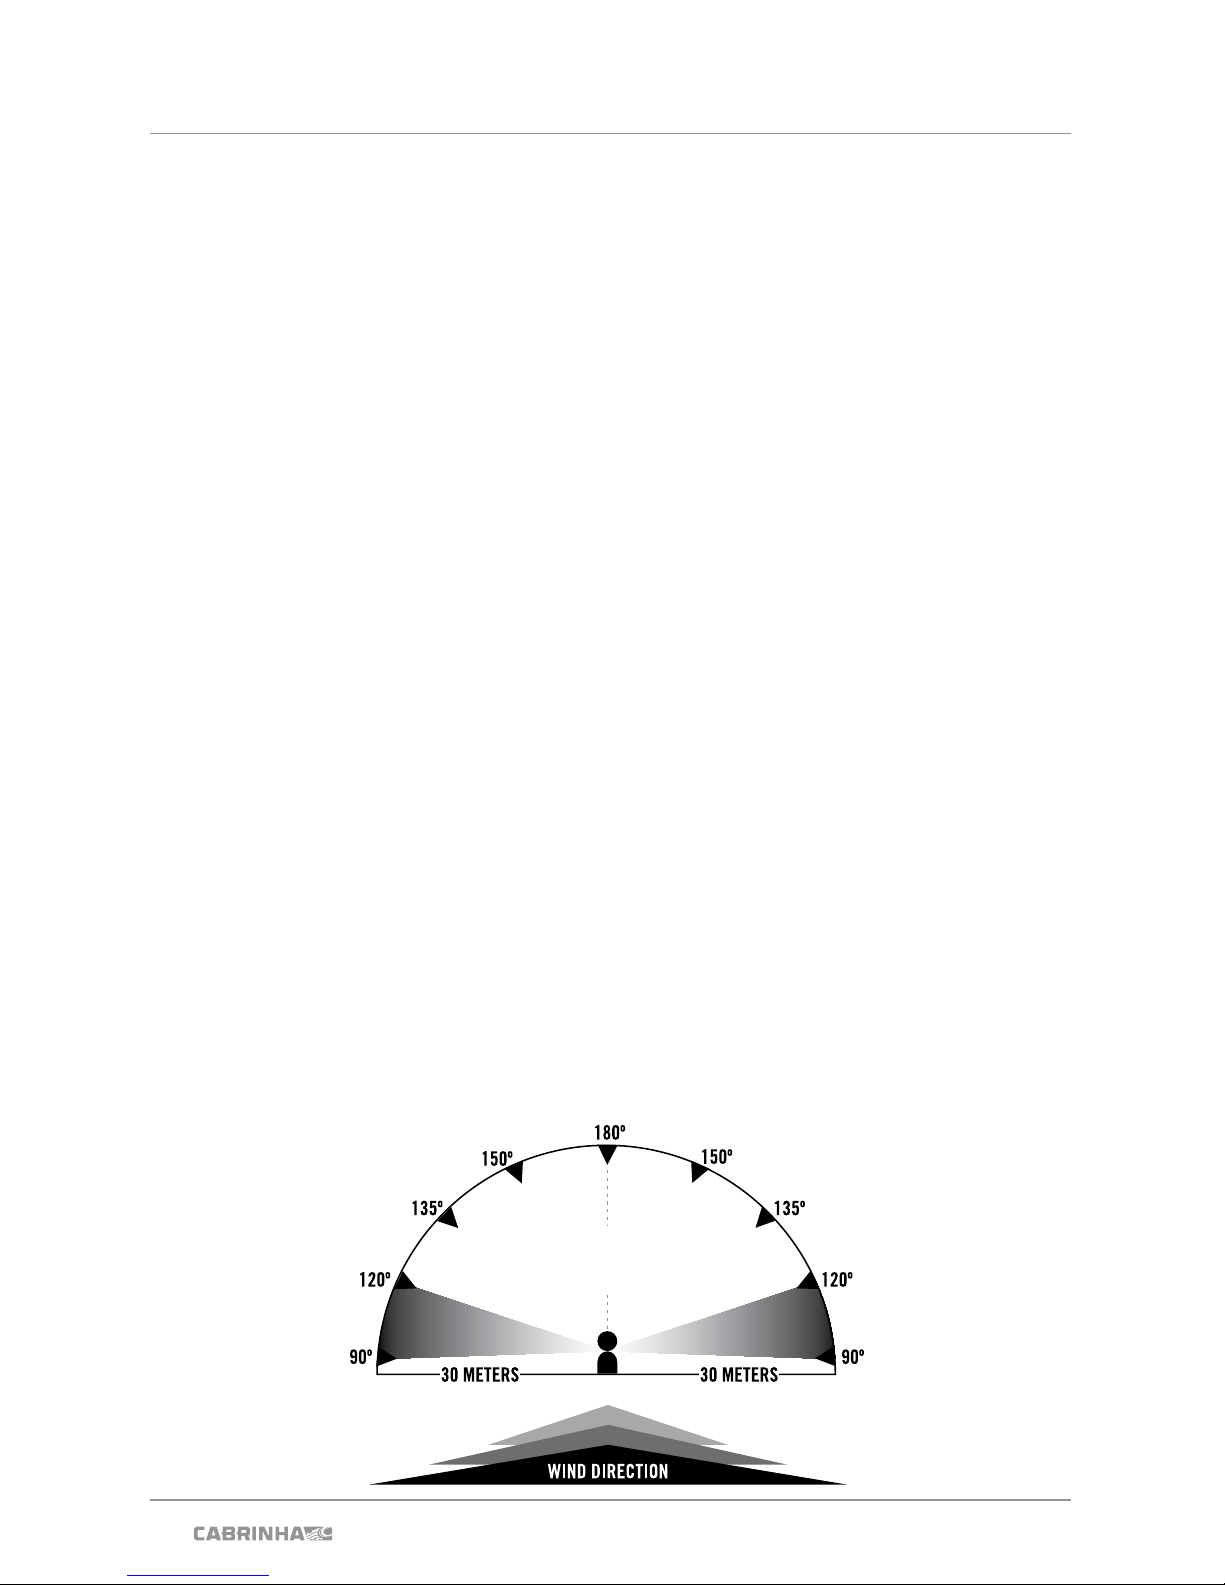
6. Have your partner stand with the kite at 100° off of the wind. (FIG 1)
7. Your partner should hold the kite in the middle of the leading edge, with the leading edge
vertical and pointing into the wind.
8. Your partner should stand behind the kite and not to the side or in front of the kite.
9. Also, your partner SHOULD NOT touch the bridle or flying lines.
10. With the control bar in your hands and at chest height, take a few steps back to take the slack
out of the flying lines.
11. Signal your partner to let go of your kite. It is important that your partner lets you steer the kite
out of his or her hands.
12. CAUTION: Your partner SHOULD NOT throw the kite into the air. Instruct him/her against
doing this BE FORE you launch. When the kite is thrown into the air, it hinders the ability of the
kite to launch properly. When thrown, the kite may either launch too abruptly and powerfully or
it may not launch at all. It is potentially a very dangerous way to launch.
13. Once your partner lets go of the kite, have him/her move upwind of you and out of your
way.
14. SLOWLY steer the kite to the edge of the power window. DO NOT make any abrupt motions.
The slower you steer the kite, the more in control you will be.
15. With the kite at the edge of the power window and the wind at your back, walk slowly to the
water’s edge, keeping in constant check with the kite. You should know what the kite is doing
at all times.
16. If anything goes wrong with the launch, you should be ready to push the control bar away to
depower the kite.
17. CAUTION: the more wind there is during your launch, the faster everything will happen. That
is why it is important that you launch the kite slowly.
RIDER
SAFER SAFER
POTENTIALLY HAZARDOUS
:
DO NOT SET YOUR KITE FOR A
STRAIGHT DOWNWIND LAUNCH.
FIG. 1
Page 32
28
2018 CONTROL SYSTEM USER MANUAL
LANDING A KITE TO YOUR PARTNER
1. Prior to launching, make sure your partner has been instructed on how to land your kite
properly.
2. Also, you should always determine adequate landing spots before you launch your kite.
3. Having done that, make sure that when you are heading toward shore, that your landing
location is still un-crowded and un-obstructed.
4. Never land your kite over, on top of, or near others, especially if they are downwind of you.
You should have an area clear of people, pets, power lines, trees, and other obstructions.
5. As you approach shore, keep your kite low near the water, at the edge of the power
window.
6. Drop down (or step) off your board and body drag the final distance to shore. Do not
approach the shoreline with speed.
7. Slowly steer your kite into the wind and to your partner.
8. Your partner should be on the windward side of your kite as he/she approaches it.
9. Once the kite is nearly touching the ground, your partner should grab the kite at the middle
of the leading edge strut. He/she should grab the kite in the same location on the kite as
when it was launched.
10. Your partner SHOULD NOT grab the kite bridles or flying lines.
11. Your partner should AVOID grabbing the kite by either wing tip or the trailing edge of the
kite. Grabbing the kite by the wing tip or the trailing edge will often cause it to flip or spin;
the kite will also be hard to manage.
12. Once your partner has the kite’s leading edge, he/she should walk the kite away from the
water’s edge.
13. Your partner may either continue to hold the kite or he/she may secure the kite by turning
it over, with the struts down and the leading edge pointed into the wind, and securing it
with sand or sand bags.
14. Once on land, with your kite secured, you may wind up your lines.
LANDING
Page 33
29
2018 CONTROL SYSTEM USER MANUAL
RELAUNCHING
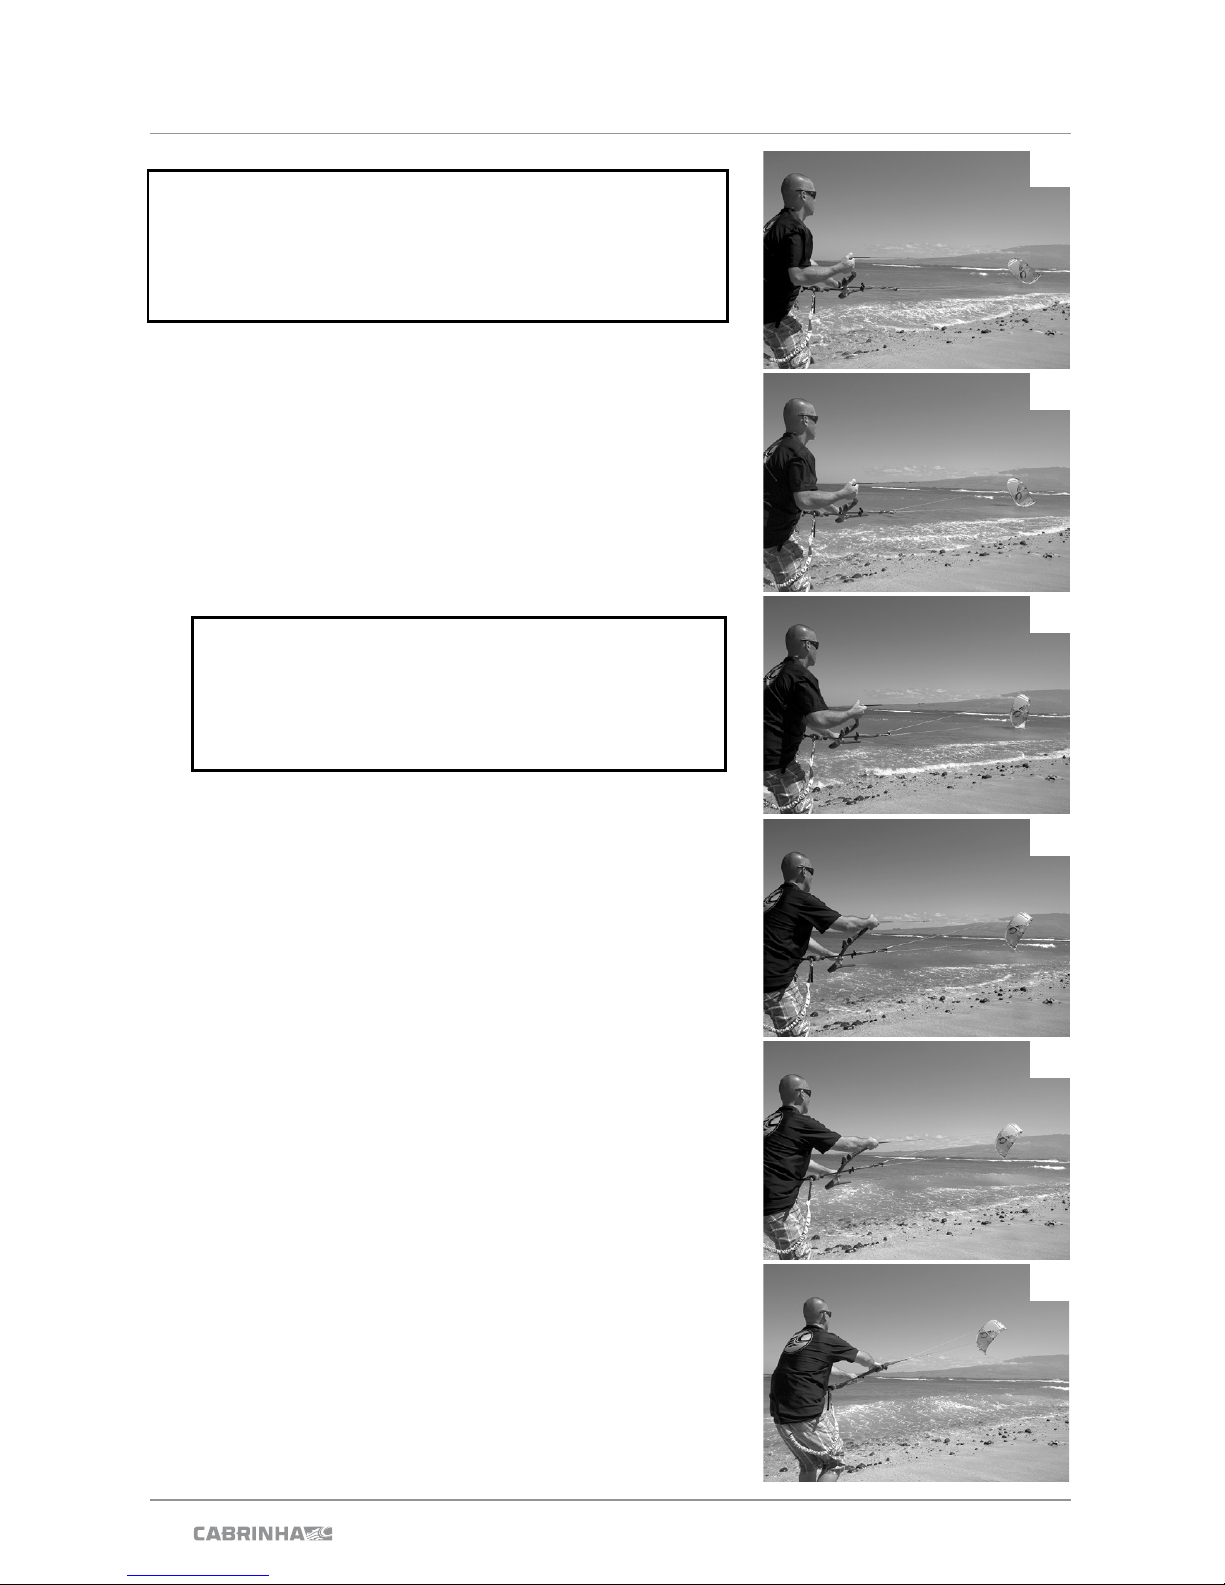
• When your kite goes down on the water, know that the
kite may re-launch on its own, often when you do not
expect it to, so be prepared.
• If your kite goes down on its face, with the leading
edge and struts facing the water, you must steer the
kite onto its side in order to re-launch.
• Pull the rear leader line toward your body. Maintain
constant tension on this leader line.
• HINT: Keep your board on your feet and in front of you.
This will slow your forward momentum and increase
the speed of relaunch.
• Once the wingtip begins to lift, the kite will soon roll
onto its side.
• Once on its side, the kite will begin to move toward the
edge of the wind window. You may have to finesse the
kite to the edge of the window; to do this continue to
hold onto the same leader line until the kite wants to
re-launch.
• Sometimes, especially in light wind, you must be
patient as the kite works its way to the edge of the
wind window. Do not get impatient and start pulling on
both sides of the bar. Continue to work the kite to the
original side you chose.
• When the kite is ready to re-launch, release the
leader line and steer the kite up into the sky. Slowly
steer your kite into the sky and level out your bar. Be
prepared to depower the kite by pushing the control
system toward the kite.
CAUTION: Make sure not to wrap the leader line
around your hand and do not allow your body to
get entangled in the lines. You may need to pull as
much as one full meter of leader line in order to lift
the wingtip of the kite.
IMPORTANT CAUTION: Proper inflation of the struts,
especially the leading edge, is imperative for relaunchability of your kite. Make sure your kite struts are
properly inflated before entering the water.
1
2
3
4
5
6
Page 34
30
2018 CONTROL SYSTEM USER MANUAL
TUNING
TUNING THE KITE
Proper tuning of your kite is essential for best performance. A properly tuned kite increases
its effi ciency, speed, and allows the kite to de-power correctly. The following guidelines will
help you to properly tune the kite to suit your style of riding.
• All models have a desired sweet spot that is achieved by the correct tension of the
steering (back) and de-power (front) lines. Fine-tuning of the kite may be done by making
small adjustments to the Centerline Adjustment Strap (CAS.).
• Please note that, due to the full range of depower available in the system, the CAS is used
to position the bar within the depower range. If you fi nd yourself riding with your arms fully
extended and bent over at the waist, you can pull the red ball and the bar will move closer
to you.
• The kite is very sensitive to over sheeting. Too much back line tension can cause the kite
to fl y slowly or even backwards in light wind. Over sheeting will also minimize the amount
of shutdown available in the depower range.
• Do not ‘over sheet’ the kite. The fi rst objective is to set the kite’s maximum power while
allowing it to fl y effi ciently across the sky. More power and quicker turning is achieved by
tensioning the steering (back) lines. This is called ‘sheeting in the kite’. There is however,
a point of diminishing returns. Too much back line tension will cause the kite to fl y slowly
across the sky and not allow it to fl y to the edge of the power window.
• With the kite directly overhead, hook into the harness loop and fully sheet in (power up)
the kite. If the kite is over-sheeted, the kite will sit back in the window.
• De-power the kite by pulling on the CAS until the desired effect is achieved. The more you
pull on the CAS the less power the kite will have. Keep in mind that you will still be able
to de-power the kite through the Depower Loop, so do not de-power too much with the
CAS. To increase power, pull down on the black power adjustment ball.
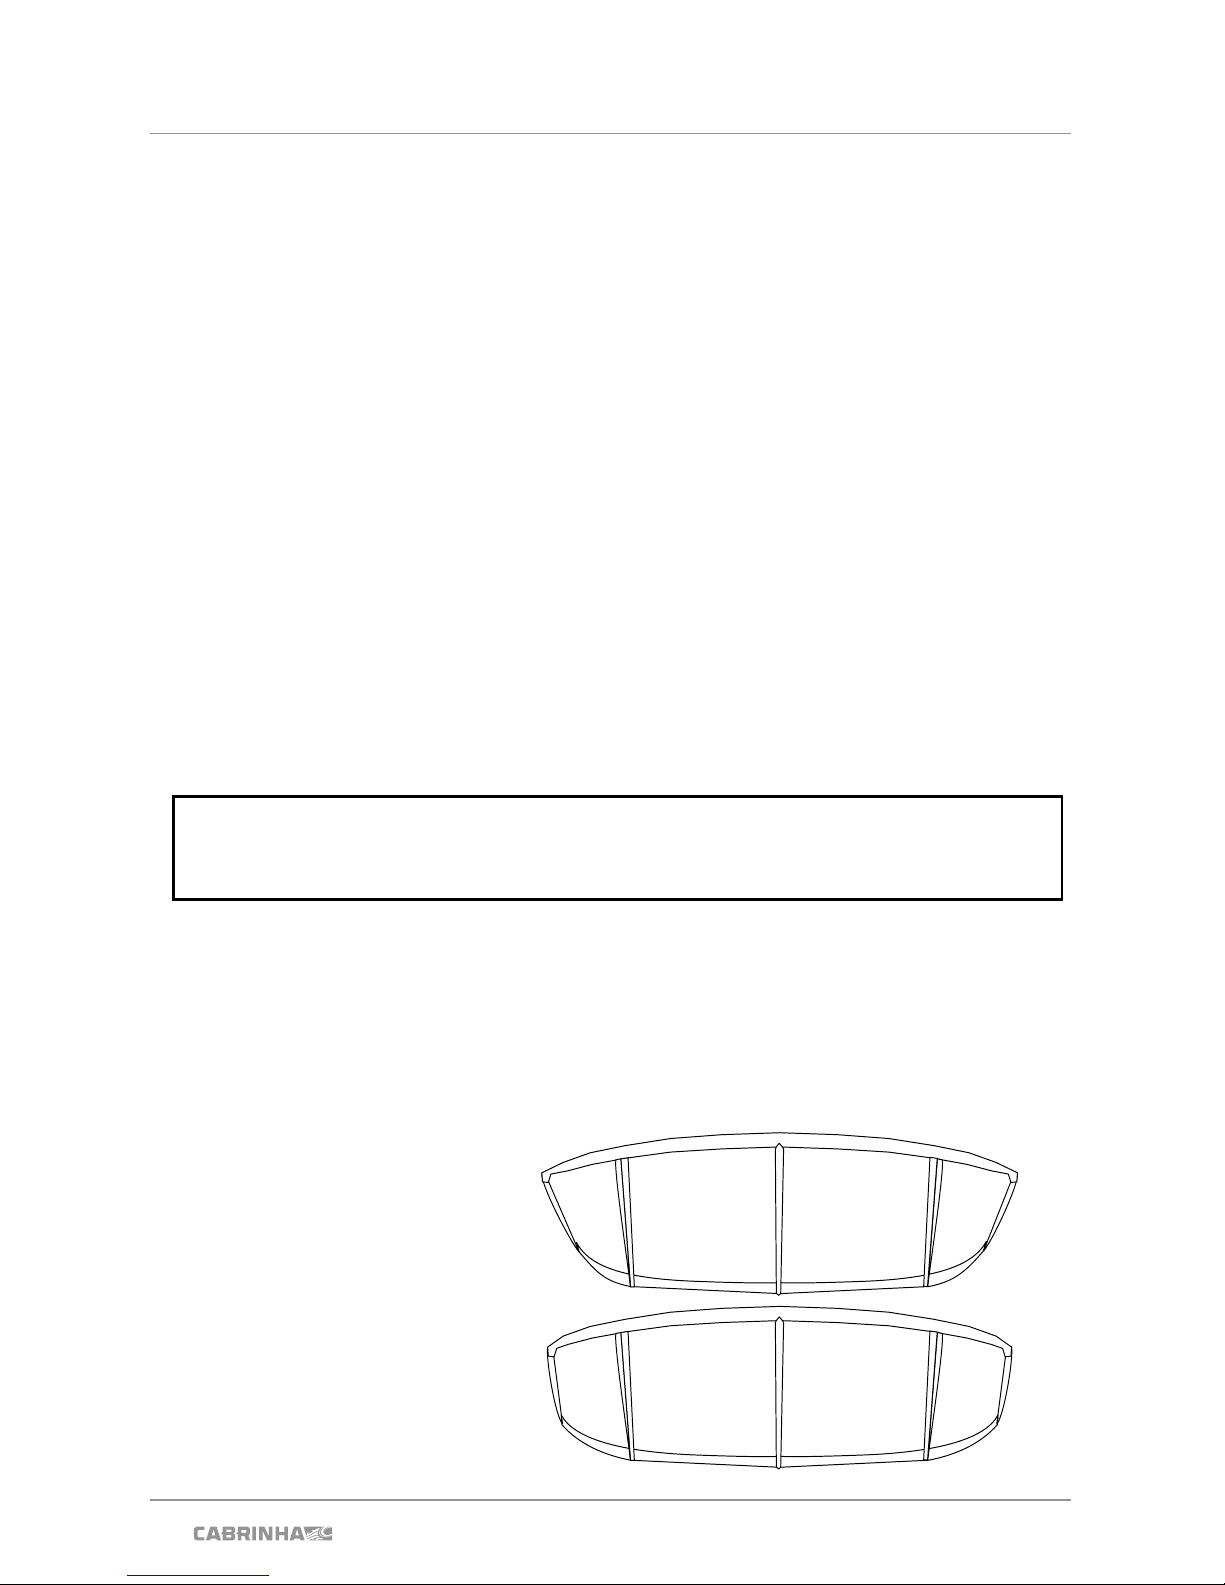
VIEW OF KITE FROM RIDERS PERSPECTIVE –
KITE IN THE NEUTRAL POSITION DIRECTLY ABOVE THE RIDER.
Over sheeted wingtip >>
(too much back line tension)
Correct Trim >>
CAUTION: Beware of lofting. Leaving the kite overhead for long periods of time
increases the risk of this phenomenon. If you feel yourself being lifted, sheet out
immediately and be ready to pull your QRS.
Page 35
31
2018 CONTROL SYSTEM USER MANUAL
GLOSSARY
FREQUENTLY USED KITEBOARDING
& WIND TERMINOLOGY
A
SPRINT TUBES
Tubes that connect the LE bladder to the strut bladders.
AIRLOCK - a 2 part valve that allows a single point for inflation and deflation of the kite.
SPRINT PINCH CLAMPS
Clips that prevent air transfer between the LE and the
struts.
B
BAR (unit) – A unit of pressure
• 1 bar = 14 PSI
• 1 mbar = 0.015 PSI
PSI – A unit of pressure. Pounds per square inch
• 1 PSI = 68.9mbar
BEAUFORT SCALE
A system for estimating wind strength based on the effects
wind has on the physical environment (e.g. the behavior
of waves, smoke, etc.). Instruments are not used to determine wind strengths in this point scale (O = calm to 12
= hurricane).
BODY DRAGGING
This is an instructional tactic / step in which the rider flies
the kite while in the water, but without the board. The rider
will launch, then walk to the water, and basically drag in the
water while practicing flying, re-launching and self-rescue
techniques.
BLADDER
The inner inflatable tube found within the leading edge and
the struts of the kite. (Imagine a bike-it has both a tire on the
outside and an inner tube which holds air).
BRIDLES
The lines that hang from the wing tips and leading edge of
the kite. The flying lines will be attached from the control
bar to these bridle lines in order to connect control bar
to kite.
Tow Points – The attachment points for the bridle.
BYPASS™ LEASH SYSTEM
A security leash feature that is recommended for all users.
This system incorporates QR2 which will separate the User
from the Kite if QR1 has been activated.
C
CENTERLINE ADJUSTMENT STRAP (CAS)
Used to depower the kite by changing the relationship between
the front and back line lengths. It is also used to position the
bar closer to the rider.
CONTROL BAR
The steering device the rider uses to steer the kite.
D
DE-POWER LINES
The two center flying lines that attach to the leading edge
bridles on the kite-one to the left wing tip, the other to the
right wing tip. These lines assist in de-powering the kite.
DOWNWIND
The direction in which the wind is traveling.
F
FLYING LINES
A term used to describe all four of the lines included with
your kite package. These lines connect the bridle lines on
the kite to the leader lines on the control bar and are typically 20-30 meters in length.
G
GUSTY WIND
Wind is inconsistent and varies considerably from one
wind strength to another.
GYBING
The motion in which the rider changes the direction of the
board he/she is riding. The rider switches from a starboard
tack to a port tack or vice versa.
H
HARNESS
A piece of equipment used to temporarily attach the rider
to the control bar harness line. This enables the rider to
save energy by utilizing their body weight and all of their
muscles to hang on to the kite. Most common are the waist
harness (attaches around the torso) and the seat harness
(attaches to the waist and around the legs).
I
INFLATABLE KITE
A kite with inflatable tubes designed to float the kite and to
facilitate water re-launchability.
Page 36

32
2018 CONTROL SYSTEM USER MANUAL
GLOSSARY
K
KITEBOARDING
The term used to describe the sport of power kiting on
water or snow.
KITESURFING
Another term used to describe the sport of power kiting
on water.
KNOTS
A measure of speed based on nautical miles.
1 knot = 1 nautical mile per hour.
1 knot = 1.15 miles per hour.
1 knot = 1.85 kilometers per hour.
L
LANDING
The action which places the kite on the water or on land.
LAUNCHING
The motion in which the rider steers the kite from their partner’s hands into the sky.
LEADER LINES
The lines that attach directly to the control bar. You will attach these lines to the flying lines in order to connect them
to your bar.
LEADING EDGE (LE)
The front inflated tube of your kite.
LEEWARD
The downwind side of the kiteboarder.
LOFTING
Lofting occurs when the kite is above the riders head in the
neutral position. Instability in the wind can cause sudden
vertical force and lift a rider off of their feet.
LUFF
A term used to describe what happens to the kite in a lull.
A term also used to describe the complete de-powering
of a kite.
LULL
A term used to describe wind when it lessens in strength,
for any amount of time.
M
MPH
Miles Per Hour. A measure of speed.
1 mph = 1.6 kilometers per hour.
N
NEUTRAL POSITION
This is the position just above the rider’s head in the sky. If
the rider levels out the bar, the kite will gravitate to the neutral position. However, it is difficult and dangerous to keep
the kite in this position. Although in this position the kite
may feel steady and may feel like it has the least amount
of power or pull, it is also the position in which on land
the rider is most susceptible to lofting. On the water, the
neutral position can be utilized to rest while you reel in your
board, but on land, we strongly suggest you do not utilize
the neutral position. After launching, it is best to make your
way to the water without delay. Do NOT linger on land with
the kite in neutral position. It is VERY dangerous.
NEUTRAL ZONE
This is the area that includes the neutral position and the
area to the left and right of the rider. It encompasses the
most upwind or windward positions in which to fly the kite.
When flown here, the kite has less power or pull than when
it is in the power zone. However, use caution when the kite
is in this zone, especially when on land, and especially in
gusty wind conditions.
O
OFFSHORE
Wind is blowing from the shore directly or to a great extent
out to the water.
ONSHORE
Wind is blowing directly or to a great extent directly from
the water toward the land.
OVER-POWERED
A situation in which the rider has a kite too powerful for his/
her ability level, weight, strength, and/or wind conditions.
P
PLANING
The point in time in which the rider gets the board skimming
on the water.
POWER ZONE
This is the area in front and to the sides of the rider, but
excluding the neutral position and zones. It is the area in
which the kite has the most power and pull. When flown in
this area, the kite can be powerful and dangerous, so avoid
flying your kite in this zone when learning. Use extreme caution when flying the kite in this zone.
PUMP – Device used to inflate the kite.
Page 37
33
2018 CONTROL SYSTEM USER MANUAL
GLOSSARY
Q
QRS-QUICK RELEASE SECURITY SYSTEM
A quick release point on the control system which, when
activated, detaches the control system from the harness
loop. Also referred to as the Main QR.
QR2
A secondary quick release located on the Bypass
Leash. When activated separates the security line
from the user. Thus separating the kite from the user.
QUICKLOOP
Quickloop refers to the molded harness loop body.
This system gives the user a quick and effective way
to reconnect the harness loop after QR1 Deployment.
R
REACH
A direction of travel relative to the wind direction. Generally 90-160 degrees off the wind.
RECOIL
Recoil is a convenience item, which allows riders a spot to
rest the bar while unspinning it from rotational tricks. It also
serves as a unit to keep tension on the bungee adjusters
while keeping them at arms reach.
RE-LAUNCHING
The motion in which the rider steers the kite off of the water and back into the sky.
S
SIDE OFFSHORE
Wind is blowing from either the left or the right and from
the shore out to the water. This is a combination of offshore and sideshore wind.
SIDESHORE
Wind is blowing from the left or from the right, parallel to
the shore. Ideal wind direction for kiteboarding.
SIDE ONSHORE
Wind is blowing from either the left or the right and from
the water toward the land. This is a combination of onshore and sideshore wind. Utilize caution when operating
your kite in or near water in this wind direction.
SINGLE LINE FLAG
SLF is a simplified bridle and control system that seamlessly provides 2 stages of depower.
SPRINT™
Single Point Rapid Inflation Technology.
STAGE 2 DEPOWER
Stage 2 Depower is a built in function of 1X which allows
the rider to self land a kite on the water or land.
STEERING LINES
The two outside flying lines that attach to the trailing edge
bridles on the kite-one to the left wing tip and the other to
the right wing tip.
STRUTS
The outer fabric tubes found on your kite. They house the
inner inflatable bladders, which are filled with air to give
structure to the kite.
T
TRAINER KITE
A kite that may be used on land to simulate the motions
used in kiteboarding. It is an excellent instructional and
learning tool. Despite its small size, this kite still has power,
so be alert.
U
UNDER-POWERED
A situation in which the rider has a kite not powerful
enough for his/her weight, strength, and/or wind conditions.
UPWIND
The direction from which the wind is blowing.
W
WATER STARTING
The motion of the rider in which he/she goes from sitting or
lying in the water to standing on the board.
WINDWARD
The upwind side of the kiteboarder.
 Loading...