

Page 1
Cablevision Scepter
Remote Control
User's Guide
Universal Electronics, Inc.
M4501 Rev A
WWW.URCSUPPORT.COM/CABLEVISION
1. Remove the battery
compartment cover on the
back of your remote control.
2. Locate the two (2) enclosed
AA batteries.
3. Match the + and - marks
with those in the battery
case, then insert them.
4. Replace the battery
compartment cover.
5. If batteries are not inserted
correctly, the remote LED
under the iO key will not
light when keys are pressed.
NOTE: When batteries need
replacement, the IO key LED will
blink 3 times upon each key-press.
CONTROLLING THE CABLE
SET-TOP BOX
In order to control the cable set-
top box with the Cablevision
Scepter rem ote control, yo u need
to insert the US B dongle that
comes with the remote into an
available USB port on the set-top
box. Once the dongle is inserted
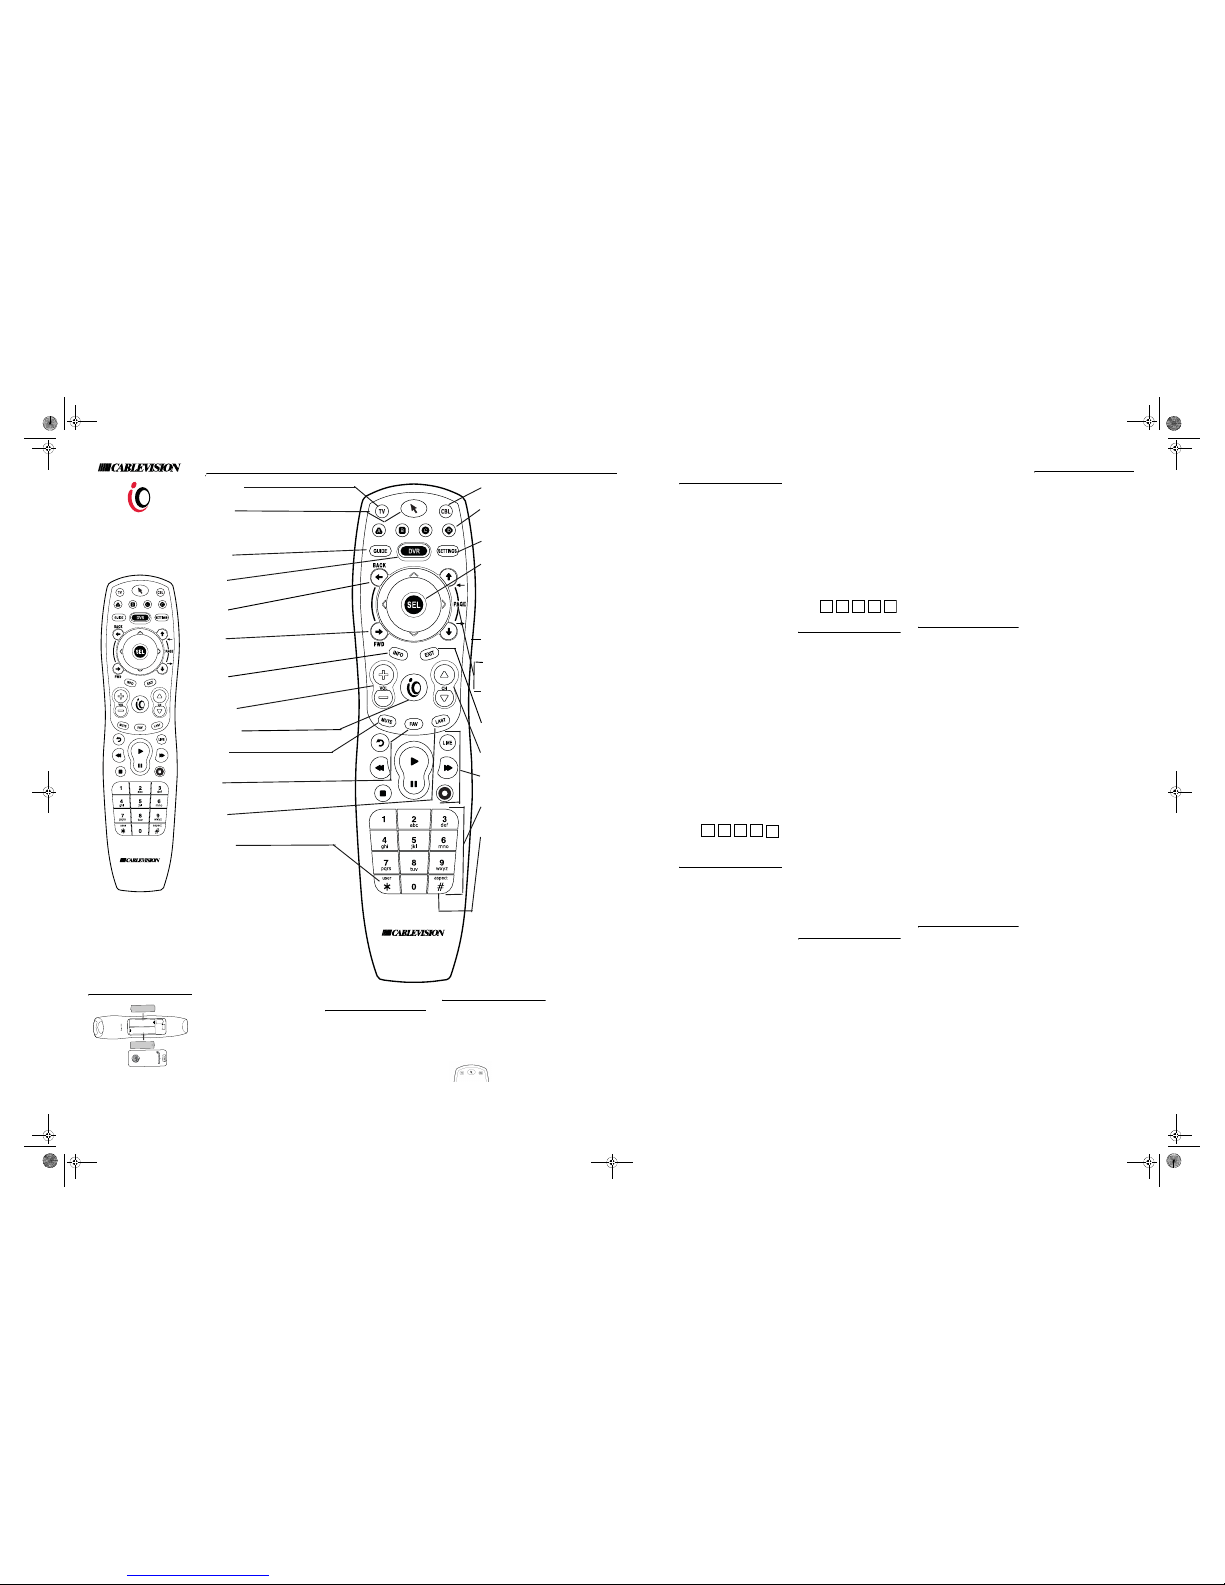
FUNCTION KEY CHART
TV Power
Press once to turn on or off your TV.
Pointer
This key is used to sta rt or stop the pointing
function on the remote control. Press at any time to
“park” the pointer so motion does not make the
pointer move.
GUIDE
Displays the on-screen program guide.
DVR
Displays the list of programs that you have
recorded.
BACK
Returns to the previous screen. Also used in day/
time navigation in the on-screen program guide.
FWD
Brings you forward in screen navigation. Also used
in day/time navigation in the on-screen program
guide.
INFO
Displays the current channel and program
information.
VOL+/-
Used to raise and to lower the audio volume.
IO(Logo)
Displays the IO applications menu.
MUTE
Press once to turn sound off, press again to turn
sound back on.
FAV
Use to cycle through your favorite channels stored
on your cable se t-top box.
LAST
Press to toggle between the channel that was last
tuned.
USER/*
This function is reserved for future use.
STB POWER
Press once to turn on or off your cabl e set-top bo
x
A, B, C, D
These functions are used for interactive
applications or to sort your on-screen program
guide:
A-Sorts the guide by time
B-Sorts the guide by theme
C-Sorts the guide by title
SETTINGS
Displays the cable box settings menu.
Navigation/SEL
Use th e Cursor keys to move the cursor in the
program guide and menu screens and to navigat
e
within the interactive service.
•Use SEL to select options, PPV events, and t
o
tune to programs from the program guide.
•Use SEL as a means to select items and
content when POINTING or to drag and drop
items and content when POINTING.
PAGE UP
Press to move one page up in the program guide
and menus.
PAGE DOWN
Press to move one page down in the program
guide and menus.
EXIT
Used to directly exit menus, guides, and
applications.
CH +/-
Press to select the next higher (or lower) channel
.
HELP
Used to trigger on-screen help tips.
Transport Keys
These keys are used to control playback of DVR o
r
On Demand content.
1-0 Keys
Use the keypad numbers (1-9, and 0) to directly
tune channels (e.g., 09).
ASPECT/#
Press to change the aspect ratio (4:3 or 16:9) on
your STB.
FUNCTION KEY CHART
TV Power
Press once to turn on or off your TV.
Pointer
This key is used to sta rt or stop the pointing
function on the remote control. Press at any time to
“park” the pointer so motion does not make the
pointer move.
GUIDE
Displays the on-screen program guide.
DVR
Displays the list of programs that you have
recorded.
BACK
Returns to the previous screen. Also used in day/
time navigation in the on-screen program guide.
FWD
Brings you forward in screen navigation. Also used
in day/time navigation in the on-screen program
guide.
INFO
Displays the current channel and program
information.
VOL+/-
Used to raise and to lower the audio volume.
iO(Logo)
Displays the iO applications menu.
MUTE
Press once to turn sound off, press again to turn
sound back on.
FAV
Use to cycle through your favorite channels stored
on your cable se t-top box.
LAST
Press to toggle between the channel that was last
tuned.
USER/*
This function is reserved for future use.
STB POWER
Press once to turn on or off your cabl e set-top box
.
A, B, C, D
These keys are used to perform various on-screen
functions.
SETTINGS
Displays the cable box settings menu.
Navigation/SEL
Use th e Cursor keys to move the cursor in the
program guide and menu screens and to navigate
within the interactive service.
•Use SEL to select options, PPV events, and to
tune to programs from the program guide.
•Use SEL as a means to select items and
content when POINTING or to drag and drop
items and content when POINTING.
HELP
Reserved for future use.
PAGE UP
Press to move one page up in the program guide
and menus.
PAGE DOWN
Press to move one page down in the program
guide and menus.
EXIT
Used to directly exit menus, guides, and
applications.
CH +/-
Press to select the next higher (or lower) channel.
Transport Keys
These keys are used to control playback of DVR or
On Demand content.
1-0 Keys
Use the keypad numbers (1-9, and 0) to directly
tune channels (e.g., 09).
ASPECT/#
Press to change the picture size on your STB.
3. Match the + and - marks with
those in the battery case, then
insert them.
4. Replace the battery
compartment cover.
5. If batteries are not inserted
correctly, the remote LED
under the iO key will not light
when keys are pressed.
NOTE: When batteries need
replacement, the iO key LED blinks
3 times upon each key-press.
CONTROLLING THE CABLE
SET-TOP BOX
In order to control the cable set-top
box with the Cablevision Scepter
remote control , you need t o insert
the USB dongle that comes with the
remote into an available USB port
on the set-top box. Once the dongle
is inserted and batteries are
installed in the remote control,
then the remote should
automatically be rea dy to control
the set-top box with any key-press.
POINTING OPERATION
The Cablevision Scepter remote
control has a unique feature that
enables movement of the remote
control to guide an on-scree n
pointer for applications that support
the pointing feature.
To enable the
pointer on the
remote, press
the POINTER key
located on the top end of the remote
control.
When the re mote is in POINTER
mode, there is a green LED that
blinks to light up the POINTER key
about once per second. While this
key is lit, you can move the onscreen pointer (for supported
applications) to navi gate and select
on-screen content. Much like a PC
mouse, the pointer allows content
to be selected with a click of the
SEL key or to be drag ged from one
location to another by holding the
key down and releasing the key to
drop an item being dragged to a
new folder or location.
PROGRAMMING THE REMOTE
FOR TV CONTROL
The Scepter universal remote
control comes pre-progra mmed to
operate the set-top box that is
supplied by Cablev ision. In
addition, Scepter can be
programmed to control bas ic
functions of TV POWER, VOLUME+/-,
and MUTE on a TV.
1. Turn on the TV that you wish
to control
2. Press and hold SEL and MUTE
simultaneously until the iO key
blinks twice.
3. Using the list of “Setup Codes
for Televisions” on the back of
this sheet, find the brand
name for the TV that you wish
to control. Enter the first fivedigit code for your brand of
TV. If performed correctly, the
iO key blinks twice.
NOTE: If the iO key emits one long
blink, the entry is invalid. Repeat
steps 2 through 3 and try entering
the same code again.
4. Aim the remote control at the
TV and press MUTE to see if
the TV responds. If the TV
responds to MUTE, try
VOLUME +/- and TV POWER to
ensure all functions work as
expected. If the TV does not
respond to these keys, repeat
steps 2 through 3, trying each
code for your brand until you
find one that works. If it still
does not respond, try
“SEARCHING F OR A TV
CODE”.
Record your TV Code here:
PROGRAMMING THE REMOTE
FOR AUDIO DEVICE CONTROL
If you use an audio device such as an
Amplifier to control the volume in
your hom e theate r, you may
program the Scepter remote control
for control of the audio device using
the follow step.
NOTE: Setting up an audio device
automatically makes that device the
default for VOLUME +/- and MUTE
functions on t he Scepter remote
control.
1. Turn on the Audio Device that
you wish to cont rol
2. Press and hold SEL and MUTE
simultaneously until the iO key
blinks twice.
3. Using the list of “AUDIO
DEVICE CODES” on the back
of this sheet, find the audio
device type and brand name
that you wish to control. Enter
the first five-digit code for
brand of audio device. If
performed correctly, the iO key
blinks twice.
NOTE: If the iO key emits one long
blink, the entry is invalid. Repeat
steps 2 through 3 and try entering
the same code again.
4. Aim the remote control at the
audio device and press MUTE
to see if the audio device
responds. If t he device
responds to MUTE, try
VOLUME +/- to ensure all
volume-related functions
work as expected. If the device
does note respond to these
keys, repeat steps 2 through 3,
trying each code for your
brand until you find one that
works. If it still does not
respond, try “SEARCHING
FOR AN AUDIO DEVICE
CODE”.
Record your au dio Code here:
SEARCHING FOR A TV CODE
If the five-digit codes for your brand
do not work for your TV, follow the
instructions below to search
through all possible TV Codes.
1. Turn on the TV that you wish
to control.
2. Press and hold SEL and MUTE
simultaneously until the iO
key blinks twice.
3. Enter 9 9 1. The iO key blink s
twice.
4. Press the 0 key once to set the
remote for TV code search.
5. Aim the remote control at the
TV and press VOL + once to
begin the automated code
search.
6. Keep the re mote control
pointed at your TV as the
remote proceeds with testing
TV codes.
7. As soon as you see your TV
turn off, press the VOL +
button again to stop t he
search process.
8. Press and hold SEL for 3
seconds until the iO key blinks
twice to save the code that
caused the TV to respond.
Tes t th e TV POWER and volume
controls (if you use TV for volume)
to make sure that the remo te is
programmed as expected.
SEARCHING FOR AN AUDIO
DEVICE CODE
If the five-digit codes for your brand
do not work for your TV, follow the
instructions below to search
through all possible TV Codes.
1. Turn on the Audio Device that
you wish to cont rol.
2. Press and hold SEL and MUTE
simultaneously until the iO
key blinks twice.
3. Enter 9 9 1. The iO key blink s
twice.
4. Press the 2 key once to set the
remote for AUDIO DEVICE
code search.
5. Aim the remote control at the
audio device and press VOL +
once to begin the automated
code search.
6. Keep the re mote control
pointed at your audio devic e
as the remote proceeds with
testing audio device codes.
7. As soon as you see your audio
device turn off, press the
VOL + button again to stop
the search process.
8. Press and hold SEL for 3
seconds until the iO key
blinks twice to save the code
that caused the audio device
to respond.
Test the volume controls with your
audio device to make sure that the
remote is programmed as
expected.
TO FIND THE DEVICE CODES
SET IN CODE SEARCH
If you used SEARCHING FOR A
CODE for either a TV or audio
device, you can find out wh ich code
was saved to control your device by
using the following steps:
1. For example, to find out
which code is operating
your TV:
2. Press and hold SEL and MUTE
simultaneously unti l the iO
key blinks twice.
3. Enter 9 9 0 0 to find the TV
code or enter 9 9 0 2 to find
the audio device code. The iO
key blinks twice.
4. To view the code for the first
digit, press 1 once. Count the
number of ti mes the iO key
blinks (e.g., 3 blinks = 3) and
write down the number in the
left-most box for that device
type on this page.
NOTE: If a code digit is 0, the
selected mode key will not blink.
5. Repeat st ep 4 three m ore
times for the remaining
digits. Use 2 for the second
digit, 3 for the third digit, 4
for the fourth digit, and 5 for
the fifth digit.
Finish writing down the code in the
device code boxes on this pa ge.
USING THE CABLE STB FOR
VOLUME CONTROL
If you want to use the cable set-top
box to control the volume in your
home theater, you may program
the Scepter remote control to do so
using the follow steps:
1. Press and hold SEL and VOL-
keys simultaneously until the
iO key blinks twice.
2. The volume functions are
now controlled by the cable
STB.
To change volume control back to
the TV or Audio Device:
1. Press and hold SEL and VOL+
keys simultaneously until the
iO key blinks twice.
2. The volume functions are
now controlled by the TV (or
Audio Device if one is
programmed in the remote
control).
INSTALLING BATTERIES
1. Remove the battery
compartment cover on the
back of your remote control .
2. Locate the two (2) enclosed
AA batteries.
TROUBLESHOOTING
PROBLEM: iO key does not blink
when you press a key.
SOLUTION: Replace the batteries
with two (2) new AA Alkaline
batteries (See “INSTALLING
BATTERIES”) .
PROBLEM: iO key blinks when you
press a key, but home
entertainment device does not
respond.
SOLUTION: Make sure you are
aiming the remote control at your
home entertainment device and
that you are within 15 feet of the
device you are tr ying to control.
PROBLEM: The remote c ontrol
does not control home
entertainment devices or
commands are not performing
properly.
SOLUTION: Try all listed codes for
the device type and brand. Make
sure all devices can be operated
with an i nfrared remo te control.
PROBLEM: The remote does not
control the cable set-top box
SOLUTION: Make sure that the USB
dongle that came with the remote
is fully inserted into an open USB
port on the cable set-top box. If
this does not work, check iO key for
blinking upon key-press. If the key
does not blink, change the
batteries.
Scepter 11x17 Manual2ab.fm Page 1 Wednesday, October 14, 2009 2:54 PM
Page 2
TV CODES
Setup Codes for Televisions
Action 00873
Admiral 00093, 00463
Advent 00761, 00783,
00817
Aftron 00891
Aiko 00092
Aiwa 01916
Akai 00812, 01675,
00030, 00672,
01207, 01676,
02232
AOC 00030, 01365,
01590, 02087
Aomni 01623
Apex Digital 00156, 00748,
00765, 00890,
01217
Astar 01531, 01738
Audiovox 00451, 00092,
00710, 00802,
00846, 00875
Aventura 00171
Barco 00556
BenQ 01032, 01212,
01315, 01562
Broksonic 00463
Byd:sign 01309
Cadia 01283
Candle 00030
Carnivale 00030
Carver 00054, 00170
Celebrity 00000
Celera 00765
Changhong 00765
Citizen 00060, 00030,
00092
Coby 02314, 02345,
02347
Commercial
Solutions
01447, 00047
Crosley 00000, 00054
Curtis Mathes 00047, 00054,
00451, 00093,
00060, 00030,
00145, 01147,
01347
Cytron 01326
Daewoo 00451, 00092,
00634, 00672
Dell 01080, 01403
Denon 00145
Digital Lifestyles 01765
Dumont 00017
Durabrand 00463, 00178,
00171, 01034,
01595
Dynex 01463, 01780,
01785
Electroband 00000
Electrograph 01755, 01623
Electrohome 00463
Element 01687, 02183
Emerson 01864, 00017,
00451, 00463,
00178, 00171,
01595
Emprex 01422, 01546,
01765
Encross 00876
Envision 00030, 00813,
01365, 02087
Epson 01290
ESA 00812, 00171,
01595
FlexVision 00710
Fujitsu 00809, 00683,
00853
Funai 00000, 00171
Gateway 01755, 01001,
01002, 01756
GE 01447, 00047,
00051, 00451,
00178, 01347
GFM 00171
Gibralter 00017, 00030
GoldStar 00178, 00030,
00037
Grundig 00683
Haier 01034, 01748
Hallmark 00178
Hannspree 01348, 01745
Harman/Kardon 00054
Harsper 01206
Havermy 00093
Helios 00865
Hello Kitty 00451
Hewlett Packard 01494, 01088,
01089, 01101
Hisense 00748, 01314
Hitachi 01643, 00145,
00797, 01037,
01484, 01576,
01854
HP 01494, 01088,
01089, 01101
Hyundai 00849, 01219,
01294
I-Inc 01746
iLo 01286, 01603,
01684
Infinity 00054
Initial 01603
Insignia 01423, 01564,
00171, 01204,
01326, 01517,
01641, 01780,
01892
Inteq 00017
JBL 00054
JCB 00000
Jensen 00761, 00817
JVC 00463, 00053,
00371, 00650,
00731, 02118
KDS 01687
Kenwood 00030
KLH 00765
Kost 01262, 01483
Kreisen 00876
KTV 00030
LG 01423, 00017,
01265, 00178,
00823, 00856,
01721, 01768,
01842
Loewe 00512, 00633,
01884
LXI 00047, 00054,
00156, 00178
MAG 01687
Magnavox 01454, 01866,
00054, 00051,
00030, 00706,
00035, 00780,
00802, 01198,
01254, 01365,
01525
Marantz 01454, 00054,
00030, 00704,
01398
Matsushita 00250, 00650
Maxent 01755, 01211,
01714, 01757
Megatron 00178, 00145
Memorex 00463, 00150,
00178, 01037
MGA 00150, 00178,
00030
Midland 00047, 00017,
00051
Mintek 01603
Mitsubishi 01250, 00093,
00150, 00178,
00108, 00512,
00836, 01522
Motorola 00093, 00835
Moxell 00835
MTC 00060, 00030
NAD 00156, 00178,
00037, 00866
NEC 00030, 00170,
00704, 01398,
01704, 01797
NetTV 01755
Nexus Electronics02183
Nikko 00178, 00030,
00092
Norcent 00748, 00824,
01089, 01365,
01590, 01591
Norwood Micro 01286, 01296
NTC 00092
NuVision 01657, 02158
Olevia 01610, 01144,
01240, 01331
Olympus 01342
Optimus 00250, 00650
Optoma 01348, 02161
Optonica 00093
Orion 00463, 01463,
00443, 02005
Panasonic 00250, 01480,
01457, 00051,
00650, 01290,
01291, 01310,
01636, 01650
PARK 01376, 02104
Penney 00047, 00156,
00051, 00060,
00178, 00030,
01347
Petters 01523
Philco 00054, 00030,
00171
Philips 01454, 01866,
00054, 00037,
00512, 00556,
00605, 00639,
00690, 01483,
01495, 01506,
01744, 01806
Pilot 00030
Pioneer 01457, 00679,
00866, 01260,
01398
Planar 01496
Polaroid 01523, 00765,
02120, 02063,
01769, 01767,
01766, 01687,
01341, 01328,
01327, 01326,
01316, 01314,
01286, 01276,
01262, 00865
Portland 00451, 00092
Prima 00761, 00783,
00817, 01785
Prism 00051
Proscan 01447, 00047,
00030, 01347,
02147, 02256
Proton 00178
Protron 01320
Proview 00835, 01687
Pulsar 00017
Puneet 01546
Pye 00412
Quasar 00250, 00051,
00650
RadioShack 00047, 00178,
00030
RCA 01447, 00047,
00051, 00093,
00090, 00679,
01147, 01347,
01781
Realistic 00178, 00030
Reoc 00714
RevolutionHD 01623
Runco 00017, 00030,
01398, 01629
Sampo 01755, 00030
Samsung 00812, 00060,
00178, 00030,
02097, 02094,
02051, 01630,
01619, 01575,
01458, 01395,
01312, 01249,
01235, 00814,
00766, 00650,
00618
Sansui 00463, 00171,
00371, 01409
Sanyo 00054, 00088,
00208, 01142,
01649
Sceptre 00878, 01217,
01360, 01599
Scotch 00178
Scott 00178, 01711
Sears 00047, 00054,
00156, 00178,
00171
Sharp 00818, 00093,
01393, 01659
Sheng Chia 00093
Sherwood 01399
Signet 01262
Sole 01483, 01623
Sony 00000, 01317,
01651, 01685,
01791, 01825
Soundesign 00178
Sova 01320
Soyo 01546, 01746,
01826
Spectroniq 01687
Squareview 00171
SunBrite 02337
Superscan 00093, 00864
Supersonic 01189
Supreme 00000
SVA 00748, 00865,
00870
Sylvania 01864, 00054,
00030, 00171,
01314
Symphonic 00171, 01595
Syntax 01610, 01144,
01240, 01331
Tandy 00093
Setup Codes for TV/DVD Combos
Tatung 01101, 01286,
01287, 01288,
01361, 01756
Teac 01248
Technics 00250, 00051
Techwood 00051
Teco 01040
Teknika 00054, 00150,
00060, 00092
Thomson 00625
TMK 00178
TNCi 00017
Toshiba 01524, 00156,
01265, 00060,
00035, 00508,
00618, 00650,
00845, 01343,
01508, 01704
TruTech 01723, 02066
TVS 00463
US Logic 01286
Vector Research 00030
Victor 00053
Vidikron 00054, 01398,
01629
Vidtech 00178
Viewsonic 01755, 00797,
00857, 00864,
00885, 01330,
01342, 01578,
01627, 01742,
02087
Viore 01207, 01684,
02104
Visart 01336
Vistron 02142
Vizio 01758, 00864,
00885, 01499,
01756
Wards 00054, 00178,
00030, 00866
Waycon 00156
Westinghouse 00451, 00885,
00889, 00890,
01282, 01577
White
Westinghouse
00463
Wyse 01365
Yamaha 00030, 00797
Zenith 00000, 01423,
00047, 00017,
00463, 01265,
00178, 00030,
00145, 00092,
00037
Akai 01675, 02232
Coby 02347
Emerson 01864
LG 01423
Magnavox 01866
Maxent 01714
AUDIO DEVICE CODES
Setup Codes for Audio
Amplifiers
Setup Codes for Audio
Receivers
Polaroid 01523, 01766,
01769
Proscan 02256
Sharp 00818
Sylvania 01864
Toshiba 01524
TruTech 02066
Viore 02104
Adcom 20577
Bose 20674
Curtis Mathes 20300
Denon 20272
Harman/Kardon 20892
Left Coast 20892
Logitech 21408
Marantz 20892
Optimus 20300
Philips 20892
Pioneer 20300
Polk Audio 20892
RCA 20300
Aiwa 21405, 20121,
21089
Alco 21390
AMC 21077
Anam 21609
Arcam 21189, 21212
Audio Control 21212
Audiotronic 21189
Audiovox 21390
Bang & Olufsen 20799
Bose 21229, 21629,
21933
Carver 21189, 20121,
21089
Coby 21389
Criterion 21420
Daewoo 21250
Denon 21360, 21104,
21434, 22857
Fisher 21801
Garrard 20463
Harman/Kardon 20110, 21304,
21306
Hitachi 21801
Insignia 21077
Integra 20135, 21320,
21805
JBL 20110, 21306
JVC 20074, 21374,
21495, 21676
Kenwood 21313, 21569,
20186, 21027
KLH 21390
LG 21293, 22197
Magnavox 21189, 21269,
21089
Marantz 21189, 21269,
21089, 21289
McIntosh 21289
Micromega 21189
Musicmagic 21089
Myryad 21189
NAD 20320
Nakamichi 21313
Nikko 20609
Niro 21634
Norcent 21389
Nova 21389
Onkyo 20135, 20842,
21320, 21805
Optimus 21023, 20186
Panasonic 21308, 21518,
21316, 21763,
21779, 22452,
22967
Philips 21189, 21269,
21089, 21266,
21673, 21831
Pioneer 21023, 20014,
21123, 21284,
21459, 21623,
21823
Polk Audio 21289
Proscan 21254
RCA 21023, 21609,
21254, 21123,
21154, 21390,
21459
Samsung 21295, 21304,
21581, 21868,
22137
Sansui 21089
Sanyo 21801
Sharp 20186, 20653
Sherwood 20653, 21077
Sony 21759, 21441,
21622, 21112,
21158, 21454,
21558, 21658,
21722, 21758,
21822, 21858,
21882, 22172,
22522
Stereophonics 21023
Sunfire 21313
Teac 20463, 21390
Technics 21308, 21518,
21309
Techwood 20609
Thorens 21189
Toshiba 21123, 21572
Venturer 21390
Victor 20074
Setup Codes for Audio
Accessories
WWW.URCSUPPORT.COM/CABLEVISION
FCC NOTICE
This equipment has been tested and
found to comply with the limits for a
class B digital device, pursuant to part
15 of the FCC Rules. These limits are
designed to provide reasonable
protection against har mful interference
in a residential installation. This
equipment generates, uses, and can
radiate radio frequency energy and if
not installed an d used in accordance
with the instructions, may cause
harmful interference to radio
communications.
However, there is no guarantee that
interference will not occur in a
particular installation. If this equipment
does cause harmful interference to radio
or television reception , which can be
determined by turning the equipment
off and on, the user is encouraged to try
to correct the interference by one or
more of the following me asures:
• Reorient or relocate th e receivin g
antenna.
• Increase the separation between the
equipment and receiver.
• Connect the equipment into an outlet
on a circuit different from that to
which the receiver is connected.
• Consult the dealer or an experienced
radio/TV technician for help.
In order to maintain compliance with
FCC regulations, shielded cables must
be used with this equipment. Operation
with non-approved equipment or
unshielded cables is likely to result in
interference to radio and TV reception.
The user is cautioned that changes and
modifications made to the equipment
without the approval of manufacturer
could void the user's authority to
operate this equipment.
DEVICES TESTED FOR FCC
APPROVAL:
Cablevision Scepter Freespace Remote
Control
Model: URC-4501BJ0-R
Remote FCC ID: MG34501-R
UEI Freespace USB Dongle
Model: URC-4501BJ0-R-B
Dongle FCC ID: MG34501-R-B
Wards 20014
Yamaha 20176, 20186,
20712, 21276,
21331, 21375,
21815, 21949,
22061
Zenith 21293
Aiwa 20159
Apple 21115
Sony 20159
Yamaha 22116
Scepter 11x17 Manual2ab.fm Page 2 Wednesday, October 14, 2009 2:54 PM
 Loading...