

Page 1
1
IP Kamera 9060A –MP (Mega Pixels)
User Guide
IP Kamera 9060A-MP
Manual version: 1.00
Date: 2006.08
Page 2

2
Caution:
Any changes or modifications not approved by the party responsible for compliance
could void the user’s authority to operate the equipment.
Note:
This equipment has been tested and found to comply with the limits for FCC and CE.
These limits are designed to provide reasonable protection against harmful
interference when the equipment is operated in commercial environment.
Important Notice:
1.IP Kamera 9060A-MP (Mega Pixels) is for indoor use. Note that the CMOS lens can
be damaged permanently if the camera lens is exposed directly to sunlight. (We will
not hold any responsibility if CMOS lens is damaged by sunlight)
2. IP Kamera 9060A-MP (Mega Pixels) is not water proof. Therefore we will not
hold any damage responsibility if the camera is used under raining condition.
3. Be sure to use the DC adapter that is provided by your dealer. We will not hold any
responsibly if wrong DC adapter is in use.
4. Be caution in handling IP Kamera 9060A-MP (Mega Pixels) for physical shocks
may occur serious damage.
5.If IP Kamera 9060A-MP (Mega Pixels) does not operate properly, please contact
your local dealer for after sale service. In all cases, you are prohibited to
disassemble the product. If so, we do not hold any responsibility for mal-function nor
service warranty.
Page 3

3
Table of Contents
1. PRODUCT OVERVIEW...............................................................................................4
FEATURES ........................................................................................................................
2. PHYSICAL DESCRIPTION..........................................................................................5
BOX CONTENT....................................................................................................................
SYSTEM REQUIRNMENT......................................................................................................
3. INTERFACE DESCRIPTION……………………………………………………………6
FRONT PANEL………………………………………………………………………………
REAR PANEL………………………………………………………………………………..
4. INSTALLATION…………………………………………………………………………..7
BEFORE INSTALLITION ........................................................................................................
HARDWARE INSTALLATION..................................................................................................
SOFTWARE INSTALLATION ..................................................................................................
5. INITALIZATION............................................................................................................8
SET UP ON ETHERNET.........................................................................................................
WORK WITH YAHOO/MSN MESSAGER..................................................................................
6. WEBPAGE FUNCTIONS………………………………………………………………14
LOGIN SETTING...................................................................................................................
LIVEVIEW SETTING..............................................................................................................
ADVANCED SETTING...........................................................................................................
NETWORK SETTING ............................................................................................................
SERVER SETTING................................................................................................................
ADMINISTRATION SETTING ..................................................................................................
EVENT TRIGGER …………………………………………………………………………….
A
DVANCES SETTING...........................................................................................................
UPDATE SETTING................................................................................................................
7. FAQ……………………………………………………………………………………….32
Page 4

4
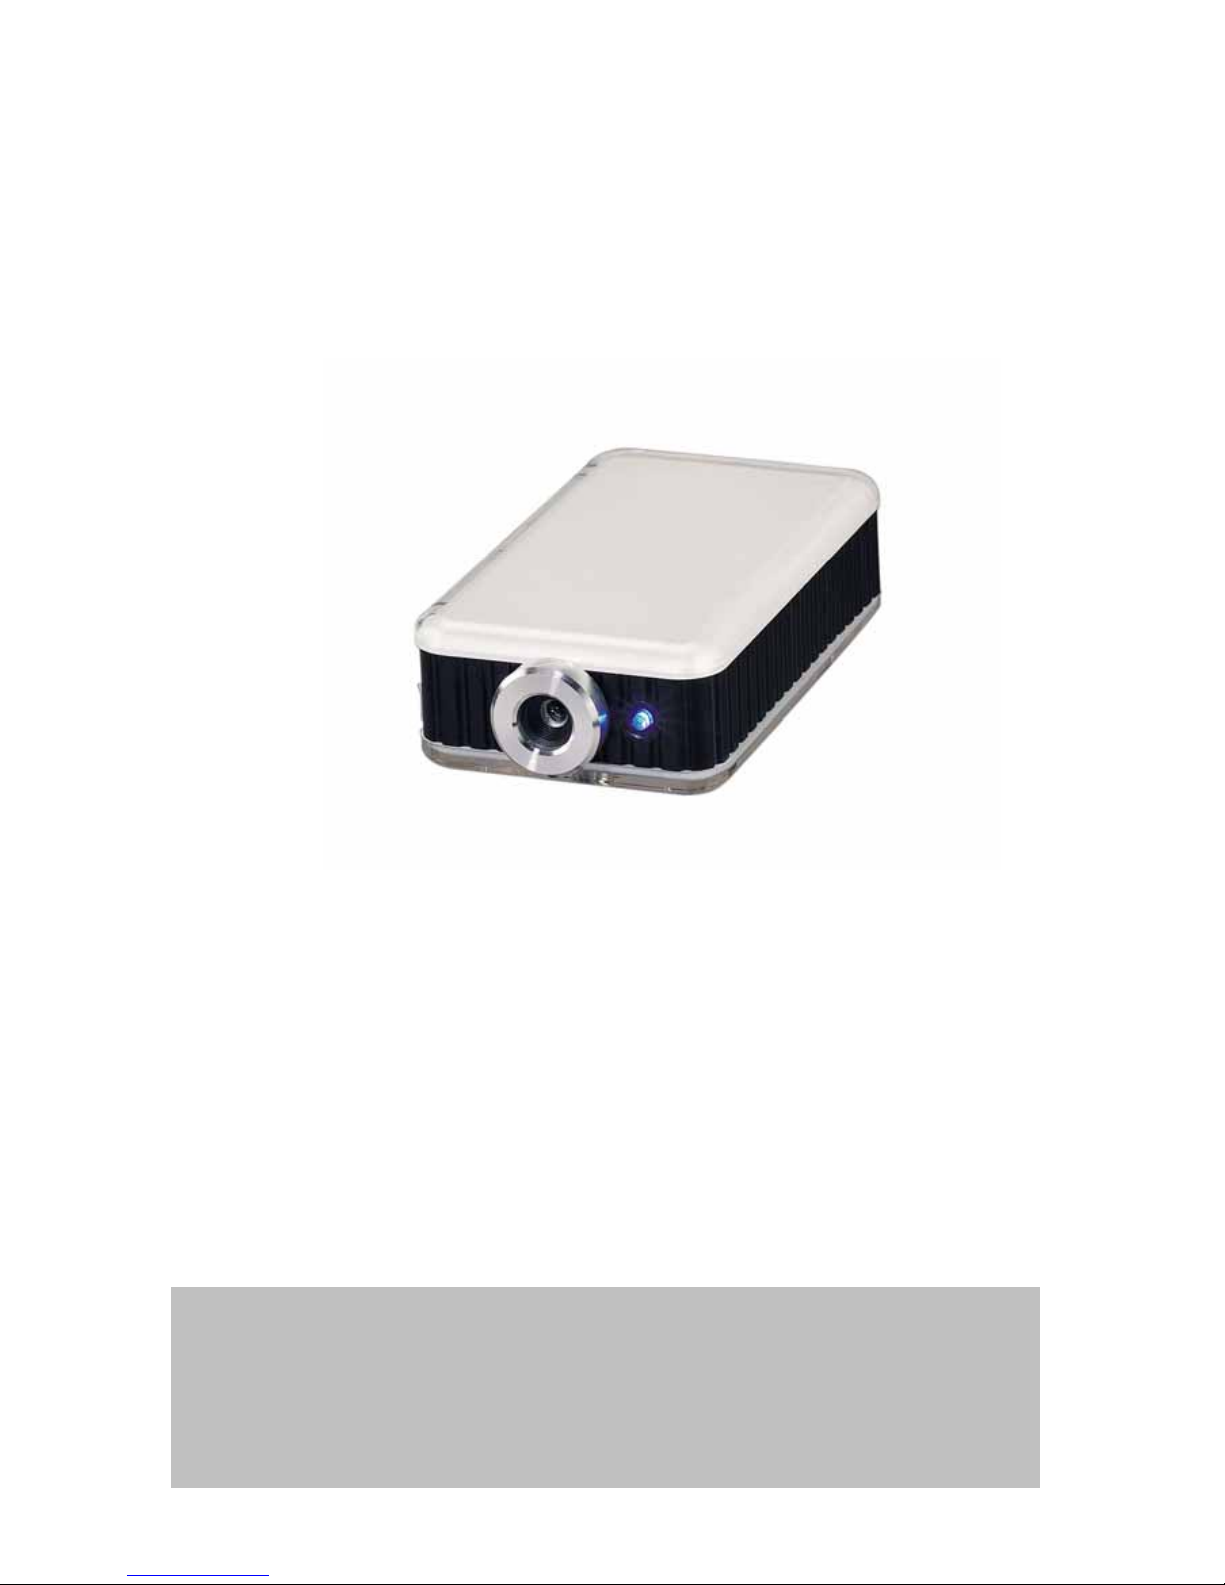
1. Product Overview
IP Kamera 9060A-MP (Mega Pixels) has a built-in a web server which can transfer video & audio
via a data network and monitor your home /office / commercial facility form any corner of the world.
Adopt latest technology, 9060A-MP (Mega Pixels) can take 1600 * 1200 pictures when enable
Motion Detection or click SNAPSHOT, unlike other IP Camera, you can get extremely clear
pictures. Further improvement, 9060A-MP (Mega Pixels) can capture video in WMV format.
FEATURES
1. Embedded Web Server -No needs PC for camera.
2. 10/100Mbps Fast Ethernet Network Access (RJ45 Jack).
3. High sensitivity Sensor for low illumination.
4. Server center: easily trace real address by name
5. Control LED Light turn ON & OFF
6. Timer Schedule: for SNAP & Motion detection
7. Block appointed IP: limit entrance IP address
8. Resolution -True 640x480, 320x240, 160x120, & max up to 25fps
9. Support Network Protocol - HTTP, TCP/IP, DDNS, DHCP, and PPPoE(XDSL).
10. Popular Browser by Internet – Internet Explore
11. Quality & Color Setup: Brightness, Contrast, Hue, Saturation and Sharpness
12. Video Capture - Save as Pictures (.JPG) / Movie (. WMV &. AVI)
13. Snapshot:
Take 2 MEGA Pixels pictures (1600 * 1200)
Timer Scheduler saves in FTP / Send by E-mail
14. Motion detection:
Take 2 MEGA Pixels pictures (1600 * 1200)
Timer Scheduler saves in FTP / Send by E-mail
Detect appointed area – support detects 2 positions.
E-Mail the Detected Images to preset e-Mail address.
Send the Detected Images to preset FTP server.
15. Wide Sensitivity Level setting (99 degree).
16. Reset all setting to default.
Page 5
5
2. Physical Description
BOX CONTENT
IP Kamera package content:
1 x IP Kamera 9060A-MP
(Mega Pixels)
1X Ceiling mount
1 x RJ 45 internet line
1 xTansformer 5V 1.0A, support 110~240V .
1 x CD
1 x Quick Installation Guide
System Requirement
Intel Pentium Ⅲ and above or relevant AMD CPU
Any system can use IE (Internet Explore) like Windows 2000 / XP,
64MB memory or above.
VGA Card:support Hi - Colors and above and direct draw
Suggest Internet Hub
Ethernet network
Internet : one set of IP provided by your ISP
Page 6
6
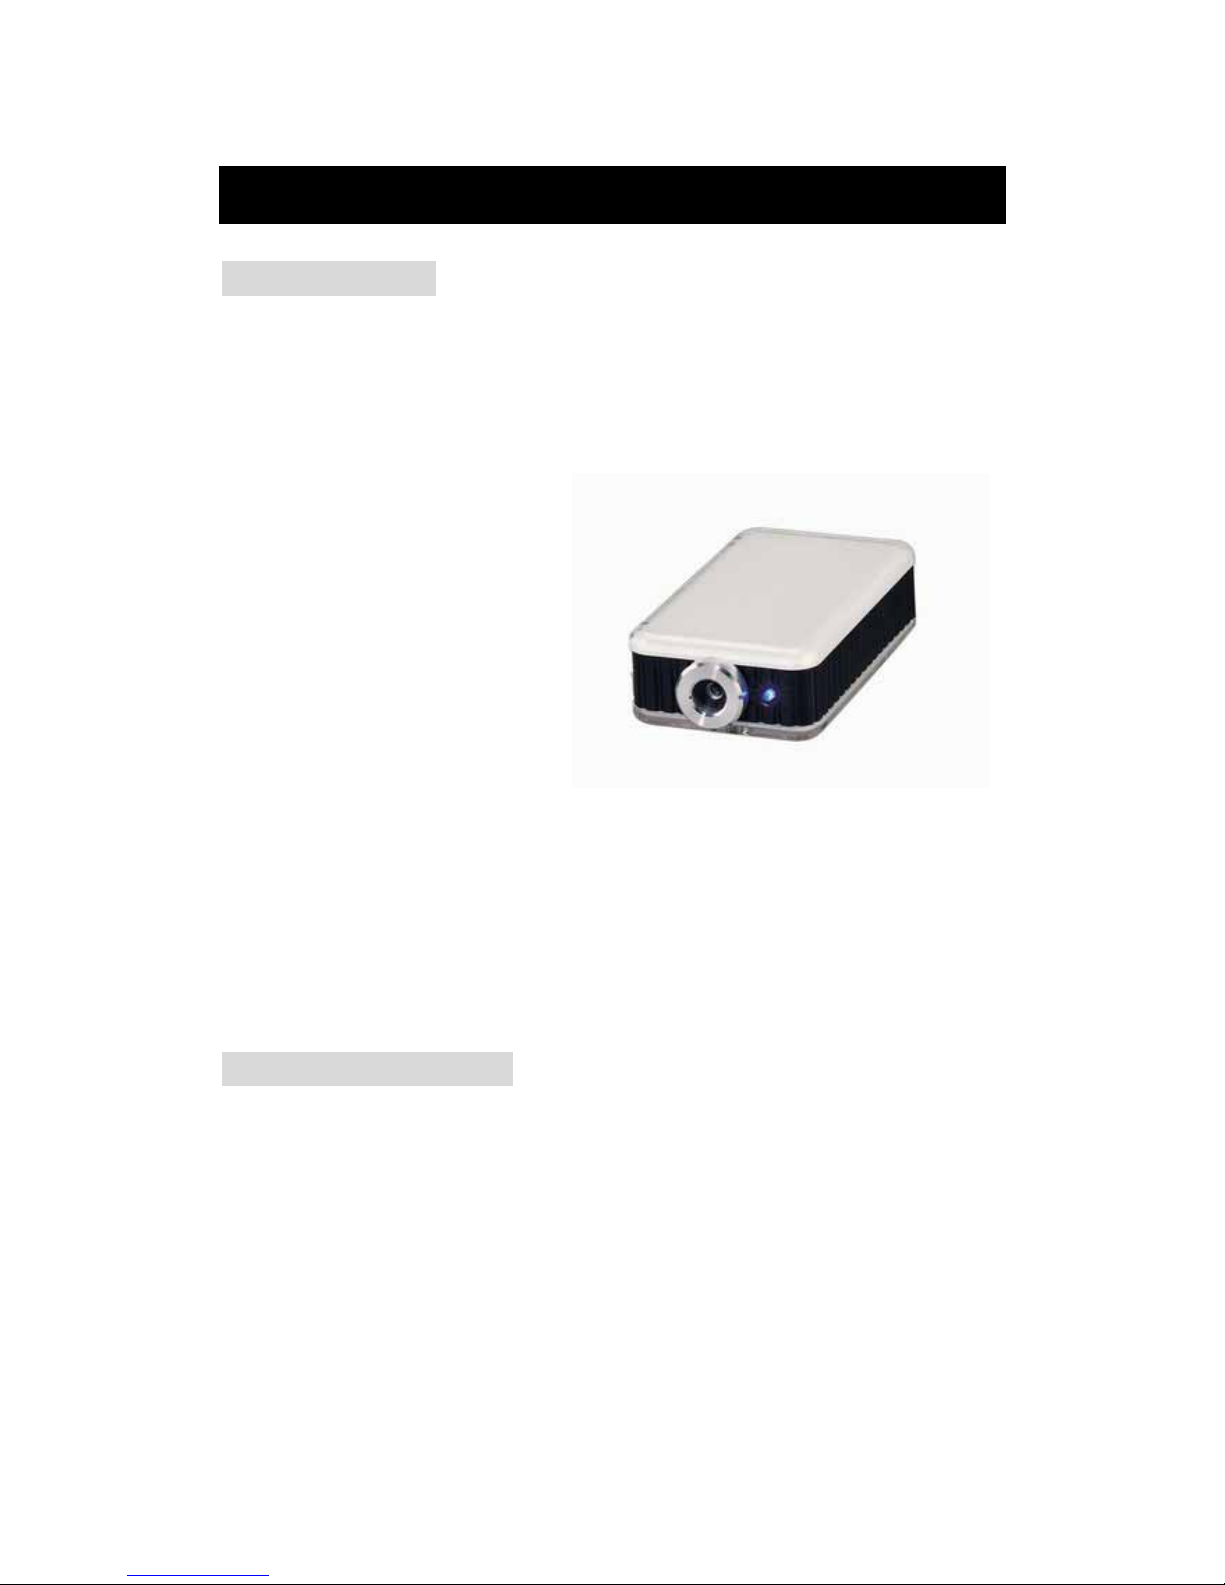
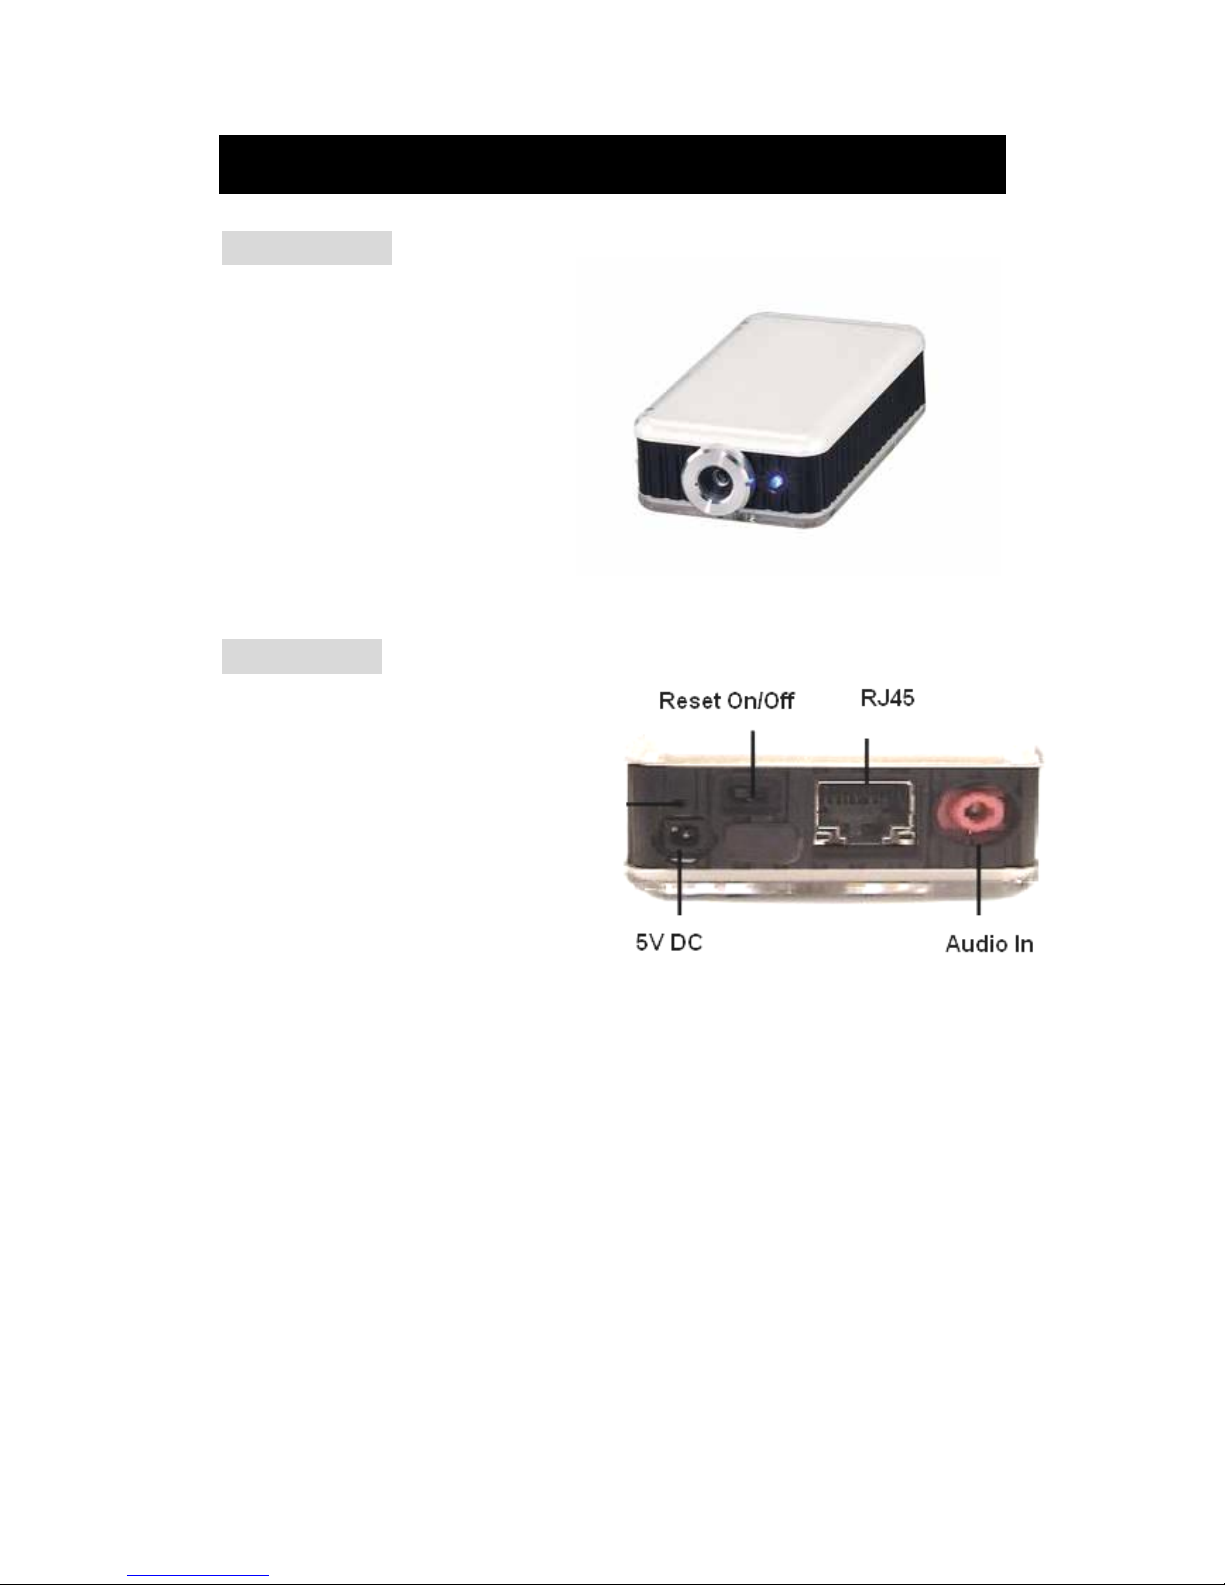
3. Interface Description
Front Panel:
1. Power indicator (LED)
2. Sensor: 1/2 CMOS
Rear Panel:
1. Reset ON / OFF
( Left - OFF & Right –ON )
2. DC Power: 5V, 1.0A
3. Microphone In
4. RJ 45 (Cat5 Network)
Notice
* Please use Microphone fro Audio In
* Reset ON/OFF: please turn to ON for 5-10 seconds and then turn back to OFF to
Finish reset:
OFF ON (Wait for 5 Second) OFF.
Page 7

7
4. Installation
Before installation:
Before using IP Kamera 9060A-MP, check as follows.
Confirm your package content
A computer connects with LAN
Hardware installation
1. Plug in RJ 45 line to connect 9060A-MP (Mega Pixels) with HUB
2. Connect the HUB into your modem.
3. Connect 9060A-MP (Mega Pixels) power.
4. Turn you computer on
9060A-MP HUB XDSL or * 9060A-MP HUB / ROUTER XDSL
Turn on your computer and the power adapter of IP SENSOR 9216.
Software installation
To view video of IP Kamera 9060A-MP, please select one of the following solutions:
1. Use Windows Media Player V9.0 or above.
2. Install IP KamVid_1070 program in CD.
Please follow the steps below to install the software.
1. Insert CD in your CD-=ROM, PC should autorun the CD and you can get the langrage page.
2. Select langrage and choose “ Driver “ , Double click “ IP _KamVId 1070” and choose “OPEN
“ instead of save”
3. After finish install, you can get IPEDIT & Infinity Cam shortcut icon on desktop.
Page 8

8
5. Initialization
Set up on Ethernet
Click “ipEdit.exe” . Please affirm the power of
9060A-MP (Mega Pixels) had been turn on and the
Ethernet connection of RJ45 is correct.
Page 9
9
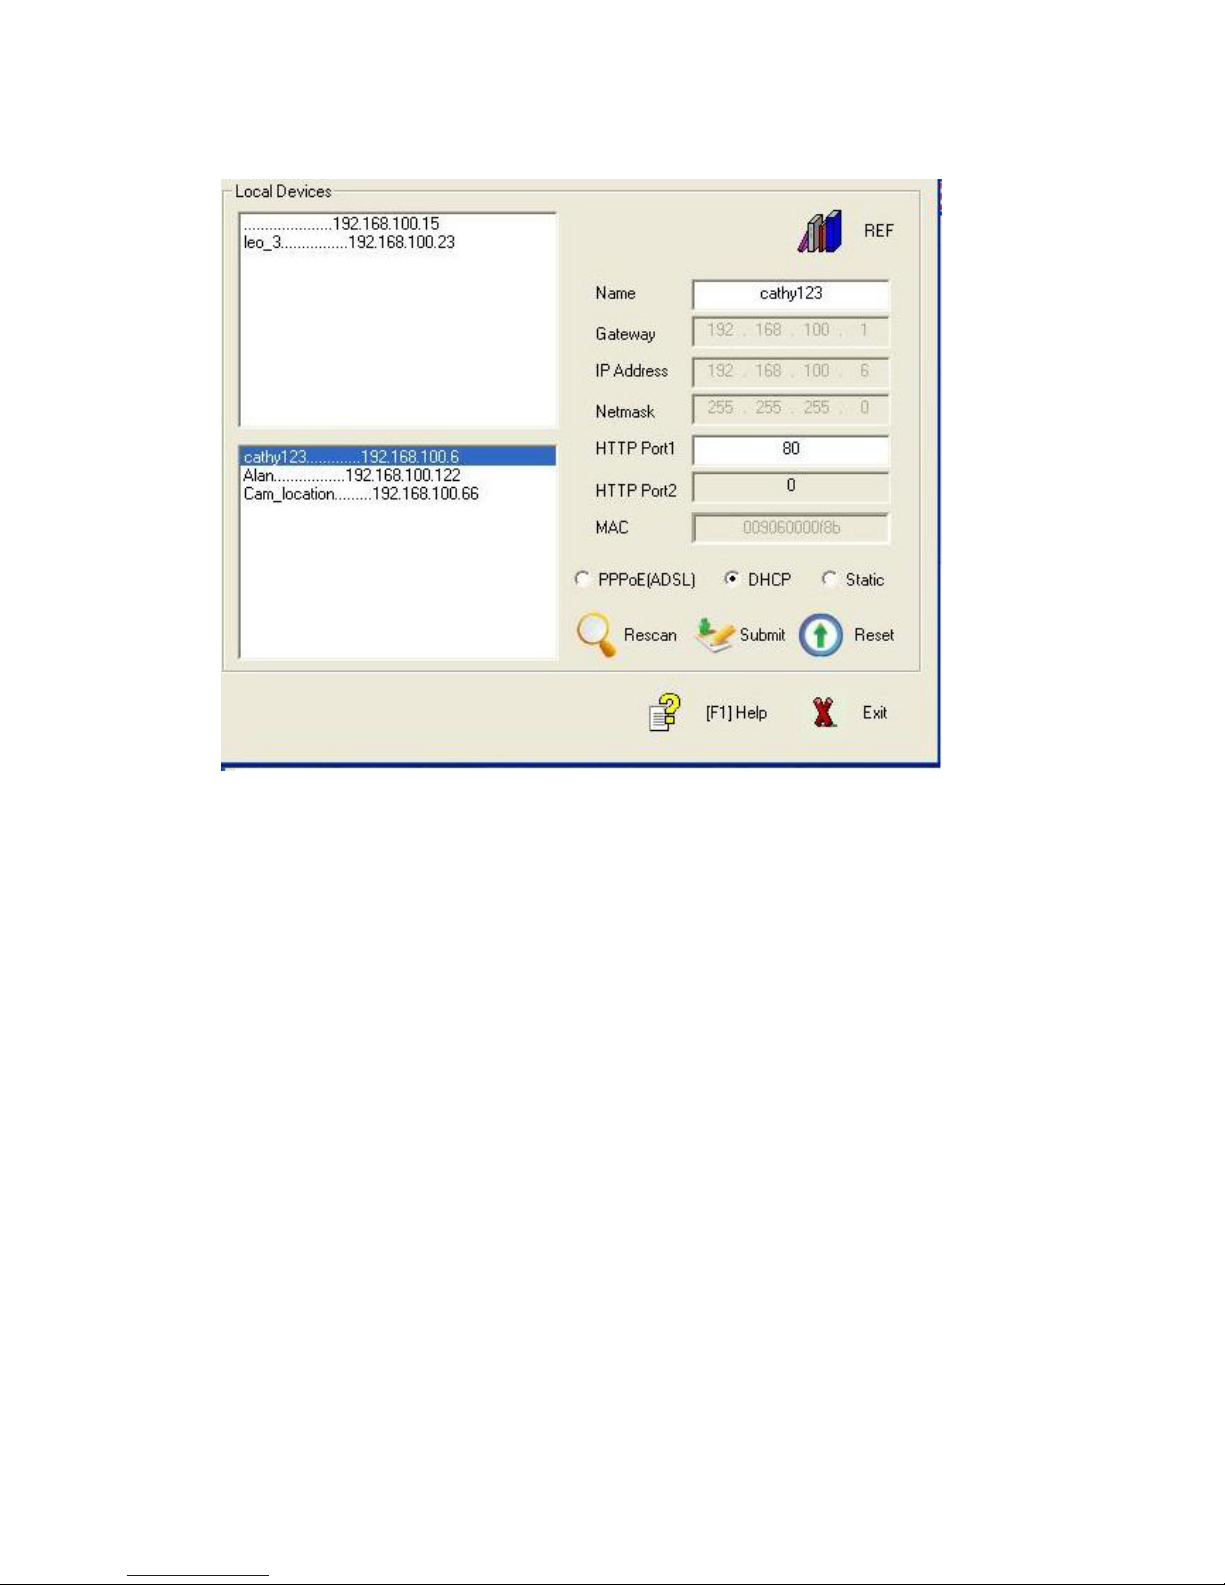
A. LOCAL Devices area:
IPEDIT will searching all IP Products 9XXXseries in the same local Ethernet, the default name of
9060A-MP (Mega Pixels) is Cam-location, and display the information as select
1. Double click the IP address, it will be covered by dark stripe, its name, and IP will be displayed
below. The IP address of IP camera 9060 should in the same subnet with your PC, subnet mask,
and default gateway mast same as 9060 also. For examp le, the IP address of 9 060 is 192.16 8.10.9,
so your computer needs to add an IP address looks like 192.168.10.XXX to get connection to 9060.
2. User can change its name (please use numbers or letter) or IP (please set in the same subnet as
your PC) in the text windows. Then click Submit after setting finish. After about 20 seconds, the
new setting will work. Click Update, the new setting of equipment will display in text window.
Note:
* The default static dynamic IP address of IP 9060A-MP (Mega Pixels) is 192.168.0.100. If can not
get in the webpage by IP 9060 static dynamic address, please set the segment of IP 9060A-MP
(Mega Pixels) with your PC.
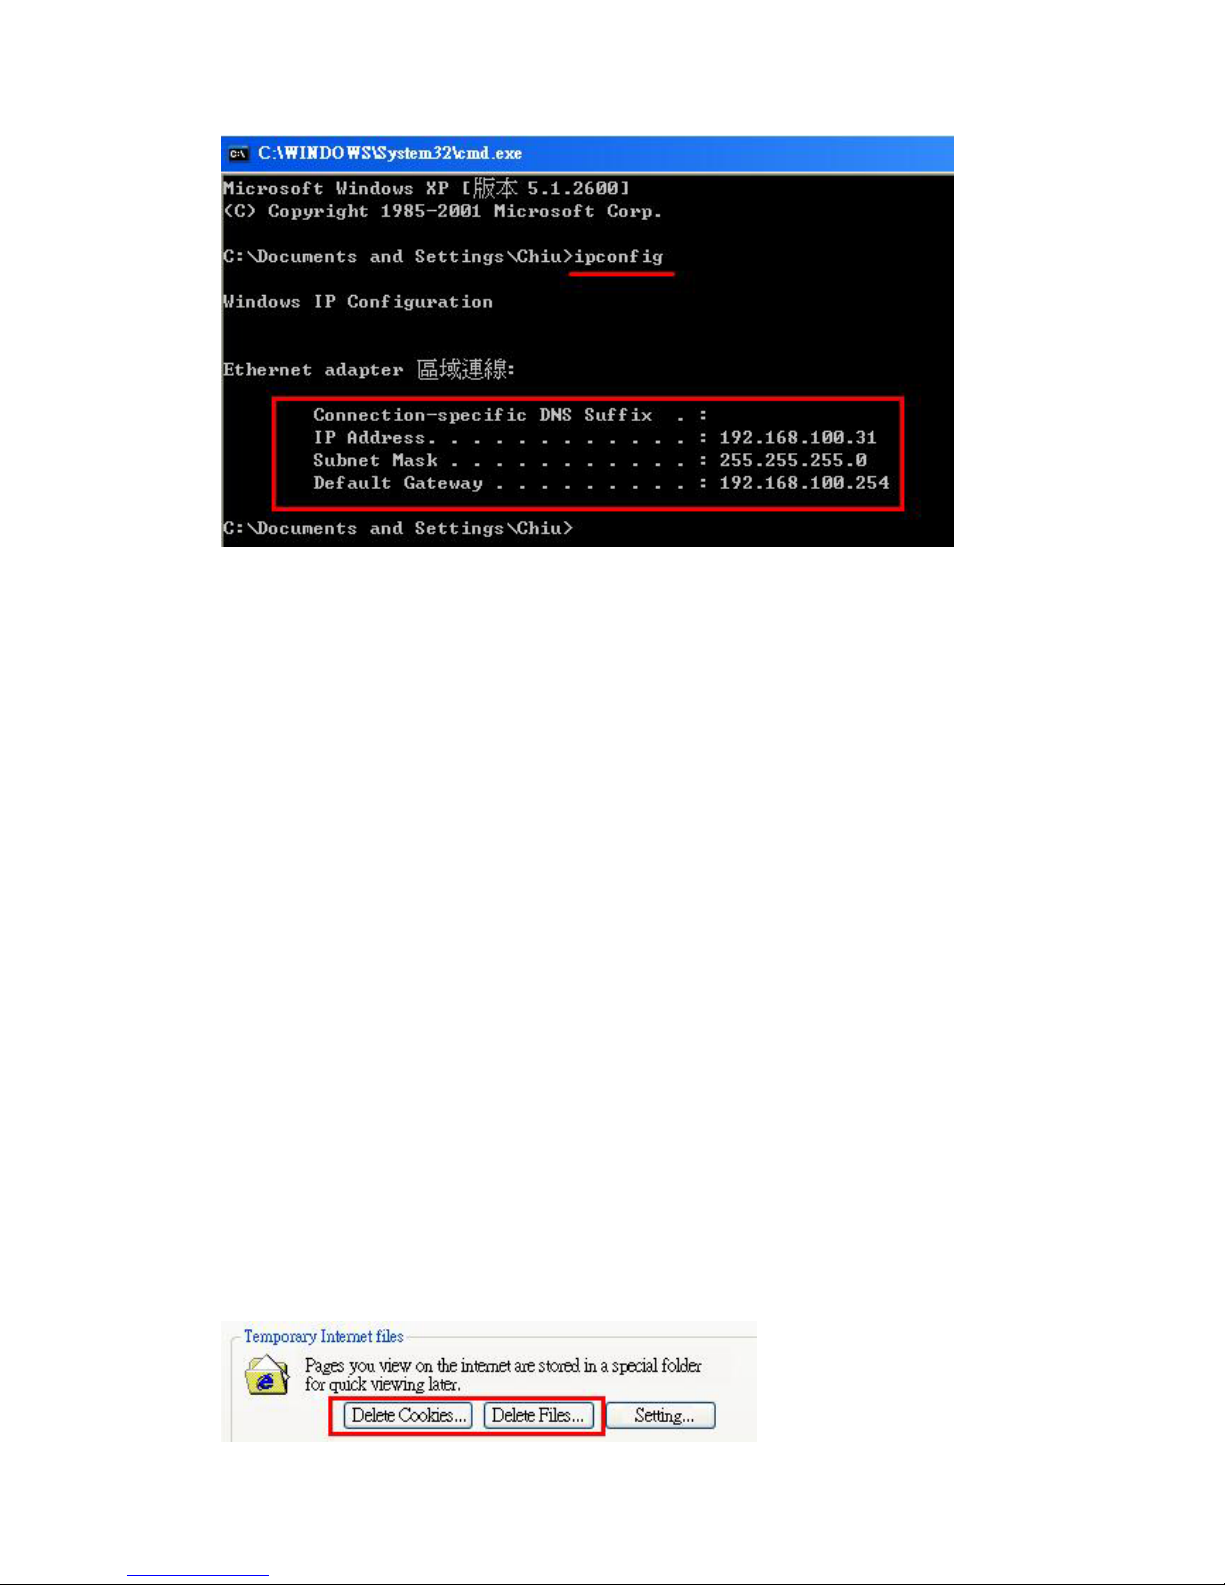
* You can get your PC network information – IP Address, Subnet Mask and Default Gateway by
step: start execute key “cmd” in dialog key “ipconfig” in MS-DOS mode
Page 10
10
IP 9060A-MP (Mega Pixels) Default static dynamic IP Address is 192.168.0.100. the last digit of
IP address (default is 100) can be any number between 1~254, but can not be same as your
PC. If using in any PC, just use HUB and type the 192.168.0.100 in Browser or use “ipedit.exe
“ then you can get in the web page.
* Same SEGMENT: The first 3 number of IP address is same - XXX.XXX.XXX.abc. The part of
XXX is same. Fro Example : IP address is 192.168.1.100 , then another IP address
192.168.1.123 is the IP in same segment .
NOTE:
1. After 9060A-MP (Mega Pixels) had been installed on your PC, it will be registered in DirectX
automatically. Therefore, it can be used as local camera by any software that supported
DirectX, such as MSN, Amcap, Media encoder, Yahoo Messenger as long as you not change
the directory path of 9060’s driver.
2. For those software that only supported old VFM driver, such as Vidcap and net meeti ng, please
click install VFM device, then you can get the captured images from 9060A -MP (Mega Pixels)
(you should be the administrator at the first install process)
3. For those not totally compatible with VFM, such as QQ and POPO, you should click remove
device button first, then click install VFM device, then you can get the captured images from
9060A-MP (Mega Pixels).
4. Note: if stay for long time as in web page, you would be unable setting and see message
“ Cookie time out “, please go to IE to change setting: “ Tools “ “ Internet operations “, please
click “ Delete Cookies “ and “Delete files “ in “ Temporary Internet file “.
Page 11

11
B. Internet online devices:
By setting the server address in IP server of advanced setting page, user can easily to get the IP
address of IP Kamera 9060A-MP on internet by name searching. The default IP address of IP
server is 220.135.169.136.
Step1: click “connect” green button
Step2: type the keyword in “ device name “
Page 12

12
Work with Yahoo /MSN Messenger
1. Work with Yahoo /MSN Messenger: We use Yahoo for instance. Select the friend you would
like to send your video. For instance, we pick up Yahoo Helper.
2. Choose T1/E1 when system ask you about the Internet connecting speed.
3. Then My WEBCAM will pop up. Please go to “file “ “Preference” “Camera Setting” to select
your prefer video parameter.
Page 13

13
4. You can type in appointed IP address (No matter Real IP or Dynamic IP) and confirm by click
“Add” and choose if reverse the out streaming video.
We support: A. Normal B. Flip Vertical C. Flip Horizontal D. Rotate 180
And you can also adjust the color, Brightness, contrast, Hue, Saturation, Sharpness and ETC.
Note
1 : for safety issue , as transfer video by Yahoo /MSN, only Administrator can do the video
streaming. You have to type the username and password.
2 : Work with Yahoo/ MSN , the streaming speed is depend on Yahoo .MSN server.
Page 14

14
6. WEBPAGE FUNCTIONS
When your computer configured IP address, you can finish setting through IE browser. Click the
picture in the window of IPEdit directly; you can open the web page of IP9060.
Login setting
General user: Default general ID is guest,
Password is
password.
Administrator: Default administrator ID is
admin,
Password is
12345678.
If forget password, please switch “ Reset ON/OFF “,
Please turn to ON for 5-10 seconds and then turn back to
OFF to finish reset: OFF ON (Wait for 5 Second) OFF.
Then 9060A-MP (Mega Pixels) will be back to default password.
All the setting (parameter) will be back to default value
(Include IP address) after arrange reset procedure.
Page 15

15
LiveView setting
After 5 minutes, you will get the video of 9060A-MP. If system inquire to download ActiveX please
select YES / download
Most of upside function key (such as Administration Update and ETC) can only be used by
Administrator.
Image Setting
Setting windows is on the left; it’s used to set up image parameter.
1. Resolution:
User can choose right resolution on the basis of your requirement and net condition.
2. Picture Quality:
The picture was compressed to JPEG; users can choose different quality on the basis of your net
transfer capacity.
Page 16

16
3. Anti-Flicker:
You can get top-quality picture for we had set up the picture condition on the basis of different
illumination environment. You can choose environment such as “Out Door”,” indoor 50hz AC
illumination” or ” indoor 60hz illumination ”.
Note: Please do select “ Outdoor “ when you monitor outdoor at daytime or 9060A-MP (Mega
Pixels) receive all the light and video will over bright.
4. Audio
The audio is closed in default mode, and users can turn it on.
5. LED light
The LED light can be turn on and off.
6.Snapshot: take 2 Mega pixels (1600*1200) pictures
The default direction of snapshot is at C:\tmp\webcam.
You can appoint direction by right click mouse as mouse on video area then the pictures will save to
appointed direction. The video will have a temp freeze during capture.
Page 17

17
Advanced quick setting
Advanced menu will be display when right click mouse on the image windows, you
can set up image, record AVI, record WMV, zoom, motion detect, splits, rotate, set
time, and set pictures path. The function can be set in other web page of
9060A-MP
Page 18

18
1. Image: parameter setting
Right click mouse on the motion image, choose “image” can open corresponding windows. Users
can adjust Brightness, Contrast, Saturation, Sharpness, Smooth and Awb(Auto White
Balance). Click “rotate” will circumrotate the image. Click “reset” will back to default
setting.
2. Record AVI:
Right click mouse on the motion image, choose “record AVI ” can open corresponding windows.
Users can adjust the setting parameter of AVI Frame Rate, file name and directory.
Please do type in full file name, for instance “ C:\tmp\1230-10.avi “. The resolution setting decides
the resolution of AVI file.
3.
Record WMV
Right click mouse on the motion image, choose “record WMV ” can open corresponding windows.
Users can adjust the setting Frame Rate (from1~20), file name and directory.
Please do type in full file name, for instance “ C:\tmp\123456.wmv “ or Choose “Browser “ to select
direction, fill the file name and then click “Save”
Page 19

19
If select “ For playback \on most pocket PCs: record smaller file than select to ““ For local playback”
4. Zoom
Right click mouse on the motion image and choose “zoom”. Users use mouse to draw a frame
round to select image, let go will be amplificatory to old image, when right click mouse again, the
image will revert.
Page 20

20
5. Motion detect
In this page, you can enable Motion detection function and setup the pictures
saving direction: in PC / by e-mail / save in Ftp. The r
esolution of detect pictures is
1600x 1200.
Use this function need to enabled Event of Event Trigger page first (click submit to save setting
after select).
Motion Detection can set up the environment parameter of event trigger.
1. Area 1 is red frame:Trigger happened in this scope, it will show red words - MD1 Warning!!
2. Area 2 is green frame: Trigger happened in this scope, it will show red words -MD2
Warning!
You can amend the detect sensitivity and area by right click on video.
Motion Detect Set: Can set up sensitivity (1~99), default is 15, the value is lower and the
detection is more sensitive.
Page 21

21
5. Splits: split video in to multi screen. 1 / 4 / 9 / 16
6. Rotate: Adjust the pictures: 180
7.Set time: Setup by same as local PC or NTP servere. If choose NTP server plea se selects i n NTP
server default: 131.246.9.116
Page 22

22
8. Set pictures path: Fast select the direction for SNAP and Motion detection.
Network setting
This menu can set up or change the assignment of IP CAM network connections. There is
three chooses: STATIC, DHCP, and PPPOE.
A. STATIC work for both real and dynamic IP address.
B. IN DHCP modes, the IP address was appointed by DHCP Server;
C. PPPOE is a connect way support by ISP company.
Page 23

23
A .Set up STATIC mode, steps:
The IP address of IP camera 9060A-SL should in the same subnet with your PC, subnet mask, and
default gateway mast same as 9060A-SL also.
For example, the default IP address of 9060A-SL is 192.168.0.100,
1.Type the new IP address, Submask, Gateway in the relevant text windows.
2. Press submit key.
3. Press reboot key, waiting for 20sec 9060 will change to new IP.
* Dynamic static IP address work in Ethernet:
Notice: The amend dynamic IP address have to be same segment with your PC. Please refer
page 9 to get PC network information.
* Real static IP address work in Internet:
Page 24

24
After amend the setting please do click “Submit “to save the setting.
B. Set up DHCP mode, steps:
1.Click DHCP, and then click “Submit”
2.Click “Reboot”, its need to wait for 15-20 seconds to enable again.
3.Use Search Tools; click Update to find IP CAM.
4. When change finished, the IP Assignment of Search Tools will show DHCP.
C. Set up PPPOE mode (As use XDSL), steps:
Before e setup PPPOE, please do setup “Mail server “ in Server page.
Before use PPPOE to get real IP address from ISP please do follow connection:
ADSL cable HUB 9XXX / PC
Page 25

25
1.Click PPPOE
2.Type User Name and Password, Click ”Submit”
3. Click “Reboot”, its need to wait for 15-20 seconds to enable again.
4. Use Search Tools “ IPEdit ”; click Update to get IP address. If still see same IP address,
please click PPPOE in IPEDIT, submit and then click update.
5. As dial successful, you can see real IP address by ipedit.
6. When change successful, the IP Assignment of Search Tools will show PPPOE.
Notice:
* When setup PPPOE (to work IP Kamera to get IP address from ISP through XDSL service), after
setting in web page (and submit), you can use IPEDIT to see the real IP address supply from ISP.
You can also click PPPOE function in this IPEDIT to connect ISP to get IP address again by select
“ PPPOE” and click “ submit”, but you have to setup the username & password in web page first. It
will take few second for IP Kamera to get real IP address from ISP. You can click update to check
status.
Page 26

26
D. HTTP Server: Appoint port number of HTTP, default is 80. HTTP port setting can help use
More than one IP Kamera for customer had only one real IP.
E. DNS Server: Appoint address of DNS Server IP, default is 168.95.1.1.
DNS work especially in FTP SERVER parts (in IE server section),
Server setting
This page can appoint proper setting of server for Mail (SMTP), FTP and DDNS, when
exceptional event happened (for example the detector detect somebody coming by), IP CAM
will automatically send video or image to user E-mail or FTP site.
A. Mail Server (SMTP - Simple Mail Transfer Protocol), Steps:
Mail server support following two events:
1. Receive real IP address as select “ PPPOE” in network page
2. Receive pictures as enable Motion detection in Event Trigger page.
1. Fill in SMTP Server (IP/Host), Mail From, Receipt to,
2. If the server need Authorization, please click on and fill the Account ID & Password
3. Click “Submit” to save setting.
Page 27

27
B. FTP (File Transfer Protocol) Steps:
1. Fill in Ftp Server (IP/ Host), Account ID, Password, and Ftp mode.
2. Click “Submit” to save setting.
C. DDNS (Dynamic Domain Name Server) Steps:
Before use DDNS service, please create your own account in Websitehttp://www.dyndns.org
And apply host name for DDNS service. Register user’s name, password, and account and
upload path. In Websitehttp://www.dyndns.org
1. Fill in Hostname (for instance: 1011.homelinux.com), account ID (Username) and password
and upload path you applied in “ www.dyndns.org
“.
2. Click “Submit” to save setting
STATUS will show the connection information.
D. NTP (Network Time Protocol) Provide the function of adjusting time. Steps:
1. Fill in IP address or website. (Default NTP address 131.246.9.116)
2. Choose time zone.
3. Click “Submit” to save setting.
Page 28

28
Administration setting
By this functions. User can set 9060A-MP (Mega Pixels)’s name, Administration’s account,
general user’s account and black list of IP address.
When there is two or more 9060A-MP (Mega Pixels), we need to distinguish every one of them. The
setting steps:
Fill in Camera Name, giving your setting name, then click “change”.
Setting user’s account, steps:
Fill in name, old password, new password, fill in new password again, click ”Submit”.
Setting Administrator’s account, steps:
Fill in name, old password, new password, fill in new password again, click ”Submit”.
Administrator can use all function; General user can view image only.
* IP Black list: the list IP address cannot log in 9060A-MP (Me ga Pixels). You can set maximum 5 ip
address.
Page 29

29
Event Trigger
Event trigger: In this page, users can select to ENABLE one or two Motion Detect functions
and the way to transfer detect pictures: Save in PC, Send by E-mail, Save in Ftp server. Click
“Submit” after type account/password to relevant text windows.
To setup the sensitivity please check page 19: You can amend the detect sensitivity and area
by right click on video and set up sensitivity from 99 (Not sensitive) to 1 (High Sensitive),
default is 15.
The lower the value is, the higher sensitivity the detection is.
Page 30

30
Advance (Timer schedule) setting
A. Timer Schedule: users can choose appointed period (EVERYDAY) for SNAP (take
pictures every setting interval) and Motion detection.
Format: Hour Minute: Hour Minutes (From H/M to H/M)
After select time please click” Add ” then the appointed time will show on bar.
You can add 5 (max) period for the schedule. To delete the period, please select the period and
click” remove”.
B. IP Server: As setting your IP Server, you can easily find the IP address by the name of
IP Kamera. Default server address is 220.135.169.136
Please refer setting and operation of IP Server at page 8.
Page 31

31
Update setting
By update functions, user cans online update 9060 firmware to get more functions;
1. Press “browse” key to chose new BIN file.
2. Press ”Submit” key to upload, it will holding 7-10 secs (100M Ethernet)
3. The windows will showing “waits system Reboot”, it means upload finished.
4. Update will last 50 SECS. During this process, make sure power supply stabilization. Powe r
fail will damage the 9060.
5. The web page will auto update after finished.
6. User can check firmware version to confirm the update.
7. FAQ
Q 1: I forgot the ID and password for the administrator account, so I cannot log into the
administration Page.
A: Make sure IP Kamera 9060A-MP (Mega Pixels) is powered on and switch “reset” button
behind IP Kamera 9060(A) to ON for at least 10 seconds and then switch back to OFF.
Note: Factory Administrator ID and Password
ID: admin
Password: 12345678
Page 32

32
Q 2: The Web Kamera does not launch?
A: Upgrade Internet Explorer to 5.0 or higher version and check If the subn et is same as your PC.
Please refer page 9 for the setting. Sometimes the web camera base cannot bring
'index.html' from the web Camera when the Internet Explorer version is fewer than 4.0. And
remember to adjust Internet default level to low when launching IP Camera’s AP for the first
time.
Q 3: The Image recording cannot stop immediately?
A: If your IP is virtual IP, than it will not be happened. If your IP is true IP (EX: PPPOE or FIX
IP….), than it might be happened. You need to wait for a second and it will be return to
normal
 Loading...