

Cabletron Systems FDCMIM-24, FDCMIM-44, FDCMIM-28, FDCMIM-34, FDCMIM-38 Installation Manual
...Page 1

FDCMIM-04/08/24/28/34/38/44/48
FDDI CONCENTRATORS
INSTALLATION GUIDE
CABLETRON SYSTEMS, P.O. Box 5005, Rochester, NH 03867-0505
Page 2

NOTICE
NOTICE
Cabletron Systems reserves the right to make changes in
specifications and other information contained in this document
without prior notice. The reader should in all cases consult Cabletron
Systems to determine whether any such changes have been made.
The hardware, firmware, or software described in this manual is
subject to change without notice.
IN NO EVENT SHALL CABLETRON SYSTEMS BE LIABLE FOR
ANY INCIDENTAL, INDIRECT, SPECIAL, OR CONSEQUENTIAL
DAMAGES WHATSOEVER (INCLUDING BUT NOT LIMITED TO
LOST PROFITS) ARISING OUT OF OR RELATED TO THIS
MANUAL OR THE INFORMATION CONTAINED IN IT, EVEN IF
CABLETRON SYSTEMS HAS BEEN ADVISED OF, KNOWN, OR
SHOULD HAVE KNOWN, THE POSSIBILITY OF SUCH
DAMAGES.
© Copyright November 1993 by:
Cabletron Systems, Inc.
P.O. Box 5005
Rochester, NH 03867-0505
All Rights Reserved
Printed in the United States of America
Order Number: 9030669-02 November 1993
SPECTRUM, LANVIEW
trademarks and
FDCMIM-04, FDCMIM-08, FDCMIM-24
FDCMIM-28, FDCMIM-38, FDCMIM-38, FDCMIM-44
, and
Remote LANVIEW
are registered
,
,
FDCMIM-48, EMME, CXRMIM, TRMM, TPRMIM, FORMIM
FDMMIM, FDMMIM-04, FDMMIM-24, FDMMIM-30
MMAC-3FNB, MMAC-5FNB, MMAC-8FNB, MMAC-M8FNB
IRM, IRM2, IRM3, IRBM
CompuServe
is a registered trademark of CompuServe, Inc.
are trademarks of Cabletron Systems, Inc.
,
,
,
Ethernet
Windows
is a trademark of Xerox Corporation.
is a registered trademark of Microsoft Corporation.
i
Page 3

FCC NOTICE
.
FCC NOTICE
This device complies with Part 15 of the FCC rules. Operation is
subject to the following two conditions: (1) this device may not cause
harmful interference, and (2) this device must accept any interference
received, including interference that may cause undesired operation.
NOTE
limits for a Class A digital device, pursuant to Part 15 of the FCC
rules. These limits are designed to provide reasonable protection
against harmful interference when the equipment is operated in a
commercial environment. This equipment uses, generates, and can
radiate radio frequency energy and if not installed in accordance with
the operator’s manual, may cause harmful interference to radio
communications. Operation of this equipment in a residential area is
likely to cause interference in which case the user will be required to
correct the interference at his own expense.
WARNING
not expressly approved by the party responsible for compliance could
void the user’s authority to operate the equipment.
: This equipment has been tested and found to comply with the
: Changes or modifications made to this device which are
DOC NOTICE
This digital apparatus does not exceed the Class A limits for radio
noise emissions from digital apparatus set out in the Radio
Interference Regulations of the Canadian Department of
Communications.
Le présent appareil numérique n’émet pas de bruits radioélectriques
dépassant les limites applicables aux appareils numériques de la class
A prescrites dans le Règlement sur le brouillage radioélectrique édicté
par le ministère des Communications du Canada.
Printed on recycled paper
ii
Page 4

SAFETY INFORMATION
SAFETY INFORMATION
CLASS 1 LASER TRANSCEIVERS
CLASS 1
LASER PRODUCT
Class 1 Laser Products
The FDCMIM-34 and FDCMIM-38 connectors use Class 1 Laser
transceivers. Read the following safety information before installing
or operating the FDCMIM-34 or FDCMIM-38.
The Class 1 laser transceivers use an optical feedback loop to
maintain Class 1 operation limits. This control loop eliminates the
need for maintenance checks or adjustments. The output is factory set,
and does not allow any user adjustment. Class 1 Laser transceivers
comply with the following safety standards:
• 21 CFR 1040.10 and 1040.11 U.S. Department of Health and
Human Services (FDA).
• IEC Publication 825 (International Electrotechnical
Commission).
• CENELEC EN 60825 (European Committee for
Electrotechnical Standardization).
When operating within their performance limitations, laser
transceiver output meets the Class 1 accessible emission limit of all
three standards. Class 1 levels of laser radiation are not considered
hazardous.
iii
Page 5

SAFETY INFORMATION
SAFETY INFORMATION
CLASS 1 LASER TRANSCEIVERS
Laser Radiation and Connectors
When the connector is in place, all laser radiation remains within the
fiber. The maximum amount of radiant power exiting the fiber (under
normal conditions) is -12.6dBm or 55x10
Removing the optical connector from the transceiver allows laser
radiation to emit directly from the optical port. The maximum
radiance from the optical port (under worst case conditions) is 0.8 W
cm-2 or 8x10 3 W m-2 sr-1.
-6
watts.
WARNING
: Do not use optical instruments to view the laser output.
The use of optical instruments to view laser output increases eye
hazard. When viewing the output optical port, you must remove power
from the network adapter.
iv
Page 6

CONTENTS
CONTENTS
CHAPTER 1 INTRODUCTION
1.1 Using This Manual ....................................................................1-1
1.2 Overview.....................................................................................1-2
1.3 Getting Help...............................................................................1-4
CHAPTER 2 CONFIGURATION AND INSTALLATION
2.1 Installation Requirements......................................................... 2-1
2.2 Adding MIMs to an MMAC ....................................................... 2-1
2.3 MMAC Configurations...............................................................2-3
2.3.1 FDCMIMs Exclusively .................................................2-4
2.3.2 IRM3 and Ethernet MIMs with FDCMIMs ................2-5
2.3.3 EMME and RMIMs with FDCMIMs ...........................2-5
2.3.4 TRMM and Token Ring MIMs with FDCMIMs .........2-7
2.4 Twisted Pair Pinout Configuration...........................................2-8
2.5 Installing the FDCMIM.............................................................2-9
CHAPTER 3 USING LANVIEW
3.1 FDCMIM Status LEDs..............................................................3-1
3.2 Port Status LEDs.......................................................................3-2
CHAPTER 4 SPECIFICATIONS
v
Page 7

INTRODUCTION
CHAPTER 1
INTRODUCTION
The FDCMIM-04/08/24/28/34/38/44/48 are components of a modular
dual attached concentrator. These components attach to an FDDI dual
ring through the Cabletron Systems FDMMIM, FDMMIM-04,
FDMMIM-24, or FDMMIM-30.
Note:
FDCMIM refers to the FDCMIM-04/08/24/28/34/38/44/48.
FDCMIMs reside in a Multi Media Access Center (MMAC), and you
can use them either with or without an FDMMIM, since you can form
a stand-alone FDDI network using one or more FDCMIMs.
Throughout this manual, unless otherwise noted, the term
The FDCMIM-X4s have four and the FDCMIM-X8s have eight master
ports (where X varies, depending on the cable/transmitter type) that
accept different connectors. Chapter 4,
operating specifications for the different available FDCMIM cable and
transmitter types.
1.1 USING THIS MANUAL
This manual explains how to install FDCMIM concentrator modules.
The following summarizes the chapter organization.
Chapter 1,
Chapter 2,
requirements, and detailed instructions for installing your FDCMIM
into an MMAC hub as a stand-alone concentrator.
Chapter 3,
FDCMIM LANVIEW LED.
Introduction
Configuration and Installation
Using LANVIEW®, describes the purpose of each
, describes the FDCMIM and its features.
Specifications
, includes installation
, lists the
Chapter 4,
FDCMIM cable/transmitter type.
Specifications
, provides operating specifications for each
Page 1-1
Page 8
INTRODUCTION
FDCMIM-04
SN
PST
PST
PST
PWRFNB
LNKPST
LNK
LNK
LNK
FDCMIM-24
SN
1
2
3
4
PWRFNB
LNKPST
1
LNKPST
2
LNKPST
3
LNKPST
4
FDCMIM-34
SN
PST
PST
PST
PWRFNB
LNKPST
1
LNK
2
LNK
3
LNK
4
FDCMIM-44
SN
PWRFNB
LNKPST
1
LNKPST
2
LNKPST
3
LNKPST
4
FDDI
UTP-PMD
FDDI
SMF-PMD
FDDI
STP-PMD
FDDI
Figure 1-1. FDCMIM-04 / 24 / 34 / 44 FDDI Concentrator
Media Interface Modules
1.2 OVERVIEW
The FDCMIM is a concentrator module that resides in an MMAC
network hub containing a Flexible Network Bus (FNB). The FDCMIM
acts as a modular component in a Dual Attached Concentrator.
FDCMIMs (and their attached stations) gain access to an FDDI dual
ring network through an FDMMIM, FDMMIM-04, FDMMIM-24, or
FDMMIM-30 the Cabletron Systems X3T9.5 compliant Dual Attached
Concentrator and Ethernet to FDDI Bridge Media Interface Modules.
The FDCMIM connects to the FDMMIM through the FDDI portion of
the MMAC Flexible Network Bus.
Page 1-2
Page 9
INTRODUCTION
FDCMIM-08
SN
LNK
PST
PST
LNK
PST
LNK
PST
LNK
FDCMIM-28
SN
PWRFNB
LNKPST
1
2
3
4
PST
PST
PST
LNK
LNK
LNK
5
6
7
8
LNKPST
1
LNKPST
2
LNKPST
3
LNKPST
4
PWRFNB
LNKPST
LNKPST
LNKPST
LNKPST
FDCMIM-38
SN
PST
5
PST
6
PST
7
PST
8
LNK
LNK
LNK
LNK
PWRFNB
LNKPST
1
PST
LNK
2
PST
LNK
3
PST
LNK
4
FDCMIM-48
5
6
7
8
SN
LNKPST
1
LNKPST
2
LNKPST
3
LNKPST
4
PWRFNB
LNKPST
5
LNKPST
6
LNKPST
7
LNKPST
8
FDDI
UTP-PMD
FDDI
SMF-PMD
FDDI
STP-PMD
FDDI
Figure 1-2. FDCMIM-08 / 28 / 38 / 48 FDDI Concentrator
Media Interface Modules
By using an FDMMIM, FDMMIM-04, FDMMIM-24, or FDMMIM-30
you can manage adjacent FDCMIMs through FDMMIM Local
Management, the out-of-band management facility resident on the
FDMMIM and FDMMIM-04 modules. You can also manage FDCMIMs
with Cabletron Systems SNMP management tools such as
SPECTRUM® or Remote LANVIEW/Windows®.
FDCMIMs also provide the flexibility of forming a single ring standalone FDDI concentrator. Since FDCMIMs connect through the
MMAC backplane through an isolated FDDI bus, you can link several
modules, and their subsequent stations, together without the need for
a bridge or repeater.
Page 1-3
Page 10

INTRODUCTION
1.3 GETTING HELP
If you need additional support relating to the FDCMIM, or if you have
any questions, comments, or suggestions relating to this manual,
contact Cabletron Systems Technical Support. Before calling, please
have the following information ready:
• The product type (e.g., FDCMIM-24 or FDCMIM-38)
• The product serial number.
Note:
Locate the serial number on the FDCMIM front panel.
You can contact Cabletron Systems Technical Support by any of the
following methods:
By phone: Monday through Friday
between 8 A.M. and 8 P.M. EST
at (603) 332-9400.
®
By CompuServe
: GO CTRON from any ! prompt
By Internet mail: support@ctron.com
Page 1-4
Page 11

CONFIGURATION AND INSTALLATION
CHAPTER 2
CONFIGURA TION AND INSTALLATION
This chapter lists MMAC configuration guidelines, explains how to
configure the FDCMIM in a hub that also holds Ethernet or Token
Ring MIMs, and then explains how to install the FDCMIM as a standalone concentrator in an FDDI hub.
2.1 INSTALLATION REQUIREMENTS
Before you start the installation, decide how you w ant to configure the
MMAC. The location of an FDCMIM in an MMAC determines how it
communicates with other FDDI modules in the same hub.
2.2 ADDING MIMS TO AN MMAC
When configuring an MMAC, remember the following:
• MMAC-3FNB board slot numbers increment from bottom to
top. MMAC-5FNB, MMAC-8FNB, and MMAC-M8FNB slot
numbers increment from right to left.
• Slot 1 (the farthest slot to the right, or to the bottom) in every
MMAC is a narrow slot reserved for half-width management
modules (like the TRMM, IRM3, or EMME). Do not place fullwidth modules in the first slot of an MMAC. When not using a
half-width management module, leave slot 1 empty.
• An MMAC-5FNB can hold four MIMs, one management
module, and two power supplies. By removing one power
supply, the MMAC-5FNB can hold an extra MIM, assuming
that the remaining power supply has enough capacity to
handle the combined load of the resident MIMs.
• The FDDI Media Interface Modules (MIMs) consume more
power than other MIMs. Some older MMACs may not have
enough power available to support a planned configuration.
Page 2-1
Page 12
CONFIGURATION AND INSTALLATION
6.8 amps
FDCMIM-04
11.8 amps
FDCMIM-08
11.8 amps
FDCMIM-08
11.8 amps
FDCMIM-08
11.8 amps
FDCMIM-08
To better explain how to configure your MMAC, refer to the following
examples. Figure 2-1 illustrates how the combined load of two
FDCMIMs exceeds the available power of an MMAC-3FNB.
12.0 amps
(MMAC-3FNB
Power Suppy
Output)
Figure 2-1. FDCMIMs in an MMAC-3FNB
Figure 2-2 represents an MMAC-5FNB equipped with dual power
supplies and three FDCMIMs. The MMAC has enough power to
support the configuration. However, the combined load of the modules
exceeds the output of a single power supply. This means that the hub
does not have redundant power (the ability of one power supply to
assume the entire load if one supply fails).
48.0 amps
(MMAC-5FNB
Dual Power
Supply Output)
Figure 2-2. FDCMIMs in an MMAC-5FNB
Figure 2-3 represents an MMAC-M8FNB equipped with a full
complement of power supplies and three FDCMIMs. The MMAC
power supplies can produce up to 80 amps of power, providing more
than double the power necessary for operation. This configuration
provides redundant power to the hub.
Page 2-2
Page 13

CONFIGURATION AND INSTALLATION
11.8 amps
FDCMIM-08
11.8 amps
FDCMIM-08
11.8 amps
FDCMIM-08
80.0 amps
(MMAC-M8FNB
Dual Power
Supply Output)
Figure 2-3. FDCMIMs in an MMAC-M8FNB
When unsure of a hub’s ability to support a planned MIM
configuration, check the appropriate manuals to determine the
amount of power consumed by each MIM (amps at 5 Vdc), and then
check your MMAC power supply configuration (single or multiple
power supplies) to determine if you have sufficient power available to
support the configuration.
2.3 MMAC CONFIGURATIONS
A single FDCMIM or multiple FDCMIMs in the same MMAC hub
comprise a stand-alone FDDI single ring concentrator. This section
describes four FDCMIM stand-alone configurations:
• FDCMIMs exclusively (using shunting and non-shunting
MMAC hubs)
• IRM3 Ethernet management module, Ethernet MIMs, and
FDCMIMs
• EMME Ethernet management module, at least one Ethernet
RMIM, and FDCMIMs
• TRMM Token Ring management module, Token Ring MIMs,
and FDCMIMs
The examples in this section use the FDCMIM as a stand-alone
concentrator. If you are using an FDMMIM to connect the FDCMIM
stations to the FDDI ring, the descriptions in this section still apply.
Page 2-3
Page 14

CONFIGURATION AND INSTALLATION
2.3.1 FDCMIMs Exclusively
By mixing FDCMIMs, you can create a stand-alone FDDI network of 4
to 56 nodes (7 FDCMIM-X8s in an MMAC-M8FNB = 56 master ports).
Depending on MMAC shunting capabilities, you may have to install
your FDCMIMs in adjacent slots to ensure continuity.
Two types of MMACs currently support FNB architecture — shunting
and non-shunting. Shunting MMAC-FNBs allow modules to continue
communicating on their perspective buses, regardless of whether
there is an empty slot between them in the chassis.
For example, let’s say you have FDCMIMs in slots 2, 3, 4, 6, and 7 of
an MMAC-M8FNB (slot 5 is empty). In a non-shunting MMAC, you
have two stand-alone networks (i.e., FDCMIMs in slots 2, 3, and 4
would constitute one network, and FDCMIMs in slots 6 and 7 would
constitute the other). Slot 5, the empty slot, breaks the continuity of
the non-shunting MMAC FDDI bus, separates it into two distinct
buses, and two separate networks.
However, with the same configuration in a shunting MMAC-M8FNB,
you would have one stand-alone network consisting of five FDCMIMs.
You don’t need to worry about empty MMAC slots, since the MMAC
FDDI bus, and FDCMIM communication remains intact.
The following table gives the part numbers of the MMAC chassis that
have shunting capabilities.
Table 2-1. MMACs with Shunting Capabilities
MMAC Chassis Part #
MMAC-3FNB FC000000000 or above
MMAC- 5FNB CC000000000 or above
MMAC-8FNB CG000000000 or above
MMAC-M8FNB DK000000000 or above
MMAC-M5FNB all
MMAC-M3FNB all
Page 2-4
Page 15

CONFIGURATION AND INSTALLATION
2.3.2 IRM3 and Ethernet MIMs with FDCMIMs
This example uses the IRM3, but the same guidelines apply if you are
using an IRM, IRM2, or IRBM.
In Figure 2-4, the MMAC-5FNB has an IRM3 in slot 1, TPMIM-22s in
slots 2 and 3, and FDCMIMs in slots 4 and 5. The FDCMIMs form a
stand-alone FDDI network with no connection to the Ethernet
components. Since there is no connection between the FDDI (C) bus
and the Ethernet (A) bus in the MMAC, the two disparate networks
have no affect on each other.
2.3.3 EMME and RMIMs with FDCMIMs
The EMME, a narrow (i.e., slot 1) Ethernet management module,
works with the repeater interface controller family of MIMs (RMIM):
TPRMIM, CXRMIM, and FORMIM. The RMIMs can take full
advantage of the MMAC’s Flexible Network Bus (FNB), making them
unique. You can configure RMIMs to use either the B or C bus of the
FNB. This means that an RMIM can put Ethernet traffic on the
MMAC buses that normally see Token Ring and FDDI traffic.
The EMME can manage Ethernet traffic on the A bus (the dedicated
Ethernet bus), either FNB data bus (B or C), the D bus (through the
front panel), and can bridge traffic among the A, B , C, and D networks.
(See Figure 2-5.)
Page 2-5
Page 16
CONFIGURATION AND INSTALLATION
FDCMIM-04
POWER
FAIL
OK
SN
SN
FDCMIM-04
SN
PWRFNB
LNKPST
1
TPMIM-22
SN
PWRFNB
LNKPST
1
MMAC - 5PSM
PST
OFF
ON
PST
PST
FDDI
PST
LNK
2
LNK
3
LNK
4
FDDI
LNK
2
PST
LNK
3
LNKPST
4
10BASE-T
ETHERNET
TPMIM-22
RCV
SN
LNK
ERR
1
2
3
4
5
6
7
8
9
10
11
12
1
X
2
X
3
X
4
X
5
X
6
X
7
X
8
X
9
X
10
X
11
X
12
X
10BASE-T
ETHERNET
IRM3
RCV
SN
LNK
ERR
1
RESET
PWR
MGMT
CLN
ON OFF
T
X
R
X
ETHERNET
POWER
FAIL
BOK
RCV
POK
MMAC - 5PSM
C
O
N
S
OFF
O
L
E
ON
M
O
D
E
M
SN
OK
2
3
4
5
6
7
8
9
10
11
12
1
X
2
X
3
X
4
X
5
X
6
X
7
X
8
X
9
X
10
X
11
X
12
X
Figure 2-4. MMAC-5FNB with FDDI and Ethernet MIMs
FNB
Figure 2-5. MMAC Data Bus Structure
Page 2-6
Ethernet “A”
“B”
“C”
Page 17

CONFIGURATION AND INSTALLATION
Even though RMIMs can place Ethernet traffic on the bus that
normally handles FDDI traffic, FDDI MIMs can still reside in the
same hub with RMIMs. RMIMs determine whether or not the MIM
that resides in the next higher numbered MMAC slot is an Ethernet
MIM. If the next MIM is not an Ethernet MIM, the RMIM activates
relays that, in effect, terminate the B and C buses. To eliminate
potential problems, we recommend installing the RMIMs in lower
numbered slots and the FDDI MIMs in higher numbered slots.
For example, assume that we have an MMAC-5FNB with the
following configuration:
Slot 1 - EMME
Slot 2 - TPRMIM-36
Slot 3 - FDCMIM-04
Slot 4 - FDCMIM-08
After turning on the MMAC, the TPRMIM checks the MIM in slot 3.
When it determines that slot 3 does not hold an Ethernet MIM, it
activates the relays that terminate the Ethernet section of the B and C
buses. This isolates the FDCMIMs from the rest of the MIMs in the
hub. This example uses the TPRMIM, but the same is true if you use
any of the other RMIMs as well.
For a more thorough description of the RMIMs and how they use the
MMAC buses, see your RMIM documentation.
2.3.4 TRMM and Token Ring MIMs with FDCMIMs
Token Ring and FDDI traffic on an MMAC bus follow distinct
pathways . As long as your Token Ring MIMs reside in adjacent lower
numbered slots, and the FDDI MIMs reside in adjacent higher
numbered slots, the two networks can peacefully share an MMAC.
For example, if you have an MMAC-5FNB with a TRMM (Token Ring
Management Module) in slot 1, and TRMIM-12s in slots 2 and 3, you
can put an FDCMIM in slot 4. The FDCMIM inter-connects any
workstations that attach to its master ports and functions as a standalone network. The FDCMIM coexists, but does not communicate,
with the adjacent Token Ring network.
Page 2-7
Page 18
CONFIGURATION AND INSTALLATION
2.4 TWISTED PAIR PINOUT CONFIGURATION
This section provides the RJ-45 pinout configuration for Unshielded
Twisted Pair (UTP) and Shielded Twisted Pair (STP) Physical Layer
Medium Dependent (PMD) ports.
Note: When connecting two twisted pair ports together (e.g., an M type
port on an FDCMIM-24 to an F7069 Desktop Network Interface (DNI)
card), a transmit and receive cross-over must occur between the two
devices (i.e., within the cable).
10BASE-T
ETHERNET
RCV
LNK
ERR
1
2
3
4
5
6
7
8
9
10
11
12
1
X
2
X
3
X
4
X
5
X
6
X
7
X
8
X
9
X
10
X
11
X
12
X
IRM3
SN
RESET
PWR
MGMT
CLN
ON OFF
T
X
R
X
ETHERNET
POWER
FAIL
SN
OK
BOK
RCV
POK
MMAC - 5PSM
C
O
N
S
OFF
O
L
E
ON
M
O
D
E
M
TPMIM-22
SN
PWRFNB
LNKPST
1
FAIL
POWER
FDCMIM-04
SN
SN
OK
FDCMIM-04
SN
PWRFNB
LNKPST
1
MMAC - 5PSM
LNK
PST
2
LNK
OFF
ON
PST
3
LNK
PST
4
FDDI
PST
PST
FDDI
LNK
2
LNK
3
LNKPST
4
10BASE-T
ETHERNET
TPMIM-22
RCV
SN
LNK
ERR
1
2
3
4
5
6
7
8
9
10
11
12
1
X
2
X
3
X
4
X
5
X
6
X
7
X
8
X
9
X
10
X
11
X
12
X
Figure 2-6. RJ-45 TP-PMD Port Pinouts
Page 2-8
Page 19

CONFIGURATION AND INSTALLATION
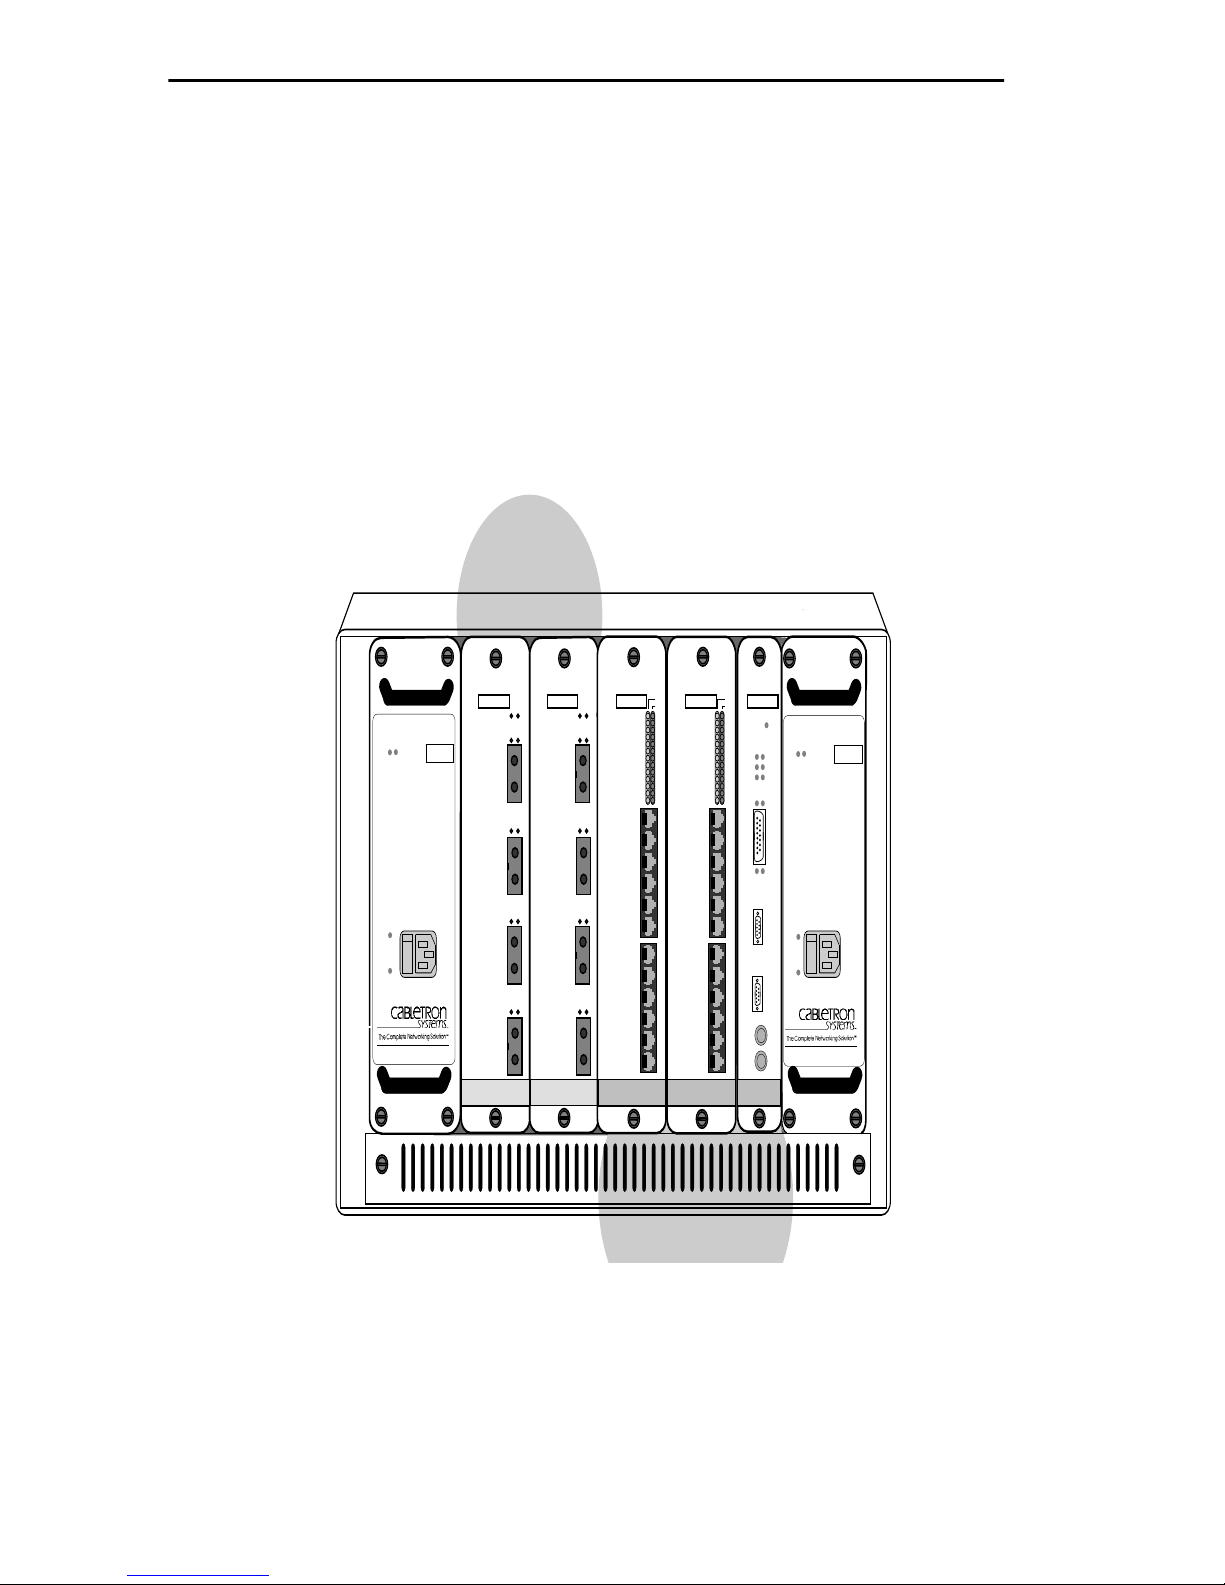
2.5 INSTALLING THE FDCMIM
The FDCMIM has “hot swap” capabilities. This means you can insert
and remove the module without first turning off the MMAC.
Occasionally, depending on the MMAC configuration, other MIMs in
the hub may go into a reset condition when you hot swap an FDCMIM.
A reset condition can cause a momentary, but self correcting,
interruption in network service.
Hot swapping does not damage any Cabletron Systems module.
However, we recommend turning off the MMAC when inserting or
removing any MIM. If you cannot turn off the MMAC, hot swapping
modules is acceptable.
Note: Observe all static precautions when handling FDCMIM boards.
After choosing an appropriate MMAC slot, use the following
instructions to install the FDCMIM:
1. Turn off the power to the MMAC. Remember that MMACs with
multiple power supplies have an On/Off switch for each supply.
2. Remove the FDCMIM from its protective cover. Always leave the
FDCMIM inside the protective cover when it is not installed in an
MMAC. If you need to set the MIM down for a moment during
installation, set it on a clean, non-conductive surface.
3. Holding the FDCMIM by the front panel, or by the edges of the
circuit board, align the bottom and top edges of the card with the
slot guides in the MMAC chassis. Be sure both the bottom and top
edges of the card rest in the guide slots. (See Figure 2-6.)
4. Slide the FDCMIM into the MMAC until you feel it meet the
backplane. At his point, the front panel should be about 1/2 inch
from being flush with the rest of the modules in the MMAC.
5. Press gently to seat the module into the backplane. Do not try to
force the module into place or attempt to use the knurled nuts to
draw the module into the backplane. Forcing a misaligned module
into place can damage the FDCMIM or the MMAC backplane.
Page 2-9
Page 20

CONFIGURATION AND INSTALLATION
6. Once the module seats in the backplane, tighten the two knurled
knobs. This step is important. If you do not tighten the knurled
knobs, vibration can cause the module to lose contact with the
backplane and disrupt your network.
7. Return power to the MMAC.
Your FDCMIM installation is now complete, and you can make
connections to your network.
POWER
FAIL
SN
OK
MMAC - 5PSM
OFF
ON
FOMIM-22
FDCMIM-04
SN
SN
TX
RX
TX
RX
PST
TX
RX
TX
PST
RX
TX
RX
TX
RX
ETHERNET
FDDI
IRM3
SN
RESET
PWRFNB
LNKPST
PWR
MGMT
CLN
1
ON OFF
LNK
2
LNK
3
T
LNKPST
X
R
X
4
ETHERNET
POWER
FAIL
BOK
RCV
POK
OK
MMAC - 5PSM
C
O
N
S
OFF
O
L
E
ON
M
O
D
E
M
SN
Figure 2-7. Installing the FDCMIM into an MMAC
Page 2-10
Page 21

USING LANVIEW
CHAPTER 3
USING LANVIEW
LANVIEW is a visual diagnostic and status monitoring system
developed by Cabletron Systems. LANVIEW LEDs can help you
troubleshoot network problems such as open segments or FDCMIM
power problems. The following sections describe FDCMIM LEDs.
3.1 FDCMIM STATUS LEDS
The FDCMIM has two LEDs, PWR and FNB, that show MIM status.
PWR (Power)
When ON, this green LED indicates that the FDCMIM is getting
power from the MMAC.
If the MMAC power is ON, but the FDCMIM PWR LED is OFF,
remove the FDCMIM from the MMAC and check for bent or broken
pins on the FNB (backplane) connectors. If you find any damaged
connectors, do not re-install the FDCMIM. Contact Cabletron Systems
Technical Support.
FNB (Flexible Network Bus Status)
This multi-state LED can indicate the following:
Green The FDCMIM connects to one or more FDDI
MIMs through the MMAC FDDI bus.
Amber Management has disabled this module.
Note: You must use an FDMMIM in conjunction with the FDCMIM to
have management available. If you do not have an FDMMIM in the
hub, an amber LED indicates an FDCMIM hardware problem.
Page 3-1
Page 22

USING LANVIEW
FNB (continued)
Red or
Flashing Red The FDCMIM has failed.
LED off The FDCMIM does not connect to any other
MIM through the MMAC bus. The single
FDCMIM comprises a stand-alone network.
3.2 PORT STATUS LEDs
Each FDCMIM port has two LEDs — PST and LNK. These LEDs
show the port status.
PST (Port Status)
This multi-state LED can indicate the following:
Green The station attached to the port is connected
to the network.
Amber Management has disabled this port.
Note: You must use an FDMMIM in conjunction with the FDCMIM to
have management available. If you do not have an FDMMIM in the
hub, and the PST LED is amber, the attached station has initiated a
trace. With no management available, the FDCMIM disables the port.
To re-enable the port, remove the cable from the port and cycle the power
to the FDCMIM.
Red or
Flashing Red The port has failed. On an FDCMIM-X4 (i.e.,
any FDCMIM having 4 ports), when one port
fails due to a hardware malfunction, most
likely all ports are inoperative.
FDCMIM-X8 ports 1 through 4 are
independent of ports 5 through 8. In other
words, one group of ports can fail without
affecting the other group.
LED off The port has no valid connector attached.
Page 3-2
Page 23

USING LANVIEW
LNK (Media Link OK)
When ON, this green LED indicates that a connection exists between
the FDCMIM and the node at the other end of the port cable segment.
To ensure you maintain the link, the port generates an idle signal
when not transmitting data.
When OFF, this LED indicates that either nothing is connected to the
FDCMIM port or the port is not receiving any signal.
Page 3-3
Page 24

SPECIFICATIONS
CHAPTER 4
SPECIFICATIONS
This chapter lists the operating specifications for the FDCMIM series
modules. Cabletron Systems reserves the right to change these
specifications at any time, without notice.
Fiber Optic Interface
Depending on the FDCMIM, interfaces have the following
characteristics:
Multimode Transmitter
Optical wavelength: 1330 nm typical
Optical output: -20.0 dBm minimum
Optical rise time: 3.5 nsec maximum
Optical fall time: 3.5 nsec maximum
Spectral width: 110 nm maximum
Supply current: 150 mAmps maximum
Multimode Receiver
Optical wavelength: 1330 nm typical
Optical input: -31.0 dBm minimum
Optical rise time: 5 nsec maximum
-14.0 dBm maximum
-14.0 dBm maximum
Optical fall time: 5 nsec maximum
Supply current: 115 mAmps maximum
Page 4-1
Page 25

SPECIFICATIONS
Multimode Receiver (Signal Detect)
Assert power: -33.0 dBm typical
Assert time: 10 µsec typical
Deassert power: -36.0 dBm typical
Deassert time: 10 µsec typical
Hysteresis: 1.5 dB
Unshielded Twisted Pair T ransmitter
-31.0 dBm maximum
100 µsec maximum
-45.0 dBm minimum
350 µsec maximum
Amplitude: 1.080 Vpk maximum
0.920 Vpk minimum
Rise time: 2 nsec minimum
4 nsec maximum
Fall time: 2 nsec minimum
4 nsec maximum
Rise/Fall variation: 0.5 nsec maximum
Overshoot: 5% maximum
Droop (14 symbols): 3% maximum
Unshielded Twisted Pair Receiver (Signal Detect)
Assert Time: 10 µsec typical
100 µsec maximum
Deassert time: 10 µsec typical
Page 4-2
350 µsec maximum
Page 26

Shielded Twisted Pair T ransmitter
Amplitude: 1.325 Vpk maximum
1.125 Vpk minimum
Rise time: 2 nsec minimum
4 nsec maximum
Fall time: 2 nsec minimum
4 nsec maximum
Rise/Fall variation: 0.5 nsec maximum
Overshoot: 5% maximum
Droop (14 symbols): 3% maximum
SPECIFICATIONS
Shielded Twisted Pair Receiver (Signal Detect)
Assert Time: 10 µsec typical
100 µsec maximum
Deassert time: 10 µsec typical
350 µsec maximum
Single Mode Transmitter
Optical wavelength: 1300 nm typical
Optical output: -20.0 dBm minimum
-14.0 dBm maximum
Optical rise time: 3.5 nsec maximum
Optical fall time: 3.5 nsec maximum
Spectral width: 140 nm maximum
Supply current: 150 mAmps maximum
Page 4-3
Page 27

SPECIFICATIONS
Single Mode Receiver
Optical wavelength: 1330 nm typical
Optical input: -31.0 dBm minimum
Optical rise time: 5 nsec maximum
Optical fall time: 5 nsec maximum
Supply current: 115 mAmps maximum
Single Mode Receiver (Signal Detect)
Assert power: -33.0 dBm typical
-14.0 dBm maximum
-31.0 dBm maximum
Assert time: 10 µsec typical
100 µsec maximum
Deassert power: -36.0 dBm typical
-45.0 dBm minimum
Deassert time: 10 µsec typical
350 µsec maximum
Hysteresis: 1.5 dB
Page 4-4
Page 28

SPECIFICATIONS
Cable Types
The FDDI Physical Layer Medium Dependent (PMD), Twisted Pair
Physical Layer Medium Dependent (TP-PMD), and Single Mode F iber
Physical Medium Dependent (SMF-PMD) ANSI standards define
cable requirements as follows:
Multimode Fiber:
Core diameter: 62.5 µm nominal
Cladding diameter: 128.0 µm maximum
122.0 µm minimum
Cable attenuation: ≤ 2.5 dB/km typical
Unshielded / Shielded Twisted Pair:
Cable / Connector — Category 5
Single Mode Fiber:
Core diameter: 8.7 µm +/- 0.5 µm
Cladding diameter: 127.0 µm maximum
Cable attenuation: ≤ 0.5 dB/km typical
Multimode Fiber Optic Cable Length
The PMD FDDI standard specifies the following:
Maximum total
cable length: 100 km (62 miles) — dual ring
200 km (124 miles) — wrapped
Maximum multimode
cable length between
adjacent nodes: 2 km (1.2 miles)
Page 4-5
Page 29

SPECIFICATIONS
Twisted Pair Cable Length
The TP-PMD FDDI standard specifies the following:
Maximum total
cable length: 100 km (62 miles) — dual ring
200 km (124 miles) — wrapped
Maximum twisted
pair cable length between
adjacent nodes: 100 m (328.1 feet)
Single Mode Fiber Optic Cable Length
The SMF-PMD FDDI standard specifies the following:
Maximum total
cable length: 100 km (62 miles) — dual ring
200 km (124 miles) — wrapped
Single mode cable length
between adjacent nodes: 40 km (24 miles) maximum
25 km (15 miles) typical
Power Requirements
The high bandwidth of FDDI means that FDDI MIMs consume more
power than Ethernet or Token Ring MIMs. Power requirements vary
from one FDCMIM-04 or FDCMIM-08 to another, depending on the
motherboard you have.
To determine your FDCMIM-04 or FDCMIM-08 power requirements:
• Locate the serial number on the front panel of the FDCMIM.
• Match the beginning of the serial number on the FDCMIM
with one of the following numbers.
Note: Depending on your FDCMIM version, you may have to preface
serial numbers with number 940. In other words, a serial number
beginning with 0568 is the same as one starting with 9400568.
Page 4-6
Page 30

SPECIFICATIONS
Use the following power consumption numbers when determining if a
particular MMAC has enough power to support your configuration.
FDCMIM-04 (SN 0568): 6.8 Amp at 5 Vdc
FDCMIM-04 (all others): 4.1 Amp at 5 Vdc
FDCMIM-08 (SN 0569): 11.8 Amp at 5 Vdc
FDCMIM-08 (all others): 7.0 Amps at 5 Vdc
FDCMIM-24: 5.0 Amp at 5 Vdc
FDCMIM-28: 9.0 Amp at 5 Vdc
FDCMIM-34: 3.9 Amps at 5 Vdc
FDCMIM-38: 6.6 Amps at 5 Vdc
FDCMIM-44: 5.0 Amps at 5 Vdc
FDCMIM-48: 9.0 Amps at 5 Vdc
Note: When calculating the total heat output of an MMAC hub, we
recommend that you consider the maximum potential heat output of the
MMAC power supplies rather than the heat output of the individual
MIMs within the hub. This approach ensures a more reliable heat
output total to use in long range facilities planning.
Environment
Storage temperature: -40°C minimum
85°C maximum
Operating temperature: 5°C minimum
40°C maximum
Operating humidity: 5% to 95% non-condensing
Safety
This unit meets the safety requirements of UL 1950, CSA C22.2
No. 950, and EN 60950; the EMI requirements of FCC Class A and
EN 55022 Class A; and the EMC requirements of EN 50082-1.
Note: It is the responsibility of the person who sells the system to which
the FDCMIM will be a part to ensure that the total system meets allowed
limits of conducted and radiated emissions.
Page 4-7
 Loading...