

Cabletron Systems CyberSWITCH CSX1000, CyberSWITCH CSX1200 Quick Start Manual
WORKGROUP
REMOTE ACCESS SWITCH
QUICK START
Release 7.2
Cabletron Systems
(603) 332-9400 phone
(603) 337-3075 fax
support@ctron.com

QUICK START
2 CyberSWITCH
NOTICE
You may post this document on a network server for public use as long as no
modifications are ma de to th e do cu ment.
Cabletron Systems reserves the right to make changes in specifications and other
information contained in this document without prior notice. The reader should in
all cases consult Cabletron Systems to determine whether any such changes have
been made.
The hardware, firmware, or software described in this manual is subject to change
without notice.
IN NO EVENT SHALL CABLETRON SYSTEMS BE LIABLE FOR ANY
INCIDENTAL, INDIRECT, SPECIAL, OR CONSEQUENTIAL DAMAGES
WHATSOEVER (INCLUDING BUT NOT LIMITED TO LOST PROFITS) ARISING
OUT OF OR RELATED TO THIS MANUAL OR THE INFORMATION
CONTAINED IN IT, EVEN IF CABLETRON SYSTEMS HAS BEEN ADVISED OF,
KNOWN, OR SHOULD HAVE KNOWN, THE POSSIBILITY OF SUCH
DAMAGES.
©Copyrigh t 1998 by Cablet ron Systems, Inc . All rights reserved.
Cabletron Systems, Inc.
P.O. Box 5005
Rochester, NH 03866-500 5
Order Number: 9032106-02
VIRU S D ISCLAIMER
Cabletron Systems has tested its software with current virus checking
technologies. H owev er, because no anti-virus sy stem is 100% rel iable, we strongly
cauti on you to wr ite pro tect and th en verif y that th e Licen sed Sof tware, pr ior to
installing it, is virus-free with an anti-viru s system in which yo u have confi denc e.
Cabletron Systems makes no representations or warranties to the effec t that t he
Licensed Software is virus-free.
Copyright © July 1997, by Cabletron Systems, Inc. All rights reserved.
Only qualified personnel should pe rform installation
procedures.
!
CAUTION

Workgroup Remote Access Switch 3
TRADEMARKS
Cabletron Systems, CyberSWITCH, MMAC-Plus, SmartSWITCH, SPECTRUM,
and SecureFast Virtual Remote Access Manager are trademarks of Cabletron
Systems, Inc.
All other product names m entioned in this manual are tradema rks or registered
trademarks of their re sp e ctive companies.
COPYRIGHTS
All of the code for this product is copyright ed by Cable tron System s , Inc.
© Copyright 1991-1997 Cabletron Systems, Inc. All rights reserved. Printed in the
United States of America .
Portio ns of the code for this p roduct are co pyrighted by the follow ing corpor ations:
Epilogue Technolo gy Co rporat io n
Copyright 1991-1993 by Epilogue Technology Corporation. All rights res erv ed.
Livingston Enterprises, Inc.
Copyright 1992 Livingston Enterprises, Inc.
Security Dynamics Technologies Inc.
Copyright 1995 by Security Dynamics Technologies Inc. All rights reserved.
Stac El e c tronics
Stac Electronics 1993, including one or more U.S. Patents No. 4701745, 5016009,
5126739 and 5146221 and other pending patents.
Telenetw orks
Copyright 1991, 92, 93 by Telene tworks. All rights reserved.
FCC NOTICE
This device complies with Part 15 of the FCC r ules. Operation is subject to the
following two conditions: (1) this de vice m a y no t caus e ha r mful interference, and
(2) this device must accept any int erference received, includ ing interference that
may caus e undesired op e ra ti on.
NOTE: This equipment has been tested and found to comply with the limits for a
Class A digital device, pursuant to Part 15 of the FCC rules. These limits are
designed to provide reasonable protection against harmful interference when the
equipment is operated in a commercial environment. This equipment uses,
generates, and can radiate radio frequency energy and if not installed in
accordance with the operator’s manual, may cause harmful interference to radio
communications. Operation of this equipment in a residential area is likely to cause
interference in which case the user will be required to correct the interference at his
own expense.
QUICK START
4 CyberSWITCH
WARNING : Changes or modific ations made to this d evice wh ich ar e not expr essly
approved by the party responsible for compliance could void the user’s authority
to operate the equipment.
DOC NOTICE
This digital apparatus do es not exceed the Class A limits for radio no ise emissions
from digital apparatus set out in the Radio Interference Regulations of the
Canadian Department of Communications.
Le présent appareil numérique n’émet pas de bruits radioélectriques dépassant les
limites applicables aux appareils numériques de la class A prescrites dans le
Règlement sur le brouillage radioélectrique édicté par le ministère des
Communicatio ns du Cana d a.
VCCI NOTICE
This is a Class 1 product based on the standard of the Voluntary Control Council
for Interference by Information Technology Equipment (VCCI). If th is equipment
is used in a domestic environment, radio disturbance may arise. When such
trouble occurs, the user may be required to take corrective actions.
CABLETRON SYSTEMS, INC. PROGRAM LICENSE AGREEMENT
IMPORTANT: Before utilizing this product, carefully read this License Agreement.
This document is an agreement between you, the end user, and Cabletron Systems,
Inc. ("Cabletron") that sets forth your rights and obligations with respect to the
Cabletron software program (the "Program") contained in this package. The
Progra m may be contai ned in fi rmware, ch ips or ot her media. BY UTILIZ ING THE
ENCLOSED PRODUCT, YOU ARE AGREEING TO BECOME BOUND BY THE
TERMS OF THIS AGREEMENT, WHICH INCLUDES THE LICENSE AND THE
LIMITATION OF WA RRANTY A ND DISCLAIMER O F LIABILITY. IF YOU DO
NOT AGREE TO THE TERMS OF THIS AGREEMENT, PROMPTLY RETURN
THE UNUSED PRODUCT TO THE PLACE OF PURCHASE FOR A FULL
REFUND.

Workgroup Remote Access Switch 5
CONTENTS
Using Quick Start 7
Basics 8
Accessing the Release Notes 8
Access in g the CyberS WI TCH 8
Connecting an Administ ration Console 8
Changing the Baud Rate 9
Telnet Connection 10
Login on the Cy b e rSWITCH 10
Making Configuration Changes 10
Upgrading Software 11
CD File Structure 12
Local Software Upg rade 12
Local Upgrade of the Second Stage Boot (SSB) 12
Local Upgrade of the Operational Softw are (OSW) 13
Remote Software Upgrade 13
Remote Upgrade of the Second Stage Boot (SSB) 14
Remote Upgrade of the Operational Software (OSW) 15
Change Defaults to Secure System 16
Return Conf iguration to Factory Defau lts 17
Initial Installation Steps 17
Beginning the Configuration Process 17
Physical Resource Configuration 17
Connectivity 19
Overview 19
Connecting a Workgroup Product to a Small Office Product via PPP 19
Bridge to Bridge Configuration 19
Configurati on for Site "Remote" 20
IP Router to IP Router Configuration 21
Configurati on for Site "C en tral" 21
Configurati on for Site "Remote" 22
IPX Router to IPX Router Configuration 23
Configurati on for Site "C en tral" 23
Configurati on for Site "Remote" 24
AppleTalk Router to AppleTalk Router Configuration 25
Configurati on for Site "C en tral" 25
Configurati on for Site "Remote" 26
Connecting a Workgroup Product to a CSX100 via PPP 27
IP Router to IP Router with Network Address Translation Configuration 27
Configuration for Site “Central” 28
Configuration for Site “Remo te” 28
IPX Router to IPX Router Configuration 29
Configuration for Site “Central” 29
Configuration for Site “Remote” 30
IPX Router to Bridge Configuration 30
Configuration for Site “Central” 31
Configuration for Site “Remote” 31

QUICK START
6 CyberSWITCH
AppleTalk Router to Bridge Configuration 32
Configuration for Site “Central” 32
Configuration for Site “Remote” 33
Index 34

U
SING QUICK START
Quick Start is recommended only for those users who are ex perienced with hardware an d software
installation procedur e s. Quick St art is divi ded into two parts.
•Basics
This chapter gives detailed instructions on the initial installation steps that are required for all
CyberSWITCH configur a tions.
• Connectivity
This chapter gives instructions for connecting two of our products together via PPP. Separate
instructions are provided fo r bridg ing, IP, IPX, and Apple T alk conf iguratio ns .

B
ASICS
ACCESSING THE RELEASE NOTES
The Rele ase Not es provide release highlights and important information related to this release that
should be re viewed befor e you b e gin the system’s installation and confi guration.
The Release Notes are located on the CD as well as on the system ’s F LA S H file syst e m.
The Release Notes on the CD are located in the REL_NOTE.TXT file. This file is a DOS text file you
can read on a DOS machine. Insert the CD into the drive, change to the proper directory, and enter
the following command at the DOS prompt:
[CD-ROM drive]:\[platform directory][ISDN standard directory][option directory]CSX1200>
type REL_NOTE.TXT | more
For example, if your CD-ROM is designat ed a s drive D, you are installin g is C SX 1204, using US
ISDN standa rds and the IP/IPX option, you would use the following p ath:
D:\CSX1204\US\IPI P X> ty pe REL_NOTE. TXT | more
ACCESSING THE CYBERSWITCH
There are tw o ways to access the system. The first method uses a console connection through the
console port on th e back of th e system, and connects up either a terminal or a workstation/PC
executing a terminal emulation program. The second method is to Telnet to the system. We
describ e each of these me thods below.
CONNECTING AN ADMINISTRATION CONSOLE
There are two ways to set up a console connection. The f irst way i s to simply connect up an ASCII
terminal to the console p o rt on the back of the system. This method ca n only be used to confi gure
or manage th e system. To install or upgrade system software, you must use the se cond method
described b elo w.
The second way is to use a PC or workstation to connect to the sys te m. The CyberSWITCH does
not have a CD-ROM drive. Theref ore, you must upgrade or install th e sof tware through an
attached PC, UNIX workstation, or any device that meets the following requirements:
• has a CD-ROM drive
• provides an RS232 termin al program
• has X-Modem communications capability (required for software upgrade only)
• has ASCII transfer capability (required for SSB recovery)
Any computer or terminal that meets these requirements and connects to the administrat ion port
on the syste m can op e rate as an administration console.
Using the provided RS232 null modem cable, attach an administrati on console to the system. The
administrat ion port is a 9-pin, male RS232 serial adapt er:
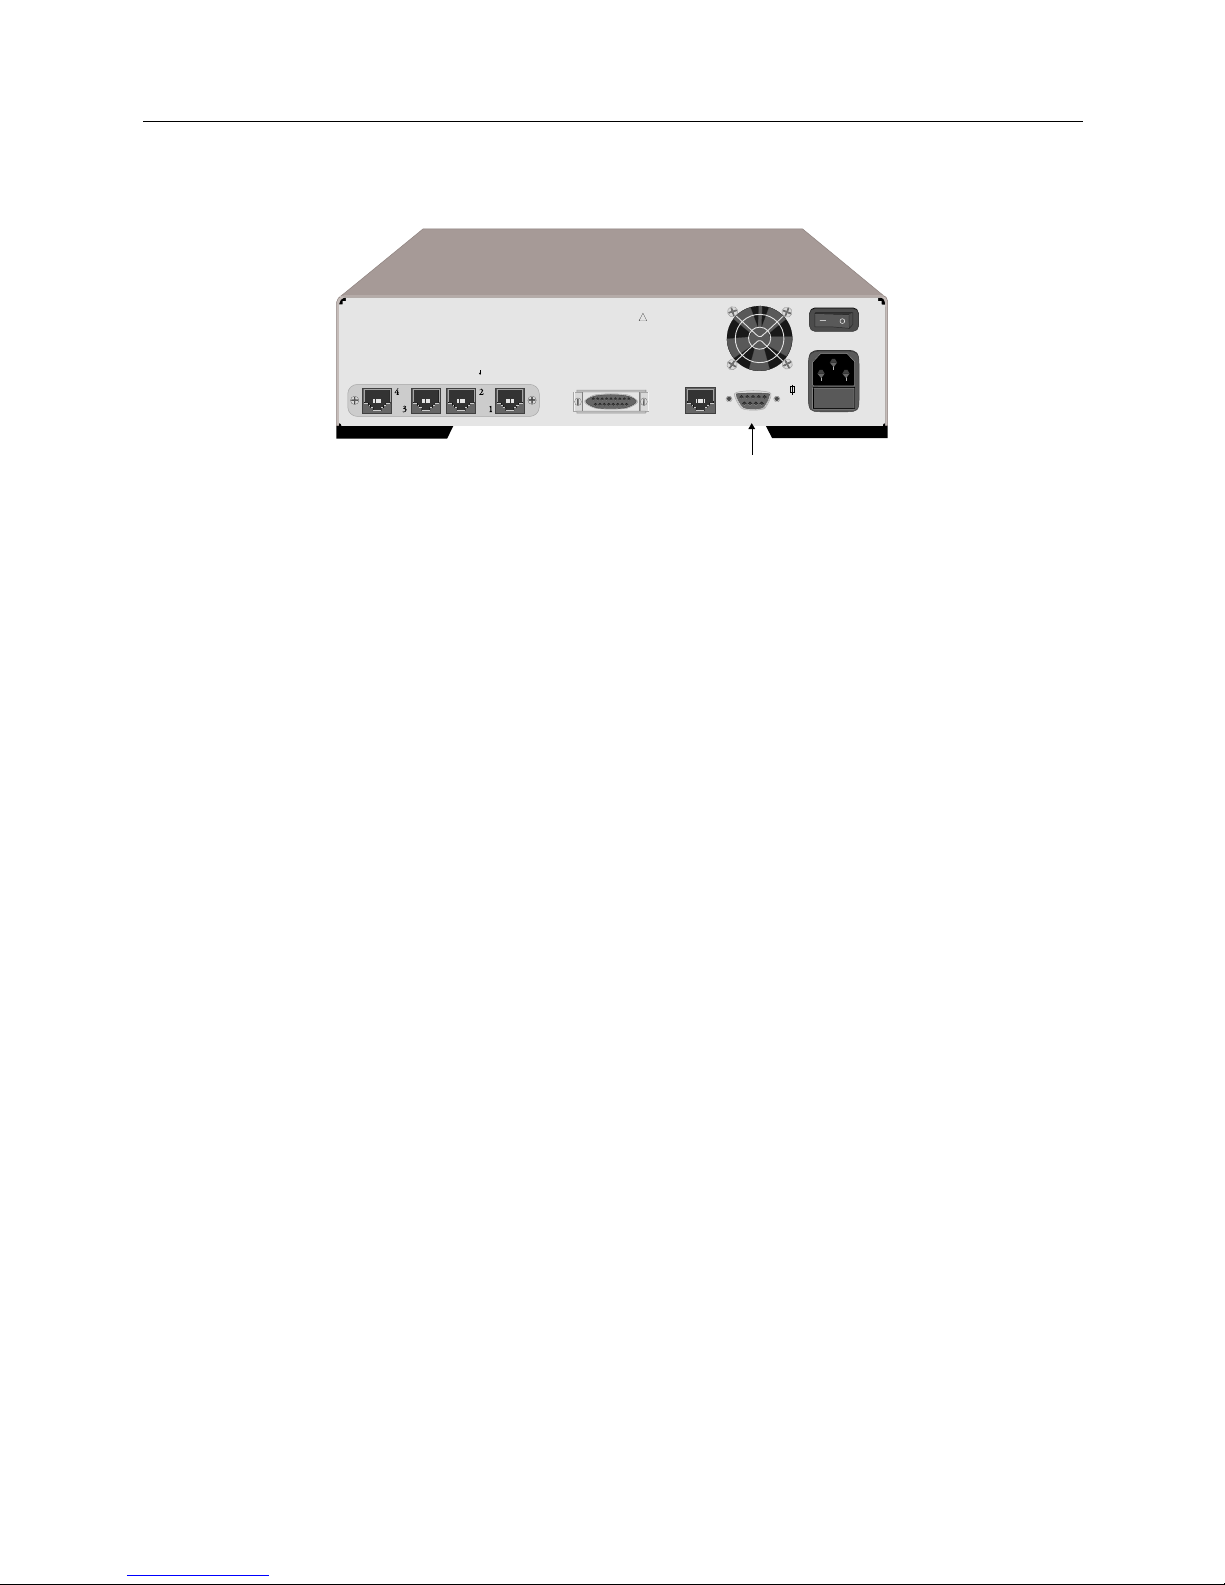
Workgroup Remote Access Switch 9
B
ASICS
Accessing the CyberSWITCH
Connect one e nd of a null modem cabl e to the console po rt on the CyberSWI TCH, and the other
end to the communication port on the PC. On the PC you must then execute a communication
package to emulat e a terminal (VT100). Your communication package should support file transfer
(Xmodem a nd ASCII) for software upgrades and install a tions.
Use the following default values for your communication package:
Baud rate 9600
Parity None
Data b its 8
Stop bits 1
Duplex Full
C
HANGING THE BAUD RATE
The baud rat e is change able. The d efault r ate perfor ms well for config uration ch anges. A faster rate
is useful, however, to download new software upgrades to your system.
To change the b aud rate through CFGEDIT:
1. Select Phy sical Reso urces from the main menu.
2. Select Data Line from the physical resources menu.
3. Follow the instruction s to make changes to the A S YNC MDM .
4. When asked, enter the baud rate you want to use.
5. Step through the remaining parameters. The last entry will ask you if you would like to save
your cha n ges. Answer yes.
6. To make the new b aud rate effec tive, restart the system (with the
restart
command).
7. Change the communications package you are using to the same baud rate.
To change the baud rate using Manage Mode:
1. Enter the Manage Mode by entering the following command:
>
manage
BRI (Termination switches behind plate; see diagram
FUSE TYPE: IEC 127/ III RATED F1.6AL-250V
INPUT
85-250V 47-63 - 1.6A MAX
CONSOLE
10Base-T
AUI
CAUTION
FOR CONTINUED PROTECTION
AGAINST RISK OF FIRE,
REPLACE
ONLY WITH SAME TYPE AND
RATING OF FUSE.
!
RS232 Adapter

QUICK START
10 CyberSWITCH
2. At the Manage Mode prompt, enter the following command:
>
ampconf change
3. Follow th e on-screen instructions for changing the baud rate.
TELNET CONNECTION
You can access the CyberSWITCH with Telnet. To do this, you must use Telnet client software.The
CyberSWITCH has default IP addresses configured to allow Telnet access. The default LA N IP
address is 1.1.1.1. To access the CyberSWITCH you must set the device’s IP address to be on the
same subnet as th e CyberSWITCH. We r ecom mend that you use 1.1 .1. 2 and do thi s on a LAN that
is not connected to the internet. Then place the CyberSWITCH on the LAN and Telnet to the
address.
This default address allows immediate access to the system for installation purposes. Be sure to
change this I P address as soon as possible to one on your local subnet.
Note: D o NOT plac e mo re than o ne Cybe rSWIT CH on a LAN wi th the def ault set ti ng. W ith bo th
having the same IP address, unpredictable results will occur.
You may also Telnet in via the WAN connection. The general procedures are:
1. Connect the system to the (WAN) ISD N l ine.
2. From a remote device that supports UnNumbered IP connections, dial in as a PPP CHAP
device USER1 (USER1 as secre t). The address on the CyberSWITCH to Telnet to is 1.1.1.1.
3. From a remote device only supporting numbered IP connection s, set up an IP Address 2.2.2.3
and have it dial as a PPP CHAP device USER2 (USER2 as secret). The address on the
CyberSWITCH to Telnet to is 2.2.2.2.
After you make a Telnet connection, enter your login id and password. Then you will be presented
with a system prompt and you can enter commands at that time.
LOGIN ON THE CYBERSWITCH
Once you have a connection to the CyberSWITCH, you will be presented with a prompt to enter
your log in id. Use admin as the login id. You will then be prompted for a new password, so choose
a password that you will remember. If your software was previously accessed by your distributor,
your password will be admin (in lower case).
After you have logged in, you many enter any command at the system prompt.
MAKING CONFIGURATION CHANGES
We provide two conf iguration tools to set up and/or alte r your configuration. These tools are :
• CFGEDIT, the full configuration utility
• Manage Mode, the dynamic management utility

Workgroup Remote Access Switch 11
B
ASICS
Upgrading Software
The CyberSWITCH is configured using the configuration editor, CFGEDIT. To begin the
configuration process:
Start up the configuratio n editor, CFGEDIT. Your machine s hould be at the sys tem prompt. To start
up the configuration editor simply type:
[system name]>
cfgedit
The main configuration menu should now be displayed. Refer to Connectivity for the configuration
steps required for the device you wish to connect.
Note: If you are prompted for configuration information that you don’t know, use the default.
This document will provi de detailed instructions if something other than the default is
required.
Once the system is working, minor configuration changes can be made in real time with the
Dynamic Management feature. This feature consists of console commands that enable you to
display current system parameters, change many parameters dynamically, and write changes to
disk file s so that they remain permanen t. Before using Dynamic Management comm ands, you mu st
first enter the special Manage Mode by typing the following command at the system prompt:
>manage
While operating in Manage Mode, only Dynamic Management commands are available. All other
system commands are ignored until you exit Manage Mode.
UPGRADING SOFTWARE
An upgrade o f sys tem soft ware ma y involve the upg rade of two co mponents: the second stage boot
(SSB) and the operational software (OSW). For most upgrades, if you have a working SSB, you will
only need to upgrade the OSW. If the new OSW requires an upgraded SSB, you will be alerted in
the Release Notes.
The Cy b e rS WITCH of fe rs two di ffe rent me tho ds of upg ra de—loc a l and remote.
• To perform a local upgrade refer to the section titled Local Software Upgrade. (A local upgrade
is performed via the administration console attached to the system’s RS23 2 port) .
• To perform a remote upgrade refer to the section titled Remote Software Upgrade . (A remote up-
grade is performed over the network using Telnet and TFTP).
For countries other than Japan, upgrade files are located on the CSX1200 CD. Refer to t he immediately following section for CD file structure information.
For Japan, refer to th e CSX1200 CD for documentation only . Note that Japanese upgra de files ar e
provided on diskettes. Keep this in mind while reading through the following file structure and
upgrade in structions.
 Loading...