

Page 1

BRIM-A6DP
USER’S GUIDE
Page 2

Page 3

Only qualified personnel should perform installation
procedures.
NOTICE
Cabletron Systems reserves the right to make changes in specifications and other information
contained in this document without prior notice. The reader should in all cases consult Cabletron
Systems to determine whether any such changes have been made.
The hardware, firmware, or software described in this manual is subject to change without notice.
IN NO EVENT SHALL CABLETRON SYSTEMS BE LIABLE FOR ANY INCIDENTAL,
INDIRECT, SPECIAL, OR CONSEQUENTIAL DAMAGES WHATSOEVER (INCLUDING BUT
NOT LIMITED TO LOST PROFITS) ARISING OUT OF OR RELATED TO THIS MANUAL OR
THE INFORMATION CONTAINED IN IT, EVEN IF CABLETRON SYSTEMS HAS BEEN
ADVISED OF, KNOWN, OR SHOULD HAVE KNOWN, THE POSSIBILITY OF SUCH
DAMAGES.
Copyright 1997 by Cabletron Systems, Inc., P.O. Box 5005, Rochester, NH 03866-5005
All Rights Reserved
Printed in the United States of America
Order Number: 9031429-03 May 1997
SPECTRUM, LANVIEW, MicroMMAC
Manager, EPIM, EPIM-A, EPIM-F1, EPIM-F2, EPIM-F3, EPIM-T, EPIM-X, FOT-F, FOT-F3
HubSTACK, SEH, SEHI
All other product names mentioned in this manual may be trademarks or registered trademarks of
their respective companies.
, and
TMS-3
, and
BRIM
are trademarks of Cabletron Systems, Inc.
are registered trademarks and
Element
FCC NOTICE
This device complies with Part 15 of the FCC rules. Operation is subject to the following two
conditions: (1) this device may not cause harmful interference, and (2) this device must accept any
interference received, including interference that may cause undesired operation.
NOTE:
device, pursuant to Part 15 of the FCC rules. These limits are designed to provide reasonable
protection against harmful interference when the equipment is operated in a commercial environment.
This equipment uses, generates, and can radiate radio frequency energy and if not installed in
accordance with the operator’s manual, may cause harmful interference to radio communications.
Operation of this equipment in a residential area is likely to cause interference in which case the user
will be required to correct the interference at his own expense.
WARNING:
party responsible for compliance could void the user’s authority to operate the equipment.
This equipment has been tested and found to comply with the limits for a Class A digital
Changes or modifications made to this device which are not expressly approved by the
,
BRIM-A6DP User’s Guide i
Printed on Recycled Paper
Page 4

Notice
DOC NOTICE
This digital apparatus does not exceed the Class A limits for radio noise emissions from digital
apparatus set out in the Radio Interference Regulations of the Canadian Department of
Communications.
Le présent appareil numérique n’émet pas de bruits radioélectriques dépassant les limites applicables
aux appareils numériques de la class A prescrites dans le Règlement sur le brouillage radioélectrique
édicté par le ministère des Communications du Canada.
VCCI NOTICE
This equipment is in the 1st Class Category (information equipment to be used in commercial and/or
industrial areas) and conforms to the standards set by the Voluntary Control Council for Interference
by Information Technology Equipment (VCCI) aimed at preventing radio interference in commercial
and/or industrial areas.
Consequently , when used in a residential area or in an adjacent area thereto, radio interference may be
caused to radios and TV receivers, etc.
Read the instructions for correct handling.
CABLETRON SYSTEMS, INC. PROGRAM LICENSE AGREEMENT
IMPORTANT:
This document is an agreement between you, the end user, and Cabletron Systems, Inc. (“Cabletron”)
that sets forth your rights and obligations with respect to the Cabletron software program (the
“Program”) contained in this package. The Program may be contained in firmware, chips or other
media. BY UTILIZING THE ENCLOSED PRODUCT, YOU ARE AGREEING TO BECOME
BOUND BY THE TERMS OF THIS AGREEMENT, WHICH INCLUDES THE LICENSE AND
THE LIMITATION OF WARRANTY AND DISCLAIMER OF LIABILITY. IF YOU DO NOT
AGREE TO THE TERMS OF THIS AGREEMENT , PR OMPTLY RETURN THE UNUSED
PRODUCT TO THE PLACE OF PURCHASE FOR A FULL REFUND.
Before utilizing this product, carefully read this License Agreement.
ii BRIM-A6DP User’s Guide
Page 5

CABLETRON SOFTWARE PROGRAM LICENSE
Notice
1. LICENSE
package subject to the terms and conditions of this License Agreement.
You may not copy, reproduce or transmit any part of the Program except as permitted by the
Copyright Act of the United States or as authorized in writing by Cabletron.
2. OTHER RESTRICTIONS. You may not reverse engineer, decompile, or disassemble the
Program.
3. APPLICABLE LA W. This License Agreement shall be interpreted and governed under the laws
and in the state and federal courts of New Hampshire. You accept the personal jurisdiction and
venue of the New Hampshire courts.
. You have the right to use only the one (1) copy of the Program provided in this
EXCLUSION OF WARRANTY AND DISCLAIMER OF LIABILITY
1. EXCLUSION OF
writing, Cabletron makes no warranty, expressed or implied, concerning the Program (including
its documentation and media).
CABLETRON DISCLAIMS ALL WARRANTIES, OTHER THAN THOSE SUPPLIED TO
YOU BY CABLETRON IN WRITING, EITHER EXPRESSED OR IMPLIED, INCLUDING
BUT NOT LIMITED TO IMPLIED WARRANTIES OF MERCHANTABILITY AND
FITNESS FOR A PARTICULAR PURPOSE, WITH RESPECT TO THE PROGRAM, THE
ACCOMPANYING WRITTEN MA TERIALS, AND ANY A CCOMPANYING HARDW ARE.
WARRANTY. Except as may be specifically provided by Cabletron in
2. NO LIABILITY FOR CONSEQUENTIAL DAMAGES. IN NO EVENT SHALL
CABLETRON OR ITS SUPPLIERS BE LIABLE FOR ANY DAMAGES WHATSOEVER
(INCLUDING, WITHOUT LIMITATION, DAMAGES FOR LOSS OF BUSINESS,
PROFITS, BUSINESS INTERRUPTION, LOSS OF BUSINESS INFORMATION, SPECIAL,
INCIDENTAL, CONSEQUENTIAL, OR RELIANCE DAMAGES, OR OTHER LOSS)
ARISING OUT OF THE USE OR INABILITY TO USE THIS CABLETRON PRODUCT,
EVEN IF CABLETRON HAS BEEN ADVISED OF THE POSSIBILITY OF SUCH
DAMAGES. BECAUSE SOME STATES DO NOT ALLOW THE EXCLUSION OR
LIMITATION OF LIABILITY FOR CONSEQUENTIAL OR INCIDENTAL DAMAGES, OR
ON THE DURATION OR LIMITATION OF IMPLIED WARRANTIES, IN SOME
INSTANCES THE ABOVE LIMITATIONS AND EXCLUSIONS MAY NOT APPLY TO
YOU.
UNITED STATES GOVERNMENT RESTRICTED RIGHTS
The enclosed product (a) was developed solely at private expense; (b) contains “restricted computer
software” submitted with restricted rights in accordance with Section 52227-19 (a) through (d) of the
Commercial Computer Software - Restricted Rights Clause and its successors, and (c) in all respects
is proprietary data belonging to Cabletron and/or its suppliers.
For Department of Defense units, the product is licensed with “Restricted Rights” as defined in the
DoD Supplement to the Federal Acquisition Regulations, Section 52.227-7013 (c) (1) (ii) and its
successors, and use, duplication, disclosure by the Government is subject to restrictions as set forth in
subparagraph (c) (1) (ii) of the Rights in Technical Data and Computer Software clause at
252.227-7013. Cabletron Systems, Inc., 35 Industrial Way, Rochester, New Hampshire 03867-0505.
BRIM-A6DP User’s Guide iii
Page 6

Notice
DECLARATION OF CONFORMITY
Application of Council Directive(s):
Manufacturer’s Name:
Manufacturer’ s Address:
European Representative Name:
European Representative Address:
Conformance to Directive(s)/Product Standards:
Equipment Type/Environment:
89/336/EEC
73/23/EEC
Cabletron Systems, Inc.
35 Industrial Way
PO Box 5005
Rochester, NH 03867
Mr. J. Solari
Cabletron Systems Limited
Nexus House, Newbury Business Park
London Road, Newbury
Berkshire RG13 2PZ, England
EC Directive 89/336/EEC
EC Directive 73/23/EEC
EN 55022
EN 50082-1
EN 60950
Networking Equipment, for use in a
Commercial or Light
Environment.
Industrial
We the undersigned, hereby declare, under our sole responsibility, that the equipment packaged
with this notice conforms to the above directives.
Manufacturer Legal Representative in Europe
Mr. Ronald Fotino Mr. J. Solari
___________________________________ ___________________________________
Full Name Full Name
Principal Compliance Engineer Managing Director - E.M.E.A.
___________________________________ ___________________________________
Title Title
Rochester, NH, USA Newbury, Berkshire, England
___________________________________ ___________________________________
Location Location
iv BRIM-A6DP User’s Guide
Page 7

CONTENTS
CHAPTER 1 INTRODUCTION
1.1 Using This Manual.......................................................................1-1
1.2 Document Conventions...............................................................1-2
1.3 BRIM-A6DP Overview.................................................................1-3
1.4 BRIM-A6DP Features..................................................................1-3
1.5 Related Manuals..........................................................................1-4
1.6 Getting Help.................................................................................1-5
CHAPTER 2 INSTALLATION
2.1 Unpacking the BRIM....................................................................2-1
2.2 Installing APIMs...........................................................................2-2
2.3 Installing BRIMs...........................................................................2-3
2.3.1 Installing a BRIM in a MIM.............................................. 2-3
2.3.2 Installing a BRIM in a Hub ..............................................2-6
CHAPTER 3 LOCAL MANAGEMENT
3.1 Local Management Keyboard Conventions.................................3-2
3.2 Accessing BRIM-A6DP Local Management................................3-3
3.3 The ATM Setup Screen...............................................................3-4
3.4 The Connection Table Screen.....................................................3-5
3.4.1 Connection Table Screen Fields..................................... 3-5
3.5 The Add/Delete Entry Screen......................................................3-7
3.5.1 Add/Delete Entry Screen Fields...................................... 3-8
3.5.2 Adding an Entry (PVC) ...................................................3-9
3.5.3 Modifying an Entry (PVC) .............................................3-10
3.5.4 Deleting an Entry (PVC) ...............................................3-10
3.6 The LEC Administration Screen................................................3-11
3.6.1 LEC Administration Screen Fields................................3-12
3.6.2 Configuring the LEC Automatically...............................3-14
3.6.3 Configuring the LEC Manually......................................3-14
3.7 The ELAN Properties Screen....................................................3-15
3.7.1 ELAN Properties Screen Fields....................................3-16
3.8 The Signalling Screen ............................................................... 3-18
3.8.1 Signalling Screen Fields ...............................................3-19
3.8.2 Setting the SVC Signalling and LAN Emulation Type... 3-20
3.8.3 Enabling and Disabling the ILMI...................................3-20
3.8.4 Setting the LEC ATM Address...................................... 3-21
BRIM-A6DP User’s Guide v
Page 8

Contents
3.9 The VLAN Assignment Screen ..................................................3-22
3.9.1 Port/VLAN Assignment Screen Fields...........................3-22
3.10 VLAN Overview..........................................................................3-24
3.10.1 Configuration Guidelines...............................................3-25
3.11 Creating VLANs .........................................................................3-27
3.11.1 ATM LEC VLANs...........................................................3-27
3.11.2 Ethernet-only VLANs.....................................................3-29
3.12 The Router MAC Address Screen .............................................3-30
3.12.1 Router MAC Address Screen Fields .............................3-30
3.12.2 Adding MAC Entries......................................................3-32
3.12.3 Deleting MAC Entries....................................................3-32
CHAPTER 4 LANVIEW LEDs
4.1 BRIM-A6DP LEDs........................................................................4-1
4.2 APIM LEDs ..................................................................................4-2
APPENDIX A APIM SPECIFICATIONS
A.1 APIM-11 Specifications............................................................... A-1
A.2 APIM-21 Specifications............................................................... A-2
A.3 APIM-29 Specifications............................................................... A-3
A.4 APIM-29LR Specifications .......................................................... A-4
A.5 APIM-22 Specifications............................................................... A-5
A.6 APIM-67 Specifications............................................................... A-6
APPENDIX B BRIM-A6DP SPECIFICATIONS
B.1 BRIM-A6DP Specifications ......................................................... B-1
vi BRIM-A6DP User’s Guide
Page 9

CHAPTER 1
INTRODUCTION
Welcome to the Cabletron Systems
manual provides the following information:
• Describes BRIM-A6DP features.
• Explains how to install the BRIM-A6DP in a Cabletron Systems
Media Interface Module (MIM) or standalone hub.
• Provides instructions on using BRIM-A6DP Local Management to
perform functions such as viewing current ATM connections,
configuring Permanent Virtual Channels (PVCs), configuring LAN
Emulation Clients (LECs), viewing Emulated LAN properties,
configuring operating parameters for Switched Virtual Channels
(SVCs), and assigning front panel Ethernet ports and/or Emulated
LANs (ELANs) to Virtual LANs (VLANs).
• Outlines specifications for the Cabletron Systems Asynchronous
Transfer Mode (ATM) Bridge/Router Interface Module (BRIM).
The BRIM-A6DP provides additional connectivity/functionality to
various Cabletron MIMs and standalone hubs. You should have a general
working knowledge of ATM networks and the ATM User-Network
Interface Specification (UNI), as specified by the ATM Forum, prior to
installing the BRIM-A6DP.
BRIM-A6DP User’s Guide
. This
1.1 USING THIS MANUAL
Read through this manual completely to familiarize yourself with its
content and to gain an understanding of the features and capabilities of
the BRIM-A6DP. The following list provides an o v ervie w of each section
of this manual:
Chapter 1,
BRIM-A6DP features and concludes with a list of related manuals.
Chapter 2,
Modules (APIMs) into the BRIM-A6DP. This chapter also explains how
to install a BRIM-A6DP into a MIM or a standalone hub.
BRIM-A6DP User’s Guide 1-1
Introduction
Installation
, outlines the contents of this manual, describes
, describes how to install ATM Port Interface
Page 10

Chapter 1:
Introduction
Chapter 3,
Local Management
, describes how to use the BRIM-A6DP
Local Management screens to perform a variety of configuration and
management procedures.
Chapter 4,
LANVIEW LEDs
, describes how to use the BRIM-A6DP
LEDs to monitor BRIM performance and status.
Appendix A,
APIM Specifications
, describes specifications and features
for each of the APIMs available for the BRIM-A6DP.
Appendix B,
BRIM-A6DP Specifications
, describes specifications and
safety compliance for the BRIM-A6DP.
1.2 DOCUMENT CONVENTIONS
The following conventions are used throughout this document:
Note
symbol. Calls the reader’s attention to any item of
NOTE
information that may be of special importance.
TIP
!
CAUTION
Tip
symbol. Conveys helpful hints concerning procedures or
actions.
Caution
damage to the equipment.
Electrical Hazard Warning
that could result in personal injury or death due to an electrical
hazard.
symbol. Contains information essential to avoid
symbol. Warns against an action
1-2 BRIM-A6DP User’s Guide
Page 11

BRIM-A6DP Overview
1.3 BRIM-A6DP OVERVIEW
The BRIM-A6DP extends the functionality of your Cabletron Systems
MIM or standalone hub to include remote bridging/routing capability. It
allows remote connectivity using ATM technology.
Using two APIMs on the front panel of the BRIM-A6DP, Cabletron
Systems can offer redundant ATM links from the BRIM to a switched
ATM network. Cabletron Systems provides a variety of APIMs that let
you select the configuration of your choice. If port redundancy is not a
requirement, then only one APIM may be installed.
The BRIM-A6DP supports two types of Virtual Channels: Permanent
Virtual Channels (PVCs), and Switched Virtual Channels (SVCs). It also
supports the ATM Forum’s User-Network-Interface (UNI) for SVC
signaling, and FORE Systems’ Simple Protocol for ATM Network
Signaling (SPANS).The BRIM-A6DP allows the user to create LAN
Emulation Clients (LECs), and Virtual LANs (VLANs). Refer to Chapter
Local Management
3,
Management features.
, for information on BRIM-A6DP Local
1.4 BRIM-A6DP FEATURES
ATM Port Interface Modules (APIMs)
The BRIM-A6DP supports two Cabletron Systems APIMs for ATM
connectivity and redundancy. You can easily install APIMs into the BRIM
for the interface of your choice.
APIMs support multiple types of physical layer cable types and are fully
compliant with all ATM Forum specifications.
MIB Support
For additional information on how to extract and compile individual
MIBs, refer to the Release Notes, or contact Cabletron Systems Technical
Support (refer to Section 1.7,
LANVIEW Diagnostic LEDs
Getting Help
Cabletron Systems provides a visual diagnostic and monitoring system
called LANVIEW. The BRIM-A6DP LANVIEW LEDs help you quickly
identify bridge and link status.
).
BRIM-A6DP User’s Guide 1-3
Page 12

Chapter 1:
Introduction
1.5 RELATED MANUALS
Use the following manuals to supplement the procedures and other
technical data provided in this manual. This manual references procedures
in these manuals, where appropriate, but does not repeat them.
Cabletron Systems
Cabletron Systems
Cabletron Systems
EMM-E6 User’s Guide
ESXMIM Installation Guide
ESX-1320/ESX-1380 User’s Guide
Cabletron Systems MicroMMAC User’s Guide
Cabletron Systems
NBR-620/420/220 Installation Guide and
NBR-620/420/220 Local Management Guide
1-4 BRIM-A6DP User’s Guide
Page 13

Getting Help
1.6 GETTING HELP
If you need additional support related to this device, or if you have any
questions, comments, or suggestions concerning this manual, contact
Cabletron Systems Technical Support:
Phone (603) 332-9400
Monday – Friday; 8 A.M. – 8 P.M. Eastern Time
CompuServe GO CTRON from any ! prompt
Internet mail support@ctron.com
FTP ctron.com (134.141.197.25)
Login
Password
BBS (603) 335-3358
Modem setting 8N1: 8 data bits, 1 stop bit, No parity
anonymous
your email address
For additional information about Cabletron Systems products, visit our
World Wide Web site: http://www .cabletron.com/
Before calling Cabletron Systems Technical Support, have the following
information ready:
• A description of the failure
• A description of any action(s) already taken to resolve the problem
(e.g., changing mode switches, rebooting the unit, etc.)
• A description of your network environment (layout, cable type, etc.)
• Network load and frame size at the time of trouble (if known)
• The serial and revision numbers of all Cabletron Systems products in
the network
• The device history (i.e., have you returned the device before, is this a
recurring problem, etc.)
• Any previous Return Material Authorization (RMA) numbers
BRIM-A6DP User’s Guide 1-5
Page 14

Chapter 1:
Introduction
1-6 BRIM-A6DP User’s Guide
Page 15

CHAPTER 2
INSTALLATION
This chapter contains instructions for unpacking the BRIM, installing
APIMs, and installing the BRIM into Cabletron Systems devices that
support BRIM technology.
To install the BRIM and APIMs, you need the following tools:
• Disposable grounding wrist strap (provided with any MIM or hub)
• Phillips screwdriver
The BRIM-A6DP and the host MIM or hub are sensitive to static
!
CAUTION
discharges. Use a grounding strap and observe all static
precautions during this procedure. Failure to do so could result
in damage to the BRIM-A6DP or the host MIM or hub.
2.1 UNPACKING THE BRIM
Unpack the BRIM as follows:
1. Remove the shipping box material covering the BRIM.
2. Carefully remove the module from the shipping box. Leave the
module in its non-conductive bag until you are ready to install.
3. Attach the disposable grounding strap to your wrist (refer to the
instructions on the disposable grounding strap package).
4. After removing the module from its non-conductive bag, visually
inspect the device. If you notice any signs of damage, contact
Cabletron Systems Technical Support immediately.
BRIM-A6DP User’s Guide 2-1
Page 16
Chapter 2:
Installation
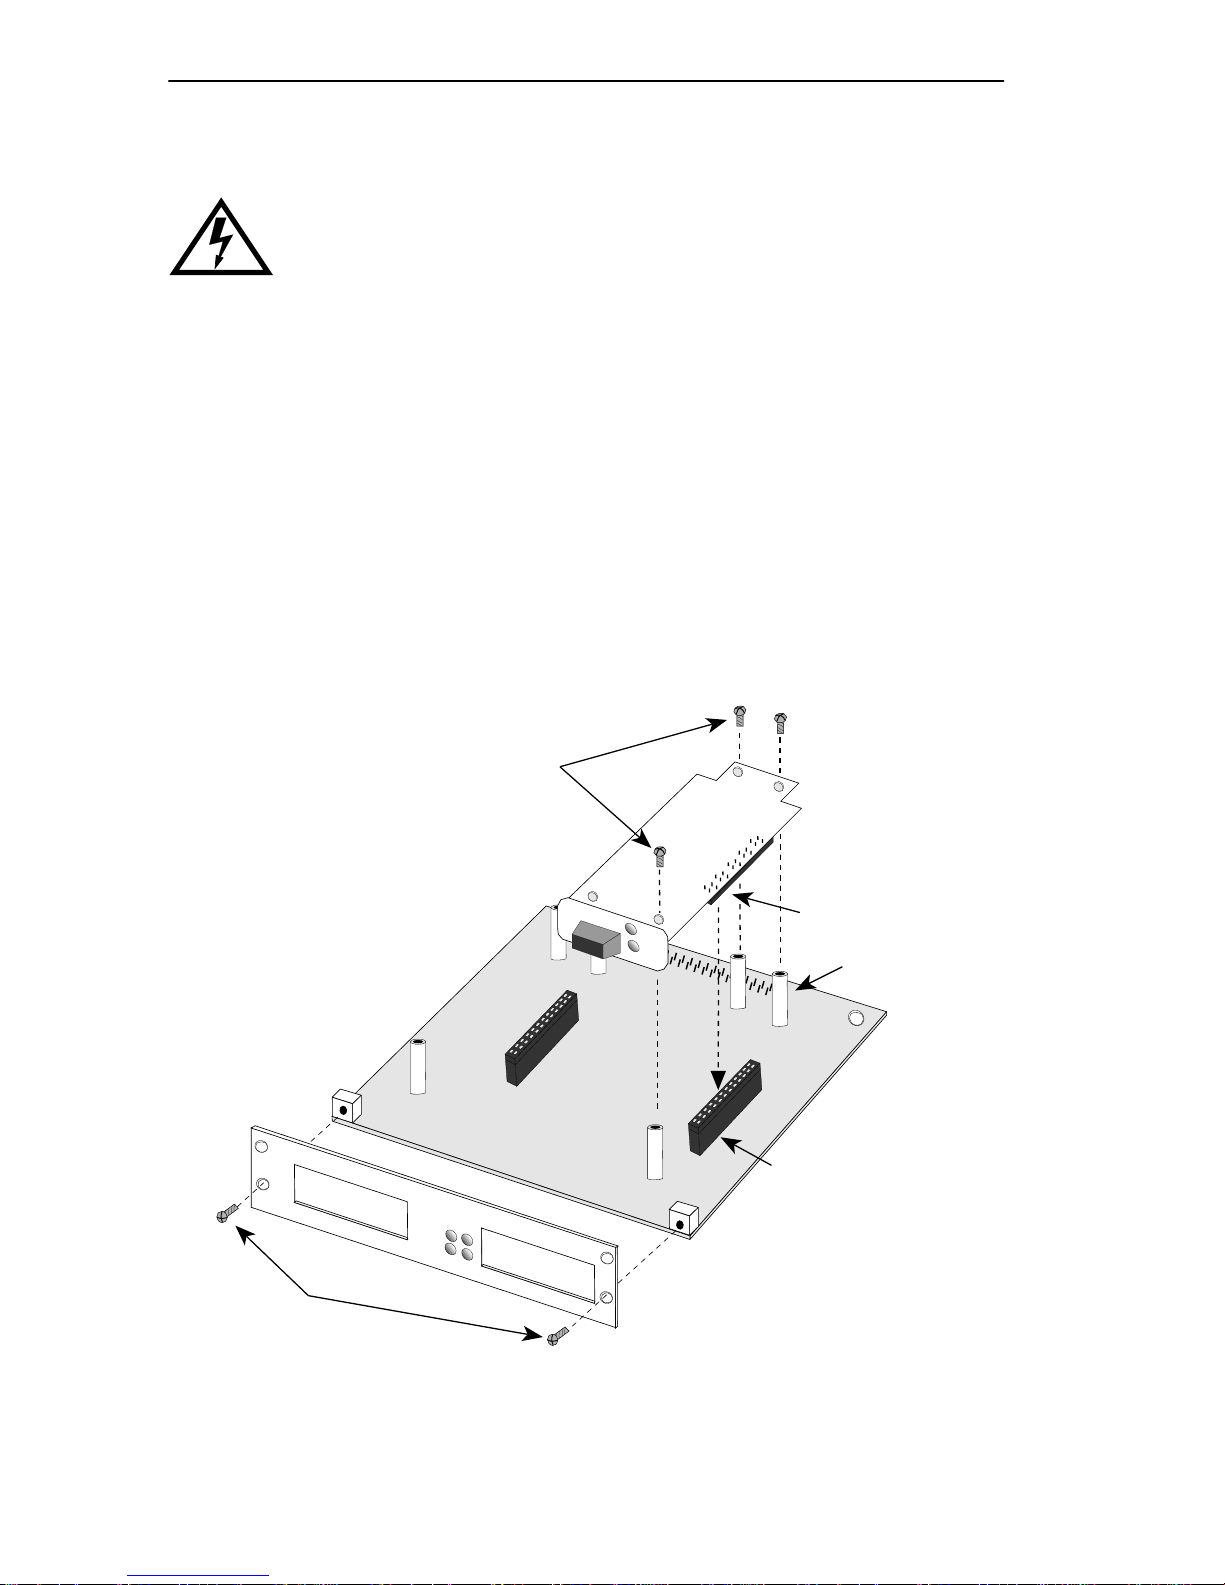
2.2 Installing APIMs
Only qualified personnel should install or service this unit.
To install an APIM into the BRIM-A6DP refer to Figure 2-1 and perform
the following steps:
1. Attach the disposable grounding strap to your wrist (refer to the
instructions on the disposable grounding strap package).
2. Remove the two faceplate screws from the BRIM.
3. Remove the three screws from the BRIM standoffs.
4. Insert the APIM connector pins into the BRIM connector.
FACEPLATE SCREWS
APIM SCREWS
BRIM-A6DP
STS
PWR
XMT
RCV
STS
LNK
APIM
APIM CONNECTOR
STANDOFF
BRIM
CONNECTOR
142901
2-2 BRIM-A6DP User’s Guide
Figure 2-1 Installing an APIM
Page 17

Installing BRIMs
5. Press down firmly on the APIM until the pins slide all the way into the
connector holes. Ensure the APIM sits flush on the standoffs.
6. Secure the APIM with the screws provided with the APIM.
7. Reattach the faceplate to the BRIM.
2.3 INSTALLING BRIMs
Only qualified personnel should install or service this unit.
You can install a BRIM in any Cabletron Systems device that supports
BRIM technology (e.g., EMM-E6, MicroMMAC). Refer to the release
notes for the version of firmware running on the Cabletron Systems
device to ensure that the BRIM-A6DP is supported. The following
subsections provide generic instructions for installing a BRIM-A6DP in a
MIM or in a standalone hub. Refer to your specific MIM or standalone
hub documentation for exact BRIM slot and connector locations.
2.3.1 Installing a BRIM in a MIM
To install a BRIM-A6DP in a MIM that supports BRIM technology
perform the following steps:
1. Power-down the MMAC hub and remove all power cords.
Cabletron Systems recommends that you po w er-down the hub
NOTE
2. Disconnect all cables from the MIM. Note the ports to which these
cables attach.
3. Attach the disposable grounding strap to your wrist (refer to the
instructions outlined on the disposable grounding strap package).
4. Unscrew the top and bottom knurled knobs of the MIM faceplate.
even though Cabletron Systems MIMs have “hot swap”
capabilities.
BRIM-A6DP User’s Guide 2-3
Page 18
Chapter 2:
Installation
5. Slide out the MIM, and place it on its side with the internal
components facing up.
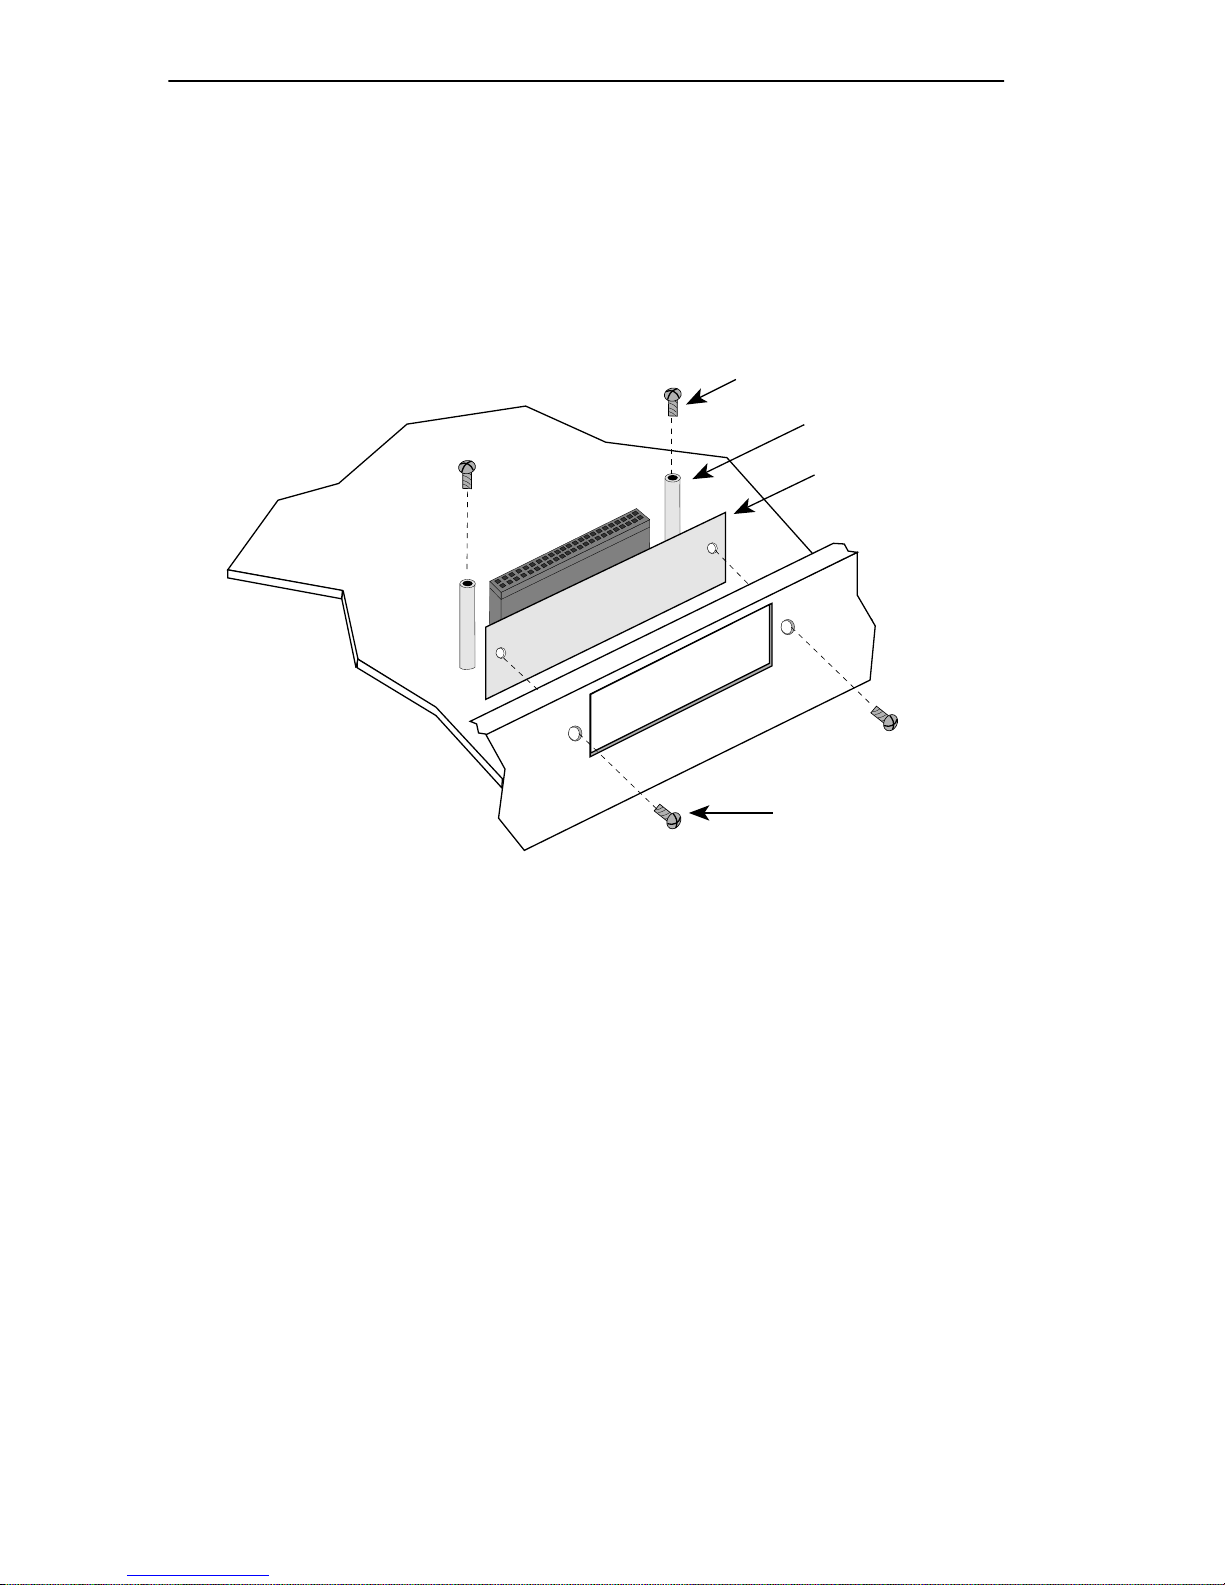
6. Remove the faceplate mounting screws and the BRIM coverplate.
See Figure 2-2.
7. Remove the standoff screws. See Figure 2-2.
STANDOFF SCREW
STANDOFF
BRIM
COVERPLATE
142902
FACEPLATE
MOUNTING SCREW
Figure 2-2 Removing the BRIM Coverplate
2-4 BRIM-A6DP User’s Guide
Page 19

STANDOFF
SCREW
PWR
BRIM-A6DP
STS
STS
RCV
LNK
XMT
APIM
Installing BRIMs
STS
LNK
APIM
STANDOFF
BRIM
CONNECTOR
142903
MOUNTING SCREW
Figure 2-3 Installing the BRIM-A6DP
8. Place the BRIM behind the MIM faceplate. See Figure 2-3.
9. Insert the connector pins of the BRIM-A6DP into the BRIM connector
on the MIM.
10. Press down firmly on the back of the BRIM until the pins slide all the
way into the connector holes.
Ensure that the standoffs on the MIM align with the standoff
FACEPLATE
NOTE
screw holes on the BRIM.
BRIM-A6DP User’s Guide 2-5
Page 20

Chapter 2: Installation
11. Reinstall the faceplate mounting screws and the standoff screws.
12. Reinstall the MIM in the MMAC.
13. Reattach all MMAC power cords.
14. Reattach the network cabling to the MIM.
15. Refer to Chapter 3 for instructions on configuring the BRIM-A6DP
using Local Management.
2.3.2 Installing a BRIM in a Hub
To install a BRIM-A6DP into a standalone hub that supports BRIM
technology perform the following steps:
1. Power down the hub and remove the power cord.
2. Disconnect all cables from the hub. Note the ports to which these
cables attach.
Ensure that you remove the power cord and ONLY the screws
required to remove the chassis cover. Failure to comply could
result in an electric shock hazard.
3. Attach the disposable grounding strap to your wrist (refer to the
instructions outlined on the disposable grounding strap package).
4. Remove the hub chassis cover (refer to your specific hub
documentation for instructions on removing the hub chassis cover).
5. Remove the faceplate mounting screws and the BRIM coverplate.
See Figure 2-2.
6. Remove the standoff screws. See Figure 2-2.
7. Place the BRIM behind the hub faceplate. See Figure 2-3.
8. Insert the connector pins of the BRIM into the BRIM connector on the
hub.
9. Press down firmly on the back of the BRIM until the pins slide all the
way into the connector holes.
2-6 BRIM-A6DP User’s Guide
Page 21

Installing BRIMs
Ensure that the standoffs on the hub align with the standoff
NOTE
screw holes on the BRIM.
10. Reinstall the faceplate mounting screws, and install the standoff
screws.
Ensure that the chassis cover is in place before reconnecting
the power cord.
11. Reattach the chassis cover to the hub, reconnect the power cord, and
reconnect the hub to your network.
12. Refer to Chapter 3 for instructions on configuring the BRIM-A6DP
using Local Management.
BRIM-A6DP User’s Guide 2-7
Page 22

Chapter 2: Installation
2-8 BRIM-A6DP User’s Guide
Page 23

CHAPTER 3
LOCAL MANAGEMENT
This chapter explains how to view current ATM connections, configure
Permanent Virtual Channels (PVCs), configure LAN Emulation Clients
(LECs), view Emulated LAN properties, configure operating parameters
for Switched Virtual Channels (SVCs), and to assign front panel Ethernet
ports and/or Emulated LANs (ELANs) to Virtual LANS (VLANs) using
Local Management.
Ensure the following procedures have been completed before configuring
the BRIM-A6DP through Local Management:
• An APIM must be installed in the BRIM-A6DP.
• The BRIM-A6DP must be installed in the host MIM or standalone
hub.
• The device must be up and running.
• A Local Management terminal must be configured and properly
connected to the host MIM or standalone hub in which the
BRIM-A6DP resides.
Refer to the host device User’s Guide for instructions on
NOTE
establishing a Local Management connection.
BRIM-A6DP User’s Guide 3-1
Page 24

Chapter 3: Local Management
3.1 LOCAL MANAGEMENT KEYBOARD
CONVENTIONS
All key names appear in this manual as capital letters. For example, the
Enter key appears as ENTER and the Backspace key appears as
BACKSPACE. Table 3-1 explains the keyboard conventions used in this
manual as well as the key functions.
Table 3-1 Keyboard Conventions
Key Function
ENTER Key and RETURN Key These are selection keys that perf orm
the same Local Management
function. For example, “Press
ENTER” means that you can press
either ENTER or RETURN, unless
this manual specifically instructs you
otherwise.
SPACE Bar and BACKSPACE Key These keys cycle through selections
in some Local Management fields.
Use the SPACE bar to cycle forward
through selections and use
BACKSPACE to cycle backward
through selections.
Arrow Keys These are navigation keys. Use the
UP-ARROW, DOWN-ARROW,
LEFT-ARROW, and RIGHT-ARROW
keys to move the screen cursor. For
example, “Use the arrow keys”
means to press whichever arrow key
moves the cursor to the desired field
on the Local Management screen.
3-2 BRIM-A6DP User’s Guide
Page 25

Accessing BRIM-A6DP Local Management
3.2 ACCESSING BRIM-A6DP LOCAL MANAGEMENT
The screens shown in this chapter are for a BRIM-A6DP
NOTE
To access BRIM-A6DP Local Management, perform the following steps:
1. Use the arrow keys to select BRIM-A6DP from the Setup Menu
screen.
2. Press ENTER. The ATM Setup screen, Figure 3-1, displays.
installed in an ESX-1320. Some screens may display different
information, in terms of number of ports, depending on the host
device in which the BRIM-A6DP resides. The functionality of all
Local Management screens, however, is the same regardless
of the host device in which the BRIM-A6DP resides.
ESX-1320 Local Management Flash Image Version: XX.XX.XX
A TM SCREENS
CONNECTION TABLE
LEC ADMINISTRA TION
ELAN PROPERTIES
SIGNALLING
VLAN ASSIGNMENT
RETURN
Figure 3-1 The BRIM-A6DP Setup Screen
BRIM-A6DP User’s Guide 3-3
Page 26

Chapter 3: Local Management
3.3 THE ATM SETUP SCREEN
The ATM Setup screen displays five options for configuration and
monitoring of the BRIM-A6DP. The following list explains each of the
ATM Setup screen fields and commands:
Connection T able
This option allows the user to view the current configured virtual
connections (PVCs and SVCs) of the BRIM-A6DP. The Connection
Table screen also provides access to the Add/Delete Entry screen, which
is used to add, modify, or delete PVCs and SVCs.
LEC Administration
This option displays the LEC Administration screen. This screen is used
to delete or modify existing LAN Emulation Clients (LECs), and to create
new LECs. New LECs can be autoconfigured, or created manually.
ELAN Properties
This option displays the ELAN Properties screen. This is a read-only
screen that allows the user to view information on multiple LAN
Emulation components.
Signalling
This option opens the Signalling screen. This screen allows the user to
view the current version of User-Network Interface (UNI) being used by
the BRIM-A6DP, and to view the current state of the Interim Local
Management Interface (ILMI).
VLAN Assignment
This option displays the VLAN Assignment screen. This screen allows
the user to create Virtual LANs (VLANs) and then assign front panel
Ethernet ports and/or ELANs to the created VLANs. This allows for the
creation of multiple separate workgroups on a single device. The VLAN
Assignment screen also provides access to the Add Router MAC screen
which is used to statically program the MAC address of a Layer 3 router
which is used to provide inter-ELAN communication. The Add Router
MAC screen is also used to enter the MAC addresses of end devices that
belong to more than one VLAN/ELAN pair.
RETURN
This command opens the previous Local Management screen.
3-4 BRIM-A6DP User’s Guide
Page 27

The Connection Table Screen
3.4 THE CONNECTION TABLE SCREEN
To access the Connection Table screen from the ATM Setup screen,
perform the following steps:
1. Use the arrow keys to highlight the Connection Table selection of the
ATM Setup screen.
2. Press ENTER; the Connection Table screen, Figure 3-2, displays.
ESX-1320 Local Management Flash Image Version: XX.XX.XX
BRIM-A6DP SETUP
ATM Port 1 Total Connections: 7
VPI
0
0
0
0
0
VCI Encapsulation Type AAL Type
0005
0016
0040
0041
0044
N/A
N/A
N/A
VC Mux 802.3 LANE
VC Mux 802.3 LANE
[ 6-7 ][PORT 1]
Figure 3-2 The Connection Table Screen
5
5
5
5
5
ADD/DELETE
ENTRY
Oper. Status
Enabled
Enabled
Enabled
Enabled
Enabled
RETURN
3.4.1 Connection Table Screen Fields
The Connection Table screen allows the user to view the current
configured virtual connections, (PVCs and SVCs) on the BRIM-A6DP.
The following list explains each of the Connection Table screen fields:
ATM Port Current Total Connections
This field displays the number of current connections on the
BRIM-A6DP.
BRIM-A6DP User’s Guide 3-5
Page 28

Chapter 3: Local Management
VPI
This field displays the V irtual Path Identifier (VPI) of the connection. This
field reads 0.
VCI
This field displays the Virtual Channel Identifier (VCI) of the connection.
This field reads between 1 and 1023.
Encapsulation T ype
This field displays the type of Encapsulation being used to switch
Ethernet frames to ATM cells. The four possible options for this field are
as follows:
• VC MUX 802.3 LANE - VC Based Multiplexed 802.3 LAN
Emulation. This method is specified by the ATM Forum LAN
Emulation specification. This option is available for SVCs only.
• VC MUX 802.3 - VC Based Multiplexing for Bridged Protocols as
defined by the IETF RFC 1483.
• LLC Encapsulated - Logical Link Control for Bridged Protocols as
defined by the IETF RFC 1483.
• N/A - This encapsulation type signifies channels that are reserved for
UNI signalling or LAN Emulation control information.
AAL T ype
This field displays the ATM Adaptation Layer being used by the
BRIM-A6DP. This field displays “3/4” or “5”.
Oper. Status
This field displays the operational status of the Virtual Channel
Connection (VCC). This field displays “Enabled” or “Disabled”.
[Port 1]
This field allows the user to toggle between each APIM installed in the
BRIM-A6DP, displaying the current connections on each APIM
respectively.
[6-10]
This field opens the next screen if the BRIM-A6DP has more than five
current connections. To toggle through the available connections use the
SPACE bar to select the group of five connections you wish to view.
3-6 BRIM-A6DP User’s Guide
Page 29

The Add/Delete Entry Screen
Add/Delete Entry
This command opens the Add/Delete Entry screen. The Add/Delete Entry
screen is used to create, modify, or delete PVCs.
RETURN
This command opens the previous Local Management screen.
3.5 THE ADD/DELETE ENTRY SCREEN
To access the Add/Delete Entry screen from the Connection Table screen,
perform the following steps:
1. Use the arrow keys to highlight the ADD/DELETE ENTRY selection
at the bottom of the Connection Table screen.
2. Press ENTER, the Add/Delete Entry screen, Figure 3-3, displays.
ESX-1320 Local Management
BRIM-A6DP ADD/DELETE ENTRY
VPI VCI AAL Type Encapsulation Type
[PORT 1] 0 0000 5 [VC Mux Bridged 802.3]
Figure 3-3 The Add/Delete Entry Screen
Flash Image Version: XX.XX.XX
RETURNDELETE ALLADD/MODIFY
BRIM-A6DP User’s Guide 3-7
Page 30

Chapter 3: Local Management
3.5.1 Add/Delete Entry Screen Fields
[Port 1]
This field represents the port the PVC will be created on when using a
BRIM-A6DP with two APIMs installed.
On this version of firmware, all PVCs are automatically created
NOTE
VPI
This field is used to enter the Virtual Path Identifier of the PVC. The
available range of this field is 0.
VCI
This field is used to enter the Virtual Channel Identifier of the PVC. The
available range for this field is 1 through 1023.
on both APIMs.
AAL T ype
This field is used to enter which ATM Adaptation Layer will be used by
the PVC. The BRIM-A6DP supports AAL 3/4 or AAL 5. The default
setting for the BRIM-A6DP is AAL 5.
Encapsulation T ype
This field displays the type of data encapsulation that the BRIM-A6DP
will use to perform LAN to ATM translation. This field toggles between
the following options:
• VC MUX Bridged 802.3 - VC Based Multiplexing as defined by the
IETF RFC 1483.
• LLC Encapsulated - Logical Link Control for Bridged Protocols as
defined by the IETF RFC 1483.
ADD/MODIFY
This command adds the PVC, or modifies an existing PVC, to the
BRIM-A6DP connection table.
3-8 BRIM-A6DP User’s Guide
Page 31

The Add/Delete Entry Screen
DELETE ALL
This command will appear only if a valid VPI and VCI ha ve been entered
in their respective fields on the Add/Delete Entry screen. This command
deletes the PVC from the BRIM-A6DP connection table.
RETURN
This command opens the previous Local Management screen.
3.5.2 Adding an Entry (PVC)
To add an entry (PVC), perform the following steps:
1. Use the arrow keys to highlight the VPI field and enter 0.
2. Use the arrow keys to highlight the VCI field and enter a value
between 1 and 1023.
3. Use the arrow keys to highlight the Encapsulation Type field and
press the SPACE bar until the desired Encapsulation Type displays.
4. Use the arrow keys to highlight the AAL Type field and press the
SPACE bar until the desired AAL Type displays.
5. Use the arrow keys to highlight the ADD/MODIFY command.
6. Press ENTER. The “ENTRY ADDED” message displays at the top of
the screen indicating that Local Management has added the PVC to the
connection table.
BRIM-A6DP User’s Guide 3-9
Page 32

Chapter 3: Local Management
3.5.3 Modifying an Entry (PVC)
To modify an existing entry (PVC), perform the following steps:
1. Use the arrow keys to highlight the VPI field and enter 0.
2. Use the arrow keys to highlight the VCI field, and enter the VCI value
that you want to change. The available range for this field is 1 through
1023.
3. Use the arrow keys to highlight the Encapsulation Type field and
press the SPACE bar until the desired Encapsulation Type displays.
4. Use the arrow keys to highlight the AAL Type field and press the
SPACE bar until the desired AAL Type displays.
5. Use the arrow keys to highlight the ADD/MODIFY command.
6. Press ENTER. The “ENTRY DELETED” then “ENTRY ADDED”
messages display at the top of the screen indicating that Local
Management has modified the PVC.
3.5.4 Deleting an Entry (PVC)
To delete an entry (PVC), perform the following steps:
1. Use the arrow keys to highlight the VPI field and enter the VPI of the
PVC that you want to delete.
2. Use the arrow keys to highlight the VCI field and enter the VCI of the
PVC that you want to delete.
3. Use the arrow keys to highlight the DELETE ALL command.
4. Press ENTER. The “ENTRY DELETED” message appears at the top
of the screen indicating that Local Management has deleted the PVC.
The DELETE ALL command appears only if a valid VPI and
NOTE
VCI have been entered in their respective fields.
3-10 BRIM-A6DP User’s Guide
Page 33

The LEC Administration Screen
3.6 THE LEC ADMINISTRATION SCREEN
To access the LEC Administration screen from the ATM Setup screen,
perform the following steps:
1. Use the arrow keys to highlight the LEC Administration selection
from the ATM Setup screen.
2. Press ENTER; the LEC Administration screen, Figure 3-4, displays.
ESX-1320 Local Management Flash Image Version: XX.XX.XX
LEC Administration
LEC Index:
Configure ELAN:
ELAN Name:
Max MTU Size:
LAN Type:
LES A TM Address:
ADD/MODIFY
Figure 3-4 The LEC Administration Screen
13
[Automatic]
ctron
[1516]
[802.3]
000000000000000000000000000000000000000
DELETE
RETURN
BRIM-A6DP User’s Guide 3-11
Page 34

Chapter 3: Local Management
3.6.1 LEC Administration Screen Fields
The LEC Administration allows the user to add, modify, or delete LAN
Emulation Clients (LECs). New LECs can be customized by the user, or
the new LEC can be created using default settings which are stored by the
BRIM-A6DP.
The following list explains each of the LEC Administration screen fields
and commands:
LEC Index
This field is used to identify this LEC in the ATM Forum’s LEC MIB. By
default, a single LEC will be automatically configured on the first
available LEC Index by the BRIM-A6DP when the host device is first
powered up. The range of available LEC Indices is dependent on the type
of host device the BRIM-A6DP resides in. Refer to Table 3-2 for a listing
of the available LEC Indices for the Cabletron Systems products the
BRIM-A6DP may be installed in.
Table 3-2 BRIM-A6DP LEC Indices
BRIM-A6DP Host Product Available LEC Indices
EMM-E6 5 through 20
ESXMIM 7 through 22
ESX-1320/ESX-1380 13 through 28
MicroMMAC 2 through 14
NBR-420 4 through 19
NBR-620 6 through 21
To create additional LECs, this field must be used to increment the LEC
Index count.
Configure ELAN
This field allows the user to configure a new LEC manually, or have the
LEC configured automatically. This field toggles between [Automatic]
and [Manual]. For instructions on how to configure a new LEC
automatically or manually refer to Section 3.6.2.
3-12 BRIM-A6DP User’s Guide
Page 35

The LEC Administration Screen
ELAN Name
This field is used to provide a user-defined ELAN for this LEC to join.
This field is modifiable when the LEC is configured in both automatic
and manual mode.
MAX MTU Size
This field is used to define the Max MTU size (in bytes) that this LEC is
allowed to transmit onto the ELAN. This field toggles between the
following options:
• [1516]
• [4554]
• [9234]
• [18190]
• [unspecified]
Although this field will display the options above, the
!
CAUTION
LAN T ype
BRIM-A6DP currently supports the default setting of [1516]
only. Setting the MAX MTU Size field to a different setting
causes the BRIM-A6DP to not function properly.
This field displays the type of ELAN that the LEC will join. The only type
of ELAN currently supported by the BRIM-A6DP is the default setting of
[802.3].
LES ATM Address
This field displays the address of the LAN Emulation Server with which
the LEC registers. If the LEC is configured manually, the LES ATM
Address must be entered in this field manually. If the LEC is configured
automatically, it is not necessary to enter the LES ATM Address, as the
BRIM-A6DP will learn this address dynamically.
ADD/MODIFY
This command adds the LEC to the BRIM-A6DP LEC Index.
DELETE
This command deletes the LEC from the BRIM-A6DP LEC Index.
BRIM-A6DP User’s Guide 3-13
Page 36

Chapter 3: Local Management
RETURN
This command opens the previous Local Management screen.
3.6.2 Configuring the LEC Automatically
To have the BRIM-A6DP configure the LEC automatically, perform the
following steps:
1. Use the arrow keys to highlight the LEC Index field. When first
powered up the BRIM-A6DP, by default, automatically creates the
first LEC, at the first available LEC Index. If only one LEC instance
is needed, this step may be skipped.
2. Enter the next available LEC Index for the new LEC to be created on.
Refer to Table 3-2 for a listing of the available LEC Indices for
Cabletron Systems products that support the BRIM-A6DP.
3. Use the arrow keys to highlight the Configure ELAN field.
4. Press the SPACE bar until the [Automatic] option displays.
5. Use the arrow keys to highlight the ADD/MODIFY command at the
bottom of the screen and press ENTER. The LEC will now be
configured automatically by the BRIM-A6DP.
3.6.3 Configuring the LEC Manually
To configure the LEC manually, perform the following steps:
1. Use the arrow keys to highlight the LEC Index field. When first
powered up the BRIM-A6DP, by default, automatically creates the
first LEC, at the first available LEC Index. If only one LEC instance
is needed, this step may be skipped.
2. Enter the next available LEC Index for the new LEC to be created on.
Refer to Table 3-2 for a listing of the available LEC Indices for
Cabletron Systems products that support the BRIM-A6DP.
3. Use the arrow keys to highlight the Configure ELAN field.
4. Press the SPACE bar until the [Manual] option displays.
5. Use the arrow keys to highlight the ELAN Name field. Enter a name
for the LEC that is no more than 32 characters in length.
3-14 BRIM-A6DP User’s Guide
Page 37

The ELAN Properties Screen
6. Ensure that the MAX MTU Size field displays [1516]. If it does not,
press the SPACE bar until [1516] displays.
7. Use the arrow keys to highlight the LES ATM Address field.
8. Enter the LES ATM Address. Ensure that a valid ATM Address is
used.
9. Use the arrow keys to highlight the ADD/MODIFY command at the
bottom of the screen and press ENTER. The manually configured LEC
is now entered into the BRIM-A6DP LEC Index. Check the ELAN
Properties screen to verify that the ELAN became operational. For
information on the ELAN Properties screen proceed to Section 3.7.
3.7 THE ELAN PROPERTIES SCREEN
To access the ELAN Properties screen from the ATM Setup screen,
perform the following steps:
1. Use the arrow keys to highlight the ELAN Properties selection of the
ATM Setup screen.
2. Press ENTER; the ELAN Properties screen, Figure 3-5, displays.
ESX-1320 Local Management Flash Image Version: XX.XX.XX
LEC PROPERTIES
LEC Index:
LEC ID:
LEC A TM ADDR:
LECS A TM ADDR:
LES A TM ADDR:
BUS A TM ADDR:
LECS Configuration Direct VCC:
d
3
0000000000000000000000000000000000000000
0000000000000000000000000000000000000000
0000000000000000000000000000000000000000
0000000000000000000000000000000000000000
LES Control Direct VCC:
LES Control Distribute VCC:
BUS Multicast Send VCC:
BUS Multicast Forward VCC:
LEC STATE:
STATUS:
0, 0
0, 40
0,255
0, 41
0,253
:
operational(7)
active(1)
Figure 3-5 The ELAN Properties Screen
BRIM-A6DP User’s Guide 3-15
PREV
RETURNEXITNEXT
Page 38

Chapter 3: Local Management
3.7.1 ELAN Properties Screen Fields
The ELAN Properties screen is a read-only screen that allows the user to
view current information on multiple LAN Emulation components.
The following list explains each of the ELAN Properties screen fields and
commands:
LEC Index
This field is used to identify this LEC in the ATM Forum’s LEC MIB.
This value is provided dynamically and is not modifiable by the user.
LEC ID
The LEC ID displays the LAN Emulation Client Identifier assigned to
this LEC by the LAN Emulation Server when the LEC was created. If the
LEC ID field reads “0” it signifies that this LEC is not a member of an
Emulated LAN and is not connected to a LAN Emulation Server.
LEC State
This field displays the current state that the LEC is in. The possible states
are as follows:
initialState
lecsConnect
configure
join
initialRegistration
busConnect
operational
Status
This field displays the current status of the LEC. The Status field reads
either “active” or “inactive”.
LEC ATM ADDR
This field displays the ATM Address of this LEC.
3-16 BRIM-A6DP User’s Guide
Page 39

The ELAN Properties Screen
LECS ATM ADDR
This field displays the ATM address of the LAN Emulation Configuration
Server. If this LEC was configured manually, this field can be empty.
LES ATM ADDR
This field displays the ATM Address of the LAN Emulation Server to
which the LEC is connected.
BUS ATM ADDR
This field displays the ATM Address of the Broadcast or Unkno wn Serv er
to which the LEC is connected.
LECS Configuration Direct VCC
This field displays the VPI and VCI of the Configuration Direct Virtual
Channel Connection (VCC) that the LEC has with the LECS. This
channel may be deleted by the LECS after it has been used.
LES Control Distribute VCC
This field displays the VPI and VCI of the Control Distribute Virtual
Channel Connection (VCC) that the LEC has with the LES.
LES Control Direct VCC
This field displays the VPI and VCI of the Control Direct Virtual Channel
Connection (VCC) that the LEC has with the LES.
BUS Multicast Send VCC
This field displays the VPI and VCI of the Multicast Send V irtual Channel
Connection (VCC) that the LEC has with the BUS.
BUS Multicast Forward VCC
This field displays the VPI and VCI of the Multicast Forward Virtual
Channel Connection (VCC) that the LEC has with the BUS.
NEXT
This command lets the user scroll to the screen that displays the
properties of the next ELAN configured for the BRIM-A6DP. To go to the
next screen use the arrow keys to highlight the NEXT command and
press ENTER. The next screen displays.
BRIM-A6DP User’s Guide 3-17
Page 40

Chapter 3: Local Management
PREV
This command lets you scroll to the previous screen. To go to the previous
screen use the arrow keys to highlight the PREV command and press
ENTER. The previous ELAN Properties screen displays.
RETURN
This command opens the previous Local Management screen.
3.8 THE SIGNALLING SCREEN
To access the Signalling screen from the ATM screen, perform the
following steps:
1. Use the arrow keys to highlight the Signalling selection of the ATM
Setup Screen.
2. Press ENTER; the Signalling screen, Figure 3-6, displays.
ESX-1320 Local Management Flash Image Version: XX.XX.XX
SVC Signalling
Signalling/LAN Emulation Type:
ILMI:
LEC A TM Address:
Figure 3-6 The Signalling Screen
[UNI3.0/LANE1.0]
[ON]
0000000000000000000000000000000000000000
RETURNSAVE
3-18 BRIM-A6DP User’s Guide
Page 41

The Signalling Screen
3.8.1 Signalling Screen Fields
The Signalling screen allows the user to select the type of SVC signaling
and LAN Emulation to be used, to enable or disable the Interim Local
Management Interface (ILMI) and enter the base ATM Address of the
BRIM-A6DP.
The following list explains each of the Signalling Screen fields and
commands:
Signalling/LAN Emulation Type
This field displays the current version of SVC Signalling and LAN
Emulation being used by the BRIM-A6DP. This field can be set for the
following options:
[UNI 3.0/LANE 1.0]
[UNI 3.1/LANE 1.0]
[SPANS/LANE 0.4]
[SPANS/LANE 0.4] is a proprietary signalling and LAN
NOTE
ILMI
Emulation type and will NOT operate with devices which are
using UNI and LANE 1.0.
This field toggles between [ON] and [OFF]. ILMI is used by the
BRIM-A6DP to get an ATM address from the ATM switch.
If ILMI is set to [OFF], an ATM Address must be given to the
NOTE
BRIM-A6DP manually using the LEC ATM Address field.
BRIM-A6DP User’s Guide 3-19
Page 42

Chapter 3: Local Management
LEC ATM Address
This field allows the user to enter a base ATM Address for the
BRIM-A6DP. If ILMI is enabled, the BRIM-A6DP ATM Address is
automatically configured.
SAVE
This command saves all changes to memory.
RETURN
This command opens the previous Local Management screen.
3.8.2 Setting the SVC Signalling and LAN Emulation
Type
To set the Signalling and LAN Emulation Type, perform the following
steps:
1. Use the arrow keys to highlight the Signalling/LAN Emulation Type
field.
2. Press the SPACE bar until the desired Signalling and LAN Emulation
type displays.
3. Use the arrow keys to highlight the SAVE command at the bottom of
the screen,.
4. Press ENTER. The changes are saved to memory.
3.8.3 Enabling and Disabling the ILMI
To enable or diable the ILMI, perform the following steps.
1. Use the arrow keys to highlight the ILMI field.
2. Press the SPACE bar to toggle between [ON] and [OFF] until the
desired mode displays.
3. Use the arrow keys to highlight the SAVE command at the bottom of
the screen.
4. Press ENTER. The changes are saved to memory.
3-20 BRIM-A6DP User’s Guide
Page 43

The Signalling Screen
3.8.4 Setting the LEC ATM Address
To give the BRIM-A6DP a base ATM address, perform the following
steps:
If the ILMI is enabled, the BRIM-A6DP ATM address is
NOTE
1. Use the arrow keys to highlight the LEC ATM Address field.
2. Enter the desired ATM address, ensure that a valid ATM address is
entered.
3. Use the arrow keys to highlight the SAVE command at the bottom of
the screen.
automatically configured.
4. Press ENTER. The changes are saved to memory.
BRIM-A6DP User’s Guide 3-21
Page 44

Chapter 3: Local Management
3.9 THE VLAN ASSIGNMENT SCREEN
To access the VLAN Assignment screen from the ATM Setup screen,
perform the following steps:
1. Use the arrow keys to highlight the VLAN Assignment field of the
ATM Setup screen.
2. Press ENTER. The Port/VLAN Assignment screen, Figure 3-7,
displays.
ESX-1320 Local Management Flash Image Version: XX.XX.XX
Port/VLAN Assignment
VLAN Name
1[ctron]
DELETE ADD ROUTER MAC
Port State
1
[Assigned]
2
[Assigned]
3
[Unassigned]
4
[Unassigned]
5
[Unassigned]
6
[Unassigned]
7
[Unassigned]
8
[Unassigned]
9
[Unassigned]
10
[Unassigned]
11
[Unassigned]
12
[Unassigned]
13
[Assigned] ELAN [ctron]
RETURNADD/MODIFY
Figure 3-7 The Port/VLAN Assignment Screen
3.9.1 Port/VLAN Assignment Screen Fields
The Port/VLAN Assignment screen is used to create Virtual LANs and to
assign front panel Ethernet ports to those VLANs.
The following list describes each of the Port/VLAN Assignment screen
fields:
VLAN Name
The VLAN Name field allo ws the user to toggle between created VLANs,
and to assign new VLAN names. Refer to Section 3.11.1 for details on
how to use this field.
3-22 BRIM-A6DP User’s Guide
Page 45

The VLAN Assignment Screen
Port
This field represents the port number of the front panel Ethernet port. The
last port number in this field represents the ELAN.
State
This field is used to designate which ports will be assigned to the VLAN
that is currently in the VLAN Name field. This field toggles between
[Assigned] and [Unassigned]. For more information on the guidelines
concerning the assignment of ports to VLANs, refer to Section 3.10.1.
ADD/MODIFY
This command saves all changes to memory.
DELETE
This command deletes the VLAN that is displayed in the VLAN Name
field.
ADD ROUTER MAC
This command opens the Add Router MA C screen. The Add Router MAC
screen is used to enter the MAC address of the router being used to
provide inter-ELAN communication. The Add Router MA C screen is also
used to enter the MAC addresses of end users that belong to more than
one VLAN/ELAN pair .
The MAC address of the router only needs to be added for
NOTE
RETURN
routers that use a single MAC address for all ELANs. If the
router uses a separate MAC address for each ELAN then the
Add Router MAC screen function is not necessary.
This command opens the previous Local Management Screen.
BRIM-A6DP User’s Guide 3-23
Page 46

Chapter 3: Local Management
3.10 VLAN OVERVIEW
Read this section thoroughly before configuring VLANs from
!
CAUTION
The following sections provide an o vervie w of the VLAN functionality of
the BRIM-A6DP and give step-by-step instructions on how to create and
configure VLANs.
When the BRIM-A6DP is first initialized, a LEC is automatically created
by the BRIM-A6DP. This LEC contacts the LAN Emulation
Configuration Server (LECS) so it can be assigned to an Emulated LAN
(ELAN). The BRIM-A6DP also automatically creates a default VLAN
upon first initialization, and assigns all front panel Ethernet interfaces to
this VLAN. Once the LAN Emulation Configuration Server has
determined which ELAN the LEC belongs to, the BRIM-A6DP
automatically maps the ELAN to the VLAN so that all front panel
Ethernet ports can communicate over the ATM network. Once the
BRIM-A6DP has performed these automatic functions, the user has the
choice to perform the following tasks:
the VLAN Assignment screen. If the guidelines and directions
outlined in the following sections are not complied with, poor
network performance will occur.
• Remove front panel Ethernet ports from the VLAN
• Create additional LECs, and assign front panel Ethernet ports to new
VLANs
• Create Ethernet-only (front panel, port-to-port) VLANs.
Once a VLAN is created, any traffic that is originated on that particular
VLAN will be confined to that VLAN even if the destination address of
the frame(s) is broadcast, multicast or unknown unicast.
3-24 BRIM-A6DP User’s Guide
Page 47

VLAN Overview
3.10.1 Configuration Guidelines
This section provides guidelines for the operation of VLANs over ATM.
If the following guidelines are not followed, poor network performance
may result.
Maximum of 16 ELAN/VLAN Pairs
The maximum number of LAN Emulation Clients (LECs) that can be
created using Local Management or the ATM Forum’s LEC MIB is 16.
No Support for Spanning Tree Algorithm
This version of BRIM-A6DP firmware does not support the Spanning
Tree Algorithm. Ensure that no parallel network links to the ATM network
exist, otherwise data loops will occur and bring the network down.
ELAN to VLAN Mappings
It is not possible to map more than one ELAN to a single VLAN. Several
VLANs, however, can be mapped to a single ELAN.
LEC and PVC Mixture
A mixture of Permanent Virtual Channels (PVCs) and LAN Emulation
Clients (LECs) is not allowed in this version of BRIM-A6DP firmw are. It
does allow, however, the mapping of Ethernet ports to LECs, or to other
Ethernet ports.
User Mobility
This version of BRIM-A6DP firmware allows the movement of Ethernet
users from one LEC to another, b ut a brief downtime will result. The ATM
Forum’s LAN Emulation 1.0 specification states that it may take up to
300 seconds for a LAN MAC address entry to be aged out of the old
LEC’s LE-ARP cache before it can communicate through a new LEC
instance.
Layer 3 Routing Requirement
Communication between ELANs requires the presence of an OSI Layer 3
routing protocol. Security may be achieved via access lists in the router.
Static Entry for Router MAC Address
If the router being used for inter-ELAN communication uses a single
MAC address for all LECs, this address must be entered in the Add
Router MAC screen. For information on how to complete this procedure
refer to Section 3.12.
BRIM-A6DP User’s Guide 3-25
Page 48

Chapter 3: Local Management
Static Entry for MAC Addresses of End Users with Multiple
ELAN/VLAN Mappings
The MAC Address for any end device which has multiple ELAN/VLAN
mappings must be entered in the Add Router MAC screen of every
BRIM-A6DP present on the network except for the BRIM-A6DP that is
installed in the host device to which the end user is directly connected.
For information on how to complete this procedure, refer to Section 3.12.
Shared Media is Not Supported
ELAN/VLAN mappings are not able to be maintained across shared
media such as Token Ring and FDDI.
Multiple VLAN Registration
If an Ethernet port is mapped to more than one VLAN, that Ethernet port
must not be connected to another Ethernet switch, repeater, bridge, or
router . Only end users are allo wed on an Ethernet port that is re gistered to
more than one VLAN. The MAC Address for any end device which has
multiple ELAN/VLAN mappings must be entered in the Add Router
MAC screen of every BRIM-A6DP present on the network except for the
BRIM-A6DP that is installed in the host device to which the end user is
directly connected. For information on how to complete this procedure,
refer to Section 3.12.
Deletion of LEC Instances
If a LEC is deleted by the user, all Ethernet ports that were mapped to that
LEC instance are no longer able to communicate with the ATM network.
The Ethernet ports must be reassigned to another VLAN which contains
another LEC instance to reestablish communication with the ATM
network.
3-26 BRIM-A6DP User’s Guide
Page 49

Creating VLANs
3.11 CREATING VLANs
Local Management allows the creation of two types of VLANs. The two
types are ATM LEC VLANs and Ethernet-only VLANs. Each type of
VLAN has special requirements that must be followed when configuring
them. The following sections describe the requirements for each type of
VLAN.
3.11.1 ATM LEC VLANs
When the BRIM-A6DP is first initialized, a single LEC is automatically
created. This LEC contacts the LAN Emulation Configuration Server
(LECS) and joins an ELAN. The BRIM-A6DP then creates a VLAN that
all Ethernet ports join. This VLAN is then mapped to the ELAN that the
LEC has joined. Before creating additional VLAN to ELAN mappings
ensure the following network requirements are met:
• A set of LAN Emulation Services (LAN Emulation Server and
Broadcast and Unknown Server) are present for each ELAN.
• After creating the necessary LECs from the LEC Administration
screen (Section 3.6) verify that the LECs are connected to the LES and
BUS by viewing the ELAN Properties screen (Section 3.7).
To create additional VLAN to ELAN mappings, perform the following
steps:
1. Use the arrow keys to highlight the VLAN Name field on the
Port/VLAN Assignment screen. By default, there are 16 unnamed
VLANs identified as novlan.
To create additional VLANs, use the arro w k eys to highlight the
NOTE
VLAN Name field and press the SPACE bar until the next
default VLAN named “novlan” displa ys . If a new VLAN name is
entered where an assigned VLAN name already exists, the
new VLAN name will overwrite the existing VLAN.
2. Press ENTER. Enter the name of the VLAN, using no more than 16
characters, and press ENTER again.
BRIM-A6DP User’s Guide 3-27
Page 50

Chapter 3: Local Management
3. Using the arrow keys, highlight the port(s) that will be assigned to the
VLAN that is currently displayed in the VLAN Name field. With the
port highlighted, use the SPACE bar to toggle between [Assigned] and
[Unassigned] until the desired mode displays.
4. The last port listed in the Port/VLAN Assignment screen displays any
ELANs which have been configured on the BRIM-A6DP. Use the
arrow keys to highlight the ELAN field near the bottom of the screen.
5. Press the SPACE bar to view the configured ELANs. When the name
of the desired ELAN displays, it can be assigned or unassigned to this
VLAN by using the arrow keys to highlight the State field and
pressing the SPACE bar until the desired mode displays.
A VLAN can ne v er hav e more than one ELAN assigned to itself.
NOTE
Communications between ELANs is only possible through a
Layer 3 routing device.
6. When all the desired ports have been assigned to the VLAN, use the
arrow keys to highlight the ADD/MODIFY command at the bottom
of the screen and press ENTER. The changes are saved to memory.
If more than one ELAN has been configured, and
NOTE
communication between the ELANs is necessary, a Layer 3
routing device is required. If the router uses a single MAC
address for all LECs, this address must be entered manually
via the Add Router MAC screen. Refer to Section 3.12 for
instructions on how to perform this procedure.
3-28 BRIM-A6DP User’s Guide
Page 51

Creating VLANs
3.11.2 Ethernet-onl y VLANs
An Ethernet-only VLAN is a group of Ethernet ports which are able to
communicate with each other without having to traverse the ATM
network. Ethernet-only VLANs can be used to create user groups local to
an Ethernet switch. To create an Ethernet-only VLAN, perform the
following steps:
1. Use the arrow keys to highlight VLAN Name field on the Port/VLAN
Assignment screen. By default there are 16 unnamed VLANs
identified as novlan.
To create additional VLANs, use the arro w k eys to highlight the
NOTE
VLAN Name field and press the SPACE bar until the next
default VLAN named “novlan” displa ys . If a new VLAN name is
entered where an assigned VLAN name already exists, the
new VLAN name will overwrite the existing VLAN.
2. Press ENTER. Enter the name of the VLAN, using no more than 16
characters, and press ENTER again.
3. Using the arrow keys, highlight the port(s) that will be assigned to the
VLAN that is currently displayed in the VLAN Name field. With the
port highlighted, use the SPACE bar to toggle between [Assigned] and
[Unassigned] until the desired mode displays.
4. Use the arrow keys to highlight the ELAN field near the bottom of the
screen. Press the SPACE bar until [none] displays. An Ethernet-only
VLAN cannot have any ELANs assigned to it.
5. When all the desired ports have been assigned to the VLAN, use the
arrow keys to highlight the ADD/MODIFY command at the bottom
of the screen and press ENTER. The changes are saved to memory.
BRIM-A6DP User’s Guide 3-29
Page 52

Chapter 3: Local Management
3.12 THE ROUTER MAC ADDRESS SCREEN
To open the Router MAC Address screen from the Port/VLAN
Assignment screen, perform the following steps:
1. Use the arrow keys to highlight the ADD ROUTER MAC command
at the bottom of the screen.
2. Press ENTER. The Router MAC Address screen, Figure 3-8, displays.
Router MAC Address Screen
TOTAL ENTRIES - 1
Add/Delete: [00-00-00-00-00-00]
ADD DELETE NEXT
Figure 3-8 The Router MAC Address Screen
STATIC MAC ENTRIES
00-00-1D-1D-62-39
RETURN
3.12.1 Router MAC Address Screen Fields
The Router MAC Address Screen is used to statically program the MAC
Address of the router being used to route between ELANs or the MAC
address of an end device which is mapped to more than one
ELAN/VLAN.
The
The MAC address of the router need only be entered if the
NOTE
3-30 BRIM-A6DP User’s Guide
router uses the same MAC address for all LECs.
Page 53

The Router MAC Address Screen
Ensure that the following rules are complied with if the MAC
!
CAUTION
Total Entries
address being entered is for an end device that has multiple
ELAN/VLAN mappings:
• The MAC address that has more than one ELAN/VLAN
mapping MUST be an end user. ONLY end users may be
mapped to more than one ELAN/VLAN pair.
• The MAC address of the end user MUST be entered into the
Add Router MAC screen of EVER Y BRIM-A6DP present on
the network, EXCEPT the BRIM-A6DP that is installed in
the host device to which this end user is connected.
This field displays the total number of entries which have been saved to
memory.
Static MAC Entries
This field displays the MAC Addresses that have been saved to memory.
Up to six MAC addresses may be viewed on one screen.
Add/Delete
This command allows the user to save a MAC address to memory. The
MAC address must be entered using a dash (-) between every two
characters (i.e., 00-00-1D-12-34-56).
ADD
This command adds the entry that is currently in the Add/Delete field.
DELETE
This command deletes the entry that is currently in the Add/Delete field.
NEXT
This command displays the next six MAC addresses of the STATIC
MAC ENTRIES field. To use this command, use the arrow keys to
highlight the NEXT command and press ENTER. The next series of
MAC addresses displays.
BRIM-A6DP User’s Guide 3-31
Page 54

Chapter 3: Local Management
PREV
This command displays the previous six MAC addresses of the STATIC
MAC ENTRIES field. To use this command, use the arrow keys to
highlight the PREV command and press ENTER. The previous series of
MAC addresses displays.
RETURN
This command opens the previous Local management screen.
3.12.2 Adding MAC Entries
To add a MAC address, perform the following steps:
1. Use the arrow keys to highlight the Add/Delete field.
2. Enter the MAC Address. The MAC address must be entered using a
dash (-) between every two characters (i.e., 00-00-1D-12-34-56).
3. Use the arrow keys to highlight the ADD command at the bottom of
the screen.
4. Press ENTER. The changes are saved to memory.
3.12.3 Deleting MAC Entries
To delete a MAC address, perform the following steps:
1. Use the arrow keys to highlight the Add/Delete field.
2. Enter the MAC Address that will be deleted. The MAC address must
be entered using a dash (-) between every two characters
(i.e., 00-00-1D-12-34-56).
3. Use the arrow keys top highlight the DELETE command at the
bottom of the screen.
4. Press ENTER. The MAC Address is deleted.
3-32 BRIM-A6DP User’s Guide
Page 55

CHAPTER 4
LANVIEW LEDs
This chapter describes how to use the LANVIEW LEDs to monitor BRIM
status and diagnose BRIM problems.
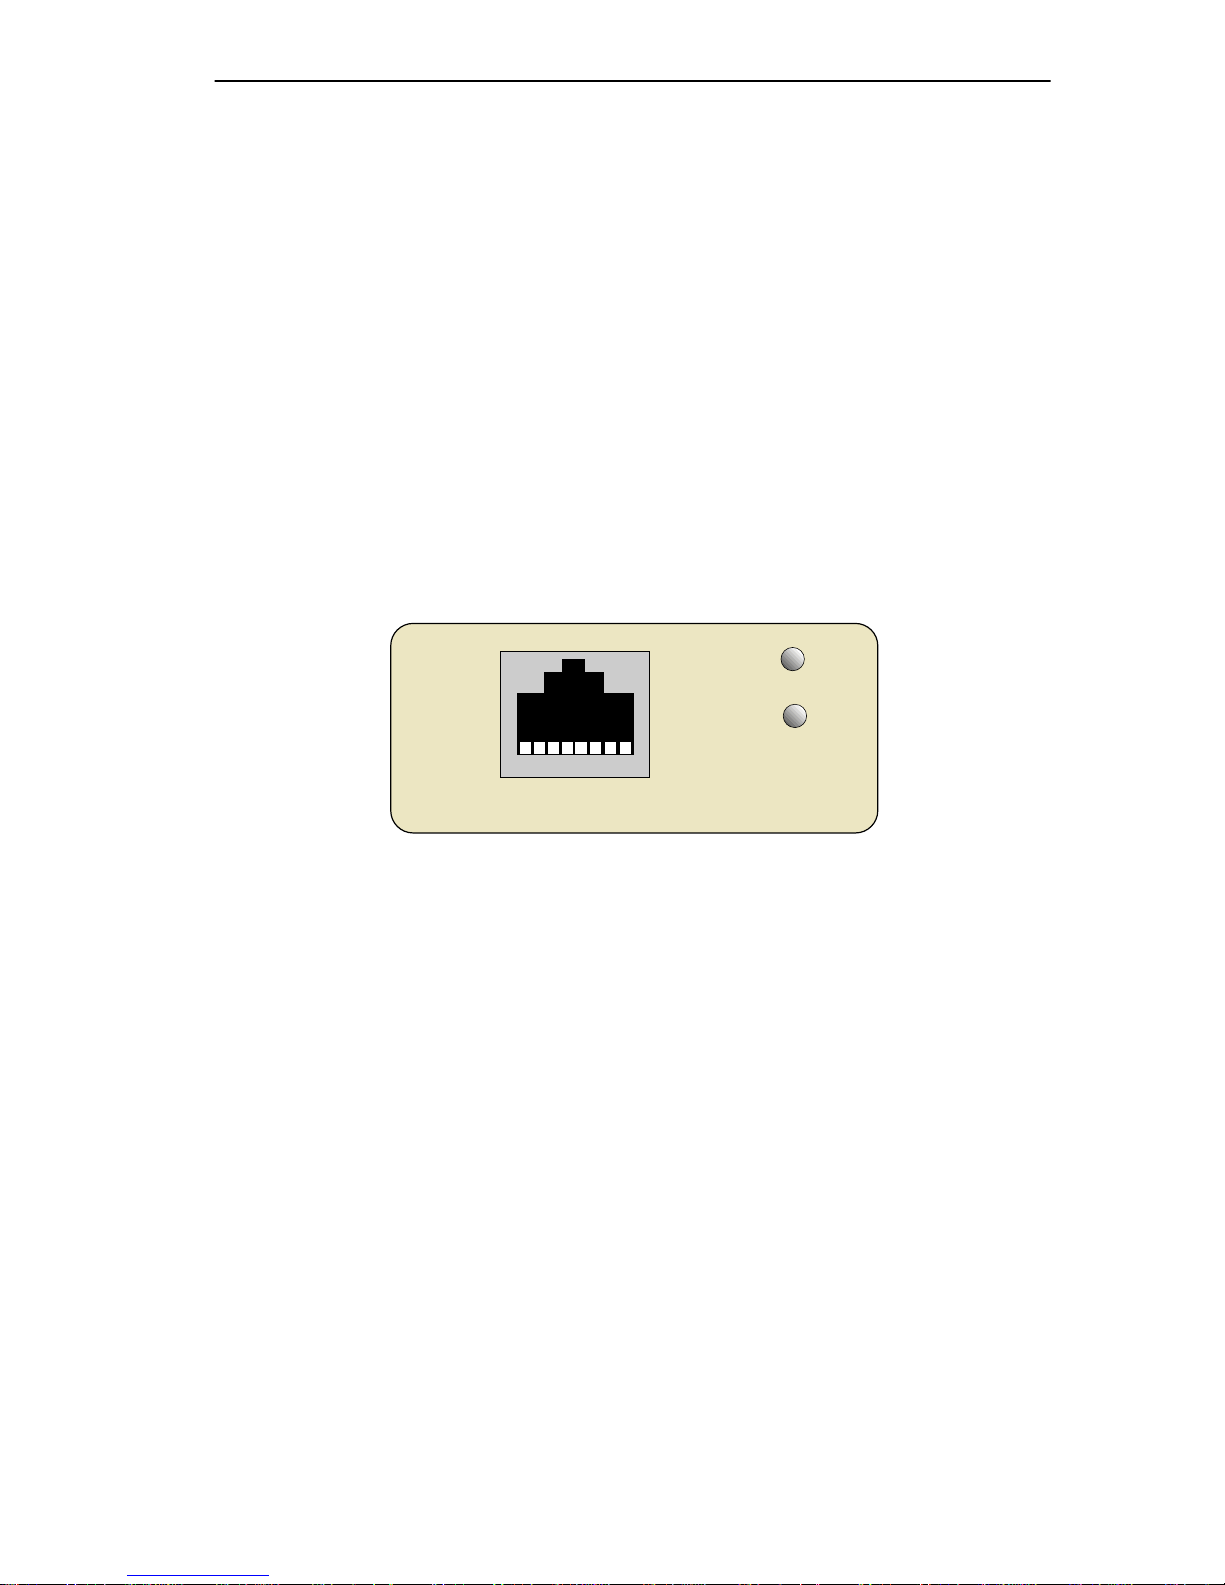
4.1 BRIM-A6DP LEDs
R
Figure 4-1 The BRIM-A6DP
Table 4-1 explains each of the BRIM LEDs.
Table 4-1 BRIM LEDs
LED Definition
STS
(Status)
PWR
(Power)
XMT
(Transmit)
RCV
(Receive)
Green - Board OK.
Red - Board Error.
Yellow - Standby.
Green (on) - Power is on.
Off - No power.
Green - Cells being transmitted.
Yellow - Cells being received.
BRIM-A6DP User’s Guide 4-1
Page 56

Chapter 4: LANVIEW LEDs
4.2 APIM LEDs
Table 4-2 describes each of the APIM LEDs.
Table 4-2 APIM LEDs
LED Definition
LNK
(Link)
STS
(Status)
Green - Have link.
Off - No link.
Green - APIM OK.
Red - Fault with media. In most
cases, the APIM automatically
corrects this condition without
interrupting operations. If the LED is
red and remains red, contact
Cabletron Systems Technical
Support.
4-2 BRIM-A6DP User’s Guide
Page 57

APPENDIX A
APIM SPECIFICATIONS
This Appendix describes the ATM Port Interface Modules (APIMs).
A.1 APIM-11 SPECIFICATIONS
Transmit Power: -14db to -18.5db
Receive Sensitivity: -14db to -32.5db
Loss Budget: -14db to -18.5db
Wavelength: 1270nm to 1380nm
Typical Link Distance: 2 km
Figure A-1 The APIM-11
R
BRIM-A6DP User’s Guide A-1
Page 58

Appendix A: APIM Specifications
A.2 APIM-21 SPECIFICATIONS
Transmit Power: -14db to -18.5db
Receive Sensitivity: -14db to -32.5db
Loss Budget: -14db to -18.5db
Wavelength: 1270nm to 1380nm
Typical Link Distance: 2 km
R
Figure A-2 The APIM-21
A-2 BRIM-A6DP User’s Guide
Page 59

APIM-29 Specifications
A.3 APIM-29 SPECIFICATIONS
Transmit Power: -8db to -14db
Receive Sensitivity: -6db to -32.5db
Loss Budget: -8db to -24.5db
Wavelength: 1261nm to 1360nm
Typical Link Distance: 25 km
R
Figure A-3 The APIM-29
BRIM-A6DP User’s Guide A-3
Page 60

Appendix A: APIM Specifications
A.4 APIM-29LR SPECIFICATIONS
Transmit Power: 0db to -5db
Receive Sensitivity: -31db
Loss Budget: -26db to -31db
Wavelength: 1280nm to 1335nm
Typical Link Distance: 60 km
LR
Figure A-4 The APIM-29
A-4 BRIM-A6DP User’s Guide
Page 61
APIM-22 Specifications
A.5 APIM-22 SPECIFICATIONS
Physical Interface: STS3
Media Type: Category 5 Unshielded Twisted
Pair
Data Rate: 155 Mbps
Connector Type: RJ45
Typical Link Distance: 100 Meters
The APIM-22R is considered an ATM User Device and therefore has a
different signal pin assignment than the ATM Network Equipment as
specified by the ATM Forum User-Netw ork Interface (UNI) specification.
Figure A-5 shows the pin assignments for the APIM-22R.
STS
LNK
1 2 3 4 5 6 7 8
APIM-22R
1. Transmit +
2. Transmit -
3. N/A
4. N/A
Figure A-5 APIM-22 Pin Assignments
5. N/A
6. N/A
7. Receive +
8. Receive -
142912
BRIM-A6DP User’s Guide A-5
Page 62

Appendix A: APIM Specifications
A.6 APIM-67 SPECIFICATIONS
Physical Interface: DS3
Media Type: 75 Ohm Coaxial Cable
Data Rate: 45 Mbps
Connector Type: BNC
Typical Link Distance: 136 Meters
The APIM-67R does not use Cell Payload Scrambling.
!
CAUTION
The APIM-67 conforms to the electrical characteristics specified by
ANSI T1.404-1989 Carrier-to-Customer Installation-DS3 Metallic
Interface Specification, section 5.12 Grounding Arrangements. In
accordance with this specification, each channel (Transmit and
Receive) must be grounded at one end.
Scrambling must be disabled on any DS3 device connected to
the APIM-67R.
Cabletron Systems ships the APIM-67R with the following default
jumper settings:
• Receive channel jumper - grounded
• Transmit channel jumper - not grounded
Figure A-6 shows the location and default setting of each jumper.
Refer to Figure A-6 if you need to change the jumper settings to
properly connect the APIM-67R to another DS3 device.
A-6 BRIM-A6DP User’s Guide
Page 63

APIM-67 Specifications
RECEIVE CHANNEL JUMPER (GROUNDED)
TRANSMIT CHANNEL JUMPER (NOT GROUNDED)
Figure A-6 APIM-67R Default Jumper Settings
142910
Figure A-7 The APIM-67
R
BRIM-A6DP User’s Guide A-7
Page 64

Appendix A: APIM Specifications
A-8 BRIM-A6DP User’s Guide
Page 65

APPENDIX B
BRIM-A6DP SPECIFICATIONS
B.1 BRIM-A6DP SPECIFICATIONS
This section describes environment specifications and safety requirements
for the BRIM-A6DP. Cabletron Systems reserves the right to change
these specifications at any time without notice.
Environment
Operating Temperature: 5°C to 40°C (41°F to 104°F)
Storage Temperature: -30°C to 90°C (-22°F to 194°F)
Operating Relative Humidity: 5% to 90% (non-condensing)
Regulatory Compliance
Safety: UL 1950, CSA C22.2 No. 950, EN 60950,
73/23/EEC, and IEC 950
Electromagnetic
Compatibility (EMC): FCC Part 15,VCCI V-3/93.01, CSA C108.8,
EN 50082-1, 89/336/EEC, and EN 55022
BRIM-A6DP User’s Guide B-1
Page 66

Appendix B: BRIM-A6DP Specifications
B-2 BRIM-A6DP User’s Guide
 Loading...