

URZ4024A - LED TV 24”
URZ4032 - LED TV 32”
Bedienungsanleitung
User's manual
Instrukcja obsługi
Manual de utilizare
DE
EN
PL
RO

Bedienungsanleitung
ACHTUNG: UM DAS RISIKO VON
BRANDVERLETZUNGEN UND
STROMSCHLÄGEN ZU VERRINGERN
ENTFERNEN SIE NICHT DIE
ABDECKUNG (ODER RÜCKSEITE)
DES GERÄTS. ÜBERLASSEN
SIE ALLE WARTUNGSARBEITEN
QUALIFIZIERTEM SERVICEPERSONAL.
Das dreieckige Blitzsymbol mit
Pfeilkopf weist den Benutzer
auf das Vorhandensein von
nicht isolierter „gefährlicher
Spannung“ im Inneren des
Gerätes hin, die ausreichen kann,
um die Gefahr eines elektrischen
Schlags darzustellen.
Das dreieckige Symbol mit
dem Ausrufezeichen weist
den Benutzer auf wichtige
Bedienungs- und Wartungs(Reparatur-) hinweise hin, die
in dieser Bedienungsanleitung
enthalten sind.
WICHTIGE SICHERHEITSANWEISUNGEN
1) Lesen Sie diese Bedienungsanleitung.
2) Bewahren Sie die Bedienungsanleitung
auf für späteres nachschlagen.
3) Beachten Sie alle Warnungen.
4) Befolgen Sie alle Anweisungen.
5) Verwenden Sie das Gerät nicht in der
Nähe von Wasser.
6) Nur mit einem trockenem Tuch reinigen.
7) Lüftungsöffnungen dürfen nicht blockiert werden, installieren Sie in Übereinstimmung mit den Anweisungen.
8) Nicht in der Nähe von Wärmequellen,
wie Heizkörper, Wärmespeicher, Öfen
oder anderen Geräten (einschließlich Ver-
stärkern), die Wärme erzeugen, installieren.
9) Umgehen Sie nicht die Sicherheitsfunktion des polarisierten Steckers . Wenn der
Stecker nicht in Ihre Steckdose passt,
beauftragen Sie einen Elektriker um die
Steckdose auszutauschen.
10) Schützen Sie das Netzkabel, damit
niemand darauf tretet, einklemmt, insbesondere an Steckern, Steckdosen, und
dem Punkt, wo es aus dem Gerät heraustritt.
11) Verwenden Sie nur vom Hersteller
empfohlene Zusatzgeräte / Zubehör.
12) Trennen Sie das Gerät vom Stromnetz
bei Gewitter oder wenn es für einen längeren Zeitraum nicht benutzt wird.
13) Lassen Sie alle Wartungsarbeiten
qualiziertem Servicepersonal. Eine Wartung ist erforderlich , wenn das Gerät in
irgendeiner Weise beschädigt wurde,
beispielsweise Netzkabel oder Stecker
beschädigt wurde, Flüssigkeiten oder Gegenstände in das Gerät gefallen sind, das
Gerät Regen oder Feuchtigkeit ausgesetzt war, nicht normal funktioniert, oder
fallen gelassen wurde.
14) Da der Netzstecker als Trennvorrichtung verwendet wird, muss die Trennvorrichtung frei zugänglich bleiben.
15) Die Belüftung darf nicht behindert
werden, indem die Lüftungsöffnungen mit
Gegenständen wie Zeitungen, Tischdecken, Vorhängen usw. bedeckt werden.
16), Keine offenen Flammen, wie brennende Kerzen, dürfen auf das Gerät
gestellt werden.
17) Es sollte auf die Umweltaspekte bei
der Batterieentsorgung geachtet werden.
18) Die Verwendung von Geräten in
gemäßigtem Klima .
19) Das Gerät darf nicht Tropf- oder
Spritzwasser ausgesetzt werden und
keine mit Flüssigkeiten gefüllten Gegenstände, wie Vasen, dürfen auf das Gerät
gestellt werden.
DE
3
Bedienungsanleitung
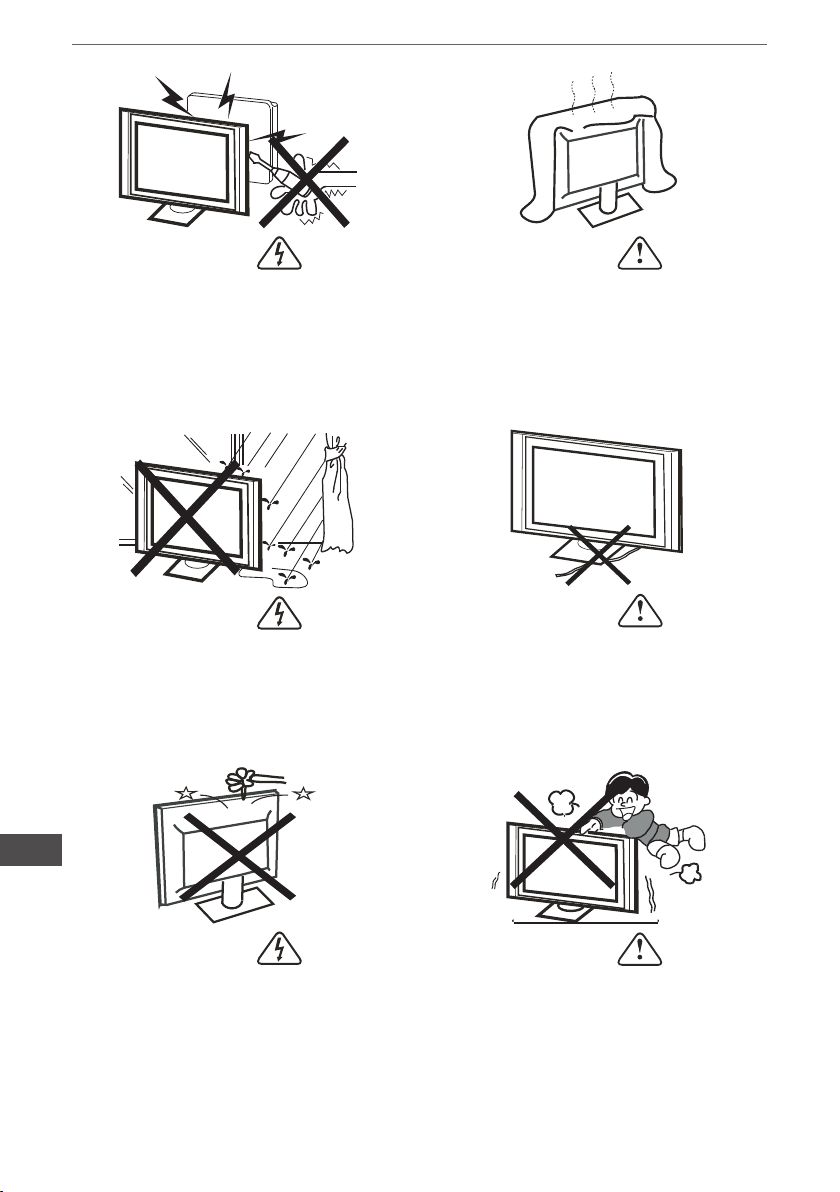
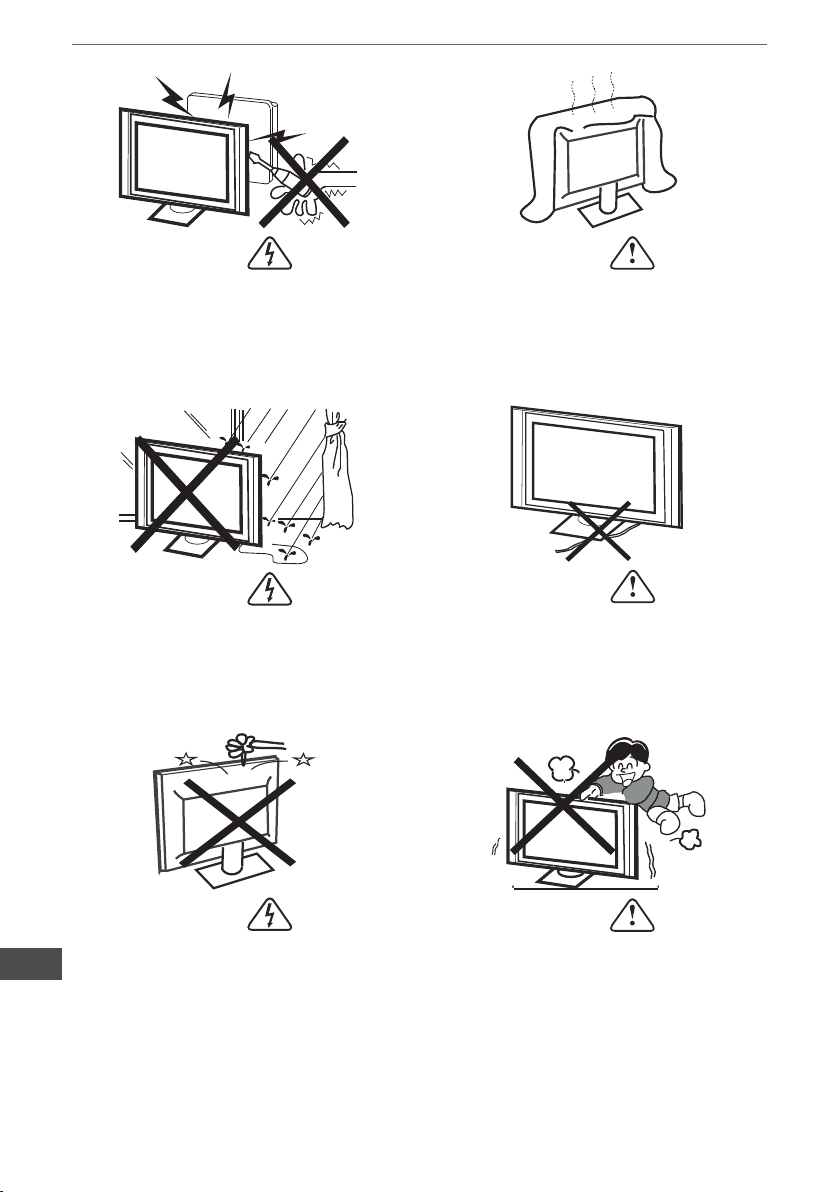
Warnung
Hochspannung wird im Betrieb dieses
Fernsehgerätes verwendet. Rückwärtige
Abdeckung nicht vom Gerät entfernen.
Überlassen Sie die Wartung qualiziertem
Servicepersonal.
Warnung
Zum vermeiden von Feuer oder der Gefahr eines Elektroschocks, darf das Gerät
nicht Regen oder Feuchtigkeit ausgesetzt
werden.
Achtung
Blockieren Sie nicht die Lüftungsöffnungen in der Rückwand. Ausreichende
Belüftung ist wichtig, um den Ausfall der
elektrischen Komponenten zu vermeiden.
Achtung
Das Stromkabel nicht unter dem Fernsehgerät einklemmen.
DE
Warnung
Keine Objekte in die Schlitze oder Öffnungen des Fernsehgerätes stecken oder
fallen lassen. Schütten Sie niemals irgendeine Art von Flüssigkeit auf das Fernsehgerät .
4
Achtung
Nie auf den Fernsehgerät oder den Ständer stehen, anlehnen, oder plötzlich
drücken. Sie sollten ein besonderes Augenmerk auf Kinder haben. Schwere Verletzungen können die Folge beim herunterfallen sein.
Bedienungsanleitung
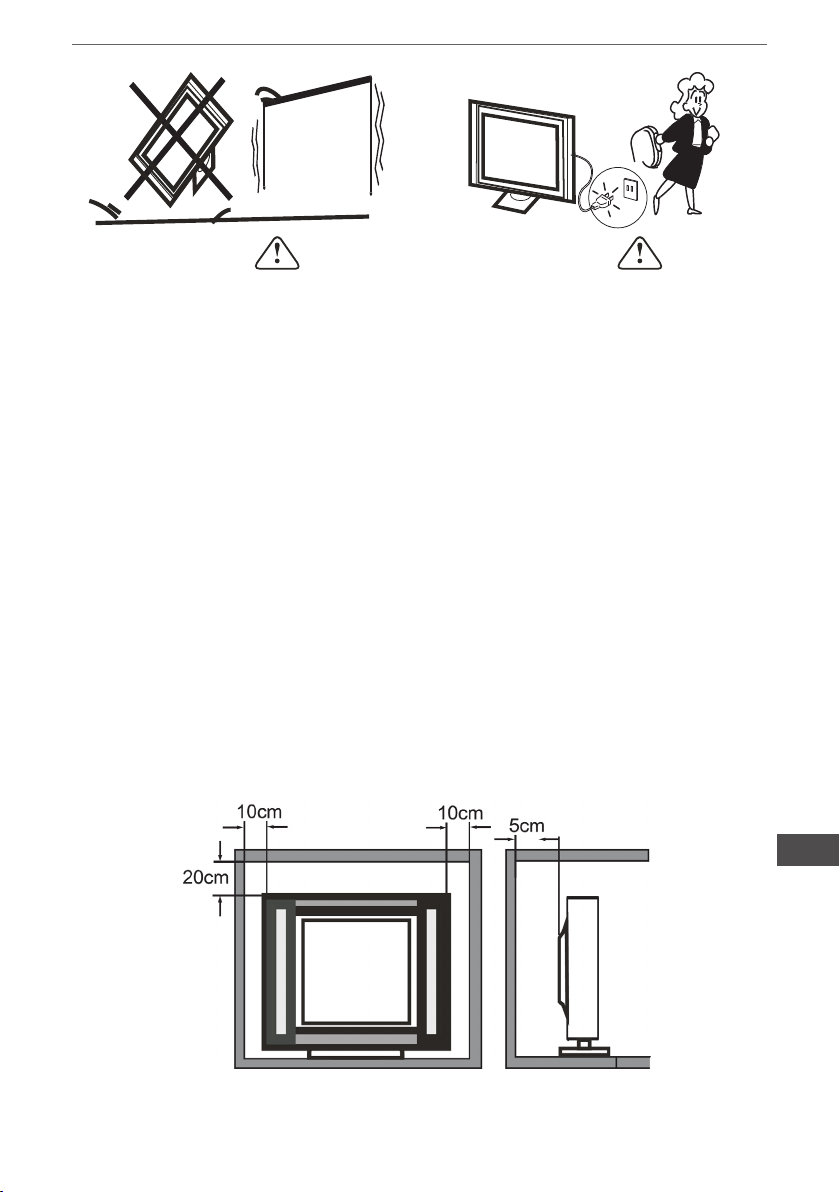
Achtung
Stellen Sie Ihr Fernsehgerät nicht auf einen instabilen Wagen, Stand, Regal oder
Tisch. Schwere Schäden an Personen
sowie am Fernsehgerät sind die Folge
beim herunterfallen.
Wenn das Fernsehgerät für eine längere
Zeit nicht benutzt wird, ist es Empfehlenswert das Netzkabel von der Steckdose zu trennen.
Achtung
INSTALLATION
* Stellen Sie das TV Gerät im Zimmer an einem Ort auf, wo das Licht nicht auf den
Bildschirm fällt.
* Totale Dunkelheit oder eine Reexion auf dem Bildschirm kann eine Belastung der
Augen verursachen. Weiche und indirekte Beleuchtung ist für angenehmes Fernsehen
zu empfehlen.
* Lassen Sie genügend Abstand zwischen TV Gerät und der Wand um ausreichende
Belüftung zu gewährleisten.
* Vermeiden Sie übermäßig warme Orte um Schäden am Gehäuse und frühzeitiges
Ausfallen der Komponenten zu vermeiden.
* Bedecken Sie nicht die Lüftungsöffnungen wenn Sie das TV-Gerät benutzen.
Minimale Abstände
DE
5
Bedienungsanleitung
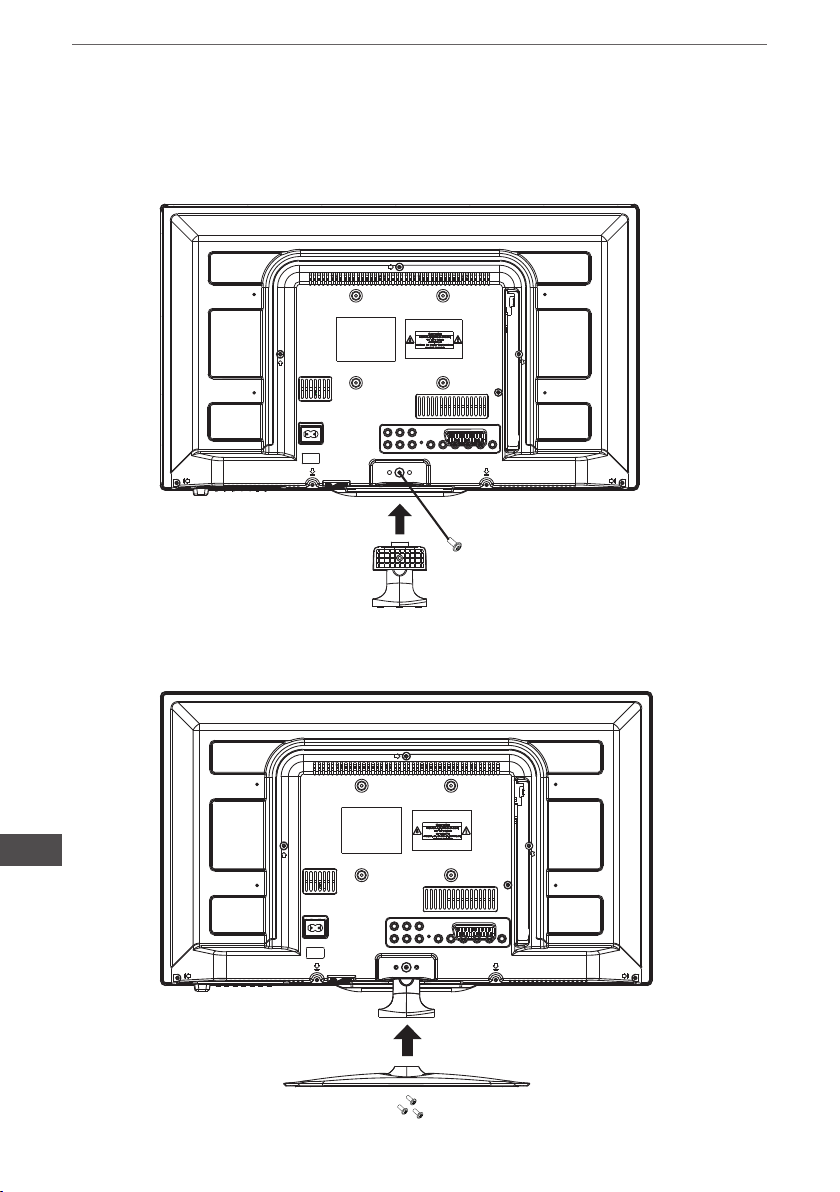
Basisständer Montageanleitung (URZ4024A)
1. Legen Sie das Fernsehgerät mit dem Bildschirm nach unten auf eine ache Oberäche. Bildschirm mit einem Tuch schützen. Suchen Sie den Boden des Ständers.
2. Befestigen Sie den Boden auf dem Ständer durch festes anziehen der Schraube.
DE
6
Bedienungsanleitung
Basisständer Montageanleitung (URZ4032)
1. Legen Sie das Fernsehgerät mit dem Bildschirm nach unten auf eine ache Oberäche. Bildschirm mit einem Tuch schützen. Suchen Sie den Boden des Ständers.
2. Befestigen Sie den Boden auf dem Ständer durch festes anziehen der Schraube.
DE
7
Frontplatte
Bedienungsanleitung
2
3
30 30
ASPECT
SLEEP
USB
VGA YPbPr TV
CH.LIST
S.M
VOL CH
P.M
DISPLAY
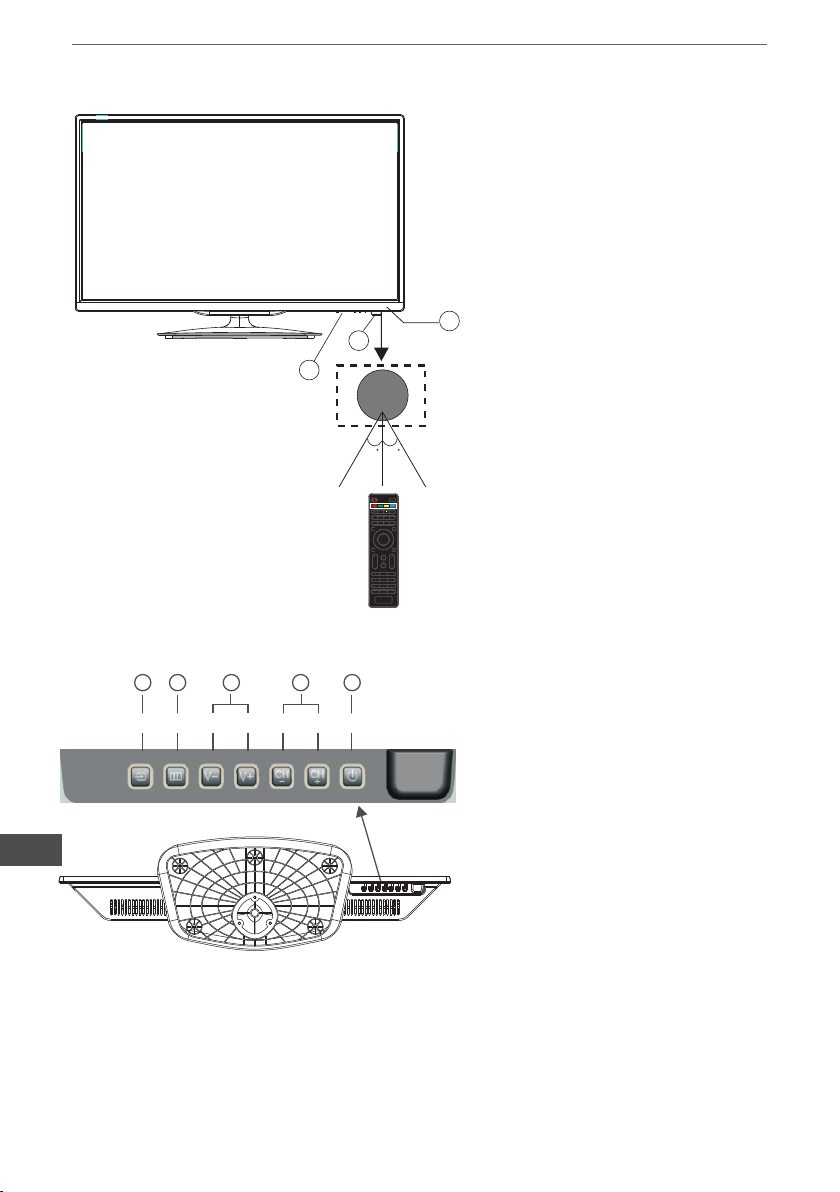
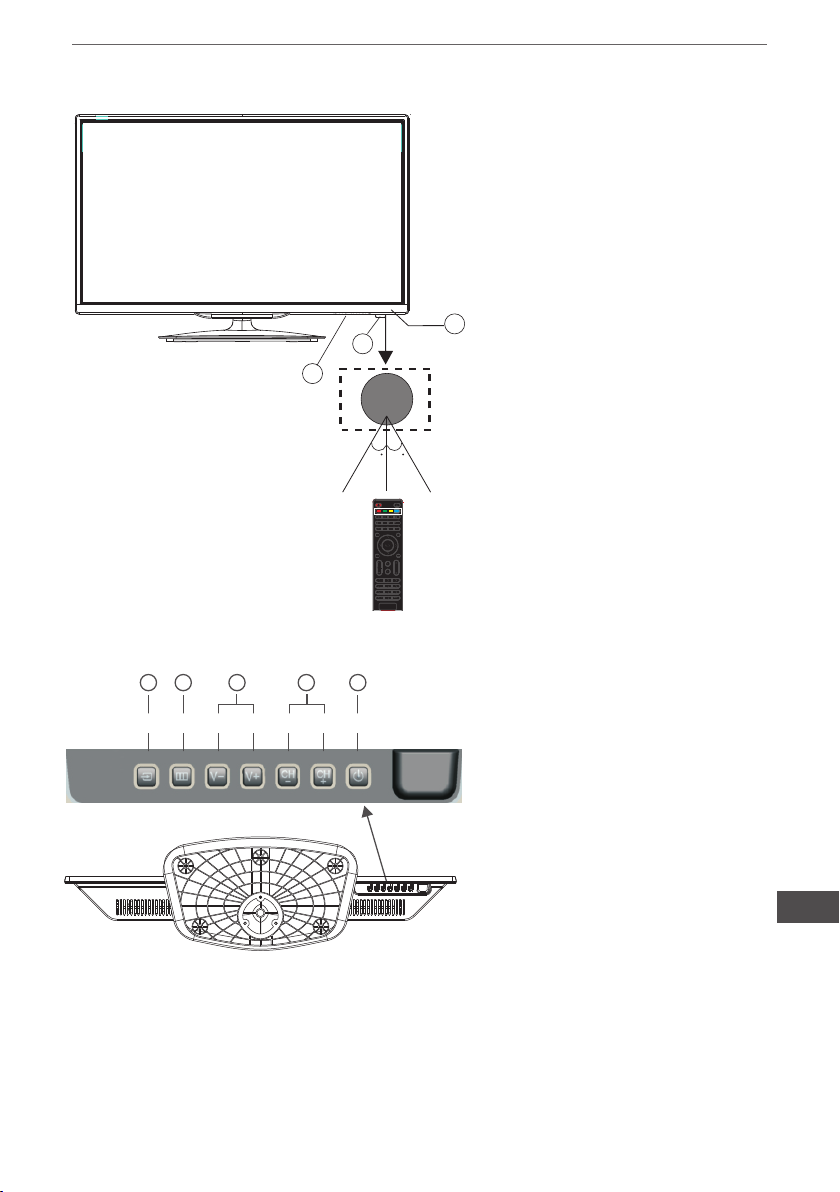
1: Fernbedienungssensor
2: LED Anzeige
• Blau - Eingeschaltet
• Rot - standby
3: Seitliche Tasten
1
DE
8
Tastatur
1 2 3 4 5
SOURCE MENU V- V+ CH- CH+ Standby
1. QUELLE
Anzeige des Eingangsquellenmenüs.
Im Menümodus, drucken Sie die
Taste “QUELLE” zum bestätigen der
Auswahl.
2. MENÜ
Anzeige des HAUPTMENÜS.
3. CH+/CH-
Im TV Modus, drücken Sie “CH-” oder
“CH+” zur Auswahl des Kanals aufwärts und abwärts. Im MENÜ Modus,
drücken Sie “CH-” oder “CH+” zur
Auswahl der Einstellungen.
4. VOL+/VOL
Regeln der Lautstärke.
MENÜ Modus, drücken Sie “VOL+”
oder “VOL-“ zum Einstellen des ausgewählten Menüpunktes.
5. STANDBY
Drucken dieser Taste zum Einzuschalten des Gerätes aus dem Bereitschaftsmodus. Erneutes drucken
versetzt das Gerät wieder in den Bereitschaftsmodus.
Bedienungsanleitung
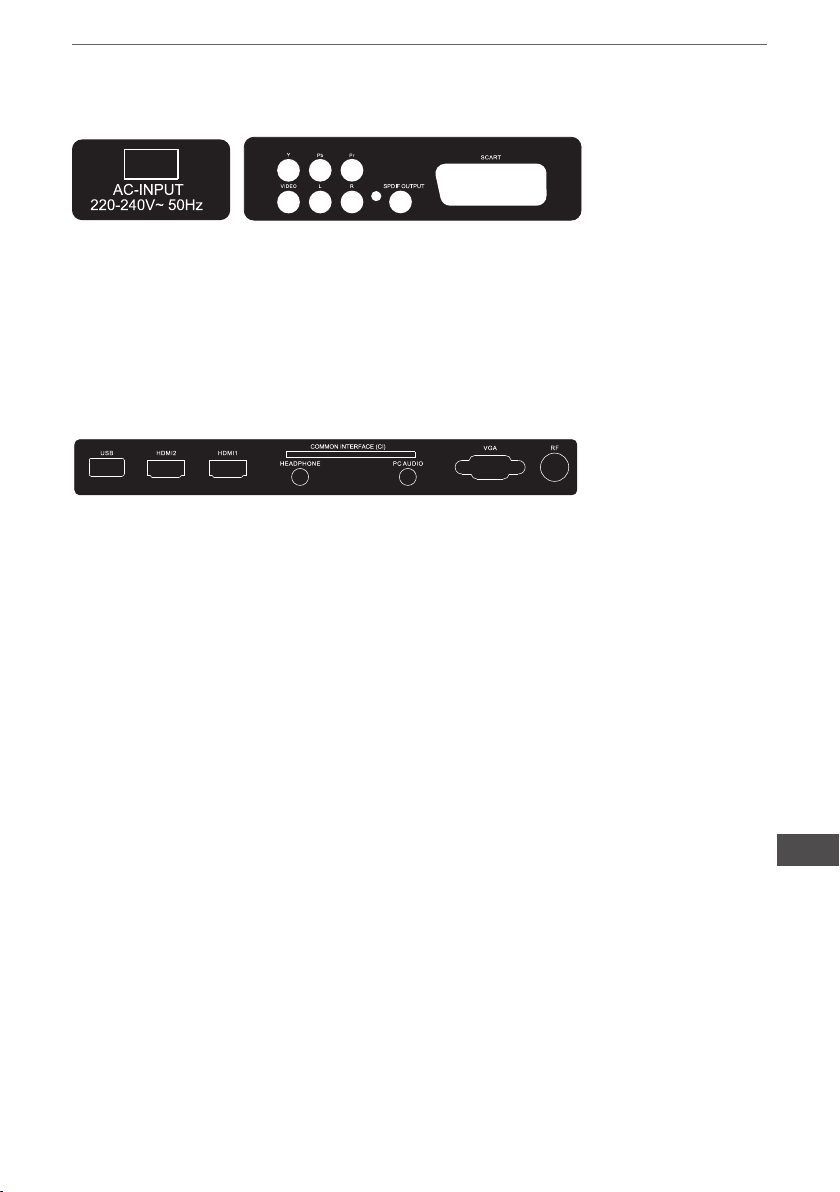
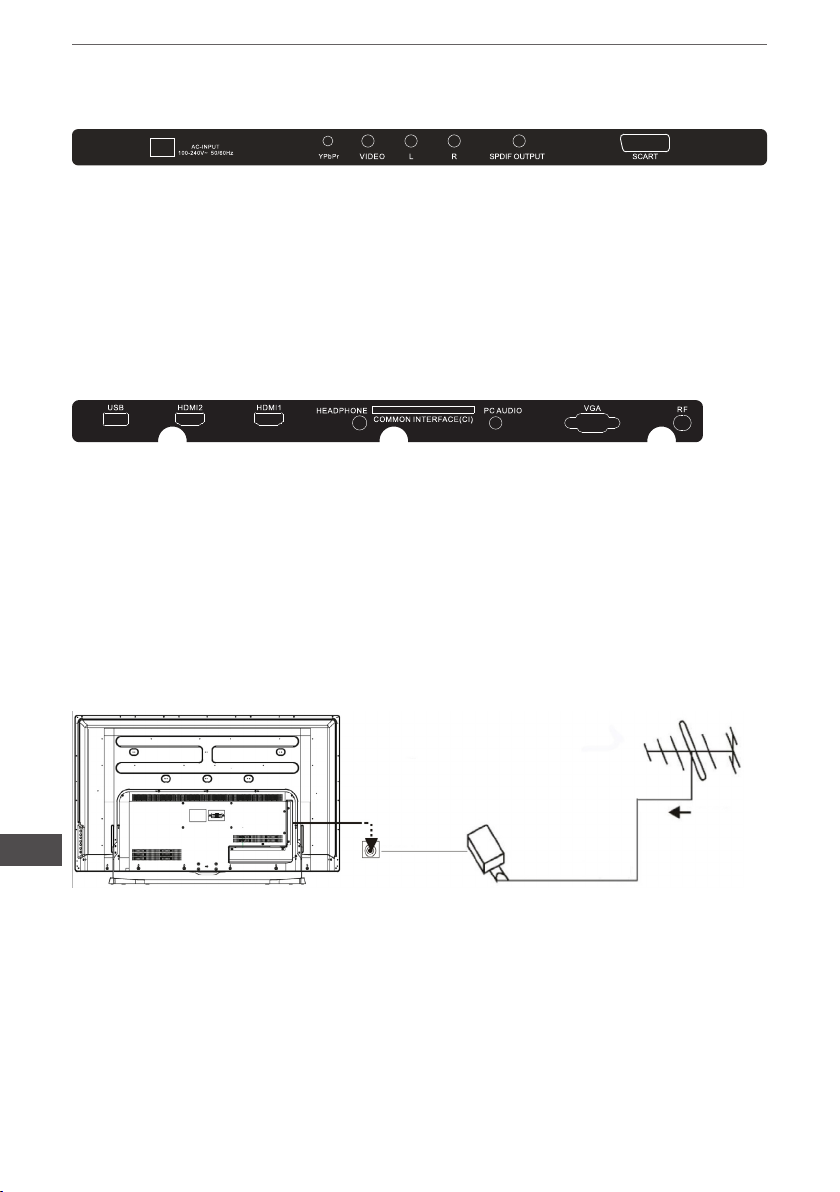
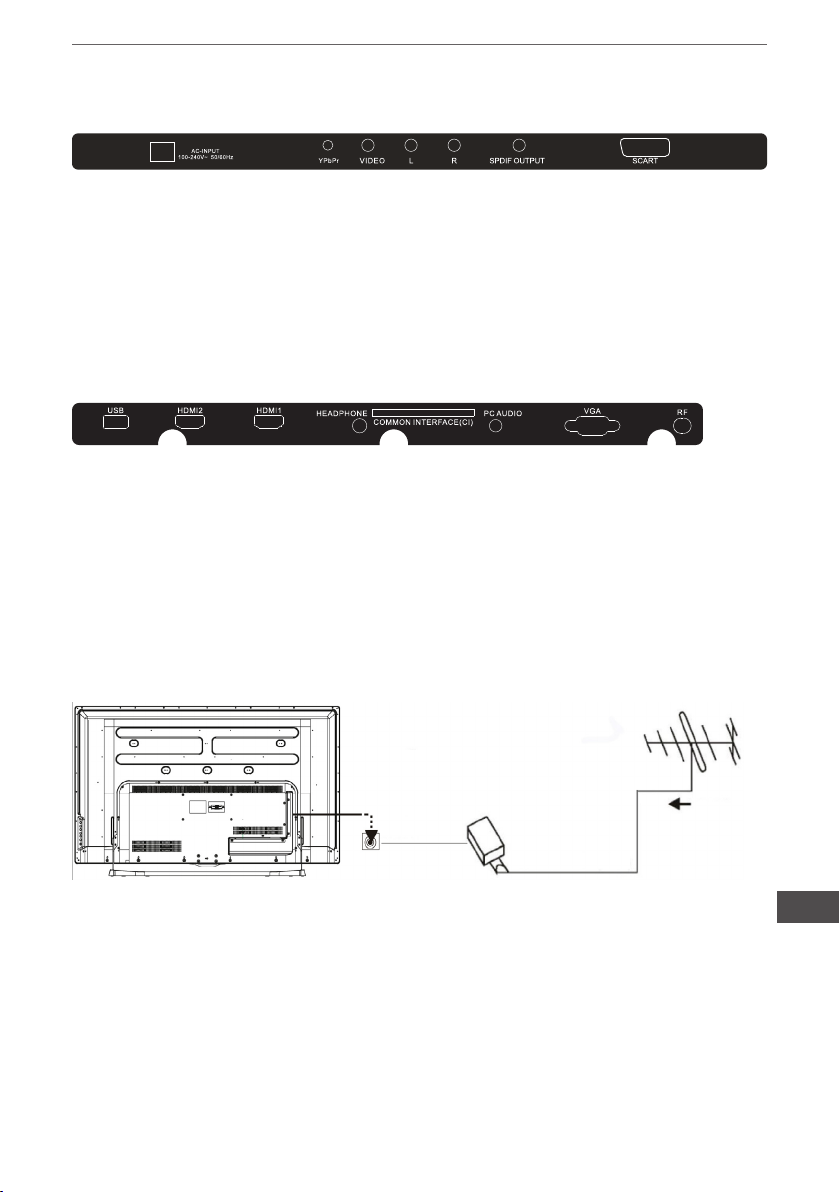
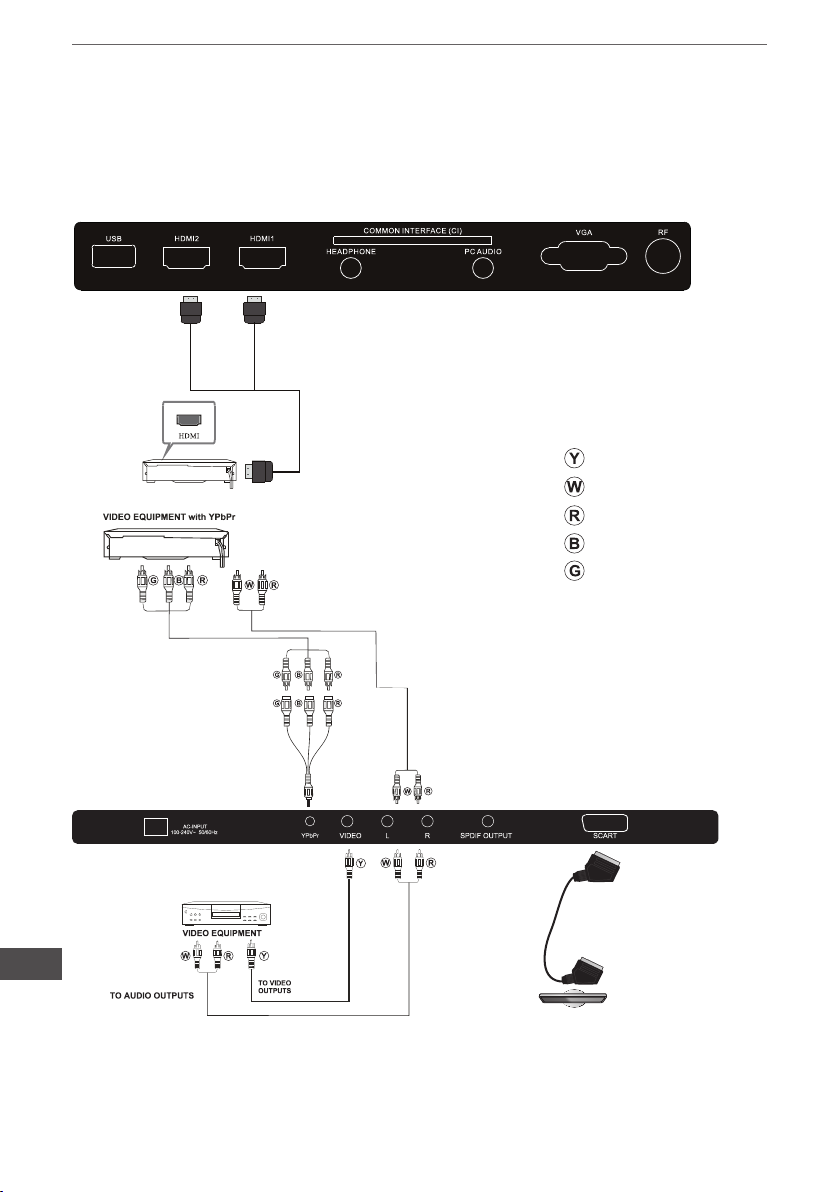
Rückwärtige AV Anschlüsse (URZ4024A)
Anschlüsse von links nach rechts: AC Netzstecker, YPbPr Eingang, VIDEO, AUDIO Eingang, SPDIF Ausgang, SCART.
Seitwärts AV Anschlüsse (URZ4024A)
Anschlüsse von links nach rechts: USB, HDMI2, HDMI1, Kopfhörer, CI, PC Audio, VGA,
RF.
Hinweis: Stecken Sie die Kopfhörerbuchse in den Anschluss KOPFHÖRER am
Gerät, die Lautsprecher werden stumm- geschaltet.
DE
9
Bedienungsanleitung
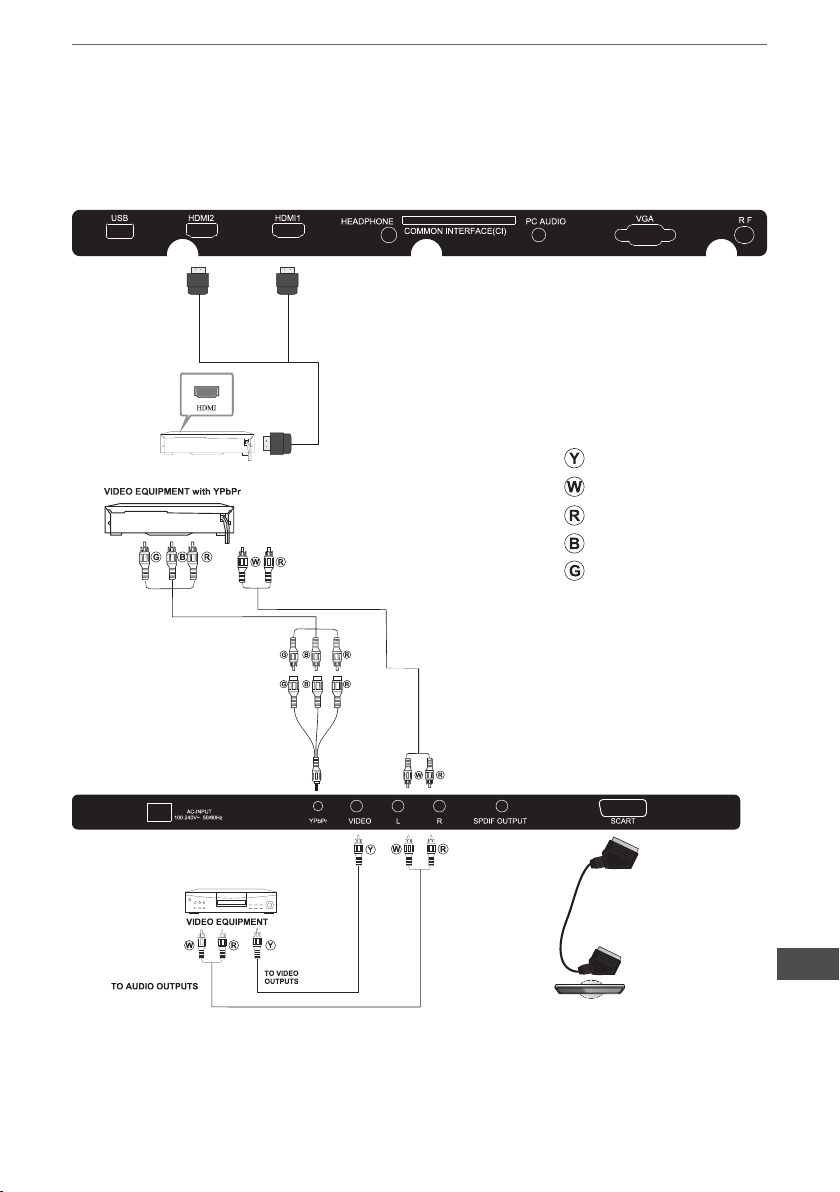
Rückwärtige AV Anschlüsse (URZ4032)
Anschlüsse von links nach rechts: AC Netzstecker, YPbPr Eingang, VIDEO, AUDIO Eingang, SPDIF Ausgang, SCART.
Seitwärts AV Anschlüsse (URZ4032)
Anschlüsse von links nach rechts: USB, HDMI2, HDMI1, Kopfhörer, CI, PC Audio, VGA,
RF.
Hinweis: Stecken Sie die Kopfhörerbuchse in den Anschluss KOPFHÖRER am
Gerät, die Lautsprecher werden stumm- geschaltet.
DE
10
Antenne
Antenne
ANT 75Ω
Adapter (nicht im Lieferumfang enthalten)
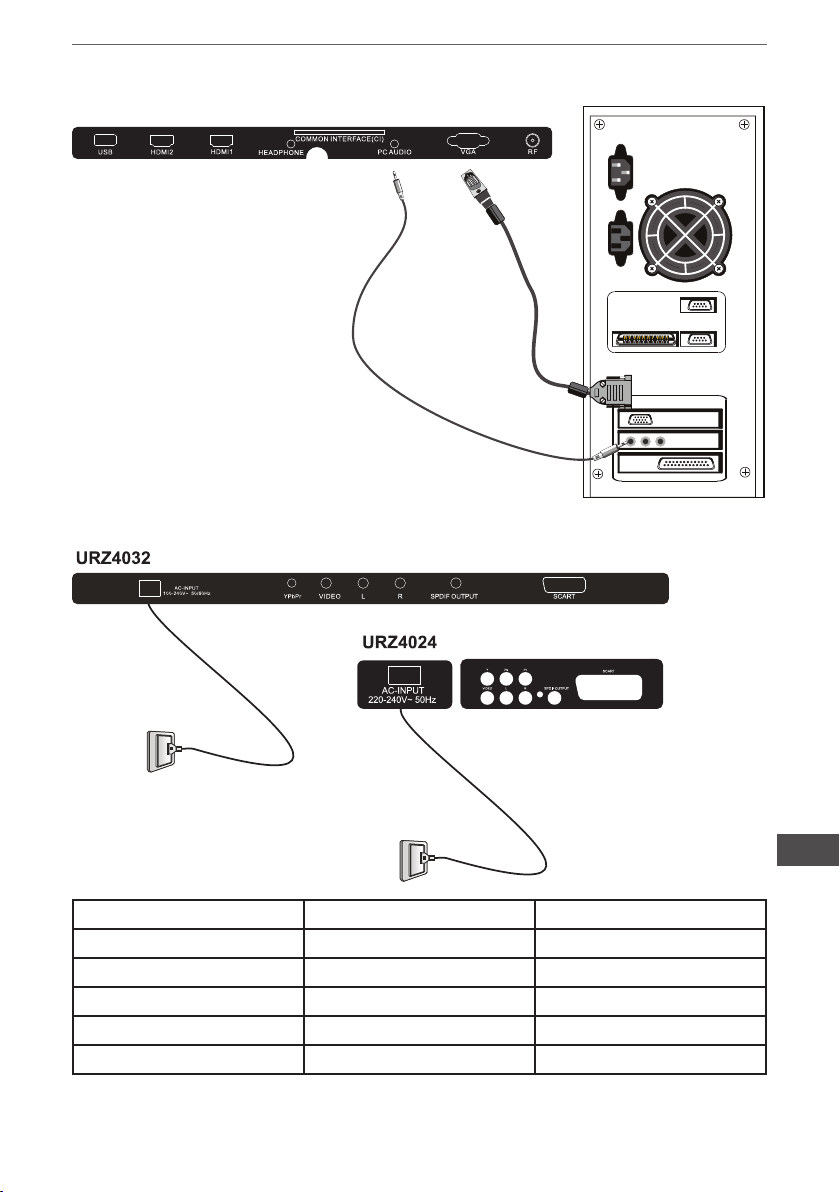
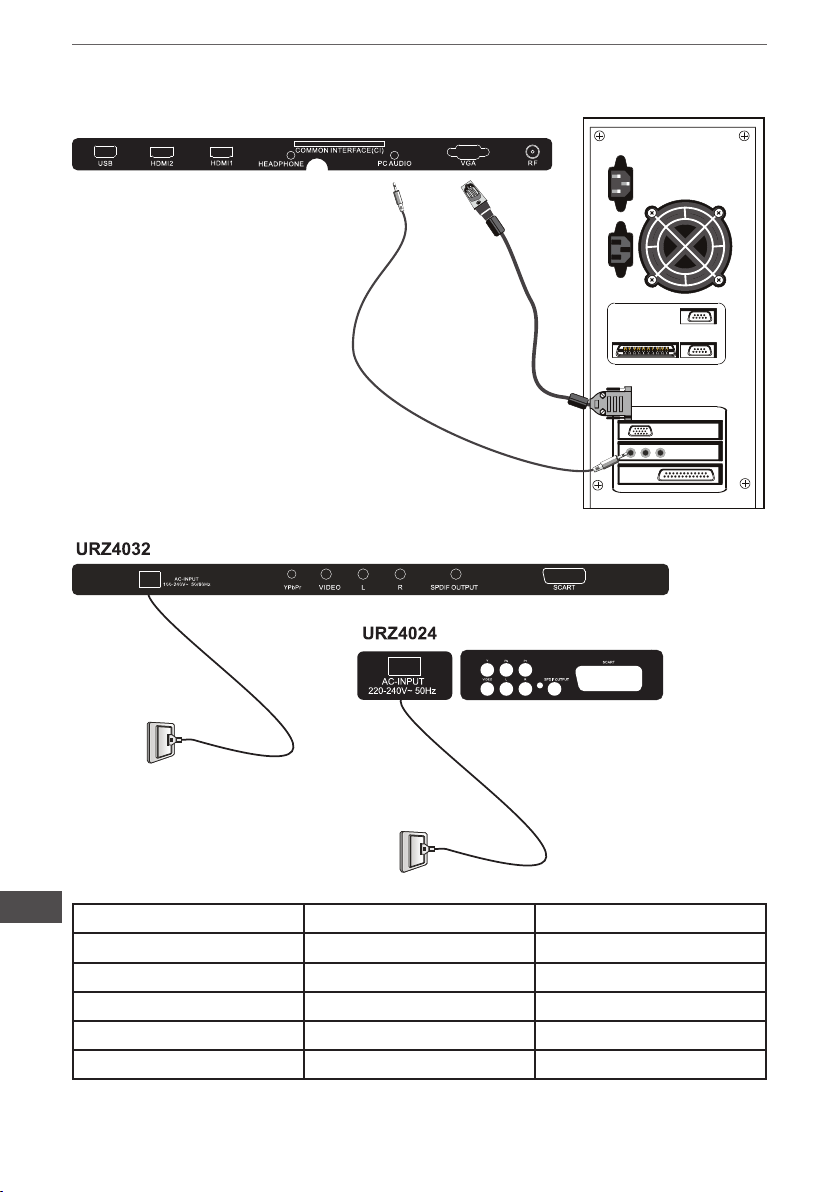
PC
Stellen Sie sicher dass sowohl das
TV-Gerät sowie der Computer ausgeschaltet sind.
1. Verbinden Sie die VGA und Audio-Kabel.
2. Verbinden Sie das Stromkabel.
3. Schalten Sie das TV-Gerät ein
und gehen in den PC-Modus
4. PC einschalten.
Hinweis: Diese Sequenz ist sehr
wichtig.
Bedienungsanleitung
A
Auösung V.Freq.(Hz) H.Freq.(Hz)
800*600 60 37.88
640*480 60 31.47
1024*768 60 48.36
1280*1024 60 63.98
1366*768 60 47.7
DE
11
Bedienungsanleitung
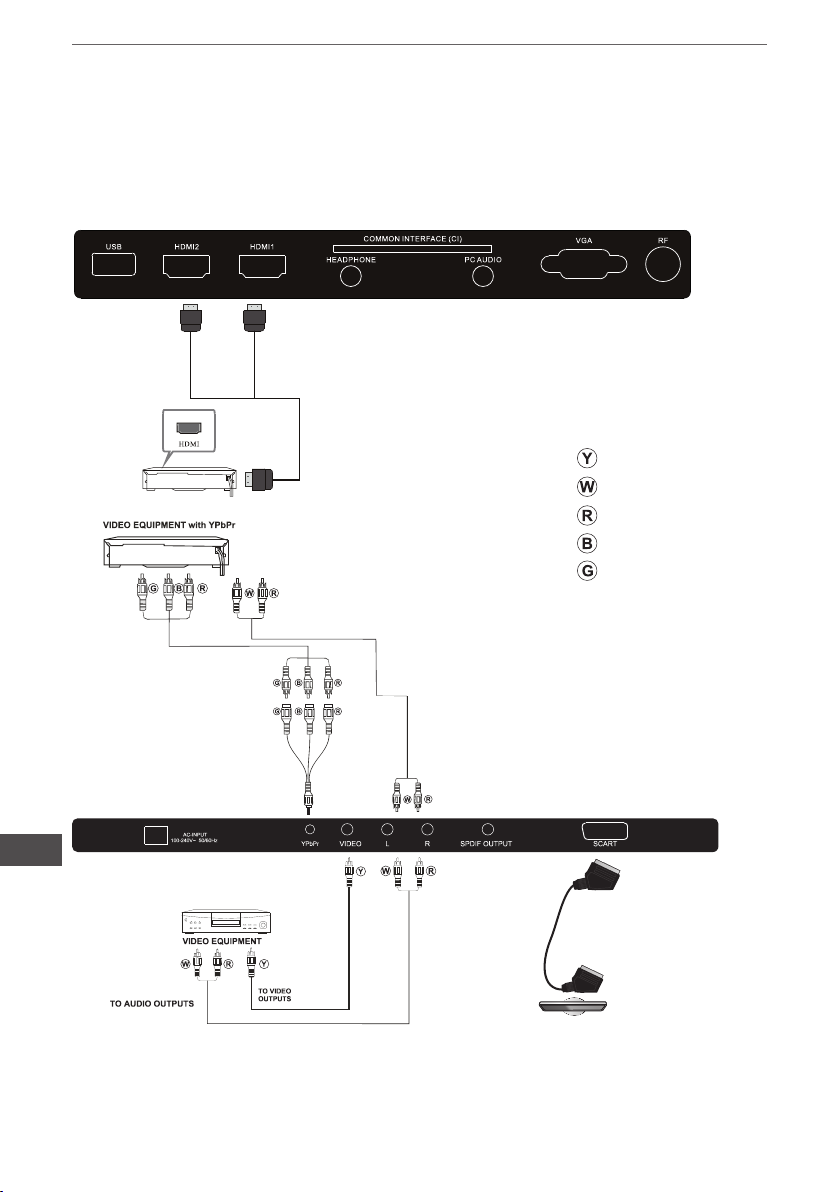
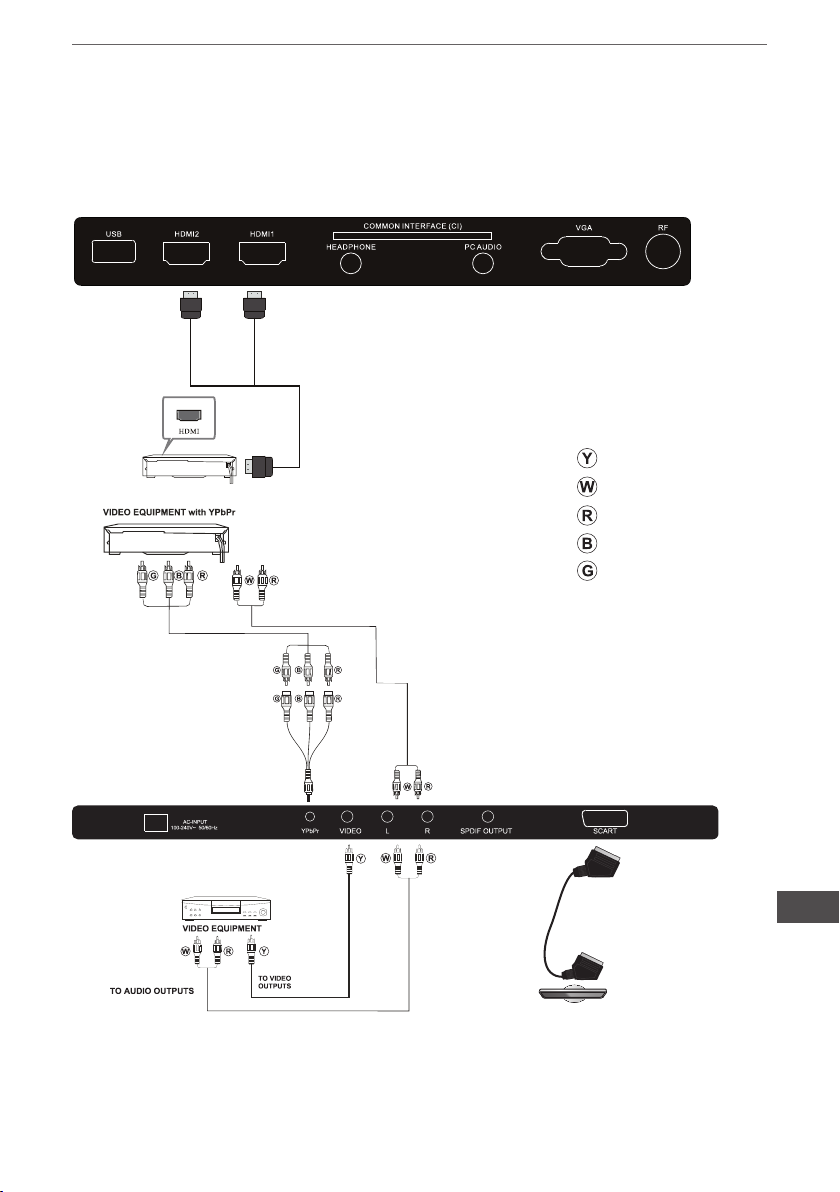
AV Geräte (URZ4024A)
Dieser Fernseher bietet eine Gruppe von AV eine Gruppe von YPbPr und einen SCART
Anschluss für die bequeme Verbindung zum Videorecorder, DVD oder anderen Videogeräten. Bitte beachten Sie die Anleitung des Gerätes, für problemloses anschließen.
Sie können die Eingangsanschlüsse am TV-Gerät hinten wie folgt verwenden:
Gelb (Video)
ß (Audio L)
Wei
Rot (Audio R oder Pr)
Blau (Pb)
Grün (Y)
DE
Es kann an folgende Geräte angeschlossen werden: VCR, Multi- Disk-Player, D\/D,
Camcorder, Videospiele oder Stereo-System, usw.
YPbPr ist mit folgenden Videoformaten kompatibel: 480i, 576i, 480p, 576p, 720p, 1080i.
12
Bedienungsanleitung
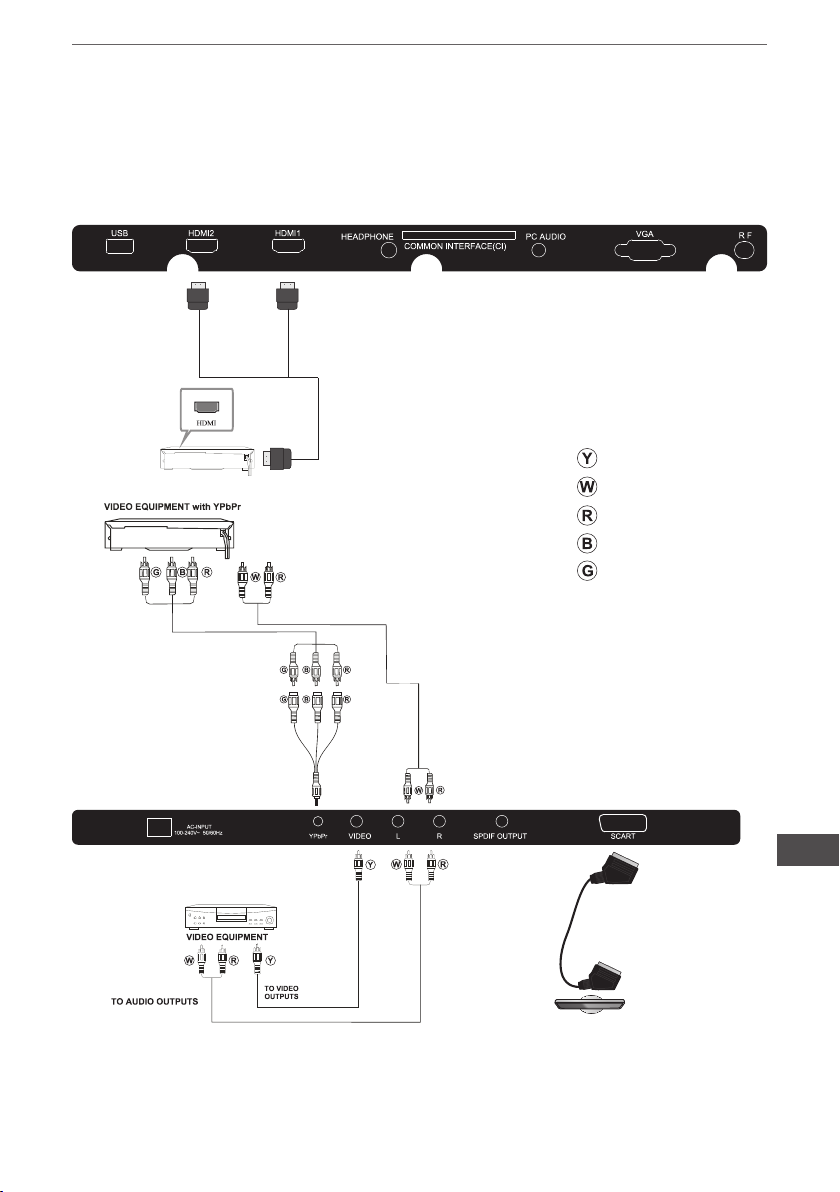
AV Geräte (URZ4032)
Dieser Fernseher bietet eine Gruppe von AV eine Gruppe von YPbPr und einen SCART
Anschluss für die bequeme Verbindung zum Videorecorder, DVD oder anderen Videogeräten. Bitte beachten Sie die Anleitung des Gerätes, für problemloses anschließen.
Sie können die Eingangsanschlüsse am TV-Gerät hinten wie folgt verwenden:
Gelb (Video)
ß (Audio L)
Wei
Rot (Audio R oder Pr)
Blau (Pb)
Grün (Y)
Es kann an folgende Geräte angeschlossen werden: VCR, Multi- Disk-Player, D\/D,
Camcorder, Videospiele oder Stereo-System, usw.
YPbPr ist mit folgenden Videoformaten kompatibel: 480i, 576i, 480p, 576p, 720p, 1080i.
DE
13
Bedienungsanleitung
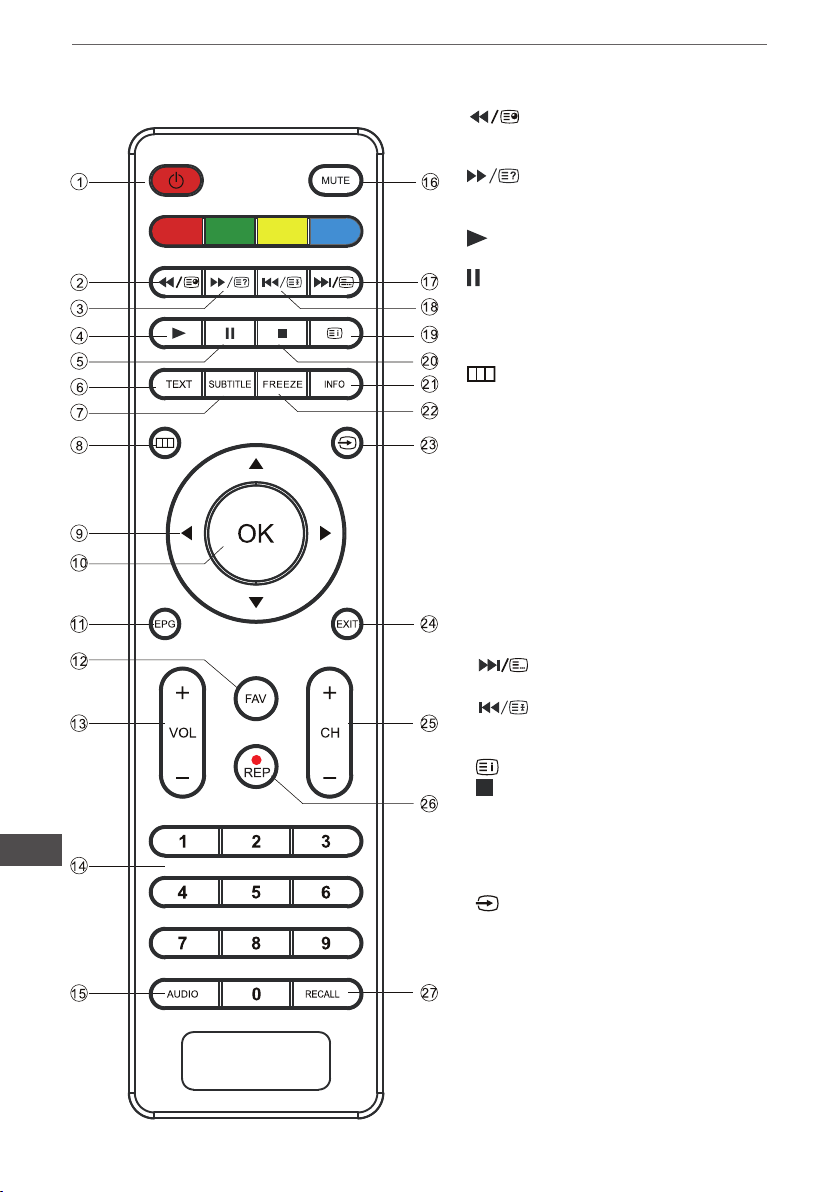
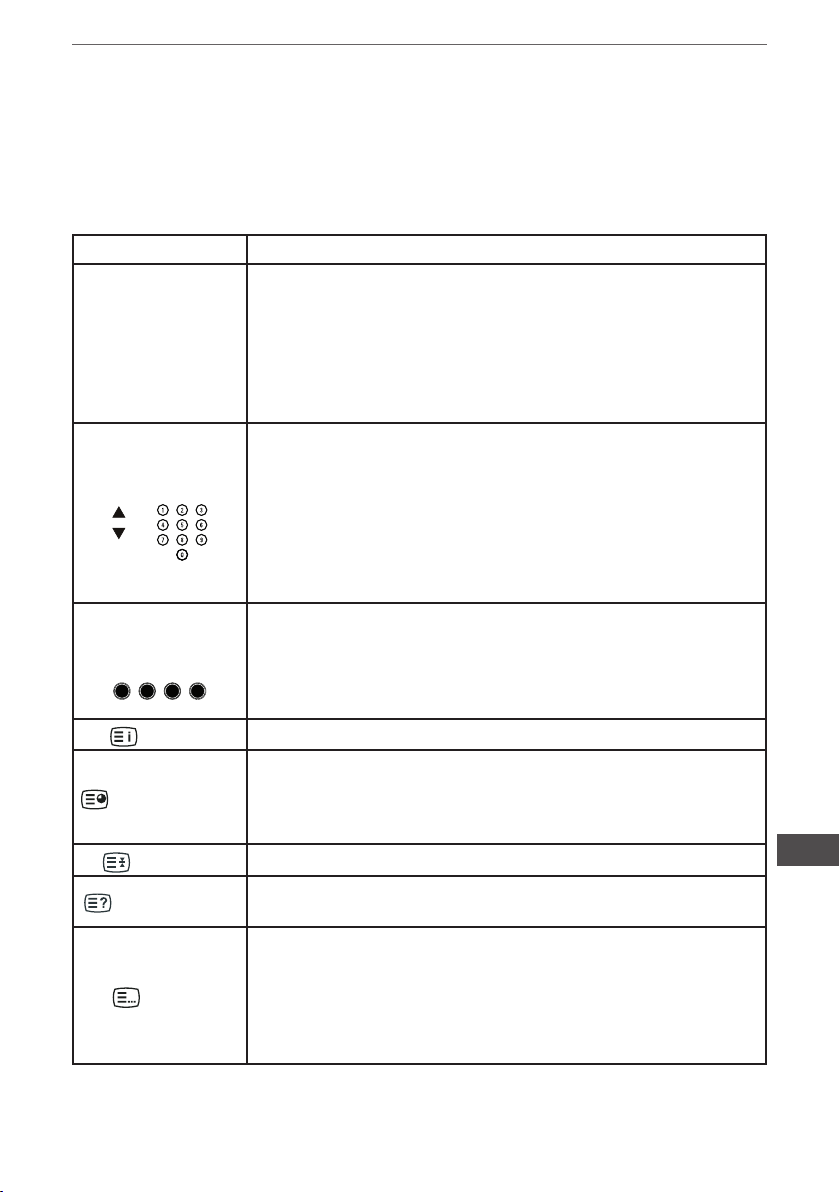
FERNBEDIENUNG
DE
1. NETZTASTE: Ein-/Ausschalten (Bereitschaftsmodus) des TV Gerätes.
2.
Zurück; im Teletext Modus benutzt als Taste
Unterseite.
3.
Vorwärts; im Teletext Modus benutzt als Taste
Enthüllen.
4.
oder fortsetzen der Wiedergabe.
5.
der Wiedergabe (Pause).
6. TEXT: TELETEXT aufrufen oder schließen.
7. SUBTITLE: Drücken zum anzeigen der
Untertitel im DTV Modus.
8.
9. CURSOR: Bewegen im Menü.
10. OK: Auswahl bestätigen.
11. EPG: Anzeige der aktuellen Programminformationen sowie Informationen über die
nächsten Sendungen im DTV Modus.
12. FAV: Aufruf der Favorit Senderliste im TV
oder DTV Modus.
13. VOL+/-: Einstellen der Lautstärke.
14. ZAHLENTASTEN: Für direkten Zugriff auf
die Sender.
15. AUDIO: Auswahl der verfügbaren Audiosprachen von TV Sendungen.
16. MUTE: Ton aus oder einschalten
(Stummschaltung).
17.
Nächste, im Teletext Modus als Taste Liste.
18.
Taste Vorherige, im Teletext Modus als Taste
Halten.
19.
20. : Im USB Modus drücken um die Wiedergabe zu beenden.
21. INFO: Drücken zur Anzeige der Programminformationen der aktuellen Sendung.
22. FREEZE: Drücken um das betrachtete
Bild einzufrieren.
23.
der verfügbaren Videoquellen.
24. EXIT: Rückkehr zum vorherigen Menü
oder Menü verlassen.
25. CH+/CH-: Betrachten des nächsten oder
vorherigen Senders.
26. REP: Im DTV Modus drücken um das
betrachtete TV Programm aufzunehmen; im
USB Modus drucken für Wiederholungsmodus.
27. RECALL: Rückkehr zum vorher betrachteten Programm.
: Im USB Modus benutzt als Taste
: Im USB Modus benutzt als Taste
: Im USB Modus drücken für beginn
: Im USB Modus drücken zum anhalten
: Anzeigen des Bildschirmmenüs.
: Im USB Modus benutzt als Taste
: Im USB Modus benutzt als
: Im Teletext Modus benutzt als Index.
: Drücken zur Anzeige und Auswahl
14
Bedienungsanleitung
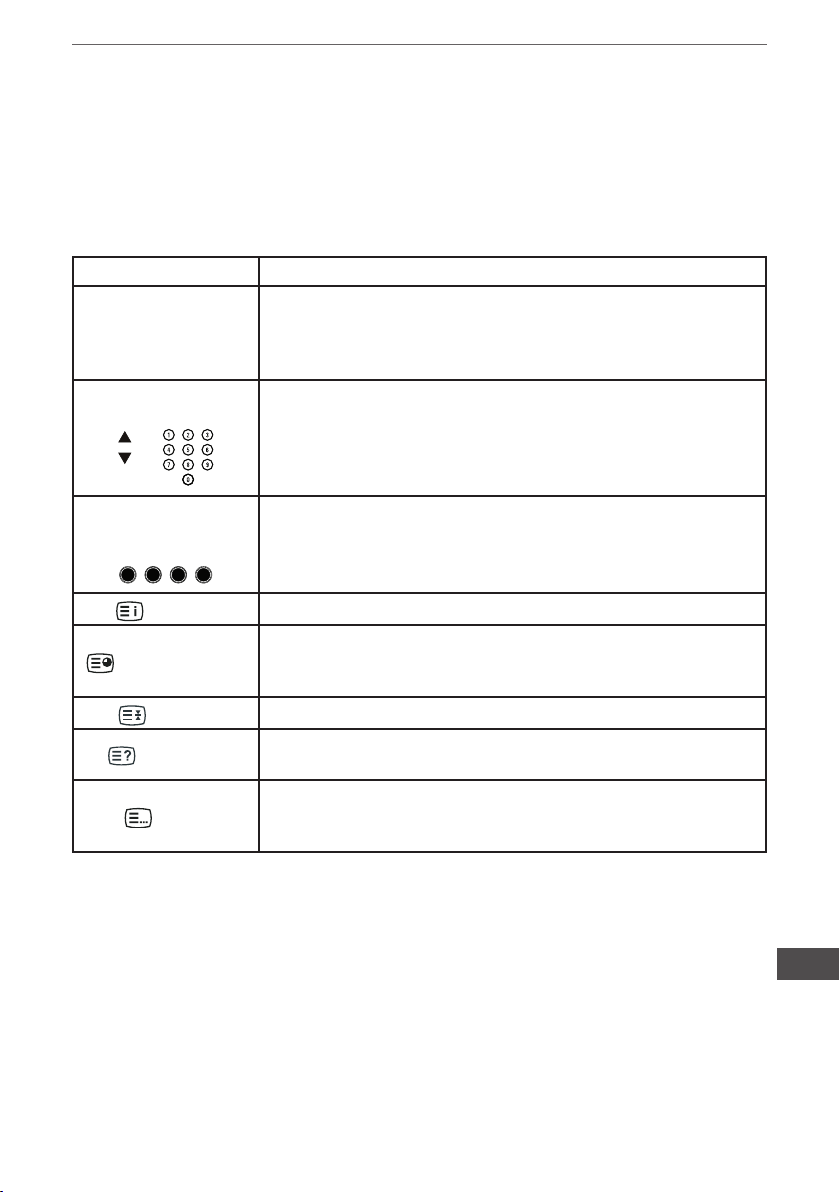
TELETEXT
Teletext ist ein Informationssystem Übertragen durch bestimmte Kanäle, das wie eine
Zeitung gelesen werden kann. Es bietet auch den Zugang zu Untertiteln für Schwerhörige oder Personen die nicht mit der Übertragungs-Sprache (Kabel, Satellit, usw.)
vertraut sind.
Drücken Funktion
Diese wird verwendet, den Teletext-Modus aufrufen oder zu
verlassen. Die Zusammenfassung erscheint als eine Liste der
Artikel, auf die zugegriffen werden kann. Jeder Artikel hat eine
TEXT
AUSWAHL EINER
SEITE
DIREKTER ZUGRIFF AUF EINE
SEITE
(INDEX)
(UNTERSEITE)
(HALTEN)
(ENTHÜLLEN)
(LISTE)
entsprechende 3-stellige Seitennummer. Wenn der gewählte
Sender keinen Teletext bietet, wird die Anzeige 100 angezeigt,
und der Bildschirm bleibt leer (in diesem Fall, Teletext beenden
und einen anderen Sender auswählen).
Geben Sie die Nummer der gewünschte Seite ein mit den
Zahlentasten 0-9 sowie den Tasten aufwärts / abwärts.
Beispiel: Seite 120, geben Sie 120 ein. Die Nummer wird oben
links angezeigt, Der Zähler sucht die gewünschte Seite und
diese wird dann angezeigt. Wiederholen Sie diesen Vorgang,
um eine andere Seite zu betrachten. Wenn der Zähler weiter
sucht, bedeutet dies, dass die Seite nicht übertragen wird.
Wählen Sie eine andere Nummer.
Farbige Schaltächen sind als an der Unterseite des Bildschirms angezeigt. Die 4 farbigen Tasten werden verwendet,
um auf die Elemente oder entsprechenden Seiten zuzugreifen.
Die farbigen Schaltächen blinken wenn der Gegenstand oder
die Seite noch nicht verfügbar ist.
Rückkehr zur Inhaltsseite (Üblicherweise Seite 100).
Einige Seiten enthalten Unterseiten, die automatisch nacheinander angezeigt werden. Diese Taste wird verwendet, um die
Akquisition der Unterseite zu stoppen oder fortzusetzen. Die
Anzeige erscheint oben links.
Einfrieren der Seite.
Um die versteckte Informationen anzuzeigen oder aus-
zublenden (Spiel-Lösungen).
Der Benutzer kann vier Lieblingsseiten direkt an die vier
Farbtasten verknüpfen. Während der Liste Modus aktiviert
ist, ist TOP oder FLOF Navigation mit den Farbtasten nicht
möglich. Die Favoriten-Seite Nummern sollten von der Sys-
temsoftware für jeden Kanal aus dem nichtüchtigen Speicher
gespeichert und wiederhergestellt werden.
DE
15
Bedienungsanleitung
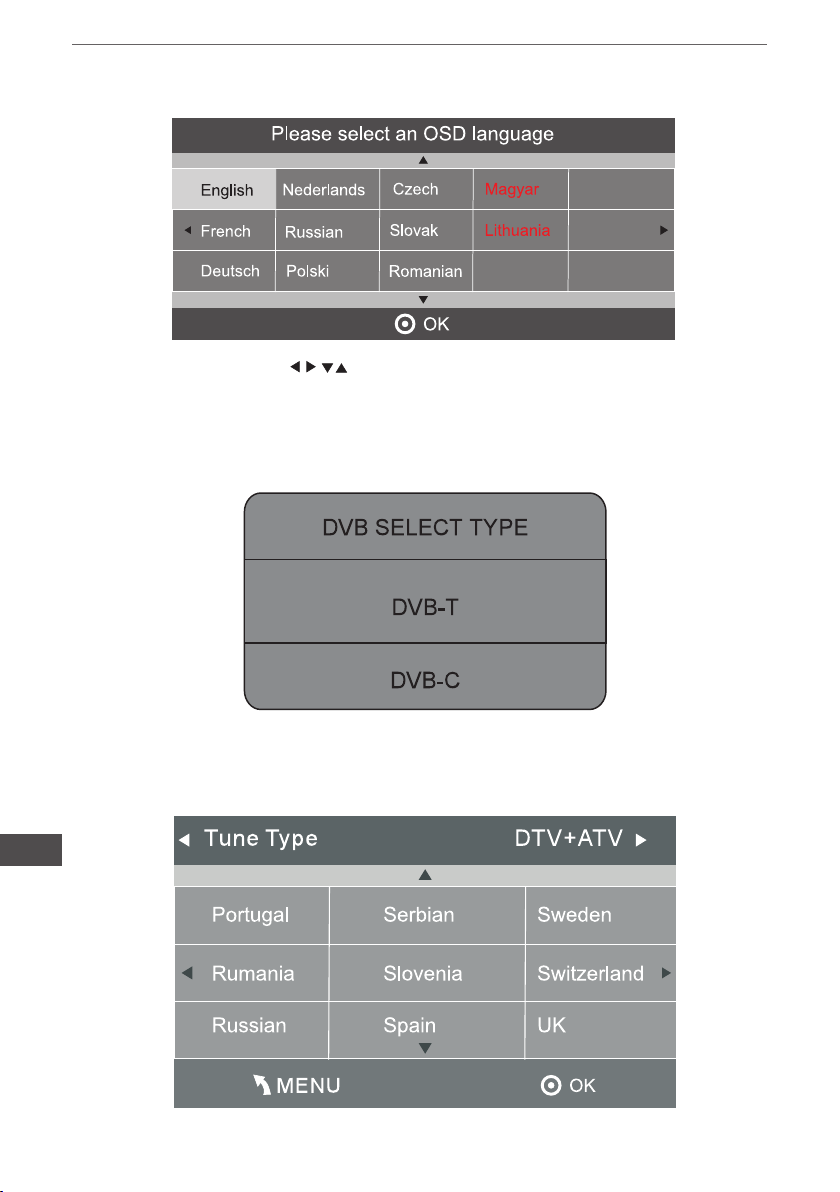
INSTALLATIONSHINWEISE
1). Drücken Sie die Tasten um durch das Menü zu bewegen und die
Einstellungen zu ändern. Drücken Sie die Taste OK zum bestätigen.
Wählen Sie die gewünschte Menüsprache.
2). Drücken Sie die Tasten zur Auswahl von DVB-T/DVB-C und drücken die Taste OK
zum bestätigen.
a. Wenn Sie DVB-T ausgewählt haben, ist der nächste Schritt Auswahl von Tunertyp
und Land, drücken Sie die Taste OK um die Sendersuche zu beginnen.
DE
16

Bedienungsanleitung
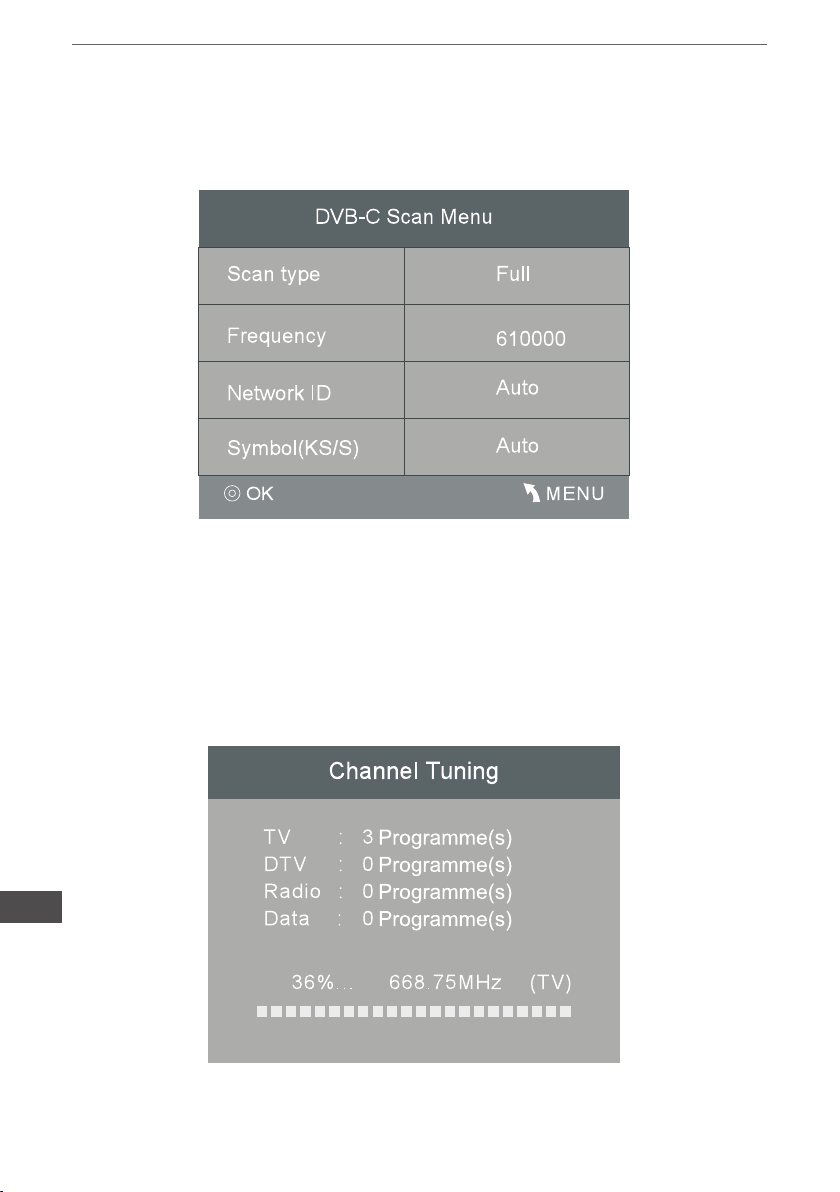
b. Wenn Sie DVB-C ausgewählt haben, ist der nächste Schritt die Einstellung des
DVB-C System, (Scan Type / Frequenz / Netzwerk ID / Symbol KS/S) danach drücken
Sie die Taste OK für das Menü Auswahl von Tunertyp (DTV/ATV) und Land ,dieser
Schritt ist der gleiche wie beim DVB-T, drücken Sie die Taste OK um die Sendersuche
zu beginnen.
3). Die Sendersuche beginnt. Dieser Vorgang kann bis zu 6 Minuten dauern. Das
Display zeigt den Fortschritt der Sendersuche an sowie die Anzahl der gefundenen
Sender.
4). Nach der vollständigen Sendersuche, sind die Sender in einer vorgegebenen
Reihenfolge angeordnet. Wenn Sie Sender überspringen möchten, ändern Sie die
vorgegebene Reihenfolge oder benennen die Sender um, wählen Sie Programm
Bearbeiten im Sender-Menü.
DE
17
Bedienungsanleitung
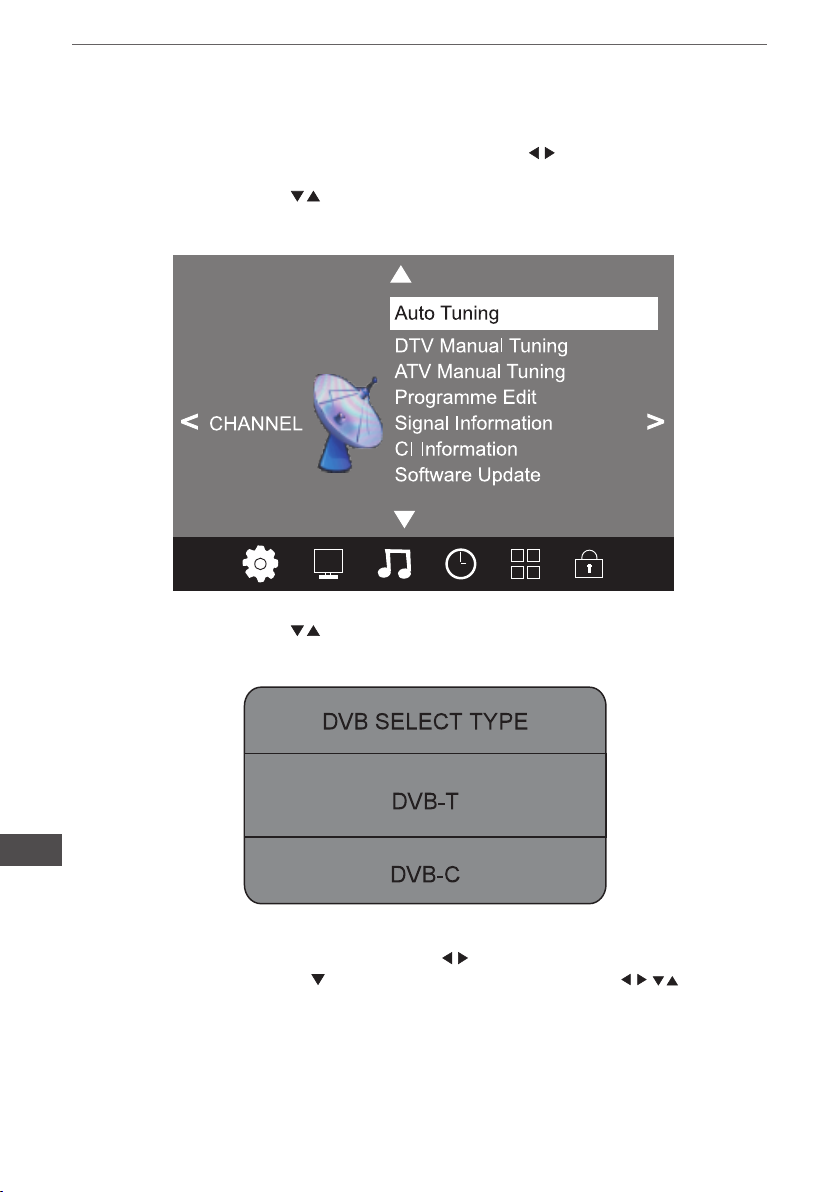
SENDERMENÜ
Automatische Sendersuche (DVB-T)
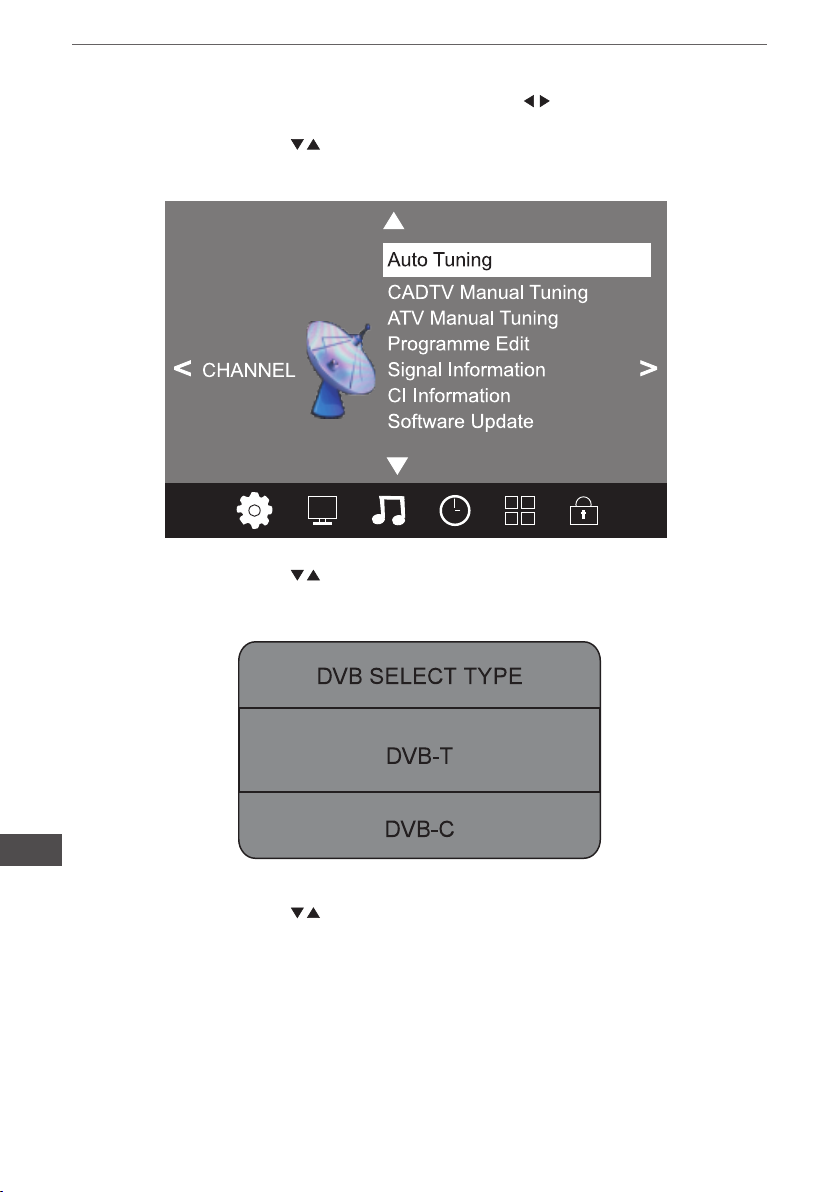
1). Drücken Sie die Taste MENÜ und danach die Tasten zur Auswahl des SENDERMENÜ und drücken die Taste OK.
2). Drücken Sie die Tasten zur Auswahl Automatische Sendersuche und drücken
die Taste OK.
3). Drücken Sie die Tasten zur Auswahl DVB-T/DVB-C. Wählen Sie DVB-T und
drücken die Taste OK zum bestätigen.
DE
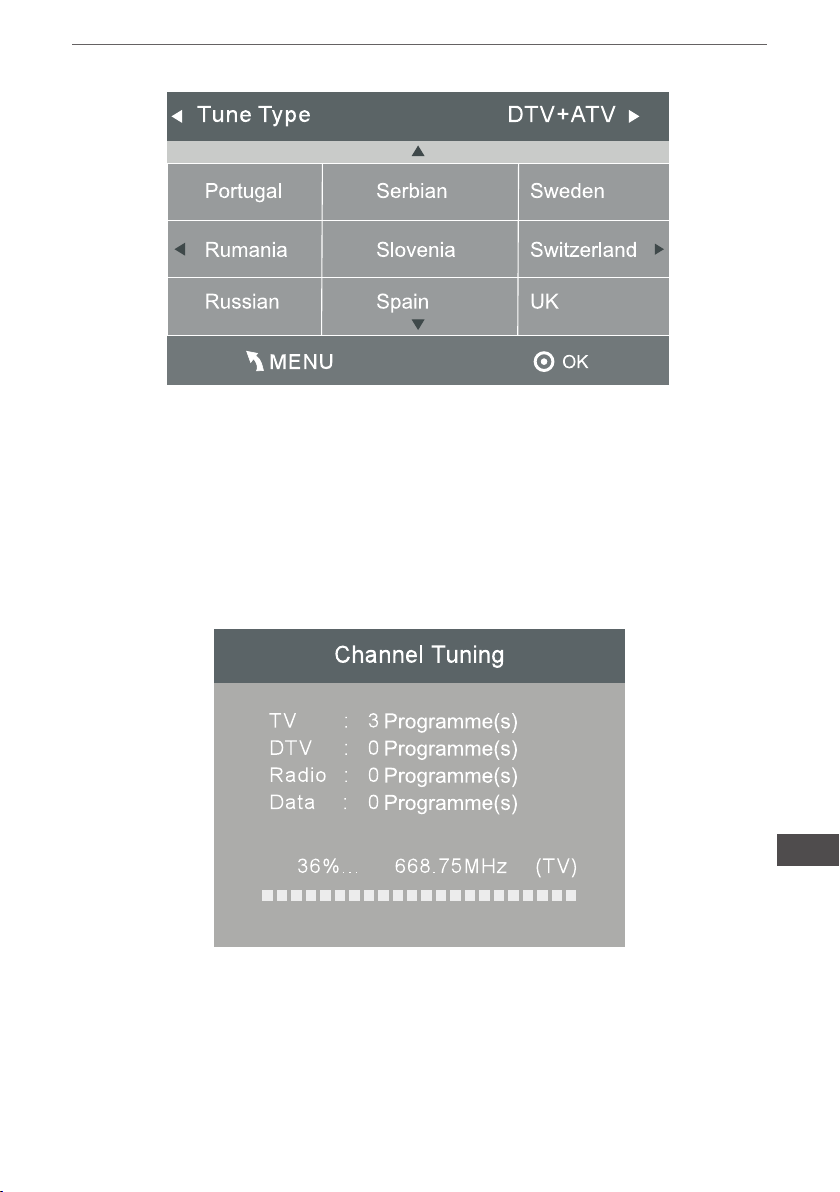
4). Im Menü Tunertyp, drücken Sie die Tasten
+ ATV. Drücken Sie die Taste und danach drücken Sie die Tasten zur
Auswahl des Landes in welchem Sie den TV betreiben. Drücken die Taste OK zum
bestätigen.
18
zur Auswahl ATV / DTV / DTV
Bedienungsanleitung
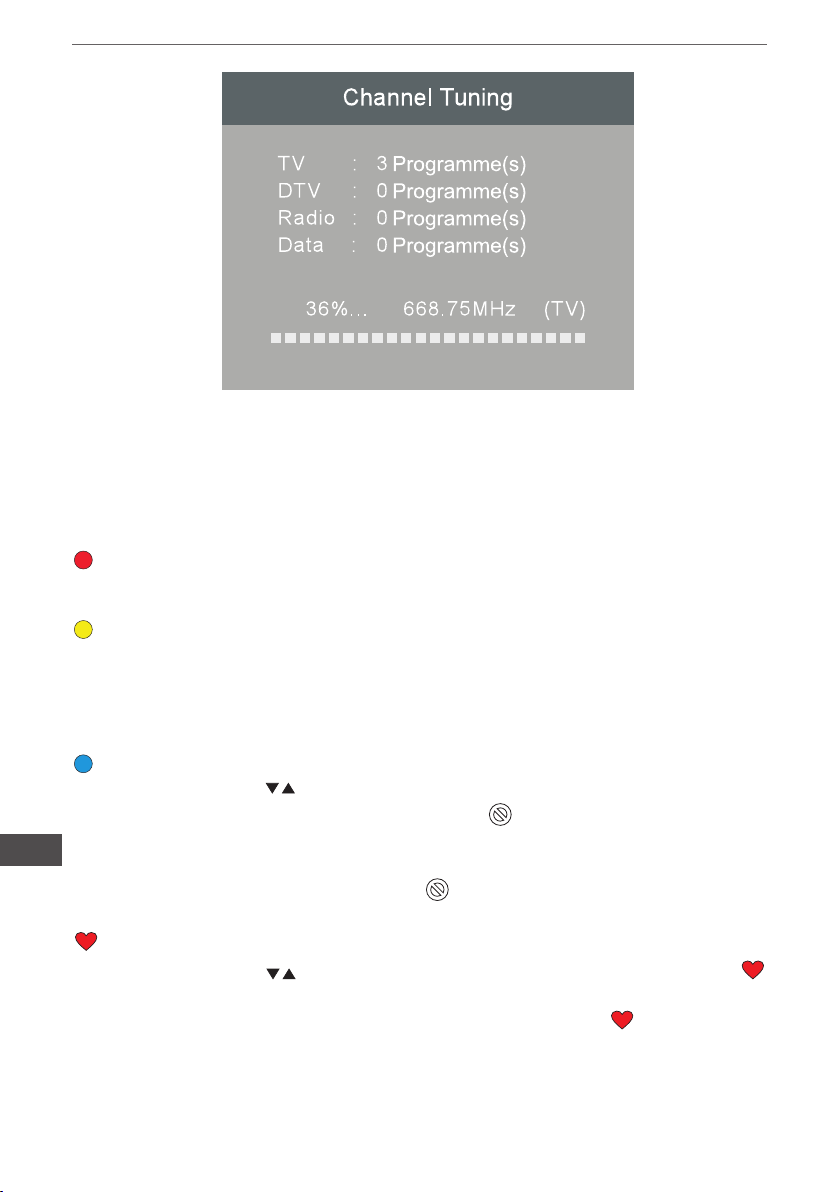
5). Die Sendersuche beginnt. Dieser Vorgang kann bis zu 6 Minuten dauern. Das Display zeigt den Fortschritt der Sendersuche an sowie die Anzahl der gefundenen Sender.
6). Nach der vollständigen Sendersuche, sind die Sender in einer vorgegebenen Reihenfolge angeordnet. Wenn Sie Sender überspringen möchten, ändern Sie die vorgegebene Reihenfolge oder benennen die Sender um, wählen Sie Programm Bearbeiten im
Sender-Menü.
DE
19
Bedienungsanleitung
Automatische Sendersuche (DVB-C)
1). Drücken Sie die Taste MENÜ und danach die Tasten zur Auswahl des SENDERMENÜ und drücken die Taste OK.
2). Drücken Sie die Tasten zur Auswahl Automatische Sendersuche und drücken
die Taste OK.
3). Drücken Sie die Tasten zur Auswahl DVB-T/DVB-C. Wählen Sie DVB-C und
drücken die Taste OK zum bestätigen.
DE
4). Drücken Sie die Tasten zur Auswahl Scan Type/Symbol(Ks/S) und drücken die
Taste OK zum bestätigen.
20

Bedienungsanleitung
5). Im Menü Tunertyp, drücken Sie die Tasten zur Auswahl ATV / DTV / DTV
+ ATV. Drücken Sie die Taste und danach drücken Sie die Tasten zur
Auswahl des Landes in welchem Sie den TV betreiben. Drücken die Taste OK zum
bestätigen.
6). Die Sendersuche beginnt. Dieser Vorgang kann bis zu 6 Minuten dauern. Das Display zeigt den Fortschritt der Sendersuche an sowie die Anzahl der gefundenen Sender.
DE
21
Bedienungsanleitung
Programm bearbeiten
Sie können Sender löschen, umbenennen, verschieben, überspringen, FAV.
Löschen
Drücken Sie die rote Teletexttaste, der Sender unter dem Cursor wird gelöscht.
Bewegen
Benutzen Sie die Pfeiltasten zur Auswahl des Senders den Sie bewegen möchten.
Drücken Sie die gelbe Teletexttaste um die Funktion Bewegen aufzurufen. Wenn die
Funktion aktiviert ist, benutzen Sie die Pfeiltasten u den Sender zu bewegen und drücken die Taste OK zum bestätigen.
Überspringen
Drücken Sie die Tasten zur Auswahl des Senders. Drücken Sie die blaue Teletext-
taste um den Sender zu überspringen, das Symbol
des Senders.
DE
Wăhlen Sie den übersprungenen Sender, drücken Sie erneut die blaue Teletexttaste,
der Sender ist wieder aktiv und das Symbol
Favoriten
Drücken Sie die Tasten
erscheint auf der rechten Seite des Senders. Wählen Sie das Favoritprogramm und
drücken erneut die Taste FAV, Sie können die Favoritwahl löschen,
Sobald Ihre Favoritgruppe erstellt wurde, können Sie die Taste FAV drücken um schnell
auf Ihre Favoriten zugreifen zu können.
22
zur Auswahl des Senders, drücken Sie die Taste FAV,
verschwindet.
erscheint auf der rechten Seite
verschwindet.
Bedienungsanleitung
BILDEINSTELLUNGSMENÜ
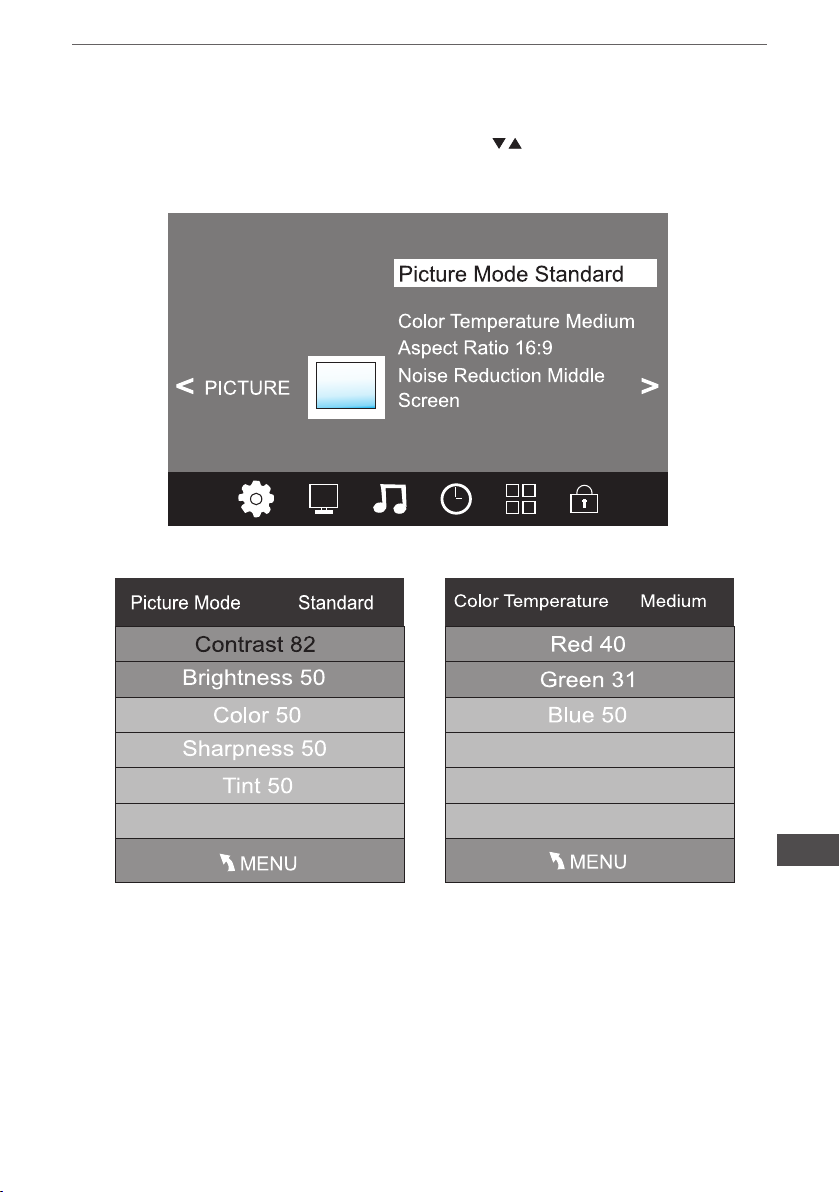
Der zweite Menü-Punkt ist das BILDEINSTELLUNGSMENÜ. Sie können hier Bild-Effekt
einstellen, wie Kontrast, Helligkeit usw. Drücken Sie , um zu bewegen, drücken Sie
OK, zum einstellen.
DE
23
Bedienungsanleitung
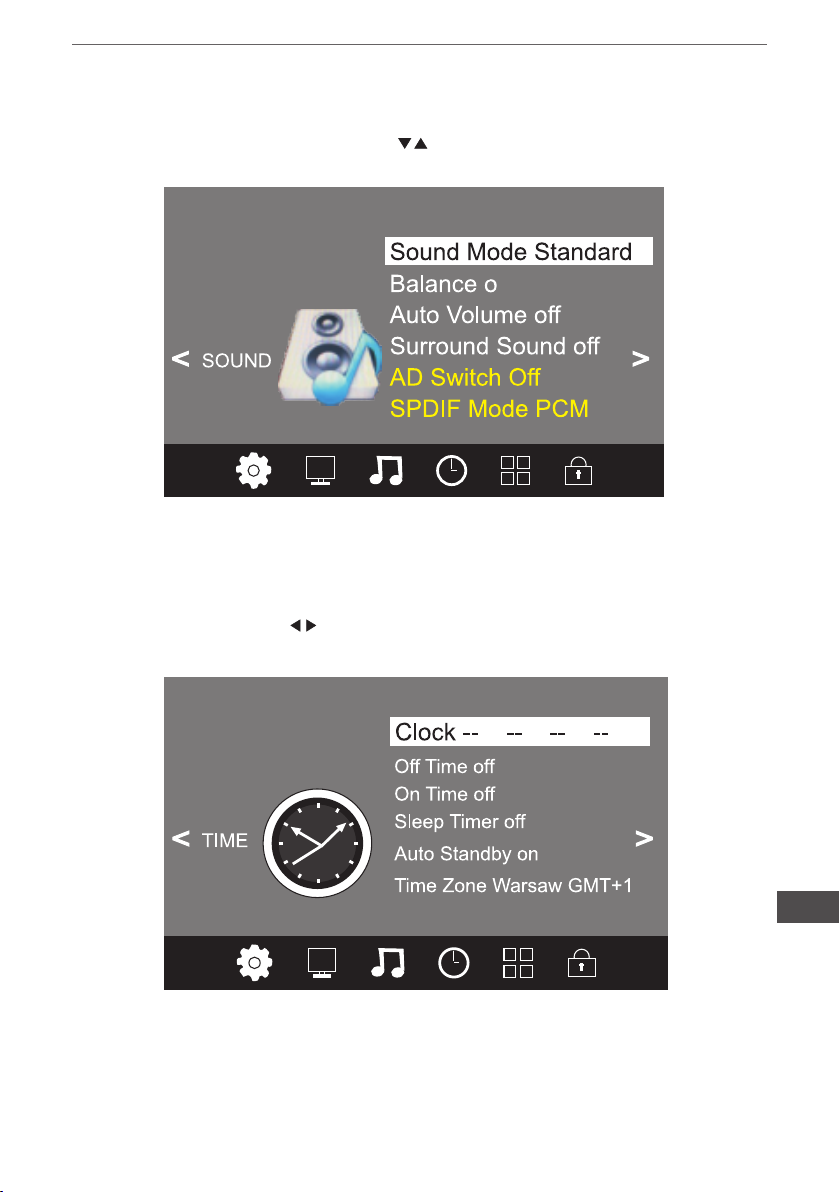
KLANGEINSTELLUNGSMENÜ
Der dritte Menüpunkt ist das KLANGEINSTELLUNGSMENÜ Sie können Klangeffekte
einstellen wie Höhen, Bass, Balance, usw. Drücken Sie , um zu bewegen, drücken
Sie OK, zum einstellen.
ZEITEINSTELLUNGSMENÜ
Der vierte Menüpunkt ist das ZEITEINSTELLUNGSMENÜ. Sie können die Uhrzeit einstellen, Ein-/Ausschaltzeit, Schlaftimer, usw. Drücken Sie
Sie OK, zum einstellen.
, um zu bewegen, drücken
DE
24
Bedienungsanleitung
OPTIONSMENÜ
Der fünfte Menüpunkt ist das OPTIONSMENÜ. Sie können die Menüsprache, Audiosprache, Untertitelsprache usw. einstellen.
Im Menü PVR Dateisystem können Sie einen USB Speicher für PVR einstellen.
HINWEIS:
Zurücksetzen auf die Werkseinstellungen löscht alle Sender und Passwörter.
DE
25
Bedienungsanleitung
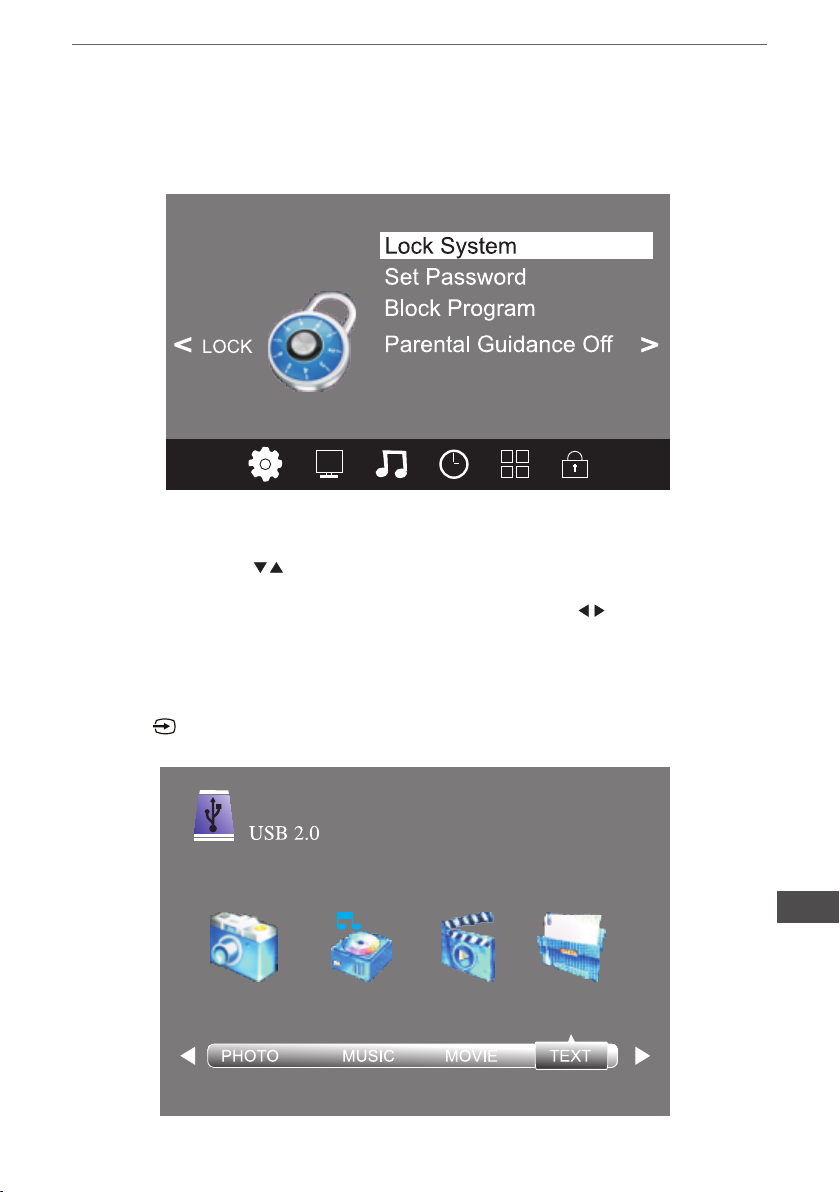
SPERRMENÜ
Der sechste Menüpunkt ist das SPERRMENÜ. Sie können das System sperren, Passwörter einstellen, Sender sperren und die Kindersicherung einstellen. Wenn das System
gesperrt ist, können Sie keine Sender suchen oder verändern.
HINWEIS:
Das werkseitige Passwort ist 6666.
Sender sperren: Drücken Sie um den Sender auszuwählen, drücken Sie die grüne
Teletexttaste um den Sender zu sperren. Um die Sendersperre aufzuheben, gehen Sie
in das Hauptmenü, geben das Passwort ein und drücken erneut die grüne Teletexttaste.
Kindersicherung: Drücken Sie zur Auswahl der Alters-Freigabestufe..
USB
Drücken Sie die Taste Quelle und wählen USB aus, um das USB Menü aufzurufen.
DE
26
Bedienungsanleitung
Bitte stellen Sie sicher, dass das USB-Gerät im Steckplatz eingesteckt ist. Es gibt vier
Medientyp Elemente die ausgewählt werden können, wie Foto, Musik, Film und Text.
Wählen Sie den Medienelementtyp durch drücken , drücken Sie OK, um das Diskauswahlmenü aufzurufen.
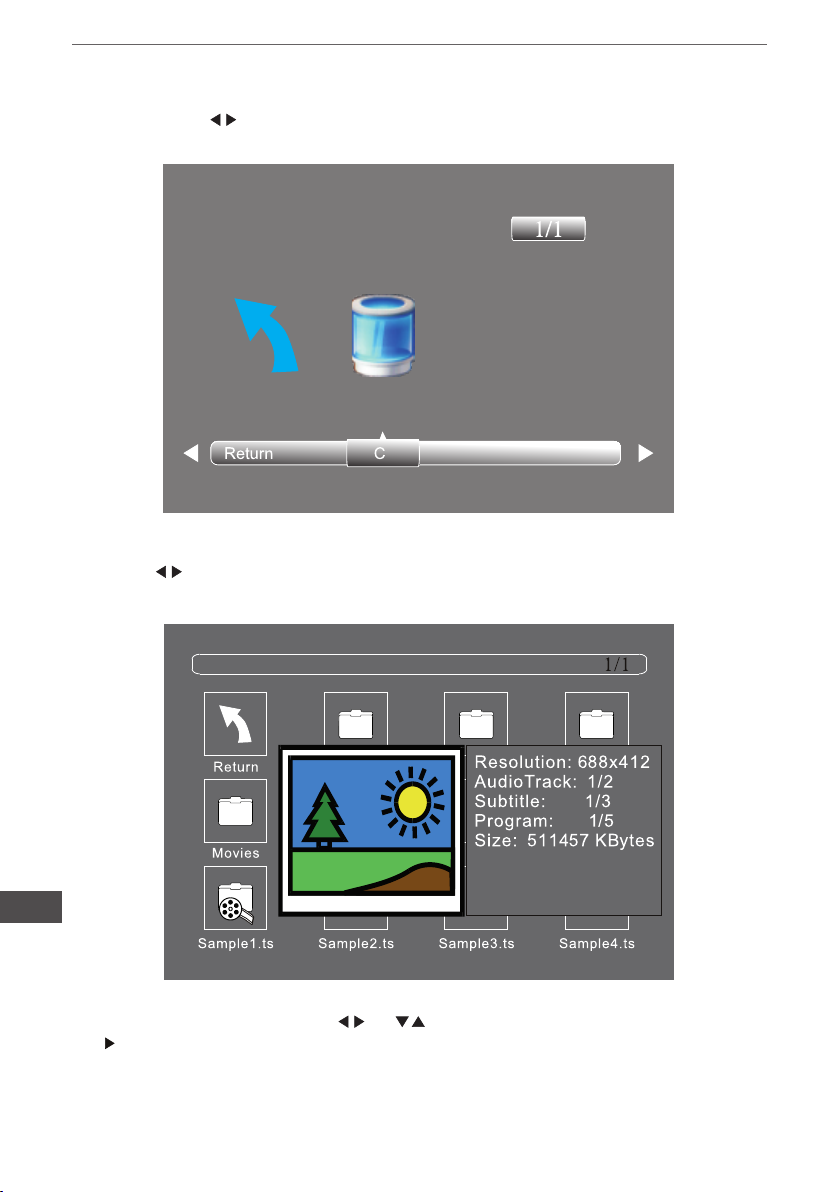
Drücken Sie zur Auswahl des gewünschten Disks und drücken OK zur Anzeige der
Medien-Dateien und Ordnerliste, oder drücken Return um zum Auswahlmenü zurückzukehren.
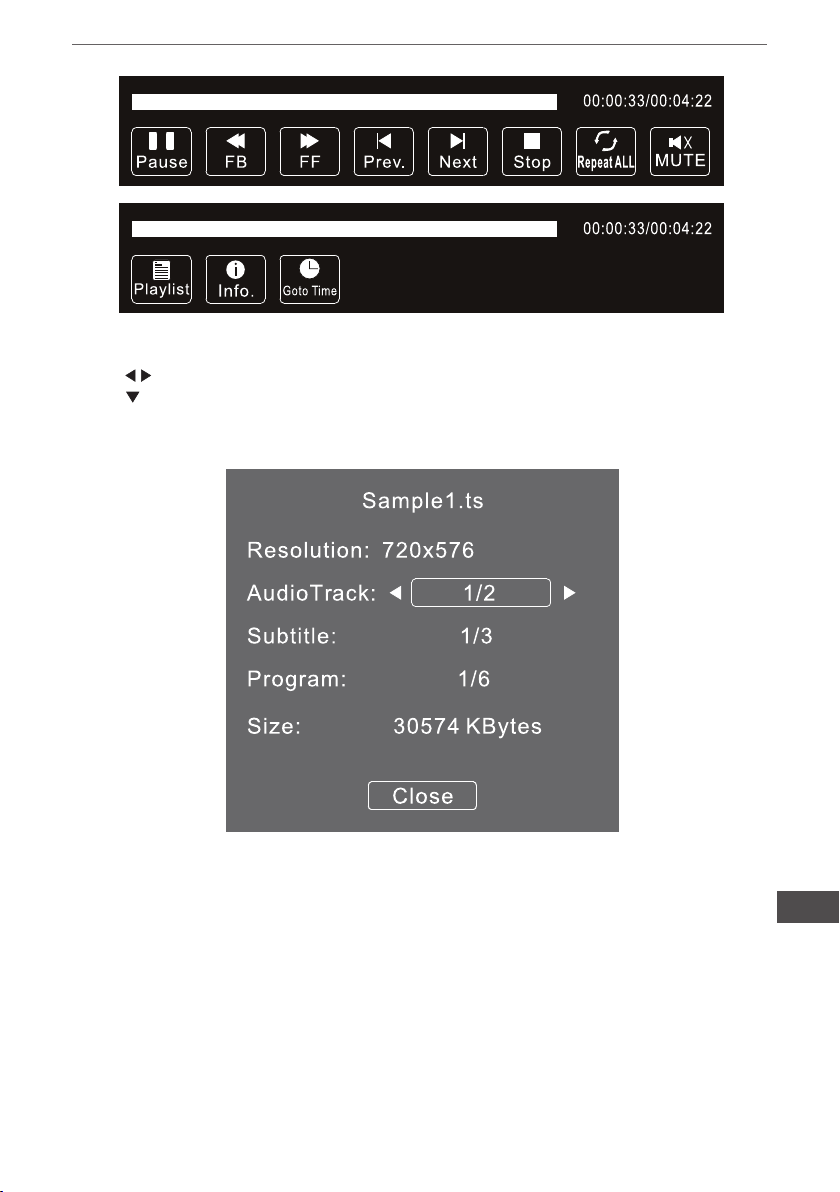
Wählen Sie die Medien-Datei durch drücken von oder , das Vorschaufenster
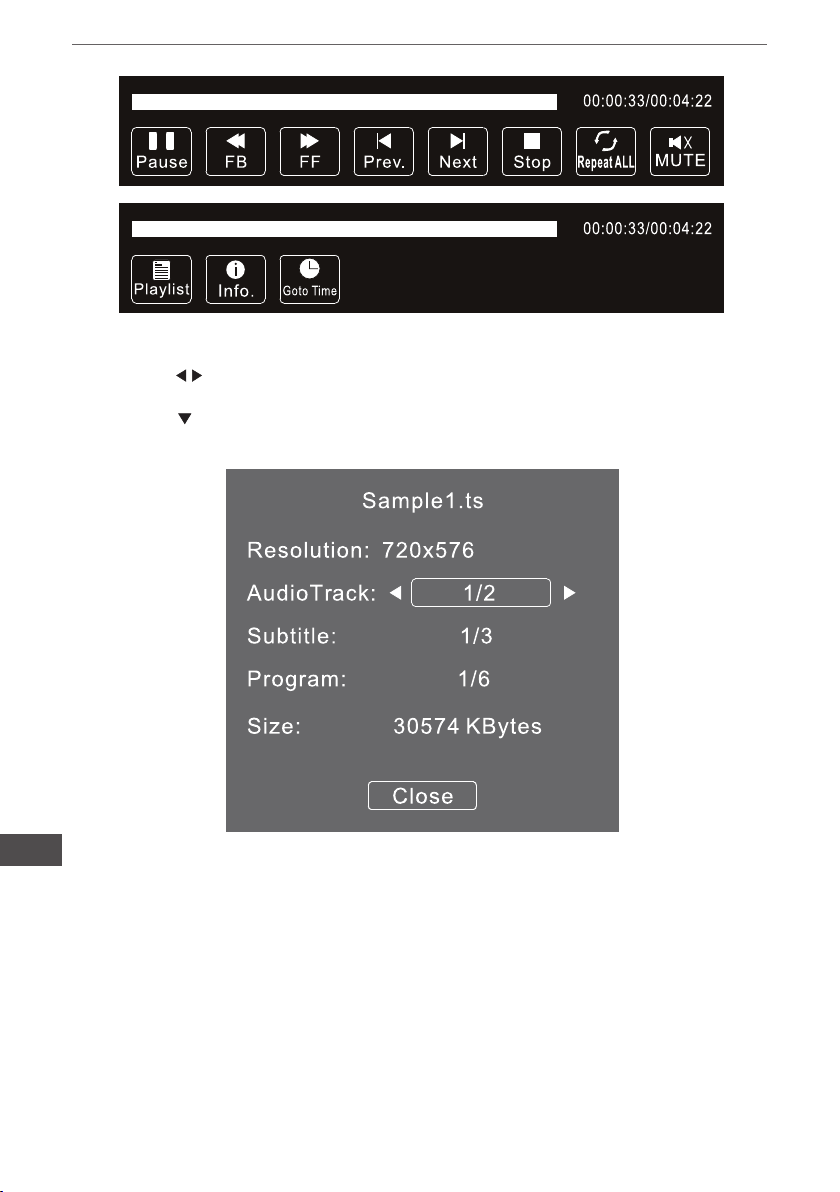
erscheint. Drücken Sie um die Medien-Datei im Vollbildmodus abzuspielen. Während
der Wiedergabe der Medien-Datei, (Foto, Musik, Film, oder Text Type), drücken Sie OK
oder Info Tastensymbol zur Anzeige der Kontroll-Leiste.
DE
27
Bedienungsanleitung
Drücken Sie zur Auswahl des gewünschten Funktionssymbol und drücken die Taste
OK zum bestätigen der Funktion.
Drücken Sie oder die Taste EXIT um die Kontroll-Leiste zu verlassen.
DE
USB Wiedergabe wird für folgende Dateiformate unterstützt:
Foto: JPEG, BMP, PNG
Musik: MP3
Text: TXT
Film: TS (MPEG2 & H.264)
28
Bedienungsanleitung
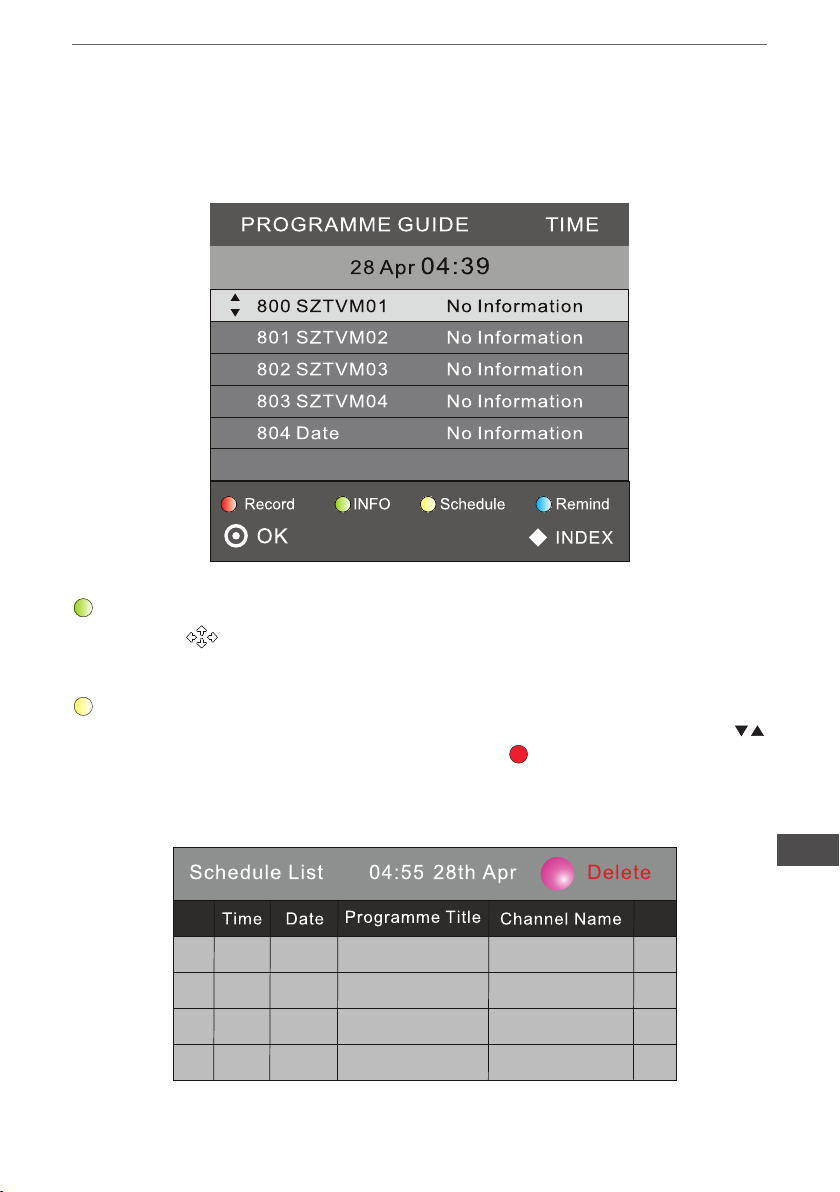
EPG-Menü (Elektronischer Programmführer)
Das EPG-Menü wird verwendet, um zu sehen, was auf einem DTV- oder Radiokanal gesendet wird. Um das EPG-Menü aufzurufen, drücken Sie die EPG-Taste, das folgende
Menü wird angezeigt:
Info
Benutzen Sie
tionen des markierten Senders wird angezeigt.
Zeitplan
Drücken Sie die gelbe Teletexttaste. Die Zeitplan-Liste wird angezeigt, drücken Sie
um die Liste auszuwählen. Drücken Sie die rote Taste
mliste zu löschen. Drücken Sie EPG, um zum EPG-Menü zurückzukehren.
zur Auswahl des Senders. Drücken Sie die Taste INFO, Die Informa-
LÖSCHEN, um die Program-
DE
29
Bedienungsanleitung
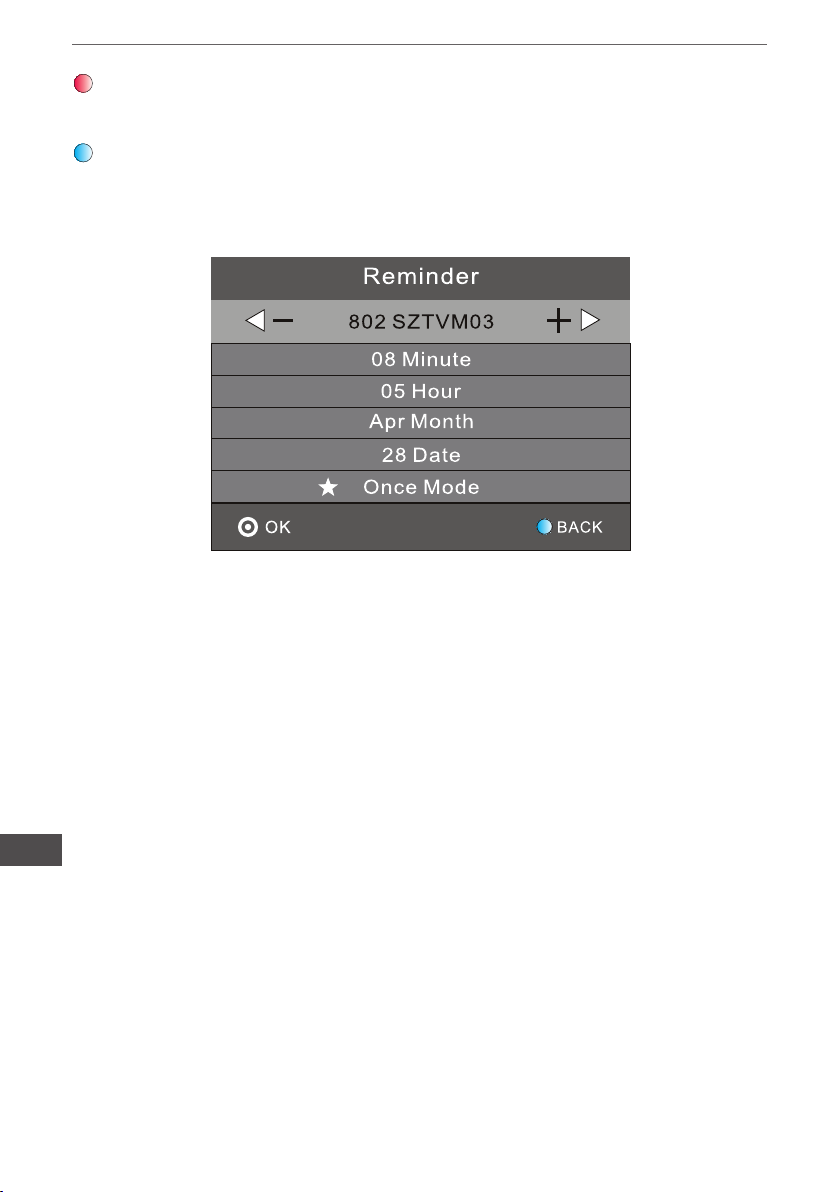
Aufnehmen
Drücken Sie die rote Taste. Die Sendung wird zum Aufnehmen programmiert.
Erinnern
Drücken Sie die blaue Taste um eine Sendung auszuwählen und eine Erinnerungszeit
einzustellen. Der TV Bildschirm schaltet zur eingestellten Zeit automatisch auf die programmierte Sendung um.
DE
30
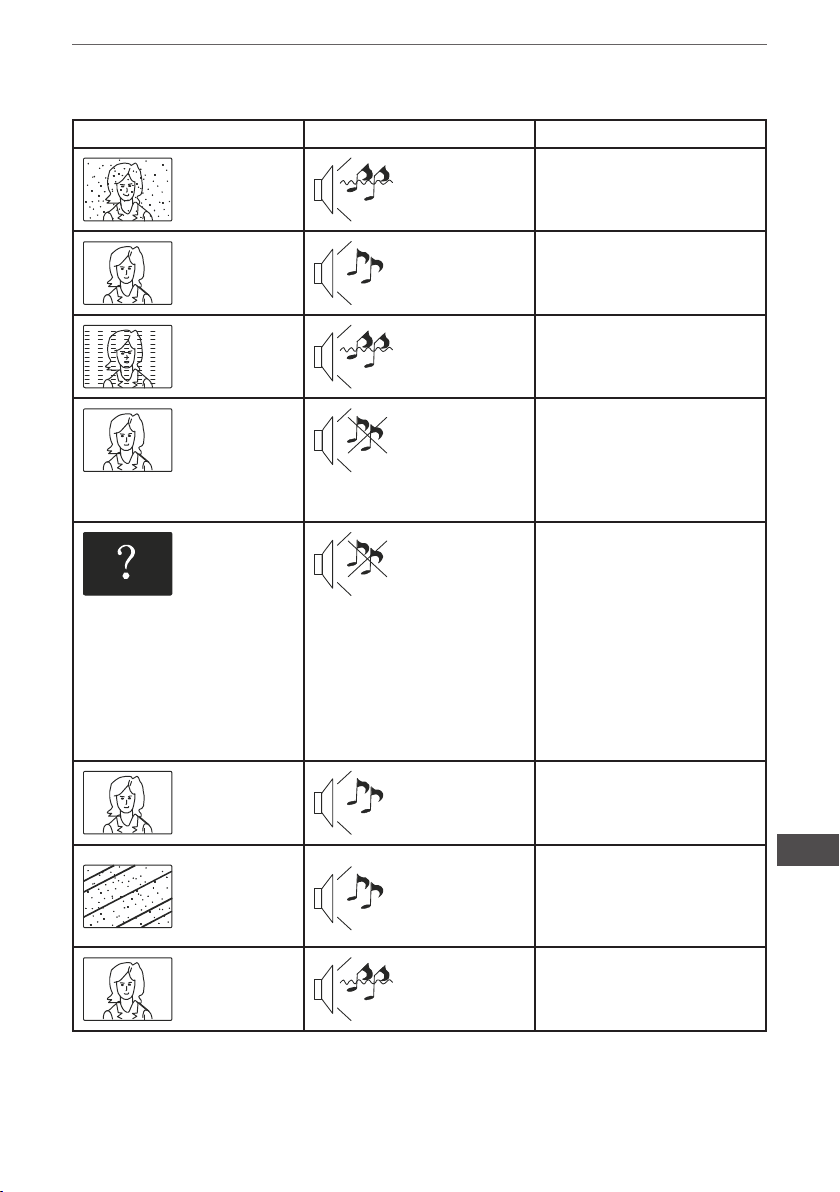
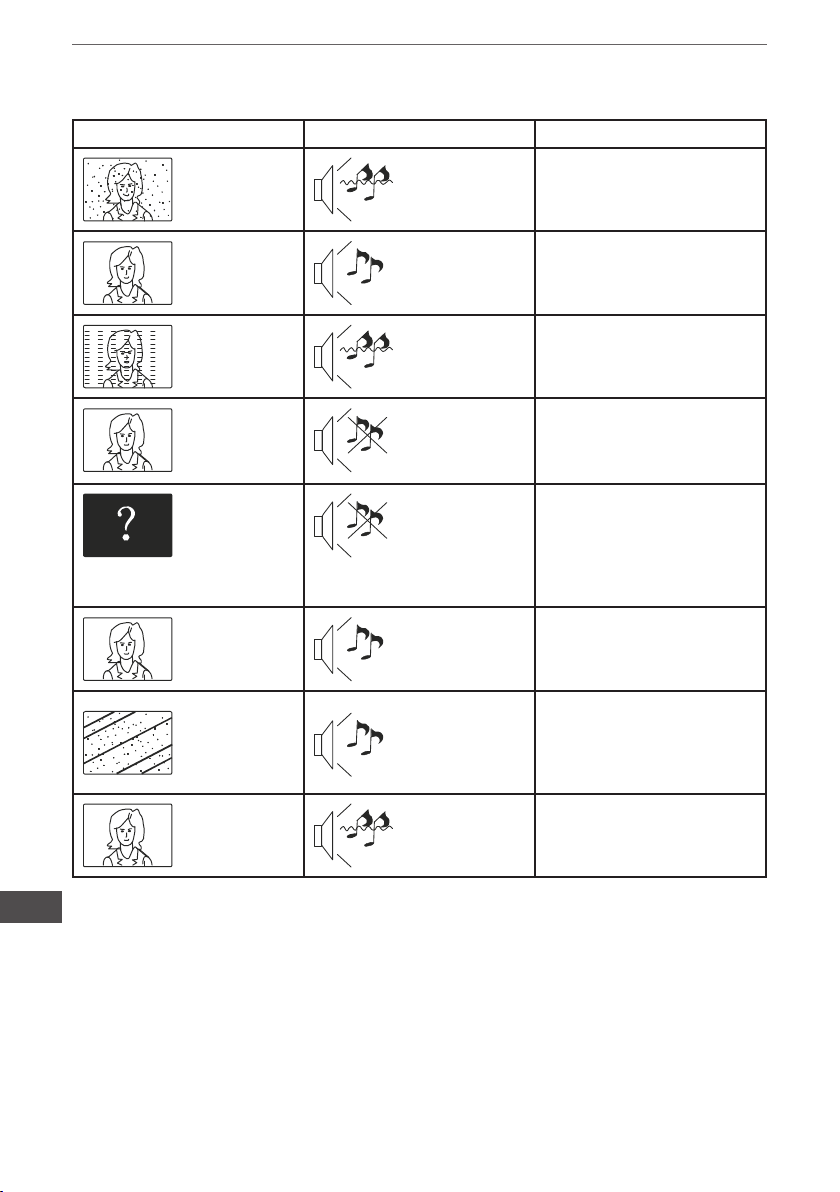
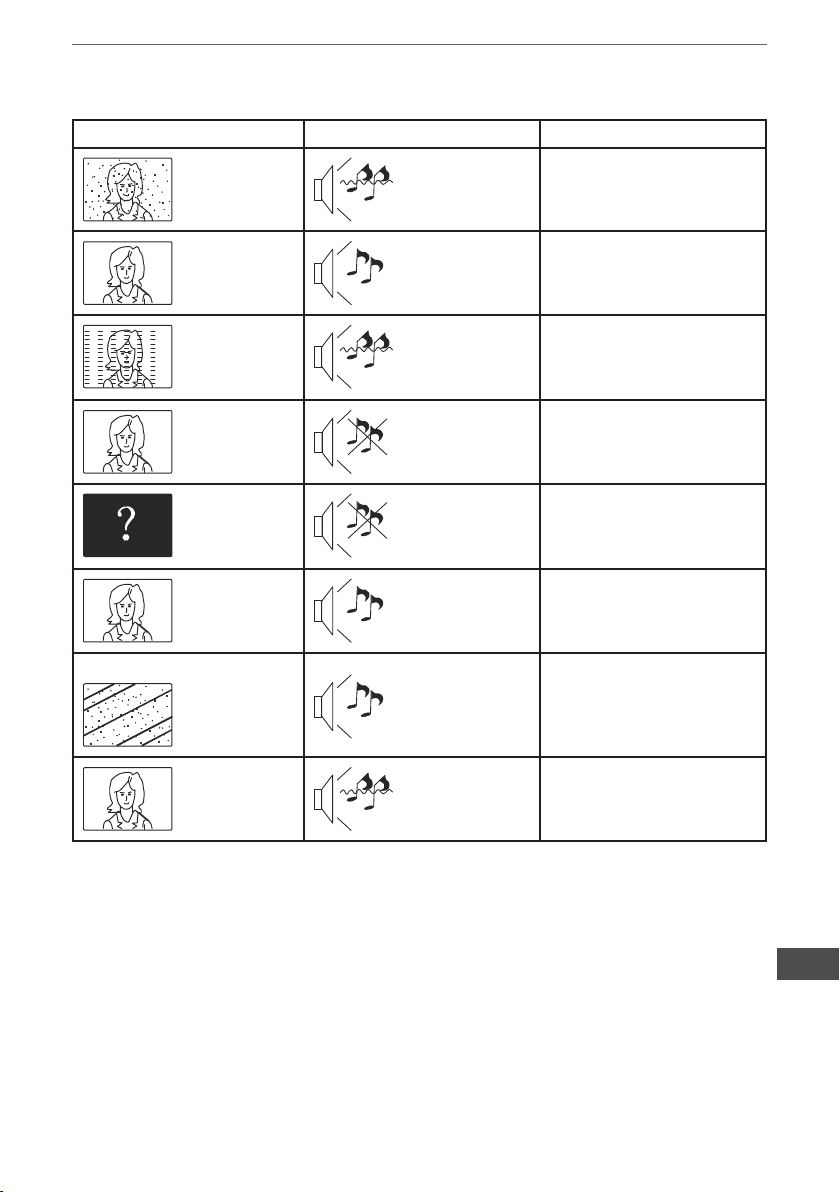
Fehlerbehebung
Bild Ton Fehlerbehebung
Schnee
Geist
Interferenz
Normales Bild
Kein Bild
Bedienungsanleitung
Geräusch
Normal Audio
Geräusch
Kein Ton
Kein Ton
- Überprüfen Sie
Antennenposition, Richtung
oder Verbindungen
- Überprüfen Sie
Antennenposition, Richtung
oder Verbindungen
- Überprüfen Sie elektronische
Geräte, Fahrzeug,/ Motorrad,
Fluoreszenzlicht
- Überprüfen Sie die
Lautstärke (Überprüfen Sie
ob der Ton Ausgeschaltet ist/
Stummschaltung aktiv oder
die Audioverbindungen nicht
richtig sind)
- Das Netzkabel ist nicht
eingesteckt
- Netzschalter ist nicht
geöffnet
- Überprüfen Sie die
Einstellungen für Kontrast und
Helligkeit/Lautstärke
- Drücken Sie die
Taste Standby an der
Fernbedienung zum
überprüfen
Keine Farbe
breaking up
Bild zerbricht
Keine Farbe
Normal Audio
oder schwach
Normal Audio
Geräusch
- Farbeinstellung überprüfen
- Sendersuche wiederholen
- TV System Überprüfen
DE
31

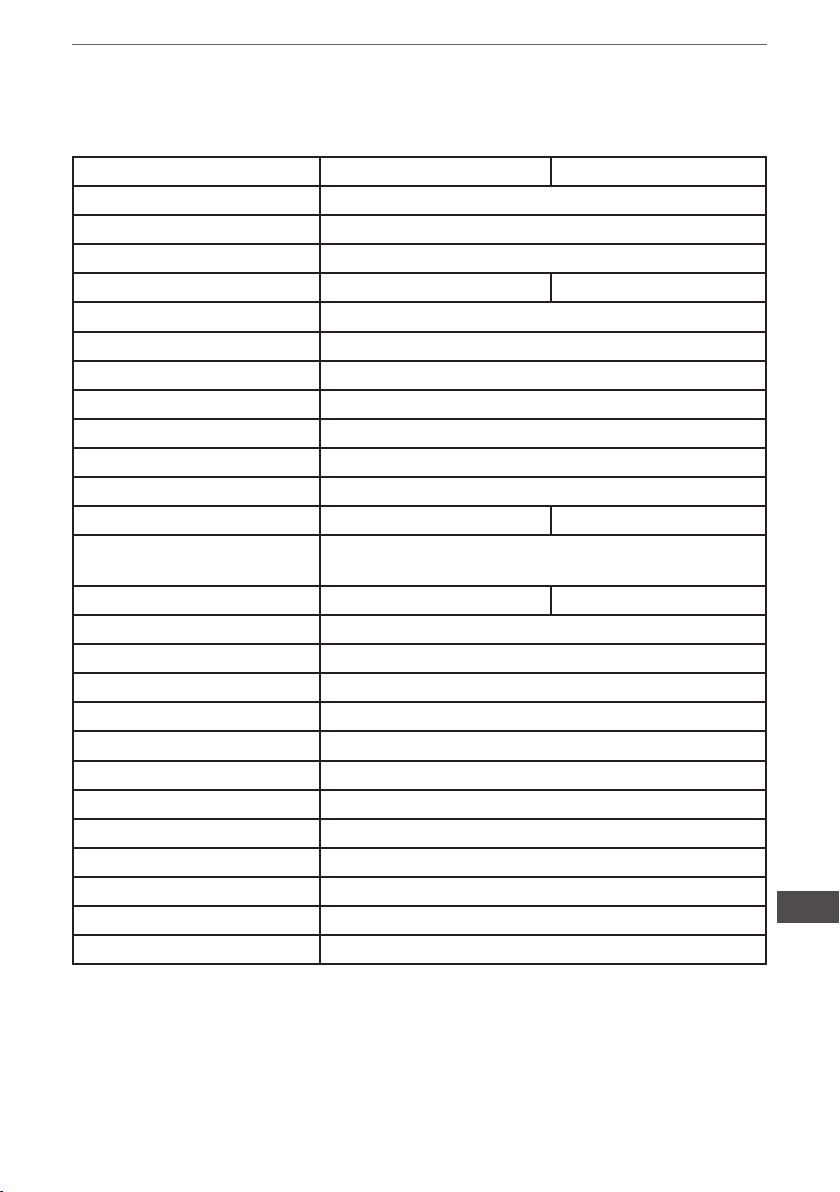
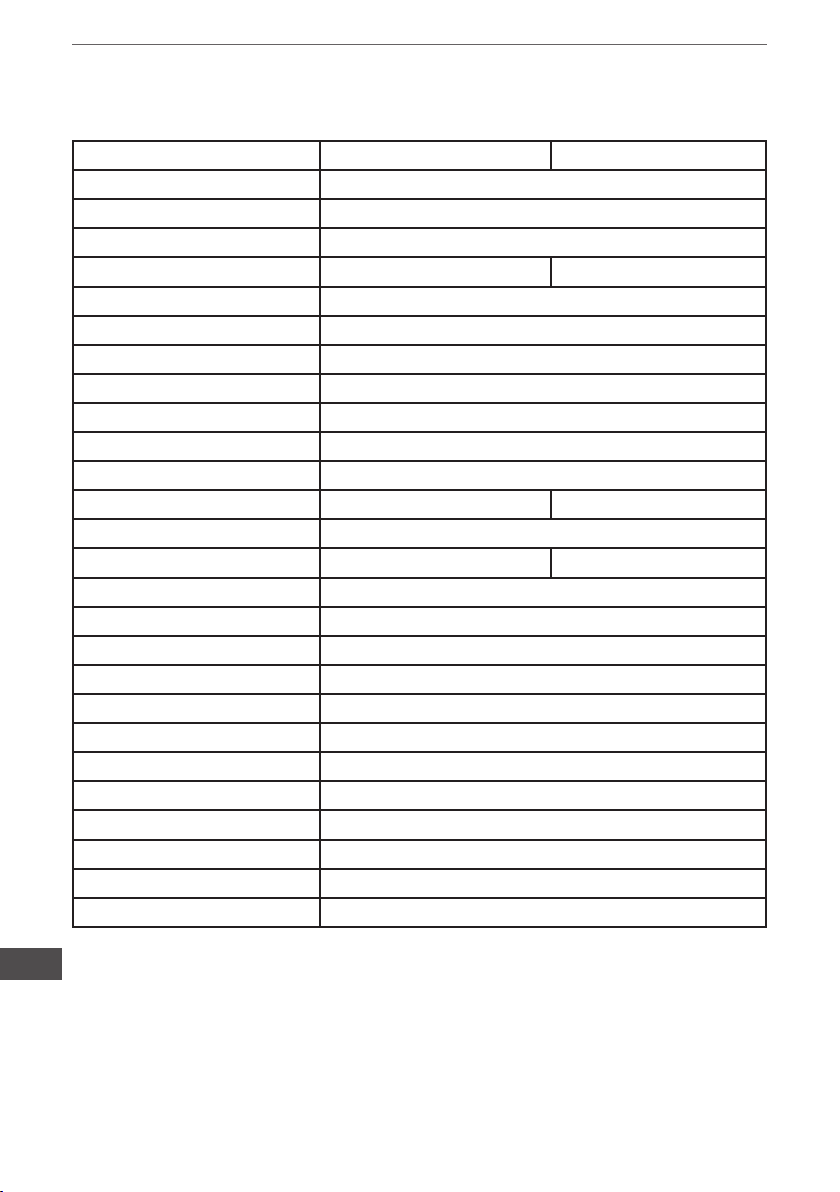
TECHNISCHE DATEN
Bildschirmgröße 24" 32"
Panel Type LED Hintergrund
Bildformat 16:9
Pixelanzahl 1366*768
Helligkeit (cd/m2) 200 (±10%) 230 (±10%)
Kontrast 1000:1
Betrachtungswinkel
(H/R,CR>=10)
Reaktionszeit 5ms
Farbanzeige 16.7M
TV System DVB-T/ C
Standard Video PAL / SECAM
Eingangsspannung 100-240V ~ 50Hz
Verbrauch 38W 50W
Verbrauch (Standby) ≤0.5W
Audio-Ausgangsleistung 2x3W 2x8W
RF Tuner x1
VGA x1
PC Audio In x1
Kopfhörer x1
CI x1
HDMI x2
USB x1
AV x1
DE
Ypbpr x1
Scart x1
Coaxial x1
Vesa 200x100mm
Bedienungsanleitung
H:160°, V:150°
Die Spezikationen können ohne Ankündigung geändert werden.
32

Bedienungsanleitung
DE
33

CAUTION
TO REDUCE THE RISK OF ELECTRIC
SHOCK, DO NOT REMOVE COVER
(OR BACK). NO USER SERVICEABLE
PARTS INSIDE, REFER SERVICING TO
QUALIFIED SERVICE PERSONNEL.
The symbol indicates that
dangerous voltages constituting
a risk of electric shock are
present within this unit.
The symbol indicates that there
are important operating and
maintenance instructions in the
Iiteraturaccompanying this unit.
IMPORTANT SAFETY
INSTRUCTION
1) Read these instructions.
2) Keep these instructions.
3) Heed all warnings.
4) Follow all instructions.
5) Do not use this apparatus near water.
6) Clean only with dry cloth.
7) Do not block any ventilation openings,
install in accordance with the instructions.
8) Do not install near any heat sources
such as radiations, heat registers, stoves,
or other apparatus (including ampliers)
that produce heat.
9) Do not defeat the safety purpose of the
EN
polarized plug. If the provided plug does
not t into your outlet, consult an electrician for replacement of the obsolete outlet.
10) Protected the power cord from being
walked on or pinched particularly at plugs,
convenience receptacles, and the point
where they exit from the apparatus.
11) Only use attachments/accessories
specied by the manufacturer.
Owner’s manual
12) Unplug this apparatus during lighting
storms or when unused for long periods
of time.
13) Refer all servicing to qualied service
personnel. Servicing is required when the
apparatus has been damaged in anyway,
such as power-supply cord or plug is damaged, liquid has been spilled or objects
have fallen into the apparatus, the appara-
tus has been exposed to rain or moisture,
does not operate normally, or has been
dropped.
14) Mains plug is used as the disconnect
device, the disconnect device shall remain
readily operable.
15) The ventilation should not be impeded
by covering the ventilation openings with
items, such as newspapers, table-cloth,
curtains, etc.
16) No naked ame sources, such as
lighted candles, should be placed on the
apparatus.
17) Attention should be drawn to the environmental aspects of battery disposal.
18) The use of apparatus in moderate climate.
19) The apparatus shall not be exposed to
dripping or splashing and that no objects
lled with liquids, such as vases, shall be
placed on the apparatus.
34

Owner’s manual
Warning
High voltages are used in the operation of
this television receiver. Do not remove the
cabinet back from your set. Refer servic-
ing to qualied service personnel.
Warning
To prevent re or electrical shock hazard,
do not expose the television receiver to
rain or moisture.
Caution
Do not block the ventilation holes in the
back cover. Adequate ventilation is essential to prevent failure of electrical components.
Caution
Do not trap the power supply cord under
the television receiver.
Warning
Do not drop or push objects into the television cabinet slots or openings. Never
spill any kind of liquid on the television
receiver.
Caution
Never stand on, lean on, or suddenly push
the television or its stand. You should pay
special attention to children. Serious injury
may result if it should fall.
EN
35

Owner’s manual
Caution
Do not place your television on an unstable cart, stand, shelf or table. Serious
injury to an individual , and damage to the
television, may result if it should fall.
When the television receiver is not used
for an extended period of time, it is advisable to disconnect the AC power cord from
the AC outlet.
Caution
INSTALLATION
* Locate the TV in the room where light does not strike the screen directly.
* TotaI darkness or a reection on the picture screen can cause eyestrain. Soft and indirect lighting is recommended for comfortable viewing.
* AIIow enough space between the TV and the wall to permit ventilation.
* Avoid excessively warm locations to prevent possible damage to the cabinet or premature component failure.
* Do not cover the ventilation openings when using the TV.
Minimum distances
EN
36

Owner’s manual
Base stand assembly instruction (URZ4024A)
1. Place the TV with the display side down on a fIat surface. Use a cloth to protect. Locate the bottom at the stand.
2. Fix the bottom with turning the screw tightly on the stand.
EN
37

Owner’s manual
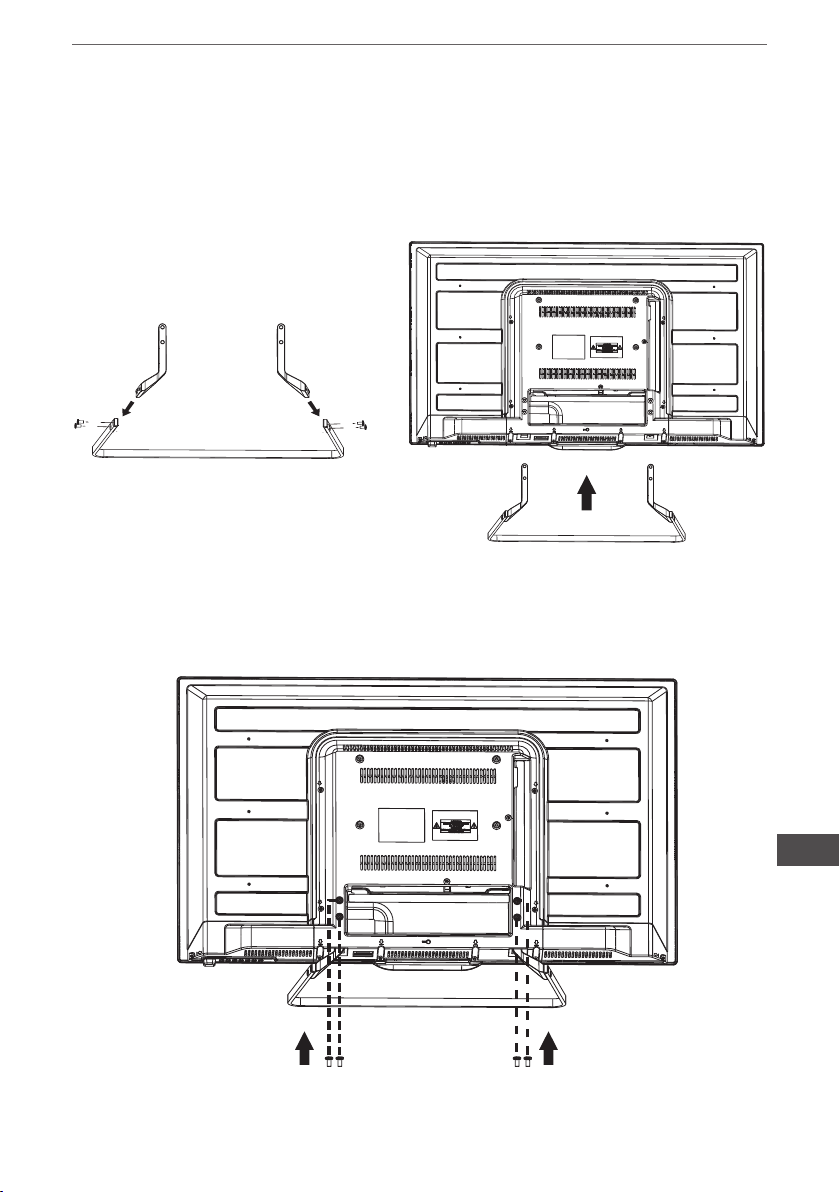
Base stand assembly instruction (URZ4032)
1. Place the TV with the display side down on a fIat surface. Use a cloth to protect. Locate the bottom at the stand.
2. Let the four screws into the screw holes and tighten the back of the TV.
EN
38
Front panel
3
Owner’s manual
1
2
30 30
ASPECT
SLEEP
USB
VGA YPbPr TV
CH.LIST
S.M
VOL CH
P.M
DISPLAY
1: Remote control sensor
2: Indicator LED
• Blue - power on
• Red - standby
3: Side buttons
Keyboard
1 2 3 4 5
SOURCE MENU V- V+ CH- CH+ Standby
1. SOURCE
Display the input source menu. In
MENU mode, press “SOURCE” to
conrm the selected item.
2. MENU
Display main MENU.
3. VOL+/VOL-
Adjust sound level.
ln MENU mode, press “VOL+” or
“VOL-“ to adjust the item that you
selected.
4. CH+/CH-
ln TV mode, press “CH-” or “CH+” to
change the channel up and down. ln
MENU mode, press “CH-” or “CH+”
to select items.
5. STANDBY
Press this button to turn the unit ON
from STANDBY mode. Press it again
to turn the set back to STANDBY.
EN
39

Owner’s manual
Rear AV connections (URZ4024A)
Terminals from left to right: AC power socket, YPbPr input, VIDEO, AUDIO inputs, SPDIF
output, SCART.
Side AV connections (URZ4024A)
Terminals from left to right: USB, HDMI2, HDMI1, headphone, CI, PC audio, VGA, RF.
Note: Insert the plug of the earphone into the earphone jack on the unit HEADPHONE.
The speakers are now muted.
EN
40
Owner’s manual
Rear AV connections (URZ4032)
Terminals from left to right: AC power socket, YPbPr input, VIDEO, AUDIO inputs, SPDIF
output, SCART.
Side AV connections (URZ4032)
Terminals from left to right: USB, HDMI2, HDMI1, headphone, CI, PC audio, VGA, RF.
Note: Insert the plug of the earphone into the earphone jack on the unit HEADPHONE.
The speakers are now muted.
Antenna
Antenna
ANT 75Ω
Adaptor (not included)
EN
41
PC
Be sure both the TV and computer
are set to Power off.
1. Connect VGA and audio cable.
2. Connect the power cord.
3. Power on the TV, switch to PC
mode.
4. Power on the PC.
Note: This sequence is very important.
Owner’s manual
EN
42
A
Resolution V.Freq.(Hz) H.Freq.(Hz)
800*600 60 37.88
640*480 60 31.47
1024*768 60 48.36
1280*1024 60 63.98
1366*768 60 47.7
Owner’s manual
AV equipment (URZ4024A)
This TV provides one group of AV one group of YPbPr and one SCART for convenient
connection to VCR, DVD or other video equipment. Please refer to the owners manual
of the equipment to be connected as well. You can use the input terminals on TV set rear
as follows.
Yellow (video)
White (audio L)
Red (audio R or Pr)
Blue (Pb)
Green (Y)
It can be connected to the following appliances: VCR, multi disc player, D\/D, camcorder,
video game or stereo system, etc .....
YPbPr can support these video formats: 480i, 576i, 480p, 576p, 720p, 1080i.
EN
43

Owner’s manual
AV equipment (URZ4032)
This TV provides one group of AV one group of YPbPr and one SCART for convenient
connection to VCR, DVD or other video equipment. Please refer to the owners manual
of the equipment to be connected as well. You can use the input terminals on TV set rear
as follows.
Yellow (video)
White (audio L)
Red (audio R or Pr)
Blue (Pb)
Green (Y)
EN
It can be connected to the following appliances: VCR, multi disc player, D\/D, camcorder,
video game or stereo system, etc .....
YPbPr can support these video formats: 480i, 576i, 480p, 576p, 720p, 1080i.
44

REMOTE CONTROL
Owner’s manual
1. POWER: To set the TV to standby or
power on.
2.
key, in teletext mode used as subpage key.
3.
key, in teletext mode used as reveal key.
4.
continue playback.
5.
pause playback.
6. TEXT: To enter or exit TELETEXT.
7. SUBTITLE: To turn on subtitles press the
subtitle button in DTV mode.
8. : Displays the main on-screen menu.
9. CURSOR: To move within the menu.
10. OK: Conform selection.
11. EPG: To display information about the
program begin viewed and what's on next it
DTV mode.
12. FAV: To access your favorite channels
list in TV or DTV mode.
13. VOL+/-: To adjust sound level.
14. NUMERIC KEY: For direct access to
channels.
15. AUDIO: To select the available audio
language of TV programs.
16. MUTE: To disable or enable the sound
output.
17.
key, in teletext mode used as list key.
18.
ous key, in teletext mode used as hold key.
19.
20. : Press to stop play in USB mode.
21. INFO: To display the program information of the show you are watching, press
the info button.
22. FREEZE: Press the freeze the picture
you are watching.
23.
available video sources.
24. EXIT: To return to the previous menu or
exit menu.
25. CH+/CH-: To access the next or previ-
ous channel.
26. REP: Press to record the TV program
you are watching in DTV mode. In USB
mode, press to select repeat mode.
27. RECALL: Jumps to last channel
viewed.
: In USB mode, used as reverse
: In USB mode, used as forward
: Press in USB mode to begin or
: Press in USB playback mode to
: In USB mode, used as next
: In USB mode, used as previ-
: In teletext mode used as index.
: Press to display and select the
EN
45

Owner’s manual
TELETEXT
Teletext is an information system broadcast by certain channels which can be consulted like a newspaper. lt also offers access to subtitles for viewers with hearing problems
or who are not familiar with the transmission language (cable networks, satellite channels, etc.)
Press You will obtain
This is used to call or exit teletext modes. The summary appears with
a list of items that can be accessed. Each item has a corresponding
3 digit page number. If the channel selected does not broad-
cast teletext, the indication 100 will be displayed and the
screen will remain blank (in this case, exit teletext and select
another channel).
Enter the number of the page required using the 0 to 9 up/
down.
Example: page 120, enter 120. The number is displayed top
left, the counter turns and then the page is displayed. Repeat
this operation to view another page. If the counter continues
to search, this means that the page is not transmitted. Select
another number.
Colored are as are displayed at the bottom of the screen. The
4 colored keys are used to access the items or corresponding
pages. The colored are as ash when the item or the page is
not yet available.
This returns to the contents page (usually page 100).
Certain pages contain sub-pages which are automatically
displayed successively. This key is used to stop or resume
subpage acquisition. The indication appears top left.
To freeze the page.
To display or hide the concealed information (games solutions).
The user can set four favorite pages to be directly linked to the
four color keys. While list mode is activated, it is not possibility to use TOP or FLOF navigation with the color keys. The
favorite page numbers should be stored and restored to/from
nonvolatile memory for each channel by the system software.
EN
TEXT
SELECTING A
PAGE
DIRECT ACCESS
TO THE ITEM
(INDEX)
(SUB PAGE)
(HOLD)
(REVEAL)
(LIST)
46

Owner’s manual
INSTALLATION GUIDE
1). Press the buttons to navigate the menu and change the settings. Press the
OK button to conrm.
Select your desired language to be displayed on the menu.
2). Press the buttons to select DVB-T/DVB-C and then press the OK button to conrm.
a. If you select DVB-T to next step is select the Tune and country the press the OK
button to start tuning.
EN
47
Owner’s manual
b. If you select DVB-C, the next step is to cong the DVB-C system like (scan type /
Frequency / Network ID / Symbol KS/S) then press OK button to into the tune type and
country select menu, this step is the same as DVB-T, select the tune type (DTV/ATV).
Choise the right country, press OK button to start tuning.
3). Channel tuning will commence. This operation may take up to 6 minutes. The
display will show the progress of the tuning and the number of channels found.
4). After tuning is complete, the channels are arranged in a preset order. If you wish
to skip channels, modify the preset order or rename channels, select Programme Edit
under the Channel menu.
EN
48

Owner’s manual
CHANNEL MENU
Auto Tuning (DVB-T)
1). Press the MENU button and then press the buttons to select the CHANNEL
menu.
2). Press the buttons to select Auto Tuning and then press the OK button.
3). Press the buttons to select DVB-T/DVB-C. Press select DVB-T and then press
the OK button to conrm.
4). In the Tune Type menu, press the
Press the button and then press the buttons to select the country where you
will operate the TV. Press the OK button to conrm.
buttons to select ATV / DTV / DTV + ATV.
EN
49

Owner’s manual
5). Channel tuning will commence. This operation may take up to 6 minutes. The display
will show the progress of the tuning and the number of channels found.
6). After tuning is complete, the channels are arranged in a preset order. If you wish
to skip channels, modify the preset order or rename channels, select Programme Edit
under the channel menu.
EN
50

Owner’s manual
Auto Tuning (DVB-C)
1). Press the MENU button and then press the buttons to select the CHANNEL
menu.
2). Press the buttons to select Auto Tuning and then press the OK button.
3). Press the buttons to select DVB-T/DVB-C. Press select DVB-C and then press
the OK button to conrm.
4). Press the buttons to select Scan type/Symbol(Ks/S) press the OK button to
conrm.
EN
51

Owner’s manual
5). In the Tune Type menu, press the buttons to select ATV / DTV / DTV + ATV.
Press the
will operate the TV. Press the OK button to conrm.
button and then press the buttons to select the country where you
EN
6). Channel tuning will commence. This operation may take up to 6 minutes. The display
will show the progress of the tuning and the number of channels found.
7). After tuning is complete, the channels are arranged in a preset order. If you wish
to skip channels, modify the preset order or rename channels, select Programme Edit
under the channel menu.
52

Owner’s manual
Program edit
You can Delete ,Rename ,Move, Skip , FAV any programs.
Delete
Press teletext red button , the program in cursor will delete.
Move
Use the Arrow Buttons to select the channel you wish to move. Then press the Yellow
Button to select Move function. Once active use the Arrow Buttons to move and then
press OK to conrm.
Skip
Press to choose the program, press teletext blue button to skip this program, the
will show on the right side of the program.
Choose the skipped program, press blue button again, you can cancel the skip, the
will disappear.
Favourite
Press
of the program. Choose the FAV program, press FAV button again, you can cancel the
FAV,
Once your favorite group is created, you can press the FAV key to quickly access your
favorite channel.
to choose the program, press FAV button, it will show on the right side
the will disappear .
EN
53

Owner’s manual
PICTURE MENU
The second item of the MENU is PICTURE MENU. You can adjust picture effect here,
such as contrast, brightness, etc. Press to move, press OK to adjust.
EN
54
Owner’s manual
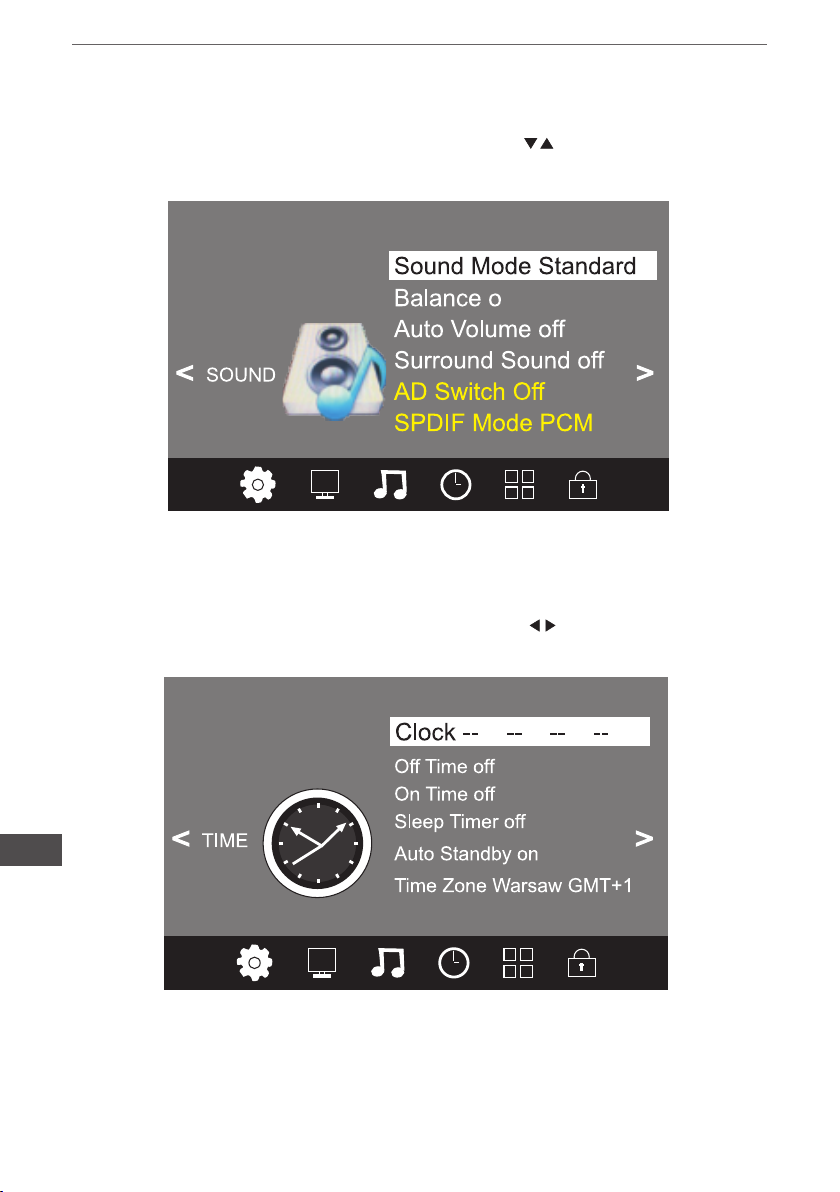
SOUND MENU
The third item of the MENU is the SOUND MENU. You can adjust the sound effect here
such as treble, bass, balance etc. Press to move, press OK to adjust.
TIME MENU
The fourth item of the menu is the TIME MENU You can adjust the clock, power on/off
time, sleep time etc. Press to move, press OK to adjust.
EN
55

Owner’s manual
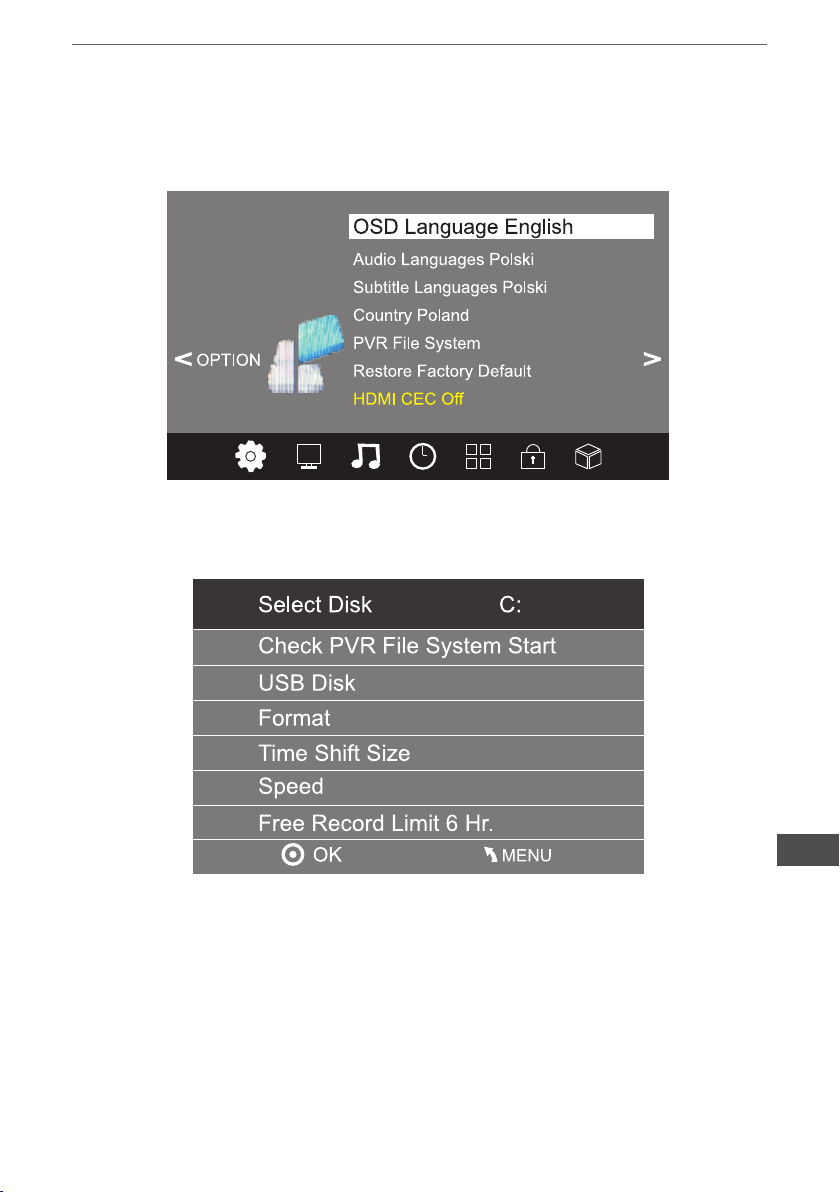
OPTION MENU
The fth item of the MENU is the OPTION MENU. You can adjust the Menu language,
Audio language,Subtitle language etc.
In PVR File system menu you can set up USB disk for PVR.
EN
NOTE:
Restore factory default will clear all the programs and password.
56
Owner’s manual
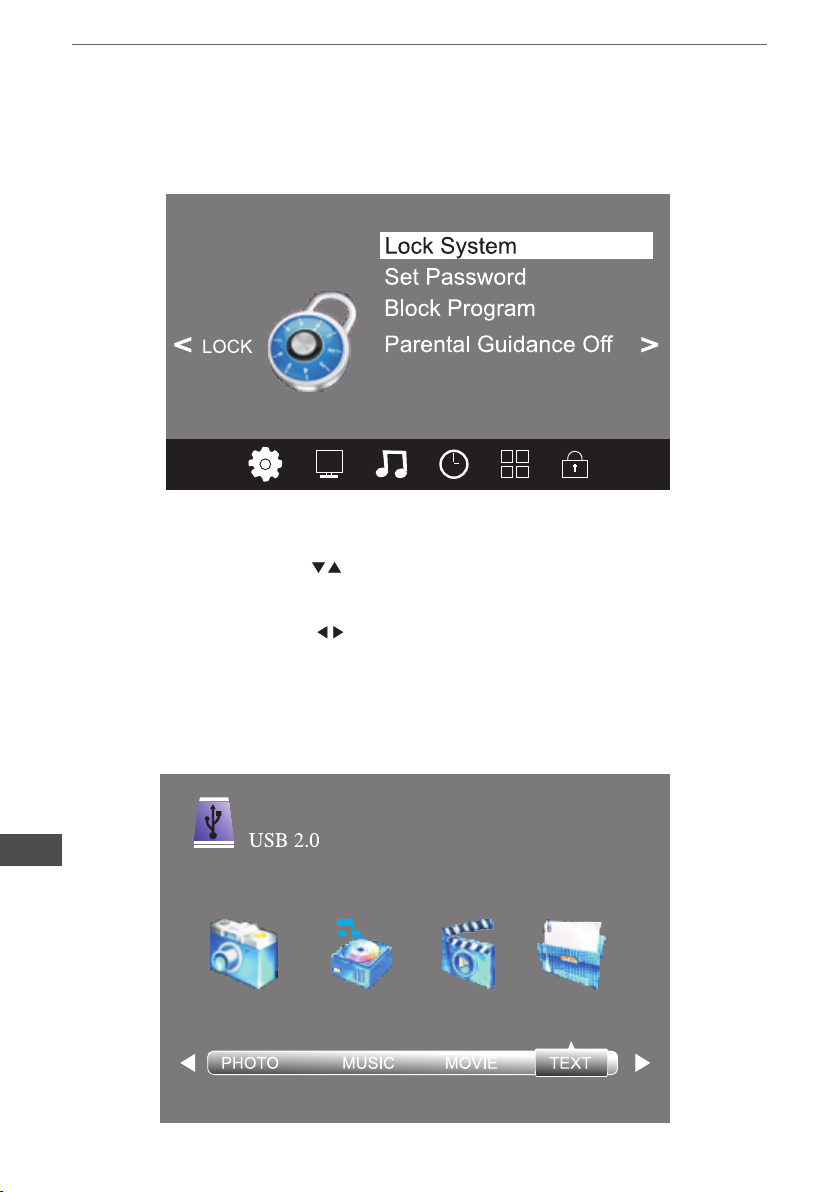
LOCK MENU
The sixth item of the menu is the LOCK MENU You can lock system, set password,
block program and set parental guidance. Once you set the lock system on, you can not
search the channels or change any programs.
NOTE:
The default pass word is 6666.
Block program: Press to choose the program, press teletext green button to block
the program. If you want unblock the program, pls enter the main menu , input the password, then press green button again. Parental guidance: Press to choose rating.
USB
Press the button and then select USB item to enter the USB menu.
EN
57
Owner’s manual
Please make sure that the USB device have plugged in the slot. There are four type me-
dia item can be selected, such as photo, music, Movie, and text. Select the type media
item by pressing
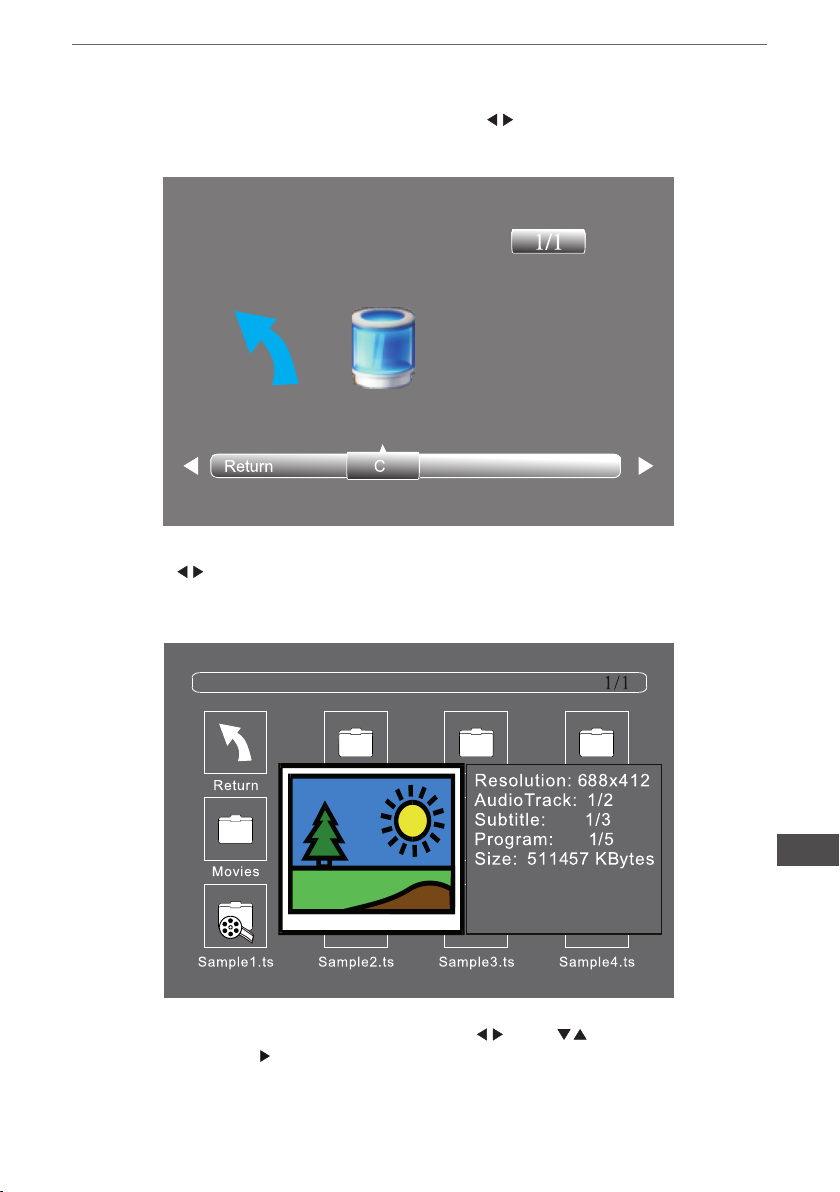
Press the to select the right disk and press OK to display media les and folder list
or choose Return to back to the media type selection menu.
, press OK button to enter the disk selection menu.
EN
Select the media le by pressing or , then the preview frame will pop up. Press
the to play the media le in full screen. When the media le (photo, music, movie, or
text type) is playing, press the OK or Info button con display the control bar.
58
Owner’s manual
Press to select the function icon, press OK button to conrm the function.
Press or EXIT button to exit the control bar.
USB playback is supported for the following formats.
Photo: JPEG, BMP, PNG
Music: MP3
Text: TXT
Movie: TS (MPEG2 & H.264)
EN
59

Owner’s manual
EPG Menu (Electronic Program Guide)
The EPG menu is used to look at what is being broadcasted on DTV or Radio channel
in the day. To access the EPG menu, press the EPG button, the following menu will be
displayed:
Info
Use
gram’s information.
Press the teletext yellow key. It can list all the reminder schedule, press to choose
the list. Press red key
EPG menu.
to choose the programs. Press INFO key, you can display the highlight pro-
Schedule
DELETE to delete the schedule list. Press EPG to return to
EN
60

Owner’s manual
Record
Press the red key, it can set the program to be recorded.
Remind
Press the blue key to choose one program and set up one reminder time. The TV screen
will skip to the choosed program in the reminder time automatically.
EN
61
TROUBLESHOOTING
Picture Sound Inspection check
Snow
Ghost
Interference
Normal picture
No picture
No color
breaking up
Picture
Owner’s manual
Noise
Normal audio
Noise
Mute
Mute
Normal audio
or weak
Normal audio
- antenna position, direction
or connection
- antenna position, direction
or connection
- electronic equipment, car /
motorcycle, uorescent light
- volume (check if mute is
activated or if the audio
system connections are not
correct)
- power cord is not inserted
- power switch is not opened
- contrast and brightness/
volume setup
- press standby key on the
remote control for inspecting
- color control
- retune channel
EN
62
No color
- TV system
Noise
Owner’s manual
SPECIFICATION
Screen size 24" 32"
Panel type LED backlight
Aspect ratio 16:9
Pixel number 1366*768
Brightness (cd/m2) 200 (±10%) 230 (±10%)
Contrast 1000:1
Viewing angle(H/R,CR>=10) H:160°, V:150°
Response time 5ms
Display colors 16.7M
System TV DVB-T/ C
Standard video PAL / SECAM
Input power voltage 100-240V ~ 50Hz
Power consumption 38W 50W
Power consumption
(Standby)
Audio output power 2x3W 2x8W
RF tuner x1
VGA x1
PC Audio In x1
Headphone x1
CI x1
HDMI x2
USB x1
AV x1
Ypbpr x1
Scart x1
Coaxial x1
Vesa standard 200x100mm
≤0.5W
EN
Specications are subject to change without notice.
63
Owner’s manual
EN
64

Instrukcja obsługi
UWAGA
ABY ZMNIEJSZYĆ RYZYKO PORAŻENIA PRĄDEM, NIE NALEŻY ZDEJMOWAĆ OBUDOWY URZĄDZENIA. PRACE
SERWISOWE POWINNY BYĆ WYKO-
NYWANE PRZEZ WYKWALIFIKOWANY
PERSONEL.
Znak błyskawicy wewnątrz trójkąta równobocznego oznacza
obecność niebezpiecznego napięcia, znajdującego się pod
obudową urządzenia.
Wykrzyknik wewnątrz trójkąta równobocznego ma na celu
zwrócenie uwagi użytkownika na
ważne operacje i instrukcje zawarte w dołączonej do urządze-
nia dokumentacji.
BEZPIECZEŃSTWO
1) Przed podłączeniem urządzenia, należy przeczytać instrukcję obsługi.
2) Instrukcję należy zachować w celu póź-
niejszego wykorzystania.
3) Należy przestrzegać wszystkich uwag
i ostrzeżeń.
4) Należy postępować zgodnie z informa-
cjami zawartymi w instrukcji.
5) Nie należy umieszczać urządzenia w
miejscu, gdzie będzie narażone na zala-
nie.
6) Do czyszczenia należy używać wyłącznie miękkiej, wilgotnej ściereczki.
7) Nie należy blokować otworów wentylacyjnych urządzenia.
8) Nie należy umieszczać urządzenia w
pobliżu źródeł ciepła.
9) Jeżeli wtyczka nie pasuje do gniazda,
należy skontaktować się z elektrykiem w
celu jego wymiany.
10) Należy zabezpieczyć przewód zasilający przed nadepnięciami lub przyciśnięciami. Szczególną uwagę należy zwrócić na miejsca przy wtyczkach, oprawach
oraz w miejscach, w których przewód wychodzi z urządzenia.
11) Należy używać wyłącznie elementów
dodatkowych / akcesoriów zalecanych
przez producenta.
12) Urządzenie należy odłączyć od źródła
zasilania podczas burzy oraz w przypadku
nieużywania przez dłuższy okres czasu.
13) W przypadku jakichkolwiek proble-
mów z działaniem urządzenia, należy
skontaktować się z wykwalikowanym
serwisem. Nie należy samodzielnie próbować naprawiać urządzenia.
14) Wtyczka zasilająca jest głównym elementem wyłączającym urządzenie. Powinna znajdować się w łatwo dostępnym
miejscu.
15) Wentylacja nie powinna być utrudniona przez zasłanianie otworów wentylacyjnych gazetami, obrusami, zasłonami itp.
16) Nie należy używać w pobliżu urządzenia otwartego ognia (np. świec).
17) Zużyte baterie zasilające (pilot zdalnego sterowania), należy wyrzucić do przeznaczonych na to pojemników.
18) Nie należy stosować urządzenia w
miejscach o skrajnie wysokiej/niskiej temperaturze oraz dużej wilgotności powietrza.
19) Nie należy umieszczać w pobliżu
urządzenia pojemników z płynami (wazonów, kubków, butelek itp). Zalanie urządzenia może spowodować jego uszkodzenie oraz porażenie prądem elektrycz-
nym.
PL
65
Instrukcja obsługi
Uwaga
Nie należy zdejmować obudowy urządzenia. Wszelkie prace serwisowe należy powierzyć wykwalikowanemu serwisowi.
Uwaga
Aby uniknąć pożaru lub porażenia prądem
elektrycznym, nie należy narażać odbiornika telewizyjnego na działanie deszczu
oraz wilgoci.
Uwaga
Nie należy zasłaniać otworów wentylacyjnych. Odpowiednia wentylacja jest nie-
zbędna do prawidłowej pracy urządzenia.
Uwaga
Nie należy umieszczać żadnych przewodów pod podstawą telewizora.
Uwaga
Nie należy narażać telewizora na uderze-
PL
nia i silne wstrząsy.
66
Uwaga
Szczególną uwagę należy zwrócić na
dzieci bawiące się w okolicy telewizora.
Uderzenie telewizora, który został przewrócony może spowodować poważne obrażenia ciała.

Instrukcja obsługi
Uwaga
Nie należy umieszczać telewizora na niestabilnym podłożu. Przewrócenie urządzenia może spowodować obrażenia ciała oraz uszkodzenie telewizora.
Gdy telewizor nie jest używany przez
dłuższy czas, należy go odłączyć od źródła zasilania.
Uwaga
INSTALACJA
* Należy ustawić telewizor w takim miejscu, aby na jego ekran nie padały bezpośrednio
promienie słoneczne oraz inne silne światło.
* Całkowita ciemność lub odbicia na ekranie podczas oglądania, mogą powodować zmęczenie oczu. Miękkie i pośrednie oświetlenie jest zalecane do komfortowego oglądania.
* Należy zapewnić wystarczająco dużo miejsca pomiędzy telewizorem a ścianą, aby
umożliwić prawidłową wentylację (rysunek poniżej).
* Nie należy umieszczać telewizora w pobliżu źródeł ciepła.
Minimalne odległości przy instalacji
PL
67

Instrukcja obsługi
Montaż podstawy (URZ4024A)
1. Należy położyć telewizor na płaskiej powierzchni (stole, biurku itp.) ekranem w dół i
przymocować wspornik podstawy. Aby zabezpieczyć urządzenie przed porysowaniem,
na stole można położyć koc lub inny miękki materiał. Przed przystąpieniem do montażu
należy odłączyć wszystkie przewody podłączone do telewizora.
2. Należy przymocować podstawę telewizora do zamontowanego wcześniej wspornika.
PL
68

Instrukcja obsługi
Montaż podstawy (URZ4032)
1. Należy położyć telewizor na płaskiej powierzchni (stole, biurku itp.) ekranem w dół.
Aby zabezpieczyć urządzenie przed porysowaniem, na stole można położyć koc lub inny
miękki materiał. Przed przystąpieniem do montażu, należy odłączyć wszystkie przewody podłączone do telewizora.
2. Należy przymocować podstawę do telewizora używając 4 śrub jak pokazano na poniższym rysunku:
PL
69

Panel przedni
Instrukcja obsługi
2
3
30 30
USB
VGA YPbPr TV
CH.LIST
VOL CH
DISPLAY
1: Sensor pilota zdalnego
sterowania
2: Wskaźnik LED
• Niebieski - TV włączony
• Czerwony - tryb standby
3: Przyciski boczne
1
ASPECT
SLEEP
S.M
P.M
Przyciski boczne
SOURCE MENU V- V+ CH- CH+ Standby
PL
70
1 2 3 4 5
1. SOURCE
Wybór źródła sygnału. W Menu potwierdzenie wybranej opcji.
2. MENU
Wyświetlenie Menu urządzenia.
3. VOL+/VOL-
Regulacja głośności.
W Menu zwiększenie/zmniejszenie
wartości.
4. CH+/CH-
Zmiana kanału w górę/dół. W Menu
przejście do następnej/poprzedniej
pozycji.
5. STANDBY
Włączenie telewizora. Ponowne naciśnięcie - przejście do trybu
STANDBY.

Instrukcja obsługi
Tylne złącza AV (URZ4024A)
Złącza od lewej do prawej: gniazdo zasilania, wejście YPbPr, VIDEO, wejścia AUDIO,
wyjście SPDIF/COAXIAL, SCART.
Boczne złącza AV (URZ4024A)
Złącza od lewej do prawej: USB, HDMI2, HDMI1, wyjście słuchawkowe, CI, PC audio,
VGA, RF.
Uwaga: Po podłączeniu słuchawek do gniazda słuchawkowego, dźwięk w głośnikach
zostanie wyciszony.
PL
71

Instrukcja obsługi
Tylne złącza AV (URZ4032)
Złącza od lewej do prawej: gniazdo zasilania, wejście YPbPr, VIDEO, wejścia AUDIO,
wyjście SPDIF/COAXIAL, SCART.
Boczne złącza AV (URZ4032)
Złącza od lewej do prawej: USB, HDMI2, HDMI1, wyjście słuchawkowe, CI, PC audio,
VGA, RF.
Uwaga: Po podłączeniu słuchawek do gniazda słuchawkowego, dźwięk w głośnikach
zostanie wyciszony.
PL
72
Antena
Antena
ANT 75Ω
Zasilacz (nie znajduje
się w zestawie)

PC
Przed podłączeniem telewizora do
komputera, należy wyłączyć oba
urządzenia.
1. Należy podłączyć kable VGA i
audio.
2. Należy podłączyć przewód zasilający do telewizora.
3. Należy włączyć TV i wybrać tryb
PC.
4. Należy włączyć PC.
Uwaga: Kolejność wykonywanych
czynności jest bardzo ważna.
Instrukcja obsługi
A
Rozdzielczość V.Freq.(Hz) H.Freq.(Hz)
800*600 60 37.88
640*480 60 31.47
1024*768 60 48.36
1280*1024 60 63.98
1366*768 60 47.7
PL
73
Instrukcja obsługi
Sprzęt AV (URZ4024A)
Do telewizora można podłączyć dodatkowy sprzęt AV: zestaw kina domowego, odtwarzacz DVD, magnetowid itp. Służą do tego złącza znajdujące się z tyłu telewizora. Przykładowe połączenie przedstawione jest na poniższym rysunku:
Żółty (video)
Biały (audio L)
Czerwony (audio R / Pr)
Niebieski (Pb)
Zielony (Y)
PL
YPbPr obsługuje format: 480i, 576i, 480p, 576p, 720p, 1080i.
74
Instrukcja obsługi
Sprzęt AV (URZ4032)
Do telewizora można podłączyć dodatkowy sprzęt AV: zestaw kina domowego, odtwarzacz DVD, magnetowid itp. Służą do tego złącza znajdujące się z tyłu telewizora. Przykładowe połączenie przedstawione jest na poniższym rysunku:
Żółty (video)
Biały (audio L)
Czerwony (audio R / Pr)
Niebieski (Pb)
Zielony (Y)
YPbPr obsługuje format: 480i, 576i, 480p, 576p, 720p, 1080i.
PL
75

PILOT ZDALNEGO STEROWANIA
PL
Instrukcja obsługi
1. POWER: Wł./wył telewizora.
2.
przycisk przejścia do kolejnej podstrony (telegazeta).
3.
USB), przycisk powrotu do spisu treści (telegazeta).
4.
5.
6. TEXT: Uruchomienie telegazety.
7. SUBTITLE: Włączenie napisów.
8. :Wyświetlenie menu głównego na
ekranie.
9. PRZYCISKI KIERUNKOWE: Przyciski
służące do poruszania się po menu.
10. OK: Przycisk potwierdzenia.
11. EPG: Elektroniczny przewodnik po programach.
12. FAV: Wyświetlenie listy ulubionych ka-
nałów.
13. VOL+/-: Regulacja głośności.
14. PRZYCISKI NUMERYCZNE: Bezpo-
średni wybór numeru kanału.
15. AUDIO: Możliwość zmiany języka lektora (w zależności od nadawanego progra-
mu).
16. MUTE: Wyciszenie dźwięków.
17.
legazeta).
18.
manie (telegazeta).
19.
20. : Stop.
21. INFO: Wyświetlenie informacji o aktual-
nie oglądanym programie.
22. FREEZE: Zatrzymanie oglądanego obrazu.
23.
24. EXIT: Powrót do poprzedniego menu
lub wyjście z menu.
25. CH+/CH-: Przejście do następnego /
poprzedniego kanału.
26. REP: Nagrywanie (tryb TV), powtarzanie odtwarzania (tryb USB).
27. RECALL: Powrót do ostatnio oglądane-
go kanału.
: Przewijanie do tyłu (tryb USB),
: Przewijanie do przodu (tryb
: Uruchomienie odtwarzania (USB).
: Zatrzymanie odtwarzania (USB).
: Następny (tryb USB), lista (te-
: Następny (tryb USB), zatrzy-
: Index (telegazeta).
: Wybór źródła sygnału.
76
Instrukcja obsługi
TELEGAZETA
Telegazeta jest systemem informacyjnym nadawanym przez niektóre kanały. Widzowie
mają do dyspozycji ogłoszenia, program telewizyjny oraz informację z wielu działów tematycznych, poświęconych m.in. ogłoszeniom, motoryzacji, biznesowi i gospodarce,
aktualnościom, pogodzie, kulturze, sportowi itp. W ramach telegazety dla niektórych
programów nadawane są również napisy dla niesłyszących.
Przycisk Działanie
Aby włączyć lub wyłączyć telegazetę, należy nacisnąć przy-
TEXT
WYBÓR STRONY
cisk TEXT. Każda strona telegazety posiada 3-cyfrowy numer. Jeśli wybrany kanał nie nadaje telegazety, po włączeniu
widoczny będzie czarny obraz.
Aby przejść do danej strony należy wprowadzić jej numer
(numer strony jest widoczny w lewym górnym rogu ekranu).
Służą do tego przyciski numeryczne od 0 do 9. (Uwaga: nie
pod każdym numerem znajduje się transmitowana strona).
PRZYCISKI
DOSTĘPU
BEZPOŚREDNIEGO
(INDEX)
(PODSTRONY)
(HOLD)
(REVEAL)
(LIST)
Znajdujące się na dole ekranu kolorowe przyciski umożliwiają
bezpośredni dostęp do żądanych stron.
Przycisk powrotu do spisu treści (zazwyczaj strona 100).
Niektóre strony zawierają podstrony, które są automatycznie
przełączane. Przycisk ten służy do zatrzymania / wznowienia
przełączania podstron na danej stronie.
Zatrzymanie strony.
Aby wyświetlić lub ukryć ukryte informacje (w przypadku
gier).
Użytkownik ma możliwość ustawienia 4 ulubionych stron
przypisanych do 4 kolorowych przycisków na pilocie zdalne-
go sterowania.
PL
77
Instrukcja obsługi
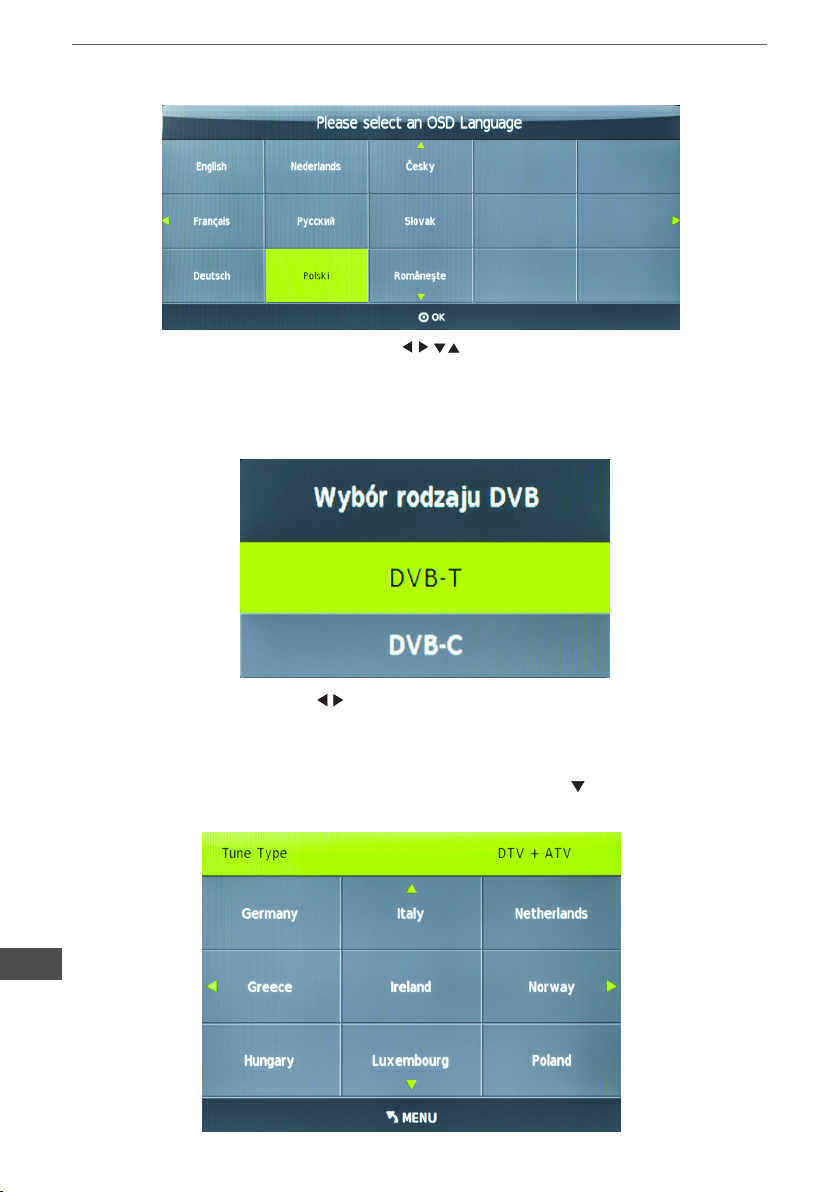
INSTALACJA
1). Za pomocą przycisków kierunkowych , należy wybrać żądany język i
nacisnąć przycisk OK.
2). Następnie należy wybrać źródło sygnału DVB-T/DVB-C i potwierdzić wybór
przyciskiem OK (dla naziemnej telewizji cyfrowej, należy wybrać źródło sygnału DVB-T,
dla telewizji kablowej - DVB-C).
DVB-T - używając przycisków należy wybrać typ wyszukiwania:
DTV - tylko kanały cyfrowe
ATV - tylko kanały analogowe
DTV+ATV - kanały cyfrowe i analogowe
Następnie należy przejść do wyboru kraju naciskając przycisk
przyciskiem OK.
PL
78
i potwierdzić wybór
Instrukcja obsługi
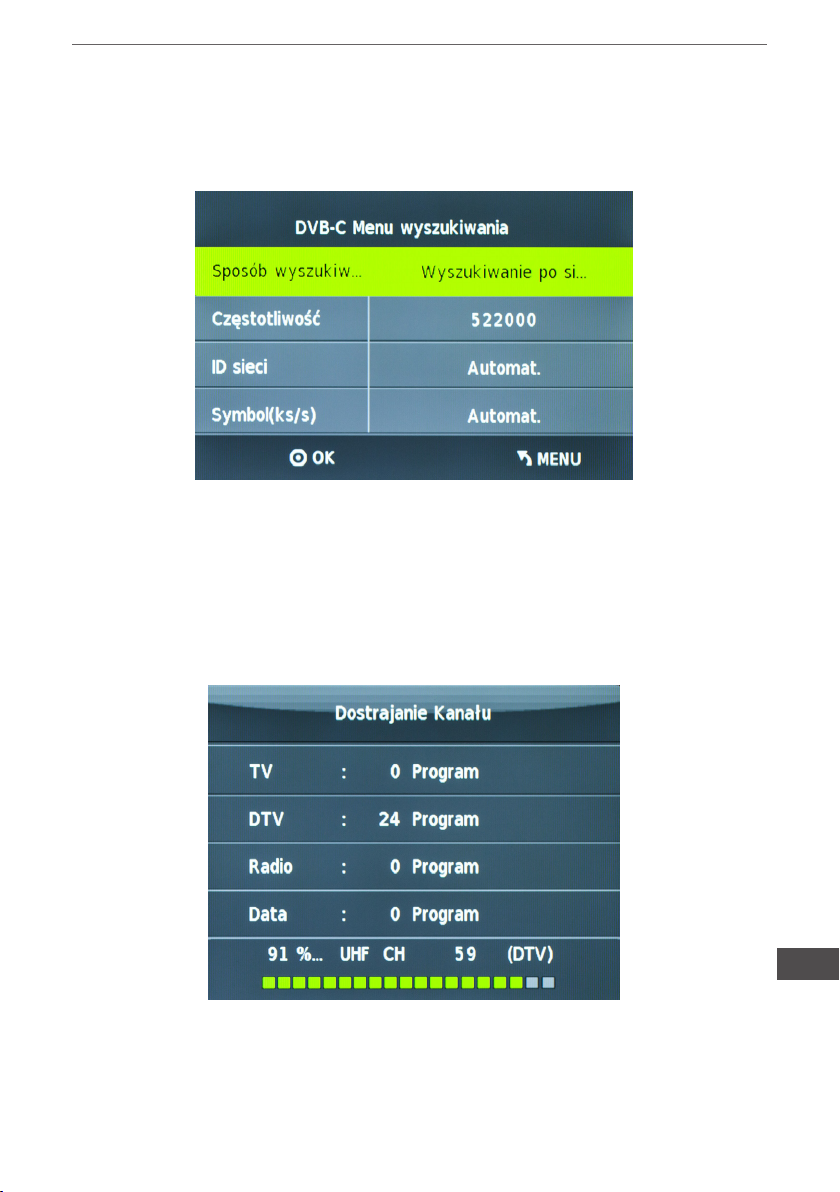
DVB-C - należy ustawić: typ skanowania/Częstotliwość/ID sieci/Symbol (KS/S) i
potwierdzić ustawienia przyciskiem OK. Następnie należy wybrać typ wyszukiwania
i kraj (analogicznie jak w przypadku DVB-T) i nacisnąć przycisk OK aby rozpocząć
wyszukiwanie.
3). Na ekranie wyświetlany jest aktualny postęp wyszukiwania oraz liczba znalezionych
kanałów. Operacja ta może potrwać ok 6 minut.
4). Po zakończeniu wyszukiwania, kanały zostaną zapisane w domyślnej kolejności.
Aby zmienić tą kolejność, należy przejść do manu Kanał i wybrać Edycja programu.
PL
79

Instrukcja obsługi
MENU KANAŁÓW
Automatyczne strojenie DVB-T (telewizja naziemna)
1). Należy nacisnąć przycisk MENU a następnie za pomocą przycisków wybrać
menu Kanał.
2). Następnie za pomocą przycisków , należy wybrać Automatyczne strojenie i
nacisnąć przycisk OK.
3). Za pomocą przycisków , należy wybrać DVB-T i potwierdzić wybór przyciskiem
OK.
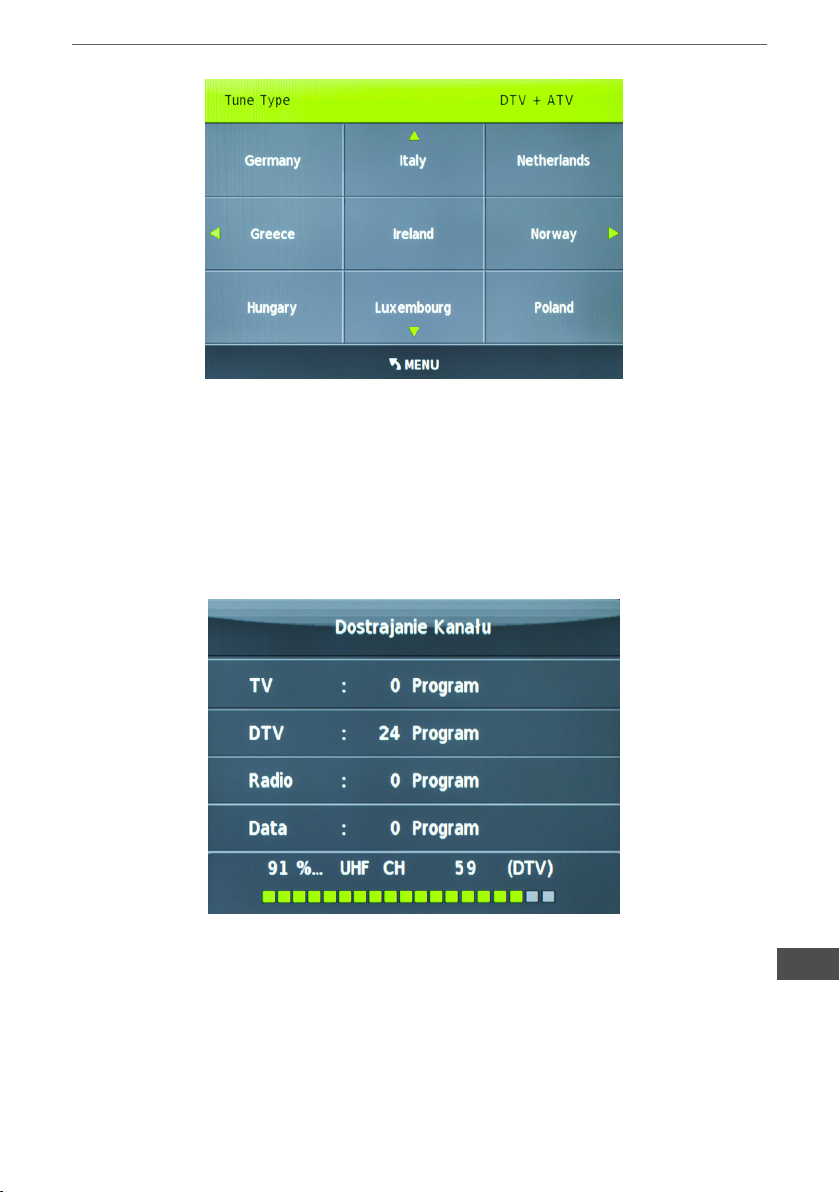
4). Używając przycisków
PL
DTV - tylko kanały cyfrowe
ATV - tylko kanały analogowe
DTV+ATV - kanały cyfrowe i analogowe
Następnie należy przejść do wyboru kraju naciskając przycisk i potwierdzić wybór
przyciskiem OK.
80
należy wybrać typ wyszukiwania:
Instrukcja obsługi
3). Na ekranie wyświetlany jest aktualny postęp wyszukiwania oraz liczba znalezionych
kanałów. Operacja ta może potrwać ok 6 minut.
4). Po zakończeniu wyszukiwania, kanały zostaną zapisane w domyślnej kolejności.
Aby zmienić tą kolejność, należy przejść do manu Kanał i wybrać Edycja programu.
PL
81

Instrukcja obsługi
Automatyczne strojenie DVB-C (telewizja kablowa)
1). Należy nacisnąć przycisk MENU a następnie za pomocą przycisków wybrać
menu Kanał.
2). Następnie za pomocą przycisków , należy wybrać Automatyczne strojenie i
nacisnąć przycisk OK.
3). Za pomocą przycisków należy wybrać DVB-C i potwierdzić wybór przyciskiem
OK.
4). Należy ustawić: typ skanowania/Częstotliwość/ID sieci/Symbol (KS/S) i potwierdzić
PL
ustawienia przyciskiem OK.
82

Instrukcja obsługi
5). Używając przycisków należy wybrać typ wyszukiwania:
DTV - tylko kanały cyfrowe
ATV - tylko kanały analogowe
DTV+ATV - kanały cyfrowe i analogowe
Następnie należy przejść do wyboru kraju naciskając przycisk i potwierdzić wybór
przyciskiem OK.
6). Na ekranie wyświetlany jest aktualny postęp wyszukiwania oraz liczba znalezionych
kanałów. Operacja ta może potrwać ok 6 minut.
7). Po zakończeniu wyszukiwania, kanały zostaną zapisane w domyślnej kolejności.
Aby zmienić tą kolejność, należy przejść do manu Kanał i wybrać Edycja programu.
PL
83

Instrukcja obsługi
Edycja programu
Menu umożliwia usuwanie, pomijanie, przesuwanie i dodawanie do ulubionych żądanych kanałów.
Usuwanie
Aby usunąć żądany kanał, należy go podświetlić i nacisnąć czerwony przycisk.
Przesuwanie
Aby przesunąć żądany kanał, należy go podświetlić i nacisnąć żółty przycisk. Następnie używając przycisków , należy przesunąć kanał na wybraną pozycję i potwierdzić przyciskiem OK.
Pomijanie
Aby pominąć żądany kanał, należy go podświetlić i nacisnąć niebieski przycisk (kanał
zostanie oznaczony symbolem
kanałach). Aby usunąć pomijanie kanału należy ponownie nacisnąć niebieski przycisk.
Ulubione
Aby dodać żądany kanał do grupy ulubionych, należy go podświetlić i nacisnąć przycisk
FAV (kanał zostanie oznaczony symbolem
należy ponownie nacisnąć przycisk FAV (symbol
PL
84
i będzie pomijany przy przechodzeniu po kolejnych
). Aby usunąć kanał z grupy ulubionych,
zostanie usunięty).

Instrukcja obsługi
MENU OBRAZ
Menu umożliwia zmianę ustawień: trybu obrazu (kontrast, jasność, kolor, ostrość), temp.
koloru, formatu obrazu, redukcji szumów itp.
PL
85

Instrukcja obsługi
MENU DŹWIĘK
Menu umożliwia ustawienie: trybu dźwięku, balansu itp.
MENU CZAS
Menu umożliwia ustawienie: czasu, automatycznego włączenia, automatycznego wyłączenia, wyłącznika czasowego (funkcja sleep) itp.
PL
86

Instrukcja obsługi
MENU OPCJE
Menu umożliwia ustawienie języka, ustawienie kraju, edycję ustawień PVR oraz przywrócenie ustawień domyślnych itp.
Menu ustawień PVR umożliwia wybór dysku USB do nagrywania PVR.
UWAGA:
Przywrócenie ustawień fabrycznych spowoduje nieodwracalne usunięcie wszystkich zapisanych programów oraz innych danych.
PL
87

Instrukcja obsługi
MENU BLOKADA
Menu umożliwia zablokowanie kanałów, zmianę hasła dostępu itp.
UWAGA:
Domyślne hasło dostępu: 6666.
USB
Aby przejść do menu USB, należy nacisnąć przycisk na pilocie zdalnego sterowania.
PL
88

Instrukcja obsługi
Należy się upewnić, że pamięć USB została podłączona do telewizora. Urządzenie
umożliwia odtwarzanie 4 rodzajów multimediów: zdjęć, muzyki, lmów oraz tekstu. Aby
rozpocząć odtwarzanie, należy wybrać żądany typ i potwierdzić wybór przyciskiem OK.
Używając przycisków kierunkowych, należy wybrać żądany plik/folder.
Aby rozpocząć odtwarzanie wybranego pliku, należy nacisnąć przycisk na pilocie. Aby
wyświetlić pasek sterowania, należy nacisnąć przycisk OK lub Info.
PL
89
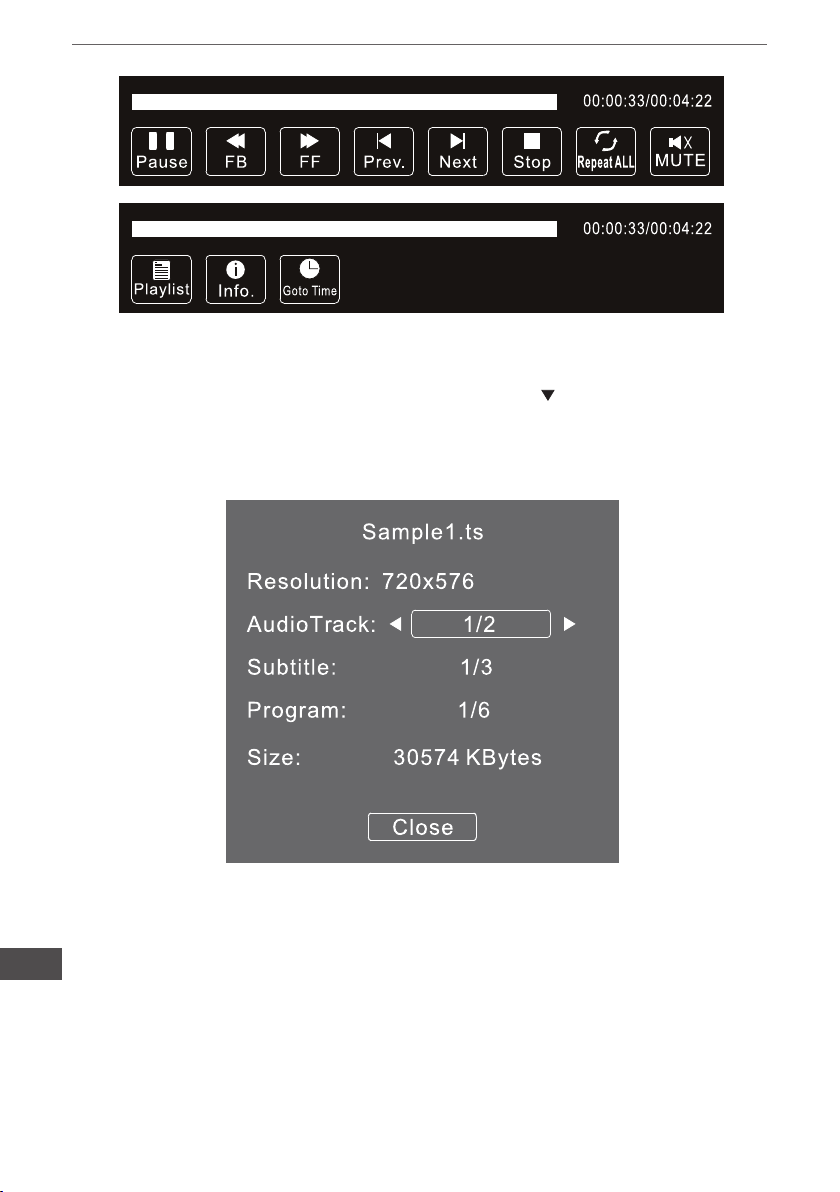
Instrukcja obsługi
Aby zamknąć pasek sterowania, należy nacisnąć przycisk lub EXIT.
Wspierane formaty multimediów.
Obraz: JPEG, BMP, PNG
Muzyka: MP3
PL
Text: TXT
Film: TS (MPEG2 & H.264)
90

Instrukcja obsługi
EPG (Elektroniczny przewodnik po programach)
EPG - przewodnik telewizyjny nadawany w formie tekstu, wyświetlający aktualny program telewizyjny. Aby przejść do menu EPG, należy nacisnąć przycisk EPG na pilocie
zdalnego sterowania.
Info
Aby wyświetlić informacje o aktualnie podświetlonym programie, należy nacisnąć zielony przycisk na pilocie.
Terminarz
Aby wyświetlić listę programów do nagrania, należy nacisnąć żółty przycisk na pilocie.
Aby usunąć program z listy, należy go podświetlić i nacisnąć czerwony przycisk.
PL
91

Instrukcja obsługi
Nagrywanie
Aby włączyć nagrywanie podświetlonego programu, należy nacisnąć czerwony przycisk na pilocie.
Przypomnienie
Aby ustawić przypomnienie podświetlonego programu, należy nacisnąć niebieski przycisk na pilocie.
PL
92
Instrukcja obsługi
ROZWIĄZYWANIE PROBLEMÓW
Obraz Dźwięk Należy sprawdzić
Śnieg
Widmo
Zakłócenia
Normalny obraz
Brak obrazu
Brak koloru
Szum
Normalny dźwięk
Szum
Brak dźwięku
Brak dźwięku
Normalny dźwięk
- pozycję anteny, jej kierunek
i podłączenie
- pozycję anteny, jej kierunek
i podłączenie
- urządzenia mogące powodować zakłócenia (sprzęt
elektroniczny, lampa uore-
scencyjna, silniki itp.)
- czy dźwięk nie jest wyciszony (poziom głośności usta-
wiony na minimum)
- przewód zasilający
- czy urządzenie jest włą-
czone
- jasność/kontrast obrazu
- ustawienia kolorów
Zakłócenia
Brak koloru
Normalny lub
słaby dźwięk
Szum
- należy ponownie wyszukać
kanały
- system TV
PL
93
Instrukcja obsługi
SPECYFIKACJA
Wielkość ekranu 24" 32"
Typ panelu Podświetlenie LED
Proporcje ekranu 16:9
Rozdzielczość 1366*768
Jasność (cd/m2) 200 (±10%) 230 (±10%)
Kontrast 1000:1
Kąt widzenia (H/R,CR>=10) H:160°, V:150°
Czas reakcji 5ms
Liczba kolorów 16.7M
System TV DVB-T/ C
Standard video PAL / SECAM
Zasilanie 100-240V ~ 50Hz
Pobór mocy 38W 50W
Pobór mocy (czuwanie) ≤0.5W
Moc muzyczna (RMS) 2x3W 2x8W
RF x1
VGA x1
PC Audio In x1
Wyjście słuchawkowe x1
CI x1
HDMI x2
USB x1
AV x1
Ypbpr x1
Scart x1
Coaxial x1
Standard Vesa 200x100mm
PL
Specykacja produktu może ulec zmianie bez powiadomienia.
94
Instrukcja obsługi
PL
95

ATENTIE: PENTRU A REDUCE RISCUL
DE ELECTROCUTARE, NU DESCHIDETI
CAPACUL (SAU PARTEA DIN SPATE).
NU VETI GASI COMPONENTE DE
SCHIMB IN INTERIORUL APARATULUI,
APELATI LA PERSONAL CALIFICAT IN
VEDEREA EFECTUARII INTRETINERII
APARATULUI.
Triunghiul alaturat cu simbolul
sagetii avertizeaza utilizatorul cu
privire la prezenta de "tensiuni
neizolate" in interiorul produsului,
care poate sucienta pentru a
constitui un risc de electrocutare.
Simbolul triunghiular cu semnul
de exclamare alerteaza
utilizatorul cu privire la
instructiunile de utilizare si
intretinere importante continute
in acest manual.
INSTRUCTIUNI DE SIGURANTA IMPORTANTE
1) Cititi cu atentie aceste instructiuni.
2) Pastrati manualul pentru referinte ulterioare.
3) Respectati toate avertismentele.
4) Urmati toate instructiunile.
5) Nu folositi aparatul in medii umede sau
in apropierea surselor de apa.
6) Curatati numai cu o carpa uscata.
7) Oriciile de ventilatie nu trebuie sa e
blocate, instalati in conformitate cu instructiunile din manual.
8) Nu instalati langa surse de caldura cum
RO
ar radiatoare, sobe sau alte aparate (inclusiv amplicatoare) care produc caldura.
9) Nu anulati pamantarea prizei de perete.
Manual de utilizare
Daca sa nu se potriveste in priza, apelati
la un electrician pentru a inlocui priza
veche. Utilizati numai priza cu pamantare
de protectie.
10) Protejati cablul de alimentare astfel in-
cat nimeni sa nu-l calce, sa nu e strans,
in special in zona prizelor si in punctul in
care iese din aparat.
11) Folositi numai dispozitive/accesorii recomandate de producator.
12) Deconectati aparatul de la sursa de
alimentare in timpul furtunilor sau atunci
cand nu este folosit pentru o perioada mai
lunga de timp.
13) Lasati toate reparatiile in seama per-
sonalului calicat. Este nevoie de service
atunci cand aparatul a fost deteriorat,
daca cablul de alimentare sau stecherul
este defect sau deteriorat, lichide sau
obiecte au cazut in aparat, aparatul a fost
expus la ploaie sau umezeala, nu functioneaza normal sau a fost scapat pe jos.
14) In caz de deconectare de urgenta, ac-
cesul la priza de perete trebuie sa e facil.
15) Ventilarea nu trebuie sa e impiedicata prin acoperirea oriciilor de ventilatie
cu obiecte cum ar ziare, fete de masa,
perdele, etc.
16) Nu puneti pe aparat surse de foc de-
schis, cum ar lumanari aprinse.
17) Bateriile uzate se vor recicla ecologic,
la punctele de colectare special amenajate in acest scop.
18) Utilizati aparatul in climat moderat.
19) Dispozitivul nu trebuie sa e expus la
stropire sau picurare iar obiecte pline cu
lichide, cum ar vaze de ori, nu vor
amplasate pe aparat
96

Manual de utilizare
Avertisment
Tensiuni inalte sunt prezente in aparat.
Nu scoateti capacul din spate al unitatii.
Apelati la personal de service calicat.
Avertisment
Pentru a evita pericolul de incendiu sau
risc de soc electric, acest aparat nu tre-
buie expus la ploaie sau umezeala.
Atentie
Nu blocati oriciile de aerisire situate pe
partea din spate a televizorului. Ventilatia
adecvata este esentiala pentru a preveni
defectarea componentelor electrice.
Atentie
Nu prindeti cablul de alimentare sub receptorul televizorului.
Avertisment
Nu introduceți si nu scapati obiecte in fantele sau oriciile televizorului. Nu varsati
nici un fel de lichid pe televizor.
Atentie
Nu va asezati pe televizor, nu va sprijiniti,
sau impingeti brusc si nu impingeti suportul acestuia. Ar trebui sa aveti grija in
special la copii. Caderea acestuia poate
provoca raniri grave.
RO
97

Manual de utilizare
Atentie
Nu plasati televizorul pe un carucior instabil, stuport, raft sau masa. Caderea acestuia poate provoca leziuni severe dar si
deteriorarea televizorului.
Daca receptorul nu este utilizat pentru o
lunga perioada de timp, este recomandabil sa deconectati cablul de alimentare
de la priza.
Atentie
INSTALARE
* Instalati televizorul in camera intr-un loc in care lumina sa nu bata direct pe ecran.
* Intunericul total sau o reexie pe ecran poate cauza oboseala ochilor. O iluminare usoara si indirecta este recomandata pentru o vizionare confortabila.
* Lasati o distanta sucienta intre televizor si perete pentru a asigura o ventilație adecvată.
* Evitati locurile excesiv de calde pentru a preveni posibile deteriorari ale carcasei sau
deteriorarea prematura a componentelor.
* Nu acoperiti oriciile de ventilatie cand utilizati televizorul.
Distante minime fata de perete
RO
98

Manual de utilizare
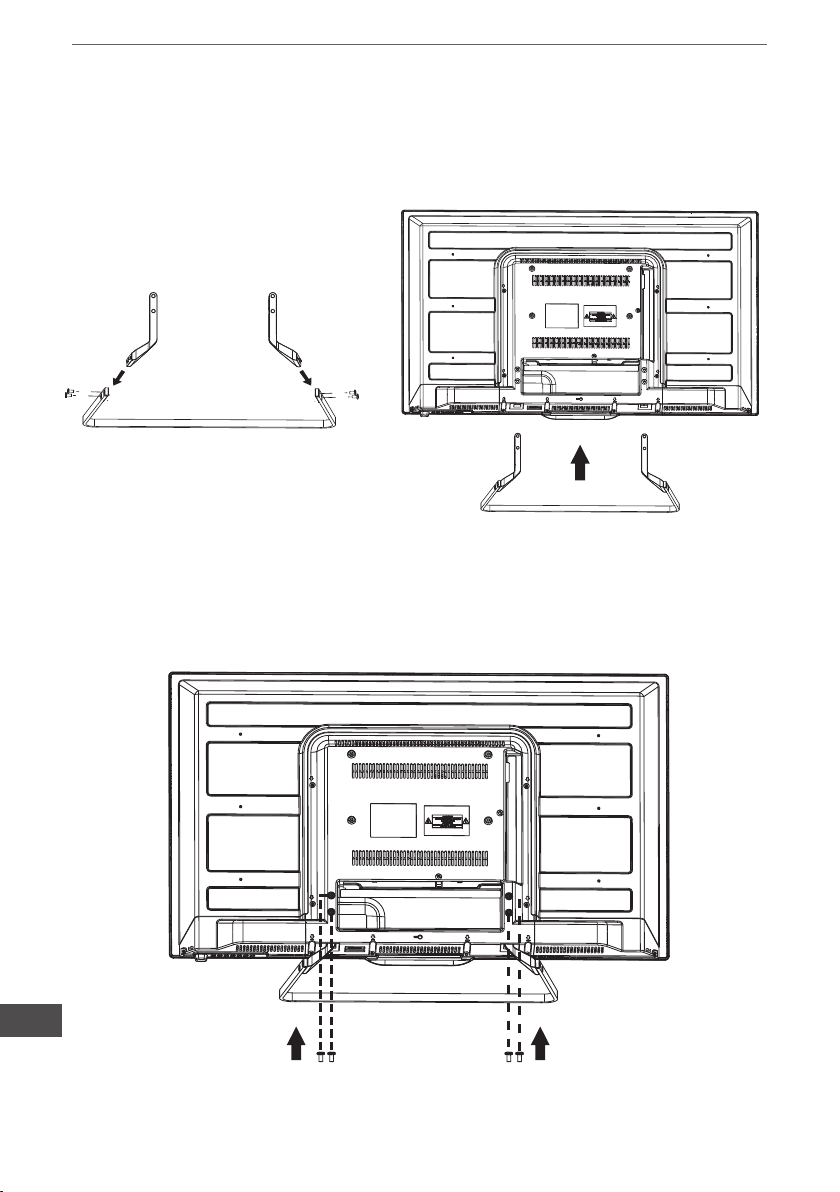
Instructiunile de asamblare pentru suport de baza (URZ4024A)
1. Asezati televizorul cu ecranul in jos pe o suprafata plata. Folositi un material pentru a
proteja ecranul. Localizati modalitatea de prindere in partea de jos a suportului.
2. Fixati partea de jos prin strangerea surubului pe suport.
RO
99
Manual de utilizare
Instructiunile de asamblare pentru suport de baza (URZ4032)
1. Asezati televizorul cu ecranul in jos pe o suprafata plata. Folositi un material pentru a
proteja ecranul. Localizati modalitatea de prindere in partea de jos a suportului.
2. Fixati partea de jos prin strangerea surubului pe suport.
RO
100
 Loading...