

Page 1
Baltic Evolution
notice d’installation
owner’s manual
•
betriebsanleitung
www.cabasse.com
Page 2
français english deutsch
Baltic Evolution murale
Baltic Evolution on wall
Baltic Evolution
mit Wandbefestigung
Baltic Evolution
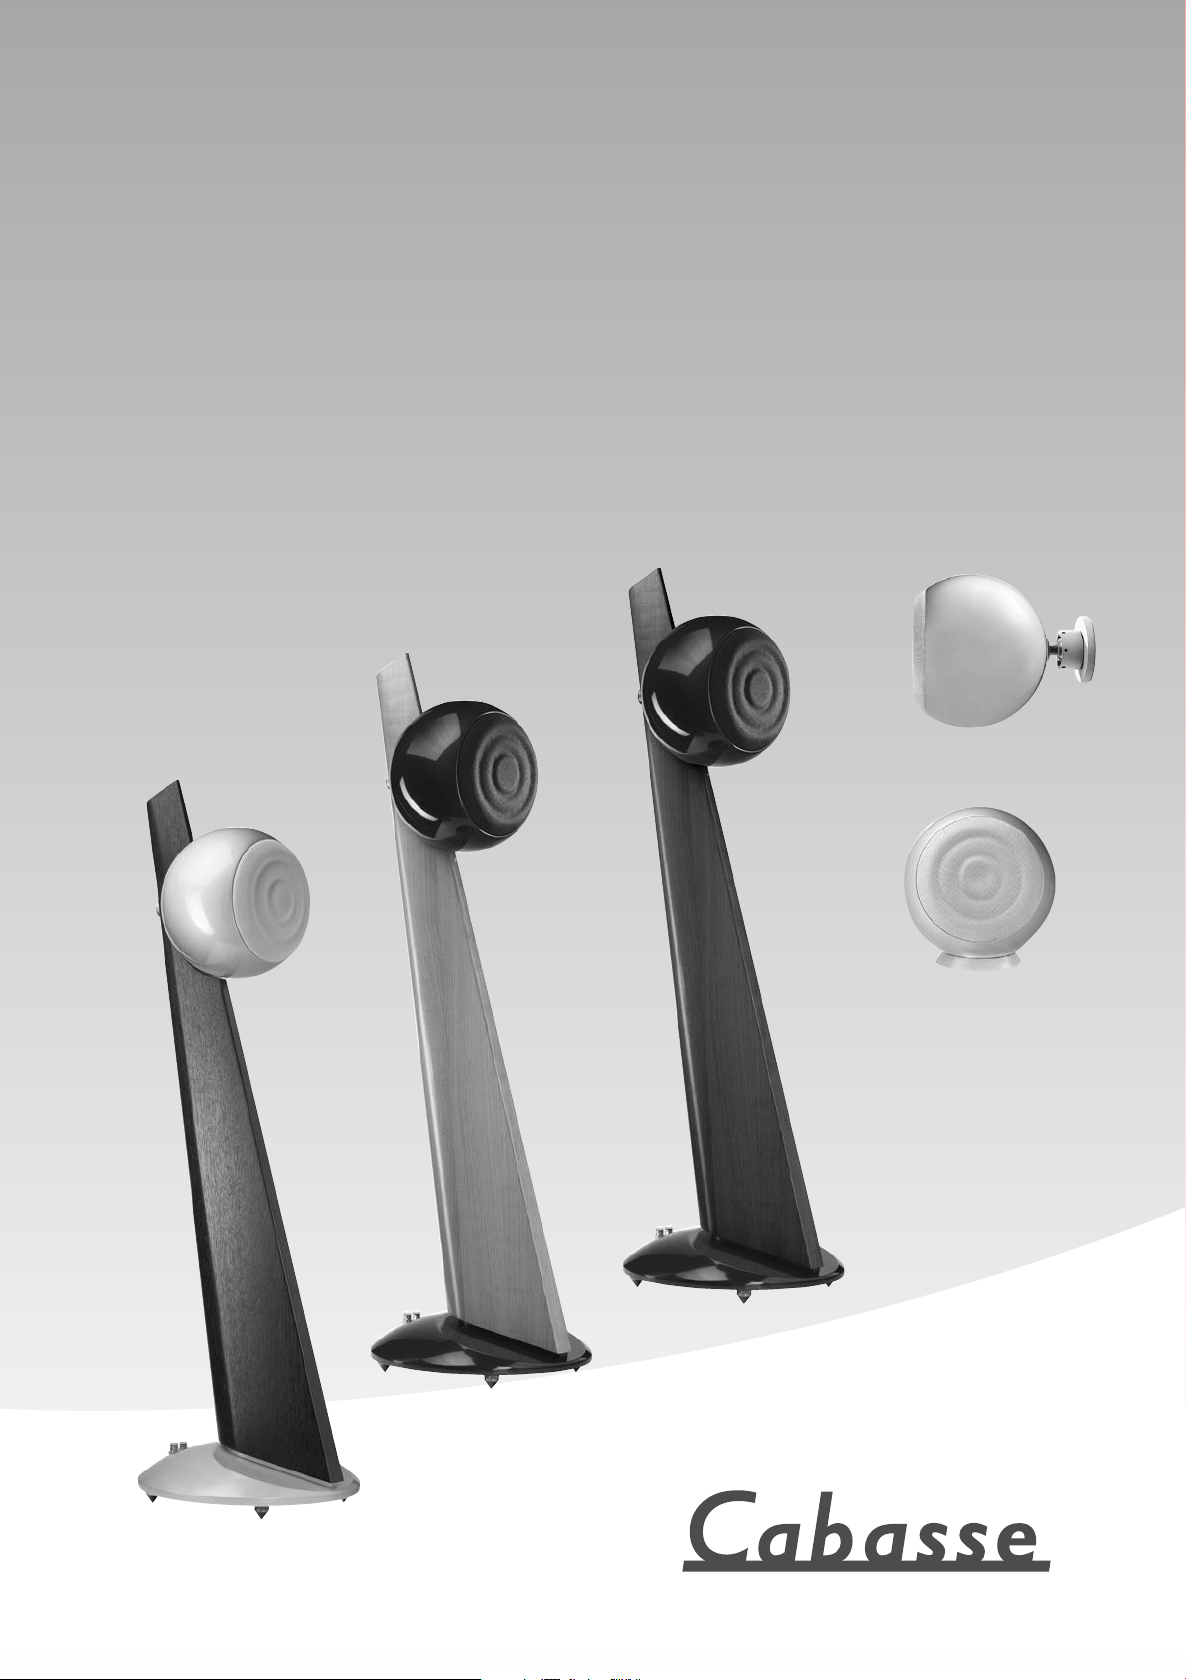
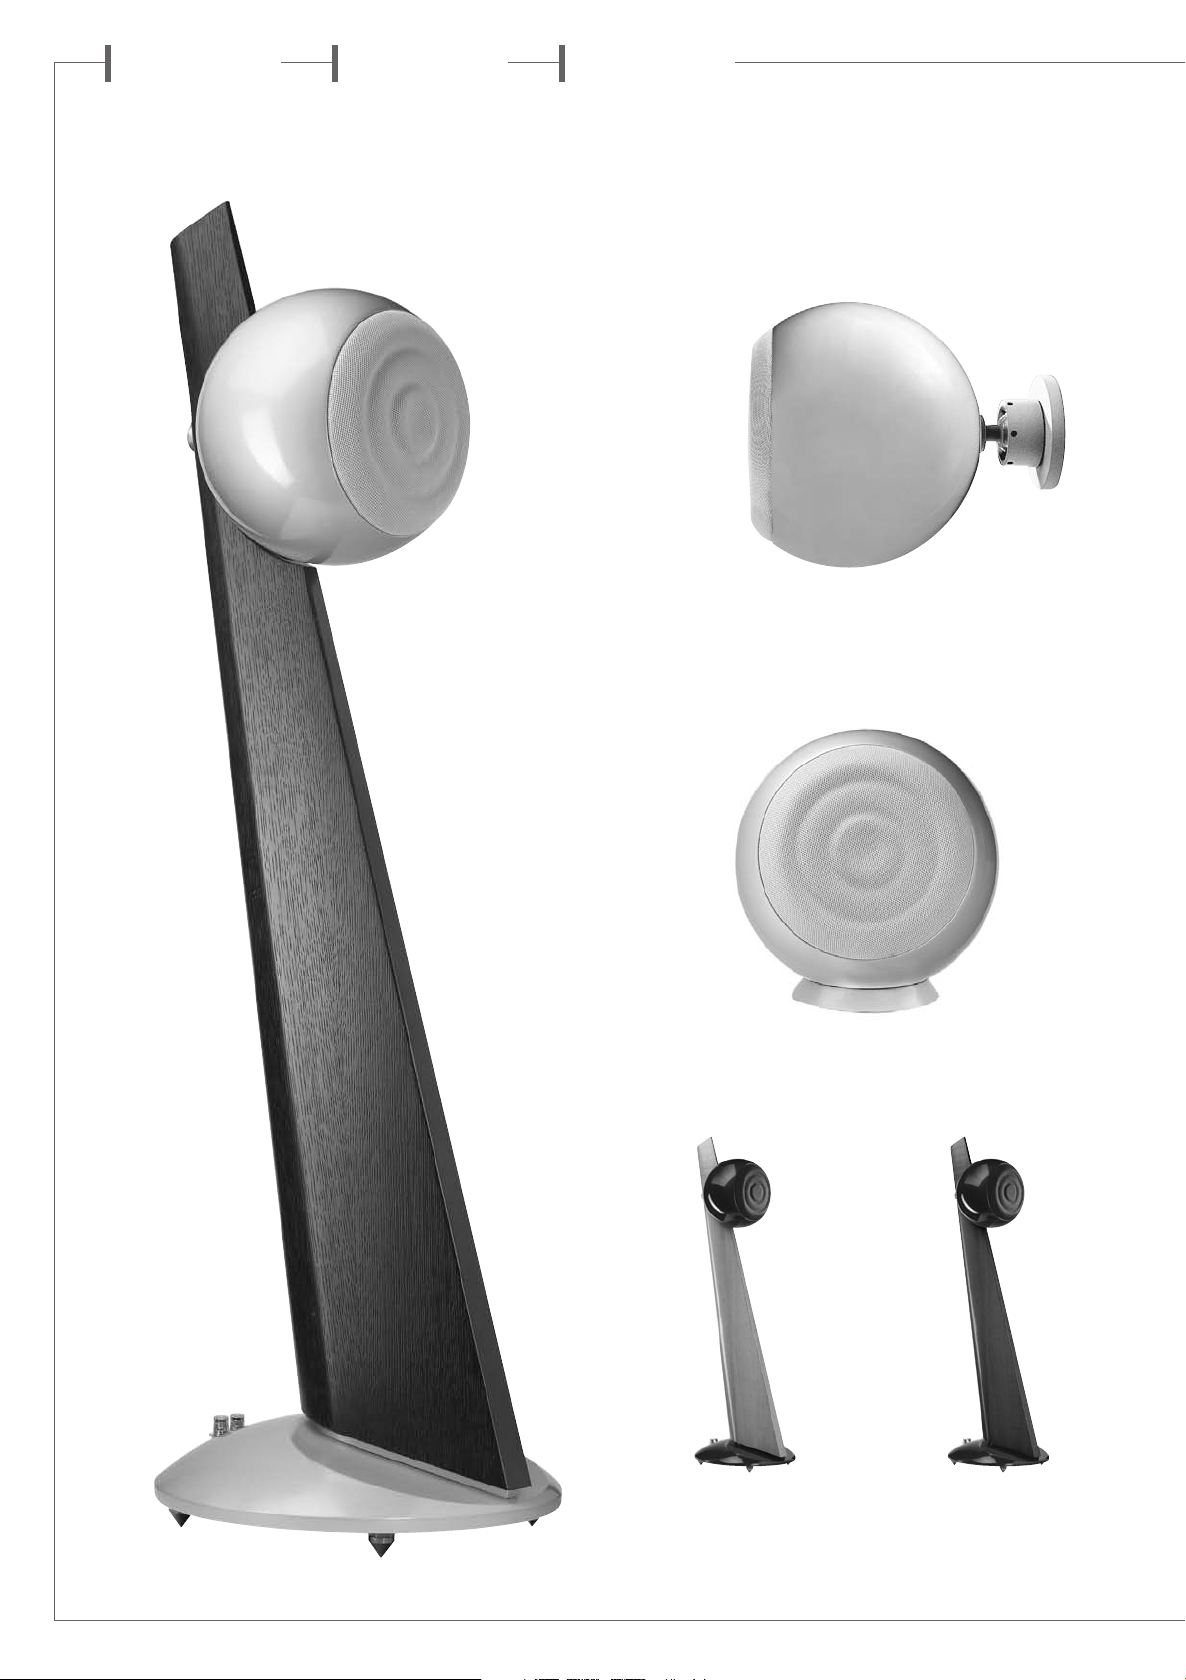
Wenge/perle
Wenge/pearl
Wenge/Kugel Perlmutt
Baltic Evolution centrale
Baltic Evolution on base
Baltic Evolution mit Sockel
Merisier/perle noire
Wild cherry/black pearl
Kirschbaum/Kugel Perlschwarz
Santos/perle noire
Santos/black pearl
Santos/Kugel Perlschwarz
Page 3
ORIENTATION MURALE
1
DE BALTIC EVOLUTION
Baltic Evolution
on wall positioning
Ausrichtung des Baltic Evolution
mit wandbefestigung
2
MONTAGE MURAL
2
DE BALTIC EVOLUTION
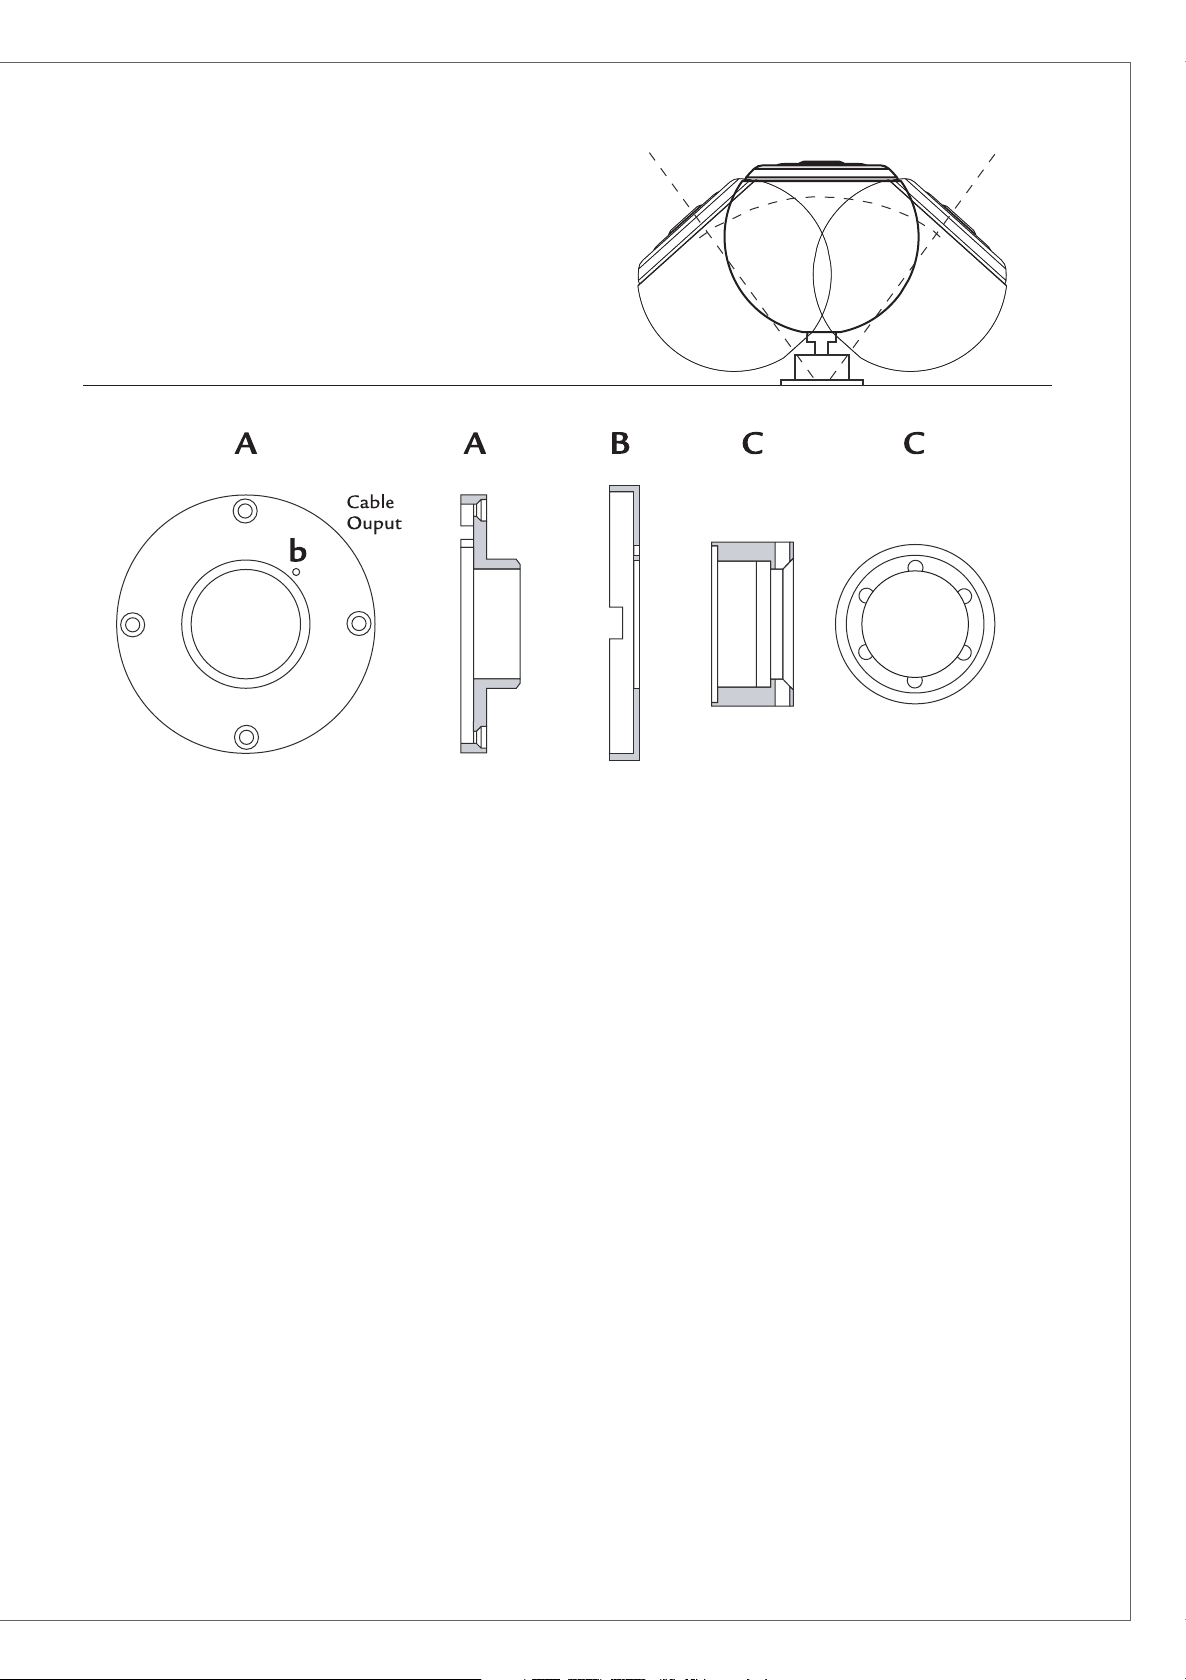
■ Déballer la Baltic Evolution murale
■ Démonter la bague C en utilisant les 2 barres métalliques
livrées avec l’une des Baltic Evolution murales
■ Enlever la vis b et retirer l’enjoliveur B
■ Installer la plaque A sur le mur avec 4 vis de fixation adap-
tées au type de mur ou de support
■ Bien positionner l’ouverture prévue pour le passage du
câble haut-parleur (Cable Output) en fonction du type de
montage souhaité :
- vers le haut pour ne pas être visible si le câble sort du mur
- dans la direction prévue pour l’arrivée du câble s’il est posé
en applique sur le mur
■ Faire passer le câble à travers les pièces A+B+C
■ Remonter l’enjoliveur B sur la plaque A et le fixer avec
la vis
b
■ Visser à la main la bague C sur la plaque A, orienter la Bal-
tic Evolution murale et figer la position en serrant fortement
avec les 2 barres métalliques fournies
INSTRUCTIONS FOR ON WALL
2
MOUNTING OF BALTIC EVOLUTION
MURALE
■ Unpack the Baltic Evolution on wall
■ Unscrew the C ring with the help of the 2 metal sticks deli-
vered with one of the Baltic Evolution on wall
■ Take out the screw on b and pull out the B painted carter
■ Wall mount the A metal piece by using 4 screws or bolts
adapted to the characteristics of the wall
■ Do not forget to position the cable (Cable Ouput) in the
optimal way:
- up if your speaker cable comes out of the wall so it can not
be seen
- in the direction your speaker cable will come from if this cable
is not inside the wall
■ Have the speaker cable go through all the pieces A+B+C
■ Mount the B part back on A with the b screw
■ Mount C on A and tight it firmly with the 2 sticks delivered
MONTAGEANLEITUNG FÜR BALTIC
2
EVOLUTION MIT WANDBEFESTIGUNG
■ Den Baltic Evolution mit Wandbefestigung aus der Ver-
packung nehmen
■ Mithilfe der mit einem Baltic Evolution gelieferten Metall-
stifte den Ring
■ Schraube b abschrauben und Kappe B abnehmen
■ Platte A mit 4 der Wand oder der Halterung angepassten
Schrauben installieren
■ Den Durchgang für das Lautsprecherkabel Ouput (Cable
Ouput) je nach gewünschter Befestigung positionieren :
- bei Kabelaustritt aus der Wand nach oben
- in die für den Kabeleingang gewünschte Richtung, wenn
das Kabel entlang der Mauer ange bracht ist
■ Das Kabel durch die Punkte A+B+C führen
■ Kappe B wieder auf Platte A anbringen und mit Schraube
b befestigen
■ Den Ring C von Hand auf der Platte A festschrauben, Bal-
tic Evolution in die gewünschte Position bringen und mithilfe der 2 mitgelieferten Stifte festschrauben
C abmontieren
Page 4
français english deutsch
POSITIONNEMENT DES BALTIC EVOLUTION
3
ET DU CAISSON DE GRAVES CABASSE
Positioning of Baltic Evolution speakers and Cabasse subwoofer
Positionierung der Baltic Evolution und des Cabasse subwoofers
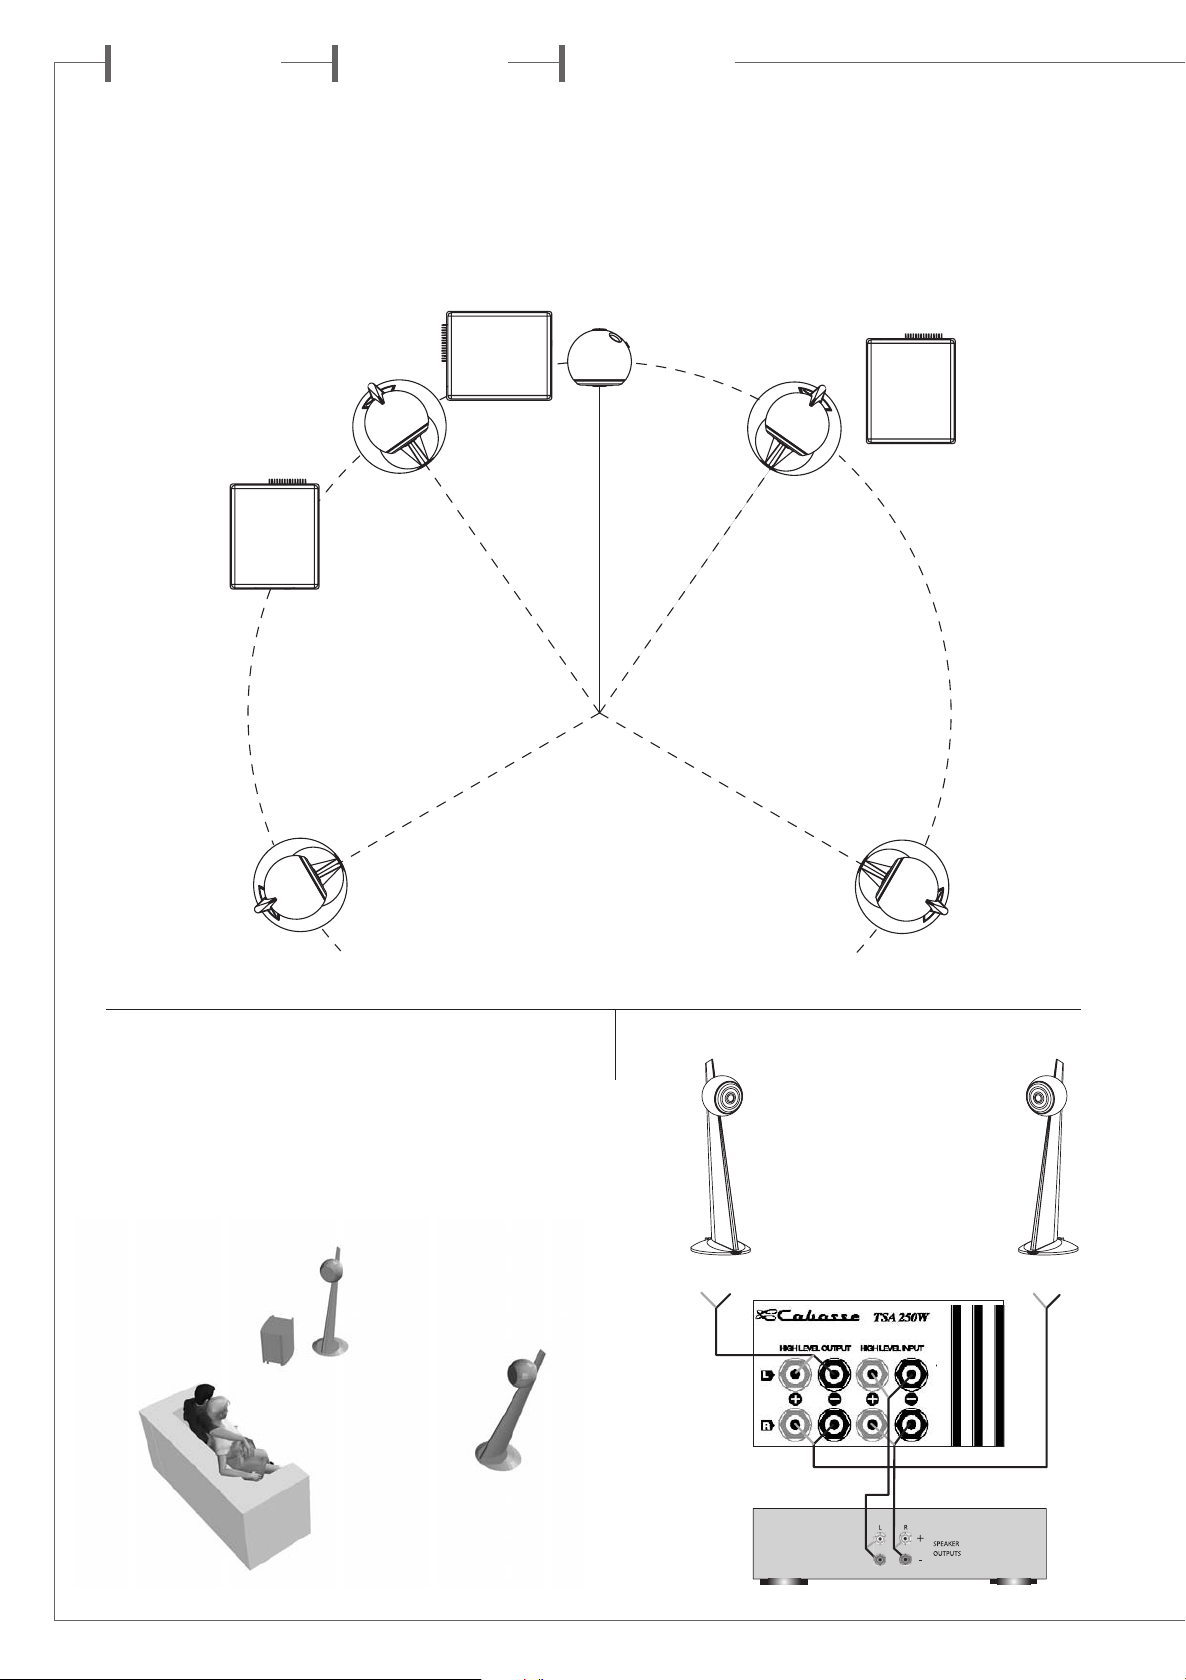
Configuration 2.1 (stereo)
45
2 satellites Baltic Evolution + 1 caisson de graves Cabasse
2.1 configuration (stereo)
2
Baltic Evolution
Konfiguration 2.1 (stereo)
2 Baltic Evolution Satelliten + 1 Cabasse Subwoofer
speakers + 1
Cabasse
subwoofer
+ -
+ -
Page 5

Configuration 5.1 (Audio Video)
5 satellites Baltic Evolution
+ 1 caisson de graves Cabasse
5.1 configuration (
5
Baltic Evolution
+ 1
Cabasse
Audio Video
speakers
subwoofer
Konfiguration 5.1 (Audio Video)
5 Baltic Evolution Satelliten
+ 1 Cabasse Subwoofer
+ -
+ -+ -
SURROUND
CENTER
FRONT
L
SUBWOOFER
LFE
)
+ -
RR
L
+
-
+ -
Configuration 5.1 (Audio Video)
2 enceintes principales + 3 satellites Baltic
Evolution + 1 caisson de graves Cabasse
5.1 configuration (
2 main speakers + 3
+ 1
Cabasse
Audio Video
Baltic Evolution
subwoofer
)
speakers
Konfiguration 5.1 (Audio Video)
2 Hauptlautsprecher
+ 3 Baltic Evolution Satelliten
+ 1 Cabasse Subwoofer
67
SUBWOOFER
+ -
+ -+ -
SURROUND
CENTER
FRONT
L
LFE
RR
L
+
-
+ -
+ -
Page 6

français
Avec Baltic Evolution, Cabasse vous propose un ensemble Hi Fi / audio vidéo utilisant
la technologie tri-axiale SCS (Source à Cohérence Spatiale) de Cabasse, technologie
spécifique à la gamme ARTIS.
Ces enceintes 3 voies, associées à un caisson de graves Cabasse, vous permettront
de construire un système de très grande qualité en configuration 2.1 (reproduction stéréo),
configuration 5.1 (reproduction 5 canaux), 6.1 ou 7.2...
Selon votre système - stéréo ou multicanal - le volume de la pièce d’écoute, vos goûts
et vos exigences, votre revendeur Artis saura guider votre choix parmi les caissons de graves
de la gamme Cabasse : Santorin 25 et Santorin 30, Thor II, Largo et Saturn 55.
INSTALLATION
Les composants de votre système :
■ 2, 3, 5, 6 ou 7 Baltic Evolution
■ 1 ou plusieurs caissons de graves Cabasse
Baltic Evolution murale
La fixation de Baltic Evolution murale permet d’orienter le
haut-parleur TC23 dans toutes les directions jusqu’à 39° hors
de l’axe et de dissimuler le câble hautparleur dans le mur sans
aucune vis apparente
montage, suivre dans l’ordre les opérations à effectuer selon le
schéma
2
.
. Afin d’effectuer correctement le
1
Baltic Evolution sur socle
La Baltic Evolution sur socle est livrée avec un berceau annulaire, permettant de poser la sphère sur toute surface plane
horizontale.
Baltic Evolution
Cette version est à poser au sol, le dessous de la semelle dispose
de cônes-vérins réglables en hauteur pour une stabilité parfaite sur tous types de sol.
Positionnement de Baltic Evolution
Pour le positionnement des Baltic Evolution et du (des) caisson(s) de graves Cabasse associé(s), nous vous conseillons de
respecter le mieux possible le principe du schéma
votre configuration. Le caisson de graves doit être placé dans
la zone d’écoute avant, et son placement contre un mur renforce l’extrême grave et limite les réflexions de 80 à 200 Hz.
Cependant, pour obtenir le meilleur résultat, il est toujours
nécessaire de faire des essais d’emplacement en fonction de
l’acoustique de la pièce.
3
selon
BRANCHEMENTS
Il est impératif de respecter pour tous les branchements la
mise en phase en reliant les bornes rouges + de l’amplificateur à la borne rouge + de Baltic Evolution.
Procéder ensuite de la même façon pour les bornes noires -.
Configuration 2.1
■ 2 Baltic Evolution + 1 caisson de graves Cabasse
A l’aide d’un câble pour enceintes, brancher les sorties de
l’amplificateur aux extrémités HIGH LEVEL INPUT L (left) et
HIGH LEVEL INPUT R (right) du caisson de graves et relier les
sorties HIGH LEVEL OUTPUT L (left) et HIGH LEVEL OUTPUT
R (right) du caisson de graves aux Baltic Evolution
Configuration 5.1
■ 5 Baltic Evolution + 1 caisson de graves Cabasse ou
■ 2 enceintes principales + 3 Baltic Evolution + 1 caisson de
graves Cabasse.
Pour une utilisation en mode stéréo, votre amplificateur ou
pré-amplificateur audio vidéo doit prendre en charge la gestion
du caisson de graves pour ce mode. Le branchement du caisson de graves s’effectue dans ce cas sur l’une des prises gauche
L (left) ou droite R (right) Cinch RCA marquées LINE IN
La sortie Cinch RCA de l’ampli audio-vidéo est généralement
libellée « subwoofer » ou « LFE OUT ».
Puis configurer le menu « set-up » de votre amplificateur audio
vidéo comme suit :
4
6
5
.
7
5 Baltic Evolution + 1 caisson de graves Cabasse
FRONT SMALL
CENTER SMALL
SURROUND SMALL
SUBWOOFER / LFE YES
.
Page 7

français
2 enceintes principales + 3 Baltic Evolution
+ 1 caisson de graves Cabasse
FRONT SMALL ou LARGE*
CENTER SMALL
SURROUND SMALL
SUBWOOFER / LFE YES
*Réglage en SMALL ou LARGE pour les enceintes principales
selon leur capacité à restituer les fréquences graves.
Certains amplificateurs audio vidéo nécessitent les informations
complémentaires suivantes :
SUBWOOFER ONLY
SUBWOOFER stereo YES
Si la fréquence du filtre est ajustable, celle-ci doit être réglée à
80 Hz.
REGLAGES DES CAISSON DE GRAVES
SANTORIN 25 - THOR II - LARGO
Ces 3 caissons de graves sont équipés de différentes versions spécifiques de
l’amplificateur Cabasse TSA250W. Les connectiques et les modes de
réglages sont identiques sur chaque modèle.
ENTRETIEN
Les ébénisteries de la Baltic Evolution, réalisées avec un placage
de bois naturel protégés par 4 couches de vernis, ne nécessitent
aucun entretien particulier, le matériau utilisé étant un produit
de très haute technicité. Elles peuvent être nettoyées avec un
chiffon humide, tout comme les parties peintes.
GARANTIE
Nous vous remercions de bien vouloir activer la garantie Cabasse dans les 60 jours à compter de la date d'achat de votre
matériel, soit en nous retournant la carte de garantie jointe
dûment complétée, soit en enregistrant en ligne votre matériel
sur notre site web
détails sur la garantie constructeur et l'extension de garantie
Cabasse propre à votre matériel .
En suivant les conseils d’installation, de branchement et d’emploi explicités dans cette notice, vous êtes assurés d’un fonctionnement parfait de vos enceintes acoustiques.
Nous recevons tous les jours des lettres de clients satisfaits du
choix de leurs enceintes et ces lettres sont pour nous la plus belle récompense de nos efforts.
www.cabasse.com où figurent également les
Crossover frequency
Dans tous les cas de figure : configuration 2.1 ou
configuration 5.1, le réglage de fréquences CROSSOVER FREQUENCY est positionné comme suit :
Level
Le réglage de niveau LEVEL s’effectue suivant les besoins. Avec
Baltic Evolution, les réglages moyens du caisson de graves sont
obtenus avec le potentiomètre LEVEL positionné comme suit:
THOR II, LARGO
SANTORIN 25
Pour un réglage optimum de ce niveau, nous vous conseillons
de l’effectuer à partir d’une source stéréo (CD).
Pour le réglage du canal LFE ( effets spéciaux dans le grave), utiliser le menu SET UP de votre amplificateur audio-vidéo et
ajuster le niveau de sortie de ce canal sans modifier le réglage
LEVEL du caisson de graves.
CARACTÉRISTIQUES TECHNIQUES
SPECIFICATIONS BALTIC EVOLUTION
Satellite 2/7 canaux
Voies 3
Haut-parleurs tweeter-medium-bas médium
3 voies triaxial TC23
Bande passante 80 - 22 000 Hz
Efficacité 90 dB / 2,8 v / 1 m
Impédance nominale 8 ohms
Impédance minimale 3,2 ohms
Puissance nominale 220 W
Puissance crête 1540 W
Blindage magnétique de série non
Baltic Evolution
finitions merisier/perle noire,
santos/perle noire,
wenge/perle
dimensions (h xlxp) 132 x 32x 42 cm
Poids 17,5 kg
Baltic Evolution murale
finitions perle noire - perle - blanc
dimensions (h xlxp) 24 x 27x 35 cm
Poids 7 kg
Baltic Evolution sur socle
finitions perle noire - perle
dimensions (h xlxp) 27 x 27x 27 cm
Poids 7 kg
Étant donné l’évolution des techniques mises en œuvre pour une fiabilité accrue et une recherche constante de qualité optimale,
Cabasse se réserve le droit d’apporter toutes modifications aux modèles présentés sur les fiches techniques ou les documents
publicitaires. Nous vous invitons à consulter sur www.cabasse.com les réglages spécifiques que nous préconisons pour l’utilisation de nos caissons de graves.
Page 8

english
With Baltic Evolution, Cabasse proposes a Hi Fi / audio video system with the Cabasse SCS
technlogy (Spatially Coherent System). Baltic Evolution comes from the high end ARTIS
range, with a specific 3-ways tri-axial driver, the TC23. With these 3-way speakers combined
with a Cabasse Cabasse active subwoofer, you can get a very high quality system, either in a 2.1
configuration (standard stereo) or in a 5.1 configuration (5 channels system) or 6.1 or 7.1...
Depending on your system - stereo or multi-channel - the size of the listening room,
your taste and demand, your Artis dealer will guide you in selecting your Cabasse subwoofer(s):
Santorin 25, Santorin 30, Thor II, Largo or Saturn 55.
INSTALLATION
The components of your system:
■ 2, 3, 5, 6 or 7 Baltic Evolution
■ 1 Cabasse Cabasse active subwoofer
Baltic Evolution on wall version
The wall bracket of Baltic Evolution on wall has been designed to allow a convenient positioning of the TC23 driver in
many directions +/- 39° in any direction, and to give the possibility to hide the speaker cable in the wall with no apparent
bolts or screws
as shown in
. Please follow step by step the instructions
1
.
2
Baltic Evolution on base version
Baltic Evolution on base is delivered with a little cradle, pose
the sphere Baltic Evolution on this cradle. This system enables
you to put Baltic Evolution on a bookshelf.
Floor standing Baltic Evolution
The stand version is supplied with adjustable spikes for a perfect stability even if the floor is not horizontal.
Positioning of Baltic Evolution
Positioning of the speakers: if possible, try to match with the
drawing, with the Cabasse subwoofer in the front area
3
facing the listening spot. Its position against a wall reinforces
the extreme low register and limits the reflections between 80
and 200 Hz. However to obtain the best result, it is always
necessary to carry out tests according to the acoustics of the
room.
CONNECTIONS
It is imperative to respect the correct phasing when connecting:
+ to + (red) and - to - (black).
Configuration 2.1
■ 2 Baltic Evolution + 1 Cabasse subwoofer
Connect with speaker cables the amplifier outputs to the terminals HIGH LEVEL INPUT L (left) and HIGH LEVEL INPUT R
(right) of the Cabasse subwoofer and connect the outputs
HIGH LEVEL OUTPUT L (left) and HIGH LEVEL OUTPUT R
(right) of the Cabasse subwoofer to the Baltic Evolution inputs
.
5
Configuration 5.1
■ 5 Baltic Evolution + 1 Cabasse subwoofer or
■ 2 main speakers + 3 Baltic Evolution + 1 Cabasse
subwoofer
When the processor of your audio video amplifier includes a
2.1 set-up (subwoofer for stereo reproduction), connect each
speaker output of the 5.1 amplifier directly to the matching Baltic Evolution (front right, front left, centre, surround...). Connect
the subwoofer CINCH RCA output of the amplifier to one of
the CINCH RCA LINE IN terminals of the Cabasse subwoofer
.
7
Then adjust the set-up menu of your audio video amplifier:
4
6
5 Baltic Evolution + 1 Cabasse subwoofer
FRONT SMALL
CENTER SMALL
SURROUND SMALL
SUBWOOFER / LFE YES
2 main speakers + 3 Baltic Evolution + 1 Cabasse subwoofer
FRONT SMALL ou LARGE*
CENTER SMALL
SURROUND SMALL
SUBWOOFER / LFE YES
*Adjustment in SMALL or LARGE, according to their ability in
reproducing deep low frequencies.
Some audio video amplifiers require these information:
SUBWOOFER ONLY
SUBWOOFER stereo YES
If your audio video has an adjustable crossover frequency, the
adjustment will be 80 Hz.
Page 9

english
ADJUSTMENTS OF THE CABASSE
SUBWOOFER
Crossover frequency
In any 2.1 or 5.1 configuration, the average position of the CROSS-OVER FREQUENCY is as follows:
After each modification of cross-over frequency and/or subwoofer or main L&R speakers position, select on the subwoofer
amplifier the phase setting offering the smoothest response.
Level
The adjustment of the LEVEL will depend upon room positioning, type of amplifier, etc. With the Cabasse subwoofer, the
average position of the LEVEL control is as follows:
THOR II, LARGO
SANTORIN 25
For an optimum adjustment of this level, we advise you to carry it out starting from a stereo source (CD).
To adjust the level of the low frequency effect channel (LFE),
do not modify the sound level of the Cabasse subwoofer but
go into the set-up menu of your audio video amplifier 5.1 and
adjust the SUBWOOFER / LFE channel.
MAINTENANCE
The Baltic Evolution cabinets are covered with a natural wood
veneer protected by 4 coats of varnish. This hi-tech veneer
does not require any specific care. Use a wet cotton waste for
cleaning the veneer, the painted parts and the granite base.
WARRANTY
We thank you for registering the Cabasse warranty within 60
days after their date of purchase. You can either send us the
enclosed warranty card fully completed or register on line at
www.cabasse.com. In our web site you will also find information on the Cabasse manufacturer warranty.
Thanks to the above information, your system is now nicely set
up and you will enjoy your speaker system for many years. We
receive every day letters from customers expressing the ever
growing satisfaction and musical emotion they have been getting with our speakers over the years. These letters are our first
motivation.
TECHNICAL DATA
SPECIFICATIONS BALTIC EVOLUTION
Speaker 2/7 channels
Number of ways 3
Driver tweeter/midrange/
low midrange
3-ways tri-axial TC23
Frequency bandwidth 80 Hz - 22 000 Hz
Efficiency 90 dB / 2.8 V / 1 m
Nominal impedance 8 ohms
Minimum impedance 3.2 ohms
Power handling 220 W
Peak power handling 1540 W
Magnetic shielding no
Baltic Evolution
finish wild cherry/black pearl,
santos/black pearl,
wenge/pearl
dimensions 123 x 32 x 42 cm (h x w x d) 48.5 x 13 x 17 in
weight 17.5 kg - 38.5 lb
Baltic Evolution on wall
finish black pearl, pearl, white
dimensions 24 x 27 x 35 cm (h x w x d) 9.5 x 11 x 14 in
weight 7 kg - 15.5 lb
Baltic Evolution on base
finish black pearl, pearl
dimensions 27 x 27 x 27 cm (h x w x d) 11 x 11 x 11 in
weight 7 kg - 15.5 lb
Because of technical improvements already under way in our constant search for optimum quality, Cabasse reserves the right to modify all the models
presented in specification sheets, advertising materials and manuals without prior notice.
Our web site www.cabasse.com will give you the specific adjustments we recommend for the use of our active subwoofers.
Page 10

deutsch
Cabasse Baltic Evolution ist ein Hifi Schallwandlersystem für den allerhöchsten Genuss
jeglicher Akustischer Reproduktion welches die aus der Artis Reihe stammende
SCS Technologie (Spatially Coherent System) beinhaltet.
Mit diesem 3 Weg-Lautsprechersystem in Verbindung mit einem unserer Subwoofer z.B.
Santorin 25, Santorin 30, Thor II, Largo oder Saturn 55 ist jede Konfiguration von 2.1
bis 7.1 oder auch jede individuelle Kombination möglich.
Ihr Artis Händler wird Ihnen die optimale Lösung für Ihren persönlichen Anspruch
anbieten können.
AUFBAU
Die einzelnen Bausteine Ihres Systems :
■ 2, 3, 5, 6 oder 7 Baltic Evolution
■ 1 aktiver Cabasse Subwoofer oder mehrere
Baltic Evolution Wandbefestigung
Mit der speziellen Baltic Evolution Wandbefestigung kann der
TC23 Lautsprecher in einer Achsabweichung bis 39° orientiert werden, und das lautsprecherkabel kann ohne sichtbare
Schraube in der Wand versenkt werden
Montage muss in folgender Reihenfolge vorgegangen werden
.
2
. Für eine korrekte
1
Baltic Evolution mit Sockel
Die Baltic Evolution Sockelversion wird mit einer Halterung
geliefert mit deren Hilfe Sie die Baltic Evolution auf beliebige
Flächen stellen können.
Baltic Evolution
Diese Version ist für eine Bodeninstallierung bestimmt und für
optimale Stabilität auf allen Böden mit Spikes bestückt.
Positionierung des Baltic Evolution
Um die Baltic Evolution und den Cabasse Subwoofer zu positionieren, raten wir Ihnen, sich so präzise wie möglich an das
Schema
deren Teil der Hörzone aufgestellt werden. Wenn er an einer
Wand positioniert ist, werden die extremen Tieftöne noch
verstärkt und die Schallreflexionen der Frequenzen zwischen 80
und 200 Hz begrenzt. Für optimale Ergebnisse ist es auf jeden
Fall in Abhängigkeit von der Raumakustik nötig, die Positionierung des Systems zu testen.
zu halten. Der Cabasse Subwoofer muss im vor-
3
ANSCHLÜSSE
Bei jedem Anschluss muss unbedingt die Phase eingehalten
werden : die roten + Anschlüsse des Verstärkers müssen mit
den roten + Anschlüssen des Baltic Evolution verbunden werden. Das Gleiche geschieht mit den schwarzen - Anschlüssen.
Konfiguration 2.1
■ 2 Baltic Evolution + 1 Cabasse Subwoofer
Mit einem Lautsprecherkabel die Verstärkerausgänge an die
HIGH LEVEL INPUT L (links) und HIGH LEVEL INPUT R
(rechts) Enden des Cabasse Subwoofers anschließen und die
HIGH LEVEL OUTPUT L (links) und HIGH LEVEL OUTPUT R
(rechts) Ausgänge des Cabasse Subwoofers an die Baltic Evolution
5
.
Konfiguration 5.1
■ 5 Baltic Evolution + 1 Cabasse Subwoofer oder
■ 2 Hauptlautsprecher + 3 Baltic Evolution + 1 Cabasse
Subwoofer
Wenn Ihr Audio-Video Verstärker den Subwoofer in Stereo
steuert, verbinden Sie jeden Audio-Video Verstärkerausgang
direkt mit dem entsprechenden Lautsprecher. In diesem Fall wird
der Cabasse Subwoofer an einen der der linken L (links) oder
rechten R (rechts) CINCH RCA LINE IN Stecker angeschlossen
.
7
Jetzt müssen Sie das « Set up » Menü Ihres Audio-Video Verstärkers folgendermaßen programmieren :
4
6
5 Baltic Evolution + 1 Cabasse Subwoofer
FRONT SMALL
CENTER SMALL
SURROUND SMALL
SUBWOOFER / LFE YES
Page 11

deutsch
2 Hauptlautsprecher + 3 Baltic Evolution
+ 1 Cabasse Subwoofer
FRONT SMALL ou LARGE*
CENTER SMALL
SURROUND SMALL
SUBWOOFER / LFE YES
*Je nach der Wiedergabekapazität der Tieffrequenzen werden
die Hauptlautsprecher auf SMALL oder LARGE eingestellt.
Manche Audio-Video Verstärker benötigen zusätzliche Informationen wie :
SUBWOOFER ONLY
SUBWOOFER stereo YES
Wenn die Filterfrequenz eingestellt werden kann, muss sie auf
80 Hz geregelt werden.
EINSTELLUNGEN DES CABASSE
SUBWOOFERS
Crossover Frequency
Bei Konfiguration 2.1 oder Konfiguration 5.1, muss
der CROSSOVER FREQUENCY Frequenzregler
immer folgendermaßen positioniert werden :
Level Lautstärkeeinstellung
Die LEVEL Lautstärke wird nach Bedarf eingestellt. Die Einstellung des Cabasse Subwoofers auf eine mittlere Lautstärke
wird mit Baltic Evolution folgendermaßen gehandhabt :
THOR II, LARGO
SANTORIN 25
Nach jeder Veränderung der Übernahmefrequenz, der Pegelanpassung, oder aber Positioniereung der Lautsprecher wählen
Sie bitte mit Hilfe der Phaseneinstellung am Subwooferverstärker die optimale Einstellung für das Wiedergabeergebniss.
Für eine optimierte Lautstärkeeinstellung empfehlen wir, diese ab einer Stereoquelle (CD) vorzunehmen.
Mit dem « test tone » Ihres 5.1, Audio-Video Verstärkers stellen Sie die Lautstärke des SUBWOOFER / LFE Kanals ein.
PFLEGE
Die Gehäuse sind mit hochwertigem Echtholz furniert. Sie sind
dank zweier Lackschichten und mit einer zusätzlichen Schicht
gegen Kratzer geschützt und können mit einem feuchten Tuch
abgerieben werden.
GARANTIE
Bitte senden Sie die Garantiekarten innerhalb von 60 Tagen ab
Kaufdatum komplett ausgefüllt ein oder lassen Sie diese on
line registrieren unter
Auf unserer Web-seite finden Sie weitere Möglichkeiten der
Garantieverlängerung.
Wenn Sie, unsere Ratschläge über den Anschluss und die Aufstellung befolgen, werden Ihre Lautsprecher jederzeit zufriedenstellend funktionieren und Sie erfreuen. Täglich erhalten
wir Briefe von Kunden, die glücklich und zufrieden über die
gleichbleibende Qualität ihrer Lautsprecher sind. Diese Briefe
sind unsere größte Belohnung für unsere Arbeit.
www.cabasse.com
TECHNISCHE SPEZIFIKATIONEN
SPEZIFIKATIONEN BALTIC EVOLUTION
Satellit 2/7 Kanäle
Anzahl der Wege 3
Dreiweg Triaxiallautsprecher SCS
Bandbreite 80 Hz - 22 000 Hz
Wirkungsgrad 90 dB / 2,8 V / 1 m
Nennwiderstand 8 ohm
Mindestwiderstand 3,2 ohm
Nennleistung 220 W
Spitzenleistung 1 540 W
Serienmäßige
Magnetabschirmung nein
Baltic Evolution
Ausführungen Wenge/Kugel Perlmutt
Abmessungen
(H x B x T) 123 x 32 x 42 cm
Gewicht 17,5 kg
Baltic Evolution
mit Wandbefestigung
Ausführungen Perlmutt - Perlschwarz - Weiß
Abmessungen
(H x B x T) 24 x 27 x 35 cm
Gewicht 7 kg
Baltic Evolution
mit Sockel
Ausführungen Perlmutt - Perlschwarz
Abmessungen
(H x B x T) 27 x 27 x 27 cm
Gewicht 7 kg
Hoch/Mittel/Tiefmittelton
TC23
Kirschbaum/Kugel Perlschwarz
Santos/Kugel Perlschwarz
Für größere Verlässlichkeit und optimale Qualität entwickelt Cabasse seine Apparate permanent weiter und behält sich deshalb das Recht vor, an den
auf technischen Unterlagen oder Werbematerial gezeigten Modellen Änderungen vorzunehmen.
Auf unserer Homepage www.cabasse.com können Sie die spezifischen Einstellungen ersehen, die wir für unsere Subwoofer empfehlen.
Page 12

Cabasse SA - 210, rue René Descartes - BP 10 - 29280 Plouzané
Tel +33 (0)2 98 05 88 88 - Fax +33 (0)2 98 05 88 99
www.cabasse.com - info@cabasse.com
NOT0237 06/08
Service Consommateur France
service-conso@cabasse.com
02 98 05 13 13
 Loading...