

Page 1

Product Marking
1
A+ series
Mach 4
1
PX Print Module
Programming Manual
XD4
J-Script and abc for cab printers
Edition 7.0
1cab Produkttechnik GmbH & Co KG
Page 2

2
JScript - the programming language for cab printers.
The usage of all described functions in this manual requires firmware version 3.17 or higher.
This is a generic manual which describes the commands for different printer models,which means
that it may contain descriptions or explanations of features which are not available on every printer
model.
2
2cab Produkttechnik GmbH & Co KG
Page 3

3
3
cab Programming Manual
valid for following printer types:
A+ -Series
XD4 -Series
Mach 4
PX -Print Module
TM
TM
TM
TM
and all printing systems based on the cab „X2“ board
copyright © cab Produkttechnik GmbH & Co KG
all rights reserved
No parts of this manual may be copied, rewritten or used for anything else
than for original cab printers.
This interdicts the usage of the manual for OEM products
unless you have a written permission.
The cab printers command language is owned and copyrighted by
cab Produkttechnik GmbH & Co KG
cab Produkttechnik GmbH & Co KG
Wilhelm Schickard Str. 14
76131 Karlsruhe / Germany
Tel: +49 - 721-6626-0
Fax:+49 - 721-6626-239
Email: support@cabgmbh.com
http://www.cabgmbh.com
All registered trademarks or product names are trademarks of their respectives companies
TM
Swiss
is registered Trademark of Bitstream Inc.
3cab Produkttechnik GmbH & Co KG
Page 4

4
4
Table of contents
copyright © cab Produkttechnik GmbH & Co KG................................................................................... 3
Chapter 1: Introduction............................................................................... 11
Introduction...........................................................................................................................................11
Nomenclature, Syntax of the commands..............................................................................................11
Usage of this manual........................................................................................................................... 12
Print Positions: .................................................................................................................................... 13
Overview ............................................................................................................................................. 14
1. ESC instructions.............................................................................................................................. 14
2. Immediate Commands .................................................................................................................... 14
3. Label Format Commands................................................................................................................ 15
4. Special Content Fields..................................................................................................................... 15
Simple programming lesson ................................................................................................................ 16
Create your first label: ......................................................................................................................... 16
Explanation of this example................................................................................................................. 16
Chapter 2: Command Overview.................................................................18
Command Overview............................................................................................................................ 18
ESC Commands ................................................................................................................................. 19
Immediate Commands ........................................................................................................................ 20
Label Format Commands.................................................................................................................... 22
Label Format Commands.................................................................................................................... 23
Special Content Fields......................................................................................................................... 24
Time Functions.................................................................................................................................... 24
Date Functions .................................................................................................................................... 24
Date Functions (continued) ................................................................................................................. 25
Jalali Date Functions ( Arab date )....................................................................................................... 26
Suriyakati Date Functions ( official date in Thailand ) ......................................................................... 26
Mathematical functions........................................................................................................................ 27
Field Calculations and Comparisons ................................................................................................... 27
Special functions (miscellaneous) ....................................................................................................... 28
RFID Functions ................................................................................................................................... 29
Database Connector commands ......................................................................................................... 30
Chapter 3: ESC Commands........................................................................33
ESCESC Replaces ESC in binary data ............................................................................................ 34
ESC!ESC! Hard Reset ..................................................................................................................... 35
ESC* Activate all RS-485 printers..................................................................................................... 36
ESC. Start and stop value for binary data ......................................................................................... 37
ESC: Start description of binary data ................................................................................................ 38
ESC< Back feed of the material behind the photocell....................................................................... 39
ESC? Request for free memory ....................................................................................................... 40
ESCa abc-status ................................................................................................................................ 41
ESCc - Cancel Printjob....................................................................................................................... 42
ESCend-of-data End description of binary data................................................................................43
ESCf formfeed.................................................................................................................................. 44
ESCg Print St art command.................................................................................................... ........... 45
ESCi Send value from the INF-memory ........................................................................................... 46
4cab Produkttechnik GmbH & Co KG
Page 5

5
ESCj Request for the latest printed job............................................................................................. 47
ESCI Request of synchronisation info .............................................................................................. 48
ESCp0 End printer´s pause mode .................................................................................................... 49
ESCp1 Set printer into pause mode ................................................................................................. 50
ESCs Printer status query ................................................................................................................. 51
ESCt total cancel.............................................................................................................................. 54
ESCz Extended status request......................................................................................................... 55
5
CHAPTER 3 - Immediate commands........................................................56
Immediate commands......................................................................................................................... 56
<ABC> - Start of the abc Basic Compiler............................................................................................. 57
</ABC> - End of the abc Basic Compiler............................................................................................. 58
<ENCRYPTED LABEL...> - S tart of an ENCR YPTED label................................................................. 59
<ENCRYPTED JOB> - St art of an ENCRYPTED job .......................................................................... 60
</ENCRYPTED JOB> - End of an ENCRYPTED job .......................................................................... 61
; - Comment line .................................................................................................................................. 62
a - ASCII Dump Mode ......................................................................................................................... 63
c - Direct cut ........................................................................................................................................ 65
e - erase data ...................................................................................................................................... 72
f - formfeed.......................................................................................................................................... 73
j - job-ID............................................................................................................................................... 74
l - Change Language ( country ) .......................................................................................................... 75
m - set measuring unit......................................................................................................................... 77
p - pause Printer.................................................................................................................................. 79
q - query Printer................................................................................................................................... 80
r - reset to default values ..................................................................................................................... 82
s - set Date/Time ................................................................................................................................. 83
t - Run Printer Self-test ........................................................................................................................ 84
v - Firmware version............................................................................................................................ 89
x - Synchronous Peripheral Signal Settings......................................................................................... 90
z - print slashed / unslashed zero ........................................................................................................ 91
CHAPTER 4 - Label Format Commands..................................................92
A - Amount of Labels ........................................................................................................................... 93
B - Barcode Definition.......................................................................................................................... 95
Barcode overview list......................................................................................................................... 102
Available check digits: ....................................................................................................................... 104
Startpositions of Barcodes................................................................................................................. 105
Barcodes - printing direction .............................................................................................................. 105
B - Barcode 2 of 5 Interleaved ........................................................................................................ 106
B - Barcode 2 of 5 Interleaved ........................................................................................................ 107
B - Barcode Add-On2 ..................................................................................................................... 108
B - Barcode Add-On5 ......................................................................................................................110
B - Barcode Aztec - Code ................................................................................................................112
B - Barcode Codabar.......................................................................................................................114
B - Barcode Codablock F ................................................................................................................116
B - Barcode Code 39 .......................................................................................................................118
B - Barcode Code 39 FULL ASCII .................................................................................................. 120
B - Barcode Code 93 ...................................................................................................................... 122
B - Barcode Code 128 .................................................................................................................... 124
B - Barcode Data Matrix ................................................................................................................. 126
B - Barcode DBP - German Post Identcode ................................................................................... 128
5cab Produkttechnik GmbH & Co KG
Page 6

6
B - Barcode EAN-8 / JAN-8 ............................................................................................................ 130
B - Barcode EAN-13 / JAN-13 ........................................................................................................ 132
B - Barcode EAN 128 / UCC 128 / GS1-128................................................................................... 134
B - Barcode EAN-18 / NVE / SSCC-18........................................................................................... 136
B - Barcode FIM ............................................................................................................................. 140
B - Barcode HIBC (Health Industry Barcode).................................................................................. 142
B - Barcode ITF-14 * / SCC-14 *..................................................................................................... 144
B - Barcode Maxicode .................................................................................................................... 146
B - Barcode Micro PDF 417............................................................................................................ 150
B - Barcode MSI (MSI Plessey) ...................................................................................................... 152
B - Barcode PDF 417 ..................................................................................................................... 154
B - Barcode Plessey ....................................................................................................................... 156
B - Barcode Postnet ....................................................................................................................... 158
B - Barcode PZN-Barcode * ........................................................................................................... 160
B - Barcode QR-Code .................................................................................................................... 162
B - Barcode RSS-14 ....................................................................................................................... 164
B - Barcode RSS-14 composite (CC-A).......................................................................................... 166
B - Barcode RSS-14 composite (CC-B).......................................................................................... 168
B - Barcode RSS-14 truncated ....................................................................................................... 170
B - Barcode RSS-14 truncated composite (CC-A).......................................................................... 172
B - Barcode RSS-14 truncated composite (CC-B).......................................................................... 174
B - Barcode RSS-14 stacked.......................................................................................................... 176
B - Barcode RSS-14 stacked composite (CC-A) ............................................................................ 178
B - Barcode RSS-14 stacked composite (CC-B) ............................................................................ 180
B - Barcode RSS-14 stacked omnidirectional................................................................................. 182
B - Barcode RSS-14 stacked omnidirectional composite (CC-A).................................................... 184
B - Barcode RSS-14 stacked omnidirectional composite (CC-B).................................................... 186
B - Barcode RSS limited................................................................................................................. 188
B - Barcode RSS limited composite (CC-A).................................................................................... 190
B - Barcode RSS limited composite (CC-B).................................................................................... 192
B - Barcode RSS expanded............................................................................................................ 194
B - Barcode RSS expanded composite (CC-A) .............................................................................. 196
B - Barcode RSS expanded composite CC-B................................................................................. 198
B - Barcode RSS expanded stacked .............................................................................................. 200
B - Barcode RSS expanded stacked half line ................................................................................. 202
B - Barcode RSS expanded stacked composite (CC-A) ................................................................. 204
B - Barcode RSS expanded stacked composite (CC-B) ................................................................. 206
B - Barcode UPC-A ........................................................................................................................ 208
B - Barcode UPC-E ........................................................................................................................ 210
B - Barcode UPC-E0 ...................................................................................................................... 212
C - Cutter Parameters ....................................................................................................................... 214
D - Global Object Offset .................................................................................................................... 218
E DBF ... - Define Files ( Extension DBF).......................................................................................... 219
E LOG ... - Define Files ( Extension LOG)......................................................................................... 220
E SQL - Define Files ( Extension SQL).............................................................................................. 222
E RFID - Define Files (Extension RFID) ............................................................................................ 223
F - Font Number................................................................................................................................ 224
F - Font Number................................................................................................................................ 225
G - Graphic Field Definition ............................................................................................................... 226
G - Graphic Definition - Circle............................................................................................................ 228
G - Graphic Definition - Line .............................................................................................................. 230
G - Graphic Definition - Rectangle..................................................................................................... 232
G - Graphic Definition - Option: Fill.................................................................................................... 234
G - Graphic Definition - Option Shade ............................................................................................... 235
G - Graphic Definition - Option: Outline ............................................................................................. 236
6
6cab Produkttechnik GmbH & Co KG
Page 7

7
H - Heat, Speed, Method of Printing, Ribbon..................................................................................... 238
I - Image Field Definition.................................................................................................................... 239
J - Job S tart....................................................................................................................................... 242
M - Memory Card Access .................................................................................................................. 243
Memory card access with FTP connection: ....................................................................................... 245
M - Memory Card Access - load file from card................................................................................... 250
O - Set Print Options ......................................................................................................................... 255
O - Set Print Options ......................................................................................................................... 256
P - Set Peel-Off Mode ....................................................................................................................... 258
R - Replace Field Contents................................................................................................................ 259
S - Set Label Size.............................................................................................................................. 260
T - Text Field Definition ...................................................................................................................... 264
X - Synchronous Peripheral Signal Settings ...................................................................................... 274
7
Chapter 5: Special Content fields............................................................275
Time Functions ........................................................................................................... 277
[H12...] Print Hour in 12-hour form (1-12) ....................................................................................... 277
[H24...] Print Hour in 24-hour form (0-23) ....................................................................................... 278
[H012...] Print H0ur in 12-hour form (01-12) -always 2 digits .......................................................... 279
[H024...] Print H0ur in 24-hour form (01-24) -always 2 digits .......................................................... 280
[ISOTIME...] Prints the T ime in ISO st andard format..................................................................... 281
[MIN] Print MINutes (00-59)............................................................................................................ 282
[SEC...] Print SEConds (00-59) ...................................................................................................... 283
[TIME ...] Print actual TIME............................................................................................................. 284
[XM...] am/pm indicator .................................................................................................................. 285
Date Functions............................................................................................................ 286
[DA TE... ] Print actual D ATE........................................................................................................... 287
[DA Y... ] Print numeric DAY of the month (1-31)............................................................................. 289
[DA Y02... ] Print numeric 2-digit DAY of the month (01-31)............................................................ 290
[DOFY... ] Print numeric Day OF Year(001-366) ............................................................................ 291
[ISODATE:...] Prints date following the ISO specs ......................................................................... 292
[ISOORDINAL: ...] Prints date following the ISO specs ................................................................. 293
[WDAY... ] Print numeric WeekDAY(0-6) ....................................................................................... 294
[wday... ] Print complete weekday name........................................................................................ 295
[wday2... ] Print weekday name, 2 - digits shortened ..................................................................... 296
[wday3... ] Print weekday name, 3 - digits shortened ..................................................................... 297
[ISOWDA Y: ...] Print date following the ISO specs.......................................................................... 298
[WEEK... ] Print numeric WEEK (1-53).......................................................................................... 299
[WEEK02... ] Print numeric WEEK with 2 -digits (01-53) ................................................................ 300
[OWEEK... ] Print WEEK with Offset(1-53).................................................................................... 301
[mon... ] Print 3-character month name ......................................................................................... 302
[month... ] Print complete month name.......................................................................................... 303
[MONTH... ] Print 2-digit MONTH (1-12)........................................................................................ 304
[MONTH02... ] Print 02-digit MONTH (01-12)................................................................................ 305
[YY... ] Print 2-digit Year (00-99)..................................................................................................... 307
[YYYY... ] Print 4-digit Year (1970-2069) ....................................................................................... 308
Jalali Date functions .......................................................................................................................... 309
Suriyakati Date .................................................................................................................................. 309
[JYEAR... ] Print 4-digit Jalali Year ................................................................................................. 310
[JDAY...] Print Jalali-DAY ..................................................................................................................311
7cab Produkttechnik GmbH & Co KG
Page 8

8
[JDAY02...] Print Jalali-DAY, 02 digits ............................................................................................. 312
[JMONTH...] Print Jalali-Month ....................................................................................................... 313
[JMONTH02...] Print Jalali-Month - 2 digits..................................................................................... 314
[JDOFY...] Print Jalali-Day OF Year ................................................................................................ 315
[jmonth... ] Print complete Jalali month name.............................................................................. 316
[JWDAY...] Print Jalali-Week-DAY .................................................................................................. 317
[SYEAR... ] Print 4-digit Suriyakati Year ......................................................................................... 318
8
Mathematical Functions............................................................................................. 319
[+:op1,op2, . . .] Addition................................................................................................................. 320
[-:op1,op2,...] Subtraction ............................................................................................................... 321
[*:op1,op2, . .] Multiplication............................................................................................................ 322
[/ :op1,op2] Division ........................................................................................................................ 323
[%: op1,op2] Modulo....................................................................................................................... 324
[|:op1,op2] Logical Or ..................................................................................................................... 326
[|:op1,op2] Logical Or ..................................................................................................................... 327
[&:op1,op2] Logical AND................................................................................................................. 328
[<: op1,op2] Comparision < Less than ............................................................................................ 329
[=: op1,op2] Comparision = Equal .................................................................................................. 330
[==: text1,text2] String Comparision == Equal................................................................................. 331
[>: op1,op2] Comparision > Greater than ....................................................................................... 332
[MOD10:x] Calculate the Modulo 10 check digit ............................................................................. 333
[MOD36:x] Calculate the Modulo 36 check digit ............................................................................ 334
[MOD43:x] Calculates the Modulo 43 Check digit.......................................................................... 335
[P: ... ] Print result in Price format .................................................................................................. 336
[R:x] Rounding method................................................................................................................... 337
Special Functions ....................................................................................................... 338
[?: ... ] LCD prompt ....................................................................................................................... 339
[ABC:x] Insert ABC value................................................................................................................ 344
[BIN:x{,y ...} ] Insert Binary data...................................................................................................... 345
[BIN16B:x{,y ...} ] Insert Binary data, 16 bit - Big Endian................................................................. 346
[BIN16L:x{,y ...} ] Insert Binary data, 16 bit - Little Endian............................................................... 347
[BIN32B:x{,y ...} ] Insert Binary data, 32 bit - Big Endian................................................................. 348
[BIN32L:x{,y ...} ] Insert Binary data, 32 bit - Little Endian............................................................... 349
[BITFIELD:... ] Bitwise encoded data field....................................................................................... 350
[C: ... ] Leading zero replacement................................................................................................... 351
[D:... ] Set number of Digits............................................................................................................ 353
[DBF:... ] Database file access ...................................................................................................... 354
[HEX:x ...] Hexadecimal conversion ............................................................................................... 355
[I: ...] Invisible fields ........................................................................................................................ 356
[JOBID] print JOB ID ..................................................................................................................... 358
[J: ... ] Justification ......................................................................................................................... 359
[LEN:x] Text Length detection......................................................................................................... 361
[LOWER:... ] Converts to lower case characters ........................................................................... 362
[L TRIM:... ] Trim data Left.............................................................................................................. 363
[name] Access a field with a name ................................................................................................. 364
[name,m{,n}] insert substring.......................................................................................................... 365
[RTMP... ] Read value from serial (TMP) file................................................................................... 366
[RTRIM:... ] Trim dat a Right........................................................................................................... 367
[RUSER... ] Read value from (user) memory.................................................................................. 368
[S:... ] Script style for numeric values............................................................................................. 369
[SER:...] - Serial numbering............................................................................................................... 370
[SQL:xx ] SQL database access..................................................................................................... 375
8cab Produkttechnik GmbH & Co KG
Page 9

9
[SQLLOG:... ] SQL logging into database ...................................................................................... 376
[TRIM:... ] Trim data....................................................................................................................... 377
[U:x] Insert Unicode characters ...................................................................................................... 378
[UPPER:... ] Convert to upper case characters.............................................................................. 380
[WINF] Mark a line for writing into the info buffer............................................................................ 381
[WLOG] Write LOG file................................................................................................................... 382
[WTMP] Write value to serial (TMP) file ......................................................................................... 383
[WUSER... ] Write value to USER memory .................................................................................... 384
9
RFID Functions ........................................................................................................... 385
[LTAG ... ] Lock RFID TAG area ..................................................................................................... 386
[RTAG ... ] Read RFID TAG............................................................................................................ 387
[RTAGBIN ... ] Read RFID T AG binary ........................................................................................... 388
[TAGID] read T AG ID...................................................................................................................... 389
[WTAG ... ] Write RFID TAG ........................................................................................................... 390
Chapter 6: cab DataBase Connector .......................................................391
How it works: ..................................................................................................................................... 392
Supported Databases:....................................................................................................................... 392
cab Database Connector and SQLClient........................................................................................... 392
Installation ......................................................................................................................................... 393
Chapter 7: abc - a-Series basic compiler..............................................398
abc - a-Series basic compiler .......................................................................................................... 398
Requirements:................................................................................................................................... 398
Restrictions: ...................................................................................................................................... 398
Import differences to Yabasic PC versions: ....................................................................................... 399
T emporary restrictions/known bugs: .................................................................................................. 399
Window-Handling: ............................................................................................................................. 399
New functions compared to Yabasic:................................................................................................. 400
Restrictions compared to Yabasic:..................................................................................................... 400
abc - PEEK Variables: ....................................................................................................................... 401
abc - POKE Variables: ....................................................................................................................... 404
abc - Streams:................................................................................................................................... 406
abc - Modes: ..................................................................................................................................... 407
Notes:................................................................................................................................................ 408
Communication with Web Browsers:................................................................................................. 408
HTML ................................................................................................................................................ 408
ASCII T able ....................................................................................................................................... 422
Appendix A ................................................................................................422
Code 39 pattern chart........................................................................................................................ 423
Code 39 Full ASCII chart................................................................................................................... 424
Tips and Tricks .................................................................................................................................. 425
Appendix B:Tips and Tricks..................................................................... 425
V ariable day offset............................................................................................................................. 426
Hexadecimal counter (Base 16, 0-F) ................................................................................................. 427
9cab Produkttechnik GmbH & Co KG
Page 10

10
10
Invisible field - depending on condition .............................................................................................. 428
Memory card „reload“ ........................................................................................................................ 429
Automatic start with pause................................................................................................................. 430
Using Replace sequence and split the content .................................................................................. 431
Leading zero suppression after calculation........................................................................................ 432
Replacing graphics dynamically......................................................................................................... 433
Appendix C - Character lists ....................................................................434
Character list Swiss 721 .................................................................................................................... 435
Character list Swiss 721 bold ............................................................................................................ 448
Character list Monospace.................................................................................................................. 462
Index ................................................................................................................................................. 473
Index...........................................................................................................473
10cab Produkttechnik GmbH & Co KG
Page 11

11
Chapter 1: Introduction
Introduction
IMPORTANT : We highly recommend to read the introduction first !!
• The described commands and sequences are tested and approved with original cab printers.
cab Produkttechnik can not guarantee that all functions are available on OEM products.
• All sample labels are created with a 300 dpi printer,
• All measurement s are in millimeters for the usage in international markets. Label positions have to be
recalculated if the printer is set to „country = USA“, if no measurement command is transmitted.
• Some described functions are only available if your printer contains the actual firmware. We
recommend to download and install the actual firmware release from our website at:
http://www.cabgmbh.com
• We tried our best to write an easy understandable programmer´s manual which should contain every
possible function of cab printers.
Multiple different methods have been used to make sure that every shown example works properly and
a few proof reads have been done to avoid any error in this manual.
Nevertheless - we would appreciate your comments, where more explanation is required and where we
have to do things better. Every comment is welcome and will influence our future work.
And if you find any error,- then please let us know. Thank you for your help !
11
Nomenclature, Syntax of the commands
• All commands are accepted when the line end identifier is transmitted, with the exception of ESC
commands, they are processed as soon as the required character is received.
• Carriage returns are not displayed in the headlines and not in the example files of this manual, to
keep a better overview. Carriage Returns (ASCII 13, HEX 0D) are only shown in the synt ax description
in italic letters (CR ).
You may use either CR (carriage return), LF (line feed) or CR/LF (carriage return/ line feed)
(See also the ASCII table in the APPENDIX of this manual)
• It is not required to use special characters to create a label format. Data can be keyed in with a simple
text editor.
• For a better overview it is allowed to add spaces or tabs within a command line. Numeric parameters
accept additional zeros.
• Separators for the parameters are either semicolons or commas.
11cab Produkttechnik GmbH & Co KG
Page 12

12
12
Usage of this manual
• The commands are sorted in different sections. In each section we further sorted the
commands in alphabetical order. We used following structure:
1. ESC commands
2. Commands which start with lower case letters
3. Commands which start with uppercase letters
4. Special content fields sorted by:
a: Time functions
b: Date functions
c: Mathematical functions
d: Special Functions
e:RFID Functions
5. Description of the cab DataBase connector
6. Description of the abc - Basic compiler
7. Appendix A shows a few chart s and t ables
8.Appendix B contains some tips and tricks shown on special samples
9. Last but not least we added a Unicode character list of the internal
TrueT ype font s.
• Special Notes and infos are shown in it alic characters where the "finger" point s
to them.
• The examples are mostly reduced to the minimum requirements to print a label, to keep it
as simple as possible.
• Not all commands are available or all printer types. This depends on if the described
function needs additional equipment such as the RFID functions which are not available in
every machine. Please referto the further documentation of your printer.
• In all cases when it was possible we printed an example label, which helps to explain the
function of each command. You may copy or type the sample in your editor to see how it
works.
• All examples have been tested and the printouts have been scanned. The original files
have been copied into the sample text to make sure to keep the amount of mistakes on a
minimum. Nevertheless - please inform us whenever you find anything wrong. We will
correct that in the next release of this manual.
12cab Produkttechnik GmbH & Co KG
Page 13

13
13
Print Positions:
The Home position or „Zero point“ of a label is shown on the picture below.The „Headline“appears first,
as it is usual on all laser printers etc. Most users prefer to get the printed label „foot first“ out of the
printer. This can easily be done when the „O R“ command is added to the shown examples.
We did not add this command in the samples to keep a better overview . You may add this whenever it
is required. „O R“ rotates the orientation of the label by 180 degrees. So all shown examples which do
not contain the „O R“ command have been rotated for a better view in this manual.
feed
direction
(paper
path)
Home position when the
„O R“ command had been
used.
Home position when the „O R“ command had been used.
Home position when the
„O R“ command had been
used.
Initial Home position
Initial Home position
13cab Produkttechnik GmbH & Co KG
Page 14

14
14
Overview
The programming language of the cab Printers is based almost completely on ASCII characters.
Together with the selectability of different codepages it is possible to connect to nearly each computer
system.
The printers accept additionally all types of line end identifiers (CR, LF, CR/LF), so that the descriptions
of labels can be created with the most simple text editors, such as „Notepad“ or „Wordpad“ - saved as
plain text files.
Instruction types
cab printers are using basically three types of instructions
• ESC instructions,
• Instructions with lowercase letters and
• Instructions with uppercase letters.
1. ESC instructions
are responsible for status queries, control functions, memory management etc. and are usually
executed immediately , i.e. even if a printing job runs. They are not absolutely required to print labels,
but they offer additional features and possibilities
Example:
ESC ? - Request for free memory.
ESC c - Cancel Job
ESC p0 - Ends printer pause state
ESC s - Printer status request
2. Immediate Commands
Instructions with lowercase letters are used for adjustments and settings which must not have
something to do with the actual printjob.
These are for example requests of fonts or graphics which have previously downloaded to the printer .
Example:
a - Activate the ASCII dump mode
c - Immediate cut
f - Formfeed
t - Performs a test print
14cab Produkttechnik GmbH & Co KG
Page 15

15
15
3. Label Format Commands
Instructions with uppercase letters are used to describe the label itself.
This has a fix structure, beginning with the start command, the description of the label size and
description of each object in the label.
At the end of the label the printer expects the amount of labels.
Example:
cab printers use additionally to that 3 command types following special commands for special text
formatting, calculations, comparisons etc.:
4. Special Content Fields
J - Job start
S - Set label size
H - Heat, speed, and printing method
O - Set print options
T - Text field definition
B - Barcode field definition
G - Graphic field definition
I - Image field definition
A - Amount of labels
Special content fields
cab database connector commands
abc - a-series basic compiler commands
are used within Label Format commands.
They consist of instructions in squared brackets, [ ], which offers various data insertion and data
manipulation functions.
Example:
A huge amount of more complex and powerful commands are explained later in this manual in the
„Special Content fields“ section.
cab database connector command and „abc“ - commands will not be explained here. Please refer to
the special sections in this manual.
On the next pages you will find a short training class which shall help you to become familiar with
the cab printer programming language „JSCRIPT“. We recommend that you try this course first, before
you start with your own projects.
[DATE] - Print date
[/ :op1,op2] - Divide
[>: op1,op2] - Greater than
15cab Produkttechnik GmbH & Co KG
Page 16

16
16
Simple programming lesson
Target:
Learn how easy it is to teach your printer to do what you want.
Understand the language structure of JScript by testing the following sample.
Get the feeling what might go wrong if the syntax is not correct.
Modify this sample with other items of this manual.
Create your first label:
1. Connect your printer to the PC, select „Country United Kingdom“ on the printer´s control panel.
The handling is explained in the operator´s manual (the language changes to „English“ and the
measurements to „millimeters“ - as the label is designed in millimeters)
2. Start your preferred plain texteditor (we will use Notep ad for this example)
3. Key in following data and don´t forget to press the ENTER key on your keyboard after the „A 1“ in
the last line is keyed in.
Example:
m m
J
H 100
S l1;0,0,68,70,100
O R
T 10,10,0,5,pt20;sample
B 10,20,0,EAN-13,SC2;401234512345
G 8,4,0;R:30,9,0.3,0.3
A 1
Explanation of this example
(Details are described in the respective sections of this manual)
J Job start
H 100 Heat (Speed) setting (100mm/sec)
S l1;0,0,68,70,100 Size of the Label (68 x100mm, gap 2mm)
O R Orientation Rotated by 180°
T 10,10,0,5,pt20;sample Text line- font:Swiss bold, 20 pt
B 10,20,0,EAN-13,SC2;401234512345 Barcode EAN 13, size SC 2
G 8,3.5,0;R:30,9,0.3,0.3 Graphic, Rectangle 30x9mm, 0.3mm
A 1 Amount of labels (in this sample 1)
4. Save that file now with the name „sample1.txt“ in your root directory of Harddrive C:
16cab Produkttechnik GmbH & Co KG
Page 17

17
17
5. Switch to the DOS - mode or to the command prompt (depending on your operating system
version)
6. At the command prompt key in: C:\> copy/b sample1.txt LPT1: ( LPT1: - if the printer is
connected to the parallel port of the PC.) -Requires the optional parallel adapter .
The result should be that the printer prints the label which is shown below.
The better possibility is to transmit data via network connection with an FTP client.
We recommend to download "NOTEP AD++" which is an open source text editor with a built in
FTP client. Copy the file directly from the editor to the "execute" folder which is shown by the FTP
client. When setting up your FTP connection you will be asked for the server name which is the IP
address of your printer. Furthermore you have to key in the Login which is always "root" and the
password which is the previously set PIN of your printer´s menu.
... and if it does not work as expected ? - Then following points might be the reason:
1. The printer receives no data:
a: The wrong interface or wrong transmission speed is selected on your printer.
- Check the interface settings in the setup menu of the printer
b: Your interface is blocked by another application.
c: The cable might be defect- check the connecting cable
2. Printer receives data but shows „ribbon out“
a: No ribbon in the printer
b: Ribbon is not fixed on the ribbon unwinder
3. Printer receives data but shows „Protocol error“ in its display
a: Transmitted data is wrong - this might be a missing comma or a accidentially set semicolon
instead of a comma or any other wrong data. S p aces after a command may cause a protocol
error, too! Check your label dat a carefully.
17cab Produkttechnik GmbH & Co KG
Page 18

18
Chapter 2: Command Overview
Command Overview
The following pages are showing lists of all available JScript printer commands
Details are explained later in this manual.
18
18cab Produkttechnik GmbH & Co KG
Page 19

19
19
ESC Commands
ESCESC Replaces ESC in binary data
ESC!ESC! Hard reset
ESC* Activate all RS 485 printers
ESC. St art and S top value for binary dat a
ESC: Start description of binary data*
ESC< Back feed of the material behind the photocell
ESC? Request for free memory.
ESCa Request for abc-status
ESCc cancel printjob
ESCend-of-data End description of binary data
ESCf formfeed (Equal to pressing „form feed“ on the navigator pad)
ESCi Send value from the INF-memory
ESCj Request for the latest printed job
ESCl Request of synchronisation Info
ESCp0 End printer ´s pause mode
ESCp1 Set printer into pause mode
ESCs Printer status query
ESCt total cancel of all jobs
ESCz Extended status request
*) available for Hermes A only !
19cab Produkttechnik GmbH & Co KG
Page 20

20
20
Immediate Commands
All Immediate commands are processed when a line end identifier is sent (CR, LF or CR/LF)
<abc> start of „abc“ (a-Series basic compiler)
</abc> end of „abc“ (a-Series basic compiler)
; comment Comment line
a set printer in aSCII dump mode
c Direct cut
d t;name.... download graphic or font data
e t;name.... erase data
f form feed
j job-ID
l name Set language (country)
m unit Set measuring unit
p status pause printer
q b;name query bitmap font
q d;name query dBase file on memory card
q e;name query format file on memory card
q f query free memory
q i;name query image availability
q l;name query label file on memory card
q m query memory type
q p query peripheral types
q r query ribbon diameter
q s;name query scaleable font availability
q t query time and date
r reset to default values
s n set date/time
20cab Produkttechnik GmbH & Co KG
Page 21

21
21
Immediate Commands
All Immediate Commands are processed when a line end identifier is sent (CR, LF or CR/LF)
t[x] Run printer self-test
v Request firmware version
x d;uo Set peripheral (x) bits directly
x e;uo Set peripheral (x) error value
21cab Produkttechnik GmbH & Co KG
Page 22

22
22
Label Format Commands
Label format commands are processed when a line end identifier is sent (CR, LF or CR/LF)
A [NO] n Amount of labels (end job/print)
B [:name;] x, y , r, type,size,text Barcode field definition
C cnt[,disp1[,disp2]] Set Cutter parameters
C e Set Cutter to end-of-job
D x,y Global Object Offset (Distance to margins)
E DBF;name Defines a DBF (database) file
E LOG;name Defines a LOG file
E RFID;... Define Files (Extension RFID )
E TMP;name Defines TMP (temporary) serial file
E SQL;[IP of cabDatabaseconnector]:portnr Sets IP adress for SQL database access
F number;name Font number
G [:name;] x, y , r; type:options, . . . Graphic field definition
H speed[,h][,t][,r][,b] Heat, speed, and printing method
I [:name;]x,y,r[,mx,my];imgname Image field definition
J [comment] Job start
M c Memory card: content request
M d type;name Memory card: delete file from card
M f;name Memory card: format card
M l type;[path]name Memory card: load file from card
M r Memory card: repeat last label
M s type;name Memory card: store data on card
M u type;[path]name uploads data to the host
O [M,][R,][N,][p][T ,][U,] Set print Options
P [disp] Set Peel-off mode
R name;value Replace field contents
S [type:]yo,xo,length,dy ,wide. . . Set label Size
22cab Produkttechnik GmbH & Co KG
Page 23

23
23
Label Format Commands
Label format commands are processed when a line end identifier is sent (CR, LF or CR/LF)
T [:name;] x,y ,r, font,size . . ;data Text field definition
X y[;uo] Synchronous setting of peripheral (eXternal) signal
23cab Produkttechnik GmbH & Co KG
Page 24

24
24
Special Content Fields
Time Functions
[H12] Print Hour in 12-hour form (1-12)
[H24] Print Hour in 24-hour form (0-23)
[H012] Print H0ur in 12-hour form (01-12) - always 2 digits
[H024] Print H0ur in 24-hour form (01-24) - always 2 digits
[ISOTIME] Prints the Time in ISO st andard format
[MIN] Print MINutes (00-59)
[SEC] Print SEConds (00-59)
[TIME] Print actual TIME in the format of the preset country
[XM] am / pm indicator
Date Functions
[DATE{:+DD{,+MM{,+YY}}}] Print actual DA TE in the format of the preset country
[DAY{:+DD{,+MM{,+YY}}}] Print numeric DAY of the month (1-31)
[DAY02{:+DD{,+MM{,+YY}}}] Print numeric 2-digit DAY of the month (01-31)
[DOFY{:+DD{,+MM{,+YY}}}] Print numeric Day OF Year(1-366)
[ISODATE{:+DD{,+MM{,+YY}}}] Print ISO date
[ISOORDINAL{:+DD{,+MM{,+YY}}}] Print ISO ordinal
[ODATE:+DD{,+MM{,+YY}}] Print DATE with Offset *
[wday{:+DD{,+MM{,+YY}}}] Print complete weekday name (0 = sunday) *
[WDAY{:+DD{,+MM{,+YY}}}] Print numeric WeekDAY(0-6)*
[wday2{:+DD{,+MM{,+YY}}}] Print weekday name, 2 - digits shortened *
[wday3{:+DD{,+MM{,+YY}}}] Print weekday name, 3 - digits shortened*
[ISOWDAY{:+DD{,+MM{,+YY}}}] Print numeric WeekDAY (1-7)
[WEEK{:+DD{,+MM{,+YY}}}] Print numeric WEEK (1-53)
[WEEK02{:+DD{,+MM{,+YY}}}] Print numeric WEEK with 2 - digits (01-53)
[OWEEK:+WW] Print WEEK with Offset (1-53)
* (in the format of the preset country)
24cab Produkttechnik GmbH & Co KG
Page 25

25
25
Special Content Fields
Date Functions (continued)
[mon{:+DD{,+MM{,+YY}}}] Print 3-character month name (i.e. jan)*
[month{:+DD{,+MM{,+YY}}}] Print complete month name (i.e. january)*
[MONTH{:+DD{,+MM{,+YY}}}] Print 2-digit MONTH (1-12)
[MONTH02{:+DD{,+MM{,+YY}}}] Print 02-digit MONTH (01-12) (leading zeros, always 2 digits)
[YY{:+DD{,+MM{,+YY}}}] Print 2-digit Year (00-99)
[YYYY{:+DD{,+MM{,+YY}}}] Print 4-digit Year (1970-2069)
* (in the format of the preset country)
25cab Produkttechnik GmbH & Co KG
Page 26

26
26
Special Content Fields
Jalali Date Functions ( Arab date )
[JYEAR{:+DD{,+MM{,+YY}}}] Print Jalali-YEAR, 4 digits
[JDAY{:+DD{,+MM{,+YY}}}] Print Jalali-DAY
[JDAY02{:+DD{,+MM{,+YY}}}] Print Jalali-DA Y, 02 digits
[JMONTH{:+DD{,+MM{,+YY}}}] Print Jalali-MONTH
[JMONTH02{:+DD{,+MM{,+YY}}}] Print Jalali-MONTH, 02 digits
[jmonth{:+DD{,+MM{,+YY}}}] Print Jalali-month, complete name
[JDOFY{:+DD{,+MM{,+YY}}}] Print Jalali-Day OF Year
[JWDAY{:+DD{,+MM{,+YY}}}] Print Jalali-Week DAY (1=saturday)
Suriyakati Date Functions ( official date in Thailand )
[SYEAR{:+DD{,+MM{,+YY}}}] Print Suriyakati-YEAR, 4 digits
26cab Produkttechnik GmbH & Co KG
Page 27

27
27
Special Content Fields
Mathematical functions
Field Calculations and Comparisons
[+:op1,op2. . ,] Addition
[-:op1,op2] Subtraction
[*:op1,op2. . ,] Multiplication
[/:op1,op2] Division
[%: op1,op2] Modulo
[|:op1,op2] Logical Or (Result 1, if minimum one operator is not equal to 0)
[&:op1,op2] Logical And (Result 0, if min. one operator is 0)
[<: op1,op2] Comparison - Less than (1=TRUE, 0=FALSE)
[=: op1,op2] Comparison - Equal (1=TRUE, 0=FALSE)
[>: op1,op2] Comparison - Greater than (1=TRUE, 0=F ALSE)
[MOD10:x] Calculates and prints the Modulo 10 Check digit
[MOD36:x] Calculates and prints the Modulo 36 Check digit
[MOD43:x] Calculates and prints the Modulo 43 Check digit
[P:name,mn{o}] Print result in Price format
[R:x] Rounding method
[==:text1,text2] String comparision (1=TRUE, 0=FALSE)
27cab Produkttechnik GmbH & Co KG
Page 28

28
28
Special Content Fields
Special functions (miscellaneous)
[?:x,y ,z,{D},{Lx},{Mx},{R},{J}] Prompt line on the printer´s display
[ABC:x] Insert ABC value
[BIN:x{,y ...}] Insert Binary data
[C:fill{,base}] Leading zero replacement
[D:m,n] Set number of Digits to print
[DBF:keyfield,keyvalue,entryfield] DataBase Field
[HEX:x] Hexadecimal conversion
[I{!}{:cond}] Invisible fields
[JOBID] print JOB ID
[J:ml] Justification
[LEN:x] Returns the Length of a variable
[LOWER:x] Converts the input data in lower case characters
[LTRIM:x] Trim data Left
[name] Access a field with a name
[name,m{,n}] Insert substring from another field
[RTMP{:x}] Read from a TMP (serial) file
[RTRIM:x] Trim data Right
[S:name] Numeric Script style
[SER:start{incr,{freq}}] Insert SERial numbering
[SPLIT:field,index] Splits t able values
[U:x] Insert Unicode character
[UPPER:x] Converts the input data in upper case characters
[WINF] Writes value into the „INF“ buffer
[WLOG] Write to LOG file
[WTMP] Write to TMP (temporary) serial file
28cab Produkttechnik GmbH & Co KG
Page 29

29
29
Special Content Fields
RFID Functions
[LTAG...] Lock RFID TAG area
[RTAG...] Read RFID TAG
[RT AGBIN...] Read RFID T AG binary
[T AGID] Read TAG ID
[WTAG...] Write RFID TAG
29cab Produkttechnik GmbH & Co KG
Page 30

30
30
Special Content Fields
Database Connector commands
[SQL:Select field from table where Searchvalue] SQL - Query function
[SQLLOG:xx] SQL - Logging function
30cab Produkttechnik GmbH & Co KG
Page 31

31
31
Special Content Fields
Special Barcode functions (not supported by all barcodes)
[ECE: 123456] Adds information for extended channel to barcodes
[APPEND:m,n,id1,id2]
[APPEND:x,id] Adds information for linked barcodes
[ANSI_DI] Adds information for ANSI - dat a identifier
[ANSI_AI] Adds information for ANSI - application identifier
31cab Produkttechnik GmbH & Co KG
Page 32

32
32
I M P O R T A N T !!
All measurements of the examples in this manual are in millimeters !
The examples will not work properly when „country“ is set to USA in the printer´s setup menu.
Select „Country = United Kingdom“ in the setup menu of the printer, or add „m m CR“
for metric measurement setting in the first line of your label sample.
We highly recommend to add the mesurement command at the beginning of all of your labels, to avoid
trouble with a different setup the printer, unless we did not show this
command in our examples in this manual to keep the examples as small as possible.
32cab Produkttechnik GmbH & Co KG
Page 33

33
Chapter 3: ESC Commands
ESC commands
are responsible for status queries, control functions, memory management etc. and are usually
executed immediately , i.e. even if a printing job runs. They are not absolutely required to print labels,
but they offer additional features and possibilities.
ESC commands cannot be handled by the most text editors. All other commands can be transmitted to
the printer by using simple text editors.
ESC commands are used for activating printers via RS-485, while the printers are „listening“ to the bus,
for resetting printers, requesting for free memory or for getting a direct status request.
Details about each command are described on the following pages.
33
33cab Produkttechnik GmbH & Co KG
Page 34

34
34
ESCESC Replaces ESC in binary data
ESC ESC is used to replace single ESC (ASCII 27 or Hex 1D) in binary data to avoid unexpected
reactions of the printers if graphics or fonts are downloaded.
Graphics or fonts may contain data which can be identical to a ESC printer command. Replacing these
ESC characters into double ESCs will tell the printer that this is part of a graphics or part of a font.
Data formats must be checked before they are transmitted to the printer.
File transfer through a FTP connection requires no data conversion if the file is downloaded to the
memory card.
Syntax:
ESCESC
34cab Produkttechnik GmbH & Co KG
Page 35

35
35
ESC!ESC! Hard Reset
forces the printer to perform a hard reset. This has the same effect as turning the printer off and on
again.
Syntax:
The system starts up with the preset default values and shows in the display that data can be received.
The display message depends on the preset language selection.
The printer is not able to receive data when the Hard Reset is accomplished. Please wait until
the printer is restarted again and shows "Ready" in the display to receive data. Otherwise
incoming data is discarded.
ESC!ESC!
35cab Produkttechnik GmbH & Co KG
Page 36

36
36
ESC* Activate all RS-485 printers
Activates all printers in a RS-485 network at the same time.
Syntax:
Sends the following data to all attached printers at the same time. This function is only available for
printers which are (optional) equipped with the RS485 interface.
Please note that this optional interface hardware is not available for all label printing systems.
ESC*
36cab Produkttechnik GmbH & Co KG
Page 37

37
37
ESC. Start and stop value for binary data
Start and Stop value for binary data.
Syntax:
To transmit binary data -such as graphics or fonts etc. - it is highly recommended to use this method of
data transmission. All ESC characters in a binary file have to be replaced by a double ESC (ESCESC)
to avoid unexpected reactions by the printer.
A binary constellation -for example- which contains ESC c would be interpreted as „CANCEL JOB“, as
soon as it is received by the printer. Therefore all ESC characters should be exchanged.
Data transmission through ftp requires no conversion.
ESC.
37cab Produkttechnik GmbH & Co KG
Page 38

38
38
ESC: Start description of binary data
Start description of binary dat a
Syntax:
cab printers offer a limited possibility to download data without converting them previously. (see also
ESC. )
In this case ESC: is required as start sequence, followed by the binary data and finished with ESCendof-data.
Note: The binary data cannot contain any ESC character (ASCII 27 or HEX 1B) ! This would be
automatically misinterpreted by the system.
ESC: cannot be used in networks
The better and cleaner way to download binary data is the usage of ESC. We highly recommend
to use the sequence.
ESC:
38cab Produkttechnik GmbH & Co KG
Page 39

39
39
ESC< Back feed of the material behind the photocell
Back feed material behind the photocell
Syntax:
The ESC< enables the printer to pull the label backward behind the internal photocell which detects the
gap of the material.
This function is only available on printing systems which are equipped with additional mechanics to
control the material. ( Hermes - applicator series). Otherwise labels would slip out of the feed roller.
ESC<
39cab Produkttechnik GmbH & Co KG
Page 40

40
40
ESC? Request for free memory
query for free printer memory input buffer - printer returns a response of 0...9 through its interface.
Syntax:
ESC?
value percentage of used memory
0 = 0-9%
1 = 10-19%
2 = 20-29%
3 = 30-39%
4 = 40-49%
5 = 50-59%
6 = 60-69%
7 = 70-79%
8 = 80-89%
9 = 90-99%
Bidirectional communications must be enabled on the requesting computer.
40cab Produkttechnik GmbH & Co KG
Page 41

41
41
ESCa abc-status
Request for abc-status. (Response: XNNNNN)
(abc = a-series basic compiler)
Syntax:
A descripton about abc and the available abc commands is shown later in this manual.
ESCa
X = Condition abc,
I = idle,
C = compiling,
R = running,
E = error,
S = syntax error during compilation
NNNNN = actual line numbers (empty lines will not be counted!)
41cab Produkttechnik GmbH & Co KG
Page 42

42
42
ESCc - Cancel Printjob
The current printjob will be cancelled when this command is received by the printer. Equivalent to
pressing the „CANCEL“ button on the printer.
Syntax:
Additional labels will processed if they are in the buffer. Please see also „ESC t“ command.
Wait for minimum one second before transmitting additional data, otherwise the printer will not
recognize the following commands.
ESCc
42cab Produkttechnik GmbH & Co KG
Page 43

43
43
ESCend-of-data End description of binary data
End description of binary data.
Syntax:
Finishes the download of binary data. ESC: must be used first, followed by the binary data and closed
by ESCend-of-data. Used for font and graphics download.
ESCend-of-data
Note: ESCend-of-data cannot be used in a RS-485 network!
43cab Produkttechnik GmbH & Co KG
Page 44

44
44
ESCf formfeed
formfeed - This command is equal to pressing „form feed“ on the navigator pad. Causes the printer to
search the start position of the next label.
Syntax:
Sending a „ESC f“ is a simple method to see immediately if an attached printer receives data and if the
connection is setup properly .
ESCf
44cab Produkttechnik GmbH & Co KG
Page 45

45
45
ESCg Print Start command
This command is equal to the signal on the external interface. ESCg is not available for applicators of
the Hermes series.
Syntax:
ESCg
45cab Produkttechnik GmbH & Co KG
Page 46

46
46
ESCi Send value from the INF-memory
ESCi responds the last value of the INF memory .This can be used to get the value of the last printed
label. The value uses the actual selected codepage and is finished with a carriage Return.
For more details please view the [WINF] command, which writes to the INF memory - described in the
section of „Special commands“
Syntax:
ESCi
46cab Produkttechnik GmbH & Co KG
Page 47

47
47
ESCj Request for the latest printed job
ESCj is used together with the command " j " -described later in this manual. Using this command
responds the name of the latest printed job. Can be used to get information about, if the print job was
finished successfully .
The responded value uses the actual selected codepage and ends with a carriage return.
Syntax:
Example:
Example:
ESCj
m m
J
S l1;0,0,68,70,100
T 25,25,0,3,13;Beer
A1
ESCj
would generate a generic name if the " j " commmand has not been used and could look
like this:
FTP-20091031-14:38:15
m m
J
S l1;0,0,68,70,100
T 25,25,0,3,13;Beer
j another way to control the printer
A1
ESCj
would respond:
another way to control the printer
47cab Produkttechnik GmbH & Co KG
Page 48

48
48
ESCI Request of synchronisation info
ESCI (small letter L) sends information if labels are synchronized and if they are in print position.
Delivers also the information about the measured label distance.
Syntax:
ESCl
Answer: XNNNN
X = Paper synchronized ( Y/N )
NNNN = Label distance in millimeters
If the distance is unknown, the response will be „0000“
48cab Produkttechnik GmbH & Co KG
Page 49

49
49
ESCp0 End printer´s pause mode
ends the printer´s pause mode. P AUSE on the printer´s front panel extinguishes and the printjob in the
buffer proceeds.
Syntax:
Note: This command cancels also existing errors when they are shown in the display of your printer.
- Same function like pressing the PSE button on the navigatior pad.
ESCp0
49cab Produkttechnik GmbH & Co KG
Page 50

50
50
ESCp1 Set printer into pause mode
causes the printer immediately to set the pause mode. This command has the same function such as
pressing the „P AUSE“ button on the printer
Syntax:
ESCp1
50cab Produkttechnik GmbH & Co KG
Page 51

51
51
ESCs Printer status query
ESCs Printer status query ,which responds through the interface
Syntax:
ESCs
Answer: XYNNNNNNZ
where:
X = Online (Y=Y es, N=No)
Y = Type of error:
NNNNNN = amount of labels to print
Z = Interpreter active (Y=Yes = print job is in process,
N=No= printer in Standby mode)
Error types:
- ---------------------------------------------------------------------------------No error
a ---- Applicator error- ----- Applicator did not reach the upper position
b ---- Applicator error- ------ Applicator did not reach the lower position
c ---- Applicator error– ------------------------------ Vacuum plate is empty
d ---- Applicator error- ------------------------------------- Label not deposit
e ---- Applicator error- -----------------------------------------Host stop/error
f ----- Applicator error- -------------------------- Reflective sensor blocked
g ---- Applicator error --------------------------------------- Tamp pad 90° error
h ---- Applicator error ----------------------------------------- Tamp pad 0° error
i ----- Applicator error --------------------------------Table not in front position
j ----- Applicator error -------------------------------- Table not in rear position
k ---- Applicator error --------------------------------------------------- Head liftet
l ----- Applicator error --------------------------------------------------Head down
m ------------------------------------------------------------- Scanresult negative
n ------------------------------------------------------------- global Network error
(this can be: no link, no timeserver, no SQL client,
no SMTP server, no DHCP server or IP adress conflict)
o -------------------------------------------------------------- Compressed air-error
r---------------------------------------------------------------------------- RFID -error
s ------------------------------------ System fault (immediately after power on)
u ----------------------------------------------------------------------------- USB error
(1)
(1)
(1)
(1)
(1)
(1)
(4)
(3)
... continued on the next page...
51cab Produkttechnik GmbH & Co KG
Page 52

52
ESCs Printer status query
Error types: (continued)
A------------------------------ Applicator error (only older firmware releases)
B---------------------------------------------Protocol error/ invalid barcode data
C------------------------------------------------------------------ Memory card error
D---------------------------------------------------------------------- Printhead open
E -----------------------------------------Synchronization error (No label found)
F ------------------------------------------------------------------------ Out of Ribbon
G --------------------------------------------------------------- PPP reload required
H-----------------------------------------------------------Heating voltage problem
M ------------------------------------------------------------------- Cutter jammed
N----------------------------------------------- Label material too thick (cutter)
O ---------------------------------------------------------------------- Out of memory
P -------------------------------------------------------------------------- Out of paper
R------------------------------------ Ribbon dectected in Thermal direct mode
S ------------------------------------------------------------Ribonsaver malfunction
V ----------------------------------------------------------------Input buffer overflow
W ------------------------------------------------------------ Print head overheated
X --------------------------------------------------------------------External I/O error
Y ---------------------------------------------------------------------- Print head error
Z ----------------------------------------------------------------- Printhead damaged
52
(2)
(2)
52cab Produkttechnik GmbH & Co KG
Page 53

53
53
ESCs Printer status query
Note: Immediately when a job has started the printer will send a Y and sets this value back to N when
the last label of this job is printed.
(1) This status request can only be processed on printing systems which are equipped with an
attached applicator !
(2) Error messages for optional devices such as „cutter jammed“ depend on the availability of the
optional device and may vary between different printer types. i.e. No cutter errors on Hermes A4
applicators (These options are not available for these models.)
(3) Network error: Only on printers with an optional or built in network interface. (No print server)
(4) Scanresult negative requires an optional barcode scanner. The availability of the optional barcode
scanner depends on the printing system.
(5) Status requests should not be sent in very short cycles ! Minimum time between a status request
should be not less than 0.5 seconds.
53cab Produkttechnik GmbH & Co KG
Page 54

54
54
ESCt total cancel
ESC t = total cancel - terminates the actual printjob and clears the complete input buffer .
Resets also errors in the display . Same effect like pressing „Cancel“ button on the control panel multiple times.
Syntax:
Please see also ESCc which cancels only the actual printjob.
Wait for minimum three seconds before transmitting additional data, otherwise the printer will
not recognize the following commands.
ESCt
54cab Produkttechnik GmbH & Co KG
Page 55

55
55
ESCz Extended status request
ESC z = exteded status request which is also accessible using the PEEK „xstatus“ in abc
Syntax:
All characters are normally N. In addition to ESCs this string is finalized with a carriage return, which
allows additional status information in the future.
ESCz
Answer: ABCDEFGHIJK CR
A = Y = Printer is paused
B = Y = Printer has a job
C = Y = Printer not ready for print data
D = Y = Paper is moving
E = Y = Ribbon pre-warning (hardware dependend)
F = Y = Paper prewarning (hardware dependend)
G = Y = Label in demand position
H = Y = Label on vacuum plate (hardware dependend)
I = Y = Applicator not ready (hardware dependend)
J = Y = External pause signal active (hardware dependend)
K = Y = External print signal acive (hardware dependend)
55cab Produkttechnik GmbH & Co KG
Page 56

56
CHAPTER 3 - Immediate commands
Immediate commands
Instructions with ( almost ) lowercase letters are used for adjustments and settings which must not
have something to do with the actual printjob. They are active as long as the printer is powered up or
when these values get overwritten.
56
56cab Produkttechnik GmbH & Co KG
Page 57

57
57
<ABC> - Start of the abc Basic Compiler
This command starts the internal Basic compiler . The Basic compiler offers the functions of the basic
programming language „Y ABASIC“. The usage of abc requires good programming knowledge.
abc can be used to create functionalities which are not covered by JScript. The usage of the basic
compiler could be to convert incoming data into a format which can be processed by the printer
(JScript) or for additional calculations and further influence on the printer.
So an additional programming language has been added to your printer.
Syntax:
Possible usage is to convert text strings - sent by a scale into JScript, or to convert incoming data
which was prepared for competitive printers into an understandable format for cab printers.
See also the command: </ABC> End of the abc Basic Compiler.
abc is not an emulator !! More information can be found in the „abc a-series basic compiler“ chapter later in this manual.
abc is not required for the programming of „standard labels“, but it offers nearly unlimited functions.
abc is still a beta release.
More infos about the possibilities of abc can be found later in this manual.
Detailed information about Yabasic can be found at http://www.yabasic.de
<ABC>
CR
57cab Produkttechnik GmbH & Co KG
Page 58

58
58
</ABC> - End of the abc Basic Compiler
Sets the end mark for the abc compiler (internal BASIC language)
Syntax:
See also: <ABC> - Start of the abc Basic Compiler.
</ABC>
CR
58cab Produkttechnik GmbH & Co KG
Page 59

59
59
<ENCRYPTED LABEL...> - Start of an ENCRYPTED label
This command marks the start of an encrypted label file, followed by the board number.
Important: This command requires additional action from cab. It cannot be used without the help
through cab.
Syntax:
Each "X2" mainboard has a unique serial number which can be used beneath a lot of other features to
encrypt label contents to protect your programming work.
Label encryption needs to be done by cab or by registered cab resellers only !
A label which looks like this here:
may look like the 2 lines below after it is encryped.
<ENCRYPTED LABEL; nnnnnnnnnnnn>
nnnnnnnnnnnn = unique main board number
J
S l1;0,0,68,71,104
T 10,10,0,3,5;Test label, encrypted
A 1
<ENCRYPTED LABEL: 111063523313>
r??@,?h??)(?H=J??2?*?r0?e???1??H??7?‘Q>
CR
This file can then be loaded for example from on a memory card. It will only execute on this specific
printer with the serial number "1 11063523313"
Please contact the cab representative if you need more details.
The description of this command has been added for your understanding, just in case if you are
confronted with this command in the ASCII dump mode.
59cab Produkttechnik GmbH & Co KG
Page 60

60
60
<ENCRYPTED JOB> - Start of an ENCR YPTED job
This command starts a previously encrypted print job.
Syntax:
Encrypted printjobs need some special support from cab.
The description of this command has been added for your understanding, just in case if you are
confronted with this command in the ASCII dump mode.
<ENCRYPTED JOB>
CR
60cab Produkttechnik GmbH & Co KG
Page 61

61
61
</ENCRYPTED JOB> - End of an ENCRYPTED job
This command finishes an encrypted print job.
Syntax:
Encrypted printjobs need some special support from cab.
The description of this command has been added for your understanding, just in case if you are
confronted with this command in the ASCII dump mode.
</ENCRYPTED JOB>
CR
61cab Produkttechnik GmbH & Co KG
Page 62

62
62
; - Comment line
The semicolon „ ; „ is used to identify a comment line. Comments may be placed anywhere in your
program code, in a separate line.
Comment lines are ignored by the printer.
Comment lines are very helpful to keep a better overview on the programming data.
Syntax:
Example:
Please note that comment lines need additional time to be transmitted to the printer. A void to use
comments in time critical situations.
; comment line
; My first label - Jobstart
; m m sets the printer to measurement"Millimeters"
m m
; "J" starts my print job
J
; set size of the label
S l1;0,0,68,70,100
; create a text line
T 10,40,0,3,16;Hello
; print one label with the command "A" (amount)
A 1
CR
62cab Produkttechnik GmbH & Co KG
Page 63

63
63
a - ASCII Dump Mode
The a command starts the ASCII dump mode. The ASCII dump mode shows all received data and is a
very important instrument to detect wrong data in the program code.
The printer´s LCD panel shows „ASCII dump mode“ in the selected language.
All received data is printed „transparent“ and the printer doesn´t interpret it.
The ASCII Dump Mode is also select able through the navigator pad.
Note: After ASCII Dump Mode is selected you must confirm this selection with the ENTER button of the
navigator pad.
Syntax:
The following data creates a label with one line of text. Please view the picture below which shows the
same label in ASCII Dump mode.
If „protocol errors“ are shown on the label means, that there is a mistake in the program code!
a
CR
a
m m
J
S l1;0,0,68,70,100
T 25,25,0,3,13;ASCII Dump Mode
A1
f
63cab Produkttechnik GmbH & Co KG
Page 64
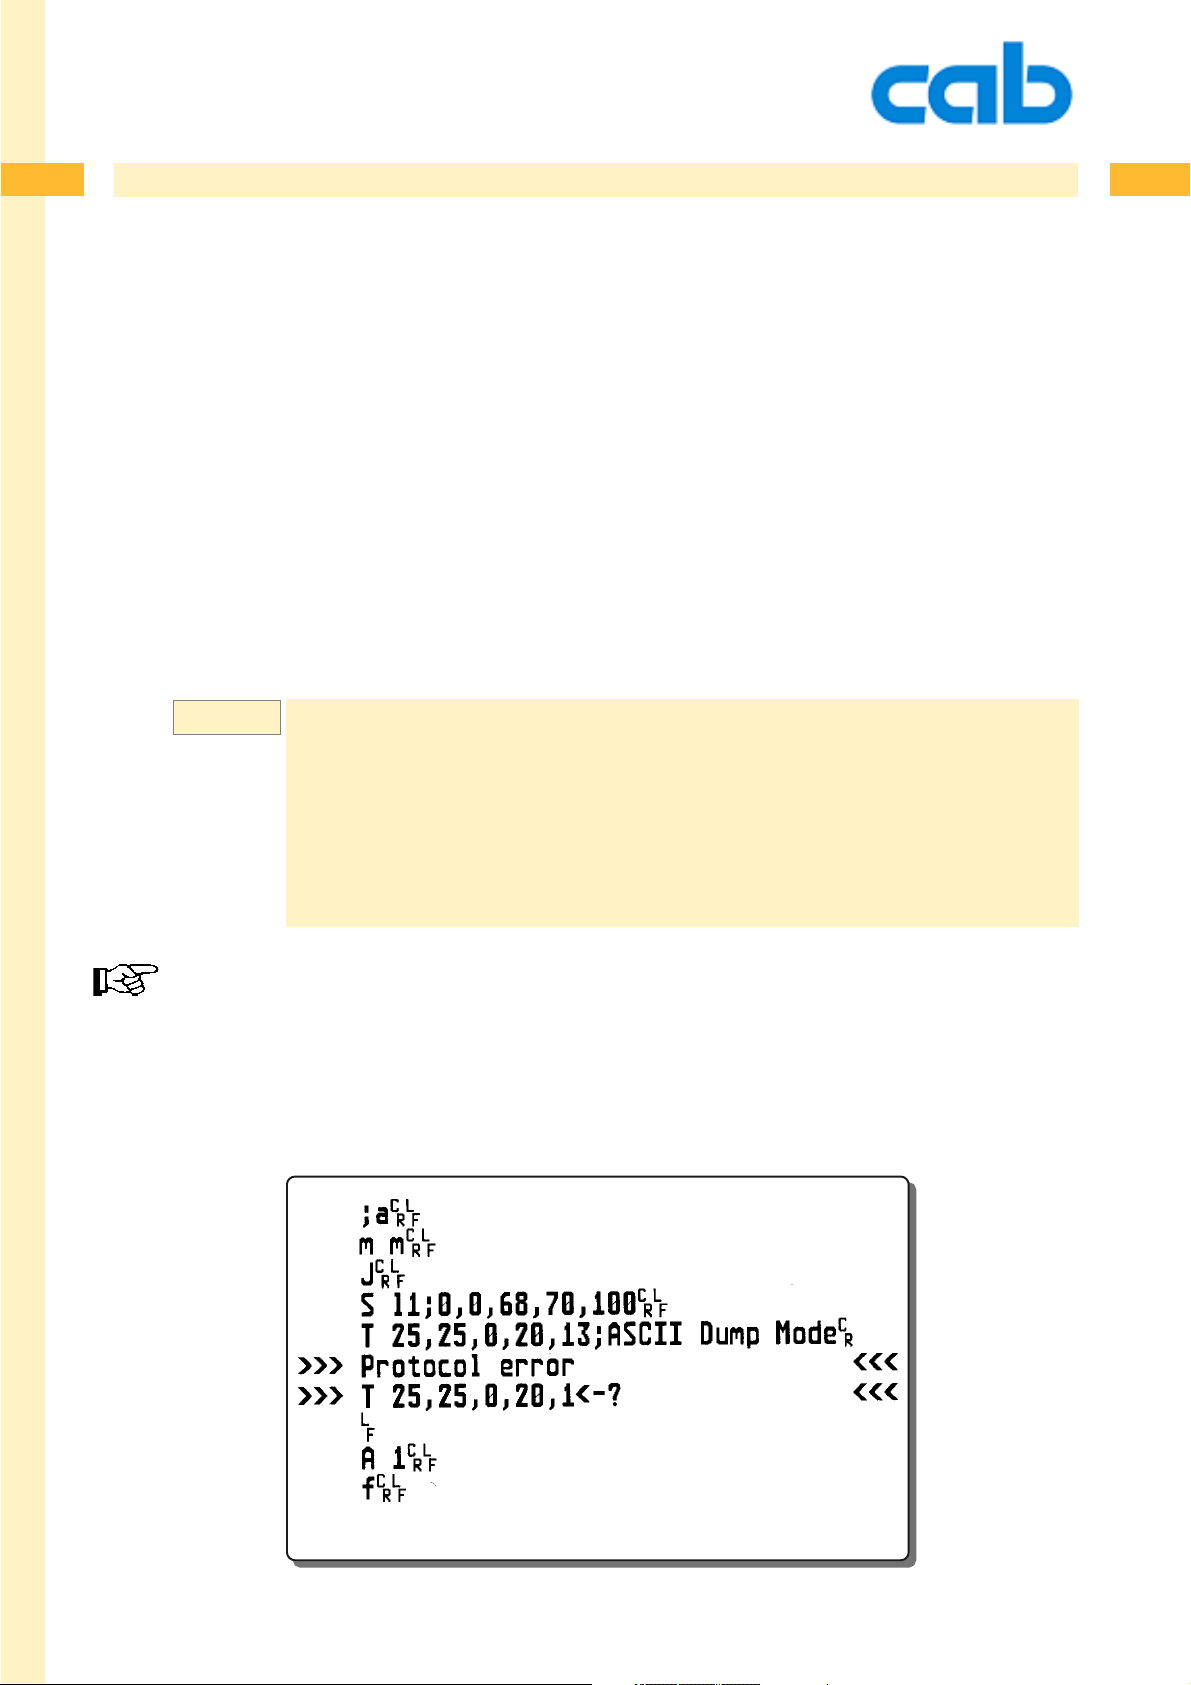
64
64
a - ASCII Dump Mode
The following example shows that something is wrong in the text line. We used a font (font number 20
which is maked in bold charcters in the sample below and which is not available in the printer. This is
recognized by the printer which points us to the line which needs to be corrected.
There is no list of "possible Protocol errors" as nearly everything which can not be interpreted by the
printer can be shown in the printer´s display or in the printout of the ASCII dump mode.
Pressing the blinking "pause button" skips the most Protocol errors and finishes the label ( unless
there is some content which is totally wrong or if no label size is defined)
Pressing the printer´s "cancel button" cancels the print job.
Example:
If „protocol errors“ are shown on the label means, that there is a mistake in the program code!
;a
m m
J
S l1;0,0,68,70,100
T 25,25,0,20,13;ASCII Dump Mode
A 1
f
64cab Produkttechnik GmbH & Co KG
Page 65

65
c - Direct cut
The c ommand forces the printer to cut immediately when it is received.
If required, the printer will do a formfeed before the cut is processed.
This command is not available for Hermes and for the PX module.
c
Syntax:
The printer shows „Protocol error c<--“ on the display if no cutter is attached.
CR
65
65cab Produkttechnik GmbH & Co KG
Page 66

66
66
d - download data (pictures, fonts etc...)
The d command is used to download data files to the printer. It is used to download graphics, font s,
databases and serial files (temporary files).T wo methods are available to download such data to the
printer:
1st Method:
The procedure which we highly recommend, unless this requires that the data has to be prepared for
downloading.
Syntax:
2nd Method:
will transmit the data as it is, but it may occasionally misinterpret embedded ESC characters in the data
as a printer command. ( i.e. ESC t would be misinterpreted as memory reset).
Syntax:
d type;name[SAVE] [B:± value]
d type;name[SAVE] [B:± value]CR ESC:
d = download data
type = the type of data that will follow, using standard file name extensions
Graphic formats:
BMP - Windows bitmap format Monochrome, 256 Colors, 24
GIF - Graphic Interchange Format (GIF 87a and GIF 89a)
IMG - GEM Image format Monochrome
MAC - MacPaint format
PCX - Paintbrush format Monochrome, 16 and 256colors
PNG - Portable Network Graphics
TIF - TIFF Format© Aldus Corp. Monochrome, Greyscale
ASC - Graphic in ASCII format
CR
ESC.
binary data
binary data
Bit Truecolor, plane only ,
uncompressed
and color. ( 4Bit and 8Bit per
pixel, RGB 8 Bit per pixel)Compression: Only packbits
and uncompressed.
ESC.
ESCend-of-data
Vector font format:
TTF - TrueType font format
Database format:
DBF - dBASE IV Database formats (Field type must be text)
others:
TMP - Serial numbering (temporary) file in ASCII format
66cab Produkttechnik GmbH & Co KG
Page 67

67
67
d - download data (pictures, fonts etc...)
We recommend to use monochrome graphics only! The resolution should not be higher than the
printer´s printhead resolution.
name = Filename to be downloaded with a maximum length of 8-digits.
This filename will be recalled on later programming.
[SA VE] = This optional parameter is used for downloading to the printer´s
memory card.
(The memory card commands (M ... explain more possibilities, please see there for more details)
The [SA VE] option copies the file from the printers memory to the
memory card.
B: ± value = Sets the brightness of dithering on graphics. Valid values
are ± 20.
Example:
Syntax:
B:+5 makes the picture 5 steps darker.
ESC.<graphics data> ESC
= 1st Method for downloading data. Data format is binary , where the ESC
characters (ASCII 27 or HEX 1B) have to be replaced first through a double ESC
(ESCESC) to avoid unexpected reactions of the printer.
ESC commands, (requests etc.) can be used during the download of this data.
cab offers the tool: DOWNLOAD.EXE (downloadable at http://www .cabgmbh.com)
to convert existing files.
d BMP;CABLOGO CR ESC. binary data ESC.
Downloads the graphics: cablogo.BMP to the printer
ESC: <graphicsdata> ESCend-of-data
= 2nd Method for downloading data. Data format is binary, starting with ESC: and
followed by ESCend-of-data (ASCII 27 or HEX 1B) followed by ASCII text string
< end-of-data >.
With this method it is allowed that the data stream contains ESC sequences in the
data stream until the ESCendofdata is received.
67cab Produkttechnik GmbH & Co KG
Page 68

68
68
d - download data (pictures, fonts etc...)
Example:
We highly recommend to use the 1st Method for data download !!
Example:
Database files have to be downloaded with the [SAVE] option, as they are only used together with the
memory card. This function is useful for „small“ databases. Big databases need a long search time for
single records. In this case we recommend the usage of the optional cab Database connector .
See more at the DataBaseConnector command area.
(cab Databaseconnector is not available for the M-series printers)
d TTF;ARIAL<CR> ESC:
d
DBF;
CDPlayer
Downloads the database file CDPlayer .DBF to the printer .
[SAVE]CR ESC.
data
ESCend-of-data
binarydata
ESC.
cab sells a helpful tool ( the cab card manager) which can be used to download files through the serial
interface to the memory card. This simplifies data conversion and download.
An alternative tool for downloading and editing directly on the memory card is the cab network manager
which connects through the ethernet interface to the printer and which offers more direct access to the
printer.
Data can also be saved on a card drive for Compact Flash cards. Please note, that the CF-cards have
to be formatted (erased) in the printers memory card slot. This automatically generates also the
required folders on the card.
68cab Produkttechnik GmbH & Co KG
Page 69

69
69
d - download data (pictures, fonts etc...)
DOWNLOAD ASCII graphics
ASCII-Graphic format
The stucture is similar to the IMG format, but uses only ASCII characters, to enable a easy usage for
host devices or ERP systems.
Following rules are used:
• all data are hex bytes, i.e. 0-9 and a-f or A-F
• The printer waits as long for data until the defined picture size is received.
• Spaces and carriage returns can be added on different locations. It is required that a carriage
return is sent at the end of the picture data.
• The image data can be compressed with a simple algorithm which is black/white optimized.
• The image data are transmitted from top to bottom, each time from left to right. A value byte
80 stands left of 01.
• The first line describes the width and the height of a picture. Width and height are 16 bit values
each in the Big-Endian format.
• Also if the width is not devidable by 8it is required that the missing pixel must be transmitted
Each line will be transmitted with following values:
• 1. Optional repetition factor, caused by 00 00 FF xx, whereby xx describes the amount of
copies of the actual line.
• Picture data - whereby different descriptions are optional possible.
a: Zerobytes are displayed through the amount of bytes.V alid input: 00 to FF.
b: Blackbytes (FF) can also be described through the amount of bytes, beginning from 81
(81 means 1 time FF, - valid values are 81 to FF .
c: A directly encoded number of bytes starts with 80 - followed by the amount of data, i.e.
80 03 123456. The amout of transmitted bytes can be between 01 and 7F.
d: A repeated pattern of arbitrary bytes can be initiated with a sequence 00 nn xx, which
means that xx bytes will be inserted nn times.
Example: 00 04 AA generates AAAAAAAA.
69cab Produkttechnik GmbH & Co KG
Page 70

70
70
d - download data (pictures, fonts etc...)
The following example shows how a graphic file may look as ASCII dat a. W e download this file
with the name "cab.asc" in the graphics folder of the optional memory card of the printer (or in the
internal Flash File System - IFFS) to recall it with the label data shown on the next page.
The example below is not length optimized. The explanation in italic letters does not belong to the
graphics data.
Example:
0053 0020 CR
0000FF09
06
800207F0
03 CR
800B007FFF003FFFE7F7FF0000 CR
800101 82 800103 82 8005E7F7FFF000 CR
800107 82 800107 82 8005E7F7FFF800 CR
80010F 82 80011F 82 8005E7F7FFFE00 CR
80011F 82 80013F 82 8002E7F7 82 01 CR
80013F 82 80013F 82 8002E7F7 82 01 CR
80013F 82 80017F 82 8002E7F782800180 CR
800B7F80007F800FE7F0007F80 CR
80017F 02 8008FE000FE7F0001FC0 CR
80017E 02 8008FE000FE7F0001FC0 CR
0000FF04
80017E 02 8008FC000FE7F0000FC0 CR
80017F 02 8008FE000FE7F0001FC0 CR
800B7F8000FF000FE7F0003FC0 CR
800B3FF000FFC00FE7F0007F80 CR
80013F 82 80047FFFEFE7 83 800180 CR
80011F 82 80043FFFEFE7 83 01 CR
80010F 82 80041FFFEFE7 82 8002FE00 CR
800107 82 80040FFFEFE7 82 8002FC00 CR
800101 82 800407FFEFE7 82 8002F800 CR
8007003FFF00FFEFE7 82 8002E000 CR
- repeats the line 4times
- describes a picture
with 83 pixels width
and 32 pixels height.
- repeats the actual line
9 times
- 6 zero bytes
- one bitstring, consists
of 2 bytes with 07 and F0
- three zero bytes
- picture data directly
sent as bit string
- picture data, mixed,
compressed and direct.
70cab Produkttechnik GmbH & Co KG
Page 71

71
71
d - download data (pictures, fonts etc...)
The sample below recalls the graphic file from memory card and prints the image on the
defined position. In this case we used the data shown on the previous page of this manual.
Example:
M l IMG;cab
m m
J
S l1;0,0,68,73,100
I:TEST;3,30,0,2,2;cab
A1
71cab Produkttechnik GmbH & Co KG
Page 72

72
72
e - erase data
The e command is used to erase data from the printer´s memory (RAM), such as fonts and graphics.
Data on the memory card will not be affected by this sequence. Separate commands are available
for erasing files from the memory card. ( see also the „M“ commandlater in this manual )
Syntax:
Example:
e type;name
e - erase data command
type = The file types being removed, with following valid file
name = The name attached to the font or graphic when it was
e FNT;*
CR
extensions:
Images: BMP, GIF, IMG, MAC, PCX, PNG, TIF
Fonts: FNT , TTF.
(FNT can be used for all font types and IMG can be used for
all picture types)
sent to the printer . A wildcard ( * ) may be used to
delete all files of the same type. "name" is not case sensitive.
Erases all true type fonts which are currently in the printer’s memory.
Example:
Erases the picture with the name "logo" in the printer´s memory
The printer keeps the received graphic fles in its internal memory until it will be switched off or until
these files will be erased or overwritten.
e IMG;logo
72cab Produkttechnik GmbH & Co KG
Page 73

73
f - formfeed
This command feeds the media forward until the top-of-form of the next label reaches the printhead. It
does the same as pressing the feed button on the printer´s control panel.
This process is controlled by the label photocell if die cut label material is used. The printer feeds the
material in continuous form mode in the length which had been selected for the last printed label.
The label photocell is disabled for gap detection and controls only if paper is out.
In continuous form mode the printer counts the steps of the stepper motor to reach the expected print
length.
f
Syntax:
CR
73
Example:
f
CR
f
CR
feeds 2 empty labels.
73cab Produkttechnik GmbH & Co KG
Page 74

74
74
j - job-ID
Sets the job ID for the actual print job / part of the print job. This command is used together with "ESCj".
The printer generates a generic name if the "j" command is used without additional information. This
string has following structure: source interface / label name-date-time.
The "j" command needs to be positioned after the job start command ("J"), otherwise the job ID would
be overwritten.
Syntax:
like this:
j Job-ID
m m
J
S l1;0,0,68,70,100
T 25,25,0,3,13;Beer
A1
ESCj
would generate a generic name if the " j " commmand has not been used and could look
FTP-20091031-14:38:15
( "ESC j" is used to show the result. The infomation is sent to the interface )
m m
J
S l1;0,0,68,70,100
T 25,25,0,3,13;Beer
j another way to control the printer
A1
CR
ESCj
would respond:
another way to control the printer
74cab Produkttechnik GmbH & Co KG
Page 75

75
75
l - Change Language ( country )
Date format, currency , measurement etc. are changed with this command to the country specific
values.
Time and date will be printed as it is usual in the specified country. (See also „Special Content Fields)
The display on the printers LCD will not be changed. (This can be done using the printer´s setup
through the control panel)
Syntax:
l name
CR
l - Change language/country command.
name = DOS short keyboard code for the country. Valid values are:
BE - Belgium / french
BF - Belgium / flamic
BG - Bulgaria
CZ - Czech Republic
DK - Denmark
FR - France
GK - Greece
GR - Germany
HR - Kroatia
HU - Hungary
IR - Iran
IT - It aly
LA - Latinoamerica
LT - Lituvia
MK - Macedonia
MX - Mexico
NL - Netherlands
NO - Norway
PL - Poland
PT - Portugal
RU - Russia
SA - South Africa
SE - Sweden
SF - Switzerland / french
SG - Switzerland / german
SP - Spain
SR - Serbia
SU - Suomi (Finland)
TH - Thailand
TR - Turkey
UK - United Kingdom (Great Britain)
US - USA*
ZH - China
*selects measurements in inches !
The "r" command resets the language to the default value in the printer´s setup
75cab Produkttechnik GmbH & Co KG
Page 76
76
76
l - Change Language ( country )
The following example prints the date, while the " l "command changes the language into
"german", which causes that the date prints in german style: Day.Month.Year ( separated with dots )
Example:
l GR
J
S l1;0,0,68,71,100
T 25,25,0,5,8;[DATE]
A1
76cab Produkttechnik GmbH & Co KG
Page 77

77
m - set measuring unit
This command sets the measuring unit for the following label data.
Once it is sent, all following settings in a label are measured in the selected unit.
The printer´s default value depends on the selected display language. For all selectable countries the
measurement is millimeters, with the exception when country USA was set through the control p anel.
We recommend to use this command always, especially for international companies where different
programmers create labels as the measuring unit is only changed for the individual label being
printed.
The measuring unit cannot change within one label. All internal calculations are processed in
millimeters, as these values are better to overview and they follow a worldwide standard.
m t
Syntax:
CR
77
m - Set measuring unit command.
t = The measuring system desired,
„m“ for metric (millimeters) or
„i“ for historical (inches, tenths and hundredths of an inch).
77cab Produkttechnik GmbH & Co KG
Page 78

78
78
m - set measuring unit
The next example shows the same label programmed with different measurement settings. The result
is the same. The first example is programmed in inches, the second example is programmed with
metric measurement settings.
Example:
Example:
m i
J
T 0.79,1.18,0,3,0.2;Measuring Unit
A1
m m
J
T 20,30,0,3,5;Measuring Unit
A1
78cab Produkttechnik GmbH & Co KG
Page 79

79
p - pause Printer
The printer is set in the pause mode or removes it from pause - depending on the parameter.
p n
Syntax:
CR
p - pause printer
n = 0 = Pause off
1 = Pause on
79
Example:
Sets the printer into pause mode. If a print job runs, it will stop after the label is printed.
Pause lights on the front panel.
p 1
79cab Produkttechnik GmbH & Co KG
Page 80

80
80
q - query Printer
The query printer command is used to get multiple information back from the printer and is e.g.. used
to find out if a font or a picture exists, so that has not to be downloaded a second time. The q command
responds through the printer´s interface. All bidirectional interfaces can be used.
Syntax:
q X;name
q - query different infos from the printer,where X =
b;name CR = Query for a bitmap font. Answer: Y/N.
d;name CR = Query for a database. Answer: Y/N
e;name CR = Query for media. Answer: Y/N
f CR = Query for free memory. Answer: xxxxxxxbytes free
CR
Requests the printer if a specified bitmap font is available.
Requests the printer if the dBase database (DBF) file
called „name“ is available on the memory card.
Requests the printer if the media (FMT) file called
„name“ is available.
Reports the free (available) memory , which may be used for
downloaded data. Requests the printer if the image ( IMG )
file called „name“ is available either in memory or on
memorycard.
i;name CR = Query for image Answer: Y/N if available in
memory , or C if the pictogram is available on memory card.
l;name CR = Query for label Answer: label name
Requests the printer if a specified label is available.
m CR = Query for the memory card type
Answer: Format "type, xxx kByte.CR", - The response will
be "No card CR“ if no memory card is attached to the printer
continued on the next page
80cab Produkttechnik GmbH & Co KG
Page 81

81
81
q - query Printer
The query printer command is used to get multiple information back from the printer and is e.g.. used
q - query , X =
p CR = Query for peripheral equipment
Reports the type of peripheral devices that are connected.
Possible responses are: NONE CR,
CUTTER CR,
REWINDER CR,
DEMAND SENSOR CR,
BLOW ON CR,
TRIGGER CR
(Applicator)
Possible answers depend on the printer type and it´s
available options !! Used to verify if a label can be processed
on the selected printer. Very helpful if multiple printers with
different peripheral equipments are connected.
r CR = Query for ribbon diameter. Answer: diameter of the
ribbon roll in mm.
If the ribbon roll has not been measured, the answer will
be -1
Can be used to get an early warning when the ribbon is close
to be finished.
s;name CR = Query for scaleable fonts Answer: Y/N or C if the font had
been found on the memory card.
This command is used to check if a specified font is available
to find out if it has to be downloaded (again).
t CR = Query for time and date Answer: yymmddhhmmss CR
yy = Year - 2 digits
mm = Month. - 2 digits
dd = da y - 2 digits
hh = hour - 2 digits
mm = minutes - 2 digits
ss = seconds - 2 digits
.
81cab Produkttechnik GmbH & Co KG
Page 82

82
82
r - reset to default values
This command resets JScript to the printer´s default values.
- resets the language
- resets slashed zero setting
- resets the selected measurement system
- erases the fontcache
-sets the date setting back to the selected country in the setup
Syntax:
r
CR
82cab Produkttechnik GmbH & Co KG
Page 83

83
83
s - set Date/Time
Used to set date and time to be recalled on a label. The printer has an internal real time clock which
keeps date and time. If it is required this command can be used to synchronize the attached device and
the printer.
Syntax:
Example:
s n[ss]
s = Set date / time command.
s 081105091500
CR
n = ASCII - string in following format to adjust date and time in the
printer of following format: YYMMDDhhmmss
YY = Year - 2 digits
MM = Month. - 2 digit s
DD = day - 2 digits
hh = hour - 2 digits
mm = minutes - 2 digits
[ss] = seconds - 2 digits
(values between 70 and 99 are interpreted as
1970-1999. Anything else is treated as year2000)
(setting of ss is optional)
Sets printer date and time to:
November 24, 2008 9:15 a.m.
83cab Produkttechnik GmbH & Co KG
Page 84

84
84
t - Run Printer Self-test
cab printers have multiple built in self -tests. A self test can be processed through the printer´s
control panel (see operator´s manual) or by software.
The printout of the status information may look different on different printer types. Information about
optional equipment, such as interfaces, cutter etc. will only be shown if they are attached.
Syntax:
t{n}
CR
t - run printer selftest
n = 0 - prints status information
= 1 - prints the font list
= 2 - prints the device list
= 3 - prints the label profile
= 4 - reserved
= 5 - prints the test grid
= 6 - wireless network status (requires installed WLAN card) *
= 7 - RFID measurement (requires installed cab RFID reader)**
The status test is displayed in the selected language of the printer .
* Only available for printers which support the WLAN card (X2 board)
** Only available on Mach 4.
84cab Produkttechnik GmbH & Co KG
Page 85

85
85
t - Run Printer Self-test
Example:
The status printout is different when printed
by different printer types. A detailed
description of the listed values can be found
in the operator´s manual.
T ransmitting „t“ without any additional number
causes the printer also to do a status printout.
t0
prints the status information
(here A4+/300)
85cab Produkttechnik GmbH & Co KG
Page 86

86
86
t - Run Printer Self-test
The label below shows a list of the printer´s internal fonts. If additionally downloaded, T rue type fonts
will also be shown on the printout in their actual shape. (see the font list below)
Example:
Example:
t1
prints a label with a list of all existing fonts. ( fontlist )
A det ailed description about the internal font s is shown later in the manual where the
usage of textfields is describedand in Appendix C.
t 2
prints the list with all attached devices.
86cab Produkttechnik GmbH & Co KG
Page 87

87
87
t - Run Printer Self-test
Example:
t3
produces following result after the printer feeded a few empty labels for the
measurement process. ( Label profile )
Example:
t5
prints a text grid which can be used for the printhead adjustment or to control the print
quality of the printer. ( Testgrid )
87cab Produkttechnik GmbH & Co KG
Page 88

88
88
t - Run Printer Self-test
Example:
t6
shows information about the optional wireless network card. ( WiFi status )
(A wireless network card needs to be inst alled to run this test)
Example:
t7
prints the RFID measurement info. (Mach 4 only) (RFID measurement )
(The printer must be equipped with the optional RFID unit)
88cab Produkttechnik GmbH & Co KG
Page 89

89
89
v - Firmware version
The v command requests the firmware version, release date and printer model. The printer responds
through the interface.
Syntax:
Example:
v
CR
v
CR
An A4+/300 printer will respond on this request with following string:
3.17 Sep 26 2008 (A4+/300)
Firmware Release Printer
version date model
89cab Produkttechnik GmbH & Co KG
Page 90

90
90
x - Synchronous Peripheral Signal Settings
The signal bits of the peripheral connector for external connections can be set with this command.
Usage: Together with an optional adapter with electrical protected interface.
The availability of these adapters depends on the used printing system.
IMPORTANT: Never connect any non cab item directly to the printers auxiliary interface !
In all cases you will need an optional adapter with the required interface !!!
Connections directly on the auxiliary interface may damage the printer electronics !
The auxiliary interface does not deliver the following signals directly.
This command controls the status of the output pins. The x command was added to take control over
peripheral device, which is usually other than the offered cab equipment. The four signal bits can be set
as follows:
Control bit 0, set on when a label starts printing
Control bit 1, toggled when a new print job starts
Control bit 2, set on for error
Control bit 3, set on when label is in the peel-off position
Each of these bits can be set or reset for individual needs. The bit signals can be used to control
external - non cab - devices.
T o reset all of these bit s, use ESC!ESC! (see ESC commands)
Syntax:
The usage of this command depends on the printer type. The description of the pin assignment can be
found in the available documentation for the optional adapters
x m;m
CR
x - Snchronous Peripheral Signal Setting Command
m = Mask (hex nibble).
90cab Produkttechnik GmbH & Co KG
Page 91

91
91
z - print slashed / unslashed zero
The default setting for the zero character is unslashed. With this command the printer can be forced to
change the style of the zero character. It can be printed as 0 (unslashed) or Ø (slashed).
This command can only be used with internal bitmap fonts. It is not available for internal vectorfonts
(Swiss, Swiss bold and Monotype) or for truetype fonts: The selected method is valid for the complete
label.
Syntax:
Example:
z t
CR
z - Select slashed zero
t = 0 - (zero - prints slashed zeros (Ø) )
= O -(upper case letter O - prints unslashed zeros (0) )
z0
J
S l1;0,0,68,71,100
T 25,25,0,-3,x9,y9;1000
A1
Prints the number 1000 with slashed zeroes.
91cab Produkttechnik GmbH & Co KG
Page 92

92
CHAPTER 4 - Label Format Commands
Label Format Commands
Instructions with uppercase letters are used to describe the label itself.
This has a fix structure, beginning with the start command, the description of the labelsize and
description of each object in the label. At the end of the label the printer expects the command
for amount of labels to print.
The printer starts printing when the amount command is received, unless it is suppressed by special
options.
92
92cab Produkttechnik GmbH & Co KG
Page 93

93
93
A - Amount of Labels
The A command is used to define the end of the label definition and to set the amount of labels to be
printed. The printer repeats internally the defined label where the amount is defined by this command.
The label will stay in the printer´s internal buffer , af ter it has been sent to the printer.
sending the A command multiple times afterwards will print the amount of labels which is specified by
the A command.
Syntax:
A [n]
CR
A - amount of labels
n = number of labels to print (Multiple options are available:)
[NOPRINT] = receives and processes the label, but suppresses
a printout. (Used for saving a label on
memorycard). It is also possible to key in [NO]
instead of [NOPRINT]
[?] = printer prompts on its display for the quantity or is
also used to be replaced from any attached system
[REPEAT] = Repeats the label at the end (makes only sense
together with the [?]option.
It is also possible to use [R] instead of [REPEA T]
[$DBF] = Prints each record of a database. Number of
records = number of labels.
Example:
Example:
A -without any value prints until the print job is cancelled
J
S l1;0,0,68,71,100
T 25,10,0,5,8;LABEL PRINTER
A 550
prints 550 labels with the text line: „LABEL PRINTER“
J
S l1;0,0,68,71,100
T 25,10,0,5,8;LABEL PRINTER
A
prints "infinite" amount of labels
93cab Produkttechnik GmbH & Co KG
Page 94

94
94
A - Amount of Labels
Example:
Transmits the label for further usage into the label buf fer. The Printout is suppressed with the
[NOPRINT] option.
It is also possible to shorten the [NOPRINT] option into [NO] - which has the same function.
Example:
Requests the user (on the printer´s display) for data entry ( [?:Input?] ) and prompts for the amount of
labels to print.
The data entry will be done through the printers control panel or through an attached keyboard.
J
S l1;0,0,68,71,100
T 25,25,0,3,8;Suppress Printout
A [NOPRINT]
J
S l1;0,0,68,71,100
T 25,25,0,3,8;[?:Input?]
A [?]
Example:
Prints all records of the database CDPLA YER.DBF, where the serial numbering function is used to
create the index file, starting at 100.
Special function: T ransmitting „A“ without parameter causes the printer to print a infinite
number of labels.
Don´t forget the „carriage return“ after the last command in the label !
m m
J
S l1;0,0,68,73,100
E DBF;CDPLAYER
T:IDX;25,225,0,3,5;[SER:100]
T0,40,0,3,6;>>[DBF:TYP,typ,NAME]<<
A [$DBF]
94cab Produkttechnik GmbH & Co KG
Page 95

95
95
B - Barcode Definition
The B command defines a barcode field in the label format. The most common barcode types are
supported by the cab printers.
The parameters for each barcode are different, depending on the selected barcode type.
Barcodes can be printed in one of four different directions (0°,90°,180° and 270°). Height and width of
the barcode elements are adjustable. Human readable text lines can be easily added.
Syntax:
B[:name;]x,y,r,type[+options],size;text CR
B - Barcode field
[:name;] = Optional fieldname
x = X - Coordinate
y = Y - Coordinate
r = Rotation
type = Barcode type
[+options] = Optional parameters
size = Barcode height and width, ratio
text = Barcode data
This is the global structure of a barcode field, a detailed description follows on the next pages
95cab Produkttechnik GmbH & Co KG
Page 96

96
96
B - Barcode Definition
B - Descriptor of a Barcode field, this is identified by the printer that the following
data is used to create a barcode.
[:name;] = describes the field name and is optional. The maximum length
of this name is 10 characters, no special characters allowed. A
field name can be used for further operations, such as
calculations ,as linked field, for field replacements or for the
enhanced usage when downloaded to a memorycard etc.
The field name must be unique in each label.
x = The x - coordinate is the horizontal start position of a barcode
(in millimeters or inches), the distance between the left margin
of a label and the upper left corner of the barcode.
y = The y - coordinate is the vertical start position of a barcode,
the distance between the top margin of a label and the upper
left corner of the barcode.
The maximum coordinate depends on the printer type. Please
refer to the operator´s manual.
r = Rotation - Rotates a barcode in 4 directions. Valid values are 0,
90, 180 and 270.
Measurement in degrees.
type = Barcode type - This defines the barcode symbology. Barcode
types with upper case names produce barcodes with human
readable characters, while lower case names for the barcodes
suppress the human readable line. The size of the human
readable characters are depending on the selected barcode
type.
More details are shown in the examples on the following pages.
cab printers are able to extract necessary portions of a barcode
ame, which means that e.g. EAN-13, EAN 13 and EAN13 will
print identical results.
continued on the next page
96cab Produkttechnik GmbH & Co KG
Page 97

97
97
B - Barcode Definition - options overview
[+options] Depending on the barcode type, several options are available. Which
option is valid for which barcode is described for each barcode type
on the next pages. Following options are available:
+MODxx = offers the possibility to add a modulo check digit to a barcode
MOD10 adds a modulo 10 check digit
MOD11 adds a modulo 11 check digit
MOD16 adds a modulo 16 check digit
MOD36 adds a modulo 36 check digit
MOD43 adds a modulo 43 check digit
The available check digits depend on the barcode type
+WSarea = white space area - prints white zone markers for design
purposes. The white space size defines the quiet zone which is
required for a good scanability of the printed code. „area“
defines the size of the markers which are shown with this
command. (can be also "0" )
+BARS = Prints boundary lines above and below the barcode.
+UPBAR = Prints a boundary line above the barcode
+DOWNBAR = Prints a boundary line below the barcode
+XHRI = (Extended Human Readable Interpretation) adds start - and
stop characters (*) for Code 39.
Adds start and stop boxes for Code 93.
Reduces the size of UPC-A and UPC-E (see det ails in the
examples)
+NOCHECK = suppresses the check digit calculation for variable weight
barcodes (EAN-13 and UPC-A with specific st art numbers :21,
24...29)
+ELx = Error Level . sets the redundancy of some 2D barcodes. V alid
values for x depends on the barcode type - please see the
details later in the manual
+RECT = Barcode type DataMatrix can be printed as a rectangle or as a
square. The default value is square. The +RECT option forces
the printer to print this barcode as a rectangle.
continued on the next page
97cab Produkttechnik GmbH & Co KG
Page 98

98
98
B - Barcode Definition - options overview
+VERIFYn = Used to verify the barcode data. +VERIFYn needs a barcode
testing equipment which is available as an option.
If required please ask cab Produkttechnik for that additional
barcode reader and describe the application. cab offers a
solution for 1 D and 2D codes whereby the scanner is attached
through a specific interface directly in front of the printer.
+VERIFYn does a string comparision with the data received by
the printer plus the calculated checksum. „n“ is the starting
value in millimeters or inches, whatever is set up in your label.
Restrictions:
1. + VERIFYn can be used only once in a label and starts the
scan when the barcode arrives in the read window of the
scanner.
2. +VERIFYn does not work when a barcode is sent as
graphics to the printer. For graphical barcodes use the
„GOODBAD“ function, described later in the chapter.
3. Functionality and technical possibilities depend strongly on
the barcode reader type. Please refer to the barcode reader
manual for detailed information. Please contact cab for further
information.
Example:
J
S l1;0,0,68,70,100
O R
B 10,16,0,CODE39+VERIFY0,20,.5,4;987656789
A 1
GOODBADn = and content check - attached USB sanner verifies the data.
In this example, the scanner starts at 0 mm from top of the
barcode with scanning and compares the read data with the
transmitted data string.
98cab Produkttechnik GmbH & Co KG
Page 99

99
99
B - Barcode Definition - options overview
+GOODBADn = Same function as +VERIFYn without checking the content. Only
good read or bad read will be controlled. Checks the answer on
NoReadString „?“ „n“ is the starting value in millimeters or
inches, whatever is set up in your label.
Example:
Example:
m m
J
S l1;0,0,68,70,100
O R
B 5,12,0,CODE39+GOODBAD0,5,.5,4;1234567890
A 1
In this example, the scanner starts at 5 mm from top of the
barcode with scanning and verifies only if the barcode is
readable or not ( GOOD or BAD)
NO content check will be done in this case.
,GOODBADn = Controls the readability of barcodes which have been
transmitted as graphics (i.e. by some labelling programs).
Controls only good read or bad read. „n“ is the starting
value in millimeters or inches, whatever is set up in your label.
m m
J
S l1;0,0,68,70,100
O R
I 10,10,0,1,1,GOODBAD0;PICT1
A 1
In this example, the scanner reads the previously downloaded
graphical barcode and does a good read or bad read check.
+VERIFYn, +GOODBADn and ,GOODBADn are available for all
barcodes, this will not be mentioned explicit in the decription of
each single barcode on the following pages.
+CCn = defines the height of a composite line in module width.
Default value is 2 and the maximum value is 99.
continued on the next page
99cab Produkttechnik GmbH & Co KG
Page 100

100
100
B - Barcode Definition - overview
size = Standard Codesize. Defines the height and width of the bars in a
barcode. Height and narrow element is defined for ratio oriented
barcodes. For EAN, JAN or UPC it is also possible to define the
standard code size which is expressed through „SCx“. The
height calculation includes the human readable characters if
enabled.
Unified barcode sizes of EAN and UPCbarcodes. Sets the size
of the barcode to a defined standard code size.
x is a numeric value (0-9) and the possible barcode size
depends on the printer´s resolution. Used instead of height and
ne (narrow element)
height = Defines the barcode height in the pre selected measurement -
millimeters or inches. A-series printers will print a grey
rastered field if the barcode does not fit including the white
space area on the label.
ne = narrow element Defines the width of the smallest element of
the barcode. The input is in millimeters or inches. The narrow
element (ne) size depends on the printer´s resolution. One dot
is the smallest possible element - therefor it depends on the
printhead resolution-how big or how small the thinnest line can
be printed. (it is not possible to print a „half“ dot )
ratio = The ratio between narrow and wide bars. (i.e. 3:1 means that
the widebar is three times the width of the small bar)
text = contains the barcode data to be encoded in a barcode.
Depending on the selected barcode type. Different rules are
used for different barcodes. Some barcodes allow only
characters, some others have a fixed length etc. More
information can be found at the samples of each barcode.
100cab Produkttechnik GmbH & Co KG
 Loading...