

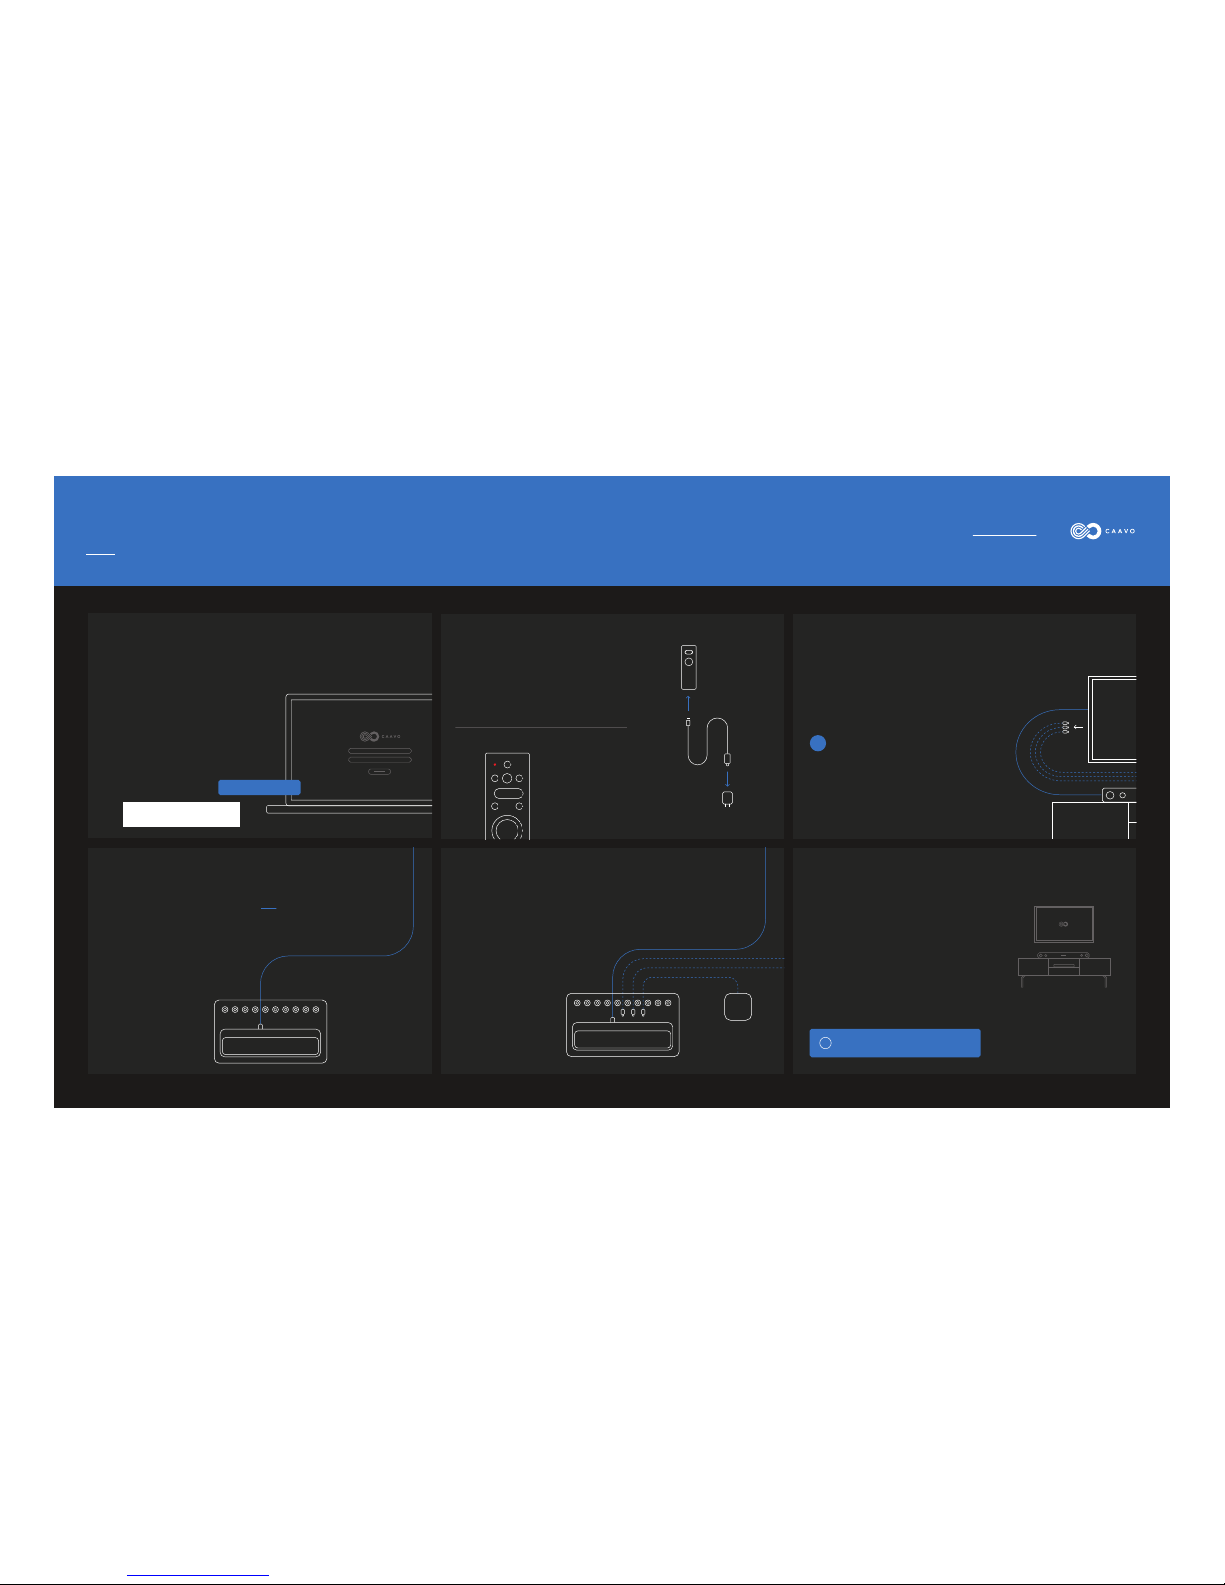
Create your Caavo Account
STEP 1
Charge the Caavo Remote
STEP 2
Disconnect your Source Devices
STEP 3
Connect Caavo to your TV or AVR
STEP 4
Connect your Source Devices to Caavo
STEP 5
Power, Network, and TV On!
STEP 6
If you’ve already created your Caavo Account,
then skip this step and give yourself a pat on
the back!
If you haven’t already created your Caavo
Account online, go to https://setup.caavo.com
and create one. Have your service credentials
handy to make setup go faster. Use the MAC ID
pasted below to pair your account to this
Caavo.
Unpack your remote, USB cable and wall
charger and connect to a wall outlet to charge.
Connect an HDMI cable between the Caavo OUT
port and one of the inputs on the TV, AVR or
Sound Bar you disconnected in Step 3.
Remember which input you used - this will
help you in Step 6.
If you connected Caavo directly to your
TV, do not use the input label “ARC”.
Connect all your source devices to Caavo using
any of the 8 numbered HDMI ports. If you use a
HDMI streaming stick, use the HDMI extender
to help you connect to Caavo.
The LED on the remote
will illuminate red to
indicate it is charging.
Connect the Caavo power cord to a wall outlet.
Connect the supplied ethernet cable from
Caavo to your router for best results. If a wired
ethernet connection is unavailable, WiFi can be
setup later.
Turn on your TV with your TV’s remote (and
AVR/Sound Bar too). Follow the on-screen
instructions to complete your setup experience.
If you have an AVR or Sound Bar connected to your TV
via HDMI, leave it connected on both ends. Then,
disconnect all your HDMI source devices from your
AVR or Sound Bar. You will connect Caavo to your AVR
or Sound Bar in Step 4.
If you do not have an AVR or Sound Bar or your
AVR/Sound Bar is connected via RCA or optical,
disconnect all your HDMI source devices from your TV.
You will connect Caavo directly to your TV in Step 4.
Make sure you are on the active input(s) you used
in Step 4 on your TV, AVR, or Sound Bar.
!
HTTP://SETUP.CAAVO.COM
Quick Start Guide
For more help visit Caavo.com/help
OR
!)(&<#'&//'.9'A6'/?'#)'44
!B=CD/EF/.///./.
G5@'
!"#$% &'( &'( )$*#"%+
!"#
, - . / 0 1 2 34%
&)HHIJKLIM&NO&BPQIR
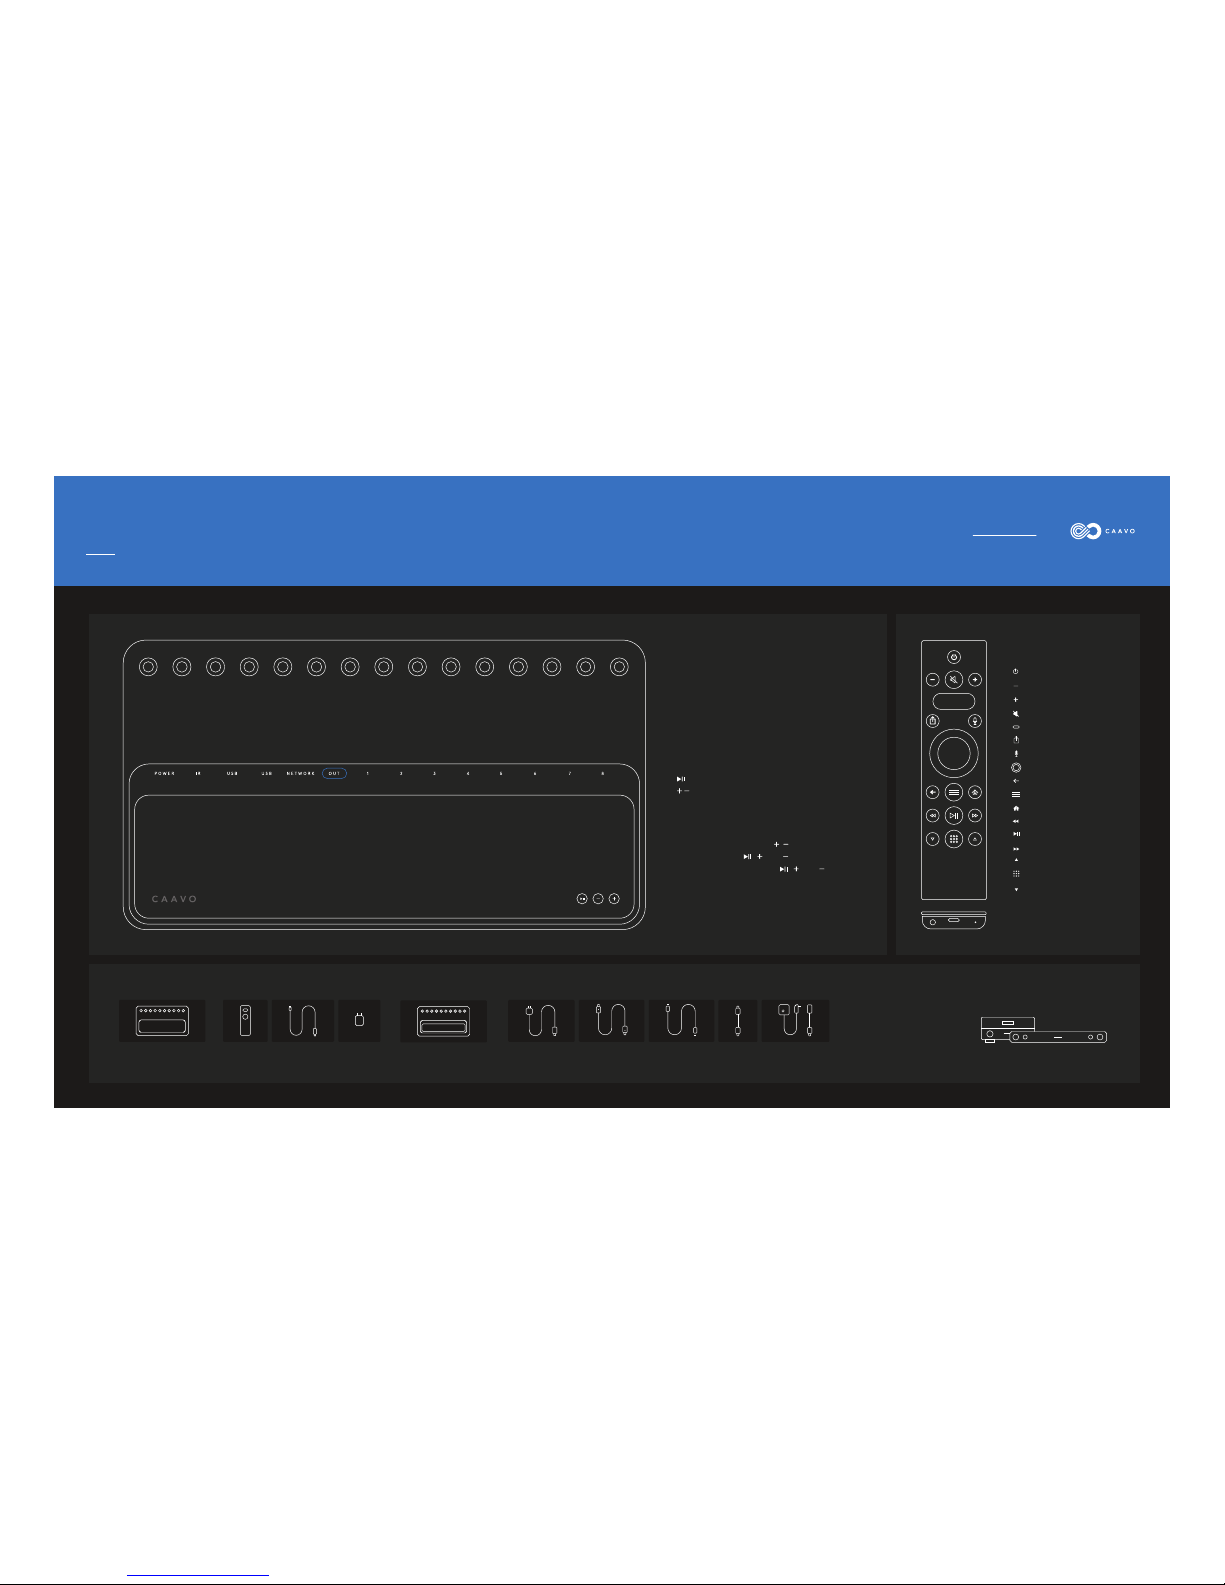
Connections
•Power: ~AC : 100-240 V , 50/60 Hz, 30W
• USB(2): Supplies 5V, 500mA
• IR: For optional “closed cabinet” accessory
• Network: Used to connect to wired networks
• OUT: Connect to your TV/AVR/Sound Bar
• 1—8: Connect your source devices.
Advanced
Pair remote: press and hold , for 5 seconds
Find remote: press , , and quickly
Factory reset: press and hold , , and for
10 seconds
Buttons
• : Will play/pause active source
• : Used to adjust source volume
Power
Buttons
Volume down
Volume up
Mute
Caavo button
Sources/Feedback
Microphone
Back
Menu
Home
Rewind
Play/Pause
Fastforward
Page up
Keypad/More
Page down
Component list
WOOD TOP CASE REMOTE USB CABLE POWER CORD HDMI CABLE ETHERNET
CABLE
HDMI
EXTENDER
IR
CONTROLLER
WALL
CHARGER
CAAVO
FOR WIRED
CONNECTIONS
FOR HDMI
STICKS
FOR HIDDEN
SOURCES
Source devices: Xfinity, Dish,
DirecTV, Roku, AppleTV, FireTV,
Xbox, Playstation, etc.
Audio video receiver (AVR) or Sound Bar:
Quick Start Guide
For more help visit Caavo.com/help
Dpad/Select
Headphone Charger Reset

Thank You
We are honored to have you as a customer. We hope you enjoy Caavo as much as
we enjoyed making your TV experience the way it was meant to be.
Safety and Warnings
Precautions
This product has been designed with the highest concern for safety. However,
any electrical device, if used improperly, has the potential for cause fire,
electrical shock or personal injury.
For a complete list of preautions, please visit www.caavo.com/support.
Use and handling
• Keep all accessories, cable ties and packaging out of reach of small children.
• Do not touch Caavo or cables during an electrical storm.
• Do not expose Caaov or accessories to high temperatures, high humidity, steam
or smoke.
• To prevent hearing damage, do not listen to Caavo at a high volme for long
periods of time.
• Place Caavo within range of your wireless network.
• Placing Caavo in an enclosed cabinet may intefere with reception of wireless
signals.
For a complete list of warnings, please visit www.caavo.com/support.
Proposition 65 Warning
This product contains chemical(s) know to the State of California to cause cancer
and brith defects or other reproductive harm.
Warranty
Caavo is commited to your happiness. Complete details of the Caavo warranty
program is available at www.caavo.com/legal/warranty.
Regulatory
This device complies with Part 15 of the FCC Rules. Operation is subject to the
following two conditions:
1. This device may not cause harmful interference, and
2. This device must accept any interference received, including interference
that may cause undesired operation.
Changes or modifications not expressly approved by Caavo could void the
user’s authority to operate the equipment.
This equipment has been tested and found to comply with the limits for a Class
B digital device, pursuant to Part 15 of the FCC Rules. These limits are designed
to provide reasonable protection against harmful interference in a residential
installation. This equipment generates, uses and can radiate radio frequency
energy and, if not installed and used in accordance with the instructions, may
cause harmful interference to radio communications. However, there
is no guarantee that interference will not occur in a particular
installation. If this equipment does cause harmful interference to radio or
television reception, which can be determined by turning the equipment off
and on, the user is encouraged to try to correct the interference by one or
more of the following measures:
• Re-orient or relocate the receiving antenna
• Increase the separation between the equipment and receiver
• Connect the equipment into an outlet on a circuit different from that to
which the receiver is connected
• Consult the dealer or an experienced radio/TV technician for help
The device has been evaluated to meet general RF exposure requirement.
The device can be used in portable exposure condition without restriction.
 Loading...