

CA BABWBN2900E20 - BRIGHTSTOR ARC BACKUP V9 CLIENT, ARCserve Backup User Manual

CA ARCserve® Backup
Client Agents Guide
r15

This documentation and any related computer software help programs (hereinafter referred to as the
"Documentation") are for your informational purposes only and are subject to change or withdrawal by CA at any time.
This Documentation may not be copied, transferred, reproduced, disclosed, modified or duplicated, in whole or in part,
without the prior written consent of CA. This Documentation is confidential and proprietary information of CA and may
not be used or disclosed by you except as may be permitted in a separate confidentiality agreement between you and
CA.
Notwithstanding the foregoing, if you are a licensed user of the software product(s) addressed in the Documentation,
you may print a reasonable number of copies of the Documentation for internal use by you and your employees in
connection with that software, provided that all CA copyright notices and legends are affixed to each reproduced copy.
The right to print copies of the Documentation is limited to the period during which the applicable license for such
software remains in full force and effect. Should the license terminate for any reason, it is your responsibility to certify
in writing to CA that all copies and partial copies of the Documentation have been returned to CA or destroyed.
TO THE EXTENT PERMITTED BY APPLICABLE LAW, CA PROVIDES THIS DOCUMENTATION "AS IS" WITHOUT
WARRANTY OF ANY KIND, INCLUDING WITHOUT LIMITATION, ANY IMPLIED WARRANTIES OF MERCHANTABILITY,
FITNESS FOR A PARTICULAR PURPOSE, OR NONINFRINGEMENT. IN NO EVENT WILL CA BE LIABLE TO THE END USER
OR ANY THIRD PARTY FOR ANY LOSS OR DAMAGE, DIRECT OR INDIRECT, FROM THE USE OF THIS DOCUMENTATION,
INCLUDING WITHOUT LIMITATION, LOST PROFITS, LOST INVESTMENT, BUSINESS INTERRUPTION, GOODWILL, OR
LOST DATA, EVEN IF CA IS EXPRESSLY ADVISED IN ADVANCE OF THE POSSIBILITY OF SUCH LOSS OR DAMAGE.
The use of any software product referenced in the Documentation is governed by the applicable license agreement and
is not modified in any way by the terms of this notice.
The manufacturer of this Documentation is CA.
Provided with "Restricted Rights." Use, duplication or disclosure by the United States Government is subject to the
restrictions set forth in FAR Sections 12.212, 52.227-14, and 52.227-19(c)(1) - (2) and DFARS Section
252.227-7014(b)(3), as applicable, or their successors.
Copyright © 2010 CA. All rights reserved. All trademarks, trade names, service marks, and logos referenced herein
belong to their respective companies.

CA Product References
This document references the following CA products:
■
BrightStor® Enterprise Backup
■
CA Antivirus
■
CA ARCserve® Assured Recovery™
■
CA ARCserve® Backup Agent for Advantage™ Ingres®
■
CA ARCserve® Backup Agent for Novell Open Enterprise Server for Linux
■
CA ARCserve® Backup Agent for Open Files on NetWare
■
CA ARCserve® Backup Agent for Open Files on Windows
■
CA ARCserve® Backup Client Agent for FreeBSD
■
CA ARCserve® Backup Client Agent for Linux
■
CA ARCserve® Backup Client Agent for Mainframe Linux
■
CA ARCserve® Backup Client Agent for NetWare
■
CA ARCserve® Backup Client Agent for UNIX
■
CA ARCserve® Backup Client Agent for Windows
■
CA ARCserve® Backup Enterprise Option for AS/400
■
CA ARCserve® Backup Enterprise Option for Open VMS
■
CA ARCserve® Backup for Microsoft Windows Essential Business Server
■
CA ARCserve® Backup for Windows
■
CA ARCserve® Backup for Windows Agent for IBM Informix
■
CA ARCserve® Backup for Windows Agent for Lotus Domino
■
CA ARCserve® Backup for Windows Agent for Microsoft Exchange Server
■
CA ARCserve® Backup for Windows Agent for Microsoft SharePoint Server
■
CA ARCserve® Backup for Windows Agent for Microsoft SQL Server
■
CA ARCserve® Backup for Windows Agent for Oracle
■
CA ARCserve® Backup for Windows Agent for Sybase
■
CA ARCserve® Backup for Windows Agent for Virtual Machines
■
CA ARCserve® Backup for Windows Disaster Recovery Option
■
CA ARCserve® Backup for Windows Enterprise Module

■
CA ARCserve® Backup for Windows Enterprise Option for IBM 3494
■
CA ARCserve® Backup for Windows Enterprise Option for SAP R/3 for Oracle
■
CA ARCserve® Backup for Windows Enterprise Option for StorageTek ACSLS
■
CA ARCserve® Backup for Windows Image Option
■
CA ARCserve® Backup for Windows Microsoft Volume Shadow Copy Service
■
CA ARCserve® Backup for Windows NDMP NAS Option
■
CA ARCserve® Backup for Windows Serverless Backup Option
■
CA ARCserve® Backup for Windows Storage Area Network (SAN) Option
■
CA ARCserve® Backup for Windows Tape Library Option
■
CA ARCserve® Backup Patch Manager
■
CA ARCserve® Backup UNIX and Linux Data Mover
■
CA ARCserve® D2D
■
CA ARCserve® High Availability
■
CA ARCserve® Replication
■
CA VM:Tape for z/VM
■
CA 1® Tape Management
■
Common Services™
■
eTrust® Firewall
■
Unicenter® Network and Systems Management
■
Unicenter® Software Delivery
■
Unicenter® VM:Operator®

Contact CA
Contact Technical Support
For your convenience, CA provides one site where you can access the
information you need for your Home Office, Small Business, and Enterprise CA
products. At CA ARCserve Backup Support, you can access the following:
■
Online and telephone contact information for technical assistance and
customer services
■
Information about user communities and forums
■
Product and documentation downloads
■
CA Support policies and guidelines
■
Other helpful resources appropriate for your product
Provide Feedback
If you have comments or questions about CA product documentation, you can
send a message to techpubs@ca.com.
If you would like to provide feedback about CA product documentation, complete
our short customer survey, which is also available on the CA Support website,
found at http://ca.com/docs.


Contents
Chapter 1: Introducing the Client Agents 9
Introduction ................................................................................... 9
Benefits of Using a Client Agent ................................................................ 9
Supported Client Systems ..................................................................... 10
Chapter 2: Installing the Client Agents 13
Installation Considerations .................................................................... 13
Client Agent for Windows .................................................................. 13
Client Agent for NetWare .................................................................. 13
Enterprise Option for OpenVMS ............................................................ 14
Communication Requirements for Client Agents Installed on UNIX, Linux, and Mainframe
Linux Platforms ........................................................................... 14
Install the Client Agents ....................................................................... 15
Common Agent Automatic Installation ......................................................... 15
Installation Directories for the Common Agent and Client Agents ................................ 16
Chapter 3: Adding and Configuring the Client Agents 17
Adding Client Agents .......................................................................... 17
How to Add, Import, and Export Agents and Nodes ......................................... 17
Manually Add Client Agents ................................................................ 18
Windows Client Agent Configuration ........................................................... 19
Windows-Related Configuration Notes ...................................................... 20
Security Configuration Options ............................................................. 20
Backup Priority and Restore/Compare Priority Options ....................................... 21
Multiple Concurrent Restore or Compare ................................................... 21
Backup and Restore Execution Options ..................................................... 21
Use the Backup Agent Admin to Set Windows Parameters ................................... 22
Configure Password Security ............................................................... 25
View Configuration Selections.............................................................. 25
Enable Raw Backup and Restore ........................................................... 26
Configure Windows Network Communication ................................................ 27
Set a Workstation Password ............................................................... 29
Create Windows Access Control List ........................................................ 30
Enable Virus Scanning..................................................................... 31
Customizable Local Options ................................................................ 32
How the Client Agent for Windows Excludes Database Application Files from Backups ......... 32
NetWare Client Agent Configuration ............................................................ 33
Contents 7

NetWare-related Configuration Notes ....................................................... 33
Configure NetWare Network Communication ................................................ 33
Back Up Novell Directory Services ......................................................... 34
UNIX, Linux, and Mac OS X Client Agent Configuration .......................................... 35
UNIX, Linux, and Mac OS X Configuration Considerations .................................... 35
UNIX, Linux, and Mac OS X Client Agent Control Files ....................................... 35
Common Agent Configuration File for UNIX, Linux, and Mac OS X ............................ 36
Snapshot and Direct I/O Support for UNIX .................................................. 45
UNIX, Linux, and Mac OS X Access Control Lists ............................................ 50
AS/400 Enterprise Option Configuration ........................................................ 53
Configure Start Preferences ............................................................... 53
Performance Configuration ................................................................ 54
Configure Stop Preferences ................................................................ 55
OpenVMS Enterprise Option Configuration ...................................................... 55
Configure Port Address .................................................................... 56
TCP/IP Stack Optimization ................................................................. 56
Trace Levels for the OpenVMS Enterprise Option ............................................ 56
Chapter 4: Using the Client Agents 57
Runtime Statistics ............................................................................ 57
View Runtime Statistics for the Client Agent for Windows .................................... 57
View Runtime Statistics for the NetWare Client Agents ...................................... 58
Activity Logs ................................................................................. 58
View Activity Logs on a Windows Server .................................................... 58
View Activity Log on a NetWare Client Agent Machine ....................................... 59
View Activity Log on a UNIX, Linux, or Mac OS X Client Agent Machine ....................... 59
Activity Logs on Computers Running the AS/400 Enterprise Option ........................... 60
Activity Logs on Computers Running the OpenVMS Enterprise Option ......................... 60
Delete Client Agent Log Files .............................................................. 61
Back Up Windows Network Server Data ........................................................ 62
Client Agent Start and Stop Procedures ........................................................ 62
Windows Start and Stop Requirement ...................................................... 62
NetWare Start and Stop Requirement ...................................................... 63
UNIX, Linux, and Mac OS X Client Agents Start and Stop Requirement ....................... 64
Enterprise Option for AS/400 Start and Stop Requirement ................................... 65
Enterprise Option for OpenVMS Start and Stop Requirement ................................. 65
Index 67
8 Client Agents Guide

Chapter 1: Introducing the Client Agents
This section contains the following topics:
Introduction (see page 9)
Benefits of Using a Client Agent (see page 9)
Introduction
Supported Client Systems (see page 10)
CA ARCserve Backup is a comprehensive storage solution for applications,
databases, distributed servers, and file systems. It provides backup and restore
capabilities for databases, business-critical applications, and network clients.
Among the compatible agents CA ARCserve Backup offers are a specific set of
operating-system-based client agents.
The client agents are separate software packages installed on network
computers to supply a network interface between the computer and CA
ARCserve Backup. In addition to enabling connectivity, the client agents share
data storage tasks with the backup servers in your network. You may need
multiple client agents, depending on the number and variety of network
machines that require regular data backup and restore functionality.
This guide provides information on installing, configuring, and adding client
agents for all workstations and servers in your network storage environment.
Benefits of Using a Client Agent
CA ARCserve Backup client agents are designed for organizations that need to
preserve network resources by offloading tasks onto centralized backup servers
and media. Among other functions, the client agents serve to:
■
Minimize the load on your communications network
■
Increase the efficiency of your CA ARCserve Backup servers by offloading the
preprocessing of archive data to the client machine
■
Supply detailed file and directory information about the remote client to the
CA ARCserve Backup server
■
Communicate with the server and let you browse and select backup
components
Chapter 1: Introducing the Client Agents 9

Supported Client Systems
■
Assist with monitoring the progress of backup jobs
■
Maintain and monitor backup logs with the status of backup and restore
activities
■
Facilitate backup of applications or file systems
Client agents can also augment data protection for all client computers from a
single CA ARCserve Backup server in the network.
With client agents installed on your network computers, a single CA ARCserve
Backup server can perform data backup and restore operations on multiple
computers and operating systems.
Supported Client Systems
CA ARCserve Backup offers client agents that support the following platforms:
Note: For a detailed description of supported operating systems and versions,
see the Client Agents Readme file located on the CA ARCserve Backup
installation media.
■
CA ARCserve Backup Client Agent for Windows. This client agent supports
the following:
– Windows Server 2008
– Windows Server 2008 R2
– Windows 7
– Windows Vista
– Windows 2000
– Windows XP
– Windows Server 2003
– Windows Small Business Server (Windows 2000 and Windows 2003)
■
CA ARCserve Backup Client Agent for NetWare
■
CA ARCserve Backup Client Agent for UNIX. This client agent supports the
following:
– AIX
– HP-UX
– Solaris
– Tru64
– FreeBSD
10 Client Agents Guide

Supported Client Systems
■
CA ARCserve Backup Client Agent for Linux. This client agent supports the
following:
– Red Hat
– SuSE
– Turbo
– Debian
– RedFlag
– Miracle Linux
– Asianux
■
CA ARCserve Backup Client Agent for Mainframe Linux. This client agent
supports the following:
– Red Hat Enterprise Server
– SLES
■
CA ARCserve Backup Enterprise Option for AS/400
■
CA ARCserve Backup Client Agent for Mac OS X
■
CA ARCserve Backup Enterprise Option for OpenVMS
Chapter 1: Introducing the Client Agents 11


Chapter 2: Installing the Client Agents
To perform a backup or restore job, you must install and start the appropriate CA
ARCserve Backup client agent software. The client agent provides
communication between a workstation and the CA ARCserve Backup server. This
chapter describes how to install client agents.
This section contains the following topics:
Installation Considerations (see page 13)
Install the Client Agents (see page 15)
Common Agent Automatic Installation (see page 15)
Installation Considerations
Installation Directories for the Common Agent and Client Agents (see page 16)
The following sections include information you should review before installing
the client agents.
Client Agent for Windows
Before installing the client agent for Windows, review the following
considerations.
■
Before you can run the client agent for Windows, your computer must be
configured to communicate using one or more of the following network
protocols:
– Transmission Control Protocol/Internet Protocol (TCP/IP)
– Windows Socket (WinSock) Direct
Client Agent for NetWare
Before installing the client agent for NetWare, review the following
considerations.
■
The client agent for NetWare can be installed on NetWare servers only. Also,
to perform a NetWare installation, your local machine must be equipped with
the Novell client for Windows.
■
The NetWare server must be configured to communicate using TCP/IP.
Chapter 2: Installing the Client Agents 13

Installation Considerations
■
You must have supervisor rights on the eDirectory tree of the NetWare
computer on which you are installing this client agent. For details, see your
Novell NetWare documentation.
■
For optimum performance, use the latest NetWare C library (CLIB) and
Systems Management Server (SMS) modules.
■
The NetWare Loadable Modules (NLMs) are available from Novell.
Enterprise Option for OpenVMS
Before installing the enterprise option for OpenVMS, review the following
considerations.
■
A computer running the supported Alpha and VAX operating systems can use
either TCP or User Data Protocol (UDP) with any of the following
communications software:
– Compaq UCX 4.2 eco 3 (on Alpha)
– Compaq UCX 3.3 eco 13 (on VAX)
– Compaq TCP/IP Versions 5.0 through 5.3
– Process Software Multinet Version 4.1B (with patches) through Version
4.4
– Process Software TCPWARE Versions 5.3 and 5.4
Important! If necessary, you can install two or more of these
communications packages on the same computer; however, you can run
only one package at a time. Do not run two or more of these communications
packages simultaneously on the same computer.
Note: If you change OpenVMS TCP/IP stacks at any time, you must reinstall
the OpenVMS Enterprise Option.
■
You should back up your OpenVMS system disk before installing the
OpenVMS Enterprise Option.
■
Ensure that you have at least 10 blocks of free space for setup file.
Communication Requirements for Client Agents Installed on UNIX, Linux, and
Mainframe Linux Platforms
To help ensure that CA ARCserve Backup primary servers and member servers
can communicate with the CA ARCserve Backup agents that are installed on
UNIX, Linux, and Mainframe Linux computers, you must allow CA ARCserve
Backup to communicate with the agent through the firewall, if any, that is
configured on the agent computers. You can allow CA ARCserve Backup to
communicate with the agent computers by adding CA ARCserve Backup to the
firewall exceptions list on the agent computers.
14 Client Agents Guide

Install the Client Agents
As a best practice, you should add CA ARCserve Backup to the firewall exceptions
list on the agent computers before you install the agents.
This requirement affects the following CA ARCserve Backup components:
■
Client Agent for UNIX
■
Client Agent for Linux
■
Client Agent for Mainframe Linux
■
Oracle Agent on UNIX platforms
■
Oracle Agent on Linux platforms
■
UNIX and Linux Data Mover
For information about how to configure the firewall on the agent computers, see
the platform-specific documentation.
Note: By default, CA ARCserve Backup communicates using port 6051.
Install the Client Agents
To install a windows client agent or a cross-platform agent, use the CA ARCserve
Backup for Windows DVD.
For more information about installing CA ARCserve Backup client agents, click
the following links on the CA ARCserve Backup installation browser:
■
Installation Instructions for CA ARCserve Backup Client Agents for
non-Windows platforms.
■
Installation Instructions for CA ARCserve Backup UNIX and Linux Data
Mover.
Common Agent Automatic Installation
When you install the client agent for UNIX, Linux, or Mac OS X, the CA ARCserve
Backup Common Agent is automatically installed.
Chapter 2: Installing the Client Agents 15

Installation Directories for the Common Agent and Client Agents
Platform
Version
Common Agent / Agent
Configuration File
Client Agent (File System
Agent)
AIX /opt/CA/ABcmagt
/opt/CA/ABuagent
HP /opt/CA/ABcmagt
/opt/CA/ABuagent
Solaris
SPARC 8, 10
x86
/opt/CA/BABcmagt
/opt/CA/BABuagent
Solaris
SPARC 9, 10
/opt/CA/ABcmagt
/opt/CA/ABuagent
Linux
SUSE
Redhat
Linux-OES
Asianux
Miracle
Red Flag
Turbo Linux
/opt/CA/ABcmagt
/opt/CA/ABuagent
Mainframe
Linux
Red Hat
SUSE
/opt/CA/BABcmagt
/opt/CA/BABuagent
FreeBSD
/opt/CA/BABcmagt
/opt/CA/BABuagent
Debian
/opt/CA/ABcmagt
/opt/CA/ABuagent
ESX
/opt/CA/ABcmagt
/opt/CA/ABuagent
Tru64
/opt/CA/BABcmagt
/opt/CA/BABuagent
Installation Directories for the Common Agent and Client
Agents
The following table describes the default installation paths for the CA ARCserve
Backup Common Agent and the CA ARCserve Backup Client Agents for UNIX and
Linux platforms.
Note: The above directories also appear in the Common Agent configuration file
(agent.cfg) along with other related configuration files for the file system agents
and the Agent for Oracle.
For a complete list of supported versions of operating systems, see the Client
Agents Readme file located on the CA ARCserve Backup installation media.
16 Client Agents Guide

Chapter 3: Adding and Configuring the
Client Agents
After installing CA ARCserve Backup and its various client agents, you must add
and configure each client agent machine in your network to the backup server.
This chapter discusses the procedures for adding and configuring client agents.
This section contains the following topics:
Adding Client Agents (see page 17)
Windows Client Agent Configuration (see page 19)
NetWare Client Agent Configuration (see page 33)
UNIX, Linux, and Mac OS X Client Agent Configuration (see page 35)
AS/400 Enterprise Option Configuration (see page 53)
OpenVMS Enterprise Option Configuration (see page 55)
Adding Client Agents
If you have CA ARCserve Backup installed on a Windows server, you can add
client agents from your network using the Add, Import, Export Node feature or
you can add client agents manually. The following sections include information
How to Add, Import, and Export Agents and Nodes
on each of these methods.
Setting up a job in an environment with many agents and nodes can be a
time-consuming and tedious task. If you have multiple agents and nodes to back
up, it may take time to add the agents and nodes to the Backup Manager one at
a time. The Add, Import, and Export Agents and Add, Import, and Export Nodes
features let you add multiple nodes and agents using the CA ARCserve Backup
user interface, whether the nodes and agents will be backed up.
Note: The Central Agent Admin also lets you add, import, or export agents and
nodes.
Chapter 3: Adding and Configuring the Client Agents 17

Adding Client Agents
You can use the Add, Import, and Export Nodes feature to add multiple nodes
and agents into the system in either of the following ways:
Add multiple agents and nodes using the user interface
1. From the Backup Manager Source Tab or the Restore Manager Destination
Tab, select a node.
2. Use the Add/Import/Export Nodes dialog to manually enter the names of all
the nodes and agents or select the nodes from the left-pane list of nodes and
agents detected by auto-discovery.
3. Specify a user name and password for the nodes.
4. Save the information in the CA ARCserve Backup database.
5. View the nodes and agents in the Backup Manager Source tree or the Central
Agent Admin.
Add multiple nodes and agents using a .csv and .txt file
1. From the Backup Manager Source Tab or the Restore Manager Destination
Tab, select a node.
2. Use the Import function on the Add/Import/Export Nodes dialog and specify
the name of the .csv or .txt file from the user interface.
The node and agent names are imported from the .csv or .txt file and are
added into the system.
3. Specify a user name and password for the nodes and agents.
4. View the nodes and agents in the Backup Manager Source tree.
Manually Add Client Agents
If Auto Discovery does not detect all client agents in your network for some
reason or if you want to add a particular client agent, you can manually add a
client agent to a Windows server or NetWare server using the Windows manager
interface. To manually add a client agent, you must add each client agent
machine to the Backup Manager.
18 Client Agents Guide
Windows Client Agent Configuration
To manually add client agents
1. Open the Backup Manager and click the Source tab.
2. Right-click the appropriate client agent object, such as Windows Systems.
3. Select Add Machine/Object.
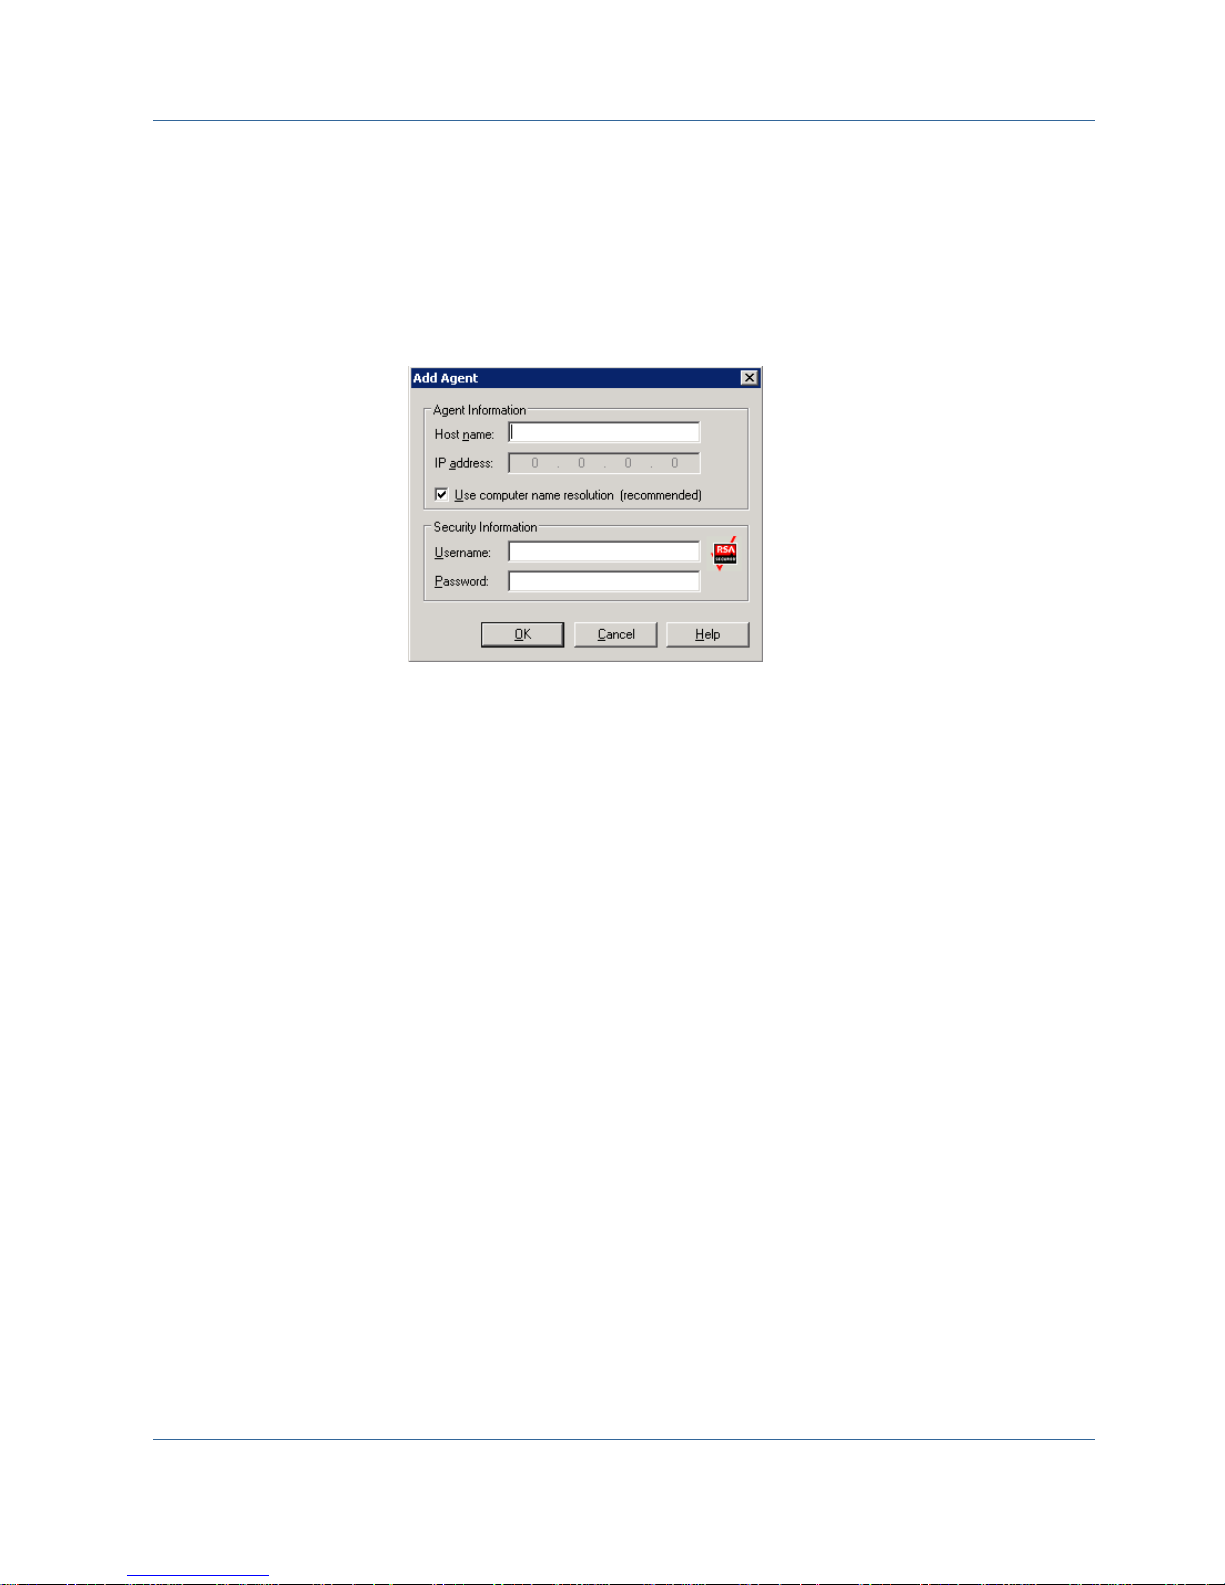
The Add Agent dialog appears.
4. Enter the name of the computer in the Host Name field.
Note: If you are adding a NetWare Client Agent, you must use the Novell
server name as the host name.
5. Select the protocol you want to use to connect to the computer:
■ TCP/IP--Select TCP/IP and, if you are adding a Windows client agent,
select Use Computer Name Resolution. Computer name resolution lets
the local Windows computer automatically detect the remote Windows
machine's IP address when connecting for backup and restore
operations. This is the recommended method and works even if you do
not know the computer's IP address.
Note: If the target Windows computer has a dynamic IP address, using
computer name resolution is preferable.
If you are not adding a Windows client agent, if computer name
resolution fails because of various DNS server or network configuration
issues, or the target computer has multiple IP addresses and you want to
be certain that a specific address is used, ensure that Use Computer
Name Resolution is not selected and enter an IP address.
6. Click Add.
The client agent is added to the server.
Windows Client Agent Configuration
The following sections discuss the Windows client agent configuration options.
Chapter 3: Adding and Configuring the Client Agents 19

Windows Client Agent Configuration
Windows-Related Configuration Notes
General information pertaining to the configuration of the Windows client agent
includes:
■
Restoring System State—The System State supports the Restore to
Original Location option.
Note: The System State also supports restoring to an alternate location, but
it will not recreate an operational system since the files are placed in default
directories created by the agent at the time of restore.
■
Shares Support—When the use agent option is selected, the client agent
backs up shares selected from the Preferred Shares/Machines object in the
Backup Manager by converting the share name to the real path.
Note: On Windows platforms, the client agent does not restore shares or
support shares as a destination except for administrative shares.
■
Restoration of the System Hive—The KeysNotToRestore feature is
designed to protect sensitive system registry keys during a regular restore of
the client agent system hive. However, this feature is unavailable when you
use the Client Agent Registry session to restore individual system keys.
Security Configuration Options
The Client Agent for Windows security options are defined on the Configuration
dialog. Select one of the following types of security:
System Security
Lets you use Windows security to perform backup, compare, and restore
operations. The client agent impersonates the active network user; that is,
the client agent uses the user name and password to log on. This ID and
password should identify a valid user in the local user database or in the
domain database if the workstation is a member of a domain.
Password Security
Lets you set individual passwords for security. This setting enables the client
agent to run under the local system account. Password Security is disabled
by default.
Note: If password security is selected, and DSA-based database agents
(such as Sybase, Informix, and so on) are installed on the machine, whole
node backup is not supported. To back up databases only, you must change
the security information in the Security and Agent Information dialog, to the
system security before submitting the job.
20 Client Agents Guide

Backup Priority and Restore/Compare Priority Options
The Client Agent for Windows process priority is defined on the Configuration
dialog. Select one of the following settings for Backup Priority and
Restore/Compare Priority:
High
Foreground processing performs client agent functions before other
processes.
Normal
Standard processing performs client agent functions without special status.
Low
Standard processing performs client agent functions when other processes
are idle.
Multiple Concurrent Restore or Compare
Windows Client Agent Configuration
The Client Agent for Windows simultaneous restore and compare is enabled on
the Configuration dialog. Enable the Allow multiple simultaneous restore or
compare jobs check box on the Configuration dialog if you want the Windows
client agent to accept multiple concurrent restore or compare jobs.
Backup and Restore Execution Options
The Client Agent for Windows execution options are defined on the Configuration
dialog. Select the pre-execution programs, post-execution programs, and define
the execution delay.
Pre-execution
Enter or select the name of any batch programs (for example,
C:\WINAGENT\PRE.CMD) that you want to automatically execute before the
backup or restore operation.
Post-execution
Enter or select the name of any batch programs (for example,
C:\WINAGENT\POST.CMD) that you want to automatically execute after the
backup or restore operation.
Execution Delay
Select the number of seconds that you want the client agent to wait before or
after executing the batch job.
Chapter 3: Adding and Configuring the Client Agents 21
 Loading...