

Page 1
BG-UHD-KVM41A
Port switch to desired port N
(1 ~ 4)
Port switch w ith host USB pow er
0 – Disable (Default)
Port switch w hen new host plug in
0 - Disable (Default)
Buzzer sound On/Off c ontrol
0 - Disable
Scroll Lock + Scroll Lock
+ S
(**): Space bar of keyboard (not include space bar) to
stop auto-scan,
Any key of keyboard to stop auto-scan and jump to
current sc an port.
4×1 USB HDMI2.0 KVM Switch
Quick Installation Guide
INTRODUCTION:
The 4×1 USB HDMI 2.0 KVM Switch shares one HDMI display between four
HDMI sources.
FEATURES:
● Share an HDTV or display, USB keyboard& mouse, and microphone
between four USB/HDMI computers and devices
● Provides an additional USB 2.0 sharing port with over-current detection
and protection
● Switch between devices via front push button or hotkey
● Supports 4K@60Hz and PC's UXGA 1920×1200 resolutions
● Supports Dolby True HD and DTS HD Master Audio formats
● HDMI2.0 & HDCP compliant
● Video bandwidth: 18Gbps
● Metal housing for better RF shielding
PACKAGE CONTENTS:
● 4×1 USB HDMI2.0 KVM Switch
● Power adapter
● Quick installation guide
COMPATIBILITY:
● Windows, Mac, Linux computers
● Game consoles, Blu-Ray DVD players, and other CE devices
1
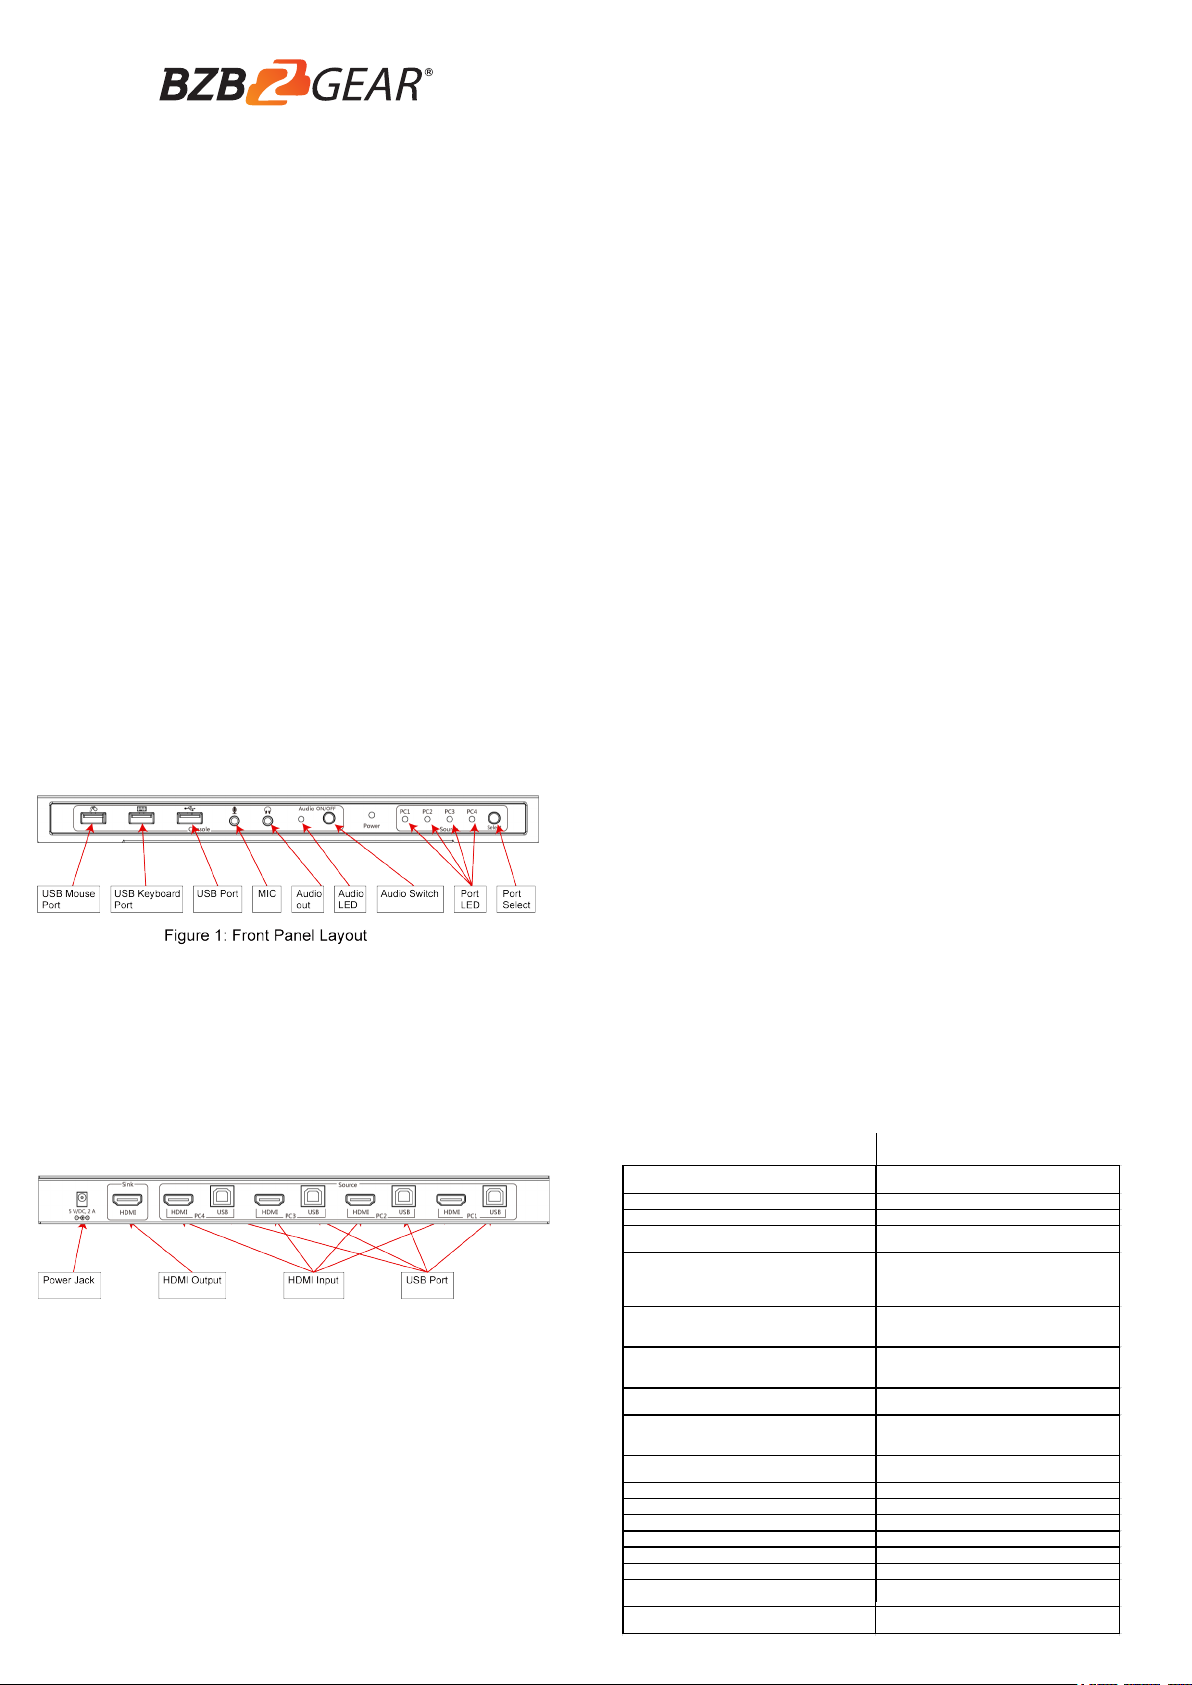
LAYOUT:
● USB Mouse Port: Connect to USB mouse devices
● USB Keyboard Port: Connect to USB keyboard devices
● USB Ports: Connect to other USB devices
● MIC: Connect to microphone
● Audio out: Connect to earphone
● Audio LED: Audio ON/OFF Indication
● Audio Switch: Switch to enable/disable the MIC/Audio out function
● Port LED: Indicate which HDMI source is selected
● Port Select: Switch between the HDMI sources
4. Connect the computer's HDMI connector to the switch's INPUT 1
connector using the HDMI cable.
Connect the computer's USB port to the switch's PC1 connector (USB
5.
Type B) using the included USB cable.
6. Repeat steps 4 to 5 for additional computer system/devices you wish
to connect to this switch.
7. Optional: Connect other USB peripherals you wish to share between
the connected computers/devices to the extra USB ports on the switch.
8. Connect the power adapter into the switch's Power Jack.
9. Power up the first computer/device and wait until it is fully booted up.
Make sure the keyboard and mouse work properly.
10. Once the first computer system is successfully setup, press the
Switch button and power up the second computer/device to verify the
setup properly.
11. The installation is complete and the 4x1 USB HDMI KVM Switch is
ready for use.
HOTKEY:
Follow the hotkey command listed below for selected operating functions:
Command Function
Scroll Lock + Scroll Lock Start Hotkey mode
Scroll Lock + Scroll Lock+[Enter] Port switch to next ac tive port
Scroll Lock + Scroll Lock+ [N]
Scroll Lock + Scroll Lock+ P + W + [0/1]
detected.
1 – Enable
2
Figure 2: Rear Panel Layout
● Power Jack: Connect to the included power adapter
● HDMI Output: Connect to HDMI Display
● HDMI Input: Connect to source device's HDMI
● USB Port: Connect to PC's USB port
HARDWARE INSTALLATION:
1. Power off all devices you plan to connect to the 4×1 USB HDMI KVM
Switch 4K2K.
Connect a monitor/display to HDMI OUTPUT of the switch by an HDMI cable.
2.
3. Connect a USB keyboard and a USB mouse to USB keyboard and
Mouse Ports of the switch.
Scroll Lock + Scroll Lock + P + L + U + G + [0/1]
Scroll Lock + Scroll Lock
+ B + [0/1]
Scroll Lock + Scroll Lock
+ U + [Enter]
Note :
(*): The buzzer sound:
Hotkey Ac tive: 1 beep
Error: 2 Beeps
3
1 - Enable
1 - Enable (Default)(*)
Auto-sc an On(**)
Reboot and enter IAP mode to
update firmware
4
Page 2
WARRANTY: MISSION STATEMENT:
BZBGEAR wants to assure you peace of mind. We're so confident in the
quality of our products that along with the manufacturer's one-year limited
warranty, we are offering free second-year warranty coverage upon
registration*!
Taking advantage of this program is simple, just follow the steps below:
1. Register your product within 90 days of purchase by visiting
BZBGEAR.com/warranty.
2. Complete the registration form. Provide all necessary proof of purchase
details, including serial number and a copy of your sales receipt.
For questions, please call 1.888.499.9906 or email [email protected].
For complete warranty information, please visit BZBGEAR.com/warranty or
scan the QR code below.
*Terms and conditions apply. Registration is required.
BZBGEAR manifests from the competitive nature of the audiovisual industry
to innovate while keeping the customer in mind. AV solutions can cost a
pretty penny, and new technology only adds to it. We believe everyone
deserves to see, hear, and feel the advancements made in today’s AV world
without having to break the bank. BZBGEAR is the solution for small to
medium-sized applications requiring the latest professional products in AV.
We live in a DIY era where resources are abundant on the internet. With that
in mind, our team offers system design consultation and expert tech support
seven days a week for the products in our BZBGEAR catalog. You’ll notice
comparably lower prices with BZBGEAR solutions, but the quality of the
products is on par with the top brands in the industry. The unparalleled
support from our team is our way of showing we care for every one of our
customers. Whether you’re an integrator, home theater enthusiast, or a
do-it-yourselfer, BZBGEAR offers the solutions to allow you to focus on your
project and not your budget.
5
6
 Loading...