

Page 1
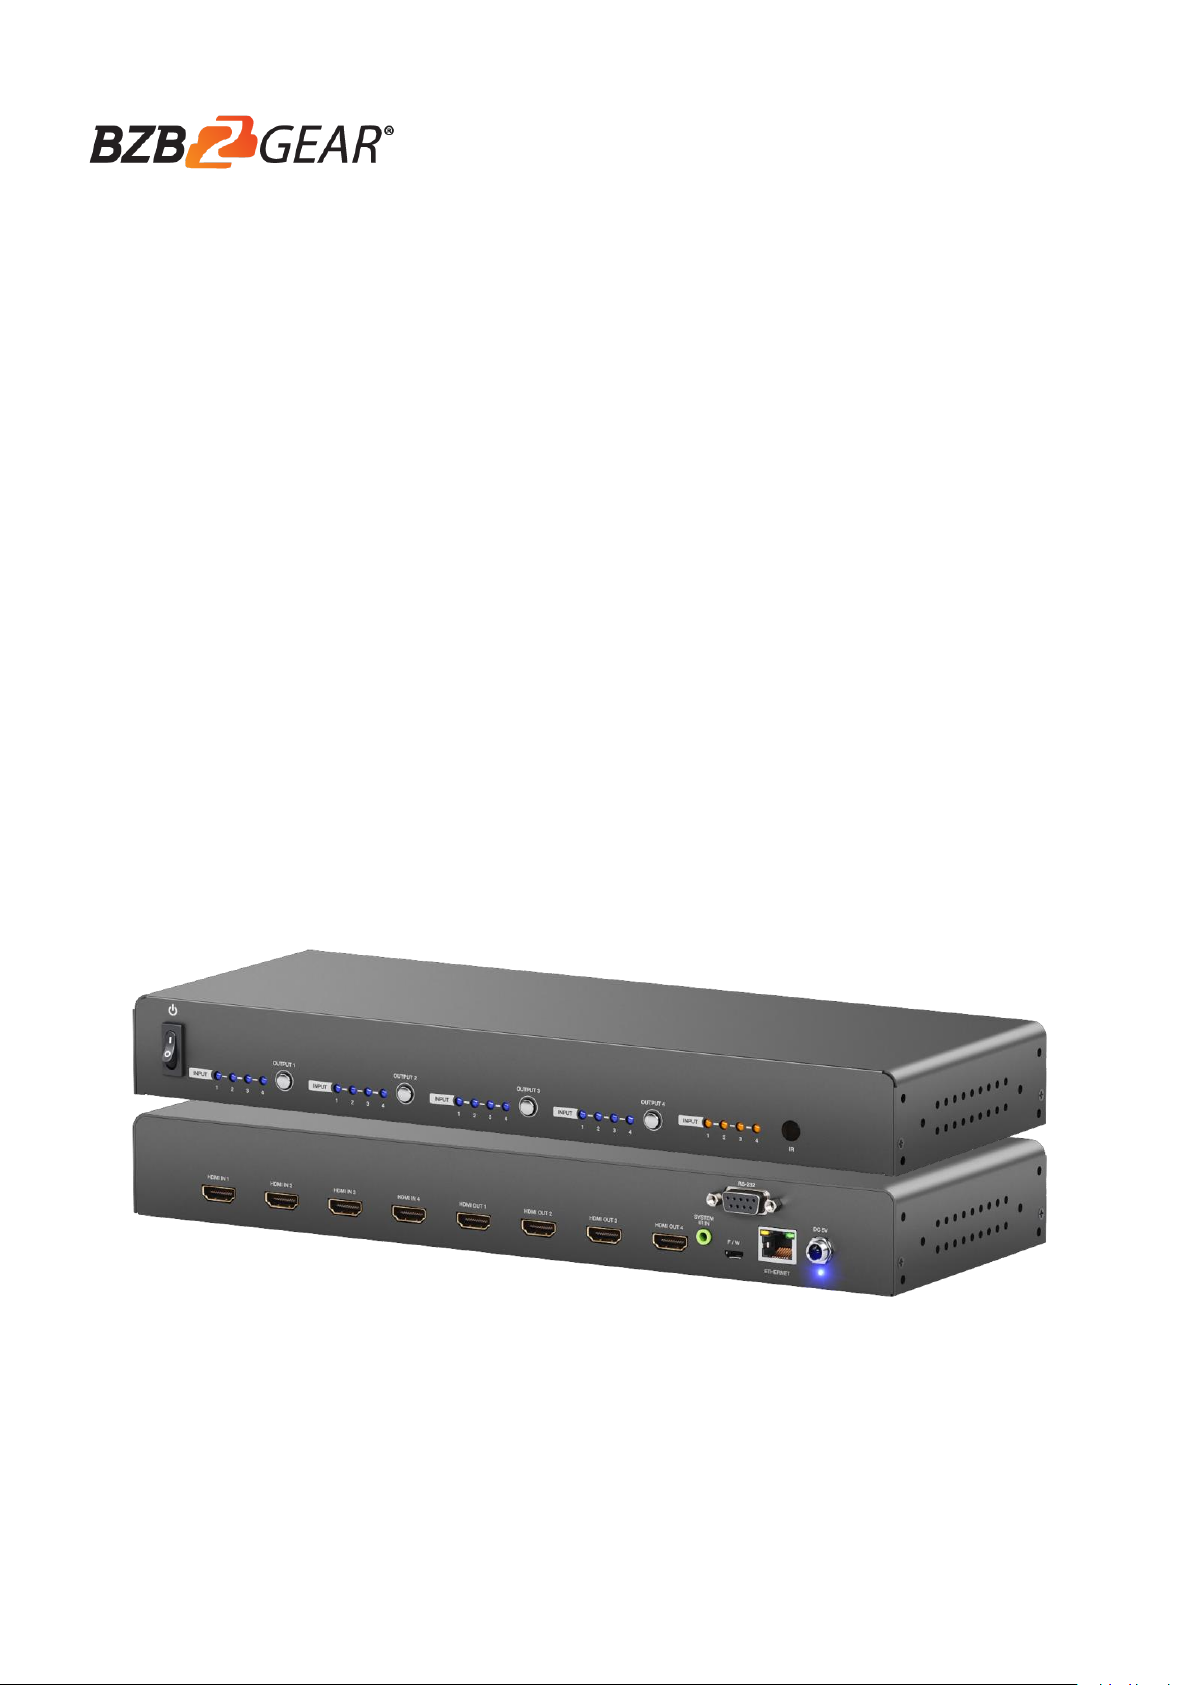
BG-UHD-44M
4X4 HDMI 2.0a Matrix
User Manual
Page 2

TABLE OF CONTENTS
INTRODUCTION ......................................................................................................................... 1
FEATURES ................................................................................................................................. 1
SPECIFICATIONS ...................................................................................................................... 2
PACKAGE CONTENTS .............................................................................................................. 3
PANEL DESCRIPTIONS ............................................................................................................ 3
CONNECTION DIAGRAM .......................................................................................................... 4
HARDWARE INSTALLATION .................................................................................................... 4
OPERATION APPROACH.......................................................................................................... 5
EDID LEARNING ...................................................................................................................... 20
FAQ ........................................................................................................................................... 21
WARRANTY .............................................................................................................................. 22
SECOND YEAR ASSURANCE…..…..…..…..…..…..…..…..…..…..…..…..…..…..…..…....23
MISSION STATEMENT…..…..…..…..…..…..…..…..…..…..…..…..…..…..…..…..…..……24
Page 3

-1-
INTRODUCTION
NOT supports
(1) Resolution downscaling from 4K2K@60 4:2:2 to 1080P
(2) Frame rate conversion
(3) 4K2K@60 4:2:2 to 4K2K@60 4:2:0
1. HDR = High Dynamic Range.
2. The video bandwidth of 4K2K@60 4:2:0 10bits (HDR) is 384 MHz, and the 4K2K@60 4:4:4
8bits is 594MHz.
○
!
*
The BG-UHD-44M HDMI 2.0a Matrix provides the most flexible and cost-effective solution in the
market to route high definition video sources plus multi-channel (up to 7.1-channel) digital audio
from any of the four HDMI sources to the remote displays at the same time. BG-UHD-44M18G supports
HDR and the true 4K2K video! Besides, BG-UHD-44M18G supports auto downscale from 4K2K to
1080P. With this benefit function, the matrix device compatibility will be better.
With the upmost HDR/4K2K@60 4:4:4 8bits and high definition audio support, BG-UHD-44M18G is
well suited for use in home theater, conference room presentation systems, or other similar
setting or application.
FEATURES
HDMI2.0a compliant
Supports 4K2K@60 4:4:4 8bits
Supports HDR1, which is 4K2K@60 4:2:0 10bits2
HDCP 2.2 and 1.4 compliant
Wide frequency range: 25MHz~600MHz
Video bandwidth: 18Gbps
Supports resolution downscaling from 4K2K to 1080P*
Supports default EDID and EDID learning from display
Supports xvYCC, x.v.Color & Deep Color
Allows any source to be displayed on multiple displays at the same time
Allows any HDMI display to view any HDMI source at any time
Micro-USB firmware update for expanding compatibility
Supports Dolby Digital, DTS-HD and Dolby TrueHD audio
The matrix switcher can switch every output channels from any HDMI inputs by Push button, IR
remote control, RS-232, IP control, cloud & echo control.
Easy installation with rack-mounting
Fast response time – 6~8 seconds for channel switch
BBG-UHD-44M18G can bypass 4K HDR data content, but can NOT process it and make HDR
content 100% fit into 1080p
Page 4

-2-
SPECIFICATIONS
Model Name
Technical
Role of usage
True 4x4 matrix
HDMI compliance
HDMI 2.0a
HDCP compliance
HDCP 2.2 / 1.4
Video bandwidth
Single-link 600MHz [18Gbps]
Video support
HDR 4K2K@60(4:2:0 10bits) / 4K2K@60 (4:4:4 8bits)
Audio support
DTS-HD Master Audio, Dolby TrueHD Dolby Digital,
DTS, DVD-Audio, LPCM, SACD, MPCM
ESD protection
Human body model — ±15kV [air-gap discharge] & ±8kV [contact discharge]
PCB stack-up
6-layer board [impedance control — differential 100Ω; single 50Ω]
Firmware update
Feasible via Micro-USB and RS-232 port
Input
4x HDMI / 1x RS-232 / 1x Ethernet / 1x IR socket for IR receiver
Output
4x HDMI
HDMI Input selection
Push-in button/ IR remote control/ RS-232 control/ IP control/ Cloud control
IR remote control
Electro-optical characteristics: = 25° / Carrier frequency: 38kHz
HDMI connector
Type A [19-pin female]
RJ-45 connector
WE/SS 8P8C(Reverse Mode)
RS-232 connector
DE-9 [9-pin D-sub female]
USB connector
Micro USB
3.5mm connector
IR receiver / IR blaster
Mechanical
Housing
Metal enclosure
Dimensions
[L x W x H]
Model
340 x 123 x 44mm [1'1" x 4.8" x 1.7"]
Package
494 x 225 x 70mm [1'6" x 8.9" x 2.8"]
Carton
510 x 380 x 252mm [1'7" x 1'2" x 10"]
Weight
Model
1181g [2.6 lbs]
Package
1837g[4 lbs]
Fixedness
Wall-mounting case
Power supply
5V 4A DC
Power consumption
12 Watt [max]
Operation temperature
0~40°C [32~104°F]
Storage temperature
-20~60°C [-4~140°F]
Relative humidity
20~90% RH [no condensation]
BG-UHD-44M18G
Page 5
-3-
PACKAGE CONTENTS
Additional IR remote controllers and IR blasters can be purchased as optional accessories to control
the HDMI sources located separately.
○
!
*
1x Rack-mounting ear set
1x Installation software CD
1x User Manual
1x BG-UHD-44M18G
1x IR receiver
1x DC 5V 4A
1x IR Remote control*
PANEL DESCRIPTIONS
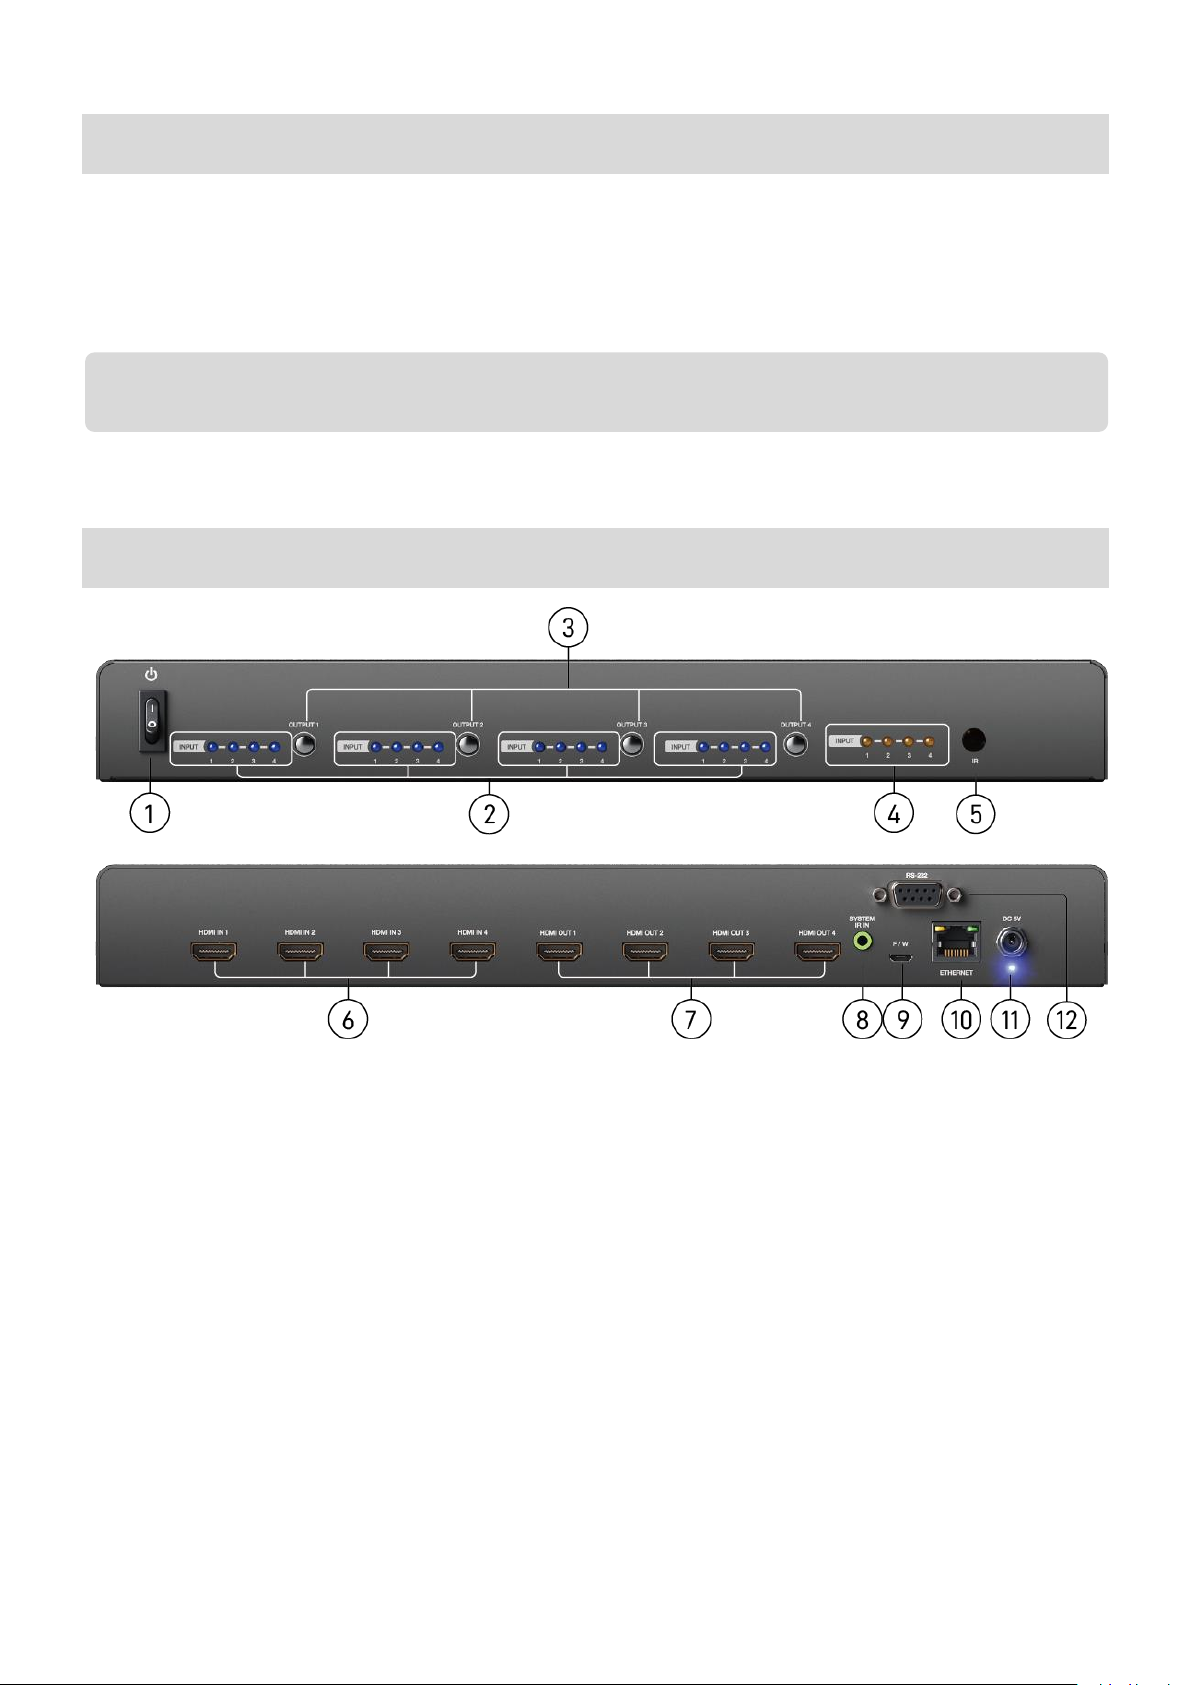
1. Power Switch
2. Selected Source Status LED: When users use port channel push button, the indicator LED will show
the selected source.
3. Port 1-4 Channel Push Button: Select input channel
4. Source Status: Input source detection LED
5. IR SENSOR: IR sensor for receiving the IR commands from IR remote
6. INPUT 1-4: HDMI inputs
7. OUTPUT 1-4: HDMI outputs
8. System IR Receiver: Ext. IR receiver
9. Micro USB: Micro-USB port for F/W update
10. Ethernet: Ethernet control port
11. +5V DC: 5V DC power jack
Page 6
-4-
12. RS-232: RS-232 control port (for software control and firmware update)
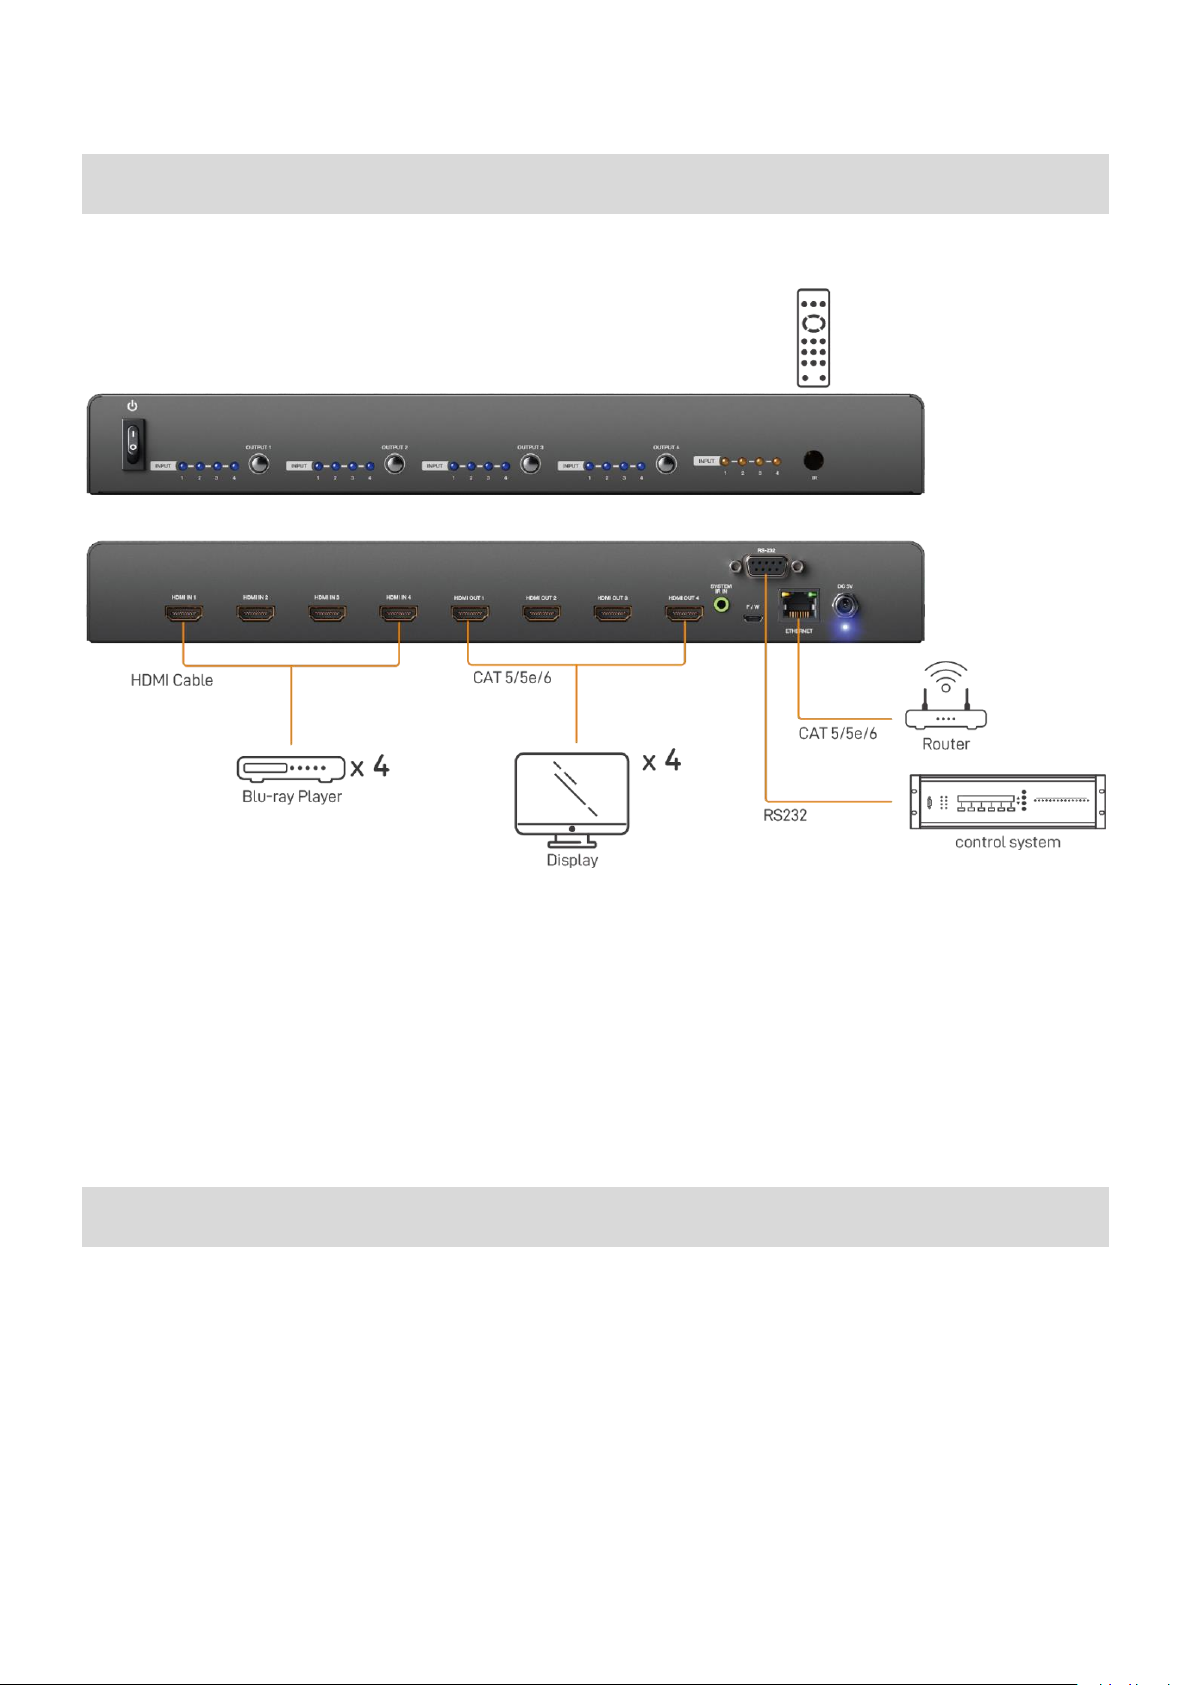
CONNECTION DIAGRAM
HARDWARE INSTALLATION
BG-UHD-44M18G as master
1. Connect all sources to HDMI Inputs on the 4x4 HDMI Matrix BG-
UHD-44M18G.
2. Connect all displays to HDMI Outputs on the 4x4 HDMI Matrix BG-
UHD-44M18G.
3. Connect the +5V 4A DC power supply to the 4x4 HDMI Matrix BG-
UHD-44M18G.
Page 7
-5-
OPERATION APPROACH
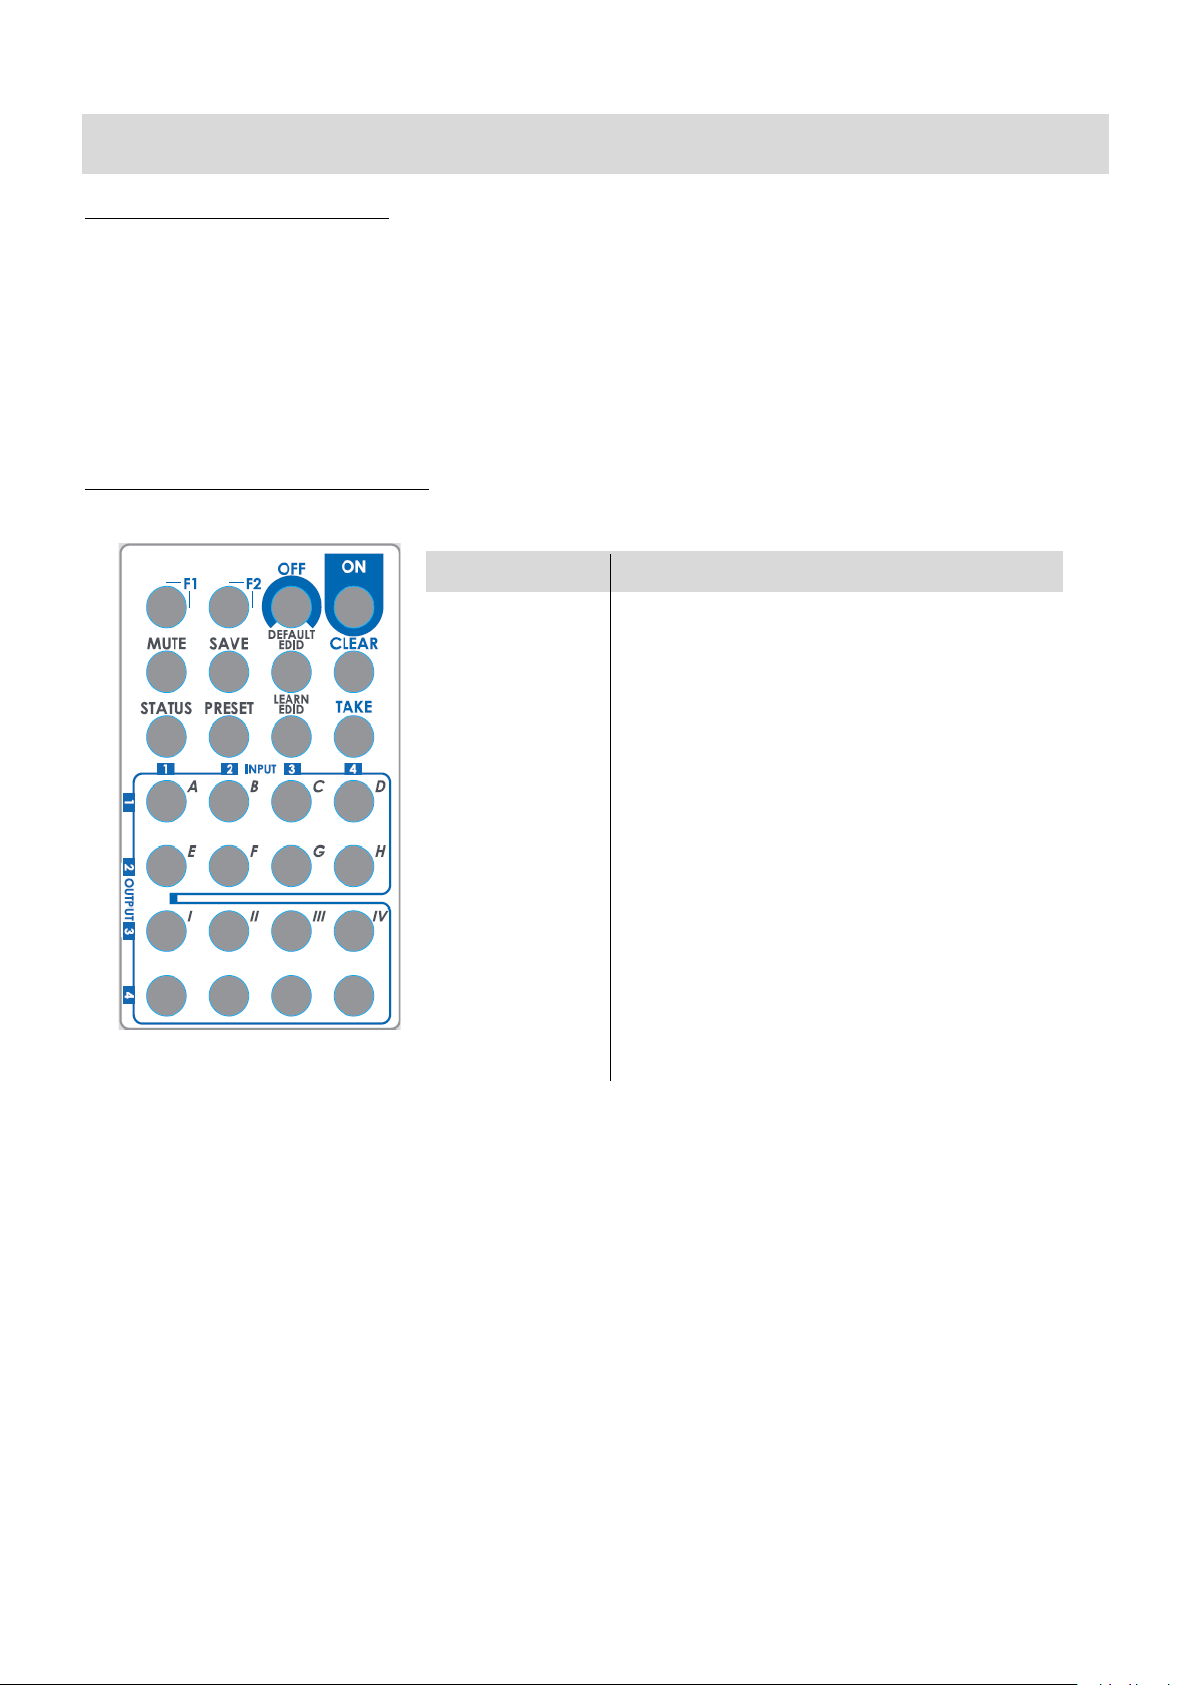
Button
Function
OFF
Standby mode
ON
Power on the matrix switcher
MUTE
Turn off output’s video and audio
STATUS
Preset output status
SAVE
Save current mapping mode
PRESET
Preset mapping mode
DEFAULT EDID
Begin default EDID selection
LEARN EDID
Begin EDID learning from one output
CLEAR
Clear the previous IR operation procedure
TAKE
Trigger the previous setting
F1
Reserved
F2
Reserved
Method A: Push-in Button
IN/OUT MAP
(1) Use Port 1-4 Channel Push Button to select the source
(2) Input1~4 can be selected in order
Method B: IR Remote Control
Page 8
-6-
1. IN/OUT Switch
Operation
Procedure
IN/OUT Switch
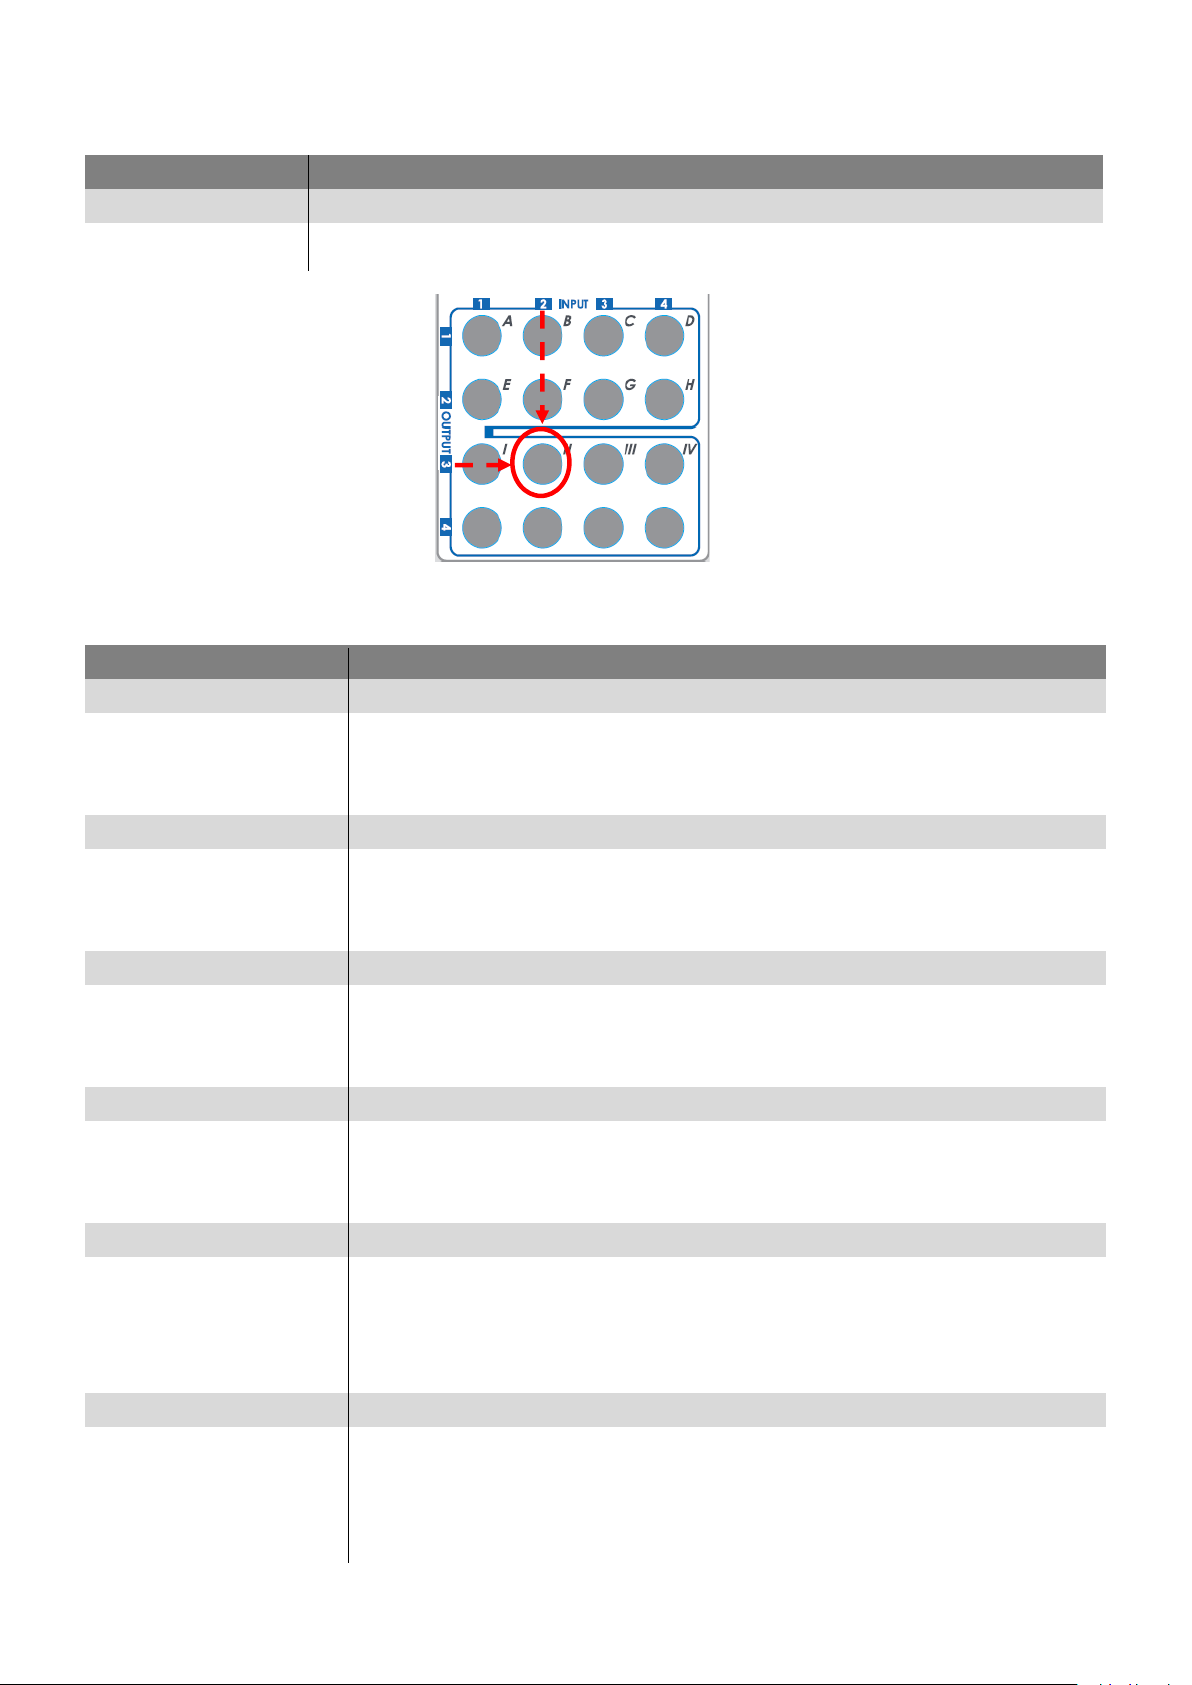
Push the button on the checkerboard to select input & output port
Ex: Input 2
To Output 3
Push the red circle button as below to select input 2 to output 3
2. Example of function key
Operation
Procedure
Mute Output
Mute + A~D(Output 1~4) + Take
Ex: Mute Output 3
1.Press “MUTE” button
2.Press number key “C” to select Output 3
3.Press “TAKE” button
Output Status
Status + A~D(Output 1~4) + Clear
Ex: Output 4
(Input 2)
1.Press “STATUS” button
2.Press number key “D” to select Output 4
3.Press “CLEAR” button
Save Current Mapping
Save + A~H(1-8 storage site) + Take
Ex: Save current
mapping to 5
1.Press “SAVE” button
2.Press number key “E” to select the storage site 5
3.Press “TAKE” button
Preset Mapping
Preset + A~H(1-8 storage site) + Take
Ex: Preset saved
mapping from 5
1.Press “PRESET” button
2.Press number key “E” to select the storage site 5
3.Press “TAKE” button
Learn default EDID
Default EDID + A~H(1-8 default EDID) + I~IV(input 1~4) + Take
Ex: Default EDID 2
Input 3
1.Press “DEFAULT EDID” button
2.Press number key “B” to select default EDID 2
3.Press number key “III” to select Input 3
4.Press “TAKE” button
Learn Output EDID
Learn + A~B(Output 1~2) +Ⅰ~Ⅳ(input 1~4) + Take
Ex: Learn Output 4
Input 3
1.Press “LEARN” button
2.Press number key “D” to select Output 4
3. Press number key “III” to select Input 3
4.Press “TAKE” button
Page 9
-7-
Method C: Software Control through RS-232 port
1. System Requirement
(1) OS Information: MS Win XP/7/8.1/10
(2) Baud rates: 115200
(3) Software size: 1 MB
(4) Minimum RAM requirement: 256 MB
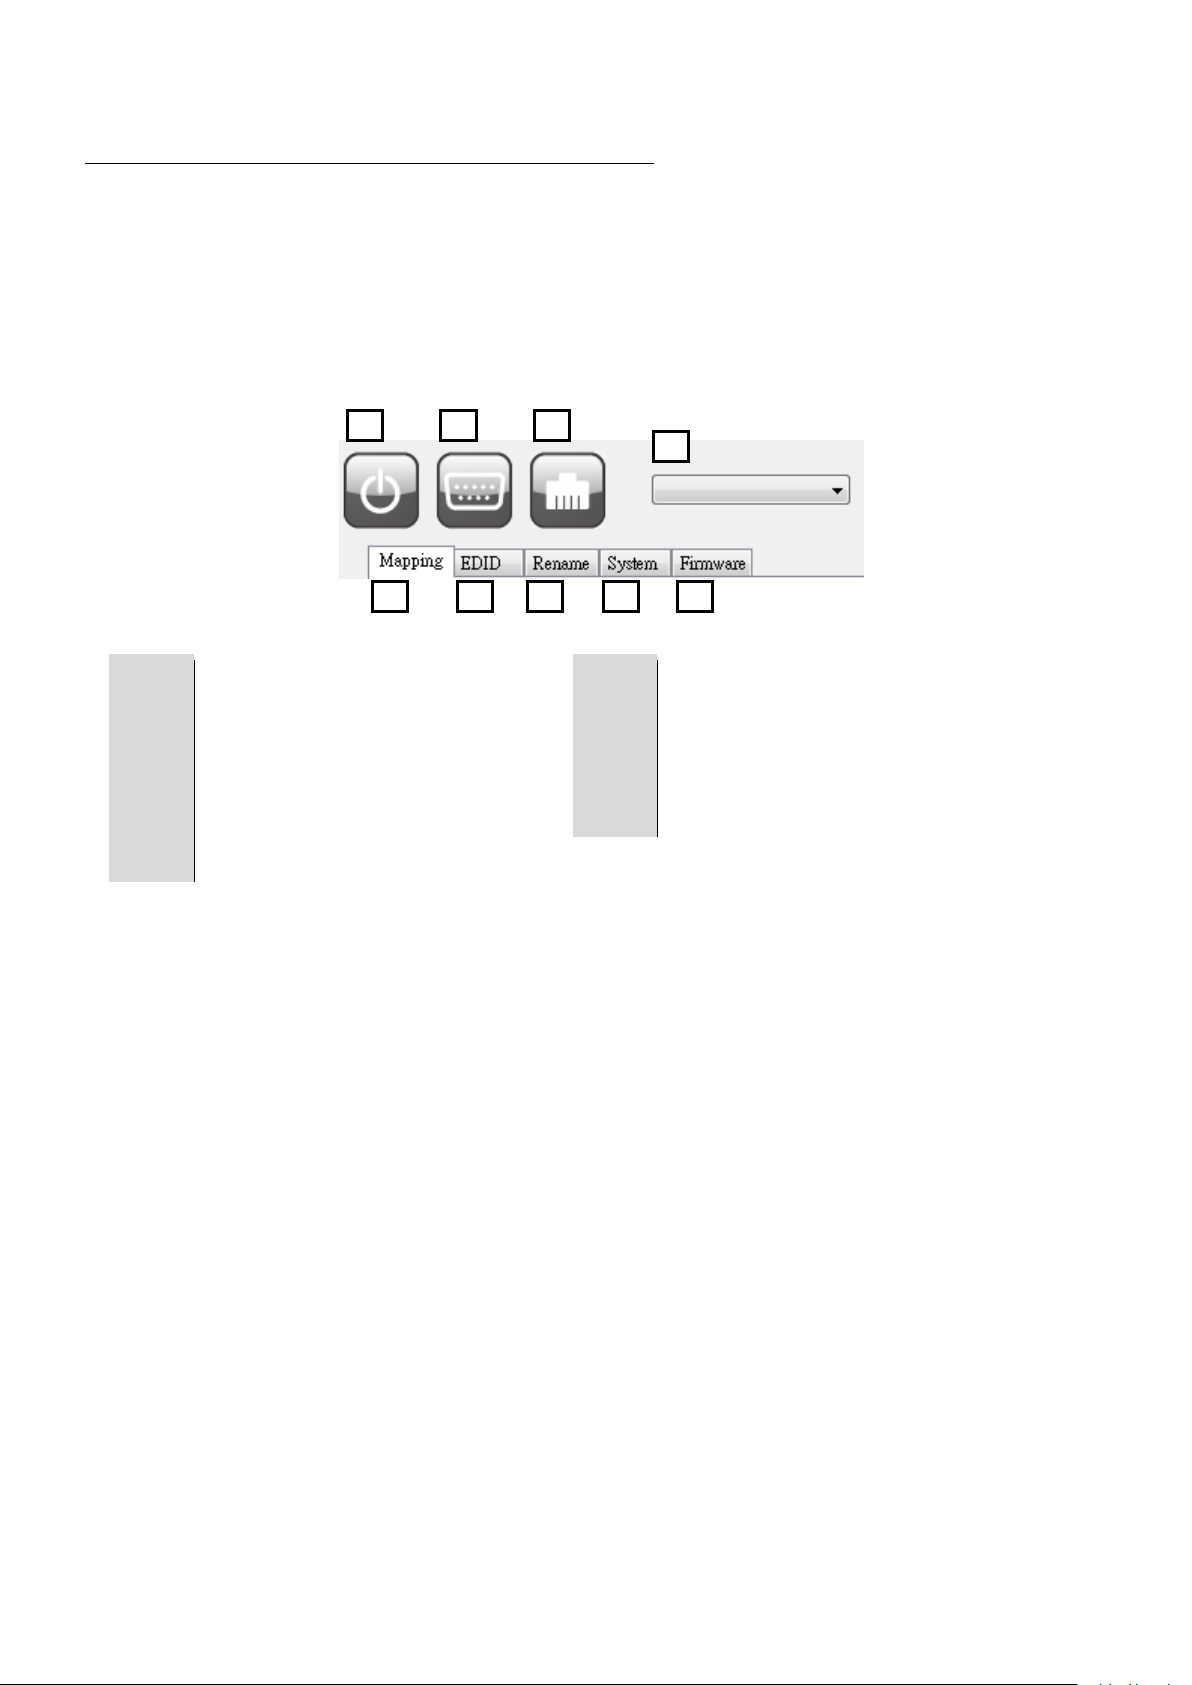
1
Power ON/ Standby mode
6
EDID Tab
2
Control SW via RS-232
7
Rename I/O Tab
3
Control SW via Network
8
System Tab
4
COM Port Selection
9
Firmware Update Tab
5
I/O Mapping Tab
1
2
5 6 7 8 9
4
3
Page 10
-8-
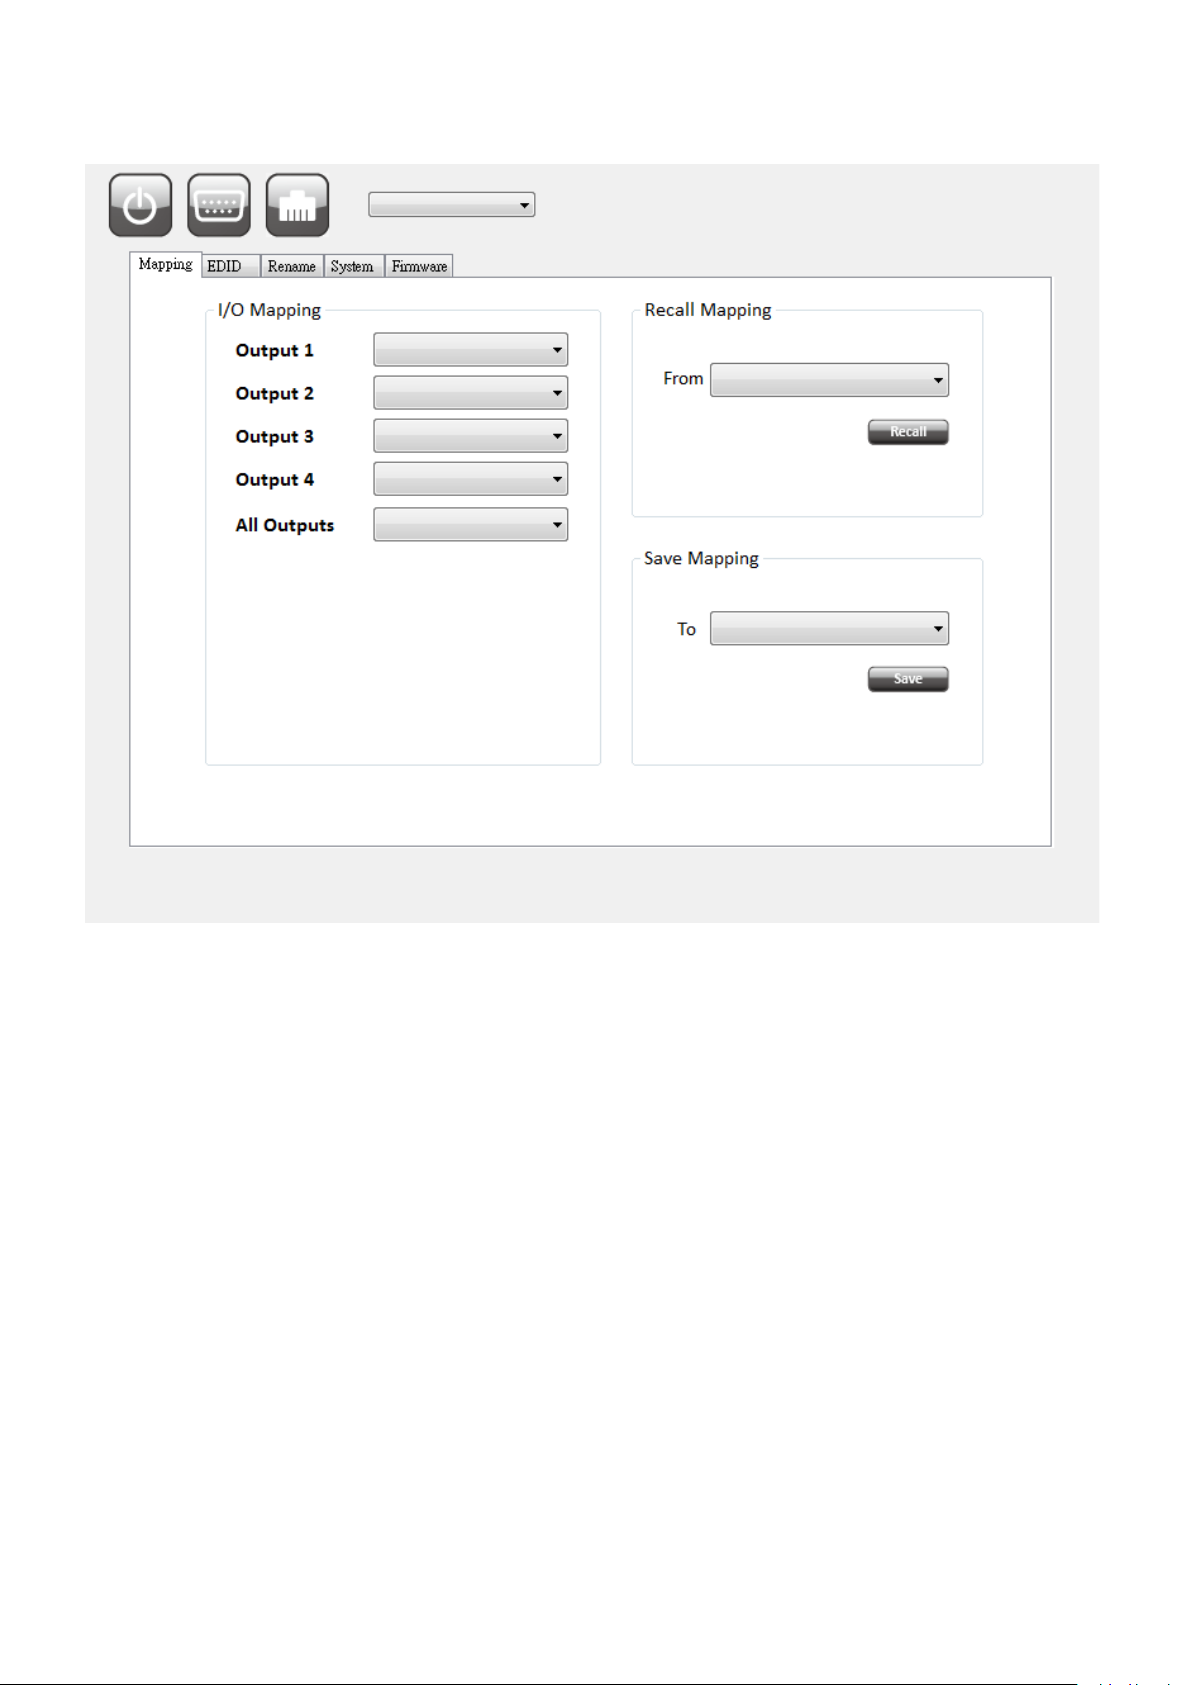
1. I/O Mapping Tab
➢ I/O Mapping:
Switch the input for each output
➢ Recall Mapping:
Select the stored Mapping(1-8)
Click “Recall” button to recall previous mapping which are saved
➢ Save Mapping:
Select Mapping(1-8)
Click “Save” button to save current mapping
Page 11
-9-
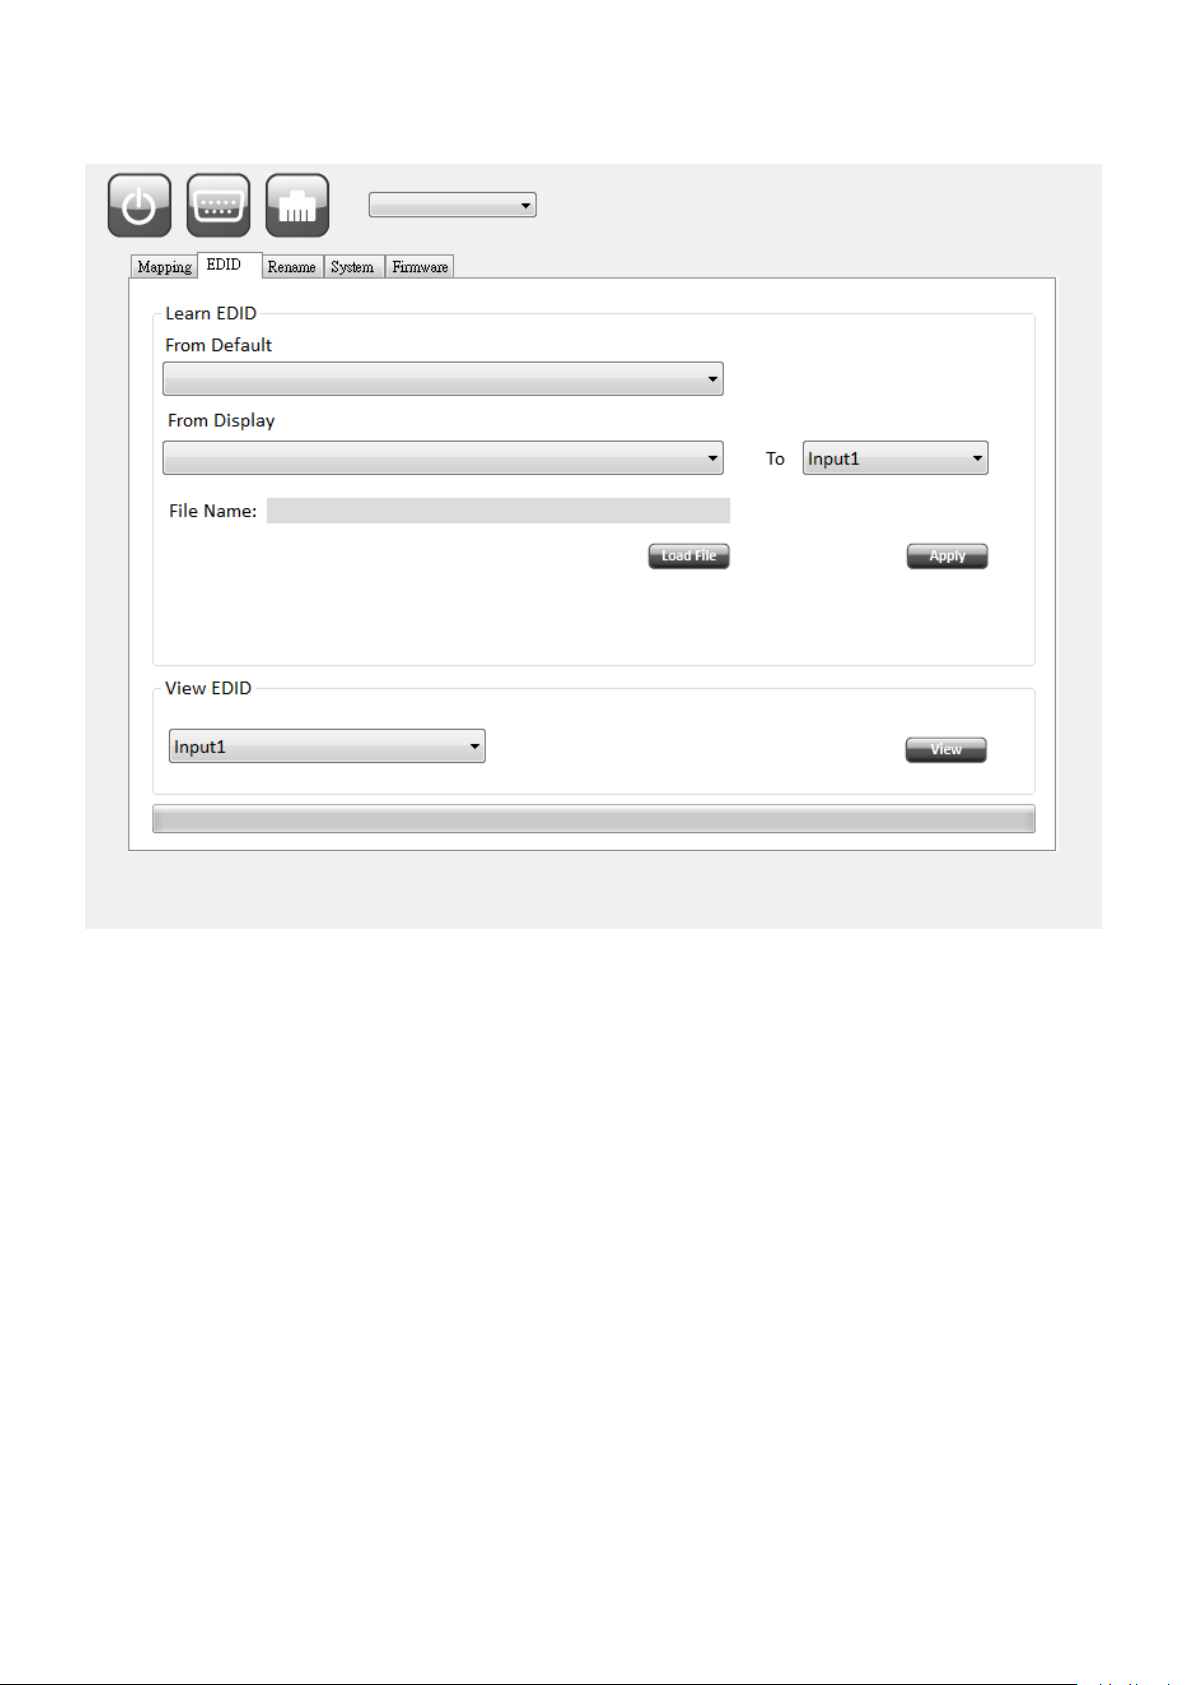
2. EDID Tab
➢ Learn EDID from Default to Input
Select Default EDID(1-17 Default EDID)
Select designated Input
Click “Apply” button to learn from default EDID
➢ Learn EDID from Display to Input
Select output
Select designated Input
Click “Apply” button to learn from display EDID
➢ Load EDID File to Input
Click “Load File” button to select the EDID file from computer
Select designated Input
Click “Apply” button to load EDID File and learn to input
Page 12
-10-
➢ View EDID information
Select Input ,HDMI output or EDID file
Click “View” button to read and analyze the EDID information
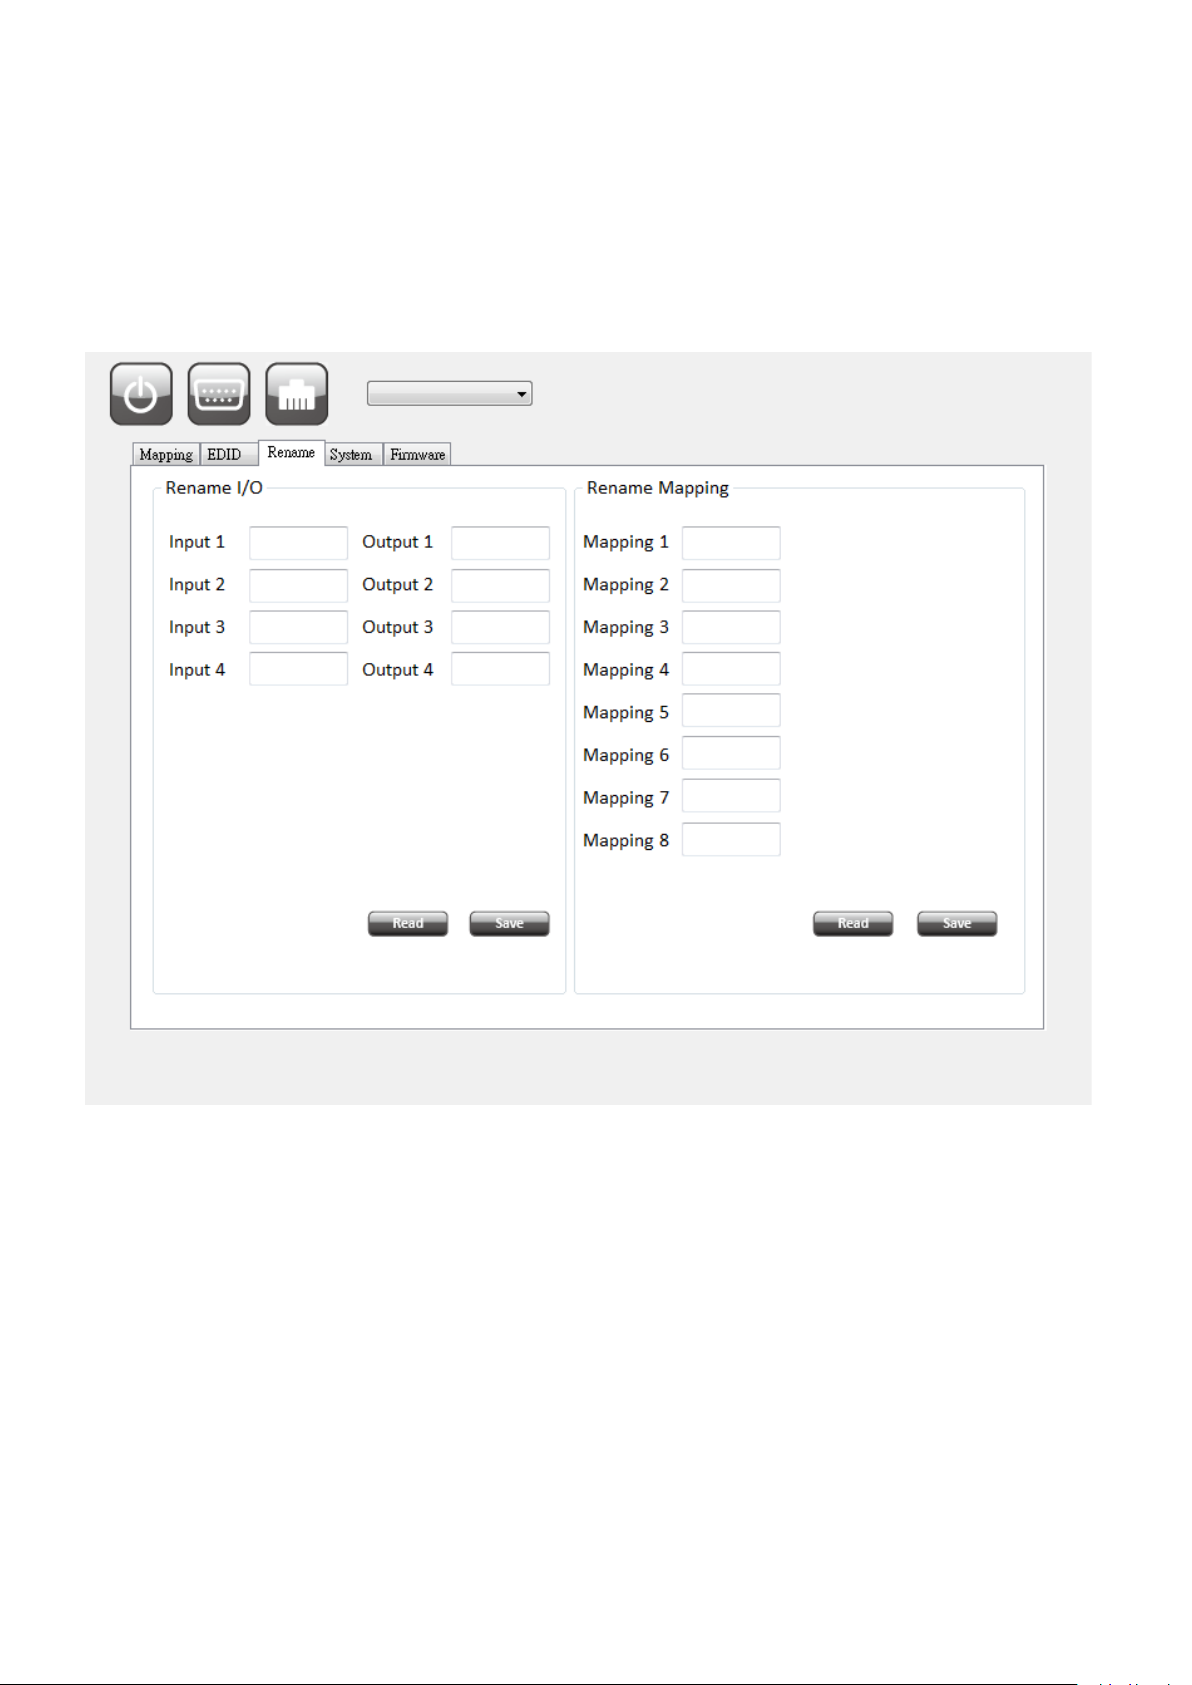
3. Rename I/O Tab
➢ Rename I/O:
Rename the Inputs
Rename the Outputs
➢ Rename Mapping:
Rename the Mappings
Page 13
-11-
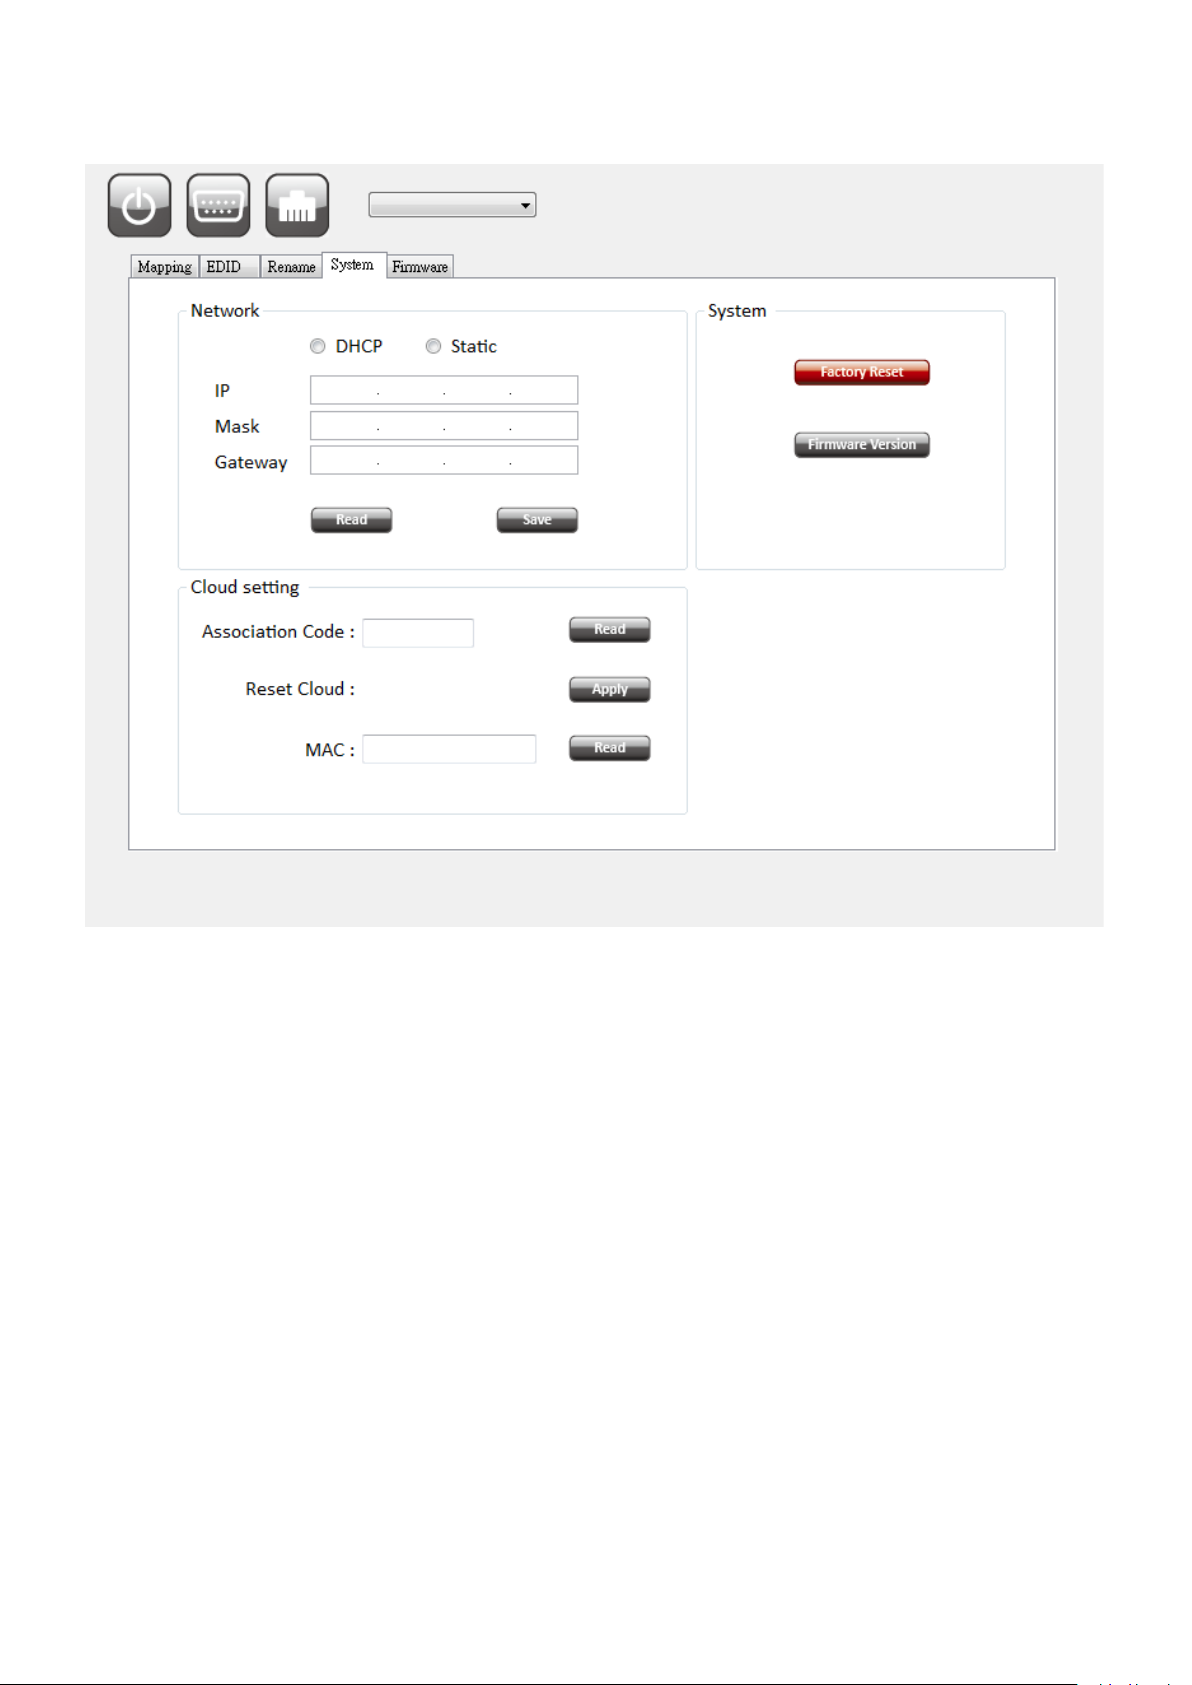
4. System Tab
➢ Network-DHCP mode
Select DHCP and click “Read” button to automatically get the IP address
➢ Network-Static mode
Select Static and then key in the “IP”, “MASK”, “GATEWAY” information. After setting IP address,
please click “Save” button to save IP address Information
➢ “Read” Button *The default IP address is 192.168.1.70
Read the IP address from the device
➢ “Save” Button
Save the IP address which is manually entered
Page 14

-12-
➢ Cloud setting-Association Code
To get an “association code”. The device can use this code to pair with cloud server.
➢ Cloud-Reset Cloud
To reset cloud after a successful pairing
➢ MAC
Read the device’s MAC address information
➢ System-Factory Reset
To do factory default reset
➢ Firmware Version
To get the F/W version information
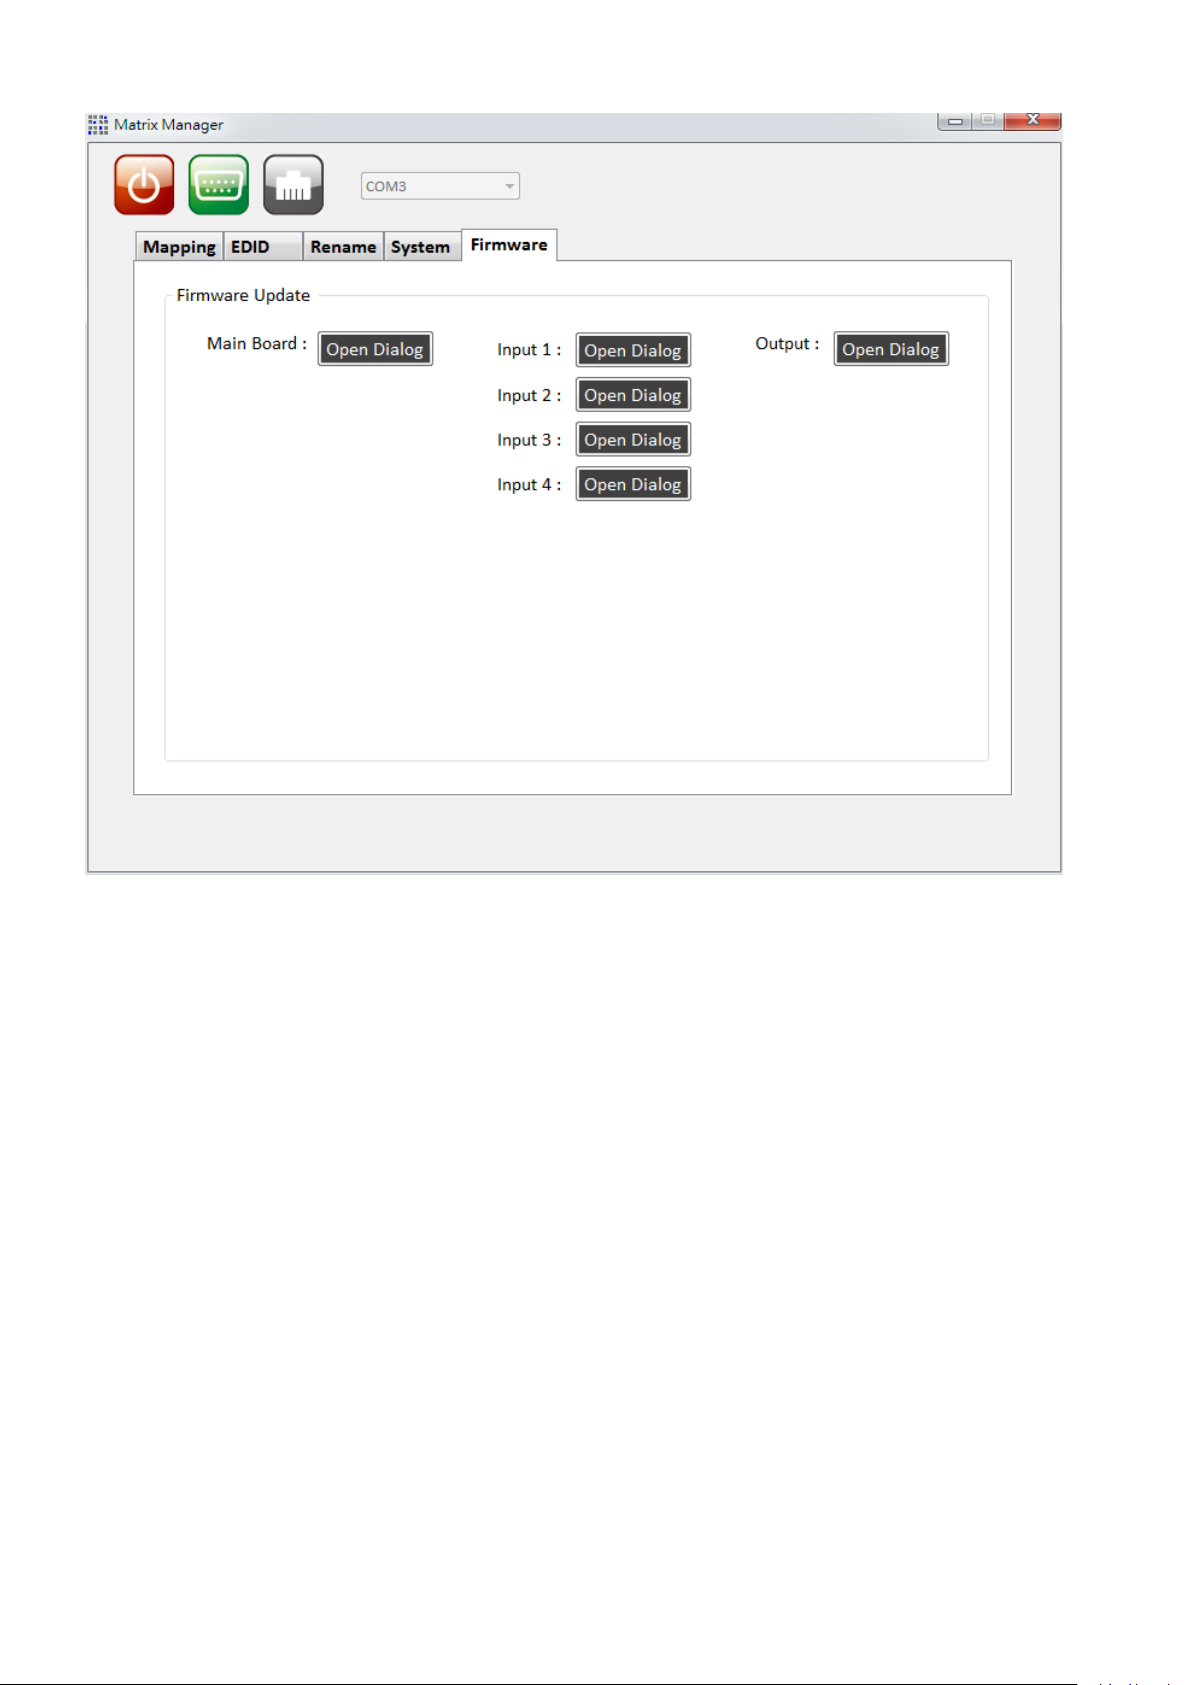
5. Firmware Update Tab
Before you start to update, please make sure you have secured the connection between your computer
COM port and the device.
Page 15
-13-
Page 16
-14-
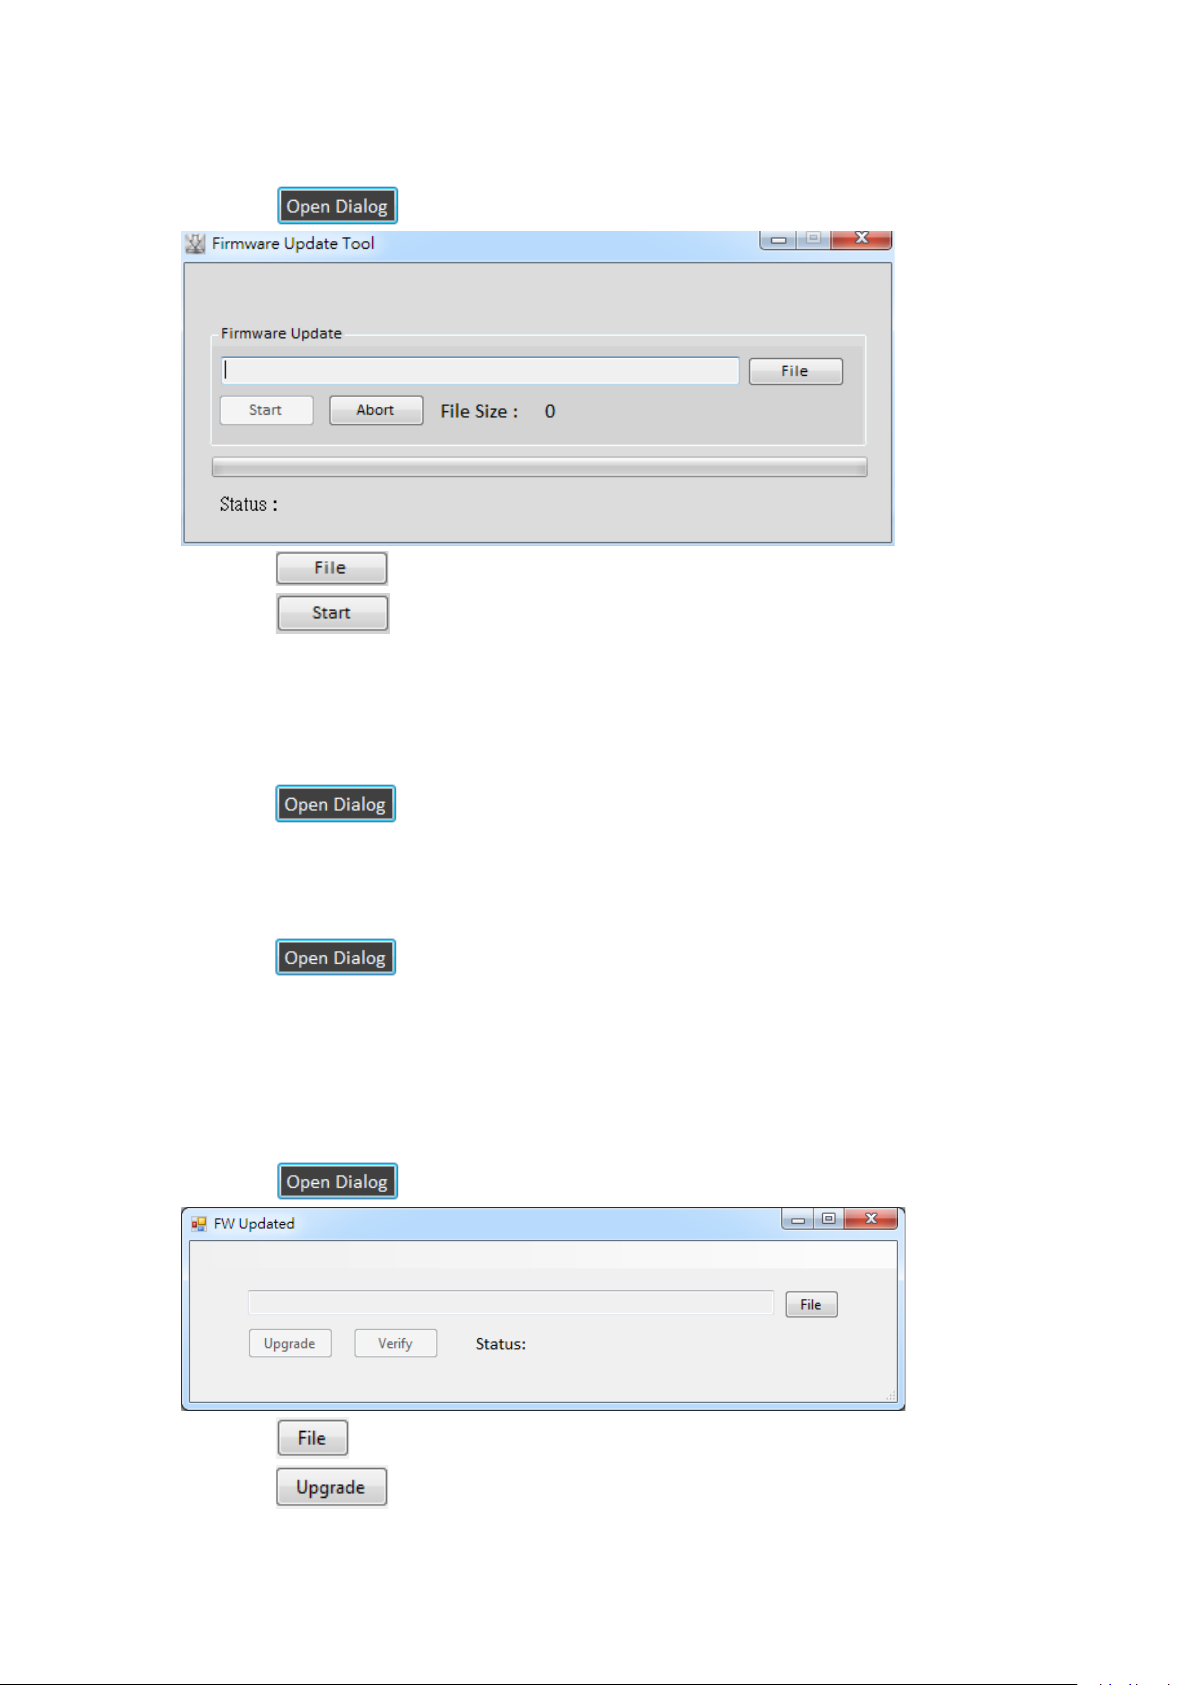
➢ Main Board
Using RS-232 to USB cable connect the device and your PC/laptop.
Click the button to open the Firmware Update Tool window.
Click the button to select the file which you want to write into device.
Click the button and the firmware will start to update.
After updating, please power cycle the device.
➢ Input
Using Micro-USB to USB cable connect the device and your PC/laptop.
Click the button to enter the software page.
Open firmware update software and then device will start to update firmware automatically.
After update process is done, software will show “Success” message and then be closed
automatically.
Click the button to update next input port.
Plug and unplug the Micro-USB cable. Repeat the step 2 ~ step 5, until finishing all the input port
firmware update.
➢ Output
Using RS-232 to USB cable connect the device and your PC/laptop.
Click the button to open the FW Updated window.
Click the button to select the file which you want to write into device.
Click the button and the firmware will start to update.
After updating, please power cycle the device.
Page 17
-15-
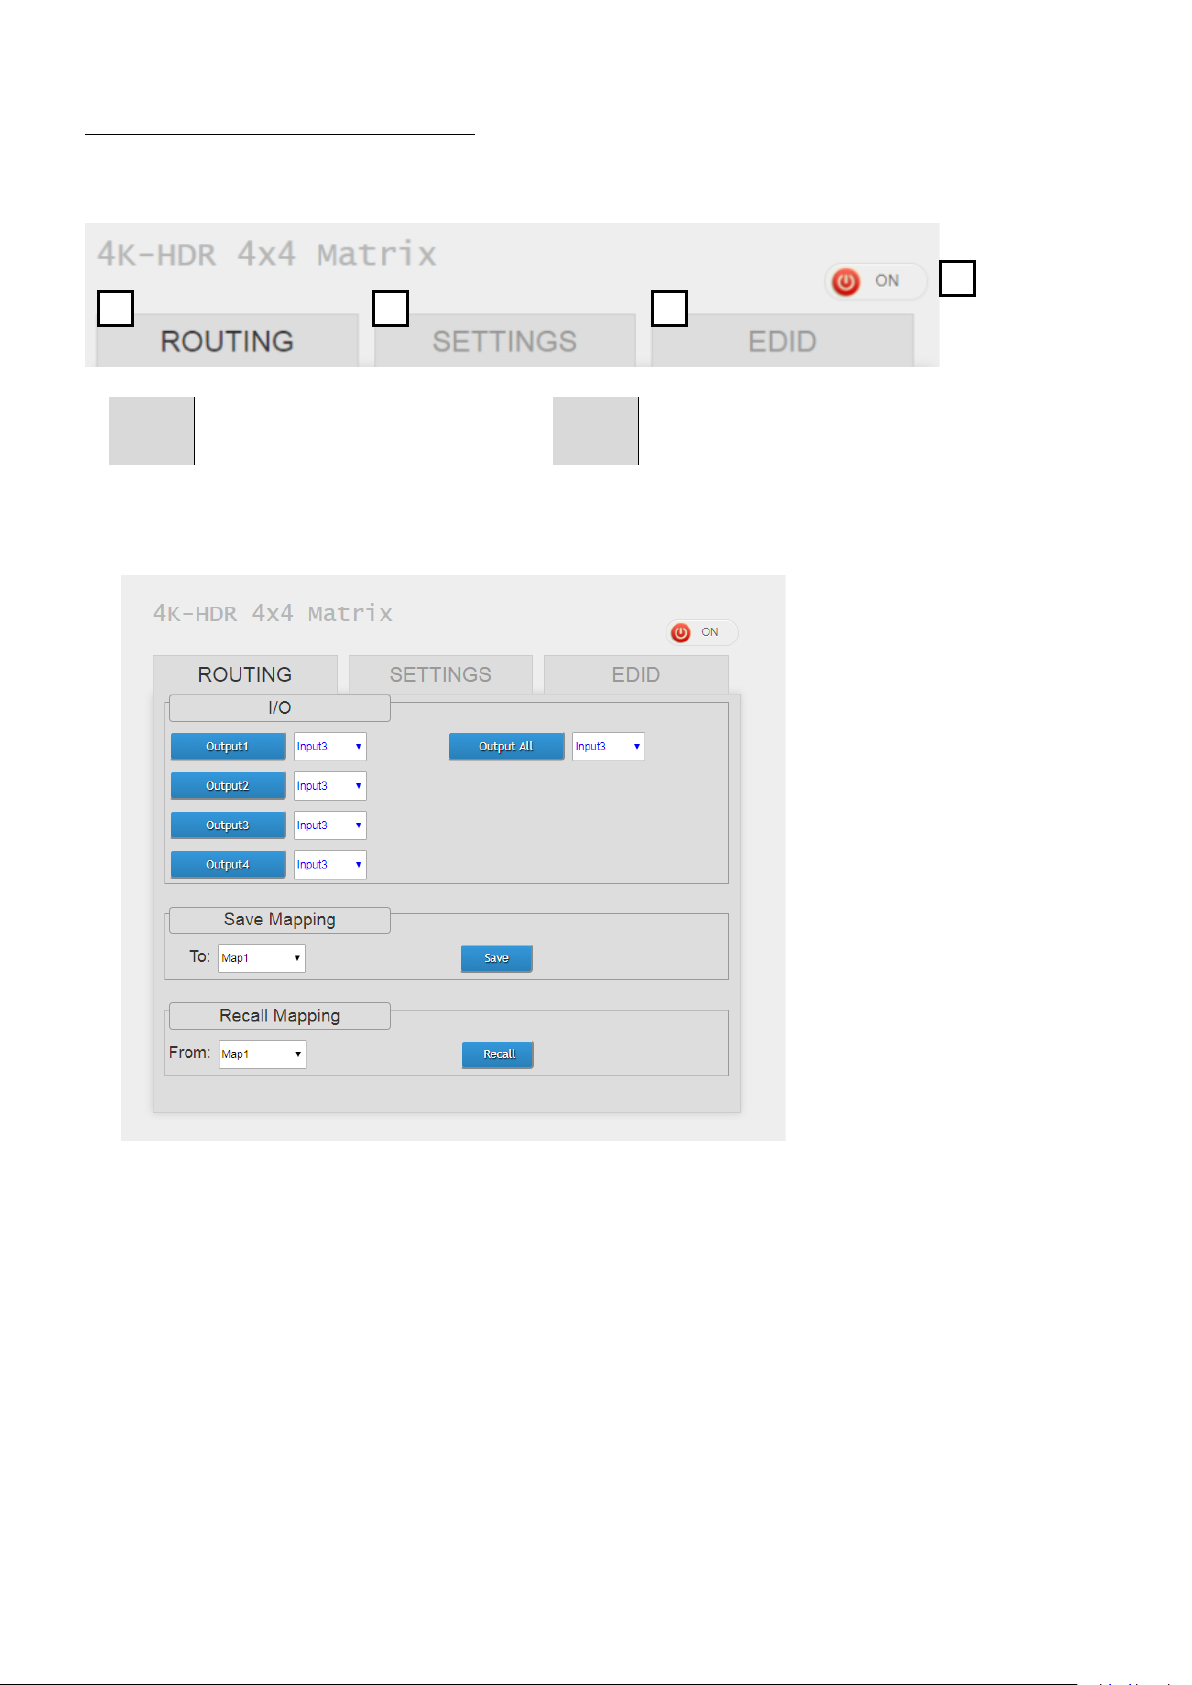
Method D: Web Interface Control
The default IP address: 192.168.1.70
1
I/O Routing Tab
3
EDID Tab
2
Rename I/O, Mapping Tab
4
Power ON/Standby mode
1. I/O Routing Tab
➢ I/O:
Switch the input for each output
➢ Save Mapping
Select Mapping 1~8
Click “Save” button to save current mapping
➢ Recall Mapping
Select the stored Mapping 1~8
4
1
2
3
Page 18
-16-
Click “Recall” button to recall previous saved mapping
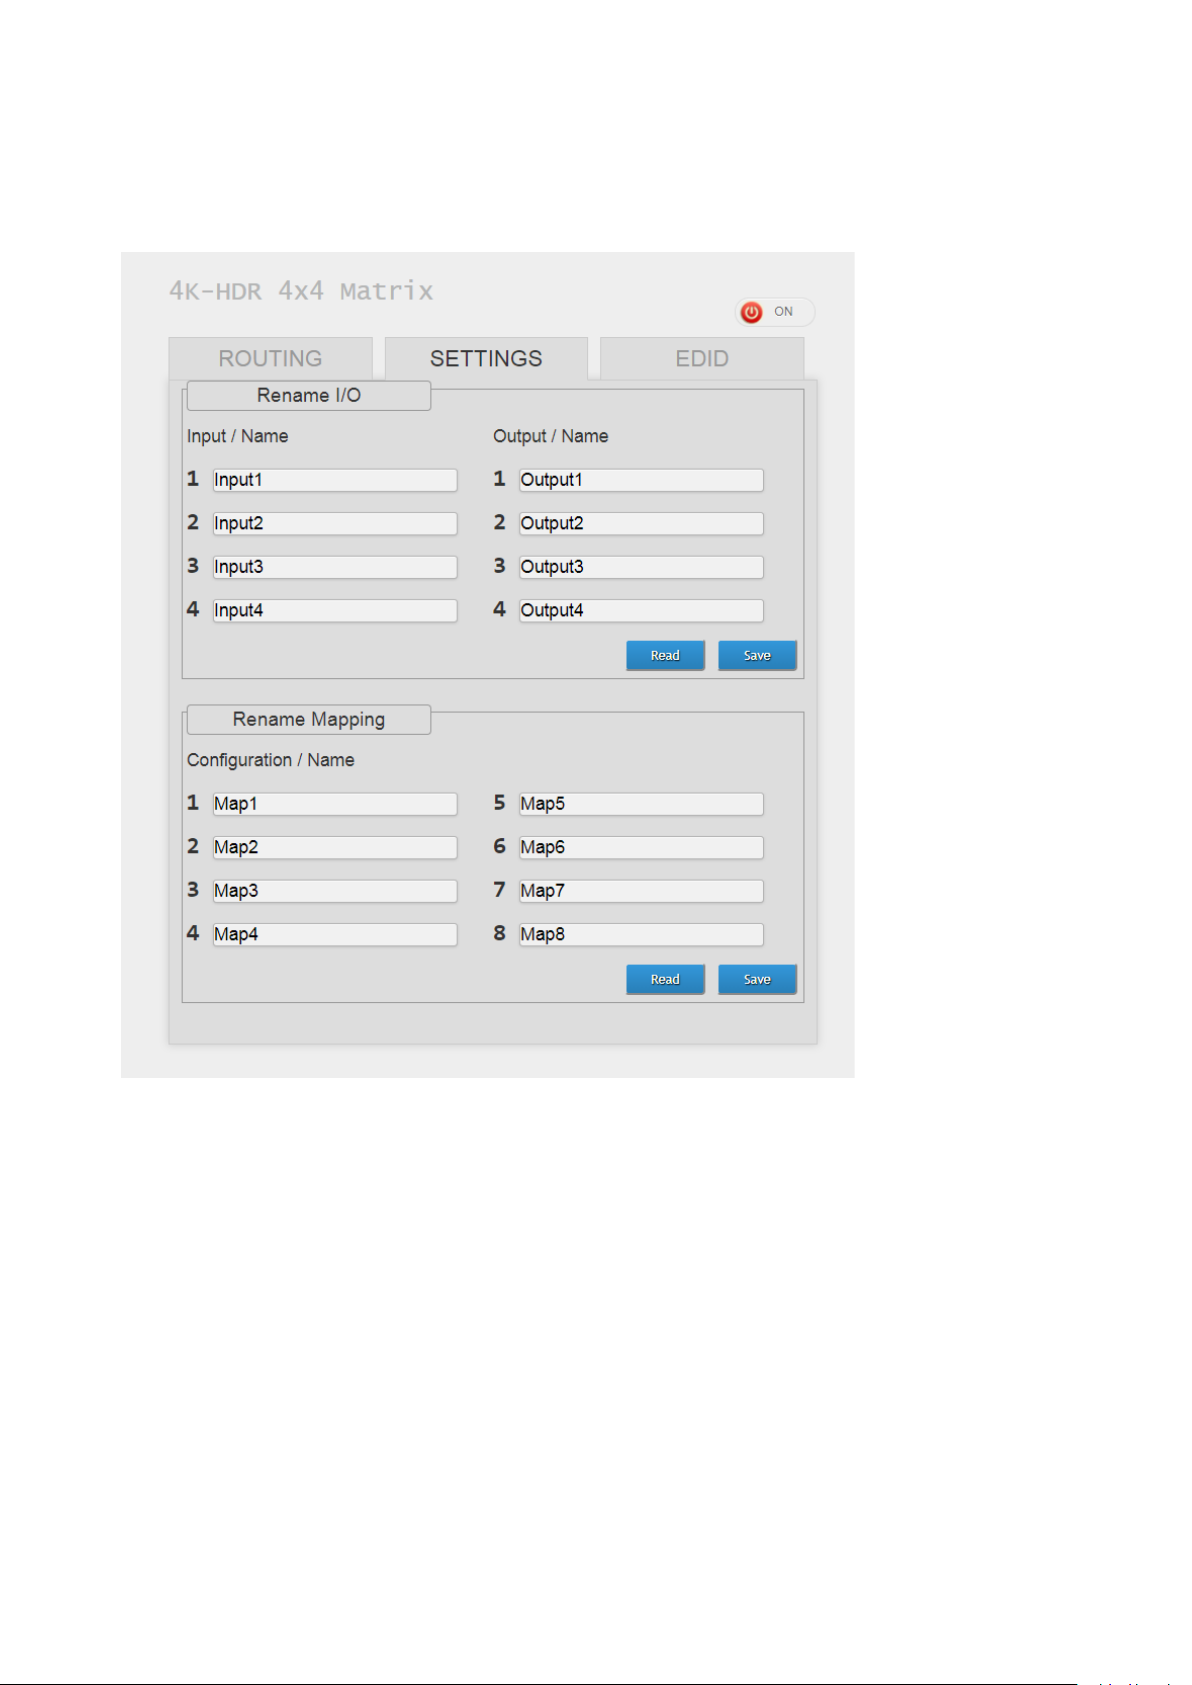
2. Rename I/O, Mapping Tab
➢ Rename I/O:
Rename the Inputs
Rename the Outputs
➢ Rename Mapping:
Rename the Mappings
Page 19
-17-
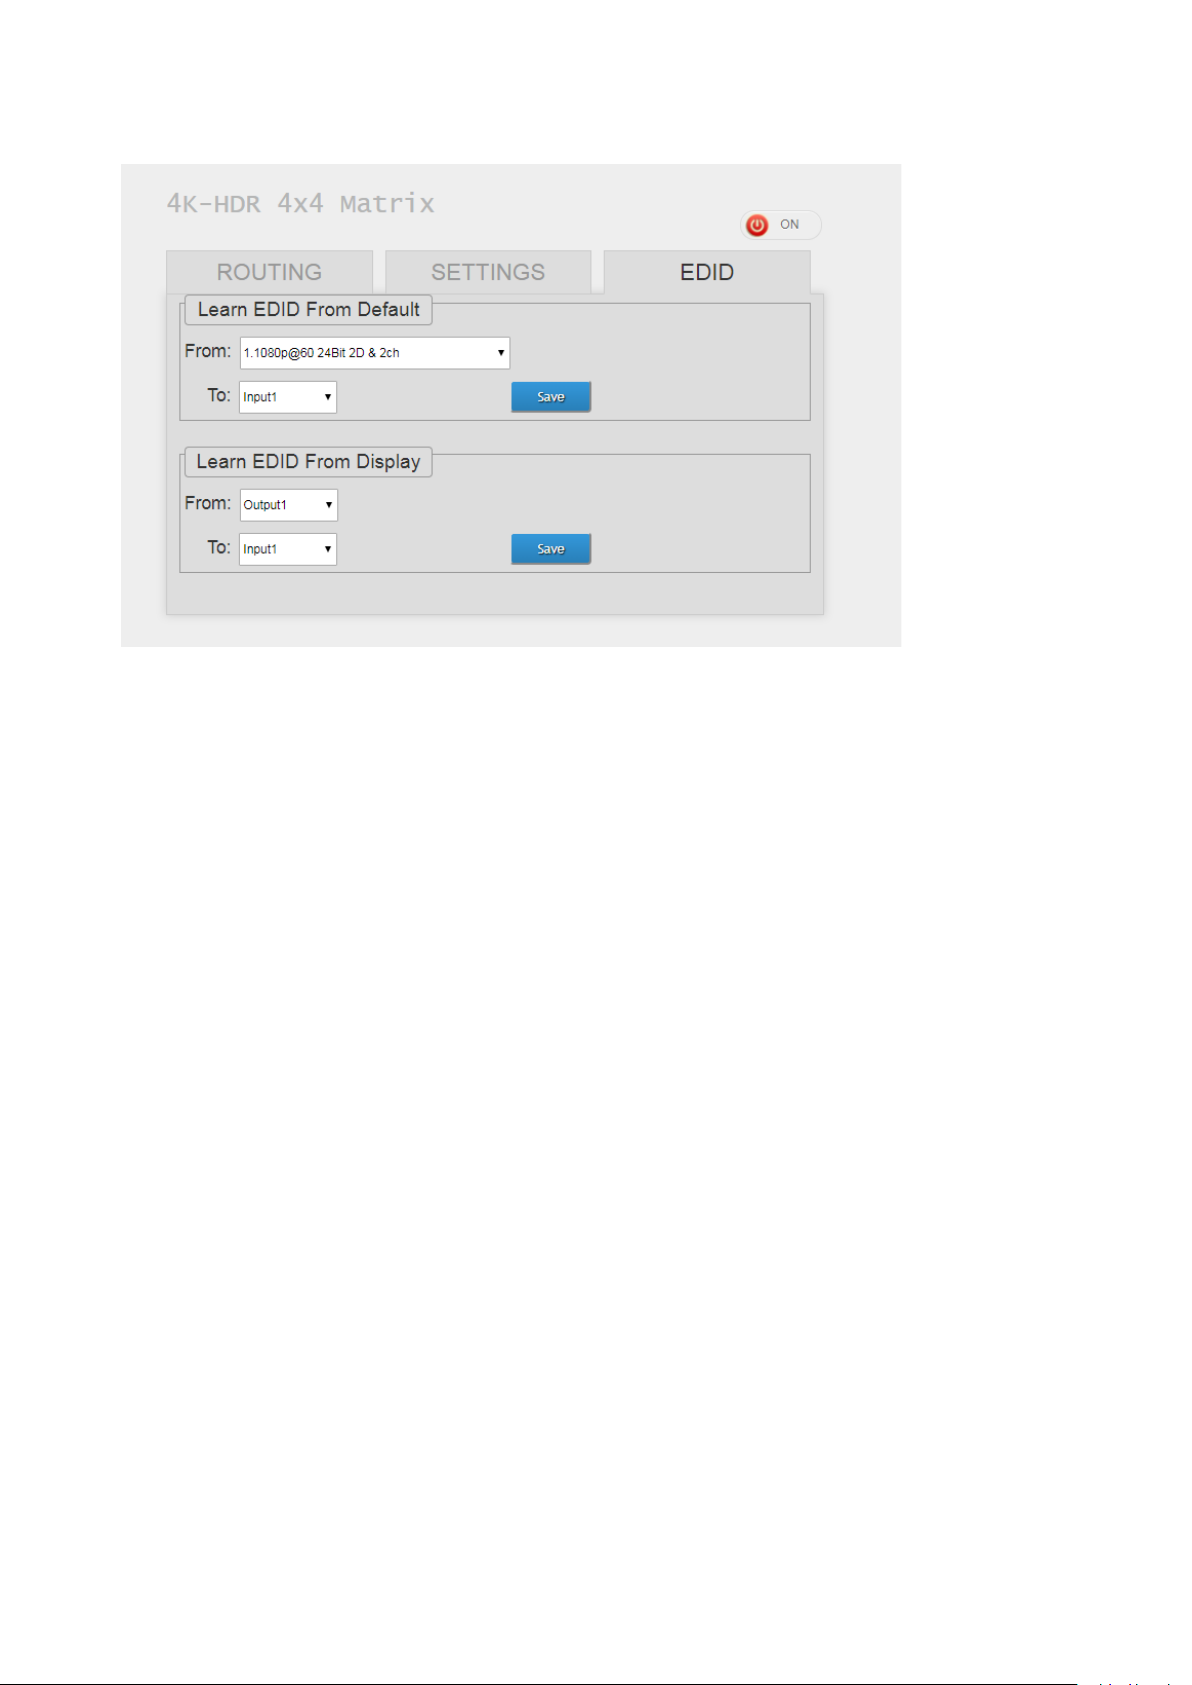
3. EDID Tab
➢ Learn EDID from Default
Select Default EDID (1-17 default EDID)
Select input
Click “Send” button to learn default EDID
➢ Learn EDID from Display
Select output
Select input
Click “Send” button to learn display EDID
4. Power ON / Standby mode
Page 20
-18-
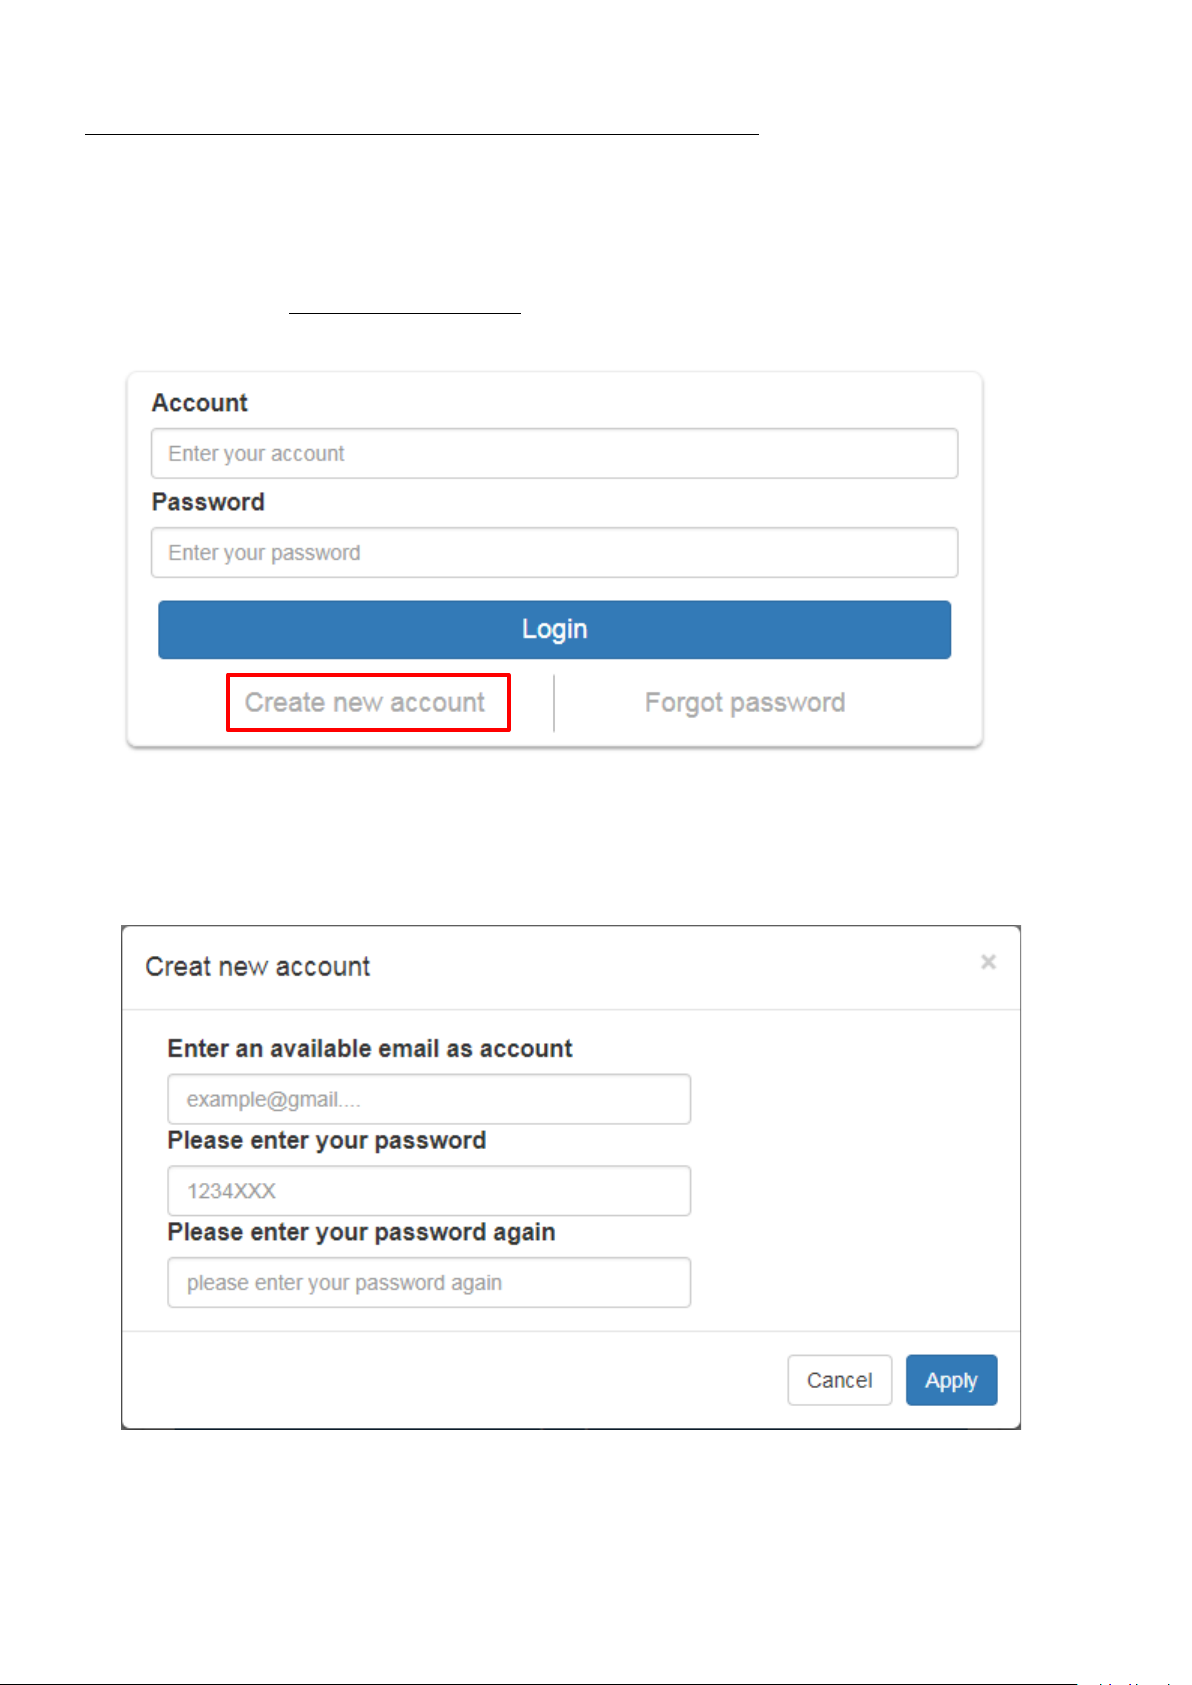
Method E: Cloud Control (Eagleyes) through Ethernet port
Create Account
The first time to use the Eagleyes service, please create a new account.
1. Access Eagleyes (http://www.eagleyes.io) and click “Create new account”.
2. The Registration page will pop up and please fill in your email and password information to create
your private account.
Page 21
-19-
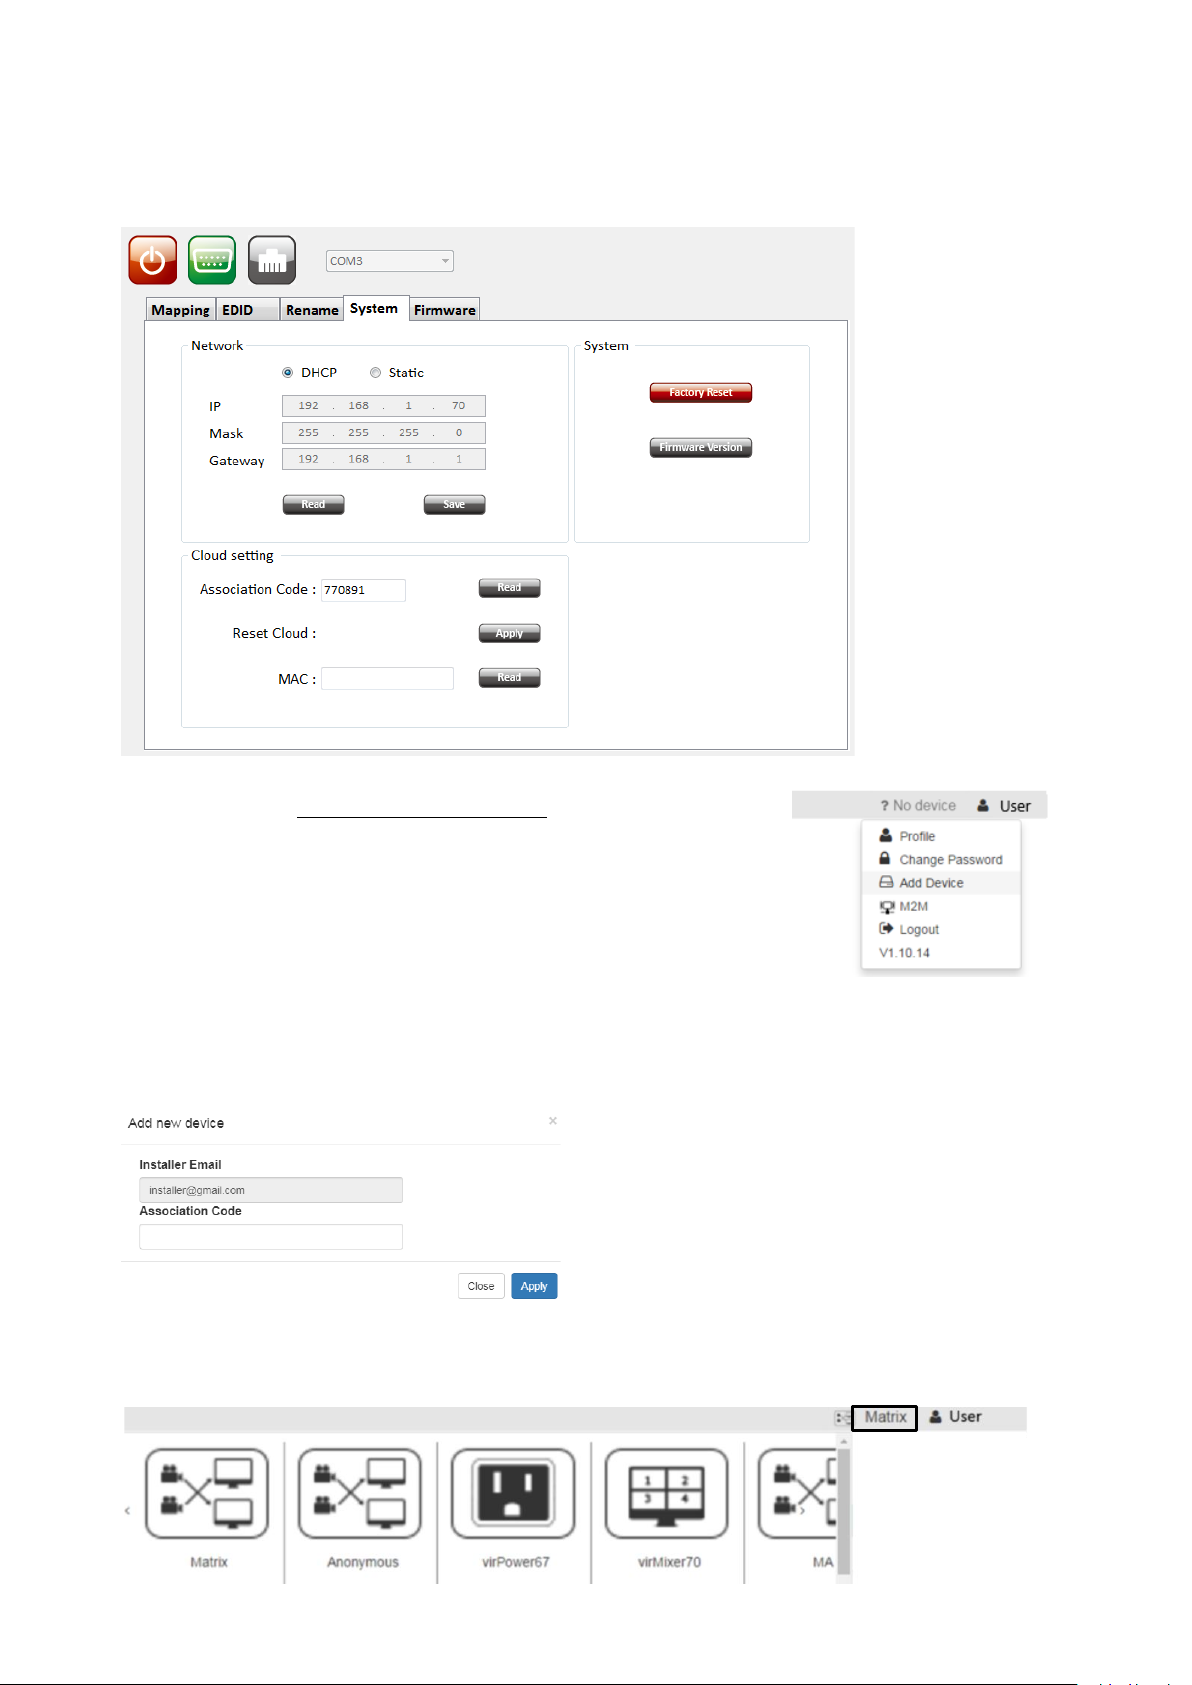
Add Device to Eagleyes
1. Firstly, please make sure the device is connected to the Ethernet. Then please executing the
software with device to get the association code (Note: the status of software is connected).
2. Access Eagleyes (http://www.eagleyes.io) or download Eagleyes
APP and then log in your account on the right top corner. Click Add
device to add the device which you just got its association code.
3. Enter the Installer Email for online support in the future, and the Association Code for pairing with
your device.
4. After adding the device, the list of device related to your account will show on the right top corner.
You can click the button to switch device for control.
Page 22

-20-
EDID LEARNING
The EDID learning function is only necessary whenever you encounter any display on the HDMI
output port that cannot play audio and video properly. Because the HDMI source devices and displays
may have various level of capability in playing audio and video, the general principle is that the source
device will output the lowest standards in audio format and video resolutions to be commonly acceptable
among all HDMI displays. In this case, a 720p stereo HDMI signal output would be probably the safest
choice. Nevertheless, the user can force the matrix to learn the EDID of the lowest capable HDMI display
among others to make sure all displays are capable to play the HDMI signals normally.
There are THREE methods to do EDID Learning as below,
1. IR Remote Control: Please refer to the Operation Approach\Method B: IR Remote Control
2. Software Control: Please refer to the Operation Approach\Method C: Software Control through RS-
232 port
3. Web Interface Control: Please refer to the Operation Approach\Method D: Web Interface Control
There are seventeen embedded default EDID as below,
1. Full-HD(1080p@60)-24bit 2D & 2ch
2. Full-HD(1080p@60)-24bit 2D & 7.1ch
3. Full-HD(1080p@60)-24bit 3D & 2ch
4. Full-HD(1080p@60)-24bit 3D & 7.1ch
5. HD(1080i@60)(720p@60)-24bit 2D & 2ch
6. HD(1080i@60)(720p@60)-24bit 2D & 7.1ch
7. Full-HD(1080p@60)-36bit 2D & 2ch
8. Full-HD(1080p@60)-36bit 2D & 7.1ch
9. Full-HD(1080p@60)-24bit 2D & 2ch & Dolby 5.1ch
10. 4k2k@30 2ch
11. 4k2k@30 7.1ch
12. 4k2k@30-3D-PCM2CH(2ch)
13. 4k2k@30-3D-BITSTR(7.1ch)
14. 4k2k@60-420-3D-PCM2CH(2ch)
15. 4k2k@60-420-3D-BITSTR(7.1ch)
16. 4k2k@60-3D-PCM2CH(2ch)
17. 4k2k@60-3D-BITSTR(7.1ch)
Page 23

-21-
FAQ
Q Can every TV work with the HDMI matrix?
A Basically, the answer is YES. But if your TV cannot support 1080p, please refer the EDID LEARNING
section to learn EDID from your TV.
Q What is EDID? Why do I need to learn EDID?
A EDID contains the whole information of the display such as the resolution and audio setting which this
display can support. Therefore, based on the EDID information, media player will pick up the most suitable
resolution and audio setting to the display. In order to faithfully transmit the EDID information from display
to the media player, learning EDID from display to this device is necessary.
Q What should I do to learn EDID for the matrix?
A Due to the limitation of HDMI, the source device can only output one format of video and audio. In
other words, the source device cannot output 720p and 1080p video at the same time, or output stereo
and surround sound at the same time. Therefore, you may need to manually setup each HDMI input for
desirable audio/video output format. The mechanism of EDID Learning is to pick up the HDMI display with
the lowest capability among the ones you would use for this input source. For example, if user would like
to play the Input-2 upon output-2, output-3 and output-4, and only output-3 cannot support 1080p
[support up to 720p only], please learn the EDID from the display connected to the output-3 at the Input2 port. Of course, if outpt-3 would get the HDMI signals from every HDMI input, please learn EDID
information from output3 to all four HDMI inputs. For more information about EDID Learning, please refer
to EDID LEARNING section.
Q My TV can support 1080p, but why there is no audio?
A The factory default EDID of this device is 1080p &2ch audio. However, there would be a problem after
you change to use 1080p & 7.1ch if the TV cannot support 7.1ch audio. Please use the default EDID,1080p
&2ch audio.
Q When I set an audio amplifier (AV receiver) between TV and the matrix to extract 7.1ch audio, but
why there is still no audio?
A Basically, the default EDID of the chosen input can support 7.1ch audio, but the problem is that the
EDID of the amplifier still cannot match the default setting. Therefore, the best method is to learn EDID
from the amplifier directly. Please refer to EDID LEARNING section and follow the steps to learn the EDID.
When learning EDID from the amplifier, user just needs to connect the matrix and amplifier. Please don't
connect HDMI cable between amplifier and TV when the EDID learning is proceeding.
Q When I play the same content upon multi-displays, why only the TV equipped with amplifier can
have 7.1ch audio, and the others don't have 7.1ch audio even no stereo?
A Due to the limitation of HDMI, the source only can choose one video and one audio format to play,
which can be either 1080p and 7.1ch or 1080p and stereo audio. It means when the user sets the matrix
at 1080p and 7.1ch, the source will only play the content under this format. Therefore if the TV cannot
decode 7.1ch audio, there is definitely no audio.
Page 24

-22-
WARRANTY
The SELLER warrants the BG-UHD-44M18G 4x4HDMI 2.0a matrix free from defects in the material
and workmanship for 1 year from the date of purchase from the SELLER or an authorized dealer. Should
this product fail to be in good working order within 1-year warranty period, The SELLER, at its option,
repair or replace the unit, provided that the unit has not been subjected to accident, disaster, abuse
or any unauthorized modifications including static discharge and power surge. This warranty is offered
by the SELLER for its BUYER with direct transaction only. This warranty is void if the warranty seal on the
metal housing is broken.
Unit that fails under conditions other than those covered will be repaired at the current price of parts
and labor in effect at the time of repair. Such repairs are warranted for 90 days from the day of reshipment
to the BUYER. If the unit is delivered by mail, customers agree to insure the unit or assume the risk of loss
or damage in transit. Under no circumstances will a unit be accepted without a return authorization
number.
The warranty is in lieu of all other warranties expressed or implied, including without limitations, any
other implied warranty or fitness or merchantability for any particular purpose, all of which are expressly
disclaimed.
Proof of sale may be required in order to claim warranty. Customers outside Taiwan are responsible
for shipping charges to and from the SELLER. Cables and power adapters are limited to a 30 day warranty
and must be free from any markings, scratches, and neatly coiled.
The content of this manual has been carefully checked and is believed to be accurate. However, The
SELLER assumes no responsibility for any inaccuracies that may be contained in this manual. The SELLER
will NOT be liable for direct, indirect, incidental, special, or consequential damages resulting from any
defect or omission in this manual, even if advised of the possibility of such damages. Also, the technical
information contained herein regarding the BG-UHD-44M18G features and specifications is
subject to change without further notice.
Page 25

-23-
SECOND YEAR ASSURANCE
BZB Gear wants to assure you peace of mind. We're so confident in the quality of our products that
along with the manufacturer's one-year limited warranty, we are offering free second-year warranty
coverage upon registration*!
Taking advantage of this program is simple, just follow the steps below:
1. Register your product within 90 days of purchase by visiting BZBGear.com/warranty.
2. Complete the registration form. Provide all necessary proof of purchase details, including serial
number and a copy of your sales receipt.
For questions, please call 1.888.660.2962 or email [email protected].
For complete warranty information, please visit BZBGear.com/warranty or scan the QR code below.
*Terms and conditions apply. Registration is required.
Page 26

-24-
MISSION STATEMENT
BZB Gear manifests from the competitive nature of the audiovisual industry to innovate while keeping
the customer in mind. AV solutions can cost a pretty penny, and new technology only adds to it. We
believe everyone deserves to see, hear, and feel the advancements made in today’s AV world without
having to break the bank. BZB Gear is the solution for small to medium-sized applications requiring the
latest professional products in AV.
We live in a DIY era where resources are abundant on the internet. With that in mind, our team offers
system design consultation and expert tech support seven days a week for the products in our BZB Gear
catalog. You’ll notice comparably lower prices with BZB Gear solutions, but the quality of the products is
on par with the top brands in the industry. The unparalleled support from our team is our way of
showing we care for every one of our customers. Whether you’re an integrator, home theater
enthusiast, or a do-it-yourselfer, BZB Gear offers the solutions to allow you to focus on your project and
not your budget.
 Loading...