

Page 1
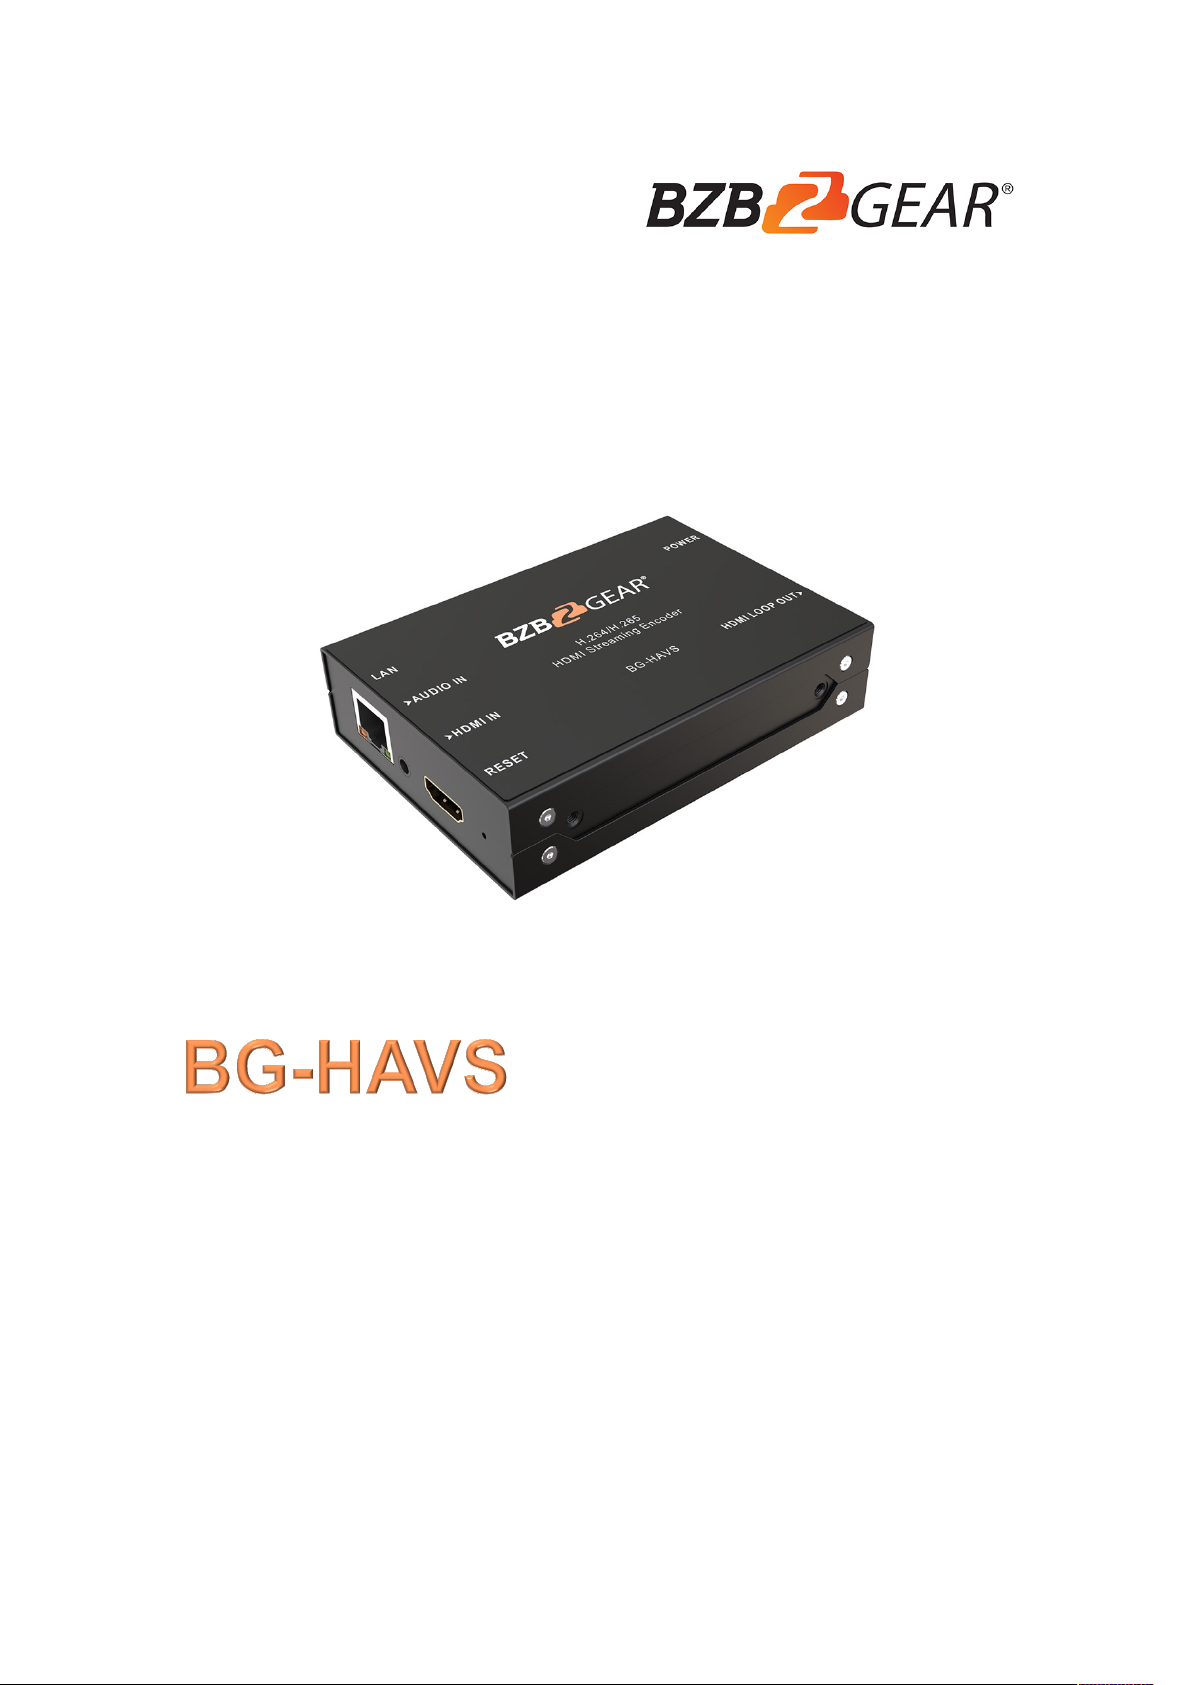
H.265/ H.264 HDMI
STREAMING ENCODER
USER MANUAL
Page 2

2
2
USING THE UNIT SAFELY
Before using this unit, please read below warning and precautions which provide
important information concerning the proper operation of the unit. Besides, to assure that
you have gained a good grasp of every feature of your new unit, read below manual. This
manual should be saved and kept on hand for further convenient reference.
Warning and Cautions
※ To avo id f a lli ng o r da ma ge , p l ea s e d o no t pl ac e t hi s un it o n an u ns t ab l e c ar t,
stand, or table.
※ Operate unit only on the specified supply voltage.
※ Disconnect power cord by connector only. Do not pull on cable portion.
※Do not place or drop heavy or sharp-edged objects on power cord. A damaged cord
can cause fire or electrical shock hazards. Regularly check power cord for excessive
wear or damage to avoid possible fire / electrical hazards.
※ Ensure unit is always properly grounded to prevent electrical shock hazard.
※ Do not operate unit in hazardous or potentially explosive atmospheres. Doing so could
result in fire, explosion, or other dangerous results.
※ Do not use this unit in or near water.
※ Do not allow liquids, metal pieces, or other foreign materials to enter the unit.
※ Handle with care to avoid shocks in transit. Shocks may cause malfunction. When you
need to transport the unit, use the original packing materials, or alternate adequate
packing.
※ Do not remove covers, panels, casing, or access circuitry with power applied to the
unit! Turn power off and disconnect power cord prior to removal. Internal servicing /
adjustment of unit should only be performed by qualified personnel.
※ Turn off the unit if an abnormality or malfunction occurs. Disconnect everything before
moving the unit.
Note: due to constant effort to improve products and product features, specifications may
change without notice.
Page 3

3
3
CONTENTS
1. BRIEF INTRODUCTION ..................................................................................................................... 4
1.1. Overview ............................................................................................................................................... 4
1.2. Main Features .................................................................................................................................... 4
1.3. Interfaces .............................................................................................................................................. 4
2. SPECIFICATIONS ................................................................................................................................. 5
3. OPERATIONS GUIDE ......................................................................................................................... 5
3.1. Network Configuration and Login ............................................................................................... 5
3.2. Management Web Page ................................................................................................................ 6
3.2.1. Language Settings ...................................................................................................................... 6
3.2.2. Device Status ................................................................................................................................ 6
3.2.3. Network Settings .......................................................................................................................... 7
3.2.4. Main Stream Settings ................................................................................................................. 7
3.2.5. Sub Stream Settings ................................................................................................................... 9
3.2.6. Audio and Extension ................................................................................................................ 10
3.2.6.1. Audio Settings ....................................................................................................................... 10
3.2.6.2. OSD Overlay ......................................................................................................................... 11
3.2.6.3. Color Control ......................................................................................................................... 11
3.2.6.4. ONVIF Settings .................................................................................................................... 12
3.2.6.5. System Settings ................................................................................................................... 12
4. TECH SUPPORT ................................................................................................................................ 13
5. WARRANTY .......................................................................................................................................... 13
6. MISSION STATEMENT .................................................................................................................... 13
Page 4
4
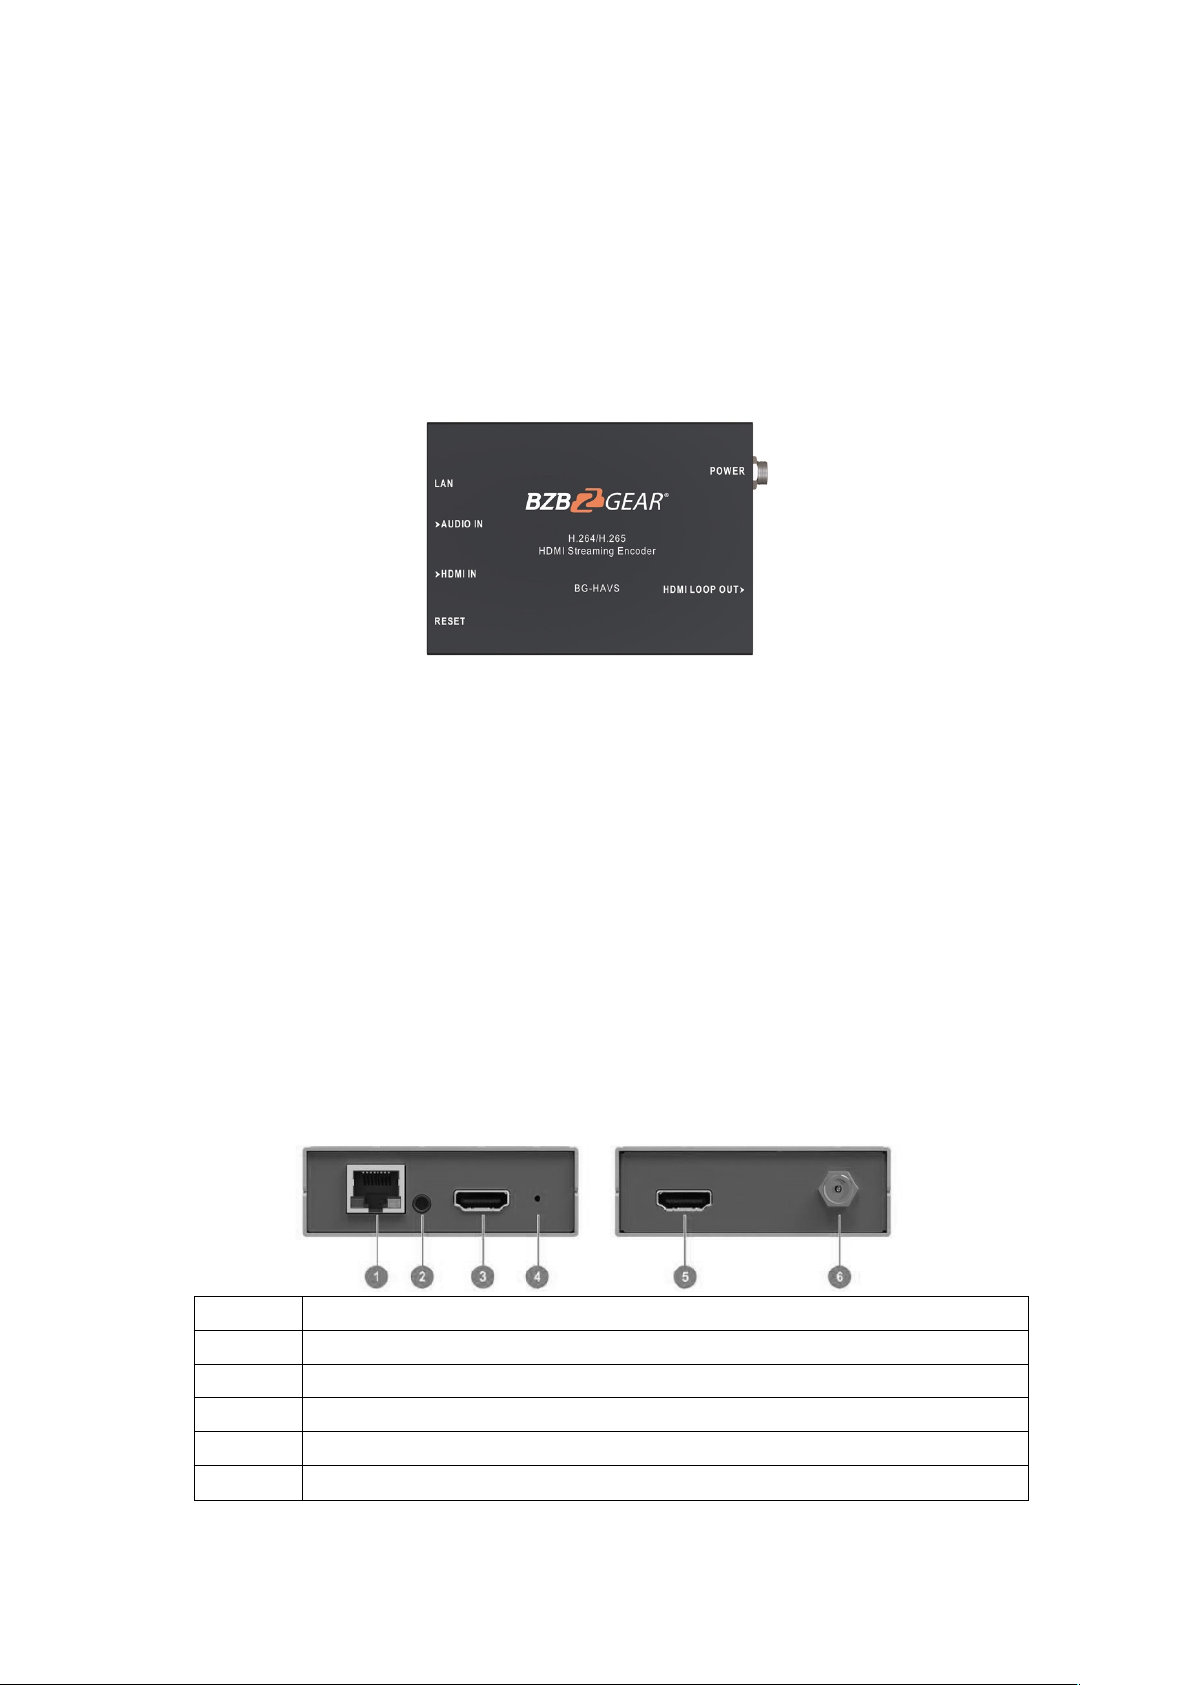
1. BRIEF INTRODUCTION
1
LAN Port for Streaming
2
AUDIO Input
3
HDMI Input
4
LED Indicator/ RESET hole (Long press 5s)
5
DC 12V In
6
HDMI Loopout
1.1. Overview
BG-HAVS is an HD audio and video encoder which can encode and compress HDMI
video and audio source into IP stream, and then transmit it to streaming media server via
network IP address to live broadcast on platforms like Facebook, YouTube, Ustream,
Twitch, Wowza, etc.
1.2. Main Features
l 1×HDMI input, 1×HDMI loop out, 1×Analog audio input
l Supports H.265/ H.264 stream encode protocol, up to 1080p60hz
l Dual-stream (main stream and sub stream)
l RTSP, RTP, RTMPS, RTMP, HTTP, UDP, SRT, unicast and multicast
l Video and audio streaming or single audio streaming
l Image and text overlay
l Mirror image & upside-down image
l Live stream with no need for connecting a computer
1.3. Interfaces
Page 5

5
2. SPECIFICATIONS
CONNECTIONS
Video
Input: HDMI Type A ×1; Loop Out: HDMI Type A ×1
Analog Audio
3.5mm line in ×1
Network
RJ-45×1(100/1000Mbps self-adaptive Ethernet)
STANDARDS
HDMI In Format Support
1080p 60/59.94/50/30/29.97/25/24/23.98/23.976,
1080i 50/59.94/60,
720p 60/59.94/50/30/29.97/25/24/23.98,
576i 50, 576p 50, 480p 59.94/60, 480i 59.94/60
Video Coding
H.265/ H.264
Video Bitrate
16Kbps ~ 12MKbps
Audio Coding
ACC/ MP3/ MP2/ G711
Audio Bitrate
24Kbps ~ 320Kbps
Encoding Resolution
1920×1080, 1680×1056, 1280×720, 1024×576, 960×540,
850×480, 720×576, 720×540, 720×480, 720×404,
720×400, 704×576, 640×480, 640×360
Encoding Frame Rate
5-60fps
SYSTEMS
Network Protocols
HTTP, RTSP, RTMP, RTP, UDP, Multicast, Unicast, SRT
Configuration
Management
Web configuration, Remote upgrade
OTHERS
Consumption
5W
Te mp e ra t ure
Working temp: -10℃~60℃, Storage temp: -20℃~70℃
Dimension (LWD)
104×75.5×24.5mm
Weight
Net weight: 310g, Gross weight: 690g
Accessories
12V 2A power supply; Mounting bracket for optional
3. OPERATIONS GUIDE
3.1. Network Configuration and Login
Connect the encoder to network via a network cable. The default IP address of the encoder
is 192.168.1.168. The encoder can auto obtain a new IP address when it is using DHCP
on the network,
Or disable DHCP and configure the encoder and computer’s network in the same network
segment. The default IP address as below.
IP Address: 192.168.1.168
Subnet Mask: 255.255.255.0
Default Gateway: 192.168.1.1
Visit encoder’s IP address 192.168.1.168 through an Internet browser to login the WEB
Page 6
6
page for setting up. The default Username is admin, and password is admin.
3.2. Management Web Page
The encoding settings can be set on the encoder management web page.
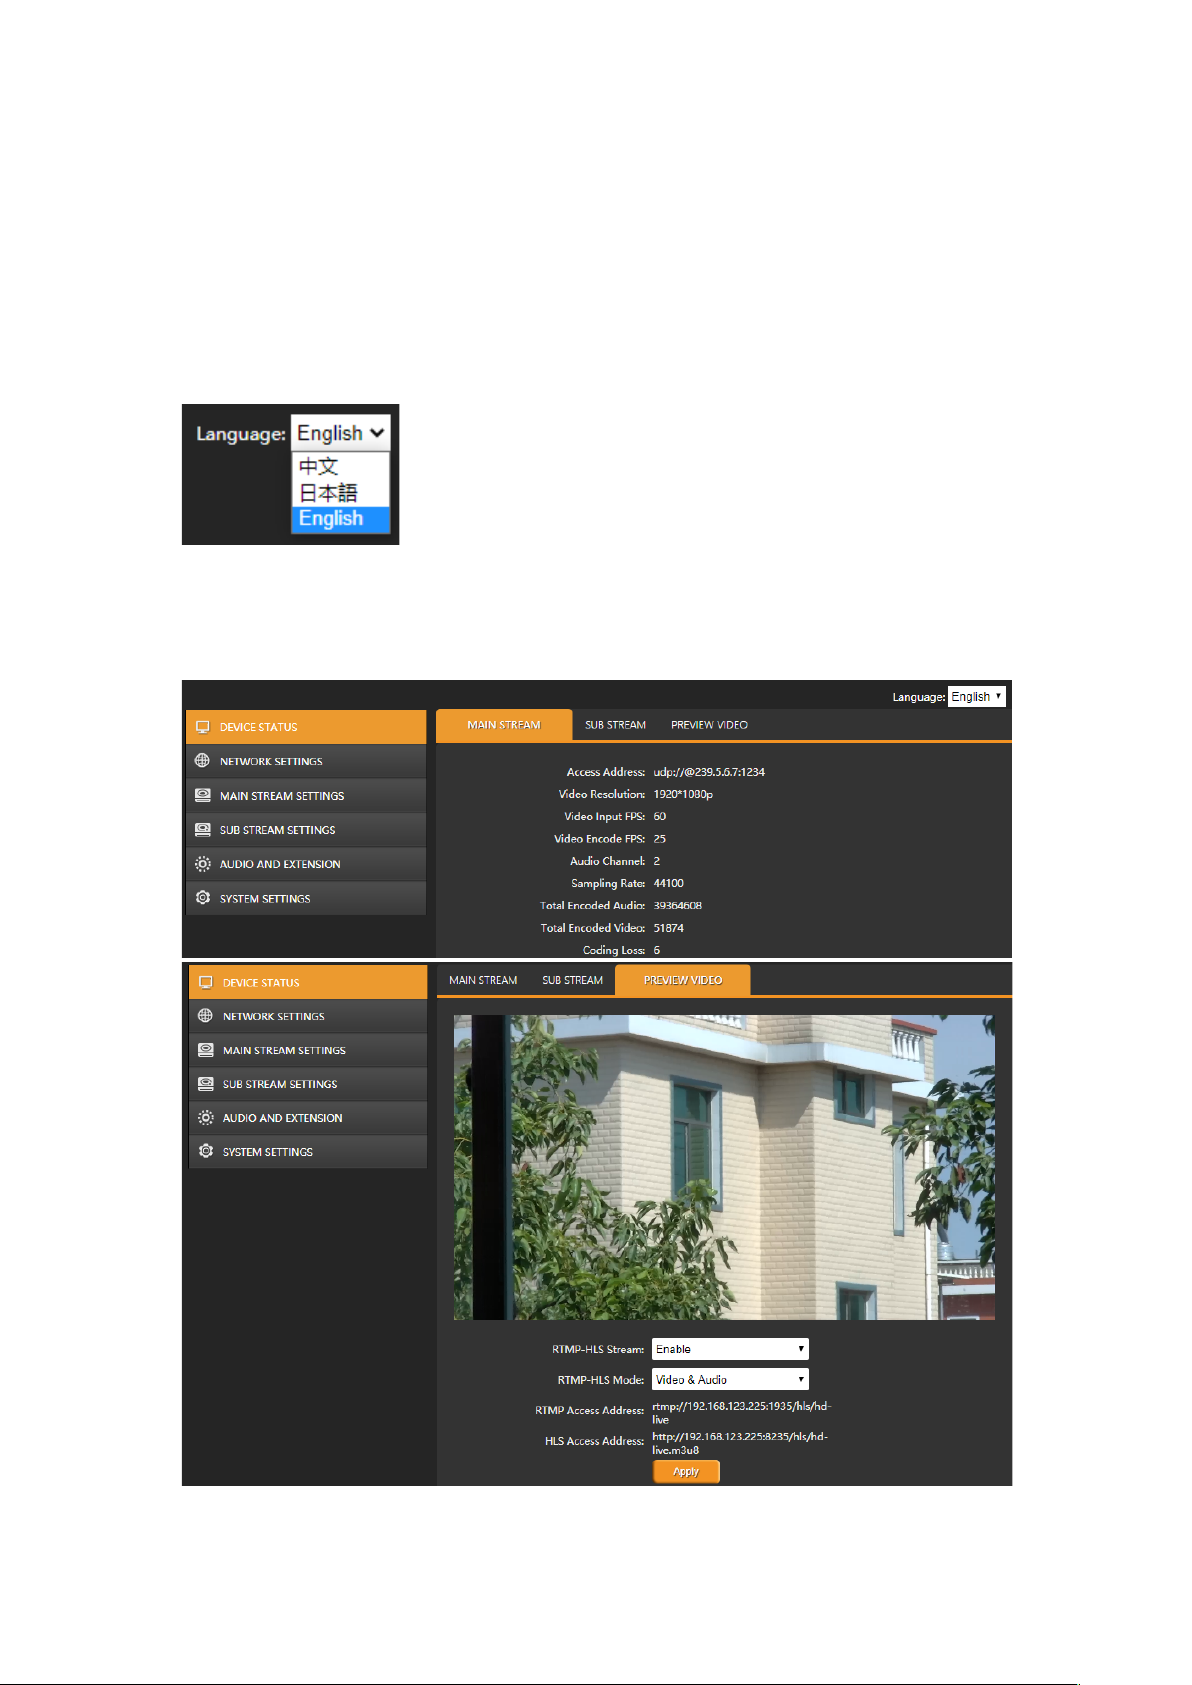
3.2.1. Language Settings
There are languages of Chinese (中文), Japanese (日本語) and English for option on the
top-right corner of the encoder management web page.
3.2.2. Device Status
The status of MAIN STREAM and SUB STREAM can be checked on the webpage. And
we also can have a preview on the streaming video from PREVIEW VIDEO.
Page 7
7
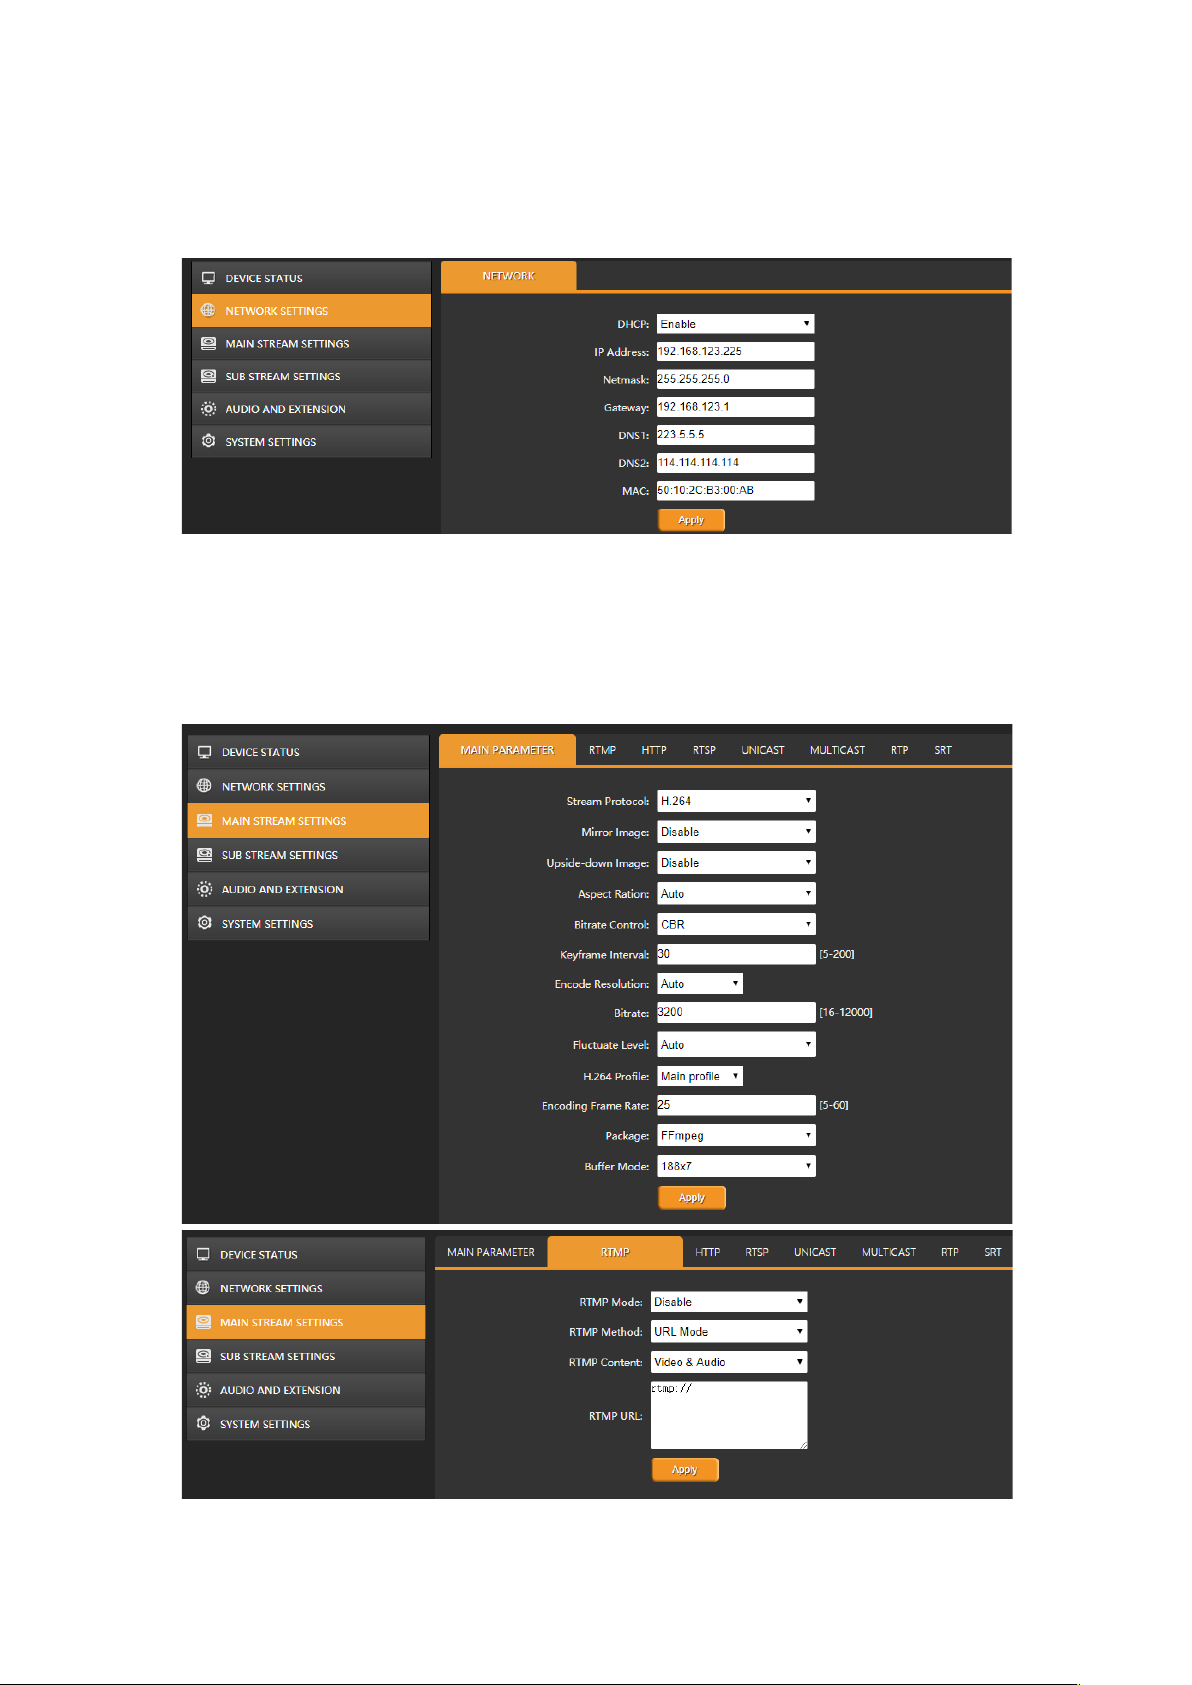
3.2.3. Network Settings
The network can be set to dynamic IP (DHCP Enable) or static IP (DHCP Disable). The
default IP information can be checked in Part 3.1.
3.2.4. Main Stream Settings
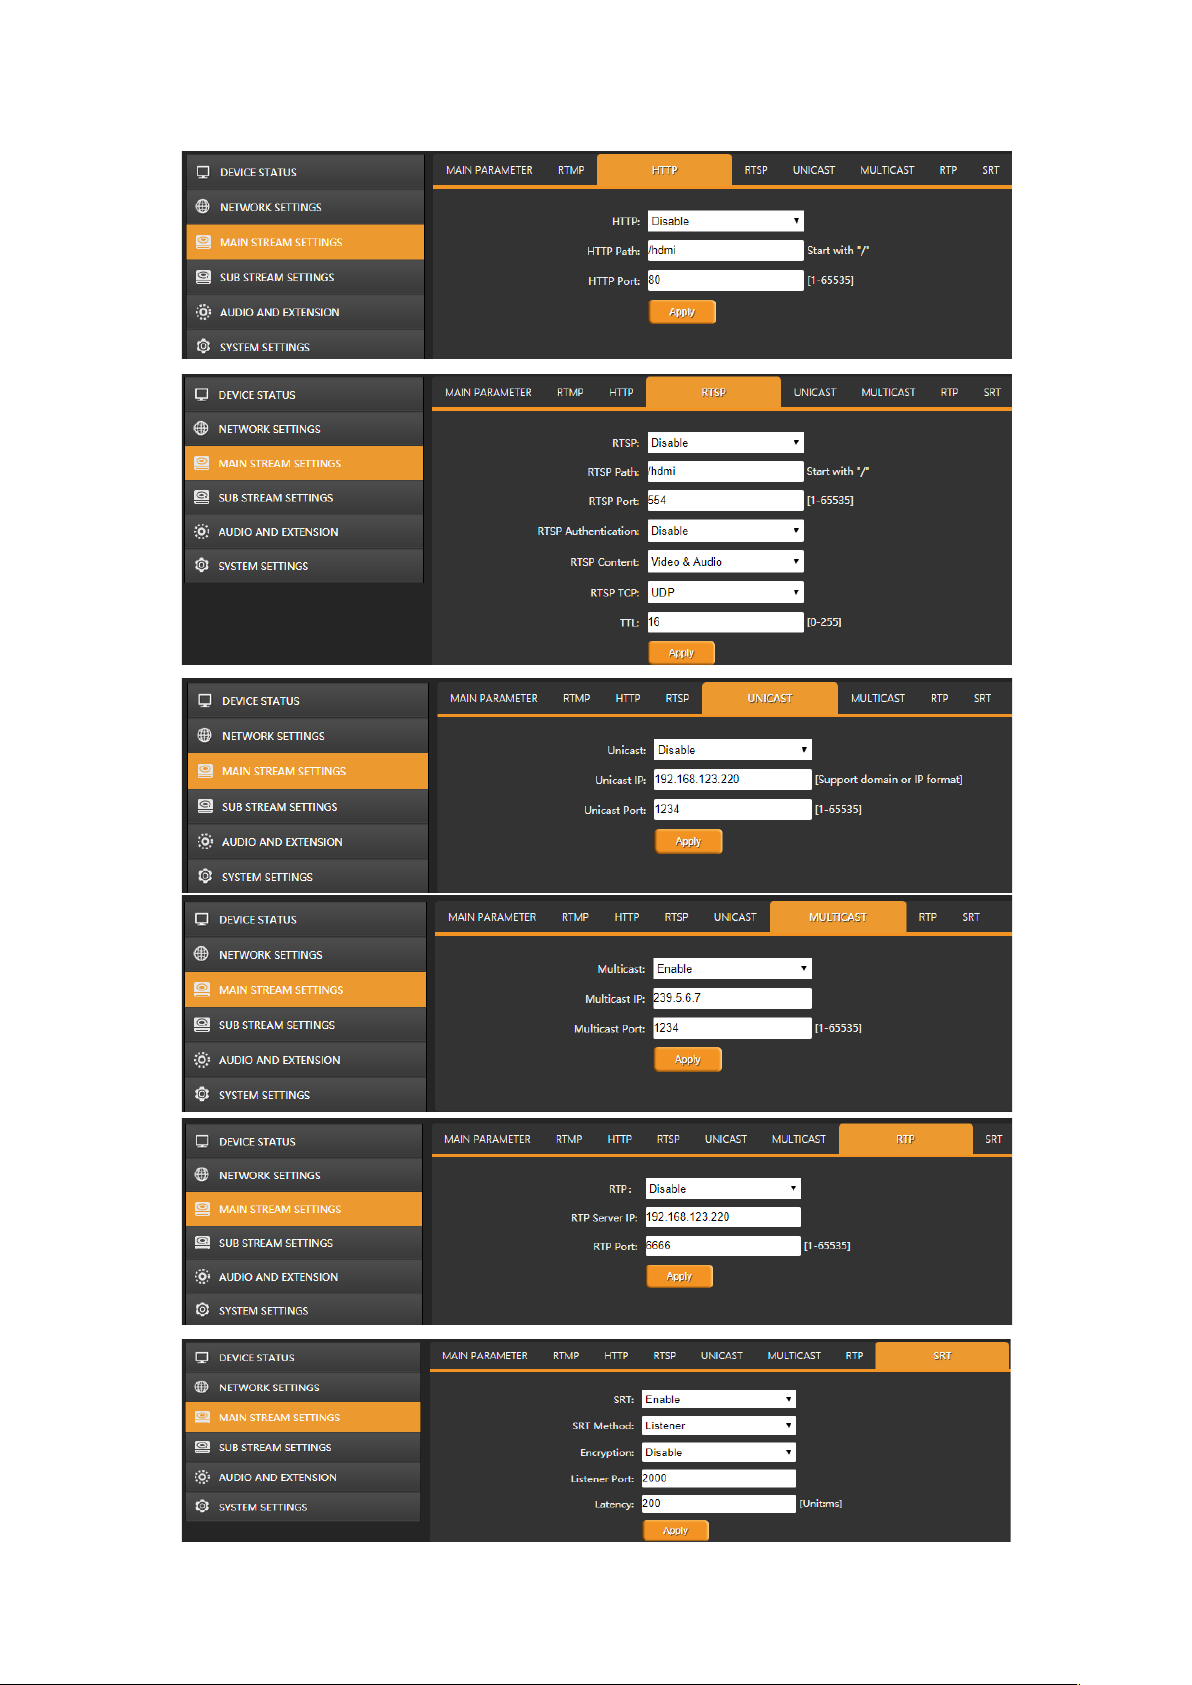
The main stream can be set to mirror image and upside-down image from MAIN
PARAM E T E R tab. Configure main stream network protocol RTMP/ HTTP/ RTSP/
UNICAST /MULTICAST/ RTP/ SRT accordingly. Please note that only one of HTTP/ RTSP/
UNICAST /MULTICAST/ RTP can be enable at same time.
Page 8
8
Page 9
9
3.2.5. Sub Stream Settings
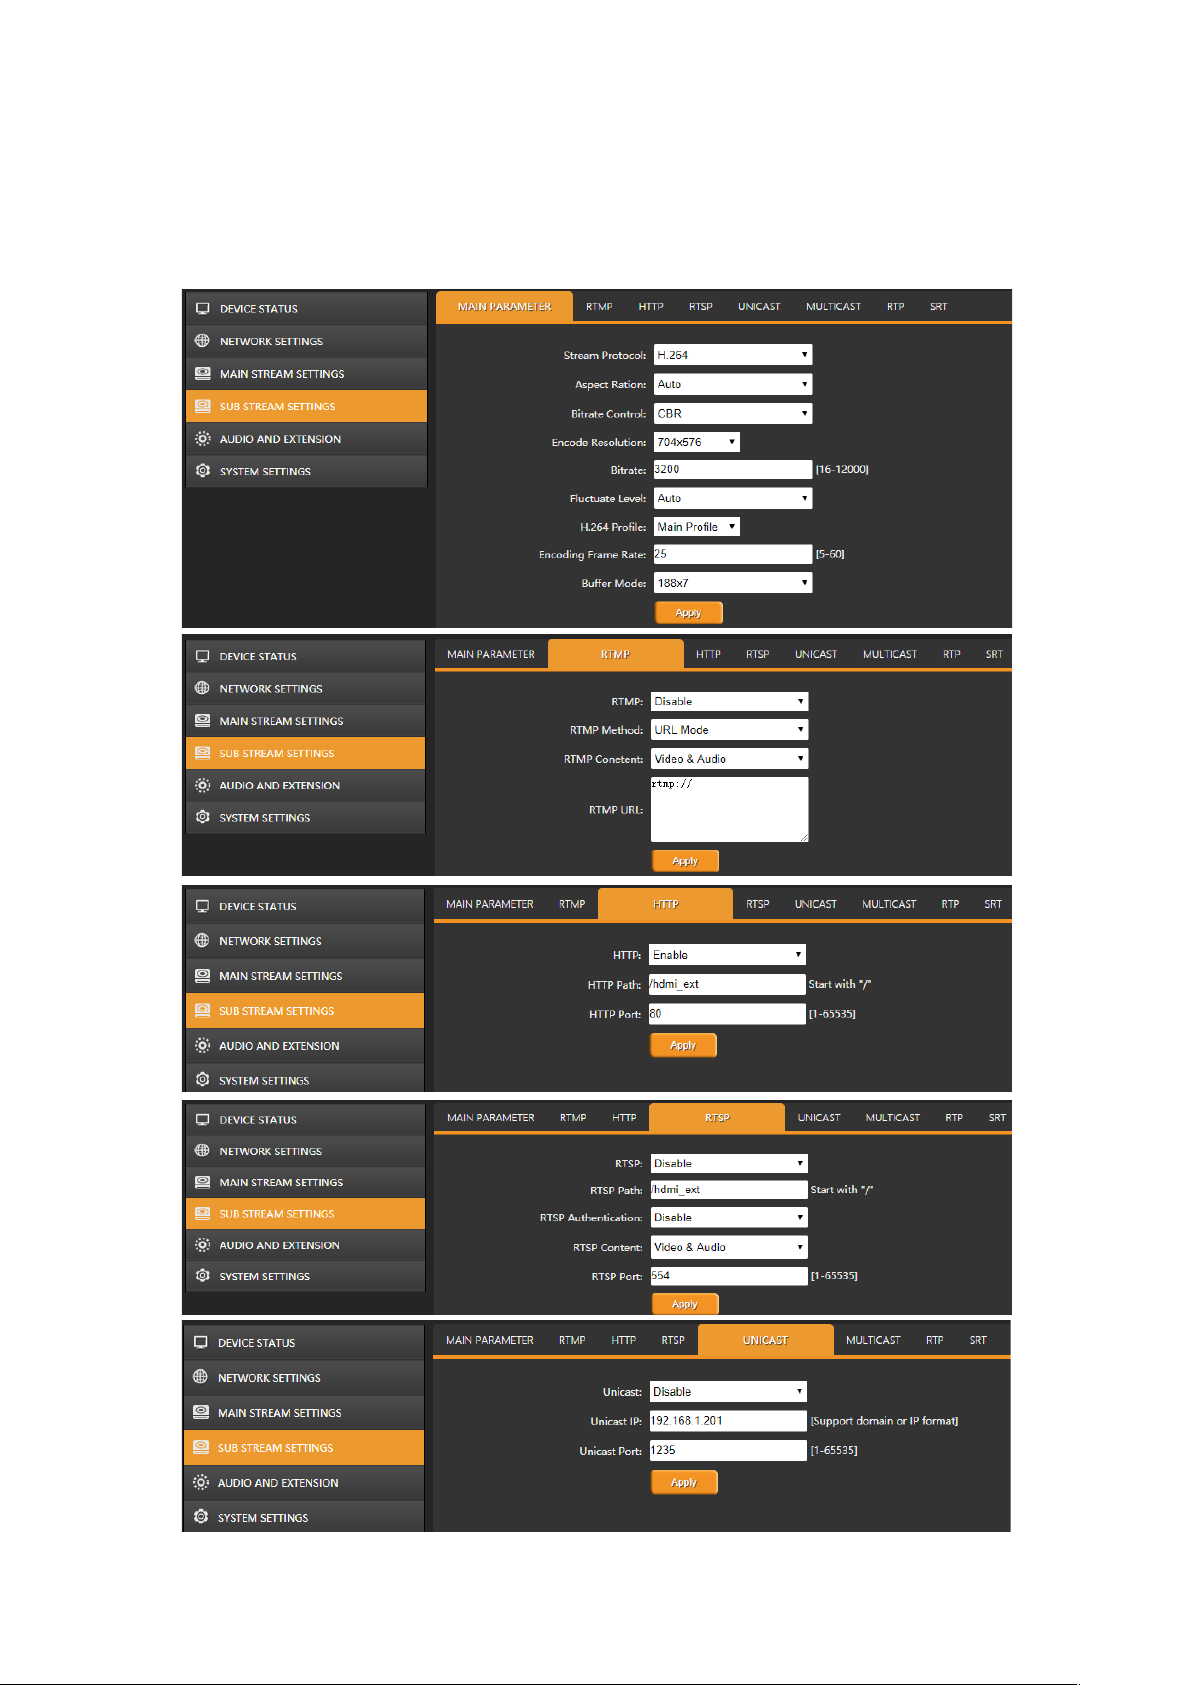
Configure sub stream network protocol RTMP/ HTTP/ RTSP/ UNICAST/ MULTICAST/
RTP/ SRT accordingly. Please note that only one of HTTP/ RTSP/ UNICAST/ MULTICAST/
RTP can be enable at same time.
Page 10
10
3.2.6. Audio and Extension
3.2.6.1. Audio Settings
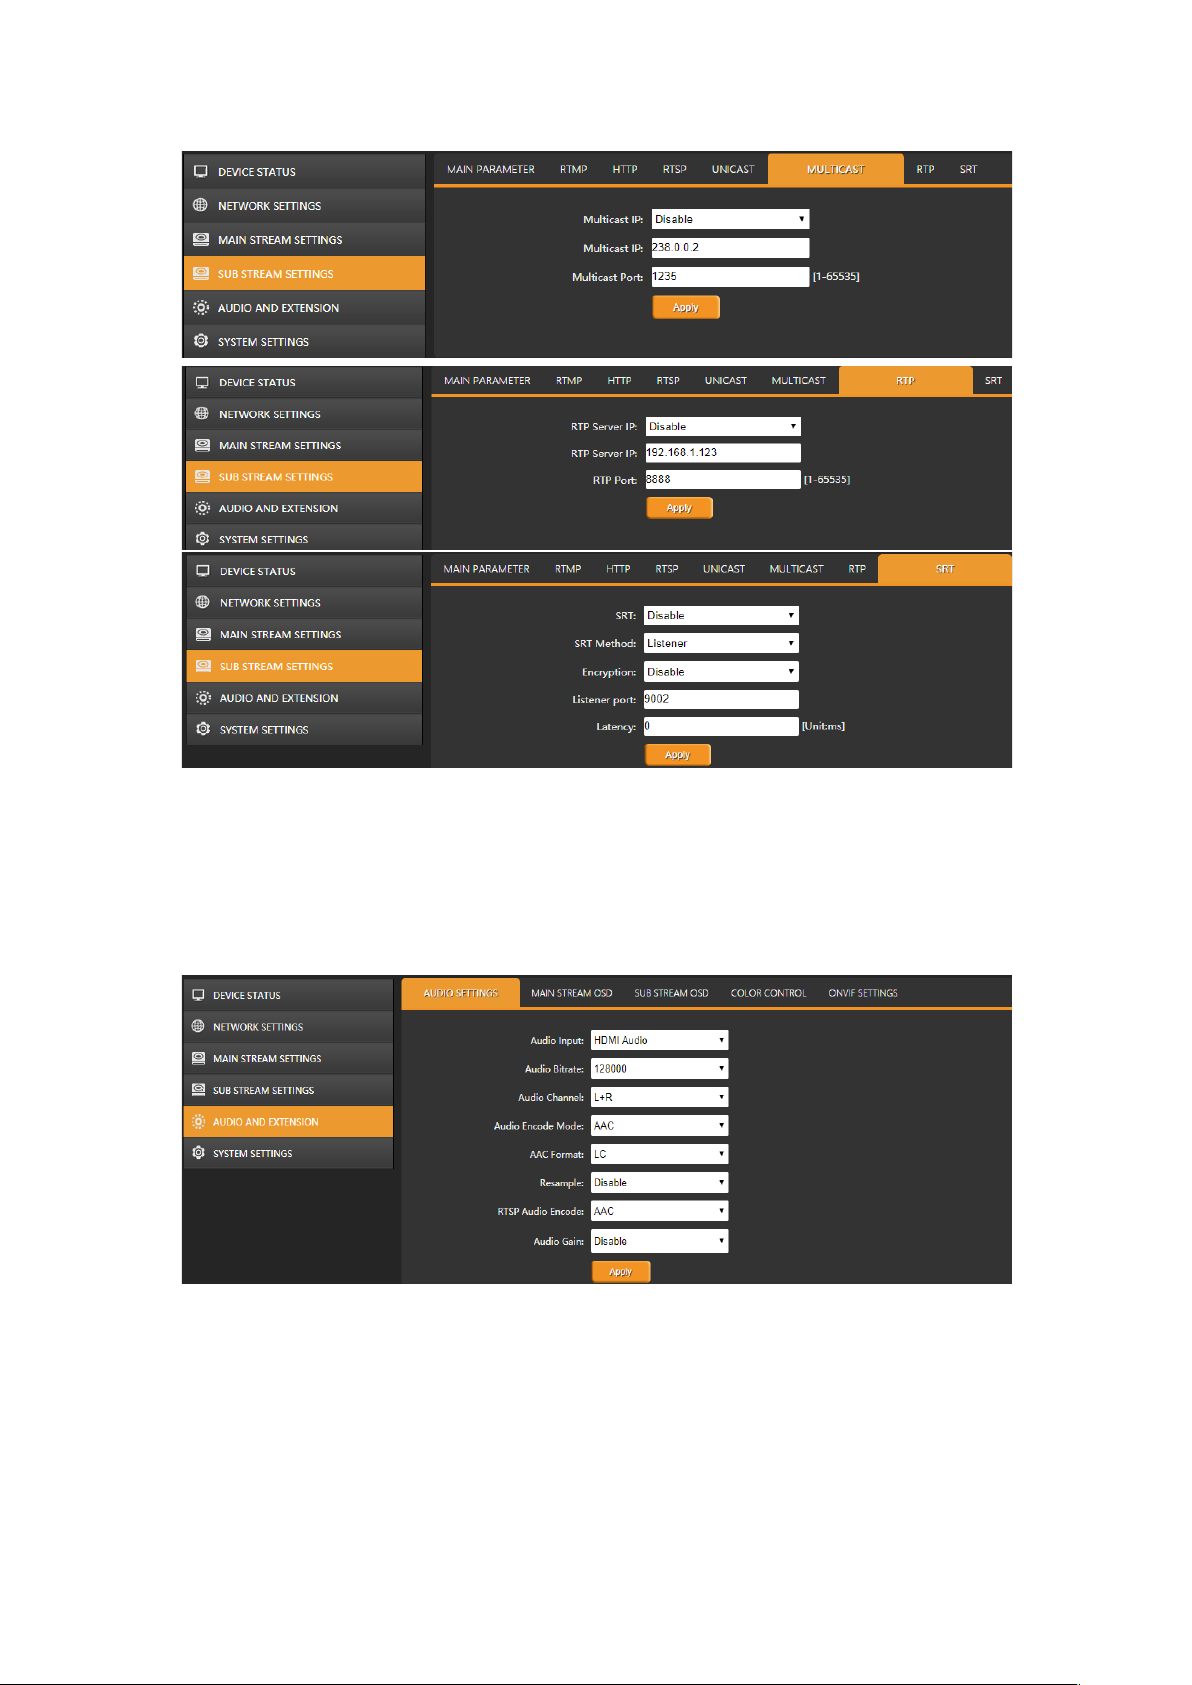
The encoder support audio embedding from external analog input. Therefore, the audio
can be from HDMI embedded audio or analog Line in audio. Besides, Audio Encode Mode
can be ACC/ MP3/ MP2.
Page 11
11
3.2.6.2. OSD Overlay
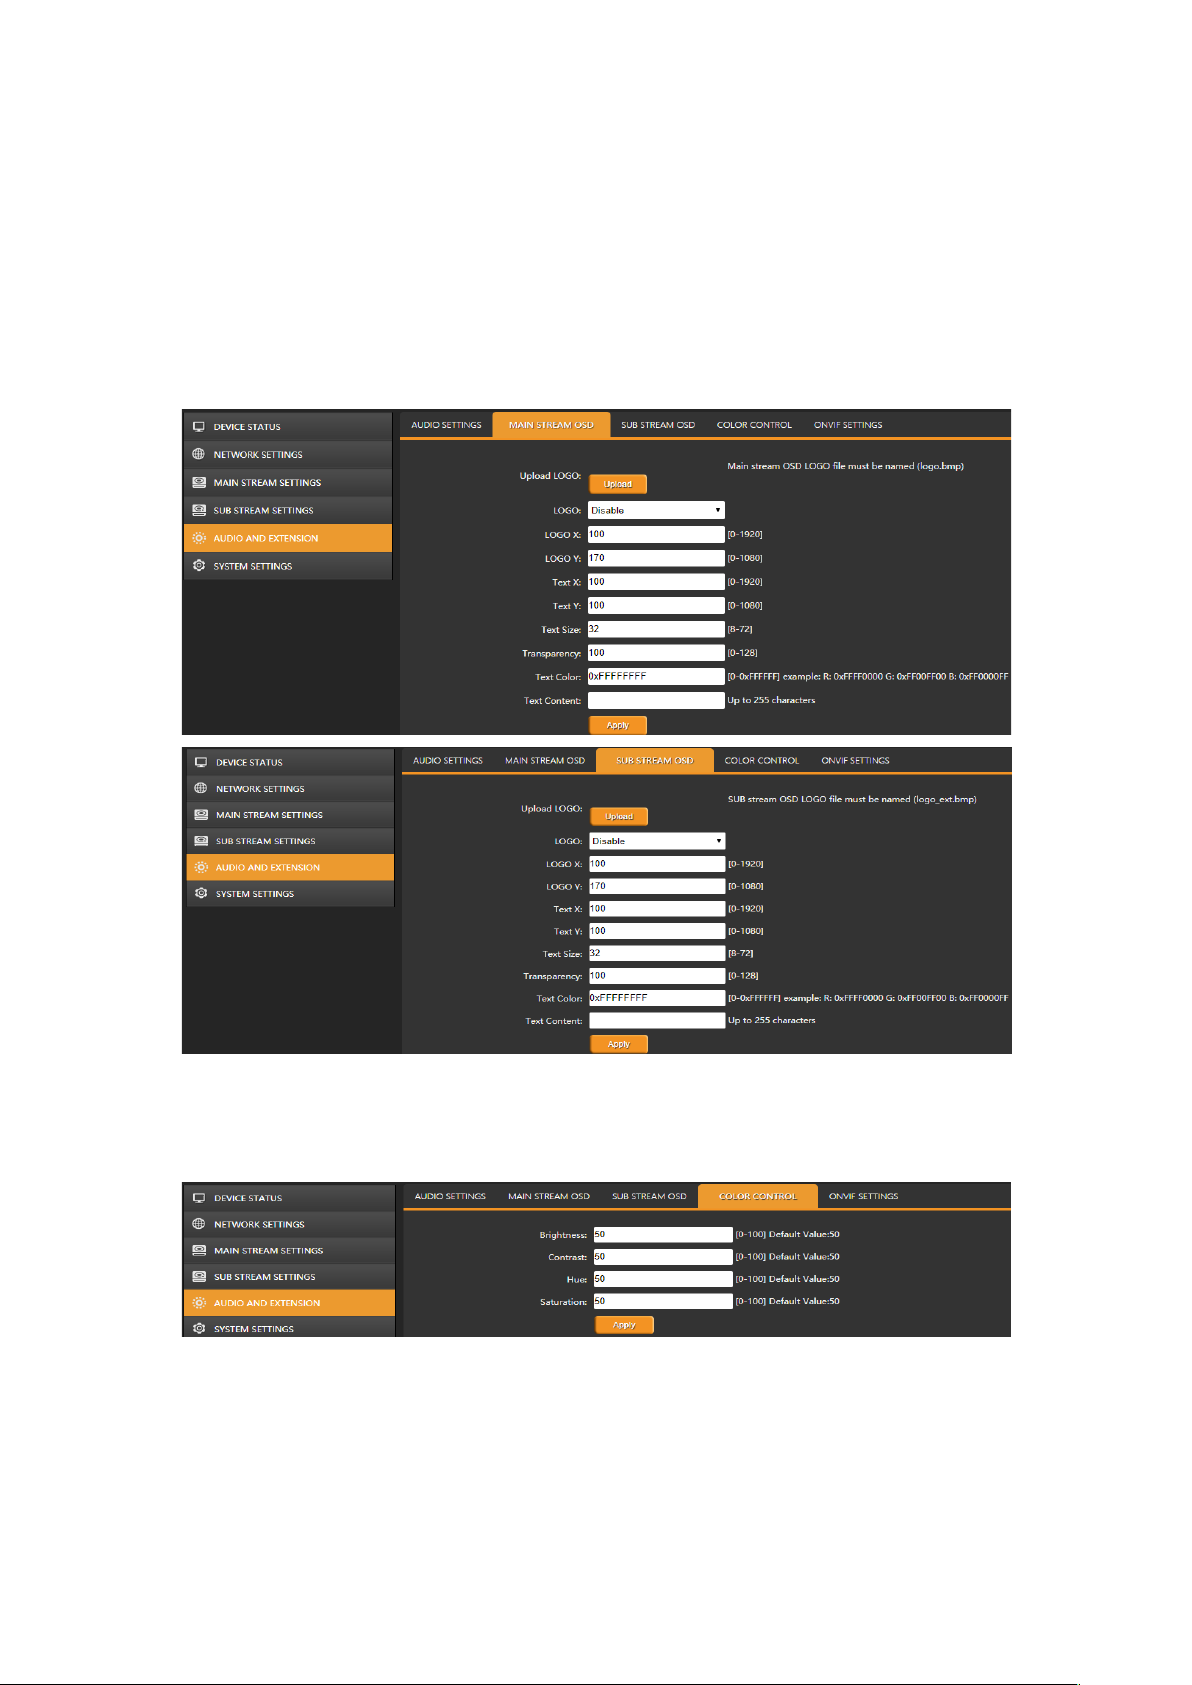
The encoder can insert logo and text to the Main Stream / Sub Stream video at same time.
The logo file should be named logo.bmp and resolution below 1920×1080 as well as less
than 1MB. Text content overlay support up to 255 characters. The size and color of the text
can be set on the web page. And user also can set the position and transparency of the
logo and text overlay.
3.2.6.3. Color Control
User can adjust the brightness, contrast, hue, saturation of streaming video through the
web page.
Page 12
12
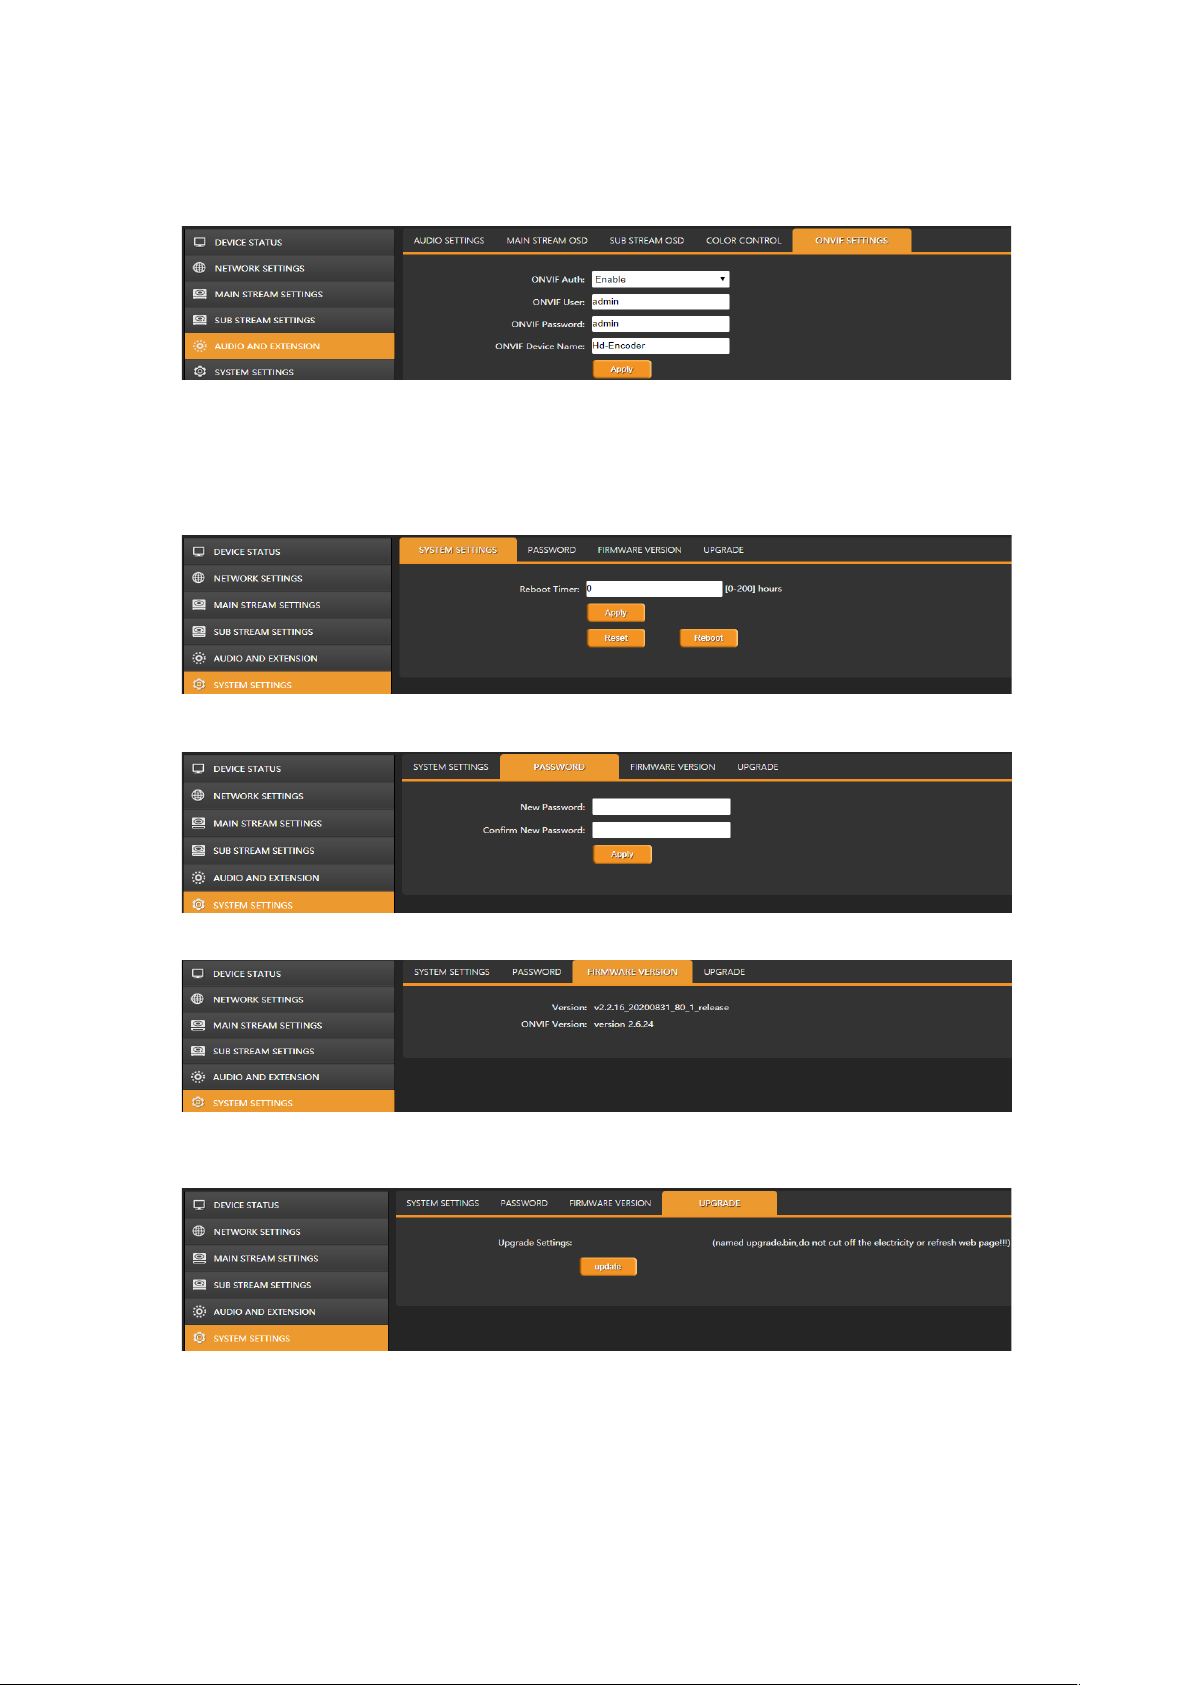
3.2.6.4. ONVIF Settings
The settings of ONVIF as below:
3.2.6.5. System Settings
User can set the encoder reboot after 0-200 hours for some applications.
The default password is admin. User can set new password through below web page.
The firmware version information can be checked the web page as below.
Upgrade new firmware through the web page as below. Please note: do not turn off the
power and refresh web page when upgrading.
Page 13

13
4. TECH SUPPORT
Before contacting tech support, we may have answered your question already! Visit our
BZBGEAR support page at bzbgear.com/support for valuable information on our products.
Here you will find our Knowledge Base (bzbgear.com/knowledge-base) consisting of
tutorials, quick start guides, and step-by-step troubleshooting instructions. Also visit our
YouTube cha nn el BZB TV a t youtube.com/c/BZBTVchannel for help setting up, connecting,
and other how-to videos regarding our products.
If you still need answers, please call 1.888.499.9906, email [email protected], or
chat at bzbgear.com.
5. WARRANTY
BZBGEAR Pro AV products and Cameras come with a three-year warranty. An extended
two-year warranty is available for our Cameras upon registration for a total of five years.
For an extended two-year warranty on our Cameras, follow these steps:
1. Register your Camera within 90 days of purchase by visiting bzbgear.com/warranty.
2. Complete the registration form. Provide all necessary proof of purchase details, including
serial number and a copy of your sales receipt.
For complete warranty information, please visit bzbgear.com/warranty or scan the QR
code below.
6. MISSION STATEMENT
BZBGEAR manifests from the competitive nature of the audiovisual and live streaming
industry to innovate while keeping the customer in mind. AV solutions can cost a pretty
penny, and new technology only adds to it. We believe everyone deserves to see, hear,
and feel the advancements made in today’s AV world without having to break the bank.
BZBGEAR is your answer for applications requiring the latest pro AV and live streaming
solutions.
You’ l l no ti ce c om pa ra bl y lower pr ic es w it h BZ BG EA R wh il e th e pe rforma nc e an d qu al it y
are on par with the top brands in the industry. Our team offers system design consultation
and expert tech support seven days a week for all BZBGEAR products. Our unparalleled
support is our way of showing we care for every one of our customers. Whether you’re an
integrator, home theater enthusiast, or a do-it-yourselfer, BZBGEAR offers solutions
allowing you to focus on your project and not your budget.
Page 14

14
Page 15

15
Page 16

 Loading...