

Page 1
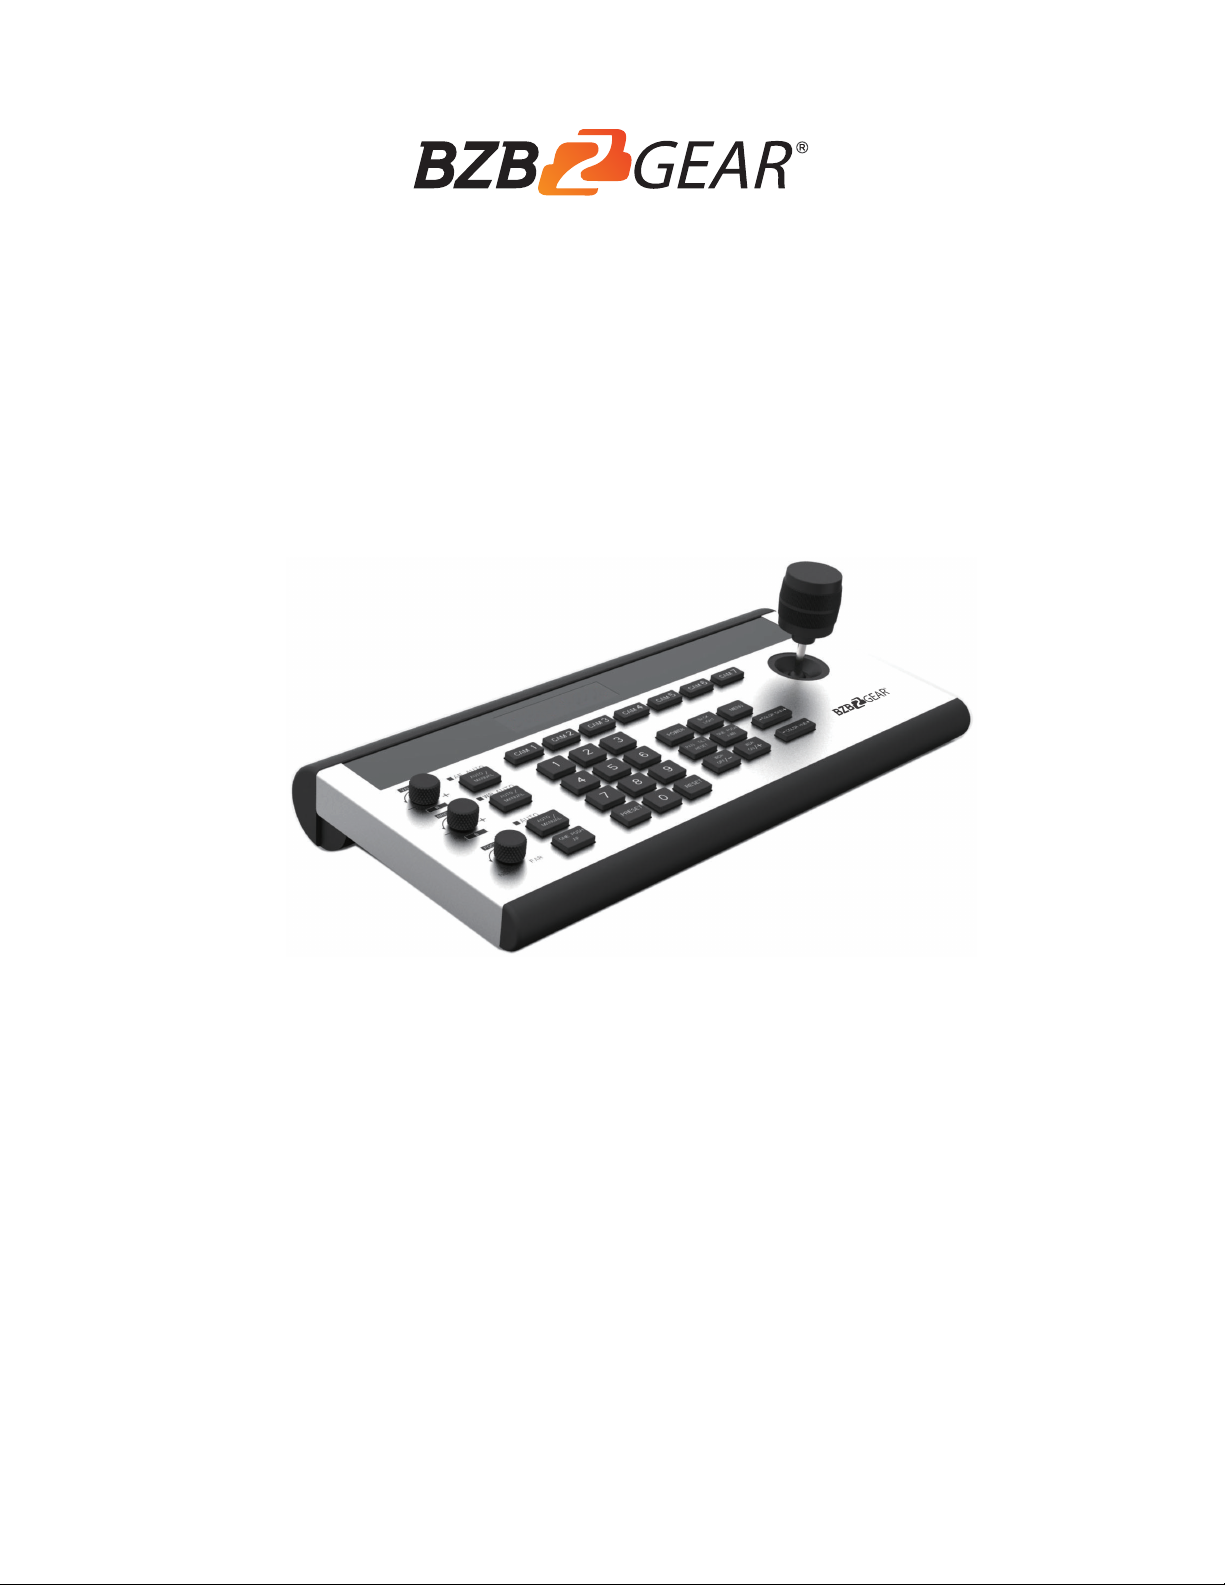
BG-CJ-IPRSPRO
Pro Camera Control Keyboard
User Manual
Page 2
Content
Specifica Parameters
Key p
PRESET
Came Fr rea
Channel Short Keys Area
Interf ram
Keyboard Menu Opera
Main Menu
System Se
COM Se
.............................................. 9
............................................. 10
rea
............................................ 9
.................................. 2
................................... 3
..................................... 5
...................................... 5
.................................... 6
.................................. 9
...................... 7
ETHERNET SETTING
Passwords Se
Dimensions Size
Warranty
Mission Statement
........................................ 11
......................................... 11
.......................................... 12
........................................ 13
Package Contents
1x BG-CJ-IPRSPRO
1x Power Supply
1x User Manual
............................................... 13
1
Page 3
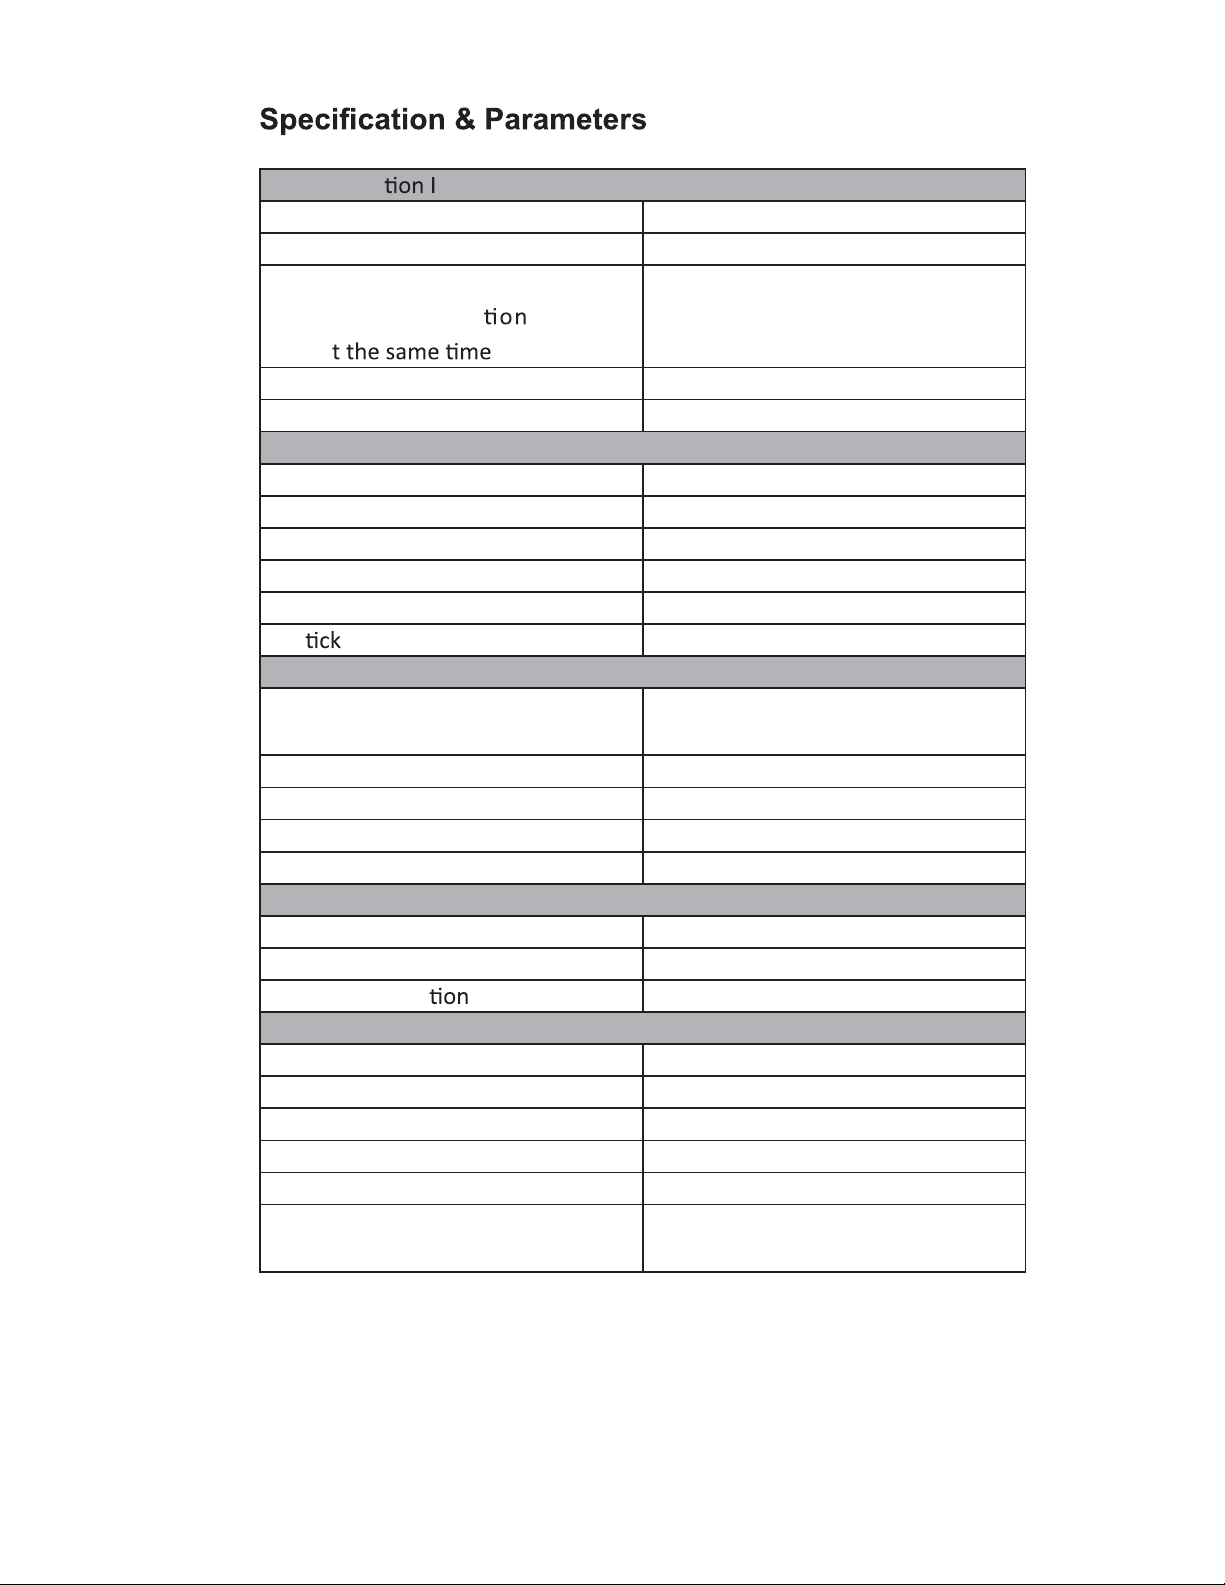
Communica nterface
RS422/RS485 Interface 4Pin Terminal
RS232C Interface DB 9Pin Male Interface
LAN Interface
(All of Communica Po r t can
work a
)
RJ45 Female Interface
Power Interface JEITA type4 Female
Upgrade Interface Micro USB Female Interface
Camera Control
Max Support 255pcs PTZ Camera
Control Protocol VISCA , PELCO P/D
Display Screen OLED Screen
Camera Channel 7
Knobs 3
Joys
1
Control Signal Format
Baud Rate 2400bps,4800bps,9600bps
,
19200bps,38400bps
Data Bit 8bits
Stop Bit 1bit
Parity Bit NONE
Ethernet Protocol UDP / TCP /IP
Power
Rated Voltage DC 12V
Rated Current 0.3A max,3.6W
Power Consump
24W
Physical
Working Temperature 0℃ ~ 40
Storage Temperature -20℃ ~ +60
32 ℉ ~ 104
℃(
℃(
℉)
-4 ℉~ 140
℉)
Working temperature Indoor
Dimension Size (L*W*H ) 350mm x 173mm x 99mm
G.W(kg
)
2.5kgs
Packing Accessories User Manual / 2Pin Terminal / Power
2
Adapter
Page 4
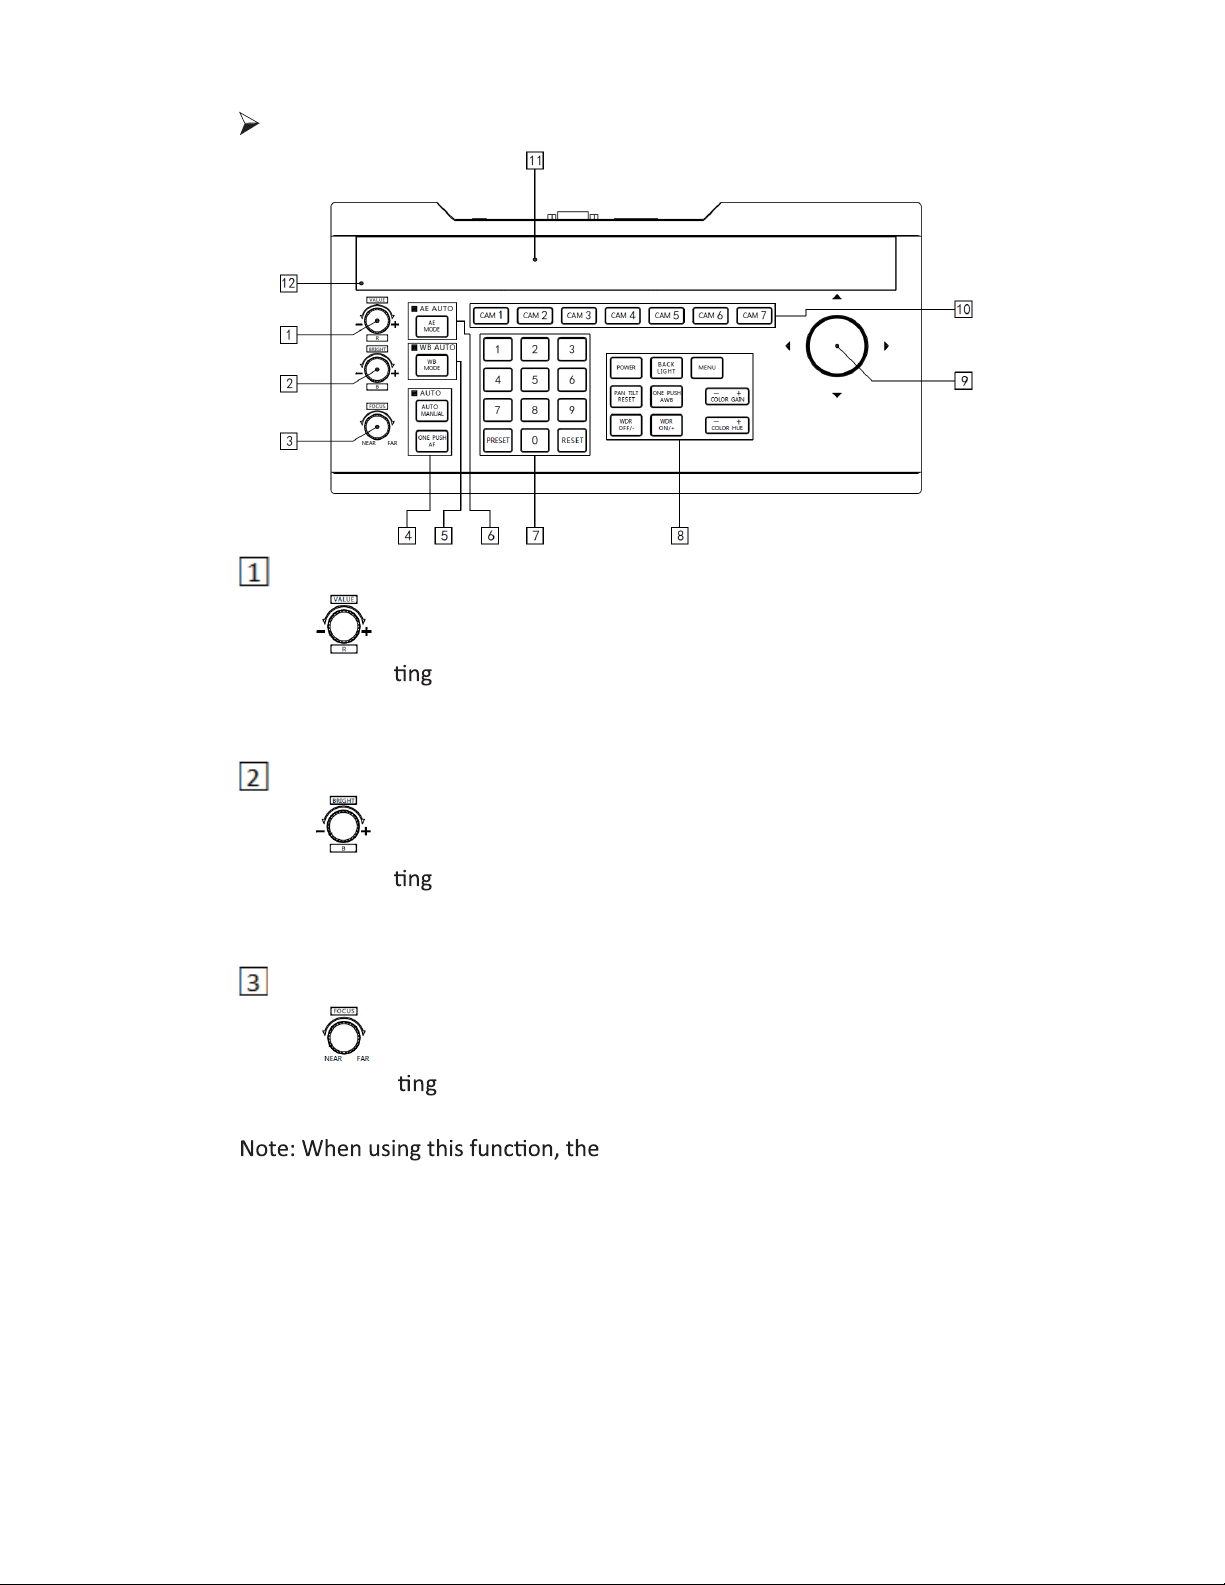
Keys Function Description
VALUE/R-Knob
For adjus camera’s Exposure parameters or Red Gain Value.
Clockwise to increase, counterclockwise to decrease.
BRIGHT/B- Knob
For adjus camera’s Exposure parameters or Blue Gain Value.
Clockwise to increase, counterclockwise to decrease.
FOCUS Kno
For adjus camera’s focal length. Clockwise to focus far,
counterclockwise to focus near.
keyboard’s Focus Mode will change to
MANUAL.
3
Page 5
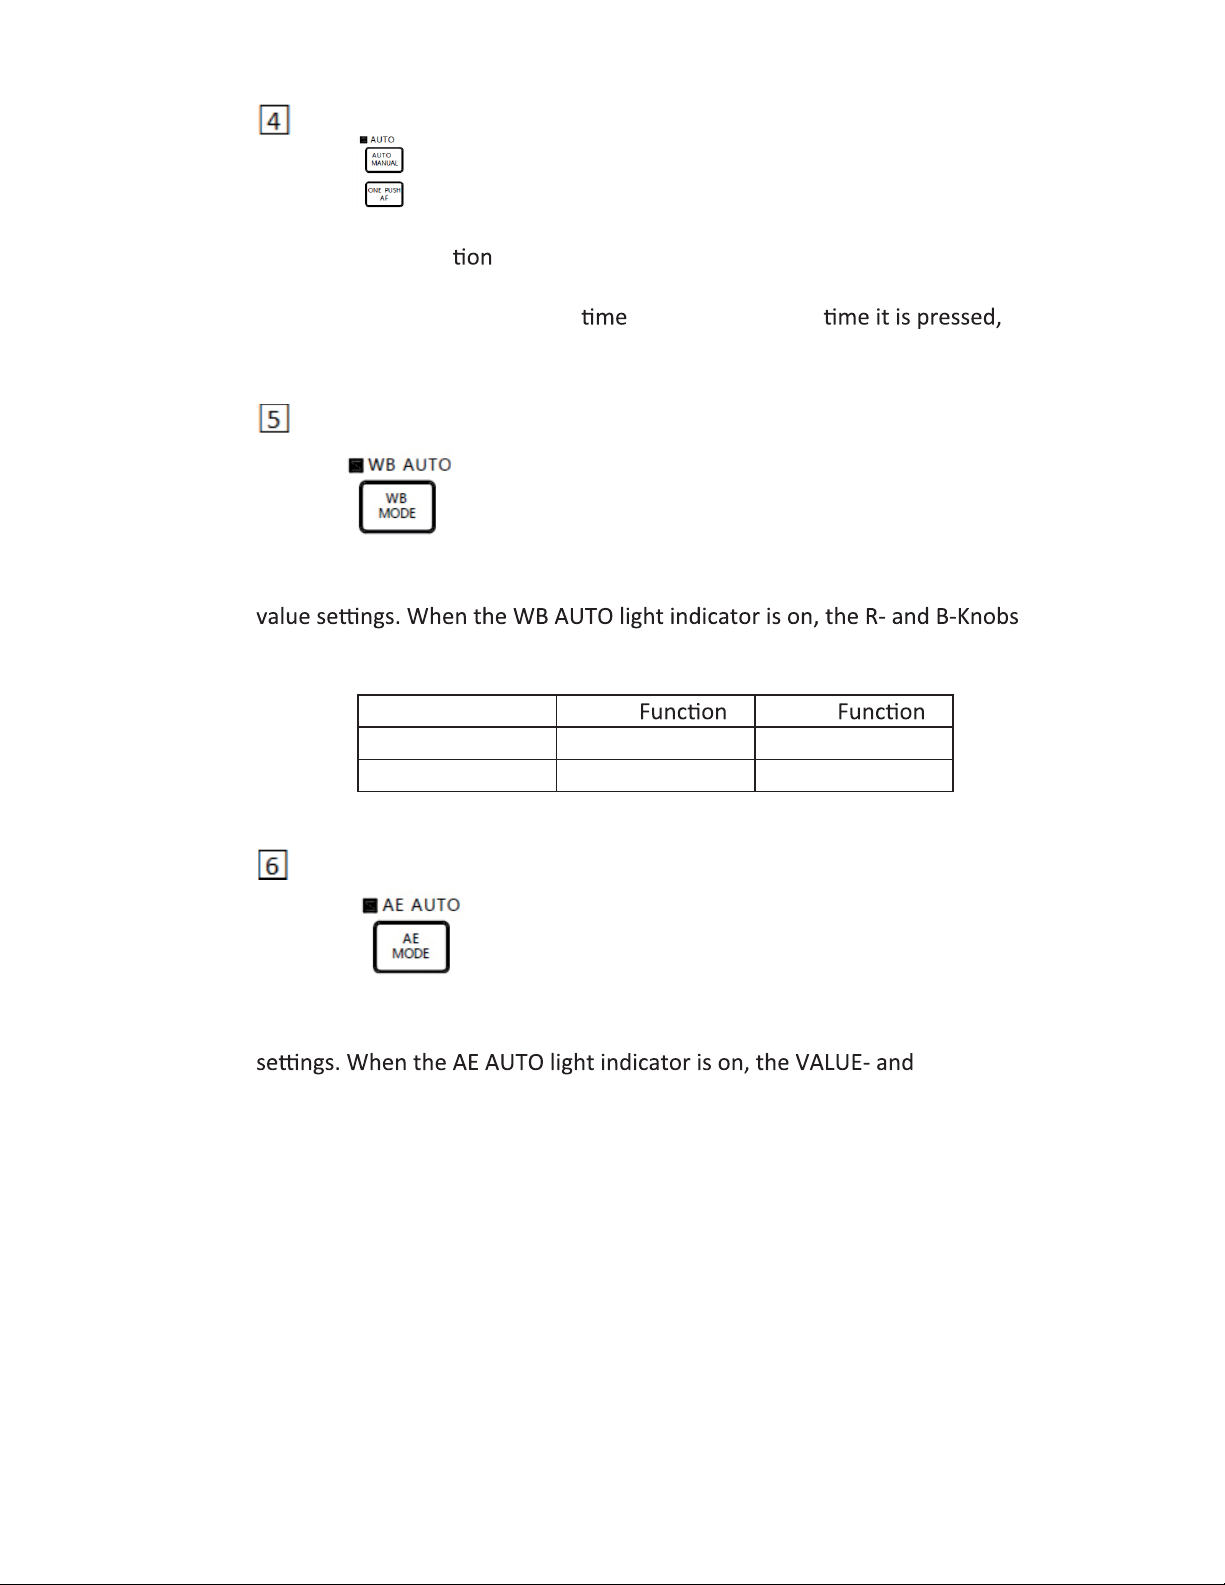
FOCUS Function Area
When AUTO indica
『
AUTO MANUAL』Adjust camera’s Focus Mode.
『
light is ON, then the current mode is AUTO MODE.
ONE PUSH AF』Triggers one- Auto FOCUS. Each
the camera focuses once. The camera will enter A U TO FOC US mode.
WB Mode Key
Modify White balance mode. Pressing will change between auto
and manual modes. Use the VALUE/R-Knob and BRIGHT/B-Knob to change
will only operate in this mode. Please see Table 1 for reference.
WB Mode R-Knob B-Knob
Auto None None
Manual Red Gain Blue Gain
Table 1
AE Mode Key
Modify Auto Exposure mode. Pressing will change between
modes. Use the VALUE/R-Knob and BRIGHT/B-Knob to change value
BRIGHT-Knobs will only operate in this mode. Please see Table 2 for
reference.
4
Page 6
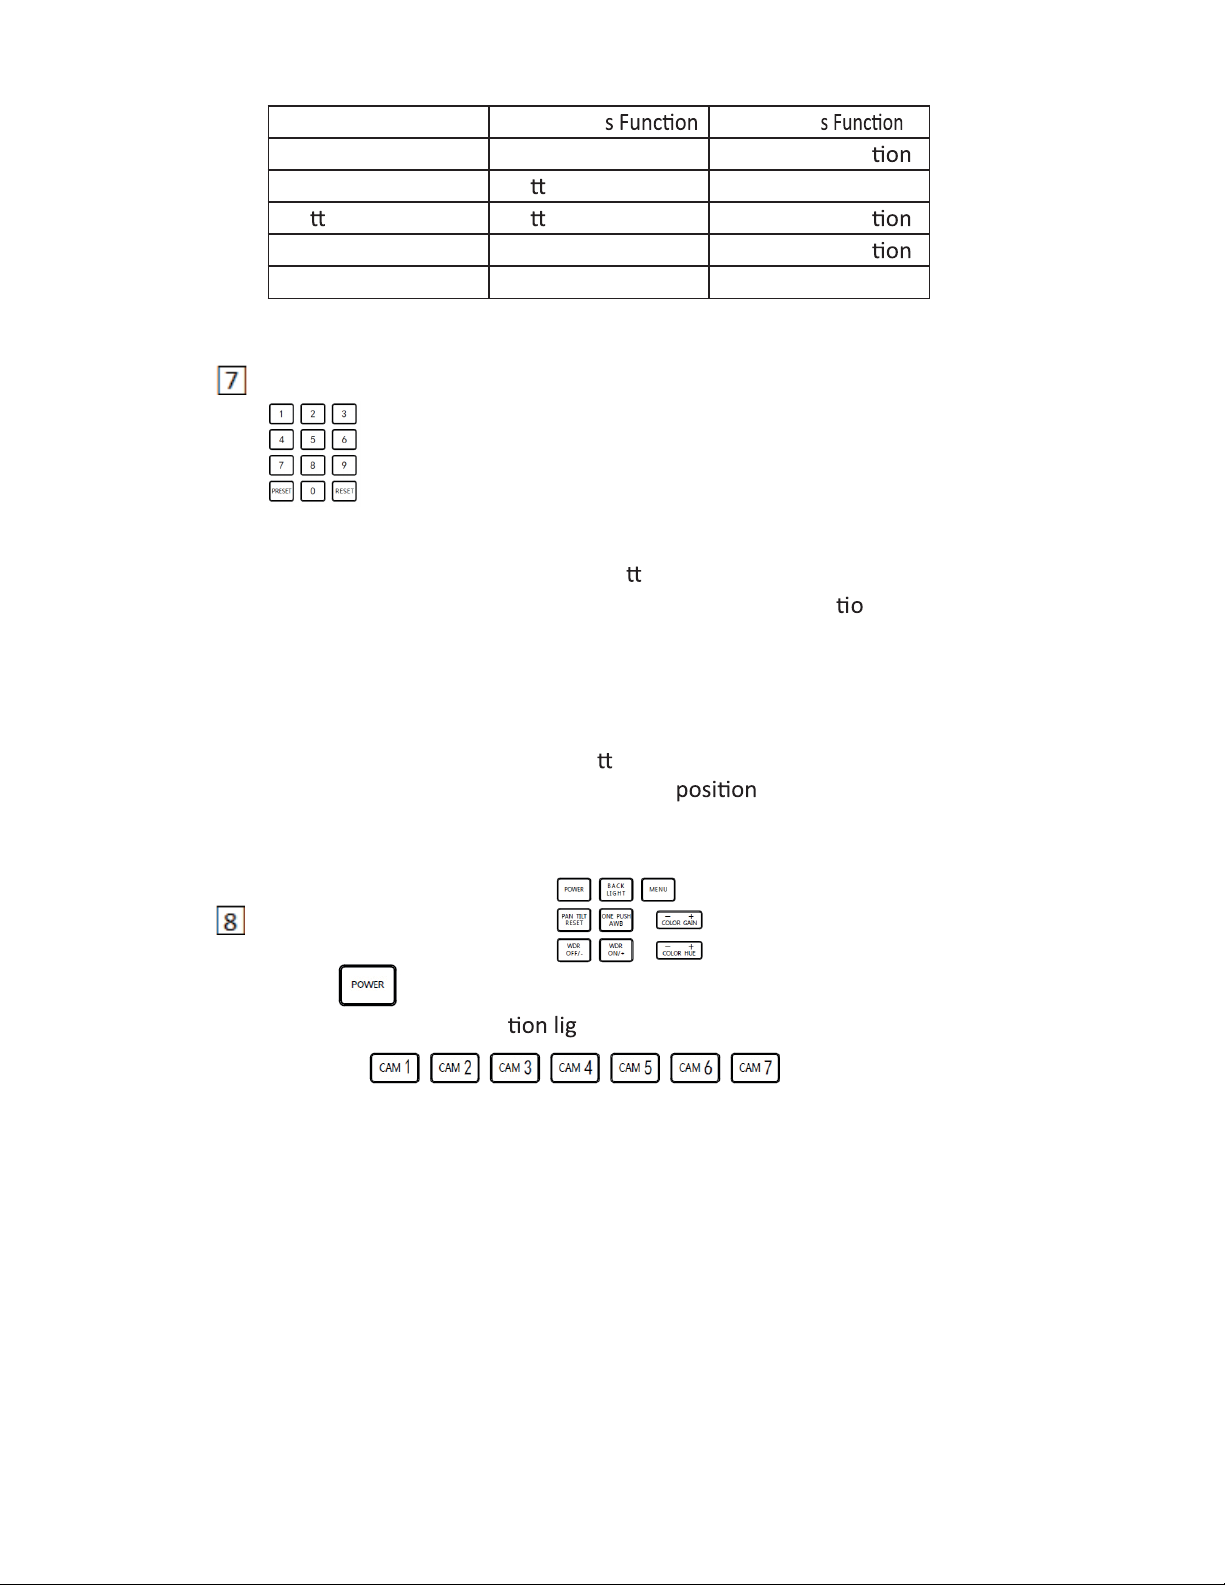
Exposure Mode
AUTO None Gain Compensa
MANUAL Shu er IRIS
Shu
er Priority Shu er Gain Compensa
Iris Priority IRIS Gain Compensa
Brightness Priority None Brightness
PRESETS Function Area
PRESET』Keys are used to Save and Call Presets.
『
Save Presets
keys start blinking. Next press the number of Preset posi n
you want saved ( e.g., 『PRESET』+ ++
:
VALUE-Knob
Table 2
Press 『PRESET』Bu on, the light of 『PRESET
『1』『2』『0』
BRIGHT-Knob
to save Preset 120).
』
Call Presets:
then press 『PRESET』, to call Preset 120).
Clear Presets:
Next press the number of the saved preset
RESET』+
『
Camera function Area
POWER
『
Press the keys and the indica
Green means the camera is powered on. White means the camera is in
standby mode. No light means the camera is not connected.
Pressing 『POWER』+『CAM1』~『CAM7』will turn on/off
』
Preset Number Keys +『PRESET』(e.g., Press『1』+『2』+『0
Press 『RESET』bu
『1』+『2』+『0』
key is to check the power status of all camera channels.
to clear Preset 120).
on; the light of 『RESET』keys will blink.
you want to clear (e.g., Press
ht of turns on.
CAM1』~『CAM7
『
』
』
,
the corresponding camera.
5
Page 7
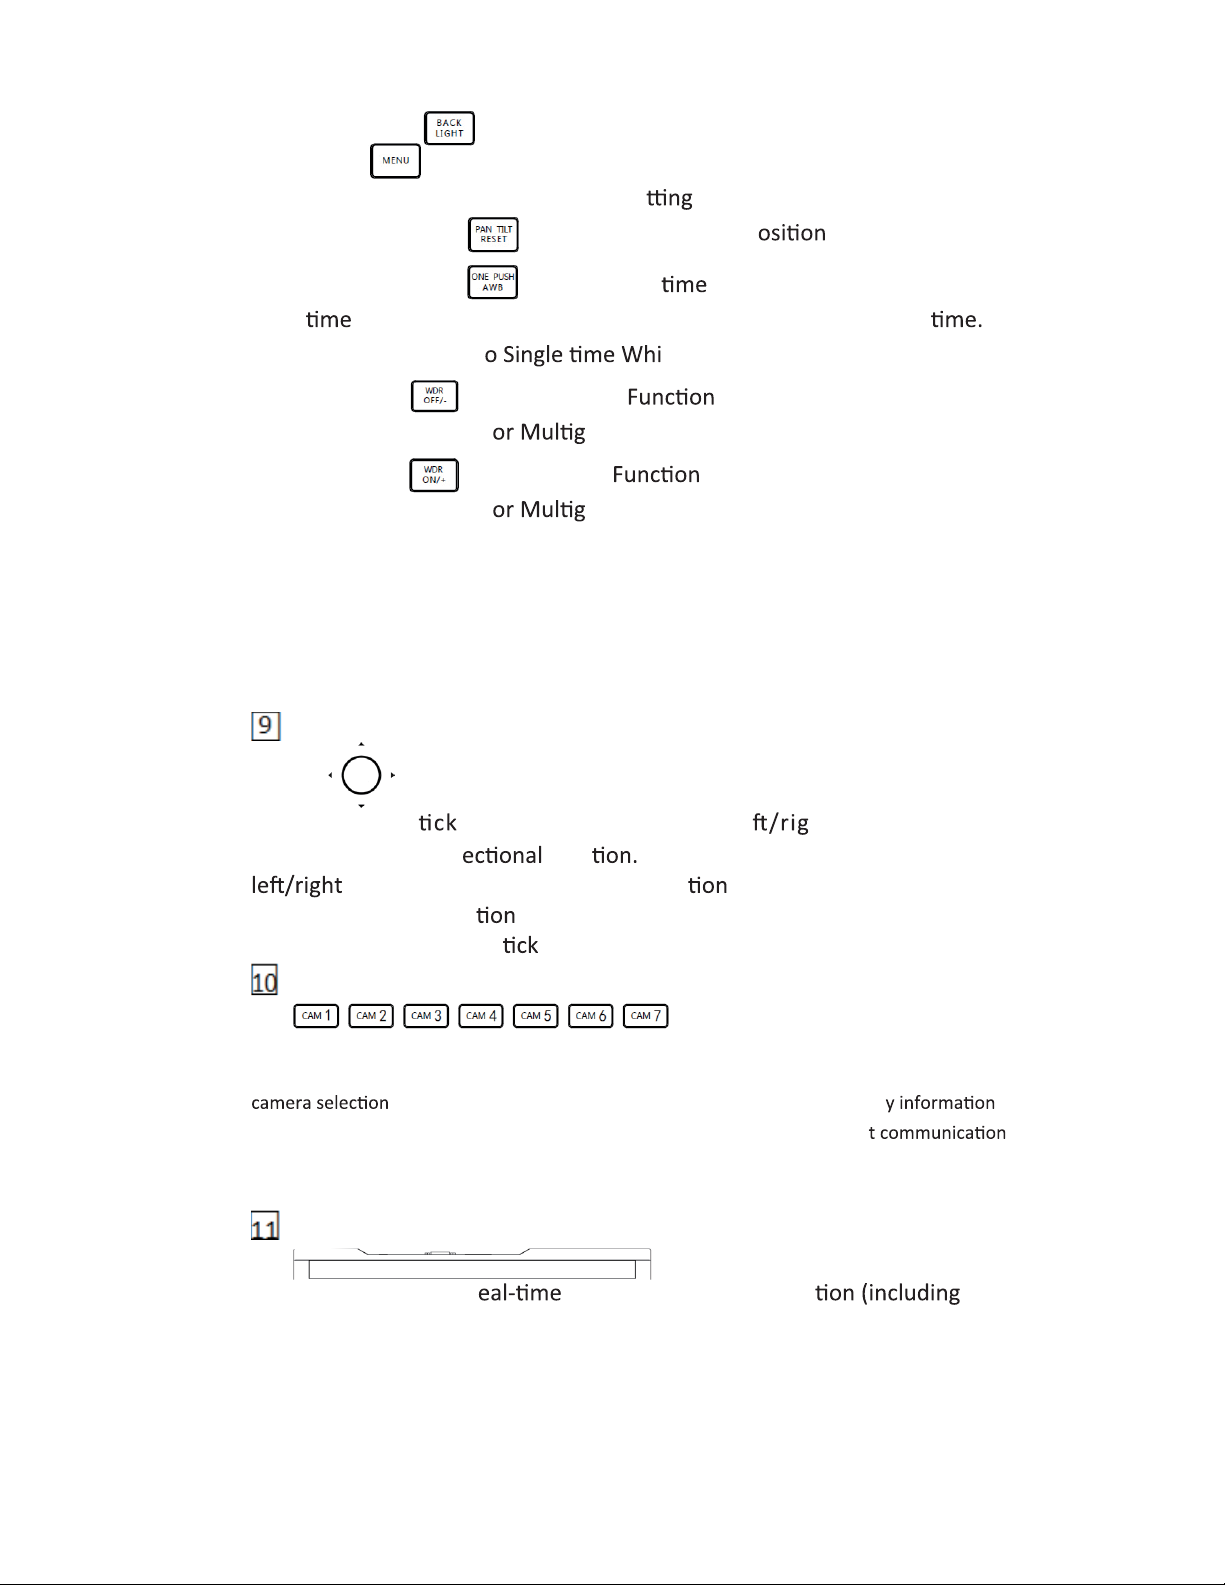
BACK LIGHT
『
』
Turn ON/OFF Back light
MENU
『
MENU』enter to Keyboard menu se
『
PAN TILT RESET
『
ONE PUSH AWB
『
』
Open or close keyboard menu; long press
;
』
』
Reset the Pan/Tilt P
Trigger one-
white balance.
of camera
Each you press, the camera will calibrate White balance one
The camera will enter t te balance Mode.
WDR OFF/-
『
』
Grade(Only available f rade WDR Camera
WDR ON/+
『
』
Grade(Only available f rade WDR Camera
COLOR GAIN+』Increase the value of COLOR GAIN
『
COLOR GAIN-』Reduce the value of COLOR GAIN
『
COLOR HUE+』Increase the value of COLOR HUE
『
COLOR HUE-』Reduce the value of COLOR HUE
『
Turn OFF WDR or Reduced Dynamic
)
Turn on WDR or Increased Dynamic
)
3-Axis Joystick
The joys
can support up/down, le ht, and clockwise/
counterclockwise dir rota It can move the camera up/down,
and zoom in/out. Clockwise rota is to zoom in (TELE),
counterclockwise rota is to zoom out (WIDE). When inside the
Keyboard menu, the joys can be used to modify the parameters.
Channel short Keys Area
CAM1』~『CAM7』is the short key to switch the channel of camera. When you press the
『
, the indicator light turns green. Now all the keyboard displa
is from that camera. All of the camera channels can work with differen
protocol and COMM parameters.
Display Screen
Displays current r
Keyboard status informa
6
Page 8
IP Address, Port Number, COMM ID, Communica Protocol, Baud Rate,
etc.) and Keyboard Menu. The display screen brightness can be set in the
Keyboard Menu.
Light Sensor
Detects the current environmental brightness. When the keyboard
the environment's light level.
Interface Function & Connection Diagram
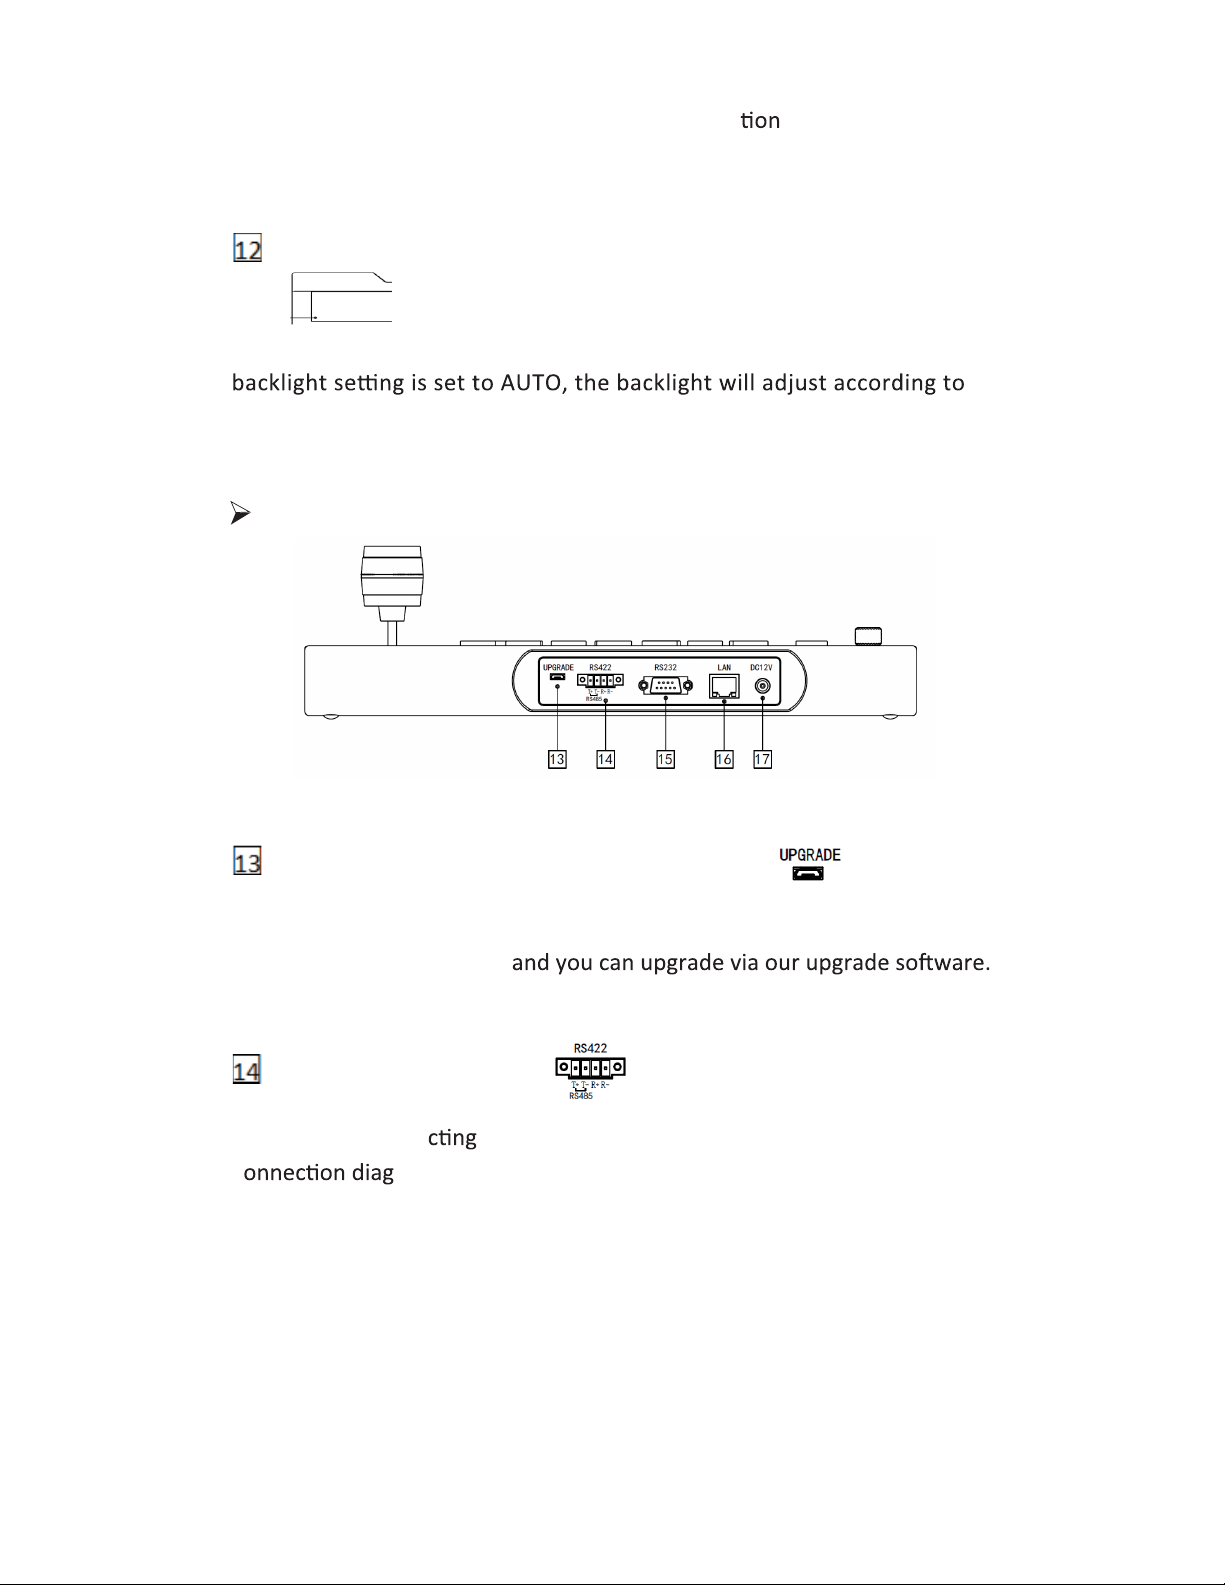
Upgrade Interface (For factory use only)
Use for upgrading t he hardware of control keyboard. Using a micro
USB cable, connect to a PC
RS422/RS485 Interface
Use for conne Camera through RS422 or RS485. Please see the
c ram for reference:
7
Page 9
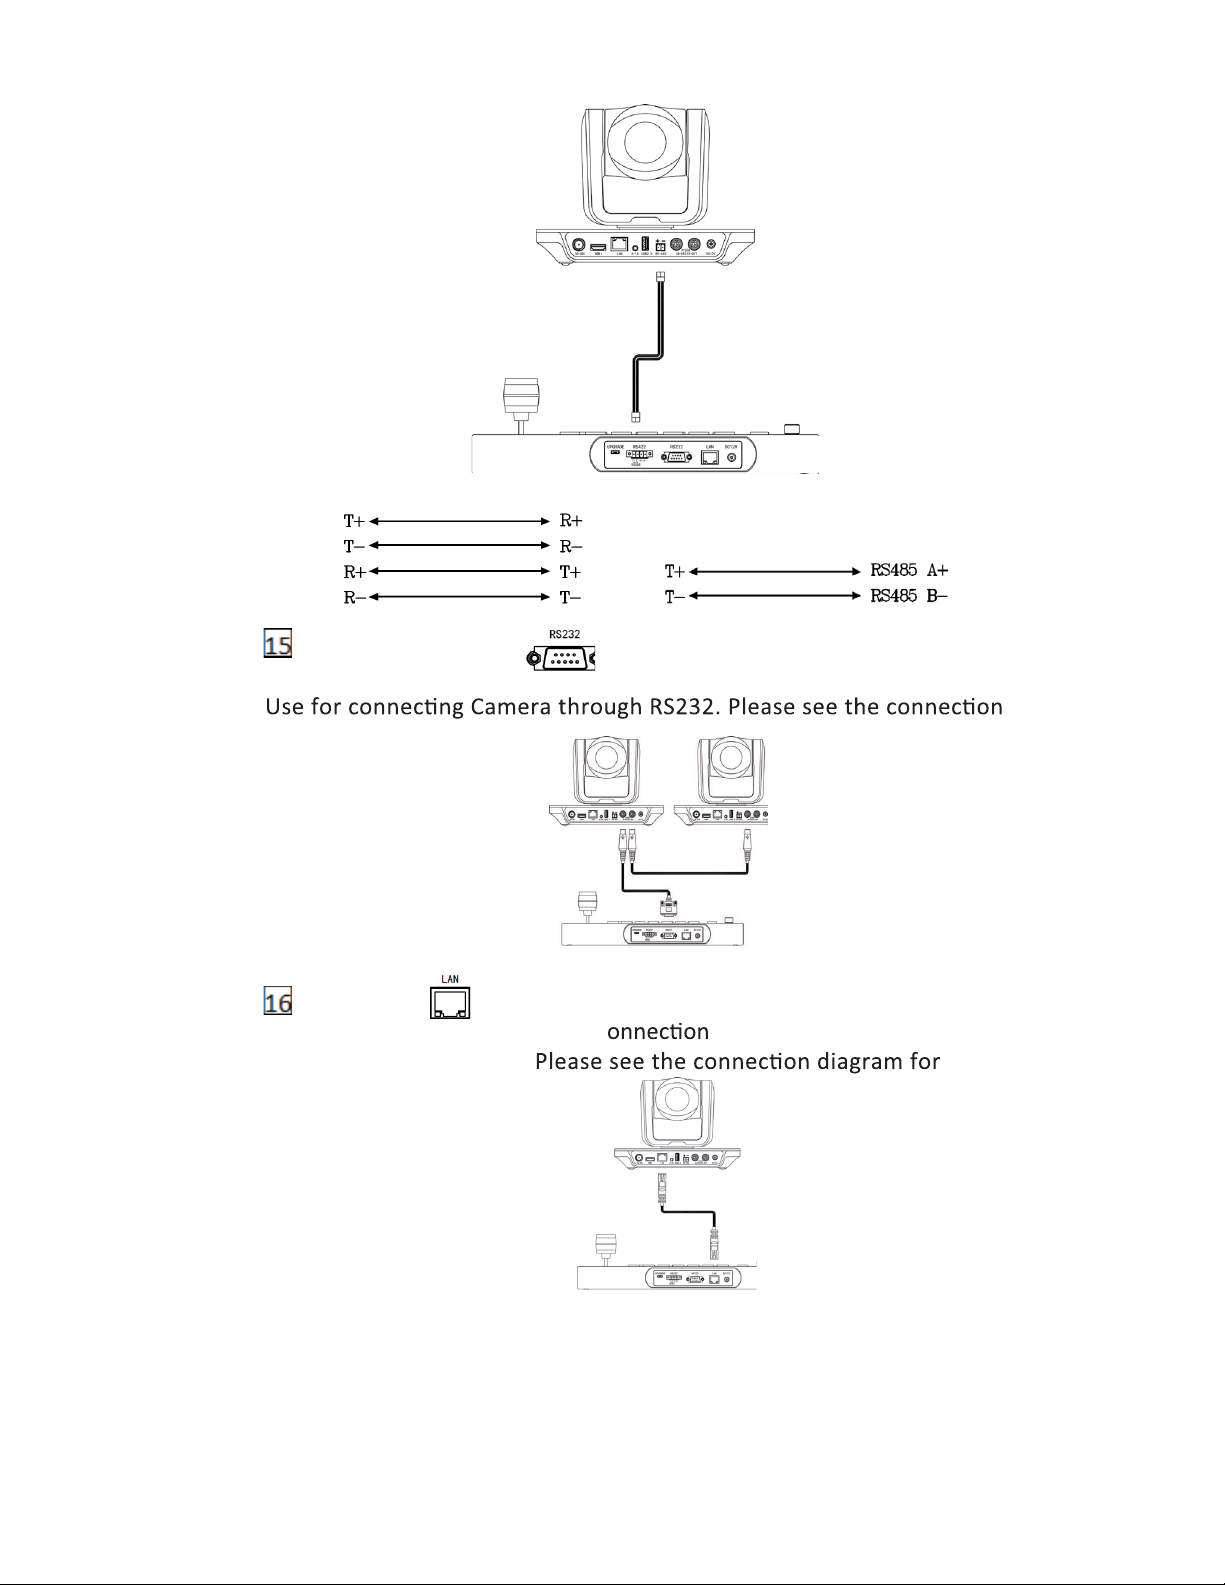
Keyboard
Camera RS 422interface
Camera RS 485interface
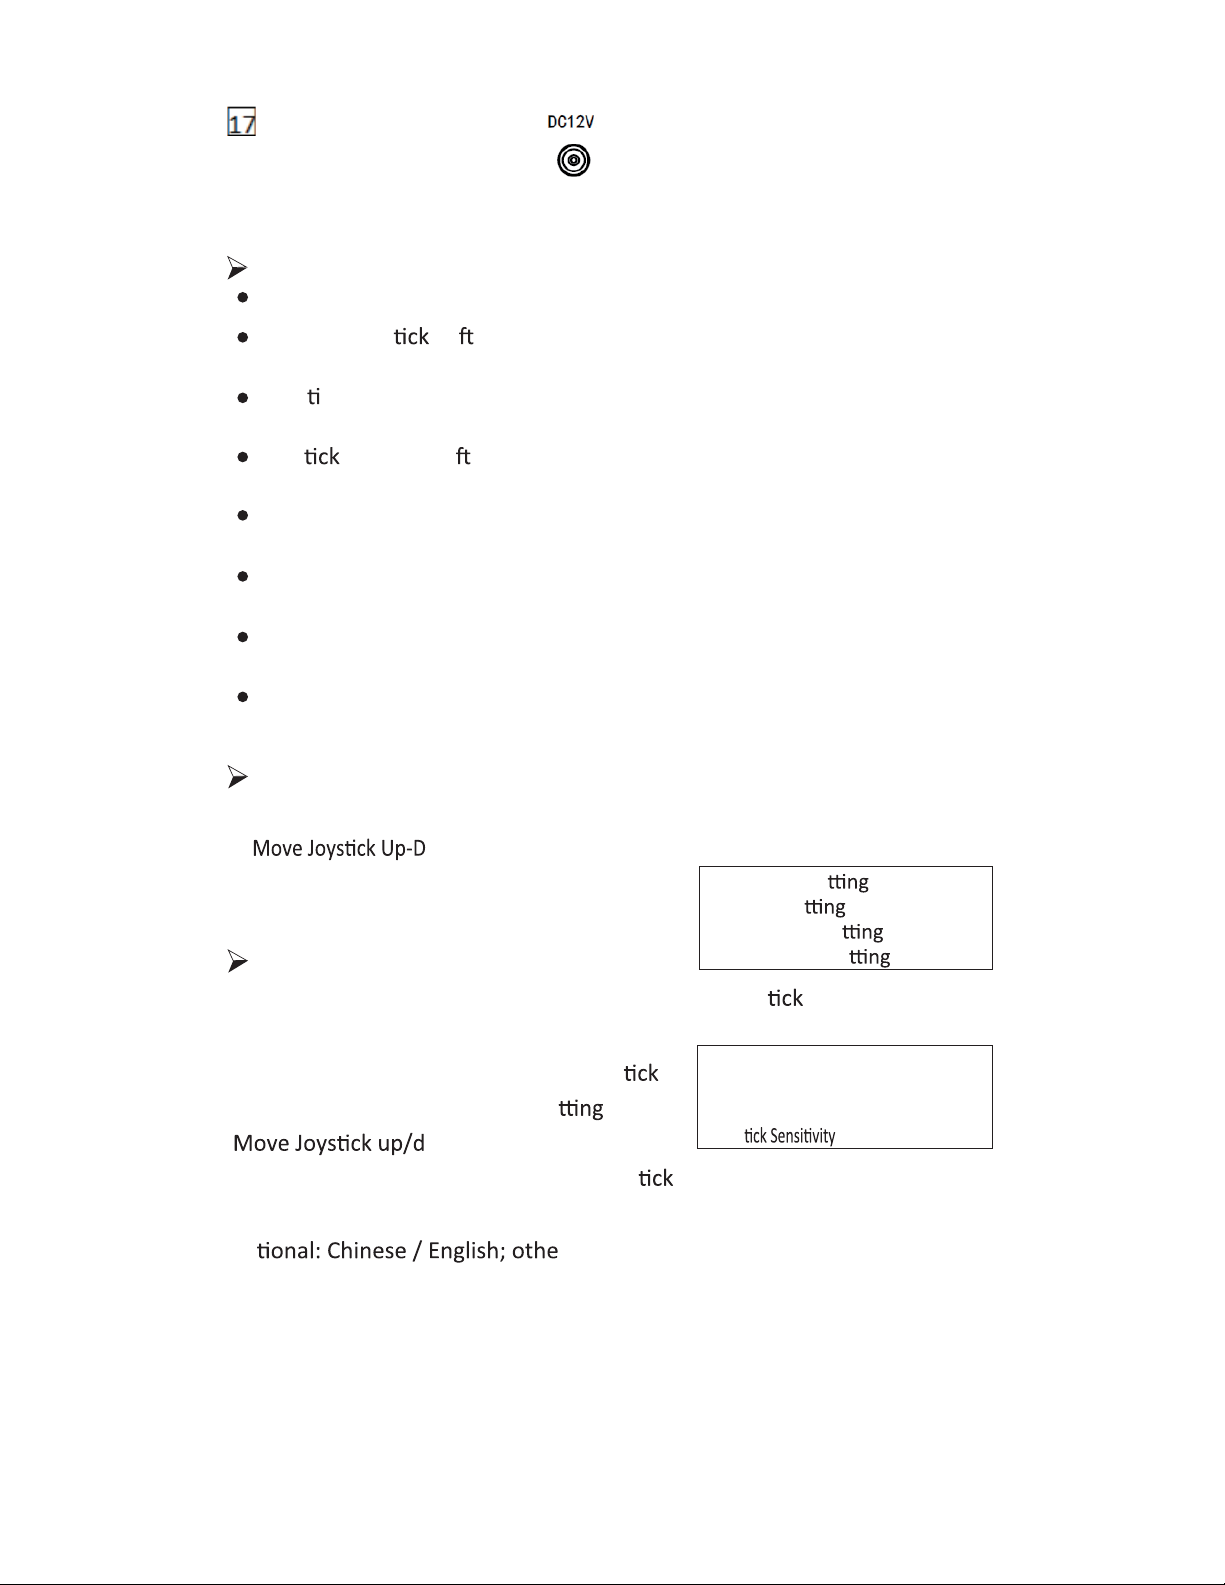
RS232 Interface
Keyboard
diagram for reference:
LAN Port
You can use a network cable c with Camera or through
Network Switch or Router.
reference.
8
Page 10
12V Power Interface
This interface is the Power supply interface. You can direct connect it
with its Power adapter; please use only the original power adapter.
Keyboard Menu Operation
Long Press『MENU』for 3 secs: enter Keyboard Menu
Swinging joys
Le & right: control the cursor up/down moving or
change current menu parameter
Joys ck towards right: e nter current menu; save & exit
Current Menu
Joys towards le : exit current menu; will not save current
menu
Press『MENU』: exit current menu; will not save current
menu
Press Number keys『0』~『9
valid for menu items that require input number
Press『PRESET
Backspace/Return to previous input number
』:
value(only valid for menu items that require input number
Press『RESET
To confirm current input value; enter to next
』:
input number value(only
』:
)
)
input item(only valid for menu items that require input number
Main Menu
Long press【MENU】for 3 secs to enter Main Menu
1.
2.
System Setting
own to control Cursor up-down
System Se
1.
Com Se
2.
Ethernet Se
3.
Password Se
4.
)
Move Cursor to
Language
【
Move cursor to
System Setting
【
】
Language
【
toward-right to enter language se status.
own to change the
, then move Joys towards right to enter.
】
Language
】
, Joys
1.
LED Brightness
2.
Back light: Mid
3.
Joys
4.
:
:
Normal
:
parameters. To save and exit, move Joys towards right.
Op r languages can be customized.
9
English
Normal
↓↓↓↓
Page 11
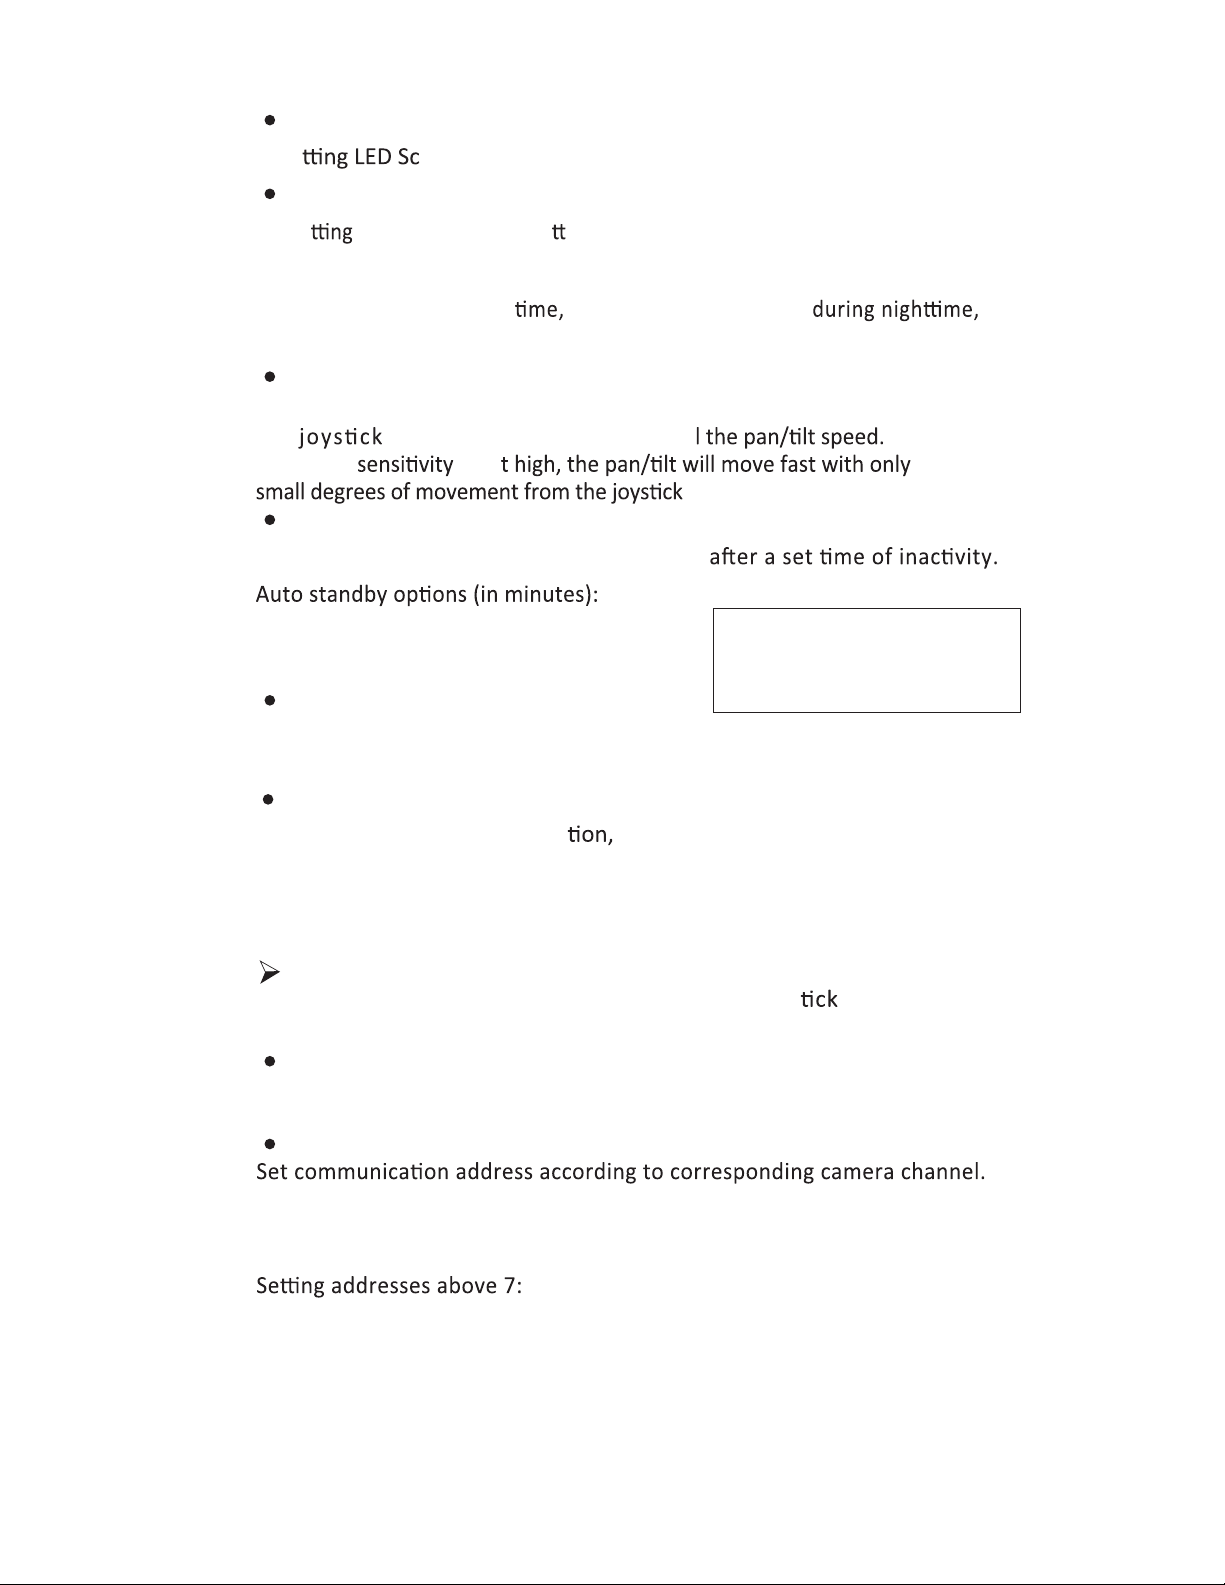
【
LED Screen Brightness
Se reen Brightness: Low, Normal, High
】
【
Button Back Light
】
Se the brightness of bu on backlight: OFF, LOW, MID, HIGH, AUTO
When “AUTO” is selected, the backlight adjusts according to environmental
brightness (e.g., during day b ac k li gh t w il l be off ;
backlight will turn on).
【
Joystick Sensitivity
Set Joystick sensitivity: Low, Normal, High.
The
degree of movement to contro
】
When the is se
.
【
AUTO STANDBY
Allows keyboard to e nt e r standby mode
】
1, 2, 5, 10, 20, 30, 60.
Auto Standby ON ↑↑↑↑
5.
Itself IP:192.168.1.88:5000
【
Keyboard IP
】
6.
About Keyboard
7.
To set keyboard’s IP Address and Port Number.
Default IP: 192.168.1.88; default Port: 5000
【
About Keyboard
】
To check the keyboard informa including Keyboard Model No, Version,
Serial Number.
Noted
:【
↓↓↓↓】indicates the menu can page down
,【
↑↑↑↑
indicates the menu can page up
COM Setting
Move the cursor to 【COMM SETTING】, Joys toward Right to
enter
;
【
CHANNEL
To select Channel CAM1 ~ CAM 7. Corresponding keyboard Keys
CAM1
『
【ID】
~『CAM7
』 』
】
When using VISCA, only addresses 1-7 are available. If using PELCO P/D, the
address can be set to 1-7 or "Others" for addresses above 7.
】
10
Page 12
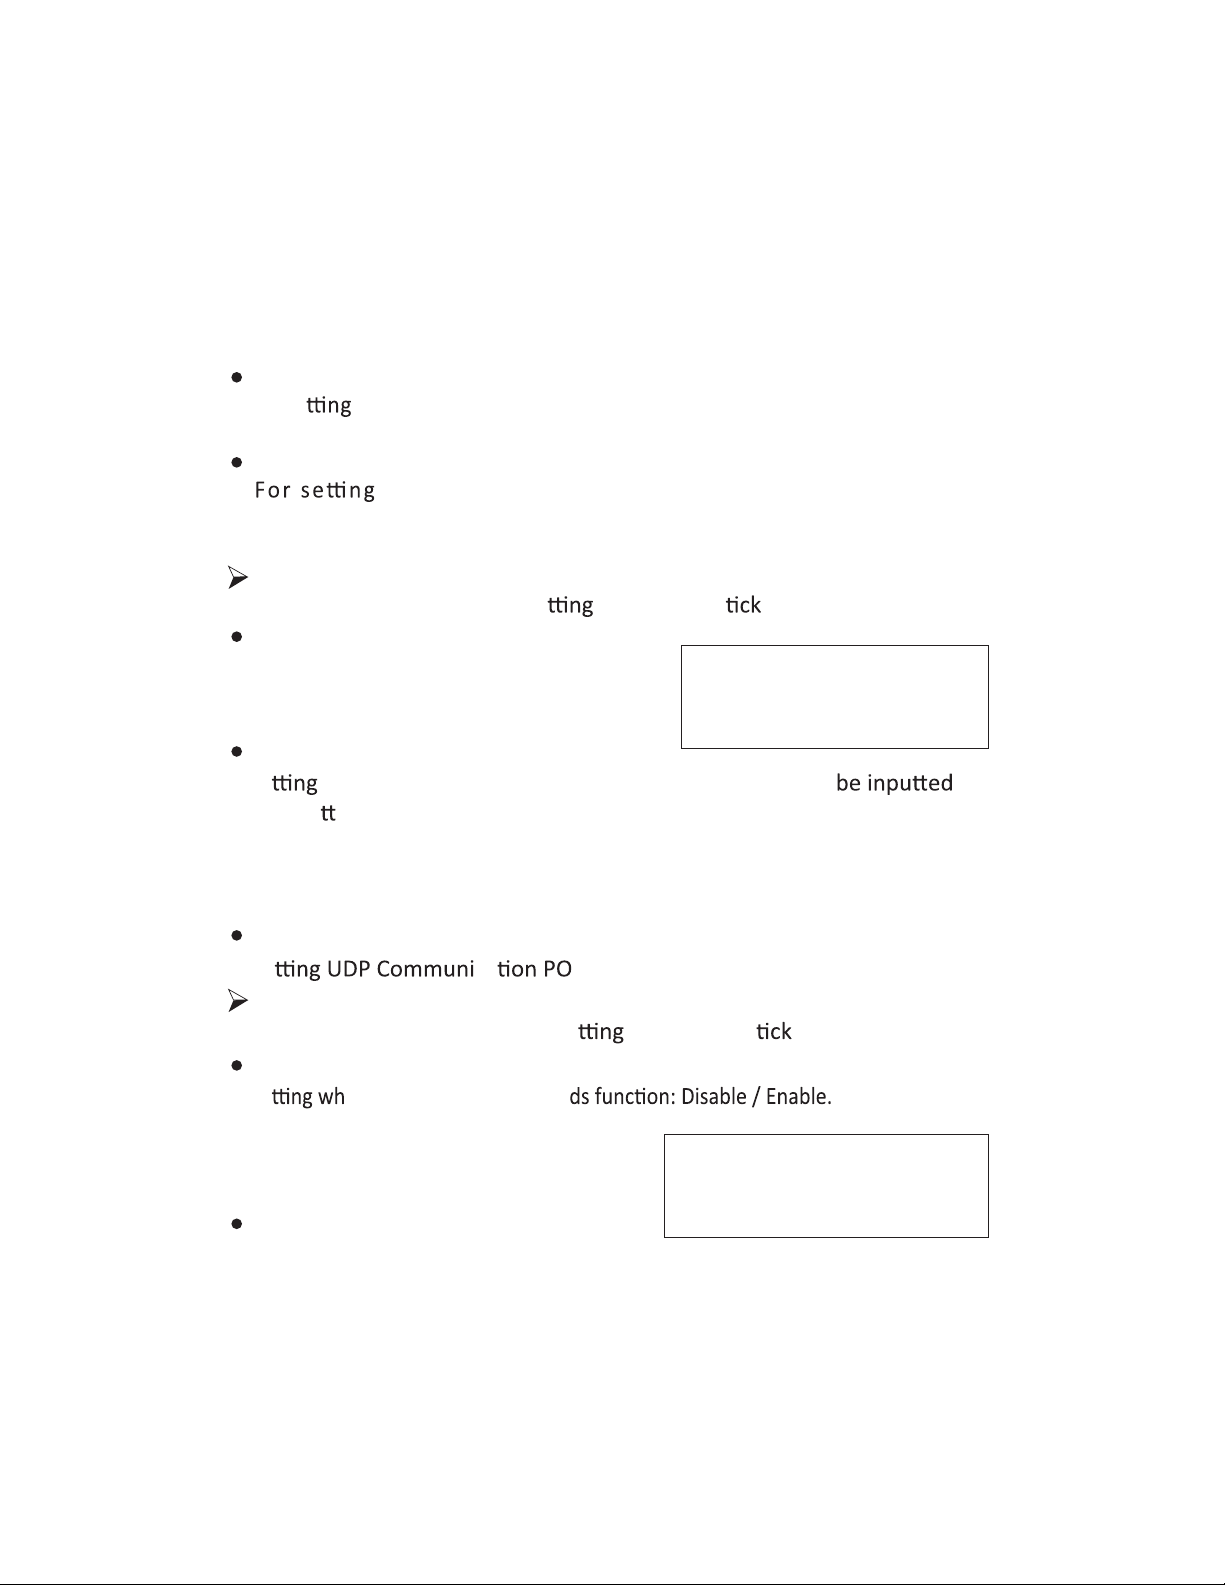
Select the channel key you’d like to use (e.g., CAM1). Set the ID to Others,
then exit the menu. Select the corresponding numbers for the address you’d
like to set (e.g., 12), then press the channel key.
Example using CAM1:
Press CAM1, then set address to Others. Exit the menu, then press [1] + [2] +
[CAM1]. The address for CAM1 will now be “12.”
【
Baud Rate
For se Baud Rate: 2400, 4800, 9600, 19200, 38400
【
PROTOCOL
ETHERNET SETTING
Move Cursor to【Network Se
【
CHANNEL
To select the corresponding Channel
『CAM1』~『CAM7
【
IP Address
Se corresponding channel of Cam IP Address. It can by
】
】
PROTOCOL: VISCA, Pelco-D, Pelco-P
towards right to enter.
Channel1:CAM1
Cam IP :192.168.1.160
Port :8090
】
】
』
, then Joys
】
1.
2.
3.
Digital Bu ons. When the number input to 3 bits, the cursor will Auto enter
next item. When the input number less 3 bits, Press『RESET』to confirm
and enter next items. If you input the wrong number, press 『PRESET
』
to backspace.
【
PORT
Se ca RT OF Corresponding Channel Camera.
】
Passwords Setting
Moving Cursor to 【Password Se
【
Password Enable
Se ether to use the Passwor
Default password: 8888
【
Modify Password
Allows to change the password.
Default password: 8888
】
】
】
11
, then Joys
Password Enable:Disable / Enable
1.
Modify Password
2.
towards right to enter.
Page 13
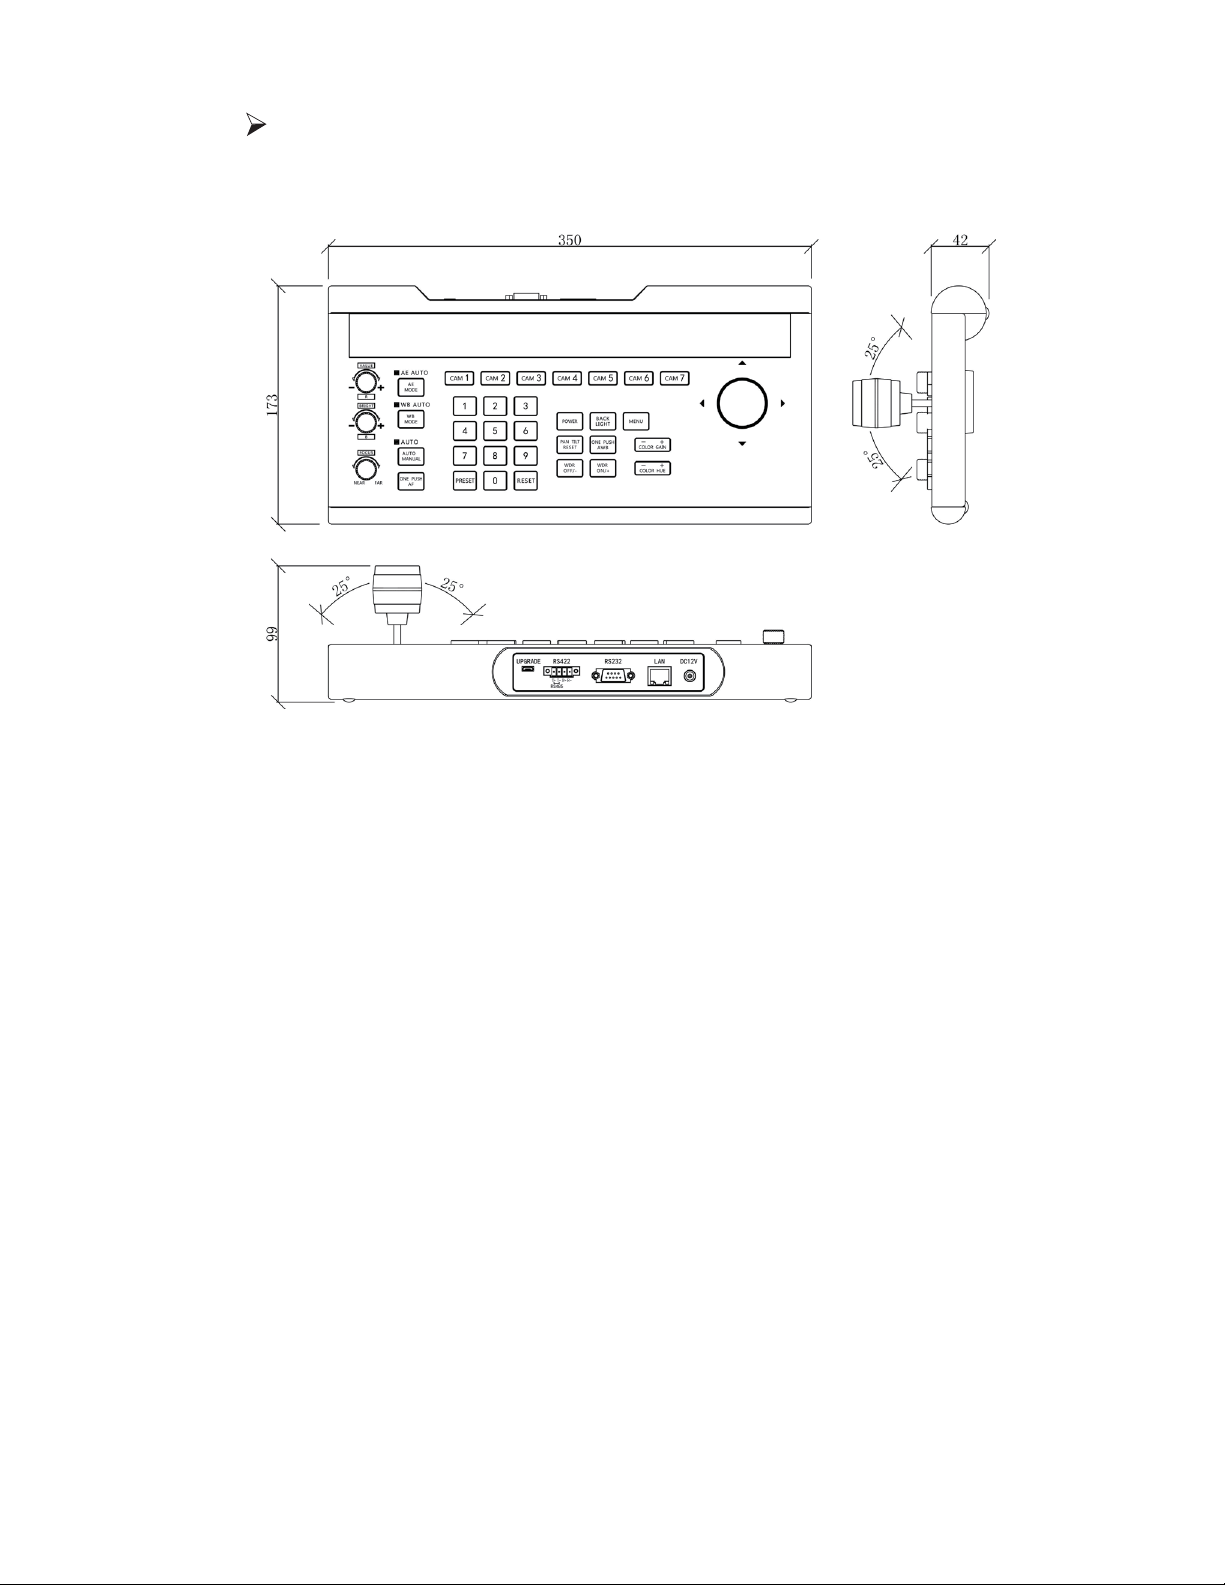
Dimensions Size (Unit: mm)
12
Page 14
Warranty
BZBGEAR wants to assure you peace of mind. All BZBGEAR cameras and
camera-related products include our Stress-Free Three Year Warranty.
Mission Statement
everyone deserves to see, hear, and feel the advancements made in
today’s AV world without having to break the bank. BZBGEAR is the
professional products in AV.
We live in a DIY era where resources are abundant on the internet. With
support seven days a week for the products in our BZBGEAR catalog. You’ll
the products is on par with the top brands in the industry. The unparalleled
support from our team is our way of showing we care for every one of our
customers. Whether you’re an integrator, home theater enthusiast, or a
your project and not your budget.
13
 Loading...