

Page 1
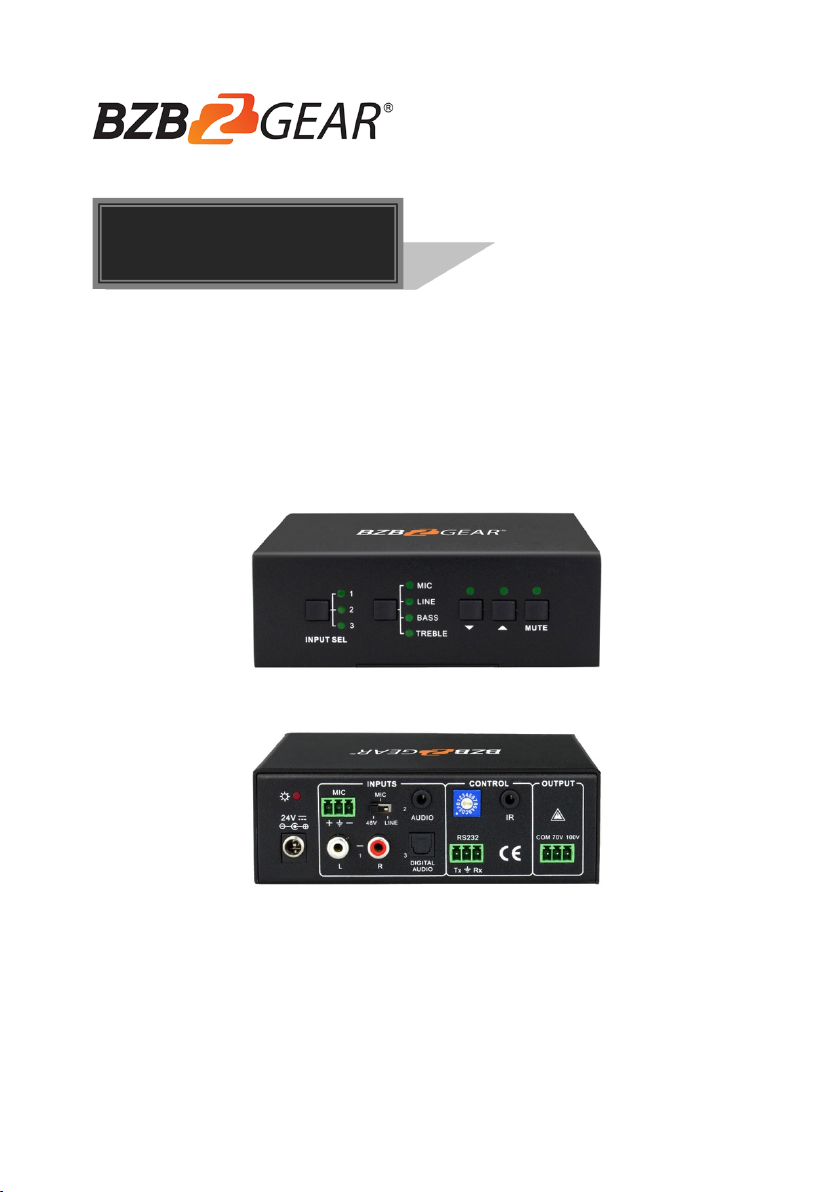
User Manual
BG-AMPC40
40 Watt Power Amplifier
All Rights Reserved
Page 2

40 Watt Power Amplifier
Preface
Read this user manual carefully before using the product. Pictures shown in this
manual are for reference only. Different models and specifications are subject to real
product.
This manual is only for operation instruction, please contact the local distributor for
maintenance assistance. In the constant effort to improve the product, we reserve the
right to make functions or parameters changes without notice or obligation. Please refer
to the dealers for the latest details.
FCC Statement
This equipment generates, uses and can radiate radio frequency energy and, if not
installed and used in accordance with the instructions, may cause harmful interference
to radio communications. It has been tested and found to comply with the limits for a
Class B digital device, pursuant to part 15 of the FCC Rules. These limits are designed
to provide reasonable protection against harmful interference in a commercial
installation.
Operation of this equipment in a residential area is likely to cause interference, in which
case the user at their own expense will be required to take whatever measures may be
necessary to correct the interference.
Any changes or modifications not expressly approved by the manufacture would void
the user’s authority to operate the equipment.
Page 3

40 Watt Power Amplifier
SAFETY PRECAUTIONS
To e n su re th e b es t f ro m t he p ro d uc t , p l ea s e r ea d a ll i ns t ru ct i o ns ca r ef u ll y be f or e u si ng
the device. Save this manual for future reference.
l Unpack the equipment carefully and save the original box and packing material for
possible future shipment.
l Follow basic safety precautions to reduce the risk of fire, electrical shock and injury
to persons.
l Do not dismantle the housing or modify the module. It may result in electrical shock
or burn.
l Using supplies or parts not meeting the specifications of product may cause
damage, deterioration or malfunction.
l Refer all servicing to qualified service personnel.
l To p r ev en t f ir e or sh o ck ha za r d, d o n ot ex po s e th e u ni t to ra i n, m o is tu r e or i ns t al l
this product near water.
l Do not put any heavy items on the extension cable in case of extrusion.
l Do not remove the housing of the device as opening or removing housing may
expose you to dangerous voltage or other hazards.
l Install the device in a place with fine ventilation to avoid damage caused by
overheating.
l Keep the module away from liquids.
l Spillage into the housing may result in fire, electrical shock, or equipment damage.
If an object or liquid falls or spills on to the housing, unplug the module immediately.
l Do not twist or pull by force ends of the optical cable. It can cause malfunction.
l Do not use liquid or aerosol cleaners to clean this unit. Always unplug the power to
the device before cleaning.
l Unplug the power cord when left unused for a long period of time.
l Information on disposal for scrapped devices: do not burn or mix with general
household waste, and please treat them as normal electrical wastes.
Page 4

40 Watt Power Amplifier
Table of Contents
1. Product Introduction .................................................................................................... 1
1.1 Features ............................................................................................................. 1
1.2 Package Contents ............................................................................................. 2
2. Panel Description ........................................................................................................ 2
2.1 Front Panel ........................................................................................................ 2
2.2 Rear Panel ......................................................................................................... 3
3. System Connection ..................................................................................................... 4
3.1 Usage Precautions ............................................................................................ 4
3.2 System Diagram ................................................................................................ 4
3.3 Audio Connection ............................................................................................... 4
3.3.1 Audio Output ............................................................................................ 4
3.3.2 Audio Inputs ............................................................................................. 5
3.4 System Applications ........................................................................................... 6
4. System Operation ....................................................................................................... 7
4.1 Operation of Front Panel ................................................................................... 7
4.1.1 Audio switching ........................................................................................ 7
4.1.2 Volume/EQ controlling ............................................................................. 7
4.2 Operation of IR Remote ..................................................................................... 8
4.3 Operation of Control Software ........................................................................... 9
4.3.1 Connection with Computer ...................................................................... 9
4.3.2 RS232 Control Software .......................................................................... 9
4.3.3 Running Environment ............................................................................ 10
4.3.4 Function Settings ................................................................................... 10
4.3.5 RS232 Communication Commands ....................................................... 11
5. Specifications ............................................................................................................ 13
6. Panel Drawing ........................................................................................................... 14
7. Troubleshooting and Maintenance ............................................................................ 15
8. Tech Support ............................................................................................................. 15
9. Warranty ................................................................................................................... 16
10. Mission Statement .................................................................................................. 16
Page 5

40 Watt Power Amplifier
1. Product Introduction
The BG-AMPC40 is a 40 Watt power amplifier (Class-D) with output alternatively at
70V or 100V. It has 2 stereo inputs (1x3.5mm jack for line in, 2xRCA for L&R), 1 digital
input, and 1 balanced MIC. It is integrated with powerful functions including ducking
function, EQ control, MIC mixer, etc. MIC input supports 3 levels with condenser MIC,
dynamic MIC, and line audio input.
As for power amplifier, we have typical voltages at 70V and 100V for different countries.
The amplifier is designed to integrate with both voltages to meet different requirements.
1.1 Features
l Mono audio output at 40Watt.
l Switchable between 70V and 100V.
l Ducking function.
l 16 ID codes for controlling multiple amplifiers.
l 3-level MIC input, supports condenser microphone, dynamic microphone, and
wireless microphone.
l MIC port can support balance/unbalance signal as well as external noise
suppression.
l Two stereo audio inputs and one digital audio input. Selectable by button, IR
remote, and RS232.
l Volume/Bass/Treble controlled by buttons, IR remote, and RS232.
l Fast switching speed for good performance.
l Convection cooler; fan is not needed.
l LED indicator for power and working status.
l Antistatic case design to provide protection for long-term and stable performance.
1
Page 6
40 Watt Power Amplifier
No.
Name
Function
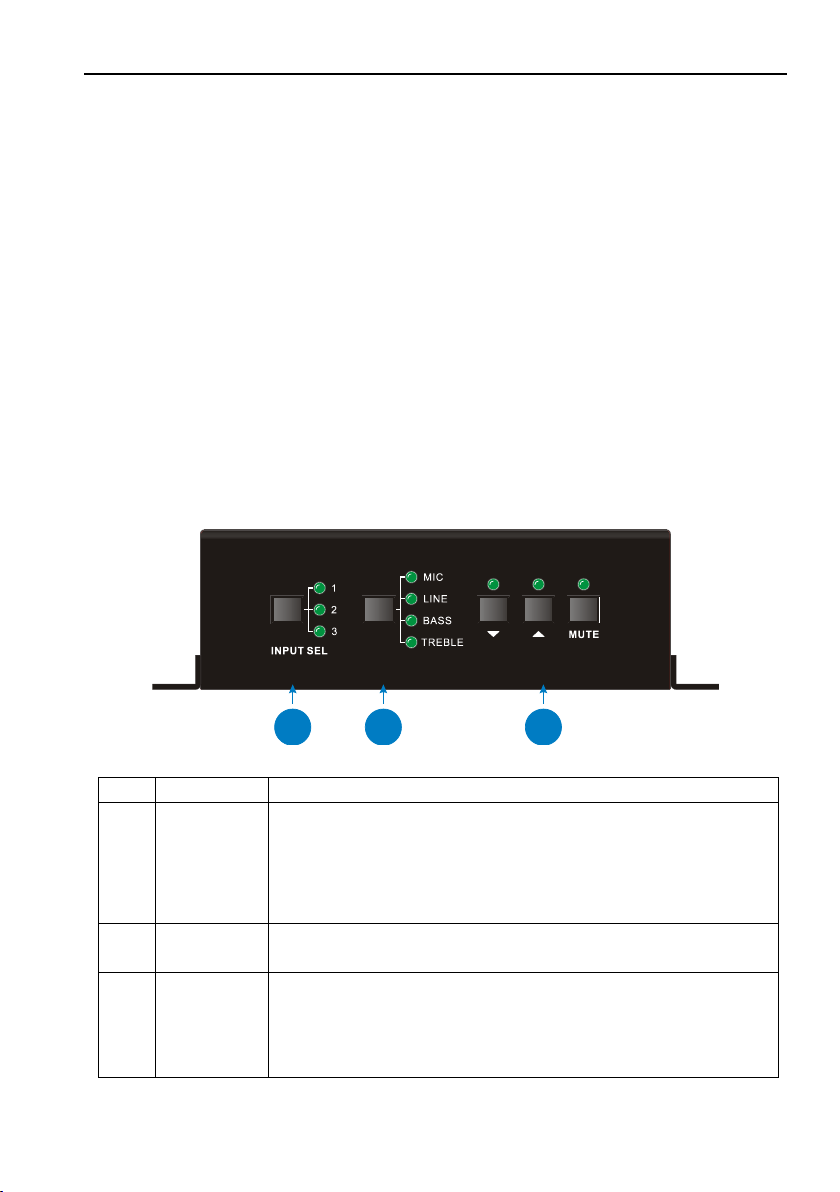
①
Audio Input
Selection
To s e le ct th e i n pu t a u di o s ou r ce , after choosing the audio
source, the corresponding LED indicator will be on. No.1 is
for dual mono audio input (2 RCA connectors for L&R), No.2
is for stereo audio input (3.5mm mini jack), and No.3 is for
digital fiber audio input.
②
Audio
Control
Adjust the volume of the MIC, Line, or the level of Bass and
Treble with this button
③
Volume
Adjustment
To t u rn u p /d ow n o r m ut e t he c o rr es p on di n g au d io .
▽
: Turn down the volume
△
: Turn up the volume
MUTE: Mute the output
1
2
3
1.2 Package Contents
l 1x BG-AMPC40 40 Watt Power Amplifier
l 2x Mounting ears with 4 Screws
l 4x Plastic Cushions
l 2x Pluggable Terminal Blocks
l 1x RS232 Cable
l 1x Power Adapter (DC 24V 2.71A)
l 1x User manual
Note: Please contact your distributor immediately if any damage or defect in the
components is found.
2. Panel Description
2.1 Front Panel
2
Page 7
No.
Name
Function
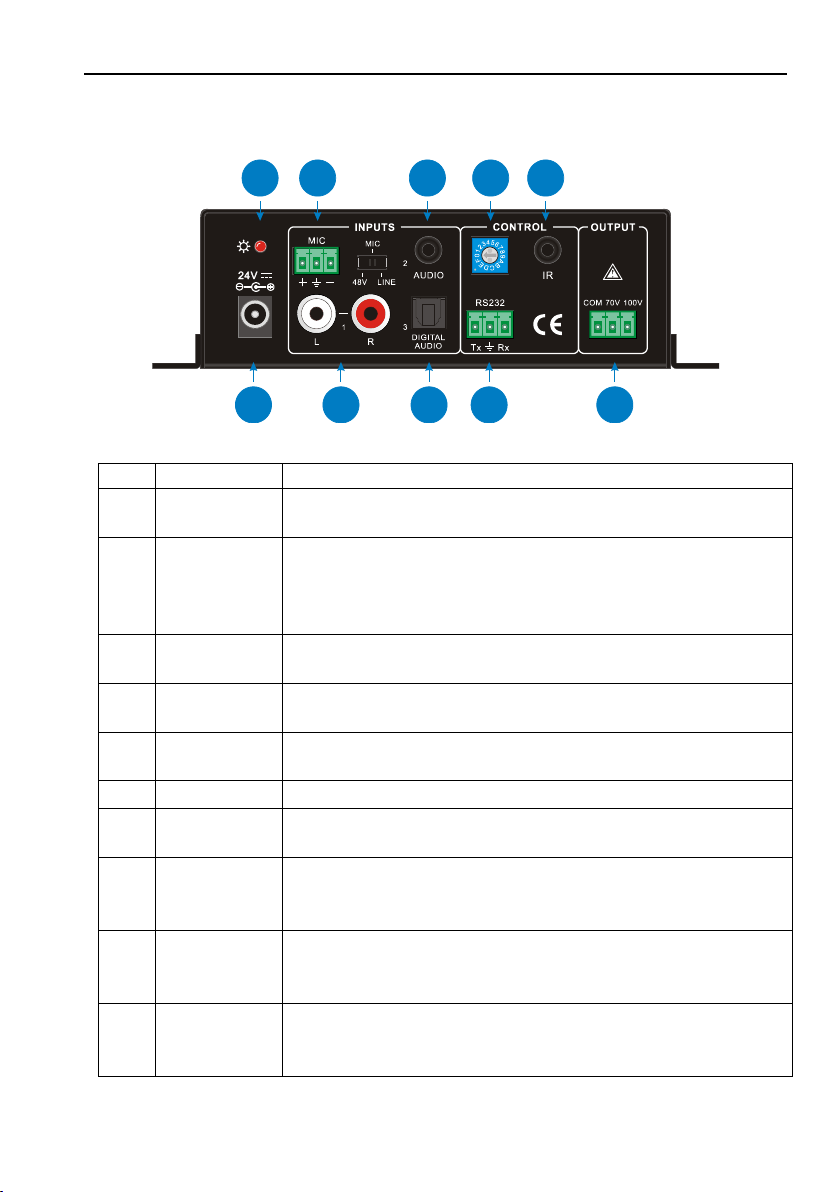
①
Power
Indicator
Turns red when power on.
②
Microphone
input port
3-pole captive screw connector for microphone input, the dial
switch on the right side is to select the micro input including
48V (for condenser microphone), MIC (for dynamic
microphone), and LINE (for line audio).
③
Audio Inputs
3.5mm mini jack for stereo audio input. It can be connected
with audio source devices (e.g., DVD player).
④
ID Code
16 codes range from 0 to F (hexadecimal). Works together
with the PC control software.
⑤
IR
To c o nn ec t w it h t he IR r ec e iv er . Works together with the IR
remote.
⑥
Power Port
To c o nn ec t w it h t he po we r a da p te r ( DC 24 V ).
⑦
L+R RCA
Dual-mono audio input, which can be connected with audio
source device such as a PC.
⑧
Digital Audio
Input
Fiber connector for digital audio input (PCM format only). It
can be connected with a device with fiber port, such as Bluray player.
⑨
RS232
3-pole captive screw connector for serial control. It can be
connected with PC (use a 3-pole captive to 9 pin female D
connector and serial control software) to control the amplifier.
⑩
Audio Output
To c o nn ec t w it h a ud i o ou t pu t d ev ic es su ch as s p ea ke r s ( to
select 70V or 100V depends on the input voltage of the
speakers). COM is for grounding (GND).
6
7
8
9
10
1
2
3
4
5
2.2 Rear Panel
40 Watt Power Amplifier
3
Page 8
40 Watt Power Amplifier
MIC
PC 1
Blu-ray
DVD
Speaker
Speaker
Speaker
Speaker
PC
(100V/10W)
(100V/10W)
(100V/10W)
(100V/10W)
IR Re mote
IR Re ceive r
3. System Connection
3.1 Usage Precautions
l Make sure all components and accessories are included before installation.
l System should be installed in a clean environment with proper temperature and
humidity.
l All of the power switches, plugs, sockets, and power cords should be insulated and
safe.
l All devices should be connected before powering on.
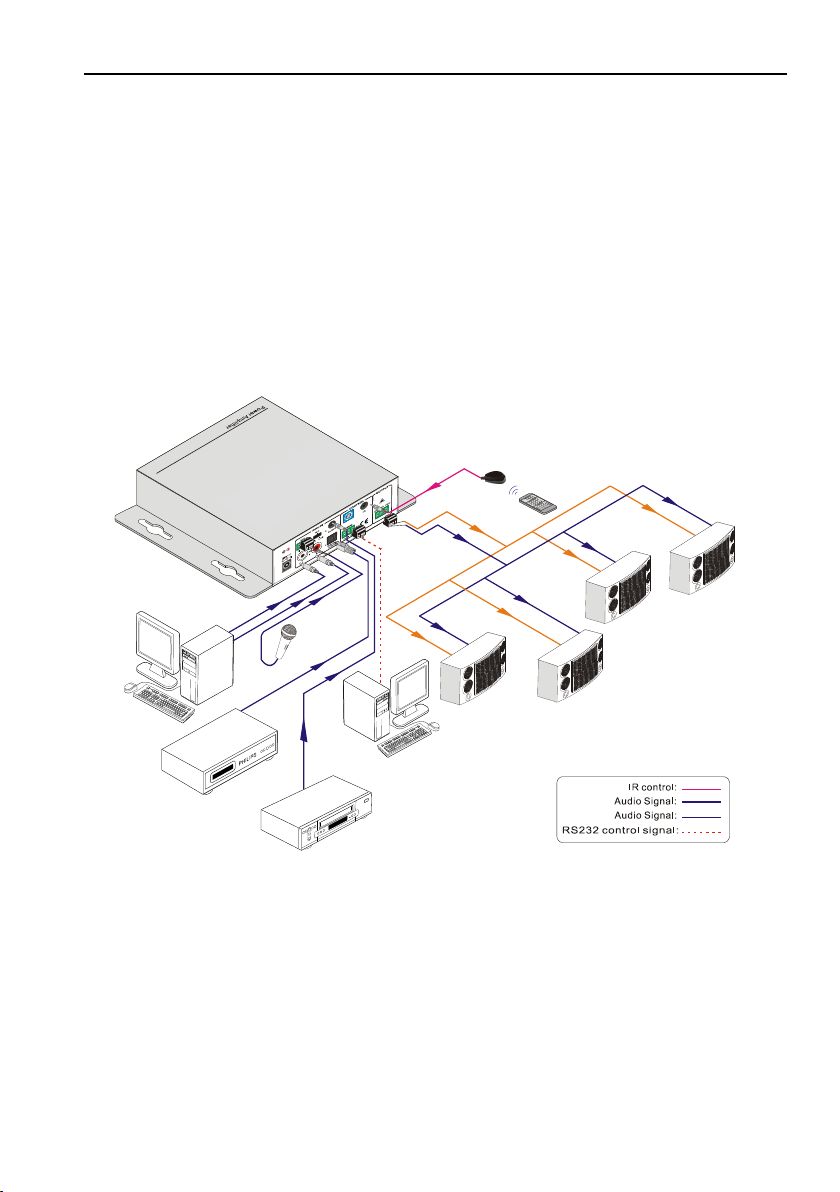
3.2 System Diagram
Figure 3 System Diagram
3.3 Audio Connection
3.3.1 Audio Output
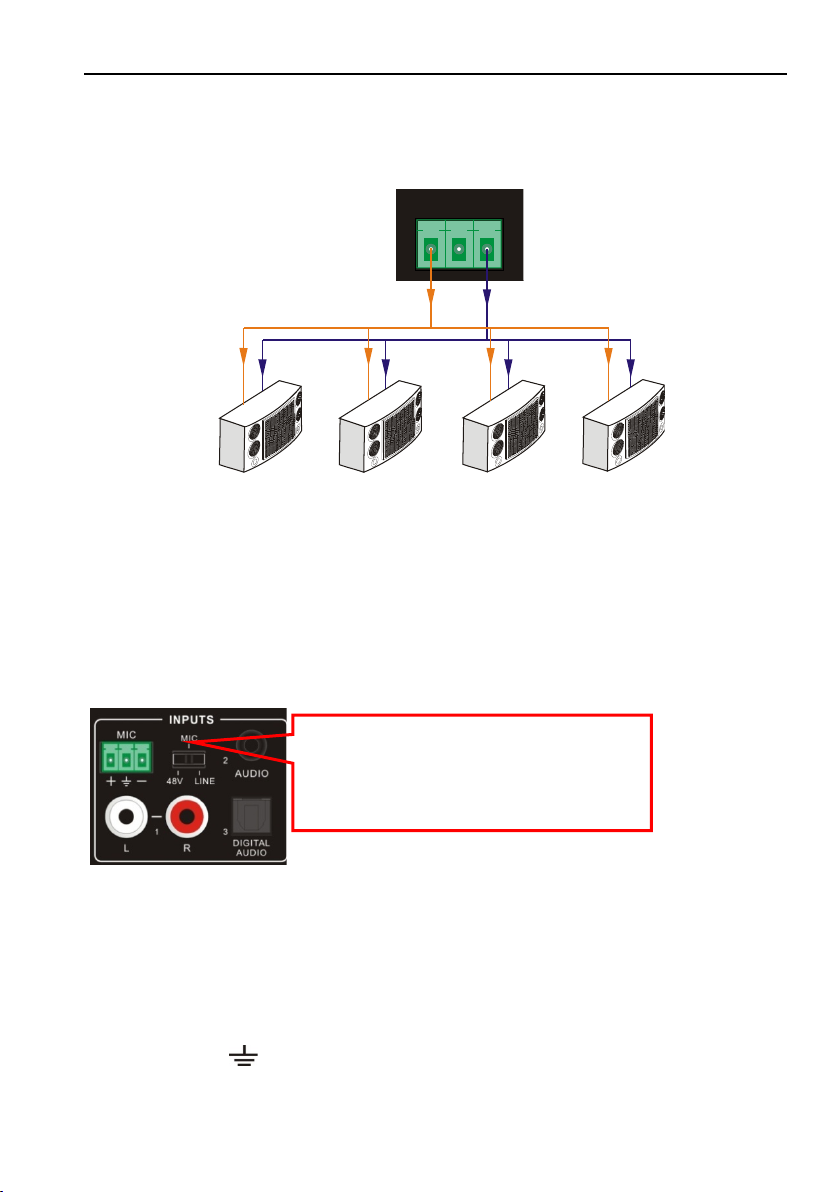
The amplifier supports mono audio output, and the output voltage is 70V or alterative
4
100V. With its dual-purpose design, it can be applied in different areas. The end COM
is for grounding. The amplifier outputs a mono audio signal with a rated power at 40
Watts and can be connected with several speakers in parallel wiring. To t al po w er must
Page 9
40 Watt Power Amplifier
COM
70V 100V
Speaker
Speaker Speaker
Speaker
(100V/10W)
(100V/10W)
(100V/10W)
(100V/10W)
Switch to select the MIC input mode,
includes MIC (dynamic microphone), 48V
(condenser microphone), and LINE
(normal audio or wireless microphone).
not be more than 40Watt.
The following figure shows how to connect with the speakers. Here we take the
100V/10W speakers for each as example.
Figure 4 Audio Output Connection
3.3.2 Audio Inputs
The amplifier provides 2 stereo audio inputs: one microphone input and one digital fiber
audio input. The following figure shows the audio input ports.
Ø 48V phantom power input
When the switch turns to “48V” (it has high input impedance and high sensitivity in this
mode), the MIC input will provide a 48V phantom power. This is usually used for
powering condenser microphones. Connection is: “+” connects to positive, “-” connects
to negative, and “ ” to ground.
Note: In this mode, only condenser microphones can be connected.
Figure 5 Audio Input Ports
5
Page 10

40 Watt Power Amplifier
Ø MIC input
When the switch turns to “MIC” (it has wide frequency response in this mode), the
microphone input is used for connecting dynamic microphones. There are two different
connections:
a) Unbalanced connection:
“+” and “ ” connect to ground and “-” connects to signal.
“-” and “ ” connect to ground and “+” connects to signal.
b) Balanced connection: “+” connects to positive, “-” connects to negative, and “ ”
connects to ground.
Ø LINE input
When the switch turns to “LINE” (it has wide frequency response in this mode), the
microphone input is used for connecting normal audio or wireless microphone outputs.
There are two different connections:
a) Unbalanced connection:
“+” and “ ” connect to ground and “-” connects to signal.
“-” and “ ” connect to ground and “+” connects to signal.
b) Balanced connection: “+” connects to positive, “-” connects to negative, and “ ”
connects to ground.
Ø Digital Audio Input
The amplifier features a TOSLINK input to connect with digital audio source device.
With this connection the audio signal can be transmitted more reliably and can be
transmitted over a long distance without distortion.
Note: This digital audio input can support/decode PCM format signal only.
3.4 System Applications
The amplifier can be applied in different settings such as classrooms, small meeting
rooms, lecture halls, bars, and hotels.
6
Page 11
40 Watt Power Amplifier
Audio Source Selection:
Audio Mode Switching
Volume Adjustment:
▽
: Turn down the volume
△
: Turn up the volume
MUTE: Mute the output
4. System Operation
4.1 Operation of Front Panel
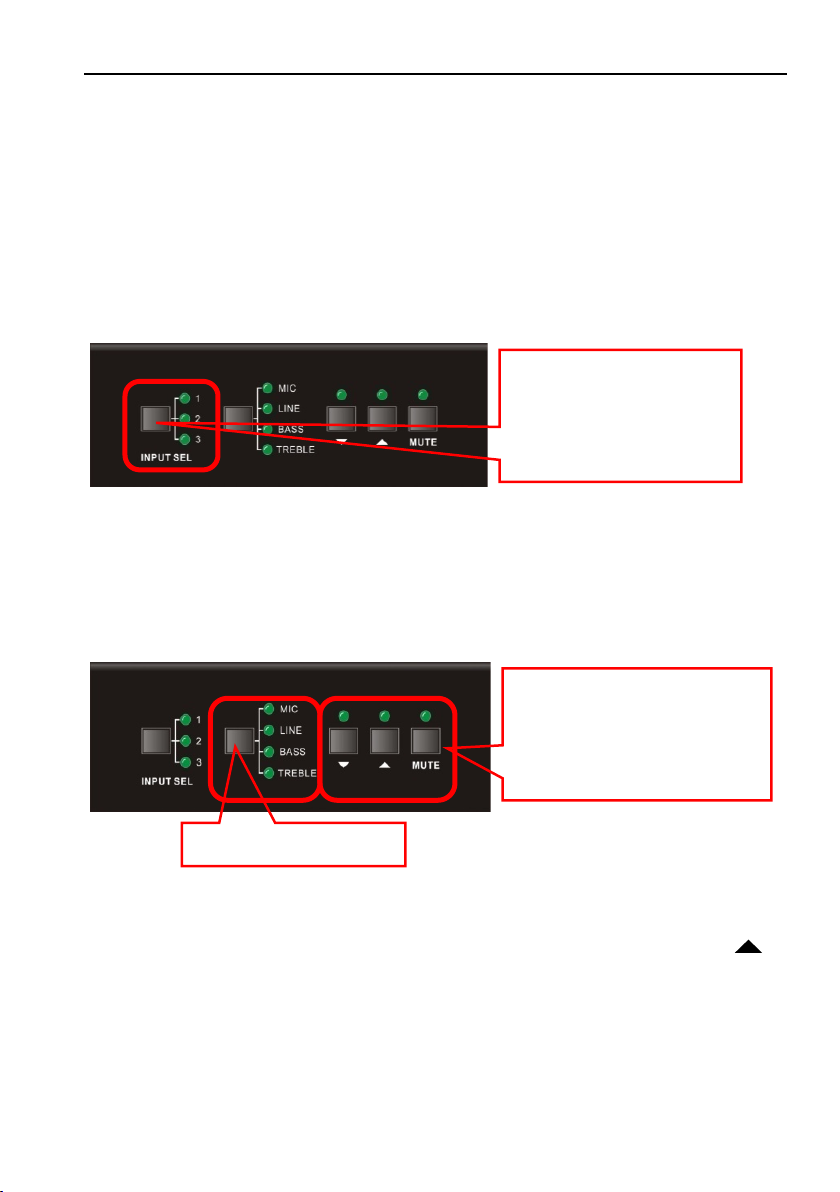
The buttons provide control for volume/EQ and switching. The LED indicators show
status. The following content explains audio switching and EQ control in detail.
4.1.1 Audio switching
There are three switchable audio inputs: one 2xRCA input, one 3.5mm jack input, and
one digital fiber audio input.
1: Dual mono audio
2: Stereo audio
3: Digital fiber audio.
Figure 6 Audio Source Selection Button
4.1.2 Volume/EQ controlling
The line volume and MIC volume can be controlled by the buttons.
The MIC Volume/LINE volume/LINE bass/LINE treble will be selected by the buttons
and controlled up/down/mute by the function buttons. Please check the picture below:
For example, to turn up the line volume, select “LINE” and then press the button “ ”.
Figure 7 Audio Mode and Volume Adjustment buttons
7
Page 12
40 Watt Power Amplifier
IR Receiver: works together
3.5mm Jack:
(3.5mm) to connect
the IR receiver with
the amplifier.
Mute Mode:
SPEAKER: Unmute
Used to transmit the
the remote controller.
Audio Controlling Modes
LINE: turn up/down the line
volume.
Audio Source Selection:
3: 1 Digital fiber audio input
4.2 Operation of IR Remote
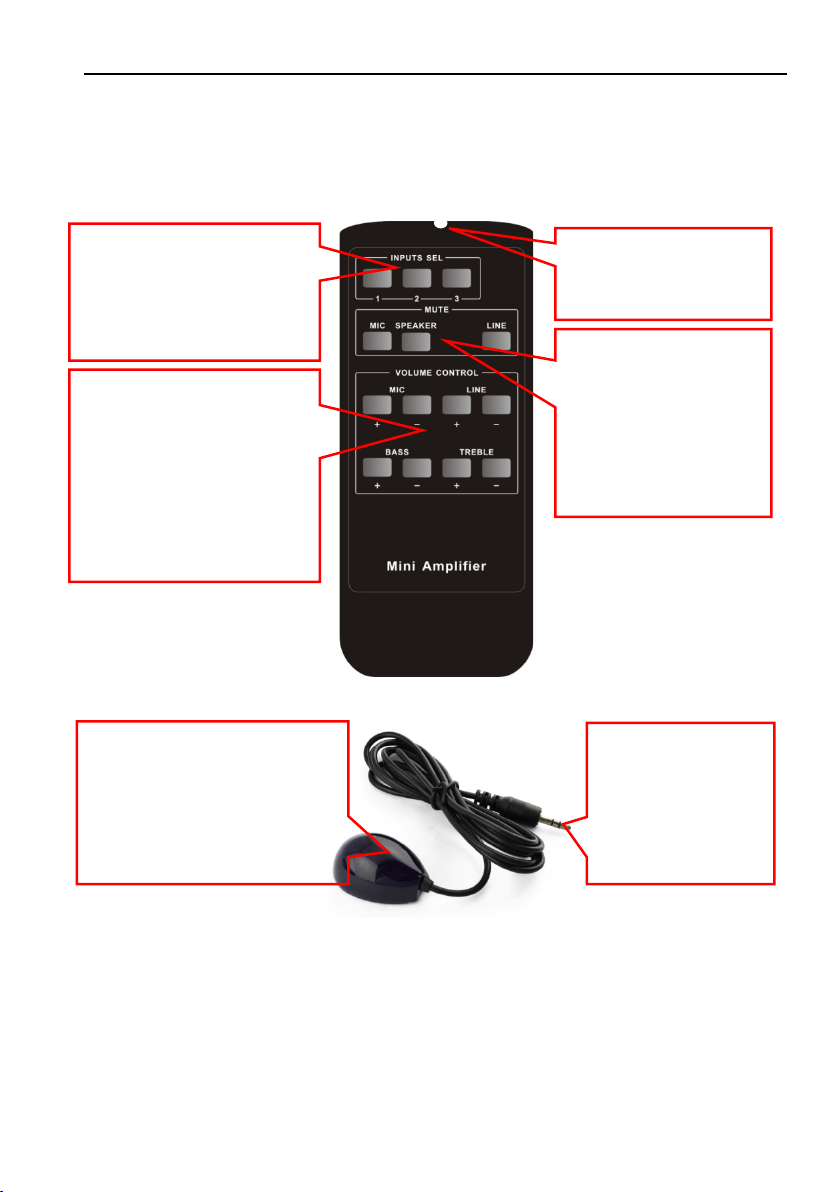
The amplifier can be connected to an IR Receiver and controlled via IR remote.
Notice: The IR Receiver and IR remote are sold separately.
1: 2 RCA dual-mono audio
input
2: 1 3.5mm jack
MIC: turn up/down the
microphone volume.
volume.
BASS: bass tuning
TREBLE: treble of line
with the IR remote. Point the
IR remote at the IR receiver
when using.
infrared signal sent by
MIC: Mute the
microphone volume.
LINE: Mute the line
volume.
Figure 8 IR Remote
insert into the
specialized socket
Figure 9 IR Receiver
8
Page 13
40 Watt Power Amplifier
4.3 Operation of Control Software
4.3.1 Connection with Computer
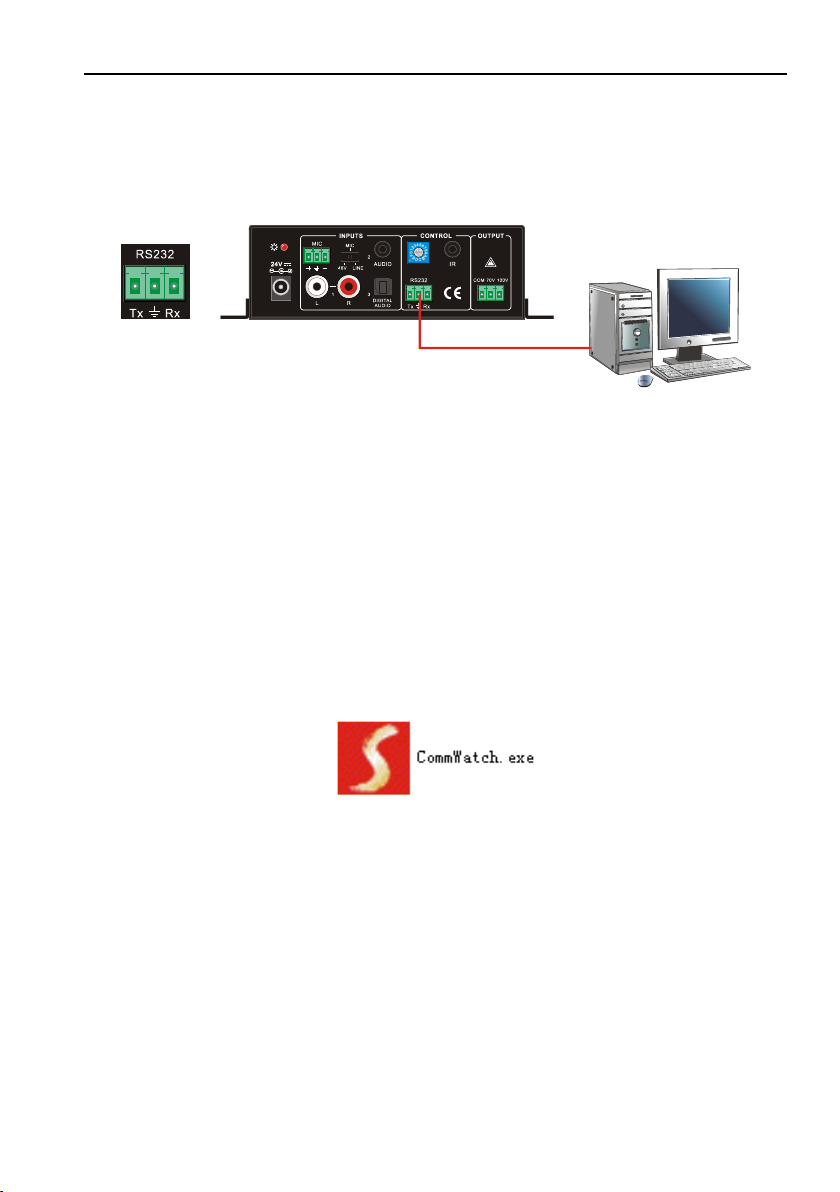
RS232 control can be utilized via a computer attached with a USB to serial adapter.
To c o nt ro l t he amplifier, users should use a 3-pole male captive screw to 9-pin HD
female connector.
Figure 10 Connection of RS232 Port
4.3.2 RS232 Control Software
l Installation
Ø Connect the input source devices and the output device according to the system
diagram.
Ø Copy the RS232 control software to one computer and then connect the RS232 port
of this computer and the amplifier.
Ø Double-click the EXE program to execute the software.
Here we use the software CommWatch.exe for example. The icon is shown below:
Figure 11 Control Software
l Uninstallation Delete all the control software files in corresponding file path.
9
Page 14
40 Watt Power Amplifier
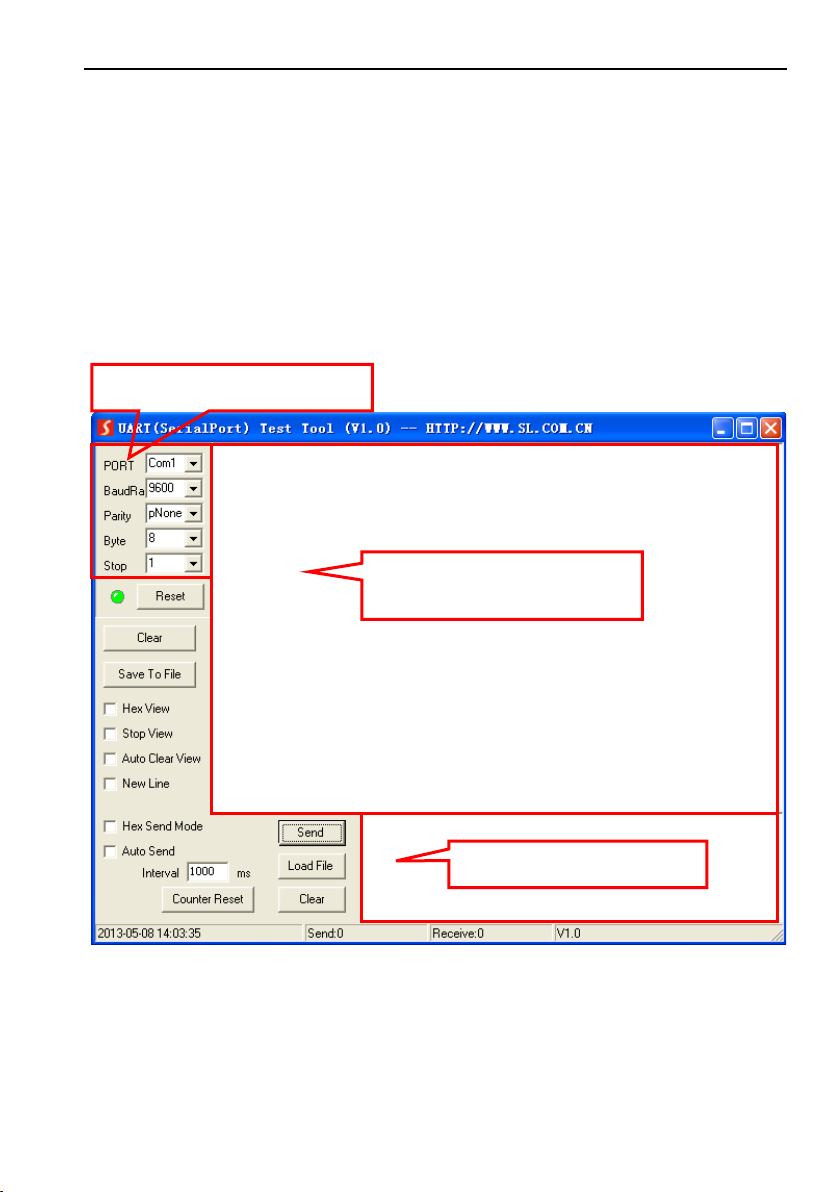
Parameter Configuration area
Monitoring area indicates if the
command sent works.
Command Sending area
4.3.3 Running Environment
While the control software is installed, we can activate the software through the RS232
port and set the parameters, making it able to send RS232 commands to control the
amplifier.
4.3.4 Function Settings
With the control software, we can easily switch the input channel, mute the output,
check the working status, adjust the volume, etc. Please refer to the details in RS232
Communication Commands.
The interface of the control software is shown below:
Figure 12 Main Interface of Control Software
10
Page 15

40 Watt Power Amplifier
Command
Function Description
Feedback Code
1A1.
Switching the audio to input 1
A: 1 -> 1
2A1.
Switching the audio to input 2
A: 2 -> 1
3A1.
Switching the audio to input 3
A: 3 -> 1
0A0.
Mute Audio of MIC and Line out
Mute
1A0.
Mute audio of MIC
Mute MIC
2A0.
Mute audio of line out
Mute LIN
3A0.
Enable noise gate.
Gate On
4A0.
Disable noise gate.
Gate Off
0A1.
Unmute Audio
Unmute Audio
600%
Checking the working status
A: 1 -> 1
Volume of MIC : 50
Volume of LINE : 50
Bass of LINE : 4
Treble of LINE : 4
Ducking Off
601%
MIC volume up
Volume of MIC: 51
602%
MIC volume down
Volume of MIC: 51
603%
Line volume up
Volume of LINE: 51
604%
Line volume down
Volume of LINE: 51
605%
Bass level up
Bass of LINE: 4
606%
Bass level down
Bass of LINE: 4
607%
Treble level up
Treble of LINE: 4
608%
Treble level down
Treble of LINE: 4
609%
Initialization, back to the default setting
Init OK
610%
Enable/disable the ducking function.
Ducking off/Ducking
on
4[x][x]%
Preset the volume level of ducking function.
[xx] arranges from [00] to [60]. 61 degrees in
total.
Ducking of LINE: 50
5[x][x]%
Preset MIC volume, [xx] arranges from [00]
to [60]. 61 degrees in total.
Volume of MIC: 50
7[x][x]%
Preset line volume, [xx] arranges from [00] to
[60]. 61 degrees in total.
Volume of LINE: 50
8[x][x]%
Preset the bass level, [xx] arranges from [00]
to [08]. 9 degrees in total.
Bass of LINE: 4
9[x][x]%
Preset the treble level, [xx] arranges from
[00] to [08]. 9 degrees in total.
Treble of LINE: 4
4.3.5 RS232 Communication Commands
Communication Protocol: RS232 Communication Protocol
Baud rate: 9600 Data bit: 8 Stop bit: 1 Parity bit: none
11
Page 16

40 Watt Power Amplifier
Notice:
l The letter inside bracket [ ] is the variable code, which is changeable.
l The bracket [ ] is not included to the RS232 commands.
l Any dot “.” after the letters is part of the commands.
l Ducking function:
When input with MIC, the volume of the line audio will be automatically turned down
to the preset volume level. If there is no input MIC audio signal after 5 seconds, the
volume will be automatically turned up to the original level. If you need to
disable/enable the ducking function, just send the command “610%” again.
l ID coding:
The ID codes of the amplifier ranges from 0 to F (hexadecimal). When sending
RS232 commands, please take notice of the address of the ID code.
If the address of the ID code is 0, any RS232 command is available.
If the address is in 1~F, it has one unique ID code (if the ID code is not the same
with the address, no RS232 command will work).
While the ID code is in 1~F, please add “ID/” before sending the command.
For example, if the ID code is 5, the RS232 command needed is “604%”. The
correct command is in this format: 5/604%.
There is no need to add “ID/” before the command when the ID code is 0.
Examples:
l Switching the input 2 to the line out, the command is: 2A1.
l Turning up the volume of line audio, the command is: 603%
l Preset the MIC volume to “21” degree, the command is: 521%
l Checking the working status of the amplifier, the command is: 600%
l If the ID code is 0, sending command 601% is able to turn up the MIC volume.
l If the ID code is 2, sending command 601% will not work and the MIC volume
remains unchanged. The right command is 2/601%.
12
Page 17

5. Specifications
Audio Input
Input
(2) Stereo Audio
(1) MIC
(1) Digital Fiber Audio
Input Connector
(2) RCA
(1) 3.5mm Jack
(1) 3-pole 3.81mm Captive Screw Connector
(1) SPF Fiber Connector
Input Impedance
>10KΩ
Audio Output
Output
(1) Mono Amplifier
Output Connector
(1) 3-pole 3.81mm Captive Screw Connector
Output Type
Constant voltage 70V or 100V.
Audio General
Frequency Response
120Hz ~ 20KHz
CMRR
>70dB@20Hz~20KHz
SNR
80dB (Max)
Bandwidth
120Hz ~ 20KHz
Rated Power Output
40Watt
THD + Noise
1%@1KHz, 0.3%@20KHz at nominal level
Volta ge Gai n
26dB
Control Function
RS232 Control
(1) 3-pole 3.81mm Captive Screw Connector
Front Panel Control
Buttons
ID Code Control
16 ID Codes for control.
Optional
IR Remote & TCP/IP controlled by programmable interface
General
Temperature
-10 ~ +40℃
Humidity
10% ~ 90%
Power Supply
DC 24V 2.71A Power Adapter
Standby Power
Consumption
5W
Case Dimension
W130 x H44 x D144mm (1U high)
Product Weight
860g
40 Watt Power Amplifier
13
Page 18
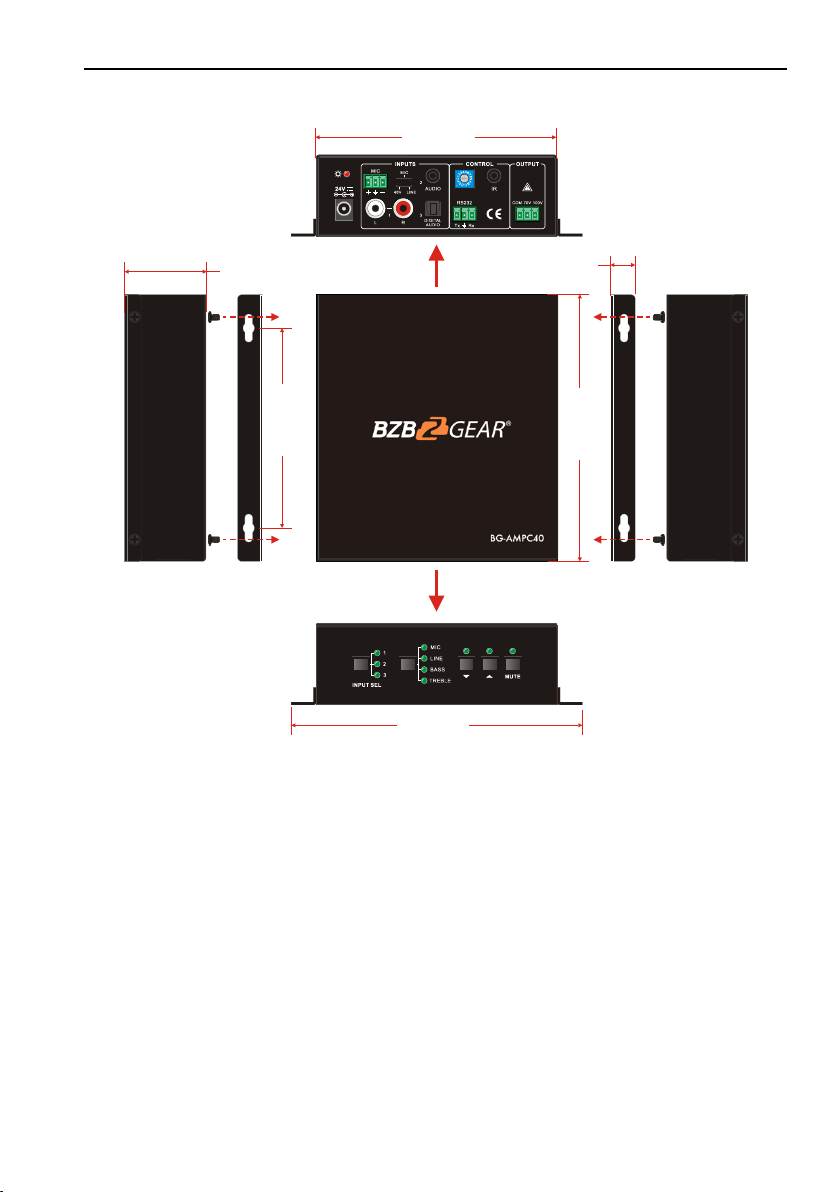
6. Panel Drawing
15 7 mm
13 0 mm
14 4 mm
44 m m
13 m m
10 8 mm
40 Watt Power Amplifier
Figure 13 Panel Drawing
14
Page 19

40 Watt Power Amplifier
Problems
Potential Causes
Solutions
No output audio
No signal at input/ output
end
Check input/ output signal
with an oscilloscope or a
multimeter.
Failed cable connection
Change for another cable.
Broken unit
Send it to the dealer for
repairing.
POWER indicator doesn’t
work or no respond to any
operation
Failed power connection
Make sure the power cord
connection is good
Static becomes stronger
when connecting the
video connectors
Bad grounding
Check the grounding and
make sure it is connected
well.
Output audio interference
Cannot control the device
with front panel buttons,
RS232 port, or IR remote
Broken unit
Send it to the dealer for
repairing.
7. Troubleshooting and Maintenance
8. Tech Support
Before contacting tech support, we may have answered your question already! Visit our
BZBGEAR support page at bzbgear.com/support for valuable information on our
products.
Here you will find our Knowledge Base (bzbgear.com/knowledge-base) consisting of
tutorials, quick start guides, and step-by-step troubleshooting instructions. Also visit our
You Tube c ha nn el B ZB T V at youtube.com/c/BZBTVchannel for help setting up,
connecting, and other how-to videos regarding our products.
If you still need answers, please call 1.888.499.9906, email [email protected], or
chat at bzbgear.com.
15
Page 20

40 Watt Power Amplifier
9. Warranty
BZBGEAR Pro AV products and Cameras come with a three-year warranty. An
extended two-year warranty is available for our Cameras upon registration for a total of
five years.
For an extended two-year warranty on our Cameras, follow these steps:
1. Register your Camera within 90 days of purchase by visiting bzbgear.com/warranty.
2. Complete the registration form. Provide all necessary proof of purchase details,
including serial number and a copy of your sales receipt.
For complete warranty information, please visit bzbgear.com/warranty or scan the QR
code below.
10. Mission Statement
BZBGEAR manifests from the competitive nature of the audiovisual and live streaming
industry to innovate while keeping the customer in mind. AV solutions can cost a pretty
penny, and new technology only adds to it. We believe everyone deserves to see, hear,
and feel the advancements made in today’s AV world without having to break the bank.
BZBGEAR is your answer for applications requiring the latest pro AV and live streaming
solutions.
You ’l l no ti ce co mp arably lower prices with BZBGEAR while the performance and quality
are on par with the top brands in the industry. Our team offers system design
consultation and expert tech support seven days a week for all BZBGEAR products.
Our unparalleled support is our way of showing we care for every one of our
customers. Whether you’re an integrator, home theater enthusiast, or a do-it-yourselfer,
BZBGEAR offers solutions allowing you to focus on your project and not your budget.
16
 Loading...