

Page 1
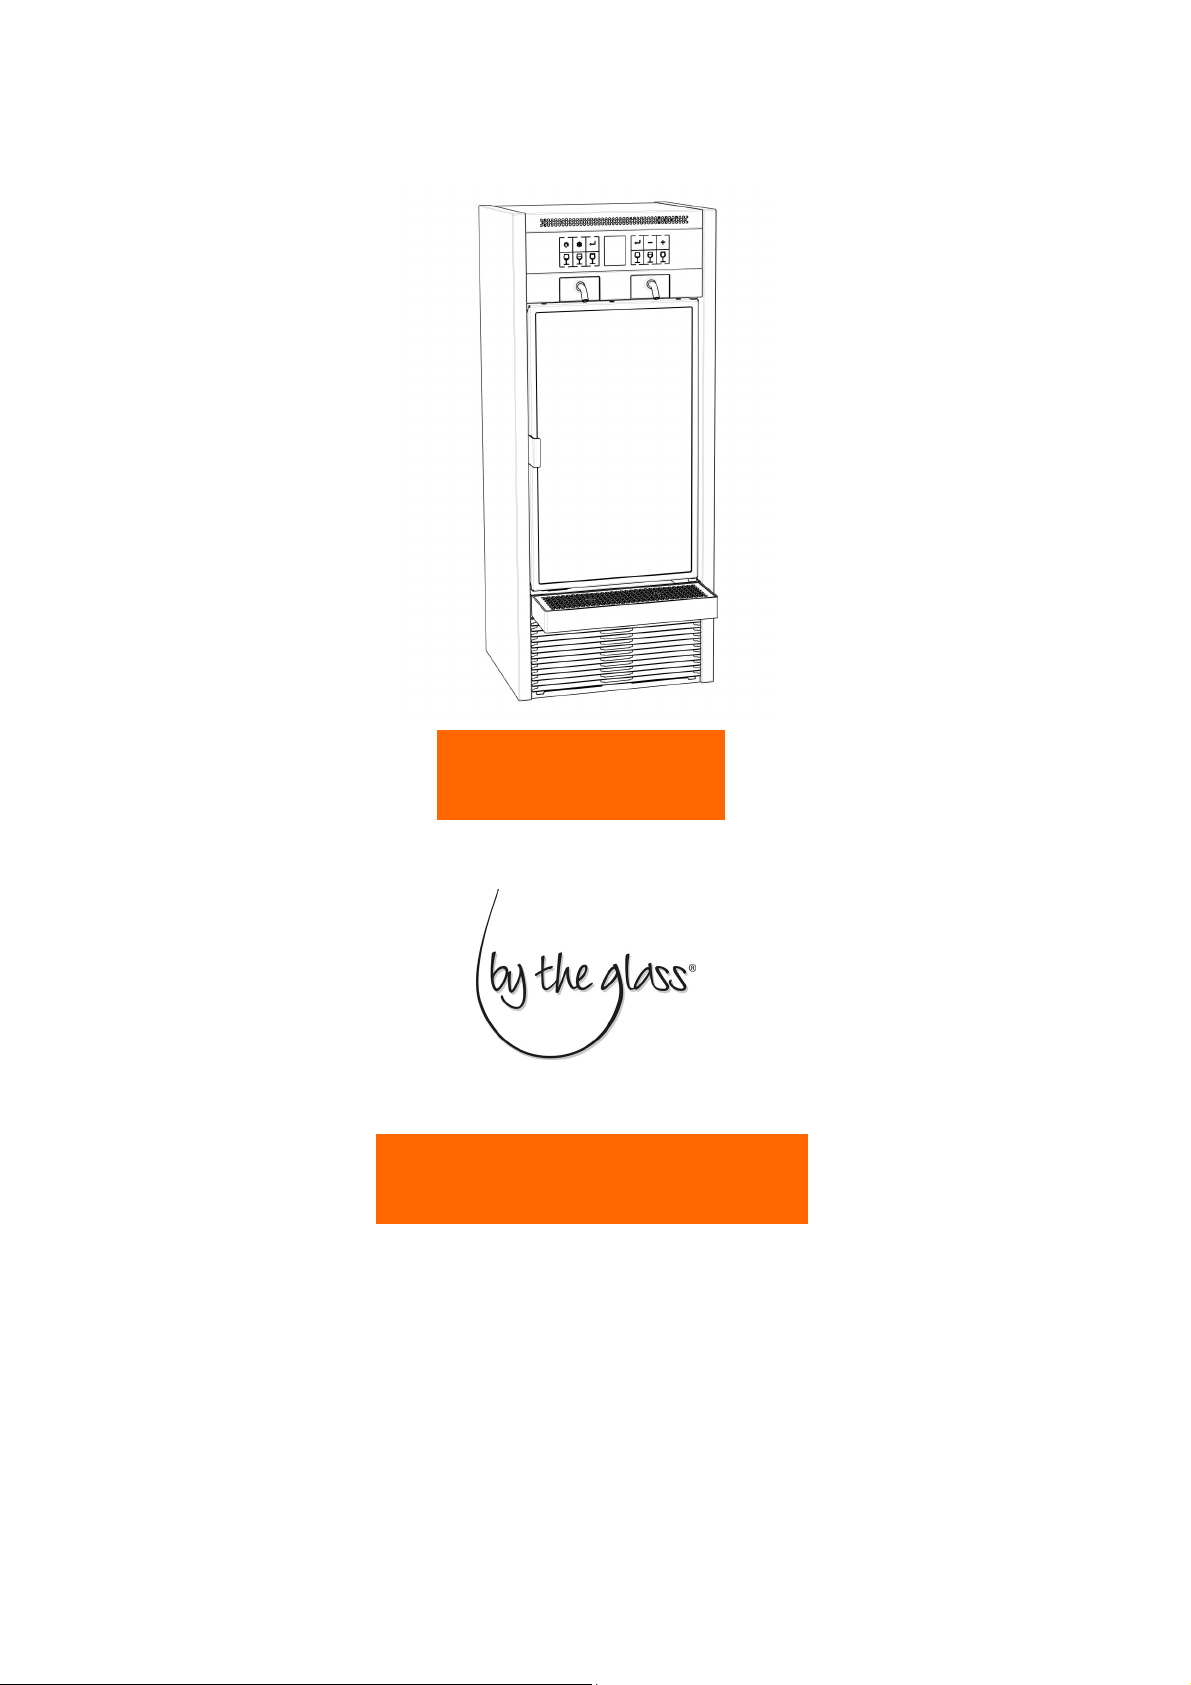
modular
wine serving systems
User Manual
April 2012
Page 2

INDEX PAGE
1. Introduction …………………………….. 3
2. Model Identification ..………………… 3
3. Warnings ….……………………………… 4
4. Transportation and Storage………… 4
5. Unpacking ………………………………… 5
6. Installation ………………………………. 5
7. Operating Instructions ………….….. 10
8. Gas Supply Options …………………… 13
9. Wine Temperature and Storage ….. 14
10. Maintenance and Cleaning …………. 15
2
Page 3
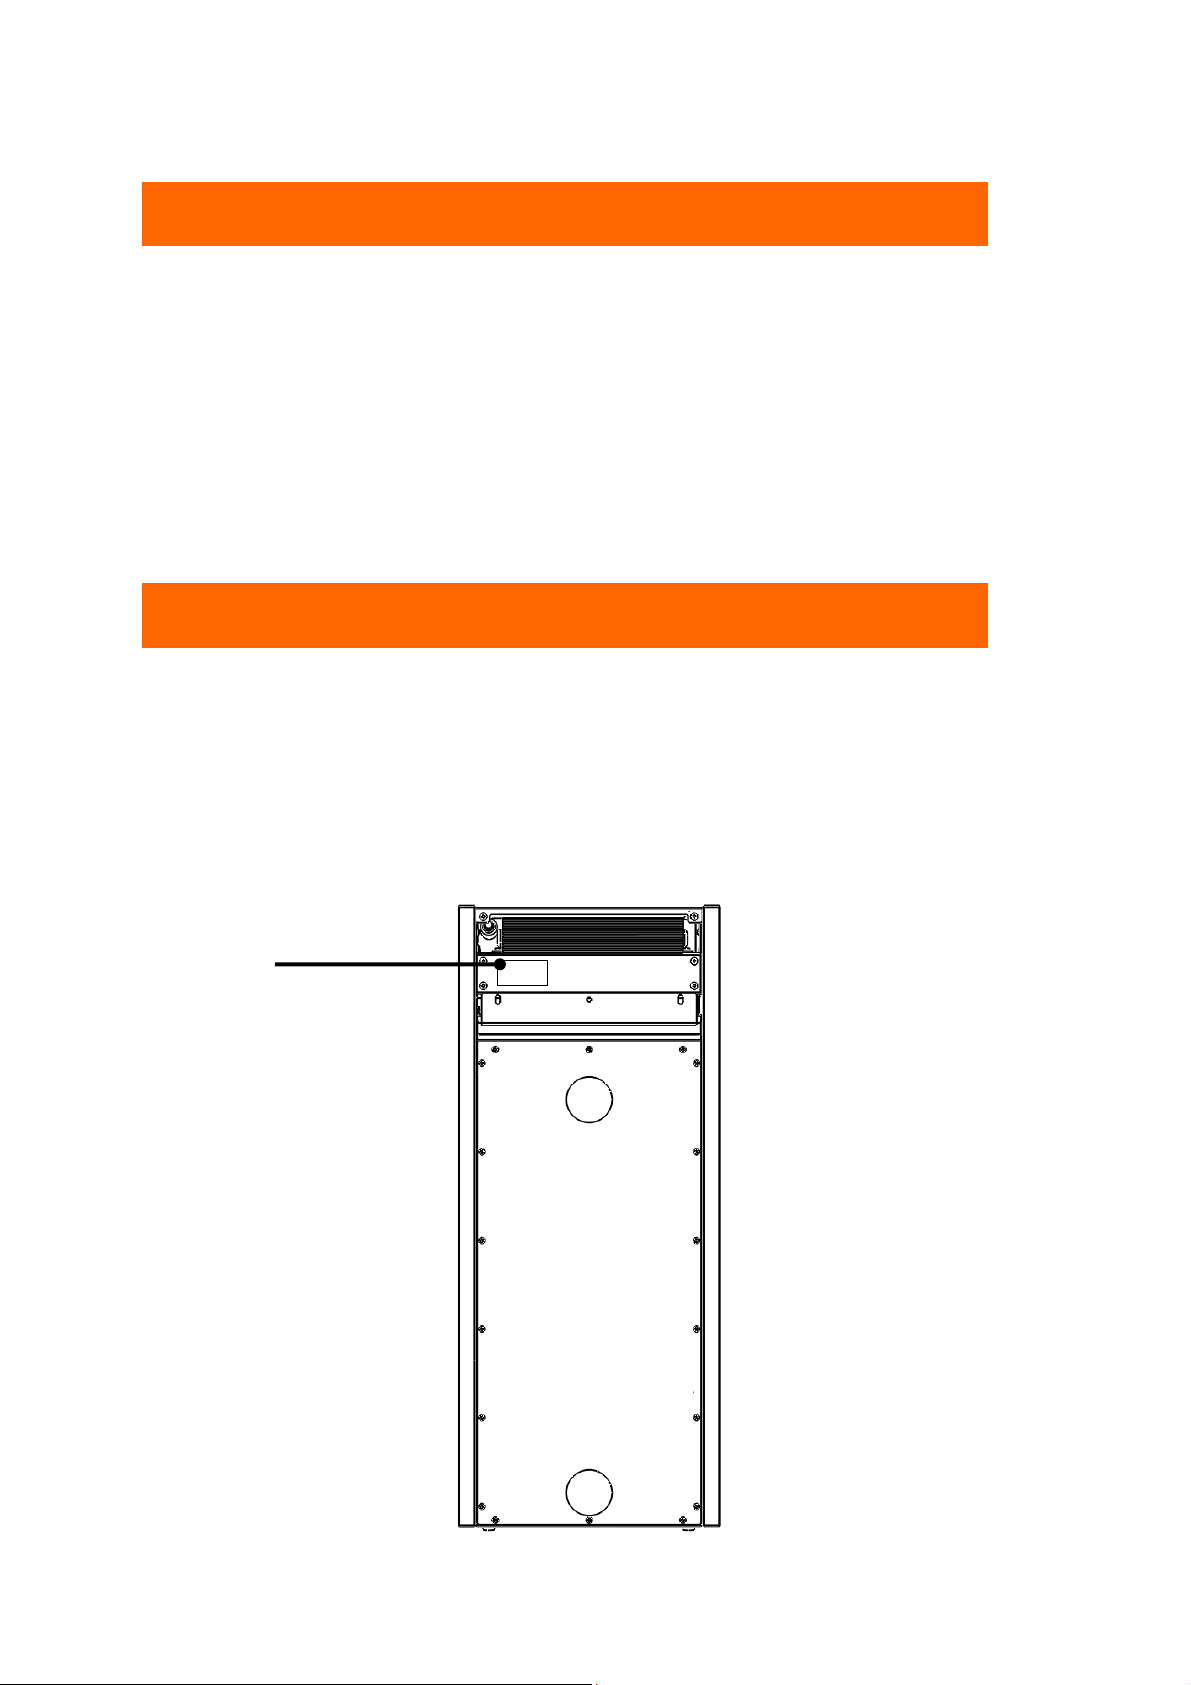
Data Label
2. Model Identification
1. Introduction
This Operation Manual is an integral part of the By The
Glass (BTG Modular) wine serving system, therefore we
recommend you to keep it available for future
references.
Before proceeding, to install and operate your BTG Modular, please read carefully the
instructions contained in this Operation Manual. They provide important information
on safety during installation, duty and maintenance. The manufacturer is not liable in
any way for any damage that may occur from unsuitable or unreasonable use and
incorrect interpretation of the safety rules and installation instructions.
Every BTG Modular is identified with a unique serial number printed on a Data Label.
There are two Data Labels on the machine: one is on the rear panel, close to the
electric socket, the other one is on the front of the machine and is visible when the
door is open. The Data Label is the only means of identification authorised by the
manufacturer and it contains all the data needed by the manufacturer to provide
prompt and clear information concerning any technical aspects as well as facilitate
the replacement of parts.
AVOID DAMAGE OR REMOVAL OF THE DATA LABEL.
3
Page 4

3. Warnings
During operation it is essential to pay attention to these safety requirements to avoid
the risk of fire, electric shocks or other incidents.
1. Before operating the BTG Modular, carefully read the instructions contained in this
Operation Manual and all other documentation you received.
2. Do not immerse the electrical cord, plugs or the BTG Modular in water or any
other liquid.
3. Install the BTG Modular in environments with temperatures ranging between 16°C
and 26°C, with a relative humidity lower than 60%. Above or below these values will
have a negative impact on the functioning of the device.
4. Be extra careful when operating the BTG Modular in the presence of children.
5. Always unplug the BTG Modular from the electrical socket and let it cool down
before carrying out extraordinary maintenance operations.
6. Do not operate the BTG Modular if the electrical cord, plug or any other parts are
damaged or broken.
7. For any repairs contact only Service Centers authorised by the manufacturer or
supplier and insist to get only original spare parts. Failure to comply with the above
may harm persons, damage property and will invalidate the Warranty.
8. Do not operate the BTG Modular outdoors.
9. Avoid allowing the electrical cord from hanging down along the supporting surface
(table, counter, etc.) and from coming into contact with hot surfaces. Also, do not
place the BTG Modular on top of its electrical cord.
10. Keep the BTG Modular far away from sources of heat and steam.
11. Before supplying the BTG Modular, check the voltage indicated on the Data
Label; it has to correspond with your country’s standard voltage supply value. You
may require an adapter to plug the cable into your electrical socket.
12. Do not clean with corrosive detergents or scraping tools. Use only a soft damp
cloth.
4. Transportation and Storage
To avoid damaging the BTG Modular, it is necessary to take exceptional care during
the loading and unloading processes, as well as lifting according to the text and
pictures, found on the cardboard packaging. Avoid shaking or turning the BTG
Modular upside down and please select a final resting place for the machine in
environments with temperatures ranging between 16°C and 26°C, and a relative
humidity lower than 60%.
4
Page 5
Never leave the packaging contents (plastic bags,
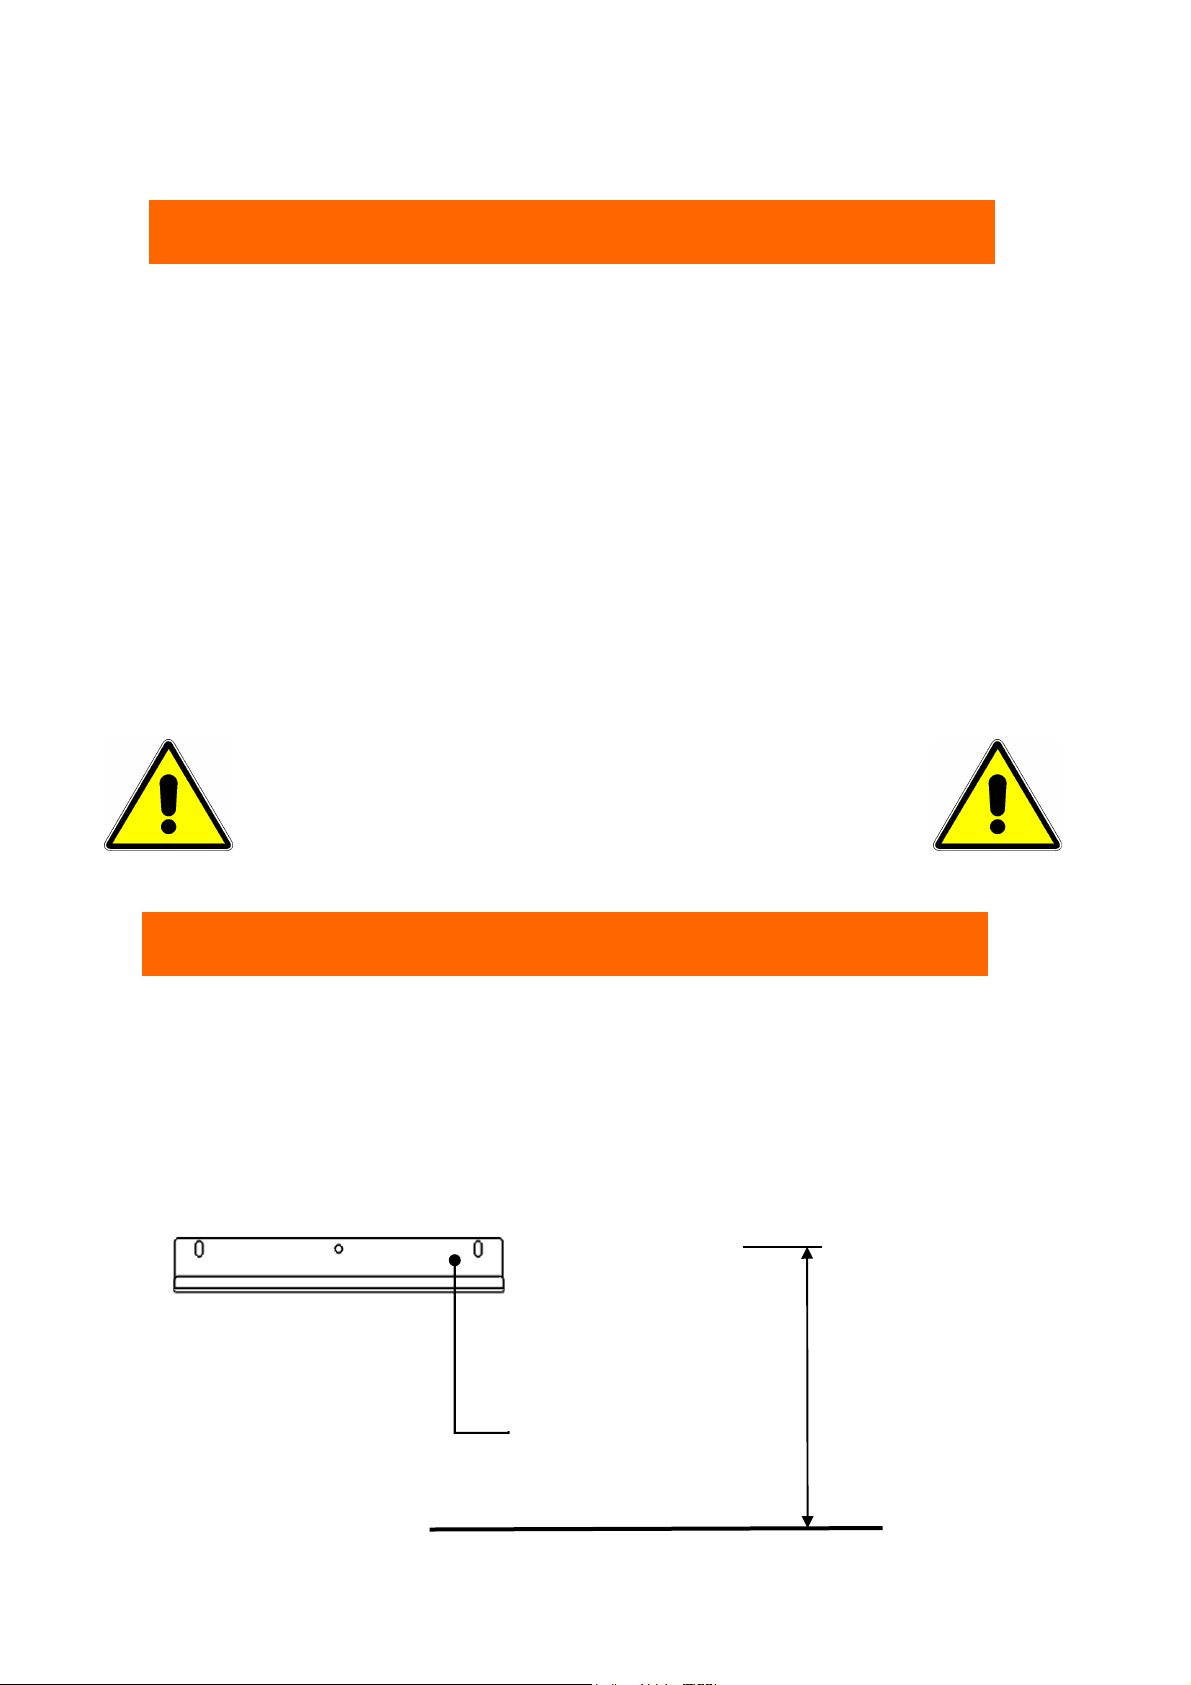
steel mounting strip
580mm
6. Installation (read carefully!)
5. Unpack
ing
When you remove the packaging, check that the BTG Modular has not been damaged
during transport. If you have any doubts, do not operate the BTG Modular and
quickly contact your By The Glass distributor for advice and consultation.
Please make sure that the following items are included in the delivery:
- 1x – Modular unit, 2 bottle capacity;
- 1x - User and Maintenance Manual, Warranty and Manufacturer Certification;
- 2x - Dispense cassette;
- 2x - silicone corks;
- 4x - VERSITEC® platinum cured silicone tubes;
- 1x - Steel strip to secure the BTG Modular to the wall;
- 4x – Connection screws;
- 1x - Stainless steel drip tray;
- 1x – short gas hose (to connect a subsequent unit);
- 1x – Gas seal;
- 1x – screwdriver to operate the lock
- 1x – electrical cord
foam polystyrene, nails, etc.) within the reach of
children, since they are a source of potential
danger. Please be eco-friendly and recycle the
packaging components.
Before installation, make sure to establish the correct positioning, ensure there is a
suitable space for the location of the inert gas cylinder (nitrogen or argon) and that
there contains an earthed electrical socket which complies with the regulations.
1. After unpacking your BTG Modular, place it on a solid desk or holder.
2. Check the stance and correct it if necessary using the proper technique of
adjusting the foot/feet. Max. allowed lean: 2°.
3. Mount the supplied steel strip(s) to the wall using a level. Ensure that the units
always remain with their feet on the ground.
5
Page 6
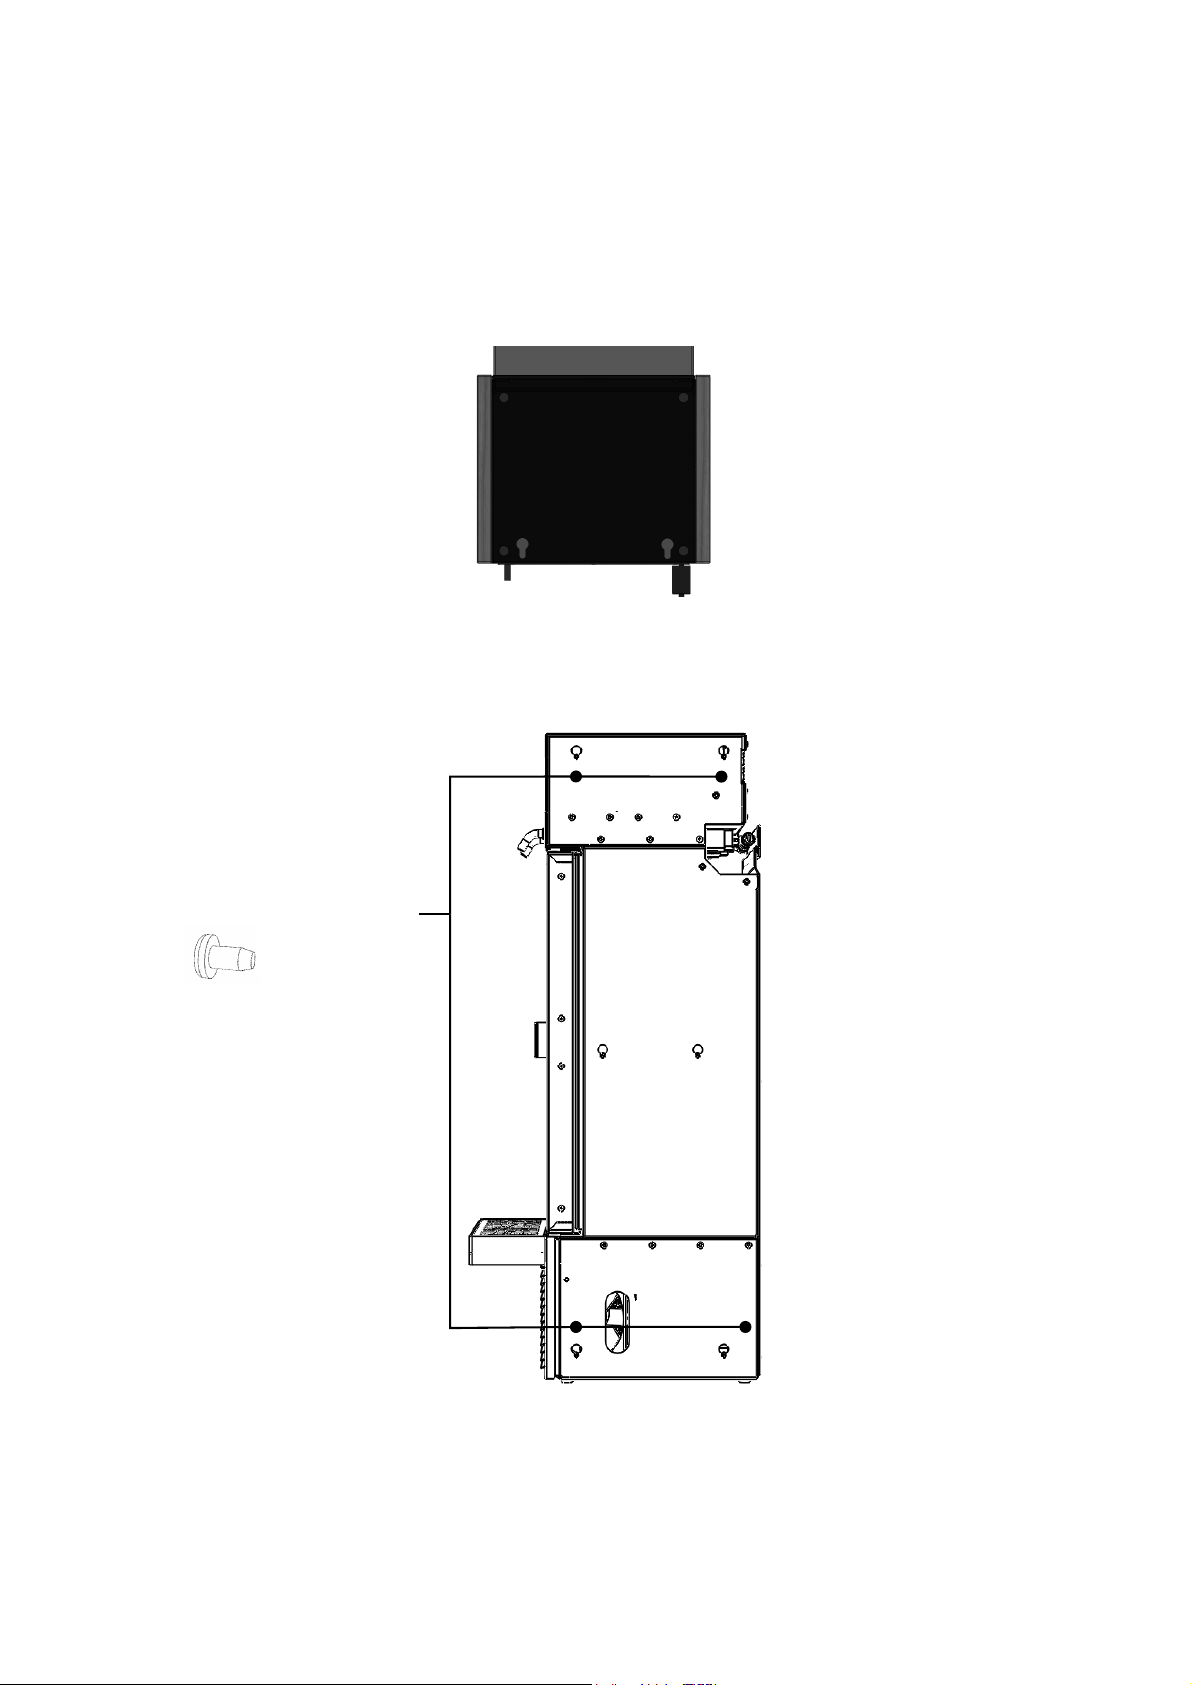
Connection screw (4x)
4. In case you can’t mount the Modular to a wall, we strongly advise that you to
embed the unit(s) into the supporting surface. To secure the unit(s) from falling,
tighten two screws in the supporting surface and slide the unit with the slotted holes
over the head of the screws.
5. If you install more Modular units next to each other, connect those together by
applying connection screws on the right side of the Modular. Place the next Modular
on the right by sliding the slotted holes over the connection screws.
6
Page 7
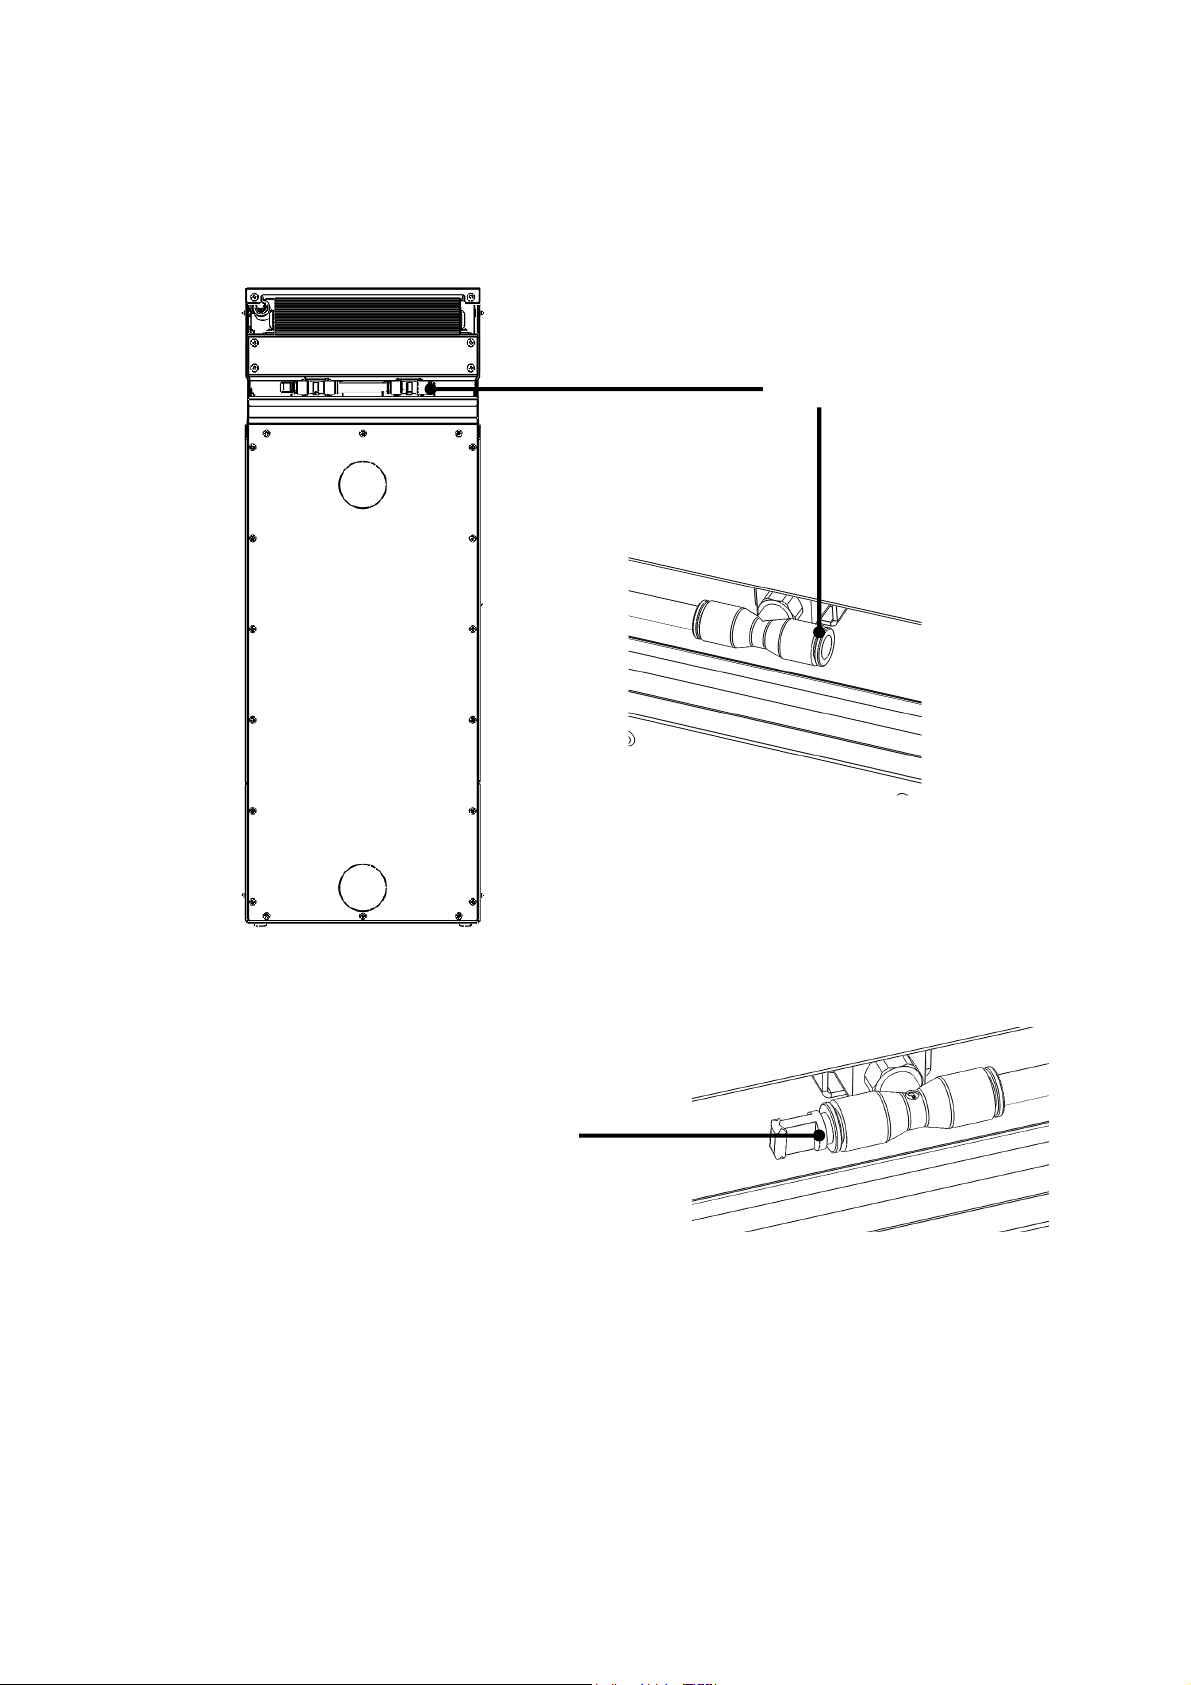
Gas connection
Gas seal
6. Connect and bond the short gas hoses in the back between all Modular units and
make sure all connections are sealed with the provided seal clips.
7. Connect and bond the electrical cords in the rear between all Modular units.
8. Make sure you place the gas seal nipple in the gas output of the last Modular unit,
to avoid any gas leakage!
9. Connect regulators according to the scheme provided in the annex.
10. Connect the provided gas hose between the (first or last) Modular and the low
pressure regulator.
11. Connect the high pressure hose to the DSI regulator and attach the hose hand
tightly to the nitrogen (or argon) tank.
7
Page 8
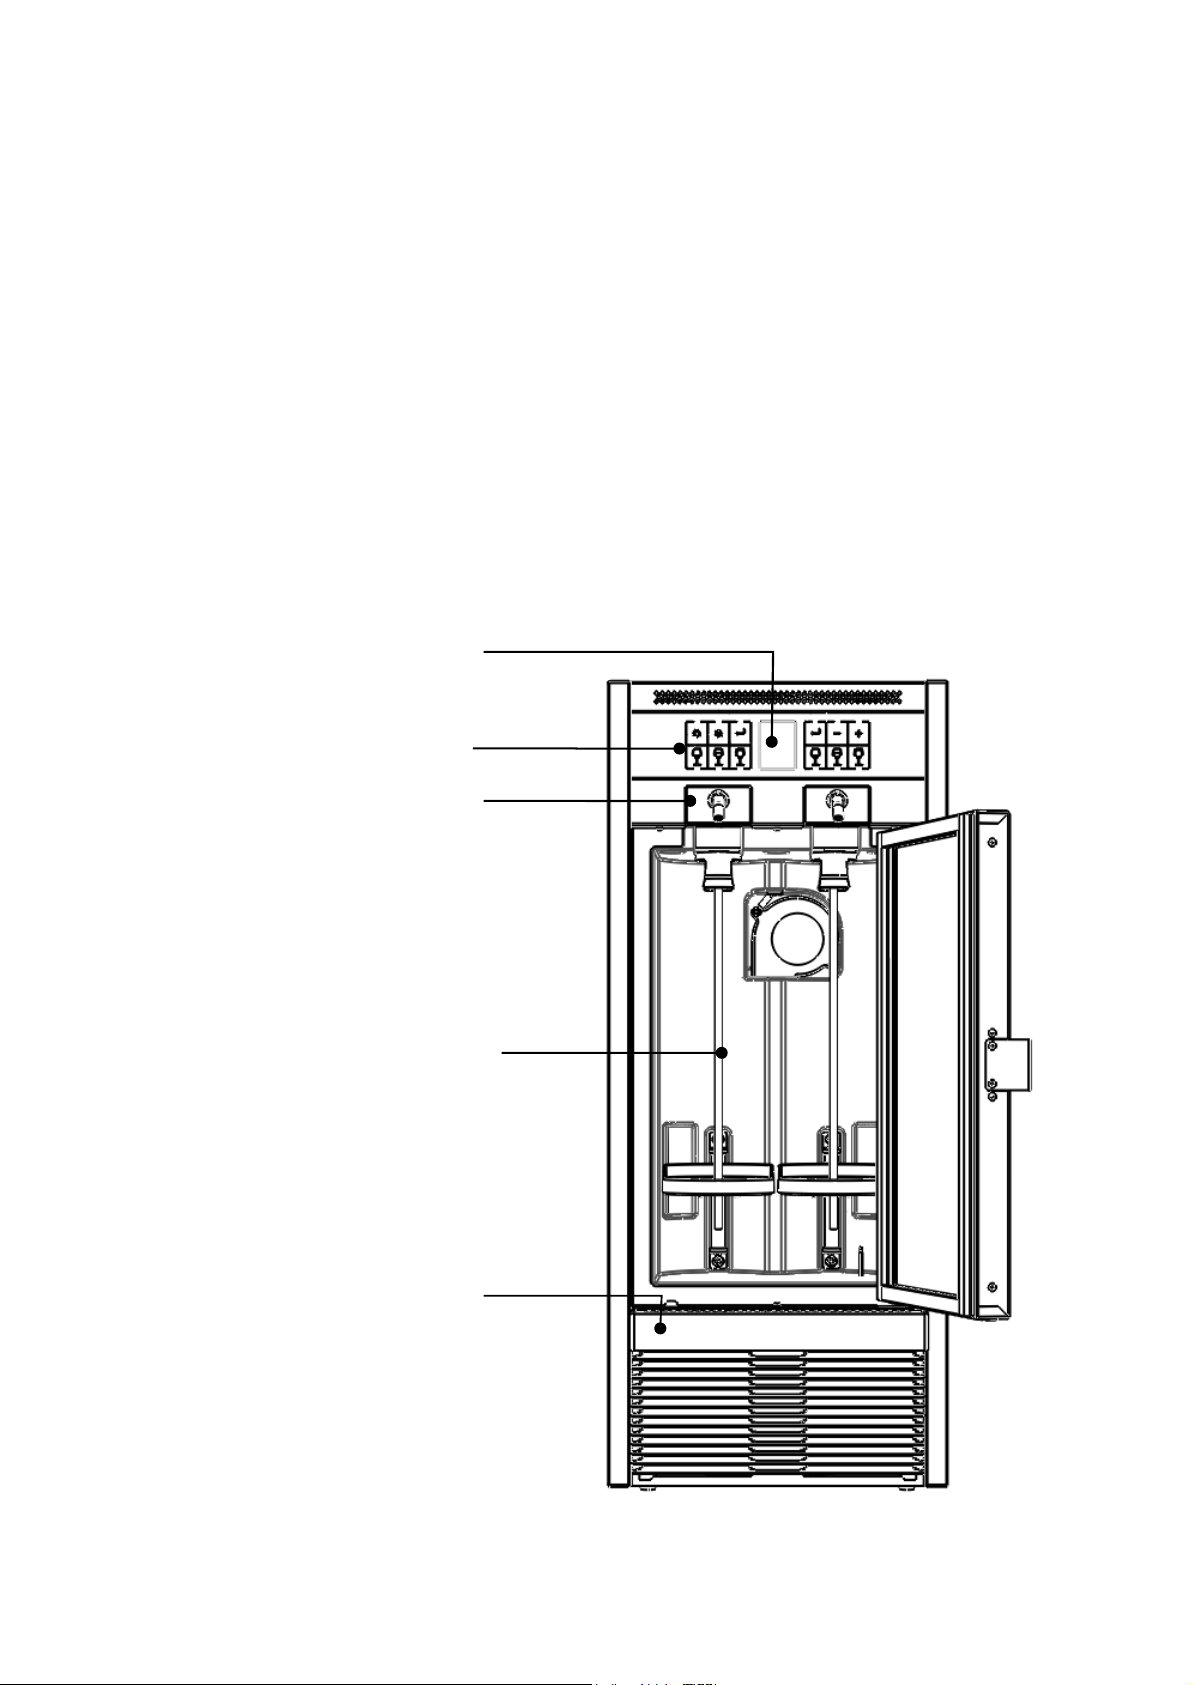
Bottle space
L
ock
Dispense cassette
serving buttons
Display
12. Connect the electrical cord of the (first or last) Modular to a wall earthed socket.
The machine will directly turn on.
13. Open the nitrogen (or argon) tank, making sure you put the pressure of the DSI
regulator on 2 bar (29 psi) and the (second) low pressure regulator on minimum
0,3 bar (4,5 psi) to maximum 0,6 bar (9 psi) (Depending on the desired speed
of the wine that flows from the tap).
14. From now on your BTG Modular wine serving system(s) is/are ready for bottle
engagements.
6.1 Parts of the BTG Modular Wine Serving System
1 – Bottle space
2 – Dispense cassette with serving spouts
3 – Programming and serving buttons
4 – Display
5 – Lock
Program and
8
Page 9

6.2 Electrical supply
The BTG Modular operates at either 110V 60Hz or 220V 50Hz depending upon the
country. The BTG Modular must be connected to a supply system equipped with an
effective earth connection in accordance with the rules and provisions established by
law.
6.3 Gas tube Connections
In order to ensure that the BTG Modular performs correctly, it is necessary to
connect it to an inert and food grade certified gas source, typically Nitrogen or Argon
whose inlet is located on the back of the machine on the top.
To connect the pipe, push firmly into the joint. To check if correctly sealed, pull the
pipe back and secure the connection with a clip.
Use certified FOOD GRADE materials as well as the By
The Glass provided gas hoses for nitrogen (or argon)
connections.
6.4 Nitrogen (or Argon) Gas Supply
The use of Nitrogen or Argon gas has two purposes;
1. To preserve wines from oxidation processes. Note: Once a bottle is placed
into the cabinet, gas does not automatically flow into the bottle. If you don’t
use the wine immediately or you don’t yet know when you will, just push the
enter button for a short period of time while holding a glass under the serving
spout. A little bit of wine will flow and then the bottle will be filled with gas
and the wine perfectly preserved.
2. To dispense wines from the bottle to the glass.
Food Grade Nitrogen (or Argon) gas of greater than 99.5% purity must be used. This
is typically supplied as a compressed gas stored in cylinders, at high pressure. The
pressure varies between countries but it is typically between 100 and 200 Bar.
Alternatively a Nitrogen generator can be used.
The Nitrogen (or Argon) Gas cylinder must preferably be stored in a vertical position,
secured in a bottle holder and stored in a ventilated space. It must be connected to a
high-pressure regulator to reduce the pressure to 0,3 - 0,5 Bar.
9
Page 10
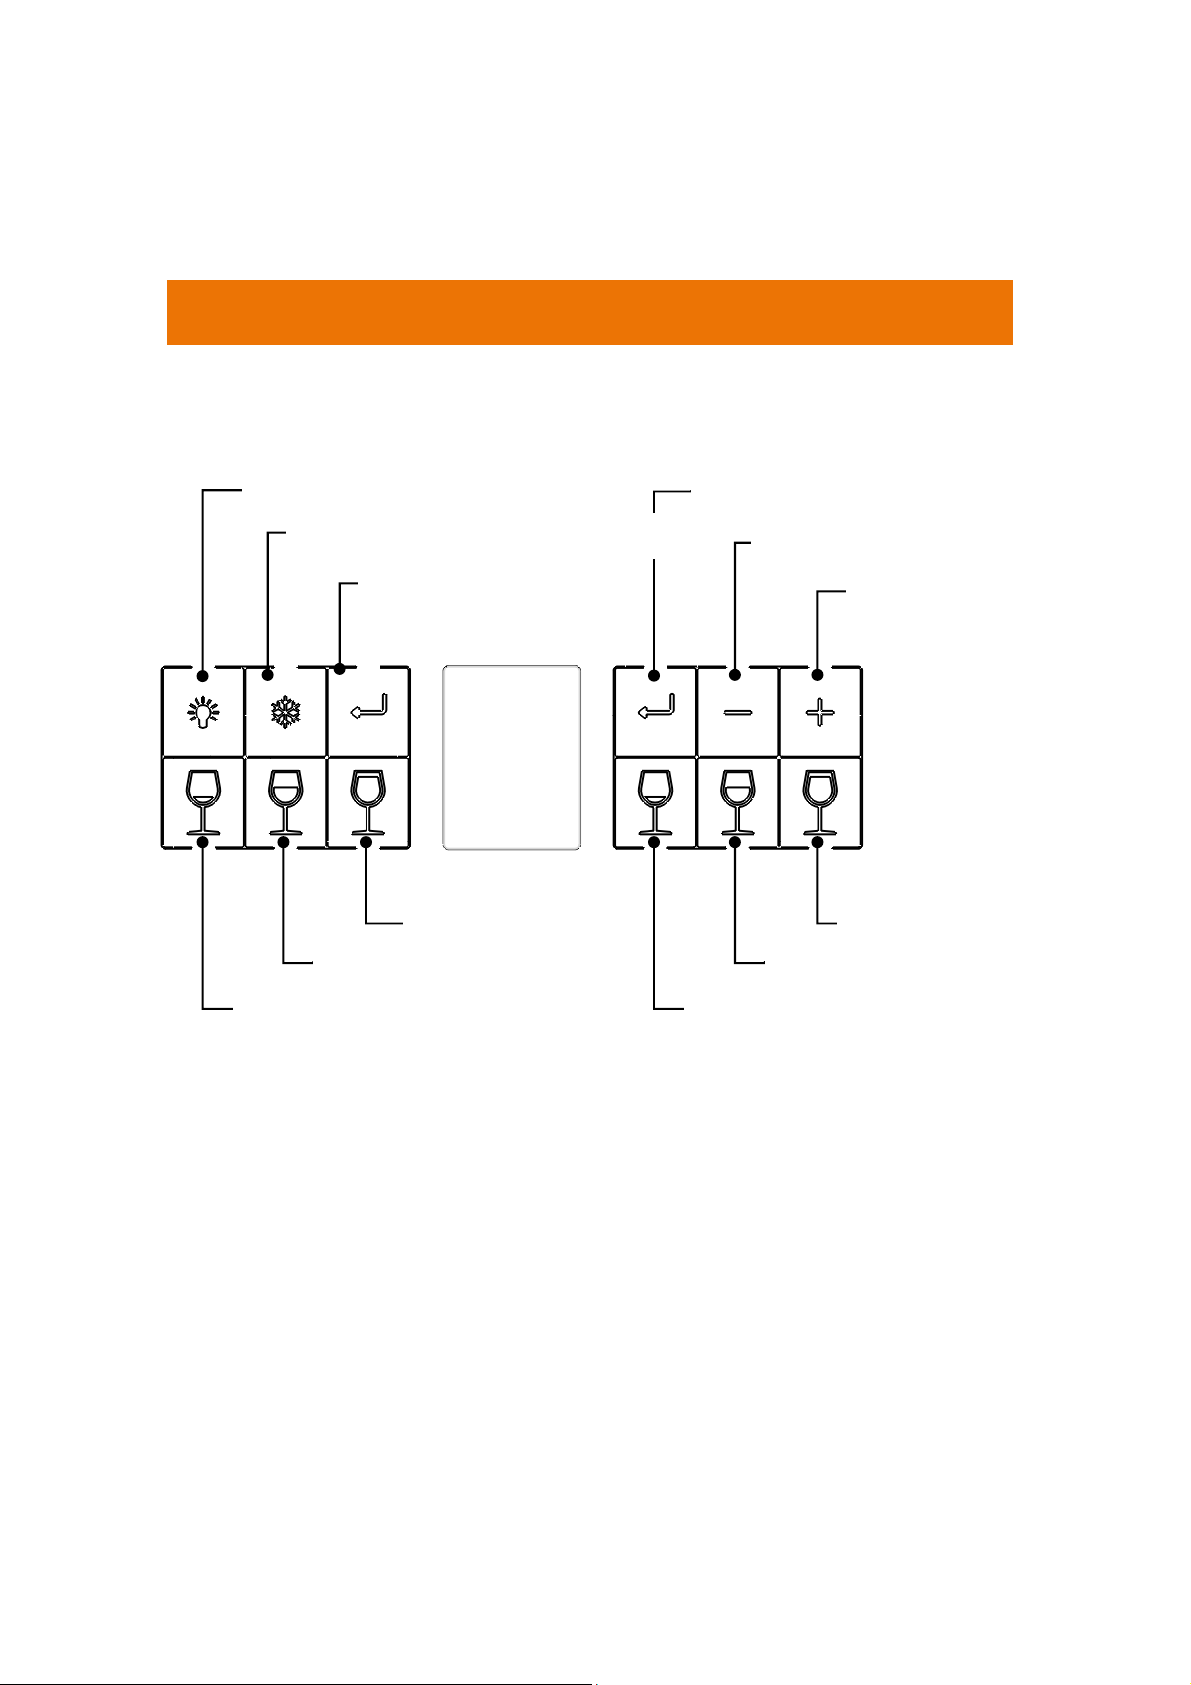
Rinse /confirm left (S1.6)
Tasting glass left (S1.1)
Half glass left (S1.2)
Full glass left (S1.3)
Full glass right (S2.3)
Half glass right (S2.2)
Tasting glass right (S2.1)
Rinse / confirm right (S2.4)
Program / min (S2.5)
Program / plus (S2.6)
7. Operating Instructions
Display
7.1 Control keypad:
Light / Lock (S1.4)
Actual temp. / Boost / Lock (S1.5)
Keypad left
Top three keys
Left button (S1.4): LED interior cabinet
• press once: Position 1 (dim light)
• press twice: Position 2 (highest cue)
• press three times: Lights Out
Middle button (S1.5): Cooling Fan
• once briefly: Display shows actual cabinet temperature
• once a longer press (3 seconds) Cooling step (boost button); to be used as the
ambient temperature is extremely hot. The display shows the same icon. Fan will run
more audibly
Right button (S1.6): Enter key (arrow): Rinse / confirm button
• one tap will give very small amount of wine (to throw away)
• once a longer press (flush mode) provides continuous wine or water until the
button is released.
10
Page 11

Electronic Locking System
Simultaneously press Top Left button (S1.4) and Top Middle button (S1.5) for 3
seconds until the lock in the display will show a closed lock. Now the serving buttons
are electronically locked and protected against unauthorized operation.
To re-activate: press again simultaneously the Top Left button (S1.4) and the Top
Middle button (S1.5) until the lock in the display will disappears.
Bottom three keys
• Left button (S1.1): Tapping of "tasting glass" bottle left
• Middle button (S1.2): Tapping of "half glass" bottle left
• Right button (S1.3): Tapping of "full glass" bottle left
Keypad Right
Top three keys
Left button (S2.4): Enter key (arrow): Rinse / confirm button
• one tap will give very small amount of wine (to throw away)
• once a long press (flush mode) provides continuous wine or water until the button
is released.
Programming the temperature in the cabinet
Simultaneously press the + and - key until "program" appears in the display
Middle button (-): Temperature down (S2.5): Display shows the set temperature.
• With a single press (or hold) the temperature goes down
Bottom three keys
Right button (+): Temperature up (S2.6): Display shows the set temperature.
• With a single press (or hold) the temperature goes up
• Left button (S2.1): Tapping of "tasting glass" right bottle
• Middle button (S2.2): Tapping of "half glass" right bottle
• Right button (S2.3): Tapping of "full glass" right bottle
Programming pouring quantities:
• Press key S1.1 and S1.2 simultaneously (respectively 2.1 and 2.2) until "program"
appears in the display
• The text "program" will be displayed with the letter L for left and R for the right
bottle
• Program now per key (S1.1, S1.2 and S1.3, respectively. S2.1, S2.2 and S2.3) the
precise desired amount of wine. You can do this in as many steps as you want (we
recommend the use of a measuring glass or, even more precisely, a scale in order to
weigh the quantity by weight).
• When satisfied, press key S1.6 or S2.4 to confirm and store. The units are now set
and programmed.
Tip: The units can either be programmed per each key individually or all at once. The
desired amount of wine per key can be done in 1 to (maximum) 3 steps. Each time
the Enter key (S1.6 and S2.4) is pressed, you exit the program mode and changes
11
Page 12
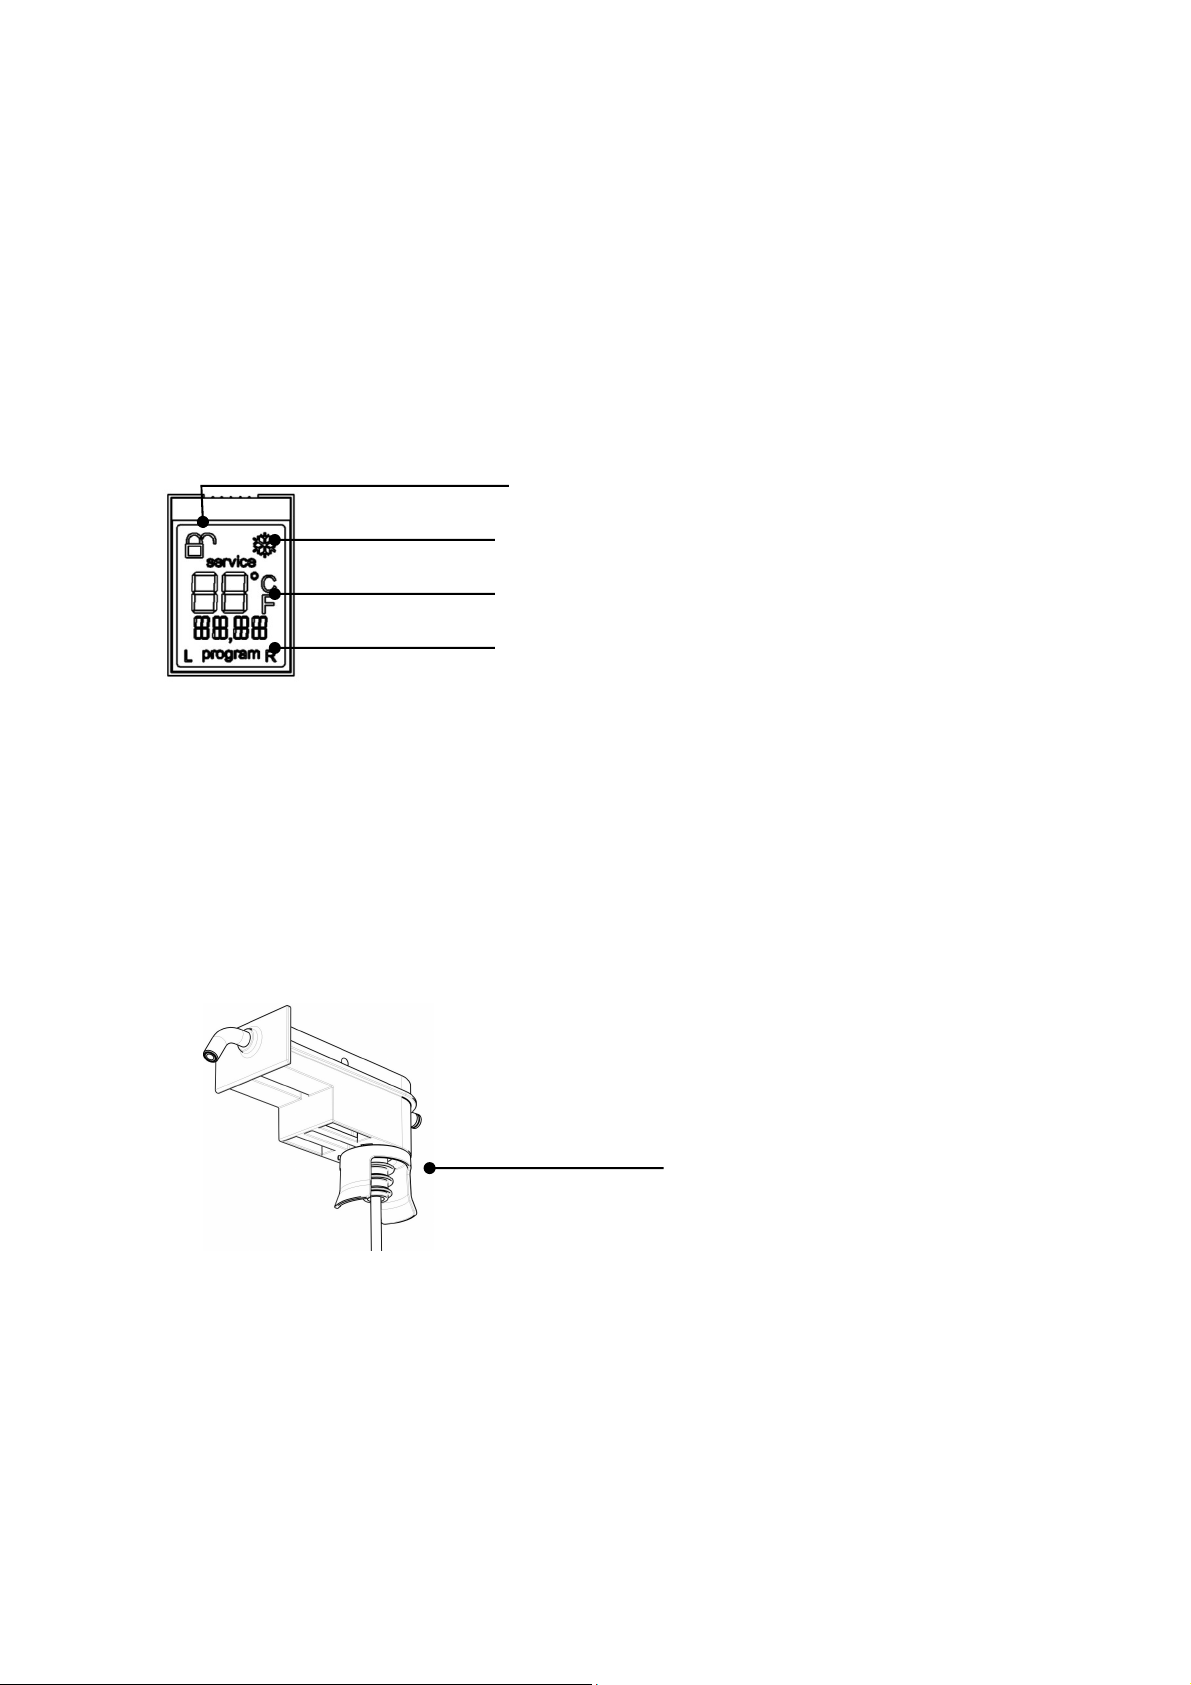
are saved.
Helmet
Freeze boost symbol
Temperature
Celsius o
r Fahrenheit
Lock symbol
Programming
tempe
rature and portions
left or right
Wine temperature setting:
• Press S2.5 and S2.6 simultaneously
• The current set temperature value will start flashing in the display
• Use key S2.5 (-) or S2.6 (+) to the desired temperature setting
• After a few seconds the blinking stops and the temperature value is the new
temperature programmed
Display:
• Displayed temperature is actual temperature (6-20° Celsius or 43-68° Fahrenheit)
• Ability to switch between Celsius and Fahrenheit. This can be done by unplugging
the electricity cord. Then hold S2.5 key (temperature down), while plugging the
electricity cord back into the socket.
• Lock symbol shows if dispensing is possible. Release lock by pressing S1.4 + S1.5
simultaneously.
• Freeze boost button when symbol (S1.5) is activated
• One short press S1.5 cabinet temperature is displayed on display for 3 seconds.
7.2 Loading the Bottle
1. Open the bottle and make sure the upper part of the bottle neck is clean.
2. Open the door of the BTG Modular.
3. Move your hand inside the unit and grab the helmet (bottom of the dispense
4. Slide the tube inside the bottle and push the cassette with silicone stopper
5. Squeeze your thumb and forefinger around helmet and bottle neck and place
6. Make sure the bottle shelf presses the bottle well into the cassette to prevent
7. Please note: Once the bottle has been engaged, the wine is not yet preserved!
cassette) with your thumb and forefinger and pull towards you to slide the
cassette completely out of the cradle.
firmly into the neck of the bottle.
the bottle in the unit by sliding the cassette back into the cradle. Move the
bottle shelf to the required height (instructions see below).
gas leaks.
Once you have tapped the wine, the bottle is under gas pressure. If the wine
12
Page 13

is not immediately needed, briefly press the rinse / confirm key (1.6 and 2.4)
8.
Gas Supply Options
and hold a glass under the spout(!).The gas flows into the bottle, forcing a
little bit of wine to escape. Now the wine is protected against oxidation for a
minimum of 14 days.
Repeat the instructions above to engage all the bottles (depending on the amount of
units installed). Please remember to close the door as quick as possible when
loading/replacing the bottle, and in any case no longer than necessary. Always put
pre-chilled white wines in your BTG Modular.
Bottle shelf adjustability in height
The bottle shelf is adjustable in height by hand (depending on the height of the
bottle). This is to ensure that the bottle is well connected into the head of the
cassette and to avoid gas leaks. To move the shelf upwards, place your fingers under
the shelf and in the back, push it upwards. You don’t need to use the handle
underneath. To move it downwards, squeeze the handle, take the shelf between your
thumb and fingers and push it downwards. To avoid damage, don’t use too much
force.
This will vary per country. Refer to the separate manual.
13
Page 14
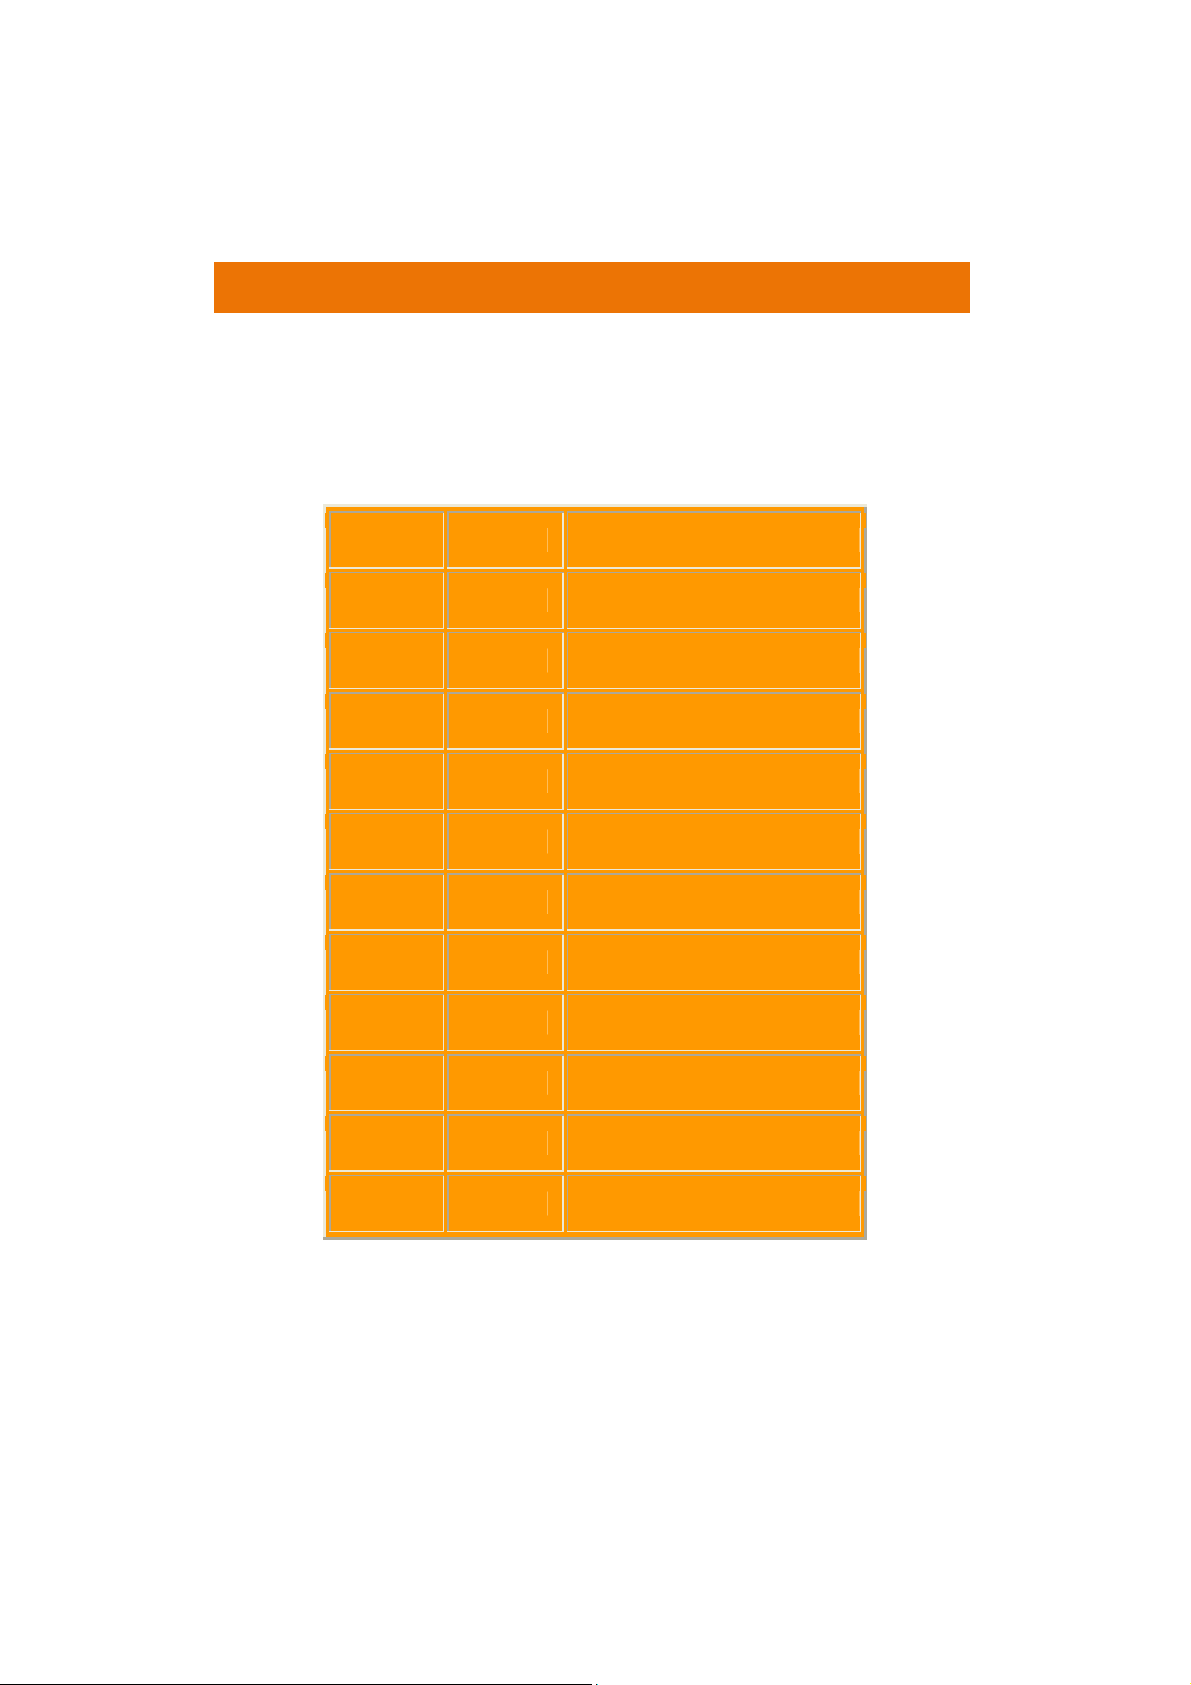
9.
Wine temperature and storage
Please refer to this temperature suggestion chart as a guide.
Temp F Temp C Notes
64°
63°
61°
59°
55°
54°
52°
48°
47°
18°
17°
16°
15°
13°
12°
11°
9°
8°
Bordeaux, Shiraz
Burgundy, Cabernet
Rioja, Pinot Noir
Chianti, Zinfandel
Ideal storage for all wines
Beaujolais, rose
Viognier, Sauternes
Chardonnay
Riesling
45°
43°
7°
6°
Champagne
Ice Wines
14
Page 15

10. Maintenance and
Cleaning
Weekly Maintenance Cleaning Tubes
Monthly Scheduled Cleaning Program
• The inside and outside of the BTG Modular should be cleaned with a slightly
damp cloth. Never use high-pressure cleaners.
Notice: Never use chemicals, gasoline, alcohol, detergents,
disinfectants, vinegar, oil, acids, abrasives, caustics or any other
harsh cleaning solutions for cleaning the BTG Modular. These
materials could cause pitting or deterioration of the stainless steel
parts. cleaning
ting
• As wine – red wine in particular – contains precipitates, it is recommended
that you clean the tubes on a weekly basis.
• It is highly recommended that the BTG Modular is always maintained in a
clean and proper state. Failure to do so will result in reduced hygiene, turn
over, and may mean a shorter life span of the unit.
• We recommend a weekly scheduled cleaning of the tubes by flushing it
through with cold water at each bottle position.
• It is also highly advisable to clean with a solution of lukewarm water and citric
acid (10%) on a regular monthly scheduled interval.
• This will prevent problems that might occur due to sediment or tartaric acid
present in wine.
• Wipe or Vacuum out any dust build-up on louvered ventilation panel at the
bottom of the unit for proper air-flow function.
15
 Loading...