

Byron SX-34 Installation Manual
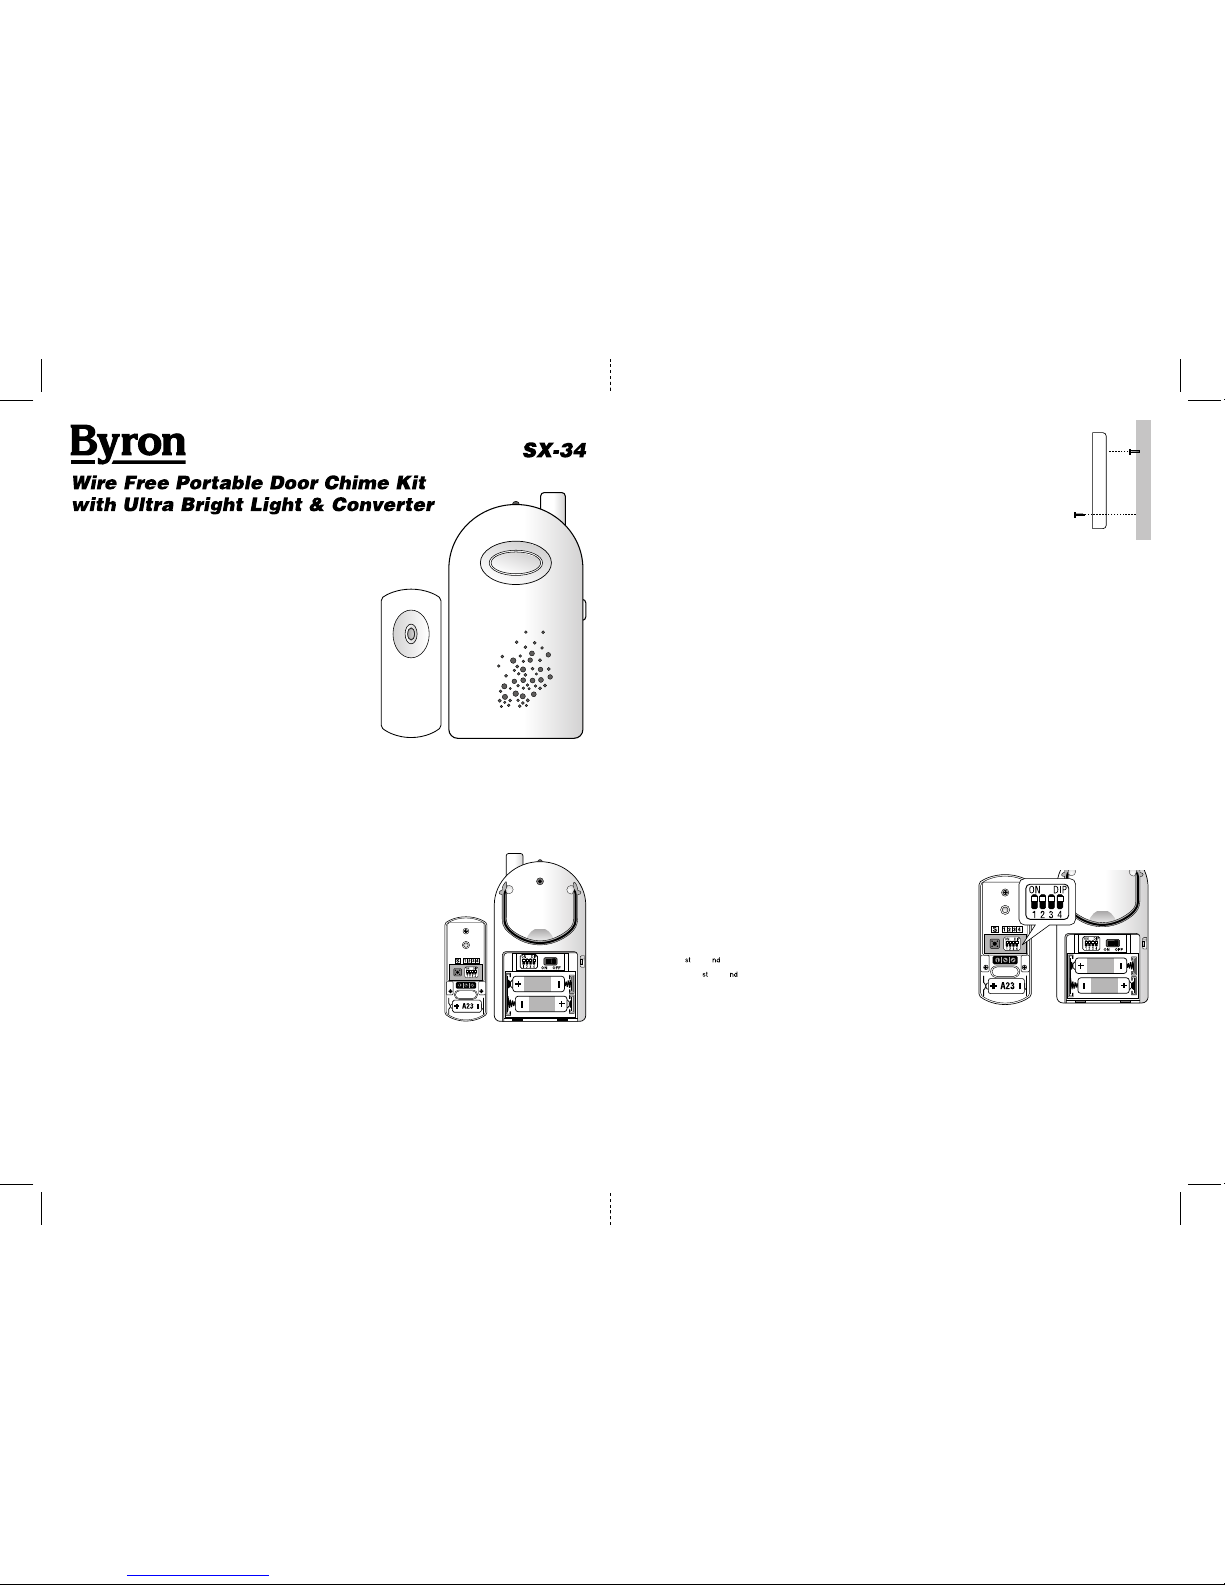
The wirefree door chime kit consists of three separate units:
1. Converter unit (Transmitter)
2. Door chime unit (Receiver)
3. Wired Brass Bell Push
When the converter is activated, it sends a wirefree
signal to activate the door chime. As the operating
range is up to 100 metres (320 ft. approx.), you can
mount or take the door chime virtually anywhere in
the home, workshop, office or garden and use the
system as a short-range personal pager. However,
the operating range of the wirefree signal will be
reduced if the signal is transmitted through a number
of walls or ceilings. Metal, and UPVC doorframes will
also reduce the operating range.
Locate the keyhole slot on the back of the chime unit, over the screw. Then use
the second hole located at the bottom half of the converter as a template, mark
the fixing position for the unit. Drill hole and fit wall plug and secure the converter
unit with the screw (self-tapping N3 x 16mm screws - included) in position.
Important: Mounting the converter unit on UPVC doorframes or metal sufaces
will reduce the broadcasting range seriously.
1) Westminster - 8 notes
2) Ding-Dong - Repeat
3) Telephone Ring
4) Circus Theme
Melody Selection
The melody selector is located inside the converter unit. It is a small button on the top left
corner of battery compartment marked with “S”. Press the switch once, the melody will change
to the next one on the list, there are total 8 melodies for selection. The converter is pre-set to
“Westminster” therefore, if no change is required, it should not be adjusted.
5) Banjo on my knee
6) Twinkle, Twinkle
7) It’s a small world
8) Dog Barking
Door Chime unit
1. Slide open the battery compartment door on the back of the unit.
Insert 2 x 1.5 volt alkaline batteries (“AA”, UM3, R6 size - not
included), ensuring the battery’s polarity matches the internal
markings. Close the battery door and the chime unit is now
ready to use.
2. Alternatively the unit can be powered by an A/C-D/C 9 volt
300mA adaptor (Byron model SX-36 - not included).
No batteries are required for the chime unit using this method.
PLEASE MAKE SURE YOU REMOVE ANY BATTERIES
FROM THE UNIT WHEN USING THE PLUG ADAPTOR
TO POWER THE CHIME UNIT.
3. This chime unit can be completely portable, or fixed in one place. There is a specially
designed hanging arm available at the back of the chime for ease of portability.
Channel Selection
The unit comes from the factory on a pre-set radio frequency channel. However, should your
door chime activate intermittently for no reason at all, it is possible that a similar unit is
operating nearby on the same frequency digital code. The encoded frequency of the
Converter (transmitter) and Door Chime (receiver) can be changed to avoid this problem.
1. Converter: Remove the back of the case by pushing in the tab on the bottom with a small,
flat screwdriver.
Door Chime Unit: Slide open the battery compartment.
2. There is 4 position dip switch marked 1,2,3,4. Use an
insulated tool to alter the dip switch levers to the “On” or
“Off” position, which can be altered to achieve a total of
sixteen (16) possible digital code.
3. Select any combination ensuring it is set to the same
code on both converter and door chime units. E.g.
If the 1 & 2 dipswitches are down in your converter,
then the 1 & 2 dipswitches must be down in your
chime unit.
4. Test to ensure correct operation before final installation.
“AA”
LR6
“AA”
LR6
Door Chime unit: This has a folding carry/hanging handle on the rear, this will
enable the chime unit to hang on a screw and be easily removed or relocated to
another room. Drill a hole and fit wall plug (if fixing to masonry) and screw (self-tapping N3
x 16mm screw included) to fixing position. Leave a gap of 3mm between the screw head and
the wall. Use the hanging arm to hang your chime.
Installation Guide
Wired Bell push: Using the two holes of the back of push button as a template, mark the
fixing position for the unit. Drill holes and fit wall plugs and secure the Bell Push unit with
screws (self-tapping N3 x 16mm screw) in position onto your front door or the position nearby.
Converter unit: Drill hole and fit wall plug (if fixing to masonary) and screw (self-tapping N3 x
16mm screw) to fixing position. Leave a gap of 2mm between the screw head and the wall.
Wiring Installation
The Converter is designed to change your new Brass Wired Bell Push to wirefree.
1. Simply connect your Wired Bell Push with the cable from Converter to the terminals on your
bell push.
2. Your Wired Bell Push with Converter is ready to use.
In case a Transformer (A/C 8V) is used to power the Wired Bell Push and Wired Door Chime.
1. Remove the bac k of the case b y pushing in the tab on the bottom with a small, flat scre wdriv er.
2. Disconnect the wire that is connected with the Wired Door Chime.
3. Feed the wire via the hole on the back of the Converter, connect the wire to the terminal
Battery Installation
Wire Free Converter
1. The Converter unit is operated by 1 x 12 volt battery (A23 - included).
2. Remove the back of the case by pushing in the tab on the bottom with a small, flat
screwdriver.
3. Insert 1 x 12 volt battery (A23 - included) in the battery compartment, ensuring the battery
polarity match the internal markings.
4. Snap the front cover of Converter back on, then it is ready to use.
“AA”
LR6
“AA”
LR6
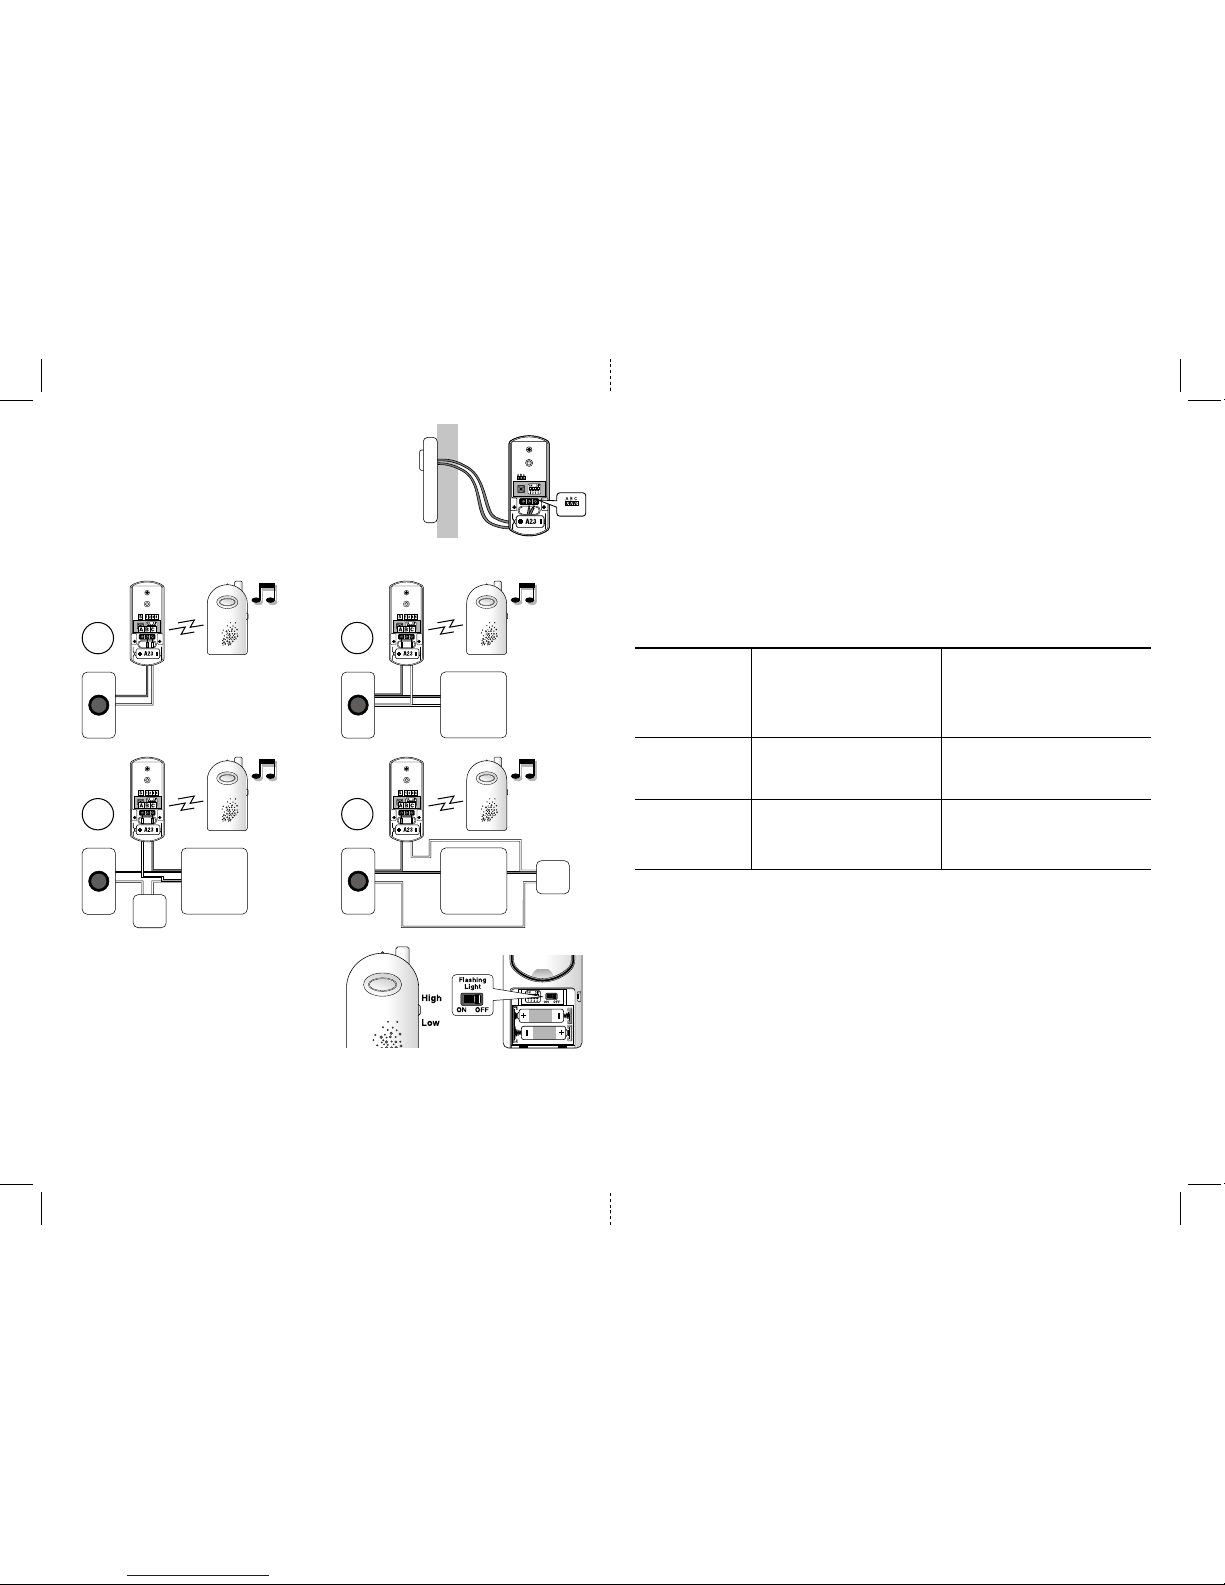
Sound Volume Adjustment
Melody sound volume can be adjusted to high
or low, the high-low switch is located at the side
of the door chime unit.
Flashing Light Function
If the flashing ultra light is not required, simply
switch the function off. The on/off switch is
located inside the door chimes battery compartment.
3. Do not mount the Converter close to fireplace or expose to high temperature.
4. Do not drop the Converter or subject to excessive blows.
5. The Converter and Door Chime units are designed for indoor use only.
6. Always use alkaline batteries as these will give longer service and are less likely to leak.
7. Please dispose of old, defective batteries in an environmentally friendly manner in
accordance with the relevant legislation.
8. Make sure that no naked flame sources, such as lighted candles, should be placed on the
unit.
9. The unit should not be exposed to dripping or splashing and that no objects filled with
liquids, such as vases, shall be placed on the unit.
10. CAUTION: Replace only with the same or equivalent type of battery that are
recommended by the manufacturer.
11. CAUTION: Danger of explosion if battery is incorrectly installed or replaced.
positions marked in diagrams below.
4. Snap the front cover of converter back on, then it is
ready to use.
Important: Do not connect the Converter unit with any
Lighted Bell Push.
“AA”
LR6
“AA”
LR6
SX
Chime
unit
WIRED
CHIME
(Transformer
operation)
4
T
Converter
unit
SX
Chime
unit
WIRED
CHIME
(Transformer
operation)
3
T
Converter
unit
SX
Chime
unit
1
Converter
unit
SX
Chime
unit
WIRED
CHIME
(Battery
operation)
2
Converter
unit
Trouble Shooting & User Hints
Problem
Chime does not
sound but LED
lights on the
converter
Possible Causes
1. Units are out of range (max.
range 100m)
2. Converter and chime units are
not on same channel
3. Converter not wired correctly
Suggested Remedy
1. Operate the Chime unit within the
operation range (100m)
2. Re-set the digital code (see Digital
Code Set Up)
3. See wiring diagrams opposite
Chime does not
sound plus no
lights on Push
Button LED
1. Flat Converter battery
2. Wrong polarity of battery in
converter
1. Change the battery
2. Re-insert battery as internal
marking in right polarity
Chime sounds
without converter
being pressed
A similar wirefree door chime
product is operating nearby
on the same frequency digital
code
Reset the digital code
(see Digital Code Set Up)
NOTE: There are no serviceable parts in the unit, do not attempt to repair it.
Specification
A. Converter
Power
Consumption
: 1 x 23A battery (included, replace with Byron model SD-100)
: 3.0mA - ON
0.003mA - OFF
B. Door Chime unit
Power
Consumption
Operating Temperature
Operating Distance
Selectable Tone
Selectable digital code
: 2 x 1.5volt batteries (“AA”, R6 or UM3 - not included)
Alternatively powered by A/C-D/C 9volt 300mA
adaptor (Byron model SX-36 - not included)
: 100mA - ON
0.3mA - Stand-by
: -10°C to +40°C
: 100 metres (320 feet approx.) in open field
: Total eight (8) tones available
: Total sixteen (16) possible digital codes
B+C SWITCH
A+C 8V/AC
B+C SWITCH
Please note that these diagrams are only for
reference as a guide.
EACH Wired chime can be wired differently, so if you
encounter problems, PLEASE CALL THE HELPLINE NO. 0121 5449499
B and C
A and C
A and C
A and C
Wired Bell
Push
Converter
unit
Important
1. Do not mount the Converter unit onto any metal surface or UPVC doorframe, as this will
reduce the operation range seriously.
2. Do not expose the unit directly to rain or immerse either in water.
Wire Free Portable Door Chime Kit with Ultra Bright Light & Converter-SX-34
 Loading...