

Byron Home Easy HE-206 Installation Instructions Manual
RE-INVENTING THE HOME
HOME
easy
HE-206 Remote Control
Bayonet Ceiling Rose
V1.0
Installation:
The HomeEasy HE-206 remote control Bayonet Ceiling Rose allows you
to convert a standard ceiling rose in to a HomeEasy remote control unit.
For use with 1 gang incandescent lights only.
INSTALLATION WARNINGS:
BEFORE COMMENCING INSTALLATION
ISOLATE YOUR MAINS ELECTRIC SUPPLY
Read the instructions care fully before starting the installation process and keep
them for future reference. If you are in any doubt on the installation process,
consult a qualified electrician.
This product should be installed in accordance with the relevant sections of
the building
regulations code, and the current edition of the IEE Wiring Regulations
(BS 7671:Requirements for electrical installations) and appropriate statutory
regulations.
As of1 April 2004, new installations in the UK should be wired using the EU
harmonised colours for the supply conductors:
New colours:
BROWN = Live BLUE = Neutral Earth = Yellow/Green
Old colours:
RED = Live BLACK = Neutral
The old colours will cease from April 2006.
Electrical installations in bathrooms, kitchens, gardens, floor and heating systems,
swimming pools, saunas and extra-low voltage lighting are classed as special
installations and must be certified and conforming to Part P, requirements of
BS 7671:2001 and appropriate statutory regulations. Contact your local Building
Regulation authority if required.
Do not install ceiling receivers on lighting circuits used to supply other
products such as extractor fans and shaver socket outlets.
Do not exceed the Maximum Power Rating of 100W, Incandescent lighting
only
Do not use the HE-206 Ceiling Rose with low voltage lighting transformers,
fluorescent bulbs, or energy saving lighting, incorrect installation may damage
the converter. In case of any doubt consult a competant electrical installer
6: Now pair the HE-206 bayonet ceiling rose with a HomeEasy Remote control
HE-100, HE-200, HE-300 or HE-102 (Not Included).
See Pairing and Deleting Remote Control.
7: Replace the ceiling rose cover making sure no wires are caught between the
switch and the wall. Do not over tighten as this could crack or distort the cover.
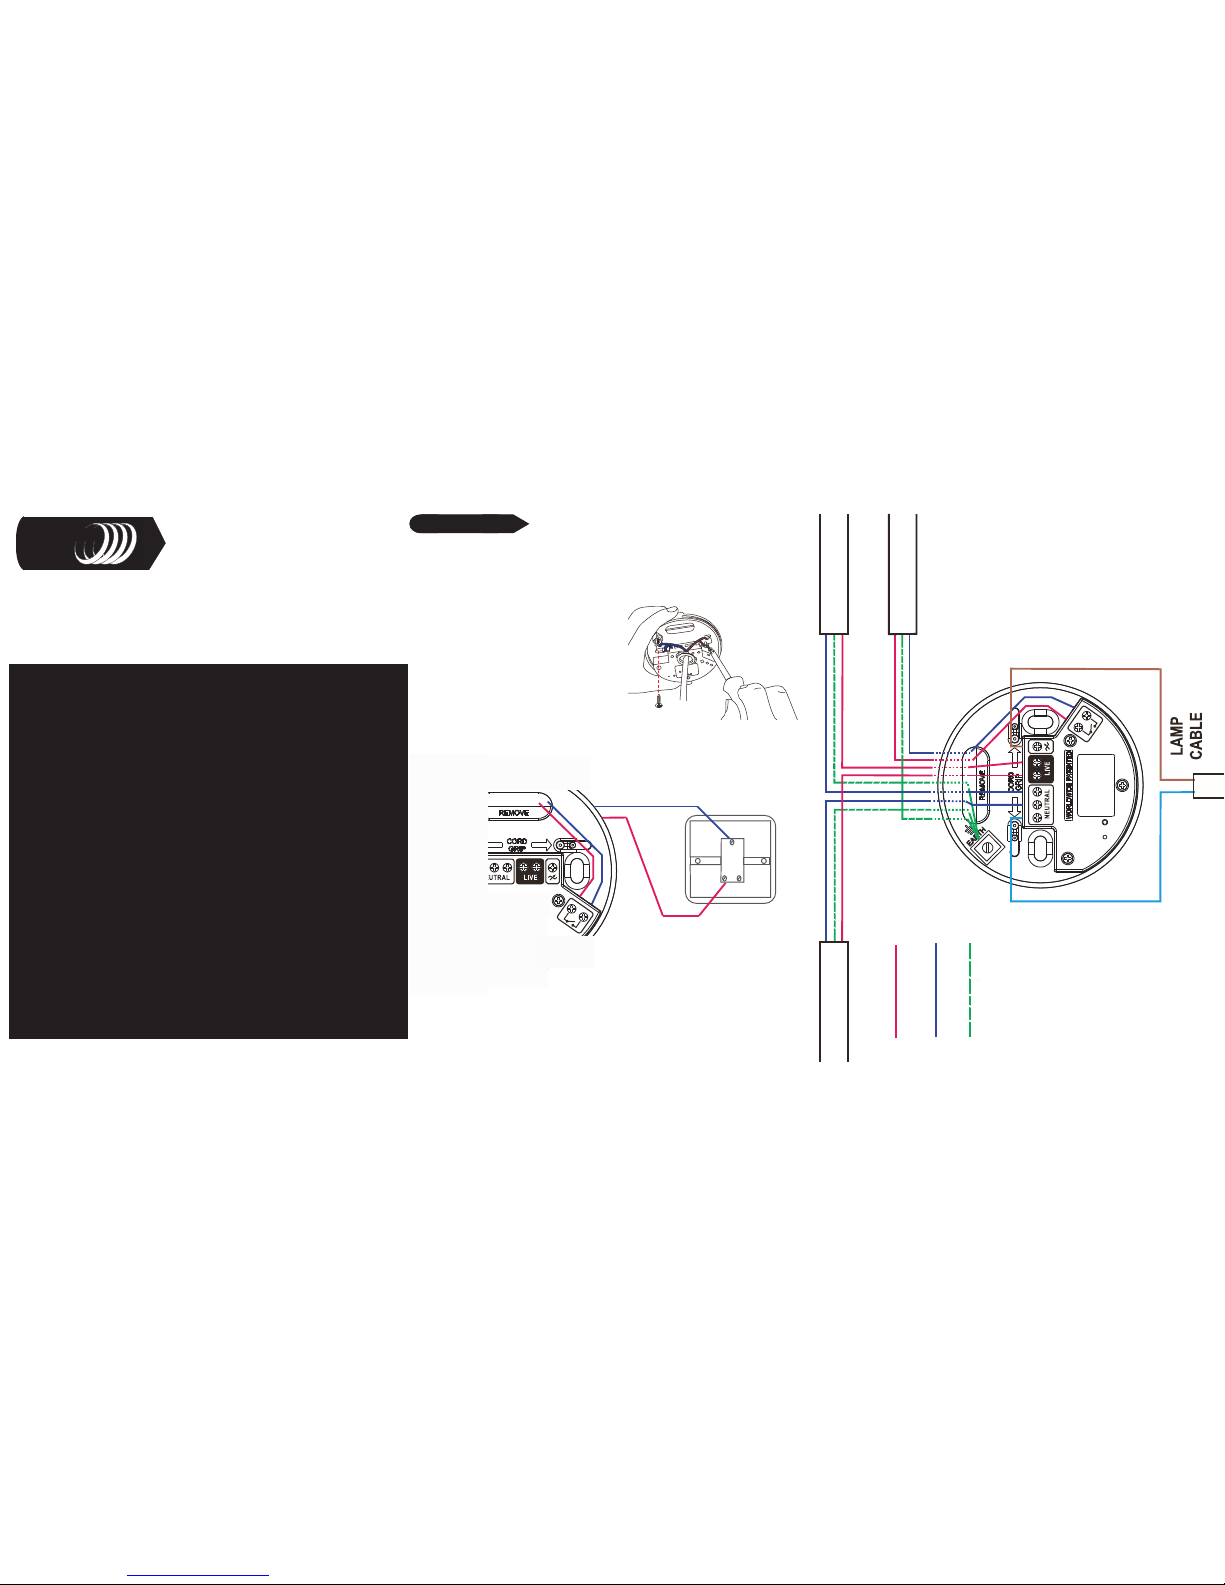
1: Isolate the mains supply, then remove the existing ceiling rose.
2: Attach the HE-206 ceiling rose using
the screws provided.
3: Wire the mains cable to the HE-206 Ceiling Rose as per the
diagram opposite, making sure the Live and neutral wires are
correctly connected.
If required a breakable tab on the base can be removed.
230~240V
230 ~ 50Hz
Earth
Live
Nutral
SWITCH CABLE
ZERO VOLTAGE
5:Make sure all the cables are connected correctly and securely fastened.
4: Connect the all switch to the ceiling rose, making sure that the switch is
zero voltage.
Com
1Way
Light Switch
Ceiling Rose

C H Byron
34, Sherwood Rd
Aston Fields
Bromsgrove
B60 3DR
Contact Details:
433MHz
R&TTE
APPROVED
CH Byron Electrical United Kingdom. www.chbyron.com
A
B
DK
FIN
F
D
GR
LT
IRL
I
L
NL
P
E
S
UK
BG
CZ
EST
H
IS
LV
M
N
SK
SLO
CH
PL
RO
0560
Tel: 0845 2301231
Fax: 01527 557701
Web: www.chbyron.com
E-mail:
support@chbyron.com
Contact: Helpline: 0845 2301 231
TIMBER
CONCRETE
METAL
GLASS
PLASTICS
RF Range: : The radio signals operating distance is reduced when the signal has
to pass through walls. The radio signals achieve a range of 30m inside a building;
this can be reduced depending on the type of material
10 - 15%
BRICK
10 - 40%
40- 80%
10 - 40%
90%
5 - 15%
Range
Reduction Guide:
Switching On/Off /Dimming:
Help Section :
Product Specification:
Switch Converter: HE-206
Power: 230V~50Hz
Max Load:100W BEC14/E27 (Incandescent Lighting)
Internal Fuse: 2A, 130 degrees Celsius
Range: 30 Metres (Open Distance)
Frequency: 433.92MHz
Indoor Use Only
Warning: Never Exceed the Product Specification
OFF
ON
Remote Control:
(See pairing/deleting with remote control)
On: Press on button
OFF: Press Off button
1
2
Resetting Ceiling Rose:
To delete all the remote control units from the memory of the HE-206 Ceiling
Rose, hold the "Learn" button for more than 6 seconds, the LED will start to
blink continuously. Press the learn button again, the LED will blink twice to
confirm the deletion of all remote controls form the memory of the Ceiling
Rose.
Dimming: Press "On" and then press "On" again, the Ceiling Rose unit will
now start to dim, press "On" to select the required level. To switch "Off",
press off as normal.
Standard Light Switch:
On/Off: Switch on and off as normal.
Dimming: Switch On, Off and On again. The converter will now start to dim, to
select the required level switch the light Off and On.
Pairing/Deleting With Remote Control:
Up to Six remote control units can be paired with
HE-206 Ceiling Rose.
To program a HE-206 Ceiling Rose install the unit as
per the instructions (See Installation), now press the
"Learn" button located inside the ceiling rose cover.
Deleting Remote Control:
To delete a remote control that has been paired with HE-206 Ceiling Rose, simply
press the "Learn" button. The LED will start to blink; press the "Off" button on the
remote control, the LED will blink twice to confirm that the remote control has been
removed from the memory of the Ceiling Rose.
The LED will start to flash, now press the selected "On" button on the remote
control, the LED will stop flashing. The units are now paired together. Place
your selected light bulb (max 100W) into the Bayonet Ceiling Rose
(BEC14/E27), you can test this by pressing the selected "ON/OFF" button.
OFF
ON
1
2
LED
LEARN
 Loading...