

Byron DIC-22815 User manual [ml]
DIC-22815

2


Table of Contents Byron
Table of Contents
1 Safety ..........................................................................................................................................................................................................6
1.1 Installation Safety...............................................................................................................................................................................6
1.2 Operation Safety ................................................................................................................................................................................6
1.3 Battery Safety ....................................................................................................................................................................................6
2 Parts description .......................................................................................................................................................................................7
2.1 What's in the box................................................................................................................................................................................7
2.2 Product overview ...............................................................................................................................................................................7
2.2.1 Indoor unit (monitor)............................................................................................................................................................ 7
2.2.2 Outdoor unit (doorbell) ........................................................................................................................................................ 7
3 Installation..................................................................................................................................................................................................7
3.1 Placing the indoor unit (monitor) ........................................................................................................................................................7
3.2 Mount the outdoor unit (doorbell).......................................................................................................................................................7
3.3 Electrical installation ..........................................................................................................................................................................8
3.3.1 Connecting AC power to the indoor unit (monitor).............................................................................................................. 8
3.3.2 Installing and charging the indoor unit battery .................................................................................................................... 8
3.3.3 Charging outdoor unit battery ............................................................................................................................................. 8
3.3.4 Installing a MicroSD card (Not included)............................................................................................................................. 9
3.3.5 Connecting AC power to the outdoor unit (doorbell) (adapter not included)....................................................................... 9
3.3.6 Connecting a door lock (not included) ................................................................................................................................ 9
3.3.7 Connecting a gate opener (not included)............................................................................................................................ 9
3.3.8 Connecting the external antenna (not included) ............................................................................................................... 10
4

Byron Table of Contents
4 Basic functions ........................................................................................................................................................................................10
4.1 Control buttons.................................................................................................................................................................................10
4.2 Screen icons ....................................................................................................................................................................................10
4.3 Settings menu ..................................................................................................................................................................................10
4.4 Answering a call...............................................................................................................................................................................10
4.5 Pairing the indoor/outdoor units .......................................................................................................................................................11
4.6 Pairing an additional monitor (not included).....................................................................................................................................11
4.7 Image setting ...................................................................................................................................................................................11
4.8 Volume control .................................................................................................................................................................................11
4.9 Ring tone setting ..............................................................................................................................................................................11
4.10 Play back recordings........................................................................................................................................................................12
4.11 Recording videos/photos .................................................................................................................................................................12
4.12 Time setting .....................................................................................................................................................................................12
4.13 Unlock time setting...........................................................................................................................................................................12
5 Cleaning and maintenance .....................................................................................................................................................................13
6 Frequently asked questions ...................................................................................................................................................................13
7 Technical Data .........................................................................................................................................................................................13
8 Environment.............................................................................................................................................................................................14
9 Declaration of Conformity....................................................................................................................................................................... 15
5

Instruction manual
1 Safety
• Please read these instructions carefully before installing and
using the product.
• Do not cut the power supply cable to extend it; the device
(transformer) will not work with a longer cable. Do not plug in the
device until all the wiring has been finished.
• Before starting the installation, power off the current.
• Before using the product, make sure that the battery cover is
covered. Do not open the cover during use, unless the battery is
replaced. Only after replacing the battery can the product be
used.
• Only use attachments/accessories specified or provided by the
manufacturer (such as the exclusive supply adapters, batteries,
etc.).
• Outdoor camera shall not be exposed to dripping or splashing,
and direct sunshine.
1.1 INSTALLATION SAFETY
• Keep children and bystanders away while installing the products.
Distractions can cause you to lose control.
• Do not overreach when installing this product. Keep proper
footing and balance at all times. This enables better control in
unexpected situations.
• This product is not a toy. Mount it out of reach of children.
1.2 OPERATION SAFETY
• Do not operate electrically powered products in explosive
atmospheres, such as in the presence of flammable liquids ,
gases, or dust. Electrically powered products create sparks which
may ignite the dust or fumes.
• The warnings, precautions, and instructions discussed in this
instruction manual cannot cover all possible conditions and
situations that may occur. It must be understood by the operator
that common sense and caution are factors which cannot be built
into this product, but must be supplied by the operator.
• Do not expose the Power Adapter of this product to rain or wet
conditions. Water entering the Power Adapter will increase the
risk of electric shock.
• Do not abuse the Power Cord. Never use the cord for unplugging
the plug from the outlet. Keep cord away from heat, oil, sharp
edges or moving parts. Damaged or entangled cords increase the
risk of electric shock.
• The adapter must match the outlet. Never modify the plug in any
way. Unmodified plugs and matching outlets will reduce risk of
electric shock.
1.3 BATTERY SAFETY
• CAUTION: RISK OF EXPLOSION IF BATTERY IS REPLACED
BY AN INCORRECT TYPE. DISPOSE OF USED BATTERIES
ACCORDING TO THE INSTRUCTIONS.
• Disposal of a battery into fire or a hot oven, or mechanically
crushing or cutting of a battery can result in an explosion.
6

Instruction manual
• Leaving a battery in an extremely high temperature surrounding
environment can result in an explosion or leakage of flammable
liquids or gas.
• A battery subjected to extremely low air pressure may result in an
explosion or the leakage of flammable liquid or gas.
2 Parts description
2.1 WHAT'S IN THE BOX
1. Indoor unit (monitor)
2. Outdoor unit (doorbell)
3. Mounting plate (outdoor unit)
4. Battery (indoor unit)
5. Battery (outdoor unit)
6. Micro USB AC adapter (indoor unit)
7. Terminal blocks
8. Manual
9. Screws and plugs
2.2 PRODUCT OVERVIEW
2.2.1 Indoor unit (monitor)
1. Screen
2. Power on/off
3. Power indicator
4. Charge indicator
5. Interface buttons
6. Microphone
7. AC adapter
EN
2.2.2 Outdoor unit (doorbell)
1. Microphone
2. Night sensor
3. Outdoor camera
4. Call button
5. External antenna connection (On the back of the unit)
6. Reset button (On the back of the unit)
3 Installation
Make sure pin 1 at the back of the outdoor unit is switched to ‘power
on’.
3.1 PLACING THE INDOOR UNIT (MONITOR)
The indoor unit (monitor) is designed to stand on a table or any flat
surface.
A. Pull out the stand leg on the back of the indoor unit.
B. Pull the antenna on the back of the indoor unit to an upright
position.
C. Place on any flat surface.
3.2 MOUNT THE OUTDOOR UNIT (DOORBELL)
7

Instruction manual
To mount the outdoor unit, you will need the following tools:
ü A suitable screwdriver for the included screws.
ü A drill and suitable drill bit for the included screw plugs.
A. Position the provided mounting plate where desired.
B. Mark the screw positions with a pen.
C. Drill the necessary holes.
D. Insert the plugs.
E. Use a knife or sharp object to puncture the cable gland. (Optional,
only when installing the AC Power. Cables are not included.)
F. Pull the required cables through the cable gland. (Optional, only
when installing the AC Power. Cables are not included.)
G. Fasten the mounting plate with the screws.
H. Remove the front cover of the outdoor unit by removing the screw
at the bottom.
I. Attach the outdoor unit to the mounting plate.
J. Fasten the outdoor unit with the supplied screws.
K. Charge the battery (see 3.3.3) and place the battery in the outdoor
unit.
L. Place the front cover and fasten the screw at the bottom of the
outdoor unit to secure the cover.
3.3 ELECTRICAL INSTALLATION
3.3.1 Connecting AC power to the indoor unit (monitor)
The monitor is portable and can be used on battery power, AC power
or both. When the AC adapter is connected the battery charges until
full and then operates directly from the AC adapter. The AC adapter
used is a standard micro USB charger.
3.3.2 Installing and charging the indoor unit battery
A. Open the battery cover on the back of the unit.
B. Check the label on the battery for the correct orientation.
C. Insert the battery and place back the battery cover.
D. Insert the micro USB adapter to charge the battery.
E. Charge the battery completely before using the monitor on battery
power alone.
3.3.3 Charging outdoor unit battery
The outdoor unit (doorbell) can be operated on battery or AC power
(AC adapter not included). If operated on battery, it must be removed
in order to re-charge.
A. Remove the screw holding the front cover.
B. Remove the front cover.
C. Press the metal lever and pull out the battery pack.
D. Re-charge the battery by using the micro USB charge adapter
supplied for the monitor.
E. After charging: Insert the battery into the outdoor unit.
8

Instruction manual
F. Place the front cover.
G. Fasten the screw holding the cover in place.
3.3.4 Installing a MicroSD card (Not included)
To record video, a MicroSD card is required.
A. Remove the battery cover and the battery of the indoor unit. (see
section “Installing and charging the monitor battery”)
B. Open the MicroSD card cradle by sliding it. (see marking on
cradle for direction)
C. Insert the MicroSD card into the cradle with pins facing down.
D. Close the cradle and slide it to the closed position. (see marking
on cradle for direction)
3.3.5 Connecting AC power to the outdoor unit (doorbell) (adapter not included)
The outdoor unit is portable and can be used on battery power or AC
power. A standard micro USB charger can be used as AC adaptor.
To connect the AC terminal blocks, you will need the following tool:
ü A small flat head screw driver.
A. ORANGE terminal block: Loosen the terminal screws.
B. With the terminal facing you: Insert the (+) wire on the left and the
(-) wire on the right.
C. Fasten the terminal screws.
D. Connect the terminal block to the outdoor unit.
3.3.6 Connecting a door lock (not included)
It is possible to connect a lock to the outdoor unit that can be opened,
using the monitor. Door locks are sold separately. Article no: DB5005
& DB5005L
To use the door lock, the outdoor unit needs to be powered by the
adapter.
To connect the door lock, you will need the following tool:
ü A small flat head screw driver.
A. On the outdoor unit: Loosen the terminal screws. (see sticker on
the outdoor unit for position)
B. Insert the wires (See sticker on the outdoor unit for position)
C. Fasten the terminal screws.
D. On the lock: Loosen the 2 terminal screws.
E. Insert the wires (any order)
F. Fasten the terminal screws.
3.3.7 Connecting a gate opener (not included)
It is possible to connect a gate opener to the outdoor unit that can be
opened using the indoor unit (monitor).
To use the gate opener, the outdoor unit needs to be powered by the
adapter.
To connect the gate opener, you will need the following tool:
ü A small flat head screw driver.
A. On the outdoor unit: Loosen the terminal screws. (see sticker on
the outdoor unit for position)
B. Insert the wires. (see sticker on the outdoor unit for position)
ð It is important that the + and – wires are in the correct position.
A. Fasten the terminal screws.
EN
9

Instruction manual
B. On the gate opener: (See the manual provided with your gate
opener.)
3.3.8 Connecting the external antenna (not included)
The internal antenna is sufficient in most cases but can be extended
using the external antenna.
4 Basic functions
4.1 CONTROL BUTTONS
1. Intercom / monitor button
2. Unlock buttons
3. Menu / OK button
4. Up button / photo or recorder button
5. Direction buttons (down, left and right)
6. Call button / pair button
4.2 SCREEN ICONS
1. Wi-Fi signal strength
2. SD card inserted
3. a) Outdoor unit powered by battery
b) Outdoor unit powered by power adapter
4. a) Video recording
b) Picture captured
5. a) Indoor unit powered by battery
b) Indoor unit powered by power adapter
6. Time and date
• Charge the battery immediately when the icon indicates a low
battery level.
4.3 SETTINGS MENU
In the standby mode, first press the intercom/monitor button and then
the ok/menu button to open the main menu. Use the directional keys
to navigate through the different settings. Press the ok/menu button to
select the highlighted submenu.
1. Camera pairing
2. Image setting
3. Volume control
4. Music setting
5. Play back
6. Rec/snap
7. Time setting
8. Unlock time setting
9. Exit
4.4 ANSWERING A CALL
When the doorbell rings, you can:
A. Press the camera button to make a video or take a picture.
B. Press the lock button to open the door (optional).
C. Press the gate button to open the gate (optional).
D. Press the talk button to talk to your visitor.
10

Instruction manual
4.5 PAIRING THE INDOOR/OUTDOOR UNITS
ü Before you can use the product, the indoor and outdoor units
need to be paired. Follow below procedure for pairing.
A. Press the power button on the indoor unit until the LED turns on.
B. Press the menu button.
C. Select the pairing icon.
D. Press the ok/menu button to confirm.
E. Press left/right button to select the doorbell/monitor icon.
F. Press the ok/menu button to confirm.
G. On the screen you will see that the indoor unit is now in pairing
mode. Press the doorbell button for a couple of seconds and the
outdoor and indoor unit will now be paired.
4.6 PAIRING AN ADDITIONAL MONITOR (NOT INCLUDED)
An additional monitor (DIC-22805) can be connected to the system.
To link this to the system, follow the steps below:
A. Power on the indoor unit that already has been successfully
paired with the outdoor unit and enter the pairing interface.
B. Use the left or right button to select the (1) icon.
C. Press the menu/ok button to confirm.
D. Power on the additional monitor and enter the pairing interface.
E. Use the left or right button to select the (2) icon.
F. Press the menu/ok button to confirm.
1. Brightness setting
2. Contrast setting
3. Color setting
• To change the image settings when using the outdoor unit on
battery, you first need to press the doorbell to have the image on
your monitor:
A. Use the arrow keys to select one of the available settings.
B. Press the menu button to confirm.
C. Use the arrow keys to adjust the setting.
D. Press the menu button to confirm.
E. Use the arrow keys to select exit.
F. Press the menu button to confirm.
4.8 VOLUME CONTROL
The volume settings available consist of:
1. Speaker volume
2. Microphone volume
3. To change the volume settings:
A. Use the arrow keys to select one of the available settings.
B. Press the menu button to confirm.
C. Use the arrow keys to adjust the setting.
D. Press the menu button to confirm.
E. Use the arrow keys to select exit.
F. Press the menu button to confirm.
EN
4.7 IMAGE SETTING
The image settings available consist of:
4.9 RING TONE SETTING
A. With the arrow keys, select the music icon and press menu/ok
button.
11

Instruction manual
B. Select one of the 24 different tunes and press menu/ok button to
confirm.
C. With the arrow keys, select the speaker icon to adjust the volume
and press the menu/ok button to confirm.
4.10 PLAY BACK RECORDINGS
A. Use the arrow keys to select the play back icon and press menu/
ok.
B. Use the arrow keys to select the video or photo icon.
C. Press the menu/ok button.
D. Press the up and down button to select folder.
E. Press right button to access the selected folder.
F. Use up and down arrow buttons to select file.
G. Show the marked file with the right button.
H. Press the up and down buttons to show next or previous files on
screen.
• To go back one step in the menu, use the left button.
Delete folder or file
A. When pressing the ok button on a selected folder or file a
submenu of the delete option will pop-up.
B. Select yes or no with the left or right button.
C. When yes is selected and after confirmation with the ok button,
the file or folder will be deleted.
4.11 RECORDING VIDEOS/PHOTOS
An SD card (not included) is required for storing video, photos
are stored on the monitor.
A. Press the direction buttons to select the rec/snap icon and press
the ok button to confirm.
B. In the submenu there are 3 options:
1. Taking a photo
2. Recording a video
3. Exit
A. Use the arrow keys to select the desired function and press menu/
ok button to confirm.
Manually record a video or photo.
A. In the talk state, press the up button to start recording a video or
take a photo.
B. Press up button again to stop recording.
C. When power is supplied to the outdoor unit, first press the monitor
button and then press the up button to take a picture or start
recording.
D. Press the up button again to stop.
4.12 TIME SETTING
A. Use the arrow keys to select the time setting icon
B. Press menu/ok to confirm.
C. Press left/right buttons to select the setting you want to change.
D. Press up/down buttons to adjust.
E. Press menu/ok to confirm.
• The system automatically records a video or takes a photo when
the call button is pressed.
12
4.13 UNLOCK TIME SETTING
This setting defines the duration of which the door lock stays
unlocked after pressing the “open door lock button”

Instruction manual
A. Use the arrow keys to select the unlock time icon ,
B. Press menu/ok to confirm.
C. Use the left/right button to select between 100mS, 1S, 5S or 10S.
D. Confirm and exit by pressing the menu/ok button.
5 Cleaning and maintenance
• Clean the outside of the appliance with a soft and slightly
moistened cloth.
• Do not use any carboxylic cleaning agents or petrol, alcohol or
similar. These attack the surfaces of the devices. Besides, the
vapors are hazardous to your health and explosive. Do not use
any sharp edged tools, screw drivers, metal brushes or similar for
cleaning.
6 Frequently asked questions
Problem Solution
• The indoor unit does not
switch on.
• The ring tone volume is too
low.
• Make sure that the monitor is
connected to the power
source.
• Make sure the adapter plug is
properly pushed in to the
power outlet.
• Perhaps you extended the
cable. Extending the cable
can reduce the volume due to
being too long or too thin.
• I connected the indoor unit to
a lock but it does not work.
• I hear interference on the
line.
• There is no sound between
the outdoor unit and the
indoor unit.
• I cannot talk or see video
when I press the intercom
button.
• Check if the lock is connected
properly and that a suitable
lock with an external power
source is used.
• Move other electronics away
from the unit to minimize
interference.
• Perhaps the cable is too long
or the wire too thin.
• The microphone may be
obstructed. Clean the
microphone.
• Check that the cables are
connected and fastened
properly.
• When the outdoor unit is
used on battery, you can only
talk or see the video feed
when the doorbell is pressed.
This is for battery capacity
reasons.
7 Technical Data
• The appliance is suitable for domestic use only.
EN
13
Instruction manual
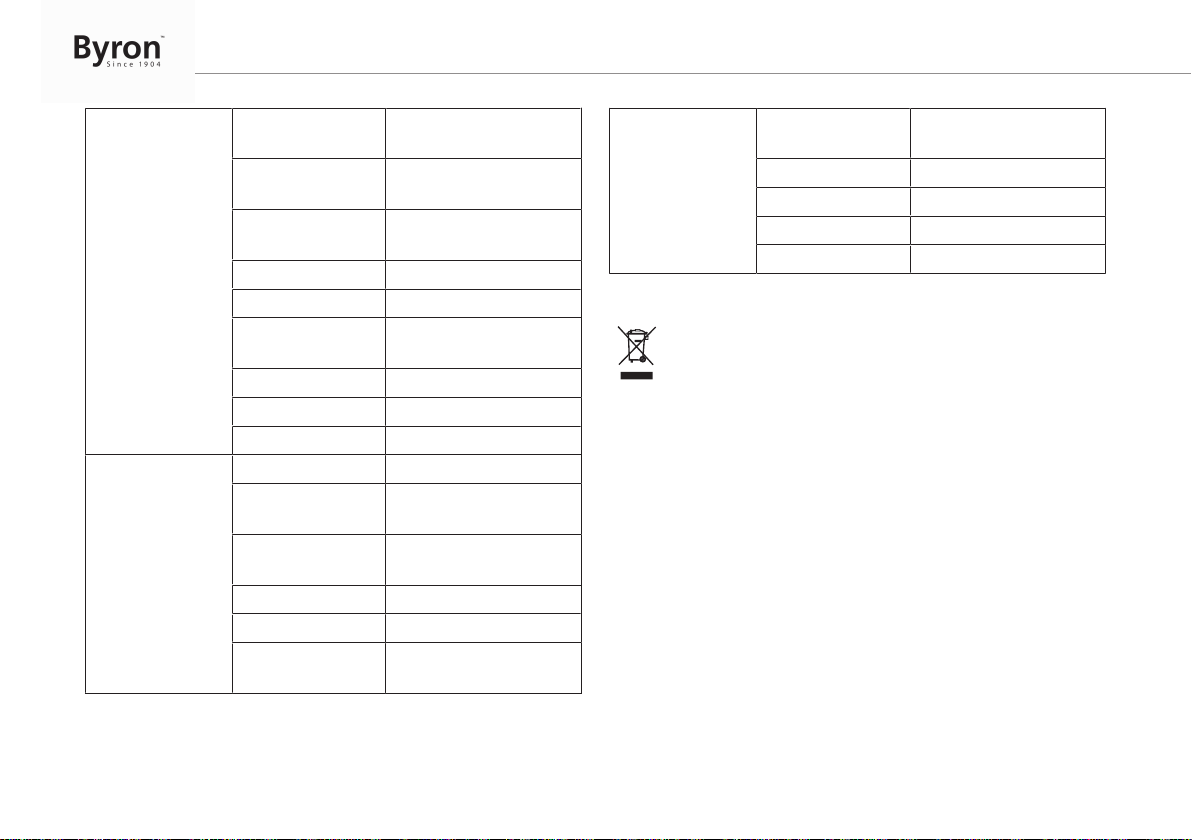
General Operating
Frequency
Transmission rate 15~25fps(only effective
Unobstructed
effective range
TX power 14~18dBm
RX sensitivity -85dBm
Operating
temperature
Storage temperature -20°C ~ +60°C
Operating humidity <85%RH
Sensor type CMOS
Outdoor camera View angle About 85°
Supply voltage DC/AC 8~24V (battery:
Consumption
current
Screen size 4,3 inch (diagonal)
Resolution 480x272(RGB)
Supply voltage DC 5V/1A (battery:
2400-2483.5MHz
distance)
200m
Max 50°C
3.7V/2000mAH 18650)
300±50mA
3.7V/1500mAH)
Indoor monitor Consumption
current
Charging time <2 hours
Image format JPEG
Video format AVI
SD card SDHC 2GB-32GB
350±50mA
8 Environment
This appliance should not be put into the domestic garbage at
the end of its durability, but must be offered at a central point for the
recycling of electric and electronic domestic appliances. This symbol
on the appliance, instruction manual and packaging puts your
attention to this important issue. The materials used in this appliance
can be recycled. By recycling of used domestic appliances you
contribute an important push to the protection of our environment. Ask
your local authorities for information regarding the point of
recollection.
Support
You can find all available information and spare parts at
www.chbyron.eu
Please read manual before use, and store it carefully for future use
and maintenance.
You can also check out our YouTube videos by scanning the QR
code below with your phone!
14

9 Declaration of Conformity
Hereby, Smartwares Europe declares that the radio equipment type
DIC-22815 is in compliance with Directive 2014/53/EU
The full text of the EU declaration of conformity is available at the
following internet address: www.chbyron.eu/doc
Instruction manual
EN
15


Byron Inhalt
Inhalt
1 Sicherheit .................................................................................................................................................................................................19
1.1 Sicherheit bei der Montage ..............................................................................................................................................................19
1.2 Betriebssicherheit ............................................................................................................................................................................19
1.3 Batteriesicherheit .............................................................................................................................................................................20
2 Teilebeschreibung ...................................................................................................................................................................................20
2.1 Lieferumfang ....................................................................................................................................................................................20
2.2 Produktübersicht ..............................................................................................................................................................................20
2.2.1 Innenmodul (Monitor)........................................................................................................................................................ 20
2.2.2 Außenmodul (Türklingel)................................................................................................................................................... 20
3 Montage ....................................................................................................................................................................................................20
3.1 Montage des Innenmoduls (Monitor) ...............................................................................................................................................21
3.2 Montage des Außenmoduls (Türklingel) ..........................................................................................................................................21
3.3 Elektroinstallation.............................................................................................................................................................................21
3.3.1 Anschluss des Netzteils am Innenmodul (Monitor)........................................................................................................... 21
3.3.2 Einsetzen und Aufladen des Innenmodul-Akkus .............................................................................................................. 21
3.3.3 Aufladen des Außenmodul-Akkus..................................................................................................................................... 22
3.3.4 Einsetzen einer MicroSD-Karte (nicht im Lieferumfang)................................................................................................... 22
3.3.5 Anschluss des Netzteils am Außenmodul (Türklingel) (Netzteil nicht im Lieferumfang)................................................... 22
3.3.6 Anschluss eines Türschlosses (nicht im Lieferumfang) .................................................................................................... 22
3.3.7 Anschluss eines Toröffners (nicht im Lieferumfang)......................................................................................................... 23
3.3.8 Anschluss einer externen Antenne (nicht im Lieferumfang) ............................................................................................. 23
17

Inhalt Byron
4 Grundfunktionen......................................................................................................................................................................................23
4.1 Steuerungstasten.............................................................................................................................................................................23
4.2 Bildschirmsymbole ...........................................................................................................................................................................23
4.3 Einstellungsmenü.............................................................................................................................................................................24
4.4 Rufbeantwortung..............................................................................................................................................................................24
4.5 das Innenmodul/Außenmodul synchronisieren................................................................................................................................24
4.6 Synchronisieren eines zusätzlichen Monitors (nicht im Lieferumfang) ............................................................................................24
4.7 Bildeinstellung..................................................................................................................................................................................25
4.8 Lautstärkeregelung ..........................................................................................................................................................................25
4.9 Einstellung des Klingeltons ..............................................................................................................................................................25
4.10 Aufzeichnungen wiedergeben..........................................................................................................................................................25
4.11 Videoaufzeichnungen / Fotoaufnahmen ..........................................................................................................................................26
4.12 Zeiteinstellung..................................................................................................................................................................................26
4.13 Entriegelungszeit-Einstellung...........................................................................................................................................................26
5 Reinigung und Instandhaltung...............................................................................................................................................................27
6 Häufig gestellte Fragen ...........................................................................................................................................................................27
7 Technische Daten ....................................................................................................................................................................................27
8 Umwelt ......................................................................................................................................................................................................28
9 Konformitätserklärung ............................................................................................................................................................................29
18

1 Sicherheit
• Lesen Sie vor der Benutzung des Produkts bitte aufmerksam
diese Betriebsanleitung.
• Schneiden Sie das Netzkabel nicht durch, um es zu verlängern.
Das Gerät (Transformator) funktioniert mit einem längeren Kabel
nicht. Schließen Sie das Gerät erst an, wenn die komplette
Verdrahtung fertiggestellt ist.
• Schalten Sie vor Beginn der Installation den Strom ab.
• Achten Sie vor der Benutzung des Geräts darauf, dass das
Batteriefach geschlossen ist. Öffnen Sie die Abdeckung nicht
während des Betriebs, sondern nur zum Batteriewechsel. Erst
nach dem Austauschen der Batterie kann das Gerät benutzt
werden.
• Verwenden Sie ausschließlich Anbauteile/Zubehör, das vom
Hersteller angegeben oder bereitgestellt wird (z.B. exklusive
Netzadapter, Akkus usw.).
• Die Außenkamera darf weder Tropfen oder Spritzern noch
direkter Sonneneinstrahlung ausgesetzt werden.
1.1 SICHERHEIT BEI DER MONTAGE
• Halten Sie Kinder und Zuschauer fern, während Sie die Produkte
montieren. Ablenkung kann dazu führen, dass Sie die Kontrolle
verlieren.
• Lehnen Sie sich bei der Montage dieses Produkts nicht zu weit
hinaus. Achten Sie jederzeit darauf, einen sicheren Stand zu
haben und das Gleichgewicht zu behalten. So können Sie auf
unerwartete Situationen besser reagieren.
• Dieses Produkt ist kein Spielzeug. Montieren Sie es außerhalb
der Reichweite von Kindern.
Bedienungsanleitung
1.2 BETRIEBSSICHERHEIT
• Benutzen Sie elektrisch betriebene Produkte nicht in
explosionsgefährdeten Bereichen (z.B. mit entflammbaren
Flüssigkeiten, Gase oder brennbarem Staub). Elektrisch
betriebene Produkte erzeugen Funken, die Staub oder Dämpfe
entzünden können.
• Die in diesem Handbuch erwähnten Warnungen,
Vorsichtsmaßnahmen und Anweisungen können nicht alle
möglicherweise auftretenden Bedingungen und Situationen
abdecken. Der Benutzer muss verstehen, dass gesunder
Menschenverstand und Vorsicht Faktoren sind, die sich nicht in
dieses Produkt integrieren lassen, sondern vom Benutzer
beizusteuern sind.
• Setzen Sie das Netzteil dieses Produktes weder Regen noch
Feuchtigkeit aus. In das Netzteil eindringendes Wasser erhöht
die Gefahr eines Stromschlags.
• Achten Sie auf die sachgemäße Benutzung des Netzkabels.
Ziehen Sie nie am Netzkabel, um den Stecker aus der Steckdose
zu ziehen. Schützen Sie das Netzkabel vor Hitze, Öl, scharfen
Kanten oder sich bewegenden Teilen. Beschädigte oder
verhedderte Kabel erhöhen die Gefahr eines Stromschlags.
• Das Netzteil muss für die Steckdose geeignet sein. Nehmen Sie
keinesfalls Veränderungen am Stecker vor. Unveränderte
Stecker und geeignete Steckdosen senken die Gefahr eines
Stromschlags.
DE
19

Bedienungsanleitung
1.3 BATTERIESICHERHEIT
• VORSICHT: BEIM ERSETZEN DER BATTERIE DURCH EINEN
FALSCHEN TYP BESTEHT EXPLOSIONSGEFAHR.
ENTSORGEN SIE LEERE BATTERIEN ENTSPRECHEND DEN
ANWEISUNGEN.
• Das Entsorgen der Batterie in einem Feuer oder heißen Ofen
oder das mechanische Zerkleinern oder Zerschneiden der
Batterie kann zu einer Explosion führen.
• Falls die Batterie extrem hohen Umgebungstemperaturen
ausgesetzt wird, kann es zu einer Explosion oder zum
Entweichen brennbarer Flüssigkeiten oder Gase kommen.
• Falls die Batterie einem extrem niedrigen Luftdruck ausgesetzt
wird, kann es zu einer Explosion oder zum Entweichen
brennbarer Flüssigkeiten oder Gase kommen.
2 Teilebeschreibung
2.1 LIEFERUMFANG
1. Innenmodul (Monitor)
2. Außenmodul (Türklingel)
3. Montageplatte Außenmodul
4. Akku (Innenmodul)
5. Akku (Außenmodul)
6. Micro USB-Netzteil (Innenmodul)
7. Klemmenblöcke
8. Bedienungsanleitung
9. Schrauben und Dübel
2.2 PRODUKTÜBERSICHT
2.2.1 Innenmodul (Monitor)
1. Bildschirm
2. Ein/Aus
3. Kontrollleuchte
4. Ladeanzeige
5. Verbindungstasten
6. Mikrofon
7. Netzteil
2.2.2 Außenmodul (Türklingel)
1. Mikrofon
2. Nachtsensor
3. Außenkamera
4. Ruftaste
5. Externer Antennenanschluss (auf der Modulrückseite)
6. Reset-Taste (auf der Modulrückseite)
3 Montage
Achten Sie darauf, dass Stift 1 auf der Rückseite des Außenmoduls
auf „Power on“ eingestellt ist.
20

Bedienungsanleitung
3.1 MONTAGE DES INNENMODULS
(MONITOR)
Das Innenmodul (Monitor) kann auf einem Tisch oder einer ebenen
Fläche abgestellt werden.
A. Klappen Sie dazu den Ständer auf der Rückseite des
Innenmoduls aus.
B. Bringen Sie die Antenne auf der Rückseite des Innenmoduls in
eine aufrechte Position.
C. Stellen Sie das Innenmodul auf einer ebenen Fläche auf.
3.2 MONTAGE DES AUSSENMODULS
(TÜRKLINGEL)
Um das Außenmodul anzubringen, brauchen Sie folgende
Werkzeuge:
ü Einen geeigneten Schraubendreher für die beiliegenden
Schrauben.
ü Eine Bohrmaschine mit geeignetem Bohrer für die beiliegenden
Dübel.
A. Platzieren Sie die mitgelieferte Montageplatte wie gewünscht.
B. Markieren Sie mit einem Stift die Schraubenpositionen.
C. Bohren Sie die erforderlichen Löcher.
D. Setzen Sie die Dübel ein.
E. Öffnen Sie die Kabeldurchführung mit einem Messer oder einem
scharfen Gegenstand. (Optional: nur bei Anschluss an die
Netzstromversorgung. Kabel nicht im Lieferumfang.)
F. Führen Sie die erforderlichen Kabel durch die Kabeldurchführung.
(Optional: nur bei Anschluss an die Netzstromversorgung. Kabel
nicht im Lieferumfang.)
G. Befestigen Sie die Montageplatte mit den Schrauben.
H. Entfernen Sie die Frontabdeckung des Außenmoduls, indem Sie
die untere Schraube lösen.
I. Bringen Sie das Außenmodul an der Montageplatte an.
J. Befestigen Sie das Außenmodul mit den mitgelieferten
Schrauben.
K. Laden Sie den Akku auf (siehe 3.3.3) und setzen Sie ihn in das
Außenmodul ein.
L. Bringen Sie die Frontabdeckung an und sichern Sie sie, indem
Sie die Schraube unten am Außenmodul festziehen.
3.3 ELEKTROINSTALLATION
3.3.1 Anschluss des Netzteils am Innenmodul (Monitor)
Der Monitor ist tragbar und kann mittels Akku, Netzstrom oder
beidem versorgt werden. Wenn das Netzteil angeschlossen ist, wird
der Akku aufgeladen, bis er voll ist, und das Modul dann direkt über
das Netzteil versorgt. Das Netzteil dient als standardmäßiges Micro
USB-Ladegerät.
3.3.2 Einsetzen und Aufladen des Innenmodul-Akkus
A. Öffnen Sie den Akkufachdeckel auf der Modulrückseite.
B. Beachten Sie die auf dem Etikett am Akku angegebene Polarität.
DE
21

Bedienungsanleitung
C. Setzen Sie den Akku ein und bringen Sie den Deckel wieder an.
D. Schließen Sie das Micro USB-Netzteil an, um den Akku
aufzuladen.
E. Laden Sie den Akku vollständig auf, bevor Sie den Monitor im
reinen Akkubetrieb benutzen.
3.3.3 Aufladen des Außenmodul-Akkus
Das Außenmodul (Türklingel) kann mittels Akku oder Netzstrom
versorgt werden (Netzteil nicht im Lieferumfang). Beim Betrieb mittels
Akku muss dieser zum Aufladen entnommen werden.
A. Entfernen Sie die Schraube, mit der die vordere Abdeckung
befestigt ist.
B. Entfernen Sie die vordere Abdeckung.
C. Drücken Sie auf den Metallhebel und ziehen Sie das Akkupaket
heraus.
D. Laden Sie den Akku mit dem Micro USB-Ladeadapter wieder auf,
der zum Lieferumfang des Monitors gehört.
E. Nach dem Aufladen: Setzen Sie den Akku in das Außenmodul ein.
F. Bringen Sie die vordere Abdeckung wieder an.
G. Ziehen Sie die Befestigungsschraube für die vordere Abdeckung
fest.
3.3.4 Einsetzen einer MicroSD-Karte (nicht im Lieferumfang)
Für Videoaufzeichnungen ist eine MicroSD-Karte erforderlich.
A. Entfernen Sie den Akkufachdeckel und den Akku (siehe
„Einsetzen und Aufladen des Innenmodul-Akkus”).
B. Öffnen Sie den MicroSD-Kartensteckplatz, indem Sie ihn
aufschieben (Pfeilmarkierung beachten).
C. Setzen Sie die MicroSD-Karte mit den Anschlussstiften nach
unten ein.
D. Schließen Sie den Kartensteckplatz, indem Sie ihn zuschieben
(Pfeilmarkierung beachten).
3.3.5 Anschluss des Netzteils am Außenmodul (Türklingel) (Netzteil nicht im Lieferumfang)
Das Außenmodul ist tragbar und kann mittels Akku oder Netzstrom
versorgt werden. Ein standardmäßiges Micro USB-Ladegerät kann
als Netzteil verwendet werden.
Um die Klemmenblöcke anzuschließen, brauchen Sie folgendes
Werkzeug:
ü Ein kleiner Schlitzschraubendreher.
A. ORANGENER Klemmenblock: Lösen Sie die Klemmenschrauben.
B. An dem auf Sie zuweisenden Klemmenblock: Führen Sie den
Draht (-) links und den Draht (+) rechts ein.
C. Ziehen Sie die Klemmenschrauben fest.
D. Verbinden Sie den Klemmenblock mit dem Außenmodul.
3.3.6 Anschluss eines Türschlosses (nicht im Lieferumfang)
Am Außenmodul kann ein Türschloss angeschlossen werden, das
sich mit dem Monitor öffnen lässt. Türschlösser werden separat
angeboten. Artikelnr.: DB5005 und DB5005L
22

Bedienungsanleitung
Für die Benutzung des Türschlosses muss das Außenmodul am
Adapter angeschlossen sein.
Um das Türschloss anzuschließen, brauchen Sie folgendes
Werkzeug:
ü Einen kleinen Schlitzschraubendreher.
A. Am Außenmodul: Lösen Sie die Klemmenschrauben (siehe
Aufkleber am Außenmodul für die Position).
B. Führen Sie die Drähte ein (siehe Aufkleber am Außenmodul für
die Position).
C. Ziehen Sie die Klemmenschrauben fest.
D. Am Türschloss: Lösen Sie die beiden Klemmenschrauben.
E. Führen Sie die Drähte ein (beliebige Reihenfolge).
F. Ziehen Sie die Klemmenschrauben fest.
3.3.7 Anschluss eines Toröffners (nicht im Lieferumfang)
Am Außenmodul kann ein Toröffner angeschlossen werden, der sich
mit dem Innenmodul (Monitor) öffnen lässt.
Für die Benutzung des Toröffners muss das Außenmodul am
Adapter angeschlossen sein.
Um den Toröffner anzuschließen, brauchen Sie folgendes Werkzeug:
ü Ein kleiner Schlitzschraubendreher.
A. Am Außenmodul: Lösen Sie die Klemmenschrauben (siehe
Aufkleber am Außenmodul für die Position).
B. Führen Sie die Drähte ein (siehe Aufkleber am Außenmodul für
die Position).
ð Es ist wichtig, dass die Drähte + und – korrekt positioniert sind.
A. Ziehen Sie die Klemmenschrauben fest.
B. Am Toröffner: (Siehe Bedienungsanleitung für den Toröffner.)
3.3.8 Anschluss einer externen Antenne (nicht im Lieferumfang)
Obwohl die interne Antenne in den meisten Fällen ausreicht, lässt
sich die Reichweite mit der externen Antenne erweitern.
4 Grundfunktionen
4.1 STEUERUNGSTASTEN
1. Sprechanlage-/Monitor-Taste
2. Entriegelungstasten
3. Menü / OK-Taste
4. Oben-Taste / Foto- oder Aufzeichnungstaste
5. Richtungstasten (Unten, Links und Rechts)
6. Ruftaste / Synchronisierungstaste
4.2 BILDSCHIRMSYMBOLE
1. WiFi-Signalstärke
2. SD-Karte eingesetzt
3. a) Außenmodul mit Akkuversorgung
b) Außenmodul mit Netzteilversorgung
4. a) Videoaufzeichnung
b) Bildaufnahme
5. a) Innenmodul mit Akkuversorgung
b) Innenmodul mit Netzteilversorgung
DE
23

Bedienungsanleitung
6. Uhrzeit und Datum
• Laden Sie den Akku umgehend auf, wenn das Symbol einen
schwachen Ladestand anzeigt.
4.3 EINSTELLUNGSMENÜ
Drücken Sie im Bereitschaftsmodus zunächst die Sprechanlage/
Monitor-Taste und dann die OK/Menü-Taste, um das Hauptmenü
aufzurufen. Navigieren Sie mit Hilfe der Pfeiltasten zur gewünschten
Einstellungsoption. Drücken Sie die OK/Menü-Taste, um das
gewünschte Untermenü zu wählen.
1. Kamerasynchronisierung
2. Bildeinstellung
3. Lautstärkeregelung
4. Musikeinstellung
5. Wiedergabe
6. Aufzeichnung/Schnappschuss
7. Zeiteinstellung
8. Entriegelungszeit-Einstellung
9. Beenden
4.4 RUFBEANTWORTUNG
Wenn die Türklingel läutet, können Sie:
A. die Kamerataste betätigen, um ein Video oder Foto zu machen
B. die Türöffnertaste betätigen, um die Tür zu öffnen (optional)
C. die Toröffnertaste betätigen, um das Tor zu öffnen (optional)
D. die Sprechtaste betätigen, um mit dem Besucher zu sprechen
4.5 DAS INNENMODUL/AUSSENMODUL
SYNCHRONISIEREN
ü Bevor Sie das Produkt benutzen können, müssen Sie das Innen-
und das Außenmodul synchronisieren. Zum Synchronisieren
verfahren Sie wie folgt:
A. Drücken Sie die Einschalttaste am Innenmodul, bis die LED
aufleuchtet.
B. Drücken Sie die Menütaste.
C. Wählen Sie das Synchronisierungssymbol.
D. Drücken Sie zur Bestätigung die OK/Menü-Taste.
E. Wählen Sie mit Hilfe der Rechts/Links-Taste das Türklingel/
Monitor-Symbol.
F. Drücken Sie zur Bestätigung die OK/Menü-Taste.
G. Auf dem Bildschirm sehen Sie nun, dass sich das Innenmodul im
Synchronisierungsmodus befindet. Drücken Sie einige Sekunden
lang die Türklingeltaste; Innenmodul und Außenmodul werden
nun synchronisiert.
4.6 SYNCHRONISIEREN EINES ZUSÄTZLICHEN MONITORS (NICHT IM LIEFERUMFANG)
Es kann ein zusätzlicher Monitor (DIC-22805) am System
angeschlossen werden. Um diesen mit dem System zu verbinden,
verfahren Sie wie folgt:
A. Schalten Sie das Innenmodul ein, der bereits erfolgreich mit dem
Außenmodul synchronisiert wurde, und rufen Sie die
Synchronisierungsoption auf.
B. Wählen Sie mit Hilfe der Rechts/Links-Taste das Symbol (1).
C. Drücken Sie zur Bestätigung die OK/Menü-Taste.
24

Bedienungsanleitung
D. Schalten Sie nun den zusätzlichen Monitor ein und rufen Sie die
Synchronisierungsoption auf.
E. Wählen Sie mit Hilfe der Rechts/Links-Taste das Symbol (2).
F. Drücken Sie zur Bestätigung die OK/Menü-Taste.
4.7 BILDEINSTELLUNG
Folgende Bildeinstellungen sind verfügbar:
1. Helligkeit
2. Kontrast
3. Farbe
• Um die Bildeinstellungen zu ändern, wenn sich das Außenmodul
im Akkubetrieb befindet, drücken Sie zunächst auf die Türklingel,
um das Bild auf dem Monitor aufzurufen:
A. Wählen Sie mit Hilfe der Pfeiltasten eine der verfügbaren
Einstellungen aus.
B. Drücken Sie zur Bestätigung die Menütaste.
C. Benutzen Sie die Pfeiltasten, um die Einstellung wie gewünscht
anzupassen.
D. Drücken Sie zur Bestätigung die Menütaste.
E. Benutzen Sie die Pfeiltasten, um das Menü zu verlassen.
F. Drücken Sie zur Bestätigung die Menütaste.
4.8 LAUTSTÄRKEREGELUNG
Folgende Lautstärkeeinstellungen sind verfügbar:
1. Lautsprecherlautstärke
2. Mikrofonlautstärke
3. So passen Sie die Lautstärkeeinstellungen an:
A. Wählen Sie mit Hilfe der Pfeiltasten eine der verfügbaren
Einstellungen aus.
B. Drücken Sie zur Bestätigung die Menütaste.
C. Benutzen Sie die Pfeiltasten, um die Einstellung wie gewünscht
anzupassen.
D. Drücken Sie zur Bestätigung die Menütaste.
E. Benutzen Sie die Pfeiltasten, um das Menü zu verlassen.
F. Drücken Sie zur Bestätigung die Menütaste.
4.9 EINSTELLUNG DES KLINGELTONS
A. Wählen Sie mit Hilfe der Pfeiltasten das Musiksymbol und
drücken Sie die Taste „Menü/OK“.
B. Wählen Sie eine der 24 verschiedenen Melodien und drücken Sie
zur Bestätigung die Taste „Menü/OK“.
C. Wählen Sie mit Hilfe der Pfeiltasten das Lautsprechersymbol, um
die Lautstärke einzustellen, und bestätigen Sie mit der Taste
„Menü/OK“.
4.10 AUFZEICHNUNGEN WIEDERGEBEN
A. Benutzen Sie die Pfeiltasten, um das Wiedergabesymbol
auszuwählen, und drücken Sie dann die OK/Menü-Taste.
B. Wählen Sie mit Hilfe der Pfeiltasten das Video- oder Fotosymbol.
C. Drücken Sie die OK/Menü-Taste.
D. Wählen Sie mit Hilfe der Oben/Unten-Taste den gewünschten
Ordner.
E. Drücken Sie die Rechts-Taste, um den gewählten Ordner zu
öffnen.
F. Wählen Sie mit Hilfe der Oben/Unten-Taste die gewünschte
Datei.
DE
25

Bedienungsanleitung
G. Öffnen Sie die markierte Datei mit der Rechts-Taste.
H. Drücken Sie die Oben/Unten-Taste, um die nächste bzw.
vorhergehende Datei auf dem Bildschirm anzuzeigen.
• Drücken Sie die Links-Taste, um einen Schritt im Menü
zurückzugehen.
Ordner oder Dateien löschen
A. Wenn Sie bei einem ausgewählten Ordner oder einer Datei die
OK-Taste drücken, erscheint ein Untermenü mit der Löschoption.
B. Wählen Sie mit der Links/Rechts-Taste die Option „Yes“ (Ja) bzw.
„No“ (Nein).
C. Wenn Sie die Option „Yes“ wählen und dann mit der OK-Taste
bestätigen, wird die Datei bzw. der Ordner gelöscht.
4.11 VIDEOAUFZEICHNUNGEN /
FOTOAUFNAHMEN
• Sobald die Ruftaste gedrückt wird, zeichnet das System
automatisch ein Video auf oder macht ein Foto.
Für die Speicherung von Videoaufnahmen und Fotos wird eine
SD-Karte (nicht im Lieferumfang) benötigt.
A. Drücken Sie die Pfeiltasten, um das Aufzeichnung/
Schnappschuss-Symbol zu wählen, und drücken Sie dann zur
Bestätigung die OK-Taste.
B. Im Untermenü sind die folgenden drei Optionen verfügbar:
1. Fotoaufnahme
2. Videoaufzeichnung
3. Beenden
A. Benutzen Sie die Pfeiltasten, um das Wiedergabesymbol
auszuwählen, und drücken Sie dann die OK/Menü-Taste.
Manuelle Videoaufzeichnung/Fotoaufnahme.
A. Drücken Sie im Sprechmodus die Oben-Taste, um eine
Videoaufzeichnung zu starten oder ein Foto zu machen.
B. Drücken Sie die Taste erneut, um die Aufzeichnung zu stoppen.
C. Wenn das Außenmodul mit Strom versorgt wird, drücken Sie
zunächst die Monitortaste und dann die Oben-Taste, um ein Foto
zu machen oder eine Aufzeichnung zu starten.
D. Drücken Sie die Oben-Taste erneut, um die Aufzeichnung zu
stoppen.
4.12 ZEITEINSTELLUNG
A. Benutzen Sie die Pfeiltasten, um das Zeiteinstellungssymbol zu
wählen.
B. Drücken Sie zur Bestätigung die OK/Menü-Taste.
C. Wählen Sie mit Hilfe der Rechts/Links-Taste die Einstellung, die
geändert werden soll.
D. Nehmen Sie mit Hilfe der Oben/Unten-Taste die Einstellung vor.
E. Drücken Sie zur Bestätigung die OK/Menü-Taste.
4.13 ENTRIEGELUNGSZEIT-EINSTELLUNG
Diese Einstellung legt fest, wie lange das Türschloss entriegelt bleibt,
nachdem die Taste „Türschloss öffnen“ betätigt wurde.
A. Benutzen Sie die Pfeiltasten, um das Zeiteinstellungssymbol zu
wählen.
B. Drücken Sie zur Bestätigung die OK/Menü-Taste.
C. Wählen Sie mit Hilfe der Links/Rechts-Taste eine der Optionen:
100mS, 1S, 5S oder 10S.
D. Drücken Sie OK/Menü-Taste, um die Einstellung zu betätigen und
das Menü zu verlassen.
26

Bedienungsanleitung
5 Reinigung und Instandhaltung
• Reinigen Sie das Äußere des Geräts mit einem weichen und
leicht befeuchteten Lappen.
• Verwenden Sie keine Carbonreinigungsmittel oder Benzin,
Alkohol oder ähnliches. Diese Mittel beschädigen die Oberfläche
der Geräte. Außerdem sind die Dämpfe gesundheitsschädlich
und explosiv. Verwenden Sie keine scharfkantigen Werkzeuge,
Schraubendreher, Metallbürsten oder ähnliches für die
Reinigung.
6 Häufig gestellte Fragen
Problem Lösung
• Das Innenmodul lässt sich
nicht einschalten.
• Der Klingelton ist zu leise. • Eventuell haben Sie das
• Stellen Sie sicher, dass der
Monitor an die
Stromversorgung
angeschlossen ist.
• Stellen Sie sicher, dass der
Netzteilstecker korrekt an
einer Steckdose
angeschlossen ist.
Kabel verlängert. Eine
Kabelverlängerung kann die
Lautstärke verringern, falls
das verwendete Kabel zu
lang oder zu dünn ist.
• Das Innenmodul ist an einem
Schloss angeschlossen, das
aber nicht funktioniert.
• In der Leitung sind
Störgeräusche zu hören.
• Zwischen Außen- und
Innenmodul wird kein
Tonsignal übertragen.
• Trotz betätigter
Sprechanlagentaste ist weder
ein Ton zu hören noch ein
Bild zu sehen.
• Kontrollieren Sie, ob ein
geeignetes Schloss mit einer
externen Stromversorgung
benutzt wurde und dieses
korrekt angeschlossen ist.
• Entfernen Sie andere
elektronische Geräte aus der
Umgebung der Einheit, um
die Störeinflüsse zu
minimieren.
• Eventuell ist das Kabel zu
lang oder zu dünn.
• Eventuell ist das Mikrofon
blockiert. Reinigen Sie das
Mikrofon.
• Überprüfen Sie, ob die Kabel
korrekt angeschlossen und
fixiert sind.
• Wenn sich das Außenmodul
im Akkubetrieb befindet,
können Sie nur sprechen
oder ein Bild sehen, wenn die
Türklingeltaste betätigt wird.
Dies dient der Schonung des
Akkus.
7 Technische Daten
• Das Gerät ist nur für den Hausgebrauch geeignet.
DE
27
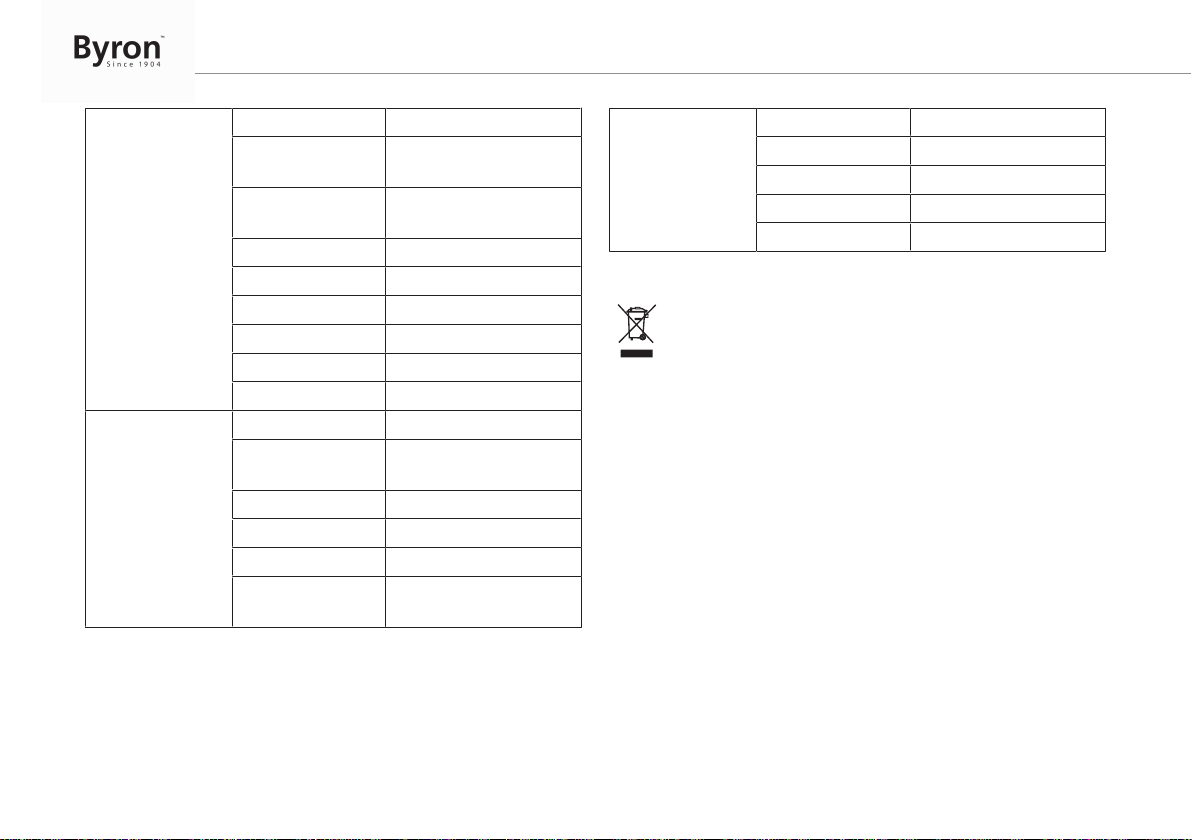
Bedienungsanleitung
Allgemeines Betriebsfrequenz 2400-2483,5MHz
Übertragungsrate 15~25fps(nur effektive
Entfernung)
Uneingeschränkte
effektive Reichweite
TX-Leistung 14~18dBm
RX-Empfindlichkeit -85dBm
Betriebstemperatur Max. 50°C
Lagertemperatur -20°C ~ +60°C
Betriebsfeuchte <85%rel.
Sensortyp CMOS
Außenkamera Sichtwinkel Ca. 85°
VersorgungsspannungDC/AC 8~24V (Akku:
Stromaufnahme 300±50mA
Bildschirmgröße 4,3Zoll (diagonal)
Auflösung 480x272(RGB)
VersorgungsspannungDC 5V/1A (Akku:
200m
3,7V/2000mAH 18650)
3,7V/1500mAH)
Innenmonitor Stromaufnahme 350±50mA
Ladezeit <2Std.
Bildformat JPEG
Videoformat AVI
SD-Karte SDHC 2GB-32GB
8 Umwelt
Dieses Gerät darf am Ende seiner Lebenszeit nicht im
Hausmüll entsorgt werden, sondern muss an einer Sammelstelle für
das Recyceln von elektrischen und elektronischen Haushaltsgeräten
abgegeben werden. Das Symbol auf dem Gerät, in der
Bedienungsanleitung und auf der Verpackung macht Sie auf dieses
wichtige Thema aufmerksam. Die in diesem Gerät verwendeten
Materialien können recycelt werden. Durch das Recyceln gebrauchter
Haushaltsgeräte leisten Sie einen wichtigen Beitrag zum
Umweltschutz. Fragen Sie Ihre örtliche Behörde nach Informationen
über eine Sammelstelle.
Support
Sämtliche verfügbaren Informationen und Ersatzteile finden Sie unter
www.chbyron.eu
Lesen Sie die Anleitung vor dem Gebrauch vollständig durch. Heben
Sie die Anleitung zum späteren Nachschlagen und zu
Wartungszwecken auf.
Sie können sich auch unsere YouTube-Videos ansehen, indem Sie
den QR-Code unten mit Ihrem Smartphone scannen!
28

9 Konformitätserklärung
Hiermit erklärt Smartwares Europe dass der Funkanlagentyp
DIC-22815 der Richtlinie 2014/53/EU entspricht.
Der vollständige Text der EU-Konformitätserklärung ist unter der
folgenden Internetadresse verfügbar: www.chbyron.eu/doc
Bedienungsanleitung
DE
29

 Loading...