

Page 1
Byron No.DB300 Size: A4 Date: 30 June 2008
Portable and Plug-In Door Chime Kit DB300
1 2 4
3
23A
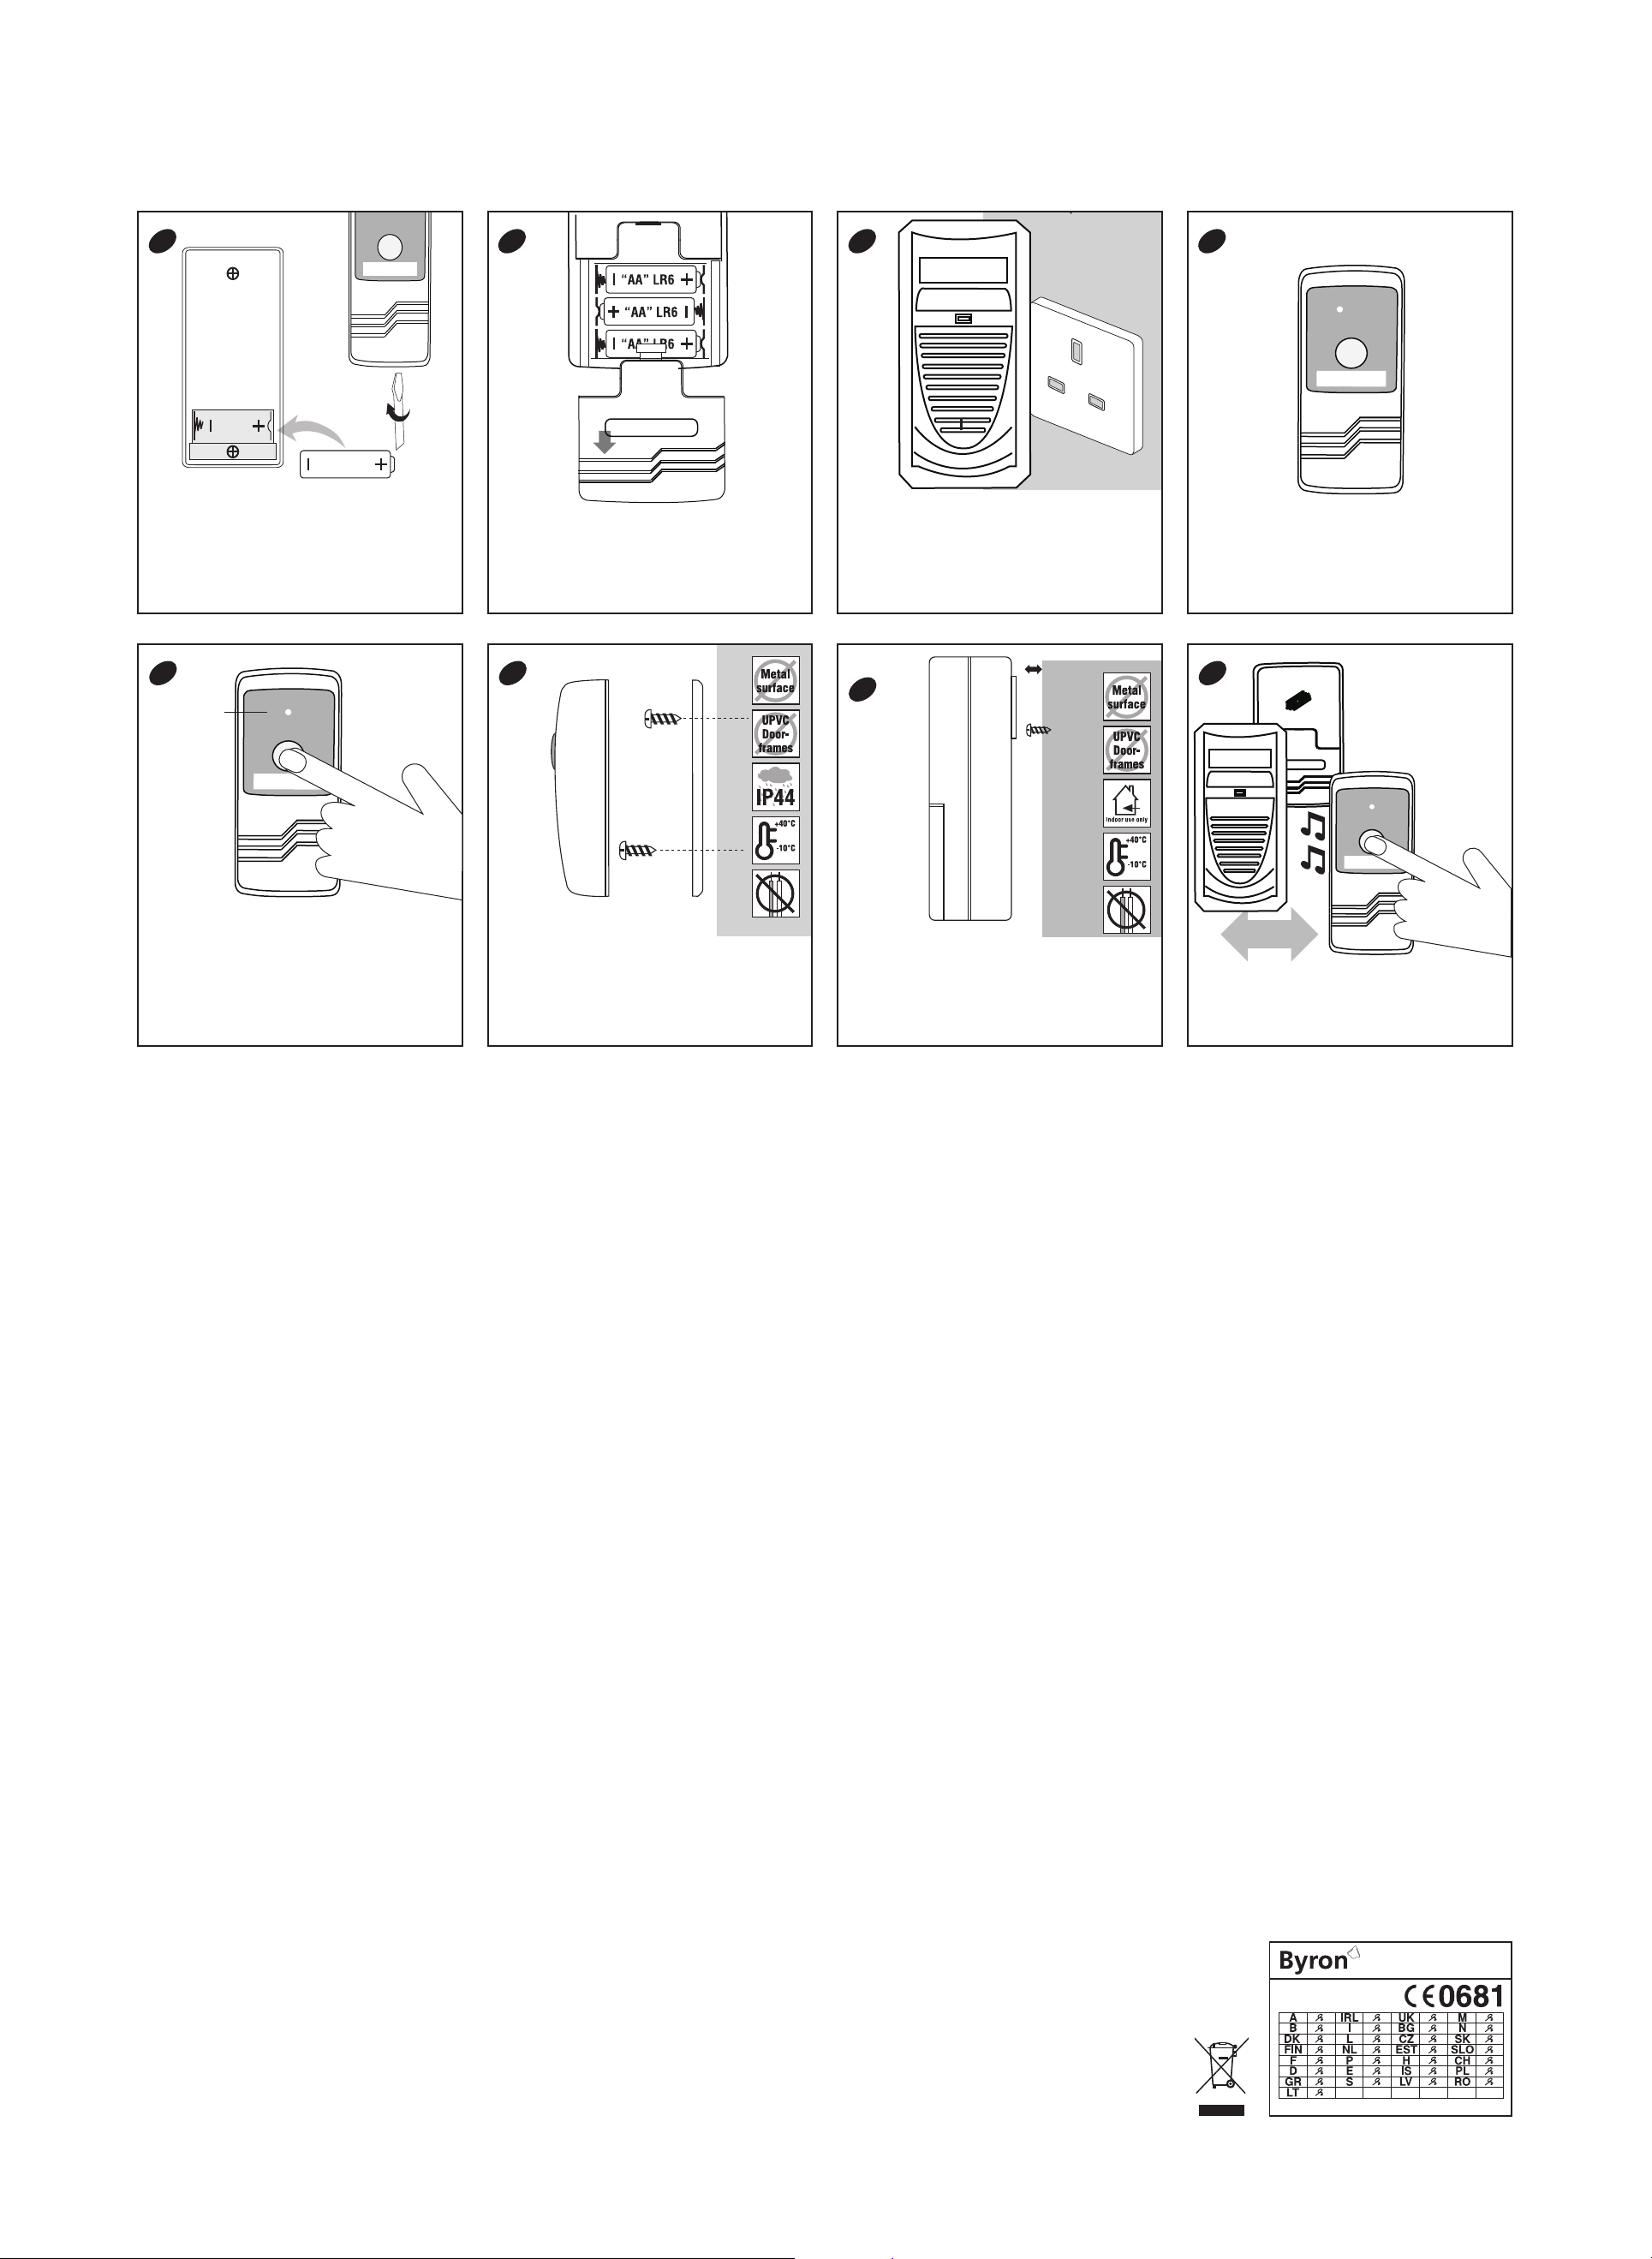
Push Button
• Open the push button by unscrewing the locking screw on the
bottom of the chime using a small "+" headed screw driver
• Insert the 12V 23A battery, ensuring that the battery
polarity matches the internal markings
.
4
Signal Sent
Indicator
Light
Portable Door Chime
•
Insert 3 x 1.5V Alkaline batteries ("AA". UM3 & LR6 - not
included) into the battery compartment, ensuring the battery
polarity match's the internal markings
•
Close the battery cover, the chime is now ready to be used
5
Plug-in Door Chime
•
Plug-in door Chime unit is powered by 230-240V 50Hz
mains supply simply plug the door chime into sny
convenient 13amp socket, with in range of the bell push.
•
The Led light will light up to show that the unit is on and
ready to be used
3mm
6
Melody Selection
•
The DB300 is programmed to play the chime sound "Ding
Dong" , no other chime sound can be selected.
.
7
Digital Code Set Up
• When the batteries have been inserted in to the Portable
Chime and the Plug-in chime switched on t
• Press the button on the Bell Push, a wire free signal will be sent
from the Bell Push to the Chime units
• The Bell Push will pair it is self to the chime units, making sure
no adjacent pushes active the chimes
Portable Door Chime Kit
Bell Push Installation
• Using the back plate of the Bell Push as a template, mark the
fixing position for the unit.
• Drill holes and fit wall plugs and secure the Bell Push to the
wall with screws - Included
• Mounting the Bell Push onto Metallic surfaces or on top of the
UPVC doors internal metal frame will reduce the operating
range
DB300
Bell Push:
Power 1 x 12v 23A battery - Included
Portable Chime:
Power 3 x 1.5v AA (UM3/LR6) alkaline batteries - not Included
Plug-in Chime:
Power: 230 - 240V ~50Hz AC Mains
Melody Selection
Melody Selection
1 melody for selection
1) Ding Dong
Digital Code Set Up
The door chime kit is fitted with a self learning code system to avoid interference from
neighbouring wire free products, to pair the Bell Push and Chime unit together:
1: First Time Operation - Insert the battery into the bell Push and the Portable door Chime
Unit and switch on Plug-in unit
2: Press the Bell Push button once, a wire free signal will be sent from the Bell Push to the
Door Chime units; the Chimes will sound to indicate that the units are paired together
3. The Door Chime units have 1min to learn the operating code after the batteries are
installed or when the unit is switched on
Wire Free Interference
Interference may occur from neighbouring units operating on the same or similar code. To reset
the code: (Chime sounds for no reason)
1: Remove the batteries from the Bell Push and the Portable Door Chime and switch off the
Plug-in unit
2: Insert the batteries into the Bell Push and the Portable Door Chime and switch on the Plug-in
unit
3: Press the button on the bell push, a new learning code will be generated, to pair the Bell Push
to the Chime units. The chimes will sound to indicate that the units are paired together
Note: If the Chime unit rings during the set-up period, a neighbouring chime has interfered with
the setup process, reset the chimes before proceeding - see above.
Portable Door Chime Installation
• The Chime can be placed on any flat surface, clipped to a belt
or wall mounted
To Wall Mount:
• Mark and drill a suitable hole and fit a wall plug a screw
• Leave a 3mm gap between the screw head and the wall
• Locate the key hole slot on the back of the Chime unit over the
screw head and slide into position
Important
Operation
• Press the Bell Push button once, a wire free signal is sent from
the Bell Push, the Chime units will sound when the signal is
received
• Operate the Door Chime units within operating range, test
before final installation
30m
1: Do not mount the unit close to fireplaces or expose to high temperature
2: Do not expose the Door Chime unit to direct sunlight or moisture
3: Always use alkaline batteries and dispose of any old/defective batteries in an environmentally
friendly manor in accordance with all relevant legislation
4: Make sure no naked flame sources, such as lighted candles are placed on the units
5: The unit should note be exposed to dripping or splashing and no objects filled with liquids, such
as vases, are placed on the unit.
6: CAUTION: Replace only with same or equivalent type of battery that is recommended by the
manufacturer
7: CAUTION: Make sure batteries are inserted correctly; incorrectly installed batteries may damage
the units due to leaking
8: IMPORTANT: There are no serviceable parts in the unit, do not attempt to repair
Trouble Shooting & User Hints
In case the door chime unit does not sound, please check the following:
1: Flat batteries in either bell push or portable door chime units - change the batteries
2: Wrong battery polarity in either bell push or Door Chime unit - reinsert batteries
3: Plug-in door chime is not powered - check to the sure socket is switched on
4: Bell Push and Door Chime units are not on the same operating code - reset the operating code
(See Digital code Setup)
5: Door Chime unit is not sounding - check operating distance, move units close to the bell push
and retest
Specification
Operating temperature -10C to +40C
Operating Distance 30 metre (Open field conditions)
Selectable melodies: 1
Selectable digital codes: automatic
"Type R2 Device - Device where the sound output is created by the initial operation of the control
and where the period of the sound output continues for the designed duration irrespective of
condition of the control
CH Byron Electrical Ltd
Byron House
34 Sherwood Rd, Astonfield
Bromsgrove, B60 3DR
UK
Tel: 0845 2301231
e: support@chbyron.com
w: www.chbyron.com
433MHz
R&TTE
APPROVED
CH Byron Electrical United Kingdom. www.chbyron.com
 Loading...