

Page 1
GB.....2204 / 2204BN Instructions
FR.....Instructions 2204 / 2204BN
DE.....2204 / 2204BN - Anleitung
IT.......2204 / 2204BN - Istruzioni
NL.....2204 / 2204BN - Gebruiksaanwijzing
NO....2204 / 2204BN - Bruksanvisning
SE.....2204 / 2204BN - Instruktioner
ES.....2204 / 2204BN - Instrucciones
Page 2

Push Installation.
If there is no hole to accept the wires to your
new bell push, drill a 5mm hole through your
doorframe in your choosen position.
Undo the small screw located on the underside of the cover and remove the wall bracket. Fix the wall bracket to the door frame
using the 2 screws provided. Ensure the
bracket is mounted with the grub screw hole
at the bottom. From inside, push the bell wire
through the 5mm hole in the door frame
through the wall bracket. (fig.1)
Attach the bell wire to the terminals on the
back of the push button, making sure the
wires DO NOT touch. (fig.2)
Fit the bell push cover back onto the wall
bracket and tighten the small grub screw
located on the underside of the bell push
cover.
Products may vary slightly from the illus-
Page 3
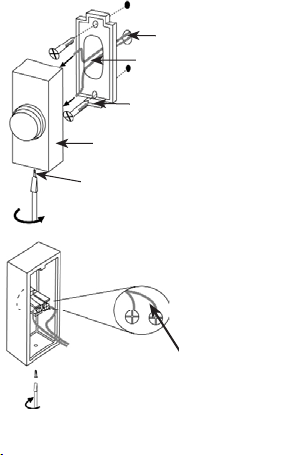
fig.1
Bell push cover
Grub screw
fig.2
5mm hole in door frame
Bell wire
Grub screw hole
Close up of
terminal
connections
located at the
back of the push.
For best results
wrap the bare
bell wire
clockwise around
the terminal
screw head and
then tighten.
Page 4
Installation du bouton de sonnette
S'il n'y a pas de trou pour les fils du nouveau
bouton de sonnette, percer un trou de 5 mm
dans le cadre de porte à l'endroit voulu.
Dévisser la petite vis située au-dessous du
couvercle et déposer l’applique murale. Fixer
l’applique murale au cadre de porte à l’aide
des 2 vis fournies. Vérifier que l’applique est
posée avec le trou de la vis sans tête situé
en bas. De l’intérieur, faire passer les fils
dans le trou de 5 mm du cadre de la porte, à
travers l’applique murale. (fig.1)
Raccorder les fils aux bornes à l’arrière du
bouton de sonnette et vérifier que les fils NE
se touchent PAS. (fig.2)
Reposer le couvercle du bouton de sonnette
sur l’applique murale et serrer la petite vis sans
tête située sur le dessous du couvercle.
Les produits peuvent être légèrement
différents de l'illustration.
Page 5
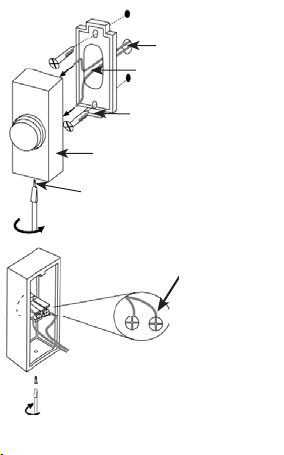
fig.1
Trou de 5 mm dans
chambranle de porte
Fil de sonnerie
Trou de vis sans tête
Cache de bouton de sonnerie
Vis sans tête
Vue détaillée des
connexions des
bornes situées à
l’arrière du bouton
de sonnette. Pour
obtenir un résultat
optimal, enrouler le
fil nu autour de la
tête de vis de la
borne dans le sens
horaire, puis serrer.
fig.2
Page 6

Installation des Klingelknopfes
Falls kein Durchgangsloch für die Drähte zum
neuen Klingelknopf vorhanden ist, muss an
der Stelle, an der Sie den neuen Knopf
anbringen möchten, ein 5 mm-Loch durch
den Türrahmen gebohrt werden.
Die kleine Schraube auf der Unterseite der
Abdeckung lösen und die Wandhalterung entfernen. Die Wandhalterung mit den beiden
Schrauben am Türrahmen befestigen und
dabei darauf achten, dass die Halterung mit
dem Madenschraubenloch unten montiert
wird. Von innen den Klingeldraht durch das 5
mm-Loch im Türrahmen und die
Wandhalterung schieben (Abb. 1).
Den Klingeldraht an die Klemmen auf der
Rückseite des Klingelknopfes anschließen
und dabei darauf achten, dass sich die
Drähte NICHT berühren (Abb. 2).
Die Klingelknopfabdeckung auf die
Wandhalterung schieben und die kleine, sich
auf der Unterseite der Klingelknopfabdeckung
befindliche Madenschraube anziehen.
Produkte können geringfügig von der
Abbildung abweichen.
Page 7

fig.1
5 mm-Loch im
Türrahmen
Klingeldraht
Madenschraubenloch
Klingelknopfabdeckung
Madenschraube
fig.2
Darstellung der
Anschlussklemmen
auf der Rückseite
des Klingelknopfes.
Für beste
Ergebnisse den
blanken
Klingeldraht im
Uhrzeigersinn um
die
Klemmenschraube
herum wickeln und
diese dann anziehen.
Page 8

Installazione pulsante
In mancanza di un foro per i fili del nuovo
pulsante del campanello, praticare un foro da
5 mm nell'intelaiatura della porta nella
posizione prescelta.
Svitare la piccola vite che si trova nel lato
inferiore del coperchio e rimuovere il supporto
a parete. Fissare il supporto all'intelaiatura
della porta usando le 2 viti in dotazione.
Assicurarsi che il supporto sia montato con il
foro per la vite di fermo nella parte inferiore.
Dall’interno, far passare il filo del campanello
attraverso il foro di 5 mm nell'intelaiatura
della porta attraverso il supporto a parete.
(fig. 1)
Collegare i fili del campanello ai terminali
sulla parte posteriore del pulsante,
accertandosi che i fili NON siano in contatto.
(fig.2)
Rimontare il coperchio del pulsante del
campanello sul supporto a parete e serrare la
piccola vite di fermo situata sotto il coperchio del
pulsante.
I prodotti possono variare leggermente rispetto
all'illustrazione.
Page 9

fig.1
Foro di 5 mm nel
telaio della porta
Filo del campanello
Foro per vite di fermo
Coperchio del pulsante
del campanello
Vite di fermo
Chiusura dei
collegamenti del
terminale situati nella
parte posteriore del
pulsante. Per un
risultato ottimale,
avvolgere il filo nudo
del campanello in
senso orario attorno
alla testa della vite
del terminale e poi
fig.2
serrare.
Page 10

Beldrukkerinstallatie.
Als er geen gat voor de draden van uw nieuwe beldrukker aanwezig is, een gat van 5mm
in uw deurkozijn op de gewenste plaats
boren.
Kleine schroef onder de afdekking losdraaien
en wandbeugel verwijderen. Wandbeugel
m.b.v. de twee bijgeleverde schroeven op het
deurkozijn bevestigen. Ervoor zorgen dat de
beugel met het gat voor het tapeind aan de
onderkant gemonteerd wordt. Van binnenuit
de beldraad door het 5mm gat in het
deurkozijn door de wandbeugel duwen.
(afb.1)
Beldraad op de aansluitingspunten aan de
achterkant van de drukknop bevestigen en
Afdekking van de beldrukker terug op de
wandbeugel plaatsen en het kleine tapeind
dat zich onder de afdekking van de beldrukker bevindt, vastdraaien.
Page 11

fig.1
5mm gat in deurkozijn
Beldraad
Gat voor tapeind
Afdekking voor beldrukker
Tapeind
fig.2
Detailfoto van de
aansluitingspunten
die zich aan de
achterkant van de
beldrukker
bevinden. Voor het
beste resultaat de
onbedekte beldraad
rechtsom om de kop
van de
aansluitingsschroef
heen wikkelen en
dan vastdraaien.
Page 12

Installere ringeknappen.
Hvis der ikke allerede er et hull som passer til
ledningtrådene til den nye klokkeringeknappen, bor et 5 mm hull gjennom dørkarmen på
et passende sted.
Skru løs den lille skruen på undersiden av
dekselet og fjern veggbraketten. Fest veggbraketten til dørkarmen med de 2 skruene
som følger med. Sørg for at braketten
monteres slik at hullet til snittskrue er nederst.
Fra innsiden, skyv klokkens ledningtråd gjennom det 5 mm store hullet i dørkarmen gjennom veggbraketten (fig.1).
Fest klokkens ledningtråd til tilkoplingspunktene bak på ringeknappen, men pass på at
ledningtrådene IKKE berører hverandre
(fig.2).
Sett dekselet til klokkeringeknapp tilbake på
veggbraketten og trekk til den lille
snittskruen på undersiden av dekselet til
ringeknappen.
Page 13

fig.1
Hull til snittskrue
Ringeknappdeksel
Snittskrue
fig.2
5 mm hull i dørkarmen
Ledningtråd til klokken
Lukk tilkoplingene
for tilkoplingspunktet
bak på
ringeknappen. Du
får best resultat ved
å vikle klokkens
ledningtråd i retning
med urviserne rundt
skruen i
tilkoplingspunktet og
så trekke til.
Page 14

Installering av tryckknapp.
Om det inte finns något hål för trådarna till
den nya tryckknappen borra ett 5 mm genom
dörrkarmen på önskad plats.
Lossa den lilla skruven som sitter på kåpans
undersida och tag bort väggkonsolen. Fäst
väggkonsolen på dörrkarmen med de 2 medföljande skruvarna. Se till att konsolen monteras med skruvstifthålet längst ned. Skjut ringledningstråden från insidan genom hålet på 5
mm i dörrkarmen genom väggkonsolen.
(fig.1)
Fäst ringledningstråden vid uttagen på tryckknappens baksida, och se till att trådarna
INTE vidrör varandra. (fig.2)
Sätt tillbaka tryckknappskåpan på
väggkonsolen och drag åt det lilla
skruvstiftet på kåpans undersida.
Produkterna kan variera något jämfört med
illustrationen.
Page 15

fig.1
Skruvstifthål
Tryckknappskåpa
Skruvstift
fig.2
5 mm hål i dörrkarm
Ringledningstråd
Närbild av
anslutningsuttag på
tryckknappens
baksida. För bästa
resultat bör denlinda
den nakna
ringledningstråden
lindas medurs runt
uttagsskruvens
huvud och sedan
drasdra åt.huvud
och sedan dras åt.
Page 16

Instalación del Pulsador.
Si no hay un agujero para canalizar los hilos
hasta su nuevo pulsador, taladre un agujero
de 5mm a través del marco de la puerta en la
posición elegida.
Desenrosque el tornillo pequeño situado en
la cara inferior de la tapa y quite la repisa de
la pared. Monte la repisa de la pared en el
marco de la puerta utilizando los 2 tornillos
suministrados. La repisa debe montarse con
el agujero para el tornillo prisionero en la
parte inferior. Desde el interior, introduzca el
hilo metálico para llamador por el agujero de
5mm perforado en el marco de la puerta, a
través de la repisa de la pared (Fig. 1).
Conecte el hilo metálico para llamador a las
bornas situadas en la parte posterior del pulsador, teniendo cuidado de que los hilos NO
SE TOQUEN ( Fig. 2).
Vuelva a montar la tapa del pulsador en la
repisa de la pared y apriete el tornillo prisionero pequeño situado en la parte inferior
de la tapa del pulsador.
Page 17

fig.1
Agujero de 5mm en el
marco de puerta
Hilo de timbre
Agujero para tornillo prisionero
Tapa de pulsador de llamada
Tornillo prisionero
Vista detallada de
las conexiones de
borna situadas en la
parte posterior del
pulsador. Para una
buena conexión,
envuelva el hilo
desnudo para
llamador, en el
sentido de las
agujas del reloj alrededor de la cabeza
del tornillo de la
borna y
fig.2
apriete éste.tornillo
de la borna y
apriete éste.
 Loading...