

Page 1

spectro2guide
Measure what you see.
Manual
Page 2

BYK-Gardner GmbH Table of Contents
spectro2guide i
Table of Contents
1 Introduction...................................................................... 3
1.1 For Your Safety ........................................................................... 4
1.2 Disposal ....................................................................................... 5
1.3 Exclusion of Liability................................................................... 5
1.4 Copyright..................................................................................... 5
1.5 Declarations ................................................................................ 6
1.5.1 EU Declaration of Conformity ......................................... 6
1.5.2 FCC Declaration (USA)...................................................... 6
1.5.3 IC Declaration (Canada) ................................................... 7
1.5.4 Japanese Declaration ....................................................... 7
1.6 Intended Use............................................................................... 8
2 Delivery Content .............................................................. 9
3 Instrument Description.................................................. 10
3.1 Names and Functions of Parts.................................................. 11
4 Getting Started............................................................... 15
4.1 System Diagram ........................................................................ 16
4.2 Docking Station ........................................................................ 16
4.2.1 Put the Docking Station into Operation ....................... 17
4.3 smart-chart Software................................................................ 17
4.3.1 Install smart-chart Software........................................... 17
4.4 Charging the Instrument.......................................................... 18
4.4.1 Charge via docking station ............................................ 18
4.4.2 Charge via USB cable...................................................... 18
4.5 Main Menu................................................................................ 19
4.6 Define Measurement Parameters............................................ 21
5 Measure .......................................................................... 23
5.1 Perform Standard Measurement ............................................. 24
5.2 Perform Difference Measurement........................................... 26
5.3 Perform Quick Check................................................................ 27
5.4 Perform Absolute Measurement ............................................. 29
5.5 Perform Opacity Measurement................................................ 30
5.6 Organizer .................................................................................. 31
6 Browse: View and Delete Measurements .................... 32
6.1 View Measurement Values....................................................... 32
6.2 Delete Measurement Values.................................................... 32
7 Configuration ................................................................. 33
7.1 Calibrate Manually ................................................................... 35
7.2 Connect with WiFi .................................................................... 35
Page 3

Table of Contents BYK-Gardner GmbH
ii spectro2guide
8 Troubleshooting ............................................................. 36
9 Technical Data ................................................................ 39
10 Service and Maintenance .............................................. 41
Page 4

BYK-Gardner GmbH Introduction
spectro2guide 3 / 43
1 Introduction
Dear customer,
thank you for having decided for a BYK-Gardner product. BYK-Gardner is committed to providing you with
quality products and services. We offer complete system
solutions to solve your problems in areas of color, appearance and physical properties. As the basis of our
worldwide business, we strongly believe in total customer satisfaction. Therefore, in addition to our products, we offer VALUE-ADDED services:
– Technical Sales Force
– Technical & Application Support
– Application and Technical Seminars
– Repair & Certification Service
BYK-Gardner is part of the Altana Group and a direct
subsidiary of BYK-Chemie, the worldwide leader of additives for coatings and plastics. Together we offer complete and unique solutions for you, our customer.
Thank you for your trust and confidence. If there is anything we can do better to serve your needs, do not hesitate to let us know.
Your BYK-Gardner Team
Page 5
Introduction BYK-Gardner GmbH
4 / 43 spectro2guide
1.1 For Your Safety
CAUTION
Familiarization with Safety Instructions is
necessary
Absence of knowledge of Safety Instructions threatens
your health and can damage the instrument.
a) Read the Safety Instructions before you use the in-
strument the first time. The Safety Instructions are
part of the delivery content. You find the Safety Instructions in the dedicated booklet enclosed to the
instrument carrying case.
b) The Safety Instructions also includes information
about disposal, liability and copyright.
CAUTION
Ergonomic hazard due to discomfort and fatigue
Discomfort and fatigue during usage of the instrument
could lead to ergonomic hazards. For example is a dropdown of the instrument conceivable.
a) Take regularly breaks and use the instrument with
the safety wrist strap.
WARNING
Eye damage caused by illumination LEDs.
Looking into the illumination LEDs during measurement
could harm your eyes.
a) Do not look into the measurement aperture during
measurement, even if you assume a fault with the
instrument.
Page 6

BYK-Gardner GmbH Introduction
spectro2guide 5 / 43
1.2 Disposal
Disused electrical equipment such as this instrument
must be professionally disposed. Do not dispose it in
household garbage and make sure to observe the national law in your country.
1.3 Exclusion of Liability
No liability other than as provided by law is assumed for
direct or indirect damage sustained in association with
the use of the instrument, the software or documentation.
BYK-Garnder GmbH precludes all liability claims if the
usage described in chapter “Intended Use” is disregarded. Any other usage than described in “Intended
use” is not according to the purpose of the instrument
and leads to termination of liability claims.
See also: Intended Use
1.4 Copyright
Specific properties and structural characteristics of the
instrument are intellectual property of BYK-Gardner
GmbH. The copyright of this manual remains with BYKGardner GmbH. This manual must not be reproduced
fully or in party, published or used for any other competitive purposes, no matter whether against payment
or not, without prior written authorization from BYKGardner GmbH.
BYK-Gardner GmbH reserves the right to update the instrument, software and written documentation without
prior notice.
© Copyright 2017 BYK-Gardner GmbH
All rights reserved
Page 7

Introduction BYK-Gardner GmbH
6 / 43 spectro2guide
1.5 Declarations
1.5.1 EU Declaration of Conformity
Hereby, BYK-Gardner GmbH declares, that this instrument complies with the requirements of the following
EU directives:
– 2014/30/EU - Electromagnetic Compatibility
– 2014/35/EU - Low Voltage
– 2014/53/EU - RED (R&TTE) Directive
1.5.2 FCC Declaration (USA)
This equipment contains a radio module with FCC ID
QPU8000.
This equipment has been tested and found to comply
with the limits for a Class A digital device, pursuant to
part 15 of the FCC Rules. These limits are designed to
provide reasonable protection against harmful interference when the equipment is operated in a commercial
environment. This equipment generates, uses, and can
radiate radio frequency energy and, if not installed and
used in accordance with the instruction manual, may
cause harmful interference to radio communications.
Operation of this equipment in a residential area is
likely to cause harmful interference in which case the
user will be required to correct the interference at his
own expense.
This device complies with part 15 of the FCC Rules. Operation is subject to the following two conditions: (1)
This device may not cause harmful interference, and (2)
this device must accept any interference received, including interference that may cause undesired operation.
Any changes or modifications not expressly approved by
the party responsible for compliance could void the user
´s authority to operate the equipment.
NOTICE!To satisfy FCC RF exposure requirements for
mobile transmitting devices, a separation distance of
20cm or more should be maintained between the an-
Page 8

BYK-Gardner GmbH Introduction
spectro2guide 7 / 43
tenna of this device and persons during operation. To
ensure compliance, operations at closer distances than
this are not recommended.
1.5.3 IC Declaration (Canada)
This equipment contains a radio module with IC ID
4523A-SN8000.
This Class A digital apparatus complies with Canadian
ICES-003.
This device complies with Industry Canada’s license-exempt RSSs. Operation is subject to the following two
conditions:
(1) This device may not cause interference; and
(2) This device must accept any interference, including
interference that may cause undesired operation of the
device.
NOTICE!To satisfy IC RF exposure requirements for
mobile transmitting devices, a separation distance of
20cm or more should be maintained between the antenna of this device and persons during operation. To
ensure compliance, operations at closer distances than
this are not recommended.
1.5.4 Japanese Declaration
This equipment contains specified radio equipment that
has been certified to the Technical Regulation Conformity Certification under the Japanese Radio Law.
MIC ID: R 006-000497
Page 9

Introduction BYK-Gardner GmbH
8 / 43 spectro2guide
1.6 Intended Use
The instrument is designed to measure color on different surfaces. By placing the base plate of the unit onto
a surface and pressing either the operate button on the
side of the instrument or triggering the measurement
on the display, the instrument measures the color and
processes, displays and stores these values. The instrument can be connected via USB or WiFi to a computer in
order to read or write data. A resistive display allows
additional functionalities.
Page 10
BYK-Gardner GmbH Delivery Content
spectro2guide 9 / 43
2 Delivery Content
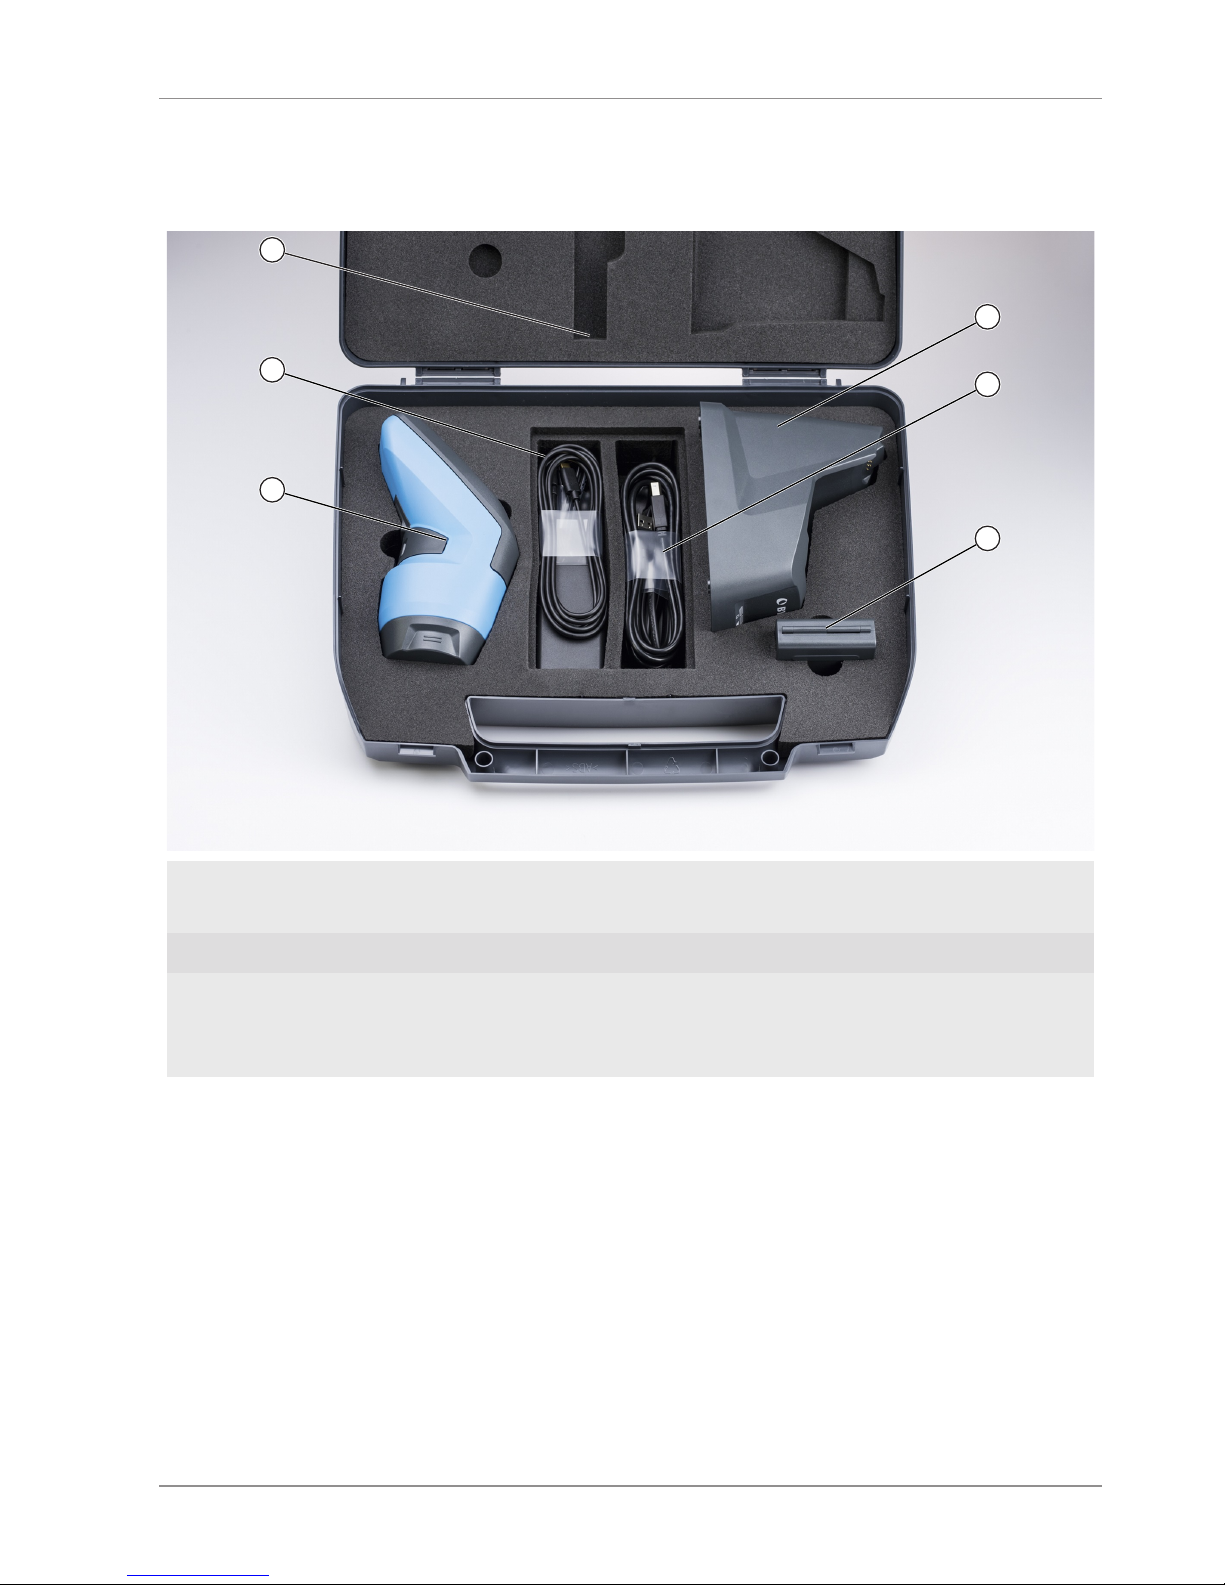
The items listed below are contained in the packaging. Please
contact BYK-Gardner if any item is missing or damaged:
2
3
4
5
6
1
1 Safety instructions and short
instructions
4 Docking station
2 USB Type-C cable 5 Power supply
3 Instrument 6 External White calibration
standard and green checking
standard
Page 11

Instrument Description BYK-Gardner GmbH
10 / 43 spectro2guide
3 Instrument Description
The spectro2guide is a portable spectrophotometer that measures color, gloss and fluorescence light. It is operated by the
operate button and the touch screen display. The operate button is used to switch on the instrument and to trigger a measurement. On the touchscreen display you can select icons and
functions directly.
This chapter gives an overview of the instrument parts and
their functions.
Page 12
BYK-Gardner GmbH Instrument Description
spectro2guide 11 / 43
3.1 Names and Functions of Parts
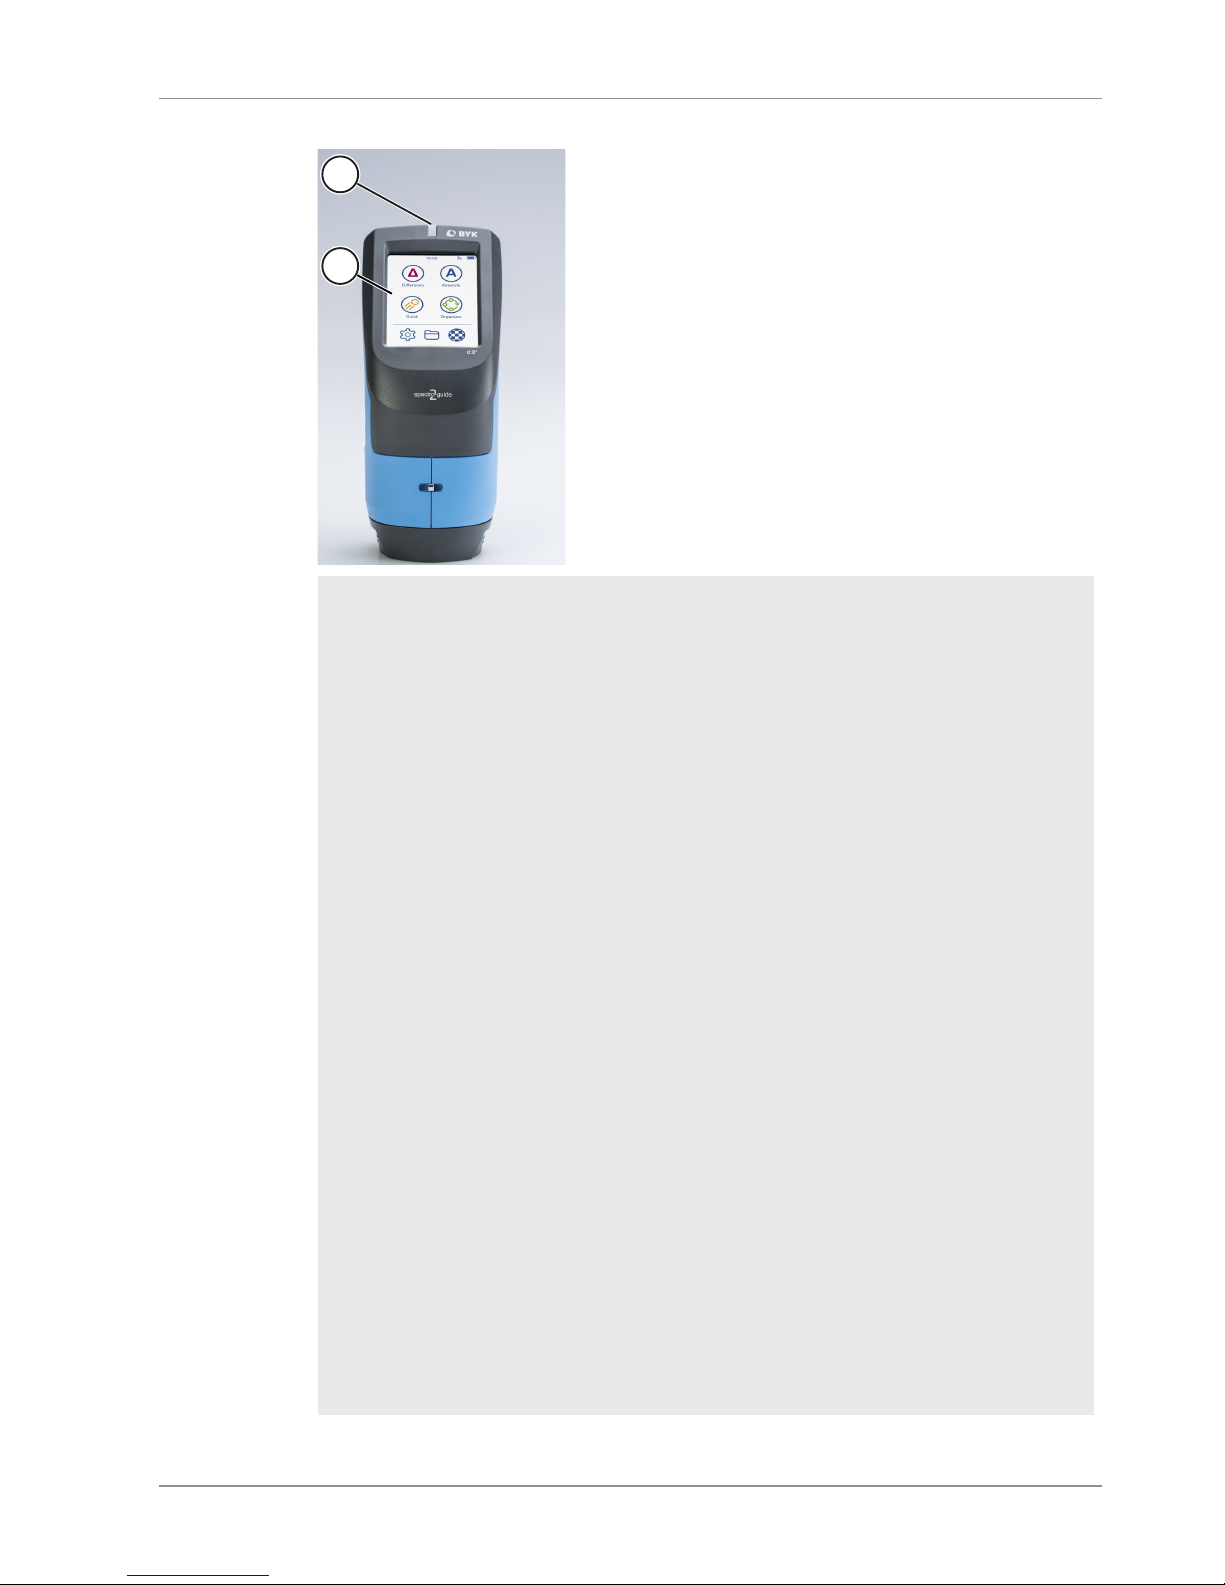
1
2
1 LED:
Measure:
– Light up in green
during measurement.
– Light up in blue if the
sample is fluorescent.
– Light up in pink if
color change due to
fluorescence is bigger
than 1/3 of the tolerance (default value,
can be changed in
smart-chart Software).
– Blink red in case of a
measurement error.
Charge:
– Pulsates in red, yel-
low, and green during charging.
– Light up in green
when the instrument
is fully charged.
2 Touch screen display:
Touch the icons on the
screen with your finger
or the stylus in order to
operate the instrument.
Page 13
Instrument Description BYK-Gardner GmbH
12 / 43 spectro2guide
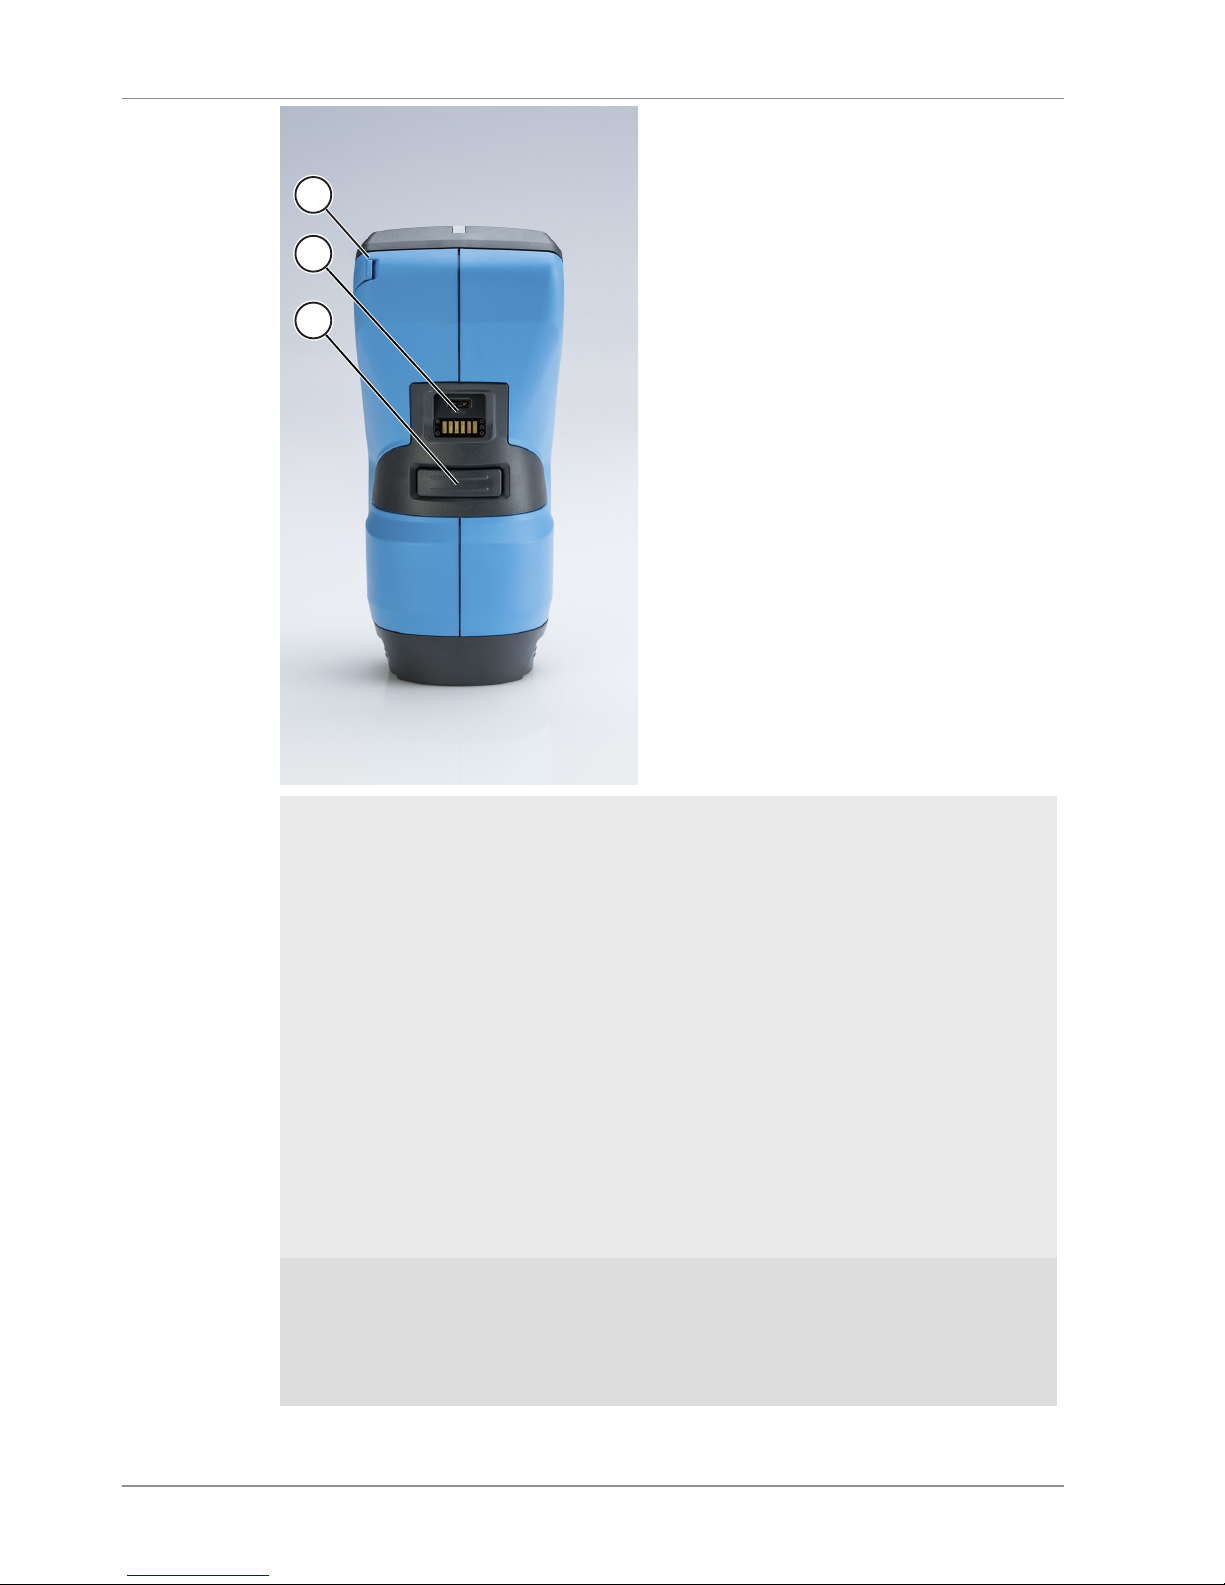
2
3
1
1 Stylus (inserted in instru-
ment):
Can be used for touching
the icons on the screen.
3 Operate button:
Press halfway:
A camera is switched on
that shows the surface to
be measured on the display.
Press completely:
– Turns the instrument
on.
– Executes a measure-
ment.
2 USB-Type-C plug:
– Transfer data be-
tween instrument
and computer.
Page 14
BYK-Gardner GmbH Instrument Description
spectro2guide 13 / 43
1
2
3
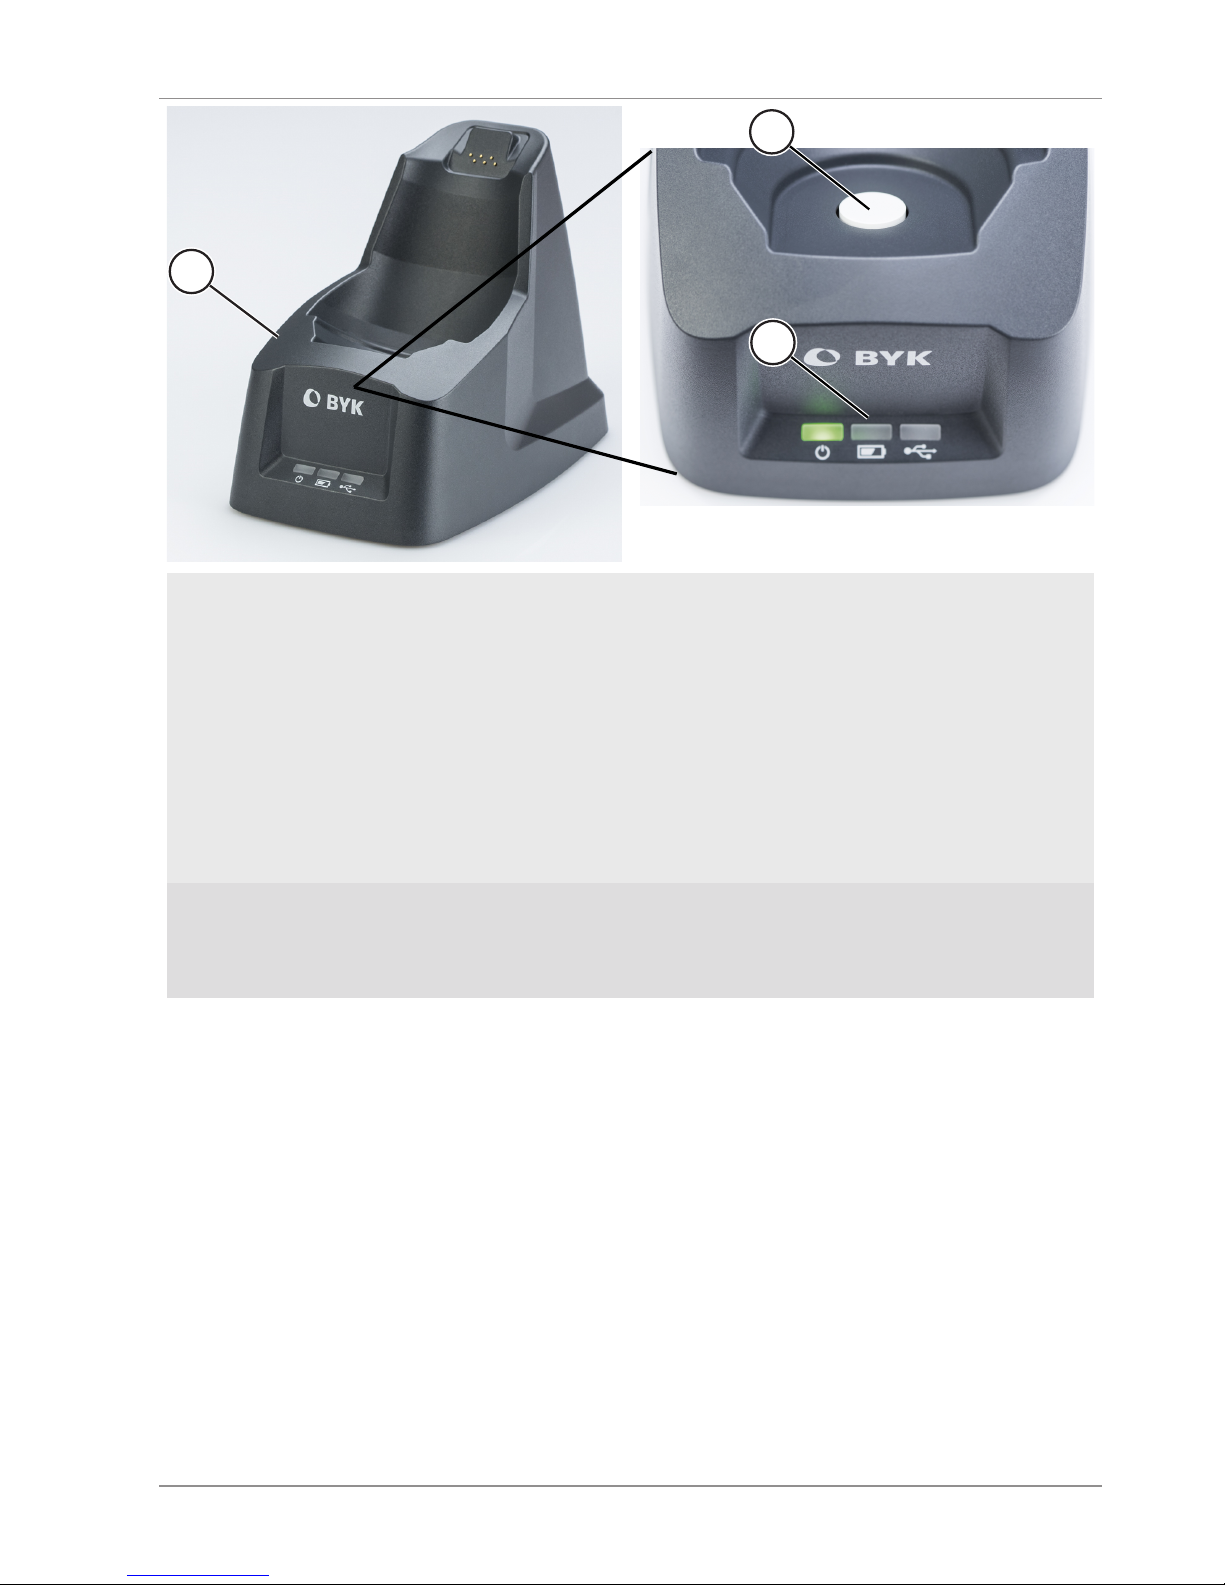
1 Docking station:
– Charges the instrument.
– Connects instrument and
computer.
3 Docking station LEDs:
From left to right:
1. Shows that the docking
station is power supplied.
2. Shows that the instrument
is charged.
3. Shows an active connection to a computer.
2 White standard:
Calibrates the instrument automatically.
Page 15
Instrument Description BYK-Gardner GmbH
14 / 43 spectro2guide
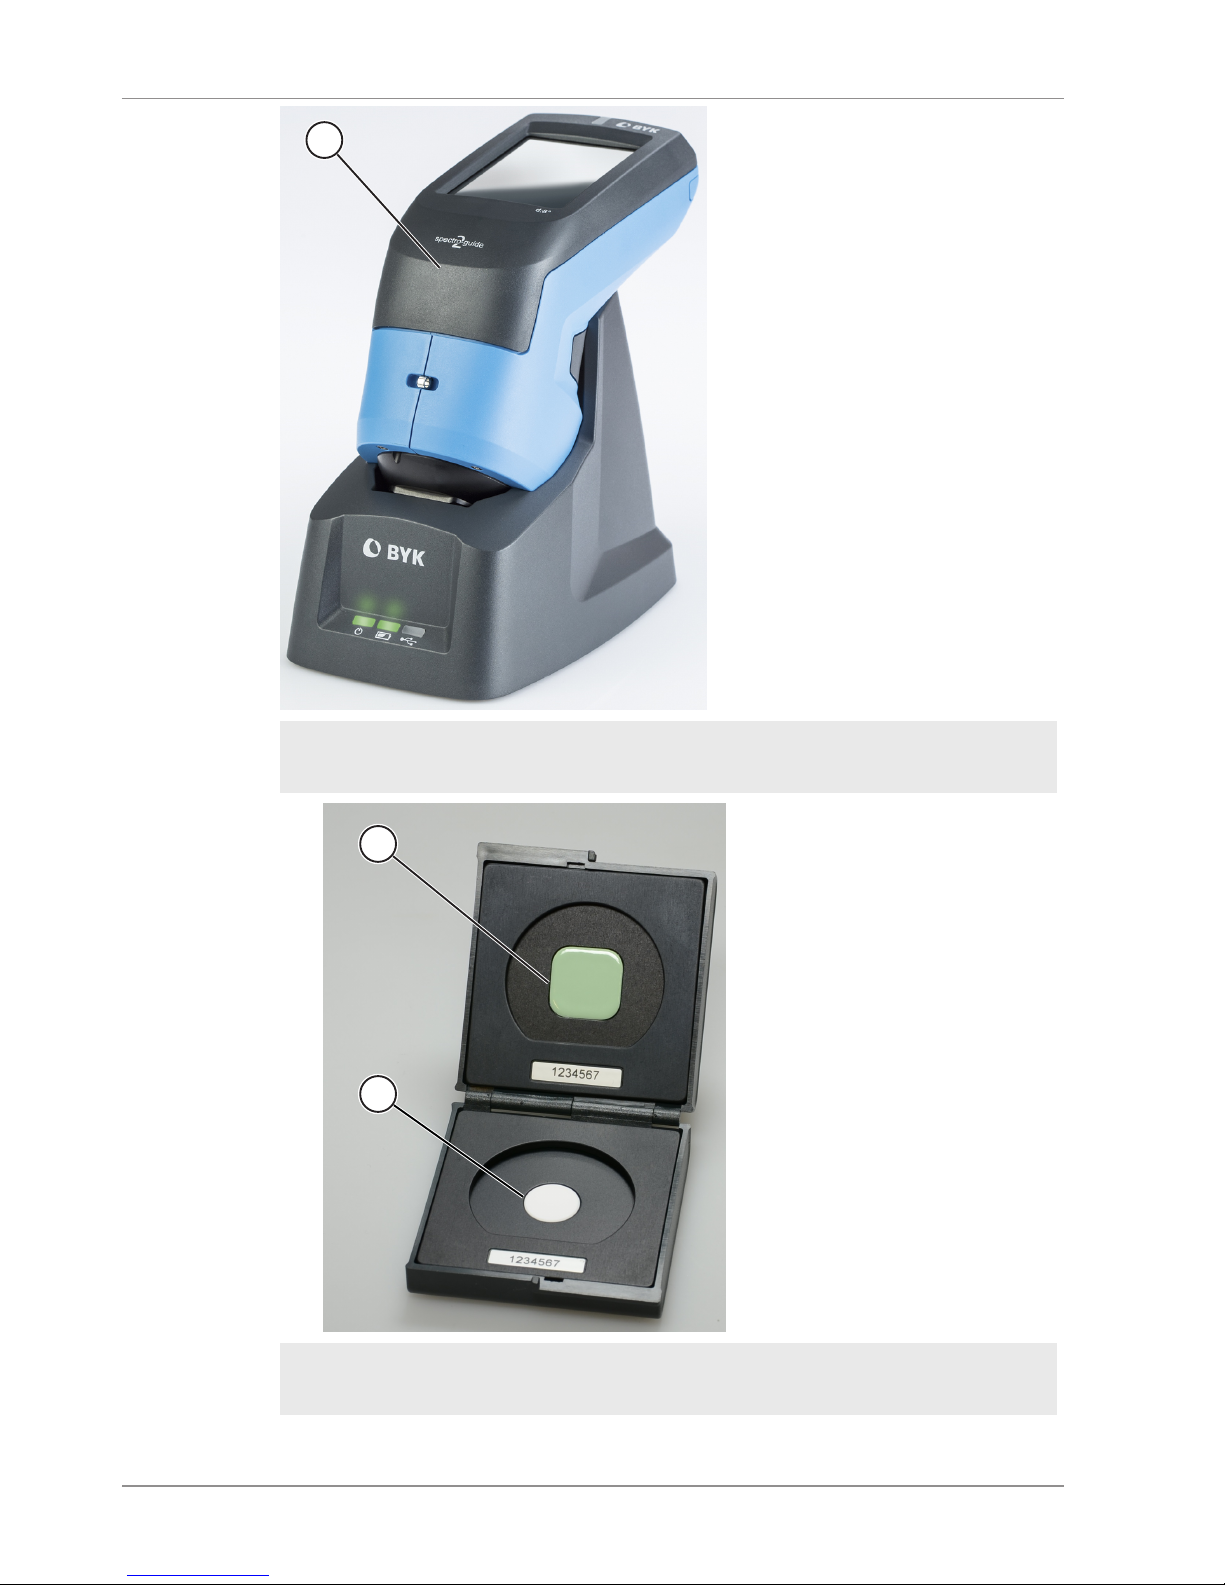
1
1 Instrument inserted in
docking station
1
2
1 Green checking standard 2 White calibration stan-
dard
Page 16

BYK-Gardner GmbH Getting Started
spectro2guide 15 / 43
4 Getting Started
Please observe following notes when you put the instrument into operation.
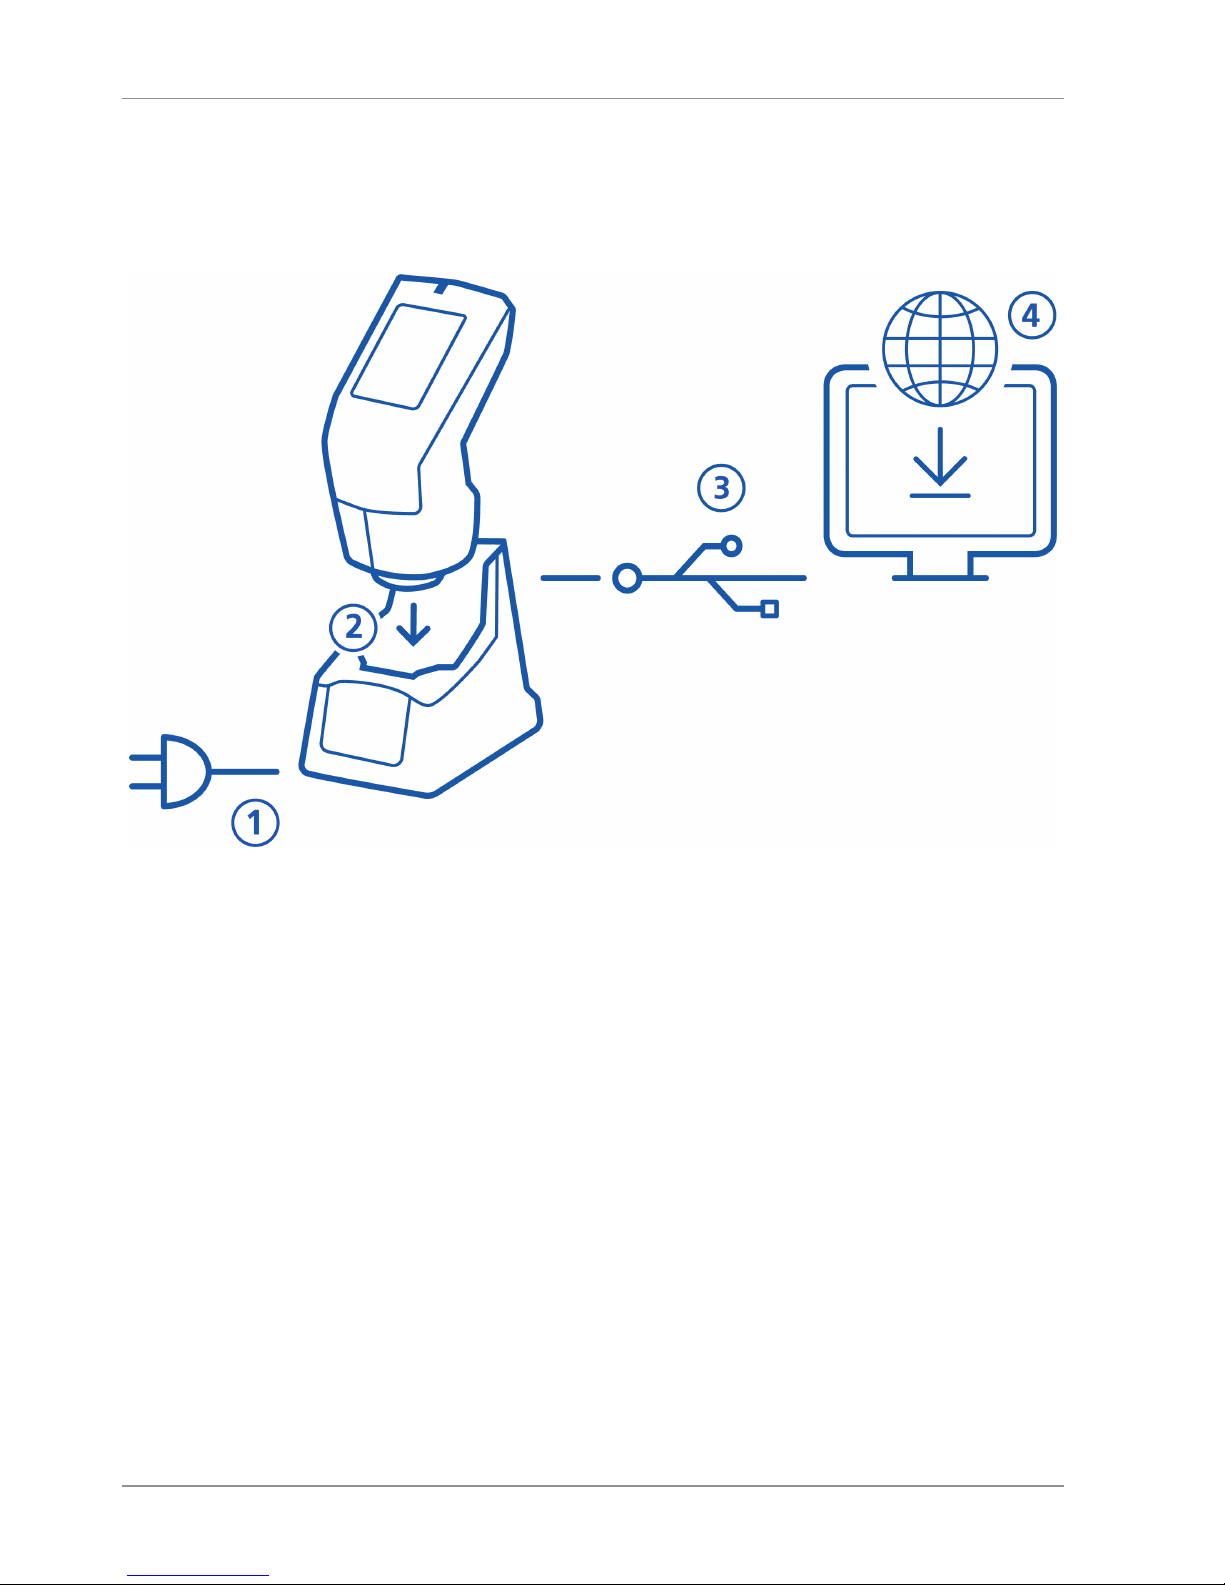
– Assemble the entire system, consisting of instru-
ment, docking station and software. Consult System
Diagram [}Page:16] for more information.
– Place the instrument in the docking station and al-
low it to charge fully. The docking station automatically loads and calibrates the instrument. Consult
Docking Station [}Page:16] and Charging the Instrument [}Page:18] for more information.
– Press the operate button in order to turn the instru-
ment on.
– Become familiar with the main menu for a quick
navigation. Consult Main Menu [}Page:19] for
more information.
– Press the displayed icons on the touch screen with
your finger or the stylus in order to navigate
through the menu and perform functions.
– Use the hand strap as protection against dropping
the instrument.
– Use the smart-chart software to tap the full poten-
tial of the instrument. Consult smart-chart Software
[}Page:17] for more information.
Page 17
Getting Started BYK-Gardner GmbH
16 / 43 spectro2guide
4.1 System Diagram
4.2 Docking Station
The docking station is used to store the instrument
when it is not in use.
Functions
The docking station charges the instrument and automatically performs auto diagnosis and calibration after
positioning. This ensures that the instrument is always
ready for operation.
Page 18

BYK-Gardner GmbH Getting Started
spectro2guide 17 / 43
4.2.1 Put the Docking Station into Operation
a) Connect the docking station with the charger to the
power supply grid.
b) Connect the docking station via USB cable to the
computer that is meant to run the smart-chart software. For more information about smart-chart, con-
sult smart-chart Software [}Page:17].
ð The power LED lights up in green.
ð The docking station is ready to use.
4.3 smart-chart Software
smart-chart is a modern and intuitive software to document, analyze and optimize your color, gloss and fluorescence data.
It is available in two different software packages: smartlab Color and smart-process Color. After software download both software packages can be used for 30 days
free trail. Thereafter, you need to register either for one
of the two software packages. The standard delivery includes two licenses for the selected software package.
Software for download: www.byk.com/spectro2guide
4.3.1 Install smart-chart Software
a) Download the zip-file from http://www.byk.com/
spectro2guide. Therefore, save it on your hard drive
into a new folder.
b) Extract the complete archive.
c) In the extracted folder, right mouse click on the file
“install.exe”.
d) Select “Run as administrator”.
e) Follow the setup instructions on the screen.
Page 19

Getting Started BYK-Gardner GmbH
18 / 43 spectro2guide
4.4 Charging the Instrument
The instrument provides two ways for charging.
4.4.1 Charge via docking station
ü The docking station is power supplied.
a) Put the instrument into the docking station.
ð The charge LED pulsates red as long as the bat-
tery charge is < 15%.
ð The charge LED pulsates yellow as long as the
battery charge is < 50%.
ð The charge LED pulsates green as long as the
battery charge is < 90%.
ð The charge LED lights up in green when the bat-
tery charge is ≥ 90%.
b) Keep the instrument in the docking station as long
as the instrument is not in use.
ð The instrument is fully charged and can be put in
operation.
4.4.2 Charge via USB cable
a) Connect the instrument with the USB cable to a
power supply.
ð The instrument loading bar on the display shows
the battery charge.
b) Disconnect the instrument from the USB cable when
it is fully charged.
ð The instrument is fully charged and can be put in
operation.
Page 20
BYK-Gardner GmbH Getting Started
spectro2guide 19 / 43
4.5 Main Menu
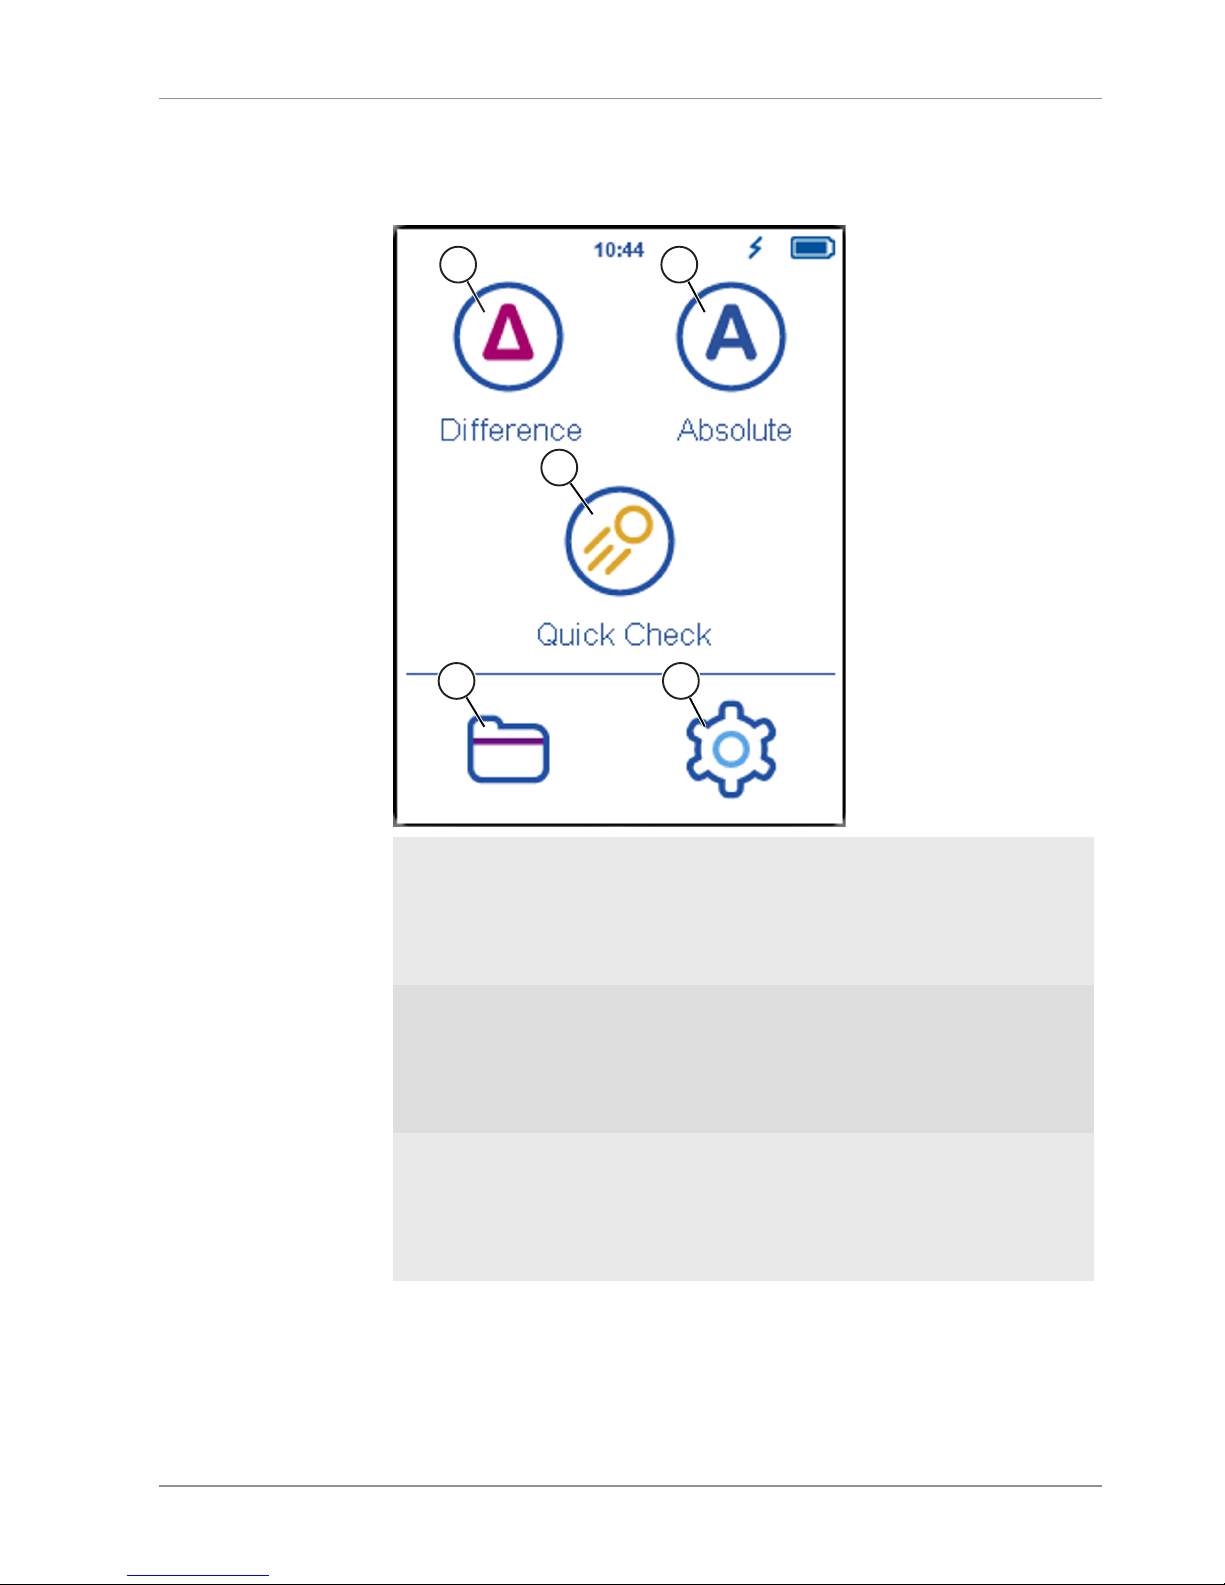
The screen below shows the icons that are displayed by
default.
1 2
3
4 5
1 Difference
Compare standard and
sample. Results are
saved automatically..
4 Browse
View and delete measurement data.
2 Absolute
Take absolute measurements. Results are
saved automatically.
5 Configuration
Change measurement
parameters or instrument settings.
3 Quick Check
Compare standard and
sample without saving.
Page 21

Getting Started BYK-Gardner GmbH
20 / 43 spectro2guide
Display of two additional icons
Two more icons will be displayed depending on
whether you have activated opacity or downloaded an
organizer from smart-chart:
– Opacity : activatable under Configuration >
Measurement Parameters > Color Indices.
– Organizer : Consult Organizer [}Page:31] for
more information.
Page 22
BYK-Gardner GmbH Getting Started
spectro2guide 21 / 43
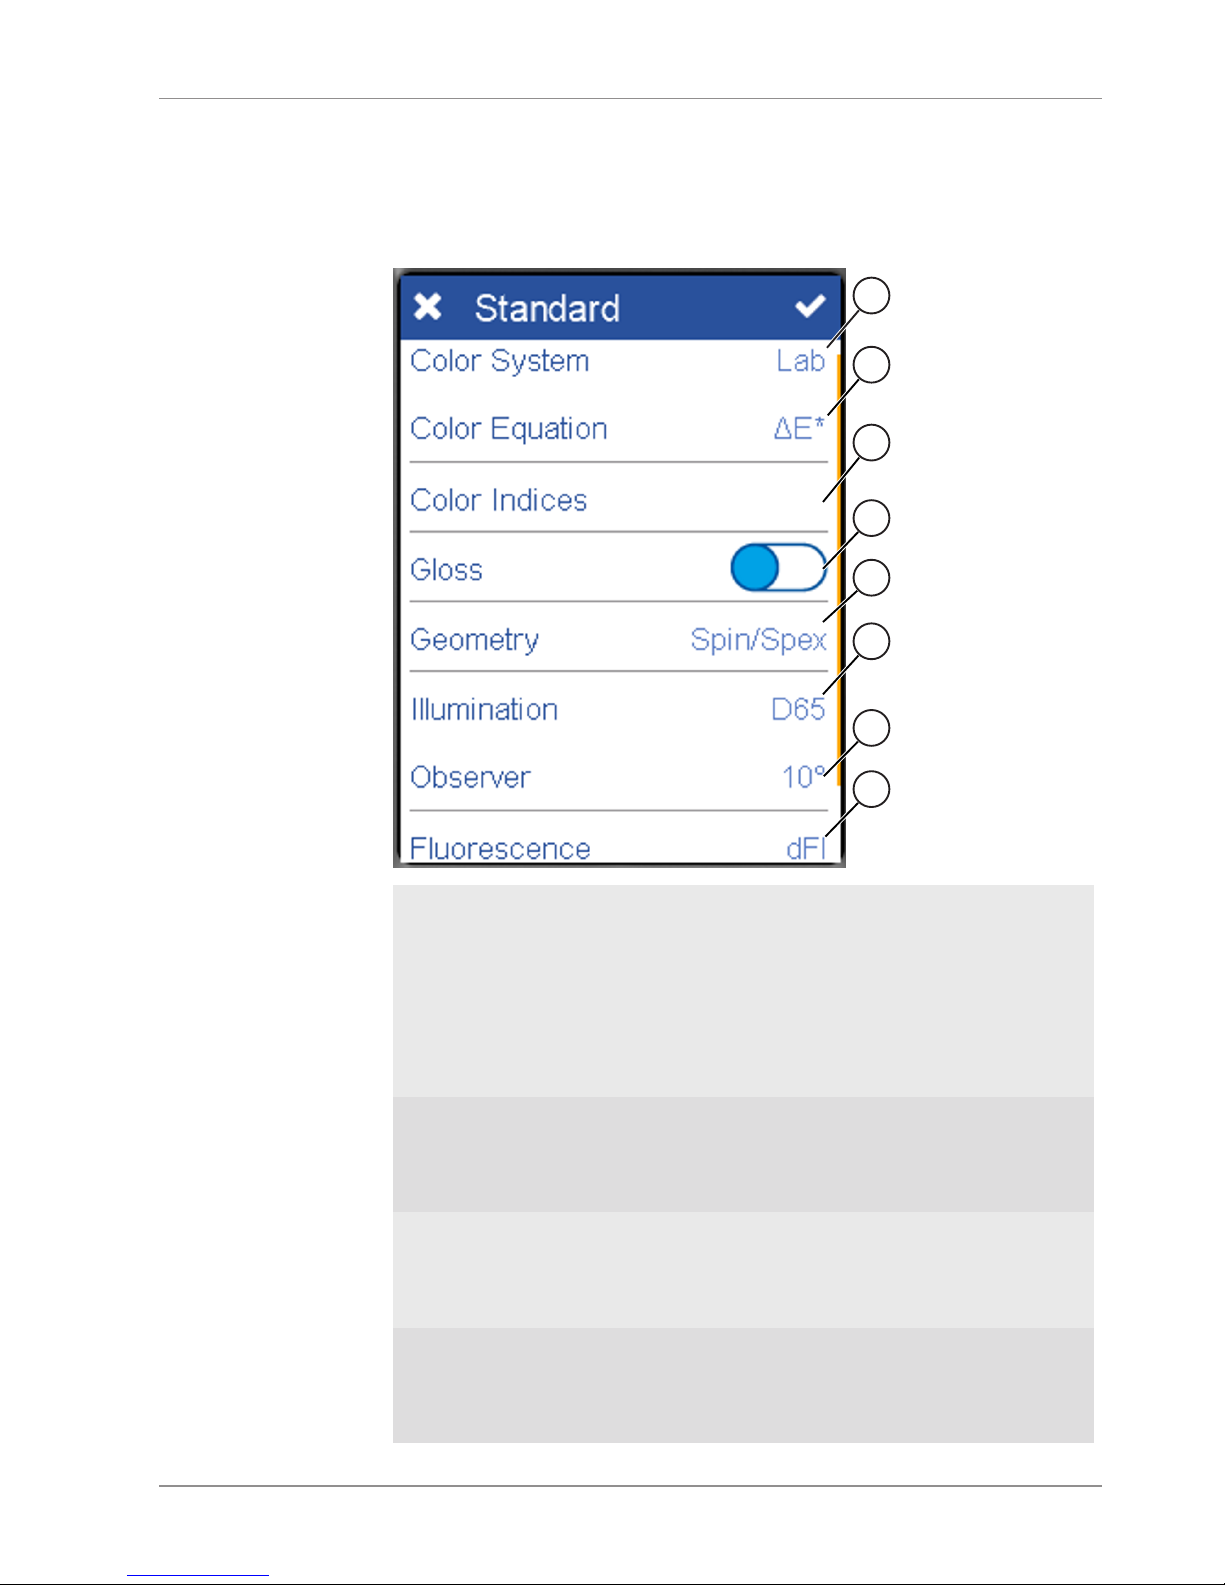
4.6 Define Measurement Parameters
a) Go to Configuration > Measurement Parame-
ters.
ð The screen below is displayed.
1
2
3
4
5
6
7
8
1 Color System:
Select color system.
Default is CIE L*a*b*.
5 Geometry:
Select SPIN/SPEX
mode. Default is SPIN.
Mode only available
for geometry d:8°
(Cat.No. 7070)
2 Color Equation:
Select color equation.
Default is ∆E*.
6 Illumination:
Select standard illuminant. Default is D65.
3 Color Indices
Select color indices.
7 Observer:
Select standard observer. Default is 10°.
4 Gloss
Turn Gloss on or off.
8 Fluorescence:
Turn fluorescence indices on or off.
Page 23

Getting Started BYK-Gardner GmbH
22 / 43 spectro2guide
b) Click on the parameter you want to set.
ð A respective list with selectable parameters ap-
pears.
c) Choose the required parameter and confirm by click-
ing on the checkmark in the upper right corner.
d) Repeat steps b and c until you set all desired param-
eters.
e) Confirm by clicking on the checkmark in the upper
right corner.
ð Measurement parameters are set.
Page 24
BYK-Gardner GmbH Measure
spectro2guide 23 / 43
5 Measure
The instrument provides various types of measurement functions:
– Difference measurement : Compare standard and sam-
ple. Results are saved automatically.
– Quick check : Compare standard and sample without
saving.
– Absolute measurement : Take absolute measurements.
Results are saved automatically.
– Opacity measurement : Measures opacity. Measure-
ment values are stored.
In order to display the measurement icon in the main
menu, opacity has to be set in the color indices. See: Define
Measurement Parameters [}Page:21]
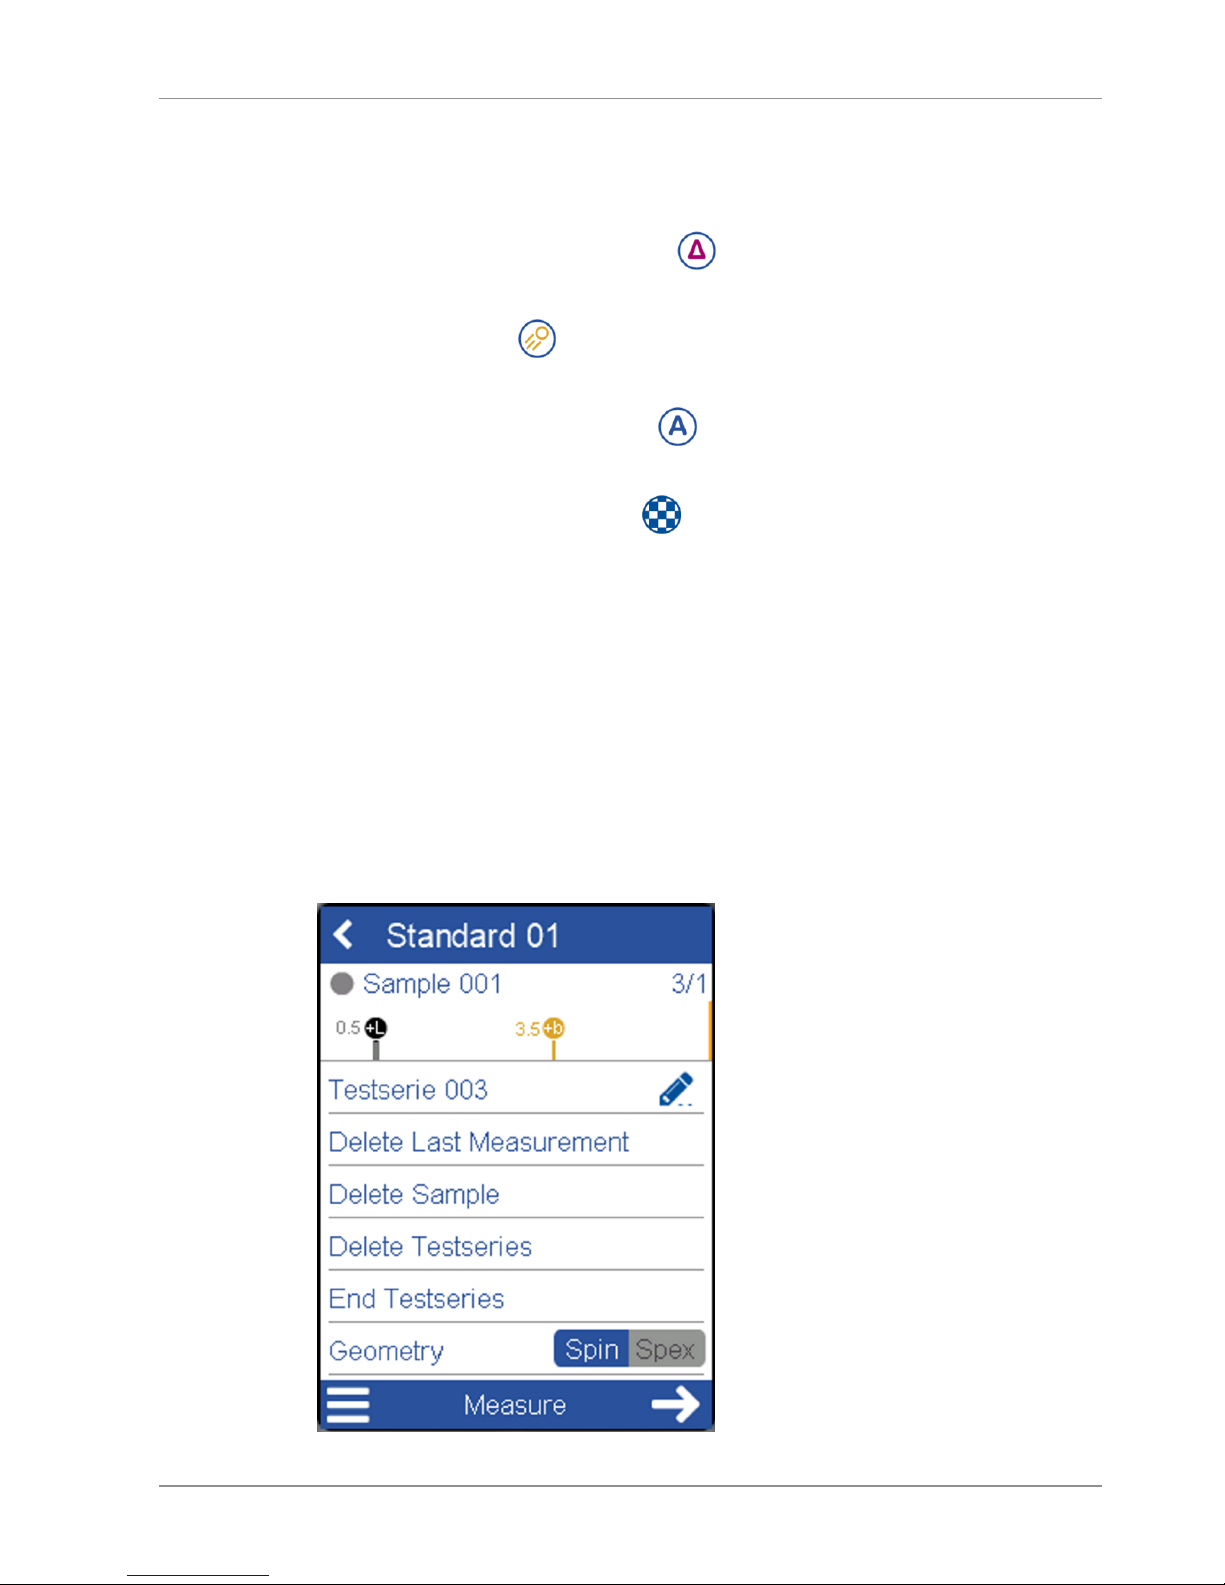
Context Menu
The context menu provides the commands “Testserie”,
“Delete Last Measurement”, “Delete Sample”, “Delete Testseries”, “End Testseries” and “Geometry”. It is accessed via the
hamburger menu icon as you see below.
Page 25
Measure BYK-Gardner GmbH
24 / 43 spectro2guide
5.1 Perform Standard Measurement
ü Measurement parameters are set. See: Define Measurement
Parameters [}Page:21]
ü The reference surface is present.
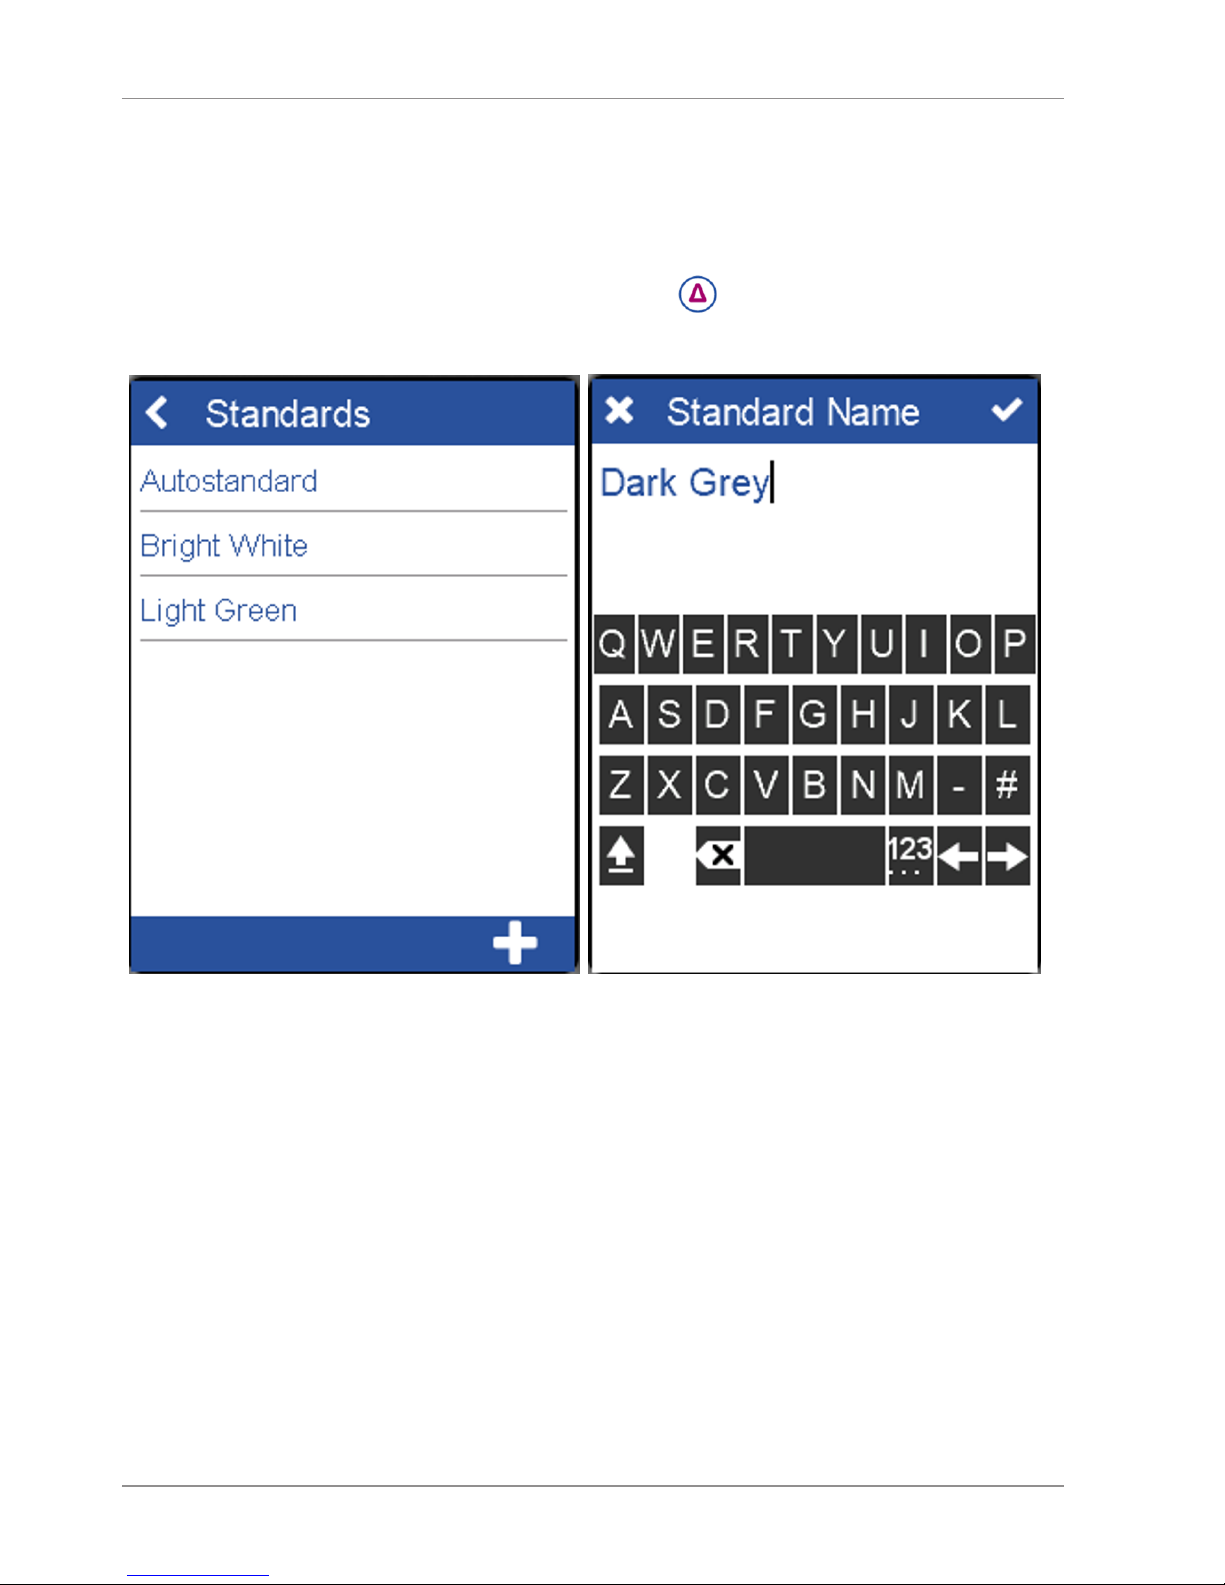
a) Click on icon “Difference“:
ð The screen below is displyayed.
b) Select existing standard from list or add a new standard.
c) To add a new standard click on +.
ð A new standard is created.
ð A input window for the standard name appears.
d) Accept the default name or enter a desired name and click
on the checkmark in the upper right corner.
Page 26
BYK-Gardner GmbH Measure
spectro2guide 25 / 43
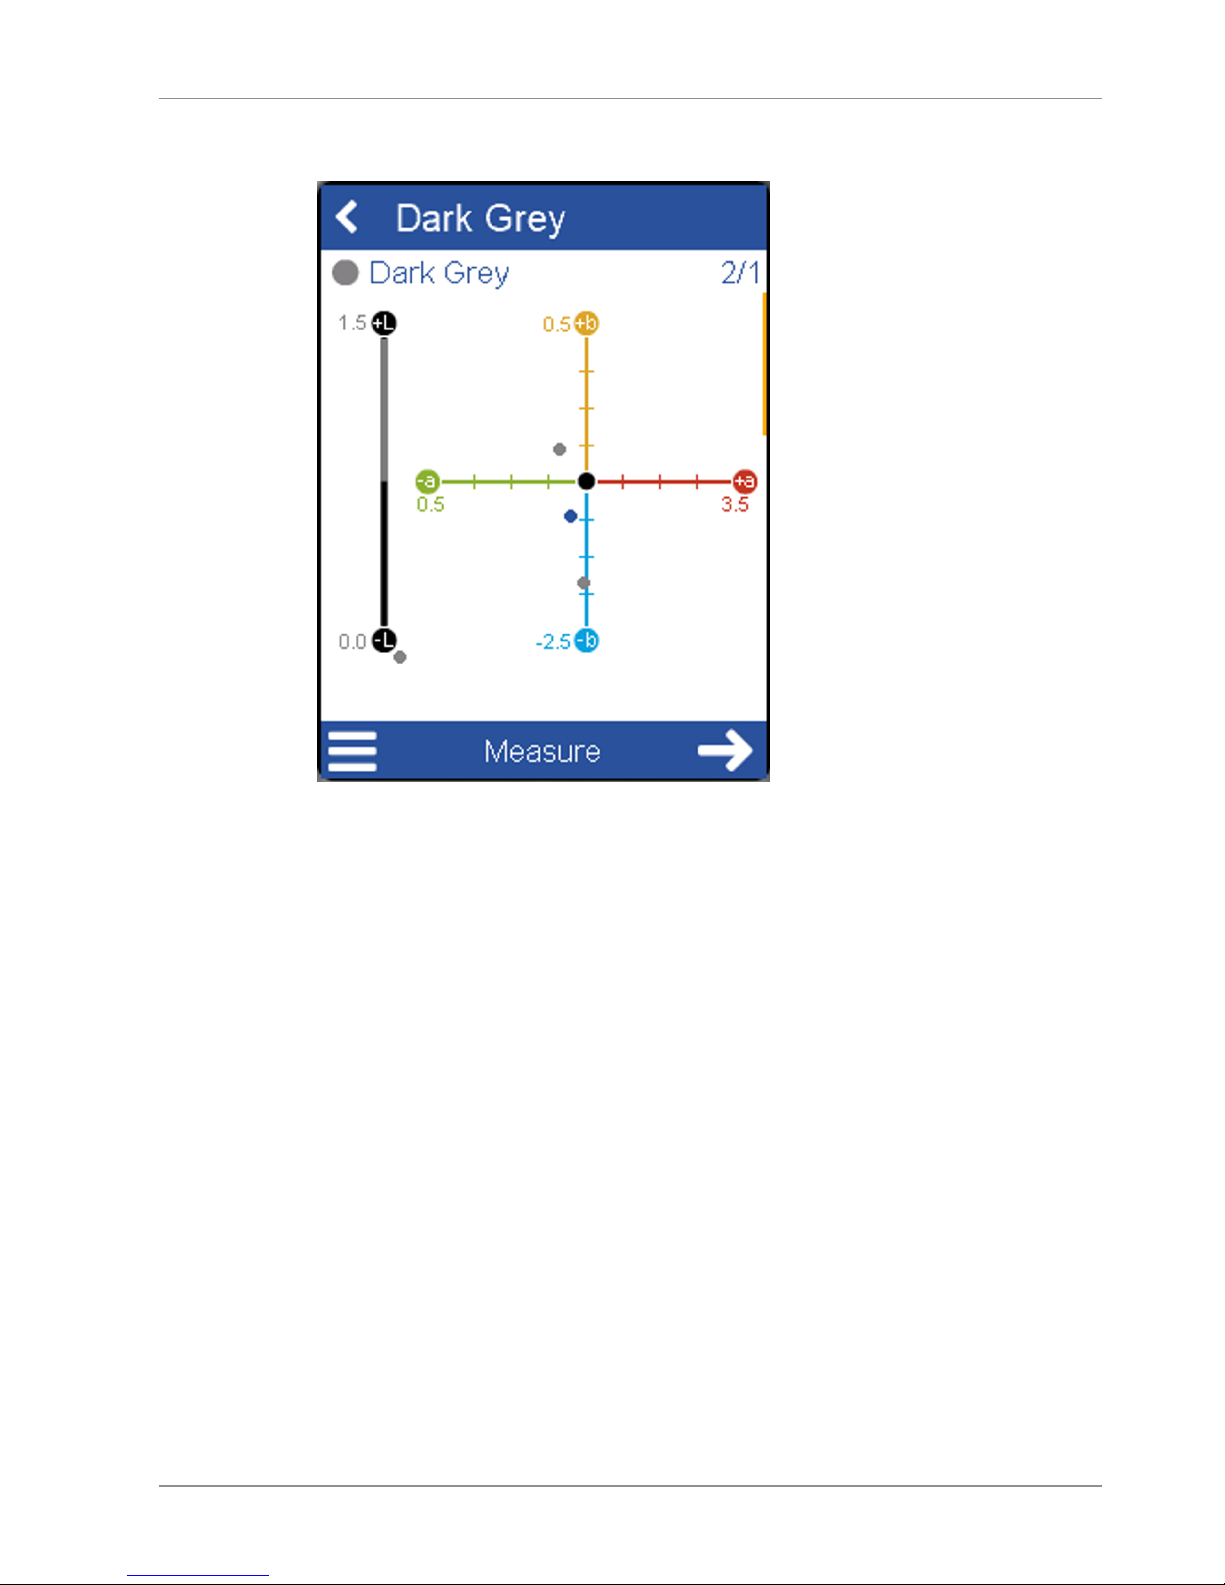
ð The screen below is displayed. The instrument is ready
to measure the standard.
e) Place instrument on standard.
f) Click on “Measure” or press operate button.
ð Standard is measured and automatically saved.
Page 27
Measure BYK-Gardner GmbH
26 / 43 spectro2guide
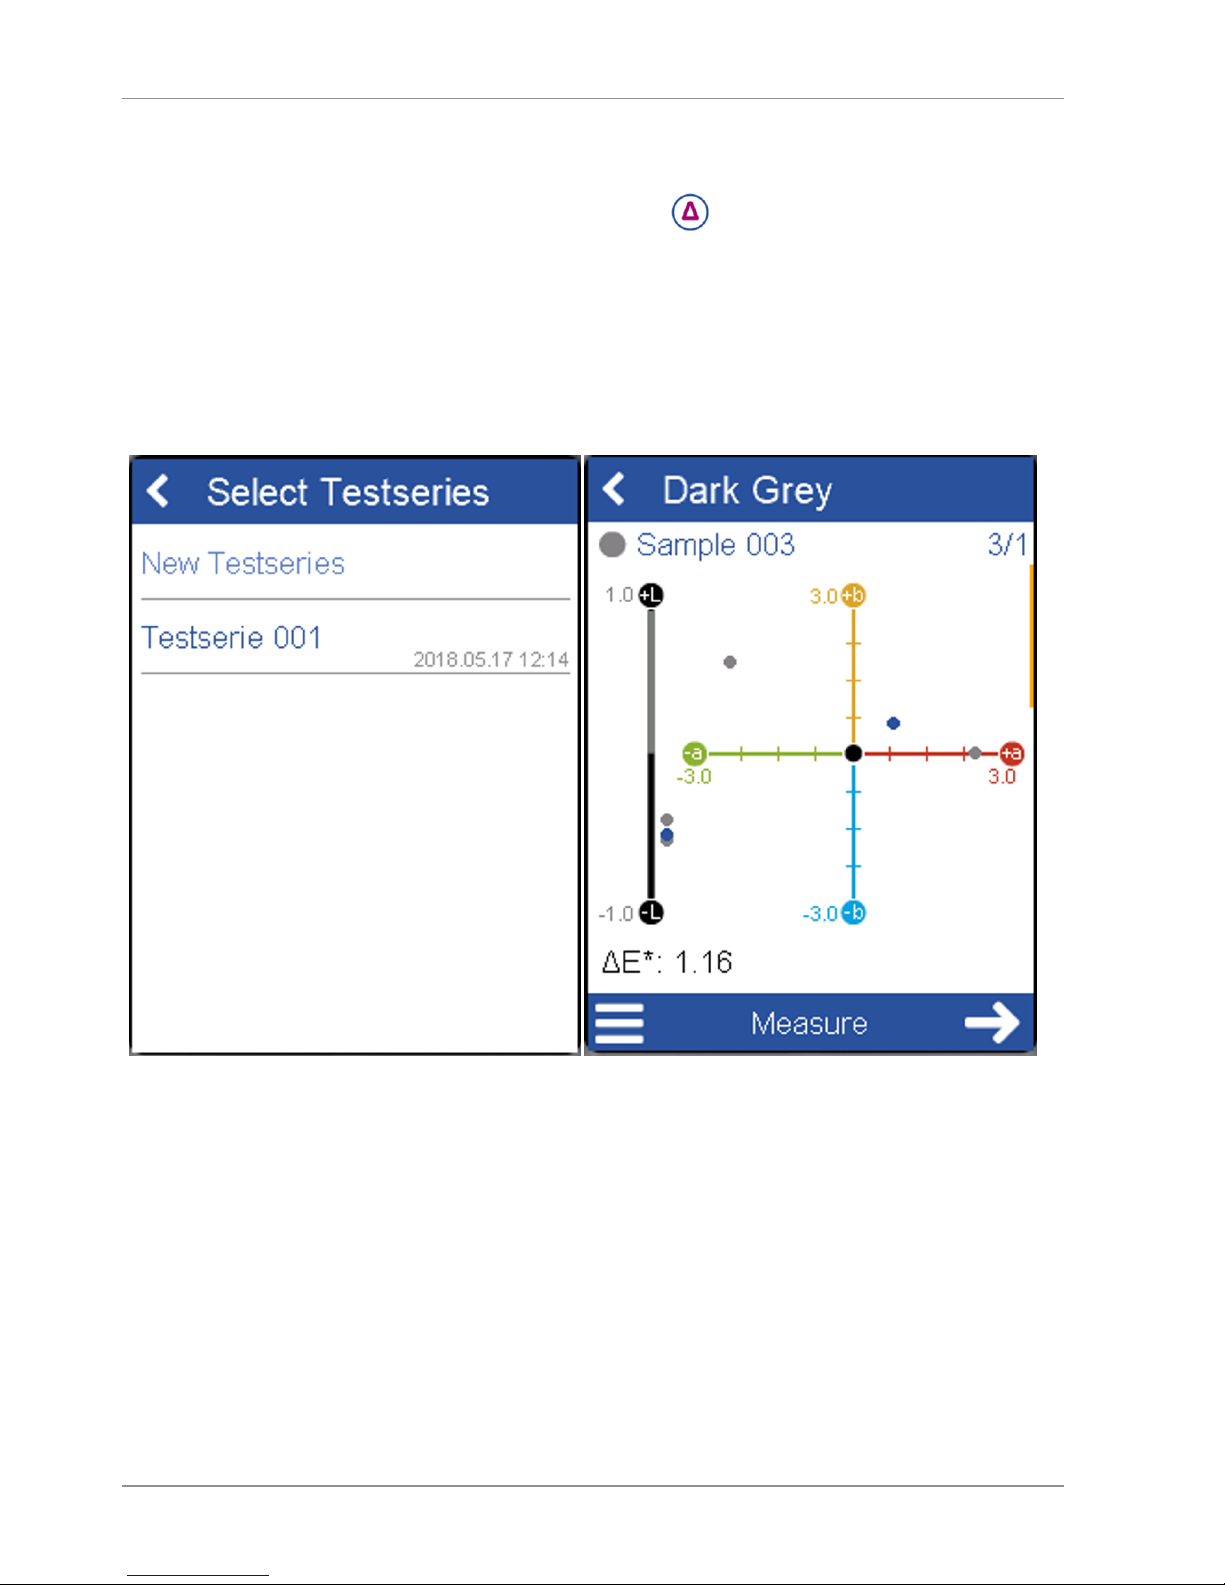
5.2 Perform Difference Measurement
ü At least one standard is existing.
a) Click on icon “Difference“: .
ð A list with standards appears.
b) To continue existing Testserie select it from list or add
new.
c) To add a new Testserie click on "New Testseries".
ð The screen below is displayed.
d) Place instrument on sample.
e) Click on “Measure” or press operate button.
ð Sample is measured and automatically saved. Scroll down
to see data table and statistics.
Page 28
BYK-Gardner GmbH Measure
spectro2guide 27 / 43
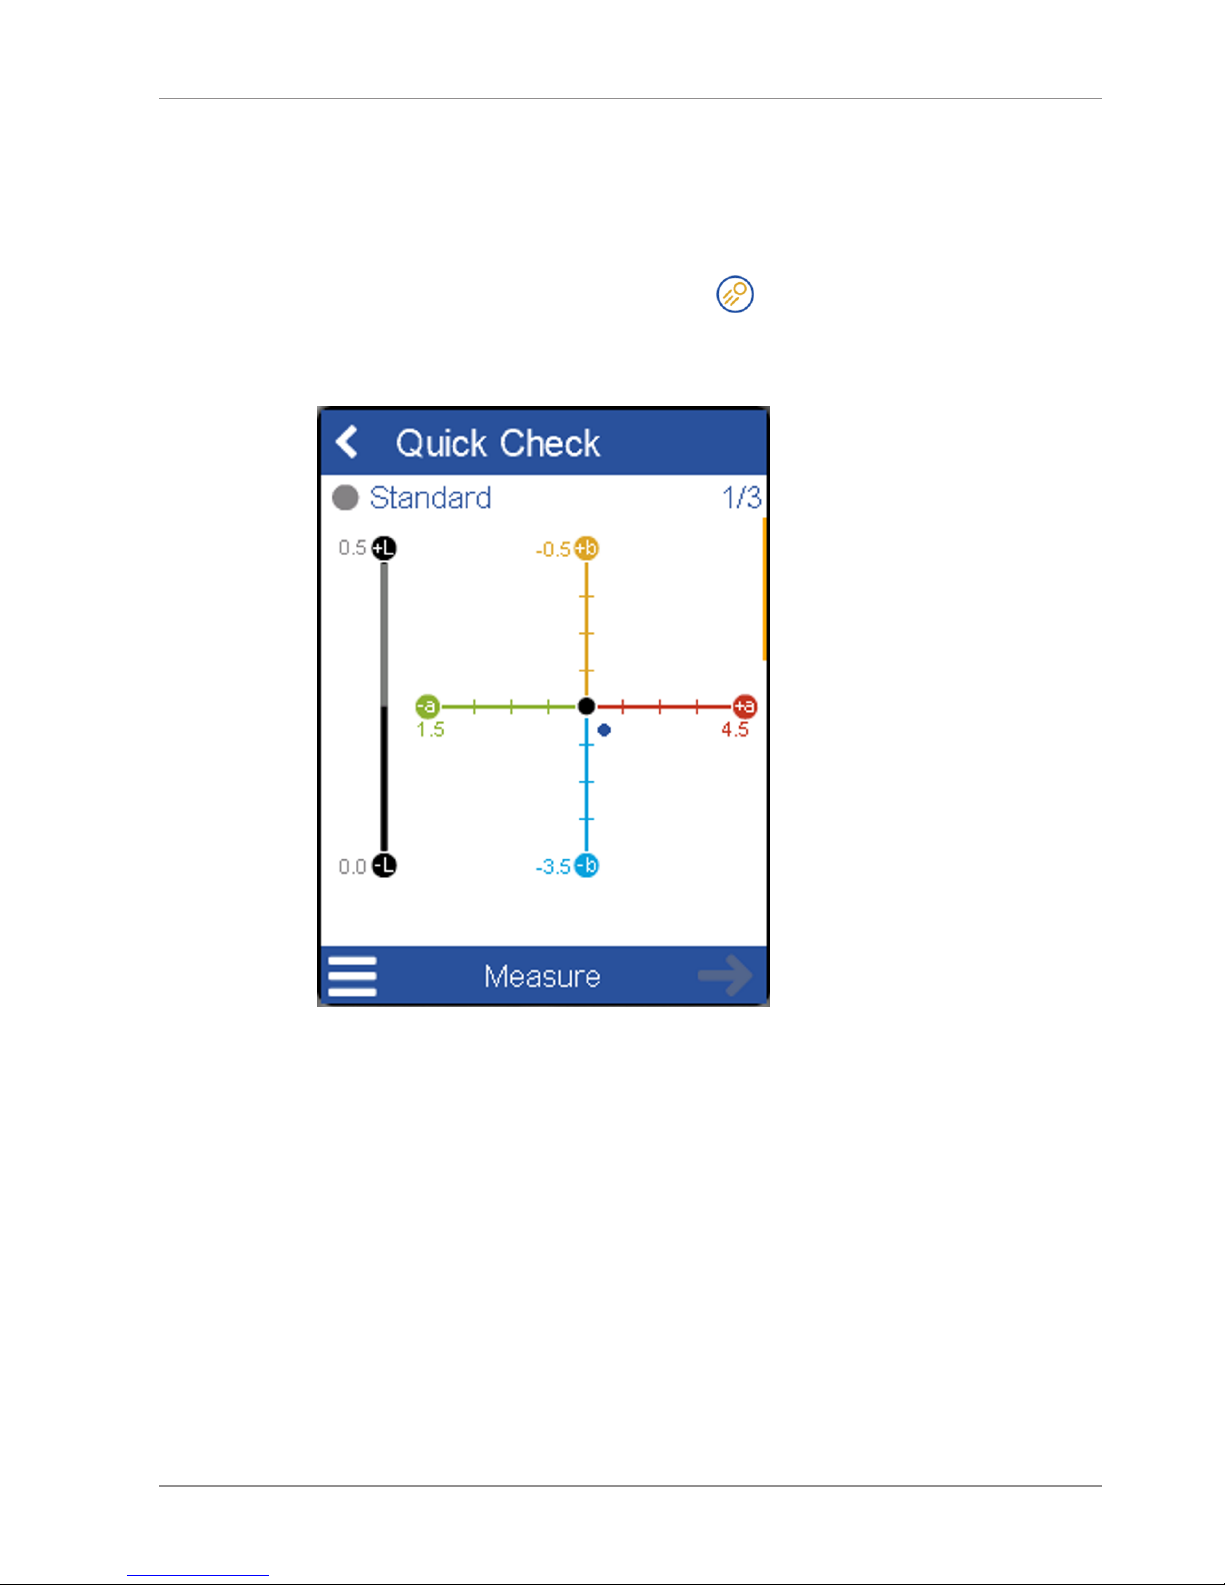
5.3 Perform Quick Check
ü Measurement parameters are set. See: Define Measurement
Parameters [}Page:21]
ü The reference surface is present.
a) Click on icon “Quick Check“: .
ð The screen below is displayed. The instrument is ready
to measure the standard for the quick check.
b) Place instrument on standard.
c) Click on “Measure” or press operate button.
ð Standard is measured.
d) Continue with “Next” and place instrument on sample.
Page 29
Measure BYK-Gardner GmbH
28 / 43 spectro2guide
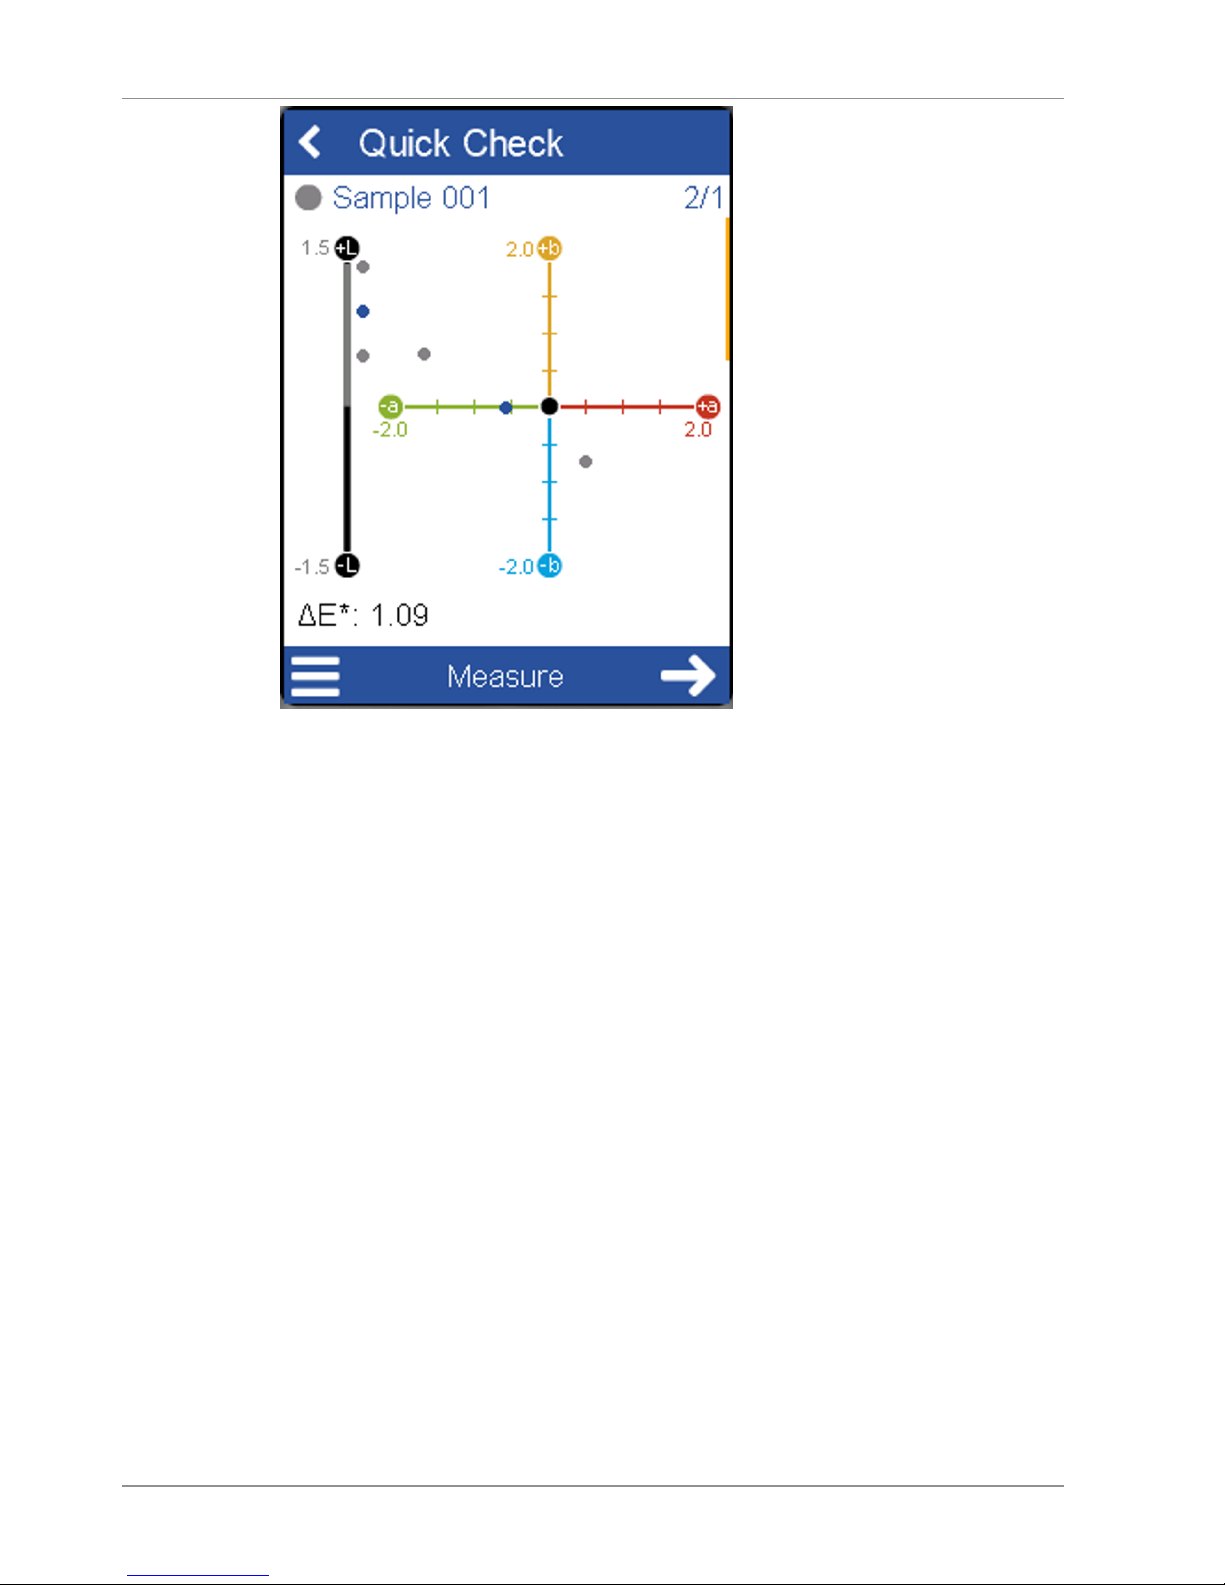
e) Click on Measure” or press operate button.
ð Sample is measured.
ð NOTE: Measurements are not saved!
Page 30
BYK-Gardner GmbH Measure
spectro2guide 29 / 43
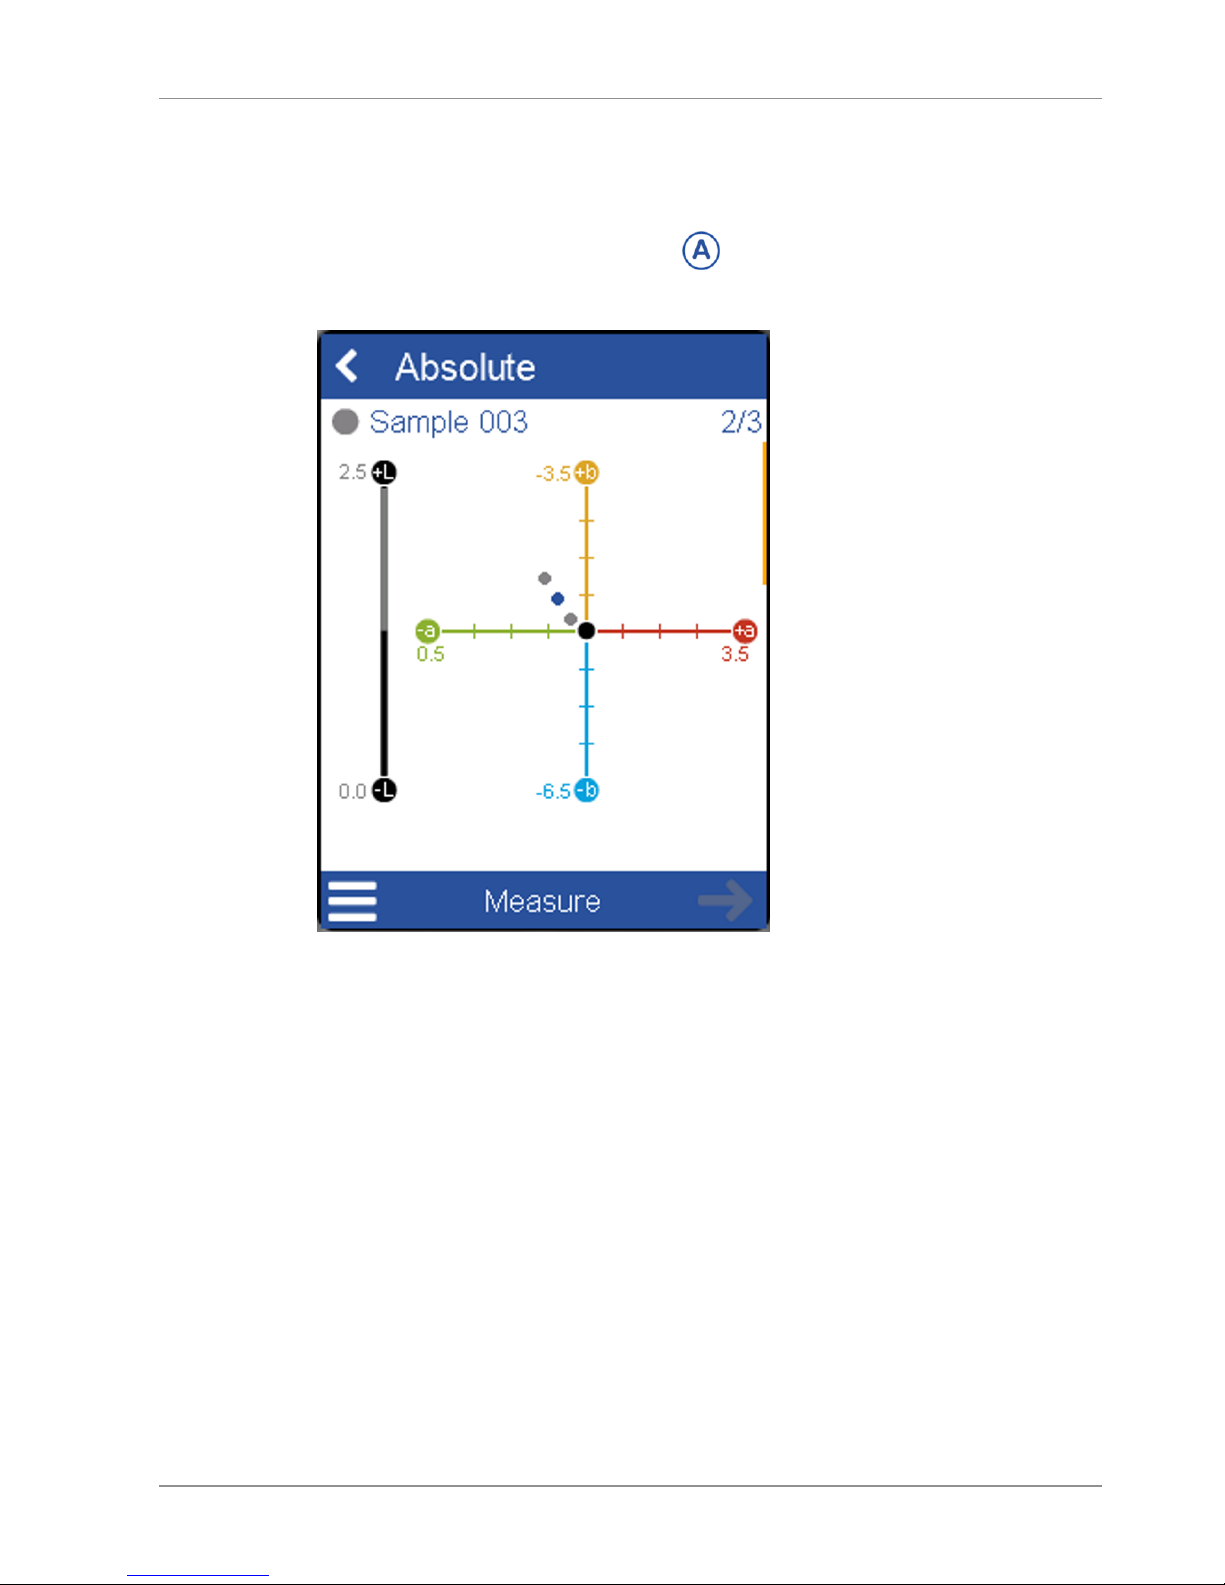
5.4 Perform Absolute Measurement
ü Measurement parameters are set. See: Define Measurement
Parameters [}Page:21]
a) Click on icon “Absolute“: .
ð The screen below is displayed.
b) Place instrument on sample.
c) Click on “Measure” or press operate button.
ð Sample is measured and automatically saved.
Page 31
Measure BYK-Gardner GmbH
30 / 43 spectro2guide
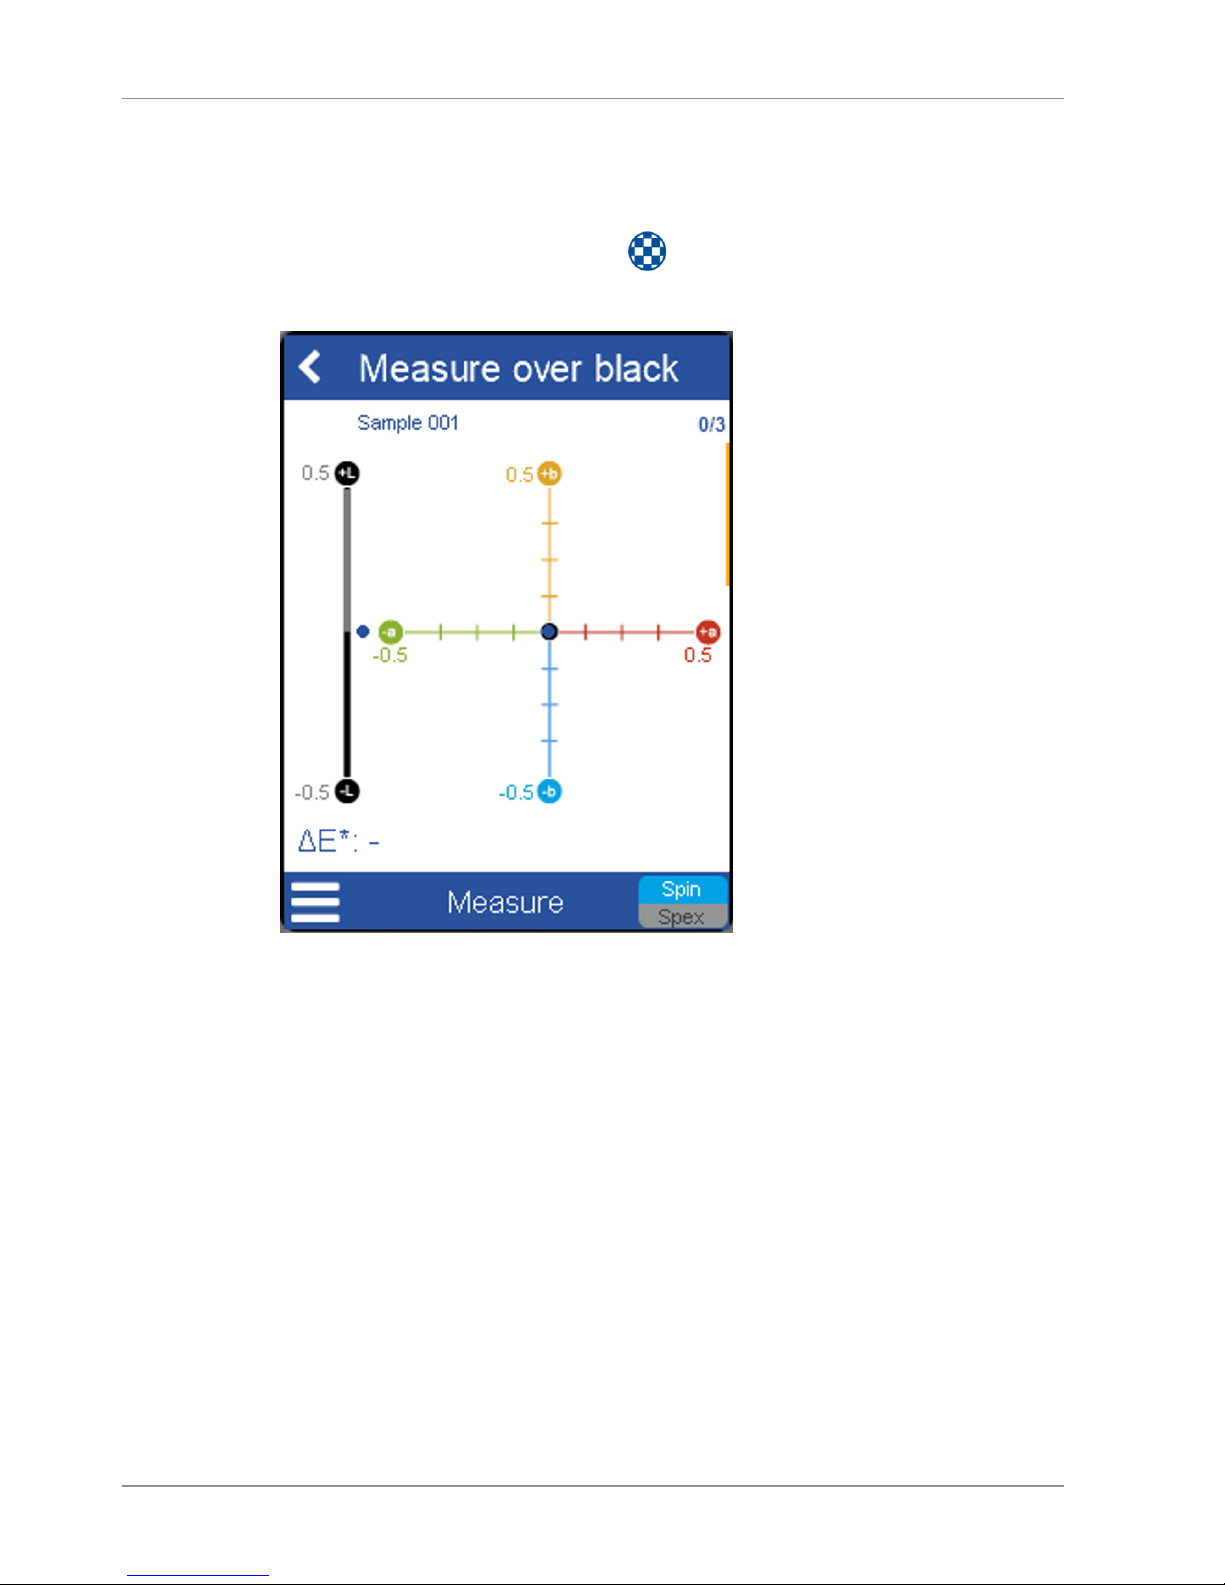
5.5 Perform Opacity Measurement
ü Opacity is set in the color indices. See: Define Measurement
Parameters [}Page:21]
a) Click on icon "Opacity": .
ð The screen below is displayed.
b) Place instrument on the black surface.
c) Click on Measure” or press operate button.
ð Standard is measured and automatically saved..
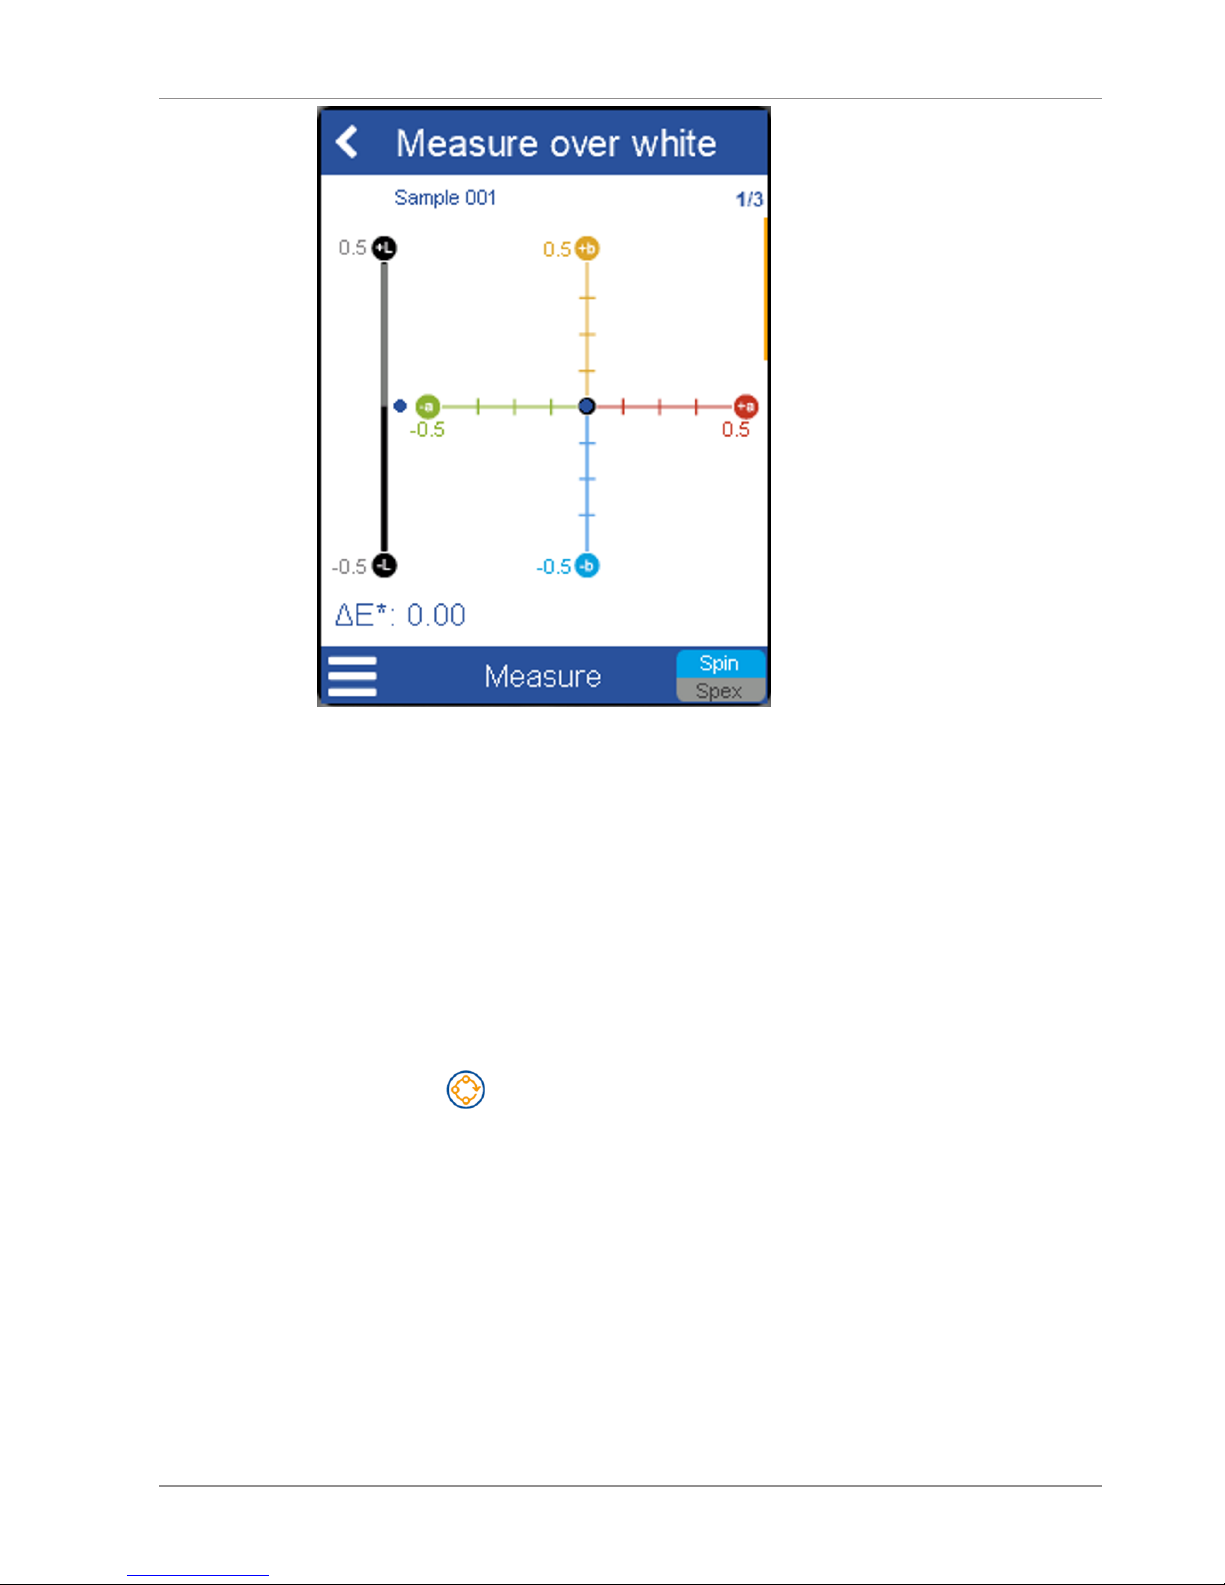
ð The screen below is displayed.
Page 32
BYK-Gardner GmbH Measure
spectro2guide 31 / 43
d) Place instrument on the white surface.
e) Click on Measure” or press operate button.
ð Sample is measured and automatically saved.
5.6 Organizer
Organize the Measurement Process
It is possible to predefine measurement sequences with the
software smart-process – the so called organizer. The orga-
nizer icon appears after downloading a organizer from
smart-process to the instrument.
Page 33
Browse: View and Delete Measurements BYK-Gardner GmbH
32 / 43 spectro2guide
6 Browse: View and Delete
Measurements
Instrument Memory
Measurement values are stored in the instrument memory. The instrument memory is accessible via the browse
icon in the main menu.
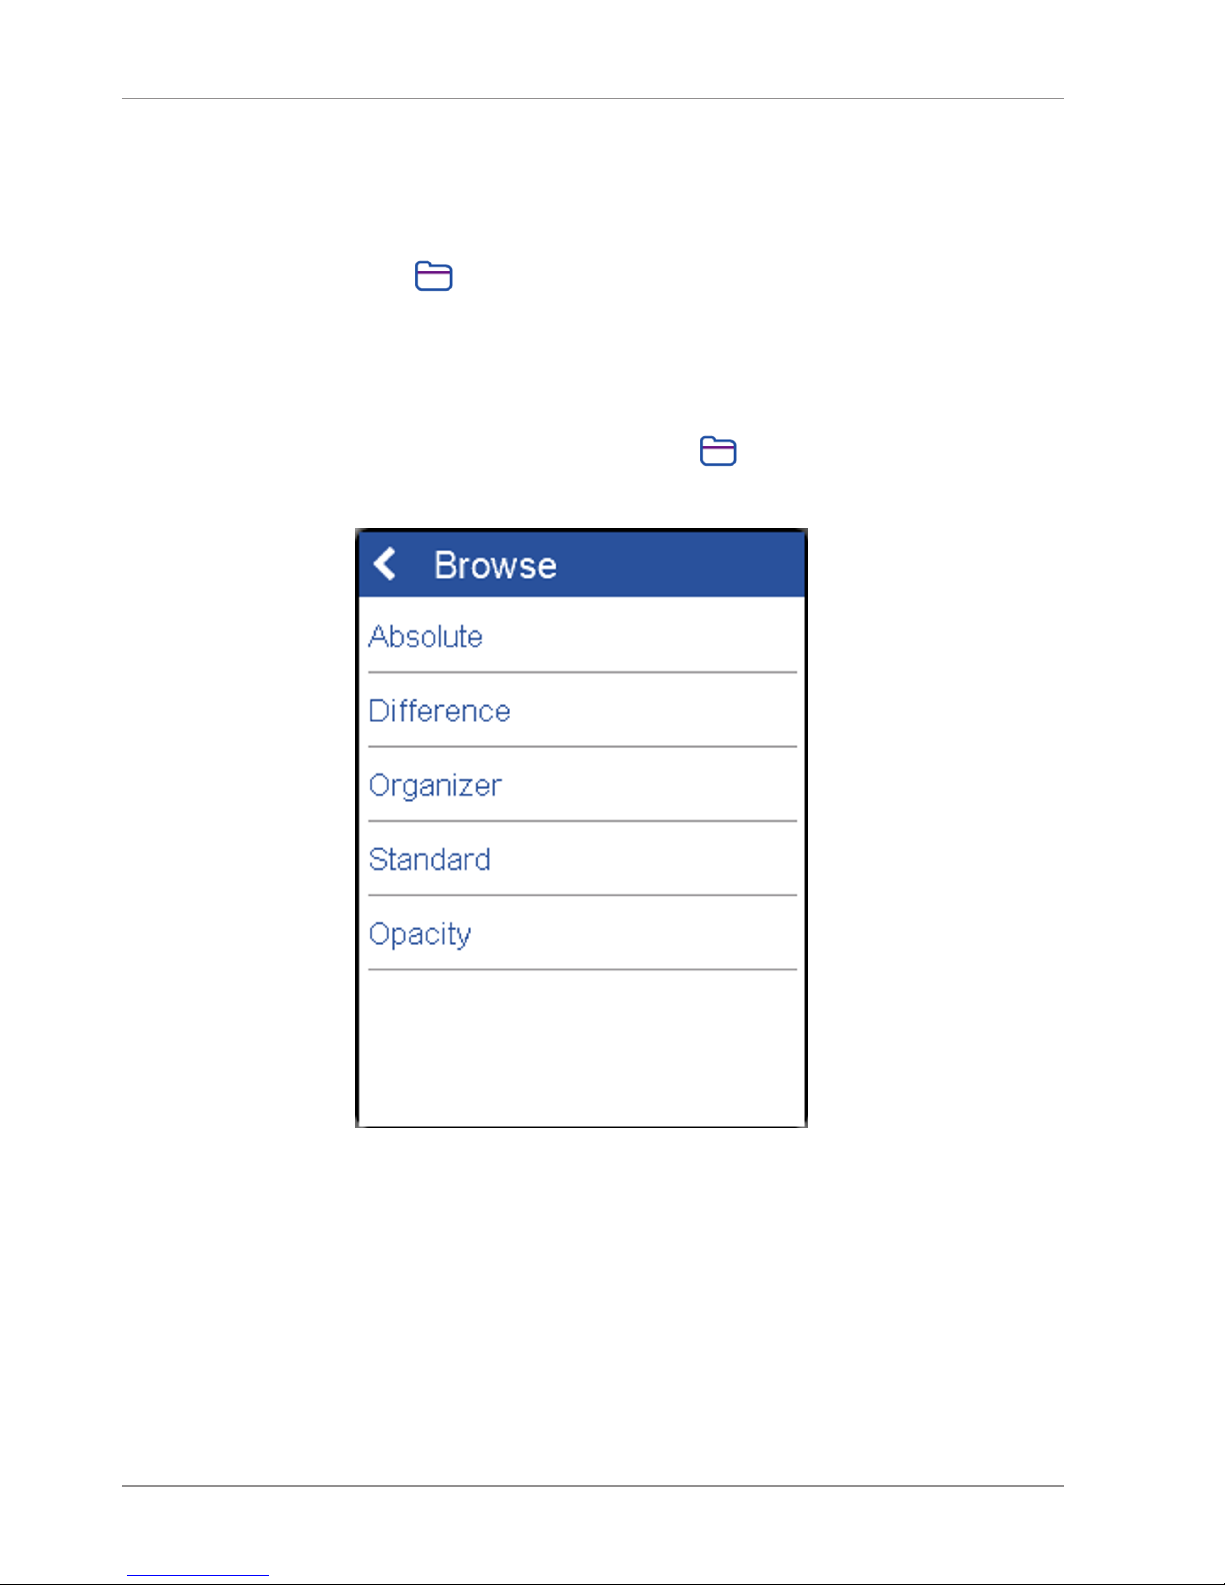
6.1 View Measurement Values
ü At least one measurement is stored.
a) Click on icon "Browse": .
ð A list with all types of measurements appears.
b) Click on the desired measurement type.
ð A list with all dedicated measurement appears.
c) Click on the desired measurement.
ð Measurement values are viewed.
6.2 Delete Measurement Values
Use the smart-chart software in order to delete stored
measurement values.
Page 34
BYK-Gardner GmbH Configuration
spectro2guide 33 / 43
7 Configuration
The configuration menu is accessible via the configuration
icon in the main menu. You can change settings or get instrument information here.
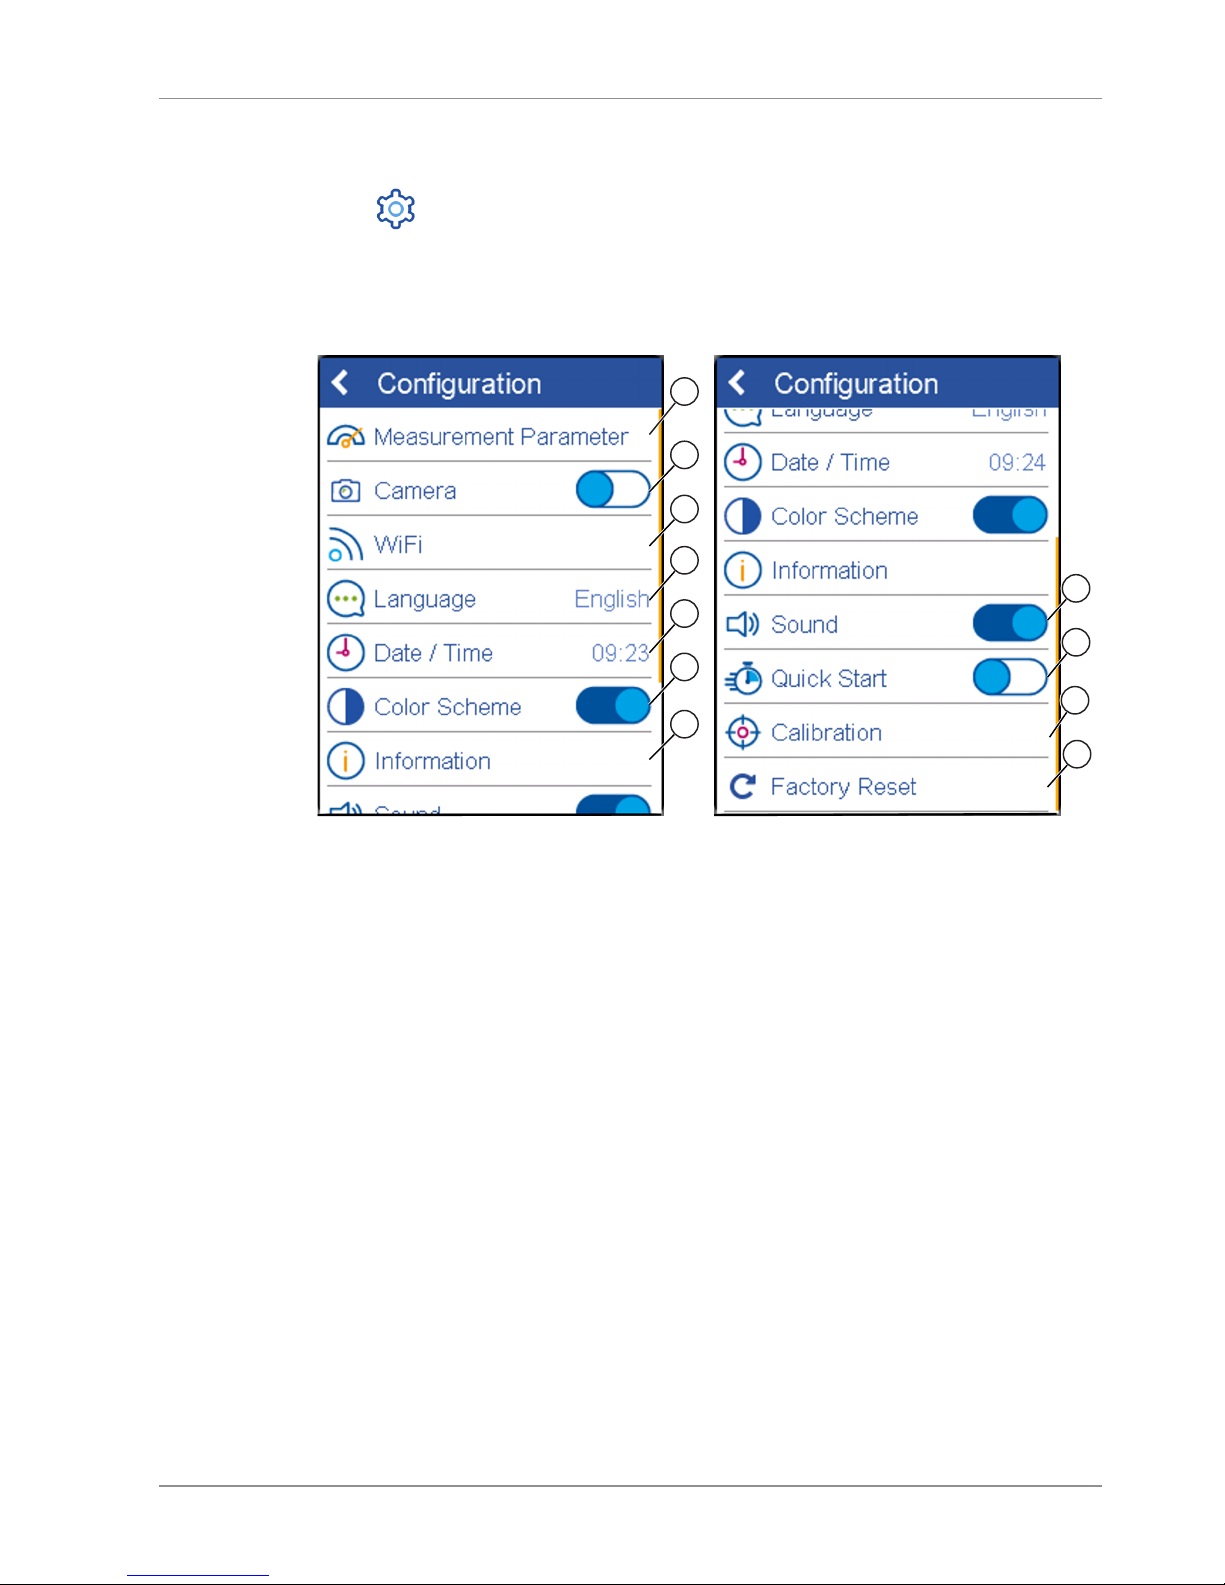
The screens below shows the configuration menu. You can
use the yellow scroll bar in order to browse the list.
1
2
3
4
5
6
7
8
9
10
11
Page 35

Configuration BYK-Gardner GmbH
34 / 43 spectro2guide
1 Measurement Parame-
ters
Set measurement parameters here. Consult Define
Measurement Parameters
[}Page:21] for more in-
formation.
7 Information
Get instrument and network information here.
2 Camera
The instrument is able to
show the surface to be
measured on the display
when the operate button
is pressed the halfway.
You can switch this function on/off here.
8 Sound
Switch instrument sound
on/off here.
3 WiFi
Connect instrument with
a WiFi network. Consult
Connect with WiFi
[}Page:35] for more in-
formation.
9 Quick Start
Switch startup animation
on/off here.
4 Language
Select instrument language here.
10 Calibration
Calibrate instrument
manually. Consult Cali-
brate Manually
[}Page:35] for more in-
formation.
5 Date / Time
Set date and time here.
11 Factory Reset
Reset instrument to factory settings here.
6 Color Scheme
Adjust screen brightness
to day and night conditions here.
Page 36

BYK-Gardner GmbH Configuration
spectro2guide 35 / 43
7.1 Calibrate Manually
The docking station automatically calibrate the instrument. In
some cases you want to calibrate the instrument manually.
ü The white standard is present.
a) Go to Configuration > Calibrate > Calibrate White
Standard.
ð The instrument gives you instructions and automati-
cally guides you through the calibration.
b) Follow the instructions of the instrument.
7.2 Connect with WiFi
ü A WiFi connection needs to be available.
a) Go to Configuration > WiFi.
b) Click on the switch symbol in the upper right corner in or-
der to turn on WiFi.
ð A list with all available WiFi connections appears.
c) Use the yellow scroll bar in order to browse the list. Select
the desired connection by clicking on the arrow behind
the name.
ð The WiFi access key is queried.
d) Enter the WiFi key and click on the checkmark in the up-
per right corner.
e) You can cancel by clicking on the “x” in the upper left cor-
ner.
ð The instrument is connected with WiFi.
Page 37

Troubleshooting BYK-Gardner GmbH
36 / 43 spectro2guide
8 Troubleshooting
Problem/Error message Solution
Error! White calibration in
docking station.
a) Use external white cali-
bration standard and repeat calibration.
ð If white calibration is
okay, please clean white
calibration standard of
docking station.
ð If calibration fails again,
contact service.
Error! Please clean
White Tile or call
customer service.
a) Clean white tile and re-
peat white calibration.
ð If white calibration fails
again, contact service.
Calibration
invalid.
Please perform
calibration.
a) Perform Calibration using
the docking station or the
external white calibration
standard.
Measurement
failed!
Please repeat.
Ambient light
Appears if an error occurs
during measurement.
ü Make sure to completely
cover measurement aperture.
ü Make sure to hold the in-
strument stable during
measurement.
a) Repeat measurement.
Battery empty.
Instrument is
switching off...
a) Charge the instrument us-
ing the docking station.
Battery empty. a) Charge the instrument us-
ing the docking station.
Instrument
temperature
too high!
Instrument temperature is >
45°C
a) Allow the instrument to
cool down.
Page 38

BYK-Gardner GmbH Troubleshooting
spectro2guide 37 / 43
Problem/Error message Solution
Instrument
temperature
too low!
Instrument temperature is <
5°C
a) Allow the instrument to
warm up.
Memory full!
Please delete
stored measurements.
a) Delete stored measure-
ments.
Light protection ring is broken or fell off
a) Contact service.
Error! White Calibration on
external white calibration
standard.
a) Use docking station and
repeat calibration
b) If white calibration is
okay, clean external white
calibration standard.
c) If calibration fails again,
contact service.
Instrument is not charging in
docking station.
ü Make sure power supply
is connected.
ü Make sure instrument is
positioned correctly.
a) If instrument is still not
charging, contact service.
Instrument is not charging via
USB connection.
ü Make sure USB power
supply provides a minimum of 500 mA (1500 mA
recommended).
a) If instrument is still not
charging, use docking station.
Page 39

Troubleshooting BYK-Gardner GmbH
38 / 43 spectro2guide
Problem/Error message Solution
No WiFi connection. ü Make sure WiFi connec-
tion is available.
a) Activate WiFi function.
b)
ü Make sure the instrument
is within the WiFi range.
a) Reduce distance to the
router.
b) Increase range of the
router.
c)
WiFi settings not adjusted
correctly.
a) Re-Enter password.
No connection between instrument and software
ü Make sure instrument is
connected.
a) Connect instrument via
USB or WiFi.
No data transfer to software Instrument within a measure-
ment.
a) Switch to home screen.
Page 40

BYK-Gardner GmbH Technical Data
spectro2guide 39 / 43
9 Technical Data
General
Memory 5000 Standards and samples
Languages English, German, French, Ital-
ian, Spanish, Russian, Japanese, Chinese
Dimensions (LxWxH) 87 x 110 x 188 mm (3.4 x 4.3 x
7.4 in)
Operation altitude up to 2000 m / 6561 ft
Weight 707 g (d/8), 690 g (45/0)
Interface USB-C (device), USB-B (dock-
ing station)
Battery 7.2 V, 2350 mAh, 16.92 Wh
Device Input 12 V, max. 2 A (Docking)
5 V, max. 2 A (USB-C)
Docking station Input 12 V, max. 2 A (Power
supply)
Input 5 V, max. 0.5 A (USB-B)
Output 12 V, max. 2 A
Power supply Input 100-240 V, 50-60 Hz,
max. 1 A
Output 12 V, max. 3 A
Gloss
Aperture Size 5 x 10 mm
Measurement Range 0-10 GU 10-100GU
Repeatability ± 0.1 GU ± 0.2 GU
Reproducibility ± 0.5 GU ± 1.0 GU
Page 41

Technical Data BYK-Gardner GmbH
40 / 43 spectro2guide
Color
Aperture Size 12 mm / 8 mm
Spectral Range Color 400 - 700 nm, 10 nm resolu-
tion
Spectral Range Fluorescence
340 - 760, 10 nm resolution
Repeatability 0.01 DE* (10 consecutive mea-
surements on white)
Reproducibility 0.1 DE* (average on 12 BCRA
II tiles)
Color Systems CIELab/Ch; Lab(h), XYZ, Yxy
Color Differences DE*, DE(h), DEFMC2, DE94,
DECMC, DE99, DE2000
Indices YIE313; YID 1925; WIE 313;
CIE; Berger; Color Strength;
Opacity; Metamerism;
Grayscale; Jetness
Illuminants A; C; D50; D55; D65; D75; F2;
F6; F7; F8; F10; F11; UL30
Observer 2°; 10°
WLAN RF Specifications
Frequency
Range
2400MHz –
2483.5MHz
IEEE Standards
802.11b 802.11g 802.11n
Modulation DSSS/CCK OFDM OFDM
Transfer Rate max. 11Mbps max. 54Mbps max. 65Mbps
Max Output 19.0 dBm 16.5 dBm 15.5 dBm
WLAN Antenna
Max. Gain 2 dBi
Page 42
BYK-Gardner GmbH Service and Maintenance
spectro2guide 41 / 43
10 Service and Maintenance
General Information
NOTICE
Damage by inserting of objects
Inserting any objects into the measurement aperture
could damage the instrument.
a) Do not insert any objects into the measurement
aperture.
NOTICE
Damage by using acetone for cleaning
Instrument housing, white and green standard tile can
be damaged when they get in contact with acetone.
a) Do not use acetone for cleaning.
NOTICE
Damage by the attempt of self-repair
The instrument can be damaged.
Warranty claims expire.
a) Do not attempt to make any repairs yourself.
b) Contact our customer service in case of malfunction.
When the Instrument is not in Use
Align the protective snap closure when the instrument
is not in use. Use the instrument case for storage.
Cleaning the Instrument
Use a soft, moist cloth for cleaning. For cleaning excessive dirt, use propanol.
Page 43

Service and Maintenance BYK-Gardner GmbH
42 / 43 spectro2guide
Cleaning the Standard Tiles
Using dirty or damaged standard tiles can impact the accuracy of measurements significantly. Clean the standard tiles when they are dirty in order to avoid measuring inaccuracy.
NOTICE!Apply only slight pressure as you clean and
make certain there are no large particles stuck in the
cloth that could damage the surface. We highly recommend to handle the standard tiles with great care. Store
them always enclosed.
Use a new lint-free cloth, dust-free lens paper or an optical cloth for cleaning. For dirt that is difficult to remove, use an optical cloth dipped in propanol. Then
wipe the surface with a dry optical cloth.
Calibration and Repair Service
Our Service Offer
BYK-Gardner´s global network of own ISO/IEC 17025 accredited service points is equipped with the full line of
reference measuring standards and tools needed to ensure highest quality service on a global basis:
– Preventive Maintenance for a longer life
– Certification Services for Standards and Physical
Testing Tools
– Repair Service
– On-site Service
Read the BYK-Gardner Global Service Brochure for more
information.
You find the brochure on the BYK-Gardner website:
http://www.byk.com/en/support/instruments/repair-service.html
Preventive Maintenance
To increase the reliability and life time of your instrument, regular inspections and optimizations are recommended. With our Preventive Maintenance solution
your instrument will always be in the best shape. We
clean the optics, check all functions, test and, if required, adjust the measured values by using reference
standards.
Page 44

BYK-Gardner GmbH Service and Maintenance
spectro2guide 43 / 43
Preventive maintenance is recommended every 12 - 24
months depending on usage and should only be performed by BYK-Gardner technical service centers. The
complete list of certified service centers can be found
on: www.byk.com.
Contact Addresses
BYK-Gardner GmbH
Lausitzer Straße 8
82538 Geretsried
Germany
Tel.: 0-800-gardner
(0-800-4273637)
+49-8171-3493-0
Fax: +49-8171-3493-140
BYK-Gardner USA
9104 Guilford Road
Columbia, MD 21046
USA
Phone: 800-343-7721
301-483-6500
Fax: 800-394-8215
301-483-6555
Page 45

295 024 855 E 1805
 Loading...