


1
BYD F6 OWNERS MANUAL

F6 OWNER’S MANUAL
- 2 -
Foreword
Welcome choosing BYD F6. To help you know BYD F6 well and quickly, please read this manual thoroughly.
BYD F6 adopts EFI engine, its wiring harness is very complex, please do not install the device by yourself as: anti-theft system, central control
lock, power window, audio and so on, otherwise the failure caused by it will be not covered by the “Warranty" of BYD.
Should drive the vehicle according to the contents that marked with “security label” or “vehicle damage”to avoid injury or damage.
The denotation and using method as follows: Security label
The illustrations in this manual are only for reference.
BYD AUTO CO., LTD reserves all rights to technical features and contents
in this manual without any restrictions and notice in advance.
Thanks for choosing BYD F6, warmly welcome your valuable suggestions.
Friendly tips
Precautions to avoid vehicle damage or personal injury
Notice
Precautions to be followed to make maintenance easier
This label means “can not do
that” or “can not make i
t
happened

F6 OWNER’S MANUAL
- 3 -
CONTENTS
F6 SPECIFICATION AND BRIEF INTRODUCTION………...1
Specification…………………………………………………………1
Brief introduction………………………………………….…………2
DRIVER AND PASSENGER SAFETY…………………………..4
Important Safety Precautions and Safety equipment……………...…4
Seat Belt and Airbag……………………………...…………………6
Fatalness of carbin monoxide…………..…………………………21
Safety label………………………………………..………………22
INSTRUMENT AND CONTROL DEVICE……………………23
Position of control switchs…………………..……………………25
Instrument Panel Indicators……………………….………………26
Control buttons around steering wheel……………………………33
Lights/signal lamp/rightness of dashboard..………………………34
Windshield wiper/washer/ Rear windshield defogger…………… 37
Steering wheel adjustment…………………………...……………39
Key and lock/key/…………………………………………………40
Ignition switch……………………………….……………………42
Power door lock/ Remote control/ Children safety lock…………43
Trunk/ Glove box/ Seat adjustment/ Power window/ Power sun roof/
rearview mirror……………………………...……………………48
Parking brake/ Front seat armrest…………………………………62
Sunglass box/ Central bill box/ Central storage box/ Accessory
electrical source socket……………………………...……………63
Cup holder/ Coin box/ Sun visor/ Vanity mirror/ Cigarette lighter/
ashtray/ Interior reading light………………………………………64
COMFORT AND CONVENIENCE EQUIPMENT…………..70
Interior air control system…………………………………………70
Audio system………..……………………………………………74
Safety system…………...…………………………………………83
BEFORE DRIVING……………………………………………...87
Running in period…………………………………………………88
Gasoline/Operation in petrol station fuel tank filling………………88
Open engine hood…………………………………… ……... ……90
DRIVING…………………………………………………......….. 98
Driving preparation/ Start engine/ Start in high altitude cold
weather…...………………………………………………………....99
Manual transmission/ Automatic transmission……………..……102
Unlock shift lock /park/brake system/ ABS……..………………104
ABS indicator/ Driving in atrocious weather/ Trailer……...……104

F6 OWNER’S MANUAL
- 4 -
MAINTENANCE………………………………………………112
Periodical maintenance schedule/ Stated maintenance record……113
Owner inspection for maintenance/engine oil/cooling system……119
Windshield washer/ Transmission oil/ Brake fluid and clutch fluid131
Air filter core/ Fuel filter/ Spark plug/ Battery/ Windshield wiper
blade…………………………………………………………......137
Air conditioner/ Dust filter/ Timing belt/tire/lamps………………146
Vehicle storage…………………………………...………………170
APPEARANCE MAINTENANCE………...…………………171
Washing/ Cere care/ Alloy wheel/ Painting repair……………...…172
Interior maintenance……………………………..…………....…174
EMERGENT MALFUNCTION SOLUTION…………….…179
Replace a flat tire…………………………………...………....…180
If engine can’t start/ Can’t start engine or starter running slowly185
Starter running normally/ Pushing car to start engine/ Engine
overheating…..…………………………………………......….. 186
Engine oil pressure indicator/ Battery charging indicator/ Engine
malfunction indicator/ Brake system indicator……………..……190
Close power sun roof/fuse/ Replacing the burned fuse…………194
Emergent towing…………………………………………………203
TECHNICAL DATA……………………………………...……205
Identification no.…………………………………………………206
Specification…………………………………………………..…208

F6 OWNER’S MANUAL
- 2 -
F6 specification
Product type
Q
CJ7200E series
Q
CJ7240E series
Length(㎜)
4846
Width(㎜)
1822
Dimensions
Hei
ght(㎜)
1465
Wheelbase (㎜)
2740
Front (㎜)
1551
Track
Rea
r (㎜)
1551
Curb weight (㎏)
1435 1480
Total weight (㎏)
1810 1855
Tire type
205/65 R15 ,205/60 R16
Approach angle (°) 14°5
Departure angle (°) 16°
Front Suspension (㎜
)
1016
Rear suspension (㎜)
1090
Basic type 5
Top speed (km/h) 185 200
Engine BYD483QB 4G69S4M
Brand L4/16 Valve MPI DOHC L4/16 Valve MPI SOHC
Displacement (ml) 1.991 2.378
Rated Power (kW)
103 118
Gradeability (﹪)
35
﹡Min.fuel consumption (L/100k
m
)
6.9 7.6
* The actual fuel consumption will depend on the vehicle condition, road condition, driving habit and so on.

F6 OWNER’S MANUAL
- 3 -
Brief introduction

F6 OWNER’S MANUAL
- 4 -
Control panel
*If you want to use the horn, just press the panel around the “BYD” logo.

F6 OWNER’S MANUAL
5
Driver and Passenger Safety
Important Safety Precautions
You’ll find many safety recommendations
throughout this section, and throughout this
manual. The recommendations on this page
are the ones we consider to be the most
important.
Always Wear Your Seat Belt
A seat belt is your best protection in all
types of collisions. Airbags are designed to
supplement seat belts, but they are designed
to inflate when the vehicle activate in
response to a severe frontal impact or other
special impact. So even though your vehicle
is equipped with airbags, make sure you and
your passengers always wear your seat belts,
and wear them properly.
Restrain All Children
Children should be properly restrained in a
back seat not in front seat. That is the best
safety. Infants and small children should be
restrained in a child booster when they can
not wear seat belt.
Be A ware of Airbag Hazards
While airbags can save lives, they can cause
serious or fatal injuries to occupants who sit
too close to them, or are not properly
restrained. Infants, young children, and
short adults are at the greatest risk. Be sure
to follow all instructions and warnings in
this manual. (refer to 7th page)
Don’t Drink and Drive
Alcohol and driving don’t mix. Even one
drink can reduce your ability to respond to
changing conditions, and your reaction gets
worse with every additional drink. So don’t
drink and drive, and don’t let your friends
drink and drive, either.
Control Your Speed
Excessive speed is a major factor in crash
injuries and deaths. Generally, the higher
the speed, the greater the risk, but serious
injuries can also occur at lower speeds.
Never drive faster than is safe for current
conditions, regardless of the maximum
speed posted.
Keep Your Vehicle in Safe
Condition
Having a tire blowout or a mechanical
failure can be extremely hazardous. To
reduce the possibility of such problems,
check your tire pressures and condition
frequently, and perform all regularly
scheduled maintenance (refer to 114
th
page)

F6 OWNER’S MANUAL
6
Safety equipment
Your vehicle is equipped with many features
that work together to protect you and your
passengers during a crash.
Some features do not require any action on
your parts. These include a strong steel
framework that forms a safety cage around
the passenger compartment, front and rear
crush zones will absorb the impact energy
with crumpled in a crash, a collapsible
steering column, and tensioners that tighten
the front seat belts in a crash.
However, you and your passengers can’t
take full advantage of these features unless
you remain sitting in a proper position and
always wear seat belts. In fact, some safety
features can contribute to injuries if they are
not used properly.
The following pages explain how you can
take an active role in protecting yourself
and your passengers。
F6 OWNER’S MANUAL
7
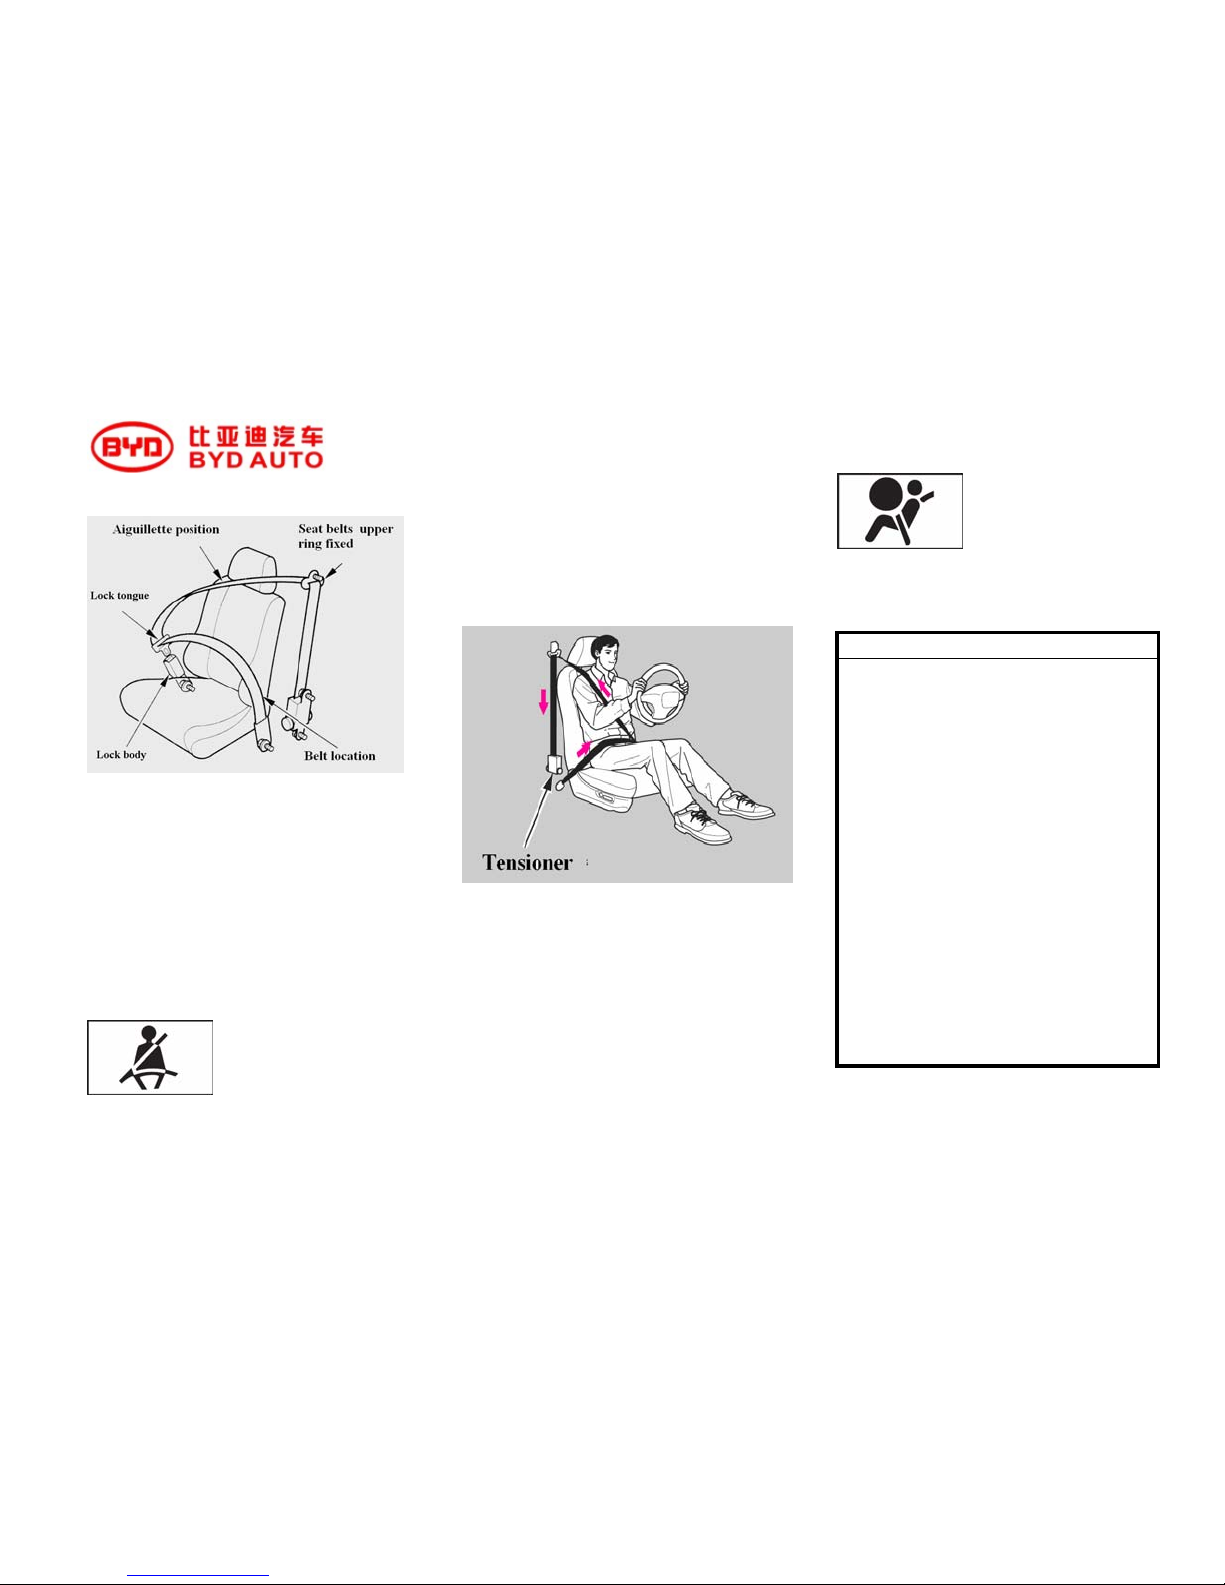
Three-point safety belt
Such type seat belt use a single belt across
your shoulders, chest and hip.
To fasten your belt, pull it out of the
retractor and insert the tab into the buckle.
After inserting the tab, then tug on the belt
to make sure the tab and the buckle are
locked.
To release the belt, press the red
buckle-release button and allow the belt to
retract.
To release the belt, press
the red buckle-release button and allow the
belt to retract. Your seat belt system also
includes an indicator on the instrument
panel and a buzzer to remind you and your
passengers to fasten your seat belts.
Safety belt tensioner(optional)
Automatic tensioner is mainly designed to
affect and activate in any collision severe
enough to cause the front airbags to deploy.
When the airbag system is active during a
crash, the automatic tensioner also can
provide help.
When the automatic tensioners are activated,
seat belts will maintain tight state until they
are unlocked by using normal manner.
The SRS light will be lit
up to alerts you to a potential problem with
your seat belt tensioner. (refer to 20th page).
Friendly tips
1 Seat belts are designed to support the
body's bones. So wear the seat belts
across the front of the pelvisl as low as
possible, that is to say, the belts should
across the pelvis, chest and shoulder.
Which means should avoid part of belt
acrossing the abdomen.
2 Wearing seat belts should be taut with
the principle of comfort, so that the
design can achieve the protective effect.
Relaxation seat belts will greatly reduce
the protection function.
3 Not wear twisted seat belts.
4 Each seat belt can only be used by
one person. Seat belts bypass in the
arms of children is extremely
dangerous.

F6 OWNER’S MANUAL
8
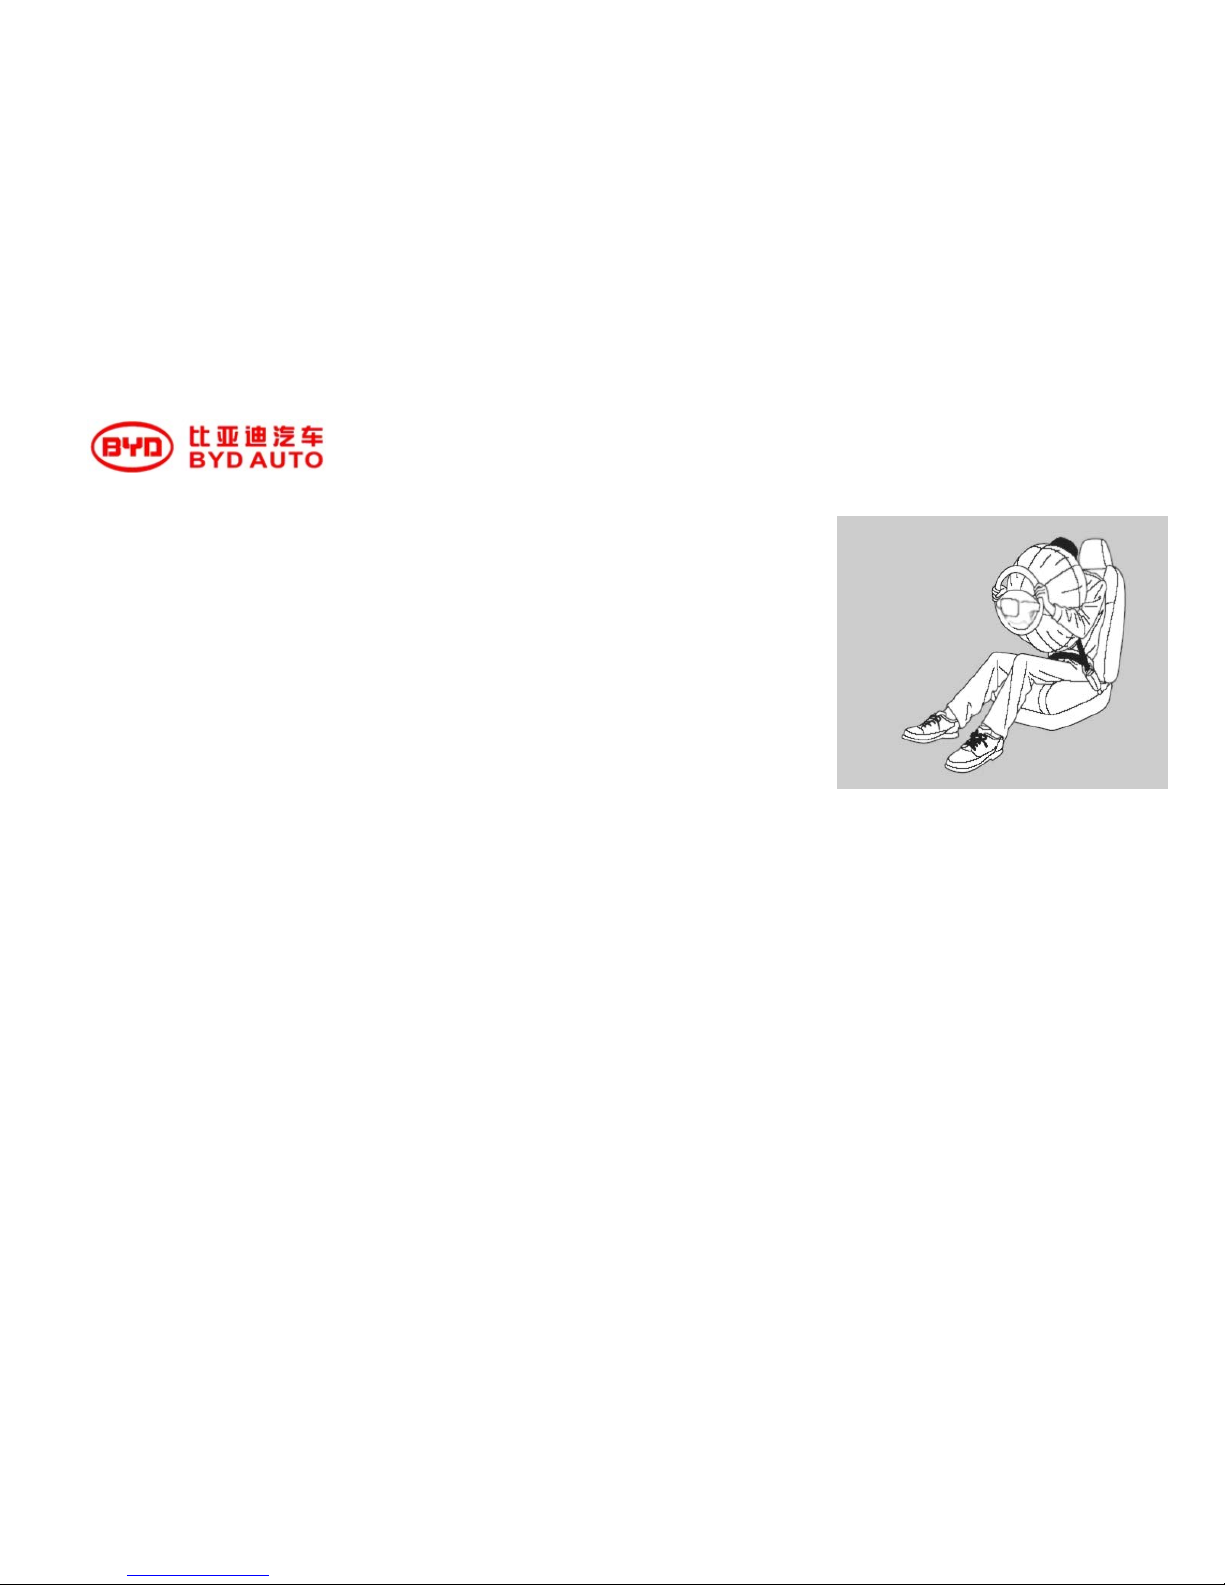
Airbag
Your vehicle has a supplemental restraint
system (SRS) with front airbags to help
protect the heads and chests of the driver
and a front seat passenger during a
moderate severe frontal collision
Side airbag (optional)
Your vehicle has side airbags to help protect
the upper torso of the driver or a front seat
passenger during a moderate severe side
impact.
Friendly tips
1.Airbags do not replace seat belts.
They are designed to supplement the
seat belts.
2.Airbags offer no protection in rear
impacts, or minor frontal or side
collisions.
3.Airbags can pose hazards.
To do their job, airbags must inflate
with tremendous force. So while
airbags help save lives, they can cause
minor injuries or more serious or even
fatal injuries if occupants are not
properly restrained or sitting properly.
What you should do: Always wear your
seat belt properly, and sit upright and as
far away from the steering wheel as
possible while allowing full control of
the vehicle. A front passenger should
move their seat as far away from the
dashboard as possible.

F6 OWNER’S MANUAL
9
Seat and seat back
This vehicle seat’s design allows you to
maintain a comfortable, straighten sitting,
and are able to farthest obtain the protection
provided by the energy absorption material
of seat belts and seats.
How to adjust your seat and seat back could
also affect your safety. For example, near
the steering wheel or dashboard too closed
will increase the possibility that you or
passengers are injured by the in floatable
airbag or goods inside.
If the seat backrest is too tilted, which will
reduce the protective effect of the seat belts.
That will increase the possibility of serious
injury as felling out from wearing seat belts.
What you should do: Try to motion front
belt backward, and maintain the adjustable
seatback always vertical state driving.
Headrest
Headrest can be prevented neck sprains and
other injuries. In order to get the best
protective effect, adjust your head restraint
to make your occiput rest against the center
of the headrest.

F6 OWNER’S MANUAL
10
Table of safety inspection before
driving
To ensure that you and your passenger can
be protected maximum by the security
facilities protection of vehicles, please
check the following matter each time before
driving:
1.Be sure all adults and children with no
suitable protection device always wear seat
belts and wear them properly.(refer to 6
th
page)
2.All infants should be placed in properly
the child protection unit in the back seat.
(refer to 10th page)
3.A front passenger should sit upright and
as far away from the steering wheel and
dashboard as possible.
4.Seat back should remain upright.
5.Adjust headrest correctly.
6.After everyone has entered the vehicle,
be sure the doors are closed and locked.
Your vehicle has a door and
trunk open monitor on the instrument panel
to indicate when a specific door or the trunk
is not tightly closed.
7.All baggage must be properly stored and
fixed good.
Other parts of this chapter will be more
detail on how to ensure your safety
maximum.
Remember, however, that no safety system
can prevent all injuries or deaths that can
occur in a severe crash, even when seat
belts are properly worn and the airbags
deploy.

F6 OWNER’S MANUAL
11
Advice to pregnant woman
1.The best way to protect your unborn child
is protect yourself well. So when driving or
riding in a vehicle is to always wear a seat
belt, and keep the lap part of the belt as low
as possible across the hips.
2.When driving, remember to sit upright
and adjust the seat as far away from the
steering wheel and dashboard as possible
while allowing full control of the vehicle.
This will reduce the risk of injuries to both
you and your unborn child hat can be
caused by a crash or an inflating front
airbag.
Friendly tips
Each time you have a checkup, ask our
doctor if it’s okay for you to drive.
Advice to genearch
1.Never hold an infant or child on your lap.
If you are not wearing a seat belt in a crash,
you could be thrown forward and crush the
child against the dashboard.
2.Never put a seat belt over yourself and a
child. During a crash, the belt could press
deep into the child and cause serious or fatal
injuries.
Friendly tips
1.Never let two people use the same seat
belt. If do that, they could be very seriously
injured in a crash.
2.Do not add any other accessory to the
seat belt.
3.Do not place the hard or sharp objects
between you and positive airbag.
4.Do not attach or place articles in the
cover of airbag.
5.In some cars equipped with side air bags,
not in the side door or door attachment hard
object
6.Do not make hand or arm near the cover
of airbag.
7.Use childproof door locks to prevent
children from opening the doors. This can
prevent children from accidentally falling
out.
8 . Please use the main switch power
windows, prevent children from playing

F6 OWNER’S MANUAL
12
with power windows, or else they might be
dangerous when their body are out of the
car window.
9.Do not leave children alone in a vehicle.
A child left alone with the key in the
ignition switch can accidentally set the
vehicle in motion, possibly injuring
themselves or others.
Extreme danger!
Under the section 94 of ECE regulations:
Do not place a rear-facing child seat in the
front seat with airbag.
Side air bag inflating resulting in serious
injuries or even death if body physical tilt
forward on the front door.
To remind you of dangerous side airbags,
your vehicle is posted with warning signs
on both sides of the front door frames.
F6 OWNER’S MANUAL
13
Supplementary data for airbag
Your (SRS) includes:
1.Two SRS (supplemental restraint system)
front airbags. The driver’s airbag is stored in
the center of the steering wheel; the front
passenger’s airbag is stored in the
dashboard. Both are marked ‘‘SRS
AIRBAG’’
2.Two side curtain airbags, one for each
side of the vehicle. The airbags are stored in
the ceiling, above the side windows. The
front and rear pillars are marked ‘‘SRS
SIDE AIRBAG’’ (refer to 52
th
page)
3.Automatic front seat belt tensioner, can
tension the seat belt with a moderate to
severe frontal impact. (refer to 6
th
page)
4.Sensors that can detect a moderate to
severe frontal impact.
5.A sophisticated electronic system that
continually monitors and records
information about the sensors, the control
unit, the airbag activators, the seat belt
tensioners, and driver and front passenger
seat belt use when the ignition switch is in
the ON (II) position.
6.An indicator on the instrument panel that
alerts you to a possible problem with your
airbags, sensors, or seat belt tensioners and
so on. (refer to 26
th
page)
7.Emergency backup power in case your
vehicle’s electrical system is disconnected
in a crash.
How does front airbag works
If you ever have a moderate to severe
frontal collision, sensors will detect the
vehicle’s rapid deceleration. If the rate of
deceleration is high enough, the control unit
will instantly inflate the driver’s and front
passenger’s airbags, at the same time
activate automatic seat belts tensioner.

F6 OWNER’S MANUAL
14
During a frontal crash, your seat belt
restrains your lower body and trunk, and the
front airbag helps protect your head and
chest. The belt pretensions will tighten and
lock seat belts to maintain your in-situ
fixed.
Although both airbags normally inflate
within a split second of each other, it is
possible for only one airbag to deploy.
This can happen if the severity of a collision
is at the margin, or threshold, that
determines whether or not the airbags will
deploy. In such cases, the seat belt will
provide sufficient protection, and the
supplemental protection offered by the
airbag would be minimal.
After inflating, the front airbags will
immediately deflate, so they won’t interfere
with the driver’s visibility, or the ability to
steer or operate other controls.
The total time for inflation and deflation is
one-tenth of a second, so fast that most
occupants are not aware that the airbags
deployed until they see them lying in their
laps.
The loudly noise will with the airbag
deploying, generally it not cause the hurt
(but eliminate the possible of a drumming in
the ears or temporary lost audition, it will be
as soon as well).After a crash, you may see
what looks like smoke. This is actually
powder from the airbag’s surface. Although
the powder is not harmful, people with
respiratory problems may experience some
temporary discomfort. If this occurs, get out
of the vehicle as soon as it is safe.

F6 OWNER’S MANUAL
15
How does side airbag works
(optional)
There are two side airbags for passengers
and you. The airbags are stored in the front
seat side near to windows where are
marked "SRS SIDE AIRBAG”.
If you ever have a moderate to severe side
impact, sensors will detect rapid
deceleration and signal the control unit to
instantly inflate either the driver’s or the
passenger’s side airbag.
Only one airbag will deploy during a side
impact. If the impact is on the passenger’s
side, the passenger’s side airbag will deploy
even if there is no passenger.
To get the best protection from the side
airbags, front seat occupants should wear
their seat belts and sit upright and well back
in their seats.
Friendly tips
Using the airbags what are not the BYD
airbags may causes the decrease for the
airbag capability or accidental hurt for
the passengers.
Never place the anything between the
side airbag and the passengers.
Do not stress over force on the seat side
that are equipped with side airbags.

F6 OWNER’S MANUAL
16
The possible causes for nodeploy airbags
If the circs occurred as the above illustration,
the airbags may do not deploy.

F6 OWNER’S MANUAL
17
The possible causes for airbag
deploying
The airbags may deploy if the vehicles
during the severe impact from the bottom as
the above illustration.

F6 OWNER’S MANUAL
18
Friendly tips
1. Airbag is designed to match the
certain vehicle model, the tire size,
bumpers, chassis and the like original
equipment with any change may infect
the function of the airbags. In addition,
prohibit taking any airbag parts to other
vehicle model, otherwise it might lead
to safety airbag system failure, resulting
in personal injury.
2. When the vehicle dashboard
occur abnormal information or can not
display the relevant information
normally (for example, abnormal speed,
seat belt wearing information, etc.),
timely get maintenance from service
stations, otherwise it will lead to system
failures or abnormal work.
3. During driving, please wear the
seat belt right and maintain a good
sitting. If you do not wear seat belts or
sitting is not correct, then the deploy
airbag in the accident will aggravate the
risk of injury.
4. Maintain the distance between
chest and the steering wheel at least 25
cm for the driver is very important, so
as to trigger the system make the driver
get the most effective protection.
5. Don’t attach, cover or decorate
any objects on the steering wheel
surface and the front seat air bag
covers. Clean these two places with dry
or moist duster cloth. Strong knock at
these two places is not acceptable.
6. Don’t let child passenger sit in the
front seat without protection. If a
collision triggers the air bag, the child
passenger may get seriously injured or
even killed.
7. Don’t stay or put any animals or
objects near the driver, the front seat
passenger and the air bags. It is
extremely dangerous for an adult to
hold a child on the laps.
8. Don’t install phone holder, cup,
ash tray or any other attachments to the
air bag cover or function area.
Otherwise, accidents triggering air bags
will increase the possibility of human
injuries.
9. Don’t make any modifications to
all components of the air bag system,
including corresponding labels.
10. Any modifications for the air
bags, including the repair other parts
(such as removal of the steering wheel)
can only be made in the BYD dealers or
franchised maintenance stores.
11. The air bag system must be
replaced in the BYD dealers and
franchised maintenance stores within 10
years since the manufacture date (the
date in the vehicle license and vehicle
label in the engine). Please keep a
record if the system is replaced before
the date.
12. . The air bag can only provide
one-time protecting function. Once the
air bag is triggered or damaged, the
system must be replaced.
13. . Please hand our materials to the
next owner of the vehicle. Please notice
that if the air bag is shut down, hand
this information to the next owner as
well.

F6 OWNER’S MANUAL
19
14. When disposing the components
of the vehicle or the air bag system,
please comply with correlative safety
regulations and disposal procedure. The
disposal must be conducted by the BYD
dealers or related resources
departments.
15. The air bag system has relatively
strong anti-interference ability against
the surrounding electromagnetic
interruption. However, in case of
accidents, please don’t operate the
vehicle under the electromagnetic
environment that is not permitted by the
government.
16. BYD F6 takes full consideration
of various kinds of misuses and road
conditions. However, don’t allow
serious crashes happen in the bottom of
the vehicle or drive toughly in poor
road conditions in order to prevent
accidents.
Shut Down Air Bags
In some occasions, shut down air bags
for the driver and the front passenger in
accord with regulations. These occasions
include:
1. When it is impossible to keep 25cm
distance between the center of the steering
wheel and the chest of the driver even
though the driver seat is adjusted properly
2. When special equipment needs to be
installed for the disabled within the air bag
function area.
3. When the front seats cannot maintain the
manufacturer’s setting location after
adjustments due to some reasons
The air bag system shutdown has to be
conducted by the BYD dealers or franchised
service stores. After the shutdown, BYD
dealers or franchised maintenance stores
must label the specific places and keep
records.
Friendly tips
If the air bag system needs shutdown
in some special occasions, please go to
the BYD dealers or franchised service
stores. Otherwise, the serious injuries or
death may be incurred.
In addition, please reopen the
shutdown airbag as soon as possible in
order to ensure the air bag recover its
protecting function.
Supplemental Information
1. Please read this manual thoroughly. If
you want to sell or demolish the vehicle,
please notify the owner or demolish
departments that the car is equipped with
the air bag system, and recommend them to
read the manual in details.
2. After the air bag inflation, please don’t
touch any components of the air bag system
(or scalds or poisoning may be caused), and
let the BYD dealers or franchised
maintenance stores handle the remains.
Once the air bag system functioned, please
install a new air bag system.
3. The front (side) air bags only function in
case of frontal (side) collisions in certain
degree. It doesn’t mean that the air bag
system has problems when it doesn’t
respond to the collision. The damages or
unusual maintenances can influence the
normal function of the system.

F6 OWNER’S MANUAL
20
How does SRS indicator works
The SRS indicator alerts
you to a potential
problem with your
airbags or seat belt
tensioners.
Equipped with side airbags in the vehicle,
this indicator is also used to remind your
driver with side air bags potentially
dangerous (refer to 28th page)
When you turn the ignition switch to the
ON (II) position, this indicator is on for 5
seconds and then extinguish. This tells you
the system is working properly.
If the indicator is on at any other time, or
does not come on at all, you should have the
system checked by the BYD AUTO dealer.
For example:
1.If the SRS indicator isn’t on after you
turn the ignition switch to the ON (II)
position.
2.If the indicator stays on after the engine
starts.
3.If the indicator is on or flashes while you
drive.
If you see any of these indications, the
airbags and seat belt tensioners may not
work properly when you need them. Then
you should recourse the BYD AUTO dealer
as soon as possible.
Friendly tips
Ignoring the SRS indicator can result in
serious injury or death if the airbag
systems or tensioners do not work
properly.
Have your vehicle checked by a BYD
AUTO dealer as soon as possible if the
SRS indicator alerts you to a possible
problem.

F6 OWNER’S MANUAL
21
Airbag maintenance
Your airbag systems included front airbag
and side airbag (optional) are virtually
maintenance free, and there are no parts you
can safely service. However, you must have
your vehicle serviced if:
1 An airbag ever inflates. Any airbag that
has deployed must be replaced along with
the control unit and other related parts. If a
front airbag inflates, the seat belt tensioners
must also be replaced. Do not try to remove
or replace any airbag by yourself. This must
be done by BYD AUTO dealer.
2 The SRS indicator alerts you to a problem.
Take your vehicle to an authorized dealer as
soon as possible. If you ignore this
indication, your airbags may not operate
properly.
Only trained personnel can do it. Prohibit
removing airbag modules and seat belts
tensioning device from the vehicle. If the
failure of engine flameout or air bags
inflated or seat belts a tension worked shall
be repaired or troubleshooting by BYD auto
dealer.
Supplementary safety notice
1 Do not attempt to deactivate your airbags.
Together, airbags and seat belts provide the
best protection.
2 Do not tamper with airbag components or
wiring for any reason. Tampering could
cause the airbags to deploy, possibly
causing very serious injury.
For cars with side airbag
1 Do not expose the front passenger’s
seat-back to liquid. If water or another
liquid soaks into the seatback, it can prevent
the side airbag cut off system from working
properly.
2 Do not cover or replace front seatback
covers without consulting your dealer.
Improperly replacing or covering front
seat-back covers can prevent your side
airbags from inflating during a side impact.
The airbag and to further clarify matters
(refer to 7
th
page).

F6 OWNER’S MANUAL
22
Avoiding toxic to carbon monoxide
Your vehicle’s exhaust contains carbon
monoxide gas. You should have no problem
with carbon monoxide entering the vehicle
in normal driving if you maintain your
vehicle properly.
Have the exhaust system inspected for leaks
whenever:
1. The vehicle is lifted for an oil change.
2.You notice a change in the sound of the
exhaust.
3.The vehicle was in an accident that may
have damaged the underside.
Friendly tips
Carbon monoxide gas is toxic. Breathing
it can cause unconsciousness and even
kill you.
Avoid any enclosed areas or activities
that expose you to carbon monoxide.
High levels of carbon monoxide can
collect rapidly in enclosed areas, such as
a garage. Do not run the engine with the
garage door closed. Even with the door
open, run the engine only long enough to
move the vehicle out of the garage
With the trunk open, airflow can pull
exhaust gas into your vehicle interior and
create a hazardous condition. If you must
drive with the trunk open, open all the
windows and set the climate control system
as shown below.
If you must sit in your parked vehicle with
the engine running, even in an unconfined
area, adjust the climate control system as
follows:
1.Please choose fresh air mode。
2.Please choose
mode.
3.Turn the fan on high speed.
4 . Set the temperature control to a
comfortable setting.

F6 OWNER’S MANUAL
23
Safety label
These labels are in the locations shown.
They warn you of potential hazards that
could cause serious injury or death. Read
these labels carefully. If a label comes off or
becomes hard to read, contact your dealer
for a replacement.

F6 OWNER’S MANUAL
24
Instruments and Controls
This section gives information about the
controls and displays that contribute to the
daily operation of your vehicle. All the
essential controls are within easy reach.
Control Locations.................. 25
Instrument Panel Indicators......... 26
Instrument....................... 31
Speedometer..................... 31
Tachometer.....................
.. 31
Odometer........................ 31
Hodometer....................... 32
Coolant Thermometer............... 32
Fuel Gauge....................... 32
Controls Near the Steering Wheel...
. 33
Headlights........................34
Head and Rear Foglights........... 35
Turn Signal....................... 36
Instrument Panel Brightness........ 36
Wipers of windshield............... 37
Washers of windshield.......
...... 37
Hazard Warning................... 38
Rear Window Defogger............ 38
Steering Wheel Adjustment......... 39
Keys and Locks................... 40
Keys ..........................
.40
Ignition Switch.................... 42
Door Locks ..................... 43
Remote Transmitter................ 45
Childproof Door Locks............. 48
Trunk. ....................
..... 48
Glove Boxes...................... 49
Seats ......................... 50
Front Seats .......................50
Adjusting the driver seat height manual 51

F6 OWNER’S MANUAL
25
Adjusting the Power Driver’s seat.... 51
Driver’s waist Support...............54
HeadRest........................ 55
Rear seat Armrest................. 55
Folding rear seat.................. 55
Seat Heaters ............
........ 55
Power Windows................... 56
Moonroof.........................57
Mirrors .........................58
Adjusting the Power Mirrors......... 61
Power Mirror Heaters.....
......... 61
Park Brake....................... 62
Armrest...........................62
Sunglasses Holder............. ....63
Central Pocket................
.... 63
Central Storage Box............... 63
Accessory Power Sockets........... 64
Beverage Holders.................. 64
Coin Box.........................66
Sun Visor..................
.......67
Vanity mirror......................67
Cigarette Lighter.................. 67
Cigarette Ash Box................. 68
Interior Lights......................68

F6 OWNER’S MANUAL
26
Position of control switchs

F6 OWNER’S MANUAL
27
Indicator lights

F6 OWNER’S MANUAL
28
The instrument panel has many indicators to
give you important information about your
vehicle.
Seat Belt Reminder
Indicator
Turn the ignition switch to the ON (II)
position. It reminds you and your
passengers to fasten your seat belts. A
buzzer also sounds if you have not fastened
your seat belt.
If you turn the ignition switch to the ON (II)
position before fastening your seat belt, the
buzzer sounds and the indicator flash. If you
do not fasten your seat belt before the
buzzer stops, the indicator stops flashing but
remains on.
If you continue driving without fastening
your seat belt, the buzzer sounds and the
indicator flash again at regular intervals.
Low Oil Pressure
Indicator
The engine can be severely damaged if this
indicator flashes or stays on when the
engine is running. For more information,
refer to 190
th
page.
Charging System
Indicator
If this indicator comes on when the engine
is running, the battery is not being charged.
For more information, refer to 191th page.
Malfunction
Indicator Lamp
Refer to192th page.
Parking Brake and
Brake System Indicator
This indicator has two functions:
1. It comes on when you turn the ignition
switch to the ON (II) position. It is a
reminder to check the parking brake. A
buzzer sounds if you try to drive with the
parking brake not fully released. Driving
with the parking brake not fully released
can damage the brakes and tires.
2. If it remains lit after you fully release the
parking brake while the engine is running,
or if it comes on while driving, there could
be a problem with the brake system. For
more information, refer to 189th page

F6 OWNER’S MANUAL
29
Supplemental
Restraint System (SYS)Indicator
This indicator comes on briefly when you
turn the ignition switch to the ON (II)
position. If it comes on at any other time, it
indicates a potential problem with your
front airbags. This indicator will also alert
you to a potential problem with your side
airbags, side curtain airbags, and automatic
seat belt tensioners. For more information,
(refer to 19
th
page)
Anti-lock Brake
System (ABS) Indicator
This indicator normally comes on for a few
seconds when you turn the ignition switch
to the ON (II) position, and when the
ignition switch is turned to the START (III)
position. If it comes on at any other time,
there is a problem with the ABS. If this
happens, have your vehicle checked at a
dealer. With this on, your vehicle still has
normal braking ability but no anti-lock
brakes. For more information, (refer to 107
th
page). .
Door and Trunk
Open Monitor
If the trunk or any door is not tightly closed,
the monitor reminds you to close the open
trunk or door(s) before you start driving.
All the indicators in the monitor come on
for a few seconds when you turn the
ignition switch to the ON (II) position.
Turn Signal and
Hazard W arning Indicators
The left or right turn signal indicator blinks
when you signal a lane change or turn. If the
indicators do not blink, or if they blink
rapidly, it usually means one of the turn
signal bulbs is burned out (refer to 29th page
and 165
th
page). Replace the bulb as soon as
possible, since other drivers cannot see that
you are signaling.
When you turn on the hazard warning
button, both turn signal indicators blink. All
turn signals on the outside of the vehicle
should flash.

F6 OWNER’S MANUAL
30
Turn on Indicator
This indicator reminds you that the exterior
lights are on. It comes on when the light
switch is in either the
or
position. If you turn the ignition switch to
the ACCESSORY (I) or LOCK (0) position
without turning off the light switch, this
indicator will stay on. A reminder chime
also sounds when you open driver’s door.
The vehicle is on the alarm system state
after removing the key from ignition switch,
automatic lighting off feature will turn off
the front headlight, front lamp, then the
light on indicator will also turn off.
If you remove the key from the ignition
switch with the headlight switch on, but not
open the door and get out, the lights will
turn off after several minutes. The lights
will turn on again when you unlock or open
the driver’s door; if you unlock the door, but
do not open it, the lights will go off.
Low Fuel Indicator
This indicator is located on fuel gauge.
This indicator comes on as a reminder that
you must refuel soon. Then there is low 8
liter of fuel in the tank.
Security System Indicator
This indicator comes on when security is set.
Refer to 83
th
page for more information on
the security system.

F6 OWNER’S MANUAL
31
High Beam Indicator
This indicator comes on with the high beam
headlights. For more information about
highlights control system device, (refer to
24
th
page).
Front Fog lamp
Indicator
This indicator comes on with the front Fog
lamp. Refer to 25
th
page on operating the
front Fog lamp.
Rear Fog lamp
Indicator
This indicator comes on with the rear fog
lamp. Refer to 25
th
page for more
information on operating rear fog lamp.
Cruise Control
Main Indicator
(optional)
This indicator comes on when you turn on
the cruise control main button (refer to 84
th
page).

F6 OWNER’S MANUAL
32
Combination instrument
Speedometer
The speedometer shows the vehicle speed
with kilometer per hour (km/h)
Tachometer
The tachometer shows the engine speed
with rpm.To prevent destroy the engine; do
not drive when tachometer finger is on the
red area.
Odometer
The odometer shows the total distance your
vehicle has been driven.

F6 OWNER’S MANUAL
33
Hodometer
This meter shows the number of kilometers
driven since you last reset it.
There are two trip meters: Trip A and Trip B.
Switch these displays by pressing the
Select/Reset knob repeatedly. Each
hodometer works independently, so you can
keep track of two different distances.
When you turn the ignition switch to the
ON (II) position, what you last selected is
displayed.
To reset a trip meter, display it, and then
press and hold the Select/Reset knob until
the number resets to “0.0’’.
Coolant temperature gauge
This shows the temperature of the engine’s
coolant. During normal operation, the
reading should be in the middle of the gauge.
In severe driving conditions, such as very
hot
weather or a long period of uphill driving,
the reading may reach near the red mark. If
it reaches the red (Hot) mark, pull safely to
the side of the road. Refer to 125th page for
instructions and precautions on checking the
engine’s cooling system.
Fuel level gauge
This shows how much fuel you have. It is
most accurate driving on flat road; it may
show slightly more or less than the actual
amount driving on curl road or unsmooth
road.
The needle returns to the bottom after you
turn off the ignition. The needle show the
fuel reading when you turn the ignition
switch to ON( )Ⅱ
Friendly tips
Avoid driving with an extremely low
fuel level. Running out of fuel could
cause the engine to misfire, damaging
the catalytic converter.

F6 OWNER’S MANUAL
34
Control buttons around steering
wheel
Two operating lever on the steering wheel
include most commonly used control
buttons. The left operating lever controls the
turning signal lights, front headlights and
fog lamps; the right operating lever control
windshield wipers and washers.
The control buttons of the moonroof and the
parking radar are under the left vents.
You can use the lever under the steering
column to adjust the steering wheel’s
gradient and flex rate.
1:If you want to use the horn, press the
panel around the “BYD” logo.
2: Optional vehicle types.

F6 OWNER’S MANUAL
35
Headlight
Rotary switch of operating lever control the
lights. Turn the switch to AUTO position,
headlight will turn on or off automatically
according to the sunlight illumination
intensity from the sunlight illumination
sensor. Turn the switch to
position
to turn on the parking lights, rear license
plate lights and the indicator. Turn this
switch to position to turn on the
headlight.
When the light switch is in either of these
positions, the indicator is on as a reminder.
(refer to 29th page).
Sunlight illumination sensor
Sunlight illumination sensor is located on
the top of instrument panel and the side of
left front treble loudspeaker. Do not cover
the sensor or spatter any liquid.
If you remove the key from the ignition
switch with lights turned on, you will hear a
reminder chime for turning off the lights
when you open the driver’s door.
To turn on the high beams, push the lever
forward until you hear a click. The high
beam indicator will be on
To turn off the high beams, pull the lever
back.

F6 OWNER’S MANUAL
36
To flash the high beams, pull the lever
farther back, and then release it. The high
beams remain on until the lever is released
The high beams will always comes on if
you
pull the turning signal rod and do not
release it, no matter where the front
headlight switch is.
Front/rear fog lamp
Front/rear fog lamp switch are at the side of
lights control switch, you can turn the front
fog lamp on by using this switch when the
lights control switch is in the either
or position. You also turn
the rear fog lamp on using this switch when
the lights switch is in the
position or
the fog lamp has been on.
Revolving the switch upward from OFF(·)to
to turn the front fog lamp, then the
indicator
is on for a warning. To turn
on or off the rear fog lamp with the front
lamp lighting, turn
upward the switch one frame from
position and release it. Then the indicator
on the instrument panel is on or off for
a warning.
If only to turn the rear fog lamp on, turn the
switch downward from OFF (·) to
position and release it.
The front fog lamp will comes on when you
turn the lights control switch to or
position. To turn the fog lamp
completely, turn the fog lamp switch
downward to OFF(·)position
If you want to turn the rear fog lamp on
again, you should turn the fog lamp switch
when the lights control switch is on the
position.
The front/rear fog lamp will come off when
you turn the light control to OFF position to
close the headlights

F6 OWNER’S MANUAL
37
Turning signal
Using this operation rod can send turning
signal or lane change signal. Push down on
the left lever to signal a left turn and up to
signal a right turn. If you push the rod to the
top or the bottom, even you loose hands, the
turning signal lights will continuous flash,
and it will come off with a completely
turning.
To signal a lane change, push lightly on the
lever in the proper direction and hold it. The
lever will return to center when you release
it or complete a turn.
Combination instrument
illumination
The Select/Reset knob on the instrument
panel controls the brightness of the
instrument panel lights and the operation
buttons of central control board. Turn the
knob to adjust the brightness.
Counterclockwise rotation decreases
brightness and clockwise rotation increases
brightness, the brightness is the most dark
or bright when you hear a click. This button
can rotate illimitably, to protect the button,
please stop co rotating when you hear a
click
.
The instrument panel will illuminate with
reduced brightness when you open the
driver’s door. The brightness will increase
slightly when you insert the key in the
ignition switch, then go to normal
brightness when you turn the ignition switch
to the ON (II) position.
If you do not insert the key in the ignition
switch after opening the driver’s door, the
illumination will be off scores of seconds
after you close the door.
If you insert the key but do not turn the
ignition switch to the ON (II) position, the
illumination will be off after several
seconds.
To reduce glare at night, the instrument
panel illumination dims when you turn the
light switch to
or . Turning
the Select/Reset knob fully to the right until
you hear a click will cancel the reduced
brightness.

F6 OWNER’S MANUAL
38
Windshield wiper
This control lever controls the windshield
wiper and washers. It has 5 shifts:
MIST:
OFF:Stop
INT(AUTO):Intermittent
LO:Low speed
HI:High speed
Push the right lever up or down to select a
position.
INT— the intermission adjustment knob
adjust its intermission time to 7S, 5S, 3S
and 1S with the raindrop number increase.
LO & HI—wiper scrape continually.
MIST—Push the control lever upwards
from OFF position. The wiper will scrape
high-speed until you release the control
lever. So that can clean the windshield
quickly.

F6 OWNER’S MANUAL
39
Pull the control lever of windshield wiper
back to clean the windshield; the syringe
will spray water, the wiper work at the some
time. The syringe will stop immediately
when you release the control lever, but the
wiper still swing three times.
Caution:
Push the button between the center vents to
turn on the hazard warning lights (six-way
flashers). This causes all six indicators
outside turn signals and both turn indicators
in the instrument panel to flash. The flash
light can remind the foot passenger or other
vehicles that your vehicle may cause
danger.
Rear windshield defogger
The rear window defogger will clear fog,
frost, and thin ice from the window. Push
the defogger button to turn it on and off.
The indicator in the button comes on to
show the defogger is on. It shuts off when
you turn off the ignition. You have to turn
the defogger on again when you restart the
vehicle.
Make sure the rear window is clear and you
have good visibility before starting to drive.
The defogger wires on the inside of the rear
window can be accidentally damaged.
When cleaning the glass, always wipe side
to side.

F6 OWNER’S MANUAL
40
Steering wheel adjustment
Make any adjustment for steering wheel
before you start driving.
Friendly tips
Adjusting the steering wheel position
while driving may cause you losing
control of the vehicle and be seriously
injured in a crash.
Adjust the steering wheel only when the
vehicle is stopped.
Adjustment:
1.Push the lever under the steering column
all the way down.
2.Move the steering wheel up or down, and
in or out to the desired position. Make sure
you can see the instrument panel gauges and
the indicator lights.
3.Push the lever up to lock the steering
wheel in that position.
4.Make sure you have securely locked the
steering wheel in place by trying to move it
up, down, in, and out.

F6 OWNER’S MANUAL
41
Key
Your vehicle is distributed a suit of keys as
picture.
The master key fits all the locks on your
vehicle.
1.Ignition switch
2.Driver’s door
3.Glove box
You should have received a key number tag
with your keys. You will need this key
number if you ever have to get a lost key
replaced. Use only BYD-approved key
blanks.

F6 OWNER’S MANUAL
42
Remote control
Please refer to 45th page on how to use the
remote control
Friendly tips
These keys contain electronic circuits
that are activated by the immobilizer
system.
1.Protect the keys from direct sunlight,
high temperature, and high humidity
2.Do not drop the keys or set heavy
objects on them.
3.Keep the keys away from liquids. If
they get wet, dry them immediately
with a soft cloth.
If you lose your key and you cannot
start the engine, contact your dealer.
Do not try to disassemble the keys.

F6 OWNER’S MANUAL
43
Ignition switch
The ignition switch has four positions:
1.LOCK (0)
2.ACCESSORY( )Ⅰ
3.ON( )Ⅱ
4.START( )Ⅲ
LOCK(0)—You can insert or remove the
key only in this position. To turn the key
from ACCESSORY( ) to LOCK(0), and Ⅰ
you must push the key in slightly. If your
vehicle is A/T vehicle, to remove the key,
the shift lever is advised in Park or neutral
position. The parking lock will lock the
steering wheel after you remove the key.
If the front wheels are turned, the anti-theft
lock may make it difficult to turn the key
from LOCK (0) to ACCESSORY( ). Ⅰ
Firmly turn the steering wheel to the left or
to the right as you turn the key
Friendly tips
Do not remove the key from the
ignition switch, otherwise the steering
wheel will be locked and the vehicle
may be losing control.
Before removing the key from the
ignition switch, make sure the shift
lever is in the Park position.
ACCESSORY( )Ⅰ —You can operate
the audio system and the accessory
power sockets in this position.
ON ( )Ⅱ —This is the normal key
position when driving. Several of the
lights on the instrument panel come on
as a test when you turn the ignition
switch from the ACCESSORY (I) to the
ON (II) position.

F6 OWNER’S MANUAL
44
START ( )Ⅲ —Use this position only to
start the engine. The switch returns to the
ON (II) position when you let go of the key.
A reminder beeper sounds if the ignition
switch is in the LOCK (0) or ACCESSORY
(I) position when you open the driver’s door.
Remove the key from the ignition switch to
turn off the beeper.
Power door lock
Each front door has a power door lock
master switch. Either switch locks and
unlocks all doors. Push the top of the switch
to lock all doors; push the bottom of switch
to unlock them.
Each door has a lock tab on it. Push down
the tab to lock the door and pull it up to
unlock. When you push down the tab on the
driver’s door, all the doors lock. Pull the tab
on the driver’s door only can open the
driver’s door. The tab on the passenger’
door only can lock or open the
corresponding door
Automatic locking
The tab of 4 door will be automatic locking
when the speed is over 20 km/h. and they
will be automatic unlocking when close the
engine.

F6 OWNER’S MANUAL
45
To lock any passenger door, push down the
tab and close the door. To lock the driver’s
door, remove the key from the ignition
switch, push down the tab or push the top of
main switch, then close the door.
All doors can be locked from the outside by
using the key in the driver’s door.
All doors will be locked at sometimes when
you turn the key counter-clockwise. And the
security system will also be active. All
exterior turning signal lights and 2 turning
signal lights on the instrument panel will
flash 3 times.
If turn the key counter-clockwise and hold
over 2 seconds at the second time, 4 door
glasses will raise automatically until you
release the key.
To unlock only the driver’s door, insert the
key, turn it clockwise, and release it.
Turning the key clockwise at the second
time can make all doors unlocked. If turn
the key clockwise and hold over 2 seconds
the second time, 4 door glass will fall
automatically until you release the key.
Security system can cancel by open the
driver’s door using remote transmitter or
keys.

F6 OWNER’S MANUAL
46
Remote control
You can lock or unlock your vehicle by
using the remote control transmitter. Press
the lock button once to lock all doors, and
the security system will be active at the
some time. The exterior turning signal lights
and 2 interior turning indicators will flash 3
times.
Pressing the unlock button only can unlock
the driver’s door. Pressing the button again
can unlock other doors. The exterior turning
signal and 2 turning indicator on the
instrument panel will flash once when you
press the unlock button once.
The front ceiling light (optional type) and
the rear ceiling light (if the ceiling light
switch is in the center position) will come
on when you press the UNLOCK button. If
you do not open any door, the light stays on
for about 30 seconds, and then fades out. If
you relock the doors with the remote
transmitter before 30 seconds have elapsed,
the light will go off immediately.
Car searching function
After the vehicle’s anti-theft function is
active, if press the lock button, the
enunciator will hoot once and the turning
light will flash, which is helpful for you to
find your vehicle.
You cannot lock the doors with the remote
transmitter if they are not fully closed or the
key is in the ignition switch.
If you unlock the doors with the remote
transmitter, but do not open any of the doors
within 30 seconds, the doors automatically
relock, this function may failure because of
magnetic field, vibration, foreign bodies,
please do not use it on your own initiative.
Press the trunk release button for about 1
second to open the trunk. You cannot open
the trunk if the key is in the ignition switch.

F6 OWNER’S MANUAL
47
Replace cell
If it takes several pushes on the button to
lock or unlock the doors, replace the battery
as soon as possible.
Battery type: CR2016
To replace the battery:
1.Remove the screw at the base of the
transmitter with a small Phillips-head
screwdriver.
2.Separate the transmitter by prying its
middle seam with your fingernail.
3.Inside the transmitter, separate the inner
cover from the keypad by releasing the two
tabs on the cover.
4.Remove the old battery from the back of
the inner cover, and note the polarity. Make
sure the polarity of the new battery is the
same (+ side facing down), then insert it
into the back of the cover.
5.Install the parts in reverse order.

F6 OWNER’S MANUAL
48
Regulations of short distance
remote control (China)
1.Do not allow to change the emission
frequency, and the output power is also not
allowed to amplify (do not allow install
exterior amplifier).
Besides, user is not allowed to replace the
transmitting antenna unless be confirmed.
2.This device can produce bad interference
for the permissive radio-communication.
This kind interference once be found, the
action of the device will be ordered to stop
until adopt effective measure.
3. This ultra-low output power device must
accept any interference received, including
interference that radio-communication,
industry, science, medical treatment
produced what may cause undesired
operation.
4.Forbid using this kind radio device at the
airplane and around the aerodrome.
Remote control maintenance
Avoid dropping or throwing the transmitter.
Protect the transmitter from extreme
temperature.
Wipe the remote transmitter with a soft
cloth. Do not use the mightiness cleaning
agent or impregnant, which may damage the
shell of remote transmitter. Immersing the
transmitter in any liquid will make it
damage so that its function is abnormal.
If you lose a transmitter, the replacement
needs to be reprogrammed by your dealer,
then the prep. Remote transmitter must be
reprogrammed too.

F6 OWNER’S MANUAL
49
Children safety lock
The childproof door locks are designed to
prevent children seated in the rear from
accidentally opening the rear doors. Each
rear door has a lock lever near the edge.
When the lock lever is pushed down, the
door can not be opened from the inside
regardless of the position of the lock tab. To
open the door, pull the lock tab up, and use
the outside door handle.
Trunk
You can open the trunk in either of the
follow ways:
1.Pull up the release lever of trunk on the
left side of driver’s seat.
2.Press and hold the trunk release button on
the remote transmitter.
To close the trunk, press down on the trunk
lid.
Refer to 95th page for cargo loading and
weight limit information. Keep the trunk lid
closed at all times while driving to avoid
damaging the lid, and to prevent exhaust gas
from getting into the interior. See Carbon
Monoxide Hazard on 21
th
page

F6 OWNER’S MANUAL
50
Glove box
Pull the handle to left, open the glove box
pushing it forcibly can close it. Also you
can lock or unlock the glove box by using
the ignition key.
The floodlight of glove box only comes on
with the lamplet turned on.
Friendly tips
Glove box that is opened will serious
hurt the passengers, even the passenger
wear seat belts.
Make sure have closed the glove box
when you start driving.

F6 OWNER’S MANUAL
51
Seat adjustment
Front seat manual adjustment
You should complete all adjustment of the
seats before you start driving.
When the seat is adjusted to the desired
position, try to move the seat backward to
make sure it is locked in position.
To adjust the seat forward and backward,
pull up on the lever under the right side of
the seat cushion’s front edge. Move the seat
to the desired position and release the lever.
Try to move the seat to make sure it is
locked in position
To change the seat-back angle, pull up on
the lever on the outside of the seat bottom,
move the seat-back to the desired position
and release the lever. Make the seat-back
locked in place.

F6 OWNER’S MANUAL
52
Driver seat height manual adjustment
Driver’s seat can be adjusted, to raise or
lower the seat, rotate the button forward or
downward.
Driver seat power adjustment
(optional)
There are two electromotor adjustment
switches. The level switch can adjust the
bottom of the seat several direction. The
short switch can adjust the seat-back angle.
You can adjust the position of the seats
whether the ignition switch is in place. You
should complete the adjustment of the seats
before you start driving.
Pushing the level switch forward or
backward can move the seat forward and
backward.

F6 OWNER’S MANUAL
53
Pulling up or press the front of the switch
can move the front of the seat up or down.
Pulling up the central of the switch can
make the seat up; and pressing the central of
the switch can make the seat downward.
Pushing the rear of the switch along the
direction of the seat-back can adjust the
seat-back angle.

F6 OWNER’S MANUAL
54
Pulling up or press the rear of the switch
can move the rear of the seat up or down.

F6 OWNER’S MANUAL
55
Driver seat waist support (Optional)
To change the waist support, move the lever
on the right side of the seat-back forward or
backward. Keep moving the lever forward
or backward until you find a suitable
position.
Head rest
The front seats of your vehicle is equipped
with headrest
Headrest can protect you and your
passengers from whiplash and other injuries.
They are most effective when you adjust
them so the back of the occupant’s headrests
against the center of the rest. Tall people
should adjust the head rest as high as
possible
The front headrest adjust for height. You
need both hands to adjust the rest. Do not
attempt to adjust it while driving. To raise it,
pull upward. To lower the rest, push the
release button and push the headrest down.

F6 OWNER’S MANUAL
56
Rear seat armrest
Rear seat armrest lies in the center of rear
seat. When using it, put it down.
Open the cover of passage of trunk from the
inner of vehicle, folded on the center
armrest open it, lift it by hands and pull
it.
Must insure stuff in the trunk or the stuff
which stretch from the placket to the rear
seat are fixed stably.
Don’t drive the car when the passage cap
of trunk as well as the trunk lid is opened.
Please refer to 21
th
page about the danger of
carbon monoxide.
Seat heating device(optional)
Both front seats are equipped with seat
heating device, there is heating device under
the passenger’s seat. The ignition switch
must be in the ON( ) position to use the Ⅱ
seat heater. Press the top of ignition switch
to choose the HI and make the seat’s
temperature increase quickly. After the seat
reaches a comfortable temperature, select
the LO by pushing the top of the switch.
This will keep the seat warm.

F6 OWNER’S MANUAL
57
When heating, the HI or LO indicator will
be always bright until you press the
opposite side of the switch to close the
heating.
In HI, turns off the heater when the seat gets
warm; and turn back on after the seat
temperature drops. If only in HI, this will
continue. The HI indicator also will be
bright to remind you the heating device is in
HI.
In LO, the heating device will continue to
heat, and don’t change with the temperature.
Follow these precaution whenever you use
the seat heaters:
1.Use the heat setting only to heat the seats
quickly, when the seat gets warm, select the
LO. Because it draws large amount of
current from the battery.
2.If the engine is left idling for an extended
period, don’t use the heater even on the LO
setting, it can weaken the battery, causing
the hard starting.
Power window
The car is equipped with the power window.
Turn the ignition switch to ON( ) position Ⅱ
to raise or lower any window .
To open the window, push the switch down
and hold it. Release it when you want to
stop the window. Pull back on the switch
and hold it to close the window.

F6 OWNER’S MANUAL
58
There is a main control panel of the power
window on the armrest of driver’s side door.
To open any passenger’s side window, push
the related switch and hold it, release it until
the window gets to the desired position; to
close the window, pull back the switch,
release it until the window get to the desired
position.
The main switch of mirror regulator can
control the window of passenger side as
well as the both rear doors: push the switch,
the three windows are locked and can’t raise
or lower; push it again, the three windows
can raise or lower freely.
The power window system has the delay
function. The window will still operate for
up to 10 minutes after you turn off the
ignition switch. Opening either front door
can cancel the delay function. You must turn
the ignition switch to ON( ) position Ⅱ
before you need to raise or lower the
window.
Caution:
Closing a power window on the someone’s
hands or fingers can cause serious injury.
Make sure the passengers’ hands away from
the power window before closing the
window.
Caution:
Have the ignition key with you while you or
you and other passengers leave the car.
The light in the switch will be on while you
turn the ignition switch to ON( ) position.Ⅱ
Power sun roof(optional)
The sun roof has two positions: it can be
tilted up in the back for the ventilation or it
can be slid back into the roof. Use the
switch under the left dashboard vent to
operate the sun roof. The ignition switch
must be in the ON( ) position. To tilt up Ⅱ
the back of sun roof, press and hold the
center switch(
);to close the sun roof,
press and hold the upper switch( );
to open the sun roof, press and hold the
lower switch(
). Release the switch
when the sun roof gets to the desired
position. Make sure everyone’s hands are

F6 OWNER’S MANUAL
59
away from the sun roof before opening or
closing it.
Caution:
Opening or closing the sun roof on the
someone’s hands or fingers can cause
serious injury.
Make sure everyone’s hands or fingers are
away from the sun roof before opening or
closing the sun roof.
The sun roof has the key-off delay function.
The function can cancel as soon as you open
either the front door. You must turn the
ignition switch to the ON( ) position to Ⅱ
operate the sun roof.
Notice
If you attempt to open the sun roof in
the below-freezing temperature, or
when it is covered with the snow or ice.
You may damage the sun roof or motor.
Friendly tips
Have the ignition key with you while
you or you and other passengers leave
the car
Putting the head, hands or other parts to
the outside of the sun roof can cause
serious injury or death while driving.
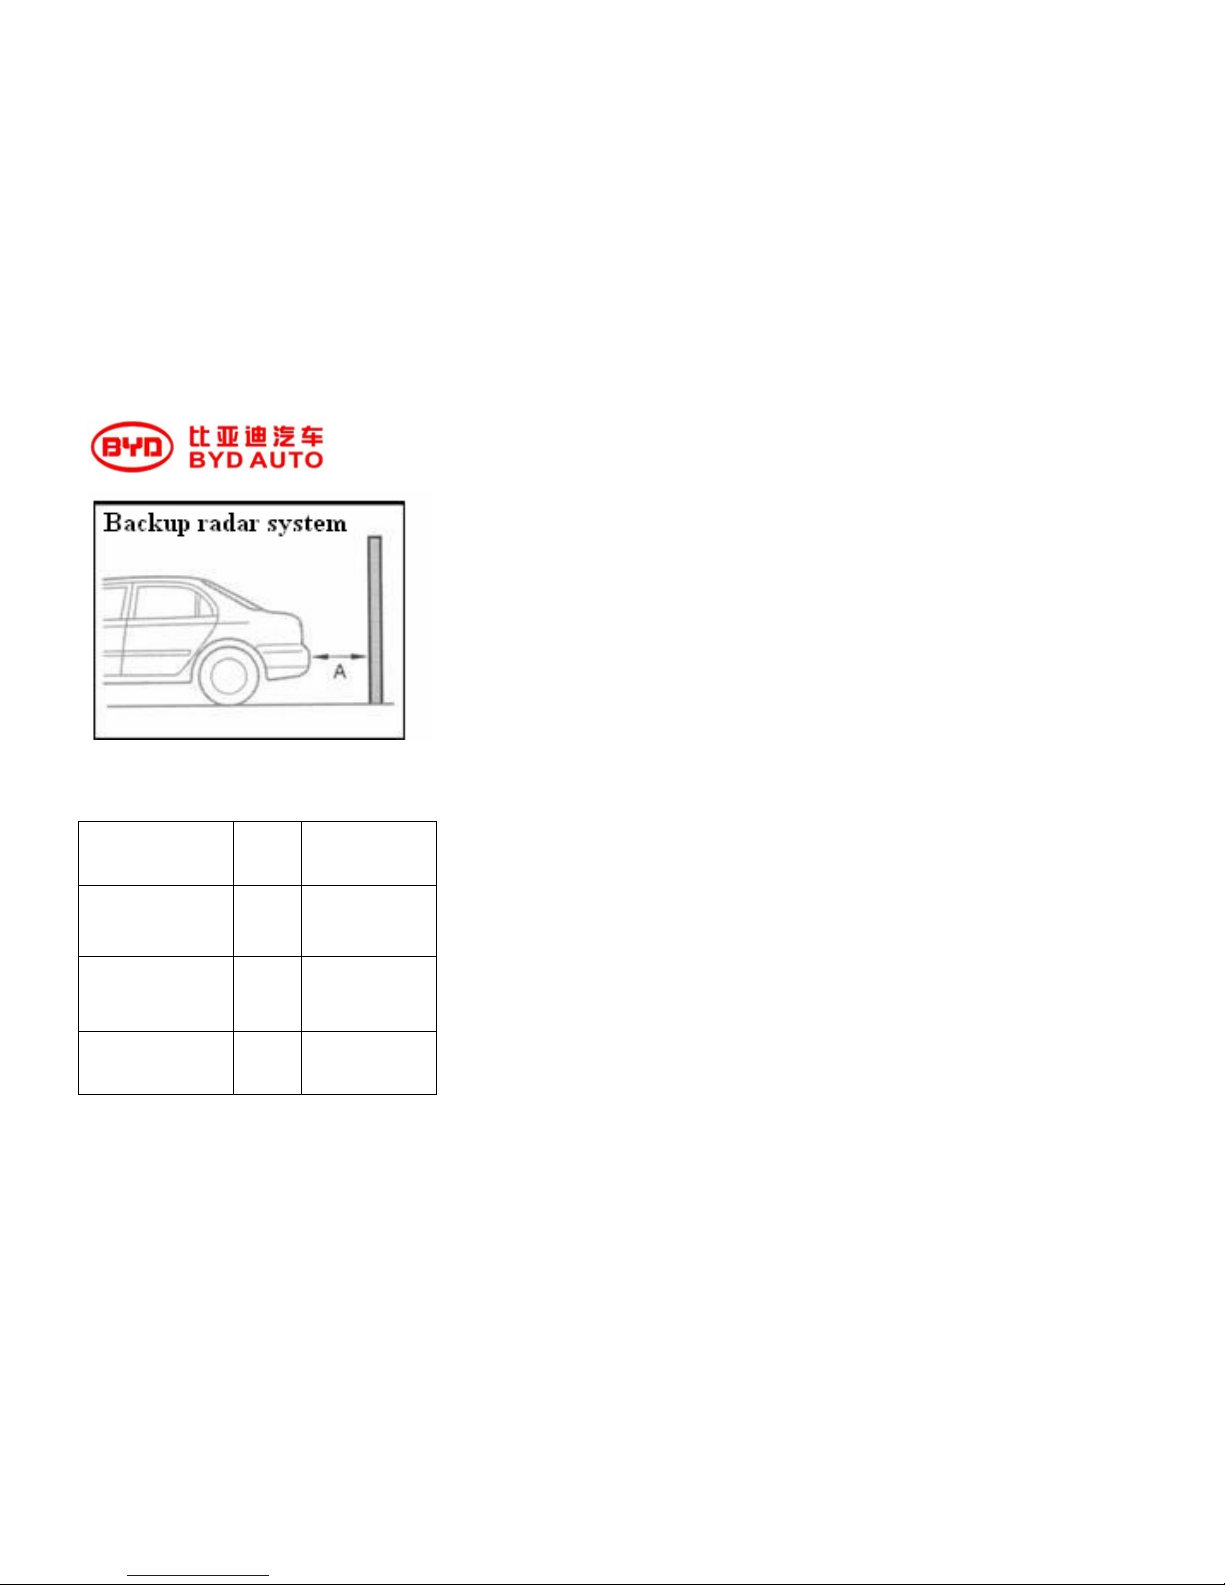
Backup radar (optional)
When backing the car, the backup radar
system reminds the driver about the distance
between the car and obstacles through the
indicator and buzzer. The system detects the
obstacles by the sensor.
When the ignition key is in the ON position,
shifting gear lever is in the reverse gear
position, the indicator OP is bright, buzzer
sounds for 1.0±0.3 seconds to show system
is normal and is working.
Open: Press and hold the switch.
The indicator is bright and buzzer sounds.
Close: Press and hold the switch again.
F6 OWNER’S MANUAL
60
The system prompts drivers the distance
between vehicles and obstacles by indicator
and buzzer.
A Distance
(mm)
Indicat
or
Buzzer
About l,200-800 Flash
Intermittently
buzz
About 800-400 Flash
Quickly
intermittently
buzz
About 400 or less
than 400
ON
Continuously
buzz
Detecting area
The detecting area of the sensor is about
l,200mm
Notice:the detecting area is limited,so you
must check the surrounding before driving
and get vehicle started slowly.
Don’t affix something on the sensor.
Otherwise, maybe the system don’t work
normally and cause unexpected accident.
Hint
At the following status, the system may not
work normally
●There are something on the sensor. For
example: ice, snow and mud and so on.
●The vehicle has parked in the higher or
lower temperature for a long time.
●The vehicle is driven in the muddy、rude
or other roads.
●The vehicle is near the object which can
eradiate ultrasonic. For example: horn or
motor of motorcycle and so on.
●Driving the car when it rains heavy or
water spatters on the vehicle.
●Install the dual passages wireless antenna
or buffer.
●The center of gravity is acclivitous.
●Shield the sensor by hands
●The vehicle is too near to the object.
●Knock the sensor seriously.
The system also don’t work normally when
the vehicle is near the following objects.
●Metal lead wire、cord or more thin objects
●Cotton、snowflake or absorbency objects
●Smaller objects
●Acuity objects
●High and protuberant objects.
Please contact the BYD authorized service
station at the following status.
●The bumpers are destroyed or sunken.
●The indicator continuously keeps ON but
the buzzer doesn’t buzz.

F6 OWNER’S MANUAL
61
Power interior rearview mirror
Keep the exterior and interior rearview
mirror clear, and make them has the best
vision angle. Before driving, adjusting is
finished.
It has two modes, day and night. It can
reduce the glare from back vehicle at night.
To change the mode, pull the convex tongue
at the edge of rearview mirror bottom.
The methods and steps to adjust interior
rearview mirror.
1、Before adjusting, pay you attention for
the following three points: the direction
which is displayed by the interior rear view
mirror is the vehicle head direction, the state
is normal, under adjusting, the words which
are displayed by the interior rearview mirror
is used to give you a tip, the state is
adjusting state:
You’d better use the clip;
when adjusting, you should choose a
square 、closed-loop street or a annular
roadway ( turnplate), and confirm the east、
south、west and north (as the illustration);
2、Adjusting steps:
The first step:start the vehicle, the words
will be displayed in the top right corner of
interior rearview mirror, the word may be
one of east、west、south、north、westnorth、
westsouth、eastnorth and eastsouth
The second step:Choose the start direction.
The third step: Use clip to press
the“confirm”to enter into adjusting state.
The screen will appear “north” and flash for
two times, and then stop.
The fourth step : Drive the car for two
circles at a slow speed, less than 8Km/h
(notice: when driving, you can’t make the
car misfire)
The fifth step: adjusting vehicle head,
make it point to south. Press the “confirm”,
and the screen appear the “ south”, then
press the “confirm” again, if appear the
“south” and flash for two times, then stop
and the adjusting is finished. It will
automatically quit the adjusting state and
enter into normal state.
Or else, the second times you press
“confirm” and appear the “east”, you should
firstly misfire, and anew adjust it from the
Confirm
Screen
Screen

F6 OWNER’S MANUAL
62
first step. If it displays the other words, it is
not necessary to misfire, anew adjust it from
the second step.
The sixth step:test, after finishing the
debug, drive the car for a circle to test
whether the displayed direction is right. If
it is wrong, anew adjust it from the first
step.
Power exterior rearview mirror
adjustment
You can adjust the exterior rearview mirror
through adjustable knob lieing in the door
armrest of driver side.
1.Turn the ignition switch to the ON( ) Ⅱ
position.
2.Rotate the adjustable knob to the left or
right side
.
3.You can adjust the rearview mirror in the
left、right、up or down way by pushing or
pulling the adjustable knob along the related
direction.
4.After finishing it, rotate the adjustable
knob to the center ( close) position. This can
close the adjustable knob to avoid touching
the knob unconsciously and causing the
angle of rearview mirror changed.
Power exterior rearview mirror
heating
(optional)
The exterior rearview mirror can be heat to
eliminate the fog、ice or frost. When turning
the ignition switch to the ON( ) positionⅡ ,
press the button and the heater is opened.
Here, the light on the button is on to remind.
Press the button again, and the heater is
closed.

F6 OWNER’S MANUAL
63
Parking brake
When using the hand brake, pull it upwards
thoroughly. When loosing it, firstly pull it
upwards lightly, and then press the release
button and put the hand brake down. The
indicator light of braking system on the
instrument panel will be automatically
turned off when the hand brake is released
thoroughly.
The buzzer will continuously buzz if you
drive vehicle up to a speed at the state that
the hand brake had not been released
thoroughly.
Notice:
The brake、 tire as well as axle will be
damaged, when you drive at the state that
the hand brake isn’t loosed thoroughly.
Front seat armrest
If you will take the storage box as the
armrest , move it to the desired position.
Make sure the passenger’s hands or fingers
are safe before moving the armrest.

F6 OWNER’S MANUAL
64
Sunglass box
When opening the sunglass box, press its
front edge. The sunglass box leaves the
buckle and lops. When closing it, push it to
the LOCK position. When driving, make
sure the sunglass box is closed tightly.
Some big size sunglass can not be put into
the box.
CD Box
If you want to open the CD box, press the
center of the box sleeve and make it leave
the buckle, the box can be opened. When
closing it, press the cover until it enters into
the buckle.
Central storage box
If you want to open the center storage box,
Lift up and pull the right rod, and tilt up the
armrest. When closing it, put it down and
press it until it is locked.

F6 OWNER’S MANUAL
65
You can put some small objects into the
groove of center storage box sleeve. When
using the groove, pull the left rod and lift up
the armrest cushion.
Accessory electrical source socket
When using the accessory electrical source
socket, tilt up its cover and turn the ignition
switch to the ACCESSORY( ) or ON( )ⅠⅡ
position.
The socket is used to supply power for the
12 volt DC accessory that are rated 120
power or less. It can’t supply power to the
cigar
Cup holder
Be careful when you are using the cup
holder. A spilled liquid that is very hot may
scald you or your passengers. Liquid can
also spill from the door cup holder when
you open or close the door. Use only the
resalable containers in the cup holder.

F6 OWNER’S MANUAL
66
The cup holder for the front passengers lies
in the center console.
To use the front cup holder, press its cover,
it will automatically open. To close it, press
it until it enters into the buckle.
There are cup holders in the interior side of
front and back doors.

F6 OWNER’S MANUAL
67
There is also cup holder in the back seat. It
lies in the center armrest. To use it, put it
down.
Bill box
The bill box lies in under of the vent. To
open it, grab and pull its upper edge
downwards. To close it, push it upwards
strongly.

F6 OWNER’S MANUAL
68
Sun visor
To use a sun visor, put it down. You can also
use a sun visor at the side window. Remove
the support rod from the clip, and swing the
sun visor toward side window.
To enter or leave the vehicle, make sure to
take it back to original place.
Vanity mirror(opotinal)
To use the vanity mirror in the sun visor,
pull its cover.
The vanity mirror lights is about to be on
when you pull its cover.
Cigarette lighter
Only when turning the ignition switch to the
ACCESSORY( ) or ON( ) position, the ⅠⅡ
cigarette lighter can work. To heat it, push it;
it will eject automatically when it can be
used. While heating, don’t press it, or it will
be overheating.

F6 OWNER’S MANUAL
69
Front ashtray
To open the ashtray, pull its cover.
To take out it, firstly open its cover, then
grab its right end and lift it.
Rear ashtray
The rear ashtray lies in the back of the
center storage box. To use it, grab its top
and pull down. To take out it to clean the
ash, firstly open its cover, then lift.
Friendly tip
The ashtray only can be used for the
cigar 、 smoke as well as other
absorbable objects. To avoid the fire
that may damage the vehicle, don’t put
the paper or burnable objects in the
ashtray.
Interior reading light
The rear interior lights has a three-position
switch. In OFF, the light is illumined. In the
open or close door position, if opening any
door, the light is on, after closing all the
door, the light will get darkness gradually to
extinguish totally. In ON, the light will be
always on.

F6 OWNER’S MANUAL
70
The front interior light has a two-position
switch. In DOOR and no door open, you
can independently control the lights by the
lens hood, push it, the light is on; push it
again, the light is off. The light will be on
when you open any door;
In OFF , the light is not on. You can
independently control the lights by the lens
hood, push it, the light is on; push it again,
the light is off.
In DOOR, Pull out the key from ignition
switch, the light is on. The light is on, if the
door isn’t opened, it will extinguish
gradually.
In DOOR,you can open the door by the key
or remote transmitter ( please refer to 29th
page ) the light will extinguish gradually
after all doors are closed.
Door light
Every door has a door light. The light is on
when opening the door.
The ignition switch also has a spotlight. The
Light will be on when opening the
driver-side door. The light will extinguish
gradually after closing the door.

F6 OWNER’S MANUAL
71
Comfort and convenience
establishment
BYD AUTO is equipped with the interior
air control system. It can supply
comfortable drive condition to you at any
climate.
Audio system has much performance. We
will introduce the performance as well as
the use method in this section. (if you
choose the other audio system, please refer
to the operation specification matched with
the audio).
The vehicle is equipped with the navigation
system.
You can operate the interior air control
system and audio system by the navigation
system. Please refer to the navigation
system manual to get the detailed
information.
Interior air control system
The interior automatically air control
system will well match with the setting
interior temperature 、 choosing air
condition、central heating and ventilating.
The system can be also used to adjust the
fan rotational speed and volume of airflow.
The direction of airflow can be adjusted
through the both sides vents of center and
instrument panel.
The interior air control system absorbs air
through exterior air inlet under the
windshield. For preventing the air inlets
from blocking by the leaves and sand, you
should keep them unblocked.
For making the interior air control system
supply the center heating and air
conditionging, the engine should be
running.
Central air outlet Adjusting handle
To adjust the direction of the center vent
airflow, pull the adjusting handle convex
tongue up, down, right or left.

F6 OWNER’S MANUAL
72
Side air outlet
You can open or close the air outlet through
the knob under the side air outlet.
(optional)
Full-automatic mode operation
Set the interior air control to the
full-automatic mode, press the AUTO
button, then rotate the temperature control
knob of driver side and set the desired
temperature.
The system display will show the “AUTO”.
The system will automatically choose the
proper adjusted or heated air. This can make
the temperature raise or lower to the setting
temperature.
When the temperature is setted to(L0)or
(HI),the system works only according to
the full air conditioning or full center
heating mode,and can’t control the interior
temperature.
When the temperature is setted between
(L0)and (HI),the temperature can be
controlled to set temperature.

F6 OWNER’S MANUAL
73
Turn off button(OFF)
Press the (OFF) button, and the interior air
control system is closed fully. For avoiding
the dreggy and moldy air cumulation, you
should often keep the fan working.
Semi-automatic mode operation
In FULL AUTO, you can choose all
function of interior air control system by
manual. While the rest functions keep
automatic control. Any manual choose will
make the “AUTO” disappear.
A/C switch
Press the A/C button to turn the air
condition on or off. The display shows“A/C
ON” or“A/C OFF”
When the A/C is off, set the temperature to
fall below the exterior temperature by the
knob, the system can’t control interior
temperature, when the A/C is on, you can
adjust the temperature to the comfort setting
value by the temperature control knob.
Interior/exterior air circulation
switch
The switch control the air headstream
entering into the system. When the
circulation indicator is on, the air from the
interior is circulated in vehicle again. When
the indicator is off, the air will be brought in
from the outside of vehicle(fresh air mode).
For example, when the vehicle passes the
area full of soot, you can use the interior
circulation mode by the manual.

F6 OWNER’S MANUAL
74
Fan speed control button
Press fan speed control button, you can
choose the fan speed by manual. press▲,
raise the speed; press▼,lower the speed
DUAL zone control switch
Press DUAL button(the button indicator is
on), you can choose the dual temperature
control mode(please refer to 76
th
page).
Press the DUAL button again (the indicator
is off), adjust the both sides temperature by
rotating the temperature control knob of
driver side.
Blowing mode button
Choose the airflow direction by the
(MODE) button,no matter what mode,
always has the air brought in from the
corner of instrument panel. Close it by the
knob under the every air outlet. Press the
(MODE) button every times, the display
shows the mode chosen. Press the button
four times, the mode will be displayed one
by one.

F6 OWNER’S MANUAL
75
The airflow is divided between
the floor vents and the defroster vents at the
base of windshield.
Airflow from floor vents.
Airflow is divided between the
vents in the dashboard and the floor vents.
Airflow from the dashboard vents
Front windshield defroster switch
Guild the main airflow to the windshield to
defrost quickly. No matter what mode you
choose, mode is priority.
When choosing mode,the air condition
will automatically work, the system will
choose the fresh air mode. For quick
defrosting, choose the manual to set the fan
high speed. The airflow to the windshield
can be increased by closing the vent in the
side of instrument panel.
Press the button to close mode again, the
system will return to the original setting.

F6 OWNER’S MANUAL
76
Rear windshield defroster switch
The button can open or close the rear
windshield defroster.
Outdoor temperature display
button(OUT)
Although the interior air control system is
opened or no, press the button, and the
display of passenger side will show the
current outdoor temperature.

F6 OWNER’S MANUAL
77
Temperature independent control
button
There are two knobs to control temperature
in the vehicle, one is belong to the drivers,
the other is belong to passengers. When the
green indicator on DUAL (independent
control) button is on, independently adjust
the temperature of driver side and passenger
side by rotating the related knob.
Temperature control button
Press the fan、air condition、automatic or
button, the display will show the setting
temperature. Close the indicator of DUAL
button, rotate the temperature control knob
of driver side to adjust the both sides
temperature to the same level.
To make the driver side temperature
different from the passenger’s side
temperature, press the DUAL button and
rotate the control knob of the driver side. To
make the passenger’s side temperature
different from the driver side temperature,
only rotate the passenger’s side knob.
Notice:The indicator of the DUAL button
will be automatically on when rotating the
passenger side temperature control knob
.
Sunlight illumination sensor/indoor
temperature sensor
Sunlight illumination sensor lies in the top
of the instrument panel. Indoor temperature
sensor is beside the steering column. Don’t
shield the sensor, or spill any liquid on it.

F6 OWNER’S MANUAL
78
Audio system
(optional)

F6 OWNER’S MANUAL
79
Audio system
AM/FM
The audio system can syllabify receive the
AM and FM. At the same time, expediently
choose the fond broadcasting station
through the TUNE.
Radio operation
To operate the radio, only when the ignition
switch is on the ACCESSORY( ) or Ⅰ
ON(Ⅱ)position. Turn the system on by
pressing the (PWR/VOL) knob or AM/
FM button,
rotate the (PWR/VOL) knob to adjust the
volume.
The bands and frequency that the radio was
last tuned will be displayed. To change the
bands, press the AM/FM button. Press the
button every time, the band will cycle from
the M1 to FM2、FM3、AM1、AM2 mode.
On the FM band, the ST will be displayed if
the station is broadcasting in stereo. The ST
will flash if the car is driving across the area
in which the signal is weak. Stereo
reproduction on AM is not available.
Channel selection
You can use any of five methods to find the
radio station on the selected band: TUNE、
SEEK、SCAN、AUTO SELECT and the
preset bars or icons.
TUNE— Use the TUNE bars or knob to
tune the radio to the desired frequency.
Press
side of the bars or tune the
knob to right to tune to a higher frequency,
press side of the bars or tune the
knob to the left to tune to a lower frequency.
When tuning, the frequency reading will
quickly change. Loose the bar when the
desired frequency is displayed. To
micro-adjusting the frequency, point and
press the TUNE bars.
SEEK—The seek function searches up and
down from a current frequency to find a
station with strong signal. To activate it,
press the or side of the bar,
then release it. The system will scan up or
down from the current frequency according
to the pressed side. Stop to search until it
searches out a station with strong signal.
SCAN—The scan function samples all
station with strong signal on the selected
band. To activate it, press the scan button,
then release it. The SCAN will be displayed.
The system will play the kept stations for 5
seconds. At the time if you don’t make any
operation, the next station will be played.
When the station you want to listen to, only
press the scan button again.
Preset—Each side of the bars (1-6) or preset
icon store two frequency ( AM1、AM2) on
AM, and three frequency (FM1、FM2、FM3)
on FM.
When storing frequency, as follows:
1.Select the desired band (AM or FM)。
2. Use the TUNE、SEEK or SCAN
function to tune the radio to a desired
station.
3.Pick the preset number(1~6),you want
for that station. Press the left or right side of
the bar or icon and hold it for 2 seconds, the
station can be stored to the related number.
4.Repeat the steps 1 through 3 to a total of
12 stations on AM and 18 stations on FM.
Once the station be stored, only point and
press the left or right side of bar, and then
you can listen to it.

F6 OWNER’S MANUAL
80
The frequency will be lost if the battery is
discharged or disconnected, or the radio
fuse is taken out.
Hold SCAN—Press the AUTO SELECT for
2 seconds, the system will search the station
and store it on FM1、FM2、FM3 or AM1、
AM2. To activate it, Press the SCAN button
of the AUTO SELECT. Then the SCAN is
displayed and flashed. The preset (1~6)
can store 12 stations on AM and 18 stations
on FM, then use the preset (1~6) to choose
the station.
If you don’t like the frequency AUTO
SELECT has stored, you can store other
frequency on the preset bars. Use the
TUNE、SEEK or SCAN function searches
desired frequency, according to the above ,
store the frequency to preset bars
Audio adjustment
The BAS、TRE、BAL and FAD can be
adjusted.
Press AUDIO, choose the desired mode.
Press the AUDIO every time,the mode can
change from the BAS to TRE to BAL to
FAD , then return to the chosen mode.
Changing the mode, the related mode name
will be displayed.
Volume balance(L-R/F-R)— these two
modes adjust the strength of the sound
coming from each speaker. BALANCE
adjust the left to right strength while the
FADER adjust the front to rear strength.
Press AUDIO, choose the BALANCE OR
FADER mode. Rotate the volume knob, the
BALANCE OR FADER can be adjusted to
desired degree. The displayed number is the
current set. Display the C, when the volume
reaches to the center of range.
Alt/Bass—Use these modes to choose the
desired tone. Press AUDIO, choose TRE
or BAS mode. Rotate volume knob to
desired mode. The displayed number is the
current set.
Display the O when volume reaches to the
center of range. Several seconds after you
stopping to use the volume knob, the system
will automatically return to and display the
chosen mode.
Electronic clock
The radio system usually display the time
when the ignition switch is on the
ACCESSORY or ON.
To enact time, press AUDIO(CLOCK) for
2 second, after listening to reminding sound,
enter into the adjusting mode. Then hold
the H(preset ing 4 until the hour increase to
the desired hour;hold M(presetting 5)
until the minute increase to desired minute.
Use the R(presetting 6), enact the time to
the nearest current time quickly. At the
clock adjusting mode, press the R. If the
time is the former half hour, press R to enact
the time always to former one hour... If the
time is rear half hour, press R to enact the
time to the beginning of next hour.
For example:
1:06 will be enacted to 1:00
1:30 will be enacted to 2:00
1:52 will be enacted to 2:00

F6 OWNER’S MANUAL
81
Before don’t set the time or battery is
disconnected、 or anew charge after power
exhausted, the display of time will always
twinkle to remind to set the time.
USB/AUX input operation
The system can play music of MP3 format
in U disk through USB interface and play
music through speaker-on board, and the
music is from the input audio signal through
AUX interface.
When inserting the connective device of
USB, the system will automatic shift into
USB mode, meanwhile play the music of
MP3 format in the storage device. Like the
CD music, you can make the operation
PLAY/PAUSE、 & and so on.
When the earphone jack and AUX faucet
which can connect the MP3 by data wire on
board is shifted to
AUX mode, the MP3 player will play music
which can be heard.
Notice:
1、Suggest using the data wire on board to
connect the U disk to avoid causing possible
damage;
2、USB interface don’t support a part of
mobile hart disk whose compatibility is bad
and the capacity of U disk exceed 1GB;
3、USB interface only supports music file of
the FAT file system MP3 format;
4、USB interface mayn’t support the USM
store device whose compatibility is bad.
CD disc play
To play the laser disc, must turn the laser
disc to ACCESSORY( ) or ON( ).ⅠⅡ
The operation of laser phonograph is same
with the radio. To choose the laser
phonograph, press the CD button. The
screen will display the “ CD” & program
number which is being played. The system
will play the disc until you change the mode.
Insert the laser disc into player. The driver
will play the music. When finish the music,
the system will anew play it.
Notice:
The CD player only can play the normal CD
format, can’t play record disc compressed
such as MP3 and WMA.
Don’t use the disc which has the sticky
label.
The label possibly makes the disc locked in
the device
.
Don’t play the 8 cm ( 3 inch) disc. Only
allow to play the round standard disc. The
abnormal disc may be locked in the driver
or cause the malfunction.
To get the best effect of CD-R, only use the
advanced disc which has the label “be used
in sound system”, when transcribing the
CD-R disc, the transcribe should be totally
close, only this, the disc can be played in
the laser phonograph. The device can’t play
the CD-RW disc.
When playing the disc, press AM/ FM
button, and can shift to radio mode. Press
the CD button again, and can return to CD
play mode, and the disc will begin to play
from the last position.
When playing, using the (PWR / VOL)
knob or closing the system by closing
ignition switch, the disc will stay in driver.
Open the system once more, the
phonograph will play from the last position.

F6 OWNER’S MANUAL
82
Press the quit button, take out the disc from
the driver.
If the disc has been quit, but don’t take out
the disc, after 10 seconds, the system will
introduce the disc automatically. To play the
disc, press the CD button.
When playing, use the (SEEK / SKIP)
stripkey to choose the track and change the
program.To quickly move the disc in the
same program, press and hold the (SEEK /
SKIP). Hold the to rapidly move and
hold the to rapidly move back. When
getting to the desired position, only need
loose the stripkey.
Press the
, the system will play the
next track on the disc. Press the , the
system will replay the track in play. Press it
again, the system will play the last track.
When playing the disc, use the function
such as (REPEAT)、 (RANDAM PLAY) or
(SCAN) and so on.
SCAN— when activating the function,
sample all the tracks on the selected disc in
the order they are recorded. To activate the
function, press the (SCAN) button, choose
scan mode. The screen will display the
“ SCAN”. The system will play the first
track for 10 seconds. If don’t do any
operation, the system will continuously
sample the each selected track for 10
seconds. When search out of the track you
want to enjoy, press the SCAN button again.
REPEAT—to activate the function, press
the (RPT) button. You will see the “RPT” in
the display to remind you. The system will
continuously replay the current program.
Press the button again to get out of the
function.
RANDOMPLAY— after activate the
function, the system will play not the
recorded order on the disc but the random
order. To play randomplay function, press
the (RDM) button. You will see the “RDM”
in the display. And the system will choose
the random track. Keep the operation until
you press the randomplay button again and
quit the randomplay mode.
The maintenance of laser disc
Hold its edge, and don’t touch its up and
down surface. Don’t add the stable ring and
paste the label on the disc. Don’t leave the
fingerprint and ink on the disc, or will not
normally play the disc or the disc will be
locked in the driver.

F6 OWNER’S MANUAL
83
when don’t use the laser disc, put it into
box to avoid being polluted. To prevent
distortion, should avoid the overheating and
the sun directly shining.
When cleaning the disc, use the clean
dishcloth from the center to edge.
The inner and outer edge of the new laser
disc is possibly some rough. The chipping
of coarse edge will flake, if the chipping
drop on the recorded face of disc, will cause
the skip or other malfunction. Use the side
of pencil or pen rub the inner and outer edge
to remove the chipping.
Don’t insert eyewinker into the laser
phonograph
.
Remote control of audio system (optional)
There are three buttons to set the radio
system on the left side of steering wheel hub.
These buttons can make you operate the
radio system and your hands don’t leave the
steering wheel.
Volume button ”+”、”-” can adjust the
volume. Hold the button ”+”、”-” and
loose it until the volume get to the desired
extent.
The (MODE) button can change the mode.
Repeat to press the button, The system will
circulate between the FM1、 AM1 or disc

F6 OWNER’S MANUAL
84
playing (if have had the disc) or MP3 music
playing
(if the USB interface has been connected
with the U disk) or the radio playing( if
AUX interface has connected the player).
Channel button “ ”“ ” has the same ∨∧
function with “SEEK/SKIP” strip key. If
you are listening to the radio, use the “ ” ∧
button and can automatically search the next
strong signal station; the “ ” button can ∨
automatically search the last strong signal
station.
When playing, press the “ ” butt∧ on every
time. The radio system will return to the last
track. Press the “ ” button, the radio ∨
system will skip to the next track. And you
will see the disc number and the track
number in the display.
If it is playing the MP3 of USB, press
the“ ” to play ∧ the last track, press “ ” to ∨
play the next track.
If it is the AUX, the button has no effect
Safety system
The safety system can protect your vehicle
and valuables from theft. When someone
tries to enter into the vehicle, the buzzer
will buzz, at the same time all buzzers will
twinkle together, the buzzer will buzz for 30
seconds, and stop for 5 seconds, then buzz
again. The longest time is 5 minutes. To
anew set the warning system within 30
seconds, can use the remote control or key
to open the side door of driver.
When locking all doors、engine hood and
trunk after 15 seconds, the safety system
will automatically set. Need use the key、
lock bolt lock switch or remote control to
start the safety system from the outer.
Meanwhile the indicator light of safety
system on the instrument panel will twinkle
to show the safety system is self-setting.
Indicator light of safety system
Once set the safety system, open any door
( no use the remote control)、 engine hood
or trunk, the safety system will send out the
warning.
Even if the system has been set, you can
still use the remote control to open the trunk,
and it can’t activate the warning. If the lock
of trunk is unclenched or opened with the
opening handle, the warning will sound.
When the engine hood, trunk or any door
has not been closed, it will not be able to set
the safety system. Before you leaving the
vehicle, ensure the trunk, engine hood or all
doors have been closed tightly.
Don’t try to change the system or add other
devices
.

F6 OWNER’S MANUAL
85
Cruise control system
Cruise control system can keep the setting
speed over 40 km/h and it isn’t necessary to
step the acceleration pedal. When driving on
the erect and unblocked highway, you can
use the function. Don’t suggest using the
function on the sinuous road、 wet and
slippery road、 rain day or at the condition
of other bad climate as well as in the
downtown. When encountering the
condition, you should self-operate the
vehicle.
Friendly tips
Improperly using the cruise control
system will be able to cause the
accident.
Only use the cruise control system in
the fine climate and on the unblocked
highway.
Start cruise control
1. Press the cruise control main button
(ON/OFF) , the indicator light of cruise
control system will be on.
2.Lift the speed to the desired speed (over
40 km/h).
3.Press the (-/SET) button, to start the
cruise control system.
Cruise control main button
Cancel button
Decelaration/ set button Acceleration/RESbutton

F6 OWNER’S MANUAL
86
When you are going up and down a hill, the
cruise control system can’t hold the setting
speed. When the speed increase going down
a hill. Use the brakes to slow down, this will
cancel the cruise control. If need use the
setting speed, press the (+/RES) button to
automatically accelerate to set speed.
When you are going up a steep hill,
automatic transmission will lower the gear
to keep the setting speed.
Change speed setting
Can increase the setting cruising speed in
any of following ways:
1.Hold the (+/RES) button, vehicle will
continuously accelerate, when reaching the
desired speed, release the button.
2.Push the accelerator pedal, accelerate to
the desired speed, press the (-/SET) button.
3. To increase the speed in very small
amounts, repeat tap the (+/RES) button.
Each time you do this, the vehicle will
speed up about 1.6km/h.
You can decrease the setting cruising speed
in any of following ways.
1.Hold the (-/SET) button, the speed will be
decreased. When reaching desired speed,
release the button.
2.Push the braking pedal lightly, when
reaching to the desired speed ( over
40km/h), press the (-/SET) button. The
vehicle will keep the desired speed.
3.To decrease the speed in a small amounts,
repeat tap the (-/SET) button. Each time you
do this. Your vehicle will speed down about
1.6 km/h

F6 OWNER’S MANUAL
87
Even if the cruise control turned on, still use
the accelerator pedal to speed up for passing.
After passing, release the accelerator pedal,
and the speed return to set cruising speed.
Resting your foot on the braking pedal will
cancel the cruise control.
Cancel cruise control
You can cancel the cruise control in any of
following ways:
1.Push the braking pedal.
2 . Press the (CANCEL) button on the
steering wheel
3.Press the cruise control master button
(ON/OFF).
4.Shift the gear to N gear.
When press the (CANCEL) button or push
braking pedal or clutch pedal, the vehicle
will cancel the cruise control and begin to
speed down. This time, you can use the
accelerator pedal to control speed according
to usual operation.
The system can store the setting cruising
speed.
To return to the speed, firstly speed up to
40km/h and tap the (+/RES) button, the
vehicle will speed up to set cruising speed.
Pressing the cruise control master button
(ON/OFF) will totally close the system,
and cancel the setting cursing speed. To use
the system once more, please refer to the
section of cruise control turning on.

F6 OWNER’S MANUAL
88
Before driving
Before you begin driving the vehicle, you
should know what gasoline to use and how
to check the levels of important fluids. You
also need to know how to properly store
luggage or packages. The information in
this section will help you solve these
problems. If you plan to add accessories to
your vehicle, please read the information in
this section first.
Running in period...................88
Gasoline...........................88
Operation in petrol station.............89
Open engine hood...…..
............90
Check engine oil....................92
Fuel saving .......................94
Luggage carrying....................95

F6 OWNER’S MANUAL
89
Running in period
During the first 1,000 kilometers, you
should especially notice the method of
driving. It’s helpful to ensure the vehicle’s
future reliability and performance.
Notice the following proceedings during
this period:
1 、 Avoid full-throttle starts and rapid
acceleration.
2、Avoid hard braking. New braking system
need running-in through properly use in the
first 300 kilometers.
3、Do not change the oil until the schedule
maintenance time or the driving mileage
You should also follow these
recommendations with an overhauled or
exchanged engine, or when the brakes are
replaced.
Gasoline
Suggest using 93# or higher unleaded
gasoline.
Using leaded gasoline will damage emission
control device of vehicle and engine. At the
same time it will also prick up air pollution.
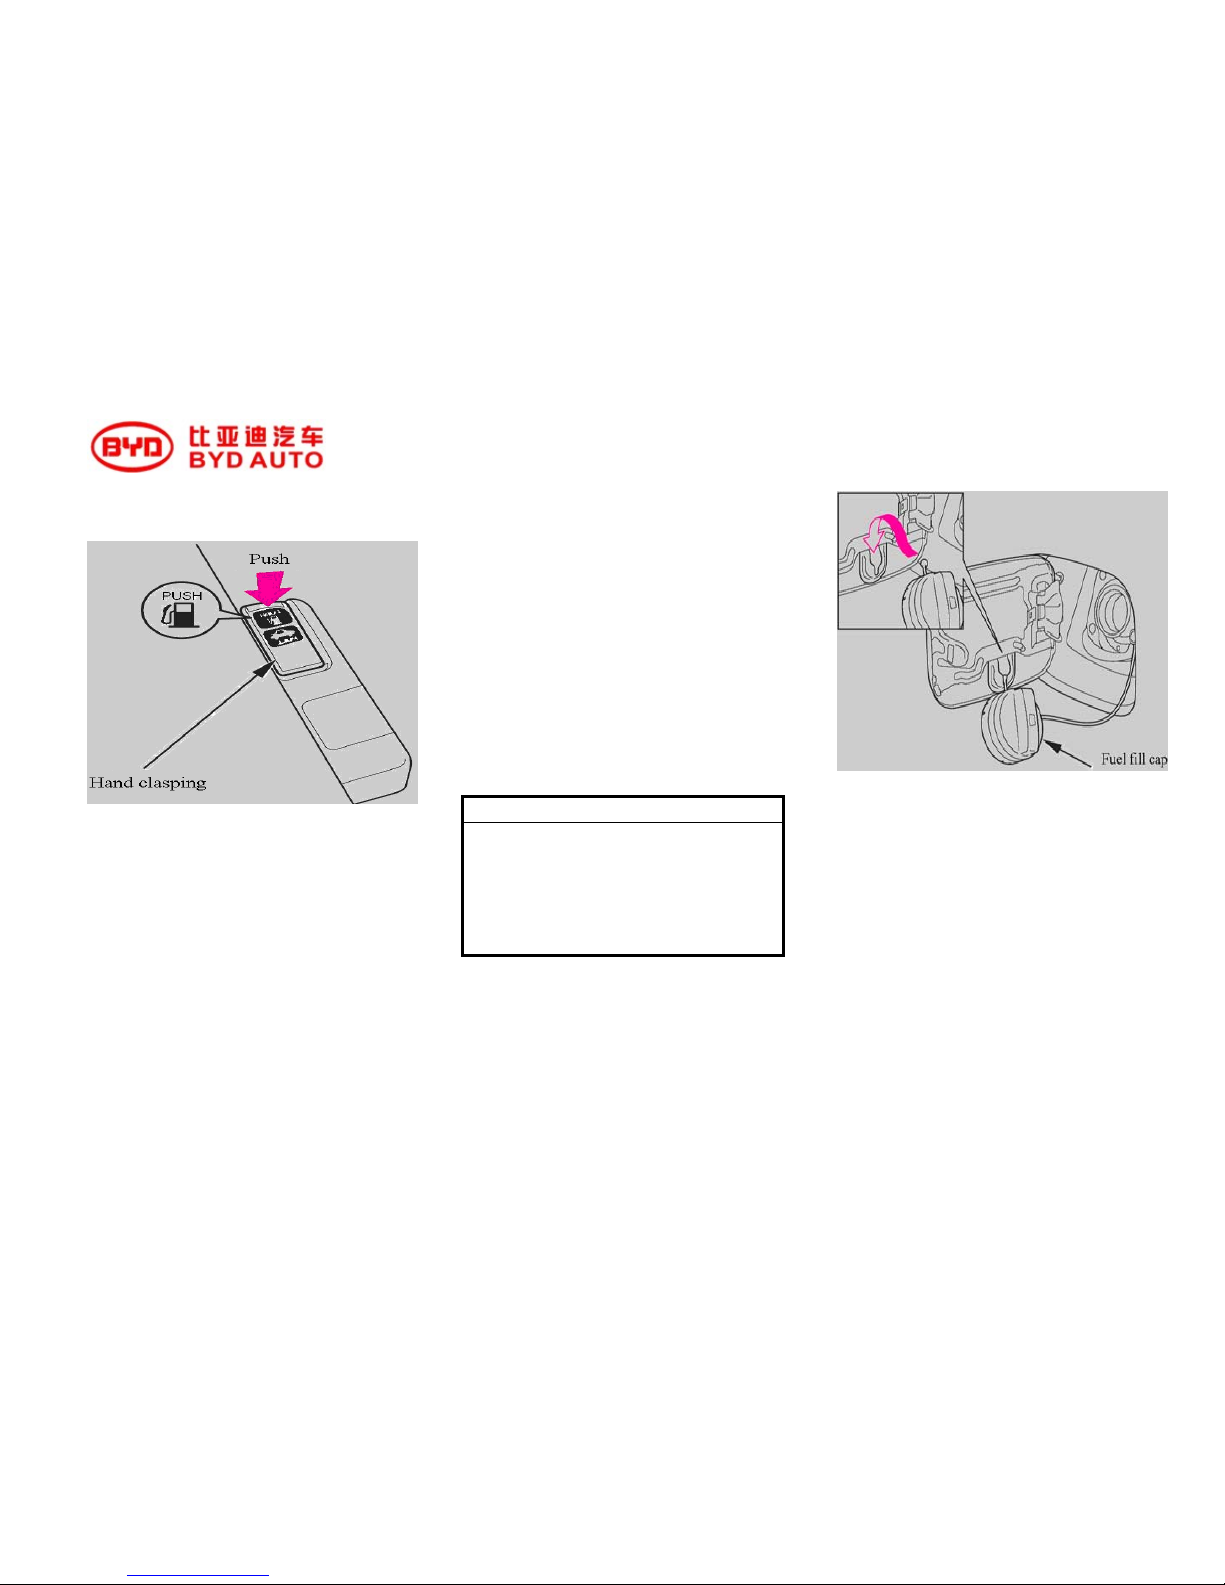
F6 OWNER’S MANUAL
90
Operation in petrol station
Fuel tank filling
1.Because the fuel cap is located on the left
side of car, please park with the left side
closest to the gas pump.
2.To open the fuel cap, push down on the
lever located to the left of the driver’s seat.
Gasoline is highly flammable and explosive.
When handling fuel, notice the following
proceedings:
1)Stop the engine, keep heat、sparks and
flames away;
2) Suggest handling fuel only outdoors;
3) Wipe up spills immediately;
3.Remove the fuel fill cap slowly. You may
hear a hissing sound as pressure inside the
tank escapes.
Friendly tips
When handling fuel, notice the
following proceedings:
1)Stop the engine, keep heat、sparks and
flames away;
2) Suggest to handle fuel only outdoors;
3) Wipe up spills immediately;
To avoid losing the fuel fill cap carelessly,
the fuel fill cap is attached to the fuel filler
with a tether. When handling fuel, put the
fuel fill cap on the bracket of fuel fill door.

F6 OWNER’S MANUAL
91
4.Stop filling fuel to the tank after the fuel
nozzle automatically clicks off. Don’t try to
“top off” the tank. Leave some room for
fuel to expand with temperature changes.
5.Screw the fuel cap back on until it clicks
at least twice.
6.Push the fuel cap closed until it latches.
Open engine hood
1、Shift to Park or Neutral, and set the
parking brake. Pull the hood release handle
located under the lower left corner of the
dashboard. The hood will pop up slightly.

F6 OWNER’S MANUAL
92
2.Stand in front of the vehicle. Put your
fingers under the front edge of the hood
near the center. Slide your hand to the left
until you feel the hood latch handle. Push
this handle up to release it. Lift up the hood.
3.Lift the hood up most of the way. The
hydraulic supports will lift it up the rest of
the way and hold it up.
When closing the hood, lower the hood to
about 30cm above the fender, and then
firmly press down on the front edge of the
hood. After closing the hood, you should
inspect the latch whether it is securely
latched.
If you can open the hood without lifting the
latch, or the hood latch handle moves stiffly
or do not return back, the mechanism should
be cleaned and lubricated (Please refer to
138th page ).

F6 OWNER’S MANUAL
93
Check engine oil
Engine oil is the consumable which can
ensure the engine in normal working.
Therefore, the oil level should be checked
regularly, for example when handling fuel.
You should also check the engine oil before
every long-distance travel.
Engine oil consumption depends on driving
status, weather condition and road condition.
Engine oil consumption can reach
max.1.0L/1,000km. Engine oil consumption
of new engine may be higher.
Ensure the engine preheating and park on
the level ground. Wait three minutes after
turning the engine off, and then check the
oil level.
1.Pull out the dipstick.
Mitsubishi 4G69S4M Engine dipstick
(White ring)
Mitsubishi 4G69S4M Engine dipstick has
two holes at the upper and lower marks. The
oil level should locate between two holes.
BYD483QB Engine dipstick (Yellow ring)
BYD483QB The upper and lower marks of
dipstick is two convex lines, and mark

F6 OWNER’S MANUAL
94
“F””L”. The oil level should locate between
the upper and lower
2.Wipe the dipstick with a clean cloth or
paper towel.
3.Insert it all the way back in its hole
.
4.Remove the dipstick again, and check the
level. It should be between the upper and
lower marks.
If it is near or below the lower mark, refer
to 123
th
page on adding oil.
Check engine coolant
Check the coolant level in the radiator
reserve tank. Make sure it is between the
Max and Min lines, refer to 125th page on
Adding Engine Coolant for information on
adding the proper coolant.
Refer to Owner’s Maintenance and check
on 119
th
page for information about
checking other items on your vehicle.

F6 OWNER’S MANUAL
95
Fuel saving
Driving custom
Moderate driving is helpful to save fuel.
Rapid acceleration, abrupt cornering and
hard braking use more fuel.
Always drive in the highest gear possible, it
can make the engine run and accelerate
more stably.
According to the traffic status, try to keep a
constant speed. Every time you slow down
and speed up, you vehicle uses extra fuel.
Using cruise control (limit to some vehicle
type) can save more fuel under appropriate
driving condition.
Cool engine uses more fuel than hot engine,
but it is not necessary to make it run in idle
speed for a long time to preheating. NO
matter how cold outdoor, you can drive the
vehicle away after one minute that you start
the engine. In this way, engine will rise
temperature more quickly, and save more
fuel. To reduce times of “cool starting”, you
should arrange short mileage driving
together.
The air condition puts an extra loading on
the engine which makes it use more fuel.
Close the air condition to reduce fuel
consumption. Use the fresh-air ventilation
when air temperature out of vehicle is
proper.

F6 OWNER’S MANUAL
96
Luggage carrying
This vehicle has several convenient storage
areas; it makes you carry the luggage safely.
Glove box、door pockets、seat-back pockets
is designed for storing small and light cargo,
and trunk is used to carry big and heavy
cargo.
In addition, trunk channel port makes you
carry long cargo in vehicle.
However, carrying too much cargo or
improperly storing, it can affect your
vehicle’s handling, stability and normal
running, and reduce vehicle’s safety. So
before carrying any type of cargo is sure to
read the following pages.

F6 OWNER’S MANUAL
97
Load limit
When loading luggage, the total weight of
vehicle, all occupants and luggage don’t
permit to exceed the Gross Vehicle Weight
Rating. Refer to208
th
page on maximum
loading.
Friendly tips
Overloading or improper loading can
affect vehicle’s handling and stability,
and cause a crash in which you can be
hurt or killed.
Follow all loading limits and other
loading guide lines in this manual.
Carrying cargo in the passenger
compartment
1 Store or secure all items that could be
thrown around and hurt someone during a
crash.
2 Don’t put any items on top of the rear
shelf. Otherwise, they can block you view
and be thrown around the vehicle during a
crash.
3. Be sure items placed on the floor behind
the front seats can not roll under the seats
and interfere with the driver’s ability to
operate the pedals or the seat.
Don’t push the cargo over the front
seat-back.
4 Keep the glove box closed while driving.
If it is open, it maybe hurt the passenger’s
knees in a crash or a sudden stop.
 Loading...