


F3/F3R OWNER’S MANUAL
Owner’s Manual to BYD F3/F3R
BYD Auto Co., Ltd.

F3/F3R OWNER’S MANUAL
Foreword
Thanks for choosing BYD F3/F3R. To help you operate and maintain BYD F3/F3R, please read this Owner's Manual thoroughly.
BYD F3 uses electric injection engine, and the wiring harness is very complex, so please do not install the following additiona l electric equipment by
yourself: burglar alarm, central control lock, power window, audio devices and so on. Any damages or malfunctions caused by the above
modifications are not covered by warranty.
Throughout this manual, you will see safety and vehicle damage warnings. You must follow these warnings carefully to avoid poss ible injury or
damage.
The types of warning, what they look like, and how they are used in this manual are explained as follows:
Important Information
NOTICE
Be convenient to overhaul, please abide the following.
All pictures in this manual are schematic and only for references.
BYD reserves the right to modify the technical features and
specifications in this manual without notice.
Thanks for choosing BYD F3/F3R. All suggestions are welcome.
CAUTION
This is a warning against anything which may cause injury to people or
damages to your vehicle.
When you see the safety symbol shown above, it means:
“Do not …”; “Do not do this”; or “Do not let this happen”.

F3/F3R OWNER’S MANUAL
CONTENTS
Section 1 Operation of Instruments and Controls
...............................................................................................................................
7
1. Overview of instrument panel
...............................................................................................................................
........................................
7
2. Keys and doors
...............................................................................................................................
.............................................................
16
3. Seats, seat belts, steering wheel and mirrors ...............................................................................................................................
39
4. Light, wipers, defogger, and HUD (Head-up Display)
...............................................................................................................................
60
5. Instruments and service reminder indicators ...............................................................................................................................
71
6. Ignition switch, manual transmission, and parking brake
............................................................................................................................
82
7. Car audio system ...............................................................................................................................
..........................................................
90
8. Air conditioning system ...............................................................................................................................
.............................................
103
9. Other equipment ...............................................................................................................................
..............................................................
119
Section 2 Driving Information for BYD F3
...............................................................................................................................
.................................
128
Section 3 Starting and Driving
...............................................................................................................................
..............................................
142
Section 4 In Case of an Emergency
...............................................................................................................................
...........................................
152

F3/F3R OWNER’S MANUAL
Section 5 Corrosion Precaution and Appearance Care
...............................................................................................................................
169
Section 6 Maintenance Requirements...............................................................................................................................
..................................
179
Section 7 Do-It-Yourself Maintenance...............................................................................................................................
..................................
191
1. Introduction ...............................................................................................................................
.................................................................
192
2. Engine and chassis...............................................................................................................................
.....................................................
199
3. Electrical components
...............................................................................................................................
.....................................................
212
Section 8 Specifications
...............................................................................................................................
.............................................................
226

F3/F3R OWNER’S MANUAL
- 1 -
Technical Specifications and Vehicle Identification
Technical specifications of BYD F3
SEIRES A0617JCQ SEIRES A0517JCQ epyT
3354 )mm( htgnel llarevO
5071 )mm( htdiw llarevO
Dimensions
0941 )mm( thgieh llarevO
0062 )mm( esab leehW
0841 )mm( tnorF
Wheel track
0641 )mm( raeR
)5721 GNC(0021 )5721 GNC(0021 )gk( thgiew bruC
Total weight (㎏)
)0561 GNC(5751 )0561 GNC(5751
51R 06/591 eriT
7.71 )°( elgna hcaorppA
9.81 )°( elgna erutrapeD
339 )mm( gnahrevo tnorF
0001 )mm( gnahrevo raeR
5 rebmun taeS
071 )h/mk( deeps .xaM
81G4AD BQ374DYB S51G4 enignE

F3/F3R OWNER’S MANUAL
- 2
-
Type
In-line 4-cylinder, 16-vavle, water-cooled, natural air inflow, SOHC
4851 8841 8841 )lm( tnemecalpsiD
5.37 97 87 )Wk( rewop .xaM
Max. gradeability (%) ≥30
* The actual fuel consumption depends on many factors, like vehicle condition, road condition,
and driving habit.
Technical specifications of BYD F3R
Type
QCJ7161A SERIES
QCJ7151A S ERI ES
5234 )mm( htgnel llarevO
5071 )mm( htdiw llarevO
Dimensions
0941 )mm( thgieh llarevO
0062 )mm( esab leehW
0841 )mm( tnorFWheel
track
0641 )mm( raeR
0711 )gk( thgiew bruC
Total weight ( )
1545
51R 06/591 eriT
k
g

F3/F3R OWNER’S MANUAL
- 3 -
7.71 )°( elgna hcaorppA
8.82 )°( elgna erutrapeD
339 )mm(gnahrevo tnorF
297 )mm( gnahrevo raeR
5 rebmun taeS
071 )h/mk( deeps .xaM
81G4AD BQ374DYB S51G4 enigne
Type
In-line 4-cylinder, 16-vavle, water-cooled, natural air inflow, SOHC
4851 8841 )lm( tnemecalpsiD
5.37 97 87 )Wk( rewop .xaM
Max. gradeability (%) ≥30
* The actual fuel consumption depends on many factors, like vehicle condition, road condition, and driving habit.

F3/F3R OWNER’S MANUAL
- 4 -
BYD F3 vehicle identification
VIN:
The VINs are set in the engine cabin
separately and on the upper left of the
panel, as shown in Figure 1. This is the
VIN of BYD-F3 for the car owner to
register. The Plate-2 shows the VIN as
well.
The above picture indicates
the fuel specification which is set
in the inner part of the cap.
1. Cooling water indicating plate
2. A/C system alarm plate
3. Cooling fan alarm plate
4. CNG
plate
1 2 3 4
standard indicating
Figure 1.
n in Figure 1.

F3/F3R OWNER’S MANUAL
- 5 -
The picture above refers to children-
protection system indication which is
downward to the children-protection
lock on the inner side of the rear door.
(4G1 series engine)
As showed in the picture above, the
number of Engine is indicated on the
cylinder.
CNG bottle alarm plate
Engine No.

F3/F3R OWNER’S MANUAL
- 6
-
The picture above shows the tire
pressure indication which is set
below the lock ring of left front
door
(473 series engine)
As showed in the picture above, the
number of Engine is indicated on the
cylinder.
Engine No.

F3/F3R OWNER’S MANUAL
- 7 -
Section 1 Operation of Instruments and Controls
SECTION 1-1
OPERATION OF INSTRUMENTS AND CONTROLS
1. Overview of instrument panel
Instrument panel overview…………………………………………………………………………………………………………………………… 7
Combined instrument overview………………………………………………………………………………………………………………………12
Indicator symbols on the combined instrument………………………………………………………………………………………………… … 14

F3/F3R OWNER’S MANUAL
- 7 -
Section 1 Operation of Instruments and Controls
SECTION 1-1
OPERATION OF INSTRUMENTS AND CONTROLS
1. Overview of instrument panel
Instrument panel overview…………………………………………………………………………………………………………………………… 7
Combined instrument overview………………………………………………………………………………………………………………………12
Indicator symbols on the combined instrument……………………………………………………………………………………………………14
F3/F3R OWNER’S MANUAL
- 8 -
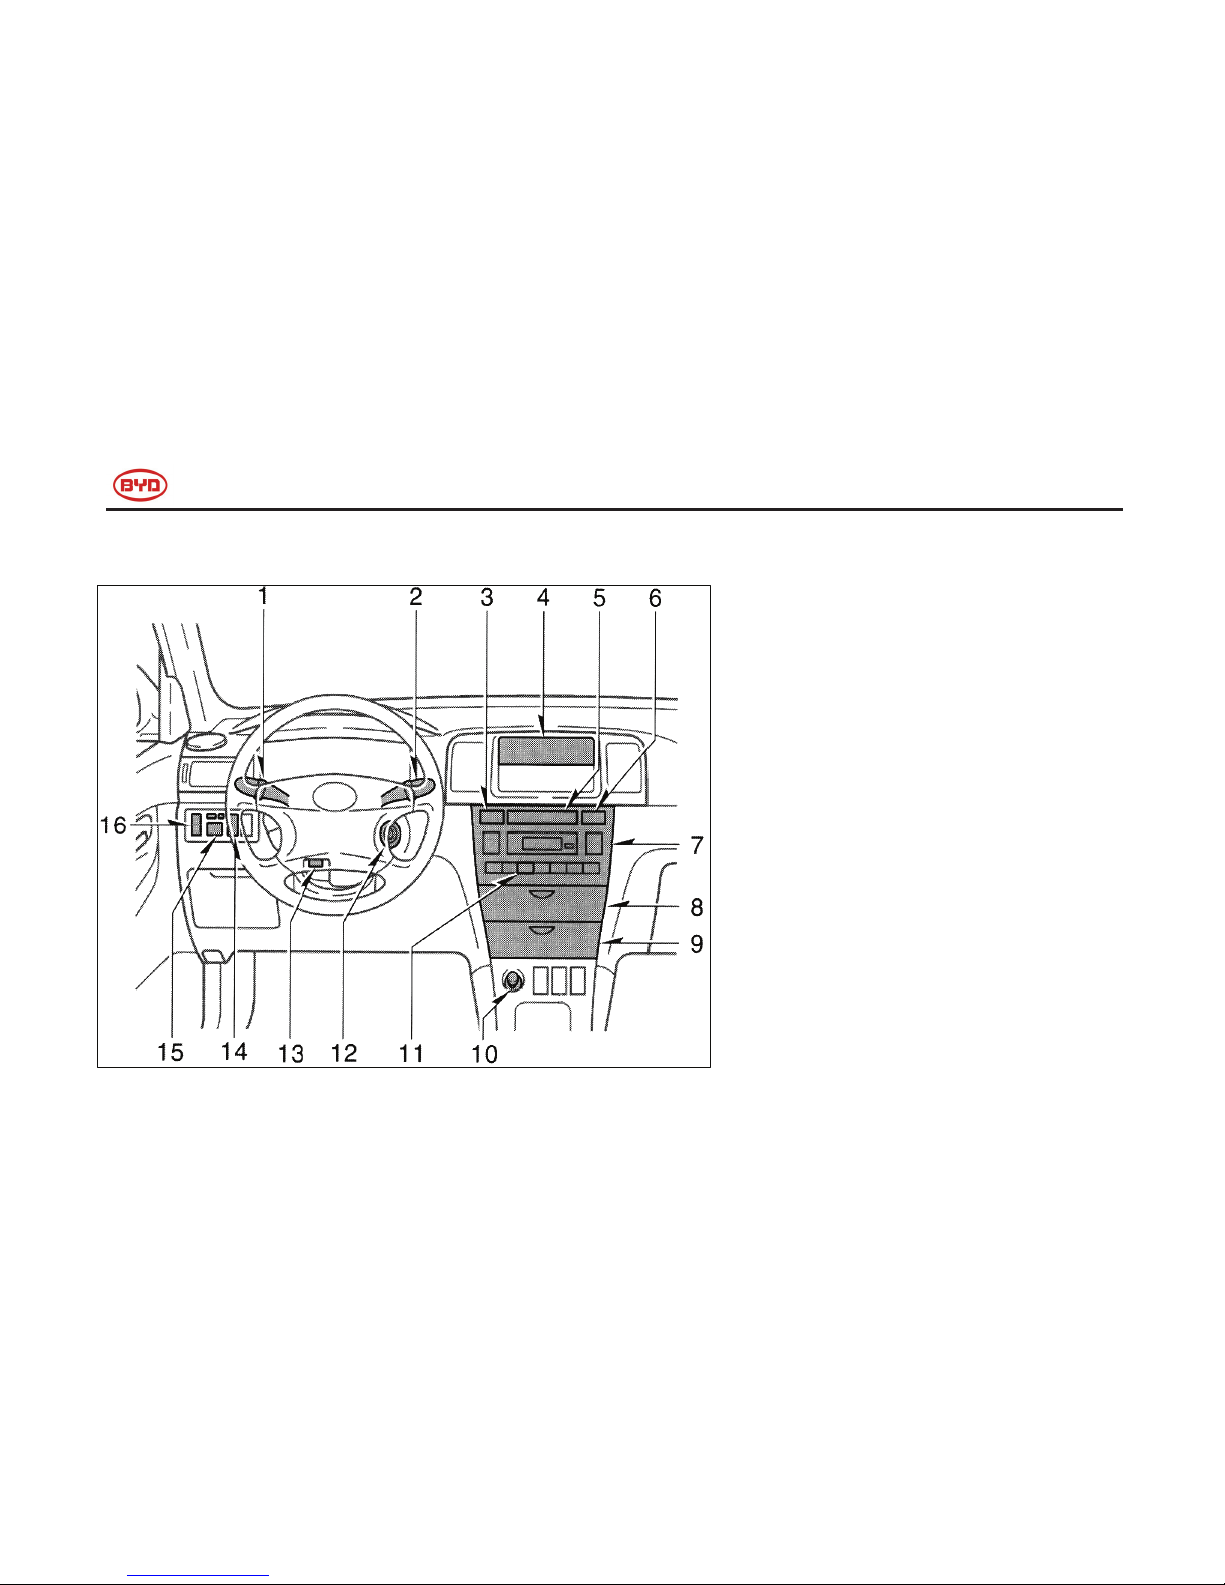
Instrument panel overview(MT)
1. Side defroster outlets
2. Side vents
3. Instrument cluster
4. Center vents
5. Front interior light and switch (Electric
sunroof switch, option)
6. Power window switches(Option)
7. Glove box
8. Cup holder(Option)
9. Console box(Option)
10. Rear ashtray(Option)
11. Parking control assembly
12. Gear shift lever(MT)
13. Auxiliary box
14. Hook lock release lever
15. Power window lock switch(Option)
16. Central door lock switch(Option)

F3/F3R OWNER’S MANUAL
- 9 -
Instrument panel overview(AT)
1. Side defroster outlets
2. Side vents
3. Instrument cluster
4. Center vents
5. Front interior light and switch (electric
sun roof switch, option)
6. Power window switches(Option)
7. Glove box
8. Cup holder(Option)
9. Console box
10. Rear ashtray
11. Parking control assembly
12. Gear shift lever(AT)
13. Auxiliary box
14. Hook lock release lever
15. Power window lock switch(Option)
16. Central door lock switch(Option)

F3/F3R OWNER’S MANUAL
- 10 -
With manual air conditioning controls
1. Leftward combination switches (Light)
2. Rightward combination switches (Wiper and washer)
3. Emergency flasher switch
4. Car audio
5. Electronic clock(Option)
6. A/C switch
7. Glove box
8. Front ashtray
9. Cigarette lighter assembly
10. Rear window defogger switch(Option)
11. Ignition switch unit
12. Tilt steering lock release lever
13. Burglar alarm indicator
14. Outer power rearview mirror control
switches(Option)
15. Rear fog lamp switch
16. Vice-driver seat trump switch (Option)
17. Reverse radar switch (Option)
F3/F3R OWNER’S MANUAL
- 11 -
With automatic air conditioning controls
1. Leftward combination switches (Light )
2. Rightward combination switches (Wiper
and washer)
3. Reverse indicator (Reverse radar switch)
4. Car audio
5. Electronic clock
6. Emergency flasher switch
7. A/C controls
8. Auxiliary box
9. Front ashtray
10. Cigarette lighter assembly
11. Rear window defogger switch
12. Ignition switch
13. Tilt steering lock release lever
14. Burglar alarm indicator
15. Outer power rearview mirrors
16. Rear fog light switch

F3/F3R OWNER’S MANUAL
- 12 -
Combined Instrument overview
1. Tachometer 2. Speedometer 3.Coolant temperature indicator 4. Fuel gauge 5.Odometer

F3/F3R OWNER’S MANUAL
- 13 -
Combined Instrument overview (AT)
1. Tachometer 2.Speedometer 3.Coolant temperature indicator 4.Fuel gauge 5 odometer

F3/F3R OWNER’S MANUAL
- 14 -
Indicator symbols on the combined instrument
Brake system warning indicator *
Door opening warning indicator *
Driver’s seat belt reminder *
SRS warning indicator *
Discharge warning indicator *
Tail light indicator
Low engine oil pressure warning indicator*
Headlight high beam indicator
Malfunction indicator *
Turn signal indicator
Low fuel level warning indicator *
Front fog light indicator
ABS warning indicator *
Rear fog light indicator
The indicators marked with * are service reminder indicators. For details, please see “Instrument and service reminder indicators” in Section 1-5.
Indicator symbols on the combined instrument (AT)
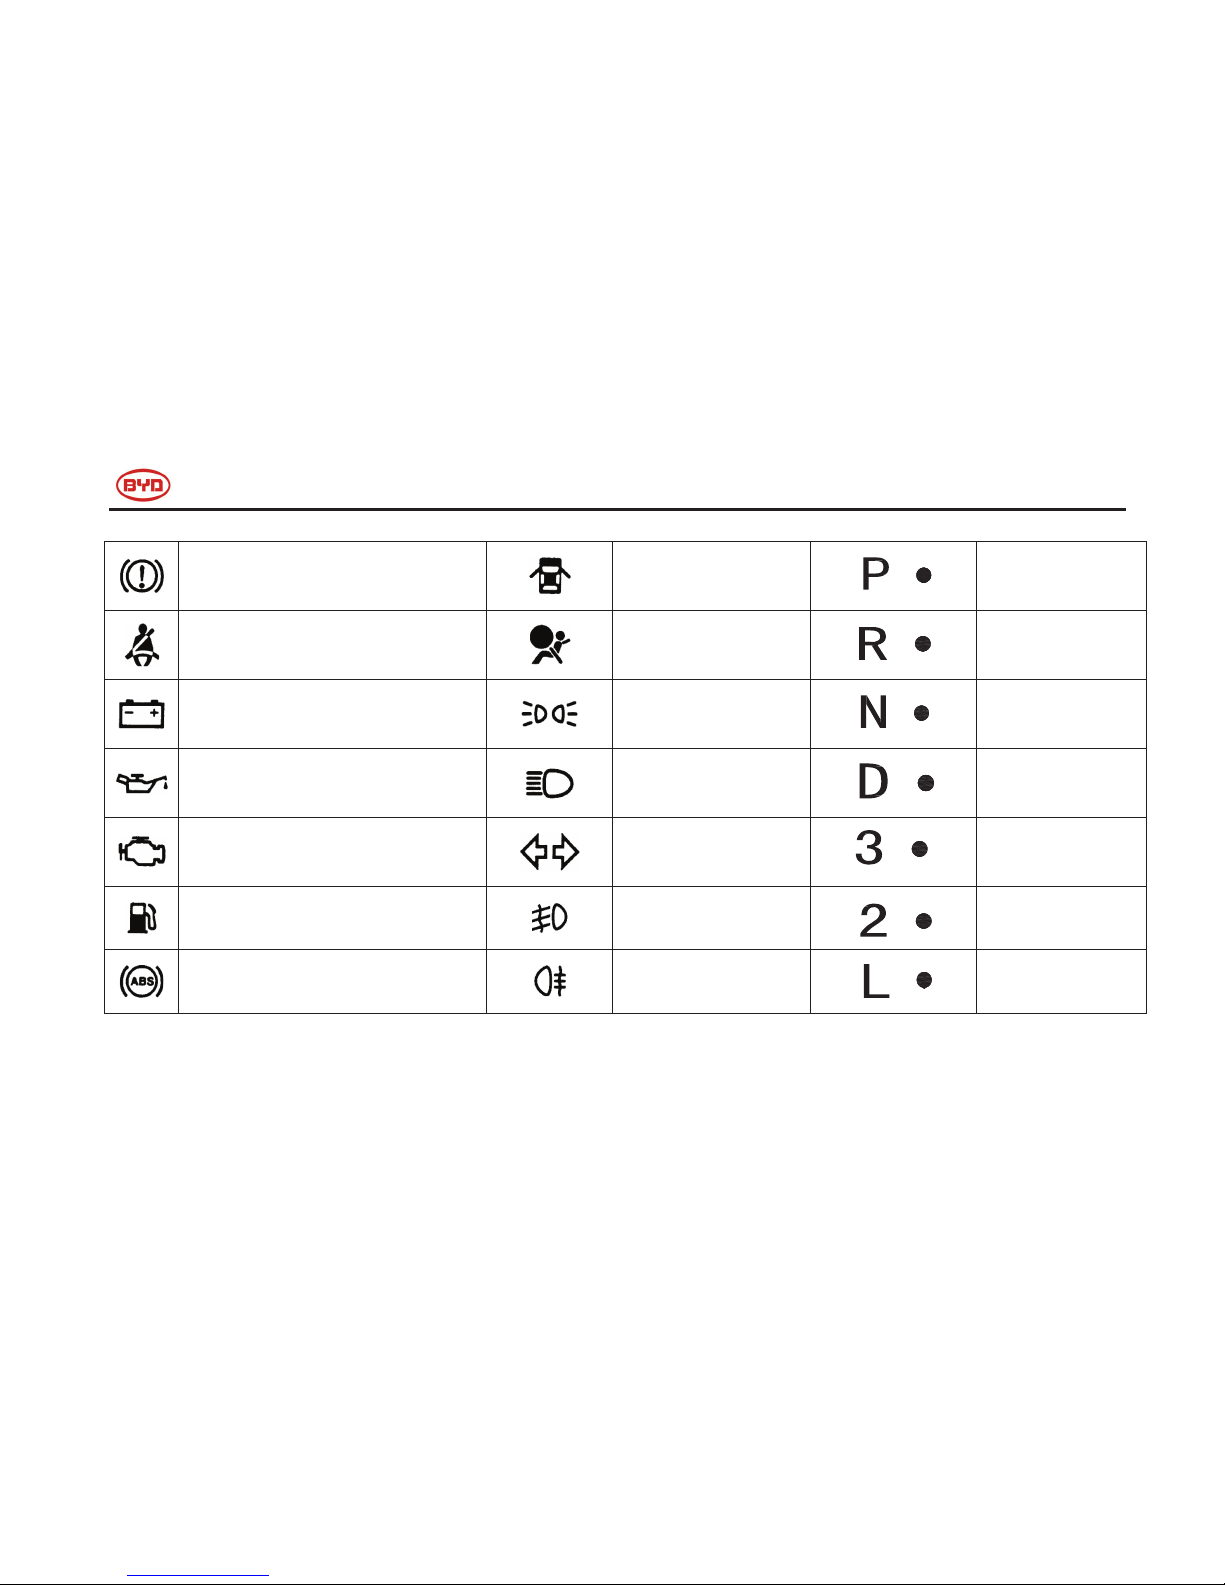
F3/F3R OWNER’S MANUAL
- 15 -
Brake system warning light *
Door opening warning
light *
Parking indicator
light(AT)
Driver’s seat belt reminder light*
SRS warning light*
Reverse indicator
light(AT)
Discharge warning light *
Tail light indicator *
Neutral indicator
light(AT)
Low engine oil pressure warning light*
Headlight high beam
Indicator Light
Driving indicator
light(AT)
Engine malfunction indicator light *
Turn signal indicator
lights
3
rd
gear indicator
light(AT)
Low fuel level warning light*
Front fog light indicator
light
2nd gear indicator
light(AT)
ABS warning light*
Rear fog light indicator
light
Low gear indicator
light(AT)
The indicators marked with * are service reminder indicators. For details, please see “Instrument and Service reminder indicators” insection 1-5.

F3/F3R OWNER’S MANUAL
- 16 -
SECTION 1-2
OPERATION OF INSTRUMENTS AND CONTROLS
2. Keys and doors
Keys…………………………………………………………………………………………………………………………...
17
Side doors…………………………………………………………………………………………………………………….
17
Wireless remote control……………………………………………………………………………………………………
……
Power windows……………………………………………………………………………………………………… ……… 25
Luggage compartment lid…………………………………………………………………………………………………… 27
Back door…………………………………………………………………………………………………………………….. 28
Engine hood…………………………………………………………………………………………………………………… 29
Anti-theft system…………………………………………………………………………………………………………….. 30
Fuel tank cap…………………………………………………………………………………………………………………
35
Electric sun roof……………………………………………………………………………………………………………… 37
20

F3/F3R OWNER’S MANUAL
- 17 -
Keys
Your vehicle is supplied with two kinds of
keys
1. Master keys: these keys work in every
lock. (2)
2. Sub key: this key will not work in the
luggage compartment. (1)
Note: Your F3R is equipped with 2 remote
keys with no spare key.
As the key is not needed when
locking the door, please take a master key
with yourself for spare use when your keys
are locked in the car accidentally
Key number plate
Your key number is shown on the plate. Keep
the plate in a safe place such as your bag,
not in the vehicle.
If you put the key in the vehicle, lock the all of
the doors, and there is not spare key, too,
you should smash the
smallest window and open the door. In this
way, the cost will be very cheap. Pay
attention to the cullet, avoiding being injured.
Side doors
Unlocking and locking with key
Insert the key into the keyhole and turn it.
To unlock: turn the key clockwise.
To lock: turn the key anticlockwise.

F3/F3R OWNER’S MANUAL
- 18 -
Vehicles with the central door lock system. All
doors lock and unlock simultaneously with
the driver’s door.
Unlocking and locking with inside lock
knob
Move the lock knob.
To unlock: pull the knob backward
To lock: push the knob forward
If you want to lock the door from the
outside, set the knob in the lock position
before closing the door. The outside door
handle must be held up while front doors are
being closed.
Do not lock your keys inside the car.
The driver’s side door can not be locked
when the door is open and the key is in the
ignition.
The driver’s door can be opened from the
inside even if the inside lock knob is in the
lock position.
Unlocking and locking with central door
lock switch
Push the switch
To unlock: push the front of the switch.
To lock: push the rear of the switch
All the doors lock or unlock simultaneously.
Unlocking and locking the door
automatically

F3/F3R OWNER’S MANUAL
- 19 -
When the speeds reach to 20km/h, all doors
will be locked automatically.
When you turn the ignition key from “ON” to
“ACC” or “LOCK”, all doors will be opened.
You can cancel these functions. For details,
see the section “Settings of optional
functions”.
Rear door child protector
Move the lock lever to the “LOCK” position as
shown in the figure.
When the child-protector is locked, you can
not open the rear door via the inside door
handle. We recommend using this feature
when ever small child are in the vehicle.
.
CAUTION
Before driving, be sure that the doors
are closed and locked, especially
when small children are in the
vehicle. Along with proper use of seat
belts, locking the doors helps
prevent the driver and passengers
from being thrown out from the
vehicle in an accident. It also helps
prevent the doors from being opened
unintentionally.

F3/F3R OWNER’S MANUAL
- 20 -
1. Indicator
2. “LOCK” switch
3. “UNLOCK” switch
4. “PANIC” switch
The wireless remote control system is
designed to lock or unlock all the side
doors and back door in the distance of 1
m or so.
To operate any switch, push it slowly
and securely. At this time, the indicator
flashes once.
Observe the following instructions to avoid
damages:
●
Do not leave the key in places where the
temperature becomes high such as on the
dashboard.
●
Do not disassemble it.
●
Avoid knocking it hard against other objects
or dropping it.
●
Avoid water entry.
If the wireless remote control does not
actuate the doors, or can not operate from a
normal distance, or the
indicator on the key
is dimmed or does not
illuminate,
please do the following actions:
●
Check for closeness to a radio
transmitter such as a radio station or an
airport which can interfere with normal
operation of the key.
●
The battery may have been consumed.
Check the battery inside the transmitter.
Replace the battery. For details, see
“Replacing the battery in the remote control”.
Wireless remote control

F3/F3R OWNER’S MANUAL
- 21 -
If you lose your wireless remote control key,
contact your BYD AUTO
service station as soon as possible.
“LOCK” switch
If the switch is kept being pressed, the
operation is not repeated. Release the switch
and then push again for another operation.
To lock: push the “LOCK” switch, all the side
doors and back door are locked
simultaneously. At this time, the turn signal
lights flash once.
If the key is in the ignition switch, locking and
unlocking can not performed by the remote
control. If
the key is not in the
ignition switch
and no doors are locked, press the “LOCK”
button on the remote control, and the forth
(fifth for F3R) door will
be locked. At the same time, the horn will
buzz one time to make a warning
without entering the anti-theft mode.
When the forth (fifth for F3R) door is closed
but do not in the state of anti-theft, press the
“LOCK” switch to lock the door.
Finding the vehicle:
when the vehicle enters
the state of anti-theft, press the “LOCK”
switch and you will hear a buzz and watch the
turn signal light flashes 15 seconds. (When
you do not ensure the position of your vehicle,
you can use this feature to find your vehicle.)
Under the state of finding the vehicle, press
the “LOCK” switch again to
enter this state again.
Cancel warning:
while the vehicle is under
the state of anti-
theft, the
warning system is
activated.
Press the “LOCK” switch, and all of
the doors will be locked one time. At the
same time, the warning will be cancelled. In
this way, the vehicle is also under the
anti-theft state.
“UNLOCK” SWITCH
If the switch is kept being pressed, the
operation is not repeated. Release the switch
and then push again for another operation.
To unlock: press the “UNLOCK”
switch, and all doors will be unlocked while
the turn signal light will flash

F3/F3R OWNER’S MANUAL
- 22 -
twice. If you press this switch when the
vehicle is under the state of anti-theft, the
vehicle will be unlocked and the turn signal
light will flash three times.
You can not unlock the vehicle by pressing
the “UNLOCK” switch if
the key is in the ignition switch. If under the
state of anti-theft and the key is in the ignition
switch, pressing the “UNLOCK” switch can
exit from the state of anti-theft and open all of
the doors simultaneously.
While using the wireless remote control to
open the key, the rear inner
light and ignition switch reminder
light will be on for 30 seconds, and
then off. (This function is optional.
For details, see “Settings of optional
functions”.)
You have 30 seconds to open a door after
using the wireless remote control unlock
feature. If a door is not opened by then, all
the doors will be automatically loc
ked again.
Quit the anti-theft state:
when the car is in the anti-theft state
(including that the anti-theft warning is on),
press “UNLOCK” switch and all the doors will
be open once with the turning light flash for
three times. At
the same time,
the car will quit the anti-theft
state.
“PANIC” switch
Press the “PANIC” switch for 1.5 seconds or
longer at any time to start intermittent
warning and enable the turn signal light to
flash. The warning lasts about 30 seconds. If
you want to stop this warning within the 30
seconds, you can press “UNLOCK” once or
“PANIC” again (Please do
not press this switch during driving).
Replacing the battery in the remote
control
For replacement, use two CR2016 lithium
batteries or the equivalent. It
is recommended to go to BYD AUTO service
station to replace it.

F3/F3R OWNER’S MANUAL
- 23 -
CAUTION
Special care should be taken to prevent
small children from swallowing the
removed battery or components.
NOTICE
Dispose of used batteries according to
the local laws.
Replace the battery by following
procedures:
1. Open the wireless remote with a
screwdriver or other tool as equivalent.
2.
Remove the module from the key
frame.
3.
Put in a new battery with the positive
side up. Tighten the cover with
screws.

F3/F3R OWNER’S MANUAL
- 24 -
NOTICE
● Make sure the positive side and
negative side of the battery are
faced correctly.
● Do not replace the batteries with
wet hands. Water may cause
unexpected rust.
● Do not touch or move any
components inside the
transmitter, or it may interfere
with proper operation.
● Be careful not to bend the
electrode when inserting the
battery and that dust or oils do
not adhere to the case.
● Close the cover securely.
After replacing the battery, check whether the
key operates properly. If the key still does not
operate properly, contact your BYD AUTO
service station.
Specification of the remote control
Frequency range: 314.9-315.1 MHz
Emission power: ≤5500 μV/m
Spurious emission threshold: ≤610μV/m
Bandwidth: ≤300 kHz
NOTICE
● Don’t change emission frequency,
increase the emission power
(including installing frequency
amplifier), or install other antenna
by yourself.
● Don’t bring baleful disturbance to
legal wireless communications.
Upon disturbance, stop using it and
contact with BYD AUTO service
station to eliminate disturbance.
● Don’t use it on airplane or around
the airport.

F3/F3R OWNER’S MANUAL
- 25 -
Power windows(Option)
Operating the switch
The ignition key must be in the “ON” position.
Operating the driver’s window
Using the switch on the driver’s door can
control all of the doors.
Normal operation: Press the switch to
enable the window to rise or descend.
To open: lightly push down the switch.
To close: lightly pull up the switch.
Automatic operation
Push the switch completely down and then
release it. The window will fully be opened or
closed. To stop the window partway, lightly
move the switch in the opposite direction and
then release it.
Operating the passengers’ windows
Use the switch on each passenger’s door or
the switches on the driver’s door that control
each passenger’s window.
The window moves as long as you press and
hold the switch.
To open: lightly push down the switch.
To close: lightly pull up the switch.
If you push down the window lock switch on
the driver’s door, the passengers’ windows
can not be operated.

F3/F3R OWNER’S MANUAL
- 26 -
F3
F3R
CAUTION
● Power windows do not have the
jam protection function, so please
pay attention to your operation.
● Recommend to use the window
lock switch when there are
children in the vehicle.
● Make sure that the ignition key is
taken out when you leave the
vehicle.

F3/F3R OWNER’S MANUAL
- 27 -
Luggage compartment lid (F3)
To open the luggage compartment lid
from the outside, insert the master key
and turn it clockwise.
See “Luggage storage precautions” in
Section 2 for precautions when loading
luggage.
To close the luggage compartment lid, lower
it and press it. Then, try to pull upward to
make sure it is really closed.
CAUTION
Keep the luggage compartment lid
closed while driving. This not only
keeps the luggage from being
thrown out but also prevents
exhaust gases from entering the
vehicle.
Luggage component inner control lever
(F3)
Pull the lever up, and the luggage component
lock will be opened.
Cancel the function of luggage
component inner control lever (F3)
After closing the luggage component, insert
the main key and turn it clockwise to cancel
the function of the inner control lever. In this
situation, you can not open the luggage
component with the sub key.

F3/F3R OWNER’S MANUAL
- 28 -
Back door (F3R)
Open the back door
1. Insert the main key and turn it clockwise, or
press the “UNLOCK” button on the wireless
remote control (All other doors are opened at
the same time).
2. Lift the outer handle to open the door.
See “Luggage storage precautions” in
Section 2 for precautions when loading
luggage
To close the back door, lower it and press it.
Then, try to pull upward to make sure it is
really closed.
CAUTION
Keep the hatch-back door closed while
driving. This not only keeps the luggage
from being thrown out but also prevents
exhaust gases from entering the vehicle.

F3/F3R OWNER’S MANUAL
- 29 -
Engine hood
To open the engine hood:
1. Pull the hood lock release lever and
the hood will spring up slightly.
CAUTION
Before driving, be sure that the hood is
closed and securely locked.
Otherwise, the hood may open
unexpectedly while driving and an
accident may occur.
2. In front of the vehicle, pull up the
auxiliary catch lever and lift the hood.
3. Hold the hood open by inserting the
supporting rod into the slot
Before closing the hood, check whether you
left any tools or rags inside. Return the
supporting rod to its clip. Then, lower the
hood and make sure that it locks into place. If
necessary, press down gently on the front
edge to lock it.

F3/F3R OWNER’S MANUAL
- 30 -
CAUTION
After inserting the supporting rod into
the slot, make sure the rod supports
the hood securely, preventing from
falling down on to your head or body.
Anti-theft system(Option)
It is used to prevent the vehicle from
stealing. When the vehicle enters the
anti-theft state, there will
be a warning in the following situations:
● Any side doors are opened.
● The ignition switch is turned to “ON”
position.
● Disconnect or re-connect battery or
control components of anti-theft system.
● The vehicle is knocked.
If someone wants to damage or enter the
vehicle, the system will enable the turn signal
light to flash and send an alarm.
Manual setting of the function
Use the wireless remote control to manually
set the anti-theft system.
Press the “UNLOCK” switch to activate the
anti-theft state and. Then, the turning light
flashes once while all the doors are locked.

F3/F3R OWNER’S MANUAL
- 31 -
Press the “LOCK” switch and the manual
anti-theft setting will be exited in 1 second.
The indicator will flash slowly.
In the following situations, the anti-theft state
can not be enabled:
● Any one door is opened.
The buzzer will buzz for about 1 second.
Close the door and try again.
Automatic setting of the function
This is an optional function. To use this
function, change the function mode first. For
details, see “Settings of optional functions”.
If you take the key out, close the side doors,
and do not operate the wireless remote
control in 30 seconds, the vehicle will enter
the anti-theft state automatically. At this time,
inserting the key into the ignition switch will
cause an alarm. When the key is at the “ON”
position, the anti-theft state will be quitted
automatically. You can also press the
“UNLOCK” switch to quit the state.
Cancel the st
ate of anti-theft
Press the “UNLOCK” switch, and all of the
doors will be opened while the
vehicle quit the anti-theft mode.
The relations between the system state
and the actions:
● If the anti-theft system is deactivated,
the turn signal lights will flash twice.
● If the anti-theft system is activated, the
turn signal lights will flash three times,
and the anti-theft indicator light will flash
quickly. When the ignition key is turned
to the “ON” position, the indicator light
will be off.
After you quit the anti-theft state, the rear
interior light and ignition key reminder light
will be on for about 30 seconds go off even
when the doors are closed. The delay time
can be modified. For details, see the
“Settings of optional functions”.
If you can not quit the anti-theft mode by
using wireless remote control, you

F3/F3R OWNER’S MANUAL
- 32 -
can use the key to cancel it: within the 15
seconds when the doors are opened, turn the
ignition key from “ACC” to “ON” ten times,
and the state will be disabled.
After the anti-theft state is disabled, all of the
doors will be locked again, and the vehicle
will enter the anti-theft state again if any one
door
is not opened.
Starting the anti-theft warning
When the anti-theft system detects an
abnormal condition, the signal light will flash
and the warning will be on for 30 seconds.
● Any door is opened.
● The key is in “ignition” position.
● Reconnect the battery or anti-theft
module.
● The vehicle is knocked.
Dual-testing function
This feature is realized through the dual
testing below.
● A beep will be sent as an alarm upon a
light knock in anti-theft mode.
If your vehicle detects a light knock in 10
seconds in anti-theft mode, it will warn by
buzzing with the turning lights flashing for 30
seconds.
●
A beep will be sent as an alarm and the
turning lights will flash for 30 seconds
upon a heavy knock in anti-theft mode.
The alarm sensitivity against knocks can be
regulated. For details, see the corresponding
part in “Steps for changing optional
functions”.
Restarting the warning
The warning will restart on the following
conditions after warning stops
Any door being open.
Key being turned to “Start”
position.
Your vehicle will alarm by buzzing with the
turning lights flashing for 30 seconds and
pausing for 15 seconds. This action circulates
for three times.
The cycle can be changed. Refer to “Settings
of optional functions” for details.
Resetting of anti-theft system

F3/F3R OWNER’S MANUAL
- 33 -
If the anti-theft system does not stay in the
states said above, the alarm stops after the
cycle. Then, the system will be reset
automatically when the auto set function is
selected.
Stopping the warn
While warning, press “LOCK” to stop it with
the anti-theft system still working.
While warning, press “UNLOCK” to
stop it with the anti-theft system not working.
Settings of optional anti-theft functions
Optional anti-theft functions:
● Automatic setting function
For details, see the “Automatic setting
function”.
● Automatic locking and unlocking
For details, see the “Automatic locking and
unlocking”.
● On-board illuminating system
For details, see the “Rear interior light” and
the “Ignition switch reminder light”.
● Starting 6 warning cycles
When the vehicle enters the anti-theft state,
an alarm will be sent and the turn signal lights
will flash 30
seconds.
A cycle will be performed every 15
seconds. Three cycles are defaulted. You
can choose 6 cycles. If so, 3 and 9 warning
cycles are cancelled automatically. If 6 and 9
warning cycles are disabled, 3 warning cycles
will be enabled again.
● Starting 9 warning cycles
Select this item to enable 9 warning cycles.
Then, 3 and 6 warning cycles are cancelled
automatically. If 6 and 9
warning cycles are disabled, 3 warning cycles
will be enabled again.
● Delay time of entering the vehicle
(15s)
After using the wireless remote control to
open all doors, the rear interior light and
ignition key reminder light will be on for about
15 seconds (original time: 30 seconds). If
selected, the default time, 30 seconds, will be
disabled.
● Delay time of entering the vehicle (30)
After using the wireless remote control to
open all doors, the rear interior light and
ignition key reminder light will be on for about
30 seconds. T
o use this function, deselect
the 15s option first. If both options are

F3/F3R OWNER’S MANUAL
- 34 -
selected, the system will set the time to be 15
seconds automatically.
Steps for changing optional functions
1. Check whether the anti-theft system is
released.
2. Close all of the doors.
3. Insert the key into the ignition switch.
4. Open and close the driver’s door twice
within 10 seconds. (close→
open→close→open→close)
5. Turn the key from “ACC” to
“ON” three times. (ACC→ON→ACC→ON
→ACC→ON→ACC)
Now the anti-theft indicator light
illuminates.
6. Press the “LOCK” switch on the wireless
remote control according to the following
tables, and make sure that the indicator
flashes.
Make sure the function state by pressing the
“LOCK” switch on the wireless remote control.
While the function is chosen, the turn signal
light will flash once and you can hear the
warning sound once. To desele
ct this
function, open any a door and close it. If you
find the turn signal
light flash twice hear the warning sound twice,
it indicates that the function is disabled. If
failed, re-open the door and close it again to
exit
from disabled state to enabled state.
Press
LOCK
Optional function
once Automatic setting
functions
twice Automatic locked and
unlocked
3 times On-board light system
4 times Starting 6 cycles warning
5 times Starting 9 cycles warning
6 times The delay time of
entering the vehicle:15s
7 times The delay time of
entering the vehicle:30s
8 times Knocking sensitive
standard

F3/F3R OWNER’S MANUAL
- 35 -
The sensitivity can be set in 4 grades: 1st
grade, 2nd grade, 3rd grade, and 4th grade.
The 1st grade is most sensitive while the
other grades feature a much less sensitivity
in turn. While the vibration sensitivity
standard is selected, the turn signal light
corresponding to the grade will
flash and the warning sound corresponding to
the grade will be given.
Changing sensitivity standards:
After entering the vibration sensitivity
standard, you can open and then close any
door to step to the next grade.
Store the settings by doing any of the
following:
Turn the ignition switch to the “ON” position.
● Close the driver’s door for 30 seconds.
● Press the “LOCK” switch on wireless
remote control again.
For details, please contact your BYD AUTO
service station.
Fuel tank cap
This indicates that the fuel filler cap is on
the left side of your vehicle.
1. To open the fuel filler door, pull the
lever up.
When refueling, turn off the engine.

F3/F3R OWNER’S MANUAL
- 36 -
CAUTION
● While refueling, do not smoke,
avoiding the sparks or the flame that
could lead to fire.
● When opening the cap, do not
remove the cap quickly. Upon hot
weather, fuel under pressure could
cause injury by spraying out of the
filler neck if the cap is suddenly
removed.
2. To remove the fuel tank cap, turn the
cap slowly anticlockwise, and then
pause slightly before removing it.
After removing the cap, hang it on the
cap hanger.
It is normal to hear a slight swoosh when the
cap is opened. While installing, turn the cap
clockwise till you hear a click.
CAUTION
● Make sure the cap is tightened
securely to prevent fuel spillage in
the event of an accident.
● Use only a genuine BYD AUTO fuel
tank cap for replacement. It is
designed to regulate fuel tank
pressure.

F3/F3R OWNER’S MANUAL
- 37 -
Electric sun roof (optional)
Sliding operation
Tilting operation
To operate the sun roof, use the switches
beside the front interior light.
The sun roof works when the ignition key is in
the “ON” position.
The sun shade can be opened or
closed by hand.
Sliding operation:
To open: push the switch on the “SLIDE”
side.
The sun shade will be opened together with
the roof.
To close: push the switch on the opposite
side of the “SLIDE” side.
As a precaution when closing, the roof stops
at the half closed position before fully closing.
Therefore, release the switch and then push
it again to close it completely.
Tilting operation:
To tilt up: push the switch on the “UP” side.
To lower: push the switch on the opposite
side of the “UP” side.
You may stop the sun roof at any desired
position. The roof will move while the switch
is being pushed and stop when released.

F3/F3R OWNER’S MANUAL
- 38 -
CAUTION
● While the vehicle is moving, always
keep the heads, hands and other
parts of the bodies of all occupants
away from the roof opening.
Otherwise, they could be seriously
injured if the vehicle stops suddenly
or if the vehicle is involved in an
accident.
● Before you close the sun roof, always
make sure nobody places his or her
head, hands, and other parts of the
body in the roof opening. Otherwise,
someone will be serious injured.
● Do not let any passenger (esp.
children) stay in the car when the
ignition key is inserted in case he/she
will touch sunroof switch and get
stuck. Passengers that nobody is
taking care, especially children, may
be involved in an accident.

F3/F3R OWNER’S MANUAL
- 39 -
SECTION 1-3
OPERATION OF INSTRUMENTS AND CONTROLS
3. Seats, seat belts, steering wheel and mirrors
Seats…………………………………………………………………………………………………………………………...
40
Front seats…………………………………………………………………………………………………………………….
40
Folding rear seats ……………………………………………………………………………………………………
……….
42
Rear armrest…………………………………………………………………………………………………………………..
43
Seat belts………………………………………………………………………………………………………………………
43
SRS driver airbag and front passenger airbag……………………………………………………………
………………….
Steering wheel………………………………………………………………………………………………………………...
57
Power outside rear view mirror………………………………………………………………………………………………
58
Interior rear view mirror………………………………………………………………………………………………………
59
48

F3/F3R OWNER’S MANUAL
- 40 -
Seats
During driving, all occupants should have the
seatback upright, sit well
back in the seat, and properly wear
the seat belts provided.
Front seats
Seat adjustment precautions
Adjust the driver’s seat so that the foot petals,
steering wheel and instrument panel controls
are within easy reach of the driver.
CAUTION
● Adjustments should not be made
while the vehicle is moving, as the
seat may unexpectedly move and
cause the driver to lose control of the
vehicle.
● When adjusting the seat, be careful
not to hit the seat against a
passenger or luggage.
● After adjusting the seat position, try
sliding it forward and backward to
make sure if it is locked in position.
● After adjusting the seat position, try
moving seat back backward to make
sure it is locked in position.
● Do not put objects under the seats.
The objects may interfere with the
seat-lock mechanism or
unexpectedly push up the seat
position adjusting lever; the seat
may suddenly move, causing the
driver to loss control of the vehicle.
While adjusting the seat, do not put
your hands under the seat or near the
moving parts. Your hands or fingers
may be caught and injured.
CAUTION
● Do not drive the vehicle unless the
occupants are properly seated. It is
not allowed to sit on the top of a
folded-down seatback, or in the
luggage compartment or cargo area.
Persons not properly seated and/or
properly restrained by seat belts can
be severely injured in the event of
emergency braking or a collision.
● During driving, passengers are not
allowed to stand up or move around
between seats. Severe injuries can
occur in the event of emergency
braking or a collision.

F3/F3R OWNER’S MANUAL
- 41 -
1. Forward and backward adjusting
lever
Hold the center of the lever and pull it up.
Then slide the seat forward or backward to
the desired position with slight body pressure
and release the lever.
2. Angle adjusting lever for the seat
back
Lean forward and pull the lever up. Then lean
back to the desired angle and release the
lever.
CAUTION
Avoid reclining the seatback any more
than needed to prevent from sliding
downward the safety belt upon a
collision. The seat belts provide
maximum protection in a frontal or rear
collision when the driver and the front
passenger are sitting up straight and
well back in the seats. If you are
reclined, the lap belt may slide past
your hips and apply restraint forces
directly to the abdomen or your neck
may contact the shoulder belt. In the
event of a frontal collision, the
more the seat is reclined, the
greater the risk of death or personal
injury.
Adjusting front seats
(option)

F3/F3R OWNER’S MANUAL
- 42 -
Folding rear seat (F3, option)
Pull upward the back seat handle to unlock
the seat, and fold down it.
In this way, the luggage compartment can be
widened till the back of the front seats. For
precaution when loading luggage, see
“Luggage storage precautions” in Section 2.
If necessary, each seat back can be folded
separately.
Folding rear seat (F3R, option)
Pull upward the back seat belts to unlock the
seat, and fold down it.
In this way, the luggage compartment can be
widened till the back of the front seats. For
precaution when loading luggage, see
“Luggage storage precautions” in section 2.
CAUTION
When the back seat is unfolded, to
prevent occupants from injuring in the
event of an accident or emergency
brake, please obey measures as
following:
● Pull the back seat forward and
backward to make sure it has been
firmly locked, and the red mark on
the button can not be seen.
Otherwise, normal operation of the
safety belts may be affected.
● Make sure the safety belt has not
been twisted or block in the back
seat. Then, put them in the right
position for use.

F3/F3R OWNER’S MANUAL
- 43 -
Integral back seat (F3, option)
Integral back seat can not been folded.
(option)
To use the armrest, pull it out as shown
above.
Seat belts
Seat belt precautions:
BYD AUTO strongly urges that the driver and
passengers in the vehicle be properly
restrained at all times with the seat belts
provided. Failure to do so could increase the
chance of injury and/or the severity of injury
in accidents.
The seat belts provided for your vehicle are
designed for people of adult size, large
enough to properly wear them.
Children must be sit in the rear seat and use
the seat belts. According to accident statistics,
the child is safer when properly restrained in
the rear seat than in the front seat.
If a child must sit in the front seat, the seat
belt should be worn properly. If an accident
occurs and the seat belts are not worn
properly, the force of the rapid inflation of the
airbag may
cause death or serious injury to the child.
Do not allow the child to stand up or kneel on
either rear or front seats. An unrestrained
child could suffer serious injury or death
during emergency braking or a collision. Also,
do not let the child sit on your lap. It does not
provide sufficient restraint.
CAUTION
During driving, passengers must sit at
seats, and fasten seat belts well.
Otherwise, injures or deaths may be
easily caused when there is emergency
braking and collision.
Rear armrest

F3/F3R OWNER’S MANUAL
- 44 -
When using the seat belts, observe the
following:
● Use the belt for only one person at a time.
Do not use a single belt for two or more
people, even children.
● Avoid reclining the seatback any more than
needed. The seat belts provide maximum
protection in a frontal or rear collision when
the driver and the front passenger are
sitting up straight and well back in the
seats. You can refer to the
descriptions about seat adjustment.
● Be careful not to damage the belt webbing
or hardware. Take care that they do not get
caught or pinched in the seat or doors.
● Inspect the belt system periodically. Check
for cuts, fraying, and loose parts. Damaged
parts should be replaced. Do not
disassemble or modify the system.
● Keep the belts clean and dry. If they need
cleaning, use a mild soap solution or
lukewarm water. Never use bleach, dye, or
abrasive cleaners which may severely
weaken the belts. (See “Cleaning the
interior” in Section 5.)
● Replace the belt assembly (including bolts)
if it has been used in a severe impact.
The
entire assembly should be replaced even if
the damage is not obvious.
CAUTION
The safety belts are designed only for
adults, not suitable for children.
Children must be seated in the rear seat.
3-point seat belts
Adjust the seat as needed and sit up
straight and well back in the seat.
To fasten your belt, pull it out of the
retractor and insert the tab into the
buckle.
You will hear a click when the tab locks into
the buckle.
The seat belt length automatically adjusts to
your size and the seat position.
The retractor will lock the belt during a
sudden stop or on impact. It also may lock if
you lean forward too quickly. A slow, easy
motion will allow the belt to extend, and you
can move around freely.

F3/F3R OWNER’S MANUAL
- 45 -
CAUTION
● After inserting the tab, make sure both
the tab and the buckle are locked and the
belt is not twisted.
● Do not insert coins, clips, etc. in the
buckle as this may prevent you from
properly latching the tab and buckle.
● If the seat belt does not function
normally, immediately contact your BYD
AUTO service station. Do not use the
seat until the seat belt is fixed. It can not
protect an adult occupant or your child
from injury.
If the seat belt can not be pulled out of the
retractor, firmly pull the belt and release it.
You will then be able to smoothly pull the belt
out of the retractor.
When a rear shoulder belt is completely
extended and is then retracted even slightly,
the belt is locked in that position and can not
be extended. Release the seat belt again,
and it retracts adequately. Then pull it out
again.
Seat belts with an adjustable shoulder
anchor(Option)
Adjust the shoulder anchor position to
your size.
To rise: slide the anchor up.
To lower: push in the lock release button and
slide the anchor down.
After adjustment, make sure the
anchor is locked in position.
Adjust the position of the loin and
shoulder belts.

F3/F3R OWNER’S MANUAL
- 46 -
Position the lap belt as low as possible in
your hips, not on your wais. Then, adjust it to
a snug fit by pulling the shoulder portion
upward through the latch plate.
CAUTION
● Both high-positioned loin belts and
loose-fitting belts could cause serious
injuries due to sliding under the lap
belt during a collision and other
unintended result. Keep the lap belt
positioned as low on hips as possible.
● For your safety, do not place the
shoulder belt under your arm.
To release the belt, press the buckle-release
button and allow the belt to retract.
If the belt does not retract smoothly, pull it out
and check for kinks or twists. Then make sure
it remains untwisted as it retracts.
CAUTION
Ensure that the belt goes through the
center of shoulder. The belt should be
farther enough from your neck and
should not fall off from your shoulder.
Otherwise, the protection from the belt
will be weakened, and injuries during
collision may be caused.
2-point seat belts
Sit on a seat straightly and well back in
the seat. To fasten your belt, insert the tab
into the buckle.
You will hear a click when the tab locks into
the buckle.
If the belt is not long enough for you, hold the
tab at a right angle to the belt and pull on the
tab.
Keep as low on hips as possible

F3/F3R OWNER’S MANUAL
- 47 -
Remove excess length of the belt and
adjust the belt position.
To shorten the belt, pull the free end of the
belt.
Position the loin belt as low as possible on
your hips, not on your loin. Then, adjust it to a
snug fit.
CAUTION
Both high-positioned and loose-fitting
lap belts could cause serious injuries
due to sliding under the lap belt during a
collision or other unintended result.
Keep the lap belt positioned as low on
hips as possible.
CAUTION
● After inserting the tab, make sure the
tab and buckle are locked and that
the belt is not twisted.
● Do not insert coins, clips, etc. in the
buckle as this may prevent you from
properly latching the tab and buckle.
● If the seat belt does not function
normally, immediately contact BYD
AUTO service station. Do not use the
seat until the seat belt is fixed. It can
not protect an adult occupant or
your child from injury.

F3/F3R OWNER’S MANUAL
- 48 -
To release the belt, press the
buckle-release button.
Dual SRS airbags (option)
Airbag is Supplemental Restraint System
(i.e. SRS). It reinforces the seat belts,
which are designed to be activated in
response to a severe frontal impact. This
system provides an extra protection to the
occupant’s head and chest to reduce
injury and death.
Seat belts cannot be substituted by an airbag
for it is part of the automobile protection
system. Please pay attention to that the
airbag could exert to the most only with the
fastened seat belt. For you and your family’s
safety, please pay particular attention to the
CAUTION in this part.

F3/F3R OWNER’S MANUAL
- 49 -
CAUTION
● Use available seat belts while
driving!
● Sit at correct pose. In this way, seat
belts and SRS airbag will protect all
occupants best!
● Child must sit at rear seats!
● Do not disassemble SRS airbag
system by yourself!
System assembly
The SRS airbag mainly contains the parts as
below:
1. SRS warning light
2. Front passenger airbag subassembly
(airbag and charging installation)
3. Airbag ECU (electronic control unit)
4. Driver airbag assembly
5. Crash sensor
The airbag ECU includes a safety sensor and
an airbag sensor.
Airbag warning indicator
This airbag is monitored by an electronic
control unit. With a self-diagnosis function, it
indicates the system state through the
warning light in the instrumental panel.
Every time when the ignition key is
turned to the “ON”
position, the indicator lights on for about
5 seconds and goes off and continues
SRS

F3/F3R OWNER’S MANUAL
- 50 -
for 5 seconds above. This means that
the system functions well.
If the airbag has been closed by BYD
service station, the indicator still work
as above but the airbag does not have
the protection function.
This warning light system monitors the airbag
ECU, crash sensor, inflators, warning light,
interconnecting wiring, and power sources.
For details, see “Maintaining the remainder
indicator and warning buzzers” in Section
1-5.
NOTICE
The following situations indicates that
the airbag system works abnormally:
● The indicator does not light on
when the ignition key is turned
on.
● The indicator does not goes off
after 5 seconds the ignition key is
turned on or comes on again after
it goes off.
● The indicator comes on again
when the ignition key is turned
off.
● The indicator goes on or flashes
when driving.
CAUTION
If the airbag doesn’t work well, please
contact BYD AUTO service station to
examine it, or it will affect the normal
function of airbag.
Conditions of activating SRS airbag
system
The SRS airbag system is designed to
activate in response to a severe frontal
impact or other special impact.
The SRS airbag is not designed to inflate if
the vehicle is involved in a low-speed frontal
collision, side or rear collision, or if it is
involved in a rollover. But seat belts will
protect occupants.
When impact occurs, the SRS ECU will
analyze the acceleration to ensure whether it
reaches the reference value to activate the
airbag. If it doesn’t reach the value, the airbag
will not be activated, even though the vehicle
is distorted heavily in the accident.
The BYD F3 airbag ECU is designed basing

F3/F3R OWNER’S MANUAL
- 51 -
on most road conditions and wrong usage of
the vehicle. However, please observe this
manual to drive your vehicle to ensure your
safety because man reasons may lead to
accidents.
The protected process of the airbag
While the airbag system is activated, the gas
is emitted in the airbag, and the airbag
inflates quickly. The driver and passenger are
protected by the airbag from being hurt upon
the head, neck and the chest when he/she
gets into the airbag while the moving inertia is
buffered.
When the airbag hustles the body, it can
absorb the energy, and make the gas
exhaust from the bag at some speed ratio.
This way can reduce the injury to the person
farther. After the accident, the gas in the bag
will be exhausted completely. Therefore, it
will not block the front visual field.
The airbag deploys at some ms, thus
carrying out extra protection towards drivers
and passengers.
While the airbag is deploying, there is a large
sound. Generally, it does not cause the injury.
Maybe it can cause the tinnitus and cause
you to lose hearing temporarily. However,
these are the unabiding and
you will recover
quickly. The gas from the airbag may give
some smell and affect your appetite, but it
does not cause the driver or passengers toxic.
While the airbag is inflating, it may emit some
smoke. It is normal.

F3/F3R OWNER’S MANUAL
- 52 -
Conditions when the SRS airbag does not
deploy
The SRS airbag is not designed to inflate if
the above conditions occur.
The examples are referred to the above
illustrations.

F3/F3R OWNER’S MANUAL
- 53 -
Conditions when the SRS airbag deploys
The SRS front airbags may deploy if
the above conditions occur.
The SRS front airbags may deploy if a
serious impact occurs to the underside
of your vehicle. For examples, refer to
the above illustrations.
NOTICE
● The SRS airbag system is designed
only for this module. Changes of
suspension system, tires, bumpers,
chassis, and other parts will bring
harmful impact. In addition, do not
replace any part of SRS airbag system
to other vehicles. Otherwise, the SRS
airbag system will be invalid.
● While driving, please wear the seat
belt and sit at correct pose. If you do
not tie the seat belt, lean forwards or
keep in correct pose, the possibility
that you get hurt will be increased in
case of accidents that would activate
the SRS airbag.

F3/F3R OWNER’S MANUAL
- 54 -
Please keep 25 cm between driver’s
chest and steering wheel. In this way
the SRS airbag system will protect
driver best. It also means that front
seats and head-rest should be
adjusted in accord with each
passenger’s figure. Besides, the
driver should keep elbow bended
slightly even close to straight.
● Do not affix anything onto the cover
of steering wheel or the surface of
front passenger airbag position.
Those two places must be cleaned
with dry dishcloth. Do not knock
those places seriously.
● Children are not allowed to sit at the
front seat without child restraint.
Since the front airbag inflates with
considerable speed and force, the
child may be seriously injured or
killed.
● There shouldn’t be any person,
animal or object between the SRS
airbag and the driver or the
passengers at the front seat. Do not
hold a child on your lap or in your
arms. It would be extremely
dangerous for children.
● There shouldn’t be any person,
animal or object between the SRS
airbag and the driver or the
passengers at the front seat. Do not
hold a child on your lap or in your
arms. It would be extremely
dangerous for children.
● Do not put any objects or your pets
on or in front of the dashboard or
steering wheel pad that houses the
front airbag system, or the possibility
that you get hurt will be increased in
case of accidents that
would activate the SRS airbag.
● Do not change any part of SRS airbag
system, including marks.

F3/F3R OWNER’S MANUAL
- 55 -
● Any operation to the SRS airbag
system or repair relating to this
system must be operated by BYD
AUTO service station.
● Change the SRS airbag system in 15
years since the manufacture date
marked on the auto certificate and
maintenance manual. This must be
operated by BYD AUTO service
station. For replacing some parts of
the SRS airbag system, please make
a record.
● The SRS airbag system only
provides one time protection. After
deployed or damaged, it must be
replaced for a new one.
● While you transfer your vehicle to
other person, give the on-vehicle files
to the new owner. If the SRS airbag
system is closed, give this file to the
new owner, too.
● To dispose the parts of the SRS
airbag system, observe the safety
order and disposal process. BYD
service station is familiar with these
regulations and detailed disposal
descriptions are available on the
maintenance manual.
● The SRS airbag system has excellent
anti-magnetic ability. However, to
avoid the suddenness,do not drive the
vehicle in some area where the
magnetic intensity is beyond the state
rule.
● The SRS airbag system is fitting for
many road conditions and wrong
operation to the vehicle. But to avoid
the suddenness, please do not make
serious crash to the chassis, or do not
drive the vehicle gruffly in rough road
conditions.

F3/F3R OWNER’S MANUAL
- 56 -
Closing SRS airbag system
At some situations, SRS airbag system
can be closed. For examples:
Even if the seat is adjusted correctly,
but the distance of 25 cm between the
driver’s chest and steering wheel can
not be kept.
Special equipment at area of steering
wheel for handicapped is needed to be
installed.
The front passenger seat is adjusted
due to some reason. However, the
position set upon delivery can not be
guaranteed.
Please contact your BYD AUTO service
station to close the SRS
airbag system. When closing an airbag,
please mark at a right position and record on
the service manual.
CAUTION
In some situations, the SRS airbag
system can be closed. To do so,
contact your BYD AUTO service
station. Otherwise, it may cause
serious injury or death.
To resume the protection function of
the SRS airbag system, please re-start
your closed SRS airbag system as
soon as possible.
Other situations
● Please read this manual carefully. If you
want to sell or dispose the vehicle,
please tell the new owner or the
disposal factory that this vehicle has the
SRS airbag system and suggest them to
read this manual thoroughly.
● While the airbag is deploying, avoid
contacting the airbag module. Otherwise,
it may cause the scald or discomfort.
Contact your BYD AUTO service station
to replace with a new SRS airbag as
soon as possible if it has been activated
before.
● The SRS airbag system will be activated
only upon some
situations. Therefore, if the SRS airbag
system fails to work, it may not be the
problem of the system itself. Abnormal
repair or untimely repair towards the
damaged parts of the vehicle may affect
the SRS airbag system.

F3/F3R OWNER’S MANUAL
- 57 -
Contact BYD AUTO service station upon
the following conditions:
● The SRS airbags have inflated.
● The front of the vehicle (shaded in the
illustration) was involved in an accident
that was not severe enough to cause the
SRS airbags to inflate.
● The pad section of the steering wheel
(shaded in the illustration) is scratched,
cracked, or damaged.
Steering wheel
To change the steering wheel angle, hold the
steering wheel, push down the lock release
lever, tilt the steering wheel to the desired
angle and return the lever to its original
position.
CAUTION
● Do not adjust the steering wheel
while the vehicle is moving. This
may cause the driver to mishandle
the vehicle and an accident may
occur.
● After adjusting the steering wheel,
try to move it upward and
downward to make sure that it is
locked in position.
Audio-control switch of Steering wheel
(option)
Under the radio mode, press the “
” key and
“
” key on the main switch of steering wheel
to search programs. Press “MUTE” to mute the
device.

F3/F3R OWNER’S MANUAL
- 58 -
Power outer rear view mirror (Option)
Adjust the mirror so that you can just see
the side of your vehicle in the mirror.
CAUTION
Do not adjust the mirror while the
vehicle is moving. Doing so may
cause the driver to mishandle the
vehicle and thus an accident may
occur.
Power rear view mirror control(Option)
To adjust a mirror, use the switches. (Taxi
model and training model are not
designed with this feature.)
1. Choice switch-To select the mirror to be
adjusted, push the switch to “L” or “R”.
2. Control switch - To move the
mirror, push the switch in the
desired direction.
Mirrors can be adjusted when the key is in
the “ACC” or “ON” position.
NOTICE
If the mirror is blocked by the ice, do
not operate the control or scrape the
mirror face. Use a spray deicer to
free the mirror.

F3/F3R OWNER’S MANUAL
- 59 -
Interior rear view mirror
Adjust the mirror so that you can just see the
rear of your vehicle in the mirror.
Pull the lever toward you (position 2 in the
illustration) to reduce glare from the headlight
of the vehicle behind you during night driving.
Daylight driving at position 1:
The reflection in the mirror has greater clarity
at this position.
Night driving at position 2:
Remember that by reducing glare you also
lose some rear view clarity.
The mirror has a direction display
function (Option):
Start condition: The ignition switch is turned
to the ACC/ON position.

F3/F3R OWNER’S MANUAL
- 60 -
SECTION 1-4
OPERATION OF INSTRUMENTS AND CONTROLS
4. Light, wipers, defogger, and HUD (Head-up Display)
Headlights and turn signal light………………………………………
………………………………………………………
.
61
High mounted braking light……………………………………………………………
……………………………………...
64
Emergency flashers………………………………………………………………………
……………………………………
64
Front fog lights………………………………………
…………………………………………………………………
…….. 65
Rear fog lights…………………………………………………………
………………………………………………………
66
Rear interior light …………………………………………………………………
……………………………………
……..66
Ignition switch light……………………………………………………
……………………………………………………...
67
Front interior light ………………………………………………
…………………………
……………………………
……68
Front reading lamp……………………………………………………
……………………………………………………….
68
Windshield wipers and washer………………………………………
………………………………………………………..
68
Rear window defogger…………………………………………………………
……………………………………………...
69
Speed HUD (heads up display) …………………………………………………
……………………………………………
70

F3/F3R OWNER’S MANUAL
- 61 -
Headlights and turn signal light (without
automatic light control system)
HEADLIGHTS
To turn on the following lights, turn the
headlight/turn signal light switch
Position 1: position lights, license plate lights
and instrument panel lights.
The indicator light (green lights) for position
lights on the instrument panel indicate that
the position lights are on.
Position 2: headlights and all lights said
above.
Light reminder buzzer
A buzzer will remind you to turn the lights off
when the driver’s door is opened if you
remove the key with the headlight switched
on.
NOTICE
To prevent the battery from being
discharged, do not leave the lights on
for a long period when the engine is
not running.
High-low beams: turn the left multi
–function switch to the headlight switch.
For low beams, push the lever to position 2.
Pull the lever to position 3 for high beams.
The headlight high beam indicator light (blue
light) on the instrument panel will tell you that
the high beams are on.

F3/F3R OWNER’S MANUAL
- 62 -
(position 1)
Pull the lever all the way back. The flashing
high beam of headlights will turn off when you
release the lever.
The headlight high beam indicator light (blue
light) on the instrument panel will tell you that
the high beams are flashing.
You can flash the high beam headlights with
the knob turned to “off”.
Turn signal lights
To signal a turn, push the left
multi-function switch up or down to
position 1.
The key must be in the “ON” position.
The lever automatically returns after you
make a turn. But you may have to return it by
hand after you change a lane.
To signal a lane change, move the lever up or
down to the pressure point (position 2) and
hold it.
If the turn signal indicator lights (green lights)
on the instrument panel flash faster than
normal, it means that a front or rear turn
signal bulb is burned out.
Headlights and turn signal lights (with
automatic light control system---optional)
Headlights
To turn on the following lights, turn the
light adjusting switch: Position 1: position
lights, license plate and instrument panel
lights.
The indicator light (green light) for position
Flashing the high beam of headlights

F3/F3R OWNER’S MANUAL
- 63 -
lights on the instrument
panel will tell you that the tail light are on.
Position 2: headlights and all lights said
above.
Position 3: (“AUTO”): headlights and all of the
light in position 2.
They automatically turn on or off depending
on the darkness of the surroundings.
When you drive the vehicle into a tunnel,
garage or other dark surrounding where
needs light immediately, turn the switch to
position 2 manually.
The automatic light control sensor is on the
top of the instrument panel at driver’s side.
Do not place anything on the instrument
panel, and do not affix anything on windshield
to block this sensor.
When you turn the ignition key from “ON” to
the “ACC” or “LOCK”, or pull the key out with
headlights switch on, the headlights will go
off.
If you want to turn on the hea
dlights again,
turn the ignition key to “ACC” or “ON”. If your
vehicle will be parked for no less than one
week, make sure the headlight switch is off.
NOTICE
To prevent the battery from being
discharged, do not leave the lights on
for a long period when the engine is not
running.

F3/F3R OWNER’S MANUAL
- 64 -
High-low beams: For high beams, push the
lever to position 1. For low beams, push the
lever to position 2. Pull the lever to position 3
for high beams. The indicator light (blue light)
for on the instrument panel the headlight high
beam will tell you that the high beams are on.
Flashing the high beam of headlights
(position 3)
Pull the lever all the way back. The flashing
high beam of headlights will turn off when you
release the lever.
You can flash the high beam headlights with
the knob turned to “off”.
Turn signal lights
To signal a turn, push the left multi-function
switch up or down to position 1.
The key must be in the “ON” position.
The lever automatically returns after you
make a turn, but you may have to return it by
hand after you change a lane.
To signal a lane change, move the lever up or
down to the pressure point (position 2) and
hold it.
If the turn signal indicator lights (green lights)
on the instrument panel flash faster than
normal, it means that a front or rear turn
signal bulb is burned out.
High mounted braking light (optional)
While pedaling, this light will be on together
with rear brake light to warn that the vehicle is
in the braking condition so that contingency
can be prevented.
Emergency flashers

F3/F3R OWNER’S MANUAL
- 65 -
To turn on the emergency flashers, press
the switch.
All the turn signal lights will flash. To turn
them off, press the switch once again.
Turn on the emergency flashers to warn other
drivers if your vehicle must be stopped where
it might be a traffic hazard.
Always pull as far off the road as possible.
The turn signal light switch will not work when
the emergency flashers are operating.
NOTICE
To prevent the battery from being
discharged, do not leave the switch on
longer than necessary when the
engine is not running.
Front fog lights (option)
To turn on the front fog lights, turn the left
multi-function switch lever. They will
illuminate when the position lights are
turned on.
The indicator light on the instrument panel for
the front fog lights will tell you that the front
fog light is on.

F3/F3R OWNER’S MANUAL
- 66 -
Rear fog lights
To turn on rear fog lights, press this
switch. Rear fog lights will be on upon
following conditions:
While the position lights switch, the front fog
lights, as well as the switch of the rear fog
lights are turned on, the rear fog lights will be
on.
While the headlights switch and rear fog
lights switch are turned on, the
rear fog lights will be on.
While the rear fog lights switch is turned on,
the rear fog lights indicator light on the
instrument panel will be on.
While the headlights switch or the position
lights switch and front fog lights switch is
turned off, the rear fog lights will be not on
even you re-open the rear fog lights switch,
While all of the other lights are off, the rear
fog lights will be off automatically. To turn on
the rear fog lights, press the rear fog lights
switch again.
Rear interior light
To turn on the interior light, slide the
switch.
The rear interior light switch has the
following positions:
“ON”: to keep the light on all the time.
“OFF”: to turn the light off.
“DOOR”: to turn the light on when any one
side door or back door is

F3/F3R OWNER’S MANUAL
- 67 -
opened. The light goes off when all the side
doors and back door are closed.
Illuminated entry system
When the switch is at the “DOOR” position,
the light will illuminate upon opening any one
door. After all the side doors and back door
are closed, the light remains on for about 30
seconds before fading out.
However, the light goes out immediately in
the following cases.
● All the side doors and back door are
closed when the ignition key is in the
“ON” position.
● All the side doors and back door are
closed and locked by the
wireless remote control.
When all the side doors and back door are
unlocked using the wireless remote control,
the light will illuminate and remain on for
about 30 seconds before fading out.
This function can be activated or deactivated.
For details, see “Settings of optional
functions” in Section 1-2.
Ignition switch indicator light(Option)
For easy access to the ignition switch, the
ignition switch light comes on when any
of the side doors or the back door is
opened.
● While all the side doors and back door
are closed, the light will illuminate and
remain on for about 30 seconds before
fading out.
● When all the side doors and back door
are locked using wireless remote control,
or after all the side doors and back door
are closed, turn the ignition switch to the
“ON” position, and the light fades.
● When the all side doors and back doors
are opened with wireless remote control,
the light will be on and remain on for
about 30 seconds even if the doors are
not opened.
This function can be activated or deactivated.
For details, see “Settings of optional
functions” in Section 1-2.

F3/F3R OWNER’S MANUAL
- 68 -
To turn on the windshield wipers, move
the lever to the desired set position.
The ignition switch must be at the “ON”
position.
Lever position Operation
Position 1 Intermittent
Position 2 Slow
Position 3 Fast
To make a wipe only one time, lift the lever up
and release it.
To turn on the front interior light,
press the switch. To turn it off, press
the switch again.
Front interior li
g
ht
(
with power sunroof
)
Front interior li
g
ht
(
with power sunroof
)
Front reading lamp (option for the
vehicle model without power
sunroof)
The operation for front reading lamp
is showed above.
Windshield wipers and washer

F3/F3R OWNER’S MANUAL
- 69 -
To squirt washer fluid, lift the lever up.
After the washer squirts, release the lever.
The wiper will operate a couple of times.
For instructions on adding washer fluid, see
“Adding washer fluid´in section 7-3.
In freezing weather, warm the windshield with
the defroster before using the washer. This
will help prevent the washer fluid from
freezing on your windshield, which can block
your vision.
NOTICE
Do not operate the wipers if the
windshield is dry. It may scratch
the glass, and damage the wiper.
Rear window defogger(Option)
With manual air conditioning controls
With automatic air conditioning controls
To defog or defrost the rear window, push
the switch.
The key must be in the “ON” position.
The thin heating wires on the inner side of the
rear window will quickly clear the window
surface. An indicator light will illuminate to
indicate the defogger is operating.
Push the switch once again to turn the
defogger off.
With automatic air conditioning controls, the
defogger goes off automatically after 15 min.
After the rear window is cleaned, make sure
the defogger is off. The battery will be

F3/F3R OWNER’S MANUAL
- 70 -
discharged if the defogger operate for long
time, especially when the car stays in
stop-and-go traffic. The defogger is not
designed for drying raindrop or melting snow.
NOTICE
● With manual air conditioning
controls: to prevent the battery from
being discharged, turn the switch
off when the engine is not running.
● When cleaning the inside of the rear
window, be careful not to scratch or
damage the heating wires or
connectors.
Speed HUD (Head Up Display) (option)
If the speed HUD is started, the vehicle
speed will be projected on the windshield.
Thus, the driver can read the information of
speed while paying attention to the situation
of road.
In this way, the driving safety can be
improved.
Starting conditions:
The ignition switch is at “ON” position.
The power switch is pressed down.
The vehicle is moving.
Main technical specifications
Item Parameter Unit
Working
Voltage
DC: +9~+15 V
Working
Temperature
-30~70 °C
Storage
Temperature
-40~80 °C
Measuring
Range
0~199 km/h
Measuring
Error
+5%
Dimension 80*54*46 mm

F3/F3R OWNER’S MANUAL
- 71 -
SECTION 1-5
OPERATION OF INSTRUMENTS AND CONTROLS
5. Instruments and service reminder indicators
Fuel ga ug e…………………… …… ……………………… …… …… ………………… …… …… ………………… …… ….
72
Engine coolant temperature gauge …………………………………………………………………… ……… …………… . . .
72
Tach o met er
……… … ………… ……… ……………… … … … … … … … ……… ………… ……… … … … … … ……………
73
Odometer and two trip meters… … … … … … ……… …
… … ……… … … … ……… … … … ……… … … … ……… … … … . . .
7 4
Serv i ce reminder indic a to r s and warning buzzers … … ……
… … ………… … …… ………… … ………… … …… …………
76

F3/F3R OWNER’S MANUAL
- 72 -
Fuel gauge
When the ignition switch is at “ON”
position, the gauge indicates the
approximate quantity of the fuel
remaining in the tank.
Nearly full: needle at “F”
Nearly empty:
needle at “E”
It’s necessary to keep 1/4 tank of fuel.
The needle moves when braking,
accelerating or making turns. This is
caused by the fuel moving in the tank.
Reminding of filling the fuel: if it
becomes yellow when needle at “E”,
please fill the fuel.
When you are driving on the slope or turning,
the fuel in the tank will be caused to swash.
Needle of fuel gauge would sway or warning
light of fuel quantity would usually be on
earlier.
When the ignition key is at “ON” position,
there is no malfunction even if needle of fuel
gauge is at “E”.
Engine coolant temperature gauge
The gauge indicates the engine coolant
temperature when the ignition switch
stays at “ON” position. Working
temperature of the engine varies with
weather and load of the engine.
If the needle moves into the red zone, your
engine is too hot. If you vehicle

F3/F3R OWNER’S MANUAL
- 73 -
overheats, park your vehicle and allow the
engine to cool.
Your vehicle may overheat during severe
operating condition, such as:
● Driving up a long hill on a hot day.
● Idling for a long period with the air
conditioning on in stop-and-go traffic.
● Daggling other vehicles.
When the ignition switch is in “START”
position, there is no malfunction even if the
engine coolant temperature gauge needle
returns to “C”.
NOTICE
● Do not remove the thermostat on the
engine cooling system as this may
cause the engine to overheat. The
thermostat is designed to control the
flow of coolant to keep the
temperature of the engine within the
specified operating range.
● Do not continue driving with an
overheated engine. See “If your
vehicle overheats” in section 4.
Tachometer
The tachometer indicates the engine
speed in thousands of rpm (revolutions
per minute). Use it while driving to select
correct shift points and to prevent engine
lugging and over-running.
Driving when the engine is running too fast
may cause excessive engine loss and poor
fuel economy.

F3/F3R OWNER’S MANUAL
- 74 -
Remember. In most cases, the slower the
engine speed is, the fewer the fuel
is consumed.
When the ignition switch is in “START”
position, there is no malfunction even if the
engine coolant temperature gauge needle
returns to “0”.
NOTICE
Do not let the indicator needle get
into the red zone. This may cause
severe engine damage.
Odometer and two trip meters
This meter displays the following
information:
1. Odometer — shows the total distance
the vehicle has been driven.
2. Two trip meters — shows two different
distances independently driven since
the last time each trip meter was set to
zero.
You can use one trip meter (TRIP A) to
calculate the fuel consumption and the
other (TRIP B) to measure the distance
on each trip.
3. Trip meter reset knob — resets the two
trip meters to zero, and also change the
meter display.
To change the meter display,
quickly push and release the knob. The
meter displays changes in the order

F3/F3R OWNER’S MANUAL
- 75 -
from the odometer to trip meter (TRIP A),
then to trip meter (TRIP B), then back to
the odometer upon every pressing.
To reset the trip meter A to zero, display
the meter (TRIP A/ TRIP B) reading;
then, push and hold the knob until the
meter is set to zero.

F3/F3R OWNER’S MANUAL
- 76 -
Service reminder indicators and warning buzzers
If the indicator lights on or the buzzer beeps… Do this…
(a)
If you are not using the parking brake, park immediately and contact your BYD AUTO
service station
(b)
(indicator and buzzer)
Fasten driver’s seat belt
(c)
Park and check
(d)
Park and check
(e)
Take your vehicle to BYD AUTO service station
(f)
Fill the fuel on time

F3/F3R OWNER’S MANUAL
- 77 -
(g)
Take your vehicle to BYD AUTO service station
If the brake system warning light is still on, park immediately and contact your BYD
AUTO service station
(h)
Turn off all the side door and back door
(i)
(Option)
Take your vehicle to BYD AUTO service station
(j)
Key reminder buzzer Remove the key
(k)
Light reminder buzzer Turn off lights

F3/F3R OWNER’S MANUAL
- 78 -
(a) Brake system warning light
This light comes on in the following cases
when the ignition key is at the “ON” position.
● The brake fluid level is low.
CAUTION
It is dangerous to continue driving
normally when the brake fluid level is
low.
Have your vehicle checked at your BYD
AUTO service station in the following cases:
● The light does not illuminate even if the
parking brake is applied when the
ignition key is in the “ON” position.
● The light does not illuminate even if the
ignition key is turned on with the parking
brake released.
A warning light turning on briefly during
operation does not indicate a problem.
CAUTION
If either of the following conditions
occurs, immediately park your vehicle at a
safe place and contact your BYD AUTO
service station.
● The light does not turn off even when
the parking brake is released while
the engine is running. In this case,
the brakes may not work properly
and your stopping distance
will become longer.
Depress the brake pedal
firmly and bring the vehicle
to an immediate stop.
● The brake system warning light
remains on together with the “ABS”
warning light.
In this case, not only the
ABS will fail but also the vehicle will
become extremely unstable during
braking.
(b) Seat belt reminder light
This light reminds the driver to buckle up the
seat belt.
Once the ignition key is turned to “ON” or
“START”, the reminder light
flashes if the driver’s seat belt is not
fastened. Unless the driver fastens the belt,
the light keeps flashing.
(c) Discharge warning light
This light warns that the battery is being

F3/F3R OWNER’S MANUAL
- 79 -
discharged.
If it comes on while you are driving, there is a
problem somewhere in the charging system.
The engine ignition will continue to operate
until the battery is discharged, however. Turn
off the air conditioning, blower, radio, etc.,
and drive directly to the nearest BYD AUTO
service station.
(d) Low engine oil pressure warning light
This light warns that the engine oil pressure is
too low.
If it flickers or stays on while you are driving,
pull over to a safe place and stop the engine
immediately. Call a BYD AUTO service
station for assistance.
The light may occasionally flicker when the
engine is idling or it may illuminate briefly
after a hard stop. There is no cause for
concern if it then goes out when the engine is
accelerated slightly.
The warning light will be on if the level of oil is
low as well. This light
isn’t designed to indicate the low oil level. The
oil level must
be inspected by oil dip rod.
NOTICE
Do not drive the vehicle with the
warning light on — even for one block.
It may ruin the engine.
(e) Malfunction indicator light
This light comes on when the electronic
injection system of the engine fails to work.
If it comes on, contact your BYD AUTO
service station as soon as possible.
(f) Low fuel level warning light
When the fuel is nearly empty, the
light will be on. Please fill the fuel at once.
When driving on the slope or taking a turning,
the light would usually be on
earlier because the fuel in tank will swash.
(g) “ABS” warning light
The light comes on when the ignition switch is
turned to the “ON” position. If there is no
malfunction about the ABS, the light will be
off in few seconds. Then, the light would be
on again caused by any malfunction of the
system.
When the “ABS” warning light is on (and the
brake system warning light is off), the

F3/F3R OWNER’S MANUAL
- 80 -
anti-lock brake system does
not operate, but the brake system still
operates conventionally.
When the “ABS” warning light is on (and the
brake system warning light is
off), the wheels could lock up during a
sudden brake or brake on slippery road
surfaces because the anti-lock brake system
does not operate.
If either of the following conditions occurs,
this indicates that a malfunction somewhere
in the components is monitored by the
warning light system. Contact your BYD
AUTO service station as soon as possible to
check the vehicle.
● The light does not illuminate or become
solid on when the
ignition key is turned to the
“ON” position.
● The light comes on while you are
driving.
A warning light turning on briefly during
operation does not indicate a problem.
CAUTION
If the “ABS” warning light remains on
together with the brake system warning
light, immediately park your vehicle at a
safe place and contact your BYD AUTO
service station.
In this case, not only the ABS will fail
but also the vehicle will become
extremely unstable during braking.
(h) Open door warning light
This light remains on until all the side door
and back door are completely closed.
(i) SRS warning light
This light will illuminate when the ignition key
is turned to the “ON” position. After about 5
seconds, the light will go off. This means that
the system of the airbag is operating
properly.
The warning light system monitors the SRS
airbag system ECU, front seat belt
pretensioner assemblies, inflators, warning
light, interconnecting wiring, and power

F3/F3R OWNER’S MANUA
L
- 81 -
sources.
The occurrence of either of the following
condition indicates that a malfunction
somewhere in the parts is monitored by the
warning light system. Contact your BYD
AUTO
service station as soon as possible to
check
the vehicle.
● The light does not illuminate or remains
on for long time when the ignition key is
turned to the “ON” position.
● The light comes on or flashes while
driving.
(j) Key reminder buzzer
This buzzer reminds you to remove the key
when you open the driver’s door with the
ignition key in the
“ACC” or “LOCK” position.
(k) Light reminder buzzer
This buzzer will sound if the position lights in
still on and the driver’s door
is opened with the key removed from the
ignition switch.
Checking service reminder indicators
1. Apply the parking brake.
2. Open one of the side door or back door.
The open door warning light will
illuminate.
3. Close the door.
The open door warning light will go off.
4. Turn the ignition key to “ON”, but
do not
start the engine.
All the service reminder indicators except the
open door warning light should illuminate.
The “ABS”
warning light goes off in few seconds. The
SRS waning light goes off after 6 seconds.
If any service reminder indicator or warning
buzzer does not function as described above,
have it checked by your BYD AUTO service
station as soon as possible
NOTICE
If warning light (such as discharging,
brake, oil, water temperature, etc.) is on
while driving, park the car as soon as
possible and check it according to the
instructions in this manual. Contact
BYD AUTO service station if necessary.

F3/F3R OWNER’S MANUAL
- 82 -
SECTION 1-6
OPERATION OF INSTRUMENTS AND CONTROLS
6. Ignition switch, manual transmission, and parking brake
Ignition switch with steering lock…………………………………………………………………………………………….83
Parking brake………………………………………………………………………………………………………………….84

F3/F3R OWNER’S MANUAL
- 83 -
Ignition switch with steering lock
“START” — to start the engine
The key returns to the “ON” position when
released.
For starting methods, see Section 3.
When the ignition switch is turned to the
“START” position, the tachometer, fuel gauge,
and engine coolant temperature gauge
needles will return to bottom. This does not
indicate
malfunctions.
“ON” — to switch on the engine and all
accessories
This is the normal driving position. When the
ignition switch is turned to “ON”, the
speedometer needle may have a move, this
does not indicates malfunctions.
“ACC” — to enable accessories such as the
radio to work while stop the engine
If you leave the key in the “ACC” or “LOCK”, a
buzzer will remind you to remove the key
when opening the driver’s door.
“LOCK” — to switch off the engine and lock
the steering wheel
The key can be removed only at this position.
You must press in the key to turn it f
rom
“ACC” to the “LOCK” position.
When starting the engine, the key may seem
stuck at the “LOCK” position. To free it, first
make sure that the key is pressed all the way
in, and then rock the steering wheel slightly
while turning the key gently.
NOTICE
Do not leave the key in the “ON”
position if the engine is not running.
The battery will discharge and the
ignition device could be damaged.

F3/F3R OWNER’S MANUAL
- 84 -
Parking brake
When parking, firmly apply the parking
brake to avoid inadvertent
creeping.
To set: pull up the lever. For better holding
power, first depress the brake pedal and hold
it while setting the parking brake.
To release:
(1) Pull up the lever slightly.
(2) Press the lock release button.
(3) Loosen the lever.
To remind you that the parking brake
is set, the parking brake reminder light in the
instrument panel remains on until you release
the parking brake.
CAUTION
Before driving, be sure the parking
brake is fully released and the parking
brake reminder light is off.

F3/F3R OWNER’S MANUAL
- 85 -
SECTION 1-7
OPERATION OF INSTRUMENTS AND CONTROLS
Introduction for CNG vehicle fuel supply system struct
ure…
………………………………………………………
…………………….
86
86
Specification for CNG vehicle fuel conversion operation………
………………………………………………………………………………………………….
CNG system

F3/F3R OWNER’S MANUAL
- 86 -
Introduction for CNG vehicle fuel supply system structure
CNG vehicle adds the multi-point natural gas injection system compared with F3 fuel supply system.
Multi-point natural gas injection system is mainly made up of gas storage system, supply system and control system:
Gas storage system :is mainly made up of gas inlet, gas inlet 3-way,CNG bottle, CNG bottle valve, high pressure pipeline, connector, etc.
Supply system :is mainly made up of redactor, low pressure pipeline, high frequency solenoid valve group, molding pipe, etc.
Control system:is mainly made up of gas controller assembly, ignition time regulator, conversion switch, etc.
Specification for CNG vehicle fuel conversion operation
Conversion switches of multi-point natural gas injection system.

F3/F3R OWNER’S MANUAL
- 87 -
1.Natural gas indicator light
2.Natural gas conversion switch
3.Gasoline indicator light
4.Natural gas gauge indicator light
Natural gas gauge indicator is made up 4 green light and one red li
-ght. Every green light indicates about 1/4 capacity; red light indicates
the gas is not enough.
of

F3/F3R OWNER’S MANUAL
- 88 -
(
1)Starting CNG vehicle
The vehicle is using gasoline to start regardness of the
position of conversion switch.If the gasoline system appears malfunction, engine can not use gasoline to work, to make the engine using
natural gas to work on, so the natural system sets the function of using natural gas to start directly.
a. Using natural gas to start
Shift the fuel conversion switch to “G” position, then check whether the gas gauge switch is indicating. Shift ignition key to “ON” gear, controller is
starting, at the moment gasoline working indicator is lighting, while natural gas working indicator is twinkling; shift conversion switch from “G”
position to gasoline position, then return to “G” position, at the moment natural gas and gasoline working indicator light are both lighting; then
start
the engine, engine is using natural gas to start and work.
To protect the reductor and make sure that gasoline system is under normal state

F3/F3R OWNER’S MANUAL
- 89 -
Caution
In normal situation, suggest using gasoline to start, do not use natural gas to start. While, if the engine water temperature is over 60℃,
please use natural gas to start directly, otherwise redactor will be damaged.
b. Using gasoline to start
Shift conversion switch to gasoline position, start as the natural driving operation procedure.
(2)Fuel conversion
a. From natural gas to gasoline
Shift the fuel conversion switch from “G” position to gasoline position, at the moment natural gas solenoid valve is close, fuel pump relay is close,
and fuel pump is working. Engine uses gasoline to work.
b. From gasoline to natural gas
Shift fuel conversion switch from gasoline position to “G” position, at the moment engine is using gasoline to work, gasoline indicator is lighting.
Step down accelerator pedal, loosen accelerator pedal until engine speed is above 2000rmp. When engine speed is under 2000rpm, system
transforms to natural gas working model, at the same time natural gas indicator is lighting, gasoline indicator is going out.
Caution
When fuel conversion, there will be a fuel supply transition period, at the moment the engine may be low down speed or gently idle. To
avoid engine stopping working, carry through fuel conversion when high engine speed, and do not carry through fuel conversion at the
place of traffic jam, upgrade and downgrade, swerve or bad line of sight.

F3/F3R OWNER’S MANUAL
- 90 -
SECTION 1-8
OPERATION OF INSTRUMENTS AND CONTROLS
8. Car audio system
Instruction of on-board CD player
…………………………………………………………………………………………
.91
Multi-media player …
………………………………………………………………………………………………………
. 96
Instruction of on-bo
ard GPS………
…………………………………………………………………………………….
98

F3/F3R OWNER’S MANUAL
- 91 -
Instruction of on-board CD player (Option)
Function and feature
1. CD supported
2. Built in AM/FM radio
3. Anti-vibration structure
4. MAX. power output: 25 W*4
5. Audio input supported
Specifications:
Item Parameter Unit
Working voltage DC: 11~16 V
Max. power output 25 W*4 W
Max. working current 10 A
FM frequency range 87.5~108.0 MHZ
AM frequency range 522~1620 KHZ

F3/F3R OWNER’S MANUAL
- 92 -
Instruction of the on-board CD function panel

F3/F3R OWNER’S MANUAL
- 93 -

F3/F3R OWNER’S MANUAL
- 94 -
Co nne ct one end of the aud io line to the external a udio de v ic e, such as the MP3 outpu t and the other en d to the
AU X input. S w itch on your CD pla yer and press this button, thus you can pla y the tracks stored in your external
au dio de vice via the on- b oa rd CD play er if the devi ce is tur ned on.
In other pl a y modes, you can press the AU X button to enab le the e xter nal au dio device to pl a y. If no ex ternal
au dio de vice is avai lab le, you will retu rn to the prev ious play mode.
Aft er your C D pl a ye r is turn ed
on , the exter nal aud io de vice pl a y mode will be ac c essed direc tly if it is in serted .
“ ” and “ ”:∧ ∨
Rad io mo de: Press the butto n for 0.5 se con d to selec t a ch ann el bac kwar d or fo rwa rd a nd for 2 seconds abo ve
to search the previ ous or n ext avai lab le ch annel au tomati c ally.
CD mo de : Press the bu tton to selec t a track bac kwa rd or forw ard. Pr e ss and hold it to perform fast forw ard or
fast rew ind.
T o resume norm al pl ay, rel e ase it.
2
RPT

F3/F3R OWNER’S MANUAL
- 95 -
NOTICE: CD: CD disk is playing; Radio: The radio is in signal receiving state.
Instruction of eliminating on-board CD malfunction
3
INT
4
RDN
5
6

F3/F3R OWNER’S MANUAL
6
noituloS nosaeR eruliaF
1 No power or sound
1. The ignition switch is not turned
on.
2. The wire is not connected
properly.
1. Turn the vehicle key to “ACC” or
“ON”.
2. Check the wire connection.
2 No sound with disk put in
1. The disk is put in reversely.
2. The disk is dirty or scratched
seriously.
1. Put in the disk correctly.
2. Wipe the disk or change a new
one
3
Unstable sound caused by vibration
1. Installation is infirm.
2. The disk is dirty or scratched
seriously.
1. Fix the machine with installation
parts.
2. Clean up the disk or change a
new one.
4
Can not store channels and the preset
broadcast
The battery line is connected
improperly.
Connect the cable to correct pole.
5
The noise sent by FM stereophony and
single channel broadcast give are too
loud
The broadcasting station is far away or
the signal is excessively weak.
Choose other broadcasting station with
stronger signal.
- 9 -
 Loading...