

Page 1

USER MANUAL
bxterra.com
BM INTELLIGENT LCD UPS
BM850LCD | BM750LCD | BM550LCD
Page 2

1
TABLE OF CONTENTS
WARRANTY & REGISTRATION...........................
SAFETY INSTRUCTIONS.....................................
INSTALLATION & OPERATION..........................
CERTIFICATIONS................................................
PRODUCT OVERVIEW........................................
BATTERY REPLACEMENT...................................
LCD DISPLAY......................................................
TROUBLESHOOTING.........................................
TECHNICAL SPECIFICATIONS............................
WARRANTY INFORMATION..............................
CONSIGNES DE SÉCURITÉ.................................
INFORMATIONS DE GARANTIE........................
2
2 - 3
3 - 4
4
5
5
6 - 7
8
8 - 9
10 -11
11
11
Page 3

2
This bXterra product is constructed to provide unmatched power protection, quality and
performance for the duration of its lifetime. Please take a few minutes to register your new product
at www.bXterra.com/registration. Registration certies your product’s warranty, conrms your
ownership in the event of a product loss or theft and entitles you to free technical support. Please
register your product now to receive the benets of bXterra ownership.
WARRANTY & REGISTRATION
SAFETY INSTRUCTIONS
SAVE THESE INSTRUCTIONS: This manual
contains important instructions that should be
followed during installation and maintenance of
the UPS and its batteries.
1. This unit is intended for installation in a
controlled environment (a temperaturecontrolled and indoor area free of
conductive contaminants). Please avoid
installing the UPS in locations where
there is standing or running water, dust,
direct sunlight or excessive humidity.
2. This UPS utilizes voltage that may
be hazardous. Do not attempt to
disassemble the unit. Only factory service
personnel may perform repairs.
3. Connect your UPS directly to a properly-
grounded AC power outlet with fuse or
circuit breaker protection. Do not plug the
unit into an outlet that is not grounded.
Turn o and unplug the unit if you need
to de-energize it.
4. Not for use in a computer room as
dened in the Standard for the Protection
of Electronic Computer/Data Processing
Equipment, ANSI/NFPA 75.
5. To reduce the risk of re, connect only
to a circuit provided with 20 amperes
maximum branch circuit over current
protection in accordance with the
National Electric Code, ANSI/NFPA 70.
6. For best performance, keep the indoor
temperature around the unit between 32⁰
F and 104 ⁰F (0 ⁰C and 40 ⁰C).
7. Do not attach medical equipment or
non-computer related items, such as lifesupport equipment, microwave ovens, or
vacuum cleaners to the UPS. bXterra does
not sell equipment meant for life-support
or medical applications. Visit our website
for more information about devices
appropriate to plug into this UPS.
8. Only stand or set up the UPS in the
direction specied in the Installation
and Operation section of this manual.
Do not block fans and leave adequate
space around all sides of the UPS for
proper ventilation. Do not expose the
unit to direct sunlight and do not install
the unit near heat-emitting appliances
such as a space heater or furnace. This
could negatively impact the unit’s internal
cooling system and cause product
damage not covered under warranty.
9. Do not plug the UPS input into its own
output. Do not attach a power strip or
surge protector to the UPS.
10. Do not modify the UPS’s plug and do not
use an adapter that would eliminate the
UPS’s ground connection.
11. Do not use extension cords to connect
the UPS to an AC outlet.
12. If the UPS receives power from a motor-
powered AC generator, the generator
must provide clean, ltered, computergrade output. Consult your generator’s
manual to see if it meets these
specications.
13. The main power outlet that supplies the
UPS should be easily accessible and near
the UPS.
14. To reduce the risk of re or electric shock,
do not use the unit on any transportation
such as airplanes or ships. The eect of
shock or vibration caused during transit
and the damp environment can cause the
unit to short out.
BATTERY WARNINGS:
Servicing of batteries should be performed or
supervised by personnel knowledgeable about
batteries and the required precautions. When
replacing batteries, replace with the same type
and number of batteries or battery packs.
CAUTION: Do not dispose of batteries in a re.
The batteries may explode.
CAUTION: Do not open or mutilate batteries.
Released electrolytes are harmful to the skin
and eyes. It may be toxic.
CAUTION: A battery can present a risk of
electrical shock and high short-circuit current.
Contact with any part of a grounded battery
can result in electrical shock.
The following precautions should be observed
when working on batteries:
a) Remove watches, rings or other metal
objects
b) Use tools with insulated handles
c) Wear rubber gloves and boots
d) Do not lay tools or metal parts on top of
batteries
Page 4

3
SAFETY INSTRUCTIONS CONTINUED
INSTALLATION & OPERATION
e) Disconnect charging source and load prior to
installing or maintaining the battery
f) Remove battery grounds during installation
and maintenance to reduce likelihood of
shock. Remove the connection from ground
if any part of the battery is determined to be
grounded.
CAUTION: RISK OF EXPLOSION IF BATTERY IS
REPLACED BY AN INCORRECT TYPE.
Please recycle your batteries. Refer to local
regulations for disposal requirements or if
you are in the USA please call 1-877-7231297 or visit www.call2recycle.org for more
information about recycling your batteries.
INTRODUCTION
Thank you for choosing a bXterra
Uninterruptible Power Supply. This UPS system
is ENERGY STAR® certied and uses our
GreenTech™ High-Eciency Design to consume
less power, reduce heat and improve UPS
operation.
INSPECTION
Inspect your UPS upon purchase. The following
items should be inside:
• UPS System • User Manual • USB A+B
Type Cable
Remove the UPS from its package and inspect
it for damage that may have occurred during
shipping. If any damage is discovered, re-pack
the unit and return it to the place of purchase.
Determine the Power Requirements of Your
Equipment
1. To determine the power requirements of
your equipment, ensure that the equipment
plugged into the outlet does not exceed the
UPS’s rated capacity. If the rated capacity of
the unit is exceeded, the UPS may overload
and shut down or the circuit breaker may
trip.
2. There are many factors that can aect the
amount of power that your equipment will
require. We suggest that the load placed on
the battery outlets not exceed 80% of the
UPS’s capacity.
CONNECT TO UTILITY POWER
Connect the AC power cord to utility power.
The UPS will start to charge its internal
battery. For best results, charge the battery
for six hours prior to initial use. When the
UPS is plugged into an AC outlet, the battery
will automatically charge whether the UPS is
turned on or not.
PLUG IN EQUIPMENT
Battery Backup Outlets
With the UPS turned o and unplugged,
connect equipment requiring battery backup
to the “Battery Backup” outlets. These outlets
provide battery backup, EMI ltering, line
conditioning, and surge protection. Battery
power is automatically provided in case of
power failure.
Surge Protected Outlets
Connect other devices requiring surge
protection to the “Surge Protected” outlets.
These outlets do not provide power during
power failure.
DO NOT plug a laser printer, paper shredder,
copier, space heater, vacuum cleaner, sump
pump or other large electrical device into the
UPS. The power requirements of these devices
will overload and possibly damage the UPS.
Connect Modem/Phone Line
This UPS protects a single line (1 in/1 out)
phone, modem, or fax machine from surges.
To protect a fax machine, phone or modem,
connect a telephone or network cable from
the wall jack outlet to the IN jack of the UPS.
Connect a telephone cable or network cable
from the OUT jack of the UPS to a fax machine,
telephone, modem or network device.
TURN THE UPS ON
To turn on the UPS unit, press the power switch
for at least two seconds. The LCD will light up.
If an overload is detected, the UPS will turn o
and the unit will beep continuously. To x this,
turn the UPS o and unplug at least one piece
of equipment from the battery power- supplied
outlets. Make sure the Circuit Breaker button is
depressed and turn the UPS on again. To turn
o the UPS unit, press the power switch again.
The LCD will turn o.
MUTE ON/OFF
Press the mute button to turn an alarm on
or o. For more information about the mute
button, please refer to the LCD Display section
of this manual.
INSTALL SOFTWARE
Connect one end of the USB cable to a PC and
the other end to the USB port at the rear of the
UPS.
Page 5

4
CERTIFICATIONS
FCC COMPLIANCE
NOTE: This equipment has been tested and found to comply with the limits for a Class B digital
device, pursuant to Part 15 of the FCC Rules. These limits are designed to provide reasonable
protection against harmful interference in a residential installation. This equipment generates
uses and can radiate radio frequency energy and, if not installed and used in accordance with
the instructions, may cause harmful interference to radio communications. However, there is no
guarantee that interference will not occur in an installation. If this equipment does cause harmful
interference to radio or television reception, which can be determined by turning the equipment
o and on, the user is encouraged to try to correct the interference by one or more of the following
measures:
-Reorient or relocate the receiving antenna
-Increase the separation between the equipment and receiver
-Connect the equipment to an outlet on a dierent circuit than the one to which the receiver is
connected
-Consult an experienced radio/TV technician for help
WARNING: Changes or modications not expressly approved by the party responsible for
compliance could void the user’s authority to operate the equipment.
GREENTECH™ UPS HIGH-EFFICIENCY DESIGN
A highly-ecient bXterra GreenTech UPS can reduce your negative environmental impact and save you
money. By implementing high-quality components and leading-edge design, GreenTech UPS systems strive
to deliver improved UPS performance resulting in less energy waste and heat buildup.
ROHS DIRECTIVE
Aside from being ENERGY STAR® compliant, we are committed to and supporters of the Restriction of
Hazardous Substances (RoHS) directive, which strictly limits the use of six hazardous substances (lead,
mercury, cadmium, hexavalent chromium, polybrominated biphenyls (PBBs) and polybrominated diphenyl
ether (PBDE)) in electrical equipment.
Download the latest version of PowerFrameTM software from www.bxterra.com to your hard drive.
Follow on-screen instructions to complete the software installation.
For optimal battery charge, always leave the UPS plugged into the AC outlet.
To store the UPS for an extended period of time, cover the unit and fully charge the battery
before disconnecting from AC power. While in storage, recharge the battery every three
months to prolong optimal battery life.
Page 6
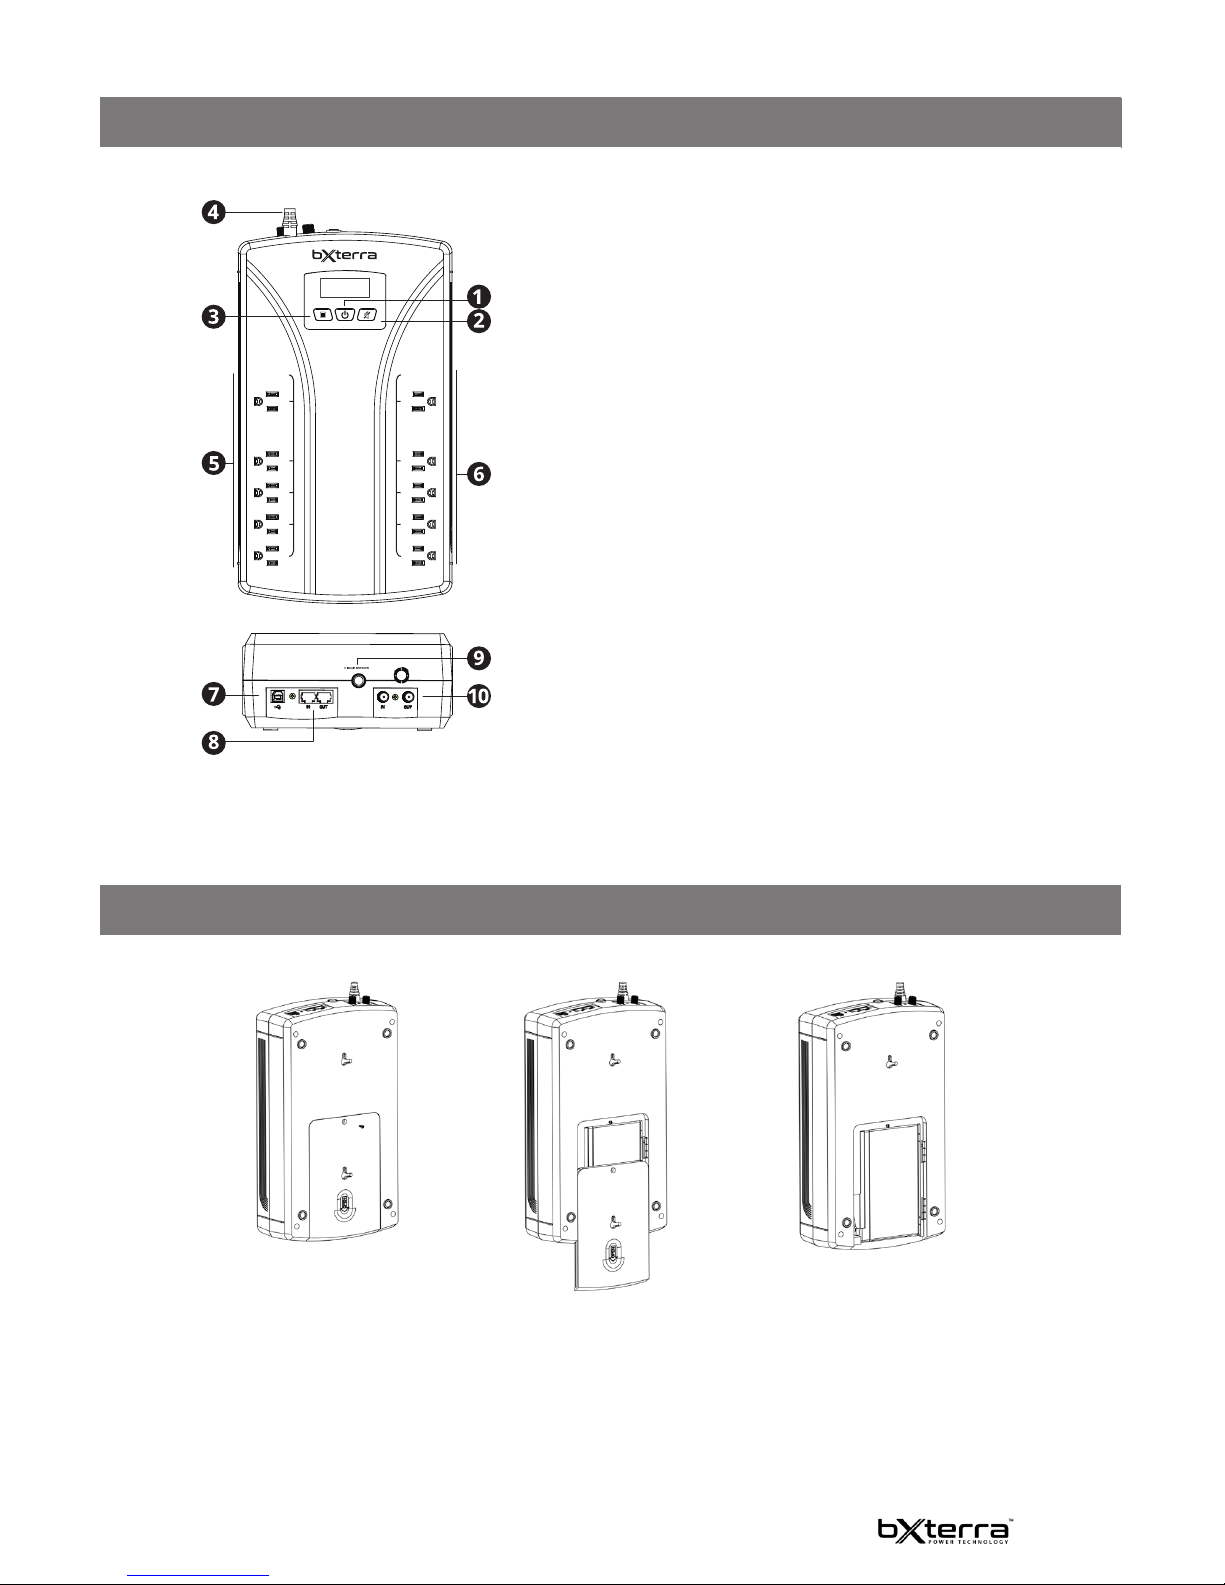
5
1. Power switch
Used as the master on/o switch for the UPS as well as for
equipment connected to the battery power-supplied outlets.
2. Mute button
Hold this button for more than one second to place the unit in
Silent Mode or silence the alarm.
3. Select button
Use this to cycle through messages and options on the LCD display.
4. AC input
Connect the main power cord of the UPS here.
5. Surge protected outlets
These outlets protect connected equipment in case of a power
surge.
6. Battery backup/Surge outlets
These outlets provide battery backup power and surge protection
to connected devices.
7. USB port
This port can connect the UPS to any computer to download the
UPS-monitoring software, PowerFrame™. Instructions for this
procedure can be found in the Installation and Operation section
of this manual.
8. Phone/network surge protection
These ports protect equipment from surges over a single phone
line or network connection.
9. Circuit breaker
This breaker provides overload and fault protection. If it trips,
remove some of the load then reset it by pressing it in.
10. Coax surge protection
These ports protect equipment from surges over a coaxial line.
MUTESELECT
POWER
BM 550
SURGE + BATTERY
SURGE + BATTERY
SURGE PROTECTION
SURGE PROTECTION
PRODUCT OVERVIEW
BATTERY REPLACEMENT
STEP 1:
Remove battery cover by
removing the screw on the
back of the unit.
STEP 2:
Push the battery cover down
as shown above.
STEP 3:
Disconnect the two battery
cables and pull out the
battery from the case.
Replace the battery with
the same specications and
number as your previous
battery.
Page 7
6
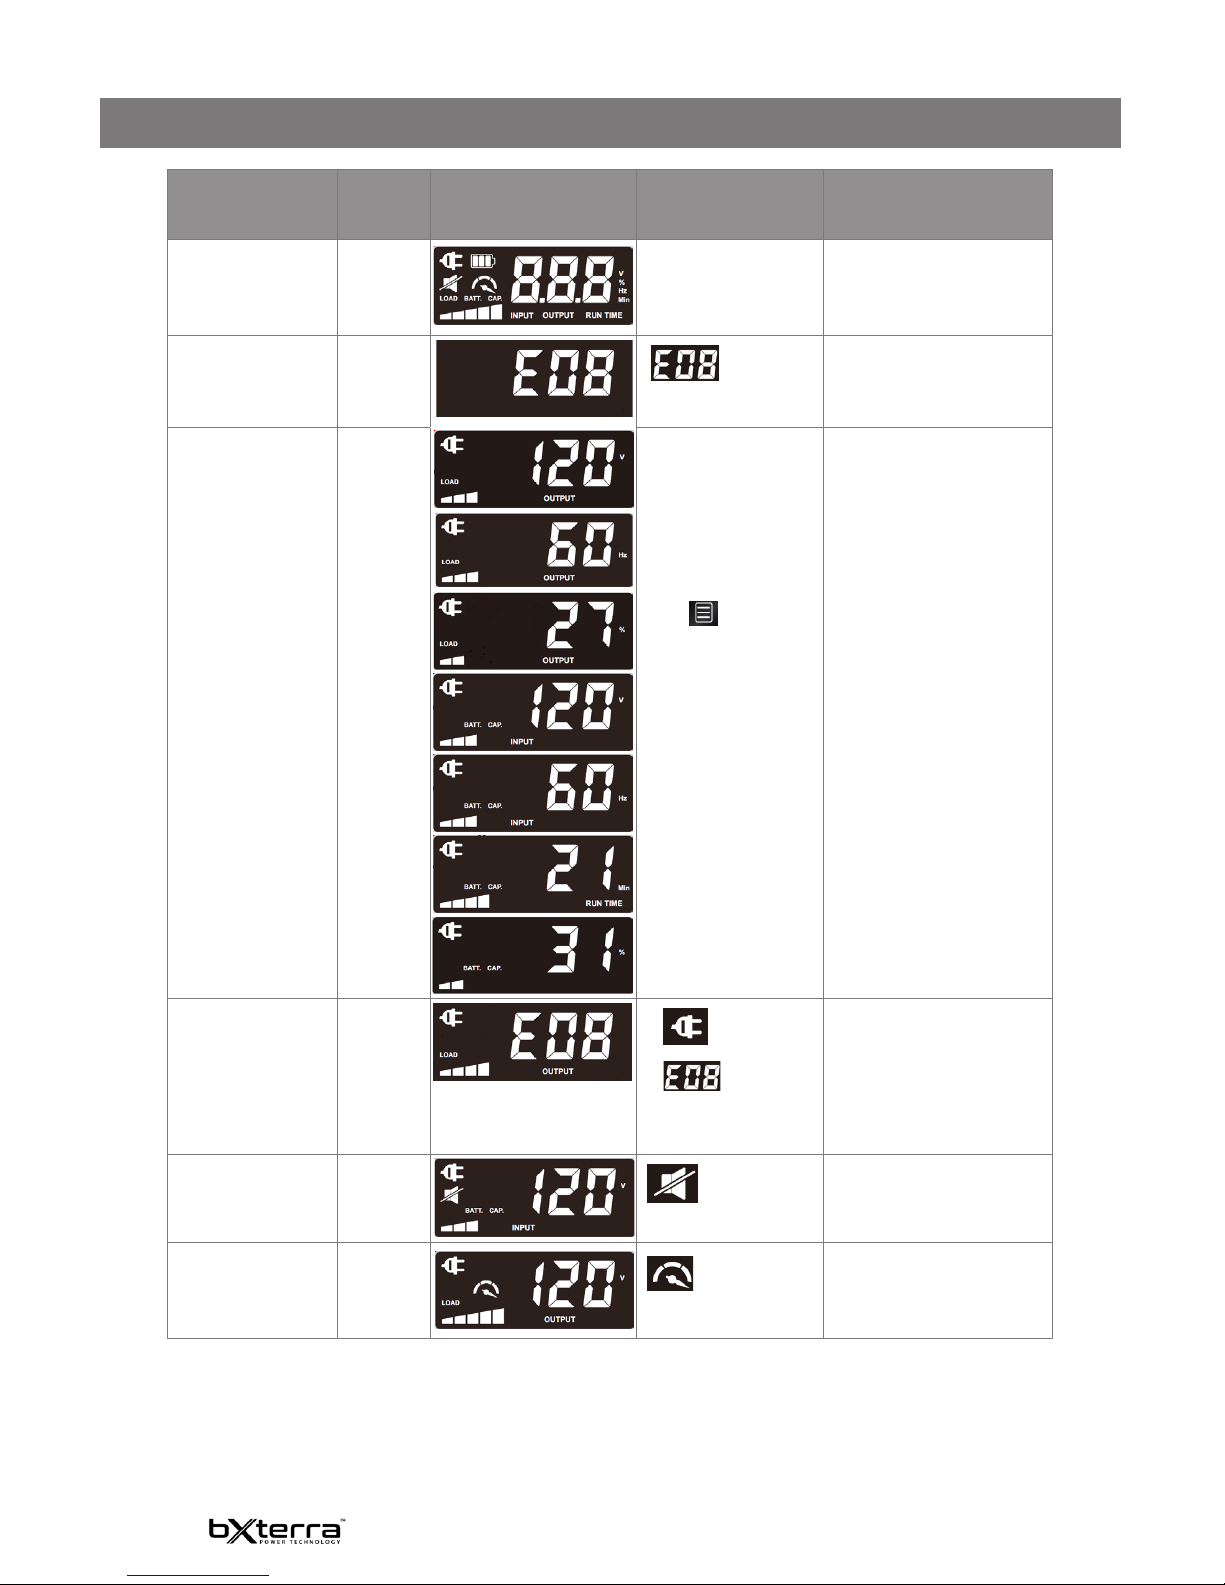
LCD DISPLAY
MODE POWER
BUTTON
LED
LCD DISPLAY DESCRIPTION AUDIO
Turning On the UPS ON
When the UPS starts
up, these icons will
illuminate for three
seconds
Continuous beeping for two
seconds
Site Wiring Fault in
Standby Mode
O
indicator will
ash every ve seconds
O
AC Mode On
1. Output voltage
2. Output frequency
3. Load percent
4. Input voltage
5. Input frequency
6. Estimated time
7. Battery level
Press
button
to cycle through the
displayed information.
O
Site Wiring Fault in
AC Mode
On
1. indicator is
ashing every second
2.
and normal
AC Mode will take turns
ashing every ve
seconds
O
AC Mode in Mute On
indicator will
display
O (The mute function can be
set, but can only be used in
Battery Mode)
AC Mode Overload
Alarm
On
indicator is
ashing every second
Beeping every 0.5 seconds
Page 8
7
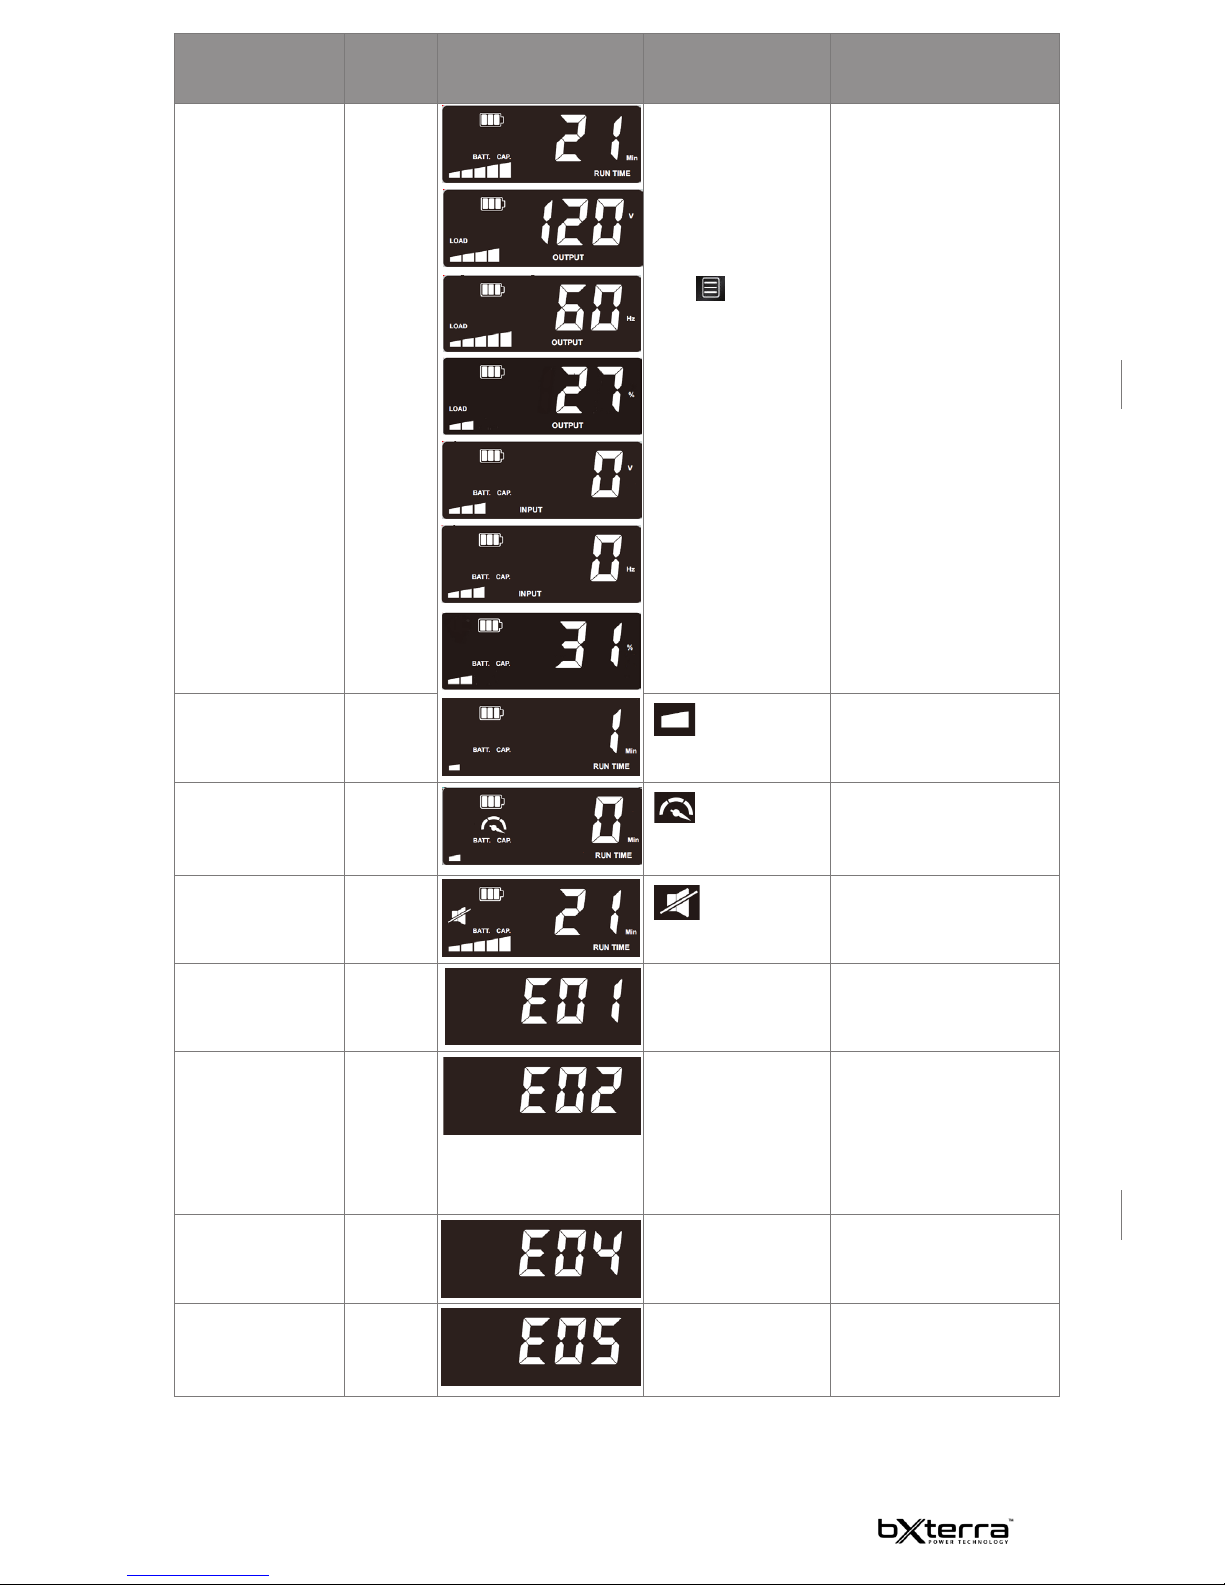
MODE POWER
BUTTON
LED
LCD DISPLAY DESCRIPTION AUDIO
Battery Mode On
1. Estimated time
2. Output voltage
3. Output frequency
4. Load percent
5. Input voltage
6. Input frequency
7. Battery level
Press
button
to cycle through the
displayed information.
Beeping every 10 seconds
Low Battery Alarm On
indicator is
ashing every second
Beeping every second
Battery Mode with
Overload Alarm
On
indicator is
ashing every second
Beeping every 0.5 seconds
Battery Mode in
Mute
On
indicator will
display
The UPS will not sound an
alarm until after an event
occurs, such as low battery,
overload, etc.
Output Short
Circuited
On
Disconnect shortcircuited loads and
restart the UPS
Continuously beeping
Overload Fault On
Turn o the UPS.
Disconnect all loads
and restart the UPS.
Plug in equipment one
at a time and make
sure not to exceed the
UPS rating for load
capacity.
Continuously beeping
Battery Mode Output
High Fault
On
Call for service
immediately
Continuously beeping
Overcharge Fault On Call for service
immediately
Continuously beeping
Page 9
8
TROUBLESHOOTING
PROBLEM POSSIBLE CAUSE SOLUTION
Nothing is displayed on the LCD
screen
The UPS is not on
Press the power button to turn the
UPS on
The battery voltage is too low Charge the battery for at least 6 hours
The battery is faulty Replace the battery
The UPS is always on Battery
Mode
The power cord is loose
Check that the power cord is plugged
in properly
The UPS beeps continuously Please check the LCD Display table on Page 6 for details
Battery backup time is too short
The battery voltage is too low Charge the battery for at least 6 hours
There is an overload
Unplug some noncritical devices.
Please verify that the load matches the
UPS capabilities.
The battery is defective
Contact [email protected] for
assistance
The surge protection outlets are
not providing power
The circuit breaker has tripped
from an overload
Turn the UPS o and unplug one piece
of equipment. Wait 10 seconds, reset
the circuit breaker then turn the UPS
on again.
The UPS will not turn on
The on/o switch is designed so
the user must press the button for
at least 2 seconds to turn it on
Turn the UPS o. Wait 10 seconds then
turn it on again.
The unit is not plugged into an
outlet
The unit must be connected to a
properly grounded outlet providing
110/120V and 50/60 Hz
The battery is worn out
Contact bXterra at
[email protected] about
replacement batteries
TECHNICAL SPECIFICATIONS
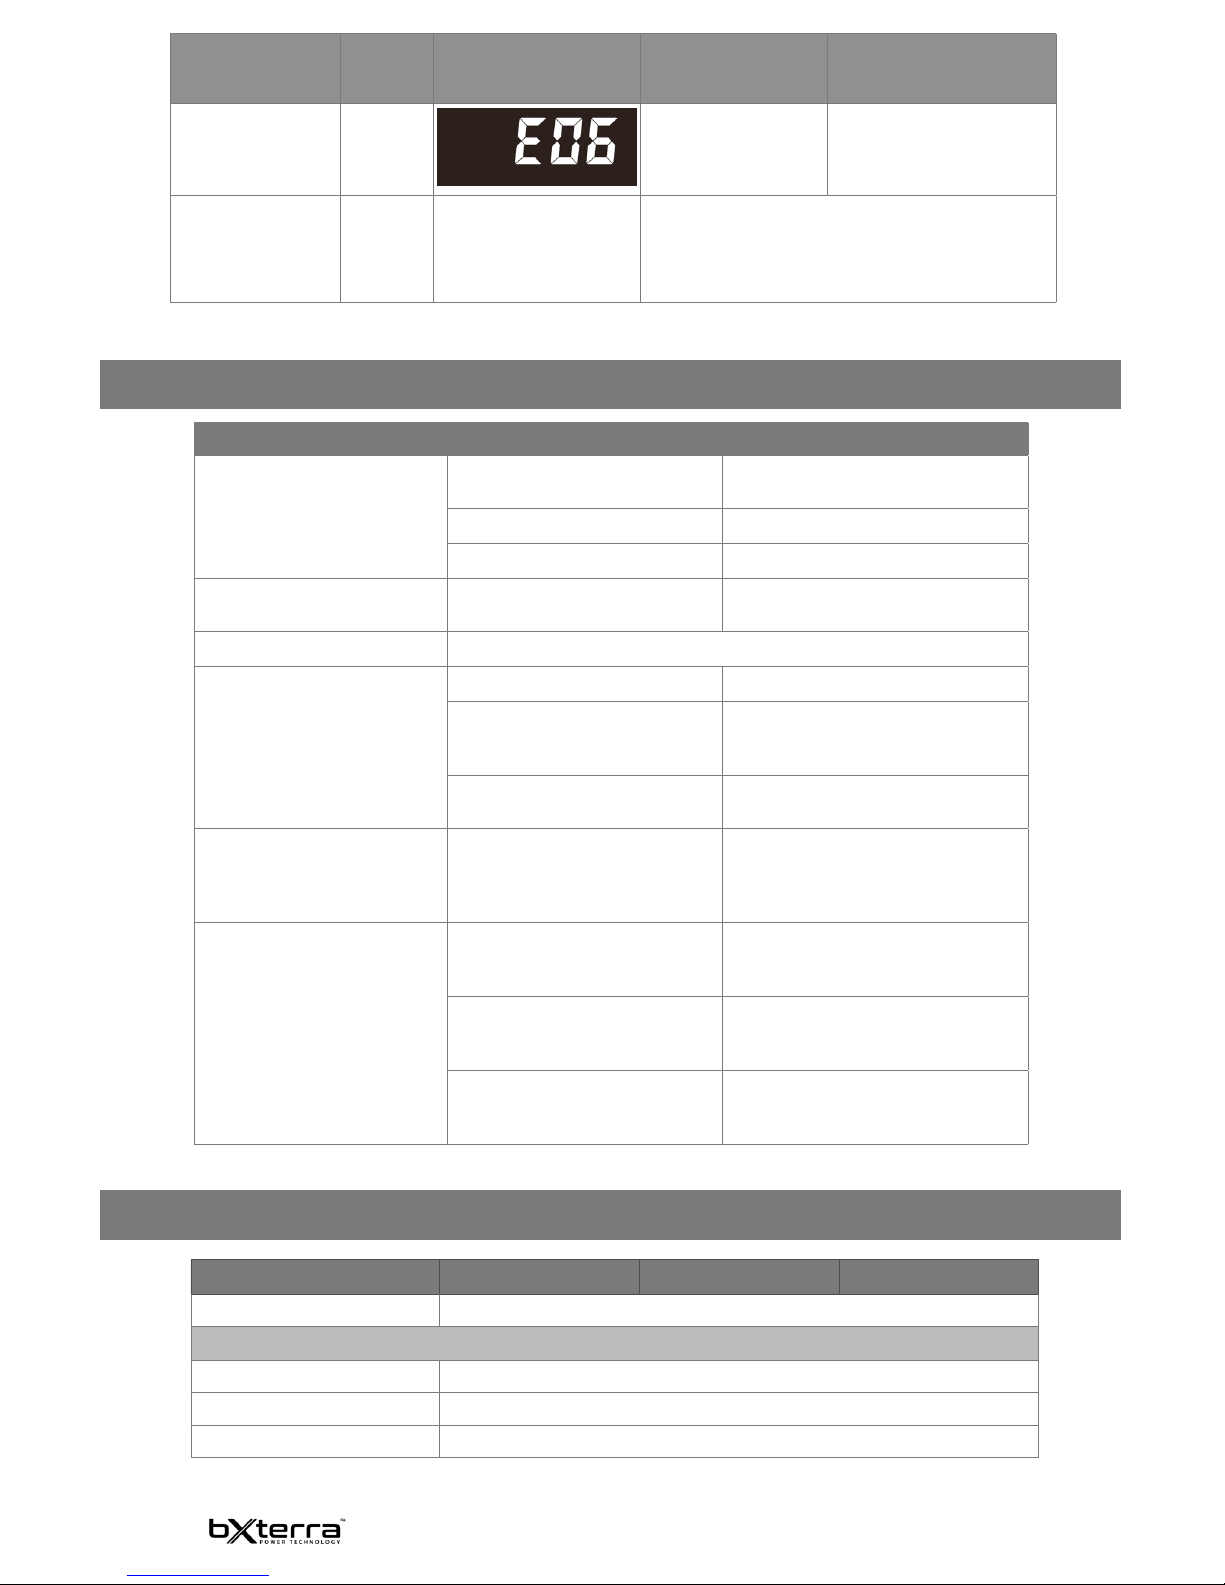
MODE POWER
BUTTON
LED
LCD DISPLAY DESCRIPTION AUDIO
Low Battery Fault On
Charge the UPS for
at least 12 hours or
replace the battery
Continuously beeping
Backlight During faults and alarms, the backlight will always stay
on.
In other modes, the backlight will light up when the
device’s buttons are pressed. If no buttons are pressed
within 20 seconds, the backlight will turn o.
MODEL BM550LCD BM750LCD BM850LCD
Topology Standby
INPUT
Voltage 120V
Frequency Range 50/60 Hz ± 5 Hz (auto sensing)
Input Voltage Range 88 - 139V
Page 10

9
MODEL BM550LCD BM750LCD BM850LCD
Circuit Breaker 12A
Plug Type NEMA 5-15P
Plug Style Right Angle, 45° Oset
Power Cord 6 ft
OUTPUT
VA/W 550VA/330W 750VA/420W 850VA/450W
On Battery Voltage
120 VAC ± 5%
On Battery
Frequency
50/60 Hz ± 1Hz
On Battery Waveform
Simulated Sine Wave
Outlet Type NEMA 5-15R
Outlets - Total 10
Battery & Surge 5
Surge-Only 5
Overload Protection Internal Circuitry Limiting/Circuit Breaker
Transfer Time 4ms Typical
BATTERY
Runtime at Half Load(min) 9 10 8
Runtime at Full Load(min) 2 3 2
Battery Type Leakproof and maintenance-free sealed lead-acid battery.
Battery Size 12V/7.0Ah 12V/9.0Ah 12V9.0Ah
Battery Model DJW12-7.0/MS7-12 DJW12-9.0/MS9-12
Battery Quantity 1
User Replaceable Yes
Recharge Time 8 Hours
SURGE PROTECTION & FILTERING
Surge Suppression 1,030 Joules 1,030 Joules 1,030 Joules
Phone RJ11/ Ethernet RJ45 Yes
EMI/RFI Filtration Yes
MANAGEMENT & COMMUNICATIONS
Multi-status LCD Panel Voltage, Frequency, Runtime, Load Capacity, Battery Capacity,
Muted, Wiring Fault
HID Compliant USB Port Yes
LED Indicators Power On
Management Cable USB Cable
Audible Alarms On Battery, Low Battery, Overload, Fault
Software PowerFrame
TM
Personal UPS-monitoring software
PHYSICAL
Form Factor Compact Desktop
Dimensions (in) L x W x H 13 x 7.48 x 3.46
Weight (lbs) 7.59 8.78 8.78
Page 11

10
CONSIGNES DE SÉCURITÉ
CONSERVEZ CES INSTRUCTIONS: Ce manuel
contient des instructions importantes à suivre
lors de l’installation et de la maintenance de
l’onduleur et de ses batteries.
1. Cette unité est destinée à être installée
dans un environnement contrôlé (zone à
température contrôlée et à l’intérieur exempte
de contaminants conducteurs). Veuillez éviter
d’installer l’onduleur dans des endroits où il y a
de l’eau stagnante ou courante, de la poussière,
de la lumière directe du soleil ou une humidité
excessive.
2. Cet onduleur utilise une tension qui peut être
dangereuse. N’essayez pas de démonter l’unité.
Seul le personnel d’entretien de l’usine peut
eectuer des réparations.
3. Connectez votre onduleur directement à une
prise secteur correctement mise à la terre avec
un fusible ou une protection de disjoncteur. Ne
branchez pas l’appareil dans une prise qui n’est
pas mise à la terre. Éteignez et débranchez
l’appareil si vous devez le mettre hors tension.
4. Ne pas utiliser dans une salle informatique
telle que dénie dans la norme ANSI / NFPA
75 relative à la protection des équipements
informatiques / de traitement de l’information.
5. Pour réduire le risque d’incendie, raccorder
uniquement à un circuit muni d’un circuit
de dérivation de 20 ampères maximum sur
protection de courant conformément au Code
national de l’électricité, ANSI / NFPA 70.
6. Pour de meilleures performances, maintenez
la température intérieure autour de l’appareil
entre 0 °C et 40 °C (32 °F et 104 °F).
7. Ne xez pas d’équipement médical ou
d’articles non liés à l’ordinateur, tels que des
équipements de survie, des fours à micro-
ondes ou des aspirateurs à l’UPS. bXterra
ne vend pas d’équipements destinés à des
applications médicales ou de survie. Visitez
notre site Web pour plus d’informations sur les
WARRANTY INFORMATION
Your bXterra product comes with a Limited 3-Year Warranty. bXterra warrants this product,
if used appropriately and in full accordance with all applicable instructions, to be free from
original defects in material and workmanship for 3 years from the date of initial purchase. If the
product can be proven defective in material or workmanship during that 3-year period, bXterra
will, subject to the full terms and limitations of the product’s Limited Warranty available on our
website, repair or replace that product. bXterra will act on its own discretion as the sole remedy for
bXterra’s breach of its Limited Warranty. Full details of this Limited Warranty and bXterra’s Directly
Connected Equipment Guarantee can be found on our website at www.bxterra.com/warranty or
at the individual product’s page on our website. Please register your product at www.bxterra.com/
registration to certify your product’s warranty.
Product specications are subject to change without prior notice
MODEL BM550LCD BM750LCD BM850LCD
CERTIFICATIONS
Safety
cTUVus (Conforms to UL1778 5th Edition & CSA 22.2 no. 107.3-
14 / R: 2014), FCC DOC Class B,
ENERGY STAR® certied
Environmental
RoHS Compliant
WARRANTY
Product Warranty
3 Year Limited Warranty
Directly Connected
Equipment Guarantee
$125,000 $150,000 $200,000
Page 12

11
© 2018 Bxterra Power Technology, a subsidiary and trademark of APX Power Technology LLC, USA. All Rights
Reserved. bXterra and the bXterra logo are trademarks of APX Power Technology LLC, USA. All other trademarks are
property of their respective owners. Imagery and specications may dier from actual products and are subject to
change without notice.
appareils appropriés pour se connecter à cet
onduleur.
8. Placez ou installez l’onduleur uniquement
dans la direction spéciée dans la section
Installation et fonctionnement de ce manuel.
Ne bloquez pas les ventilateurs et laissez
susamment d’espace autour de tous les côtés
de l’onduleur pour assurer une ventilation
adéquate. N’exposez pas l’appareil à la lumière
directe du soleil et n’installez pas l’appareil à
proximité d’appareils émettant de la chaleur,
tels qu’un radiateur ou une fournaise. Cela
pourrait avoir un impact négatif sur le système
de refroidissement interne de l’unité et causer
des dommages au produit non couverts par la
garantie.
9. Ne branchez pas l’entrée de l’ASI dans
sa propre sortie. Ne xez pas une barrette
d’alimentation ou un parasurtenseur à
l’onduleur.
10.Ne modiez pas la che de l’onduleur et
n’utilisez pas d’adaptateur qui éliminerait la
connexion à la terre de l’onduleur.
11.N’utilisez pas de rallonges pour connecter
l’onduleur à une prise secteur.
12.Si l’onduleur est alimenté par un générateur
CA alimenté par un moteur, le générateur
doit fournir une sortie propre, ltrée et de
qualité informatique. Consultez le manuel de
votre générateur pour voir s’il répond à ces
spécications.
13.La prise d’alimentation principale qui
alimente l’onduleur doit être facilement
accessible et proche de l’onduleur.
14.Pour réduire les risques d’incendie ou
d’électrocution, n’utilisez pas l’appareil sur des
moyens de transport tels que des avions ou
INFORMATIONS DE GARANTIE
Votre produit bXterra est assorti d’une garantie limitée de 3 ans. bXterra garantit que ce produit, s’il
est utilisé de manière appropriée et conformément à toutes les instructions applicables, contre les
défauts de matériaux et de fabrication du produit pendant 3 ans à compter de la date d’achat. S’il
est prouvé que le produit présente un vice de matériau ou de fabrication au cours de cette période
de 3 ans, bXterra réparera ou remplacera, sous réserve des conditions et restrictions complètes de
la garantie limitée du produit disponible sur notre site Web. bXterra agira à son gré comme seul
recours en cas de violation de sa garantie limitée par bXterra. Tous les détails de cette garantie
limitée et de la garantie d’équipement directement connecté de bXterra sont disponibles sur notre
site Web à l’adresse www.bxterra.com/warranty ou sur la page de chaque produit sur notre site
Web. Enregistrez votre produit sur www.bxterra.com/registration pour attester de la garantie de
votre produit.
des navires. L’eet de choc ou de vibration causé
pendant le transport et dans l’environnement
humide peut entraîner un court-circuit de l’unité.
AVERTISSEMENTS DE BATTERIE:
L’entretien des batteries doit être eectué ou
supervisé par du personnel qualié sur les
batteries et les précautions requises. Lorsque
vous remplacez les piles, remplacez-les par le
même type et le même nombre de piles ou de
batteries.
ATTENTION: Ne jetez pas les piles dans un feu. Les
piles peuvent exploser.
ATTENTION: N’ouvrez pas et ne mutilez pas les
piles. Les électrolytes libérés sont nocifs pour la
peau et les yeux. Cela peut être toxique.
ATTENTION: Une batterie peut présenter un
risque d’électrocution et un courant de courtcircuit élevé. Tout contact avec une partie d’une
batterie mise à la terre peut entraîner un choc
électrique. Les précautions suivantes doivent
être observées lorsque vous travaillez sur des
batteries:
a) Enlever des montres, des bagues ou d’autres
objets métalliques
b) Utiliser des outils avec poignées isolées
c) Portez des gants et des bottes en caoutchouc
d) Ne posez pas d’outils ou de pièces métalliques
sur les batteries
e) Débranchez la source de charge et la charge
avant d’installer ou de maintenir la batterie
f) Retirer les masses de la batterie pendant
l’installation et la maintenance an de réduire les
risques de choc. Retirez la connexion de la masse
si une partie de la batterie est déterminée pour
être mise à la terre.
ATTENTION: RISQUE D’EXPLOSION SI LA BATTERIE EST
REMPLACÉE PAR UN TYPE INCORRECT.
 Loading...