

Page 1

MT-2
AV Multimedia Scheduler
User Manual
Page 2

Advanced Setting
Holiday......................................... 19
Account........................................ 20
System
System.................................. 21
Earthquake............................ 22
Network................................. 23
Sound.................................... 24
IO........................................... 25
Display................................... 26
Update................................... 27
Contact Us .......................................... 28
Safe Instructions............................................... 1
Rear Panel ....................................................... 2
System Diagram……………………………….... 3
Information Display........................................... 4
Remote Control
Log In…..................................................... 5
Dashboard................................................. 6
Media Center
Media Center- File Management............... 7
Media Center- Recycle Bin........................ 8
Schedule.................................................... 9
Schedule- Weekly Date- Add Schedule
List............................................................ 10
Schedule- Weekly Date- Add Schedule… 11
Schedule- Weekly Date- Revise
Schedule.................................................. 14
Schedule- Specific Date- Add
Schedule.................................................. 15
Schedule- Specific Date- Revise
Schedule.................................................. 18
Index
Page 3

1. Please read the instruction manual carefully before installing and using the apparatus.
2. Please save the instruction manual well for reference.
3. Please follow the instructions and aware of warning indications.
4. Except your dealer, please do not use any spare parts recommended by others.
5. Please use the fixing accessories provided by BXB. If the system is broken due to the improper fixing, BXB would not bear
the responsibility for compensation.
6. Please make sure the power cord has been fixed properly.
7. Do not use any three-hole plugs or extension cords as this would result in fire or short circuit.
8. Do not stuff anything into the apparatus or splash any liquid on it.
9. Please contact maintenance technicians if the conditions below occur:
A. Power cord or plug is damaged.
B. Liquid has been spilled into the apparatus.
C. The system cannot operate normally even everything has followed the instructions.
D. The apparatus fall down or the cover is damaged..
E. Other problems that need to be repaired.
10. To reduce the risk of damage caused by lightning strike, it is essential that all cables must be bonded well to the same
grounding point.
11. Install the apparatus and its other equipment carefully. Impacting and fierce shaking should be avoided.
12. Do not disassemble or remodel the the apparatus:
A. High voltage and sensitive electrical circuit are inside of the apparatus. Do not disassemble it to prevent electric shock.
B. The specification of any replaced spare part should be validated by manufacturer, or it may cause fire and short circuit.
1. Do not use the apparatus in the environment with improper temperature, moisture, and power level: the adequate range
is 0°C ~ 40°C (32°F ~ 104°F) and 90% below of moisture.
1. Do not expose the apparatus to rain and moisture. Put it in a dry location to avoid any damage of the inside components.
2. Do not clean the apparatus and its accessories with chemical detergent. Use a cloth dampened a little bit water instead.
3. Do not switch on/off the power of apparatus rapidly no matter it’s operating or off. It can maintain the regular operation of the
sensitive electronic circuit.
Caution: The static electricity treatment of printed circuit boards should follow ESD safety measure.
Caution: Please aware of the voltage accordance with that in your country.
Warning: Only qualified maintenance technicians can disassemble the cover of apparatus.
Safety Instructions
P1
Page 4
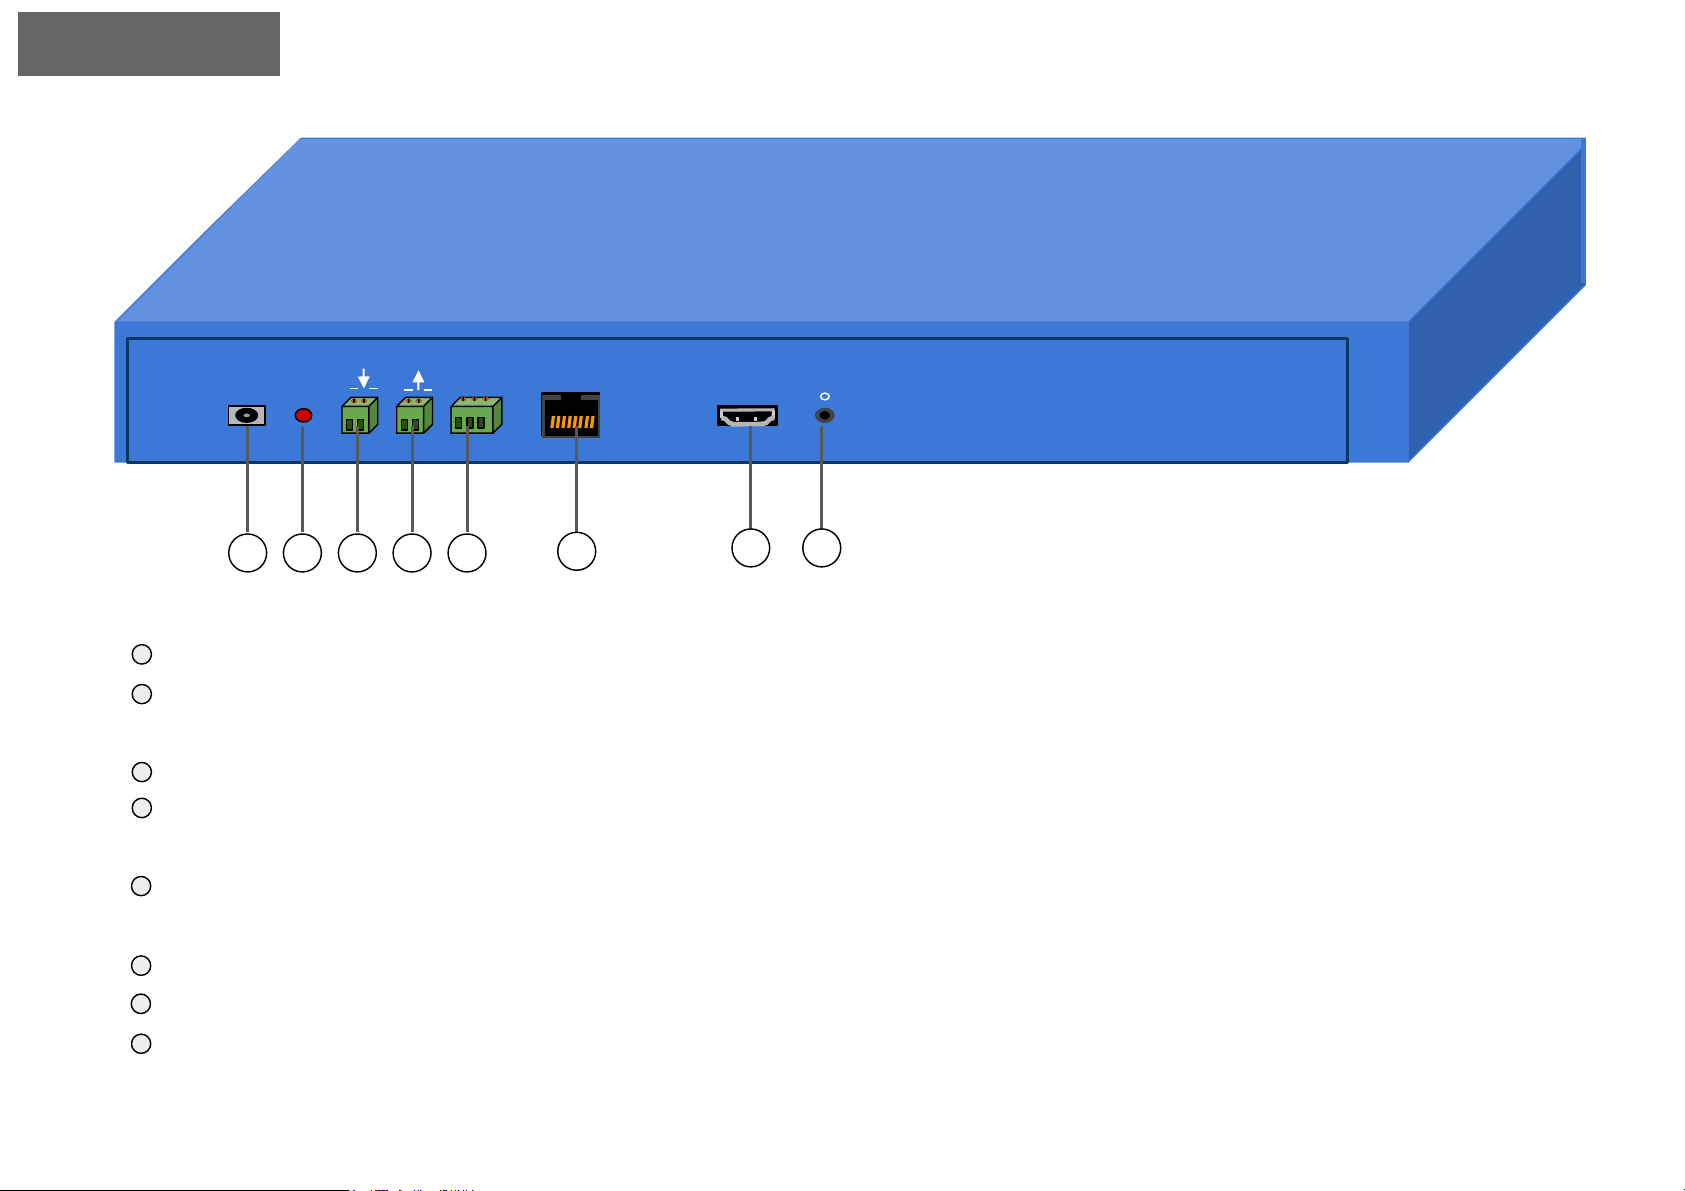
Rear Panel
DC 5V LAN HDMIStatus IOIOI Audio Output
1 2 3 4 5
6
7 8
Power Supply: connect with AC100-230V to DC-5V adapter.
Power Status Indicator: turn on when the power status is normal; turn off when there’s the abnormal condition
of power supply.
Trigger IN Dry Contact: the preserved contact.
Trigger OUT Dry Contact: N.O. trigger contact for connecting other equipment such as an amplifier. It enables
the equipment to switch on.
RS-232 port: the pin from the left to right is GND, TX, RX. For connecting with BXB’s WMP-1206 Speaker
Circuit Zone Selector.
Internet port: you can set the schedule, system configurations, and NTP clock via Internet.
HDMI OUT: connect with screens for displaying weather &air quality information and scheduled messages.
Audio OUT: enable to connect with PA system. As the system is executing broadcasting, the sound could
come out from this linear source or the HDMI port for mixing output.
3
1
2
4
5
6
7
8
P2
Page 5
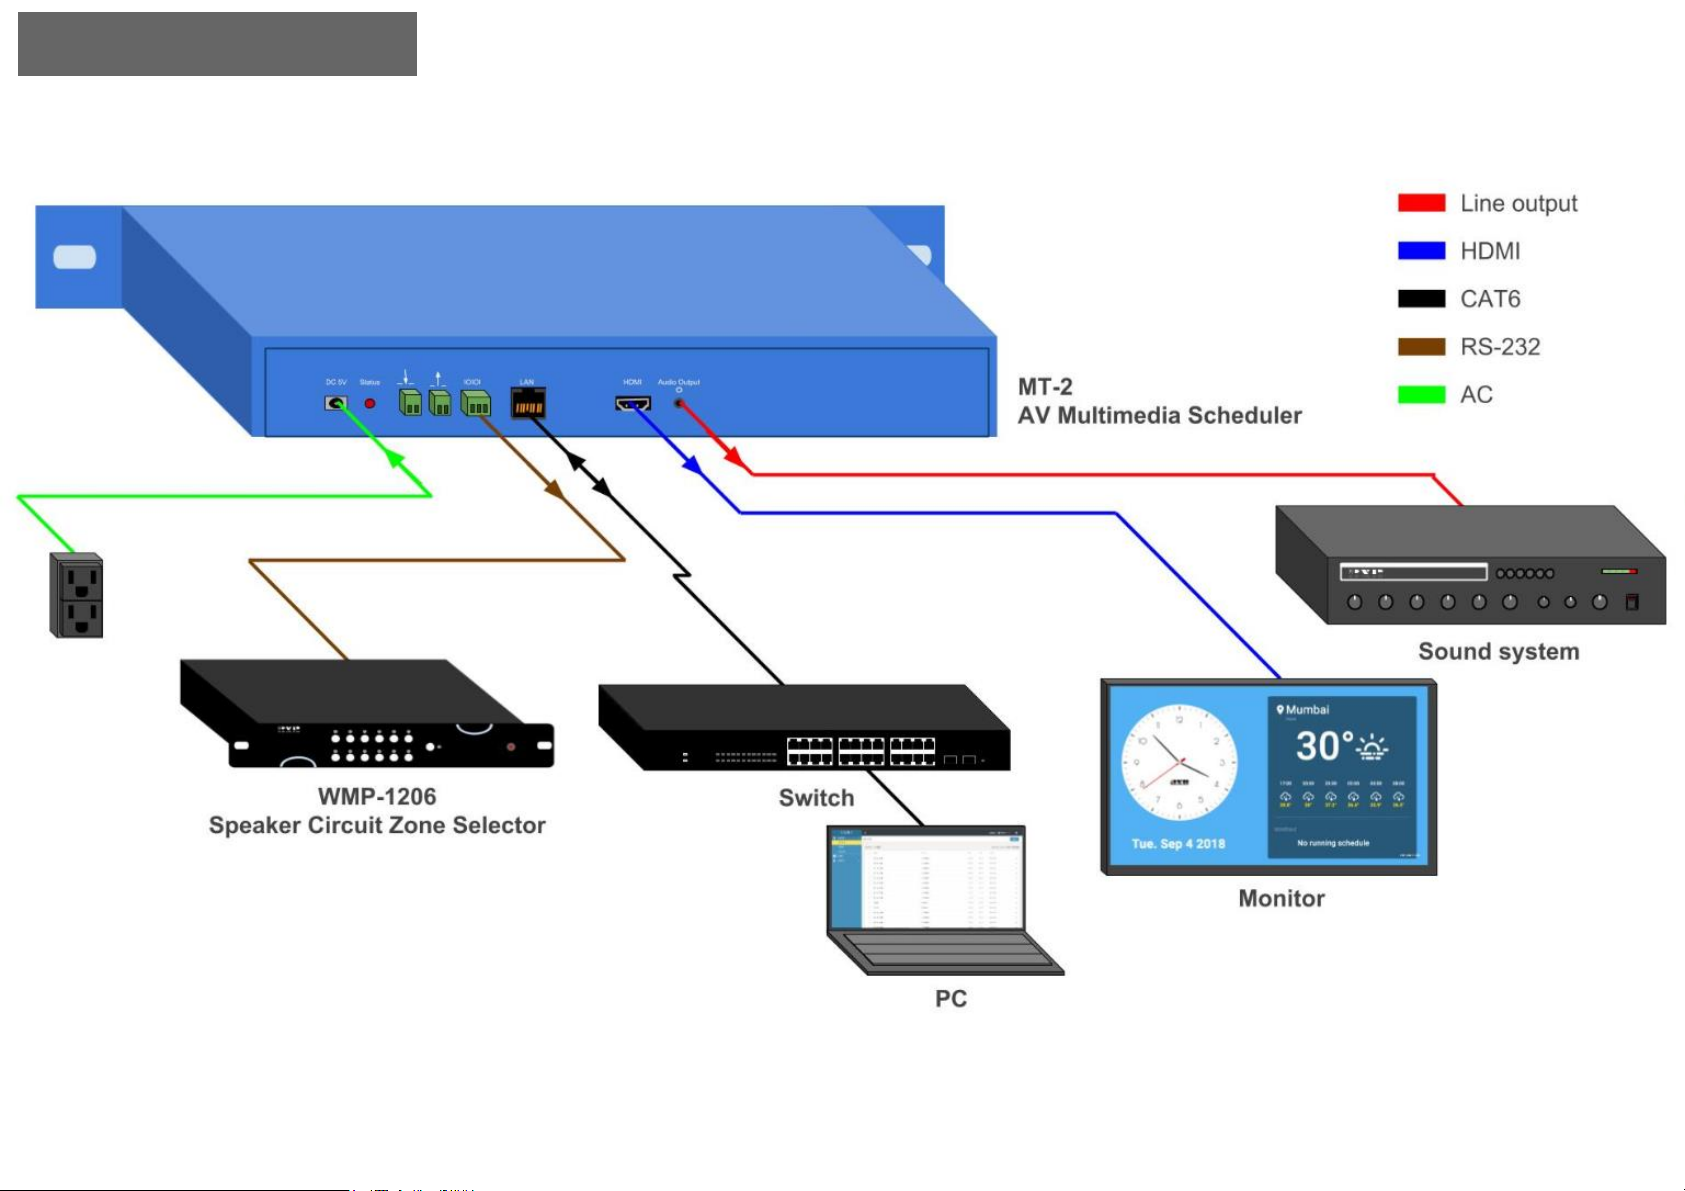
Notice: all functions would work normally only by connecting with the Internet.
System Diagram
P3
Page 6
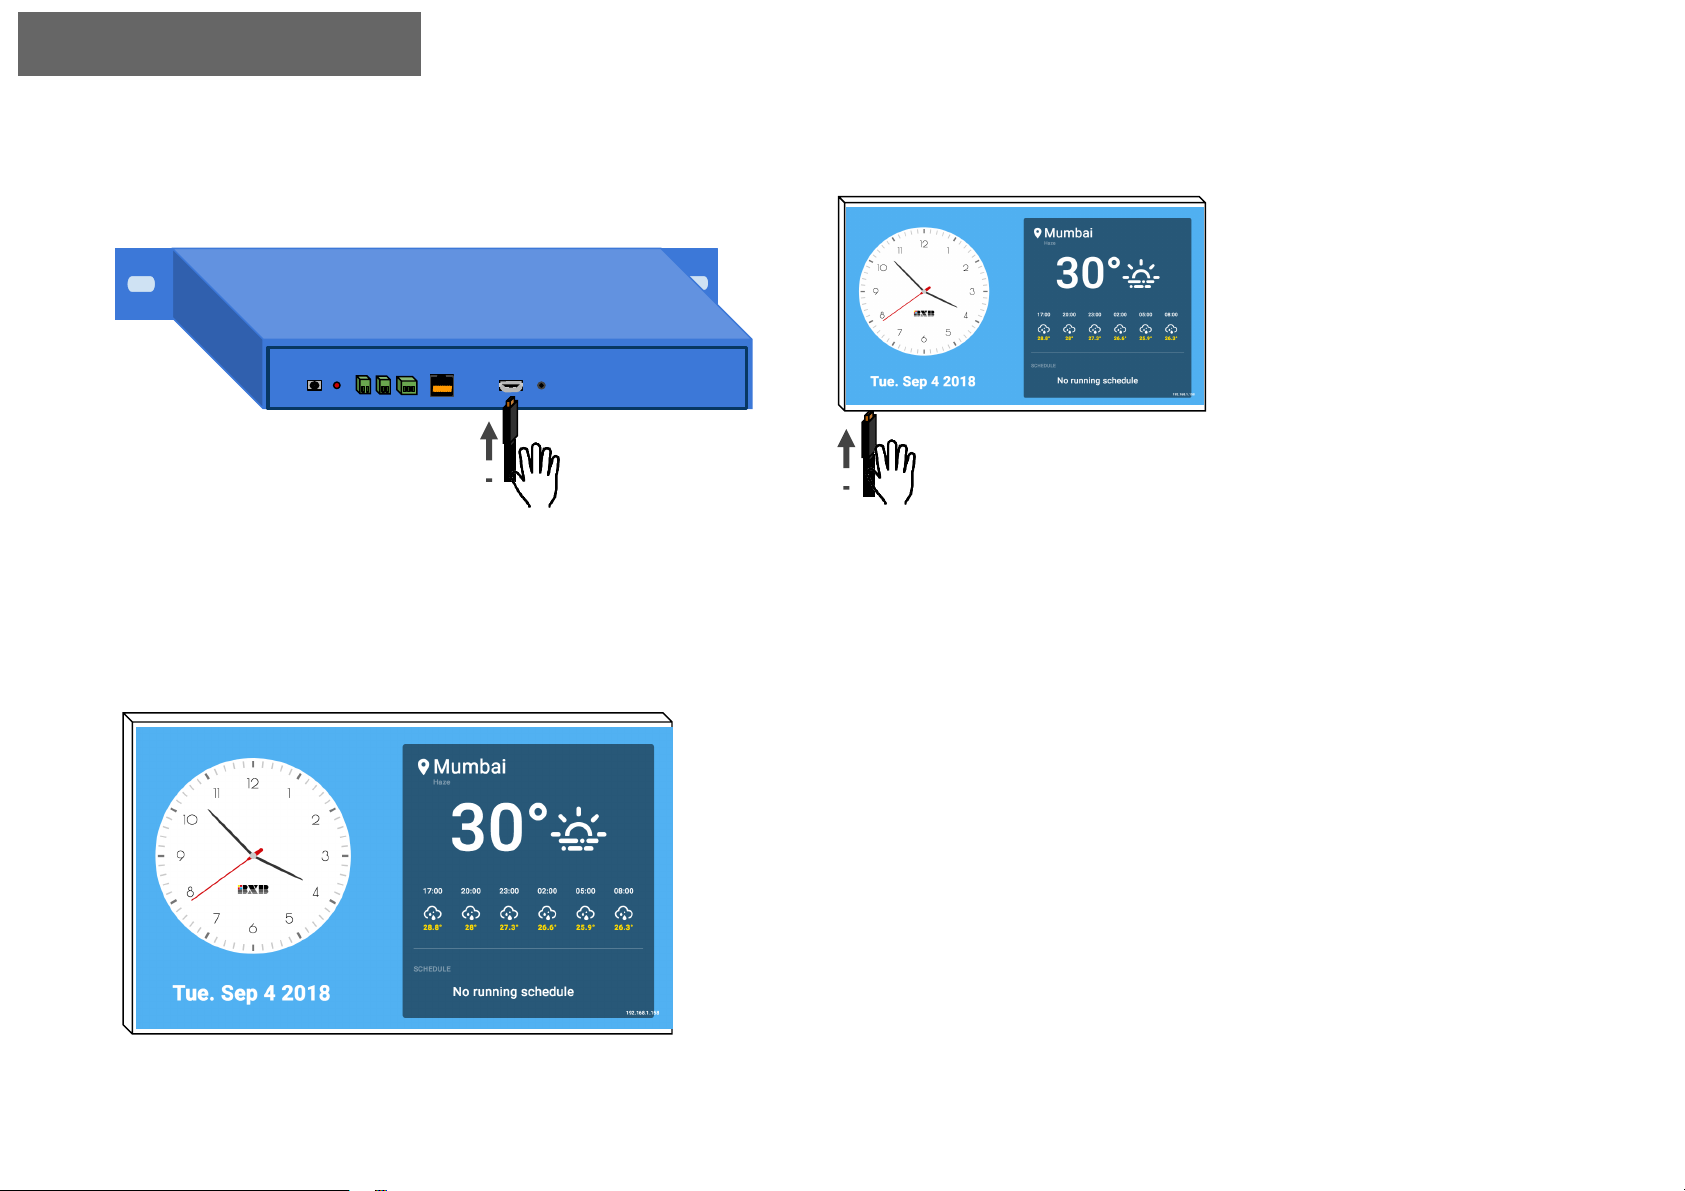
Information Display
1
Connect MT-2 and the monitor with HDMI cable and switch the monitor channel to HDMI.
2
Via the Internet, MT-2 can show the information of local time, weather, and air quality.
By connecting with the
monitor, MT-2 can display
the scheduled messages and
the weather information from
the Internet.
You can select horizontal or
vertical display based on the
way of installing the monitor.
As the earthquake occurs,
BXB’s server would send out
the warning messages
automatically via Internet.
Beside audio warning, the
messages can also be
displayed on the monitors for
instant protection and
evacuation.
MT-2 enables the information
visualized, making you
manage the information
quickly and conveniently.
P4
Page 7
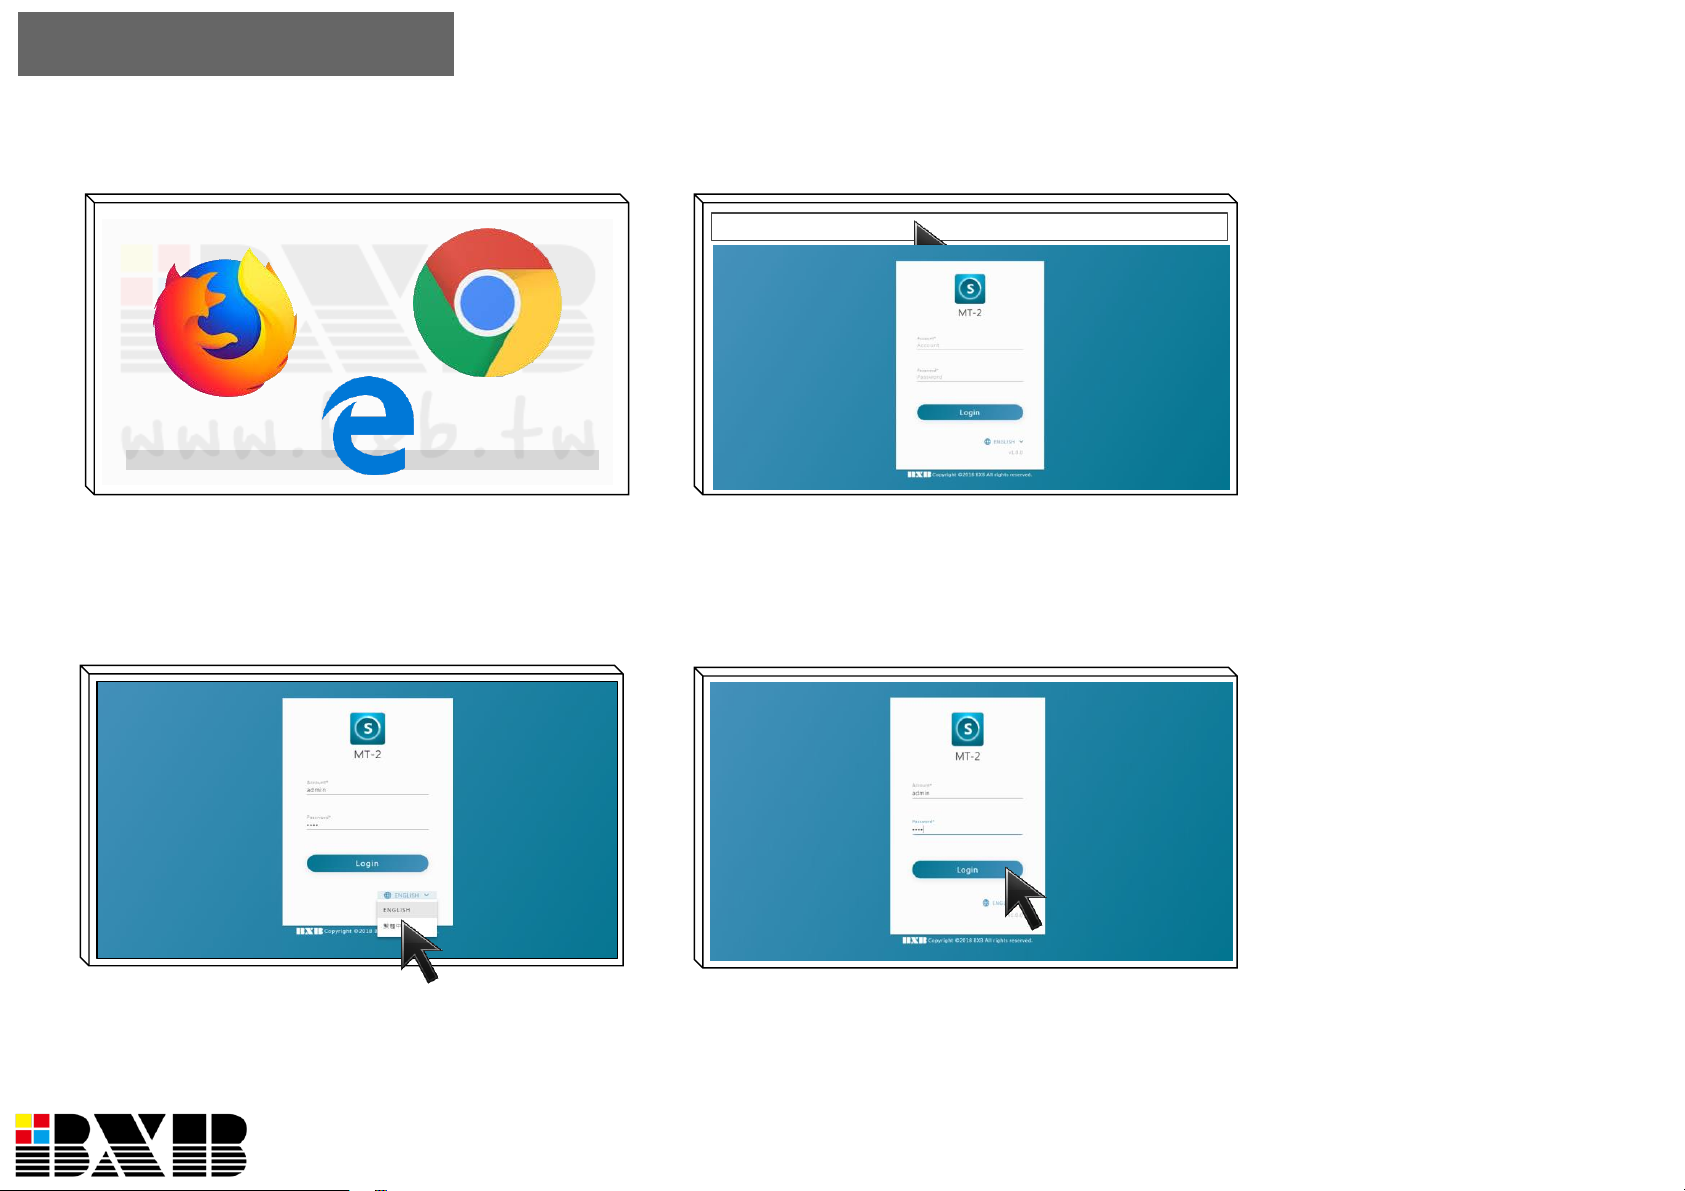
1
Open a web browser
2
http://192.168.1.98
Key in the MT-2’s IP address on
the URL bar.
3
You can select Traditional Chinese or
English on the log-in page.
4
Key in the account number and
password to log in.
The IP address of MT-2 can
be set as DHCP or fixed IP.
If you couldn’t make sure the
IP address, just watch the
screen from HDMI output to
get the present IP address.
You can remote control MT-2
via the mainstream web
browsers such as Chrome,
Microsoft Edge, and Firefox.
Just key in the MT-2’s IP
address to enter the login
page.
The default account number
for logging in is “admin”;
password “1234”. If you want
to add or revise the number,
just go to “ Account” of
“Advanced Setting” after
logging in.
Remote Control- Log in
P5
Page 8
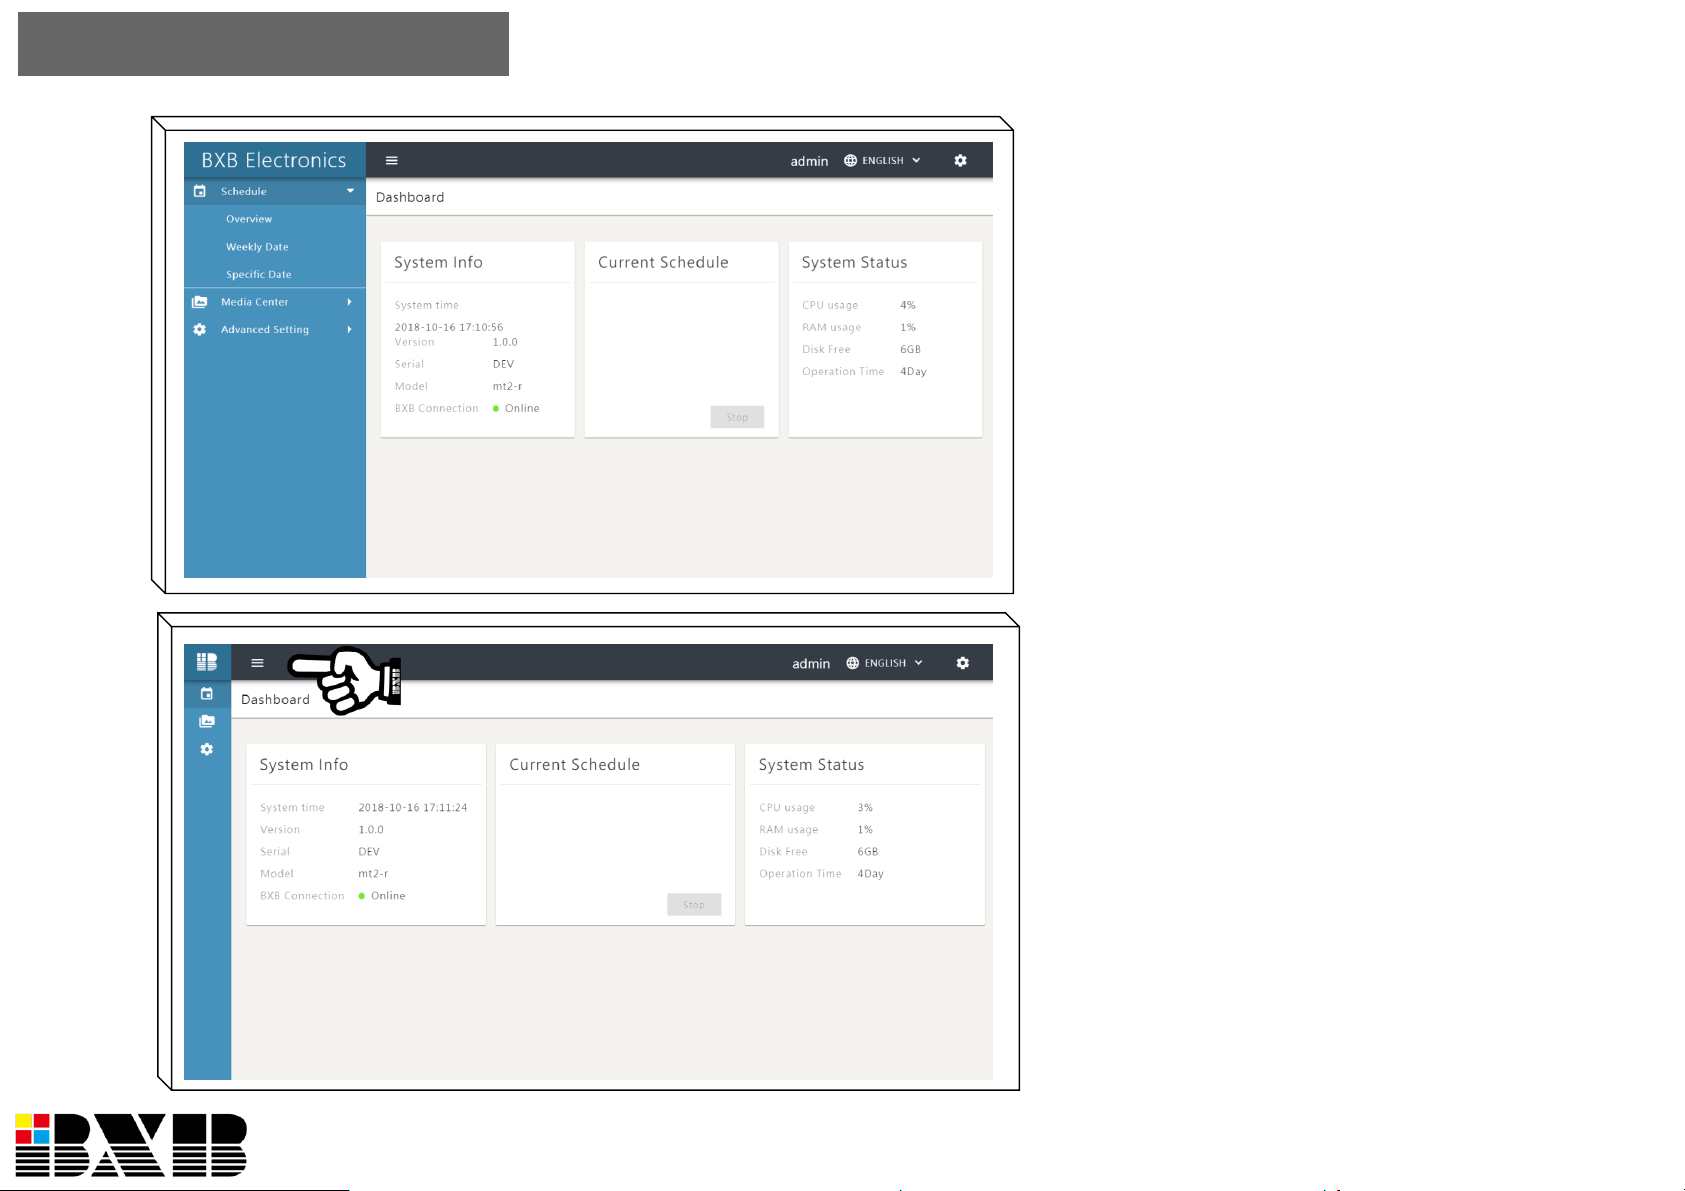
Click「≡」to show/hide the task bar.
From MT-2’s dashboard, you
can see the information such as
connection status, system
version, CPU/RAM usage, and
current schedule. It facilitates the
administrator understanding the
system status remotely.
Each setting item is listed on the
left task bar. You can show/hide
the bar. If you want to change
the language or revise the
account number, just click the
upper right items for the setting.
Remote Control- Dashboard
P6
Page 9
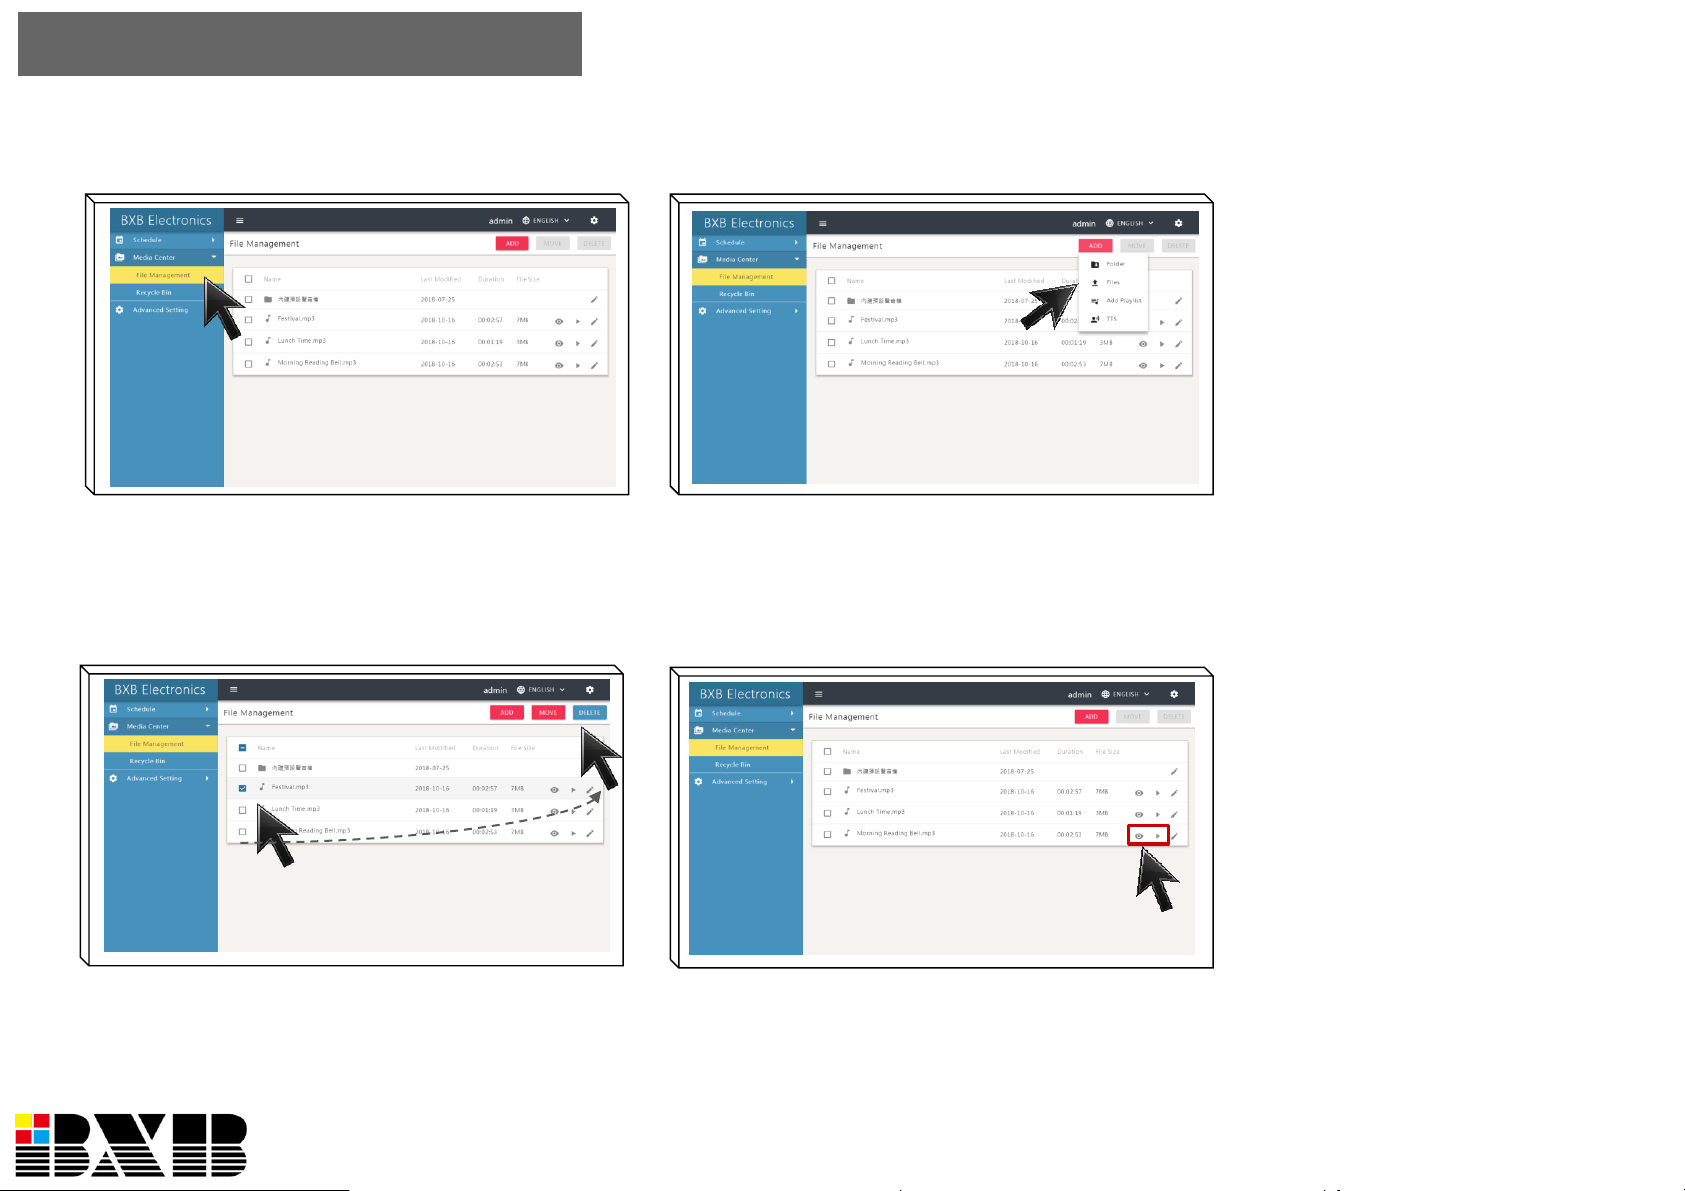
1
Click “Media Center”
and select “File Management”
2
Click “ADD” to add multimedia files.
3
You can check the item to delete the file.
4
Preview or play the music/video.
You can add, delete, preview,
and play the multimedia files
on “File Management”, which
makes schedule arrangement
more convenient.
Support uploading the files
with MP3, MP4, and WAV
formats. However, MT-2 only
executes audio broadcasting.
If you upload the video with
MP4 format, you can still
preview the video but only
could hear the audio as MT-2
is executing broadcasting.
MT-2 is built-in with TTS
function. You can enter the
texts in advance. The system
would transform the texts into
audio m e ssages wi th
male/female voice.
For playing multiple audio
files, add the files to “Playlist”
and set the play mode as
“Sequence” or “Random”.
Media Center- File Management
P7
Page 10
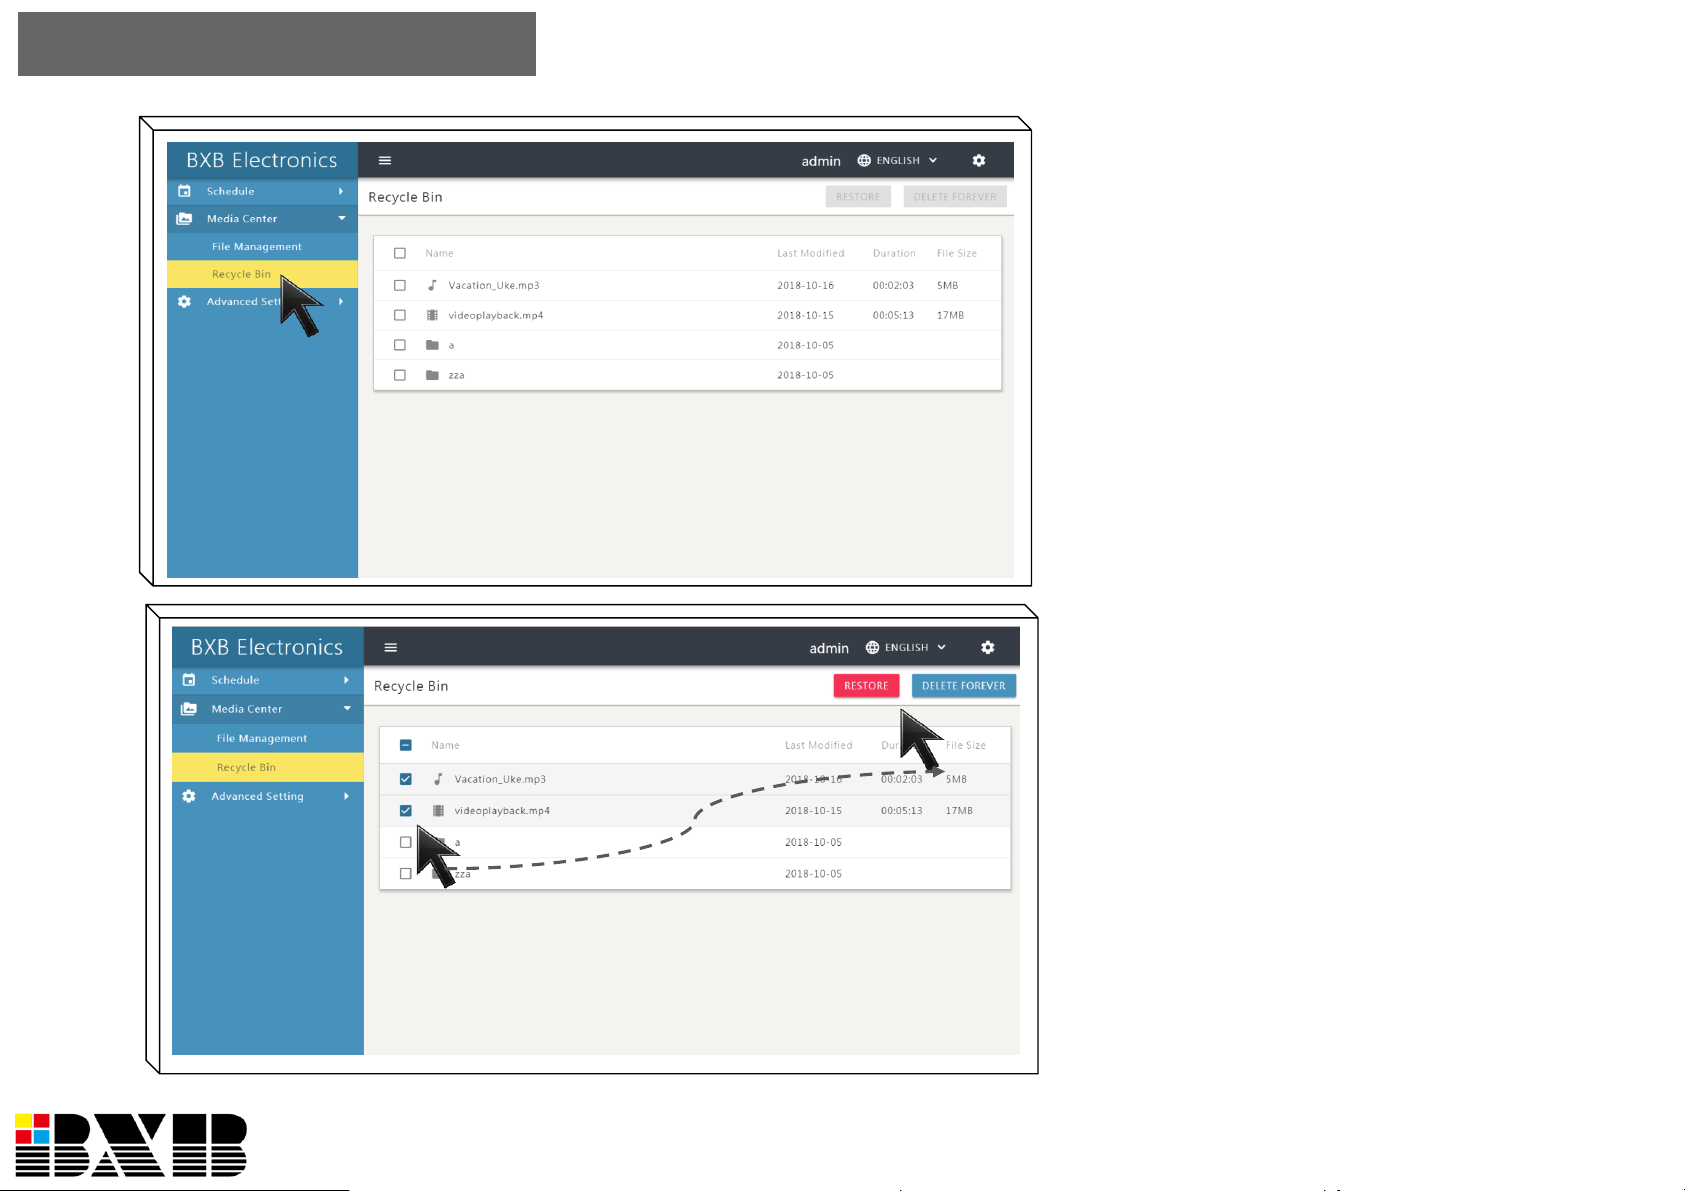
The files deleted from “File
Management” would be saved in
the “Recycle Bin” temporarily.
You can click “RESTORE” to
restore the deleted files back to
“File Management” list.
However, if you select “DELETE
FOREVER”, the files couldn’t be
restored anymore.
P8
Media Center - Recycle Bin
Page 11
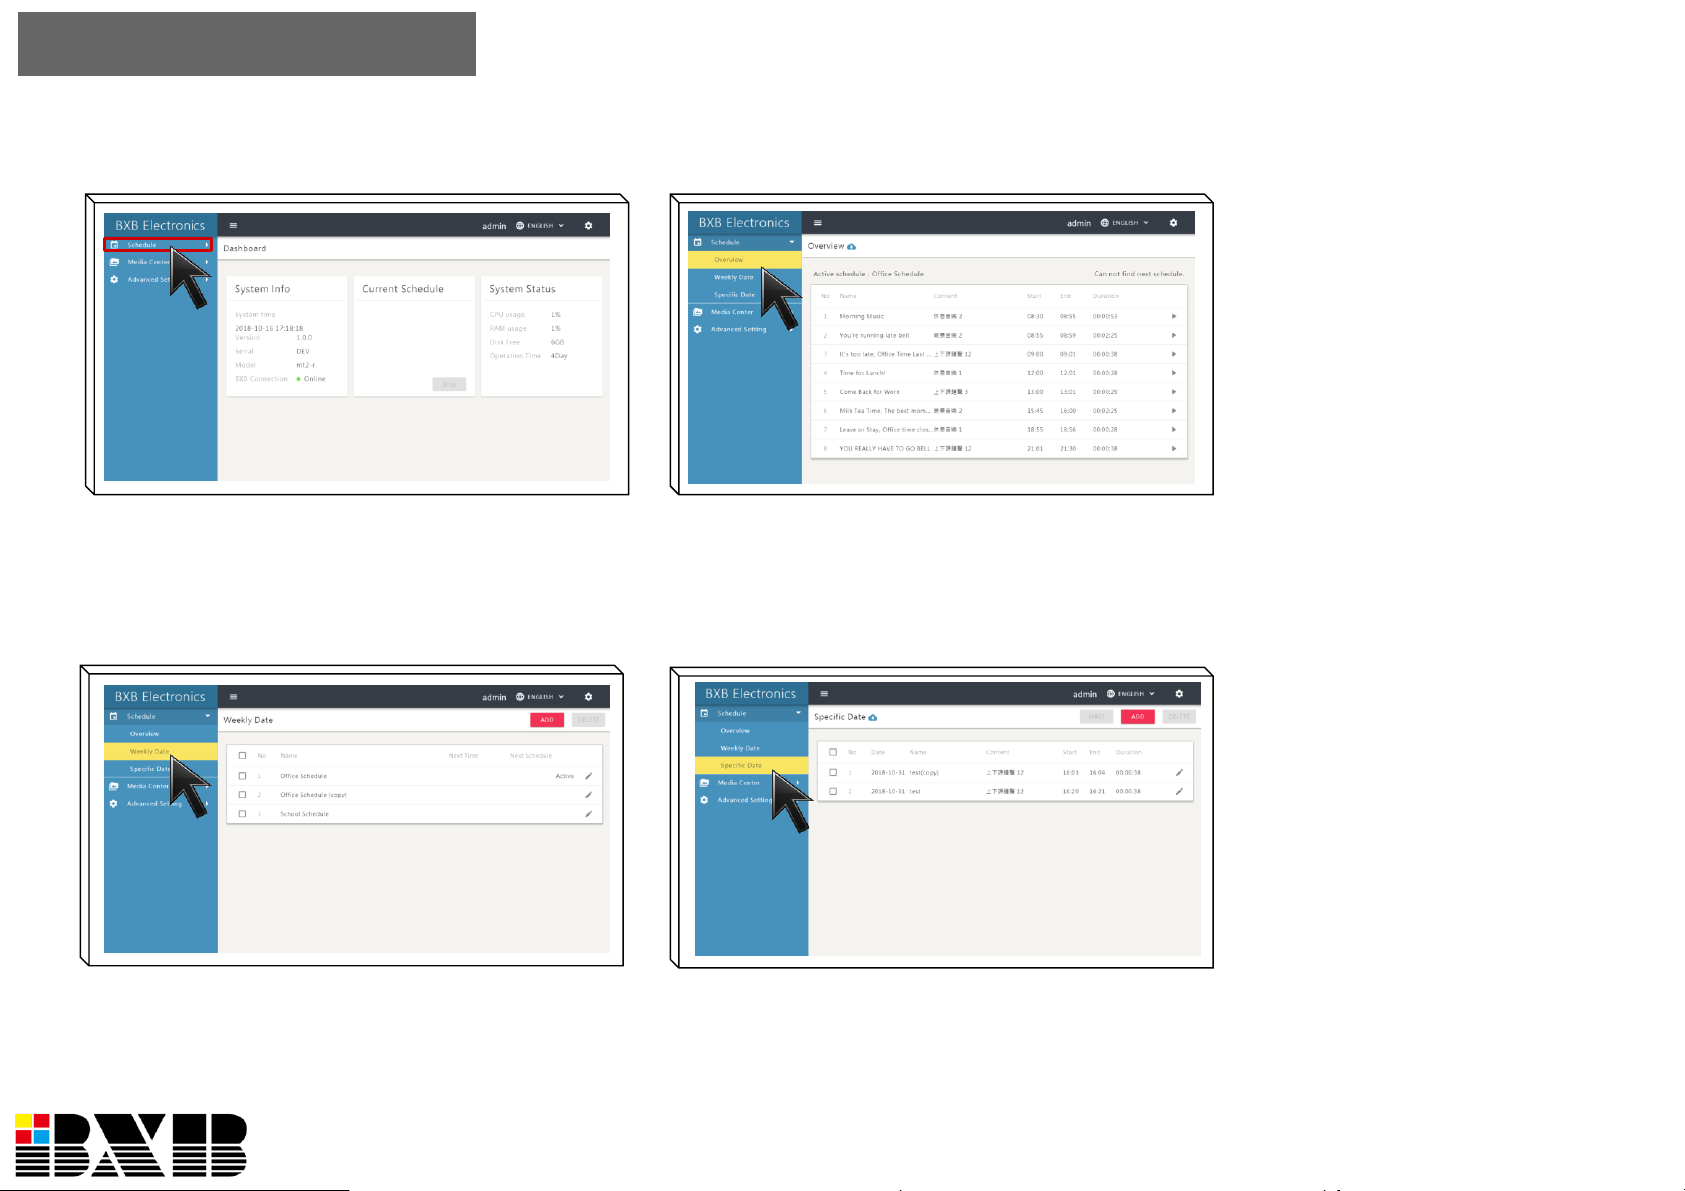
1
Click “Schedule” to arrange each schedule.
2
Click “Overview” to see today’s schedule.
3
Click “Weekly Date to set/manage the
weekly schedule.
4
Click “Specific Date” to set/manage the
schedule of specified dates.
There’re three setting pages
for schedule arrangement:
“Overview”, “Weekly Date”,
and “Specific Date”.
“Overview” page: you can
see the schedules for
today’s broadcasting as well
as execute/terminate the
schedules right away. All
schedules can be exported
as XLSX format and saved
for future use.
You can edit the weekly
schedule and set specific
dates as your broadcasting
basis.
Remote Control- Schedule
P9
Page 12
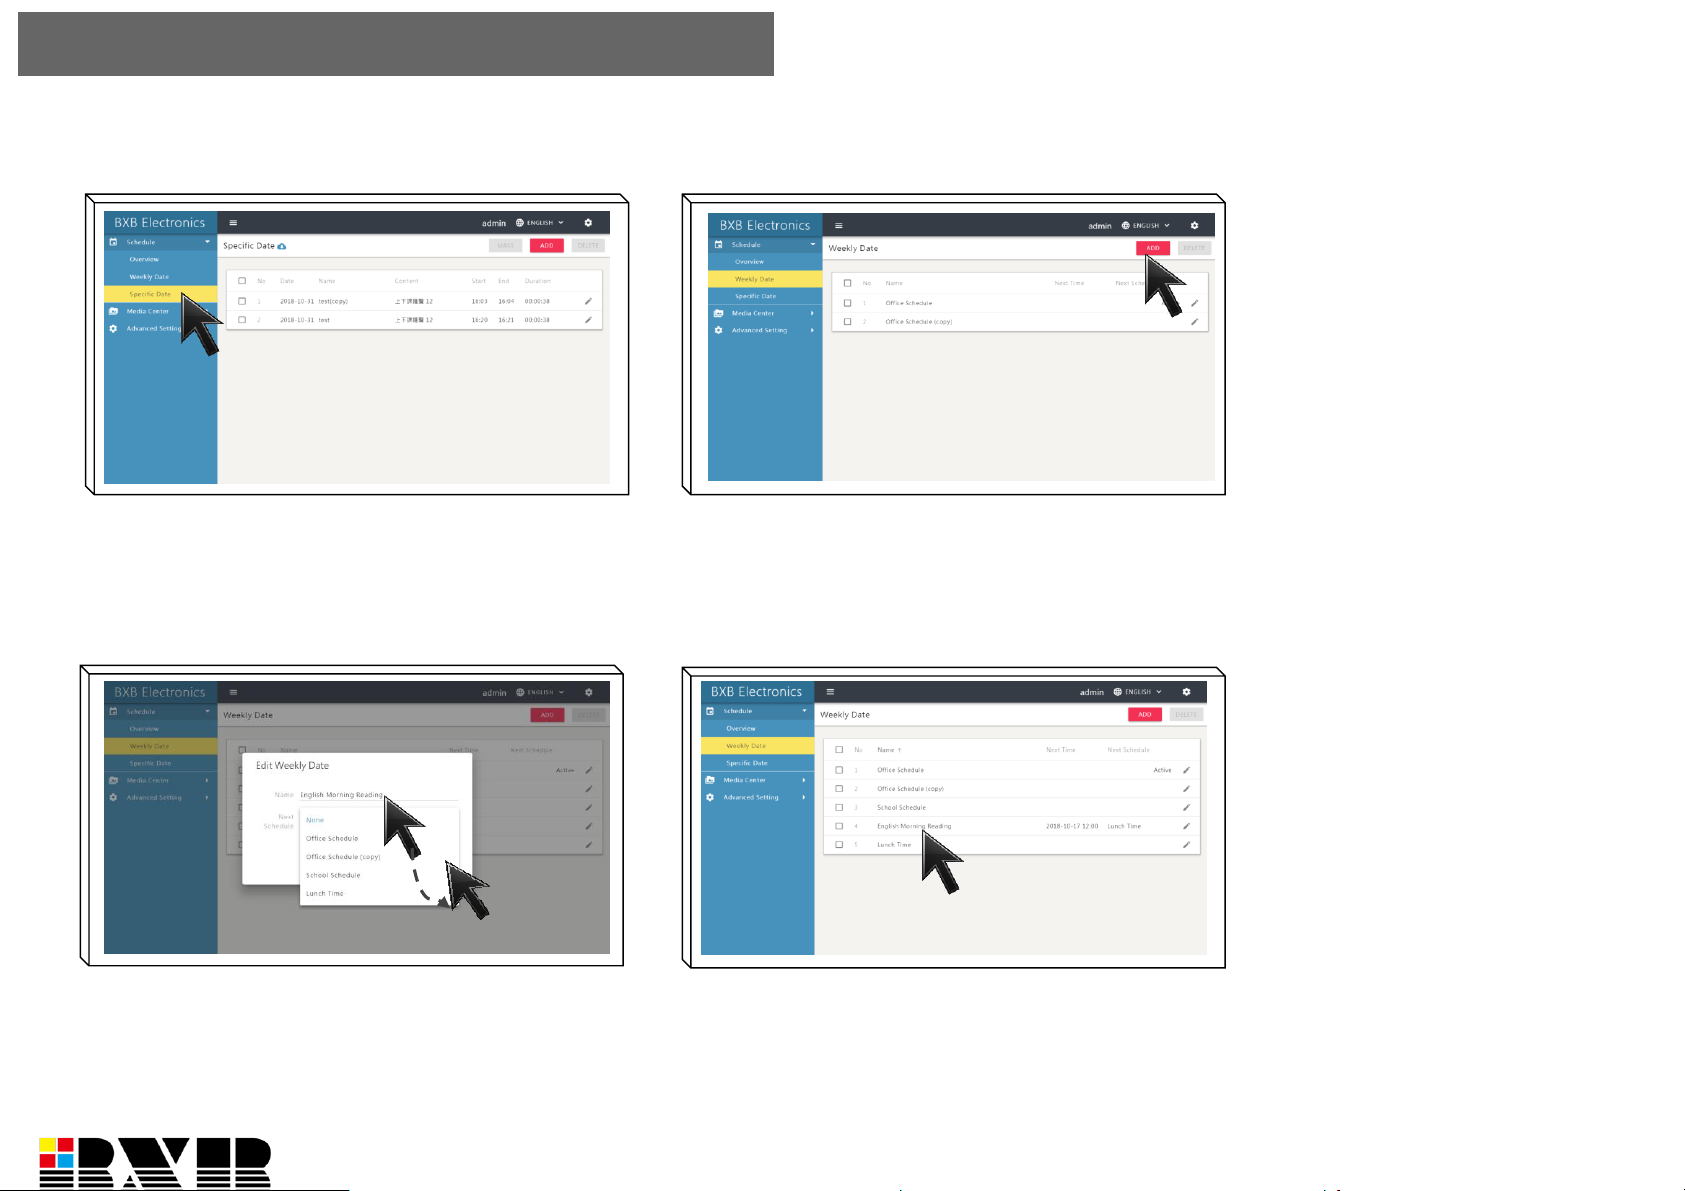
1
Click “Weekly Date” for schedule setting
and management.
2
Click “ADD” to add a blank schedule.
3 4
Based on the class or
working timetable, you can
edit the schedule with
multimedia files such as
MP3 or TTS.
You can add multiple
schedules and use the
“Next Schedule” function.
T h e s y s t e m w o u l d
automatically switch the
schedule based on the
time you’ve set so that you
don’ t need to switch
manually.
If you didn’t set “Next
Schedule” function, the
system would execute the
broadcasting based on the
present schedule.
Name the new schedule and set the time
for the next schedule.
After finishing the setting, the weekly
schedules would be shown on the list.
Schedule- Weekly Date- Add Schedule List
P10
Page 13
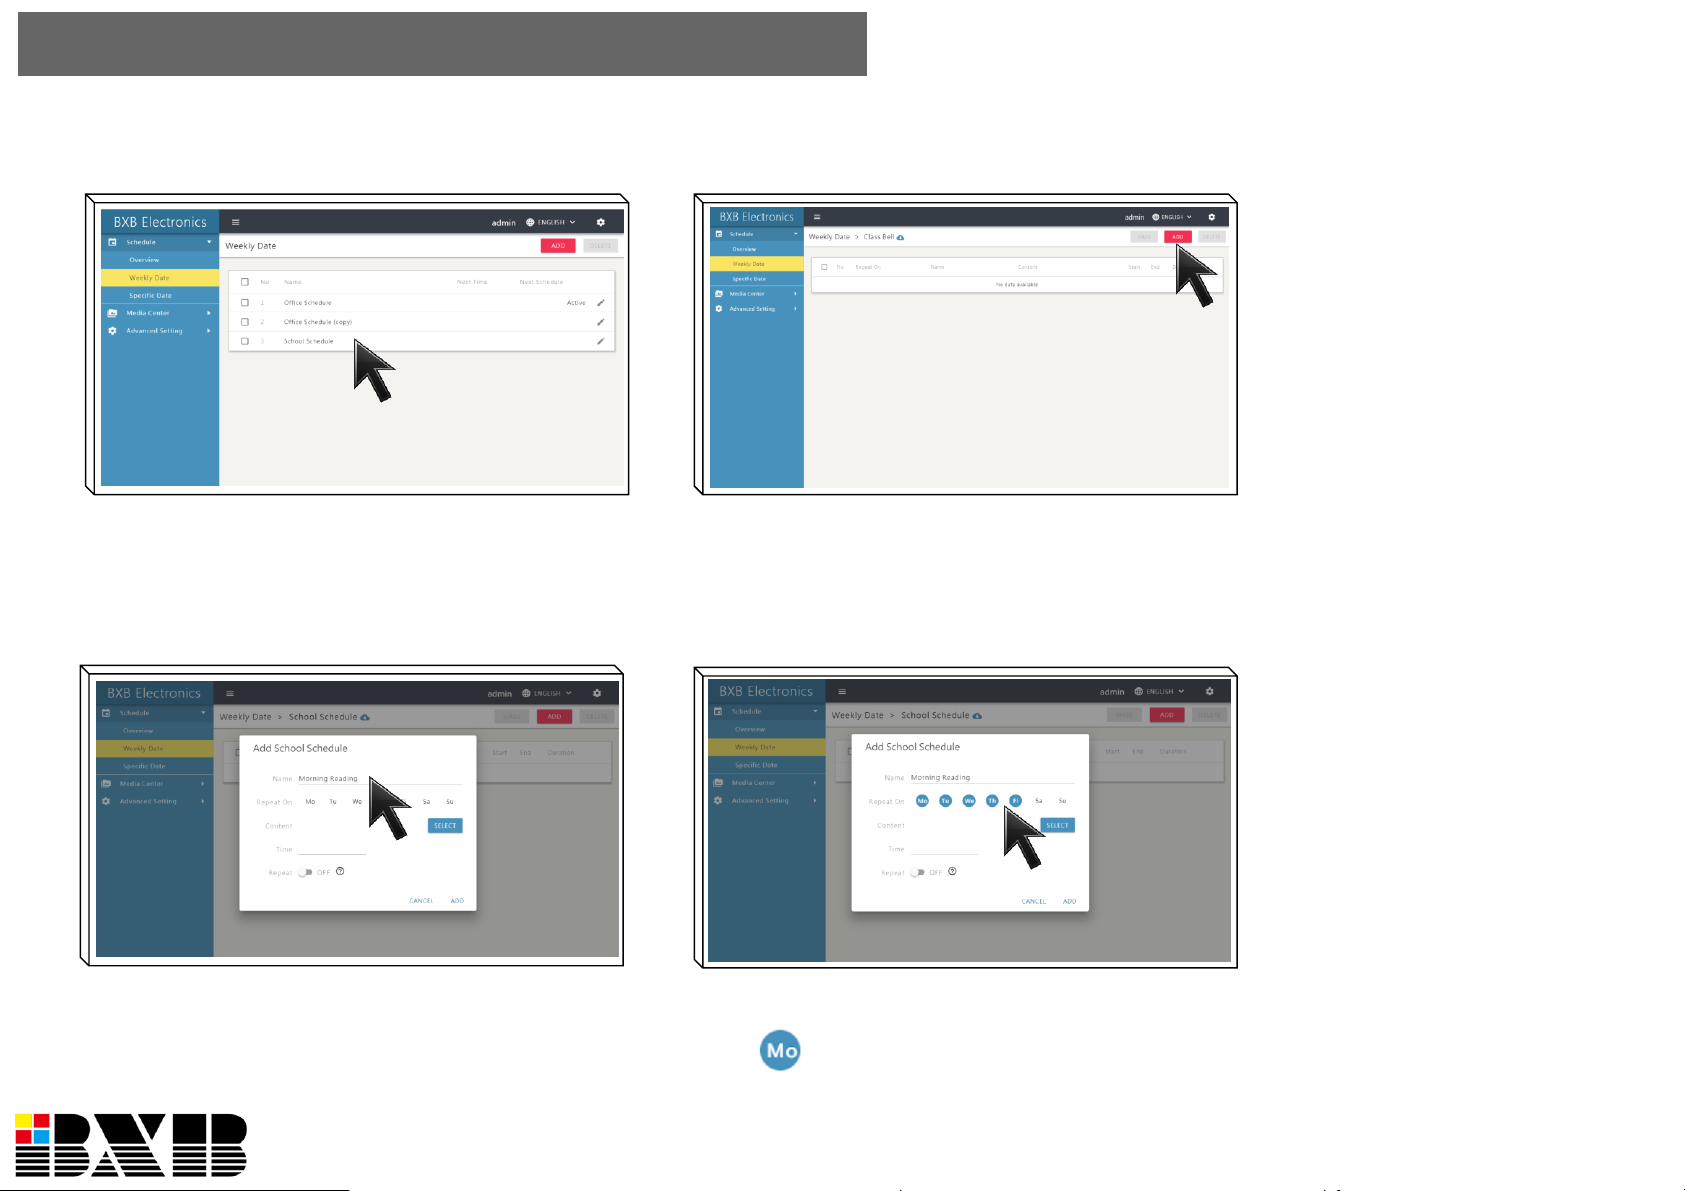
1
Double-click the name of the schedule.
2
Click “ADD” to add a new weekly
schedule.
3
Name the weekly schedule.
4
Select the weekly day. Eg., select
for executing broadcasting every
Monday.
Just few steps to complete
the schedule setting for the
entire year or semester.
The equipped calendar
makes the date & time
setting more convenient
and intuitive.。
Schedule - Weekly Date- Add Weekly Schedule
P11
Page 14
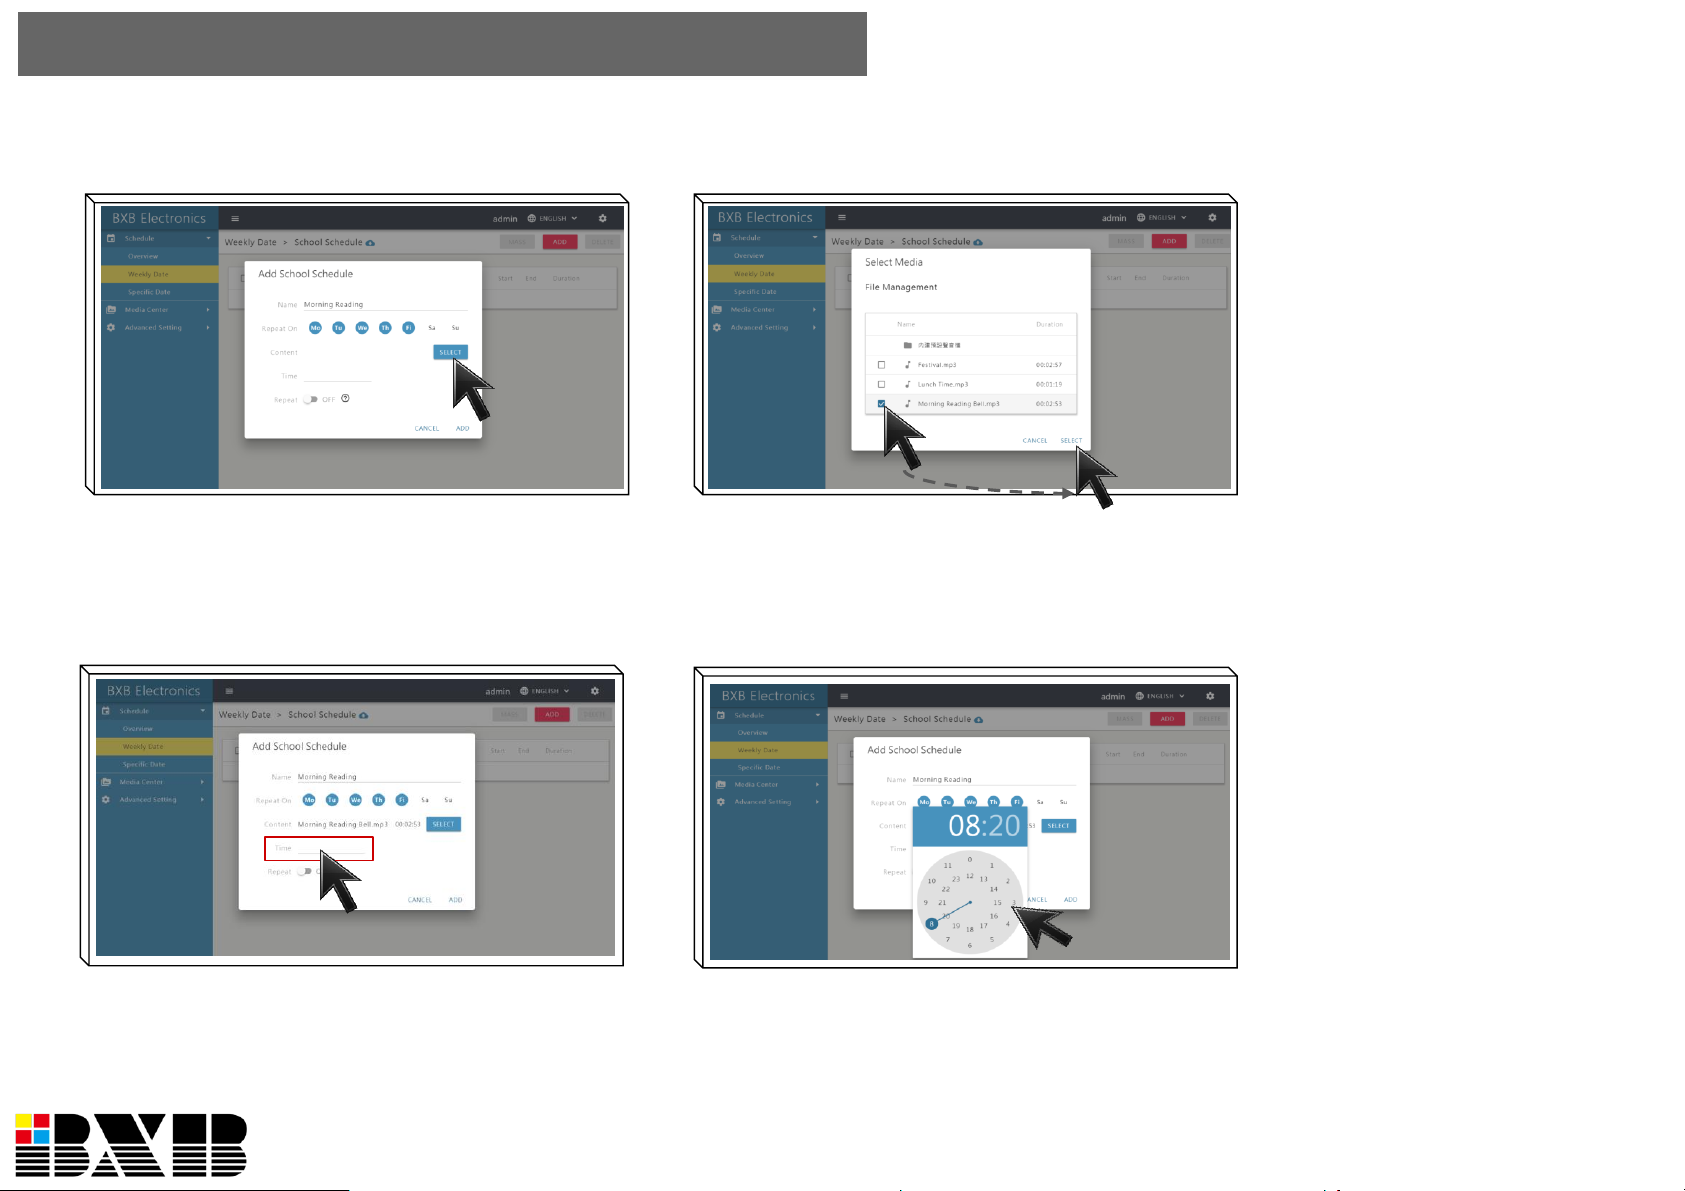
5
Click “SELECT” and open the list of
“File Management”.
6
Check the media and click “SELECT” to
finish the setting.
7
Click “Time” to set the broadcasting time.
8
Set the hour and minute.
After selecting the media,
you can select the play
mode as putting a song
on repeat, sequence,
random, or TTS based on
your demands.
P12
Schedule - Weekly Date- Add Weekly Schedule
Page 15
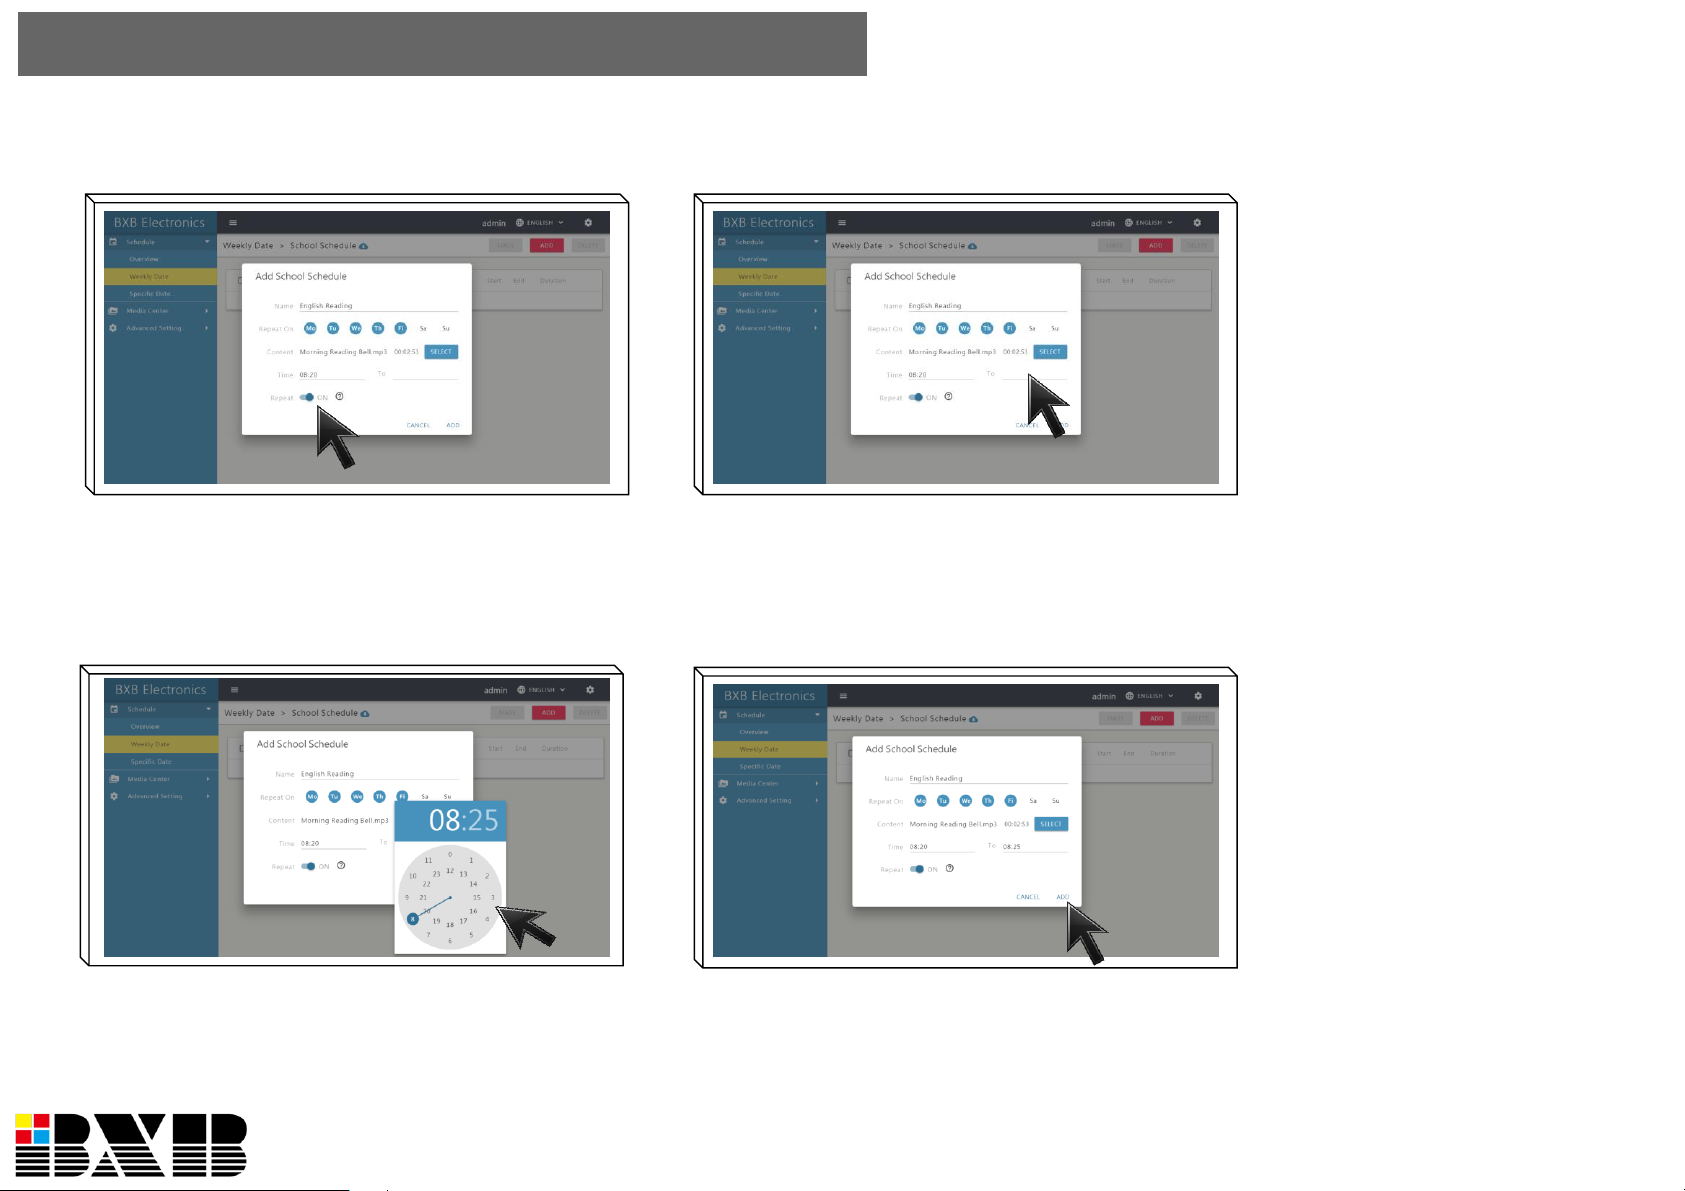
9
Switch on “Repeat” for repeat play. Set the time for stop playing.
11
Set the hour and minute. The repeated
media play would start and finish based on
the time you set.
12
Click “ADD” to finish adding the schedule.
You can set “Repeat” for the
schedule play. For example,
you set the time for English
reading bell as 8:20-8:25,
the system would repeatedly
ring the bell from 8:20 and
then stop playing at 8:25.
10
P13
Schedule - Weekly Date- Add Weekly Schedule
Page 16
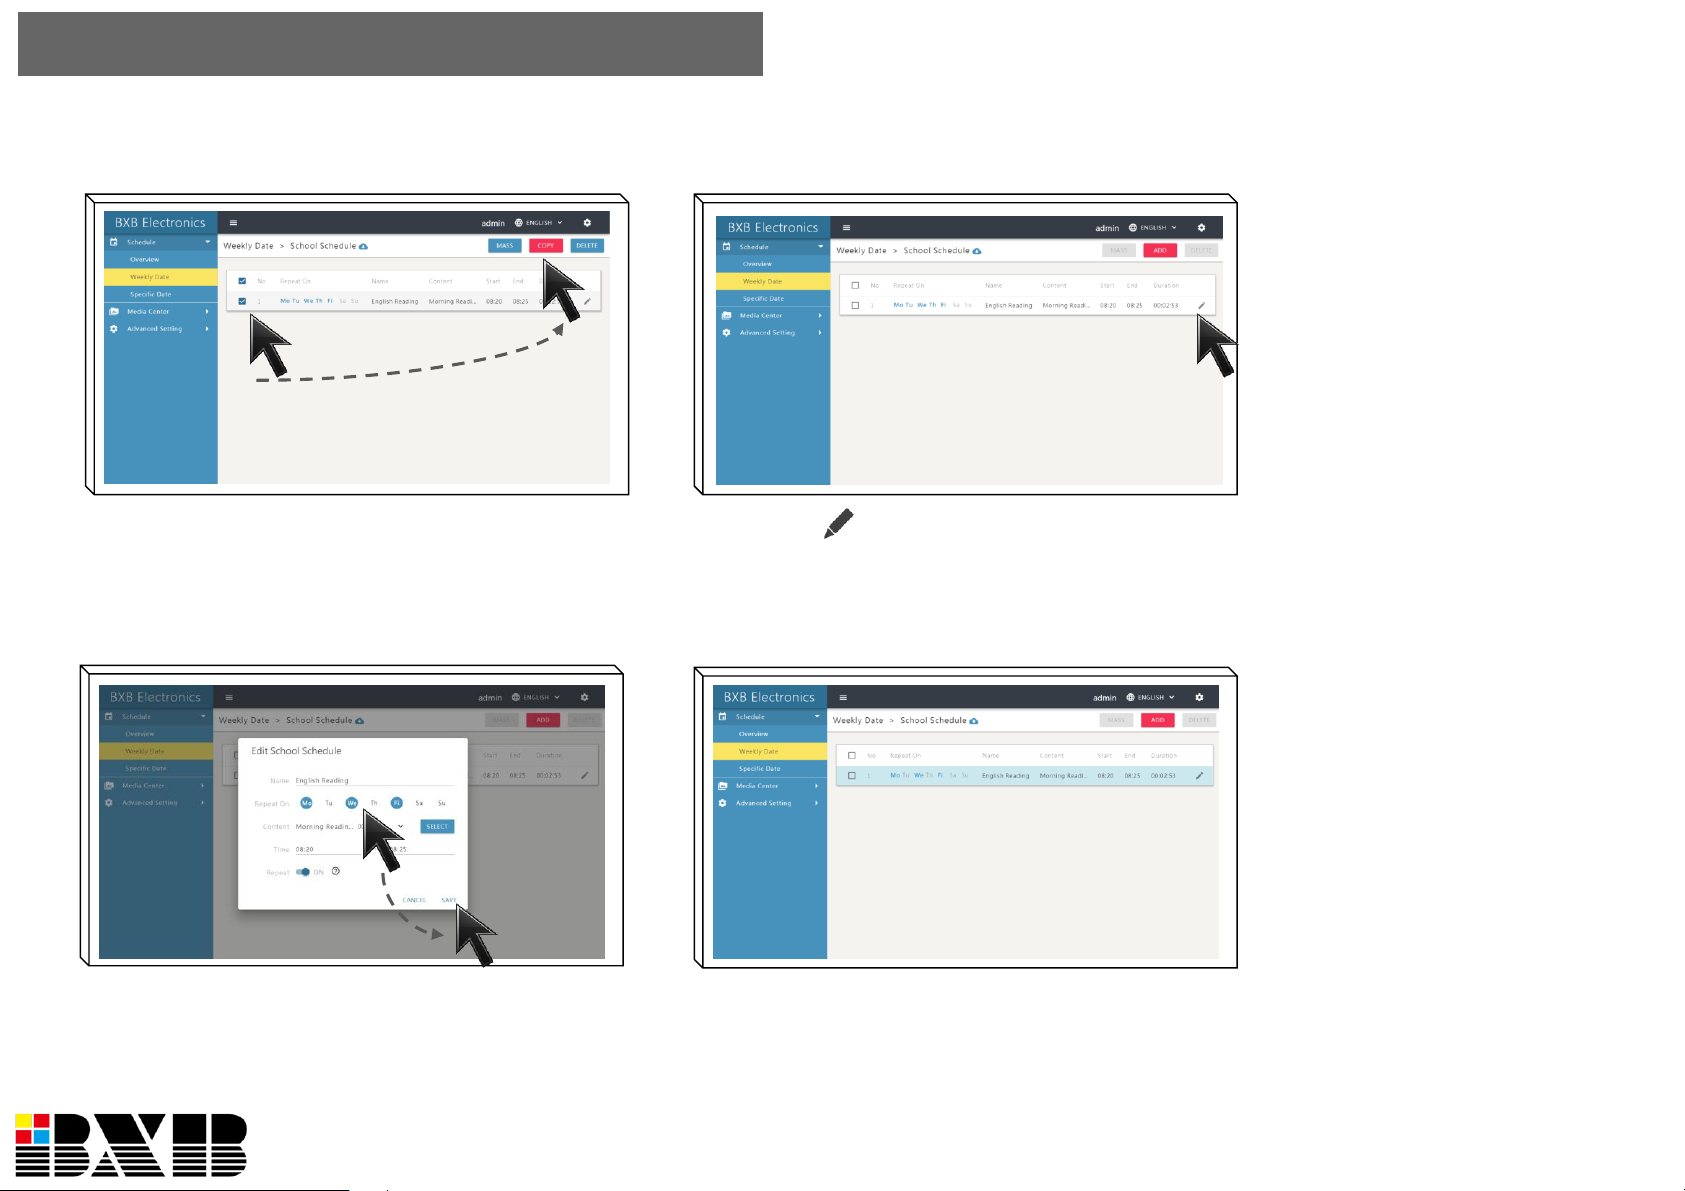
You can select multiple
schedules to copy and
delete to ease the batch
revision.
After finishing the revision,
the system would update
the information instantly.
You don’t need to spend
time waiting.
Schedule- Weekly Date- Revise Schedule
1
Check the schedule and then click
“COPY” or “DELETE”.
2
Click to open th edit page for the
schedule.
3
Revise the settings of the schedule.
4
After finishing the revision, the schedule
list would be updated.
P14
Page 17
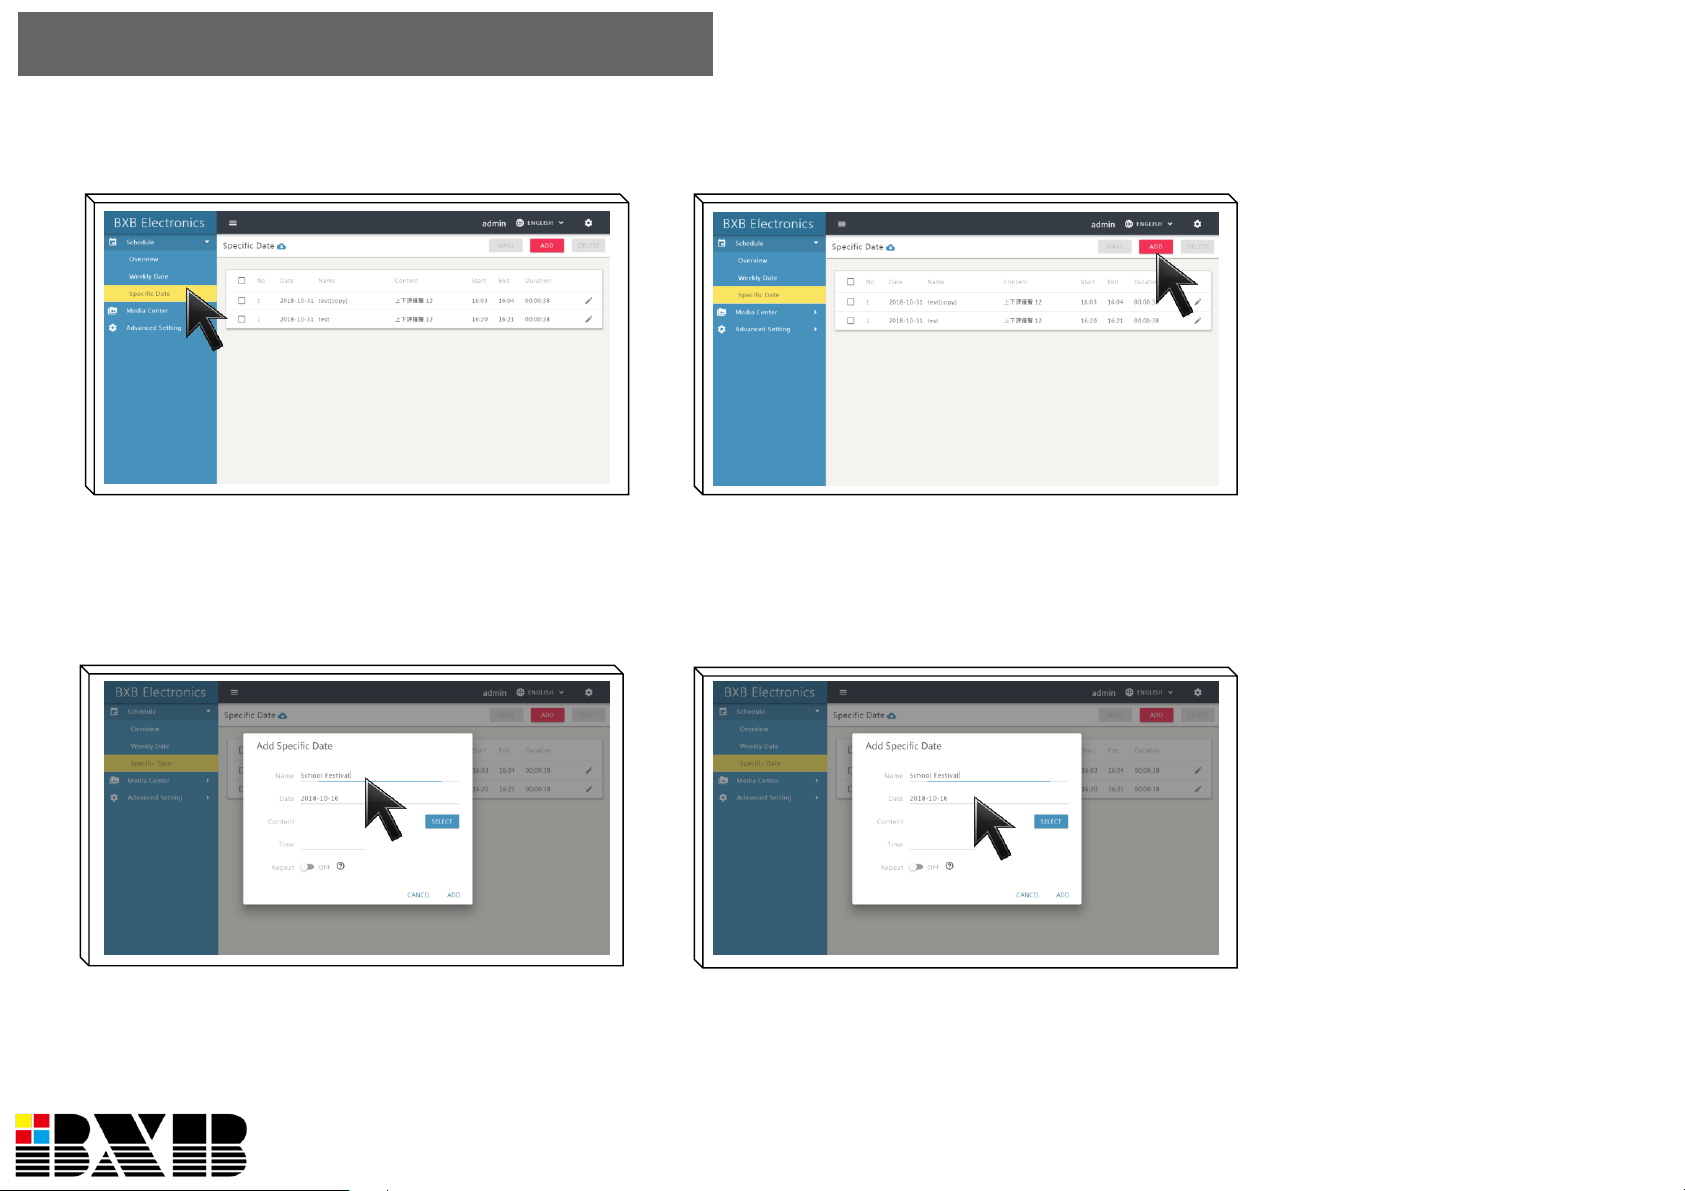
1
Click “Specific Date” to edit the schedule.
2
Click “ADD” to add a new schedule.
3 4
If “ today’ s schedule”
includes “specific date” and
“weekly date” schedules,
the system would put
“specific date” schedule as
the broadcasting priority.
For example: if today’s
schedule has the “specific
date” for mid-term exam
bell and “weekly date”
semester bell at the same
time, the system would only
ring the mid-term exam bell.
Name the new schedule. Click “Date” to open the calendar.
Schedule- Specific Date- Add Schedule
P15
Page 18
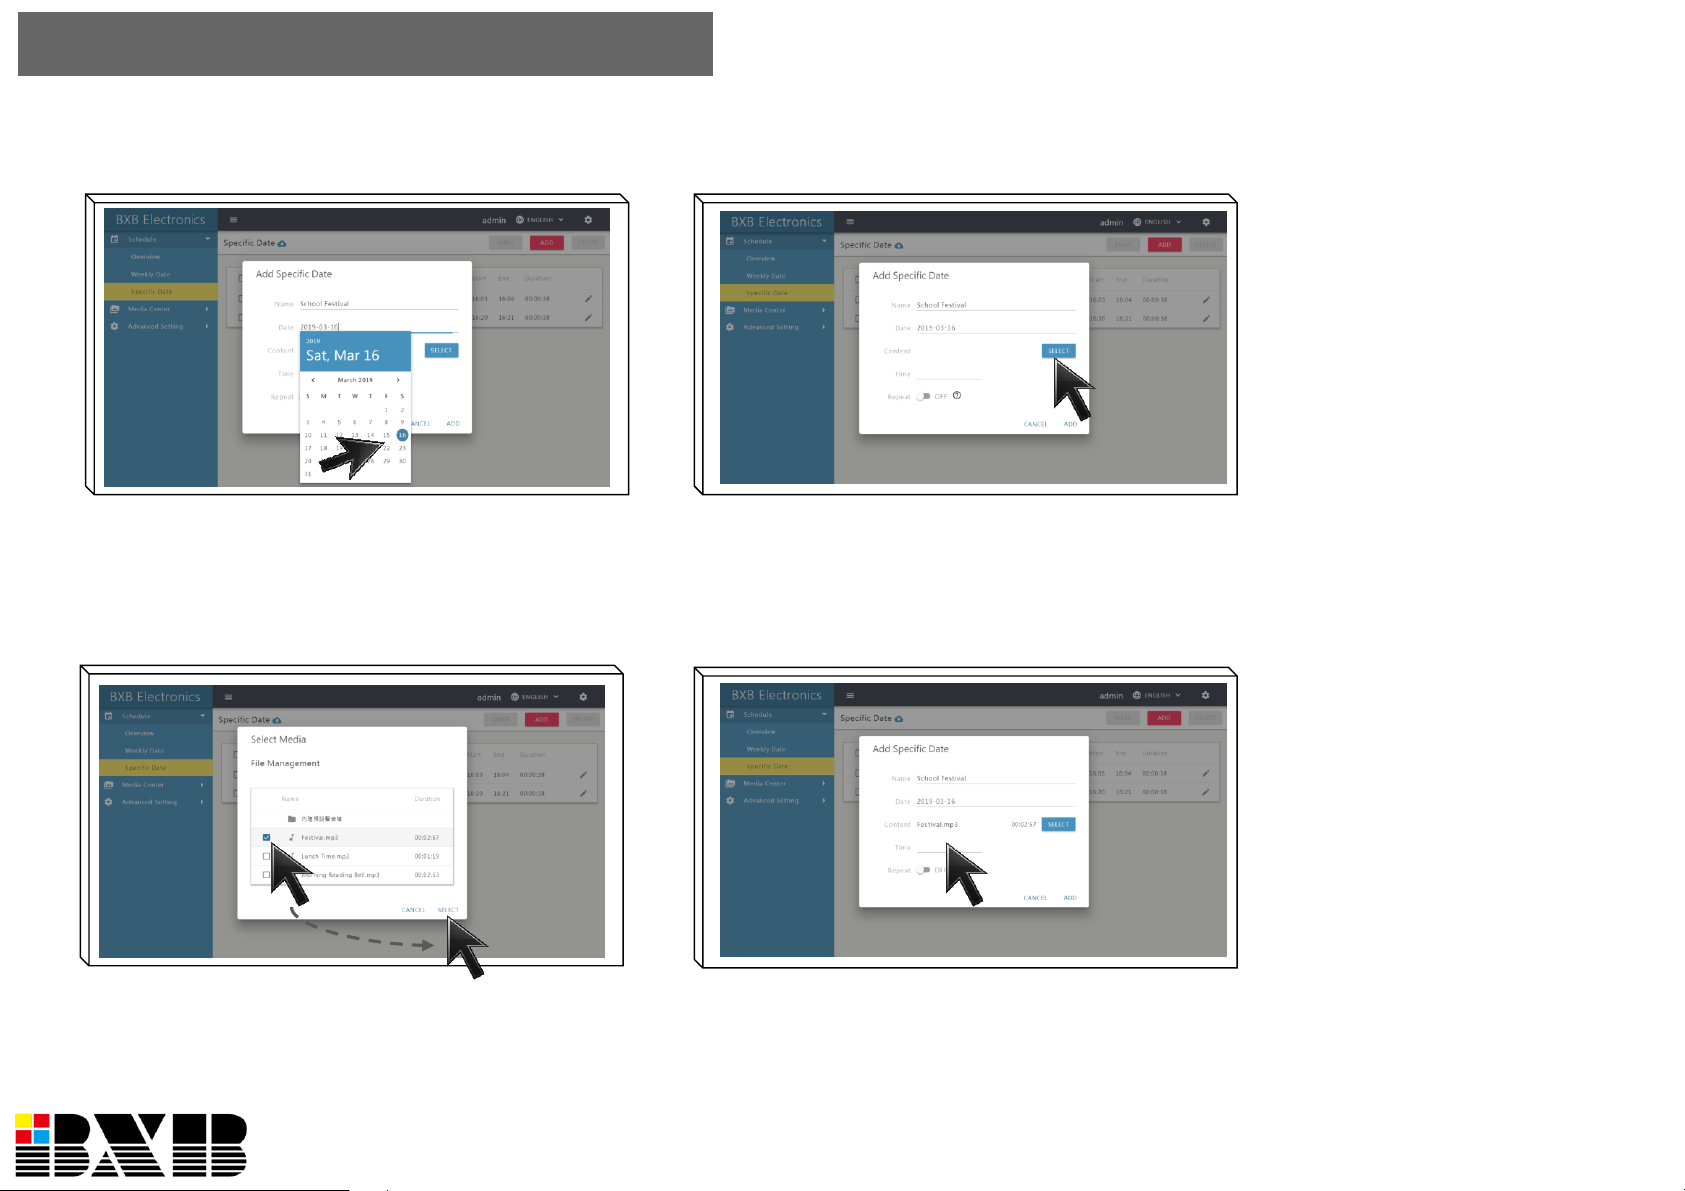
5
Select the date for the schedule.
6
Click “SELECT” and open the list of
“File Management.
7
Check the media and click “SELECT” to
finish the setting.
8
Click “Time” to set the broadcasting time.
After selecting the media,
you can select the play
mode as putting a song on
repeat, sequence, random,
or TTS based on your
demands.
The equipped calendar
makes the date & time
setting more convenient
and intuitive.
P16
Schedule- Specific Date- Add Schedule
Page 19
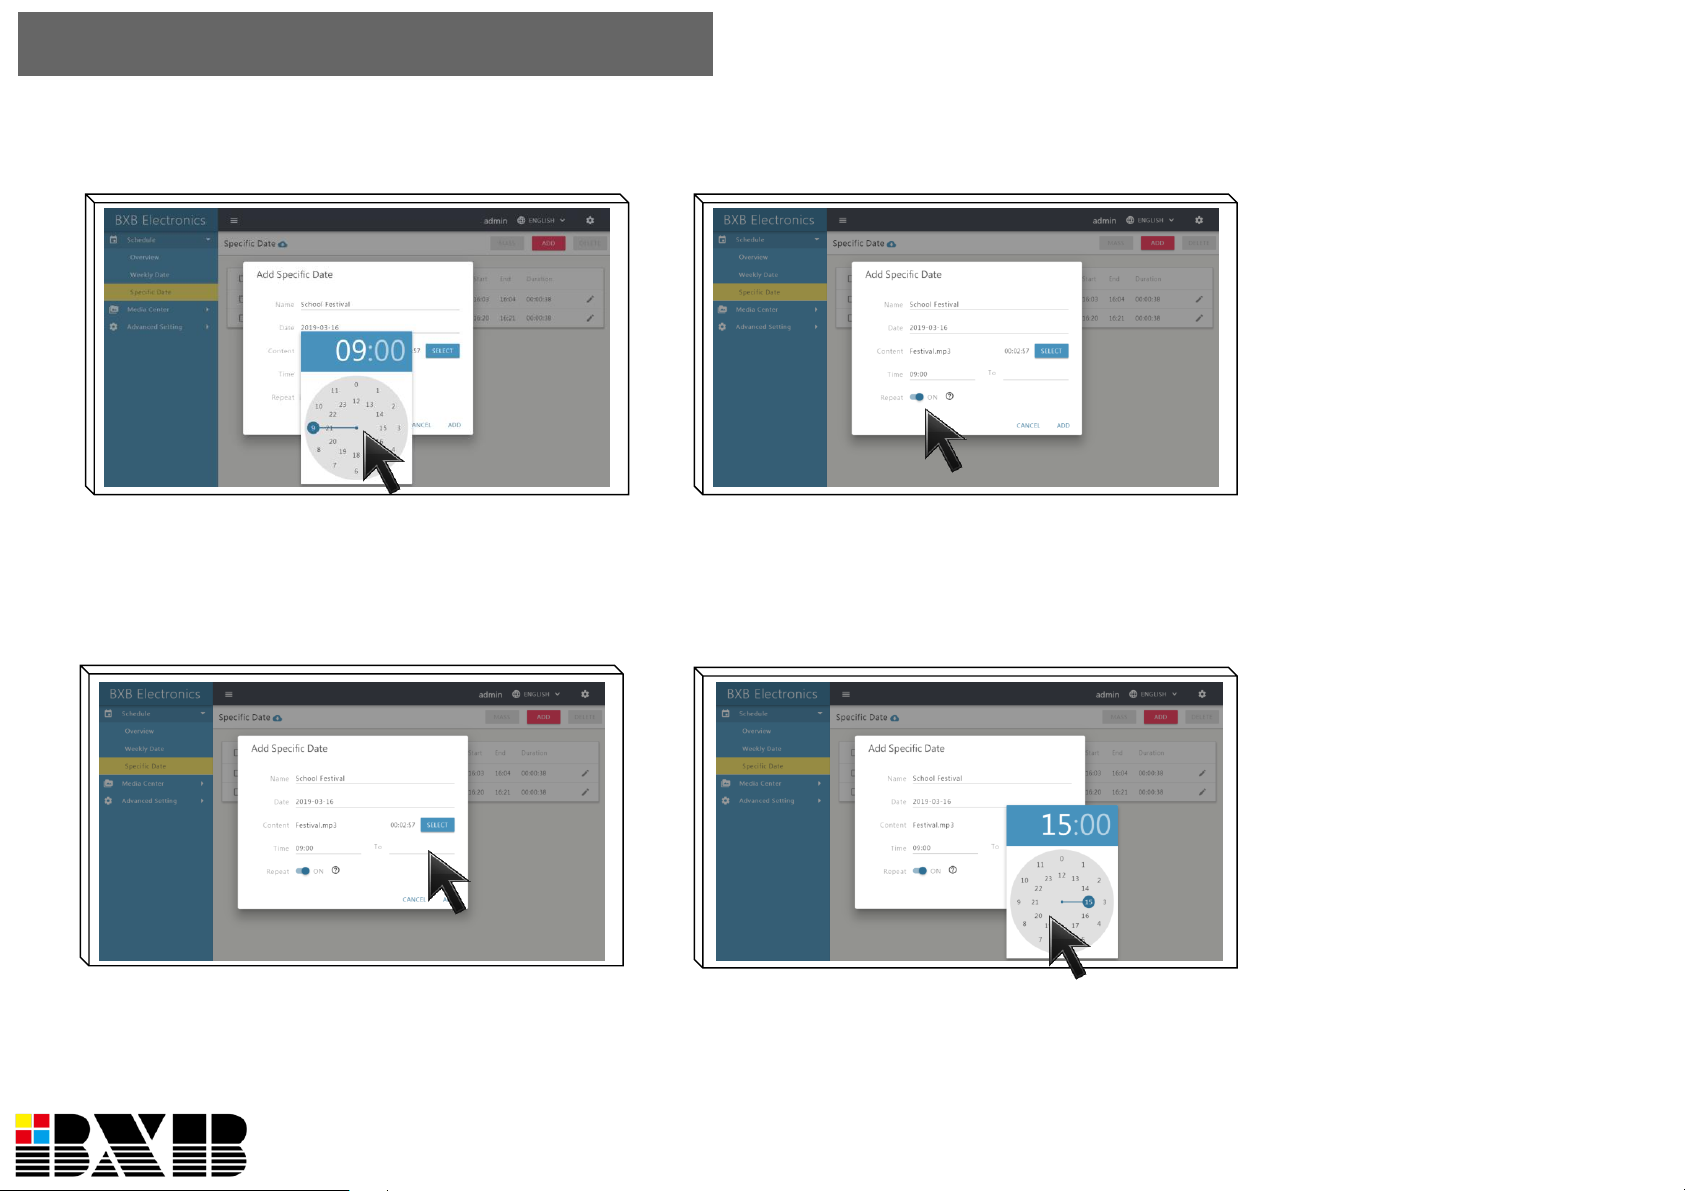
9
Click “Time” to set the broadcasting time. Switch on “Repeat” for repeat play.
11
Set the time for stop playing.
12
Set the hour and minute. The repeated
media play would start and finish based
on the time you set.
You can set “Repeat” for the
schedule play. For example,
you set the time for School
Festival background music
as 9:00am-3:00pm, the
system would repeatedly
play the music from 9:00am
and then stop playing at
3:00pm.
10
P17
Schedule- Specific Date- Add Schedule
Page 20
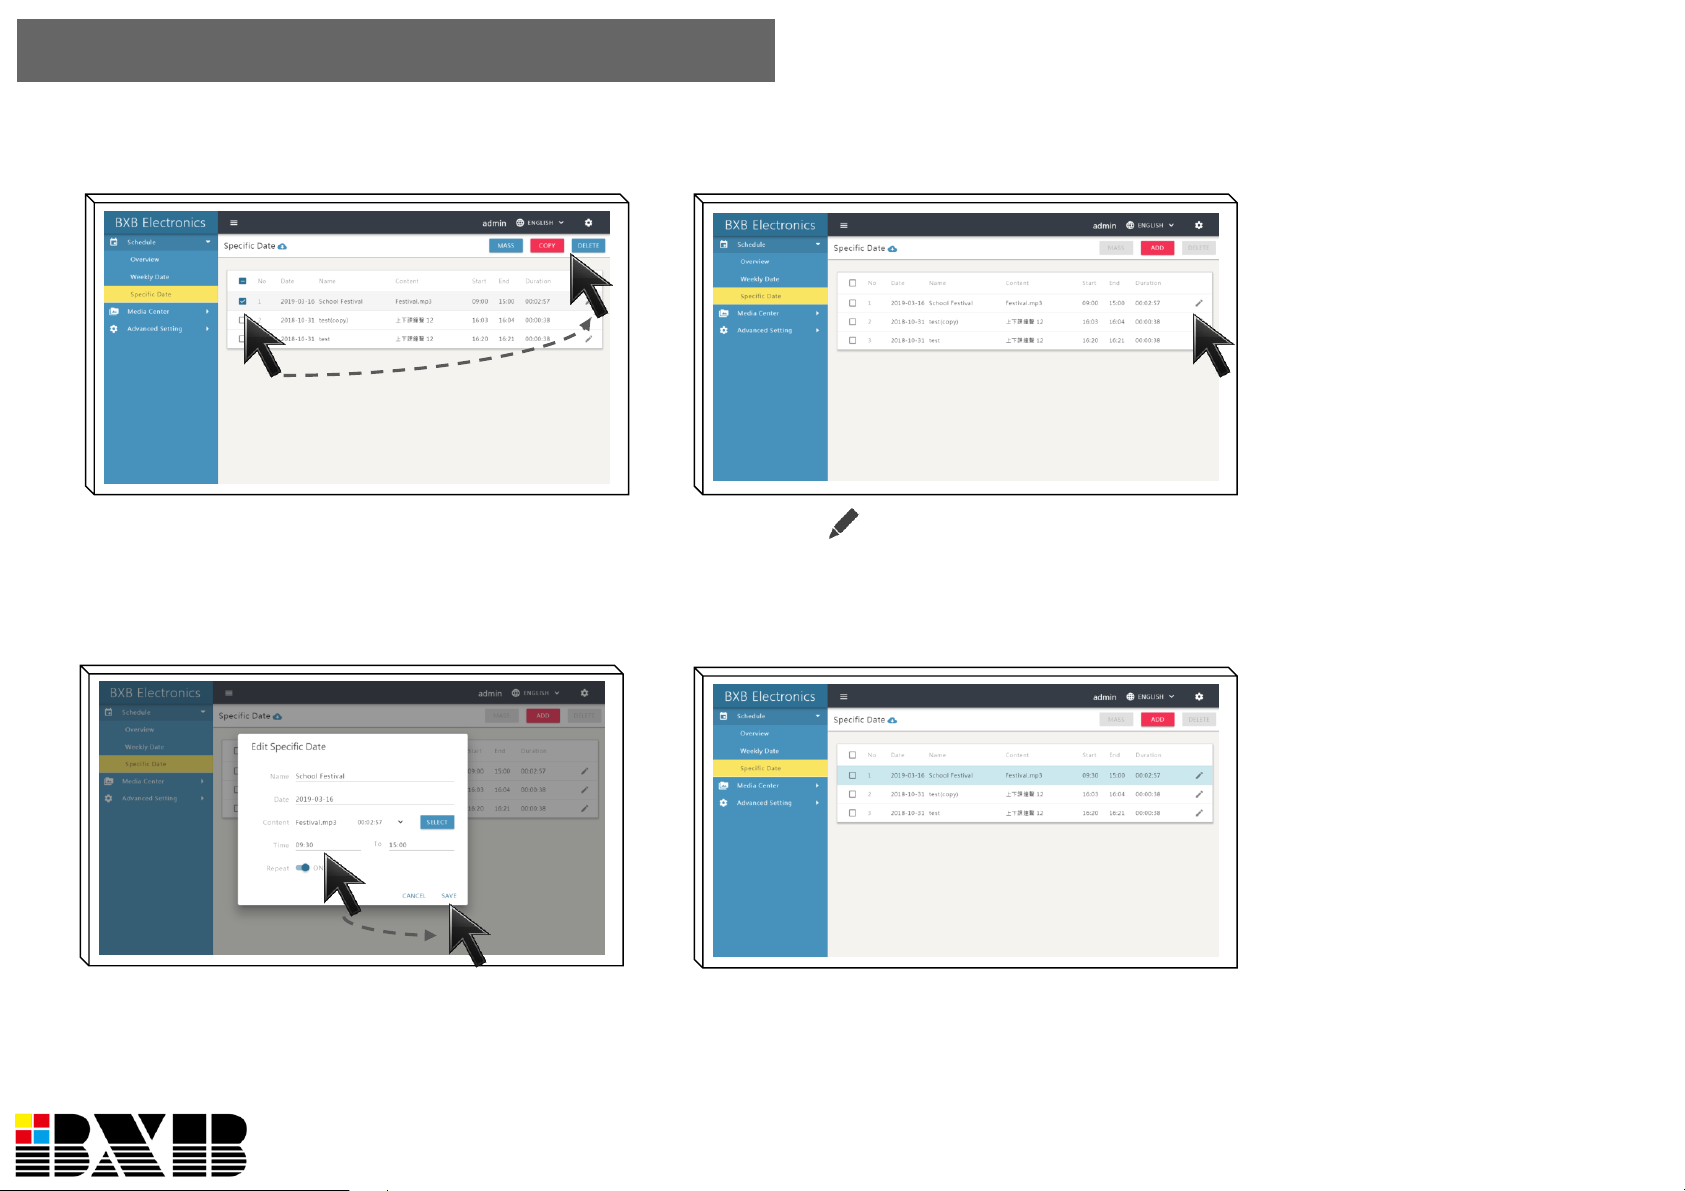
You can select multiple
schedules to copy and delete
to ease the batch revision.
After finishing the revision,
the system would update the
information instantly. You
don’t need to spend time
waiting.
Schedule- Specific Date- Revise Schedule
1
Check the schedule and then click
“COPY” or “DELETE”.
2
Click to open th edit page for the
schedule.
3
Revise the settings of the schedule.
4
After finishing the revision, the schedule
list would be updated.
P18
Page 21
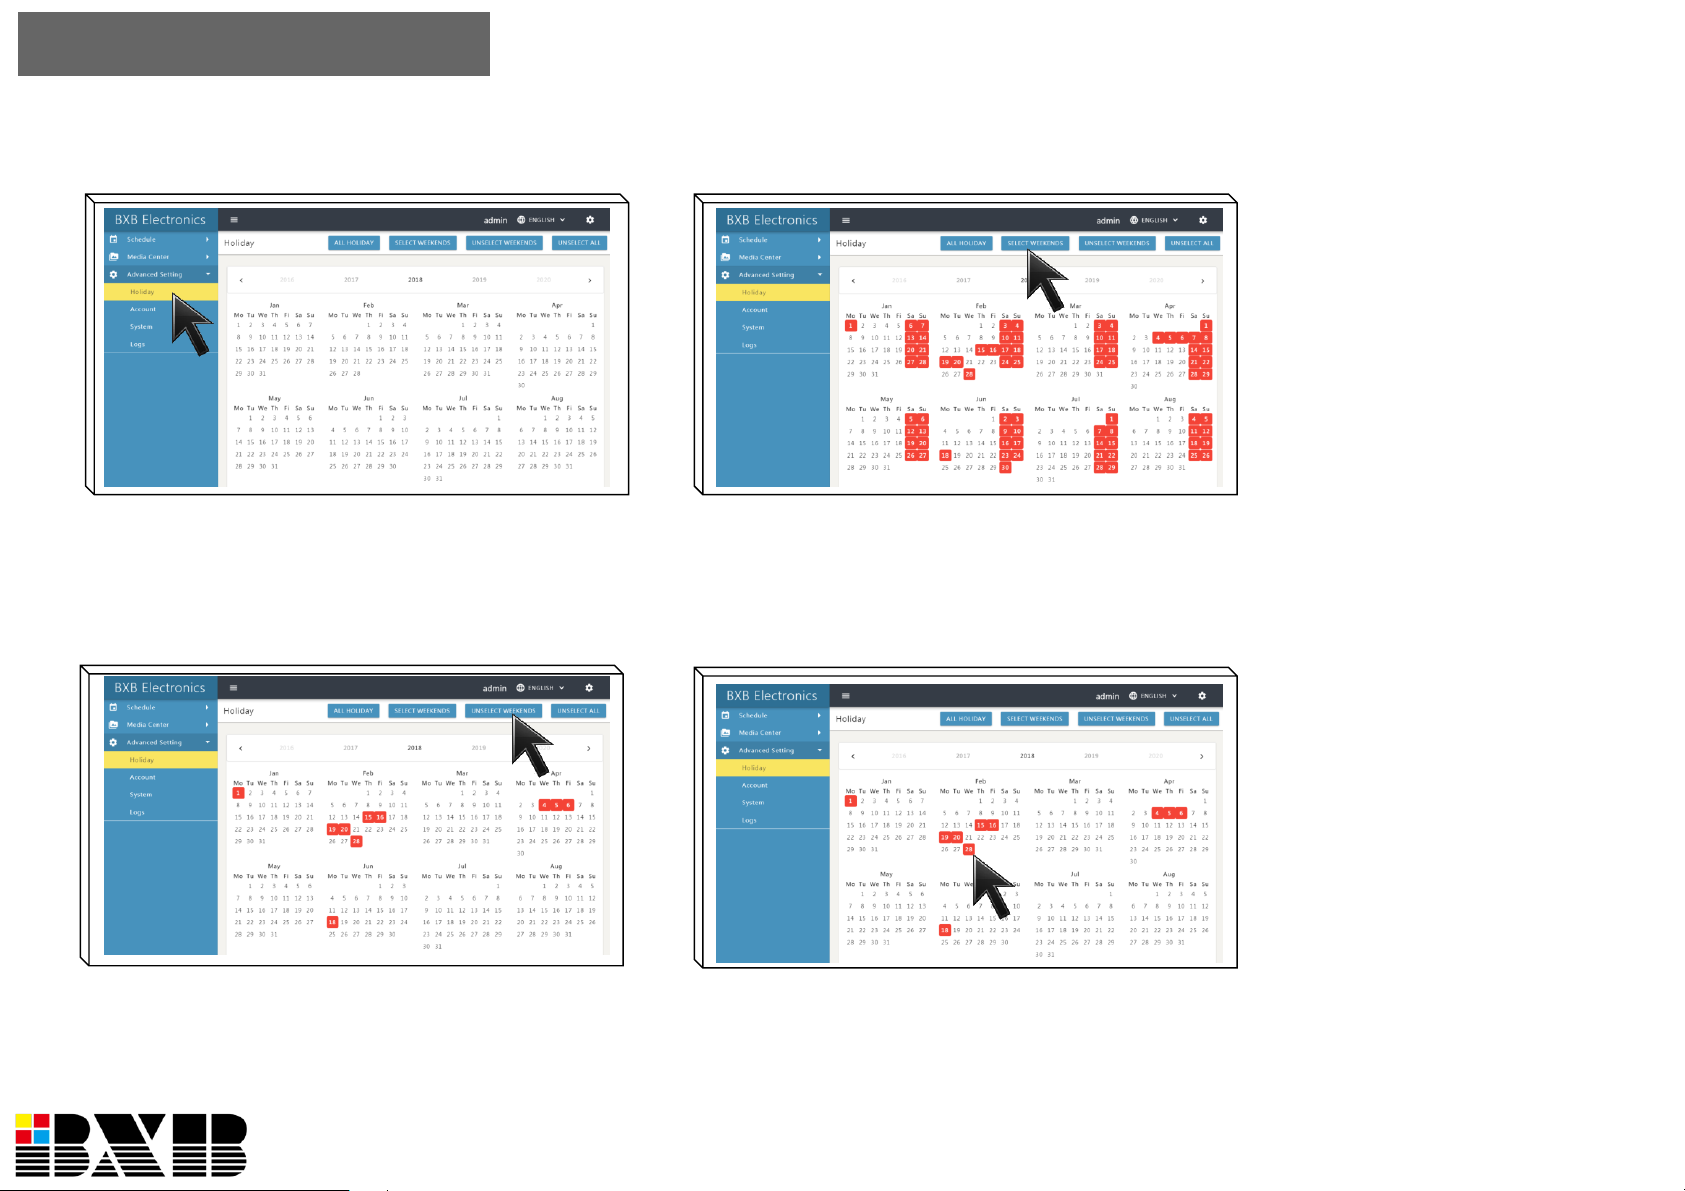
Via “Holiday” setting, the
system would update the
calendar automatically.
You can also select a date
on the calendar for not
executing broadcasting.
For example, on the day
of 28 February, there’s a
weekly schedule. However,
due to its setting as the
holiday, the system would
not e x e c u t e t h e
broadcasting.
1
Click “Advanced Setting” and select
“Holiday”.
2
Click “ALL HOLIDAY” or “SELECT
WEEKENDS” for batch setting.
3
Click “UNSELECT WEEKENDS” or
“UNSELECT ALL” for cancelling the
batch setting.
4
Click a specific date on the calendar for
not executing broadcasting.
Advanced Setting- Holiday
P19
Page 22
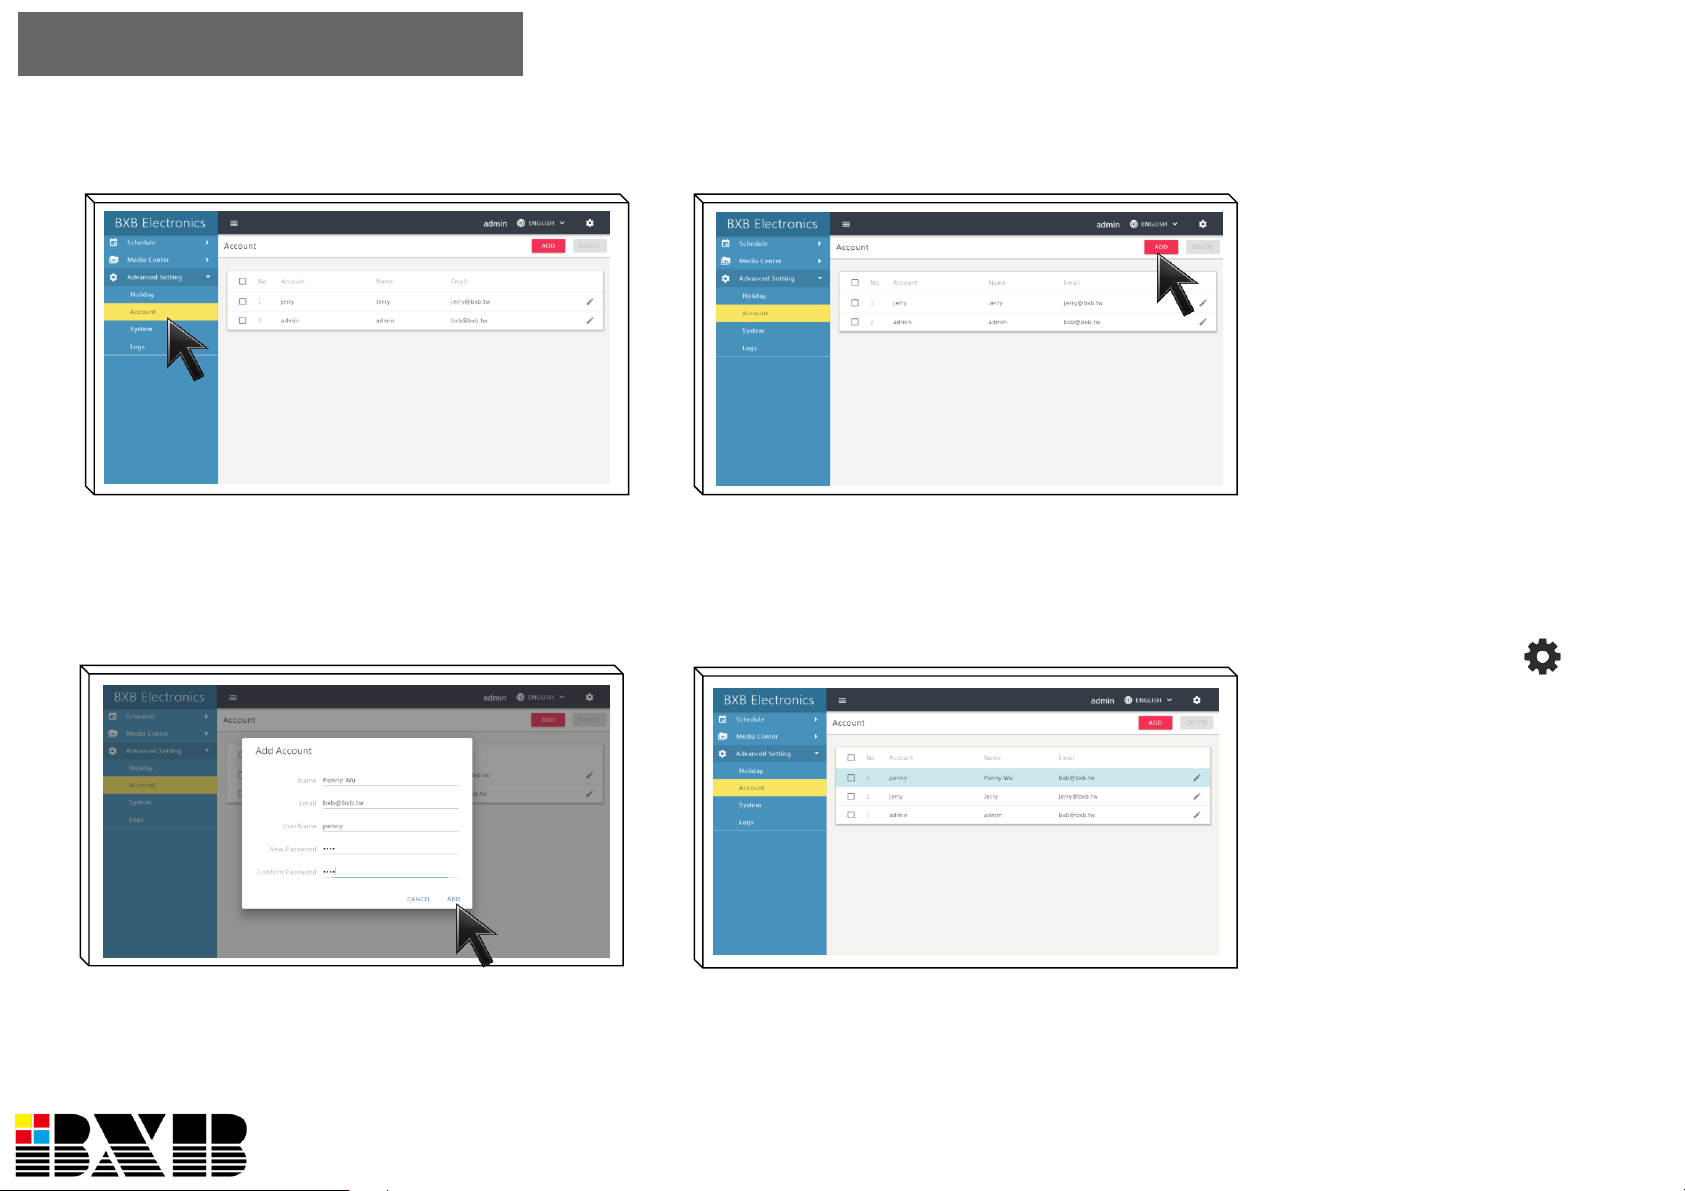
Via LAN, the users can
control and edit the setting
on the web interface with
the PC or mobile devices.
MT-2’s default account /
password is admin/1234.
The administrator can add
new ones for other users.
After logging in, the new
user can click the icon
on the upper right corner
of the page to change the
password.
The “Account” setting can
only be seen and operated
by the user of the default
account (admin).
1
Click “Advanced Setting” and select
“Account”.
2
Click “ADD” to add a new account and
password for remote login.
3
Key in the new user’s information and
click “ADD”.
4
The new user’s account and password
have been added to the list.
Advanced Setting- Account
P20
Page 23
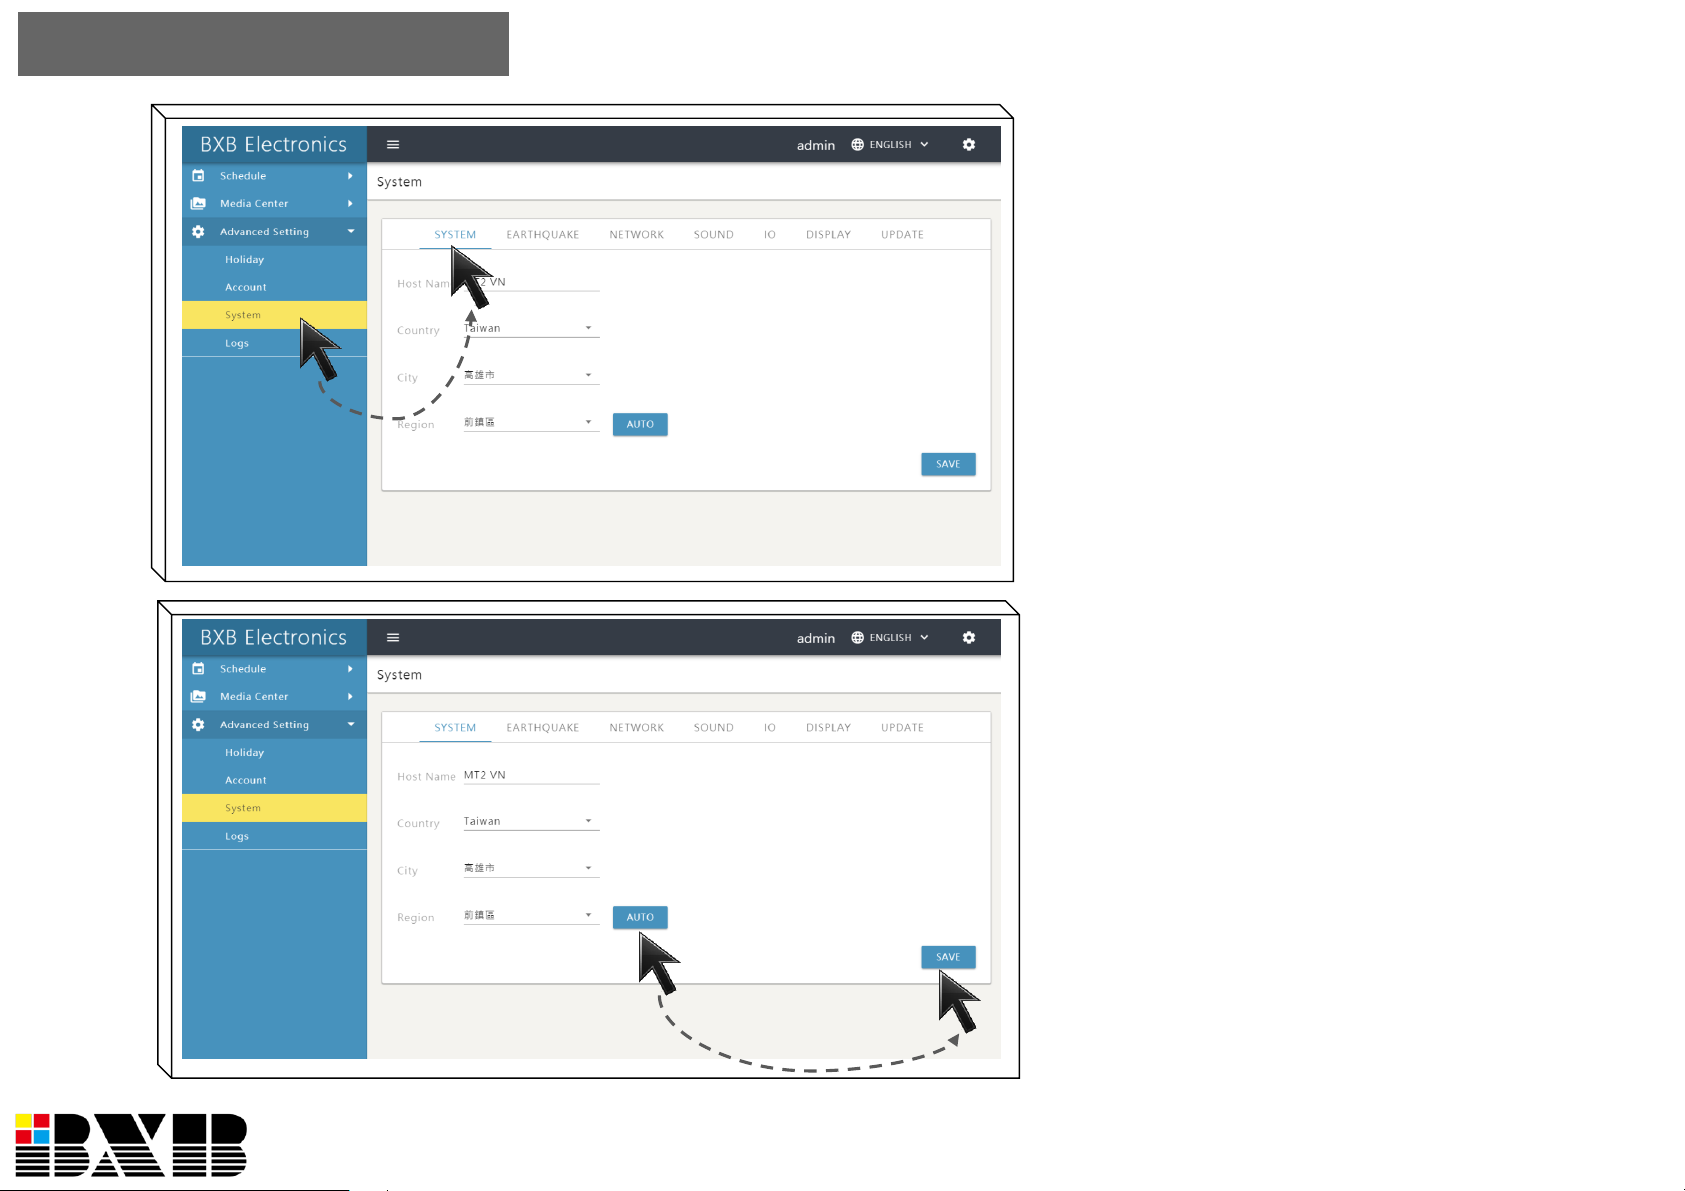
Manually or automatically set the location positioning.
You can change the name for MT-2, which
enables the users easily identifying the
equipment for remote login.
The setting of “Country”, “City”, and
“Region” would affect the information
display of weather, air quality, and the
earthquake warning.
Via Internet, the system can automatically
position the present location. You can also
manually set the location information.
Advanced Setting- System
P21
Page 24
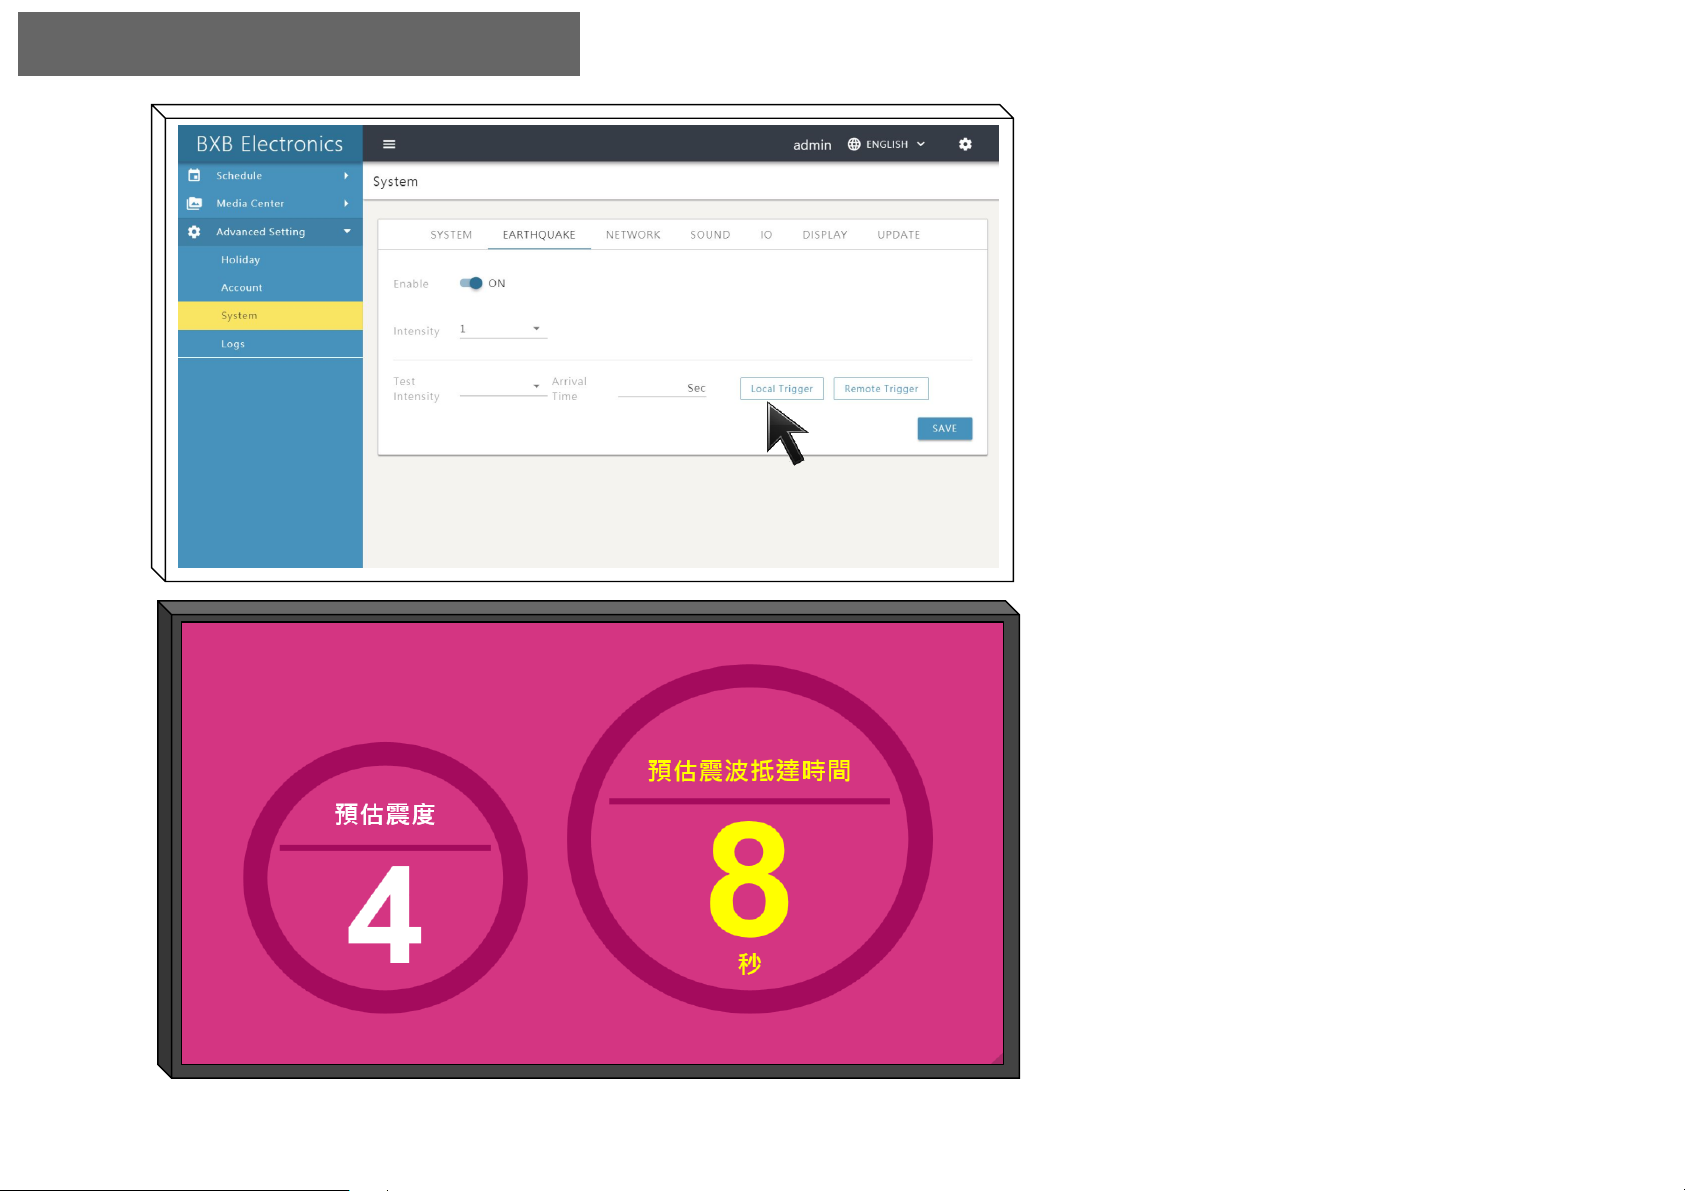
Beside audio warning, the messages would also be shown on
the connected monitors.
Via earthquake setting, BXB’s server
would announce the warning messages
before the earthquake occurs.
There’re two modes for earthquake
rehearsal simulation: Local Trigger and
Remote Trigger.
Local Trigger: executing the rehearsal
by the local MT-2. Remote Trigger: the
server should be connected with the
Internet and then send back the
messages to execute the rehearsal.
Besides the warning sound, the
information of intensity and seismic
waves can be shown on monitors via
HDMI output.
Advanced Setting- Earthquake
P22
Page 25
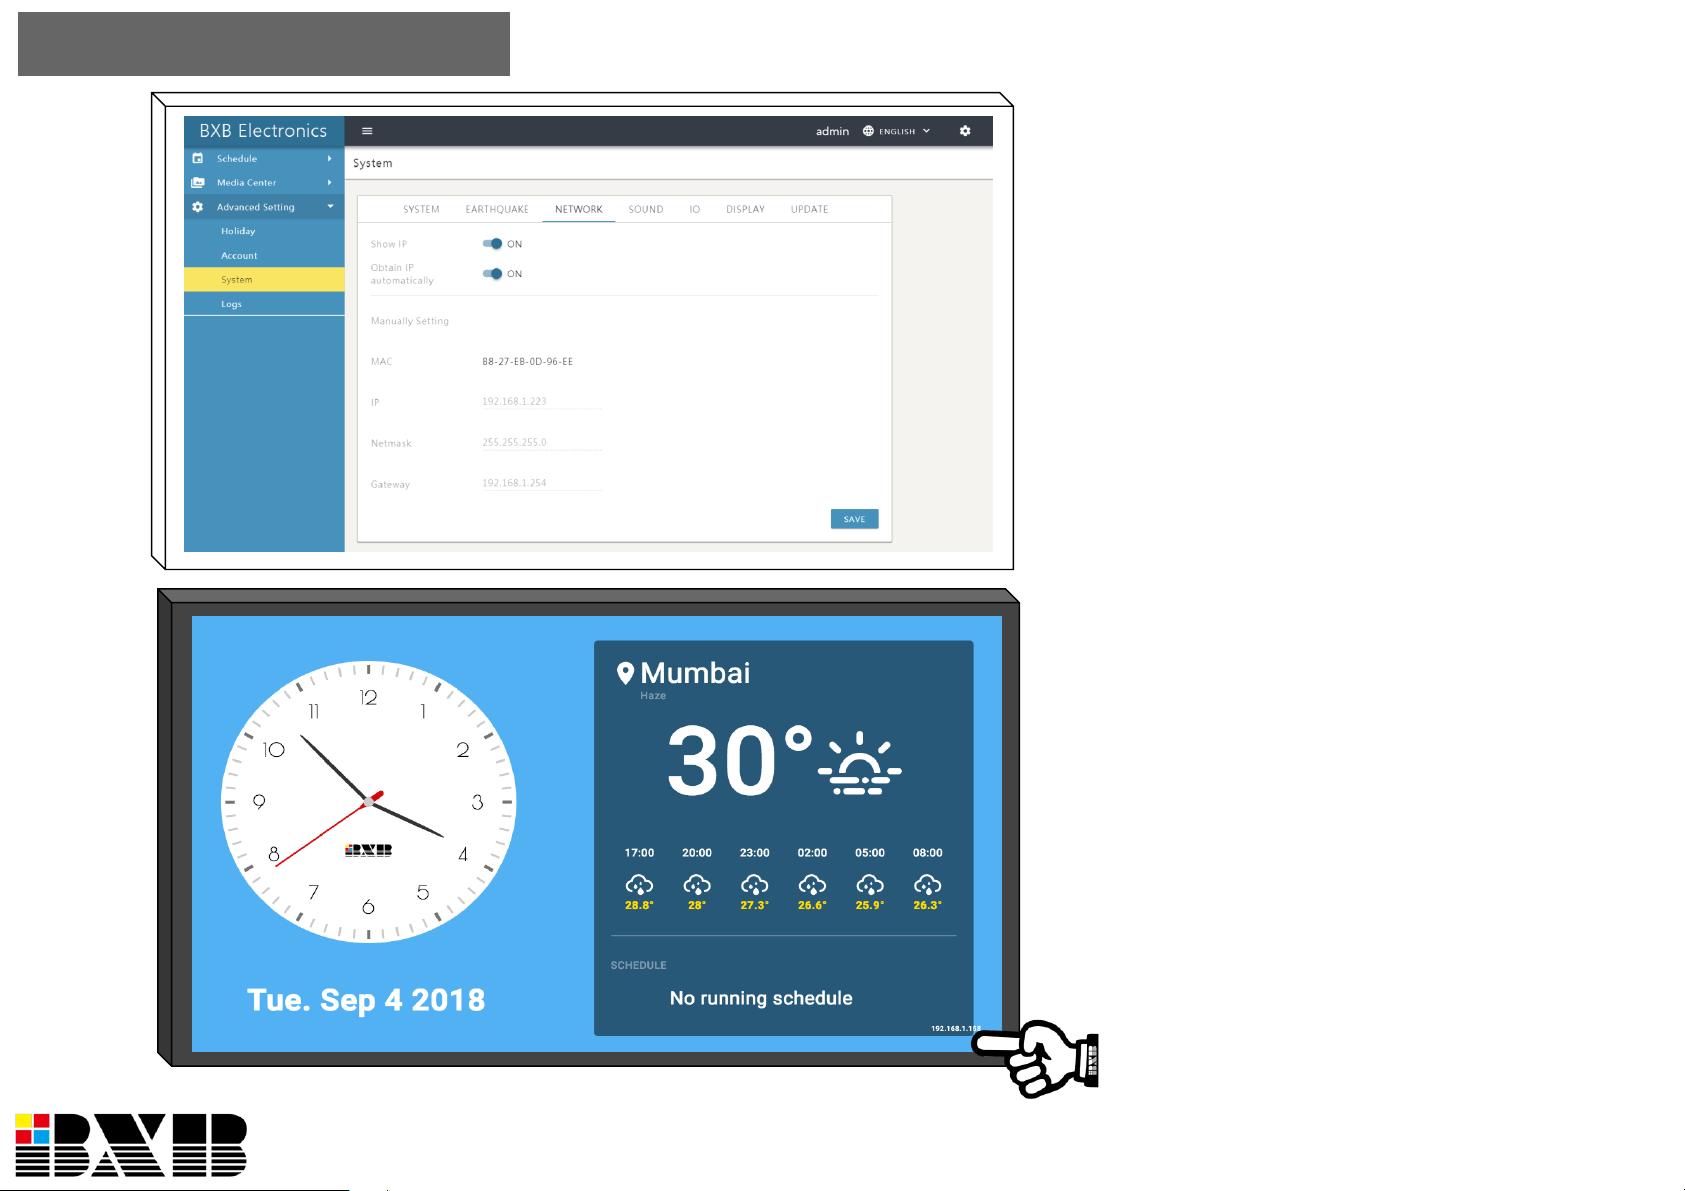
MT-2’s IP address can be shown on the screen.
On the “NETWORK” setting page,
you can set the MT-2’s IP address as
“DHCP” or “fixed IP” to ensure the
normal status of network connection.
The IP address can be shown on the
display monitors, which facilitates
administrator’s remote control.
Advanced Setting- Network
P23
192.168.1.98
Page 26
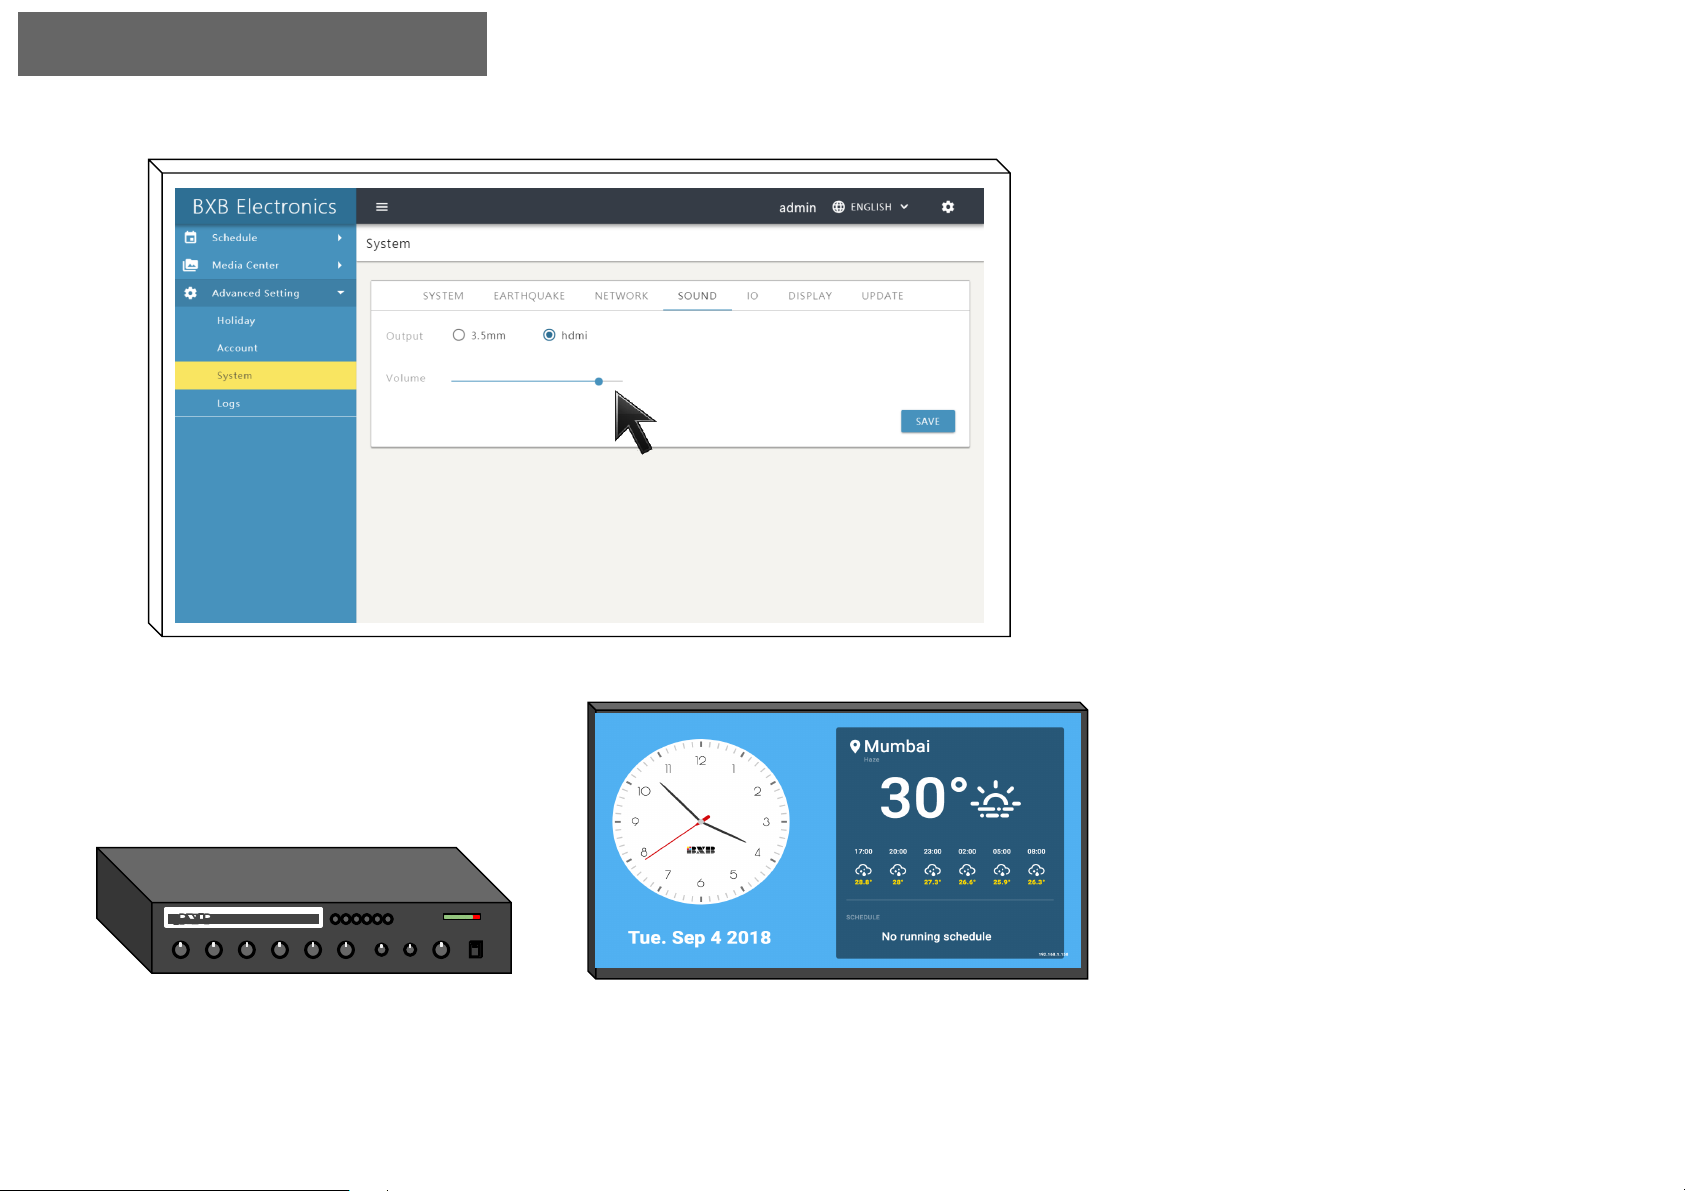
MT-2 only supports either “3.5mm” or “HDMI mix” output.
MT-2 supports either “3.5mm” or
“HDMI mix” output modes.
For example, if you set the audio
output as 3.5mm and MT-2 is
connected with the PA system,
the media sound would be only
outputted to the loudspeakers of
the PA system. The connected
monitors (HDMI) would not have
the sould.
Advanced Setting- Sound
P24
Page 27
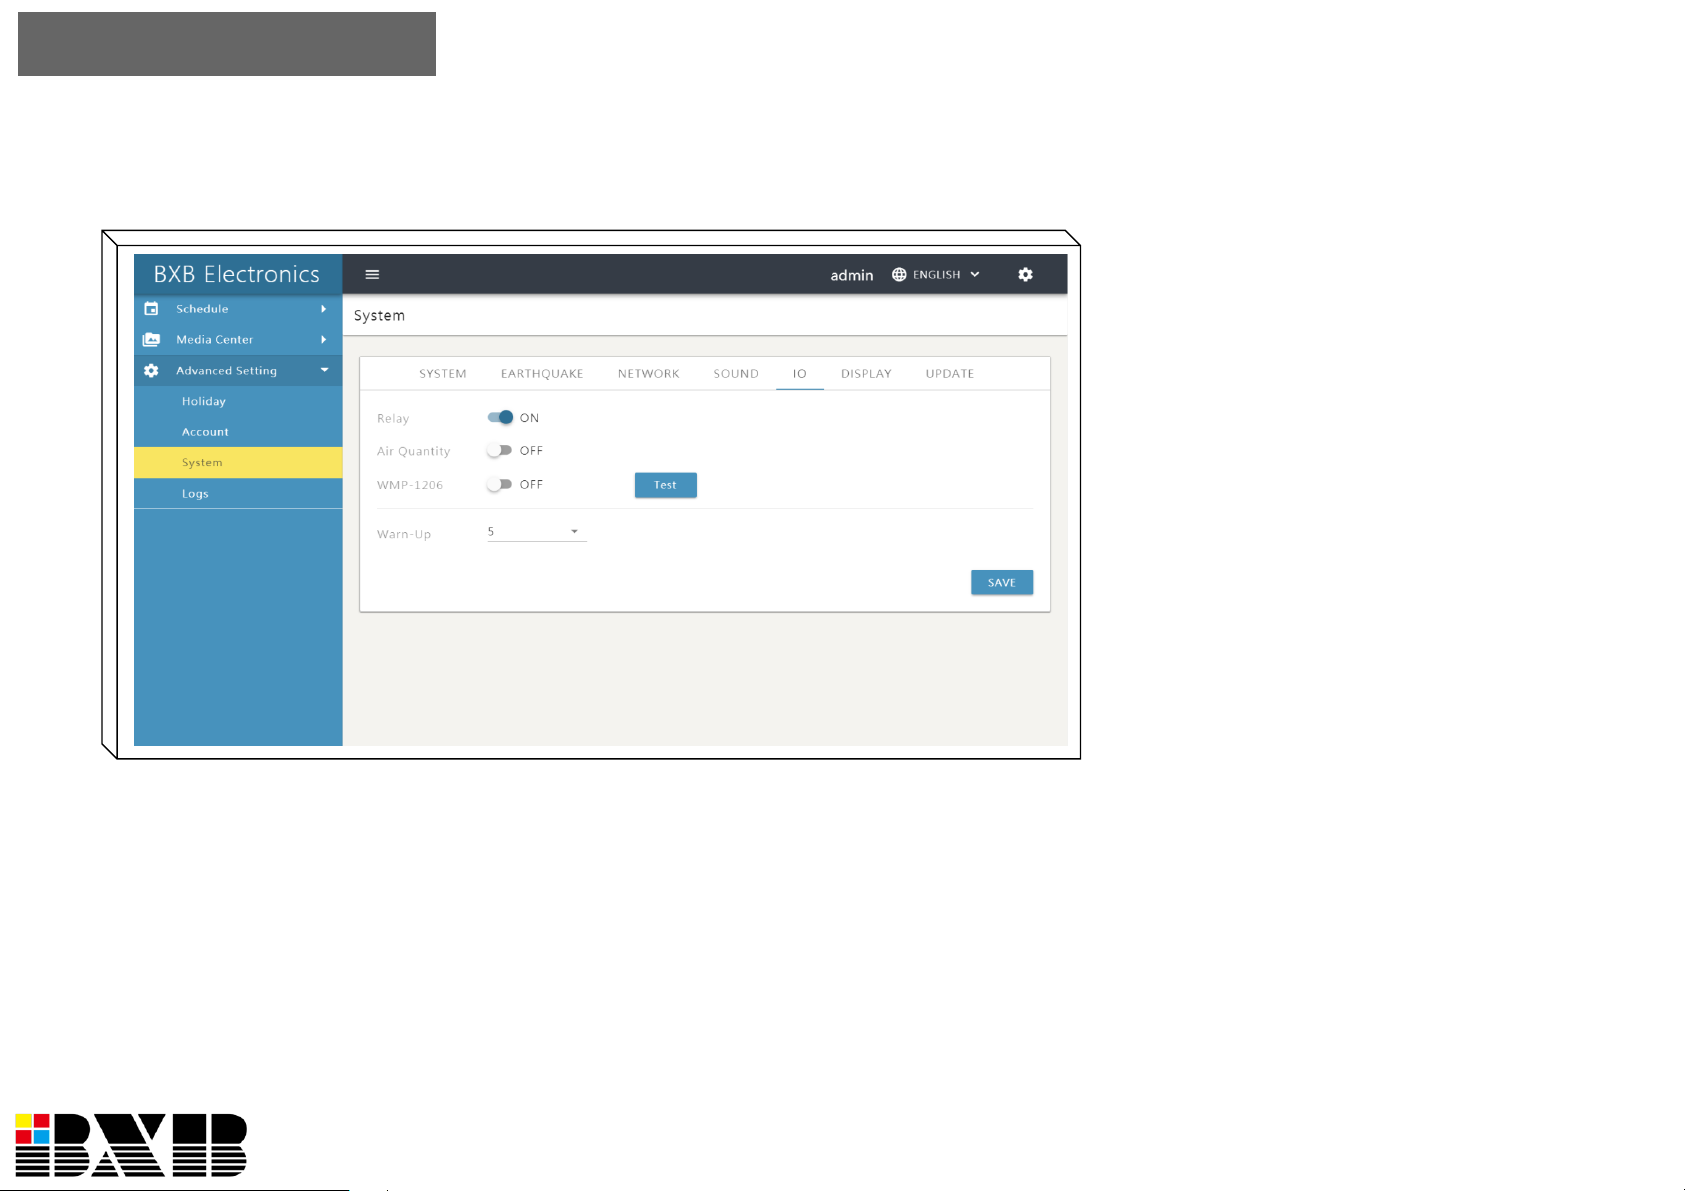
You can set multiple extension fucntions on “IO” page.
By connecting MT-2 with PA
system, N.O. signal trigger can
control the power of the
terminal equipment.
After setting the “Warm-up”
time, MT-2 would turn on
before executing the schedule
broadcasting. It ensures the
normal operation of audio
output.
Turn ON/OFF for the HDMI
display of air quality.
Switch ON/OFF of WMP-1206
to operate RS-232 port for
extension functions.
Advanced Setting- IO
P25
Page 28
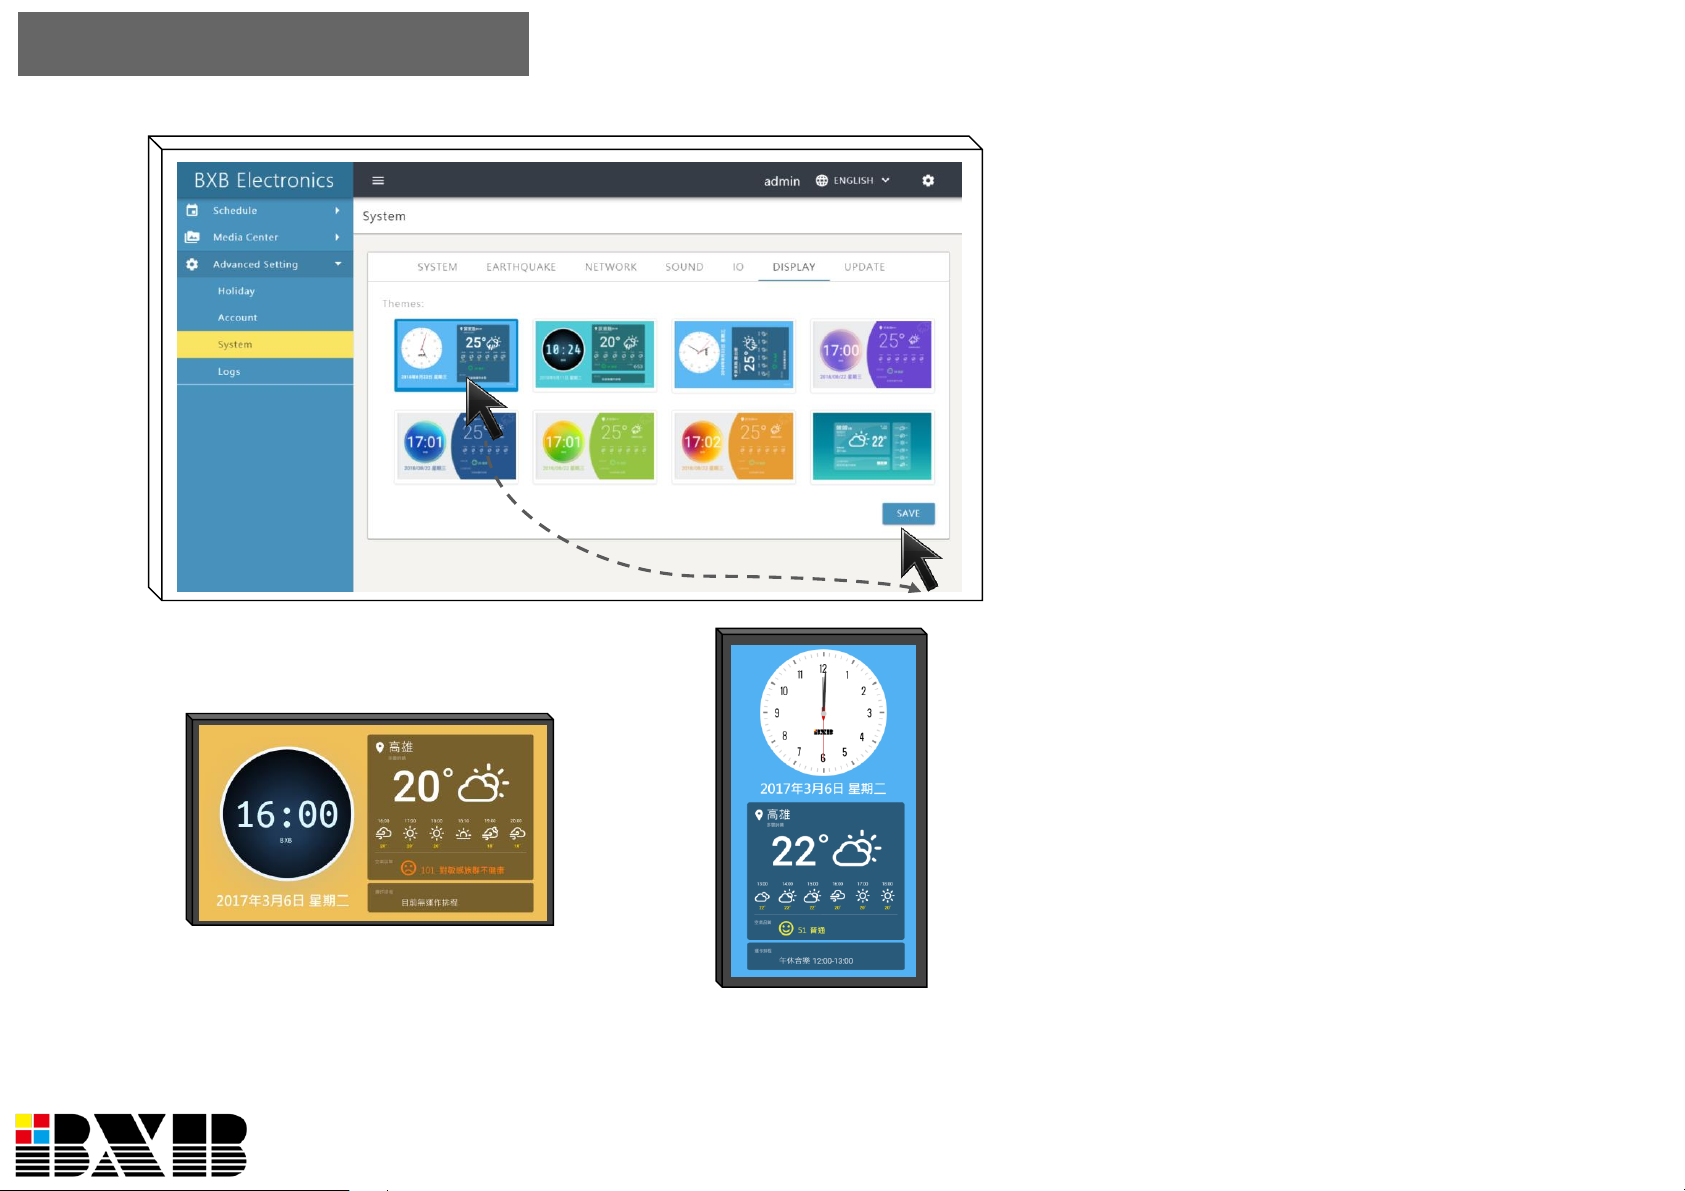
You can select various display styles based on the demands and
monitor’s installation modes (horizontal/vertical).
The monitor display can show the local
time, weather, air quality, and the status
of the executing schedules. There’re
various display styles for your choices.
Based on the monitor’s installation
modes (horizontal or vertical), you can
select the way of display.
Advanced Setting- DISPLAY
P26
Page 29
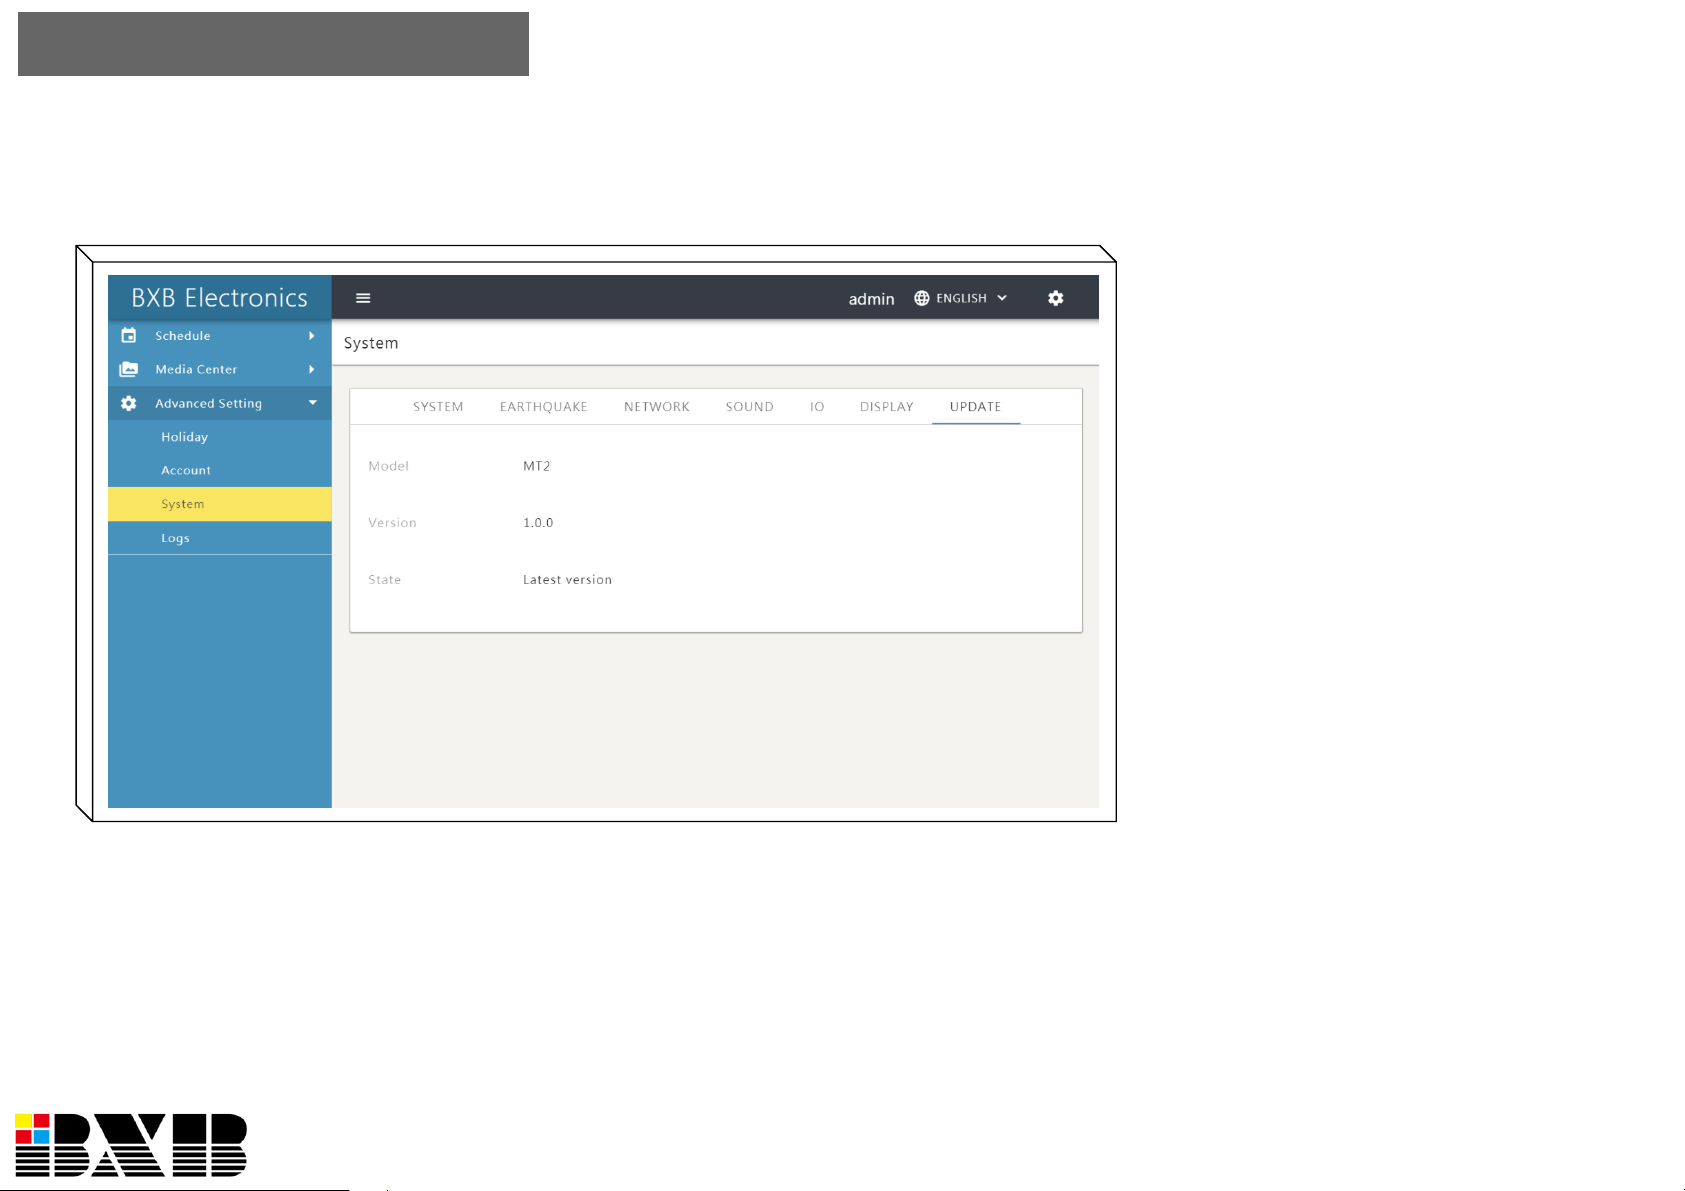
The systme could update the MT-2’s version via Internet.
You can update the MT-2’ s
version via Internet. The update
won’t affect the schedules and
system configurations that have
been set.
Advanced Setting- UPDATE
P27
Page 30

Contact Us
BXB Electronis Co., Ltd.
Rm. 1, 6F., No.288-5, Xinya Rd., Qianzhen Dist., Kaohsiung City 806, Taiwan
TEL:+886-7-970-3838
FAX:+886-7-970-3883
E-mail:[email protected]
P28
 Loading...