

Page 1
mobile
PhoneTools
User’s Guide
Contents
Requirements...........................................................................................2
Installing mobile PhoneTools....................................................................3
Cellular installation and configuration.......................................................4
Online registration .................................................................................... 6
Uninstalling mobile PhoneTools ...............................................................6
mobile PhoneTools main window.............................................................7
mobile PhoneTools functions panel..........................................................8
Configuring mobile PhoneTools................................................................9
Main phone features ..............................................................................12
GPRS connection...................................................................................14
SMS .......................................................................................................15
E-mail .....................................................................................................17
Fax ......................................................................................................... 20
Phonebook .............................................................................................23
Synchronization...................................................................................... 26
Melodies editor .......................................................................................31
Additional information.............................................................................34
1
Page 2

Requirements
mobile PhoneTools requires Windows® 98, 2000, Millennium, NT™ 4.0, or XP. For
other operating systems and any information concerning upgrades, contact BVRP
Software or your distributor.
For mobile PhoneTools to operate properly, survey the following points:
• Pentium® II 233 MHz computer, connected to your cell phone (with a
cable, an infrared port, or a Bluetooth adaptator).
• Local hard drive with 20MB free space.
• Cell phone including a data/fax modem (that supports AT commands).
• Data/fax option included in the subscription contract with your cell phone
operator (to allow fax and e-mails transmission and reception).
• GPRS option included in the subscription contract with your cell phone
operator (for high speed e-mail and Internet use on the cellular network).
• Minimum active memory: 32MB of RAM under Windows® 98,
Millennium, and NT™ 4.0; 64MB of RAM under Windows® 2000 and
XP.
Today’s main supported cell phones series: Nokia (6210, 7110, and 8210),
Ericsson (R320m, R520m, T39m and T68), Motorola (P7389, T250, and T260),
Siemens (S35i, S45, and SL45). To check if your cell phone is supported, visit our
website: www.bvrp.com\home_mobile_PhoneTools.htm
Before Installing
Screen Shots
The screen shots in this guide correspond to the use of mobile PhoneTools in a
Windows XP environment. When running the application in other Windows
operating systems, the aspect of the screens may change. This will not impair the
software’s functionality.
Online Help
mobile PhoneTools has a context sensitive online help that can be accessed by
clicking the help button or by pressing F1 on your keyboard. Complete information
on how to use mobile PhoneTools can be found in the help files.
Conventions
This documentation assumes that you have some familiarity with the basic
Windows user interface. If not, consult your Windows® user’s manual for
information about how to use windows, help, menus and dialog boxes.
In this documentation, text in bold is used for items and text to select or type on
your computer screen. For example: Click the OK button.
2
Page 3

Installing mobile PhoneTools
To install mobile PhoneTools on your hard drive, insert the CD-ROM containing the
program in the appropriate drive.
Rom, the installation process starts automatically.
Should the installation program not start, execute the following instructions:
1.Select the Run command from the Start menu (accessible from the task bar).
2.Select the drive that contains the CD or type D:SETUP (D: represents the CDRom drive).
3.Click OK to run the file.
An installation wizard will guide you step-by-step through the installation process,
prompting for information where needed. During the installation process the
content of the CD-Rom is copied onto your hard drive and a program group is
created to hold the application icons for mobile PhoneTools.
After installation, the online registration wizard is automatically launched (see
Online registration, page 6). The registration is necessary to benefit from the
guarantee, the technical assistance, and free upgrades.
Depending on the operating system, when the installation process is completed,
the installation wizard asks you to restart your computer so that all system
changes take effect.
When installing mobile PhoneTools from the CD-
The mobile PhoneTools program group is then accessible from the Start menu
(from the task bar) and the following icon is automatically added to your desktop:
mobile
PhoneTools
Note: after installation when launching the application for the first time:
- if no modem has been selected, a popup window prompts you to choose a modem from a list or to
have your installed cellular modem automatically detected. If you select the Select modem option,
make certain that your cell phone is correctly connected to your computer and that it is turned on.
- if one modem is installed and correctly detected by the application, you do not need to intervene.
3
Page 4
Cellular installation and configuration
Before starting mobile PhoneTools, your telephonemust be connected to your
computer (cable, Infrared, or Bluetooth).
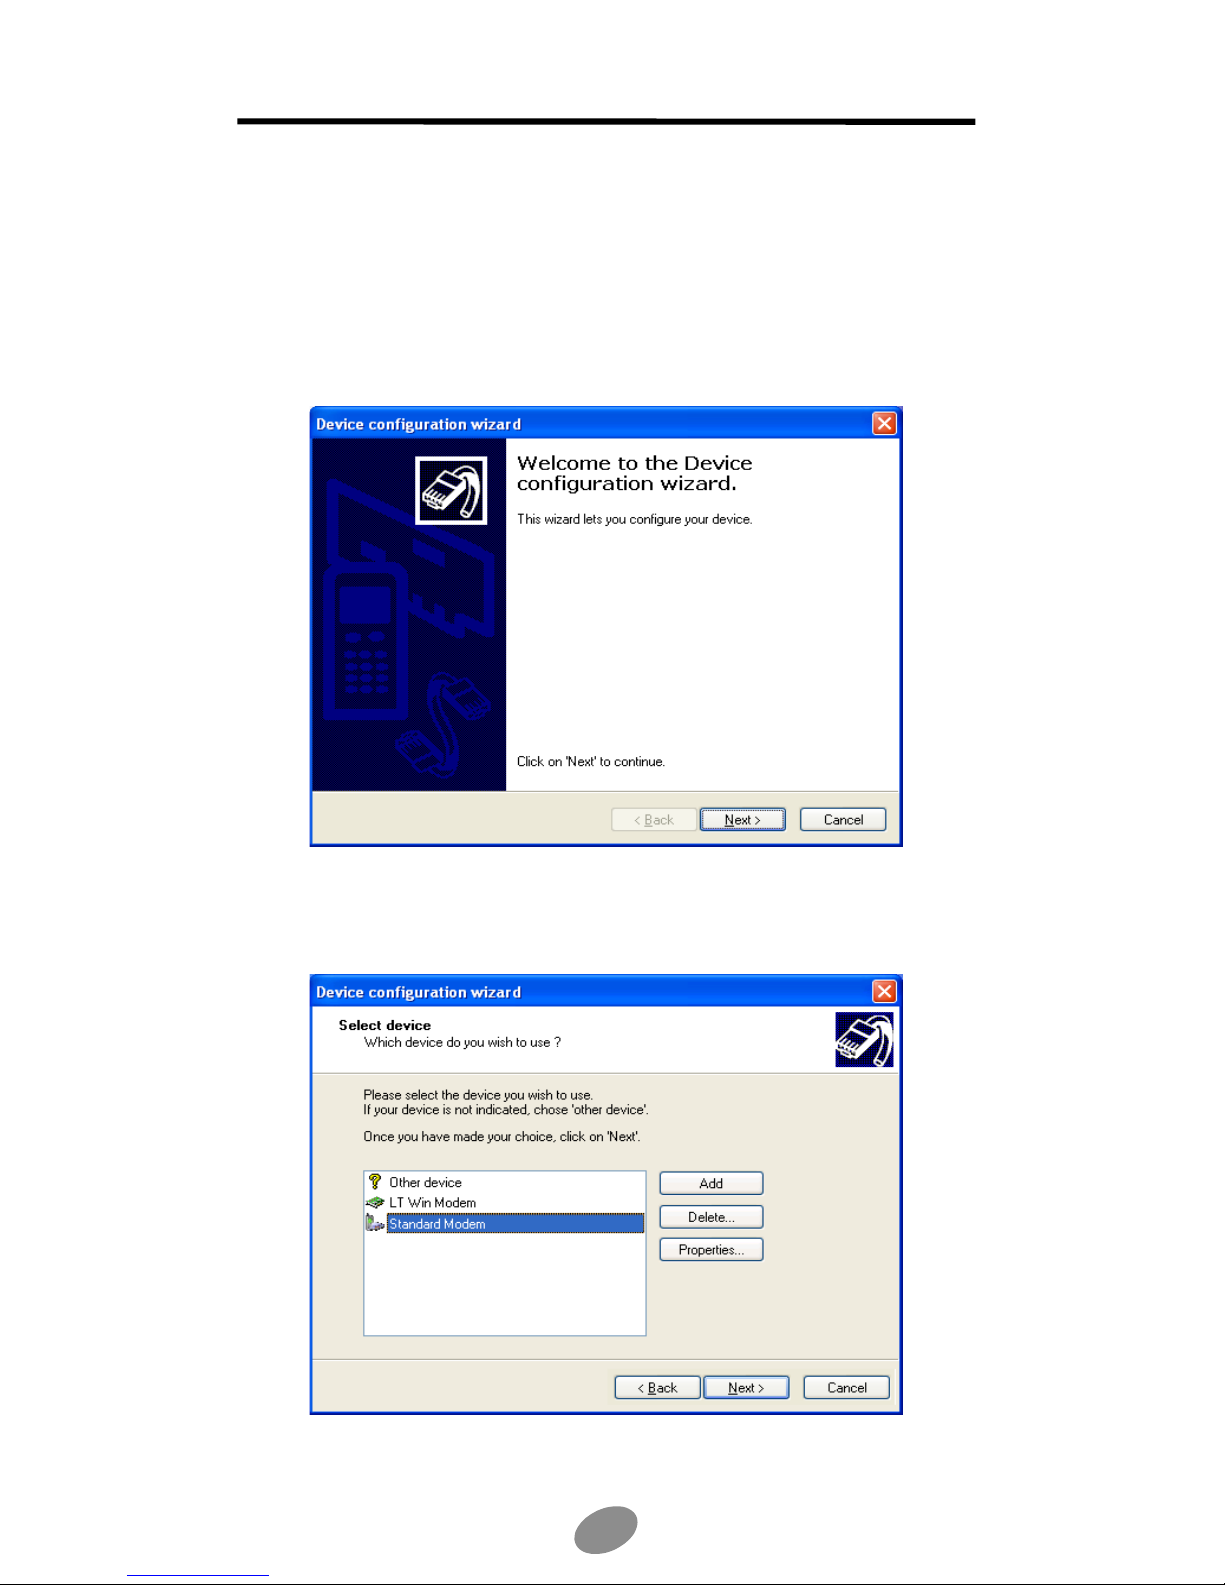
If no telephone has been configured in mobile PhoneTools, if this is the first time
you are starting, or if you choose Change Modem in General Configuration, the
Device Configuration Wizard appears:
Click on Next.
The following screen appears:
4
Page 5
There are two possibilities:
Your cell phone is in the list
Select it, click on Next and follow the instructions.
Your cell phone is not in the list
Select «Other Device» and click on Next.
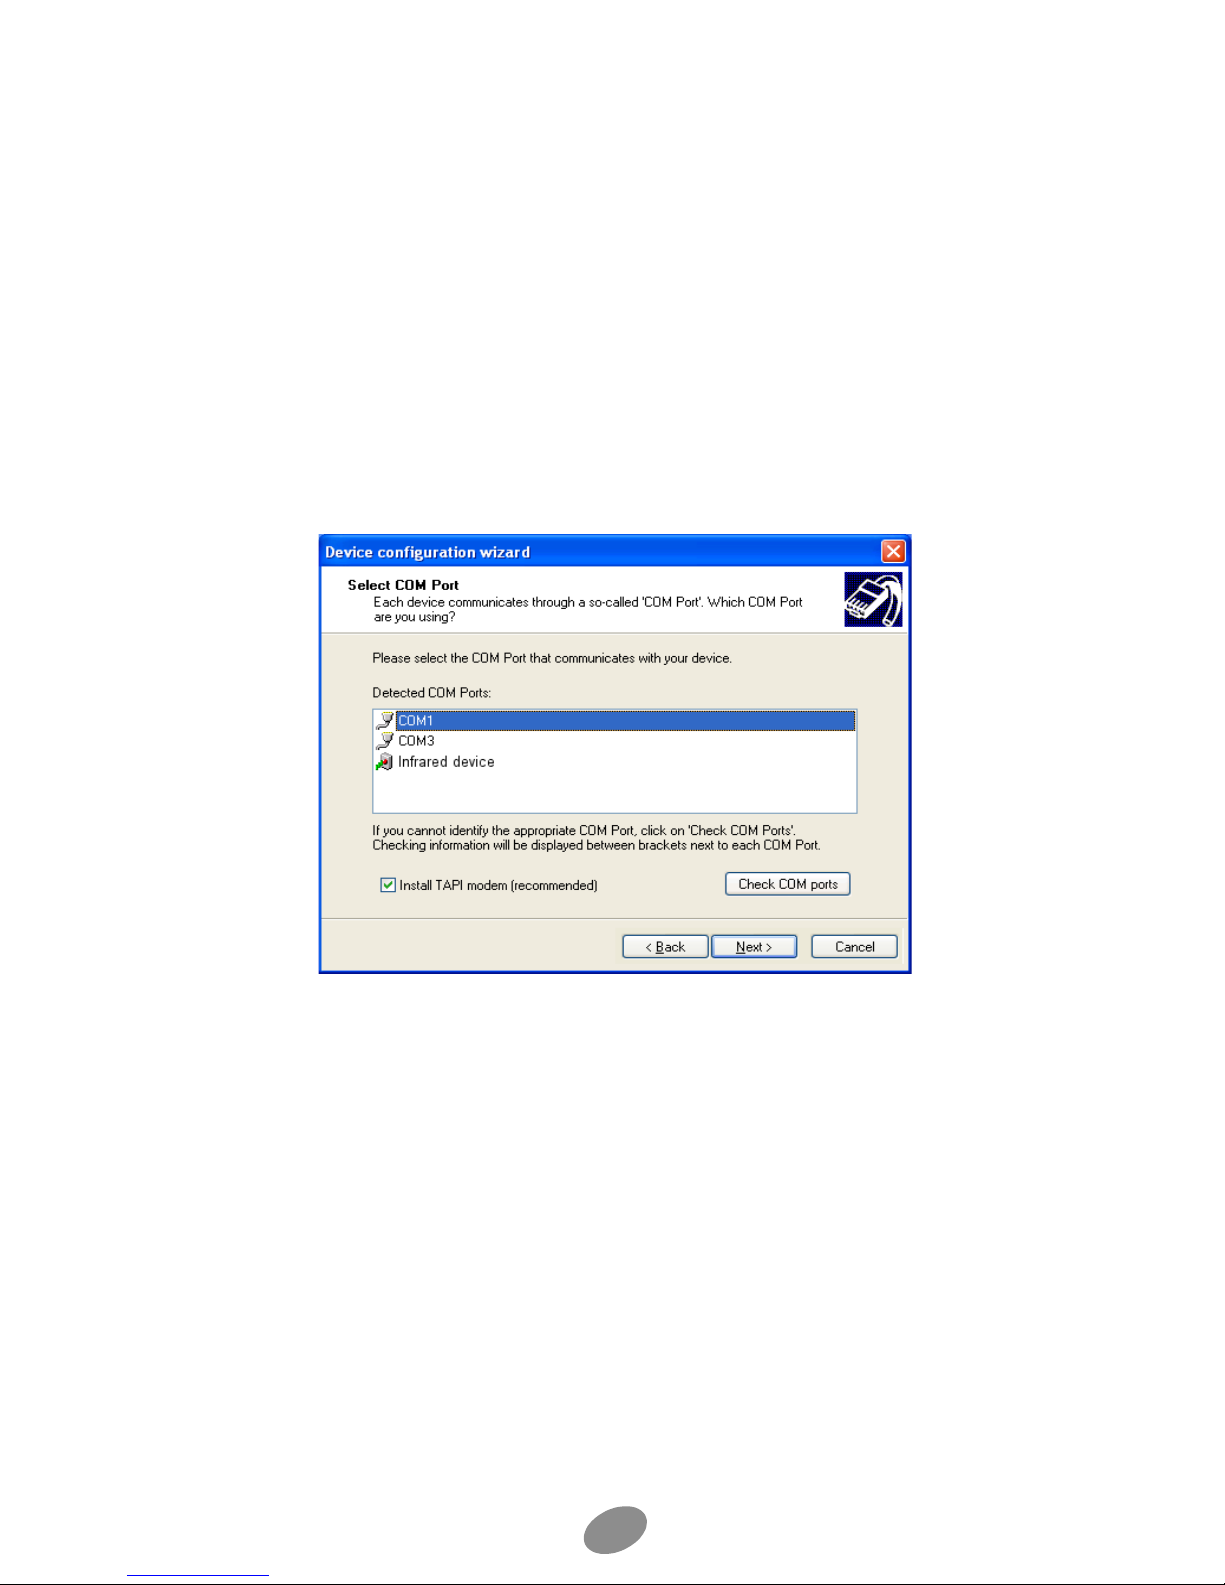
A window appears displaying a list of communication COM port series as well as
the Infrared mode.
Note: If you wish to use the GPRS module, and you are using Windows 2000 or XP, and your cell
phone is connected to your PC in infrared, your cellular must be in the list (see previous caption). To do
this, see the corresponding paragraph in the ReadMe file.
If you do not know which series port or infrared your cellular is connected to, click
on «Check COM ports» which will detect and select your port (unless another
cellular or modem is already connected to your PC, in which case you will need to
select the proper material), then click on Next.
Important! Do not uncheck «Install TAPI modem»!
5
Page 6
Online registration
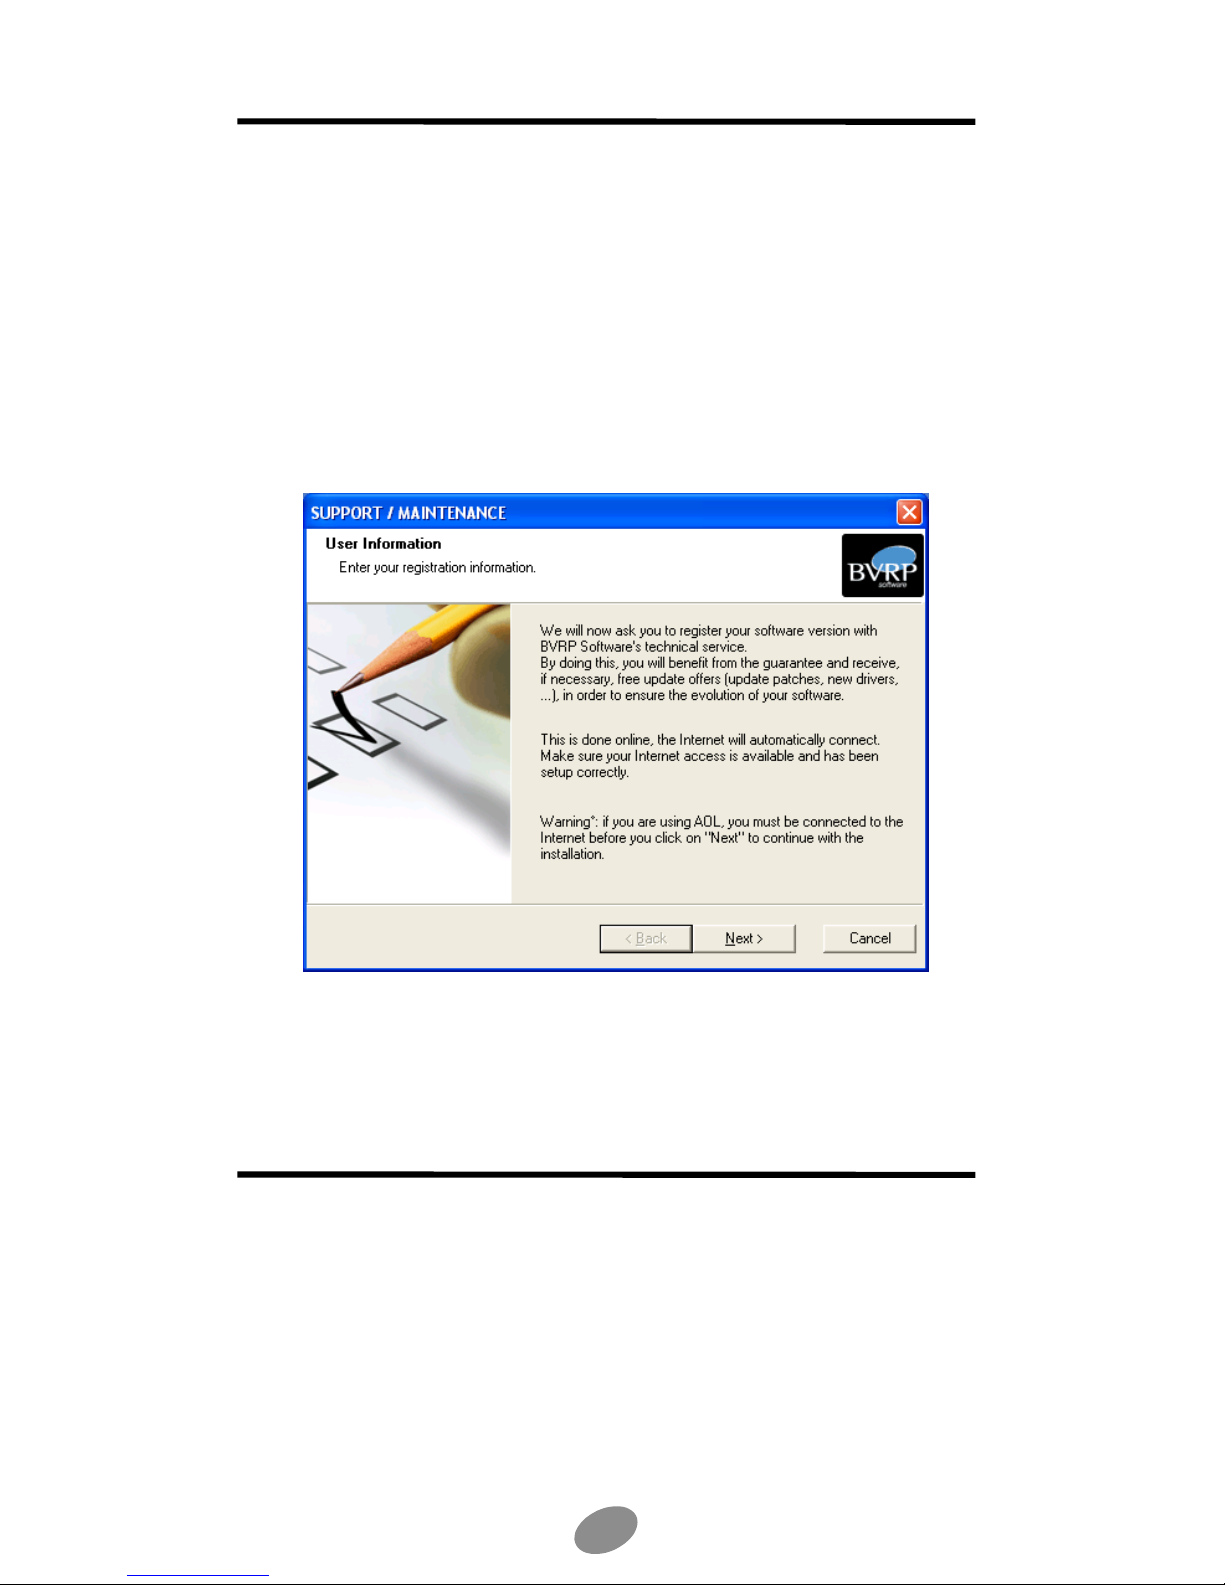
To benefit from the guarantee, the BVRP Software technical assistance, and free
upgrades, register online with our services. The online registration wizard is
automatically launched at the end of the installation process. Simply follow the
instructions displayed on the screens.
Check that your Internet access is avalaible and properly set up to ensure an
automatic Internet connection.
If online registration could not be completed during installation, you can also
register at any other time using the online help (F1 keyboard button or the main
window ? button).
Uninstalling mobile PhoneTools
1. In the Windows task bar, click the Start menu and select the Parameters>
Configuration Panel commands. The Configuration Panel window opens.
2. In the list, double-click the Add/Delete program option.
3. Highlight the mobile PhoneTools program group and click the Modify/
Delete button.
The uninstallation process starts.
6
Page 7
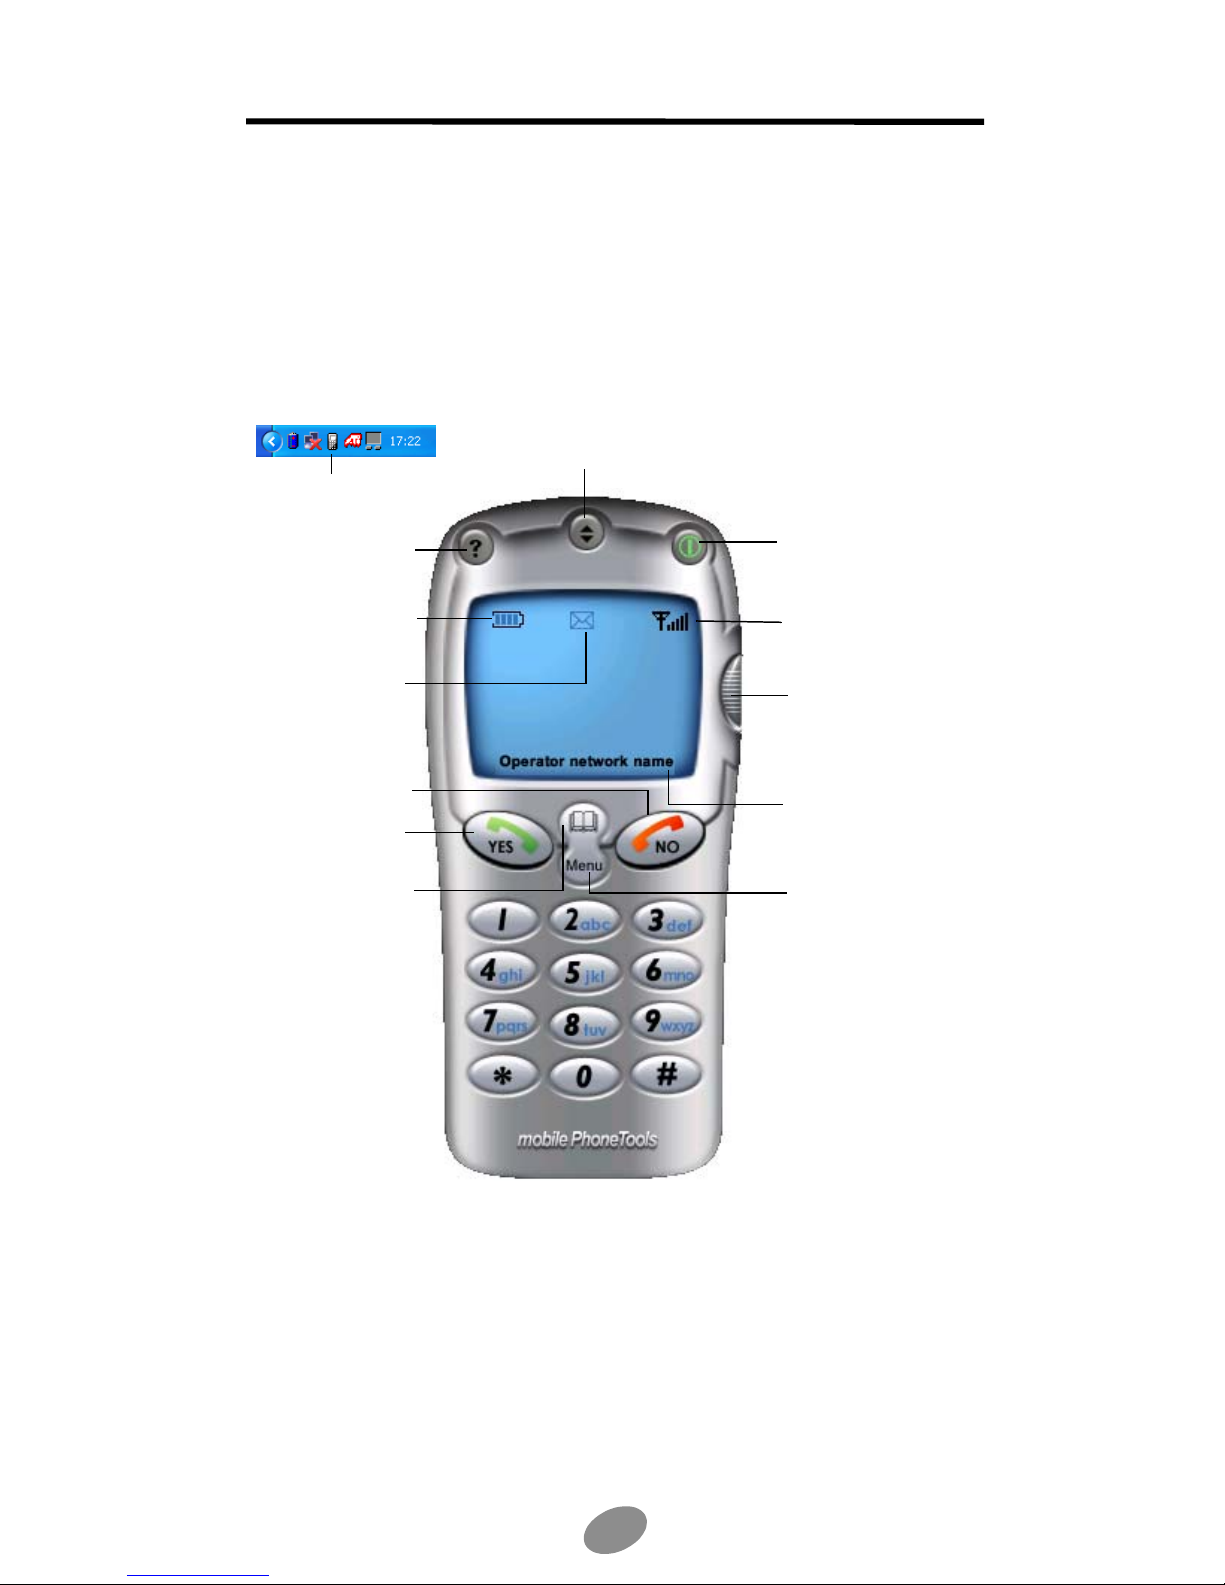
mobile PhoneTools main window
C
h
b
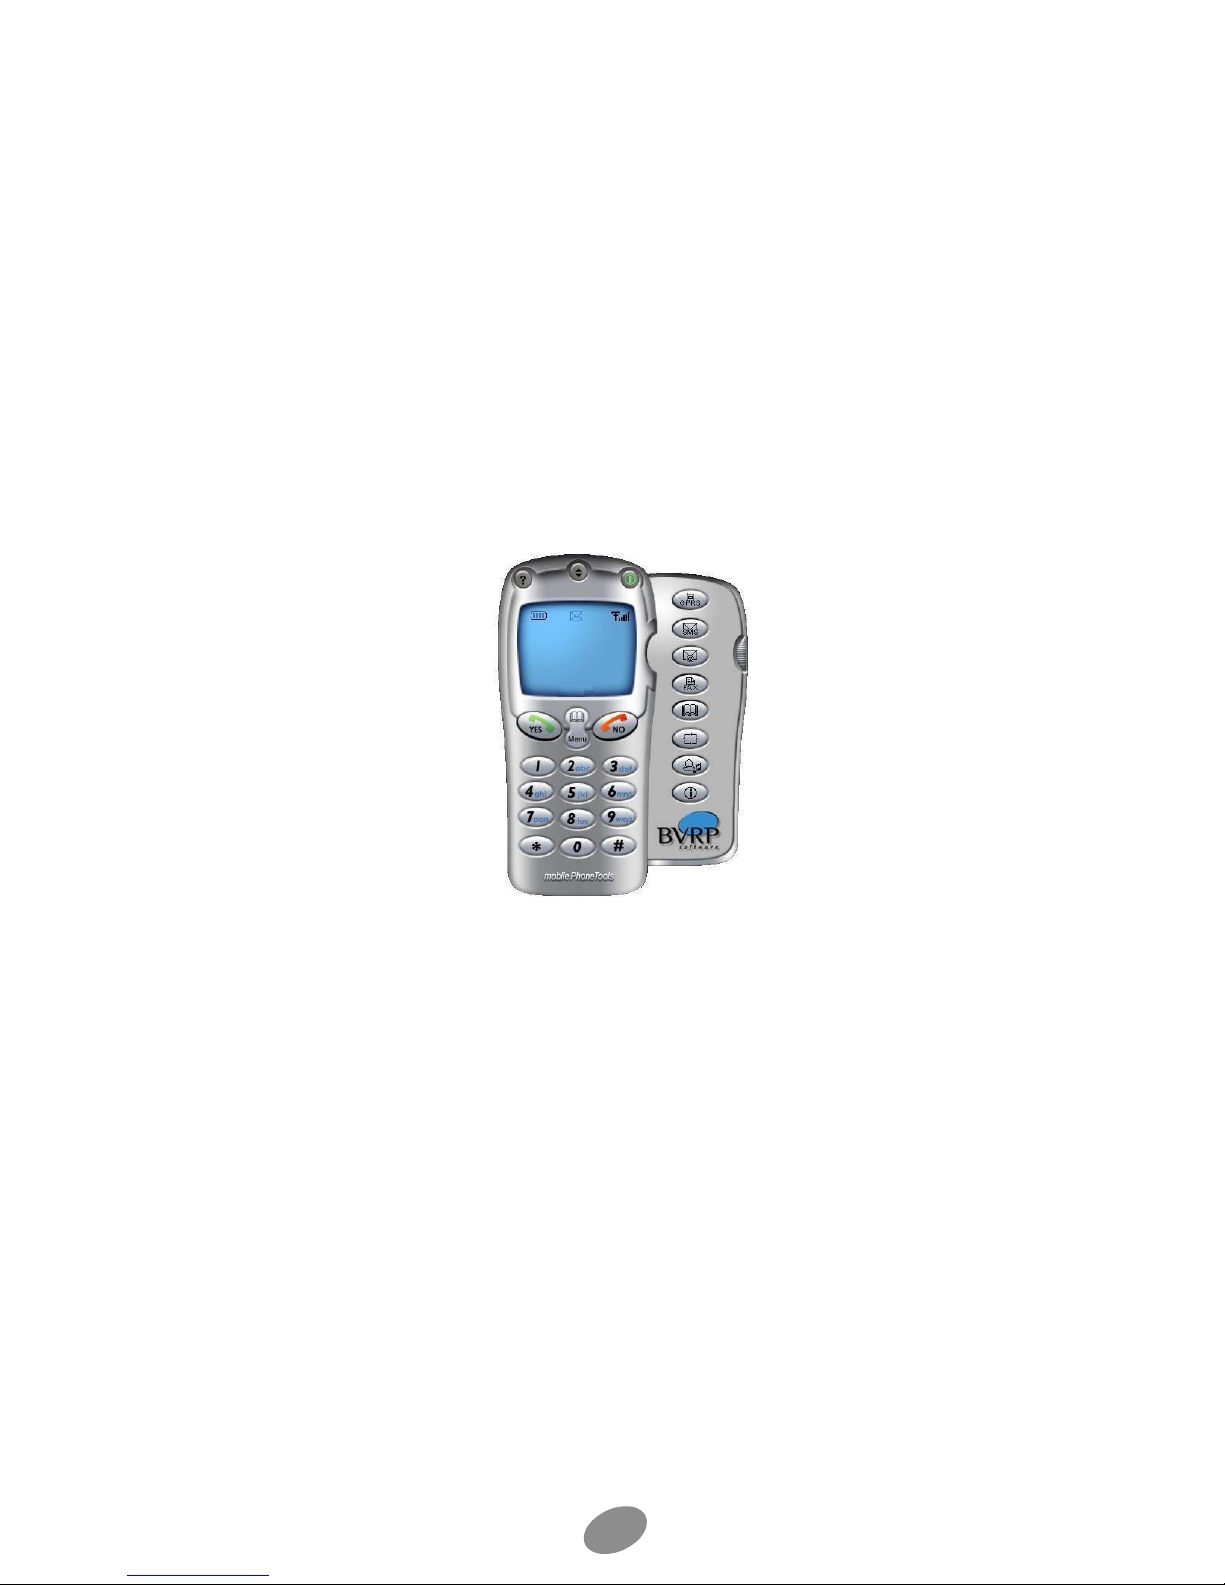
With mobile PhoneTools you can share the information contained in your cell
phone with your computer. Once your cell phone is connected to your computer,
the following operations can be easily processed: place and receive calls; send
and receive faxes, e-mails, and SMS; synchronize your phonebooks; load, create
and modify ring tones for your cell phone;launch a GPRS session...
Click here to minimize mobile PhoneTools
and have its icon placed in the tray bar of
your desktop as shown below:
Double-click here to have
the mobile PhoneTools
window displayed.
lick here to obtain online
elp.
Battery indicator. When
lack, battery is full.
When blinking, the
envelope indicates
you have messages
or faxes.
To place a phone call,
use the dialer as you
would with a normal
phone and click the
green handset YES
button. To hang up, click
the red handset NO
button.
Click here to select a
correspondent and place
a call.
Click here to close mobile
PhoneTools.
This indicates the strength
of the network signal.
A simple click here opens
the functions panel in a
new window (you can also
click Menu>Display>
Functions Panel to open
it). Click again to close the
panel. See page 9.
When connected, your
operator network name
appears here.
A click here enables you
to access all the
functionalities and setup
options of mobile
PhoneTools.
7
Page 8
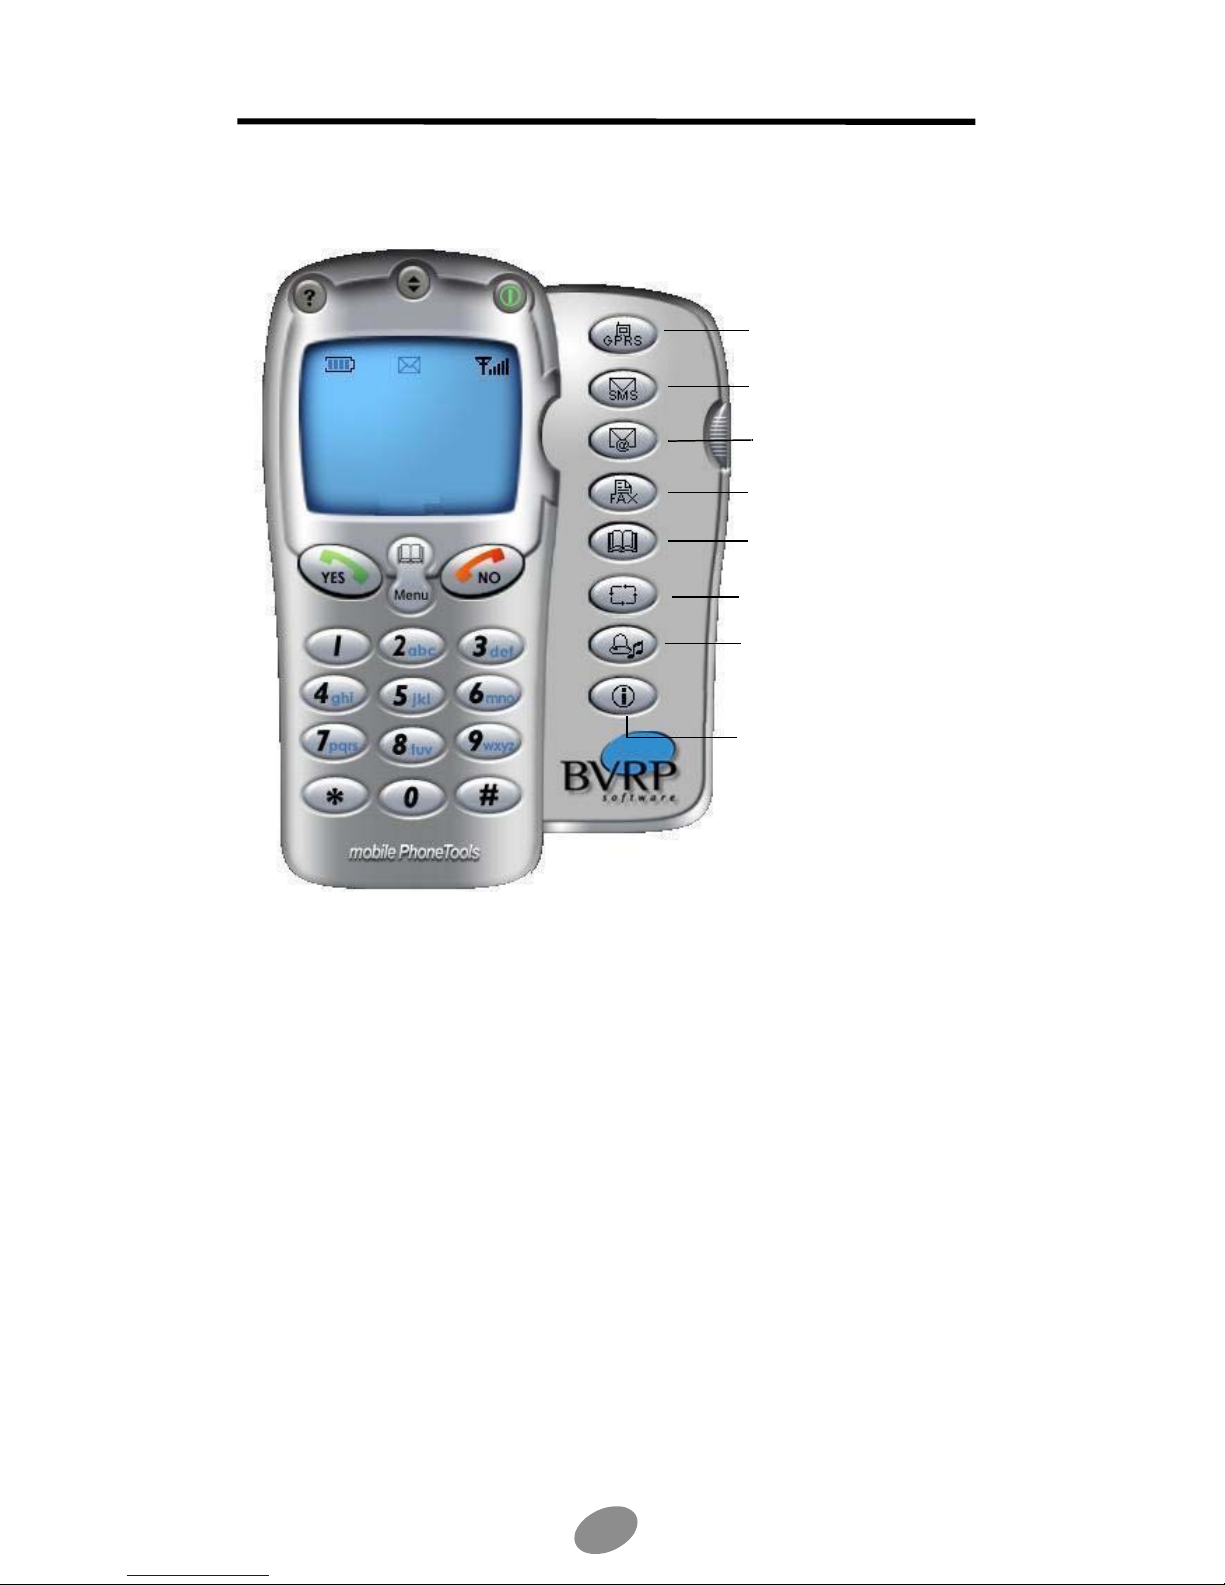
mobile PhoneTools functions panel
Icon description :
Launches or ends the default
GPRS connection.
Opens the Send Message
window to write and send SMS
messages.
Opens the Send E-mail
window.
Enables Fax transmission.
Opens Phonebook.
Synchronizes your phonebooks.
Opens Melody manager to
apply, create, and modify
melodies and use them as ring
tones on your cell phone.
Provides information regarding
cellular, phonebook, and SMS
storage capacities.
8
Page 9
Configuring mobile PhoneTools
Now that your system has been correctly installed, it is recommended that you
configurate your mobile PhoneTools.
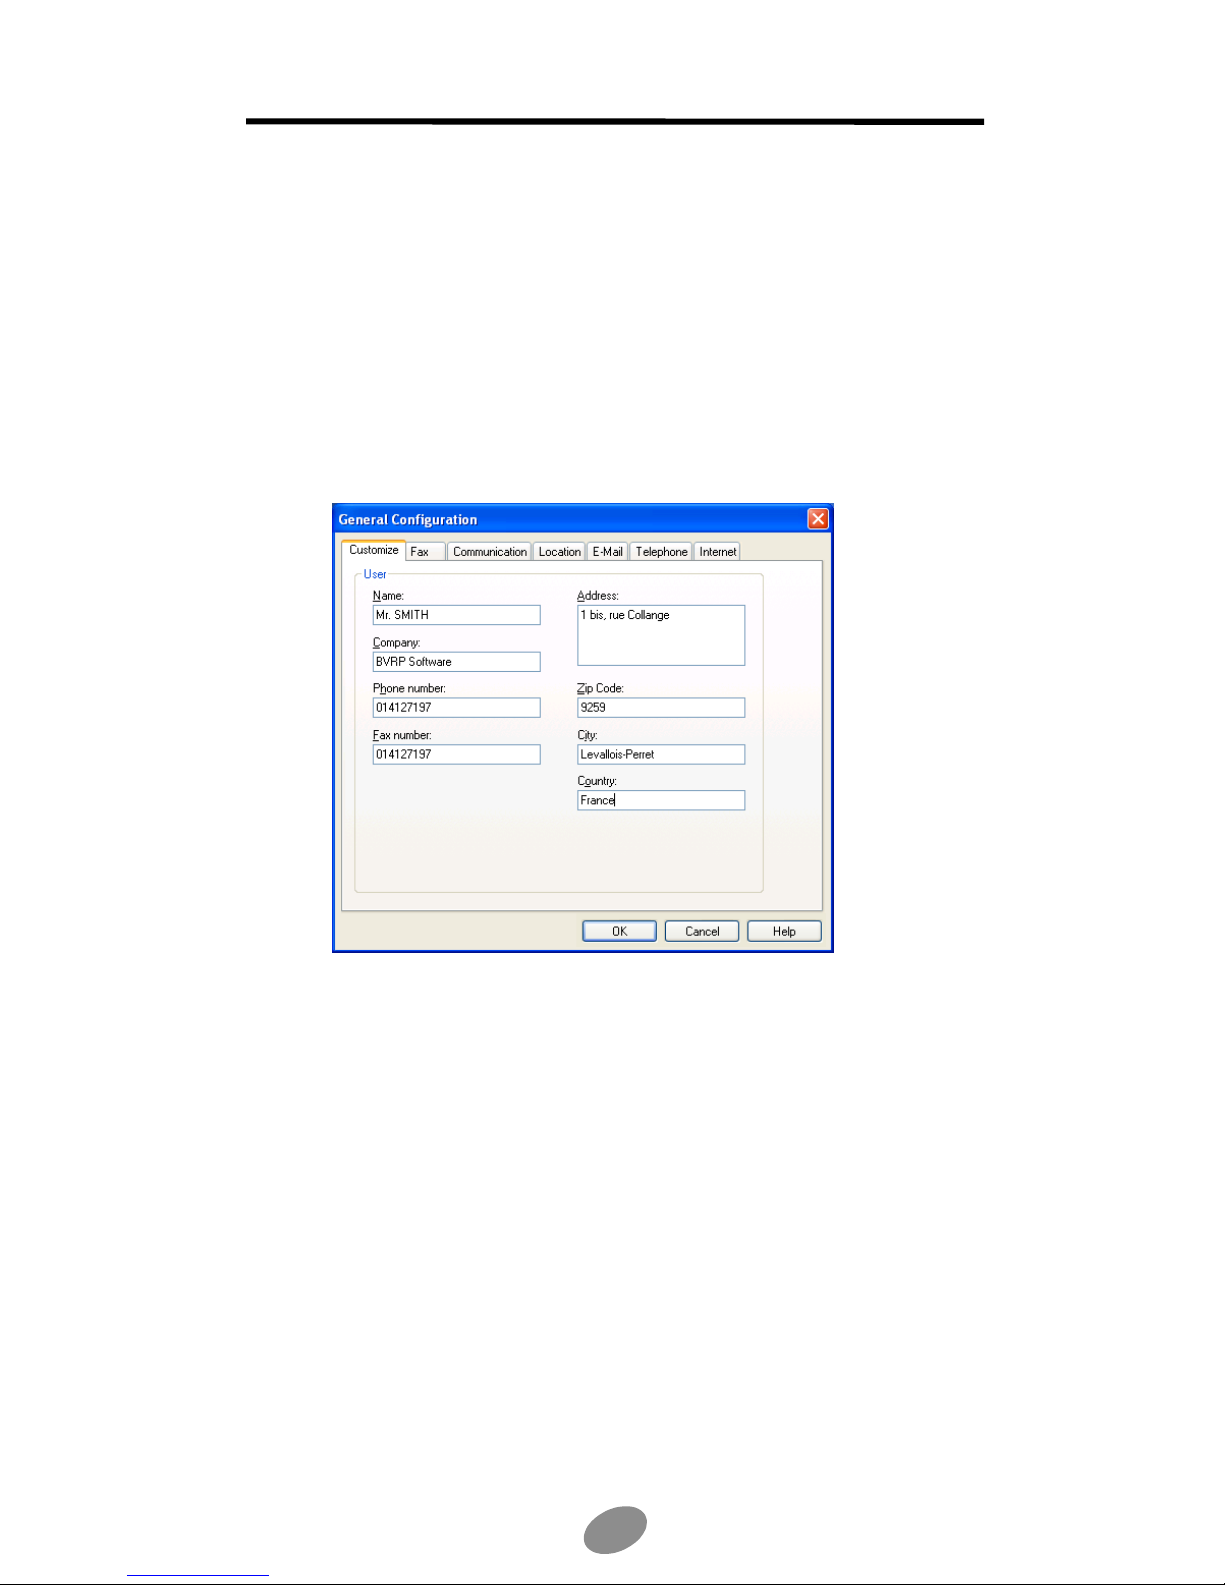
To access the General Configuration window
1. In the mobile PhoneTools main window, you can either press F6 on your
keyboard or click the Menu button.
2. If you choose to click the Menu button, in the menu displayed, select Setup
and then General Setup.
The General Configuration dialog box appears:
3. Set the appropriate parameters in the various tabs:
• Customize To enter your personal data.
• Fax To select your fax reception/transmission options.
• Communication To set up your communication functions.
• Location To set up the dialing properties.
• E-mail To configurate your e-mail accounts.
• Telephone To choose a ring tone to be played on your computer when
receiving a phone call.
• Internet To indicate whether you are using a LAN (through a local
network) or a dial-up connection (with a modem).
4. Click OK.
To access the Cell Phone Setup window
1. In the mobile PhoneTools main window, click the Menu button.
2. In the menu displayed, select Setup then Configure Cell phone.
9
Page 10
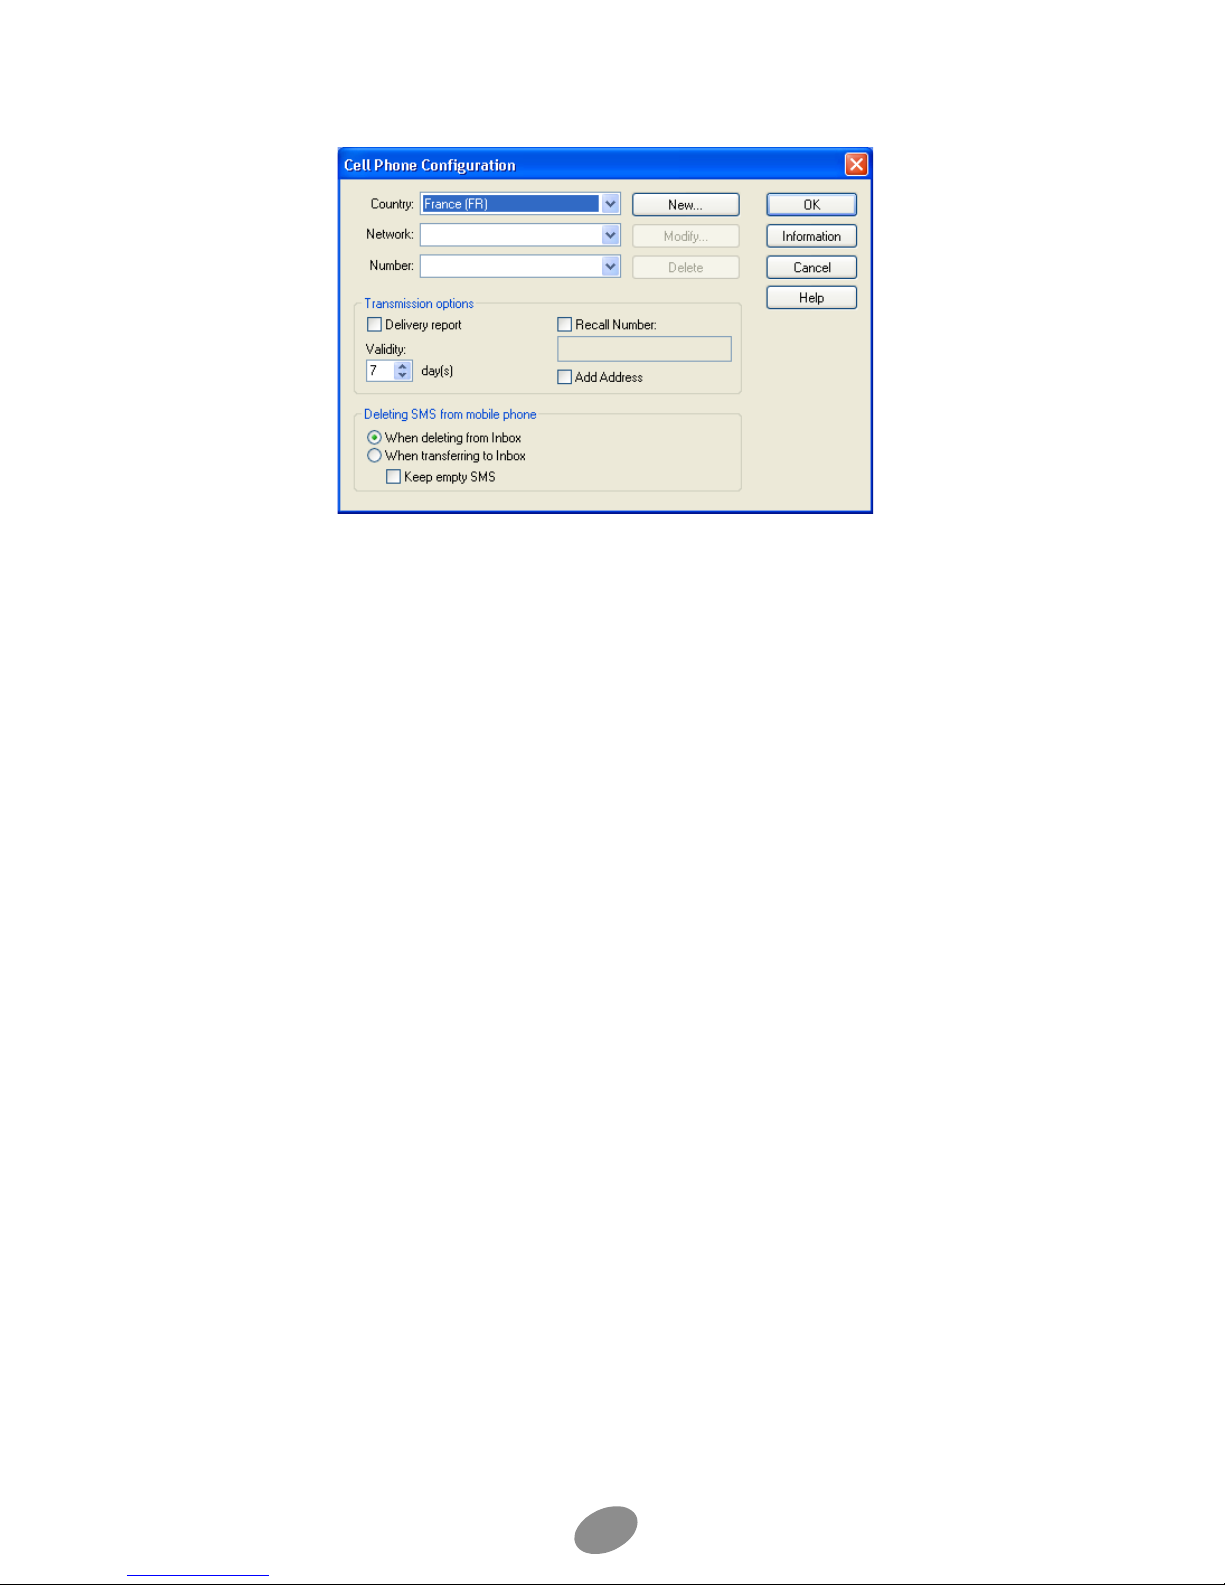
The Cell Phone Configuration dialog box appears:
3. Select the Country your are calling from and the network for your
telephone Operator in the corresponding drop-down lists.
4. In the Transmission options group box, check the:
• Delivery report if you wish to be notified upon reception of your message
by the recipient. In the Validity section, you can modify the deadline to
deliver the message (the default deadline is 7 days). If the recipient’s
phone is turned off, your Service Center will save the message and try
delivering it until the deadline is reached. If the message cannot be
delivered before the deadline, the message is deleted and you do not
receive a delivery report.
• Recall Number box if you wish the indicated phone number to appear on
all the messages you send. In the data entry field, type the phone
number where you wish to be called back by your recipient.
5. In the Deleting SMS from cell phone group box, choose when to delete
the SMS received. Check the Keep empty SMS box to save received
empty messages in both mobile PhoneTools and the device. When
unchecked, they are deleted from both mobile PhoneTools and the cell
phone and the information concerning these messages (calling number,
date and time of call) is no longer available.
6. Click the Information button to access the read-only information related to
your cell phone and to your phonebook and SMS storage capacities.
10
Page 11
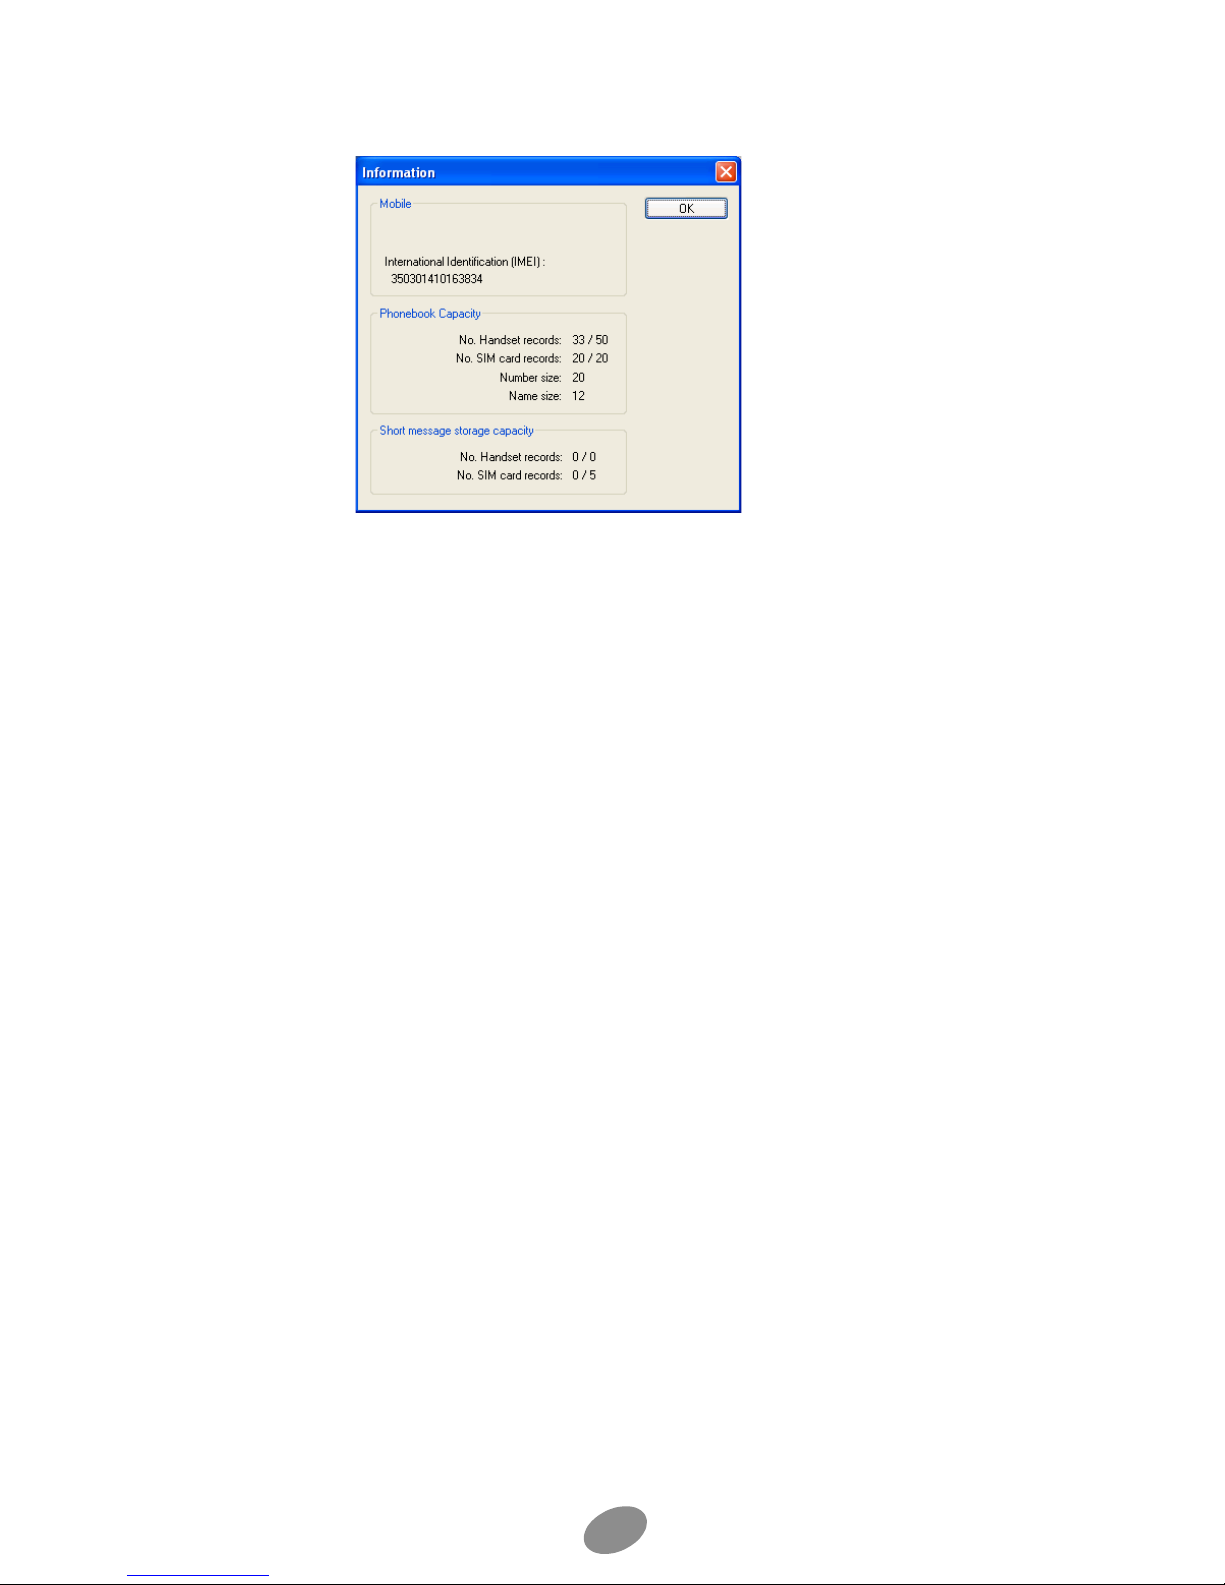
The following window appears:
7. Click OK to close the window.
11
Page 12
Main phone features
To call a correspondent
1. In the mobile PhoneTools main window, you can either directly use the
keyboard to dial the number or use the mouse and dial on the application.
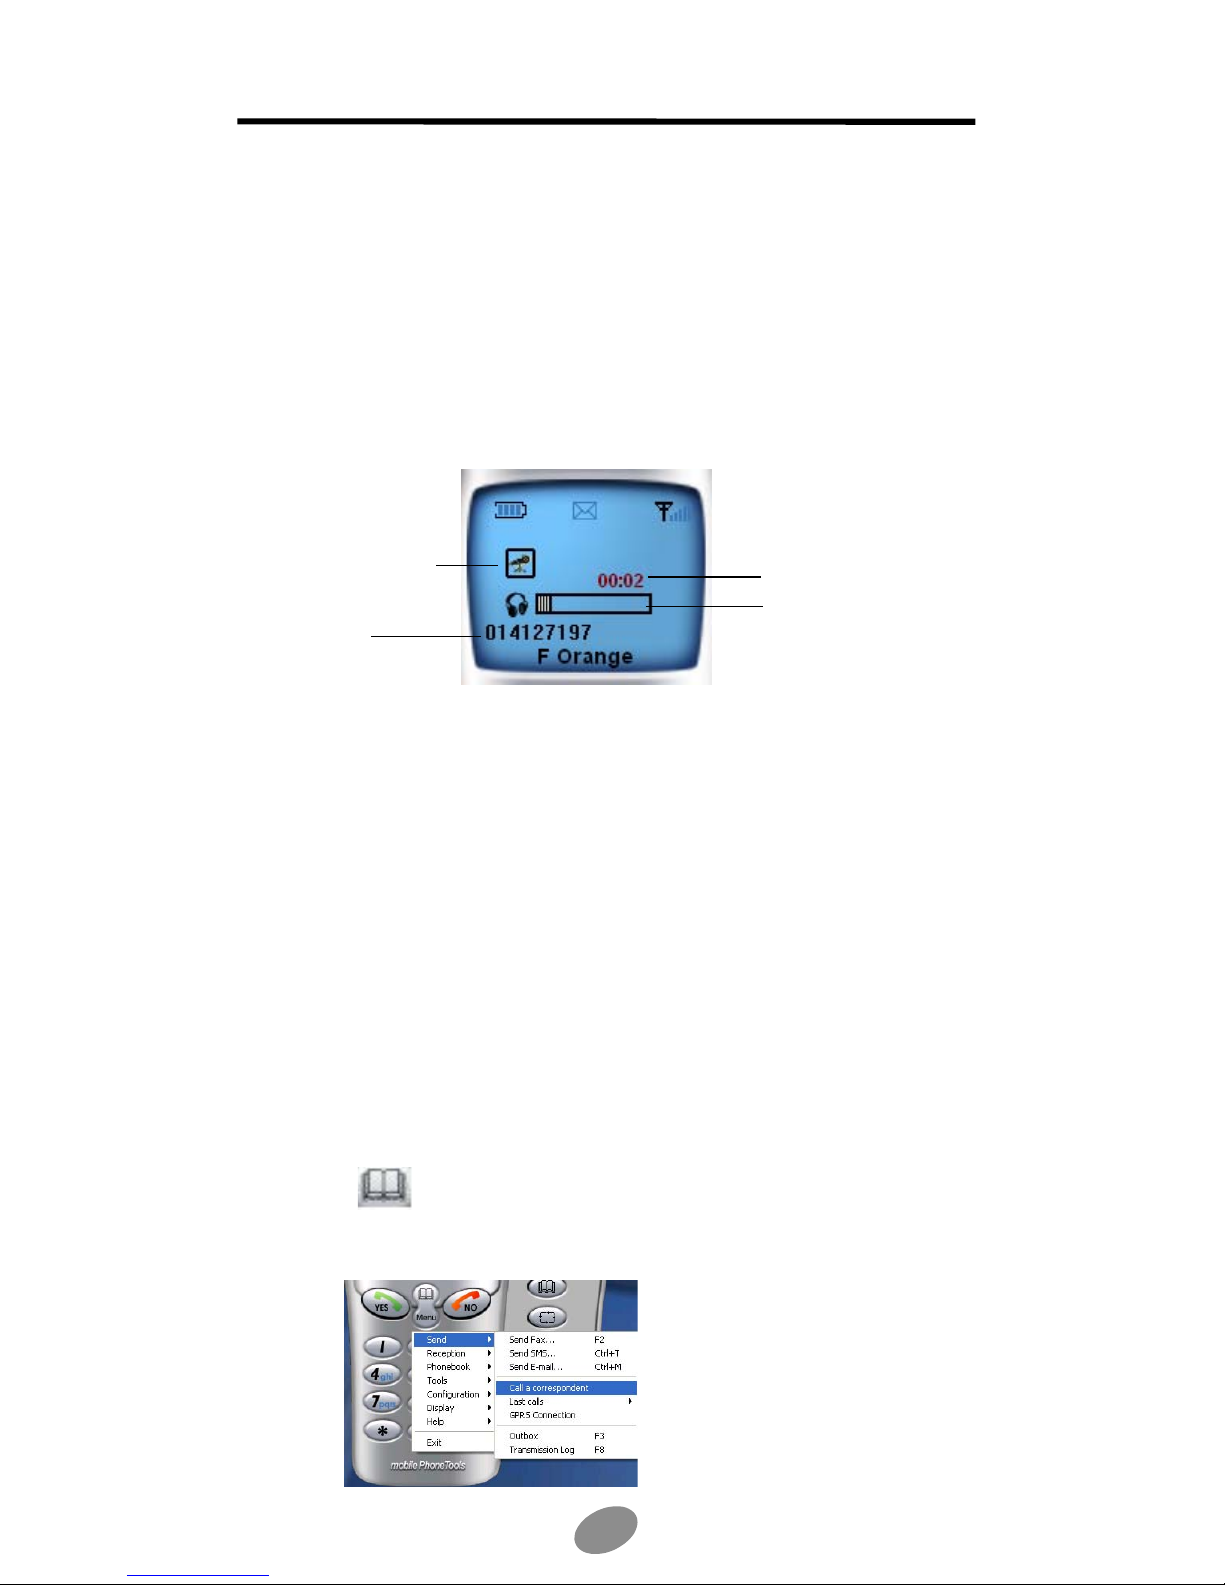
2. Press Enter on your keyboard or click YES on the application. The
application launches the call and during communication, the following
information appears (certain functions only appear if supported by your
phone):
Click here to mute the micro.
Click again to reactivate it.
The number you
are connected to
displays here.
Call duration displayed in
minutes and seconds.
Click and hold here to move
to the right or to the left to
change the volume.
3. To hang up, click the red NO button on the handset.
Note: when entering the phone number you want to call, you can also use the keyboard buttons and
arrows and use the red handset No button to correct or erase the number.
When calling a vocal server, use the main window buttons as you would with a telephone.
To call back a previously dialed number
1. In the mobile PhoneTools main window, click the green handset YES
button. A list showing the 10 last dialed numbers displays.
2. Scroll to the number you want to call back. The number displays and is
automatically dialed.
To call a correspondent from the Phonebook
1. In the mobile PhoneTools main window, click the Call a correspondent
icon
2. If you choose to click the Menu button, in the menu displayed, select Send
then Call a correspondent as shown below:
or click the Menu button.
12
Page 13

The Choice of a correspondent dialog box opens which contains the default
phonebook entries (see
3. Select a folder and locate your correspondent entry to select it.
4. Click OK. The dialog box closes and the telephone number of the
correspondent is automatically dialed in the mobile PhoneTools main
window. Proceed as you would with a normal phone.
To answer a phone call
When receiving a phone call, the blinking message Incoming Call displays on
mobile PhoneTools main window. Then, depending on your subscription and
operator, the number and the name (if saved in the phonebook) of the caller are
also displayed.
• To answer the incoming call, click the green handset YES button.
• To refuse the incoming call, click the red handset NO button.
• To ignore the incoming call, let it ring until the answering service of your
cell phone initiates.
To access the Inbox and the Outbox windows
1. In the mobile PhoneTools main window, click the Menu button.
2. In the menu displayed:
• Select Send then Outbox (or press F3 on your keyboard).
• Select Reception then Inbox (or press F4 on your keyboard).
Phonebook, page 23)
These windows also give you access to Pending emails, Finished
transmissions, and Failed transmissions (SMS, e-mails, faxes).
To view last calls
1. In the mobile PhoneTools main window, click the Menu button.
2. In the menu displayed, select Send then Last calls. A list showing the 10
numbers most recently dialed with mobile PhoneTools displays. You can
scroll to a number to call it back.
To view Logbooks
1. In the mobile PhoneTools main window, click the Menu button.
2. In the menu displayed:
• Select Send then Logbook (or press F8 on your keyboard) to view
Transmission Log Book.
• Select Reception then Logbook (or press F9 on your keyboard) to view
Reception logbook.
To view Modem Exchange
1. In the mobile PhoneTools main window, press F12 on your keyboard or
click the Menu button.
2. If you choose to click the Menu button, in the menu displayed, select
Display then Modem Exchange. The Modem Exchange window displays
the log files between the modem and mobile PhoneTools.
13
Page 14
GPRS connection
GPRS stands for General Packet Radio Service. It is an extension of the GSM
network that enables high speed packet mode transmission. GPRS works faster
than the Data/Fax option and allows you to send and receive emails and surf the
Internet at a faster rate. With the GPRS function, mobile PhoneTools allows you to
immediately connect your computer to the Internet wherever you are (if the GPRS
network is available).
Note: this function depends on your cell phone, your operator network and requires a GPRS
subscription with your cell phone operator.
To configure GPRS connection
1. In the mobile PhoneTools main window, click the GPRS icon from
the side panel, or click the Menu button.
2. In the menu displayed, select Setup then GPRS connections. The GPRS
Connections dialog box appears.
3. Double-click on the Add new GPRS Connection icon. The GPRS
connection wizard opens. It will guide you through to configure your
connection settings.
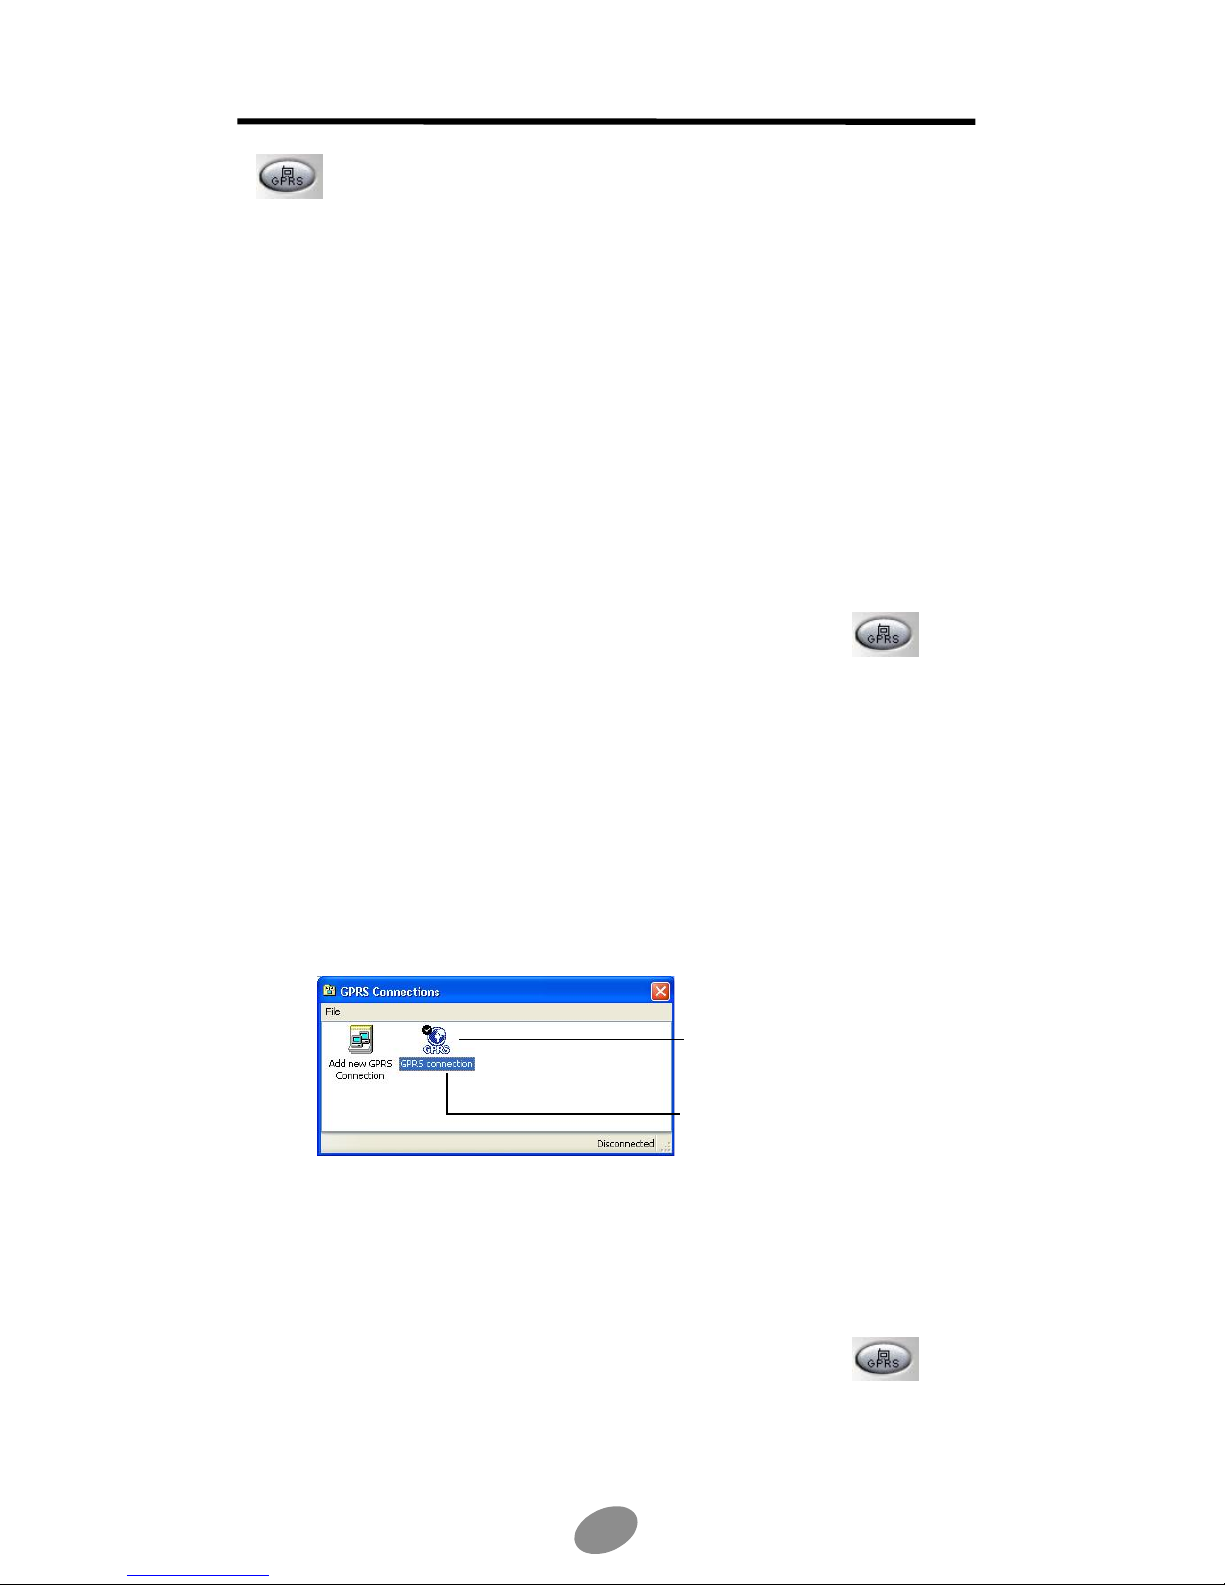
4. Once finished, a new icon appears in the GPRS Connections dialog box as
shown below:
The connection checked is the one
set as default connection.To set up a
connection as the default, select the
icon and from the File menu, select
Set as default connection.
The new icon placed here has the
name you typed during the wizard.
Here the connection has been
named GPRS connection.
5. Repeat the same steps for each connection you want to set up.
To launch a GPRS connection
1. In the mobile PhoneTools main window, click the GPRS icon from
the side panel, or click the Menu button.
2. In the menu displayed, select Send then GPRS connection. The GPRS
connection is automatically launched.
14
Page 15
SMS
1. Enter
The list of
With mobile PhoneTools you can read, send, reply, and transfer short messages to
various recipients simultaneously. Your messages are automatically retrieved
when you connect.
Note: You can send SMS messages that exceed 160 characters. mobile PhoneTools splits a message
that exceeds 160 characters into several messages and links them together. To do this, you must have
configured mobile PhoneTools (see page 9).
To access the Inbox/Outbox window and view messages
1. In the mobile PhoneTools main window, either click the SMS icon
from the side panelor click the Menu button.
2. In the menu displayed:
• To open the Outbox window, select Send then Outbox.
• To open the Inbox window, select Reception then Inbox.
3. Click the message to be viewed in detail. The selected message is
highlighted and its contents displayed in the detail view.
4. Double-click to open it in a new window.
To create and send an SMS
1. In the mobile PhoneTools main window, click the SMS icon on the side
panel
, or click the Menu button.
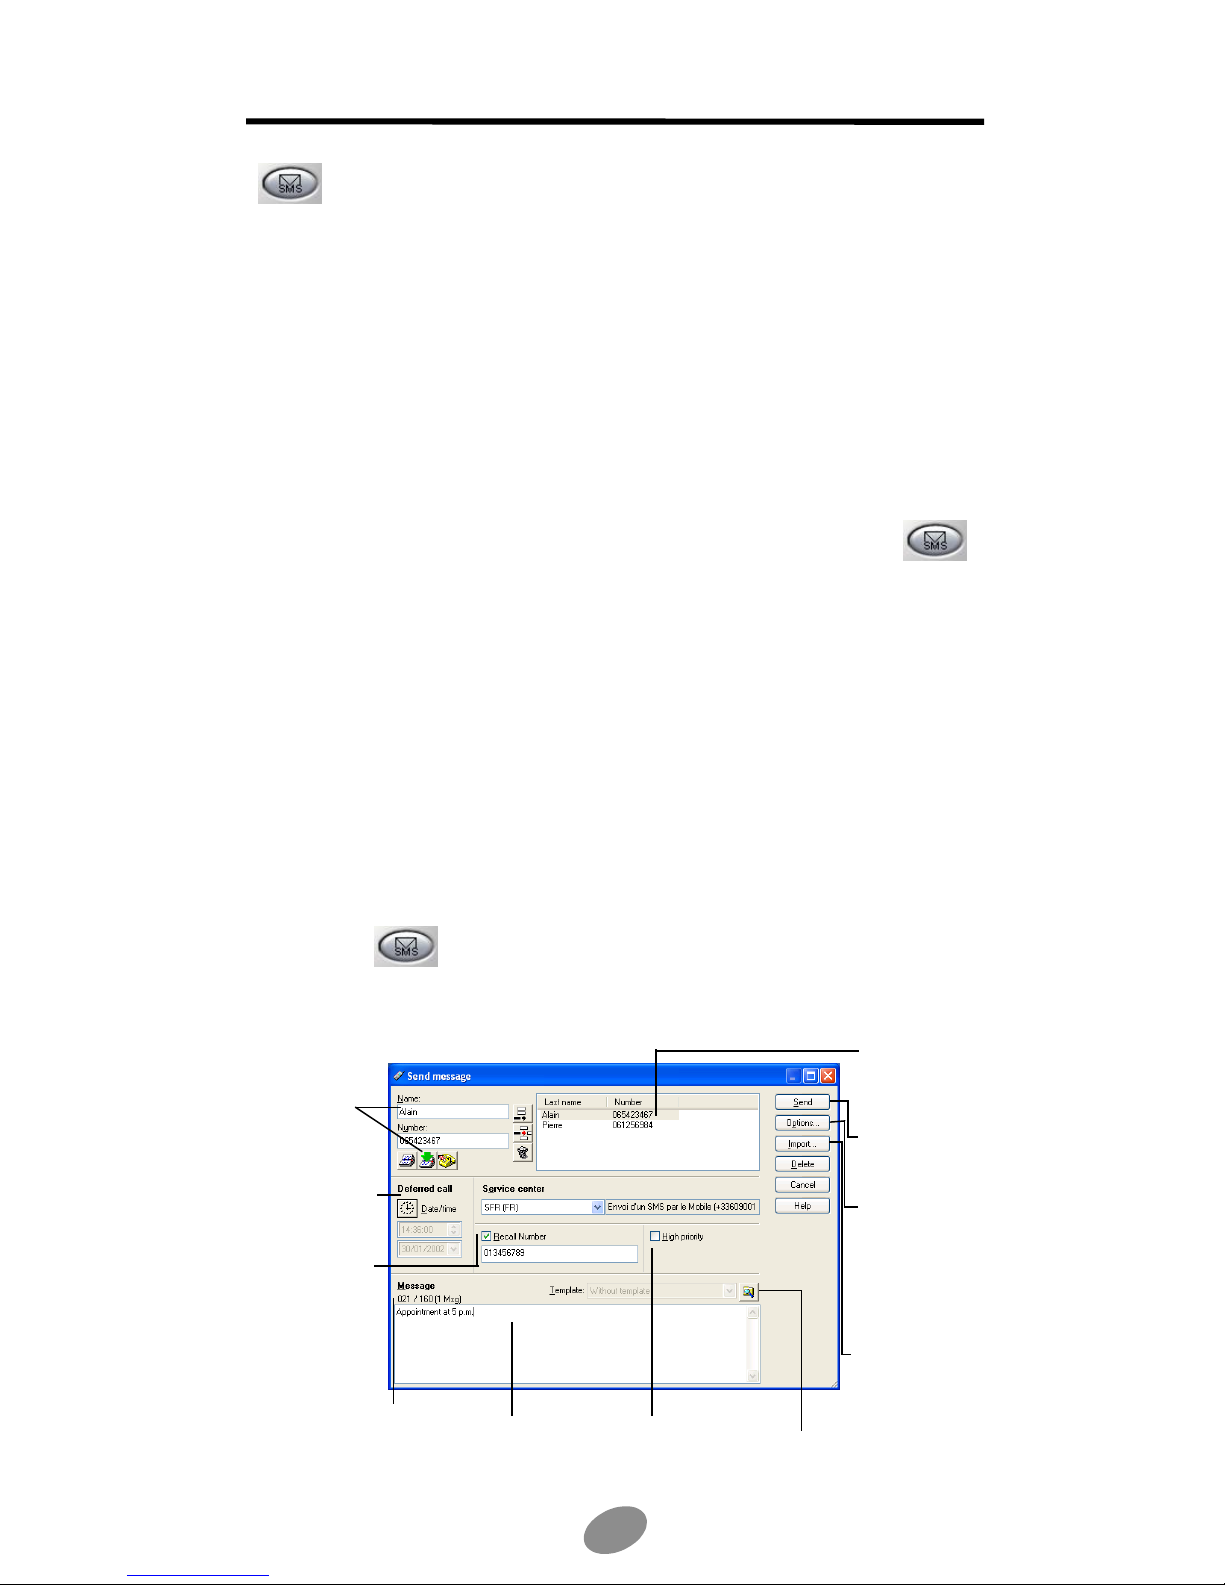
2. In the menu displayed, select Send then Send SMS. The Send message
dialog box appears:
your
recipient details
or click the
PhoneBook
icon to select it.
Click here if you
want to
postpone the
transmission of
your SMS.
Check here if
you want to
modify the recall
number and
type new
number below.
Check the number of
characters and messages
when creating a long
SMS.
2. Type your
message
here.
Check here if you wish the
recipient to receive your SMS
directly in his cell phone display.
Click here to locate
and select a template
for your SMS.
selected
recipients
appears here.
3. To send the
message, click
Send.
Click here to
Click here to
edit Options.
edit Options.
Those defined
Those defined
here will have
here will have
priority over
priority over
those specified
those specified
in your cellular.
in your cellular
Click here if you
want to Import a
file to send as an
SMS.
15
Page 16

To reply to a received SMS
1. To check for incoming SMS, from the mobile PhoneTools main window,
open the Inbox dialog by pressing F4 on your keyboard. Received
messages are automatically downloaded to the Inbox.
2. Select the message you want to reply to and click on it.
3. Click the Reply icon. The Send message dialog box appears with the
recipient fields filled in.
4. Type your message in the Message field and select the appropriate
options where needed.
5. Click Send.
To transfer a received SMS as an SMS, fax or e-mail
1. From the mobile PhoneTools main window, open the Inbox dialog box by
pressing F4 on your keyboard.
2. Select the SMS message your want to transfer and right-click on it. A menu
appears.
3. Scroll to the Forward option. A sub-menu appears.
4. Scroll to one of the following options:
• By SMS to have it transferred as an SMS.The Send message dialog box
appears including the text of the SMS.
• By Fax to have it transferred as a fax. The Send Fax dialog box appears
with the text copied in the Message text area.
• By E-mail to have it transferred as an e-mail. The Send e-mail dialog box
appears including the text of the SMS.
16
Page 17
E-mail
5
c
a
o
b
w
a
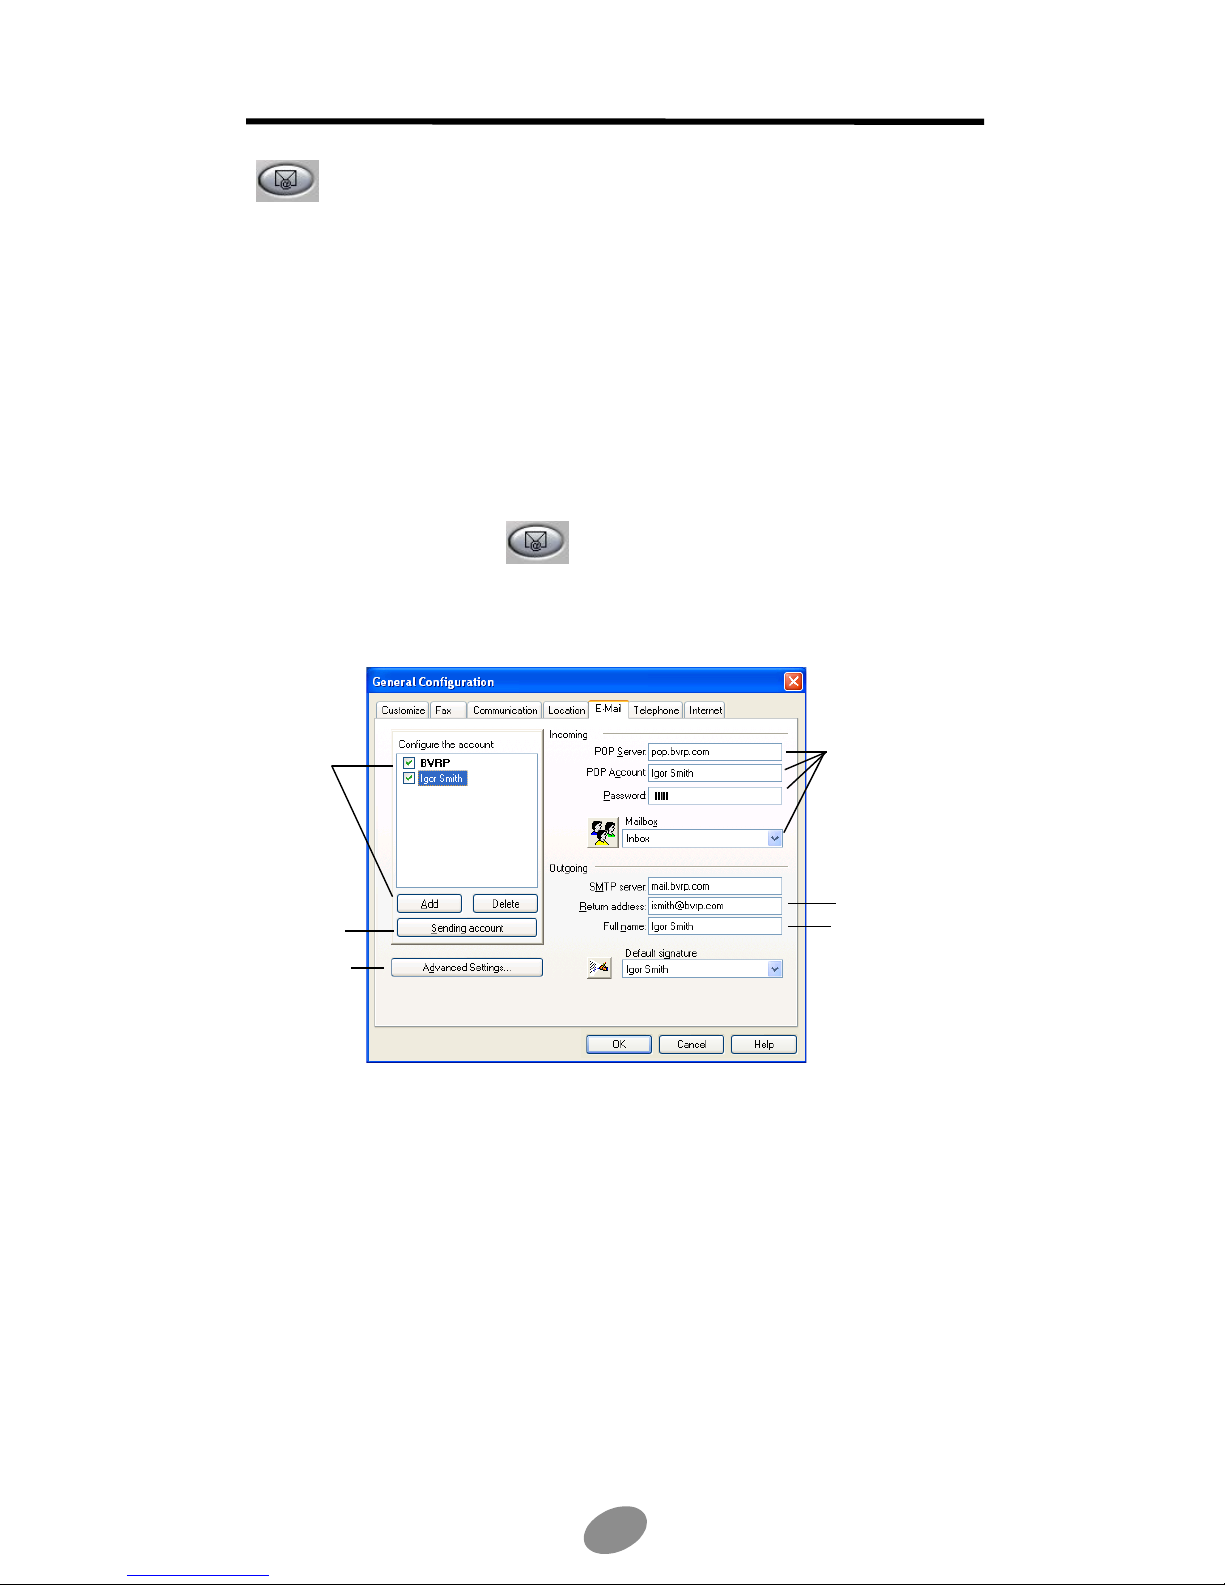
With mobile PhoneTools you can either send or receive e-mail messages. To do
so, the Data/fax option must be included in the subscription contract with your cell
phone operator.
mobile PhoneTools lets you manage multiple email accounts.
To configure your e-mail accounts
1. In the mobile PhoneTools main window, press F6 on your keyboard (or
click the e-mail icon
Configuration dialog box appears.
2. Click the E-Mail tab.
1. Click Add
and enter an
e-mail
account
name.
You can add
several
accounts. The
one highlighted
in bold is the
Sending
account.
. Click here to
onfigure
dditional
ptions such as
eing notified
hen receiving
n e-mail.
from the side panel).The General
2. These fields must
be filled in to enable
your ISP server to
identify your
account.
3. This field is
mandatory.
4.The Full name is
the name that will
appear in your
correspondents’
message list.
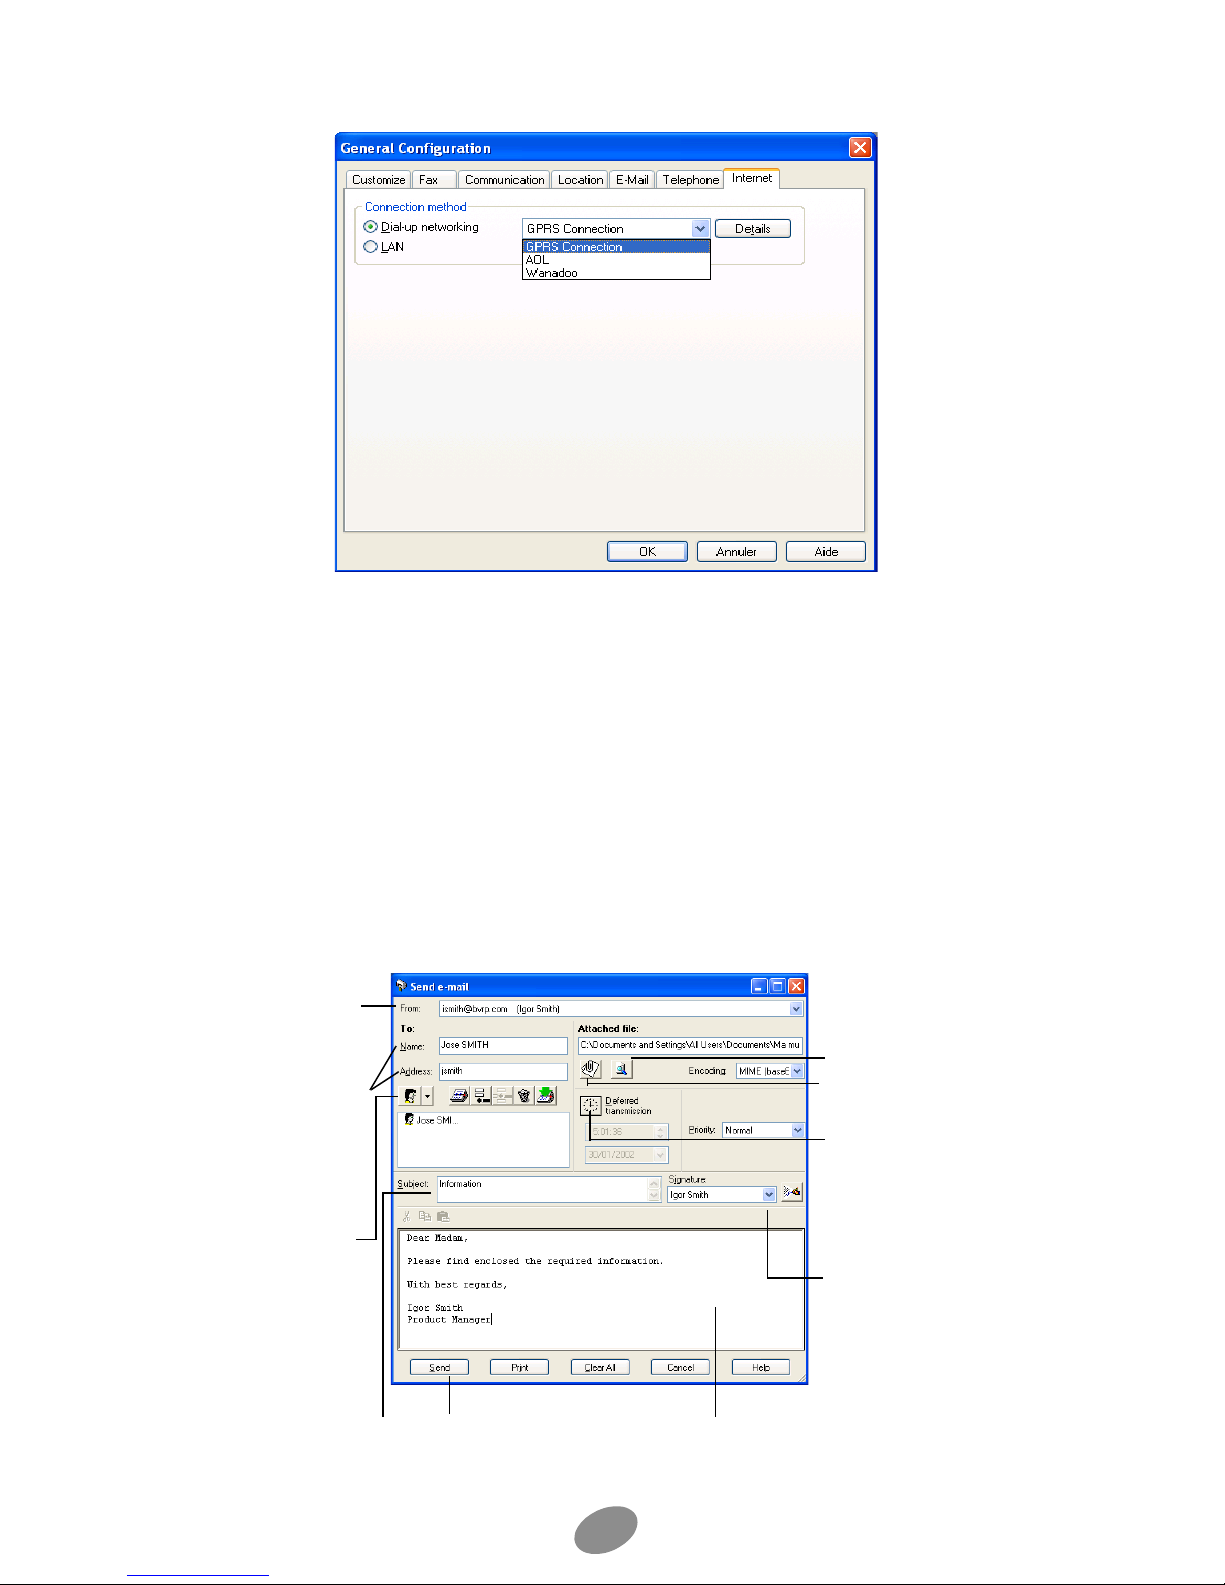
3. To select the Internet connection mode, click on the Internet tab. You can
then choose Dial-up networking (such as Wanadoo or AOL), or LAN as
your Internet connection method.
17
Page 18
4. When finished, click OK to close the window. You are now ready to send
e
and receive E-mail messages.
Note: for each e-mail account you create, you need to fill in the Incoming and Outgoing group
boxes.You will find the necessary information in the subscription contract with your Internet Service
Provider (ISP). If you are using a local network connection, contact your company’s network
administrator.
To send an e-mail
1. In the mobile PhoneTools main window, click the Menu button.
2. In the menu displayed, select Send then Send E-Mail.
The Send e-mail dialog box opens:
1. Display the From
scrolling list and
select the e-mail
account with which
you want to send
the message.
2. Enter your
recipient details or
click the
PhoneBook icon to
select it. Press
Enter on your
keyboard.
3. Select each
recipient status in
the scrolling list
here (direct, carbon
copy or blind
carbon copy).
Click here if you
wish to open the file
selection window
and select an
attached file.
Click here to view
the attached file.
If you wish to postpon
the transmission, click
here and choose a
date and a time of
transmission.
Create and choose
signatures here.
The chosen
signature will be
automatically
added to the end of
your e-mail.
4.Type a subject
here.
6. Click here to
send the e-mail
message.
5.Type your
message text here .
18
Page 19

To check for incoming e-mails
1. Click the Menu button in the mobile PhoneTools main window.
2. In the menu displayed, select Reception>E-mail reception. The mail
received is automatically placed in the Inbox folder of the tree view
(accessible by pressing F4 on your keyboard).
To transfer a received e-mail as an SMS, fax or e-mail
1. From the mobile PhoneTools main window, open the Inbox dialog box by
pressing F4 on your keyboard.
2. Select the e-mail message your want to transfer and right-click on it. A
menu appears.
3. Scroll to the Forward option. A sub-menu appears.
4. Scroll to one of the following options:
• By Fax to have it transferred as a fax. The Send Fax dialog box appears
with the text of the e-mail copied in the cover page.
• By E-mail to have it transferred as an e-mail. The Send e-mail dialog box
appears including the text of the e-mail.
• By SMS to have it transferred as an SMS. The Send message dialog box
appears including the e-mail text.
Note: your SMS messages can exceed 160 characters. mobile PhoneTools splits a message that
exceeds 160 characters into several messages and links them together.
To configure automatic reception
1. In the E-Mail tab from the General Setup dialog box (F6 keyboard key),
click Advanced Setup.
2. Click the General tab, and in the Reception group box, check Check for
new messages every (n) minutes and enter a number for n.
3. Click OK to close windows.
19
Page 20

Fax
mobile PhoneTools enables you to send and receive faxes. To do so, the Data/fax
option must be included in the subscription contract with your cell phone operator.
Fax configuration options
1. In the mobile PhoneTools main window, press F6 on your keyboard (or
click the fax icon
box appears.
2. Click the Fax tab. From this screen you can edit the default values of
mobile PhoneTools fax functions:
• Identifier: type in a name which will be used to “ sign ” documents sent
as faxes by the system. Some hardware systems accept alphanumeric
characters, others accept only digits; the entry for this line is adapted
accordingly.
• Include cover page: check the box to activate the fax transmission with
a cover page.
• Apply outgoing header: check the box to add an information line
containing the sender’s name, recipient’s name, date and time of
transmission as well as the current page number and the total number of
document pages to the heading of each page.
• High quality fax transmission: check the box to have all faxes sent in
fine mode (200 points per vertical inch).
• Print outgoing faxes: check the box to have all sent faxes automatically
printed (when mobile PhoneTools is opened).
from the side panel). The General Setup dialog
• Print received faxes: check the box to have all received faxes
automatically printed (when mobile PhoneTools is opened).
• Do not clear recipients list between transmissions: check the box to
save the list from one transmission to the next.
• Show fax wizard: check the box to activate the fax wizard whenever you
create a fax.
To send a fax
1. In the mobile PhoneTools main window, click the Menu button.
2. In the menu displayed, select Send then Send Fax. The Send Fax dialog
box appears:
20
Page 21
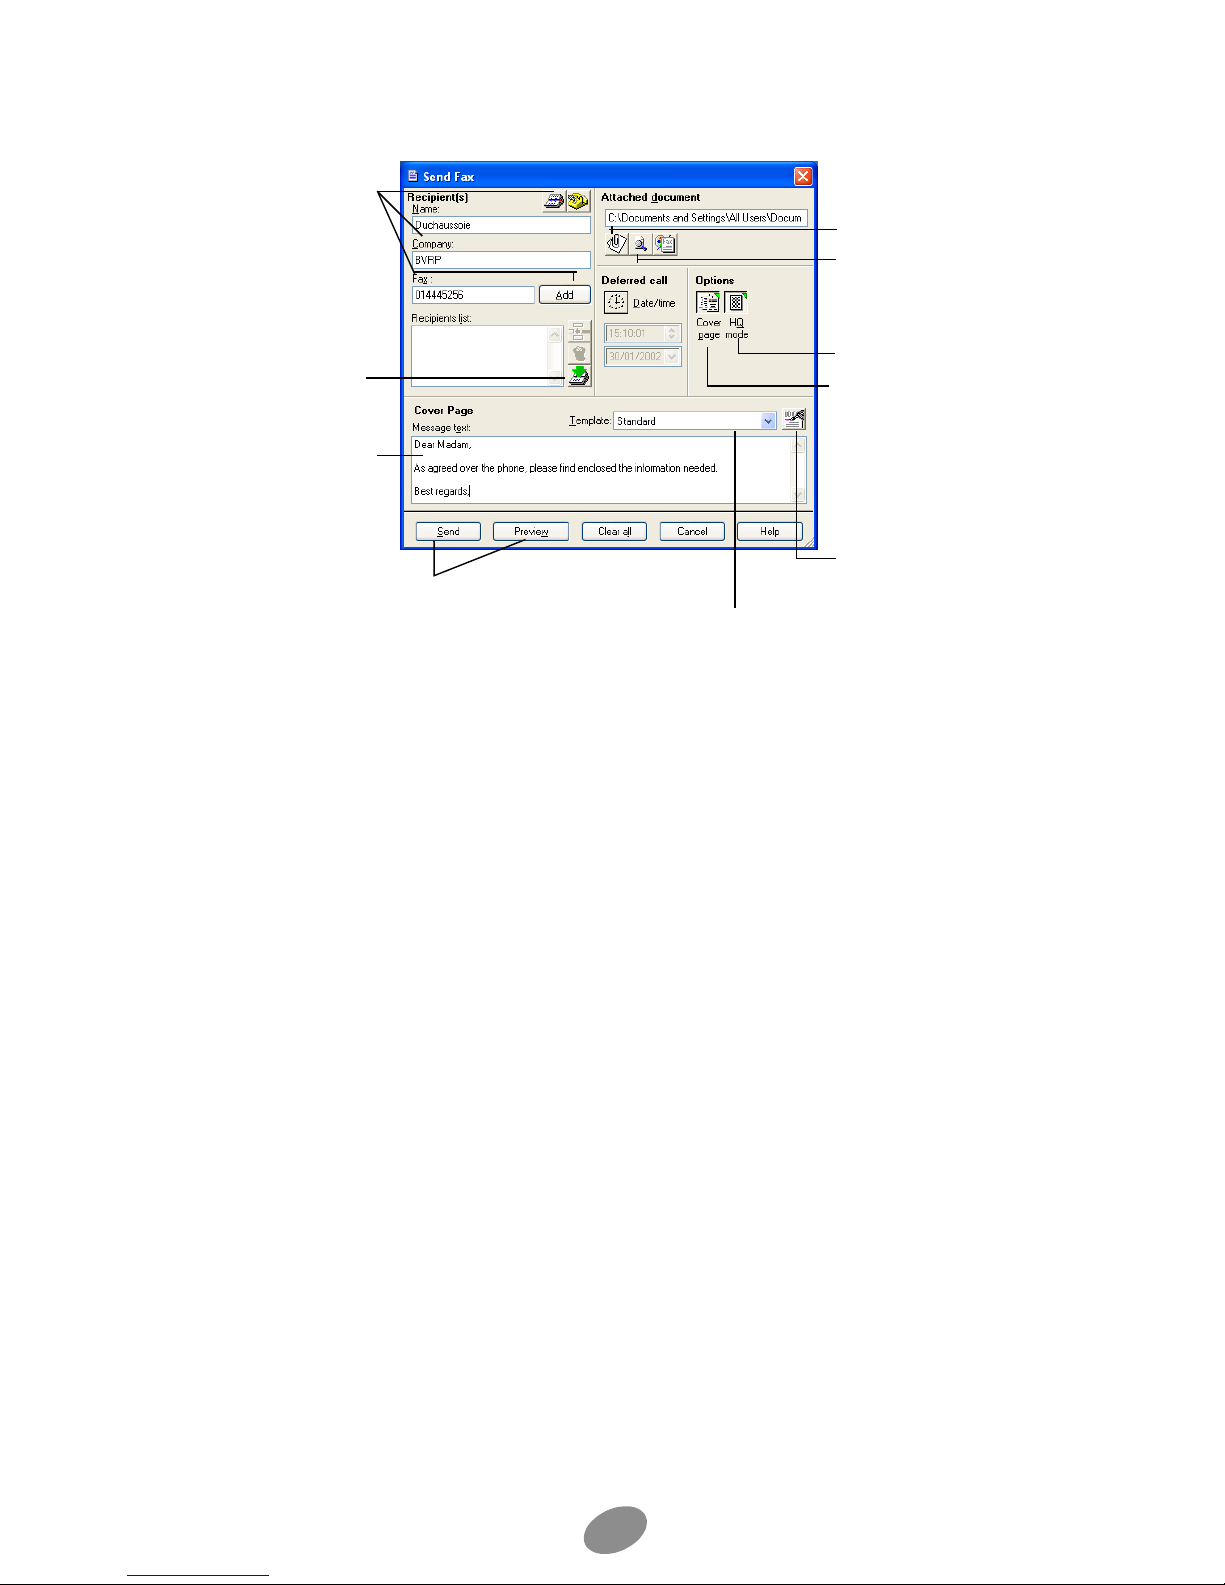
Note: by default, the fax wizard displays and guides you through the preparation of your fax. If you have
deactivated the Show fax wizard option, then the Send Fax window opens.
1. Enter your
recipient details
or click the
PhoneBook
icon to select it.
Then click Add.
Click here to
add the
recipient to the
Phonebook.
2.Type the
cover page text
here. This
Cover Page
data entry field
appears only
when the
Include cover
page option is
checked in the
General Setup
> Fax tab.
4. Click Preview to
view your fax then
Send to send it.
Choose templates here. The chosen
template will be automatically applied to
the fax you are preparing.
3.Click here to
open the file
selection window
and select the file to
send as a fax.
Click here to view
the file to send as a
fax.
Click here to send
the fax in high
resolution mode.
Click here to
include a cover
page.
Click here to
access the Logo
management.
If you wish to
postpone the
transmission, click
here and choose a
date and a time of
transmission.
To receive a fax
Faxes sent to you are automatically received by mobile PhoneTools. They are
placed in the Inbox folder (accessible by pressing F4 on your keyboard).
However, for fax reception to be possible, mobile PhoneTools must be opened.
To transfer a received fax as a fax or e-mail
1. From the mobile PhoneTools main window, open the Inbox dialog box by
pressing F4 on your keyboard.
2. Select the fax your want to transfer and right-click on it. A menu appears.
3. Scroll to the Forward option. A sub-menu appears.
4. Scroll to one of the following options:
• By Fax to have it transferred as a fax. The Send Fax dialog box appears
with the fax included as an attached file.
• By E-mail to have it transferred as an e-mail. The Send e-mail dialog box
appears including the fax as an attached file.
To use the fax wizard
The fax wizard automatically activates and helps you prepare and send faxes.
To do this, simply follow the instructions displayed on the screen.
21
Page 22

To activate the fax wizard by default:
1. In mobile PhoneTools main window, click the Menu button, then select
Setup>General Setup.
2. Click the Fax tab and check the Show fax wizard box.
3. Click OK.
To deactivate the fax wizard:
1. In the main window of mobile PhoneTools, click the Menu button, then
select Setup>General Setup.
2. Click the Fax tab, uncheck the Show fax wizard box and click OK; or
directly from the Send Fax wizard dialog box, check the box check here to
bypass this wizard and go directly to the send fax window, then click
Finish. The Send fax dialog box opens.
To receive a fax from a server
1. In the mobile PhoneTools main window, click the Menu button.
2. In the menu displayed, select Reception, then Automatic reception. The
Automatic dialog box opens.
3. Type in the server number from which you want to receive a fax.
4. Click OK. The received fax is placed in the Inbox dialog box (accessible by
pressing F4 on your keyboard).
22
Page 23
Phonebook
mobile PhoneTools enables you to:
• Manage your mobile PhoneTools, MS Outlook, or MS Outlook Express
phonebooks (import/export phonebooks; create, edit, delete entries...).
• Download your cell phone entries and synchronize them with those of
your mobile PhoneTools phonebook, with the possibility to restore them
at any time.
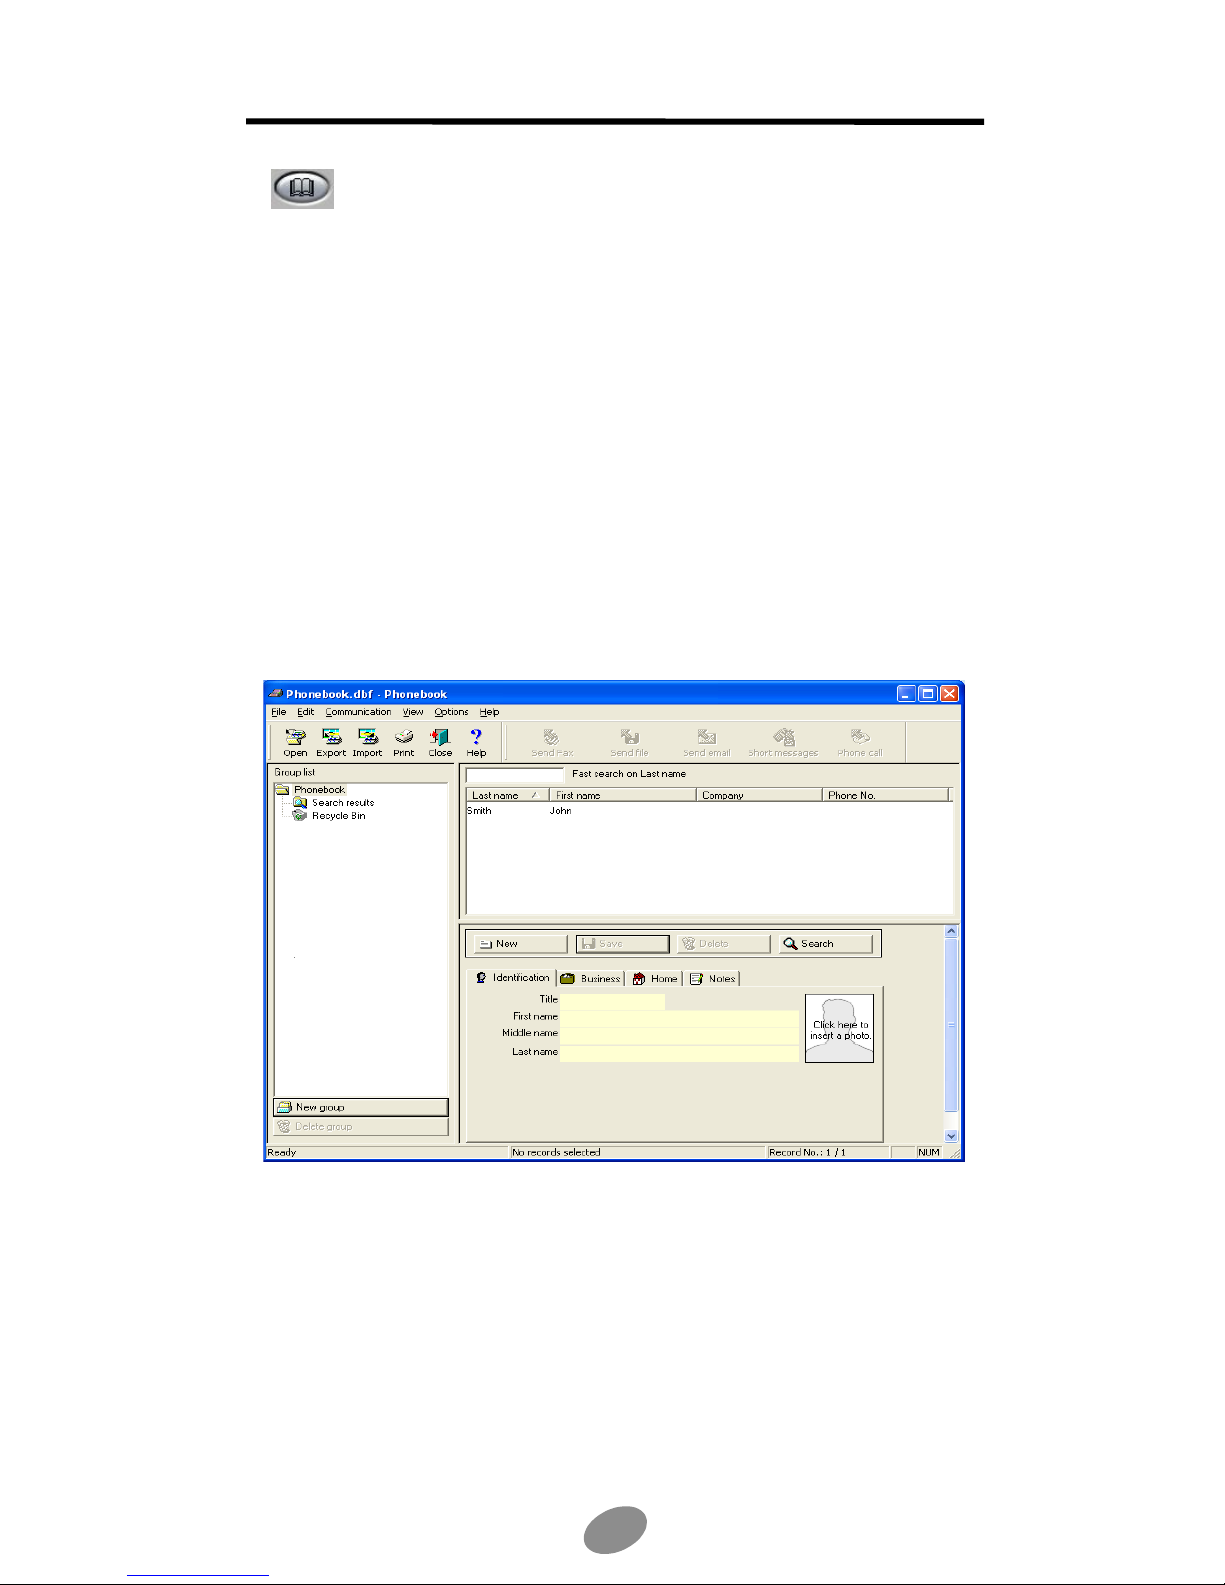
To open the default PhoneBook
1. In the mobile PhoneTools main window, you can either press F5 on your
keyboard or click the Menu button.
2. If you choose to click the Menu button, in the menu displayed, select
Phonebook and then General Phonebook.
The Phonebook dialog box appears:
To open a phonebook
1. In the mobile PhoneTools main window, press F5 on your keyboard. The
default Phonebook dialog box appears.
2. From the File menu, select Open. The Open Phonebook dialog appears.
3. Select the phonebook you want to open and click Open.
23
Page 24
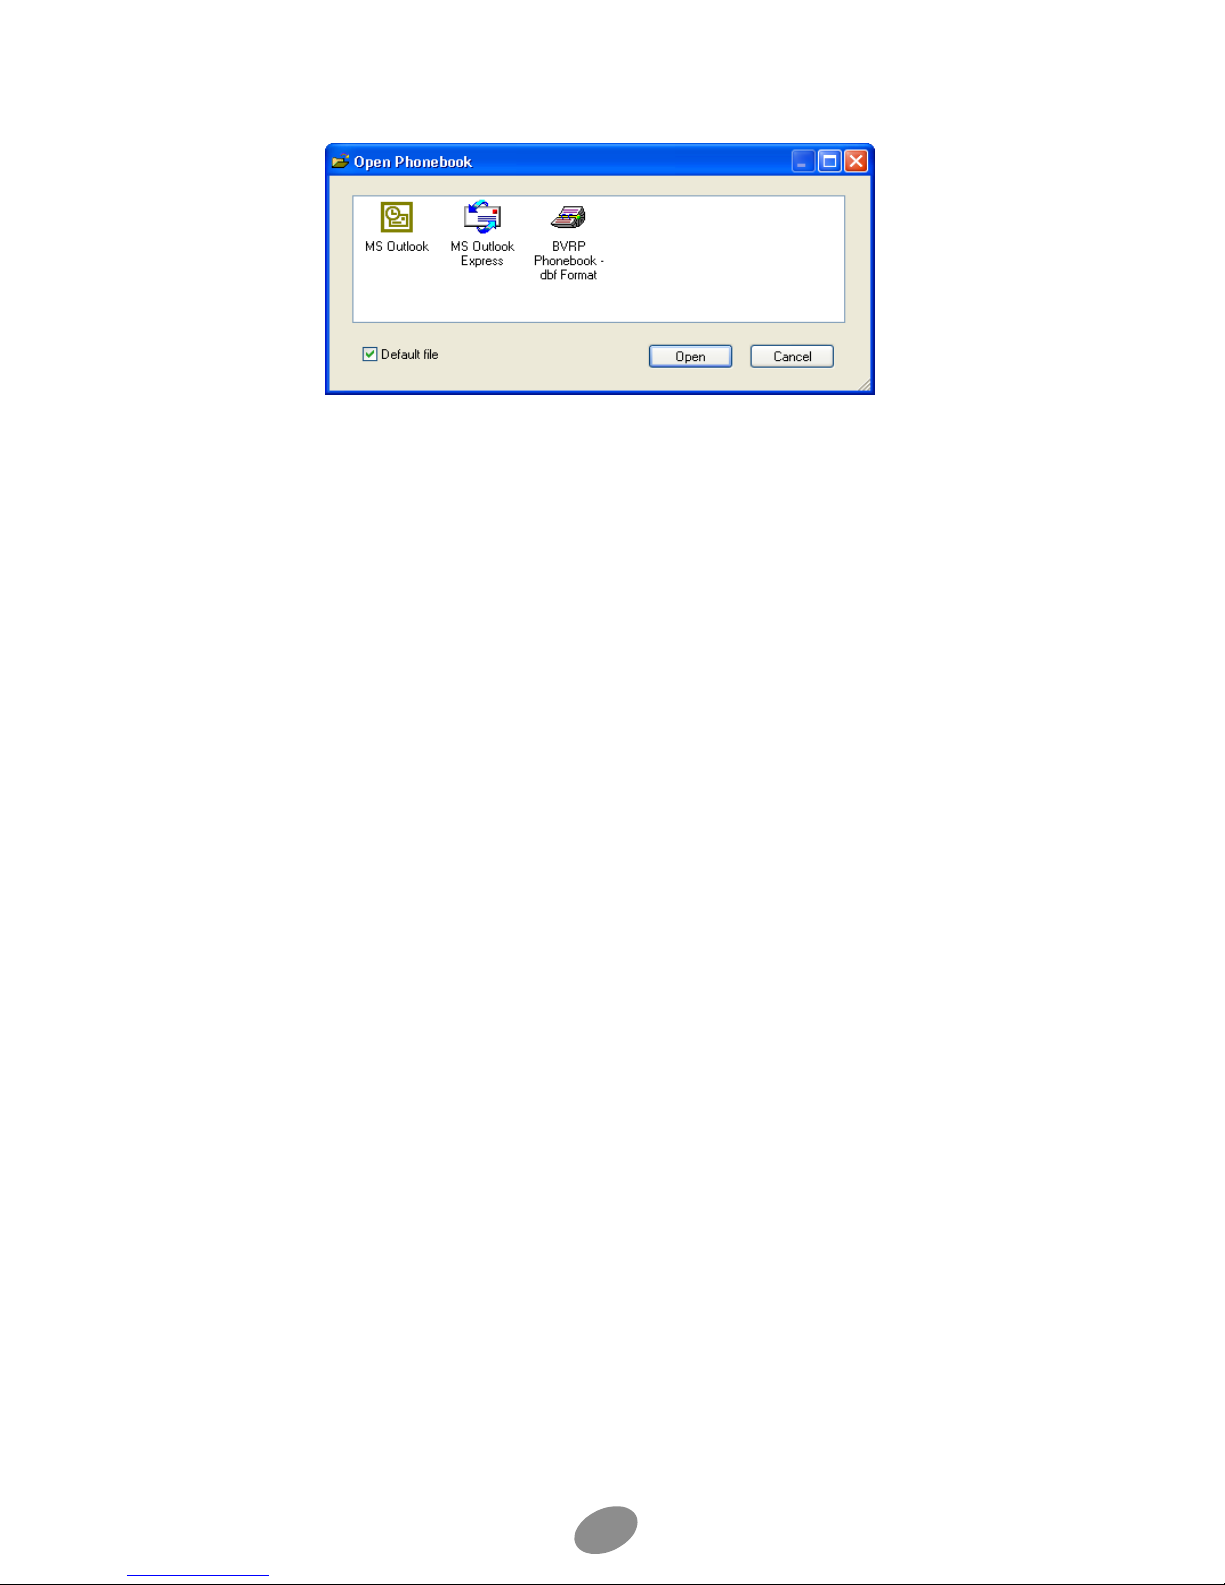
Note: the last opened phonebook becomes the default (It will be automatically opened whenever you
access the phonebook).
To create a phonebook
1. In the mobile PhoneTools main window, press F5 on your keyboard. The
default Phonebook dialog box appears.
2. From the File menu, select New. The New Phonebook dialog box appears.
3. Navigate to the drive and folder where you wish to place the phonebook.
4. Type a name for the new phonebook.
5. Select a format and type a description.
6. Click Save.
The new phonebook appears in the Group list tree view. You can now add
entries.
To import/export a phonebook
• Open the phonebook and from the File menu, select Export or Import. A
wizard displays to guide you through the export or import steps. Refer to
the written instructions as they show up and to the related online help for
detailed information.
To add an entry
1. Open the phonebook where you want to create an entry and click the New
button.
2. In the tabs (Identification, Business, Home, Notes), click in the data
entry fields and fill out at least one of the following fields: Last name, First
name, or Company.
3. Click Save.
To edit an entry
1. Open the phonebook and highlight the entry you want to edit.
2. In the lower part of the window, select the tab (Identification, Business,
Home, Notes) where you wish to make the modification.
3. Click in the field you want to edit and make the necessary modifications.
4. Click Save.
24
Page 25

To delete an entry
1. Open the phonebook and highlight the entry you want to delete.
2. Click the Delete button. A popup window prompts you to confirm deletion.
3. Click YES.
To synchronize both cell phone and mobile PhoneTools
phonebooks
1. Open the mobile PhoneTools phonebook and make sure your cell phone is
connected to your computer and turned on.
2. Check you have assigned a position to the numbers transferred to the cell
phone and you have specified which data is to be synchronized (see
Synchronization, page 26).
3. In the phonebook main window, click the Synchronize icon or from the
Cellphone menu, select Synchronize.
Note: for complete information about phonebook functionalities as restoring a deleted entry, inserting a
photograph, placing a phone call from the phonebook, searching for a correspondent and so on, refer to
the online help.
25
Page 26
Synchronization
With its synchronization function, mobile PhoneTools allows you to download your
cell phone entries to mobile PhoneTools and vise versa.
To access the Synchronization Settings
1. In the mobile PhoneTools main window, either click the Synchronization
icon from the side panel
2. In the menu displayed, select Setup then Synchronization Settings.
Depending on your telephone, mobile PhoneTools uses different synchronization
methods, which we will call Method 1 and Method 2.
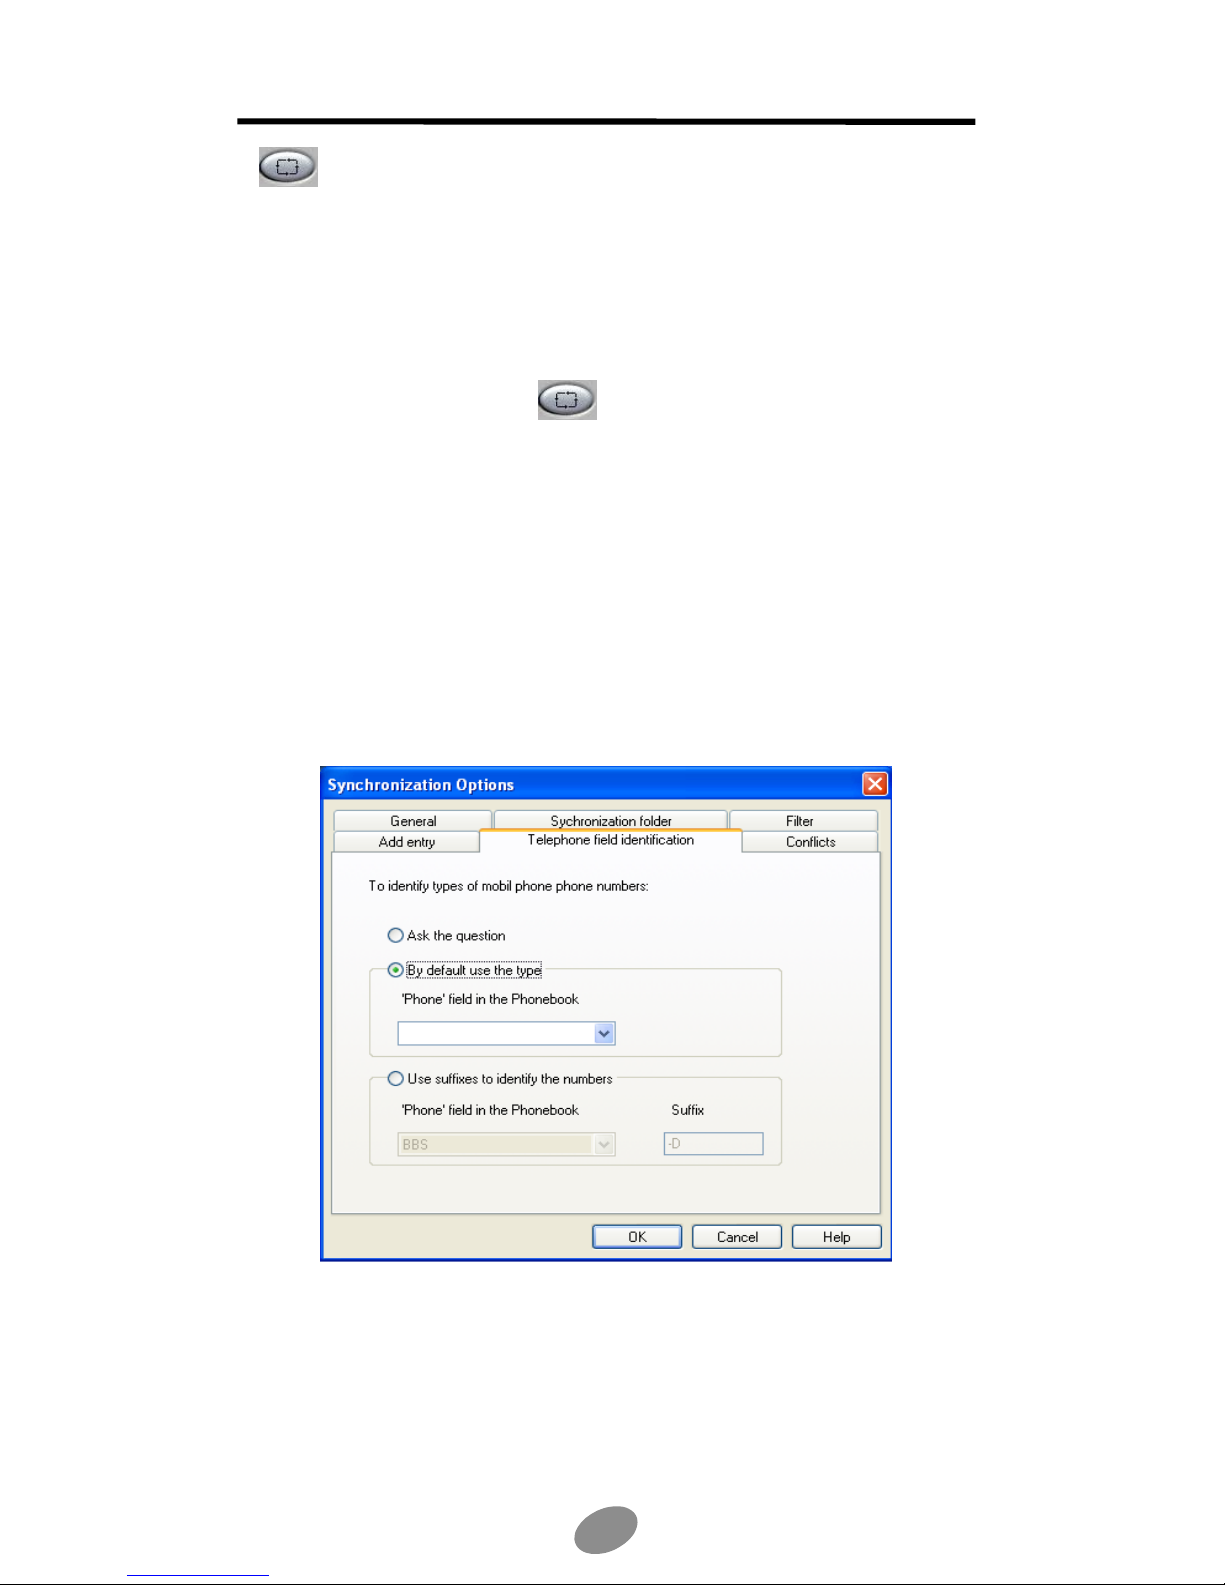
Note: To determine which method your cell phone uses, consult the Synchronization
Options (from Phonebook, choose CellPhone/Options from the toolbar) and check if
the telephone field identification tab exists, if this is the case, you are using method 1.
Synchronization options window for method 1:
, or click the Menu button.
This tab is used to identify numbers by default, suffixes, or to have the question
asked.
26
Page 27
Before synchronization, you must set the synchronization option tabs according to
the method you are using. For method 1 they are as follows:
• General: check Synchronize when connecting to have synchronization
automatically launched whenever you connect your cell phone to your
computer. Select how you want your entries to appear: according to their
last name or to their first name.
• Synchronization folder: navigate to the folder and select the phonebook
containing the entries to synchronize with your cell phone.
• Filter: check the individual entries to synchronize.
• Add entry: from the scrolling list select a location where you wish to store
new entries.
• Telephone field identification: choose which common format to apply
to the phone numbers of both phonebooks.
• Conflicts: indicate which phonebook should be given priority when an
entry is found to be different from the phonebook during synchronization.
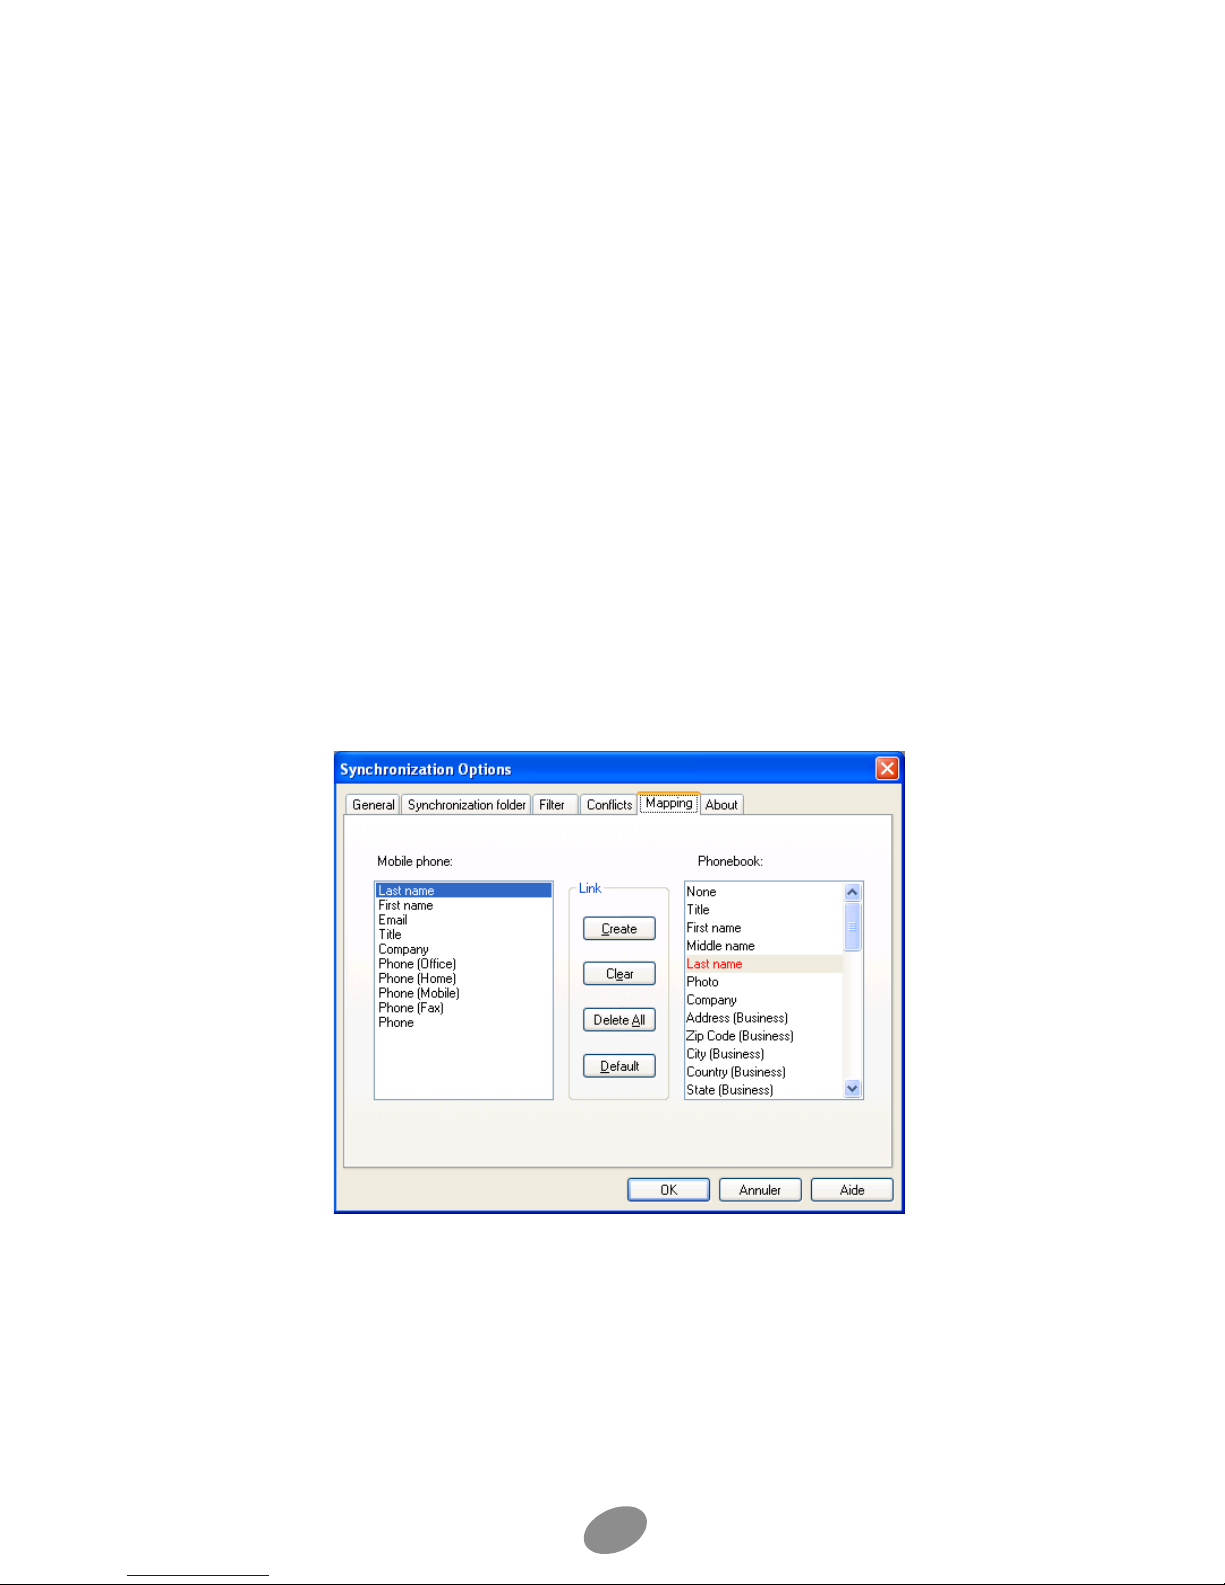
Synchronization options window for Method 2:
Before synchronization, you must set the synchronization option tabs according to
the method you are using. For method 2 they are as follows:
• General: check Synchronize when connecting to have synchronization
automatically launched whenever you connect your cell phone to your
computer. Select how you want your entries to appear: according to their
last name or to their first name.
27
Page 28

• Synchronization folder: navigate to the folder and select the phonebook
containing the entries to synchronize with your cell phone.
• Filter: check the individual entries to synchronize.
• Conflicts: indicate which phonebook (PC or cellular) should be given
priority, or choose to have the question asked.
• Mapping: correspond your cell phone information with that of your
phonebook.
• About: information regarding your cell phone.
Synchronizing your PC phonebook with your cell
phonebook
1. Once your computer and your cell phone are connected, double-click on
the mobile PhoneTools icon on your desktop.
2. Click the Menu button and in the menu displayed, select Phonebook then
General Phonebook.The Phonebook dialog box appears.
3. Click the Synchronize icon or select the Synchronize option from
the Cell phone menu, or from the mobile PhoneTools main window, select
Menu>Phonebook>Phone Directory>Synchronization.
With Method 1: When you click on Synchronize, a dialog box opens. On the
left, the PC phonebook is shown and on the right, the cellular phonebook. On the
left side, the files marked in green are the ones that have already been
synchronized with the cellular. The ones marked in red have not been
synchronized for one of the following reasons:
• they have been modified and will be synchronized the next time.
• the files not taken into account for synchronization (see filter tab) are still
displayed (Display menu «Entries to synchronize» is not selected).
28
Page 29
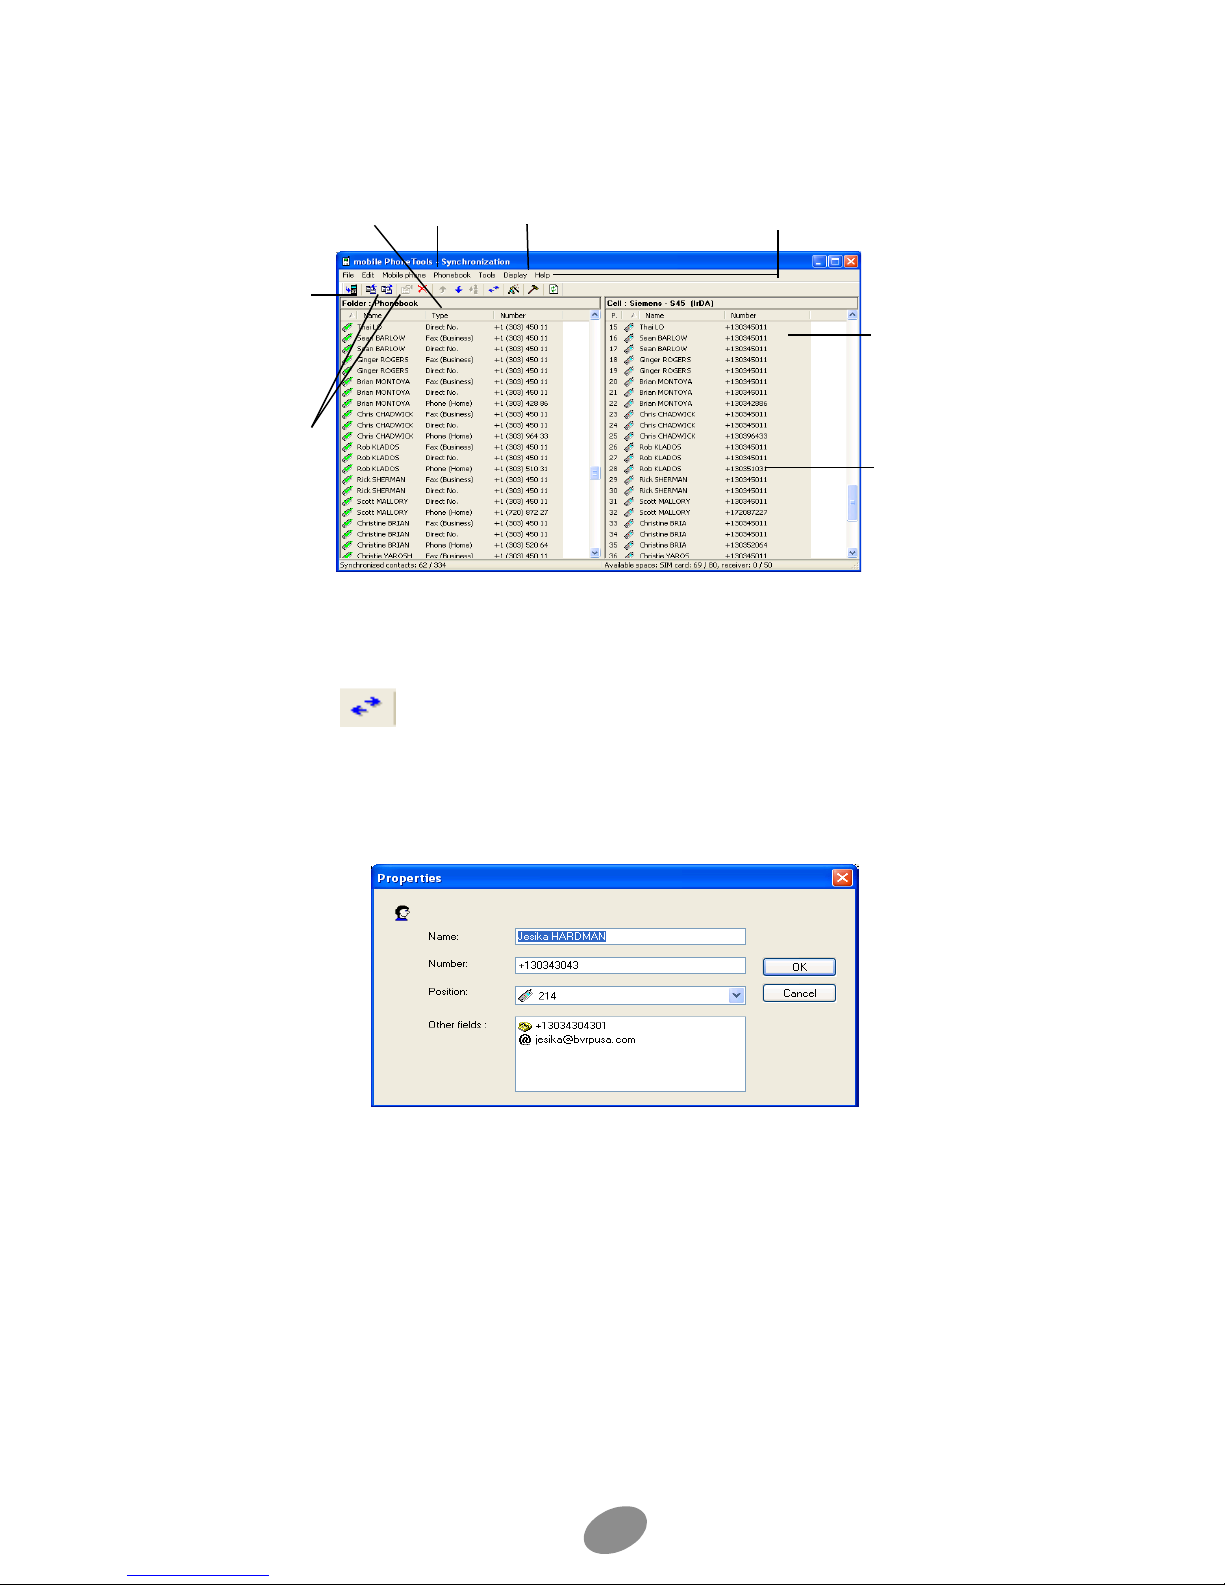
The synchronization of both phonebooks starts. Once finished the Synchronization
n
Click h
dialog box opens:
ere to
access
Options.
List of entries i
your cell phone
phonebook.
List of entries in your
mobile PhoneTools.
When a
modification
is made to
one entry,
click here to
launch
synchronization.
To delete an entry,
select it and click
here.
Click here to apply the
wizard to Back up /
Restore entries.
Select an
entry in one
of the lists
and click
here to have
it copied to
the other list.
Note: depending on the cell phone being used, the Synchronization dialog box might not open as the
synchronization is automatically completed.
Double-click
an entry to
see/edit its
properties:
Number and
Position.
Click on again to synchronize.
With Nokia 6210 or 7110 (using method 1):
In the right side, if you double click or right click on an entry, the following dialog
appears:
This window lets you manage multiple numbers for one cell phone file. A right click
in the «Other fields» section lets you add, modify, or delete information related to
the file.
With Method 2: Simply click on the Synchronize icon to start synchronization.
29
Page 30

To apply the Backup / Restore wizard
The wizard enables you to save, delete, or restore data from your cell phone.
1. Once your computer and your cell phone are connected, double-click on
the mobile PhoneTools icon on your desktop.
2. Click the Menu button and in the menu displayed, select Phonebook, then
Phone Directory > Backup/Restore. The Backup /Restore wizard dialog
box appears.
3. Follow the instructions and navigate through the windows by clicking the
Next and Previous buttons until completion.
30
Page 31
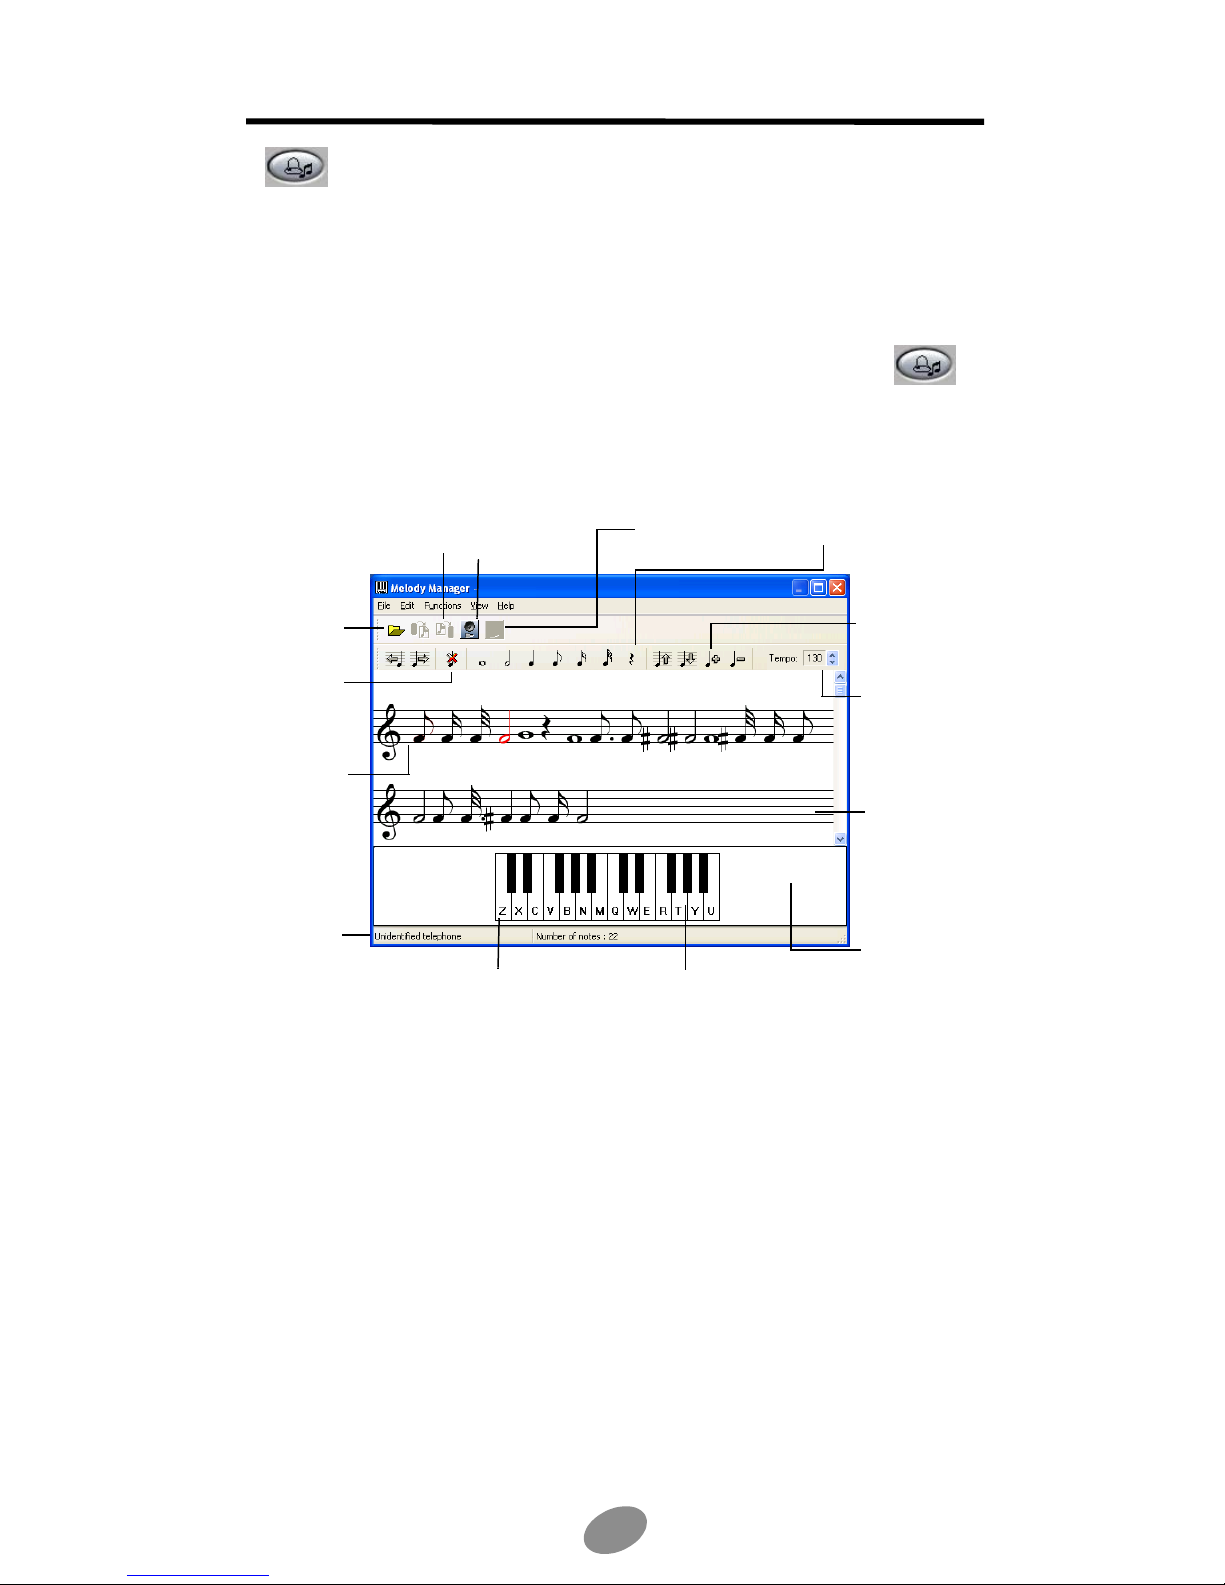
Click the notes and
t
e
Click h
Click h
the
Click here to
Melodies editor
mobile PhoneTools allows you to compose your own melodies and use them as
ring tones for your cell phone.
To access the Melodies editor
1. In the mobile PhoneTools main window, either click the Melody
icon from the side panel, or click the Menu button.
2. In the menu displayed, select Tools then Melodies editor. The Melody
Manager dialog box appears:
ere to
save a melody
in your cell
phone.
Click here to
open a melody
file from your
cell phone.
Select a note
and click here to
delete it.
Music sheet
where selected
notes are
displayed.
The status bar
here displays
information
about the
connection,
cellular type,
and number of
notes.
play the current
melody on your
PC.
To insert notes, you
can also use the
keyboard.
To view here the chain melody instead
of the keyboard, select View the chain
melody from the View menu.
To obtain a ring tone for your phone, you can do one of three things: directly
ere to play
current melody on y our
cell phone.
icons to be inserted in th
music sheet.
Click here to
increase and
decrease the
length of a
selected note.
Click the up and
down arrows to
set the tempo
(increase or
decrease the
melody speed)
The music sheet
extends as
notes are
inserted.
To display the
keyboard,
select View
keyboard from
the View menu.
compose your melody, open a melody file, or open a melody text.
res
To compose a melody
1. From the File menu, select the New score option. A music sheet appears.
2. From the Edit menu, select the notes to be inserted or directly click the
notes icons. They appear in the music sheet.
3. To play the melody you just created, select one of the two options from the
Functions menu: Listen to the melody on the sound card or Listen to
the melody on the telephone (function available depending on your cell
phone’s capacities, which you can consult on our website: http://
www.bvrp.com\home_mobile_phonetools).
31
Page 32

4. When satisfied with the melody composed, select the Save a melody file
option from the File menu to save it on your PC or select the Save a
melody on the telephone option from the File menu to save it on your cell
phone. The Save a melody file dialog box opens.
5. Navigate to the drive and select the directory in which the music file is to be
saved.
6. Enter a name for the file containing your new melody and click Save. The
music file is saved in the MIDI format (.mid). You can select another
format in the Type scrolling list.
To open and edit a melody file
1. From the File menu, select the Open melody file option to open a melody
stored in your PC or select the Open a telephone melody option to open
a melody stored in your cell phone. The Open melody file dialog box
appears.
2. Navigate to the drive and directory where the music file is located and
select it.
3. Click Open. The melody notes display in the music sheet.
4. Edit the melody the same way as if you were creating a melody and when
finished, save it as described above.
Note: Many Internet web sites offer examples of melody texts. They can be found by
entering words like «ring+cell phone», or «ring tones», etc.
To open a melody Text
A melody text is the translation of the melody into letters and figures.
1. From the File menu, select the Open a melody Text option. The Melody
Texts dialog box appears.
2. In the Format group box, select a format and refer to the corresponding
explanations and example displayed in the right side of the dialog box.
3. In the String: data entry field of the Import information group box, enter a
melody in the chosen format.
Note: Many Internet web sites offer examples of melody texts. They can be found by
entering words like «ring+cell phone», or «ring tones», etc.
4. In the Tempo section, set a tempo if the chosen melody format allows it.
5. Click OK. The text is automatically translated into notes and transferred to
a new Melody Manager music sheet.
6. To edit and save the text, proceed as if you were creating a melody and
when finished, save it as described above.
32
Page 33

To apply a melody as a ring tone for your PC
1. In the mobile PhoneTools main window, you can either press F6 on your
keyboard or click the Menu button.
2. If you choose to click the Menu button, in the menu displayed, select Setup
and then General Setup. The General Setup dialog box appears.
3. Click the Telephone tab.
4. Select the File radio button and click to navigate to the directory and
select the music file you wish to apply as a ring tone.
5. Click OK.
Once you have the desired ring tone saved in your phone, you can do one of three
things:
1. Listen to the ring tone on your PC. This is done by clicking on the icon
«listen to melody on sound card»
above).
2. If your phone allows it, you can listen to the ring tone on your phone.This is
done by clicking on the icon «listen to melody on phone»
Melody editor window above).
3. Download the ring tone to your phone, and save it as described above.
(see the Melody editor window
(see
33
Page 34

Additional information
Keyboard shortcuts
F1 Online help
F3 Outbox
F4 Inbox
F5 Phonebook
F6 General Setup
F8 Transmission logbook
F9 Reception logbook
Technical assistance
Technical assistance information for mobile PhoneTools is available on our
website: http://www.bvrp.com/support.htm
You can also contact our technical assistance at the following address:
www.bvrp.com/pagemail.htm, or by phone at +33 (0)1 41 83 44 66 , from 9am to
6pm, Monday through Friday (except holidays).
Guarantee
This product is guaranteed for a 3-month period from date of purchase. A
guarantee extension service (which becomes available after registration) can be
requested by contacting our technical assistance and requires an online
subscription.
Customer service
To obtain information on our products, order updated versions or obtain a list of our
distributors and resellers, contact us at the following e-mail address:
[email protected]
BVRP Software website
Frequently visit our website to obtain latest information on products and available
upgrades: http://www.bvrp.com
Copyright and trademarks
© 2001-02 BVRP Software. All rights reserved.
mobile PhoneTools is a registered trademark of BVRP Software S.A.
All product names mentioned in this document are trademarks or registered
trademarks of their respective owners.
34
Page 35

www.bvrp.com
35
 Loading...