

Page 1
Broadcastvision Entertainment
Toll Free: 888-330-4BVE(4283) www.broadcastvision.com
Programming
18.5”
18.5”
Widescreen
Widescreen Controller
Manual for
LCD – Part
Broadcastvision Entertainment
Number:
– Part
Number: AXSPVSC-BVE
AXS19HD2G
AXS19HD2G
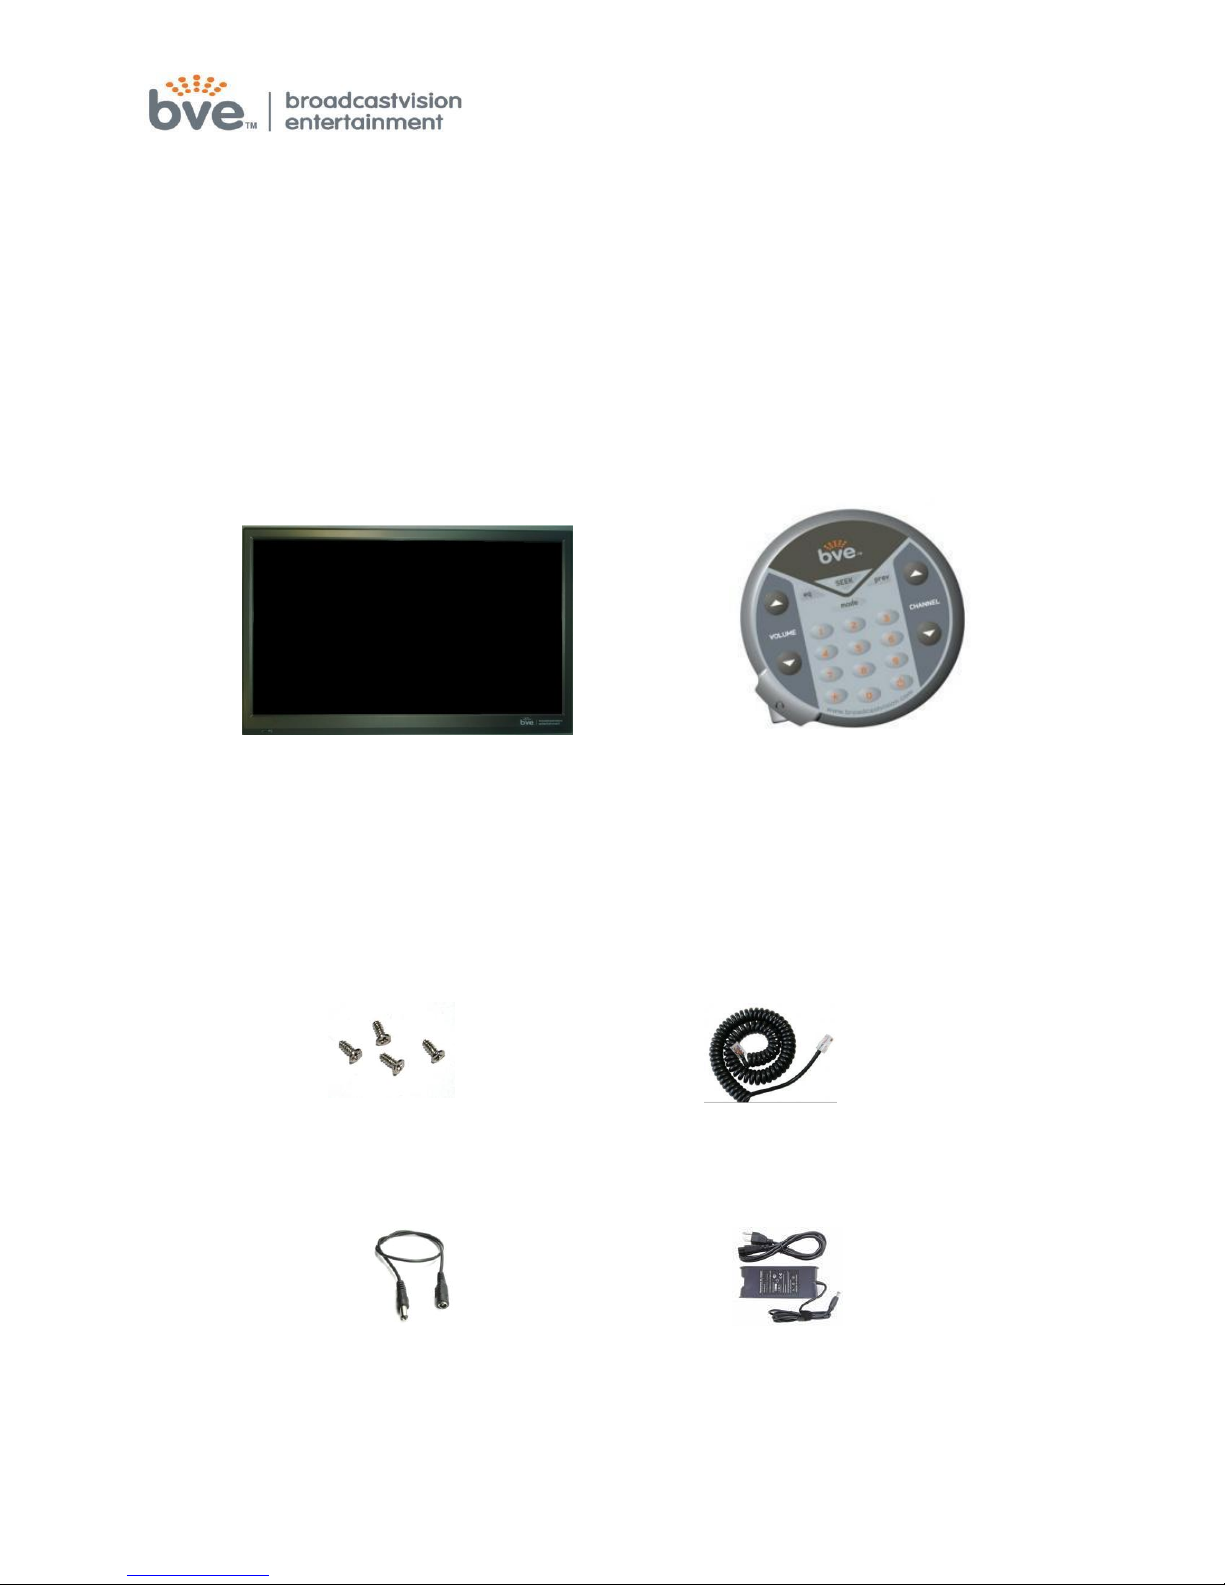
Other parts and
accessories
included in this
AXSPVSC-BVE
package:
TV
Mounting
Stand Patch Cord TV Power Adapter
Screws AXS20SC –
Controller/Screen
Cable
Page 2

Broadcastvision Entertainment
Toll Free: 888-330-4BVE(4283) www.broadcastvision.com
READ FIRST
Please
Controller
Your
note the
Do not plug the
TV will not
following before installing your personal screen
controller
program
TV.
Before connecting
the
When the screen is
corner. A
GREEN
light means that the
connected, always turn the LCD on and off using the power button on the
controller.
Factory
controller
Default
will be
shipped
into the
using the
controller
powered
Settings
with the
screen
wireless
to the
until the
remote if the
screen,
be sure the LCD is powered off.
off, a RED light will
screen
following
is
default settings.
channels
controller
appear
at the
currently
and controller.
are programmed. The
is
connected
bottom
on. Once the
For
programming
right hand
controller
to the
is
and
de-programming
Programmed
controller
to work with your TV. If for some reason it is not
TV, please see pages 19-20 for
Source
button Inactive – The source button on the
inactive. An active source button will allow your
source
options,
Auto Off Feature – To
turn off after 15
headphone inserted
instructions,
to
communicate
for
example:
conserve energy
minutes
in the
please see pages 19-20.
with TV – We have
programming
DVD
players,
if no
controller buttons
headphone
in your
jack.
instructions.
MP3
players,
facility,
already programmed
communicating
the
with the
controller
members
is
programmed
as
to choose other AV
Ipod’s, etc.
the screen will automatically
are pressed and if there is no
Page 3

Summary
Screen Features
1
Safety Information
2-3
Remote Features
4
Picture Menu
5-6
Sound Menu
7-8
Time Menu
8
Setup Menu
9-10
Lock Menu
11
Channel
Menu
12
QUICK SETUP GUIDE &
CONTROLLER PROGRAMMING
FEATURES
13-16
Table of Contents
Broadcastvision Entertainment
Toll Free: 888-330-4BVE(4283) www.broadcastvision.com
Page 4
Broadcastvision Entertainment
Toll Free: 888-330-4BVE(4283) www.broadcastvision.com
Screen Features
Broadcastvision Entertainment
Screen Size
18.5” HDMI Widescreen
(16.9 Aspect Ratio)
Brightness
500 cd/m2
Image Contrast Ratio
700:1
Viewing Angle
160/150
Tuner
NTSC, ATSC
Thank you for your
purchase
of the
Broadcastvision
Personal Viewing Screen. This
product has been designed
ensuring
provide years of
maximum performance
high-quality
specifically
for use in the health and fitness industry
and longevity. With proper care, this product will
entertainment.
Additional Features for Broadcastvision Entertainment Personal LCD Screens:
LCD Panel: A Grade HD Widescreen Format
Vesa Pattern: 100 – Adaptable to 75 with adapter plate
Closed Captioning
Quick Change Headphone Option with Extra Durable Barrel Style
Headphone Jack
Commercial Grade and designed for the Fitness Industry with a protective
shield over the LCD panel
Slim, sleek design
Inputs:
o HDMI
o Analog Coax
o Digital Coax
o Composite Input
o Component Video Input
Page 5
Broadcastvision Entertainment
Toll Free: 888-330-4BVE(4283) www.broadcastvision.com
Before
You Begin
Important Safety Information
Read all instructions for installation &
maintenance of this product before
installing and using it. Follow all
IMPORTANT!
cautionary labeling on the product.
In order to prevent personal injury or product damage, do not
expose this product to rain or excessive moisture.
Only use the power adapter supplied with this product! Changes in
product design throughout the life cycle of this product may
necessitate a change in power adapters even if the product appears
identical. Use of non-approved power adapters may result in
personal injury or damage to the product. Ensure the power adapter
is plugged into a properly installed, grounded power outlet. Do not
alter any electrical cords provided with this product.
This product should be installed using a manufacturer-approved
mounting method ONLY. Use of unapproved mounting brackets
may damage the product and void the warranty.
Route all cables as per the instructions for your particular mounting
situation. Ensure that the cables are routed in a manner as to avoid
being damaged by personnel or equipment.
Ensure the product has adequate ventilation so as not to
overheat the product. Do not place anything on the product
that may impede proper air circulation and thus damage the
product.
Avoid extreme temperatures. Locate the equipment away from
sources of heat, such as radiators and heat registers.
Page 6

Broadcastvision Entertainment
Toll Free: 888-330-4BVE(4283) www.broadcastvision.com
Avoid dropping anything on or spilling anything inside the product.
Fluids will damage the product.
Do not attempt to disassemble or otherwise service the product.
There are no user-serviceable parts inside.
Do not allow foreign objects to enter the product. This may
cause personal injury and/or cause damage to the product.
The number of countries supporting the DVB-T Broadcasting
standards is subject to change as the standard is adopted by an
increasing number of countries. If this product is to be used outside
Europe, please check the broadcast standards in your area. If further
information is required, please contact your Broadcastvision
Entertainment representative. Information is also available at the
Advanced Television Standards Committee website: www.atsc.org.
WARNING!
Any changes or modifications made to this
product not approved by Broadcastvision
Entertainment could void the user the
authority to operate this equipment.
For questions or if you need assistance with this product, please
contact
Broadcastvision Entertainment
Tech Support at
1-888-330-4283 x 3.
Page 7

Broadcastvision Entertainment
Toll Free: 888-330-4BVE(4283) www.broadcastvision.com
Remote
Features
POWER: To set the TV to standby or power on
MUTE: To disable or enable the sound
MODE: To display TV input source menu
MENU: To display LCD TV menu
RECALL: Return to previous channel.
VOL+/-: To adjust sound level
NUMBER KEY: Used to select channel, in Teletext
mode.
-/--: Channel option between channel number with
and without dot
CH+/-: To access the next or previous programmers
EQ: To switch sound modes
CC: To close the caption
OK: Confirm
: UP, Down, Left, Right
Page 8
Broadcastvision Entertainment
Toll Free: 888-330-4BVE(4283) www.broadcastvision.com
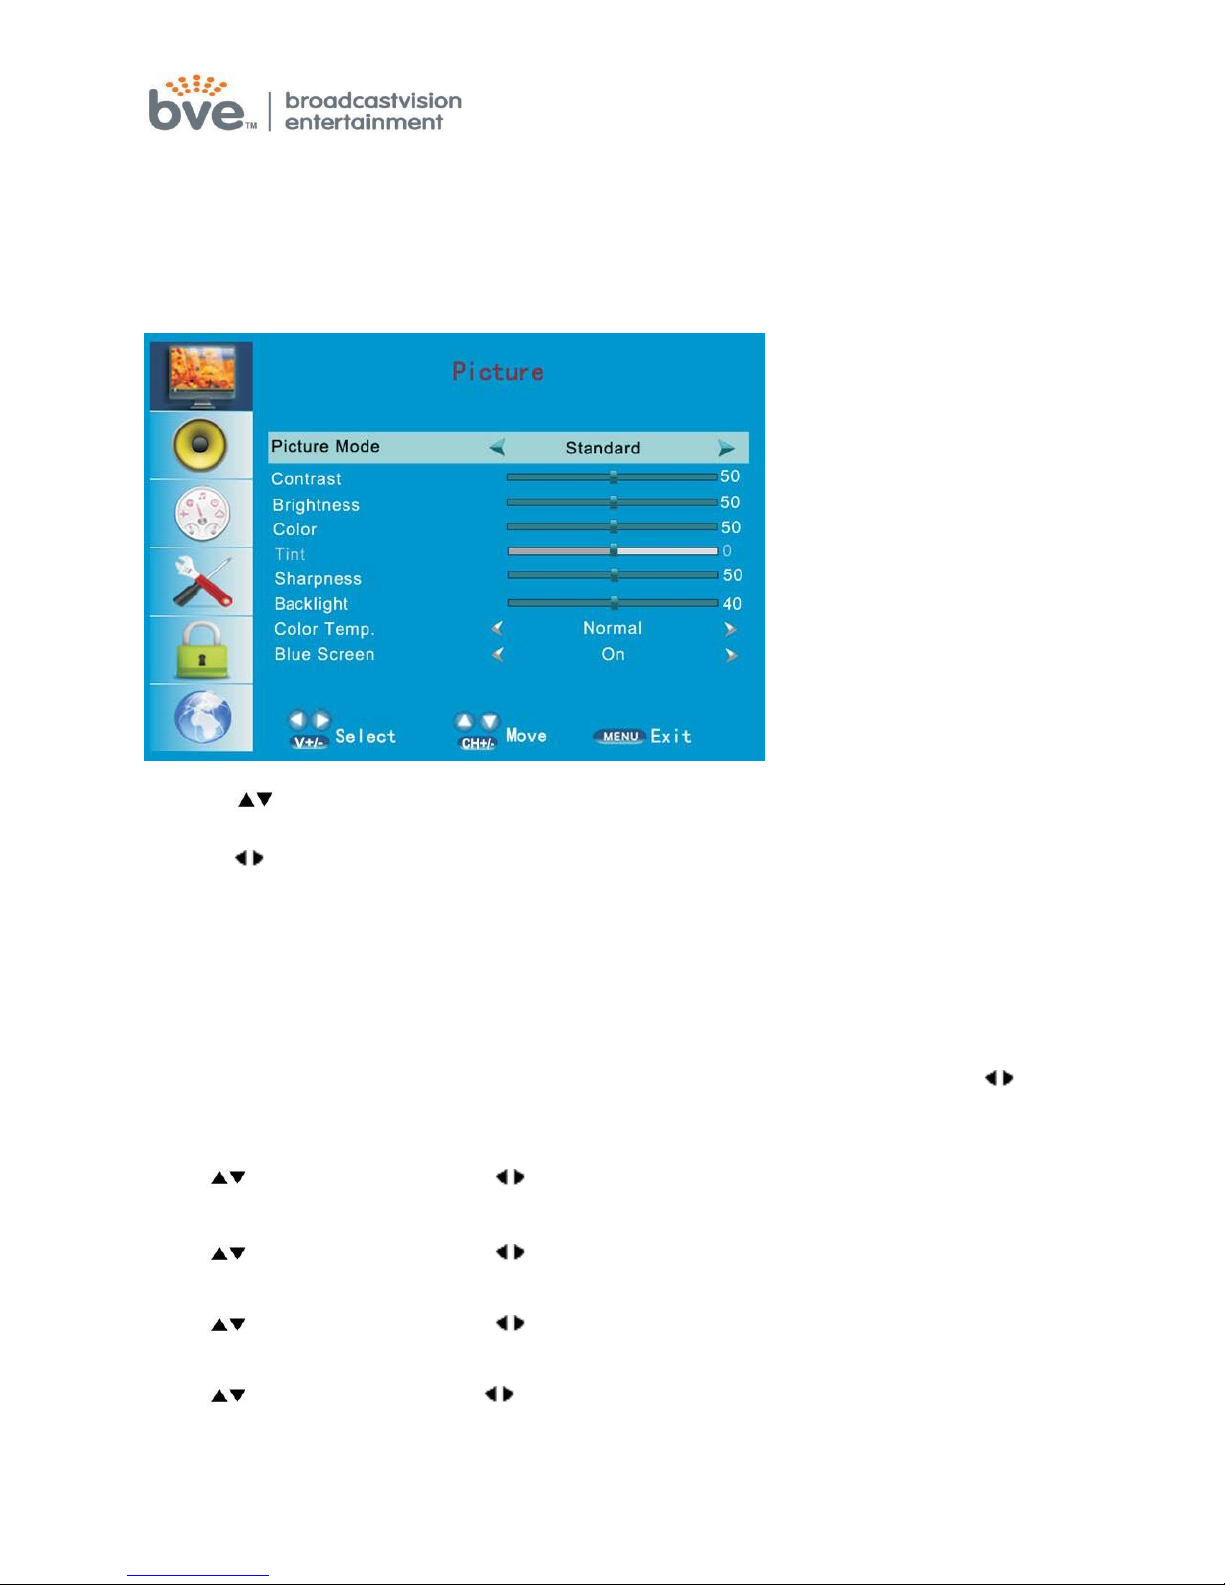
PICTURE MENU
This first item of the menu is the PICTURE menu
You can adjust the following, such as PICTURE MODE, CONTRAST, BRIGHTNESS,
COLOR, TINT, SHARPRESS and ADVANCED VIDEO.
1. Press buttons to move the cursor to the item to be selected.
2. Press buttons to make the desired adjustments.
3. When you are satisfied with your adjustments, press MENU or EXIT to exit the main
menu.
Picture Mode
Select the type of picture that best corresponds to your viewing requirements by
selecting Picture Mode in the PICTURE menu. Press the OK button and press to
select the picture mode such as Standard/Sports/Theater/Custom/Vivid mode.
Contrast
Press buttons and then use to adjust the contrast of the picture.
Brightness
Press buttons and then use to adjust the brightness of the picture.
Color
Press buttons and then use to adjust the color saturation.
T int
Press button and then use to adjust the tint of picture.
But this function is available in the NTSC that is one of the color systems
Page 9

Broadcastvision Entertainment
Toll Free: 888-330-4BVE(4283) www.broadcastvision.com
Sharpness
Press buttons and then use to adjust the sharpness level of picture.
Color temper: Press buttons to select normal/cool/warm.
Blue Screen: Press buttons to select on/off.
Page 10
Broadcastvision Entertainment
Toll Free: 888-330-4BVE(4283) www.broadcastvision.com
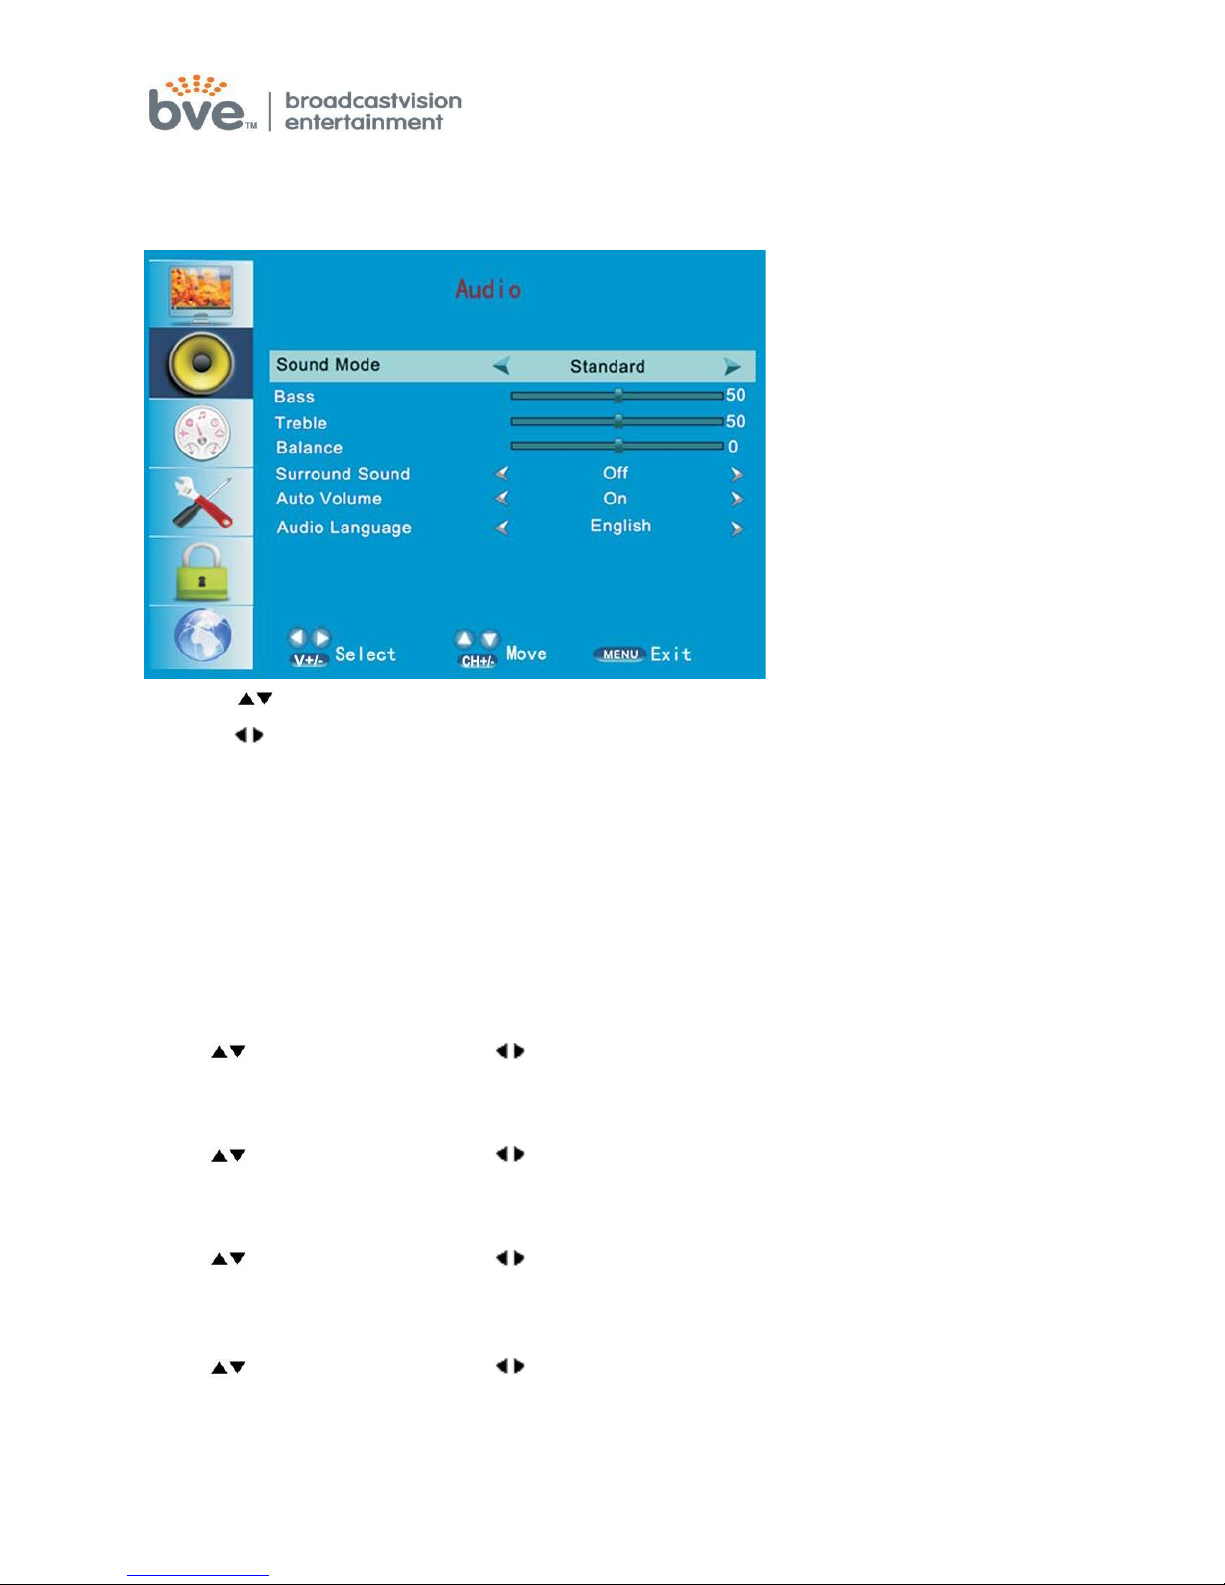
SOUND MENU
The second item of the menu is the SOUND MENU
1. Press buttons to move the cursor to the item to be selected.
2. Press button to adjust.
3. When you are satisfied with your adjustments, press the MENU or EXIT to exit
the main menu.
Sound Mode
You can select the type of sound which best corresponds to your listening
preferences
by selecting Sound in the sound menu. Press the OK button to select one of the
modes such as Standard/Music/Movie/User.
Bass
Press buttons and then use button to increase or decrease the level of the
bass response.
Treble
Press buttons and then use buttons to increase or decrease the level of the
treble sounds.
Balance
Press buttons and then use buttons to adjust the audio output level between
left and right speakers.
Surround Sound
Press buttons and then use buttons to select surround ON or OFF.
Auto Volume
Press ENTER to set or cancel. When AVL is set on, it will limit the channel changes.
Usually be enabled at night.
Page 11
Broadcastvision Entertainment
Toll Free: 888-330-4BVE(4283) www.broadcastvision.com
Audio Language
Press buttons to select one of the audio languages such as English/French and
Spanish, but the language code must be programmed for this option to be available.
If there is no selection it has not been programmed for this model.
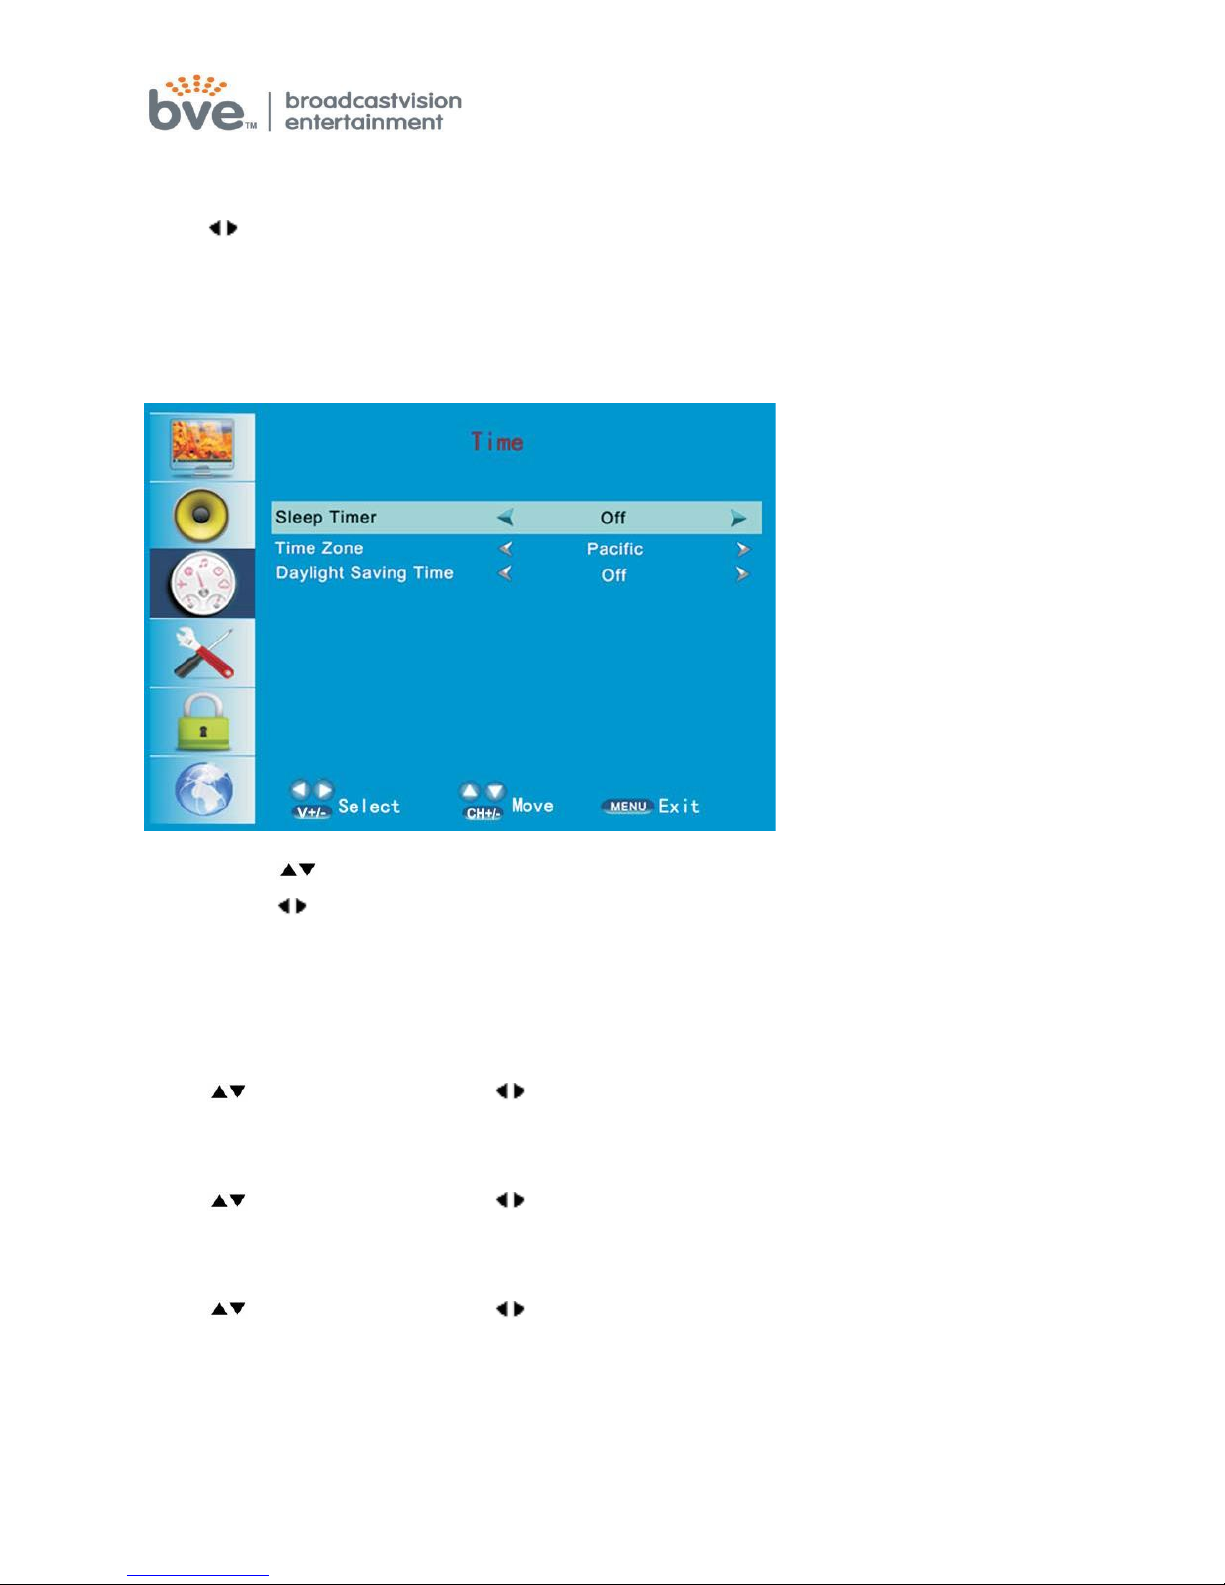
TIME MENU
1. Press the button to move the cursor to the item to be selected.
2. Press the buttons to make adjustments.
3. When you are satisfied with your adjustments, press the MENU button to exit the
main menu.
Sleep Timer
Press buttons and then use buttons to select the sleep timer, the options are
off / 30Min / 45Min / 60Min / 90Min / 120Min / 180Min / 240Min.
T ime Zone
Press buttons and then use buttons to select the correct time zone, the
options are Pacific/ Alaska / Hawaii/ Eastern/Central/ Mountain.
DST: Daylight Saving T ime
Press buttons and then use buttons to select Daylight Saving Time ON or OFF.
When Daylight Saving Time is ON, the clocks are set one hour ahead of local standard
time.
Page 12
Broadcastvision Entertainment
Toll Free: 888-330-4BVE(4283) www.broadcastvision.com
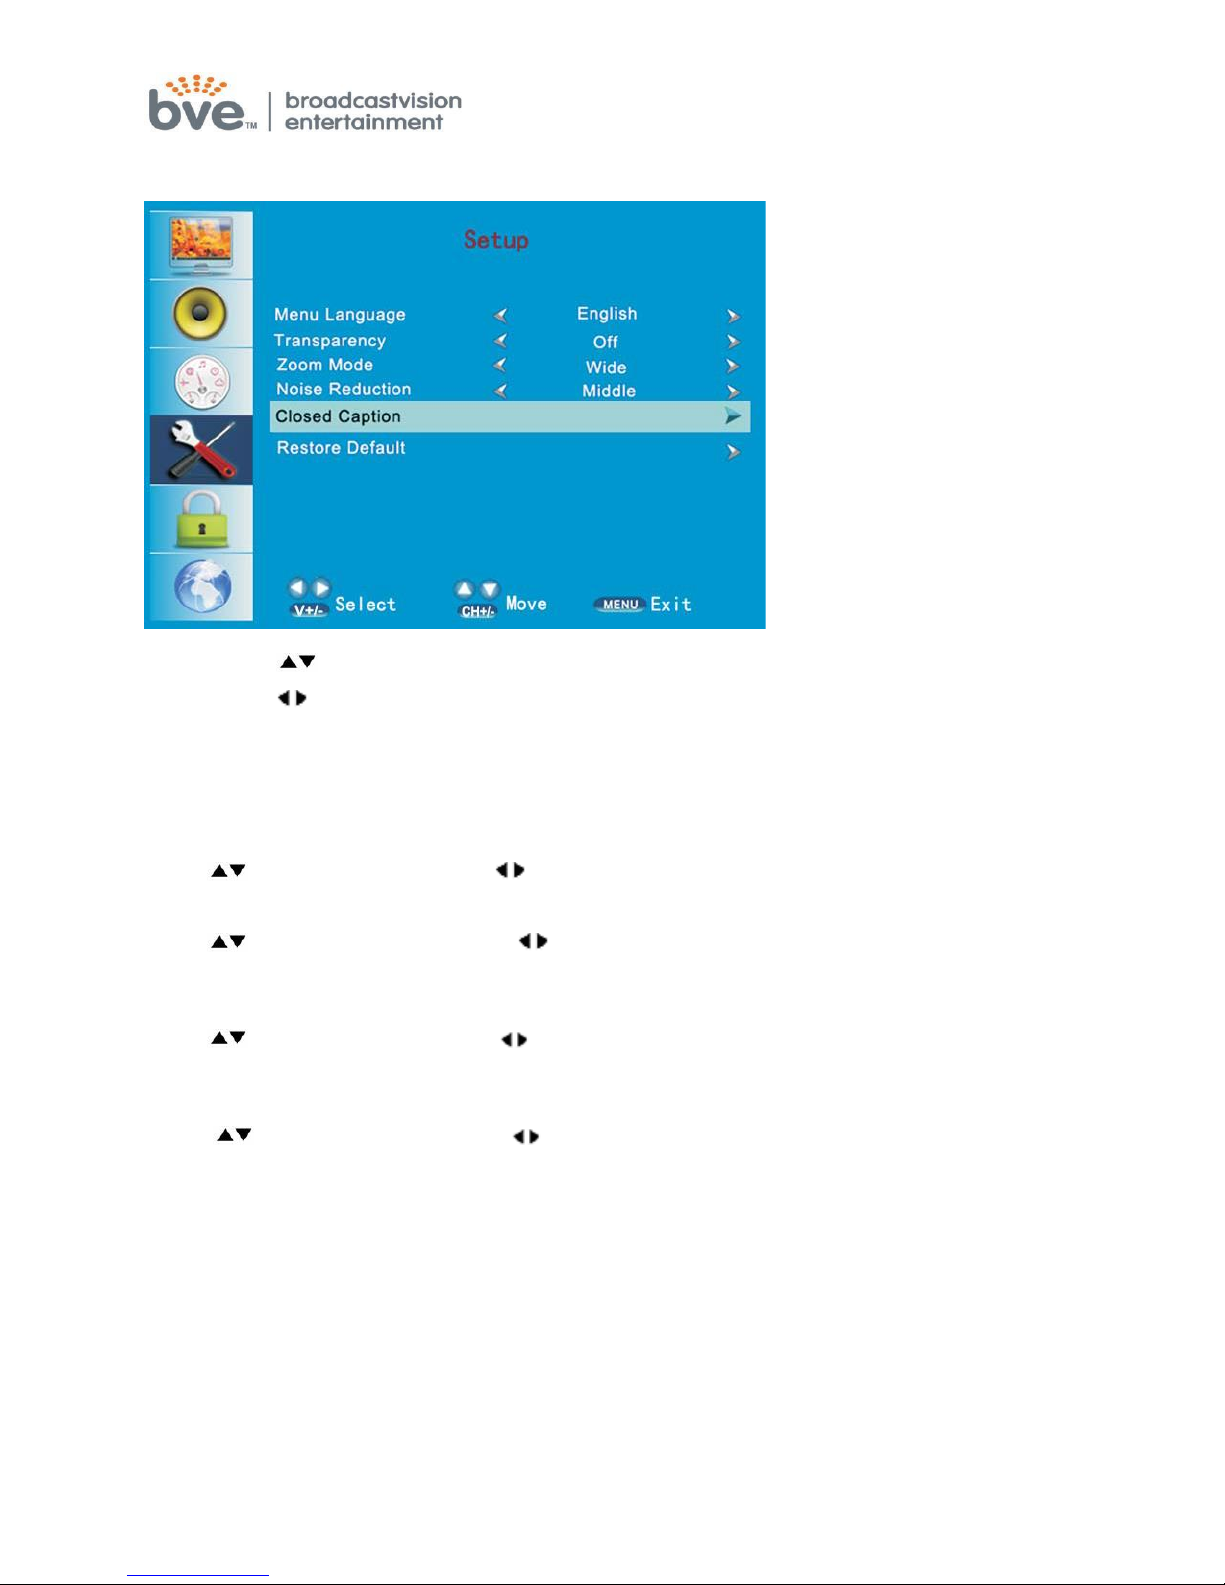
SETUP MENU
1. Press the button to move the cursor to the item to be selected.
2. Press the buttons to make adjustments.
3. When you are satisfied with your adjustments, press the MENU button to exit the
main menu.
Menu Language
Press buttons and then use buttons to select English/French/Spanish.
Transparency
Press buttons and then use buttons to select 0%/25%/50%/75%/100% of
transparency degree.
Zoom mode:
Press buttons and then use buttons
to select normal/wide/zoom/cinema
mode.
Noise reduction:
Press buttons and then use buttons
to select off/weak/middle/strong/auto.
Page 13
Broadcastvision Entertainment
Toll Free: 888-330-4BVE(4283) www.broadcastvision.com
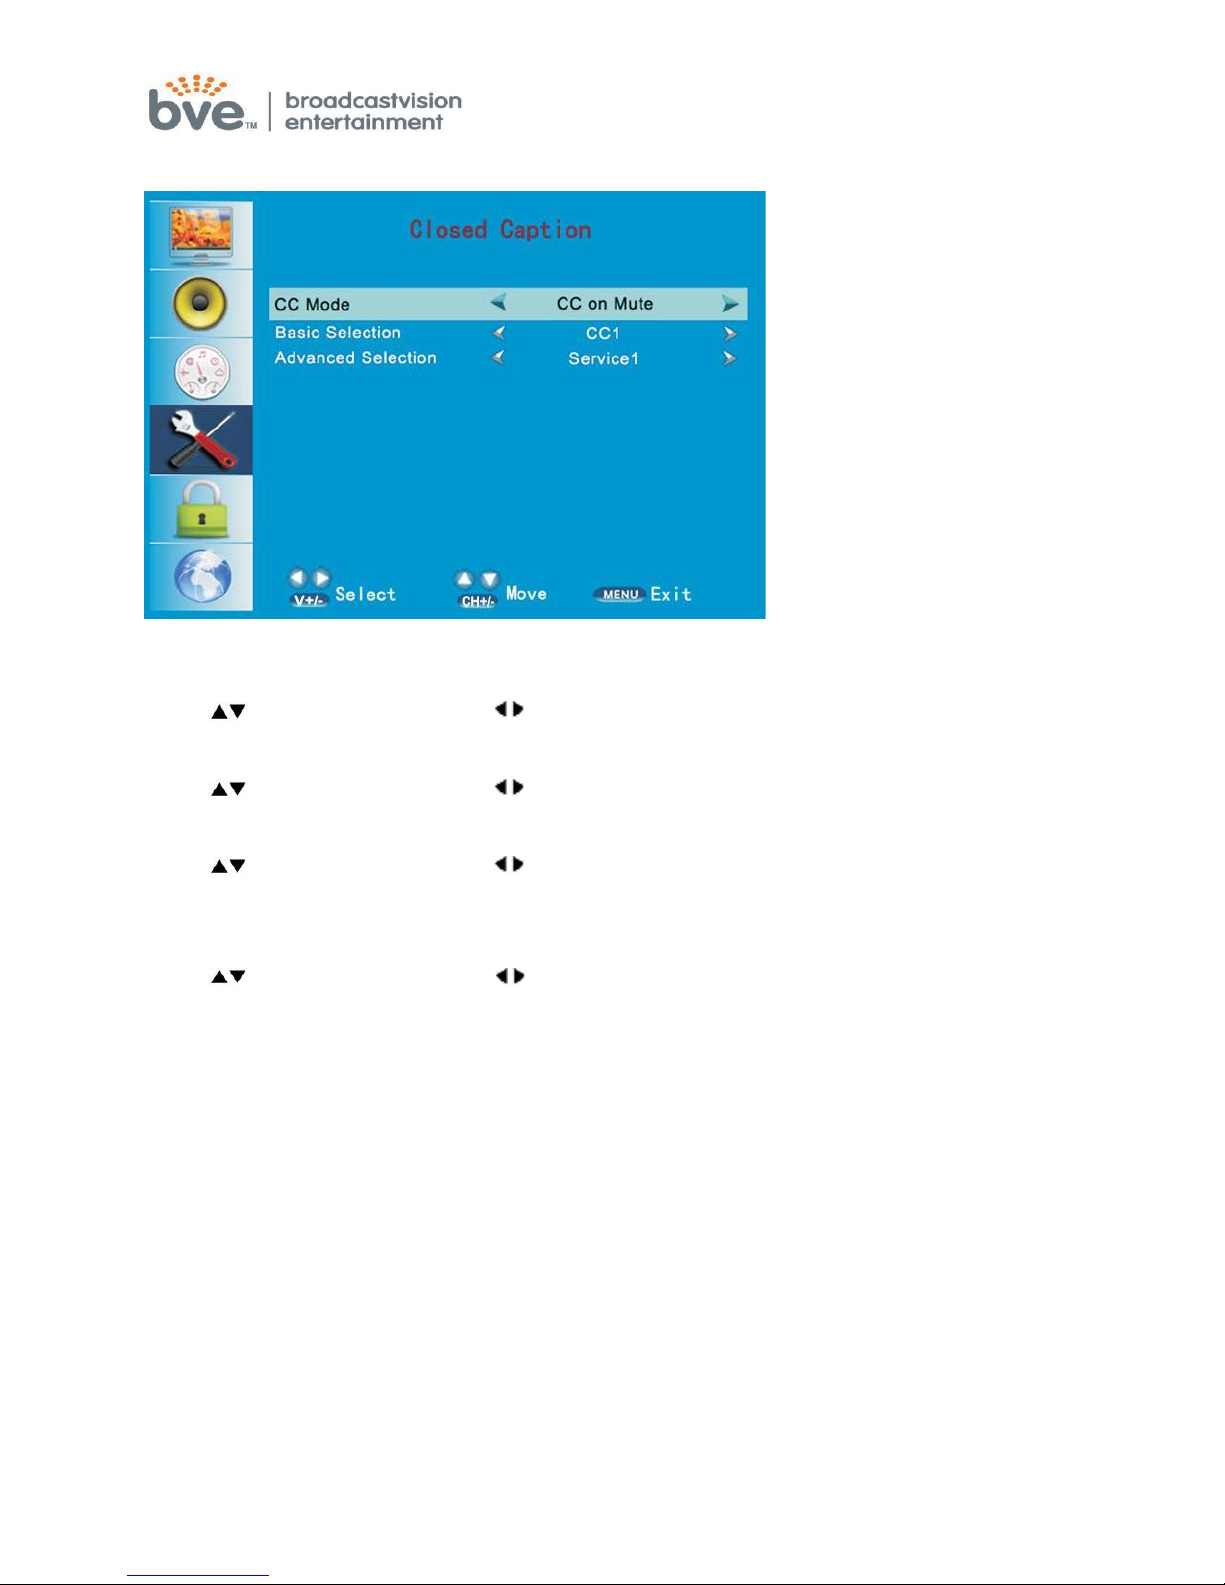
Closed Caption
CC Mode
Press buttons and then use buttons to show CC mode and select on/off.
Basic Selection
Press buttons and then use buttons to show CC1/CC2/CC3/CC4 mode.
Advanced Selection
Press buttons and then use buttons to show Service1/2/3/4/5/6 mode.
Restore Default
Press buttons and then use buttons to select Yes/No and press OK button to
confirm.
Page 14
Broadcastvision Entertainment
Toll Free: 888-330-4BVE(4283) www.broadcastvision.com
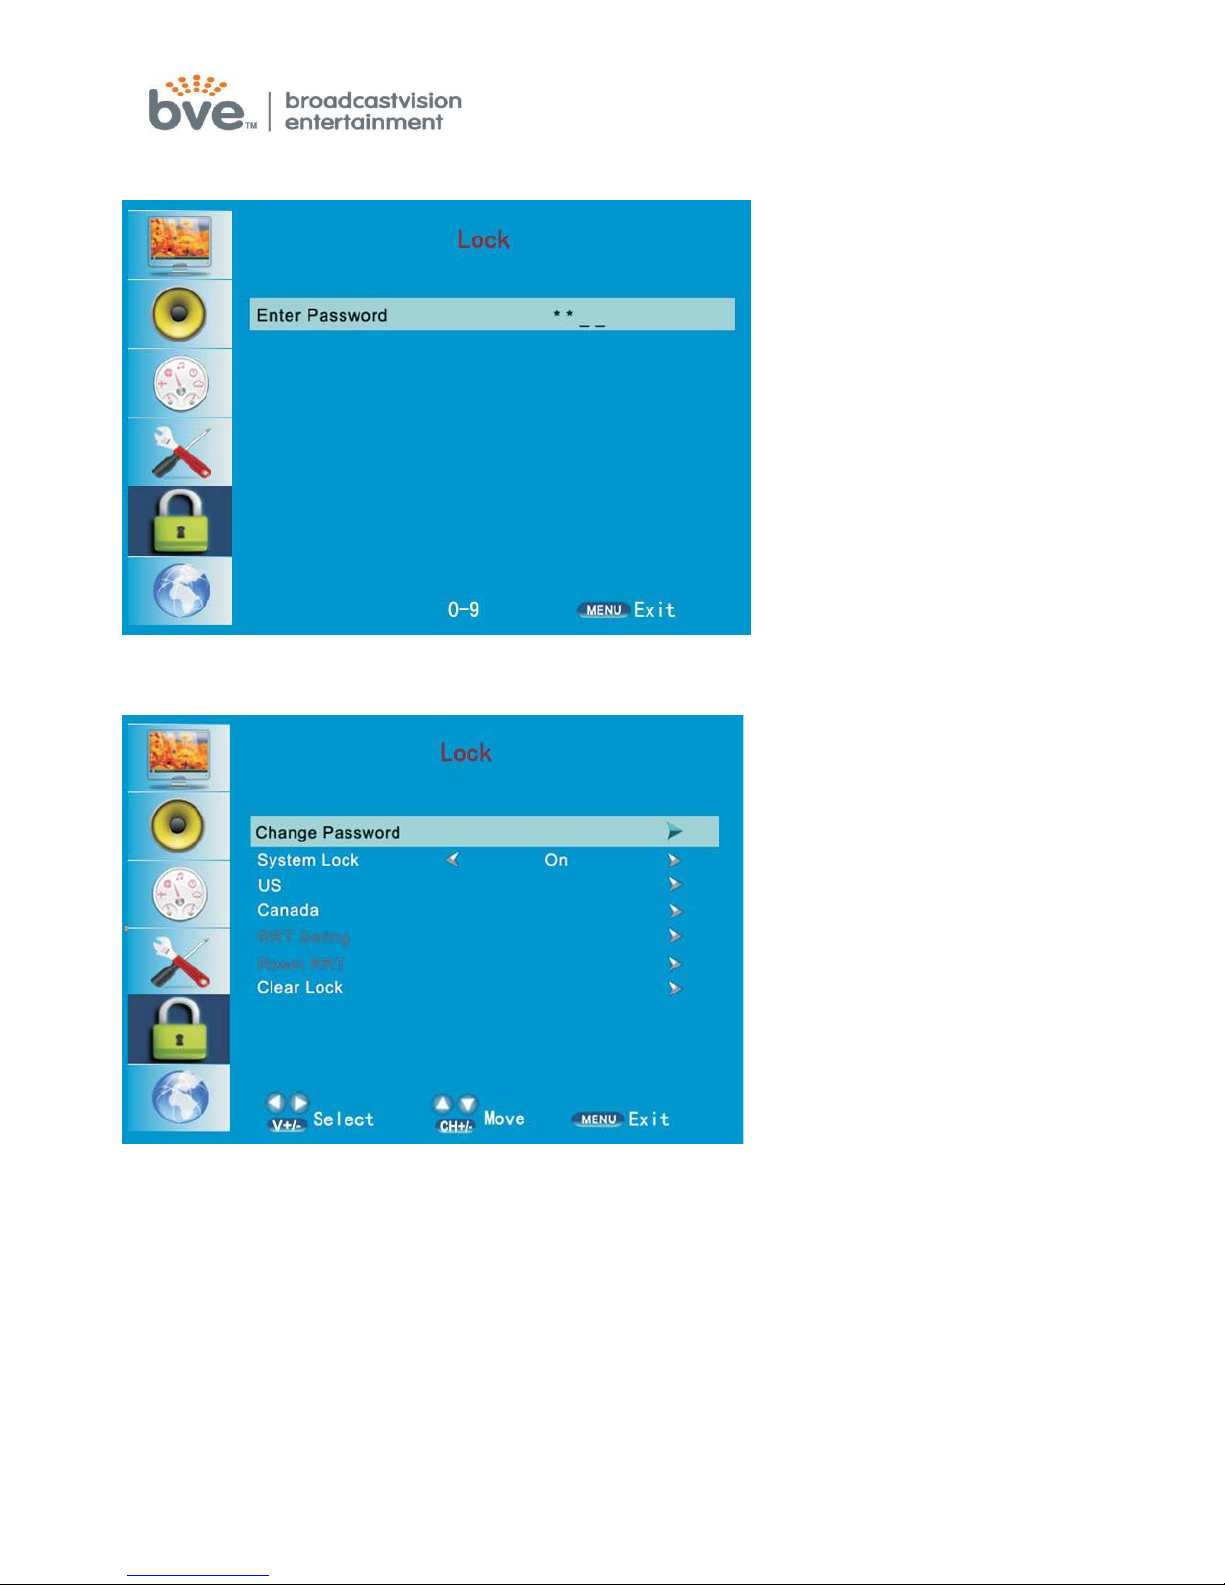
Lock Menu
After input the password, you can open the lock menu, the default password is 0000.
Page 15
Channel Menu
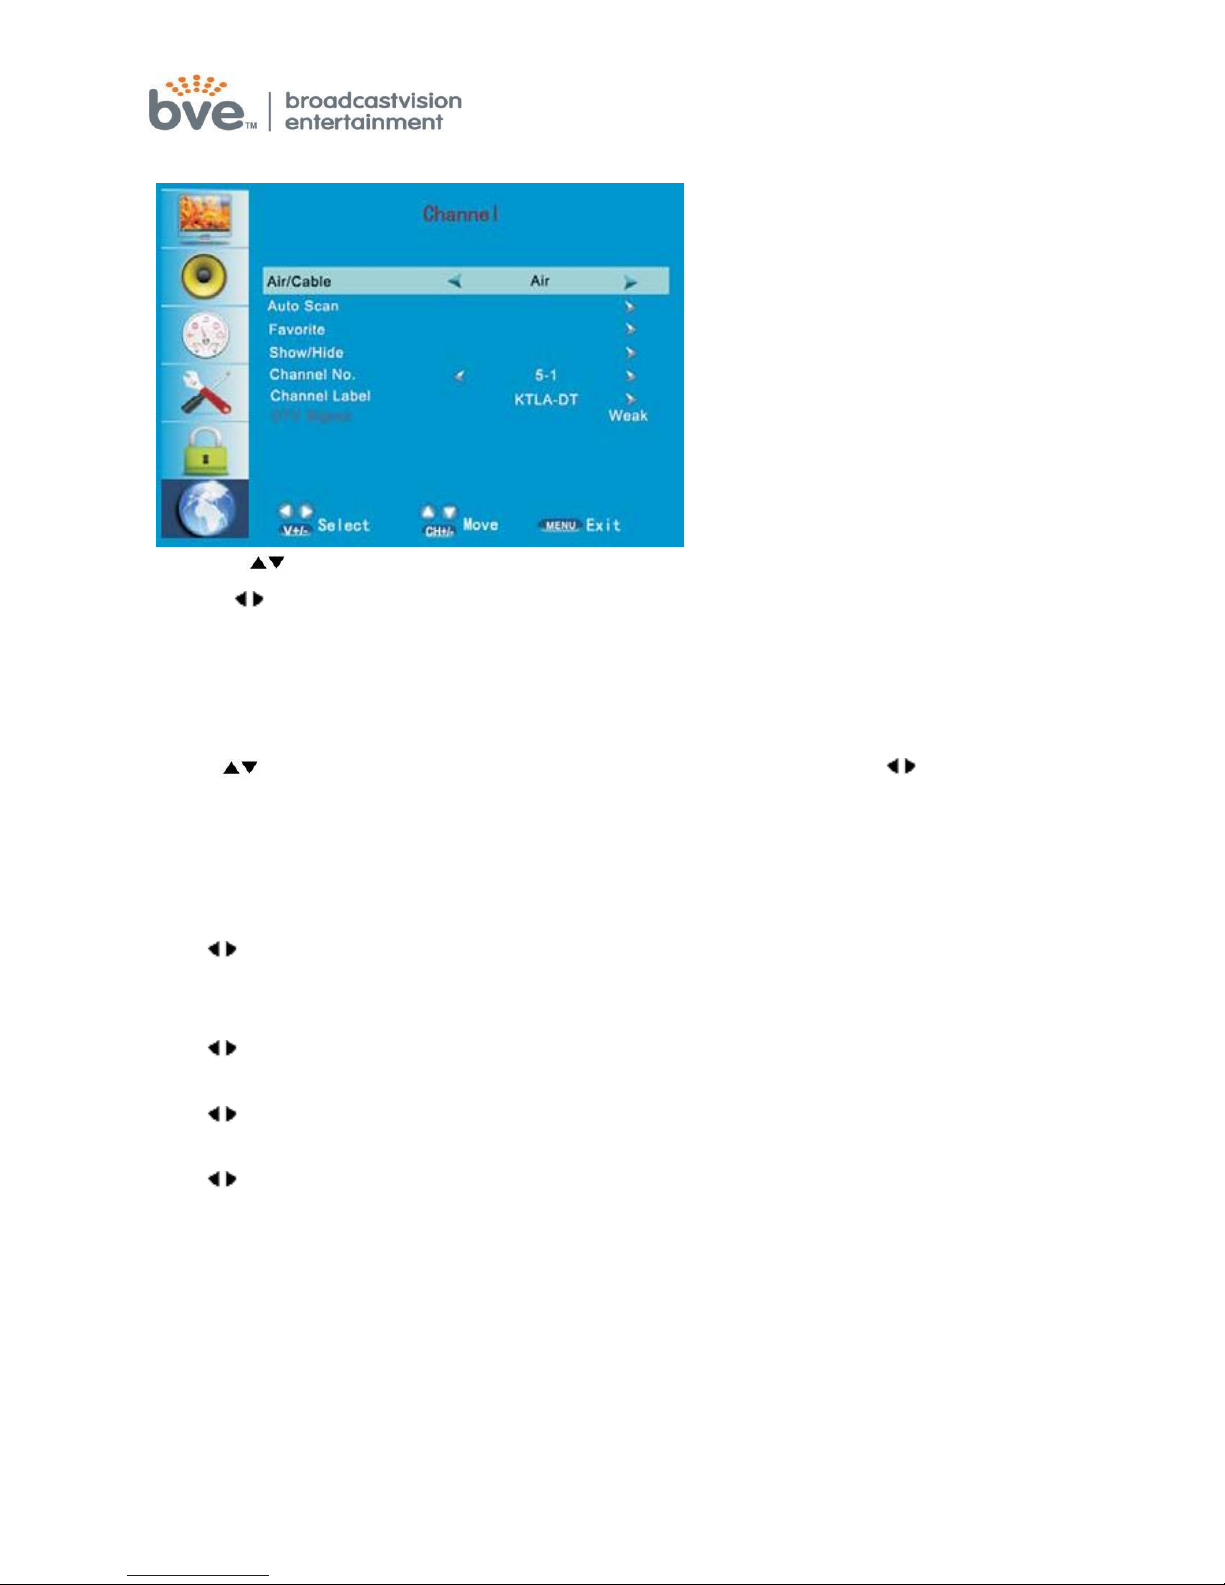
1. Press buttons to move the cursor to the item to be selected.
2. Press buttons to adjust.
3. When you are satisfied with your adjustments, press the MENU to exit the
main menu.
Air/Cable
Press buttons to move the cursor to select Air/Cable mode and buttons
to select air or cable mode.
Auto Scan
Press menu button to start search DTV or ATV program automatically from V-L to
UFH, the searched program will be stored orderly.
Favorite
Press buttons to enter Favorite mode and Channel NO., Channel name, Favorite
menu item would occur and press OK button to set.
Show/Hide
Press buttons to enter Show/Hide mode.
Channel NO.
Press buttons to enter Channel No. mode and select the Channel No. wanted.
Channel Label
Press buttons to enter submenu and you can edit the channel label inside it.
DTV Signal
This item will show how current DTV signal strength.
Note:
If the set is cold, there may be a small "flicker" when the set is switched on. It is
normal. There is nothing wrong with the set.
Some dot defects may appear on the screen ,like red. green or blue.
Spots, however, this will have no impact or effect on the monitor
performance.
Do not press the LCD screen with your finger for a long time as it may incur some
Page 16
damage to the screen.
Programming instructions for 18.5” AXS19HD
Screen & AXS19TVC2 Screen Controller.
In order to program the screen you must follow
these steps first:
Connect the TV to an active cable line.
Power the TV by plugging in the supplied power adapter.
1) Turn on the TV by pressing the power button on the wireless
remote.
2) Press MODE on the wireless remote and you will see the
following
options:
TV
AV
Composite
HDMI
3) Select TV by using the channel up and down buttons
and press the OK button located on your wireless remote
directly underneath the mode button.
4) Press the MENU button on your remote and scroll
across using the volume buttons on the remote until you reach
CHANNEL. (This will be on the far right side of the menu)
Press OK below the mode button.
If you are not able to select Channel from the menu, the TV is not
recognizing signal from your cable or satellite provider. Check the cable feed and
connection to the screen.
Page 17
5) Using the channel up and down buttons, select
AIR/CHANNEL. You will have 2 options, either CABLE or AIR. AIR
will give you limited analog channels where as CABLE will give you
all channels including digital. Select the proper option by pressing
the volume button on the wireless remote.
In most applications, choosing CABLE is the proper choice.
6) Using the channel up and down buttons, now select AUTO
TUNING and press OK. The TV should start auto scanning
available channels. This process will take 5-12 Minutes to
complete. Once your channels have been scanned, the TV should
display an active channel.
7) Now you can plug the controller into the screen. Plug the
coiled controller cable into the back of the screen. The controller
cable will have one end that is coiled and the other will be straight
(not coiled). The coiled end is designed to be attached to the TV.
The straight end is designed for use on the controller so you can
easily secure the cable on the back of the controller.
8) Remove the base from the controller by using a flat head
screw driver. Please be careful not to lose the screw or the lock
washer that is embedded in the controller. If the washer is not
present, the base will not properly lock and therefore spin.
9) Insert the cable connection into the controller. Please note
that we purposely made the connection so it’s snug so continue
to press until you here a click. Similar to a phone cord or internet
cable, this means your controller cable is secure.
10) Now secure the cable in the provided grooves on the
back of the controller and re-attach the base using the screw
provided.
11) Attach the controller to the equipment with the provided
straps and
screen controller and screen should be fully functioning.
plug in a pair of headphones into the headphone jack. Your
Page 18

Programming
the Controller and Special Features
The screen has many built in features that can be simply added by
programming special code sequences in the controller. Below is a list of
code sequences based on your requirements.
Auto-off feature
o This feature will enable the screen to automatically turn off after 15
minutes if no controller buttons are pressed and if there is no
headphone inserted in the headphone jack. To disable the auto-off
feature (which is active by default), press *, 4, source.
Activate Wireless Remote through the Controller IR Module
o The remote pass through allows the wireless remote to work
through the controller IR module. Program your controller(s)
by pressing, * 2
Source.
Buttons on Controller Not Communicating with the Personal LCD Screen
o If the controller is not communicating with the LCD screen,
then program your controller(s) by pressing *, 1, SOURCE,
1, 7, SOURCE.
Mid-Range Volume Level Adjustment Feature
o If the volume level through the controller is too loud or too low at
the mid-range, it is possible to re-set the internal controller volume
to a moderate level at the mid-range setting.
o First use the volume up or down buttons to set the volume bar at the midway
point (level 50).
o Press *, 5, source then press the Volume up or down button until the sound is
at a moderate level.
o Press the source button to save that moderate volume level as the
new midway point.
Page 19

Enable ‘SOURCE’ Button to Function as Selecting Multiple Sources
o This feature will allow the user to simply press the Source key to
select different sources that may be connected to one of the inputs
on the screen, example: IPOD, DVD Player, etc. Enter the following
button sequence *, 1, source, 1, 9, source
Enable ‘SOURCE’ Button to Function as DECIMAL POINT
o Depending on the channel set-up from your local provider, it may be
helpful to allow the user to enter a decimal point to access some
channels. To configure the ‘SOURCE’ button as a decimal point,
enter the following button sequence:
Screen Set-up mode through controller
o Press 7 and 9 simultaneously. Recommended if you have misplaced
your wireless remote.
*, 1, SOURCE, 1, 8, SOURCE
For questions or if you need assistance with this product, please contact
Broadcastvision Entertainment Tech Support at 1-888-330-4283 x 3.
Broadcastvision Entertainment Toll Free: 888-330-4BVE(4283) www.broadcastvision.com
 Loading...