

Page 1

ESSENCE USERS MANUAL VERSION
-
1, SEPT.
2006.
essence
API™ 500 Series Compatible
Differential Opto Compressor
Users Manual
Thank you for choosing the Buzz Audio
Essence compressor module. Please take
the time to read this manual so that you
are familiar with the operation of the unit.
To gain our Extended Warranty, please
return the enclosed Registration Card or
register your purchase online at
www.buzzaudio.com
Contents
1] Compatibility and Power ........................... 2
2] VU Meter Cal Options................................. 3
3] Installation ................................................. 4
4] Controls and Indicators ............................. 5
5] Tips for Using the Essence .......................... 9
6] Specifications .......................................... 15
7] Warranty and Service............................... 16
CONTENTS COPYRIGHT BUZZ AUDIO LTD 2006.
PO BOX 6677, TE ARO. WELLINGTON, NEW ZEALAND. VOICE/FAX 64+4+385-2478.
www.buzzaudio.com email [email protected]
- 1 -
Page 2
1] Compatibility and Power
The Essence compressor module is designed to be
installed into an API™ 500 Series compatible rack and
cannot function stand alone, requiring the power
source supplied by the rack system.
It should be noted that the Essence module consumes
more power supply current than most other 500 series
modules due to the True Class A amplifiers used in the
design. For this reason, there may be limitations on how
many Essence modules can be installed into some
older rack systems.
The current consumption of the Essence is rated at 120
milliamperes at +/-15 volts DC. If 5 modules are
installed into a 10 space rack, then a total of 600 milliamperes will be required from the rack power supply.
Most currently manufactured racks will easily meet this
requirement but if in doubt, please check with the
manufacturer of your particular rack.
For more information on the API™ 500 Series racks and
the VPR Alliance, visit the API™ website at
www.apiaudio.com.
2] VU Meter Cal Option
Before installing the Essence into your 500 Series rack,
you may wish to change the 0dB reference of the front
panel VU meter. This can be set to read either +4dBu
(VU meter standard, LINK OFF) or +14dBu (as supplied
from the factory, LINK ON).
The +14dBu setting is useful if the Essence is feeding a
digital work station, as the levels will generally be higher
than working with an analogue tape recorder.
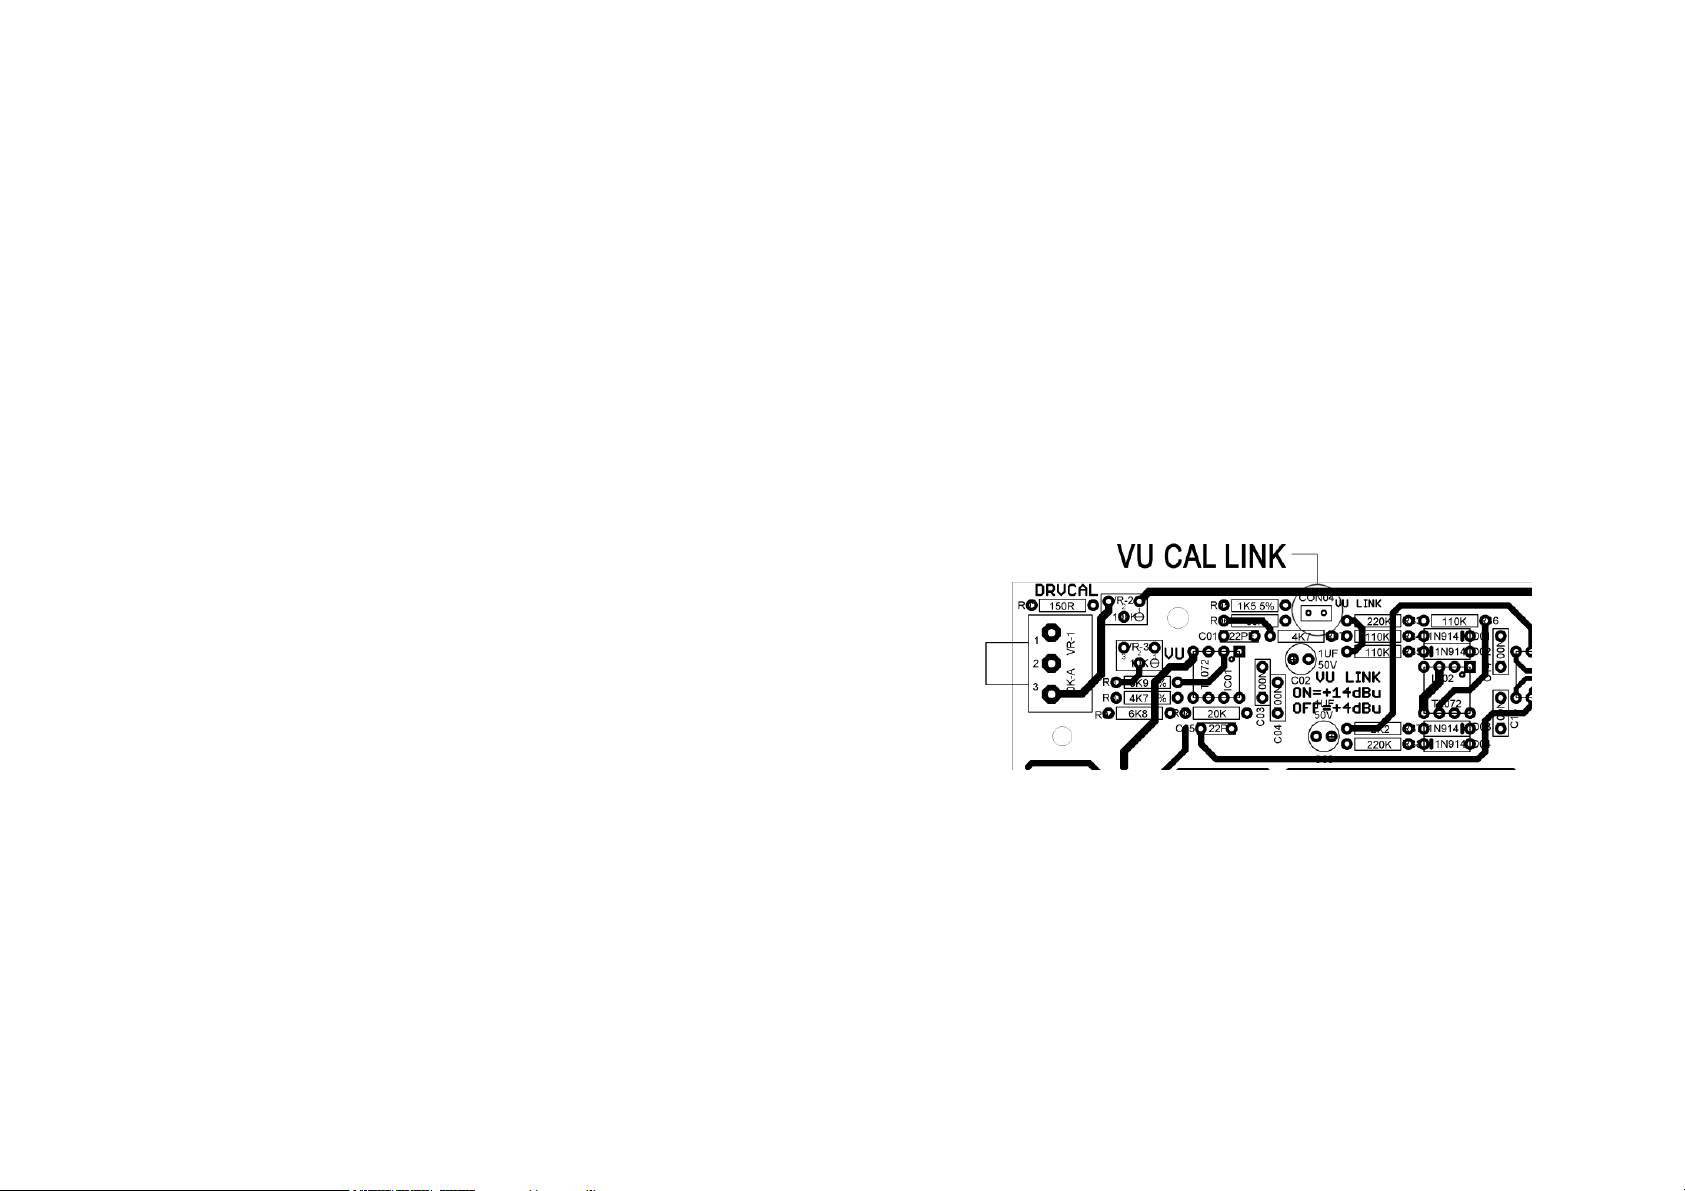
Locate the LINK at the top left hand side of the outer
circuit board behind the DRIVE control and remove or
replace the link as required. No other adjustment is
needed.
- 2 -
- 3 -
Page 3

3] Installation
Installation into the 500 Series rack is relatively straight
forward. Ensure the rack is completely powered down
before attempting installation to prevent damage to
the module.
Choose the position in the rack to which you will install
the module. Note that the Essence has two edge
connectors that must mate with the rack connectors.
Slide the unit in so that the gold plated edge
connectors of the module align with the matching
connectors in the rack. A gentle push and the module
should slide home into the rack connectors.
Please avoid touching the gold plated edge connector
of the module to prevent sweat from tarnishing the gold
plate and thereby avoiding any connection reliability
problems in the future.
Attach the Essence front panel to the front of the rack
with screws supplied by your rack manufacturer. This is
important for mechanical rigidity. Do not over tighten
these screws to avoid stripping out the threads.
!! Important Note !!
The Essence consumes 2 slots within the 500 rack. If the
unit is installed into slot 1 and 2 of the rack, the main
audio input and output is accessed via the XLR
connectors associated with slot 1. The XLR connectors
associated with slot 2 can be used to insert another
device (an equalizer for example) into the side chain
path of the compressor. The male XLR is the send to
the external device, the female is the return from the
device. More on side chain insertion later in this
manual.
Once you have the module in place, apply power, test
that everything is working OK, and most importantly,
enjoy!
4] Controls and Indicators
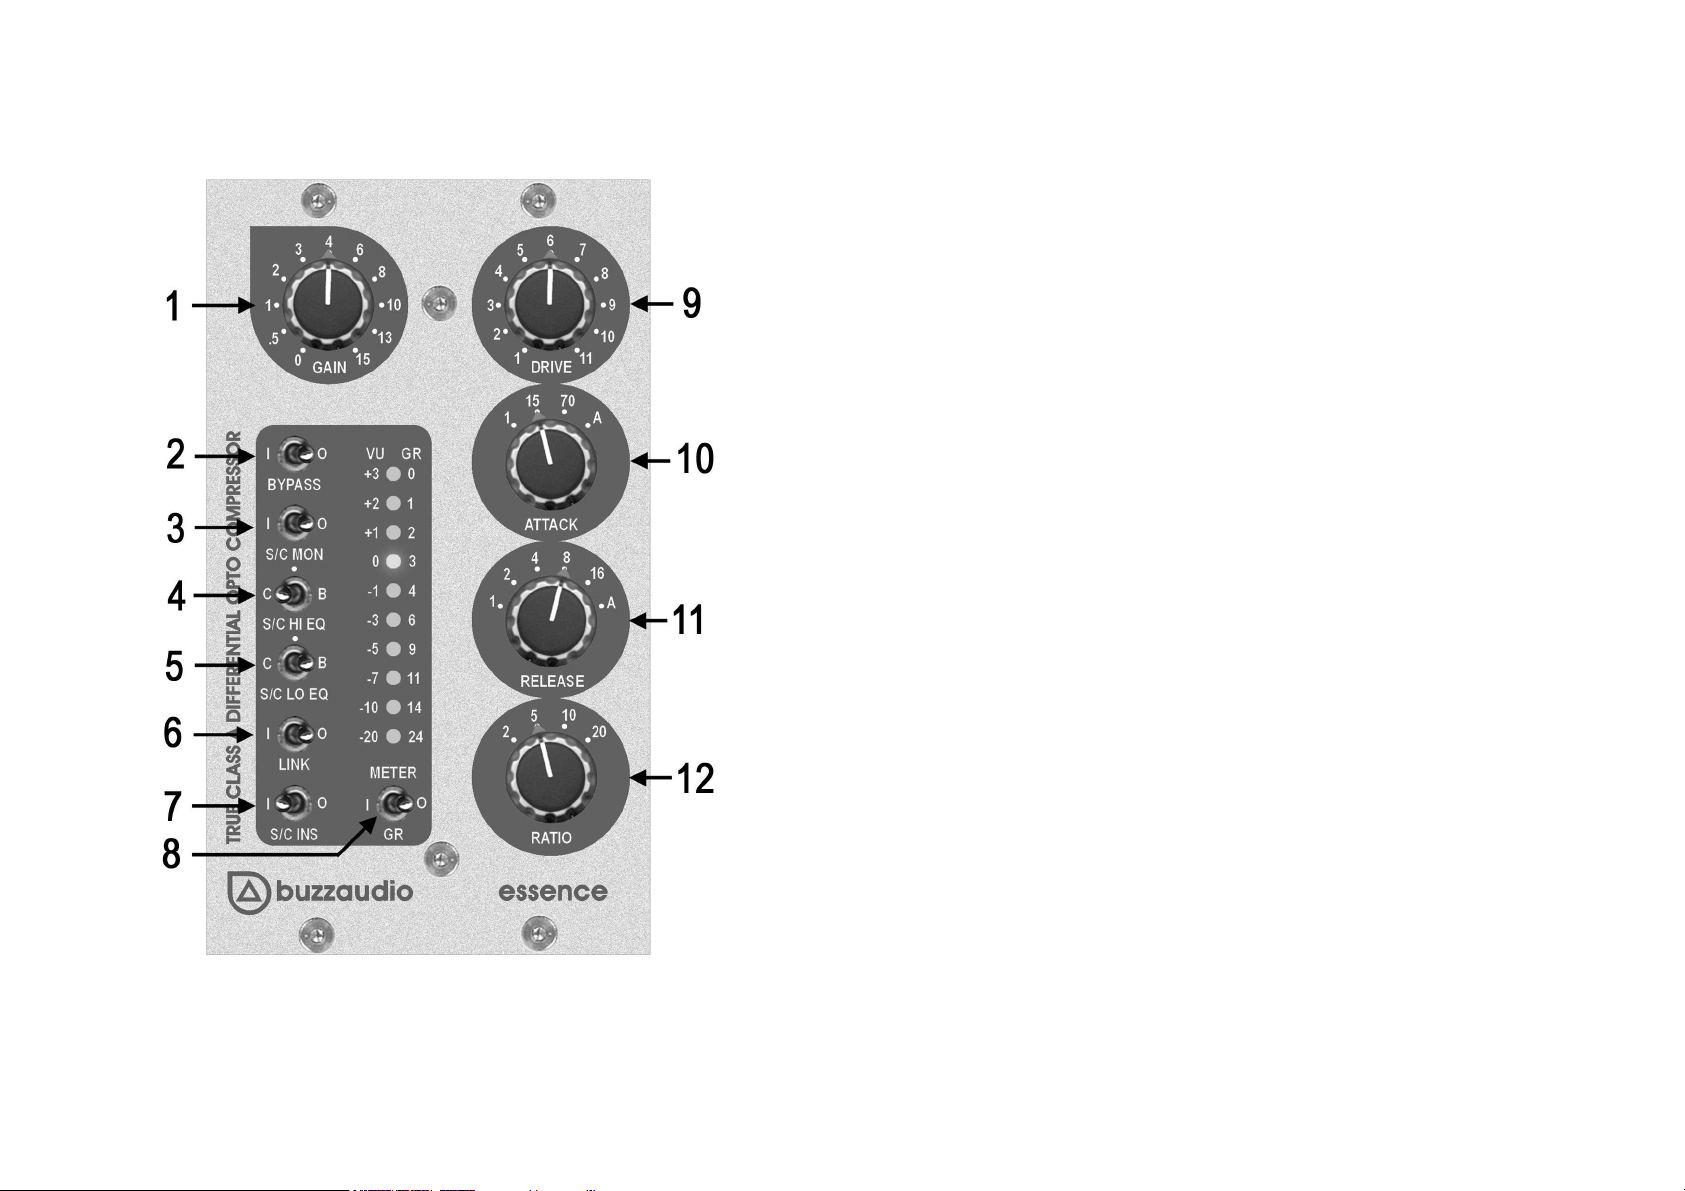
Please refer to the picture on the following page.
[1] GAIN This rotary control varies the output gain of the
Essence from 0 to +15dB and makes up for the loss
associated with compression. This control is bypassed
when using the S/C MON function (3).
[2] BYPASS This switch completely removes the
compressor from the audio path connecting the input
to the output directly. The compressor is bypassed in the
I (in) position and active in the O (out) position.
[3] S/C MON S/C is the abbreviation for Side Chain. This
control allows you to monitor (via the Essence main
output) the audio feeding into the compressor control
circuitry. This is useful if you have an equaliser inserted
in the S/C path or are using the onboard S/C EQ.
- 4 -
- 5 -
Page 4
Controls and Indicators continued…
[4] S/C HI EQ This switch allows you to boost (B) or cut (C)
the treble feeding into the Essence side chain (or
control circuitry). In the centre position, the control is
bypassed. If you apply boost into the S/C, then the
compressor will be more sensitive to the treble
frequencies, and more compression is applied. If you
apply cut, the compressor becomes less sensitive at
high frequencies.
[5] S/C LO EQ Similar to the S/C EQ HI, this switch applies
boost (B) or cut (C) in the bass register or low
frequencies.
[6] LINK This switch connects the Essence S/C to other
Essence compressors that may be installed in the rack
and will provide tracking of the two linked units for stereo
or multi channel compression tasks.
!! IMPORTANT NOTE !!
The Essence should NOT be linked with any other type or
brand of compressor – damage may result! Please
consult the rack manufacturer’s instructions for setting
up the link function in your rack.
[7] S/C INS Side Chain Insert. This switch connects
whatever is feeding the S/C return into the compressor
control circuitry (slot 2 female XLR connector). The Side
ESSENCE FRONT PANEL
Chain Insert allows you to connect another device (such
as an equaliser) to modify the Essence compression
- 6 -
- 7 -
Page 5

Controls and Indicators continued…
characteristic. The Side Chain send or output (slot 2
male XLR) is always active. The Essence onboard S/C
EQ is post the S/C Insert point.
[8] METER Use this switch to monitor on the LED VU Meter
the input level to the Essence (I), the output level
leaving the Essence (O) or the amount of Gain
Reduction (GR) being applied to the audio signal. The
VU meter 0dB reference point (in I or O modes) can be
set to either +4dBu (VU standard) or +14dBu (digital).
See section 2 of this manual.
[9] DRIVE This rotary control is used to adjust the amount
of compression applied to the audio signal, similar to a
threshold control on other compressors. Clockwise
rotation increases the amount of compression.
[10] ATTACK A four position switch which adjusts the
attack time or time taken for the compressor to respond
to the incoming audio signal peaks. Position 1 is the
fastest attack, with the Essence taking 1mS (millisecond) or less to respond. Position 15, the compressor
takes 15mS to respond, and position 70, the attack time
is slow at 70mS. Position A is the auto mode where the
attack time of the Essence varies with program material.
[11] RELEASE A six position selector which adjusts the
time taken for the compressor to recover from a
program peak. The release times are 100mS, 200mS,
Controls and Indicators continued…
400mS, 800mS, 1600mS. The A position is the Auto
mode whereby the compressor will release from fast
transient signals quickly, but will maintain a slower
release time with more continuous signals.
[12] RATIO This control adjusts the change in gain
reduction for a given change in input signal level. The
ratios are 2:1, 5:1, 10:1, 20:1. As an example, in
position 5 a 5dB increase in input signal level will yield a
1dB increase in output signal level, being a ratio of 5:1.
Because the Essence has a soft knee characteristic, the
ratio value selected is the ultimate achieved and will
appear to be softer at onset of compression. See the
next section for more on this.
5] Tips for Using the Essence
Unlike some other audio compressors that are designed
to “text book” parameters, the Buzz Audio Essence
possesses a unique “musically transparent” soft knee
compression characteristic provided by the unique
Differential Drive Side Chain topology. It is equally at
home providing gentle level control of acoustic sources
through to full on squash for “in your face” lead vocals.
The following operational tips will help in getting the best
out of your unit, but the final word has to be – use your
ears!
- 8 -
- 9 -
Page 6

Tips for Using the Essence continued…
•70mS Attack
The slow 70mS position is useful in obtaining more fronts
from percussive sounds. For example, a snare that has
no “stick” sound may be improved by gentle
compression with a slow attack and quick (1 or 2)
release time. The initial transient of the snare is allowed
to pass unaffected but compression is applied to the
“tail” of the sound, bringing the “stick” forward.
•Auto Attack
Best choice for low ratio light compression of sources
like acoustic guitar, bass guitar, vocals and even stereo
mixes. The adaptive nature of the auto position
prevents “pumping” and really is the “classic” sound of
LDR based Optical compressors.
•1mS Attack
Generally, when high ratio’s and heavy compression are
applied to vocals, the fast attack position is the best
choice to prevent sibilance problems. When
compressing a stereo mix, the fast position will help
control peaks in the program material getting through.
•Release Times
Selecting the most appropriate compressor release
time is best achieved by ear but here are some
guidelines.
Tips for Using the Essence continued…
Stereo Mixes – generally speaking, a release time of
400mS (number 4 on the dial) or Auto is appropriate,
but really does depend on the type of program
material.
Bass Sounds - faster release times will distort the bass
register as the compressor actually starts to track the
bass frequencies, however the effect of a fast release
and the distortion may be the sound you’re looking for!
Vocals & Voice Overs – under heavy gain reduction,
100mS release (number 1 on the dial) will prevent
“pumping” and missing phrases due to the compressor
still releasing from a loud patch. If using a low ratio and
light compression, slower release or the Auto position
may sound warmer. Again, experimentation is the key.
Auto Release – a clever little circuit inside the Essence
provides a quick release from transients and peaks
whilst maintaining a slow release on overall program.
This is similar to an automatic gain control (AGC) type
action, although a lot more intelligent in it’s response.
•Ratios
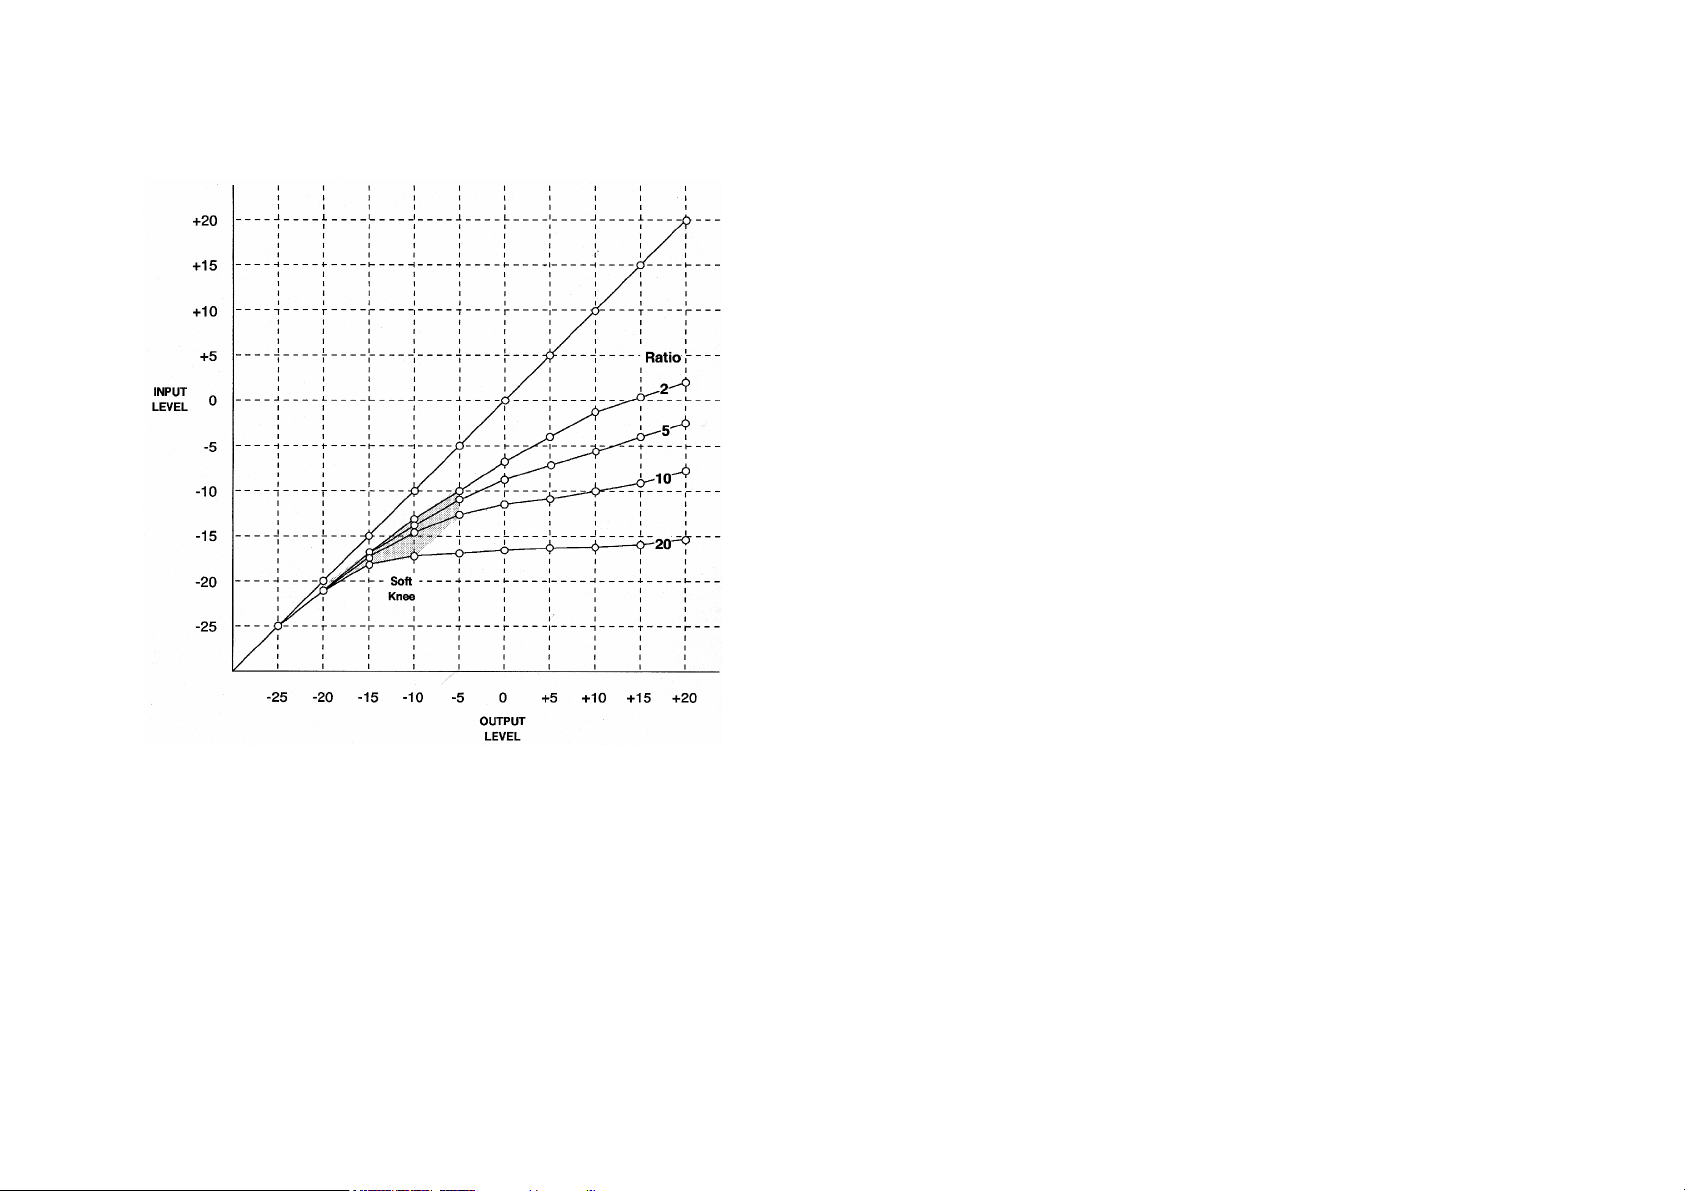
The graph on the next page shows the input to output
relationship of the four available ratios with the Drive
control set fully clockwise.
- 10 -
- 11 -
Page 7
ESSENCE INPUT/OUTPUT RELATIONSHIP
From this graph we see that for lower ratios settings (2:1
and 5:1), the ratio is ultimately achieved only after
another further 10dB of gain reduction from threshold,
(threshold meaning 0dB gain reduction). For higher
ratios, (10:1 and 20:1) the ultimate ratio is achieved
within approx. 10dB and 5dB respectively.
Tips for Using the Essence continued…
This area of the graph represents the “soft knee” of the
Essence compression characteristic and is an important
feature of it’s design.
Choosing a low ratio setting for gentle control of level
and thereby increasing the loudness of a sound within a
mix is possible without signal degradation and minimal
colouration. On the other hand, with higher ratio
settings, a sound may be “clamped” or levelled whilst
still retaining some audible dynamic.
Note that the 20:1 ratio setting is virtually hard limiting in
that a 20dB input change only results in a 1dB output
change.
•Side Chain Equalizers
The on board equalizers can be used to alter the
sensitivity of the compressor at high and low
frequencies. By boosting the S/C HI EQ, the compressor
is more sensitive at high frequencies, which may be
useful in controlling a sibilant vocal.
By boosting the S/C LO EQ the compressor is more
sensitive to low frequencies, which may be useful in
compressing a bass guitar that has an accentuated low
end.
Combinations of boost and cut on both EQ’s can be
used to either enhance midrange compression (cut
- 12 -
- 13 -
Page 8

Tips for Using the Essence continued…
both HI and LO EQ) or reduce it (boost both HI and LO
EQ). Once again, experimentation is the key and there
is no right or wrong way to use this function. And
remember that you can monitor what you doing with
these switches by engaging the S/C MON.
•Side Chain Insert
This function has numerous uses including inserting a
more elaborate equalizer into the Essence side chain or
for “keying” the compressor. By inserting a 1/3 octave
graphic equalizer, very narrow band compression to
clamp a troublesome resonance on a bass track is
possible. Or, by using fast attack and release times and
boosting around 6-20Khz on the graphic, vocal deessing is possible.
Keying involves using a particular sound to reduce the
volume of another sound. As an example, a guitar
track could be made to reduce in volume with the
vocal track by passing the guitar through the Essence
main audio path and feeding the vocal track into the
side chain insert return. With appropriate adjustments,
the guitar track will get quieter when the vocal is
present. All sorts of similar effects are possible.
6] Specifications
Frequency Response with no gain reduction
14Hz to 107kHz, +/- 1.5dB
Maximum Input Level +25dBu
Maximum Output Level +27dBu
Total Harmonic Distortion
Measured at 0dBu input, no gain reduction, make up Gain 0dB
100Hz 0.1%, 1kHz 0.015%, 10kHz 0.002%
Measured at +10dBu input, 20dB gain reduction, make up Gain
+15dB, Attack AUTO, Release 16
100Hz 0.1%, 1kHz 0.015%, 10kHz 0.005%
Residual Noise -95dB A wtg, 150ohm source Z, make up Gain 0dB
Make up Gain 0dB to +15dB
Maximum Available Gain Reduction 25dB
S/C HI EQ Boost/Cut 8dB @ 10kHz
S/C LO EQ Boost/Cut 8dB @ 100Hz
Main Audio Input Impedance 20k ohms, bal or unbal
Main Output Impedance 100 ohms bal or unbal
Sidechain Send Output Impedance 100 ohms unbal
Sidechain Return Input Impedance 44k ohms bal or unbal
Sidechain Max Input/Output Levels +22dBu
Size = (3”Wx5.25”H). Fits 2 spaces in API™ 500VPR Series rack format
Power requirements = 120mA +/- 15-18 volts DC, as supplied by
rack power supply.
Specifications are typical of a production unit and are subject to
change without notice because we might be able to make it slightly
better. 0dBu reference = 0.775 volts RMS.
- 14 -
- 15 -
Page 9

7] Warranty and Service
ESSENCE USERS MANUAL VERSION
-
1, SEPT.
2006.
We are confident that you will receive many years of
trouble free operation from your unit. If however you
experience any technical problem with your Essence,
contact your dealer or Buzz Audio for recommendations
on what to do.
For on line support visit our web site;
www.buzzaudio.com and click on Users Area
Buzz Audio, 42b Hania St, PO Box 6677, Te Aro,
Wellington, New Zealand.
Voice/Fax 64+4+385-2478.
Email; [email protected]
•Disclaimer
Buzz Audio Ltd is not liable for any damage to
amplifiers, consoles, speakers, the rack and power
supply into which it is fitted or any other equipment
and/or electric shock to humans that is caused by
negligence or improper installation and/or use of the
Essence compressor module.
•Standard Product Warranty
Buzz Audio guarantees the Essence to be free of
defective materials and/or workmanship for a period of
1 year (12 months) from the date of sale, and will
replace defective parts and repair malfunctioning
products under this warranty when the defect occurs
under normal installation and use – provided the unit is
returned to our factory (or duly authorised service
centre) via prepaid transportation with a copy of the
proof of purchase, ie, sales receipt. This warranty
provides that examination of the returned product must
indicate, in our judgement, a manufacturing defect.
This warranty does not extend to any product that has
been subjected to misuse, neglect, accident, improper
installation, or where the date code has been removed
or defaced. The standard warranty is NOT transferable.
•Product Warranty Extension
The above Warranty may be extended to a period of 2
years (24 months) from date of sale provided the
enclosed Warranty Registration card is completed and
returned to the office of Buzz Audio within 4 weeks (28
days) from purchase date. Alternatively, you may
Register your purchase on-line at our web-site
www.buzzaudio.com. The Extended Warranty is
transferable to the new owner if you on sell the unit
during the warranty period.
CONTENTS COPYRIGHT BUZZ AUDIO LTD 2006.
PO BOX 6677, TE ARO. WELLINGTON, NEW ZEALAND.
VOICE/FAX 64+4+385-2478.
www.buzzaudio.com email [email protected]
- 16 -
- 17 -
 Loading...