

Page 1

Database Prep
A Guide to Input and Output Files
Database Prep Edition 18
September 2006
Page 2

Contact information Contact us on the Web at http://www.firstlogic.com/customer
If you find any problem with this documentation, please report it to Business Objects
in writing at
Copyright Copyright © 2006 Business Objects. All rights reserved.
Patents Business Objects owns the following U.S. patents, which may cover products that are
documentation@businessobjects.com
.
offered and sold by Business Objects: 5,555,403, 6,247,008 B1, 6,578,027 B2,
6,490,593 and 6,289,352.
Trademarks Business Objects, the Business Objects logo, Crystal Reports, and Crystal Enterprise
are trademarks or registered trademarks of Business Objects SA or its affiliated
companies in the United States and other countries. All other names mentioned herein
may be trademarks of their respective owners.
Third-party contributors Business Objects products in this release may contain redistributions of software
licensed from third-party contributors. Some of these individual components may
also be available under alternative licenses. A partial listing of third-party
contributors that have requested or permitted acknowledgments, as well as required
notices, can be found at: http://www.businessobjects.com/thirdparty
2
Database Prep
Page 3

Contents
Preface .............................................................................................................5
Chapter 1:
Introduction to the software programs ....................................................... 7
Software programs ...........................................................................................8
Input files and input file results......................................................................10
Databases that the software can process ........................................................12
Supporting file types ......................................................................................13
Chapter 2:
Databases that the software can process ................................................... 15
dBASE3 and compatible databases................................................................16
Variable-length, delimited ASCII text files ...................................................18
Fixed-length ASCII and EBCDIC text files...................................................20
Use Oracle as input ........................................................................................22
Chapter 3:
Format files for fixed-length ASCII
and fixed-length EBCDIC .......................................................................... 27
Introduction to format files ............................................................................28
Create format files..........................................................................................29
ASCII file formatter .......................................................................................30
Define fields in your format file.....................................................................31
Chapter 4:
Delimited format files for delimited ASCII .............................................. 35
Introduction to delimited format files ............................................................36
Create delimited format files..........................................................................37
Define fields in your delimited format file.....................................................38
Set up the delimiter characters .......................................................................40
Table of ASCII code values ...........................................................................42
Chapter 5:
Definition files (DEF) .................................................................................. 43
Introduction to definition files........................................................................44
Match input with a definition file...................................................................45
Create definition files.....................................................................................46
Define input name format ..............................................................................49
Use PW fields for aliasing..............................................................................51
Chapter 6:
Changes in definition files........................................................................... 53
Choose contents of definition files.................................................................54
Follow a database through the software.........................................................56
Chapter 7:
Output files................................................................................................... 61
Set up an output file .......................................................................................62
Contents
3
Page 4

Overview of output file setup ........................................................................ 63
Set the format of an output database..............................................................64
Place information in an output database........................................................66
Types of data available for output .................................................................67
Supporting files automatically created with an output database.................... 69
Chapter 8:
Convert database types and format .......................................................... 71
Input files with different formats...................................................................72
Input and output fields and data types ........................................................... 74
Convert ASCII and EBCDIC input to dBASE3 output ............................... 76
Convert dBASE3 input to ASCII output ....................................................... 78
Create a delimited file with nonstandard delimiters ...................................... 79
Chapter 9:
Filter and function expressions.................................................................. 81
Expressions .................................................................................................... 82
Filters and functions....................................................................................... 83
Use filters to set criteria .................................................................................84
Operator words for combining functions....................................................... 86
Nested functions ............................................................................................ 87
Example functions ......................................................................................... 88
Other operators .............................................................................................. 91
List of functions .............................................................................................92
Summary of functions by purpose............................................................... 100
Appendix A:
Using Unicode............................................................................................. 103
How we support Unicode ............................................................................105
Unicode implementation in your Job and Views product............................107
Interface changes ......................................................................................... 108
Processing Unicode data.............................................................................. 109
Mapping values from Unicode to Latin-1.................................................... 112
Handling characters that lack valid values .................................................. 113
Bypassing data you don’t want processed ................................................... 115
Creating filters for Unicode data ................................................................. 118
Unicode implementation in your API product............................................. 121
Unicode functions and methods...................................................................122
Index............................................................................................................ 123
4
Database Prep
Page 5

Preface
About Database Prep This manual is a training aid and reference document that explains how to
prepare your databases for some of our software applications. We assume that
you are familiar with your operating system, text editor, and database manager
or other list-management program.
Don't miss emails from us
Email messages concerning this product come from a different address now.
Ever since Business Objects purchased Firstlogic, Inc. in April 2006, email
messages from us have come from a businessobjects.com email address. Make
sure that your email system does not unintentionally filter these messages to a
spam, trash, or quarantine area where you might miss them. We don’t want
product to not reach you.
Access the latest documentation
any important news about your
You can access product documentation in several places:
On your computer. Release notes, manuals, and other documents for
each product that you have installed are available in the Documentation
folder. Choose Start > Programs > [product name or product family] >
Documentation.
On the Customer Portal. Go to www.firstlogic.com/customer, and then
click the Documentation link to access all the latest product
documentation. You can view the PDFs online or save them to your
computer for viewing or printing.
Conventions This document follows these conventions:
Convention Description
Bold
Italics
> in menu
commands
!
Highlights file names, paths, and text that you should type exactly
as shown. For example, “Type
Both emphasizes text and indicates text for which you should substitute your own data or values. For example, “Type a name for your
file, and the
Indicates commands that you choose from menus in the following
format: Menu Name > Command Name. For example, “Choose
File > New.”
Alerts you to important information and potential problems.
Points out special cases that you should know about.
Draws your attention to tips that may be useful to you.
.txt
extension (
cd\dirs
testfile
.txt
.”
).”
Preface
5
Page 6

6
Database Prep
Page 7

Chapter 1:
Introduction to the software programs
This chapter provides an introduction to the software products DataRight IQ,
ACE, Match/Consolidate, Presort, and Label Studio. It also provides a brief
overview of input, output, and work files, as well as the databases that the
software can process and the types of supporting files used by the software.
Chapter 1: Introduction to the software programs
7
Page 8

Software programs
The following is a brief description of the software products DataRight IQ, ACE,
Match/Consolidate (MCD), Presort, and Label Studio.
DataRight IQ DataRight IQ is an important part of any information quality project because it
gives clean, consistent, and complete data. DataRight IQ has powerful name and
firm parsing, standardization, and data enrichment capabilities, which provide the
foundation for subsequent customer matching and consolidation. Providing
customers the ability to parse additional data elements, such as e-mail, date, SSN,
phone number (domestic and International) and patterns empowers them to gain
greater insight to their data.
Pre-processing with DataRight IQ will allow for greater matching results, and
therefore a more accurate single customer view of each client. When implemented
within a total information quality suite, DataRight IQ maximizes the
effectiveness and accuracy of data mining results, providing greater intelligence
for targeted marketing efforts and improved response rates and business results.
ACE and International ACE
ACE is an acronym for Address Correction and Encoding. ACE does just that—
you give ACE an address, and ACE gives you back a corrected, complete,
standardized form of that address. At the same time, ACE can assign codes for
postal automation and other purposes.
Most ACE users simply want to make sure that their address data is correct and
complete. To deliver this, ACE relies on directories of addresses that are known
to the governing postal service. In addition:
ACE verifies that the city, state or province, and postal code agree with one
another. If you have only a city and state or province, ACE usually can add
the postal code, and vice versa.
ACE can standardize the address line, too. For example, ACE can correct a
misspelled street name, fill in missing information, and remove unnecessary
punctuation marks.
If your address list contains any undeliverable addresses (vacant lots,
condemned buildings, and so on), ACE identifies these for you.
ACE can also assign its own diagnostic codes to help you find out why
addresses were not assigned or how they had to be corrected.
Match/Consolidate Match/Consolidate is a data quality tool that identifies matching records based on
user-elected criteria. Match/Consolidate uses sophisticated, adjustable matching
techniques in its search for matching consumer and business records. This lets
you perform a finer, more flexible search for matches in any database, and allows
for more meaningful relationship analysis of the data.
Match/Consolidate also lets you eliminate duplicate records and can help you
manage your lists. Users can eliminate duplicate records by sending them to an
output database or purge them to alleviate disk space problems. List management
allows you to target those that may be most receptive to their offers by analyzing
customers that appear on more than one list.
8
Database Prep
Page 9

Presort Presorting is the task of sorting mail and preparing it in containers so that it can
be transported through the postal system. It’s called pre sorting because you sort
the mail before you submit it to the U.S. Postal Service (USPS) instead of paying
them to sort it.
A presort scheme is a set of USPS rules for presorting. There are several schemes
for each class of mail and type of mail piece. Each scheme is linked with a
particular type of container (trays, sacks, or pallets) and a range of postage rates.
When you run Presort, it plans for you how packages and containers are formed,
according to the USPS scheme rules. Every package and container has a
destination—either a local office or a larger, central facility—and a label or mark
that identifies that destination. When it reaches its destination, the package or
container is opened and processed—perhaps for further routing, and eventually
for delivery.
Label Studio Label Studio is a design tool that takes your input files and outputs customized
labels. It is a perfect fit with our other database and mailing-list management and
production products.
With Label Studio, set up your job file, set up your printers, design and print your
labels (address, container, pallet, or generic), and print your reports. In addition,
you can split your output into multiple output files by creating unit and/or subunit
breaks.
Label Studio works with many different Windows and UNIX printer drivers and
ink jet printer drivers, or you can use a Generic Text driver.
Chapter 1: Introduction to the software programs
9
Page 10

Input files and input file results
The following illustration shows how information flows into and out of a job. For
descriptions of each of these job components, see the following subsections on
input files, output files, and work files.
Job File
Software program
Output
Database(s)
Supporting
File(s)
Reports
Input
Database(s)
Supporting
File(s)
Work
file(s)
Label
Studio
Input files The following is a brief overview of the input files:
.
File Description
Job file A job file contains all of your instructions, such as where to find the
list(s), what sort of processing to perform, which reports and outputs to create, and where to place them. You’ll find information
about job files in your program manuals.
Input database Usually, the input database is a file of names, addresses, and other
data. See “Databases that the software can process” on page 15 for
more information about the types of input databases that the software accepts.
Supporting file Most of this manual is about the supporting files and how to create
them. Note that supporting files are also known as format files and
definition files. By describing the input database, these supporting
files help the software to open and read data from the database.
10
Database Prep
Page 11

Output files The following are the output files that result from processing:
File Description
Output databases DataRight IQ, ACE, Match/Consolidate, and Presort can create
output databases—that is, databases of processed names and
addresses. Presort creates databases of container and pallet information in addition to arranging your databases into the presort
order you have chosen. The format and content of output files is
up to you.
When the software produces an output database, it automatically
creates supporting files to go with it. This makes it easier to prepare the output of one software program for input to the next
program.
Reports All of the software programs prepare plenty of reports, which doc-
ument your job processing results in many different ways. For
example, some reports present statistics for use by your management or your clients; some are facsimiles of USPS forms for submission with mailings.
Most users instruct the software to save reports in files. You can
then read reports on your screen or send them to your printer. Be
sure to check reports from one process and verify good results
before generating reports for several processes.
Labels Label Studio creates address, container, and pallet labels. You can
send the output directly to your printer, or save it to a disk for later
printing.
Work files During processing, the software programs create work files, which contain
statistics and other information about your job. Most work files are unreadable
except by the software. Consider the following points about work files:
Before processing, make sure that you have enough free disk space for the
software to create the work files. In your job file, you can tell the software
where to place the work files.
Sometimes, the software deletes the work files itself after processing. Other
times, you must delete the files yourself.
Chapter 1: Introduction to the software programs
11
Page 12

Databases that the software can process
As shown in the following table, the software programs process the following file
types; the software also supports file-type conversions. You can input one file
type, and output records to a different type of file. For details about conversions,
see “Convert database types and format” on page 71.
File type Software-type
code
dBase3
, III+, or IV or compatible
database files
Variable-length ASCII
ited with commas, tabs,
or quotes.
Fixed-length ASCII
Fixed-length EBCDIC
Relational Database (RDB)
you run Match/Consolidate jobs
with Oracle access.
text delim-
text ASCII See “Format files for fixed-length ASCII and fixed-length
text EBCDIC See “Format files for fixed-length ASCII and fixed-length
lets
dBASE3 See “Definition files (DEF)” on page 43.
delimited See “Delimited format files for delimited ASCII” on page 35,
RDB See “Use Oracle as input” on page 22.
If you process a database that is not listed above, first consider if the file can
be exported or converted (by other software) to one of the file types that the
software does support. Many users do this, exporting their special files as
fixed-length ASCII text. However, the conversion process takes time and disk
space.
For more information
and “Definition files (DEF)” on page 43
EBCDIC” on page 27, and “Definition files (DEF)” on page 43
EBCDIC” on page 27, and “Definition files (DEF)” on page 43
.
.
.
12
Database Prep
Page 13

Supporting file types
The software works with two types of supporting files: format files and definition
files.
Format files The format file is a physical description of the input data. In this file, you tell the
software some very basic information about each field.
There are four different types of format files: .fmt, .ebc, .dmt, and .rdb. For
information about which databases require format files, see “Supporting-file
requirements” on page 14.
Purposes of definition files
.fmt or .ebc
Topoffset, 1024
Filler1, 30,c
Name, 26,c
Phone, 10,c
Address, 26,c
City, 16,c
State, 2,c
ZIP, 5,c
ZIP4, 4,c
DPBC, 2,c
CART, 4,c
EOR, 2,B
.dmt
Field Delimiter = 044
Topoffset, 1024
Name,, c
Phone, c
Address, c
City, c
State, c
ZIP, c
ZIP4, c
DPBC, c
CART, c
uid = rickm
pwd = xyz123
dsn = mrktdata
select = select fname,
lname, addr1, addr2, city,
state, zip from
address_data where
current_customer = ‘y’
.rdb
No matter what type of database you are processing, the software always requires
a definition file. Consider the following points regarding definition files:
First, you must tell the software what type of database you are processing
because the software will not guess as to the database type.
The software does not guess field names, either, so the definition file sets
higher-level information about fields. In this file, you tell the software how
you want it to interpret and work with your fields.
Definition files contain PW fields paired up with fields from your database; the
PW fields act as translators for the software. You tell the software in the definition
file the names of your fields and the names the software uses for that field.
Refer to the Quick Reference for a list of PW fields. Note that some PW fields
are specific to certain software products. The Quick Reference provides
details about these fields, as well as guidelines for use.
For example, suppose that your database includes a field named ZIP_CODE. The
software does not recognize that name or know what to do with that field. So, in
your definition file, you link this field to a name that the software does recognize,
such as ZIP.
Database Type = dBase3
Name_Line = NAME
Phone = TELEPHONE
Address = ADDRESS
City = CITY
State = STATE
ZIP = ZIP_CODE
ZIP4 = ZIP4
DPBC = DPBC
CART = CART
.def
Chapter 1: Introduction to the software programs
13
Page 14

Now the software knows your ZIP_CODE field by the alias ZIP, and the software
knows what to do with the field, such as receive a ZIP Code from it or perhaps
write a ZIP Code out to it.
Supporting-file requirements
Which supporting files that you need to create depends on the types of databases
processed. See the following table for a list of file types and their required
supporting files.
File type Supporting files required For more information
dBASE3 Definition (
Delimited Format (
ASCII Format (
EBCDIC Format (
Oracle Format (
.def
) only See “Definition files (DEF)” on page 43.
.dmt
) and Definition (
.fmt
) and Definition (
.ebc
) and Definition (
.rdb
) and Definition (
.def
)See “Delimited format files for delimited ASCII” on page 35, and
“Definition files (DEF)” on page 43
.def
)See “Format files for fixed-length ASCII and fixed-length
EBCDIC” on page 27, and “Definition files (DEF)” on page 43
.def
)See “Format files for fixed-length ASCII and fixed-length
EBCDIC” on page 27, and “Definition files (DEF)” on page 43
.def
)See “Definition files (DEF)” on page 43.
.
.
.
14
Database Prep
Page 15

Chapter 2:
Databases that the software can process
This chapter provides information about dBASE3 and compatible databases,
variable-length, delimited ASCII text files, fixed-length ASCII or EBCDIC text
files. It also provides information about Oracle, which helps you organize related
data in separate, manageable units, while maintaining data integrity.
Chapter 2: Databases that the software can process
15
Page 16

dBASE3 and compatible databases
All software programs (except AS/400 and MVS versions) can process databases
produced by dBASE, versions III, III+, and IV. Whenever you must identify your
database type, use dBASE3. By convention, dBASE3-compatible files have the
file-name extension .dbf.
The following database programs are claimed by their manufacturers to be
compatible with dBASE3. To that extent, they should be compatible with the
software. Note that we make no warranty about such compatibility.
Alpha Three, Alpha Four, and Alpha Five by Alpha Software Corp.
Clipper by Nantucket Corp.
FoxBASE and FoxPro by Fox Software
Quicksilver by Wordtech Systems, Inc.
If you use Microsoft Access, use the Export feature to create a copy of your
database that is dBASE3-compatible. Then run the copy through the software.
dBASE3 features that the software supports
All software programs can read input from dBASE3 files. When producing
output, the software can create a new dBASE3 file or append records to the end of
an existing database. Another option, referred to as Input Posting, uses the
software results to update the same file that you input. See your program manual
for details about Input Posting.
The software conforms to the file standards of dBASE3. Each record may contain
up to 4,000 bytes in up to 128 fields. Numeric fields cannot exceed 19 bytes. Note
that some compatible programs produce non-compatible database files. FoxPro,
for example, supports some fields that are not supported by dBASE3. It also
allows for more bytes in more fields than dBASE3.
Nondestructive delete markings
The software supports nondestructive delete marking in any dBASE3 file. Most
software programs automatically ignore deleted records. ACE, DataRight IQ, and
Label Studio give you the option of processing deleted records or ignoring them.
The software does not support Memo fields. Also, the software does not work
with indexes, so the software processes records in their physical sequence.
dBASE3 input You do not need to provide the software programs with a physical description of
the file; in other words, you do not have to create a format file. The software
receives field name, length, and type information from the dBASE3 header. (A
header is a section at the top of a dBASE3 file, not normally displayed to users.)
However, you are required to provide a supporting definition (DEF) file. For
more information, see “Definition files (DEF)” on page 43
.
16
Database Prep
Page 17

dBASE3 output The software programs can create a new dBASE3 file for output or append
processed output records to the end of an existing database. When you choose to
create a new file, you may specify the name, length, and type of each field, which
you will specify in your job file. The following table shows the field type and
length rules. Consider the following field name rules:
The maximum name length is 10 characters.
The first character must be a letter.
The only punctuation mark permitted is the underscore ( _ ).
Field type Length Comments
Character 1–254 Sometimes called alphanumeric. Data is left aligned and
right-filled with spaces.
Numeric 1–19 One byte is reserved for the sign (positive + or minus –) so
the field length is actually 19 plus 1 for the sign. Also, if
there is a decimal point, it will physically occupy 1 byte, and
there must be at least 1 digit to the left of the decimal point.
Not suitable for ZIP or ZIP4 fields, because leading zeroes
are removed (for example, ZIP 07960 becomes _7960.
Date 8 Format is yyyymmdd.
Logical 1 May contain T/F or Y/N.
When the software creates a dBASE3 file, it enforces dBASE3 rules. If your
output-file specifications do not conform to dBASE3 standards, the software
issues an error message.
The software automatically creates a definition file to go with your new dBASE3
output file; this definition file contains the database type only. If you are going to
use the definition file for input to another program, remember to include other
information before using it. For more information, see “Definition files (DEF)”
on page 43.
Chapter 2: Databases that the software can process
17
Page 18

Variable-length, delimited ASCII text files
In a delimited file, fields or records vary in length. To find where one field or
record ends and another begins, the software looks for special, separating
characters called delimiters. The following illustration shows a few of the most
common styles.
Comma-delimited, with double quotes around all fields
“MS.”, “ A L I C E ”, “ M ”, “BRADSHAW E”, “ ”, “ 9 4 G L E N M A R K R D ”, “A G A W A M ”, “ M A”
“MS.”, “DAPHNE”, “J”, “CHESHIRE”, “”, “45 MORAL RD”, “AGAWAM”, “MA”
“MR.”, “JOSHUA”, “A”, “OMELETTE”, “JR”, “70 DIKE RD”, “ASHBURNHAM”, “MA”
“MRS.”, “NANNETTE”, “V”, “PAVELSHAM”, “”, “134 WALKER RD”, “ASHBURNHAM”, “MA”
“MS.”, “RORY”, “A”, “PARKER, USNR”, “”, “95 LIONEL ST”, “FRAMINGHAM”, “MA”
Comma-delimited, with quotes only where necessary
MS., ALICE, M, BRADSHAWE, , 94 GLENMARK RD, AGAWAM, MA
MS., DAPHNE, J, CHESHIRE, , 45 MORAL RD, AGAWAM, MA
MR., JOSHUA, A, OMELETTE, JR, 70 DIKE RD, ASHBURNHAM, MA
MRS., NANNETTE, V, PAVELSHAM, , 134 WALKER RD, ASHBURNHAM, MA
MS., RORY, A, “PARKER, USNR”, , 95 LIONEL ST, FRAMINGHAM, MA
Tab-delimited (shown here with tabs expanded)
MS. →ALICE
MS.
→
DAPHNE
MS.
→
JOSHUA
MRS.
→
NANNETTE→V →PAVELSHAM,
MS.
→
RORY
→M →
BRADSHAWE
→J →
CHESHIRE
→A →
OMELETTE
→A →
PARKER, USNR
→→
94 GLENMARK RD→AGAWAM
→→
45 MORAL RD
→JR→
70 DIKE RD
→→
134 WALKER RD
→→
95 LIONEL ST
→
→
→
→
Delimiters The following table describes the three types of delimiters.
Delimiter type Description
Record A record delimiter separates one record from another; it is almost
always an end-of-line mark. An end-of-line mark may be a linefeed character or carriage-return and line-feed pair.
Field A field delimiter separates one field from another. The most com-
mon characters used are either a comma or a tab.
Framing Field-framing delimiters are helpful when there is punctuation
within a field that might be mistaken for a field delimiter. For
example, “Manager, Sales.” The most common framing character is
the double-quote. Some programs place quotes around every field;
other programs use quotes only where necessary.
AGAWAM
ASHBURNHAM
ASHBURNHAM
FRAMINGHAM
→
MA
→
MA
→
MA
→
MA
→
MA
Delimited input All programs can read input from delimited ASCII files. However, some
supporting utilities cannot accept delimited input, including ZipCount.
You are required to provide two supporting files: delimited format (DMT) and
definition (DEF). These files provide information about how to read the delimited
18
Database Prep
Page 19

file. The delimited format file is explained in “Delimited format files for
delimited ASCII” on page 35, and the definition file in “Definition files (DEF)”
on page 43.
By default, the software expects the most common types of delimiters: carriage
return/line-feed between records, commas between fields, and double-quotes for
framing. If your file is different—other characters are used, or one of the
delimiter types is not used—then you must inform the software by specifying the
delimiter characters in your delimited format file. For instructions, see
“Delimited format files for delimited ASCII” on page 35.
The software limits the number of fields per record and the total number of
characters per record to 32,767. In theory, you could have one field of 32,767
characters, or 32,767 fields of 1 character each.
The Input Posting feature is not available for delimited input files; in other words,
you cannot write the software results back to a delimited input file. Note that this
is possible with all other database types. In addition, ACE does not support the
Sort Input File by ZIP Code option with delimited files.
Delimited output When producing output, the software can create a new delimited file or append
records to the end of an existing file. When you choose to create a new file, you
specify its format through settings in your job file. You may specify each field,
but you may not specify delimiters.
By default, the delimited output file contains carriage return/line feed for record
delimiters; commas for field delimiters; and double quotes for field-framing
characters. If you want delimiters other than the defaults, follow the instructions
“Create a delimited file with nonstandard delimiters” on page 79.
The software automatically creates definition, delimited format, and index (IDX)
files to go with your new delimited output file. These supporting files are
important if you use the file for input to another software program. The IDX file
is an index that enables other programs to process the database much more
quickly.
Chapter 2: Databases that the software can process
19
Page 20

Fixed-length ASCII and EBCDIC text files
In a fixed-length file, each field must be the same length in every record, and all
records must be exactly the same length. To find where one field or record ends
and another begins, the software simply counts characters. The following
example shows part of a fixed-length file as seen using a text editor.
MS. ALICE MBRADSHAWE 94 GLENMARK RD AGAWAM MA
MS. DAPHNE JCHESHIRE 45 MORAL RD AGAWAM MA
MS. JOSHUA AOMELETTE JR 70 DIKE RD ASHBURNHAM MA
MRS. NANNETTE VPAVELSHAM, 134 WALKER RD ASHBURNHAM MA
MS. RORY APARKER-JONES 95 LIONEL ST FRAMINGHAM MA
When the data is shorter than the space allotted for it, programs insert extra
spaces to fill the gap. Note that in the following example, the dots represent the
extra spaces.
MS. ALICE....... MBRADSHAWE.......... 94 GLENMARK RD.. AGAWAM...... MA
MS. DAPHNE...... JCHESHIRE........... 45 MORAL RD..... AGAWAM...... MA
MS. JOSHUA...... AOMELETTE......JR... 70 DIKE RD...... ASHBURNHAM.. MA
MRS. NANNETTE... VPAVELSHAM,......... 134 WALKER RD... ASHBURNHAM.. MA
MS. RORY........ APARKER-JONES....... 95 LIONEL ST.... FRAMINGHAM.. MA
Whenever you view a fixed-ASCII or EBCDIC file using a text editor, the fields
should line up in neat columns. If they don’t line up, there may be a flaw in the
database itself or an error in the format information (format file). The following
example shows a file with an error in the format information; notice that the
columns aren't lined up.
MS. ALICE MBRADSHAWE 94 GLENMARK RD AGAWAM M
AMS. DAPHNE JCHESHIRE 45 MORAL RD AGAWAM
MAMR. JOSHUA AOMELETTE JR 70 DIKE RD ASHBURNHAM
MAMRS. NANNETTE VPAVELSHAM, 134 WALKER RD ASHBURNHAM
MAMS. RORY APARKER-JONES 95 LIONEL ST FRAMINGHAM
MA
Delimited vs. fixed-length
If you have a choice of storing your records in delimited or fixed-length format,
consider these points: Delimited files require less disk space for the same data,
but disk space is relatively inexpensive. Delimited files can be much slower to
process because the software must scan for delimiters.
20
You cannot post to a delimited input file. In a fixed-length file, the software can
simply count characters, which is much faster. Also, some utilities cannot support
delimited file types and ASCII files.
Database Prep
Page 21

Fixed ASCII and EBCDIC input
All programs can read input from fixed-length ASCII and EBCDIC files. You are
required to provide two supporting files, called format and definition. These files
provide the software with information about how to read the database. For
information about format files, see “Format files for fixed-length ASCII and
fixed-length EBCDIC” on page 27. For information about definition files, see
“Definition files (DEF)” on page 43
.
The software limits the number of fields per record, and the total number of
characters per record, to 32,766. In theory, you could have one field of 32,766
characters, or 32,766 fields of one character each.
The software can read only printable characters. The software reads any nonprintable characters as blanks, or the software coverts them to some other
character or output rather than a blank. There are exceptions to this, however. For
information about these exceptions, see “Packed numeric fields” on page 32, and
“Binary field” on page 32.
The Input Posting feature is available for fixed-length input files. In other words,
you can write the software results back to an input file. For more information,
refer to your program manual.
Fixed ASCII and EBCDIC output
When producing output, the software can create a new fixed-length ASCII or
EBCDIC file, or append records to the end of an existing file. When you choose
to create a new file, you may specify the name, length, and data type of each field.
You specify this information in your job file.
The software automatically creates format files and gives you the option to create
definition files to go with your new fixed ASCII or EBCDIC output file. These
supporting files are important if you are going to use the file for input to another
program.
Chapter 2: Databases that the software can process
21
Page 22

Use Oracle as input
Match/Consolidate is the only job file product currently supporting Oracle.
Enable Oracle access After installing the software, run the batch file listed below for your operating
system. This batch file copies several files so that Match/Consolidate can use
Oracle databases.
Platform Batch file Notes
Windows 2000
UNIX
set_ora.bat
set_ora Important:
run it from the
When you run the batch file, you must
/adm
subdirectory.
Running set_ora copies the floci.dll file for the installed Oracle version into
floci.dll. If Match/Consolidate properly executes this batch file, these two DLL
files should be the same size.
On Windows 2000, do not run set_ora from Explorer; run it from DOS.
Disable Oracle access In the future, if you decide that you no longer want to be able to access Oracle
databases with Match/Consolidate, you may disable the Oracle access by running
the batch file listed below for your operating system.
Platform Batch file Notes
Windows 2000
UNIX
uset_ora.bat
set_ora
(Select Option 1
No Oracle support)
Important:
When you run the batch file,
you must run it from the
/adm
subdirec-
tory.
Provide essential Oracle information to users
22
Database Prep
Be sure to share the following Oracle information with those who will set up the
Match/Consolidate jobs. Users will need to enter this information in the relational
database (RDB) file (see “RDB file setup” on page 24) so that they may run
Match/Consolidate jobs with Oracle access.
Statement Description
UID User name or identification, which is needed to access the Oracle
database.
PWD User password, which is needed to access the Oracle database.
DSN Database file in which to connect.
SELECT The Select statement tells Oracle what data to retrieve from the
database. See “Select statements” on page 24 for details.
Page 23

Oracle work files If you are working from an Oracle database, Match/Consolidate creates
additional work files in the work file directory with the following names. Note
that “jobname” is the name of the job file, and “xx” is the input file number.
jobname.xx.db
jobname.xx.fmt
jobname.xx.def
Consider saving your work files so that if you need to rerun your job for changes
to your output files and reports, or if you need to rerun your job for additions to
your output files and reports, you can eliminate the need to do another timeconsuming Select statement from the Oracle database.
Size of .db file It’s important to note that the .db file may be quite large, depending on the size of
fields and number of records that you’re working with. To calculate how large
this file may be, multiply the combined length of all selected fields times the total
number of selected records (or rows). This number (in bytes) is roughly the size
of the .db file.
For example, if the combined length of all selected fields is 150 characters, and
there are 200,000 selected records, then the size of your .db file would be roughly
30 million bytes, or 30 MB (megabytes).
Combined field
length
X number of records = .db file size (in bytes)
150 X 200,000 = 30,000,000
Plan accordingly to ensure that you have enough disk space to accommodate
these work files. If the work files are too large, you will receive a “write
failed” error message.
Novell version Novell 4.1 and prior versions support file names only in the 8.3 format (8-
character file name and a 3-character extension). Because of the differently
formatted Oracle work files, you will not be able to access Oracle databases with
Match/Consolidate if you are running on Novell 4.1 or a prior version of Novell.
Novell may supply a patch to fix this, which you may obtain from their web site
at http://www.novell.com
Oracle Preparing to access an Oracle database is similar to preparing to use other
databases:
You must have a DEF file, which defines the database type and matches field
names from the database with field names that Match/Consolidate can
understand.
You must have an RDB file, which contains descriptive information about the
database. The RDB file takes the place of the input file and the format (FMT)
file.
Chapter 2: Databases that the software can process
23
Page 24

DEF file setup To let the software know that you’re processing an Oracle database, in your DEF
file, type oracle on the DATABASE TYPE line, after the equal (=) sign.
DATABASE TYPE = oracle
RDB file setup In your RDB file, you enter information about the database file.
Statement Description
UID User name or identification, which is needed to access the Oracle
database.
PWD User password, which is needed to access the Oracle database.
DSN Database file in which to connect.
SELECT The Select statement tells Oracle what data to retrieve from the
database. See “Select statements” on page 24 for details.
Consider the following example data:
uid = rickm
pwd = xyz123
dsn = mrktdata
select = select fname, lname, addr1, addr2, city, state, zip from
address_data where current_customer = 'y'
You enter the RDB file name at the Input File Name parameter in the Input File
block. The RDB file is not the actual database, but it points Match/Consolidate to
your Oracle database. In addition, you do not have a separate FMT file when
using an Oracle database, so you must leave the Default ASCII FMT parameter in
the Auxiliary Files block blank.
BEGIN Input File ==============================
Input File Name (path & file name) = thisjob.rdb
…
In Views, opening an Input File block may take a long time when there is a
large Oracle selected. You cannot use the Post to Input File block to post back
to an Oracle database.
Select statements In your RDB file, on the SELECT line, you enter a Select statement to indicate
what data you want to retrieve from the Oracle database. For information about
how to compose Select statements, refer to your Oracle or SQL documentation.
Input file In your RDB file for your input database, you can use any Select statement that
Oracle can read. It’s a good idea to test your Select statement, using SQL*Plus to
make sure that Oracle can read your Select statement.
Output file You may clone an RDB file, and you may append to an existing Oracle database
named in your RDB file. However, you may not create an RDB output file.
24
If you are writing output to an existing Oracle database, do not set up the Create
File for Output block. You will only set up the desired output file block, such as
Database Prep
Page 25

the Match/Consolidate, All-Duplicates, Multi-Occurrence, or Custom Match/
Consolidate output file blocks.
In an RDB file for an output database (to insert data in an existing table), it has
the same four parameters as the RDB input file; however, the syntax for the Select
statement is more limited. You may not use “where” clauses or “order by” clauses
in the Select statement.
To append to an existing Oracle database, use one of the output file blocks
(for example, the Match/Consolidate Output File block). Enter the name of
the RDB file in the File Name parameter, and type append at the Existing File
parameter.
In addition, the Select statement used for output files may refer to only one table.
If you need to work with more than one table, you could post to a temporary table
and then use SQL to update the real tables in the database. In this case, you would
probably also want to use some kind of identification number, such as customer
ID, to use when updating the real tables.
Real table
Match/Consolidate
Merge/Purge-
processed
processed data
data
Temporary
table
Real table
Unconventional ending to
select statement
Unlike other Select statements that you may use when working with Oracle, the
Select statements that you enter in your RDB file must not end with a semicolon.
Oracle database tips For Match/Consolidate to be able to read fields in your Oracle database, the fields
must be of the types and maximum field lengths as shown in the following table.
Field type Maximum field length
char 255
varchar2 2000 (variable length character field)
numeric 18 (see the paragraph below)
date 8 (yyyymmdd)
The maximum field length for numeric fields from Oracle databases is slightly
smaller than it is for other database types. The reason for this is that the field must
be able to accommodate a possible minus sign and decimal point (one character
for each).
Database type Maximum field length for numeric fields
Oracle 18
Other 19 or 20
Chapter 2: Databases that the software can process
25
Page 26

Verification When you run a Match/Consolidate job that reads from an Oracle database over
the network, there may be a delay while Match/Consolidate performs verification.
The length of the delay depends on such factors as your computer’s speed, the
server’s speed, and the size of the database.
26
Database Prep
Page 27

Chapter 3:
Format files for fixed-length ASCII
and fixed-length EBCDIC
This chapter provides an introduction to format files and information about
guidelines for creating format files. The chapter also provides information about
the FirstPrep program and how to define fields in your format file.
You may have purchased one of our file preparation utilities, such as FilePrep or
Pwfmt for UNIX users, or FirstPrep for Windows users. For information about
these products, see the Utilities page of the documentation site of the Customer
Portal.
Chapter 3: Format files for fixed-length ASCII and fixed-length EBCDIC
27
Page 28

Introduction to format files
A format file is a physical description of a database. Format files contain
information about the record layout, including each field’s name, length, type,
and format.
When you process a dBASE3 file, you do not need a format file; the software can
get format information from the header that every dBASE3 file contains.
However, a format file is required for most other database types.
In order for the software to correctly read your database, the format file
!
must be accurate. If you do not define and correct errors in format files,
they may cause delays in processing.
Matching input with a format file
A format file is external and is a separate file from the database, so you must help
the software match each input database to a format file. There are three ways to
do this:
You can make an individual format file compatible with each database that
you process. Based on the name and location of the database, the software
will find the format automatically. Be sure to place the format file in the same
directory as the database. For example, for the database c:\data\myfile.dat,
the format file is c:\data\myfile.fmt.
Topoffset, 1024
Filler1, 30,c
Name, 26,c
Phone, 10,c
Address, 26,c
City, 16,c
State, 2,c
ZIP, 5,c
ZIP4, 4,c
DPBC, 2,c
CART, 4,c
EOR, 2, B
If all the databases you process are in the same format, then you can save
some time by making one master format file and applying it to all of your
databases. This feature is called Default ASCII FMT; if the application
supports this, look for it in the Auxiliary Files block in your job file.
Perhaps most of your databases are in standard format, but you process a few
exceptions, too. In that case, set up a default format file and apply it to the
standardized files. For the others, create individual format files. Where the
software finds an individual format file, it will override the default format
file.
28
Database Prep
Page 29

Create format files
Follow these guidelines when you create format files.
Lines As shown in this example, list fields one field per line in the order that they
appear in records. On each line, type the name, length, and data type of one field;
be sure to place a comma between these items. For more information, see “Define
fields in your format file” on page 31.
Topoffset, 1024
Filler1, 30,
Hour_Wage, 4, n, 2
Hire_Date, 10, d, dd-mmm-yyyy
SSN,11,c
Filler2, 90
Name, 26,c
Phone, 10,c
Address, 26,c
City, 16,c
State, 2,c
ZIP, 5,c
ZIP4, 4,c
DPBC, 2,c
CART, 4,c
EOR, 2, B
Spaces and field names
The software does not require spaces between items; if you use extra spaces, the
software ignores them. Do not use spaces within field names. Consider the
following rules regarding field names.
Make every field name unique.
Field names must conform to dBASE3 rules: maximum name length is 10
characters, which refers to name length, not field length. The first character
must be a letter. The only punctuation mark that you may use in field names
is the underscore ( _ ). You may not use spaces in names.
Capitalization of field names is optional; however, field names are not case-
sensitive. For example, no format file should have both zip and ZIP fields
because the software would consider these two to be the
same fields.
For your ZIP+4 field, use the name ZIP4, and leave out the plus sign.
To prevent confusion, you may find it helpful to use the same names for your
fields that we use for PW fields. Definition files use PW fields to translate
your database field names and formats into something that the software can
recognize and process. Refer to the Quick Reference for a list of software
names.
Text files Format files are small text files. They must contain only ordinary characters, such
as printable ASCII. If you use a word processor to type a format file, be sure to
save the format file as straight text, not as a word processing document.
File name and location Place the format file in the same directory as the database. For example, for the
database c:\data\myfile.dat, the format file would be c:\data\myfile.fmt.
Chapter 3: Format files for fixed-length ASCII and fixed-length EBCDIC
29
Page 30

ASCII file formatter
The Pwfmt program is part of the FilePrep Utilities package and is typically sold
to UNIX customers. FirstPrep performs the same functionality and is sold to
Windows customers. Keep in mind that the following information is only a
summary. If your company owns FilePrep or FirstPrep, refer to the Utilities page
of the documentation site on the Customer Portal for information about these
utilities.
The Pwfmt and FirstPrep utilities help you create and edit format files. They
combine a text-editing box, where you can type your format file, with Browse
and View modes that help you see your data as you would in a database program.
These utilities also provide several tools for measuring field and record lengths.
Even if you have no information about the data file, you can define its format,
then browse your format file to see that the data is aligned. That’s one of the best
things about using Pwfmt or FirstPrep: When you finish using it, you know your
format file is right.
30
Database Prep
Page 31

Define fields in your format file
This section explains how to type the lines of your format file and applies
whether you create format files through the Pwfmt or FirstPrep utilities, or a text
editor.
To type fields in your fixed-length ASCII or EBCDIC format file, you must first
type the name of the field followed by a comma, the length of the field followed
by a comma, and the type of field. Note that there may be a fourth element, such
as a date format or a number for decimal point position.
Topoffset field for file header
If there is a header at the top of the file, the software must skip over this to find
the first real record. Add a topoffset line at the beginning of your format file,
along with the length of the header in bytes. Keep in mind that this field is an
exception to the format described above for typing the actual lines of your format
file.
Topoffset is a special name recognized by all of the software programs, so
spelling is important. For example: TOPOFFSET, 1024
Character fields Character fields may contain any printable letters, numbers, or punctuation
marks. Mark character fields with a C. For example:
NAME_LINE,30,C
ADDRESS,30,C
CITY,20,C
Numeric fields Mark numeric fields with an N.The fourth element in this example is the number
of decimal places. For example: BALANCE,7,N,2
Date fields When you set up a Date field, you must also declare its format. Mark date fields
with a D. For example: HIRE_DATE,11,D,mmm-dd-yyyy
Note that if you do not specify a date format, mm/dd/yy is the default.
Format entry Example of data
mm-dd-yy 09-13-04
mm/dd/yy (default) 09/13/04
mmm-dd-yyyy Sep-13-2004
yyyy-mm-dd 2004-09-13
yy/mm/dd 04/09/13
Consider these points when working with dates in your databases.
If you have a field that contains a date, use a D for date instead of a C
for character.
A field that contains a date isn't necessarily a date field unless you use a D to
set it up as a date field.
Chapter 3: Format files for fixed-length ASCII and fixed-length EBCDIC
31
Page 32

Logical fields Logical fields represent a True or False, Yes or No value. A logical field should
be one byte long. Your format entry might look like this:
SUBSCRIBER,1,L
Consider these rules regarding Logical fields in ASCII and EBCDIC files:
When presenting an input file containing a Logical field, that field may
contain the letter “T” or the letter “Y” to indicate a Logical value of True.
(Exception: Presort accepts only “T”, not “Y”.) The software interprets any
other value in the field as a Logical value of False.
When an ASCII or EBCDIC output file includes a logical field, the software
represents a Logical value of True by placing a character “T” in the output
field. The software represents a Logical value of False with the letter “F”.
If you use a Logical field in a filter or function (see “Filter and function
expressions” on page 81), remember that you are manipulating Logical
values of True and False, not the letters T, F, Y, or N.
For example, if Subscriber is labeled a Logical field in your format file, then
this input filter would work to input only True records:
+ Input Filter (to 512 chars)....= DB.Subscriber
However, the following filter would not work, because you would be
comparing a Logical True/False with the Character-type constant “T”:
+ Input Filter (to 512 chars)....= DB.Subscriber = "T"
Packed numeric fields The software marks packed numeric fields with a P. When you specify a packed
numeric field, be sure to specify the unpacked length. For example:
ACCOUNT,8,P,15
The fourth element is the number of unpacked digits. If you omit this number, the
software assumes that the number is twice the field length, minus one. A packed
numeric field should only contain integers (no hyphens, slashes, or decimals, for
example).
Do not confuse this field type with the IBM packed decimal. When the
software unpacks fields, it does not insert a physical decimal point. This
treatment is acceptable for integer numbers, such as ZIP Codes; however, do
not process any field that contains a true decimal number.
Binary field If any field contains unprintable data—that is, any characters outside the printable
ASCII set—set up that field as binary type. In your format file, mark binary fields
with a B. For example: BIT_MASK,16,B
Binary fields need not literally contain binary data. Consider the following points
about binary fields:
Binary fields can be passed through the software—copied from an input to an
output file—undisturbed.
32
Database Prep
An end of record (EOR) field, which is a mark that may consist of a line-feed
character or a carriage-return and line-feed pair, should be binary because
C
EOR characters are unprintable (
R and LF). For example: EOR,2,B
Page 33

The software cannot process or display a binary field; it can use only
printable characters for input data. When the software reads data from a
binary field and converts it to character data, it converts any unprintable
characters to blank spaces.
Filler fields When you want the software to ignore a field, refer to it as the following: filler.
The software does not process or display filler fields, so filler is an appropriate
field type for confidential fields (salary, for example) or any unused field.
Each filler field must have a unique name. After the word filler, add a suffix of up
to four letters or numbers—for example, filler1, filler2, and so on. Do not be
concerned about getting your filler fields in any particular order; however, be
ensure to uniquely name each field. For example: FILLER1234,89,B
If you omit the data-type letter, the software will by default handle your filler
field as binary-type data.
If you are defining filler or binary fields and you are planning to convert
!
your ASCII input to dBASE3 output, see “Binary and filler fields” on
page 76.
End-of-record field (EOR)
Your ASCII or EBCDIC database may contain end-of-record marks. The mark
may consist of a line-feed character, or a carriage-return and line-feed pair. Many
ASCII and EBCDIC databases contain these characters, because without them,
records would be difficult to display and read.
If your file contains end-of-record marks, set up a field named EOR. On DOS
systems, the field usually should be 2 characters long; on UNIX systems, it
should be 1 character long. Be sure to use a B for binary when you define the
EOR field. For example:
DOS: EOR,2,B
UNIX: EOR,1,B
The software programs recognize the field name EOR. This is important if you
use the input-file cloning feature, then append more fields. For example, when
you run ACE, you might clone the input file and also append fields for postal
codes. The software ensures that the appended fields are inserted before the EOR
field.
This FMT describes the input file.
You must provide this FMT.
Topoffset, 1024
Filler1, 30,b
Name, 26,c
Phone, 10,c
Address, 26,c
City, 16,c
State, 2,c
ZIP, 5,c
EOR, 2, B
In your ACE job file, you ask
ACE to append three new fields
for postal codes. ACE keeps the
EOR field at the end.
This FMT describes the output file.
The software provides this FMT for you.
Topoffset, 1024
Filler1, 30,b
Name, 26,c
Phone, 10,c
Address, 26,c
City, 16,c
State, 2,c
ZIP, 5,c
ZIP4, 4,c
DPBC, 2,c
CART, 4,c
EOR, 2, B
Chapter 3: Format files for fixed-length ASCII and fixed-length EBCDIC
33
Page 34

34
Database Prep
Page 35

Chapter 4:
Delimited format files for delimited ASCII
This chapter provides an introduction to delimited format files and gives
guidelines for creating delimited format files. It also provides information about
defining fields in your delimited format file and about setting up the delimited
characters.
Your company may have purchased one of our file preparation utilities, such as
FilePrep for UNIX users or FirstPrep for Windows users. For information about
these products, refer to the Utilities page of the documentation site on the
Customer Portal.
Chapter 4: Delimited format files for delimited ASCII
35
Page 36

Introduction to delimited format files
When you process a variable-length, delimited (DMT) ASCII database, the
software requires a delimited format file. They are called DMT files because of
the file-name extension .dmt assigned to them.
Field Delimiter = 009
Field Framing Character =
Topoffset, 1024
Name, 30,c
Phone, 10,c
Address, 30,c
City, 18,c
State, 2,c
ZIP, 5,c
ZIP4, 4,c
DPBC, 2,c
CART, 4,c
The delimited format file is external, meaning that it is separate from the
delimited file itself. The delimited format file is a physical description of a
delimited file and includes information about the record layout, including each
field’s name, type, and format.
For the software to correctly read your delimited file, the file must be
!
accurate. If you do not define and correct errors in delimited format files,
they may cause delays in processing.
Delimited format vs. format
A delimited format file is in some ways similar to a format file. However,
consider the following differences:
In delimited format files, you may define character, date, and numeric fields.
However, you may not use some other field types that are possible in format
files, such as: packed numeric, binary, filler, and EOR.
In a format file, you must provide the length of each field. In a delimited
format file, you should specify a length because the software will run faster;
however, this is optional. For more information see “Maximum field length”
on page 39.
In a format file, you can set up a special field called end of record (EOR). In
a delimited format file, it’s managed differently, with a parameter called
Record Delimiter.
You can create format files using the Pwfmt or FirstPrep utilities, a text
editor, or a word processing program.
36
Database Prep
Page 37

Create delimited format files
Follow these guidelines when you create delimited format files.
Lines As shown in the example at right, list the fields in the order that they appear in
your records, one field per line. On each line, type the name, maximum length
(optional), and data type of one field. Sometimes, there is a fourth element, such
as a date format or a number for decimal point position. Place a comma between
items.
Topoffset, 1024
Hour_Wage, 6, n,2
Hire_Date, 10, d, dd-mmm-yyyy
SSN,11,c
Name, 30,c
Phone, 10,c
Address, 30,c
City, 18, c
State, 2, c
ZIP, 5,c
ZIP4, 4,c
DPBC, 2,c
CART, 4,c
Spaces and field names
The software does not require spaces between items; if you use extra spaces, the
software ignores them. Also, do not use spaces within field names. Consider these
rules regarding field names.
Make every field name unique.
Field names must conform to dBASE3 rules: maximum name length is 10
characters, which refers to name length, not field length. The first character
must be a letter. The only punctuation mark that you may use in field names
is the underscore ( _ ). Do not use spaces in names.
Capitalization of field names is optional; however, field names are not case-
sensitive. For example, no delimited format file should have both zip and ZIP
fields.
For your ZIP+4 field, use the name ZIP4, and leave out the plus sign.
Use the same names for your fields that we use for PW fields. Definition files
use PW fields to translate your database field names and formats into
something that the software can recognize and process. Refer to the Quick
Reference for a list of software names.
Text A delimited format file is a small text file. They must contain only ordinary
characters, such as printable ASCII. If you use a word processor to type a
delimited format file, be sure to save the delimited format file as straight text, not
a word processing document.
File name and location Give your format file the .dmt extension the same base file name as the delimited
file that it describes. Place the delimited format file in the same directory as the
delimited file. For example, the delimited file c:\data\myfile.txt requires the
format file c:\data\myfile.dmt.
Chapter 4: Delimited format files for delimited ASCII
37
Page 38

Define fields in your delimited format file
This section explains exactly how to type the lines of your delimited format file.
Topoffset field for file header
If there is a header at the top of the file, the software must skip over this to find
the first real record. Add a topoffset line at the beginning of your format file,
along with the length of the header in bytes. Topoffset is a special name
recognized by all programs, so spelling is important, such as in this example:
TOPOFFSET,1024
Character fields Character fields may contain any printable letters, numbers, or punctuation
marks. If you wish, you can mark character fields with a C. If you omit the letter,
the software assumes that the field type is character. Consider the following
example:
NAME_LINE,30,C
ADDRESS,30,C
CITY,18,C
The length mentioned in a delimited format file entry is the maximum length. For
information about maximum field length, see “Maximum field length” on
page 39.
Numeric fields A numeric field is marked with an N. For example: BALANCE,7,N
Date fields When you set up a date field, you must also declare its format. For example:
HIRE_DATE,11,D,mmm-dd-yyyy. Note that if you do not specify a date format,
mm/dd/yy is the default.
Format entry Example data
mm-dd-yy 09-13-04
mm/dd/yy (default) 09/13/04
mmm-dd-yyyy Sep-13-2004
yyyy-mm-dd 2004-09-13
yy/mm/dd 04/09/13
Consider these points when working with dates in your databases.
If you have a field that contains a date, use a D for date instead of a C
for character.
A field that contains a date isn't necessarily a date field unless you use a D to
set it up as a date field.
38
Database Prep
Page 39

Logical fields Logical fields represent a True or False, Yes or No value. A logical field should
be one byte long. Your format entry might look like this: SUBSCRIBER,1,L
Here are some rules on Logical fields in ASCII and EBCDIC files:
When you present an input file containing a Logical field, that field may
contain the letter “T” or the letter “Y” to indicate a Logical value of True.
(Exception: Presort accepts only “T”, not “Y”.) The software interprets any
other value in the field as a Logical value of False.
When an ASCII or EBCDIC output file includes a logical field, the software
represents a Logical value of True by placing a character “T” in the output
field. The software represents a Logical value of False with the letter “F”.
If you use a Logical field in a filter or function (see “Filter and function
expressions” on page 81), remember that you are manipulating Logical
values of True and False, not the letters T, F, Y, or N.
For example, if Subscriber is labeled a Logical field in your format file, then
this input filter will input all records within a True value:
+ Input Filter (to 512 chars)....= DB.Subscriber
However, the following filter would not work, because you would be
comparing a Logical True/False with the Character-type constant “T”.
+ Input Filter (to 512 chars)....= DB.Subscriber = “T”
Maximum field length When you specify length in a delimited format entry, this is the maximum length.
The software stops reading an input field when it reaches your limit or the field
delimiter. In effect, excess input data is ignored.
Length is optional in delimited format entries. You may omit it if you would like
the software to read entire fields, regardless of length. However, keep the comma
as a placeholder. For example:
NAME_LINE, ,C
BALANCE, ,N,2
HIRE_DATE, ,D,mmm-dd-yyyy
Be sure to set a maximum field length. If you do not specify a maximum
length, the software takes more time to process the input file because the
software checks each record to determine the maximum length of the field.
Chapter 4: Delimited format files for delimited ASCII
39
Page 40

Set up the delimiter characters
In a delimited file, there may be up to three types of delimiting characters. These
delimiters can be typed as the very first or very last entry in your delimited
format file.
Delimiter Description
Record A record delimiter separates one record from another.
Field A field delimiter separates one field from another.
Framing Field-framing characters are helpful when there is punctuation within a
field that might be mistaken for a field delimiter (for example,
“Manager, Sales.”).
Defaults Unless you specify otherwise, the software assumes that delimited files will have
the following delimiters:
Delimiter Description
Record A line-feed character (UNIX), or carriage-return and line-feed
pair (Windows).
Field Comma.
Framing Double quotation marks around character-type fields only (no framing
around date or numeric fields).
In other words, the software assumes that delimited files will look something like
the following example.
“MS.”, “A LI C E ”, “M ”, “ BR A D SH A W E ”, “”, “ 9 4 G L E NM A R K R D ”, “A G AWAM ”, “ M A”
“MS.”, “DAPHNE”, “J”, “CHESHIRE”, “”, “45 MORAL RD”, “AGAWAM”, “MA”
“MR.”, “JOSHUA”, “A”, “OMELETTE”, “JR”, “70 DIKE RD”, “ASHBURNHAM”, “MA”
“MRS.”, “NANNETTE”, “V”, “PAVELSHAM”, “”, “134 WALKER RD”, “ASHBURNHAM”, “MA”
“MS.”, “RORY”, “A”, “PARKER, USNR”, “”, “95 LIONEL ST”, “FRAMINGHAM”, “MA”
Custom delimiters If you use some other character for a delimiter, or don't use a particular delimiter
at all, then you must set one or more of the following parameters in your
delimited format files: Record Delimiter, Field Delimiter, or Field Framing
Character.
Consider the following points regarding these parameters:
40
You do not need all three parameters. Do not insert a parameter in your
delimited format file unless you really need it. If you insert a parameter but
leave it blank, the software assumes that your input file does not contain that
delimiter. This is explained below.
Database Prep
Page 41

In the delimited format file, do not type the delimiting character itself;
instead, type its ASCII-code value. We use ASCII-code values because some
delimiters are unprintable characters.
For example, the ASCII code for the <Tab> character is 009. So, when you
are processing a tab-delimited file, place the following line in your delimited
format file: Field Delimiter = 009
You will find a table of printable ASCII-code values on the following page. If
you need to type more than one code on the same parameter, separate them
with a space. The following is an example of a tab-delimited file.
MS. →ALICE →M →BRADSHAWE →→94 GLENMARK RD →AGAWAM →MA
MS. →DAPHNE →J →CHESHIRE →→45 MORAL RD →AGAWAM →MA
MS. →JOSHUA →A →OMELETTE →JR →70 DIKE RD →ASHBURNHAM →MA
MRS. →NANNETTE →V →PAVELSHAM, →→134 WALKER RD →ASHBURNHAM →MA
MS. →RORY →A →PARKER, USNR →→95 LIONEL ST → FRAMINGHAM →MA
Turn off a delimiter You may disable any of the delimiters by leaving the parameter blank. For
example, suppose you are processing a file that does not contain any record
delimiters. In other words, there is no line-feed at the end of each record.
In this situation, you must tell the software not to expect that character. Insert the
Record Delimiter line into your delimited format file, but leave it blank. For
example: Record Delimiter =
If you do this, the software separates one record from the next by counting fields.
For example, if you define five fields in your delimited format file, the software
assumes that the sixth field is the start of the next record.
Do not disable all three delimiters. If you do, the software will not be able
!
to read your input file.
Chapter 4: Delimited format files for delimited ASCII
41
Page 42

Table of ASCII code values
The following table lists printable characters in the lower ASCII set (values 032–
126) for the United States. We also include three frequently used non-printable
characters (009, 010, and 013).
You may use other characters in the extended ASCII set. Those characters are not
included in this list because they vary from one computer system to another.
Refer to your system manuals for information about extended ASCII. A complete
list of ASCII characters is included in the Quick Reference.
009................................................ta
b
010........................ .......line feed
013 ..................... carriage return
032 .................................. space
033 ....... ! (exclamation mark)
034 ............... " (double quote)
035 .................. # (pound sign)
036 ......................................... $
037 ........................................ %
038 ........................................ &
039 ..... ' (apostrophe or single
.........................quotation marks
040 .......................................... (
041 .......................................... )
042 ....................... * (asterisk)
043 ......................................... +
044 ......................... , (comma)
045 ........................ - (hyphen)
046 ......................... . (period)
047 .............. / (forward slash)
048 ......................................... 0
049 ......................................... 1
050 ......................................... 2
051 ......................................... 3
052 ......................................... 4
053 ......................................... 5
054 ......................................... 6
055 ......................................... 7
056 ......................................... 8
057 ......................................... 9
058 ........................... : (colon)
059 .................... ; (semicolon)
060 ......................... < (less than)
061 ......................................... =
062 ................ > (greater than)
063 .......................................... ?
064 ........................................ @
065 ........................................ A
066 ......................................... B
067 ......................................... C
068 ........................................ D
069 ......................................... E
070 ......................................... F
071 ........................................ G
072 ........................................ H
073 .......................................... I
074 .......................................... J
075 ........................................ K
076 ......................................... L
077 ........................................ M
078 ........................................ N
079 ........................................ O
080 ......................................... P
081 ........................................ Q
082 ......................................... R
083 ......................................... S
084 ......................................... T
085 ........................................ U
086 ........................................ V
087 ........................................ W
088 ........................................ X
089 ........................................ Y
090 ......................................... Z
091 .......................................... [
092 ..................... \ (backslash)
093 ............................................. ]
094 ........................... ^ (carat)
095 ................ _ (underscore)
096 ........................ ` (accent)
097 ......................................... a
098 ......................................... b
099 ......................................... c
100 ......................................... d
101 ......................................... e
102 ......................................... f
103 ......................................... g
104 ......................................... h
105 .......................................... i
106 .......................................... j
107 ......................................... k
108 .......................................... l
109 ........................................ m
110 .......................................... n
111 .......................................... o
112 .......................................... p
113 .......................................... q
114 .......................................... r
115 .......................................... s
116 ........................................... t
117 .......................................... u
118 .......................................... v
119 ......................................... w
120 ......................................... x
121 ......................................... y
122 ......................................... z
123 ......................................... {
124 ........ | (vertical bar, pipe)
125 ......................................... }
126 ................................... ~
(tilde)
42
Database Prep
Page 43

Chapter 5:
Definition files (DEF)
This chapter provides an introduction to definition files and presents ways to
match input with a definition file. It also provides guidelines for creating
definition files and for defining input name format, and explains how to use
PW fields for aliasing.
Chapter 5: Definition files (DEF)
43
Page 44

Introduction to definition files
No matter what type of database you are processing, the software always requires
a definition (DEF) file. They are called DEF files because of the file-name
extension .def assigned to them. Consider the following points regarding DEF
files:
The software will not guess as to the database type, so you must tell it what
type of database you are processing.
The software does not guess about field names, either, so the DEF file sets
higher-level information about fields (you do not need a line for every field
that appears in your database file). In this file, you tell the software how you
want it to interpret and work with your fields.
Definition files contain PW fields paired with fields from your database; the PW
fields act as translators for the software. You specify in the definition file the
names of your fields and the names the software uses for that field.
Refer to the Quick Reference for a list of PW fields. Note that some PW fields
are specific to certain software products. The Quick Reference provides
details about these fields, as well as guidelines for use.
For example, as shown in the example at right, suppose that your database
includes a field named ZIP_CODE. The software does not recognize that name or
know what to do with that field. So, in your definition file, you link this field to a
name that the software does recognize, such as ZIP.
Database Type = dBase3
Name_Line = NAME
Phone = TELEPHONE
Address - ADDRESS
City = CITY
State = STATE
ZIP = ZIP_CODE
ZIP4 = ZIP4
DPBC = DPBC
CART = CART
Now the software knows your ZIP_CODE field by the alias ZIP. And the
software knows what to do with the field—expect a ZIP Code from it, or perhaps
write a ZIP Code to it.
44
Database Prep
Page 45

Match input with a definition file
A definition file is an external text file, which is separate from the database itself.
There are three ways to help the software match each input database to a
definition file:
You can make an individual definition file for each database that you process.
The software finds the definition file based on the name and location of the
database.
Give your definition file a .def extension, and the same base file name as the
database it describes. Place the definition file in the same directory as the
database. For example, for the database c:\data\myfile.dbf, the definition file
would be c:\data\myfile.def.
If all the databases you process are in the same format, then use the feature
Default DEF to make one master definition file and apply it to all of your
standard databases. If the application supports it, look for this parameter in
your job file.
If most of your databases are in standard format, but you process a few
exceptions, set up a default definition file and apply it to the standardized
files. For the other databases, create individual definition files. Where the
software finds an individual definition file, it overrides the default definition
file.
The following example shows a definition file paired with an ASCII format file.
Notice how these files are different and how the definition file turns the physical
fields in the delimited format file into PW fields. Remember, you do not need a
line for each and every field that appears in your database file.
DEF definition file FMT format file
Database type = ASCII
First_Name = FIRST_NAME
Mid_Name = MID_INIT
Last_Name = LAST_NAME
Address = ADDRESS
Last_Line = CITY_STATE & ZIP
user:Account = ACCT
Priority = HIRE_DATE
TOPOFFSET, 1024
FIRST_NAME,,c
MID_INIT,,c
LAST_NAME,,c
ADDRESS,,c
CITY_STATE,,c
ZIP,,c
ACCT,,c
SALARY,,c
CERTIFICAT,,c
HIRE_DATE,,d, mmddyyyy
DEMO_CODE,,c
Chapter 5: Definition files (DEF)
45
Page 46

Create definition files
Follow these guidelines when you create definition files.
Database Type The very first line in your definition file is the Database Type parameter. Choose
the line from the following list that is most appropriate for your database type:
Database Type = Dbase3
Database Type = delimited
Database Type = ASCII
Database Type = EBCDIC
Database Type = Oracle (Match/Consolidate only)
Next, list the fields from your input file and their corresponding PW field names,
one on each line. Note that you do not need a line for each field that appears in
your database file.
Field definitions Field definitions look like parameters. As shown in this example, place the PW
field name on the left, followed by an equal sign (=), and your database field
name on the right. Note that this example shows the field parameter typed with
the prefix “PW.”, which is optional.
PW field = Database field
PW.ZIP = ZIP_Code
Definitions may appear in any order, and they do not have to match the physical
sequence of fields in the file. Remember, this is not a physical description, like a
format file. However, your definition file may be easier to understand if you keep
the name and address fields in the order they appear in the file layout.
There is an important difference between format and delimited format
!
files and definition files. Format and delimited format files must contain a
specification for every field in the database. If you omit a field, the
software reads your database incorrectly. In your definition file, you do
not necessarily need a line for each and every field that appears in your
database file.
Select and define PW fields based on these questions:
1. What data fields does the software need for processing? For example, ACE
processes address fields, so you should include the address fields in your
definition file.
2. What common fields will I need for the output database? For example, ACE
outputs address fields such as LOT and LOT_ORDER, so include those
fields in your definition file if they exist in your input structure.
46
Database Prep
Page 47

Typing The software does not require spaces between items. If you use extra spaces
(don't use tabs), the software ignores them. Do not use spaces within field names.
You can type field names in any case (uppercase, lowercase, or mixed case). The
software ignores case in definition files; however, the software recognizes casing
when defining a field as a constant value, such as PW.List_ID = “LIST1,” and
when filtering on that value.
Text Definition files are small text files. They must contain only ordinary characters,
such as printable ASCII. If you use a word processor to type a definition file, be
sure to save it as straight text, not as a word processing document.
Constants Most of the time, a PW field is based on some database field or perhaps on a
combination of fields. However, there are a few situations when you must define
a PW field based on a constant value. A constant value will always be between
quotation marks, as in this example: PW.List_ID = “RJD”
This means that every time the software reads a record from this database, it
assigns the record to an Input List defined in the software as RJD.
Remember that if you ever base a PW field on a constant, put the constant
!
value inside double quotation marks. If you don’t do this, the software will
think that the value is the name of a database field.
Consider this example: PW.List_ID = RJD. If you do this, the software issues an
error message stating that it can’t find the RJD field in your database.
You can, however, use PW.List_ID without quotes by using a valid database field
name after the equal sign. This informs the software to look in that database field
and to use the values as List_ID values set up as Input List Definitions in the
software job.
Remember, putting List_ID in your definition file does not add a List_ID field to
your database. Nor does the software record RJD in any field. This field and this
value exist only inside the software’s internal records.
Punctuation The software accepts a limited set of punctuation marks in definition files.
Consider the following symbols and rules:
Symbol Rule
= Place an equal sign between the PW field name and the database field name:
PW.ZIP = DB.ZIP_Code
Or between a parameter and its setting, as indicated in the following examples:
Database Type = dBASE3
Name Format = FML
_ The underscore is often used within field names.
“ ” When you need to set a PW field equal to a constant value, place the con-
stant inside double quotation marks.
Chapter 5: Definition files (DEF)
47
Page 48

Symbol Rule
* As shown in the following example, if you would like to insert comments in
your definition file, begin each line with at least one asterisk. This signals
the software to ignore the line.
*** This template definition file may be used with all in-house databases.
+ Do not use the plus sign in field names. For example, the ZIP+4 field is
named ZIP4.
Concatenators Sometimes, you may need to merge two or more database fields into one PW
field. When you concatenate fields, you have a choice of two methods:
Symbol Rule
& Most often you should use the ampersand. The software reads the database
fields as if there were exactly one space between them. For example, suppose that you have written this line in your definition file: last_line = city &
state & zip
and in one of your records, the data looks like this (dots represent spaces):
LA•CROSSE••••••••WI54601
When the software reads this data as the PW field Last_Line, the software
actually receives this: LA•CROSSE•WI•54601
If you copy the PW field Last_Line to your output file, or print it on address
labels, then this is what your output will look like: LA•CROSSE•WI•54601
+ The plus sign may also be used to merge two or more database fields into
one PW field. However, it leaves spaces in place, as they occurred in the
input database fields. If you write this line in your definition file: last_line =
city + state + zip
and print the PW field Last_Line on your address labels, you get this:
LA•CROSSE••••••••WI54601
48
Database Prep
Page 49

Define input name format
Name format Use a name format parameter when you use Name_Line in your definition file so
that DataRight IQ, and Match/Consolidate can parse names into separate
components.
Name format is the sequence of name components in a name line. For example:
First-Middle-Last or Last-First-Middle. If the name format is consistent
throughout your database, you will get better name-parsing results, provided you
tell the software the name format.
For instance, given the name Kent Clark, if the software knew the name format, it
could correctly identify the first name and last name. However, if the software did
not know the name format, it would be unclear which was the first name and
which was the last. Is it Kent Clark or Clark Kent?
The software retains the input name format. For example, if the input name is
Smith, John R., the output name line will be Smith, Mr. John R.
Inconsistent name format
The software can accept and process input names even if the name format varies
from record to record. For example, the software can accept and process a file in
which some names are in First-Middle-Last sequence, and others are in LastFirst-Middle sequence.
If the name format is inconsistent in your database, tell the software that the name
format is unknown. The software will identify first, middle, and last name based
on the data itself, not its order in the field.
Define name format To select the appropriate name format, first determine the sequence of names.
Then, determine whether or not job titles are usually present in the name line(s).
Choose one of these name formats.
Name format Name sequence Job title
FML First-Middle-Last May or may not be present
FML_TITLE First-Middle-Last Usually present
FML_NOTITLE First-Middle-Last Seldom present
LFM Last-First-Middle May or may not be present
LFM_TITLE Last-First-Middle Usually present
LFM_NOTITLE Last-First-Middle Seldom present
UNKNOWN Unknown or inconsistent May or may not be present
UNK_TITLE Unknown or inconsistent Usually present
UNK_NOTITLE Unknown or inconsistent Seldom present
No option set Not known May or may not be present
In reference to the above table, the FML_TITLE format replaces the
FML_COMMA name format option from previous versions of Match/
Consolidate. The LFM format replaces the old L_COMMA_FM option.
Chapter 5: Definition files (DEF)
49
Page 50

In your definition file, include the Name Format parameter. For example:
Name Format = FML_TITLE. If you do not include the Name Format parameter
in the definition file, the software uses a default setting of UNKNOWN.
50
Database Prep
Page 51

Use PW fields for aliasing
Your databases may come from different sources and they probably don’t call
each and every field by the same name because each organization has its own
needs and practices. One organization may refer to a field as “Firm,” while
another uses the name “Company.” If you’re processing databases from several
sources, you may run into problems with field naming. You need a common set of
field names when it’s time to merge to one output.
Through proper use of PW fields, you can present your databases to the software
as if they were in a uniform, recognizable format called field-name aliasing. Here
are two approaches to using PW fields for field-name aliasing:
The software programs recognize a set of pre-defined PW fields that you can
use for aliasing. For example: PW.Name_Line, PW.Firm, and PW.Address.
For a complete list of PW fields, refer to the Quick Reference.
If you need an alias that isn't included in our PW set, you can define your
own user PW field. Use the prefix user: in your definition file. For example,
if you define user:Hire_Date = Date_of_Hire, then you can work with
PW.Hire_Date as you would any other PW field, in posting or in filters.
The following definition files show how you can employ user-defined PW fields
to overcome differences between databases. Using these definition files, you
could use the following PW fields for output: PW.Education, PW.Pay_Scale,
PW.Spec_Int, PW.SpouseName, PW.Hire_Date.
Note that the following example databases do not include fields for SpouseName,
Spec_Int, and Hire_Date, so set the field equal to a blank constant value.
Database Type = ASCII
...
Other fields defined
...
user:Education = CERTIFICAT
user:Pay_Scale - SALARY
user:Spec_Int = ASSOC
user:SpouseName = SPOUSE
user:Hire_Date = HIRE_DATE
These databases do not include fields for SpouseName, Spec_Int, and Hire_Date, so we
set the PW field equal to a blank constant value.
B CA
Database Type = ASCII
...
Other fields defined
...
user:Education = HIGH_ED
user:Pay_Scale - INCOME
user:Spec_Int = **
user:SpouseName = **
user:Hire_Date = MEMBERDATE
Database Type = ASCII
...
Other fields defined
...
user:Education = EDUCATION
user:Pay_Scale - WAGE
user:Spec_Int = **
user:SpouseName = **
user:Hire_Date = **
Chapter 5: Definition files (DEF)
51
Page 52

52
Database Prep
Page 53

Chapter 6:
Changes in definition files
This chapter explains how to choose contents of definition files and follows an
input file through the software process. It also illustrates how your choice of PW
fields in a definition file changes from application to application.
Chapter 6: Changes in definition files
53
Page 54

Choose contents of definition files
Definition files may change with each software program. DataRight IQ, for
instance, needs PW fields associated with name information. ACE requires
address-type PW fields. The key to choosing the contents of your definition file
lies in your desired results and the function of the individual application. Refer to
the Quick Reference for a complete list of PW fields and information about
program differences.
This chapter illustrates how one database progresses through all of the software
programs and how the choice of PW fields in the definition file correlates with
the function of the software.
A single database First, let’s look at the software system and how it processes a database file.
DataRight IQ ACE Label Studio Presort
Database DatabaseDatabase Database
1. The software
system reads
raw data into
DataRight IQ.
2. Output from
DataRight IQ
becomes input
for ACE.
Match/Consolidate
3. Output from ACE
becomes input for
Match/Consolidate.
4. Match/Consolidate
purges duplicates from
input, which becomes
input for Presort.
5. Output from
Presort becomes
input for Label Studio.
54
Database Prep
Page 55

A single record The following table shows an individual record being processed by the software.
Note that the table shows only DataRight IQ and ACE because the record won’t
physically change in Match/Consolidate, Presort, and Label Studio. As the file
changes, the DEF file also must change.
Before DataRight IQ After DataRight IQ After ACE
PW.Line1
PW.Line2 WILLIAM MCKAY,
PW.Line3 PRESIDENT
PW.Line4 MCKAY INCORP.
PW.Line5 201 N PEARL
PW.Line6 LA CROSS, WISC 54601
PW.Line7
PW.Line8
Acct_No
DOB
Soc_Sec
Phone
Cen_Tract
Own_Hm
Subs
Cr_Rate
Mar_Stat
Self_Emp
Name1
Name2
Title1
Title2
Company
Address
City
State
Zip
Zip4
DPBC
CART
LOT
Lot_Order
1595
06/04/65
389-83-3809
608-839-3821
102
Y
N
GOOD
M
Y
1595
06/04/65
389-83-3809
608-839-3821
102
Y
N
GOOD
M
Y
Mr. William McKay
Pres.
McKay Inc.
201 N Pearl
La Crosse
WI
54601
1595
06/04/65
389-83-3809
608-839-3821
102
Y
N
GOOD
M
Y
Mr. William McKay
Pres.
McKay Inc.
201 N Pearl
La Crosse
WI
54601
3250
01
C018
1234
A
The next several pages show the structure of a multiline input file, the PW fields
that make up the different definition files, and changes to a database as the
software processes it.
Chapter 6: Changes in definition files
55
Page 56

Follow a database through the software
DataRight IQ DataRight IQ standardize and parse name and address data and convert multiple
input files into one uniform output. The following diagram shows a multiline
input file organized into a format chosen by the user.
DataRight IQ
DataRight IQ job
file
AP.NAME1,Name1
AP.NAME2,Name2
AP.TITLE1,Title1
AP.TITLE2,Title2
AP.FIRM1, Company
AP.ADDRESS1, Address
AP.CITY,City
AP.STATE, State
AP.ZIP, ZIP
Definition file
Database Type = dBase3
PW.Line1 = DB.Line1
PW.Line2 = DB.Line2
PW.Line3 = DB.Line3
PW.Line4 = DB.Line4
PW.Line5 = DB.Line5
PW.Line6 = DB.Line6
PW.Line7 = DB.Line7
PW.Line8 = DB.Line8
Parsed, standardized
fields produced by
DataRight IQ
Fields to
process
Database
Line1
Line2
Line3
Line4
Line5
Line6
Line7
Line8
Acct_No
DOB
Soc_Sec
Phone
Cen_Tract
Own_Hm
Subs
Cr_Rate
Mar_Stat
Self_Emp
Fields copied
but not processed
Non-processed
database fields
DB.Acct_No
DB.DOB
DB.Soc_Sec
DB.Phone
DB.Cen_Tract
DB.Own_Hm
DB.Subs
DB.Cr_Rate
DB.Mar_Stat
DB.Self_Emp
Standardized and
parsed data
Output
Name1
Name2
Title1
Title2
Company
Address
City
State
ZIP
Acct_No
DOB
Soc_Sec
Phone
Cen_Tract
Own_Hm
Subs
Cr_Rate
Mar_Stat
Self_Emp
Data carried over
from database
56
Database Prep
Page 57

ACE ACE corrects and standardizes addresses and assigns postal codes. The following
illustration shows how we are inputting the output file from DataRight IQ,
cloning the file, standardizing the address components, and appending postal
codes.
ACE
ACE job file
AP.ZIP4.ZIP4
AP.DPBC,DPBC
AP.CART,CART
AP.LOT,LOT
AP.Lot_Order,Lot_Order
Definition file
Database Type = dBase3
PW.Address = DB.Address
PW.City = DB.City
PW.State = DB.State
PW.ZIP = DB.ZIP
Appended fields
produced by ACE
Fields to
process
Database
Name1
Name2
Title1
Title2
Company
Address
City
State
ZIP
Acct_No
DOB
Soc_Sec
Phone
Cen_Tract
Own_Hm
Subs
Cr_Rate
Mar_Stat
Self_Emp
Fields copied
but not processed
Clone
DB.Name1
DB.Name2
DB.Title1
DB.Title2
DB.Company
DB.Address
DB.City
DB.State
DB.ZIP
DB.Acct_No
DB.DOB
DB.Soc_Sec
DB.Phone
DB.Cen_Tract
DB.Own_Hm
DB.Subs
DB.Cr_Rate
DB.Mar_Stat
DB.Self_Emp
We told ACE to
standardize the bolded
fields by including them in
our definition file as PW
fields
Output
Name1
Name2
Title1
Title2
Company
Address
City
State
ZIP
ZIP4
DPBC
CART
Acct_No
DOB
Soc_Sec
Phone
Cen_Tract
Own_Hm
Subs
Cr_Rate
Mar_Stat
Self_Emp
LOT
Lot_Order
Appended data
Chapter 6: Changes in definition files
57
Page 58

Match/Consolidate Match/Consolidate searches for and eliminates duplicate records. It can either
purge the original input file of duplicates or it can create an entirely new file. The
following illustration shows how we choose to purge our input file of duplicates.
Match/Consolidate
Definition file
Database Type = dBase3
PW.Name_Line1 = DB.Name1
PW.Name_Line2 = DB.Name2
PW.Address = DB.Address
PW.City = DB.City
PW.State = DB.State
PW.ZIP = DB.ZIP
PW.Merg_Purg1 = DB.DOB
PW.Merg_Purg2 = DB.Soc_Sec
PW.ZIP4 = DB.ZIP4
PW.DPBC = DB.DPBC
PW.CART = DB.CART
PW.LOT = DB.LOT
PW.LOT_Order = DB.Lot_Order
This definition file contains PW
fields for Match/Consolidate and
Presort processing.
Match/Consolidate uses the
bolded fields for matching.
Database
Name1
Name2
Title1
Title2
Company
Address
City
State
ZIP
Acct_No
DOB
Soc_Sec
Phone
Cen_Tract
Own_Hm
Subs
Cr_Rate
Mar_Stat
Self_Emp
ZIP4
DPBC
CART
LOT
Lot_Order
Match/Consolidate
removes duplicates
58
Database Prep
Page 59

Presort Presort arranges your database records into packages and containers and produces
documentation shipped to post offices with the mail pieces. Presort does not alter
your input records; rather it organizes how the software presents your records to
label-printing software.
Presort
Presort pallet
output file
Definition file
Database Type = dBase3
PW.Name_Line1 = DB.Name1
PW.Name_Line2 = DB.Name2
PW.Address = DB.Address
PW.City = DB.City
PW.State = DB.State
PW.ZIP = DB.ZIP
PW.Merg_Purg1 = DB.DOB
PW.Merg_Purg2 = DB.Soc_Sec
PW.ZIP4 = DB.ZIP4
PW.DPBC = DB.DPBC
PW.CART = DB.CART
PW.LOT = DB.LOT
PW.LOT_Order = DB.Lot_Order
Database
Name1
Name2
Title1
Title2
Company
Address
City
State
ZIP
Acct_No
DOB
Soc_Sec
Phone
Cen_Tract
Own_Hm
Subs
Cr_Rate
Mar_Stat
Self_Emp
ZIP4
DPBC
CART
LOT
Lot_Order
Dest_Line Cont_Line
This definition file
contains PW fields
for Match/Consolidate,
and Presort.
Presort processes
the bolded fields.
Presort address
output file
Name1
Name2
Title1
Firm_Line1
Company
Address
City
State
ZIP
Acct_No
DOB
Soc_Sec
Adr_Bc_Dgt
Pkg_Brk_F
Plt_Brk_F
Phone
Cen_Tract
Own_Hm
Subs
Cr_Rate
Mar_Stat
Self_Emp
ZIP4
DPBC
CART
LOT
Lot_Order
Opt_Endrs
Ctn_Brk_F
Mail_Type
Orig_Line
Dest_Line
Ctn_BC_Dgt
Presort container
output file
Cont_Line
Orig_Line
Zebra_Req
Chapter 6: Changes in definition files
59
Page 60

Label Studio Label Studio takes Presort’s output file to create address, container, pallet, or
generic labels and prints them in the order specified by Presort.
Label Studio
Presort address
output file
Name1
Name2
Title1
Firm_Line1
Company
Address
City
State
ZIP
Acct_No
DOB
Soc_Sec
Adr_Bc_Dgt
Brk_Lvl1_F
Brk_Lvl3_F
Presort container
output file
Dest_City
Dest_ZIP
Ctn_BC_Dgt
Presort pallet
output file
Dest_City
Dest_ZIP
Phone
Cen_Tract
Own_Hm
Subs
Cr_Rate
Mar_Stat
Self_Emp
ZIP4
DPBC
CART_Endrs
LOT
Opt_Endrs
Brk_Lvl2_F
Cont_Nompc
Cont_Pc
Orig_Line
Zebra_Req
Cont_Nompc
Cont_Pc
Orig_Line
Address definition file
Database Type = dBase3
PW.ZIP = DB.ZIP
PW.ZIP4 = DB.ZIP4
PW.DPBC = DB.DPBC
PW.CART_Endrs = DB.CART_Endrs
PW.LOT = DB.LOT
PW.Adr_BC_Dgt = DB.Adr_BC_Dgt
PW.Opt_Endrs = DB.Opt_Endrs
PW.Brk_Lvl1_F = DB.Brk_Lvl1_F
PW.Brk_Lvl2_F = DB.Brk_Lvl2_F
PW.Brk_Lvl3_F = DB.Brk_Lvl3_F
Container definition file
Database Type = dBase3
PW.Ctn_BC_Dgt = DB.Ctn_BC_Dgt
PW.Orig_Line = DB.Orig_Line
PW.Contents = DB.Cont_Nompc
PW.Mproc_Code = DB.Cont_Pc
PW.Zebra_Reg = DB.Zebra_Req
PW.Dest_City = DB.Dest_City
PW.Dest_ZIP = DB.Dest_ZIP
Pallet definition file
Database Type = dBase3
PW.Orig_Line = DB.Orig_Line
PW.Contents = DB.Cont_Nompc
PW.Mproc_Code = DB.Cont_Pc
PW.Dest_City = DB.Dest_City
PW.Dest_ZIP = DB.Dest_ZIP
60
Database Prep
Page 61

Chapter 7:
Output files
This chapter provides an overview of your output options. The software programs
offer a lot more output options than we can discuss here; this chapter provides
only an overview of the most crucial points. For detailed information about
output options, refer to your program manuals.
Chapter 7: Output files
61
Page 62

Set up an output file
Setting up an output file requires you to perform two tasks. The figure in the
subsection “Overview of output file setup” on page 63 shows an example of these
two setups.
1. First, through your entries in the Create File for Output block, you define the
2. Second, through your entries in the Posting block, you determine the content
format of the new file.
of information placed, or posted, in the fields of the output file.
Use one of three methods
For each task, format and content, you have your choice of three methods:
1. You can instruct the software to automatically create a basic output file. This
file is based on the format and content of another file or files, which is
referred to as cloning the format (field layout) and automatic posting of the
contents (data).
2. You can turn off the cloning feature and manually specify everything.
3. You can set up a combination of these methods by turning on the cloning
features, then adding your own manual posting. Your purpose in posting
manually might be to augment or override the cloning features.
Setting up an output file is similar to setting up an input file; however, there is a
crucial difference. When you describe to the software the format of your input
file(s), you do so in external supporting files. When you specify the format of
output files, you do so inside your job file, along with all the other instructions for
the job.
62
Database Prep
Page 63

Overview of output file setup
}
}
The following illustration shows an example software job file. For Views users,
choose these options in the View screen.
BEGIN Create File for Output ==================================
Output File (location & file name)... = d:\outfile.dbf
File Type (See NOTE)................. =
Rec Format to Clone (path & file name)= d:\house.dbf
Field (name,length,type[,misc])...... = Prel, 4, c
Field (name,length,type[,misc])...... = First1, 15,c
Field (name,length,type[,misc])...... = Mid1, 2, c
Field (name,length,type[,misc])...... = Last1, 30, c
Field (name,length,type[,misc])...... = Gender1, 1, c
END
BEGIN Post to Output File =====================================
Output File (location & file name)... = d:\outfile.dbf
Existing File (APPEND/REPLACE)....... = replace
Maximum Number of Records to Output.. =
Nth Select (1.0 - ???)............... =
Output Filter (to 512 chars)......... =
Copy Input Data to Output File (Y/N). = yes
Copy (source,destination)............ = ap.pre_name1, Pre1
Copy (source,destination)............ = ap.firstname1, First1
Copy (source,destination)............ = ap.mid_name1, Mid1
Copy (source,destination)............ = ap.last_name1, Last1
Copy (source,destination)............ = ap.gender1, Gender1
END
DBASE3
The following table describes each of the numbered components.
Component Description
Output file name
Database type
Cloning
Manual formatting
Copy input data
Set up the file format in the Create File for Output block and the
content in the Post to Output File block. The link between the
block files is that they both refer to the same output file name.
This entry serves the same purpose as the database-type parameter that you place in a definition file. It tells the software which
database software to use when creating the file.
To clone its physical format, type the location and file name of
the input file. To save setup time, you can also clone the physical format of the input file by using the input file location and
file name. If you need to add more fields, you can specify them
manually.
Each parameter specifies the format of one output field; copy
and paste the parameter to create as many parameters as you
need. Notice that these entries look like format file or delimited
format entries. In effect, you’re writing a format file for a database that doesn’t yet exist.
To save setup time, the software can automatically copy the content (data) from an input file to an output file.
Manual posting
Each Copy entry places data into an output field. Notice that
each Copy parameter in the Posting block corresponds to a Field
parameter in the Create
File for Output block.
Chapter 7: Output files
63
Page 64

Set the format of an output database
To set the format of an output database, you can either clone, clone and append,
or define your own format.
Clone Using the cloning feature can save you time when you want to carry over all input
fields to the output file. The software creates your output file with the same fields,
lengths, and data types as an existing file. For example, when you run ACE, you
can clone the format of the (one) input database. To clone, you turn on a
parameter in the Create Output File block inside the ACE job file.
The following examples show ACE Views. Notice that the Clone parameter uses
the word “copy” instead of “clone.”
Other software programs accept more than one input file, so cloning is just a little
more complex because you must tell the program which database’s format you
want to clone. To clone an existing file’s format, enter that file’s name and
location. The following example shows DataRight Views.
The database named here—the one whose format you clone—does not have to be
one of the databases that was input for the job. It could be a master database,
some kind of template, or perhaps a file from a previous job. You must provide a
definition file and format file for the file to be cloned.
If the master database has a format or file type that is different from the input
databases for this job, see “Convert database types and format” on page 71 for
tips and details on converting database types.
One of the most common formats cloned is the format of your input file. You
can clone your input file's format and then add on the fields that you want the
software to add to your database (see “ACE” on page 57).
Clone and append If you clone, you may also append new fields to the end of each record; however,
you cannot intersperse new fields among those cloned. Also, the appended fields
64
Database Prep
Page 65

follow after all fields except the End of Record (EOR) field. For more
information, see “End-of-record field (EOR)” on page 33.
To append new fields to the end of each record, turn on the cloning as shown
above, then repeat the Field parameter as many times as necessary to define the
added fields. For example, the following ACE job file shows the Create Output
F il e b lo ck wi th bo t h Z IP 4 a nd CA RT ap pe nd ed to th e f ie l ds fr om th e i np ut f il e:
Define your own format
Perhaps you would like to define a new format for your output file. To do this,
turn off cloning and define all of the fields manually. Now the ACE job file has
the copy format turned off and a list of field names that makes up the complete
record in the output file:
Remember, Field entries look just like those in an FMT, DMT, or EBC format
file. If you want to add extra fields for later use, that's okay. Technically you can
create fields and not have a corresponding Copy parameter to populate that field.
Chapter 7: Output files
65
Page 66

Place information in an output database
Once you have set up the physical format of your output file, the next step is to
place information in the output fields. To place information in an output database,
you can either clone, clone and append, or select the data yourself.
Clone The cloning feature can save you time when you want to carry over input fields to
the output file. Using a posting block, you can set the clone parameter in your job
file setup using the Output file setup parameter. The following example shows an
ACE job file setup in Views.
Again, there are a few situations in which you may not use the cloning
feature. See “Convert database types and format” on page 71.
Clone and append If you clone, you may also post other information. To do this, set the cloning
parameter as above, then use the Copy parameter to post data manually. For
example, as shown in the following example, the same ACE job file from above
now has three appended fields:
Select data yourself If you would like to take complete control of your output file, turn off cloning
and, as shown, use the Copy parameter to fill all of the fields.
The destination of posting is always a database field in the output file. The
source of posting may be a field from the input file, or data generated during
processing. For more information, see “Types of data available for output” on
page 67.
66
Database Prep
Page 67

Types of data available for output
The software offers several types of output data. For information about PW fields
and application (AP) fields, refer to the Quick Reference.
Four options You can place the following four types of data in an output file. The diagram
below shows an example of how these data types function in ACE. Note that this
is an example only; other products work similarly.
Option Description
DB If you want a direct copy without any standardization, you can copy over a
database
field name. For example, if your input file contains a Phone field, you can
post DB.Phone.
field straight from the input file by using the prefix DB. on your
Your input file is the
source of the DB fields.
PW You can copy over a PW field from the input definition (
.def
) file. Instead
of using database fields, you might use PW fields if you are using the PW
fields to fix a field-naming problem. See “Use PW fields for aliasing” on
page 51 for examples of field-naming problems.
Use the prefix PW. on your field name. For example, if in your input definition file you set up the PW field Address, then you can post PW.Address.
Note that DataRight and ACE case PW fields according to the job’s standardization settings.
AP During processing, the software programs produce many data fields called
application (AP.)
fields. For example, when you process a record through
ACE, you can save the ZIP+4 code by posting AP.ZIP4 to your output file.
Refer to the
Quick Reference
for a complete list of AP fields.
" " If you want to place the same data in every output record, you can post a
constant value. For example, some users like to place a date stamp on processed records. You could post today’s date, as a constant value, to a datestamp field.
“Convert database types and format” on page 71 provides information
about converting a field from one data type to another, and what to do if
your output file type is different from the input file type.
ACE
PW fields are fields that you set up in
the DEF file. The fields come from the
input file and pass through ACE. If you
post them manually, they are
capitalized, not standardized. If ACE
posts them automatically, they are
standardized per each job setting.
AP fields originate inside the ACE
assignment engine. Some are parsed
from the input data; others are
assigned from the postal directories.
All are standardized, some per job-file
settings.
DB fields are original, untouched data.
Automatic posting
means that ACE copies
over all input fields, and
standardizes those PW
fields identified in the
DEF file.
Manual posting means
that you choose any
combination of DB, PW,
and AP fields, and place
them yourself where
you want them.
The posting destination
is your output file.
DB DB
Chapter 7: Output files
67
Page 68

Advanced options Filters and functions are special commands that manipulate and select data or
choose records. See “Filter and function expressions” on page 81 for a complete
list of functions and how to use them.
68
Database Prep
Page 69

Supporting files automatically created with an output database
When the software creates a database for output, it also creates supporting files.
This saves time when using output from one program as input for another
program.
File type Supporting files For more information
dBASE3 Definition (
delimited Format (
Definition (
.def
) only See “Definition files (DEF)” on page 43.
.dmt
) and
.def
)
See “Delimited format files for delimited
ASCII” on page 35, and “Definition files
(DEF)” on page 43.
ASCII Format (
Definition (
.fmt
) and
.def
See “Format files for fixed-length ASCII
)
and fixed-length EBCDIC” on page 27,
and “Definition files (DEF)” on page 43
EBCDIC Format (
Definition (
.ebc
) and
.def
See “Format files for fixed-length ASCII
)
and fixed-length EBCDIC” on page 27,
and “Definition files (DEF)” on page 43
Oracle Format (
Definition (
When the software creates a definition file, it is not complete; the only
!
line that it contains is the Database Type parameter. However, the
.rdb
) and
.def
See “Definition files (DEF)” on page 43
)
automatic definition file does not contain any definitions of PW fields
because the software does not presume how you will want PW fields set
up in your next job.
Before you can use the database as input to another program, you must edit the
definition file and add definitions of PW fields. For instructions, refer to the
Quick Reference and “Definition files (DEF)” on page 43
.
.
.
.
DEF produced by
the software
Database Type = dBase3
DEF after editing
Database Type = dBase3
Name Format = FML
Name_Line = Name
Line1 = Address1
Line2 = Address2
City = CITY
State = STATE
ZIP = ZIP_Code
Phone = TELEPHONE
Chapter 7: Output files
69
Page 70

70
Database Prep
Page 71

Chapter 8:
Convert database types and format
This chapter explains how to convert files from one type or format to another and
provides solutions to common problems in database design. It provides
information about input and output fields and data types, how to convert ASCII
and EBCDIC input to dBASE3 output, how to convert dBASE3 input to ASCII
output, and how to create a delimited file with nonstandard delimiters.
Chapter 8: Convert database types and format
71
Page 72

Input files with different formats
Assume that you have rented three lists for an upcoming promotion; we’ll call
them A, B, and C. Each list comes from a different source, and each one has a
different format. Consider the following format files:
A
Name, 26, c
Address, 26, c
City, 16, c
State, 2, c
ZIP, 5, c
First_Name, 10, c
Mid_Init, 1, c
Last_Name, 13, c
Address, 26, c
Apt, 12, c
City_State, 20, c
ZIP_Code, 5, c
B
C
Name, 26, c
Title, 26, c
Address1, 26, c
Address2, 26, c
C_St_ZIP, 26, c
As an example, here’s how the same data would look in those three formats:
A
John Q. Public, VP Sales
100 Vine St., Suite 55
Shoreview
MN
55126
John
Q.
Public
100 Vine St.
Suite 55
Shoreview MN
55126
B
C
John Q. Public
VP Sales
100 Vine St.
Suite 55
Shoreview MN 55126
The problem As you look at the examples above, notice that the files are different in two ways.
First, they break down the data into fields differently. Second, even when they’re
entering the same information into a field, they call it different names (ZIP versus
ZIP_Code). This will cause problems when you start designing address labels.
72
To print information on all labels, the printing labels need common field names;
you must present these formats to the software as if they were the same. If the
formats are not common, you will receive a warning and get blank lines on your
labels. All three files could go through a conversion process by physically
converting them to one format; however, there is an easier, faster way.
Database Prep
Page 73

The solution By setting up the definition files as shown in the following example, you can
make the files appear to the software as though they were in the same format.
Where one file breaks down finer than another, we have to combine the fields;
this has been called the “lowest common denominator” approach. And we need to
adjust the field names, possibly giving them aliases. For information about
defining input name and format, see “Define input name format” on page 49.
A
Database type = ASCII
Name_Line = Name
Name Format = FML
Line1 = ““
Line2 = Address
Last_Line = City & State & ZIP
Database type = ASCII
Name_Line = First_Name & Mid_Init & Last_Name
Name_Format = FML
Line1 = Apt
Line2 = Address
Last_Line = City_State & ZIP_Code
BC
Database type = ASCII
Name_Line = Name & Title
Name Format = fml
Line1 = Address1
Line2 = Address2
Last_Line = C_St_ZIP
The result Now the software can work with four PW fields, no matter which input database a
record happens to come from: Name_Line, Line1, Line2, and Last_Line.
For example, in Label Studio, it will be the PW fields that we will place on the
label layout, not the original database fields. See the following table for an
example of the label output.
PW fields Potential output
PW.Name_Line John Q. Public VP Sales
PW.Line1 Suite 55
PW.Line2 100 Vine St
PW.Last_Line Shoreview MN 55126
Chapter 8: Convert database types and format
73
Page 74
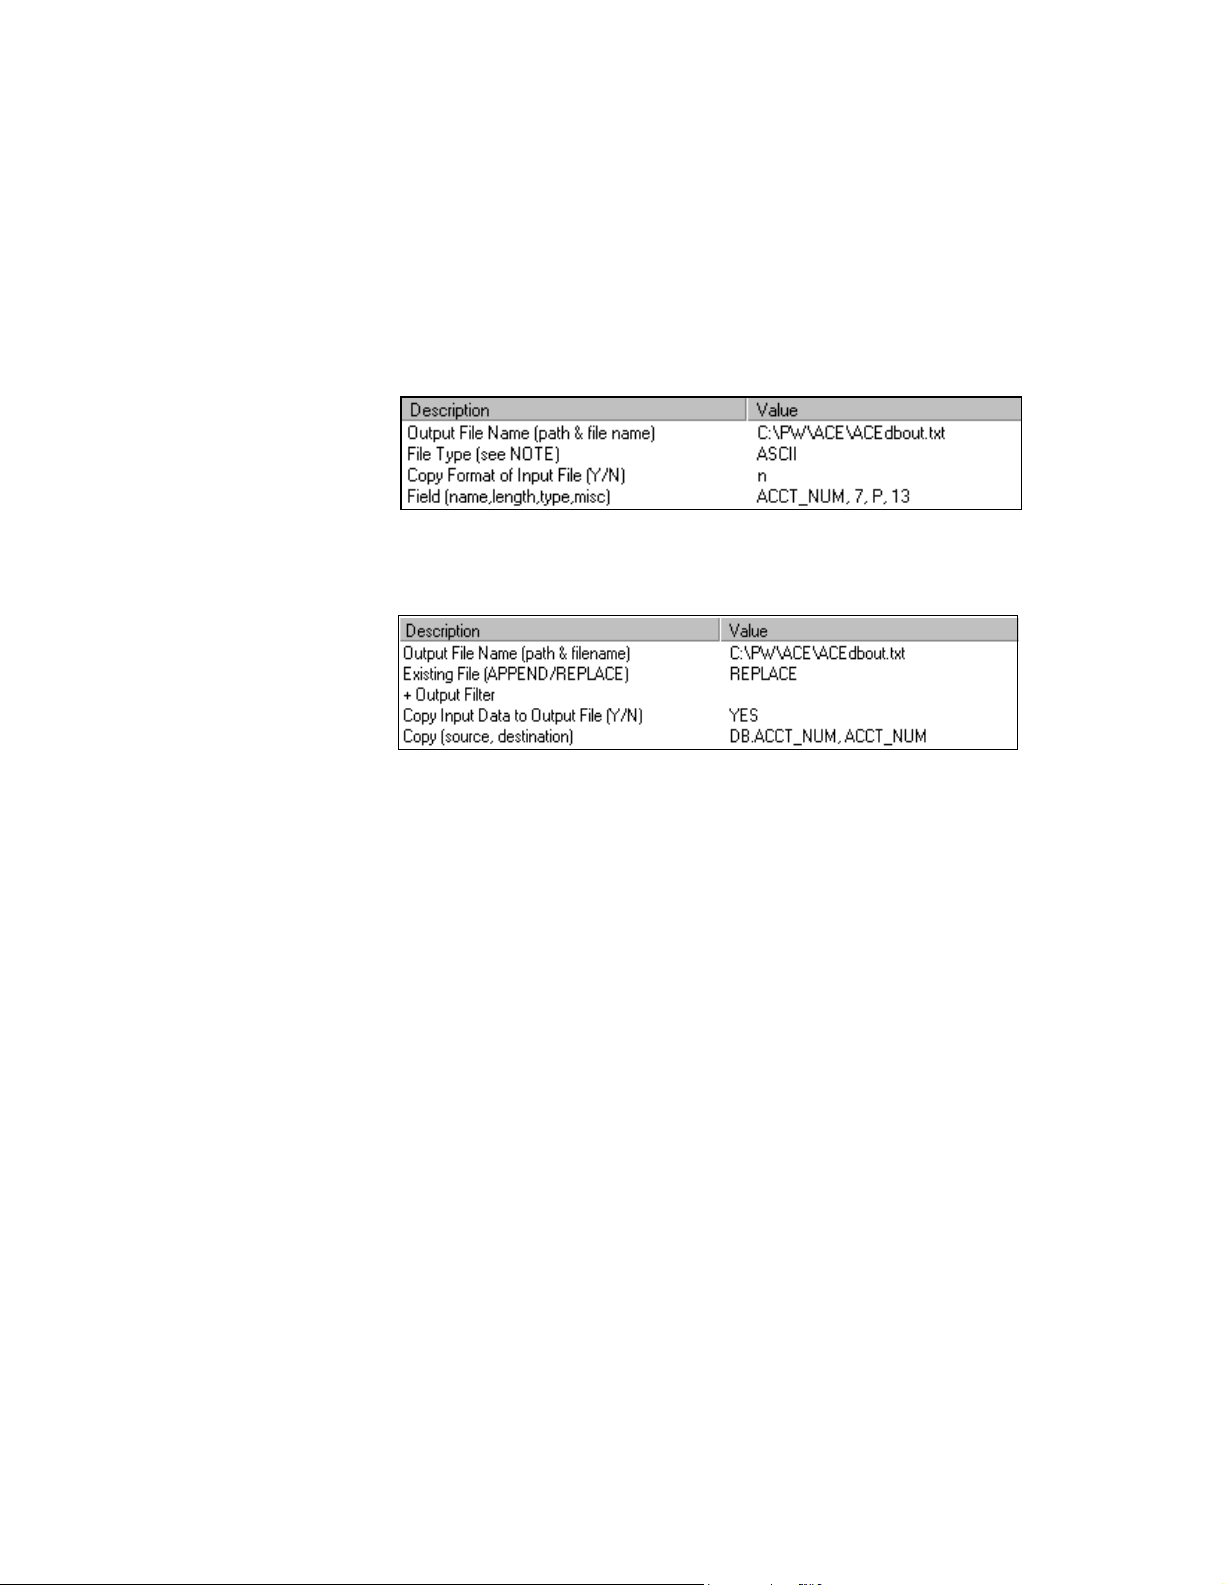
Input and output fields and data types
Preserve the data type
If you want output fields to match the data types of the input, the easiest way is to
use the cloning features, as explained in the previous chapter. If for some reason
you can’t use the cloning features, and you need to specify your output file
manually, then you need to be careful about data types.
For example, suppose you input a packed numeric field called ACCT_NUM. If
you want to preserve the field as a packed numeric, ensure that your output field
is that type. In your job, the setup might look like this:
Then post the field as follows, copying it straight from the input to the
output database:
Convert the format automatically
Suppose that your input database is dBASE3, but you want an ASCII output file
(fixed or delimited). In dBASE3, the format of date fields is yyyymmdd.
However, in your ASCII output file, you want the format dd/mmm/yyyy. In other
words, 20040720 would become 20/Jul/2004.
In your job, when setting up the format of your output file, you will not be able to
use the cloning feature. If you did, the date format of output would be the same as
input. Instead, you must tell the software the format you want for all output
fields. The setup of the date field might look like this:
Field (name,length,type,misc) HIRE_DATE,9,D,dd/mmm/yyyy
However, when it comes to posting—placing information into the fields of your
output file—then you can use either of two methods:
Copying from the input file using the cloning feature (ensure that the input
and output field names are the same), or
Manual posting using a posting command in your job. For example:
Copy (source, destination)... = DB.HIRE_DATE, HIRE_DATE
When the software copies over your HIRE_DATE field, it automatically converts
the data to match the format of the output field.
74
Database Prep
Page 75

Convert the data type automatically
The software also converts data types in some situations. For example, suppose
you’re running ACE and you import a packed numeric field called ZIP9. If you
use the cloning feature, your output ZIP9 field will also be a packed numeric.
However, the 9-digit ZIP Code assigned by ACE is character-type data. As shown
in the following example, ACE converts it automatically if you post it directly to
a packed numeric field.
Copy (source, destination)... = AP.ZIP9, ZIP9
The same is true if the output field is numeric, whether the output file is ASCII or
dBASE3.
Convert with a function
Some data-type conversions the software cannot perform automatically (see the
examples on the following pages). This is something to consider, especially when
you are converting from one file type to another. In these situations, you can use
functions to convert your data.
Convert via PW fields Let’s return to the packed-numeric input field called ACCT_NUM. In your output
database, you want to expand this data and convert it to be a character-type field.
One way to convert it would be to handle it as a PW field:
1. In your definition file, define ACCT_NUM as a user-defined PW field. The
software automatically converts the data to character type. The definition
entry looks like this:
USER.ACCT_NUM = DB.ACCT_NUM
2. In your job, when you set the format of your output file, include a charactertype field named ACCT_NUM:
Field (name, length, type, misc)... = ACCT_NUM,13,C
The length must be the unpacked length. For example, the Acct_Num packednumeric length is seven. Calculate the unpacked length this way: 2 X 7 – 1 =
13. (The 13 is the length defined in the above field parameter).
For more information, see “Packed numeric fields” on page 32. Also, read
about “Packed numeric fields” on page 76.
3. Then post the field as follows:
Copy (source, destination)... = PW.ACCT_NUM, ACCT_NUM
Chapter 8: Convert database types and format
75
Page 76

Convert ASCII and EBCDIC input to dBASE3 output
For the most part, ASCII-to-dBASE3 conversion is trouble-free. The same holds
true for EBCDIC-to-dBASE3. However, some problems are caused by
differences in data types.
Packed numeric fields The software accepts the packed numeric field in your fixed-ASCII or fixed-
EBCDIC input file; dBASE3 can handle numeric, but not packed numeric. You
should not use format cloning; instead, manually declare a dBASE3 numeric field
of adequate length to handle the unpacked numbers. You can easily figure
adequate length by using the following:
2 (packed field length) – 1.
If you use format cloning, the software creates a dBASE3 numeric field equal to
the packed length of your input. Then, the software copies the unpacked number
into this too-short field.
Binary and filler fields You can use binary and filler fields in fixed-ASCII and fixed-EBCDIC, but not in
dBASE3. The software issues an error message if the following three conditions
exist:
Your input file includes any binary or filler fields, and
You ask the software to convert your output to a dBASE3 format, and
You attempt to use the cloning features.
The software issues an error message because it cannot determine what to do with
the binary-type input fields. They can’t be cloned because they are illegal in the
dBASE3 output file. However, there is one exception: If your input fixed-ASCII
or fixed-EBCDIC file includes a binary-type EOR field, the software will not
issue an error message. The EOR field is not necessary in a dBASE3 file and is
dropped.
DataRight always treats a filler field as a binary type field unless you specify
the data type. Match/Consolidate handles a filler field as a binary field unless
it is specified as a character field.
One way to preserve your filler fields is to declare them—in your format file—as
character-type data. The format file entry might look like this: Filler1, 28, C
Note that filler fields can be character-type. Binary is the default data type for
filler fields, but it is not required. If your filler field contains any bytes that are
unprintable characters in the ASCII set, the software converts them to spaces in
the output file.
76
Database Prep
Page 77

Logical fields Some ASCII and EBCDIC databases contain a character-type field that works
like a logical field—the field either contains some special character as the “Yes”
or “True” value, or is blank to indicate “No” or “False.”
This situation is common when a database has been exported to ASCII or
EBCDIC text. For example, suppose you manage custom databases that the
software can’t read directly, so you export to fixed ASCII. When you export, the
software converts logical-type fields to 1-byte, character-type fields. An asterisk
in this field is equivalent to a logical True, and an empty field equals a logical
False.
If you’re in this situation, you have two options: The easier one is to simply carry
over the field as a single character. You can do this using the cloning features, if
you like.
More effort is required if you want to convert to a true dBASE3 logical-type field
because you cannot simply post the field directly from an ASCII-character input
field to dBASE3-logical output field. Instead, you must use a function, in your
posting, to test the character data and return a logical True or False.
For example, suppose your ASCII input file includes a character-type field called
PAID_UP. (This field contains an asterisk if the customer’s subscription is
current; or it is blank if the account is expired.) In your dBASE3 output file, you
want PAID_UP to be a logical-type field. The following illustration shows how
this example might be set up in your job. For more information about functions,
see “Filter and function expressions” on page 81.
Delete field Some ASCII and EBCDIC files contain a 1-byte, character-type, DELETE field
to mimic nondestructive delete marking. You can carry over such a field as a
character-type field. However, you cannot set the hidden delete byte in dBASE3
output records. It would take some dBASE3 programming and post processing of
your output file to delete records based on the value in the character-type
DELETE field.
Chapter 8: Convert database types and format
77
Page 78

Convert dBASE3 input to ASCII output
If you input dBASE3 and output ASCII (either fixed-length or delimited),
consider the following points.
Delete mark All of the software programs—except ACE—ignore input records that the
software marks for deletion. With ACE and Label Studio, you have the option to
process and output deleted records.
However, the software does not automatically preserve the dBASE3 delete mark
in the ASCII output file. If you want to preserve the deleted status of your output
file, you must manually set up an output field (Deleted) and use the following
posting expression:
Copy (source,destination) = iif(deleted(),"*",""), DELETED
To use the non-destructive delete mark in your ASCII file, you must define
PW.Delete in the DEF file.
End-of-record mark The dBASE3 records do not contain an end-of-record field; be sure to add this to
your ASCII output records. If you do not, the output file may be hard to work
with.
In your job, be sure to append a field named EOR and post to it either a line-feed
character (UNIX), or the carriage-return/line-feed pair (Windows). For example,
the job setup looks like this:
78
Database Prep
Page 79

Create a delimited file with nonstandard delimiters
When you create a delimited output file, you may specify its format through
settings in your job file. However, you may not specify delimiters in your job file.
The software uses the default delimiters: Carriage return/line feed between
records, commas between fields, and double quotation marks for framing around
character-type fields (no framing on date or numeric fields).
The software uses the default delimiters even if you are cloning a file that
contains other delimiters. For example, cloning a tab-delimited file results in a
comma-delimited output file. However, there is a different method for those who
require delimiters other than the defaults. Perform the following steps before you
start the software processing:
1. Go to the directory where you want the software to create the output file.
Here, you will create supporting files for an output database that does not yet
exist. To make this procedure clear, let’s suppose that the output file will be
named example.dat.
2. Create an empty file named example.dat with a text editor. Press the space
bar or the enter key, then exit out of the file. Be sure to save the file.
3. Create a definition file named example.def. The only line you really need in
this file is this: Database Type = delimited
4. Create a delimited format file named example.dmt. Fill out this file
completely, specifying all the fields that you want in your records. You must
specify the maximum field length for each field that you list in your
delimited format file. For more information, see “Delimited format files for
delimited ASCII” on page 35.
If you want to clone the input, you can copy the input file’s .dmt to
example.dmt
5. Add to your delimited format file, as necessary, parameters to select the
delimiters:
Record Delimiter =
Field Delimiter =
Field Framing Character =
For example, suppose you want tabs between fields, instead of commas:
Field Delimiter = 009
Remember, you do not need all three parameters. Do not insert a parameter in
your delimited format unless you really need it. If you insert a parameter but
leave it blank, the software assumes that you are turning off that delimiter.
6. When you set up your job file, do not include a Create File for Output block
for the file. Your specifications for the output file are not contained in the job
file, as usual, but in the external files that you created. However, your job file
must include the block for posting information to the output file. That posting
block will mention the database name example.dat. Be sure to set the
Existing File parameter to Append.
7. Run the job. The software posts the data to the example.dat file that you
created. In the posting block, instruct the software to overwrite/replace the
existing file.
Chapter 8: Convert database types and format
79
Page 80

80
Database Prep
Page 81

Chapter 9:
Filter and function expressions
This chapter provides information about filter and function expressions and their
purpose in software processing.
Chapter 9: Filter and function expressions
81
Page 82

Expressions
An expression is a sentence that a software program reads. Expressions contain a
special language consisting of specific words, punctuation marks, and
combinations of data. The illustration at right is an example of a simple
expression.
substr(db.zip,1,5) = “54601”
Function Field Operator Constant
The software constructs the elements of an expression so that when it reads the
expression, it inserts data where appropriate, processes and evaluates the
expression, and derives with some sort of a result. The software does this either in
the input file or when writing a record to an output file.
Results of an expression
The result controls how the software functions with respect to an individual
record or field—either include or exclude the record in the outcome, or change
the record in the manner specified in the expression. Based on the results you
want, you determine whether you want to write your expression as a filter or a
function.
You are able to enhance the control of the software by including expressions in
your job file. However, writing expressions is oftentimes very difficult, and the
more complicated expressions should be reserved for your programmers and
computer specialists.
82
Database Prep
Page 83

Filters and functions
Filters includes certain records and excludes others. The results of a filter are
either true or false. True results include the record in processing, while false
results exclude the record.
For example, assume that you have a database of records that contains a list of
magazine subscribers, and each record contains a field called Month. You need to
compile a list of those records in which the Month field contains "October." The
following example filter includes each record that contains the value October.
Note that the casing of the data is important. OCTOBER is not the same as
October or october.
alltrim(DB.Month) = "October"
To do this, the software looks for the DB.Month field in each record. When
found, the alltrim() function trims any leading and trailing spaces from
DB.Month and the software determines if its value is equal to the constant
October.
If the field has the constant October, the software includes that record in posting
(True). If the field does not contain the constant, the software ignores the record
and excludes it from posting (False).
Functions Functions change a record and produce information that can be in the form of
mathematical results, converted data, compared data, new data, extracted data,
rearranged data, and tests (True/False). The record changes in the way specified
in the expression.
For example, assume that you have records in a database that include account
balances to the exact penny. You want only even dollar amounts and you want to
eliminate the odd cents. The following function takes a numeric expression and
rounds it to the number of decimal places specified.
Round(DB.Balance,0)
To do this, the software looks for the DB.Balance field in each record. When
found, the software changes the record and the result is a rounded number. The
result is as follows:
5998.03 is rounded to 5998.00.
Chapter 9: Filter and function expressions
83
Page 84

Use filters to set criteria
You can base filters on constants, PW fields, database (DB) fields, and
application (AP) fields. The following is an example of each filter type.
Constants When processing a database in which you want to only include names of senior
citizens, you might use an input filter like the one below. The year function
extracts the year, as numerical data, from a date-type field. The software
compares the result with the numerical constant 1944.
For example, if used in 2001, this filter limits the records selected from the input
file to contain records of people aged 57 years and older.
PW fields Identify PW fields by adding the prefix PW.; for example, PW.State. This tells the
software that it must look in the definition file for State, not in the database itself.
For example, suppose you want to confine an output list to residents of the state
of Texas. You might use the input filter below, which means that to be included in
processing, a record must contain the character string “TX” in the PW field State.
Database (DB) fields Identify database fields with the prefix DB.; for example, DB.INCOME. This
tells the software that it must look for the INCOME field in the database itself,
not in the definition file. For example, you might limit an output file by setting a
minimum income (greater than or equal to $50,000) with the following input
filter. Note that the income would have to be a numeric-type field.
84
Database Prep
Page 85

Application (AP) fields A filter based on an application field uses information generated by the software.
Identify application fields with the prefix AP.; as in AP.ZIP. In the following
example, the filter tells the software not to output records with a specific ACE
generated ZIP Code.
In this example, we base our filter on ZIP Codes that have been processed by
ACE. This way you can be sure your ZIP Codes are correct because ACE has
processed them first, then included in an output filter using AP.ZIP. Using the AP
field ensures that you are using ZIP Codes that are accurate because ACE
generated them.
Data types You can apply filters and functions to the software fields, database fields,
application fields, and constants. In filters and functions, the software supports
four data types: character, numeric, logical, and date.
DB fields may be any of those four types; PW and Application fields (AP.field)
are always character type. You can type a character, numeric, or logical constant;
to create a date-type constant, see the ctod() function in the subsection “List of
functions” on page 92.
As a reminder, application fields (AP.field) and PW fields are always character
type no matter what type the underlying database field may be. When you base a
PW field on a date-type database field, the data is standardized to a yyyymmdd
string. When you base a PW field on a logical-type database field, the software
coverts the data to a character: T, Y, F, or N.
Chapter 9: Filter and function expressions
85
Page 86

Operator words for combining functions
You may find that you often need more than one test in your filters. Depending on
the product, you can assemble tests up to a total filter length of 512 characters. To
combine tests, use the following three operators:
.AND.
.OR.
.NOT.
You can type these words in uppercase or lowercase; however, don't forget
the periods.
.And. When you combine two tests together with .AND., a record must pass both tests
to be included, which may reduce the number of records that pass the filter. For
example, the following filter would set both a minimum income and minimum
age. The income field must contain a number greater than or equal to $50,000,
and the year of birth must be 1957 or earlier.
db.income >= 50000 .AND. year(db.birth) <= 1957
.Or. When you combine two tests together with .OR., the software includes a record if
it passes either test, which tends to allow more records to pass the filter. For
example, the following filter includes residents of both New York and New
Jersey.
PW.State = “NY” .OR. PW.State = “NJ”
.Not. The .NOT. operator reverses the truth or falsehood of the test that follows it. For
example, the following filter would exclude records in which the AP.ZIP field
was not equal to 54601. Note that you may prefer to use the exclamation mark (!)
instead of .NOT.
.NOT. AP.ZIP=“54601”
86
Database Prep
Page 87

Nested functions
Nesting combines more than one function to achieve the results you want on your
database. The following example shows a nest of three functions:
third_function ( second_function ( first_function ( data ) ) )
Reading nested functions
When reading a nested function (or expression), the software begins with the
right-most function and goes to the left-most function (starting with the innermost parenthesis and continuing outward). It performs the first function; then it
performs the second function on the results of the first, and so on.
When you write a nested function, keep in mind how the software interprets an
expression; then examine your objective and divide that objective into separate
tasks. Those tasks become the functions that make up the complete nested
function.
The following table shows how the software reads this function:
left(upper(alltrim(PW.Last_Name)),3)
In the table, note that the dots shown in the data represent spaces and are for
illustrative purposes only. For more information about reading and writing
functions, see “Example functions” on page 88.
Step Function Result
First alltrim(PW.Last_Name) The software eliminates spaces from the left and
right of the data:
Johnson.
Second upper(
result of alltrim
) The software changes the data from mixed-case
to uppercase: JOHNSON
..
.
Johnson
...
changed to
Third left(
result of upper
, 3) The software returns the three leftmost charac-
ters of the last name: JOH
Chapter 9: Filter and function expressions
87
Page 88

Example functions
Example 1 Let’s assume that you want to select a range of ZIP Codes. Consider the following
example data:
Function + Input Filter (to 512 chars) = val(DB.ZIP)>=54600 .and.
val(DB.ZIP)<54900
Explanation The function val( ) will convert character data into numeric data enabling
the use of the> = and <
tests must be true for the record to be included.
Results Records with ZIP Codes ranging from 54600 to 54899.
Example 2 To select all ZIP Codes within 546, you could choose one of the following:
Function + Input Filter (to 512 chars) = val(substr(DB.ZIP,1,3))=546
Explanation The substr() portion tells the software to start in the first position of the
DB.ZIP field and go for a length of 3 characters. To make the expression
equal to a number (in this example, 546) the DB.ZIP field has to be in
numeric form (it is in character form in the database). The val() function
converts the DB.ZIP into numeric data so that it can be compared to 546.
The result would have to be 546 in order to be included in the record.
operators. The operator .and. requires that both
Results Records with ZIP Codes starting with 546.
If you didn't want to convert your data into numeric form, you could use
this function:
Function + Input Filter (to 512 chars) = substr(DB.ZIP,1,3)
=
"546"
Explanation This function eliminates the requirement for the ZIP data to be in numeric
form by making the function equal to the
constant "546".
Results Records with ZIP Codes starting with 546.
88
Database Prep
Page 89

Example 3 Let’s assume that you want to add a series of zeros to numbers in a character-type
field so that each field is the same length. To do so, choose one of the following:
Function Copy (source, destination) = right("000000" + allt-
rim(DB.Account),6),field
Explanation The alltrim() function will make sure that all spaces are eliminated from
the right and left of the field. The right function will take the 6 rightmost
characters (spaces, numbers or letters) and return them as a 6-character
string.
Results
…1…
to 000001
...
234. to 000234
.2…
207
.
328.. to 000328
..20..
to 000002
…
to 000207
to 000020
or
Function Copy (source, destination) = right(" " + alltrim(DB.Account), 6), field
Explanation The right() function in this example will simply right-align the number
taking the rightmost characters. Instead of returning zeros, the function
will return blanks.
Results
…1…
to ..........1
...
234. to ......234
.2…
207
.
328.. to ......328
..20..
to ..........2
…
to ......207
to ........20
Chapter 9: Filter and function expressions
89
Page 90

Example 4 This example presents a lengthy nested expression that performs a seemingly
simple task. Let’s assume that you want to post a name in one field and an 8-digit
account number in another when the field contains both on the same line.
The first expression extracts the account number from Line1 and places it in the
Acct_No field.
Function Copy (source, destination)=
iif(isdigit(right(alltrim(DB.Name),1)),
right(alltrim(DB.Name),8),""), Acct_No
Explanation
alltrim trims spaces from the DB.Name field.
right returns the rightmost character from the trimmed DB.Name
field (5).
isdigit returns T (True) if the rightmost character is a number.
If True is returned, right extracts the rightmost eight characters from a
trimmed DB.Name. If False is returned, Acct_No is left empty.
Larry James 10625975
Position One Length of field minus: 8 characters
Result Acct_No 10625975
The second expression extracts the name and places it in the Name field.
Function Copy (source, destination)=iif(isdigit(right(alltrim(DB.Name),1)),
left(DB.Name
,
(len(alltrim(DB.Name)–8)),DB.Name), Name
Explanation alltrim trims spaces from the DB.Name field.
right returns the rightmost character from the trimmed DB.Name field (5).
isdigit returns T (True) if the rightmost character is a number.
len returns the length of a trimmed DB.Name.
–8 subtracts 8 characters from the length.
If True is returned,
left extracts the first n left characters (length –8); in
other words, everything except the last 8 characters.
If True is not returned, the complete DB.Name field is returned.
90
Larry James 10625975
Length of field minus: 8 characters
True Result Name Larry James
Database Prep
Page 91

Other operators
Arithmetic
Operators are punctuation marks or symbols for arithmetic or testing.
Symbol Function Example
* Multiplication 3 * 2 = 6
+ Addition 3 + 2 = 5
- Subtraction 3 - 2 = 1
Comparison
String concatenation
/ Division (no % modulus available; see “mod(number,
number)” on page 96).
Symbol Function Example
< Less than 3 < 2 returns .F.
<= Less than or equal to 3 <= 2 returns .F.
> Greater than 3 > 2 returns .T.
>= Greater than or equal to 3 >= 2 returns .T.
<> Not equal to 3 <> 2 returns .T.
= Is exactly equal to 3 = 2 returns .F.
“a “ = “ab” returns .F.
“a “ = “a” returns .F.
$ Is contained in or is a subset of “a” $ “ab” returns .T.
“a “ $ “ab” returns .F.
Symbol Function Example
3 / 2 = 1.5
Miscellaneous
& Concatenate strings, removing all
“ a “ & “b ” returns “a b”
leading and trailing spaces from both.
+ Concatenate strings, leaving leading
“a ” + “b ” returns “a b ”
and trailing blank spaces where they
are.
- Concatenate strings, collecting all
“a ” - “b ” returns “ab ”
trailing blank spaces at the end.
Symbol Function Example
! Not !.T. returns .F.
( ) Precedence is the order in which operations are
performed
Chapter 9: Filter and function expressions
91
Page 92

List of functions
The following functions are listed in alphabetical order and are summarized. Data
types are number, char (for character), date, log (for logical), or expr (expression)
when more than one type is valid. Expressions may be field names, constants in
double quotation marks, or another function.
abs(number) This function converts a numeric expression to its absolute value and returns a
positive number or a zero. For example, when the BALANCE field contains a
lesser value (like 2000) than the LIMIT field (containing 3000), the following
expression would still result in a positive number (1000):
abs(DB.Balance - DB.Limit)
abs(2000 – 3000) = 1000
alltrim(char) This function trims leading and trailing spaces from a character expression and
returns the remainder as a character string. For example: alltrim(DB.City)
When the DB field City contains “…Philadelphia…”, the software returns the
character string “Philadelphia.”
asc(char) This function returns the ASCII value (a number between 0 and 255) of the left-
most character in a character expression. Use it when you need to do arithmetic
on the ASCII value of a character. The subject “character” is case-sensitive. For
example, the following expression would result in the number 66: asc(“B”)
For a list of ASCII characters and their numerical values, see “Table of ASCII
code values” on page 42.
at(char, char) This function searches for the first character expression within the second and, if
it is found, returns the starting character position as a number. For example, the
following would return the number 8 when DB.Name is “Jones, Scott.”
at(“,”,DB.Name)
If the substring is not found, at returns “0”. If all you need to know is whether or
not an expression is present, use the “$” operator listed under “Comparison” on
page 91.
cdow(date) This function converts a date expression to a day-of-the-week name (DOW) and
returns any of the capitalized character strings, (“Sunday,” “Monday,” etc.). For
example:
cdow(DB.Anniv_Date) is converted to "Monday" when the database field
Anniv_Date contains “04/12/04”.
92
Database Prep
Page 93

chrtran(char1 , char2 ,
char
)
3
This function translates char1 using char2 and char3 as a search-and-replace table
and operates only on individual characters. If any character in char
, then the software replaces the char1 character with the character from char3
char
2
that is in the same position as the character found in char
replacement character in char
.
char
1
, then the software removes the character from
3
. If there is no
2
is found in
1
For example, suppose we’re processing a Name field in which a slash character
separates names from titles. We want to convert this to a blank space when
posting Name to an output file. The output posting would be as follows:
Copy(source,destination) = chrtran(DB.Name, “/”, “ ”), Name
If there is no replacement character in char3 , then the software removes the
character from char
. So you can use chrtran() to delete a character.
1
If one of the characters that you want to remove is a double quotation mark,
then you must place it inside single quotation marks (apostrophes).
You may set up a more complex search-and-replace table by entering more
than one character in char2 and char3 .
Remember that chrtran() works on individual characters only, so be careful
!
to count character positions within these two strings. For example, if you
have a field called DB.Keycode that contains numbers from 1–9, and you
want to replace those numbers with letters, your output posting would look
like this:
Copy(source,destination) = chrtran(DB.Keycode, “123456789”,
“ABCDEFGHI”), keycode
This would replace a Key Code number like “5183” with “EAHC”.
chr(number) This function interprets the number as an ASCII value and returns the
corresponding character and is opposite of the asc() function. For example, the
following would post carriage-return and line-feed characters:
Copy (source, destination) = chr(13) + chr(10), EOR
For a list of ASCII characters and their numerical values, see “Table of ASCII
code values” on page 42.
cmonth(date) This function converts a date to a month name and returns any of the capitalized
character strings (“January,” “February,” etc.). For example, the following would
be converted to “October” when the database field Anniv_Date contains “10/04/
2004”:
cmonth(DB. Anniv_Date)
Chapter 9: Filter and function expressions
93
Page 94

ctod(char) This function converts a character expression in the American format (mm/dd/
yyyy or mm/dd/yy) to a date value. For example, if DB. Anniv_Date is a
character field, the following returns the field’s contents as date-type data:
ctod(DB. Anniv_Date)
This enables you to compare this date with other date-type data such as the
following:
date() = ctod(DB.Anniv_Date)
date() This function returns the current date (according to your computer’s time-of-day
system) as a date-type value. The function accepts no input (argument) from you,
so do not type anything between the parentheses.
day(date) This function extracts the day of the month from a date expression and returns it
as an integer numeric value. For example, the following example gives the
number 17 when Birth_Date contains “07/17/2004”: day(DB. Birth_Date)
deleted() This function tests the input record to determine if it is marked to be deleted. The
software returns a logical True (.T.) if deleted; otherwise, False (.F.). For
example, you could use the following output filter to divert deleted records into a
separate output file, based on their delete status in the input file.
+ Output Filter (to 512 chars)........ = deleted()
You can use the deleted() function in an input filter. However, many programs
prefilter deleted records, so a deleted record would never be presented to your
filter. ACE and DataRight offer the option to process deleted records, so you
may be able to use this function in those programs.
dow(date) This function extracts the day of the week from a date and returns it as an integer
numeric value from 1 to 7 (Sunday = 1, Monday = 2, Saturday = 7). For example,
on January 1, 2001, dow(date()) takes the date from the computer's time-of-day
clock, determines the day of the week (Monday), and converts that day to the
number 2.
dtoc(date) This function converts a date-type value to a character string in the American
format (mm/dd/yyyy). Note that if the input date does not include the century, the
software assumes the current century.
For example: dtoc(DB.Anniv_Date) returns the character string “10/04/2004”
when Anniv_Date contains “10/04/04”.
Compare this function with dtos(). Note that this function is opposite of ctod().
94
Database Prep
Page 95

dtos(date) This function converts a date-type value to an 8-character string in the format
yyyymmdd. Compare this function with dtoc().
If the input date does not include the century, the software assumes the current
century. For example: dtos(DB. Anniv_Date) returns the character string
“20041004” when Anniv_Date contains “10/04/04”.
empty(char) This function returns a logical True (.T.) if the character expression (usually a
field) is empty or filled with spaces or tabs. This function returns False (.F.) if it
contains data. For example: empty(AP.Group_No) returns a logical True when
the application field AP.Group_No is empty.
iif(logexpr, expr2 ,
expr
3
)
With this function, if the logical expression is True, the second expression is
returned; otherwise, the third expression is returned. For example, suppose we
want to post Occupant to the Name field if that field is empty:
Copy (source, destination).. = iif(empty(DB.Name), “Occupant”,
DB.Name), Name
The returned expressions may be of any data type, and they do not have to be
of the same data type.
int(number) This function converts a numerical expression to an integer by truncating (not
rounding) all digits to the right of the decimal point. Compare this function with
round().
For example, the number 3 results from: int(3.9); however, the number 4 results
from: round(3.9, 0)
isalpha(char) This function returns a logical True (.T.) if the character expression begins with a
letter (A to Z or a to z), and returns a logical False (.F.) if it begins with any other
character. The following expression should be True:
isalpha(PW.First_Name)
isdigit(char) This function returns a logical True (.T.) if the character expression begins with a
number (0 to 9) and returns a logical False (.F.) if it begins with any other
character. For example, the following filter might be used to exclude Canadian
records: + Filter (to 512 chars)........ = isdigit(DB.Postcode)
islower(char) This function returns a logical True (.T.) if the character expression begins with a
lower-case letter (a to z) and returns a logical False (.F.) if it begins with any other
character.
For example: islower(DB.City) would return a logical False (.F.) if DB.City is
Madison because the name begins with an upper case letter.
isupper(char) This function returns a logical True (.T.) if the character expression begins with
an upper-case letter (A to Z) and returns a logical False (.F.) if it begins with any
other character.
Chapter 9: Filter and function expressions
95
Page 96

For example isupper(DB.City) would return a logical True (.T.) if the city is
Madison because the name begins with an upper case letter.
left(char, number) This function extracts from a character expression the leftmost number
characters, and returns this as a character string. For example left(PW.City, 13)
returns the first 13 characters of the PW field City.
len(char) This function returns the length of a character expression as a numerical value.
For example: len(alltrim(PW.City)) trims leading and trailing spaces before
measuring the length of the city name. When the PW field City contains
…
Philadelphia
"
lower(char) This function converts a character expression to lowercase and returns it as a
…..
", the software returns number 12.
character string. For example lower(“T. S. Eliot”) returns the character string “t.
s. eliot”.
ltrim(char) This function trims leading spaces from a character expression and returns the
remainder as a character string. For example: ltrim(PW.City)
When the PW field City contains “…Philadelphia
…..
character string “Philadelphia
”.
…..
”, the software returns the
max(number, number)
This function compares two numeric expressions and returns the larger one as a
numeric value. Note that this function is the opposite of min().
For example, max(DB.Cred_Limit, 500.00) compares the numeric database field
Cred_Limit with the value 500, and returns whichever is the larger amount.
min(number, number) This function compares two numeric expressions and returns the smaller one as a
numeric value. Note that this function is the opposite of max().
For example, min(DB.Balance, 0.00) compares the numeric database field
Balance with the value 0, and returns whichever is the smaller amount.
mod(number, number)
This function divides the first number by the second, and returns the remainder
(modulus) as a numeric value. For example, mod(44,3) returns the number 2 (44
divided by 3 is 14, with a remainder of 2). Use this function to give you every x
th
record number. For instance, mod(recno(), 4) = 0 gives you every 4
record in a
database.
month(date) This function extracts the month from a date expression and returns it as an
integer numeric value from 1 to 12 and is useful for staggering output files by
months.
For example: month(DB.Birth_Date) = 9 would limit an output to those born in
September.
96
Database Prep
Page 97

proper(char) This function converts a character expression to mixed-case (also called initial
capitals). For example, the following returns “Micron Electronics Inc” when the
PW field Firm contains “MICRON ELECTRONICS INC”.
proper(PW.Firm)
This function does not accept acronyms or other capitalization exceptions.
The software coverts all words the same way. For example, proper() returns
"Ibm Corp" when the input is “IBM Corp”.
recno() This function returns the current record number as an integer numeric value. Use
it to post the input record number to an output file for trace-back and to limit
input to a portion of the file.
For example, you could use
+ Input Filter (to 512 chars)........ = recno() > 1000 .and. recno() <= 2000
to confine an output file to the second 1,000 records. Note that this filter is slower
to process than using the input range parameters.
replicate (char, number)
This function repeats a character expression a specified number (number) of
times and returns it as a character string; the number must be an integer. For
example, the following function would insert 8 spaces in a designated field:
replicate(“ ”, 8)
right(char, number) This function extracts the rightmost number characters from a character
expression, and returns it as a character string. The number must be an integer.
This function ignores significant characters and extracts trailing blanks, if any
are present. Consider doing an rtrim() first: right(rtrim(DB.Suite), 3)
round (number, number)
This function rounds the first numeric expression to the number of decimal places
specified in the second and returns a numeric value. Compare this function with
int(), which truncates.
For example, the number 4 results from round(3.992385, 0) But the number 3.99
results from round(3.992385, 2).
To round before the decimal point, the number must be an integer, but may be
negative. For example, the number 120.0 results from round(123.456, -1).
rtrim(char) This function trims trailing spaces from a character expression and returns the
remainder as a character string. Consider the example rtrim(PW.City)
When the PW field City contains “…Philadelphia
…
character string “
Philadelphia”.
…..
”, the software returns the
space(number) This function returns a character string consisting of a number of blank spaces.
For example, the following function would yield 30 blank spaces: space(30)
span(char, char) This function returns, as a numeric value, the index of the last character in string
1 that is present in string 2. For example, span("edcTbaM","abcdefg") would
Chapter 9: Filter and function expressions
97
Page 98

return the number 3, because the first three characters of string 1 are also present
in string 2. The fourth character of string 1 is the first one that does not exist in
string 2. Note that this function is case-sensitive.
str(number, [len, [decimal ] ] )
This function converts a numeric expression to a character string that is leftaligned and includes decimal digits, decimal point, and minus sign (if any). You
can specify the length of the returned string and the number of decimal places
(both numeric). If you omit the length, the software assumes 10 characters.
If you specify length, but not decimal, the software rounds the value to an integer.
For example, the following converts the numeric-type database field “12.85” to a
character string 8 characters long, with 5 significant digits, a decimal point, and 2
decimal places (the dots represent spaces): str(DB.Number, 8, 2) returns
…
12.85”
“
substr(char, start [, length ]
This function extracts a substring from the character expression, beginning at
character position start (a number) and continuing to the end, unless you specify a
numeric length.
For example, the following extracts the exchange “788” from the 10-digit
telephone number field 6087888700: substr(DB.Phone, 4, 3)
Compare this function with functions left() and right().
time() This function returns the current time (according to the computer’s time-of-day
clock) as an 8-character string in the format hh:mm:ss. Hours are in a 24-hour
format.
translated() This expression returns the number of non-Latin-1 characters that are converted
to Latin-1 with the Unicode to Latin-1 table.
unassigned() This expression returns the number of non-Latin-1 characters that are either
illegal or unassigned. An unassigned character is one that has a numeric value
greater than 255 for which there is no value specified in the Unicode to
Latin-1 table.
upper(char) This function converts a character expression to uppercase and returns it as a
character string. For example, the following returns “IBM CORP” when the PW
field Firm contains “IBM Corp”: upper(PW.Firm)
val(char) This function converts a character expression to a numeric value, and stops when
it encounters a second decimal point or a nonnumeric character. For example, the
following converts the character-type field AP.List_Cnt into numeric data.
val(AP.List_Cnt) + Output filter = val(AP.List_Cnt) <= 2
year(date) This function extracts the year from a date expression and returns it as an integer
numeric value. For example, the following function extracts the year of
graduation: year(DB.Grad_Date)
98
Database Prep
Page 99

If the date format for DB.Grad_Date is mm/dd/yyyy the software returns the yyyy
portion.
Chapter 9: Filter and function expressions
99
Page 100

Summary of functions by purpose
The following table lists each of the functions according to its function.
Purpose Description Function
Arithmetic Perform division and return the remainder mod()
Convert
data
Compare Select the larger of two numbers
Provide
data
Extract Day of the week from date (Sunday, Monday, ... Saturday)
ASCII value to character
Character mm/dd/yy or mm/dd/yyyy to date
Character string to lowercase
Character string to UPPERCASE
Character string to mixed-case
Character to ASCII value
Character to numeric
Date to character mm/dd/yyyy
Date to character yyyymmdd
Numeric decimal to integer by truncation
Numeric decimal to
Numeric to absolute value
Numeric to character string
Select the smaller of two numbers
Character repeated
Current date from time-of-day clock
Current time from time-of-day clock
n
spaces
Number of current record, from input file
Day-of-the-month numeric from date (1, 2, ... 31)
Day-of-the-week numeric from date (1, 2, ... 7)
Leftmost
Month name from date (January, February, ... December)
Month numeric from date (1, 2, ... 12)
Range of characters from string
Rightmost
Year numeric from date
n
characters from string
n
characters from string
n
decimal places (or integer) by rounding
n
times
chr()
ctod()
lower()
upper()
proper()
asc()
val()
dtoc()
dtos()
int()
round()
abs()
str()
max()
min()
replicate()
date()
time()
space()
recno()
cdow()
day()
dow()
left()
cmonth()
month()
substr()
right()
year()
100
Database Prep
Fit and
trim
Substrings Where is character expression 1 located within expression 2?
Trim leading and trailing spaces from a character expression
Trim leading spaces from a character expression
Trim trailing spaces from a character expression
Measure the length of a character expression
Search a string for one character and substitute another
How many characters in expression 1 are within expression 2?
Is character expression 1 located within expression 2
(True/False)?
alltrim()
ltrim()
rtrim()
len()
at()
chrtran()
span()
$
 Loading...