


Data Federator Installation Guide
BusinessObjects Data Federator XI Release 2 Accelerated SP1

Copyright
© 2007 Business Objects. All rights reserved. Business Objects owns the following
U.S. patents, which may cover products that are offered and licensed by Business
Objects: 5,555,403; 6,247,008; 6,289,352; 6,490,593; 6,578,027; 6,768,986;
6,772,409; 6,831,668; 6,882,998 and 7,139,766. Business Objects and the Business
Objects logo, BusinessObjects, Crystal Reports, Crystal Xcelsius, Crystal Decisions,
Intelligent Question, Desktop Intelligence, Crystal Enterprise, Crystal Analysis,
Web Intelligence, RapidMarts, and BusinessQuery are trademarks or registered
trademarks of Business Objects in the United States and/or other countries. All
other names mentioned herein may be trademarks of their respective owners.
Third-party
Contributors
Business Objects products in this release may contain redistributions of software
licensed from third-party contributors. Some of these individual components may
also be available under alternative licenses. A partial listing of third-party
contributors that have requested or permitted acknowledgments, as well as required
notices, can be found at: http://www.businessobjects.com/thirdparty

Contents
Installing Data Federator 7Chapter 1
Overview......................................................................................................8
Installation requirements..............................................................................8
Starting the installer in graphical mode.....................................................10
Starting the installer in console mode........................................................11
What happens during installation..............................................................12
Description of install sets...........................................................................15
Running the installer in silent mode...........................................................17
Creating a configuration file for silent mode installation............................19
Uninstalling Data Federator.......................................................................20
Accessing data sources through JDBC.....................................................22
Accessing Progress data sources.............................................................24
Configuring connectors for SAS................................................................27
Installing Connection Dispatcher...............................................................28
Hardware Requirements........................................................................8
Software Requirements..........................................................................9
Before You Install Data Federator..........................................................9
No spaces in paths on AIX or Solaris.............................................10
Administrator rights.........................................................................10
Installing drivers for JDBC connections...............................................22
List of drivers for JDBC connections....................................................23
Pointing a resource to an existing JDBC driver....................................23
Installing OEM SequeLink Server for Progress connections...............24
Installing drivers for Progress connections..........................................24
Installing drivers for SAS connections..................................................28
Installing Connection Dispatcher on Windows as a service.................29
Data Federator Installation Guide 3

Contents
Starting Data Federator 31Chapter 2
Starting Data Federator servers on Windows............................................32
Starting servers when Data Federator Windows Services are
installed................................................................................................32
Starting servers when Data Federator Windows Services are not
installed................................................................................................33
Starting Data Federator servers on AIX or Solaris....................................33
Starting servers manually.....................................................................34
Shutting down Data Federator servers on Windows.................................34
Shutting down servers when Data Federator Windows Services are
installed................................................................................................34
Shutting down servers when Data Federator Windows Services are not
installed................................................................................................35
Shutting down Data Federator servers on AIX or Solaris..........................36
Shutting down servers manually..........................................................36
Login and passwords.................................................................................36
Ports used by Data Federator....................................................................37
Using Connection Dispatcher....................................................................37
Starting Connection Dispatcher when Data Federator Windows Services
are installed..........................................................................................38
Starting Connection Dispatcher when Data Federator Windows Services
are not installed....................................................................................38
Starting Connection Dispatcher on AIX or Solaris...............................39
Shutting down Connection Dispatcher when Data Federator Windows
Services are installed...........................................................................39
Shutting down Connection Dispatcher when Data Federator Windows
Services are not installed.....................................................................40
Shutting down Connection Dispatcher on AIX or Solaris.....................40
Backing up and restoring data 43Chapter 3
Starting the Data Federator Backup and Restore tool...............................44
4 Data Federator Installation Guide

Contents
Starting the Backup and Restore tool..................................................44
Backing up your Data Federator data........................................................46
Restoring your Data Federator data..........................................................47
Updating licenses 49Chapter 4
Updating your license................................................................................50
Index 53
Data Federator Installation Guide 5

Contents
6 Data Federator Installation Guide

Installing Data Federator
1

Installing Data Federator
1
Overview
Overview
The Data Federator installer is accessible from the web page on the Data
Federator CD. You can run the Data Federator installer in either graphical
mode or console mode.
Use the console mode if your AIX or Solaris environment lacks the graphic
libraries to launch the installer in graphical mode. Console mode follows the
same steps as graphical mode.
This document presents the installation instructions, and hardware and
software requirements for BusinessObjects Data Federator.
You should consult this document and the release notes
xir2_acc_sp1_df_releasenotes_en.pdf file on the installation CD before you
install Data Federator.
Once you have installed and started Data Federator, you can find the Data
Federator User Guide PDF as follows.
On Windows, click Start > Programs > BusinessObjects Data Federator
•
XI Release 2 Accelerated SP1 > Data Federator Documentation
Or:
Look in the directory data-federator-install-dir\doc.
On AIX or Solaris, look in the directory data-federator-links-
•
dir/Data_Federator_Documentation, where data-federator-links-dir is
the links directory that you chose for Data Federator.
Or:
Look in the directory data-federator-install-dir/doc.
Installation requirements
Hardware Requirements
To use Data Federator, you need:
8 Data Federator Installation Guide

any IBM-compatible machine with a Pentium III 500 MHZ processor or
•
higher
at least 512 MB of RAM for the client
•
at least 2 GB of RAM for the server
•
a hard disk
•
a CD-ROM drive
•
Software Requirements
The following software is required on your system:
One of the following operating systems:
•
MicrosoftWindows:
•
Microsoft Windows XP Service Pack 2
•
Windows 2003 Server
•
Windows 2000 Server
•
IBM AIX
•
SunSolaris
•
Installing Data Federator
Installation requirements
1
For Data Federator Designer:
•
Microsoft IE6 or IE7 browser
•
Note:
Data Federator Designer is not supported on IE plugins that are running
in other applications.
For Data Federator Administrator:
Microsoft IE6 or IE7 browser or MozillaFirefox
•
Before You Install Data Federator
Read the following issues before you install Data Federator.
Data Federator Installation Guide 9

Installing Data Federator
1
Starting the installer in graphical mode
No spaces in paths on AIX or Solaris
On AIX and Solaris, your Data Federator installation and Data Federator
links paths must not contain any spaces. If you change the default installation
path or default links path on AIX or Solaris, make sure that you do not use
any spaces.
Administrator rights
On Windows, you must be defined as Administrator to install the Data
Federator servers as Windows services.
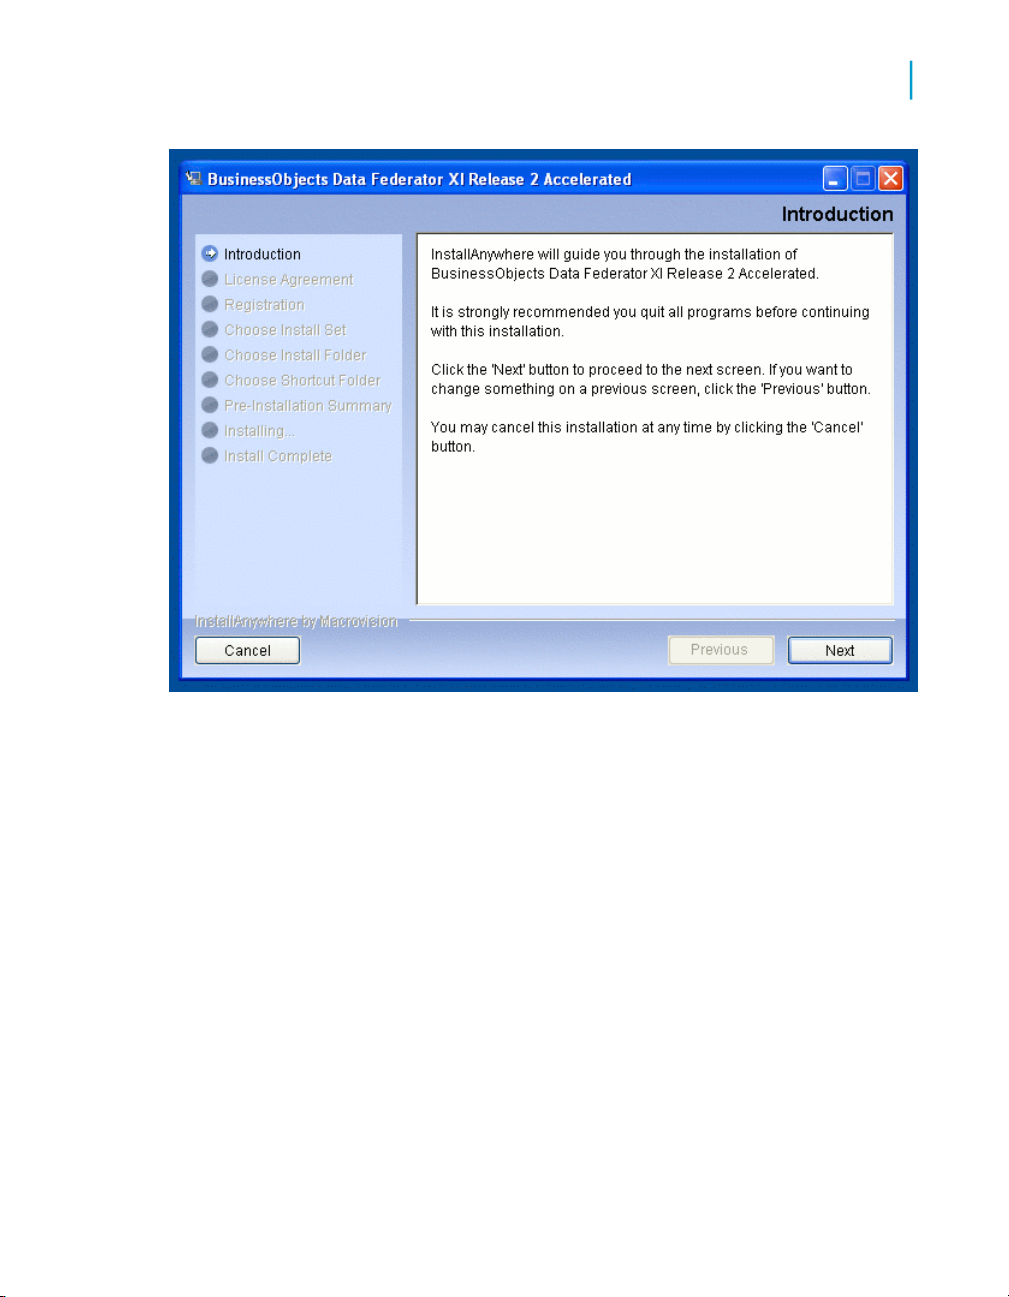
Starting the installer in graphical mode
1. Insert the install CD into the drive.
2. Browse to the CD root and double click the file Install.htm.
The install start page appears.
3. Click the View link beside your listed OS to read important installation
information before you install.
4. Once you have read the installation information, click the Download link
for your OS to start the Data Federator installation wizard.
A "File Download" box appears.
5. Click Open.
The install wizard "Introduction" window appears.
10 Data Federator Installation Guide
Installing Data Federator
Starting the installer in console mode
1
Follow the instructions on-screen to complete the installation. For details,
see What happens during installation on page 12.
Starting the installer in console mode
You can use the Data Federator installer in console mode if your AIX or
Solaris environment lacks the graphic libraries to launch the installer in
graphical mode.
• You can launch the installer in console mode with one of the following
commands, from the root directory of the installation CD.
Data Federator Installation Guide 11

Installing Data Federator
1
What happens during installation
Table 1-1: Starting the Data Federator installer in console mode
on Solarison AIX
sh InstData/AIX/VM/in
stall.bin -i console
The install wizard Introduction message appears in a console.
Follow the instructions on-screen to complete the installation. For details,
see What happens during installation on page 12.
sh InstData/Solaris/VM/in
stall.bin -i console
What happens during installation
This section lists the windows and choices that appear when you use the
Data Federator installer.
The installation procedure is the same on Windows, AIX and Solaris.
1. The Data Federator installer starts with the "Introduction" window.
2. The "License Agreement" window displays the license text and asks
you to confirm the terms of the License Agreement if you want to continue
the installation.
3. The "Registration" window lets you enter your license key.
4. The "Choose Install Set" window lets you choose the set of components
that you want to install.
12 Data Federator Installation Guide

Installing Data Federator
What happens during installation
1
You can choose to install Data Federator as a Typical or Custom
installation, or you can install only the Connection Dispatcher, only the
Data Federator JDBC and ODBC drivers or only the data access driver
for Progress OpenEdge 10.0B.
5.
If you chose the Custom install set, the "Choose Install Set" window
lets you select the components that you want to install.
Select check boxes for components that you want to install. Clear check
boxes for components that you do not want to install.
6. The "Choose Install Folder" window lets you choose an installation
directory.
You can type in a file path, or click Choose to browse to the installation
directory.
On AIX and Solaris, your Data Federator installation path must not contain
any spaces. If you change the default installation path on AIX or Solaris,
make sure that you do not use any spaces.
Data Federator Installation Guide 13

Installing Data Federator
1
What happens during installation
7. The "Choose Shortcut Folder" window lists options for the placement
of icons and shortcuts.
If required, you can type or browse to a directory to put the shortcut icons.
If you change the default directory for shortcuts on AIX or Solaris, make
sure that you do not use any spaces in the path to the directory.
8. The "Pre-Installation Summary" window lets you review your install
options and launch the installation.
9. The "Installing BusinessObjects Data Federator XI Release 3" window
displays the installation progress.
10. The "Install Complete" window indicates the installation status.
11. The installation creates an install log at data-federator-install-
dir/install.log
The installer creates a silent mode installation response file, which you
can use to re-run the same installation in silent mode. This file is located
at data-federator-install-dir/install/silent/in
stall.silent.properties.
Related Topics
• Description of install sets on page 15
• Starting the installer in graphical mode on page 10
• Starting the installer in console mode on page 11
• Running the installer in silent mode on page 17
14 Data Federator Installation Guide
Description of install sets
DescriptionInstall type
The following Data Federator components are installed:
•
•
•
Typical
•
• Data Access Drivers
Note:
You must be logged in with an administrator account to install Windows services.
Installing Data Federator
Description of install sets
Data Federator Query Server
Data Federator Designer
Data Federator Windows Services
On Windows, Data Federator
Query Server and Data Federator
Designer are installed as Windows services.
Data Federator JDBC and ODBC
Drivers
1
Dispatcher
Data Federator Connection Dispatcher
is installed.
On Windows, this component is installed as a Windows service.
Use this option if you already have
multiple installations of Query Server
on different machines and you want to
install Connection Dispatcher to dispatch connections between them. For
details, see the User Guide.
Note:
You must be logged in with an administrator account to install Windows services.
Data Federator Installation Guide 15

Installing Data Federator
1
Description of install sets
JDBC/ODBC Drivers
DescriptionInstall type
Only the Data Federator JDBC and
ODBC drivers are installed.
Select this option if you already have
Data Federator Query Server on a different machine and you want to access
it from a client machine through JDBC
or ODBC drivers.
Install the Data Federator JDBC and
ODBC drivers on the client machine.
Note: Data Federator Query Server
can also be accessed remotely using
the web interface (Data Federator Administrator) without requiring any client
installation.
Data Access Drivers
Only the data access driver for
Progress OpenEdge 10.0B is installed.
16 Data Federator Installation Guide

Custom
Installing Data Federator
Running the installer in silent mode
DescriptionInstall type
You can choose which Data Federator
components are installed. You can install the following components:
Data Federator Query Server
•
Data Federator Designer
•
Data Federator Connection Dis-
•
patcher
Data Federator Windows Services
•
On Windows, you can choose to
install Data Federator Query
Server, Data Federator Designer
or Data Federator Connection
Dispatcher as Windows services
by selecting the Data Federator
Windows Services component.
Data Federator JDBC and ODBC
•
Drivers
1
Data Access Drivers
•
When you click on each component's
option, a description appears in the
Description box.
Note:
You must be logged in with an administrator account to install Windows services.
Running the installer in silent mode
You can run the Data Federator installer in silent mode if you want to repeat
a previous installation with the same configuration.
You can create a configuration file for silent mode installation by using the
provided template file, or by simply running a graphical or console installation
Data Federator Installation Guide 17

Installing Data Federator
1
Running the installer in silent mode
first. The graphical and console installations automatically create a
configuration file that lets you repeat the same installation on another
machine.
1. Insert the install CD into the drive.
2. Create a configuration file for the silent mode installation.
•
•
If you have not previously completed an installation, create a new
configuration file for the silent mode installation.
For details, see Creating a configuration file for silent mode installation
on page 19.
If you have previously completed an installation using graphical mode
or console mode, copy the configuration file that the installer created.
This file contains the settings that you chose during the previous
installation. You can use this file to re-run the same installation on a
different machine.
This file is located at data-federator-install-dir/in
stall/silent/install.silent.properties.
Copy this file to a new location, your-silent-mode-installation-
configuration-file
3. Run the silent mode installation from a command line, using the -f option
to point to your configuration file.
If you are installing on Windows, type the following in a command line.
•
CD-drive-letter:\InstData\Windows\VM\install.exe -f "yoursilent-mode-installation-configuration-file"
For example:
D:\InstData\Windows\VM\install.exe -f "C:\My Documents\Pre
vious Installations\Data Federator\install.silent.proper
ties"
If you are installing on AIX, type the following in a command line.
•
sh CD-drive-mount/InstData/AIX/VM/install.bin -f "yoursilent-mode-installation-configuration-file"
For example:
sh /mnt/cd/InstData/AIX/VM/install.bin -f
"/home/jill/previous_installations/data_federator/in
stall.silent.properties"
18 Data Federator Installation Guide

Installing Data Federator
Creating a configuration file for silent mode installation
If you are installing on Solaris, type the following in a command line.
•
sh CD-drive-mount/InstData/Solaris/VM/install.bin -f
"your-silent-mode-installation-configuration-file"
For example:
sh /mnt/cd/InstData/Solaris/VM/install.bin -f
"/home/anil/previous_installations/data_federator/in
stall.silent.properties"
The silent mode installation installs Data Federator according to the properties
you set in the configuration file.
Caution:
Note the following items when you install in silent mode.
After you install Data Federator in silent mode, you should check if you
•
need to restart your machine. Open the file data-federator-install-
dir/install/install.properties; if the property RESTART_NEEDED=yes,
then you should reboot.
If you install Data Federator in silent mode, the uninstaller also runs in
•
silent mode.
1
On Windows, if you install in silent mode, and then uninstall, you should
•
reboot the machine after uninstallation.
If you try to run the silent mode installation when there is an existing
•
installation on your system, the silent mode installation will abort. You will
know that the installation aborted if the install.log file appears on your
Desktop on Windows, or in your home directory on AIX or Solaris.
Creating a configuration file for silent
mode installation
Create a configuration file for the installer by copying and editing the template
file.
1. Copy the file data-federator-cd-dir/InstData/silent_install/in
stall.silent.template.properties to a new location, your-silent-
mode-installation-configuration-file
2. Edit your-silent-mode-installation-configuration-file and
complete the missing properties, as documented inside the file.
Data Federator Installation Guide 19

Installing Data Federator
1
Uninstalling Data Federator
Uninstalling Data Federator
You should manually stop the Data Federator servers before you uninstall,
in the following cases.
If you installed on Solaris or AIX.
•
If you installed on Windows without the Data Federator Windows Services.
•
1. Start the Data Federator uninstallation.
On Windows, click Start > BusinessObjects Data Federator XI
•
Release 2 Accelerated SP1 > Uninstall.
On AIX, run Uninstall_Data_Federator from the links directory that
•
you chose for Data Federator.
Or, if you did not create a links directory, run the following command.
sh data-federator-install-dir/Uninstall_Data_Federa
tor/Uninstall
On Solaris, run Uninstall_Data_Federator from the links directory
•
that you chose for Data Federator.
Or, if you did not create a links directory, run the following command.
sh data-federator-install-dir/Uninstall_Data_Federa
tor/Uninstall
The "Uninstall BusinessObjects Data Federator XI Release 2
Accelerated SP1" window appears.
20 Data Federator Installation Guide

Installing Data Federator
Uninstalling Data Federator
1
Click Complete Uninstall to uninstall all components.
Or
Click Uninstall Specific Features to choose which installed components
you want to remove.
2. Choose an uninstall type and click Next.
3. Click Uninstall.
The uninstall process removes the Data Federator components from your
machine.
4. Click Done at the end of the uninstallation.
The uninstallation removes Data Federator components from your system.
Caution:
If you are asked to reboot after uninstalling, you should reboot before
reinstalling a new version.
Data Federator Installation Guide 21

Installing Data Federator
1
Accessing data sources through JDBC
On Windows, if you ran the installation in silent mode, then you should always
reboot after uninstalling. The silent mode uninstallation does not warn you
if you need to reboot.
Related Topics
• Shutting down servers when Data Federator Windows Services are not
installed on page 35
• Shutting down servers manually on page 36
Accessing data sources through JDBC
You can access JDBC data sources from Data Federator by pointing to your
data source's driver.
In most cases, this is just a matter of copying a .jar file to the LeSe
lect/drivers directory in your Data Federator installation.
Installing drivers for JDBC connections
In order to connect to data-access applications through JDBC, you must
install JDBC drivers for that application. These drivers are usually available
from their vendors' websites.
1. Download the JDBC driver for your data-access application.
For details on where to download drivers for common DBMSs, see List
of drivers for JDBC connections on page 23.
You get a driver in the form of a .jar file or several .jar files.
2. Copy the driver .jar files to data-federator-install-dir/LeSe
lect/drivers
This directory is the default directory where Data Federator looks for
JDBC drivers. If you want to put the drivers in a different directory, you
must enter this directory name in the corresponding resource. For details,
see Pointing a resource to an existing JDBC driver on page 23.
When Data Federator starts, it loads your JDBC drivers, and it can access
the corresponding JDBC data source.
22 Data Federator Installation Guide

Accessing data sources through JDBC
List of drivers for JDBC connections
Where to get itDriver
Installing Data Federator
1
DB2
MySQL
Oracle
SAS
SQL Server
2000
SQL Server
2005
Use the following link to download the IBM DB2 JDBC Universal
Driver. The product is called IBM Cloudscape.
To complete this download, you must register on the IBM
website. Registration is free.
http://www14.software.ibm.com/webapp/download/
After you install IBM Cloudscape, you can find the driver file
in ibm-cloudscape-install-directory/lib/db2jcc.jar.
The file db2jcc.jar is the driver you can use for DB2.
http://dev.mysql.com/downloads/connector/j/3.1.html
http://www.oracle.com/technology/software/tech/java/sqlj_jd
bc/index.html
http://dcs.uchicago.edu/sas/sas-docinet/java/jdbc/index.html
http://www.microsoft.com/downloads/details.aspx?fami
lyid=07287b11-0502-461a-b138-2aa54bfdc03a&displaylang=en
Note:
The recommended driver for SQL Server 2000 is SQL Server
JDBC driver SP3 (the version is 2.2.0040)
http://www.microsoft.com/downloads/details.aspx?fami
lyid=E22BC83B-32FF-4474-A44A-22B6AE2C4E17&display
lang=en
Pointing a resource to an existing JDBC driver
By default, Data Federator looks for JDBC drivers in the directory data-
federator-install-dir/LeSelect/drivers. You can keep the drivers in
a different directory by changing the path in the resource.
• In Data Federator Administrator, use the "Connector Resources" tab
to set the driverLocation property to the name of the directory where
you keep your drivers.
Data Federator Installation Guide 23

Installing Data Federator
1
Accessing Progress data sources
You can also use the ALTER RESOURCE statement to set the driverLoca
tion property.
For example, to set the directory for the oracle9 resource, use the following
statement.
ALTER RESOURCE "jdbc.oracle.oracle9" SET driverLocation
'C:\drivers\ojdbc14.jar'
Accessing Progress data sources
This section describes how to configure Data Federator so that you can
access Progress data sources.
Installing OEM SequeLink Server for Progress connections
In order to bridge the Progress JDBC driver to the Data Federator DataDirect
Progress OpenEdge driver, you must install the SequeLink Server for ODBC
Socket 5.5 OEM version. The SequeLink Server installation is provided on
the Data Federator CD.
• Run the following script from the Data Federator CD.
sl550socket\oemsetup.bat
You can find documentation on the SequeLink Server in the directory
sl550socket\doc on the Data Federator CD.
Installing drivers for Progress connections
In order to connect to Progress databases, you must do the following:
install a JDBC driver for Progress (using the Data Federator installer)
•
install the OEM SequeLink Server for ODBC Socket 5.5
•
install the OEM ODBC driver (Data Federator DataDirect Progress
•
OpenEdge)
install the Progress OpenEdge 10.0B client
•
24 Data Federator Installation Guide

Installing Data Federator
Accessing Progress data sources
configure DSN entries to point to your Progress databases
•
Data Federator loads the Progress driver for JDBC. The Progress driver
uses the OEM SequeLink Server. The OEM SequeLink Server connects to
Data Federator DataDirect Progress OpenEdge, which is an ODBC driver.
The ODBC driver connects to the Progress OpenEdge 10.0B client. Finally,
the Progress OpenEdge 10.0B client connects to the Progress database.
The Progress driver for JDBC and the OEM SequeLink Server should be on
the same machine as Data Federator.
The Data Federator DataDirect Progress OpenEdge driver should be on the
same machine as the Progress OpenEdge 10.0B client.
The connection from the Progress OpenEdge 10.0B client to the Progress
database is covered in your Progress documentation.
1
Figure 1-1: Architecture of an instalation from Data Federator to Progress
1. Install a Progress OpenEdge 10.0B client. See the Progress
documentation for details.
2. Set your environment variables to point to the Progress OpenEdge
installation as follows.
DLC=C:\Progress\OpenEdge
PATH=%PATH%;%DLC%\bin
3. Run the Data Federator installer and choose an install set that contains
the data access driver for Progress OpenEdge 10.0B.
4. Open your operating system's "ODBC Data Source Administrator".
Data Federator Installation Guide 25
Installing Data Federator
1
Accessing Progress data sources
On Windows, you configure DSN entries in the "ODBC Data Source
Administrator".
To open the "ODBC Data Source Administrator" on a standard
installation of Windows, click Start > Programs > Administrative Tools
> Data Sources (ODBC).
5.
Add a DSN entry of the type Data Federator DataDirect Progress
OpenEdge, and configure it as follows.
Data source name
Enter...For the parameter...
a name of your choice: yourprogress-data-source-name
for example, accounts-progress-
data-source
Description
Host
Database name
User
6. Use the Data Federator CD and install the SequeLink Server OEM version.
The SequeLink Server is a bridge between the JDBC driver for Progress
and the Data Federator DataDirect OpenEdge driver.
7. Open the administration interface of the SequeLink Server.
8. Add a data source, and configure it as follows.
a description of your choice, to describe this Progress data source
the name of the machine where your
Progress database is installed
the port of the Progress databasePort
the name of the Progress database
to which you want to connect
a username that has at least read
privileges on the Progress database
to which you want to connect
for example, progress-username
26 Data Federator Installation Guide
Installing Data Federator
Configuring connectors for SAS
Enter...For the parameter...
1
data source name (in tree list)
the attribute DataSourceSOCODBC
ConnStr, in the term DSN
When you complete the above steps, any connections that users create of
type jdbc.progress.openedge will connect to Progress through the
SequeLink Server. Use your-sequelink-data-source-name as your datasource
name in the resource.
Related Topics
• Installing drivers for Progress connections on page 24
a name of your choice: your-se
quelink-data-source-name
the name that you chose in the DSN
entry for your ODBC driver, your-
progress-data-source-name
For example, for the attribute Data
SourceSOCODBCConnStr, enter
DSN=accounts-progress-datasource
Configuring connectors for SAS
In order to use a SAS connector, you must:
install a driver that lets Data Federator connect to a SAS/SHARE server
•
have SAS/SHARE server version 9.1 or higher
•
A SAS/SHARE server is a server that allows you to connect to SAS data
sets. For more information about SAS/SHARE, see the SAS website.
You can install the driver as you would install any other JDBC driver for Data
Federator.
Related Topics
• Installing drivers for JDBC connections on page 22
• Pointing a resource to an existing JDBC driver on page 23
• http://www.sas.com/products/share/index.html
Data Federator Installation Guide 27

Installing Data Federator
1
Installing Connection Dispatcher
Installing drivers for SAS connections
In order to connect to SAS sources from Data Federator, you must install a
SAS/SHARE driver for JDBC.
The SAS/SHARE driver lets Data Federator connect to a SAS/SHARE server.
The SAS/SHARE server accesses your SAS data sets.
The SAS/SHARE driver for JDBC should be on the same machine as Data
Federator.
To set up your SAS/SHARE server, see your SAS documentation.
Figure 1-2: Architecture of an installation from Data Federator to SAS
• Install a driver for a JDBC connection to SAS, as you would install a
regular JDBC driver in Data Federator.
Users can now add a datasource of type SAS.
Related Topics
• Installing drivers for JDBC connections on page 22
Installing Connection Dispatcher
You can install Connection Dispatcher using the Data Federator installer.
28 Data Federator Installation Guide

Installing Data Federator
Installing Connection Dispatcher
Installing Connection Dispatcher on Windows as a service
1. Launch the Data Federator installer.
For details on launching the Data Federator installer, see What happens
during installation on page 12.
2. Choose an install set that contains the Connection Dispatcher.
For details on the install sets, see What happens during installation on
page 12.
Connection Dispatcher installs on the machine where you ran the installer.
1
Data Federator Installation Guide 29

Installing Data Federator
Installing Connection Dispatcher
1
30 Data Federator Installation Guide

Starting Data Federator
2

Starting Data Federator
2
Starting Data Federator servers on Windows
Starting Data Federator servers on
Windows
Data Federator runs servers for Data Federator Designer, Data Federator
Query Server and Data Federator Repository. On Windows, you can start
Data Federator servers using Windows services or using scripts.
Starting servers when Data Federator Windows Services are installed
If you installed the Data Federator Windows Services component in the Data
Federator installer, Data Federator servers start automatically. Specifically,
the Data Federator Windows Services start the Data Federator servers.
The following table lists the names of the Data Federator Windows Services
that run the Data Federator servers.
Table 2-1: List of Windows services
Run the service in this
order...
1
2
32 Data Federator Installation Guide
DataFederator.Reposito
ry
DataFederator.Query
Server
the service runs...name of service is...
Data Federator Repository
Data Federator Query
Server
Data Federator DesignerDataFederator.Designer3

Starting Data Federator
Starting Data Federator servers on AIX or Solaris
Starting servers when Data Federator Windows Services are not installed
If you did not install the Data Federator Windows Services component in the
Data Federator installer, you can use the startup scripts to start Data
Federator servers.
The following table lists the names of the scripts that run Data Federator
servers.
Table 2-2: List of scripts that run Data Federator servers on Windows
2
Run the script in this
order...
1
2
3
data-federator-in
stalldir\hsqldb\bin\start
up.bat
data-federator-in
stall-dir\LeSe
lect\bin\startup.bat
data-federator-in
stall-dir\tom
cat\bin\startup.bat
the script runs...name of script is...
Data Federator Repository
Data Federator Query
Server
Data Federator Designer
Starting Data Federator servers on AIX or
Solaris
Data Federator runs servers for Data Federator Designer, Data Federator
Query Server and Data Federator Repository. On AIX or Solaris, you can
start Data Federator servers using scripts.
Data Federator Installation Guide 33

Starting Data Federator
2
Shutting down Data Federator servers on Windows
Starting servers manually
There are two methods of starting the Data Federator servers manually:
If you installed Data Federator shortcuts, you can click the
•
Data_Federator_Servers_Startup icon in the Data_Federa
tor_Links_Dir directory (the links directory you selected when you
installed Data Federator shortcuts).
Note:
See What happens during installation on page 12 for details of installing
Data Federator shortcuts.
If you did not install Data Federator shortcuts, you can run the following
•
script:
data-federator-install-dir/bin/startup.sh
Shutting down Data Federator servers on
Windows
Data Federator runs servers for Data Federator Designer, Data Federator
Query Server and the Data Federator repository. On Windows, you can shut
down Data Federator servers using Windows services or using scripts.
Shutting down servers when Data Federator Windows Services are installed
You can stop the following Data Federator Windows Services in order to
shut down the Data Federator servers.
34 Data Federator Installation Guide

Table 2-3: List of Windows services
Starting Data Federator
Shutting down Data Federator servers on Windows
2
stop the service in this
order...
2
3
DataFederator.Query
Server
DataFederator.Reposito
ry
the service controls...name of service is...
Data Federator DesignerDataFederator.Designer1
Data Federator Query
Server
Data Federator Repository
Shutting down servers when Data Federator Windows Services are not installed
If you did not install the Data Federator Windows Services component in the
Data Federator installer, you can use the shutdown scripts to shut down Data
Federator servers.
The following table lists the names of the scripts that shut down Data
Federator servers.
Table 2-4: List of scripts that stop Data Federator servers on Windows
Run the script in this
order...
1
2
data-federator-in
stall-dir\tom
cat\bin\shutdown.bat
data-federator-in
stall-dir\LeSe
lect\bin\shut
down.bat
Data Federator Installation Guide 35
the script shuts down...name of script is...
Data Federator Designer
Data Federator Query
Server

Starting Data Federator
2
Shutting down Data Federator servers on AIX or Solaris
Run the script in this
order...
3
data-federator-in
stalldir\hsqldb\bin\shut
down.bat
the script shuts down...name of script is...
Data Federator Repository
Shutting down Data Federator servers on
AIX or Solaris
Data Federator runs servers for Data Federator Designer, Data Federator
Query Server and the Data Federator repository. On AIX and Solaris, you
can shut down Data Federator servers using scripts.
Shutting down servers manually
There are two methods of shutting down the Data Federator servers manually:
If you installed Data Federator shortcuts, you can click the
•
Data_Federator_Servers_Shutdown icon in the Data_Federa
tor_Links_Dir directory (the links directory you selected when you
installed Data Federator shortcuts).
Note:
See What happens during installation on page 12 for details of installing
Data Federator shortcuts.
If you did not install Data Federator shortcuts, you can run the following
•
script:
data-federator-install-dir/bin/shutdown.sh
Login and passwords
The default user name is sysadmin.
36 Data Federator Installation Guide

The default password is sysadmin.
You should use Data Federator Administrator to change the login parameters
after installation. Starting Data Federator Administrator is described in the
Data Federator User Guide.
Ports used by Data Federator
The following list shows the ports that are used by default when you install
Data Federator.
Data Federator Designer:
•
3081 (HTTP)
•
3005 (shutdown server)
•
Data Federator Query Server:
•
3080 (HTTP, needed for Data Federator Administrator)
•
5512 (Corba, needed for jdbc driver communication)
•
5612 (Corba secured SSL)
•
3055 (proprietary protocol, needed for jdbc driver communication)
•
3334 (proprietary protocol, accessible from local machine only, used
•
for internal management)
Starting Data Federator
Ports used by Data Federator
2
Data Federator Repository: 9009 (hsqldb proprietary protocol, needed
•
only for local access, can be firewalled to enhance security)
Data Federator Connection Dispatcher
•
3555 (proprietary protocol)
•
3344 (proprietary protocol, accessible from local machine only, used
•
for internal management)
Using Connection Dispatcher
If you install the Connection Dispatcher with the Data Federator Windows
Services component, you can use Windows services to start Connection
Dispatcher.
Data Federator Installation Guide 37

Starting Data Federator
2
Using Connection Dispatcher
Once Connection Dispatcher is started, you can connect to it by opening a
telnet session to localhost (port: 3344). You can enter commands to
Connection Dispatcher directly in its telnet console.
Starting Connection Dispatcher when Data Federator Windows Services are installed
If you installed the Data Federator Windows Services component in the Data
Federator installer, the Connection Dispatcher server starts automatically.
Specifically, the Data Federator Windows Services start the Connection
Dispatcher server.
The table below shows the Windows service that runs the Connection
Dispatcher server.
Table 2-5: List of Windows services
the service runs...name of service is...
Data Federator Connection DispatcherDataFederator.ConnectionDispatcher
Starting Connection Dispatcher when Data Federator Windows Services are not installed
If you did not install the Data Federator Windows Services component in the
Data Federator installer, you can use the startup scripts to start Connection
Dispatcher.
The following table shows the script that runs Connection Dispatcher.
Table 2-6: List of scripts that run Connection Dispatcher on Windows
the script runs...name of script is...
data-federator-installdir\dispatcher\bin\startup.bat
38 Data Federator Installation Guide
Data Federator Connection Dispatcher

Starting Data Federator
Using Connection Dispatcher
Starting Connection Dispatcher on AIX or Solaris
The following table lists the names of the script that runs Connection
Dispatcher.
Table 2-7: List of scripts that run Connection Dispatcher on AIX or Solaris
the script runs...name of script is...
2
data-federator-installdir/dispatcher/bin/startup.sh
Data Federator Connection Dispatcher
Shutting down Connection Dispatcher when Data Federator Windows Services are installed
Stop the following Data Federator Windows Service in order to shut down
Data Federator Connection Dispatcher.
Table 2-8: List of Windows services
the service controls...name of service is...
Data Federator Connection DispatcherDataFederator.ConnectionDispatcher
Note:
When you shut down Connection Dispatcher, any new connections requests
of any clients that are pointing to Connection Dispatcher will fail. Make sure
to either restart Connection Dispatcher or point the clients to a different
server.
All connections that were already acquired may still be used.
The shutdown operation and status are noted in the configured log.
Data Federator Installation Guide 39

Starting Data Federator
2
Using Connection Dispatcher
Shutting down Connection Dispatcher when Data Federator Windows Services are not installed
If you did not install the Data Federator Windows Services component in the
Data Federator installer, you can use the shutdown scripts to shut down
Connection Dispatcher.
The following table shows the name of the script that shuts down Connection
Dispatcher:
Table 2-9: List of scripts that stop Connection Dispatcher on Windows
the script shuts down...name of script is...
data-federator-installdir\dispatcher\bin\shut
down.bat
Data Federator Connection Dispatcher
Note:
When you shut down Connection Dispatcher, any new connections requests
of any clients that are pointing to Connection Dispatcher will fail. Make sure
to either restart Connection Dispatcher or point the clients to a different
server.
All connections that were already acquired may still be used.
The shutdown operation and status are noted in the configured log.
Shutting down Connection Dispatcher on AIX or Solaris
The following table lists the name of the script that shuts down Connection
Dispatcher.
40 Data Federator Installation Guide

Starting Data Federator
Using Connection Dispatcher
Table 2-10: List of scripts that shut down Connection Dispatcher on AIX or Solaris
the script shuts down...name of script is...
2
data-federator-installdir/dispatcher/bin/shutdown.sh
Note:
When you shut down Connection Dispatcher, any new connections requests
of any clients that are pointing to Connection Dispatcher will fail. Make sure
to either restart Connection Dispatcher or point the clients to a different
server.
All connections that were already acquired may still be used.
The shutdown operation and status are noted in the configured log.
Data Federator Connection Dispatcher
Data Federator Installation Guide 41

Starting Data Federator
Using Connection Dispatcher
2
42 Data Federator Installation Guide
Backing up and restoring data
3

Backing up and restoring data
3
Starting the Data Federator Backup and Restore tool
Data Federator provides a tool to back up and restore all of your Data
Federator data at once. This is useful for example when moving to a new
server.
The Data Federator Backup and Restore tool backs up and restores the
following data:
projects, including datasource definitions, targets, mappings, lookup tables
•
and domain tables
connector resources
•
usernames and authorizations
•
Starting the Data Federator Backup and
Restore tool
You can start the Data Federator Backup and Restore Tool in two modes:
graphical or console. Both modes offer the same functionality.
Starting the Backup and Restore tool
You can start the Data Federator Backup and Restore Tool as follows.
1. Make sure you are logged out of your Data Federator applications.
2. Use one of the following methods to start the Backup and Restore Tool.
44 Data Federator Installation Guide

To start the Backup
and Restore Tool on
this platform...
Windows
Backing up and restoring data
Starting the Data Federator Backup and Restore tool
in console modein GUI mode
In the Start menu, click
Programs > Busines
sObjects Data Federa
tor XI Release 2 Accel
erated SP1 > Data
Federator Backup and
Restore Tool.
You can also run the
Backup and Restore
Tool with the following
batch script.
data-federator-in
stall-dir\bin\back
uptoolgui.bat
Run the following batch
script.
data-federator-in
stall-dir\bin\back
uptoolcon.bat
3
on AIX
Run Data_Federa
tor_Backup_and_Re
store_Tool_GUI from
the links directory that
you chose for Data Fed
erator.
You can also run the
Backup and Restore
Tool with the following
shell script.
data-federator-in
stall-dir/bin/back
uptoolgui.sh
Run Data_Federa
tor_Backup_and_Re
store_Tool_Console
from the links directory
that you chose for Data
Federator.
You can also run the
Backup and Restore
Tool with the following
shell script.
data-federator-in
stall-dir/bin/back
uptoolcon.sh
Data Federator Installation Guide 45
Backing up and restoring data
3
Backing up your Data Federator data
To start the Backup
and Restore Tool on
this platform...
in console modein GUI mode
Run Data_Federa
tor_Backup_and_Re
store_Tool_GUI from
the links directory that
you chose for Data Fed
erator.
on Solaris
The Data Federator Backup and Restore Tool stops the Data Federator
services and prepares to backup or restore your data.
You can also run the
Backup and Restore
Tool with the following
shell script.
data-federator-in
stall-dir/bin/back
uptoolgui.sh
.
Run Data_Federa
tor_Backup_and_Re
store_Tool_Console
from the links directory
that you chose for Data
Federator.
You can also run the
Backup and Restore
Tool with the following
shell script.
data-federator-in
stall-dir/bin/back
uptoolcon.sh
Backing up your Data Federator data
You can backup your data using the Data Federator Backup and Restore
Tool.
1.
Start the Data Federator Backup and Restore Tool (see Starting the Data
Federator Backup and Restore tool on page 44).
2. Click Backup. (In console mode, type 0 and press enter).
3. Choose a directory where you want to store your data.
You can type the name of a new directory, and the Backup and Restore
Tool will create it.
The Backup and Restore Tool backs up your data
If you are using Windows, and the Data Federator Windows services are
installed, the Backup and Restore Tool restarts the Data Federator
services automatically. Otherwise, use the shutdown and startup scripts.
46 Data Federator Installation Guide

Backing up and restoring data
Restoring your Data Federator data
4. If you are using AIX or Solaris, restart the Data Federator servers by using
the command: [data-federator-install-dir]/bin/startup.sh
Restoring your Data Federator data
You must have previously backed up your data using the Backup and Restore
Tool.
You can restore your data using the Data Federator Backup and Restore
Tool.
1.
Start the Data Federator Backup and Restore Tool (see Starting the Data
Federator Backup and Restore tool on page 44).
2. Click Restore. (In console mode, type 1 and press enter).
3. Choose the directory where you backed up the data that you want to
restore.
The Backup and Restore Tool restores your data.
If you are using Windows, and the Data Federator Windows services are
installed, the Backup and Restore Tool restarts the Data Federator
services automatically. Otherwise, use the shutdown and startup scripts.
3
4. If you are using AIX or Solaris, restart the Data Federator servers by using
the command: data-federator-install-dir/bin/startup.sh
Data Federator Installation Guide 47

Backing up and restoring data
Restoring your Data Federator data
3
48 Data Federator Installation Guide

Updating licenses
4

Updating licenses
4
Updating your license
If you have a new keycode, you can update your license by using the Data
Federator License Management Tool.
You can get a new keycode from your Business Objects representative.
The Data Federator License Management Tool is available in an interactive
GUI version and an interactive console version.
Updating your license
1. Start the Data Federator License Management Tool, as follows.
To start the License
Management Tool in
on this platform...
Windows
Click Start > Programs
> BusinessObjects
Data Federator XI Re
lease 2 Accelerated
SP1 > Data Federator
License Management
Tool
You can also run the Li
cense Management
Tool with the following
batch script.
data-federator-in
stall-dir\bin\li
censetoolgui.bat
console modeGUI mode
Run the following batch
script.
data-federator-in
stall-dir\bin\li
censetoolcon.bat
50 Data Federator Installation Guide

To start the License
Management Tool in
on this platform...
Updating licenses
Updating your license
console modeGUI mode
4
AIX
Solaris
Run Data_Federator_Li
cense_Manage
ment_Tool_GUI from
the links directory that
you chose for Data Fed
erator.
You can also run the Li
cense Management
Tool with the following
shell script.
data-federator-in
stall-dir/bin/li
censetoolgui.sh
Run Data_Federator_Li
cense_Manage
ment_Tool_GUI from
the links directory that
you chose for Data Fed
erator.
You can also run the Li
cense Management
Tool with the following
shell script.
data-federator-in
stall-dir/bin/li
censetoolgui.sh
Run Data_Federator_Li
cense_Manage
ment_Tool_Console
from the links directory
that you chose for Data
Federator.
You can also run the Li
cense Management
Tool with the following
shell script.
data-federator-in
stall-dir/bin/li
censetoolcon.sh
Run Data_Federator_Li
cense_Manage
ment_Tool_Console
from the links directory
that you chose for Data
Federator.
You can also run the Li
cense Management
Tool with the following
shell script.
data-federator-in
stall-dir/bin/li
censetoolcon.sh
2. Follow the instructions that appear on the screen.
When asked, enter your new keycode.
The License Management Tool updates your license.
Data Federator Installation Guide 51

Updating licenses
Updating your license
4
52 Data Federator Installation Guide

Index
A
administrator
rights to install services 10
B
backing up
data
Backup and Restore Tool 44
Data Federator data 46
Backup and Restore Tool
starting 44
backups 46
C
configuration file
silent mode installation 19
Connection Dispatcher
installing 28, 29
shutting down 39, 40
starting
AIX 39
Solaris 39
Windows 38
stopping 39, 40
using 37
connectors
SAS 27
D
data
backing up
Backup and Restore Tool 44
restoring
Backup and Restore Tool 44
Data Federator installer
starting 10, 11
datasources
installing drivers 22, 23, 24, 28
installing middleware 24
I
install sets
description 15
installation
hardware requirements 8
prerequisites 9
requirements 8
software requirements 9
steps 12
installation path 10
installing
Connection Dispatcher 28, 29
Data Federator 12
silent mode 17, 19
installing drivers
datasources 22, 23, 24, 28
JDBC 22, 23
Progress 24
resources 22, 23, 24, 28
SAS 28
Data Federator Installation Guide 53

Index
installing middleware
datasources 24
Progress 24
resources 24
J
JDBC
installing drivers 22, 23
JDBC data sources 22
L
licence
updating 50
licenses
updating 50
login and password
default 36
P
ports
used by servers 37
Progress 24
installing drivers 24
installing middleware 24
R
resources
installing drivers 22, 23, 24, 28
installing middleware 24
restoring
backups 47
data
Backup and Restore Tool 44
Data Federator data 47
S
SAS
connectors 27
installing drivers 28
servers
shutting down 34, 35, 36
starting 32, 33, 34
stopping 34, 35, 36
shutting down
Connection Dispatcher 39, 40
servers 34, 35, 36
silent mode
installing 17, 19
silent mode installation
configuration file 19
starting
Connection Dispatcher 38
Data Federator installer 10, 11
servers 32, 33, 34
stopping
Connection Dispatcher 39, 40
servers 34, 35, 36
U
uninstall
procedure 20
uninstalling
Data Federator 20
updating
licence 50
licenses 50
W
Windows services 32, 34, 39
not installed 33, 35, 38, 40
54 Data Federator Installation Guide
 Loading...