

Page 1
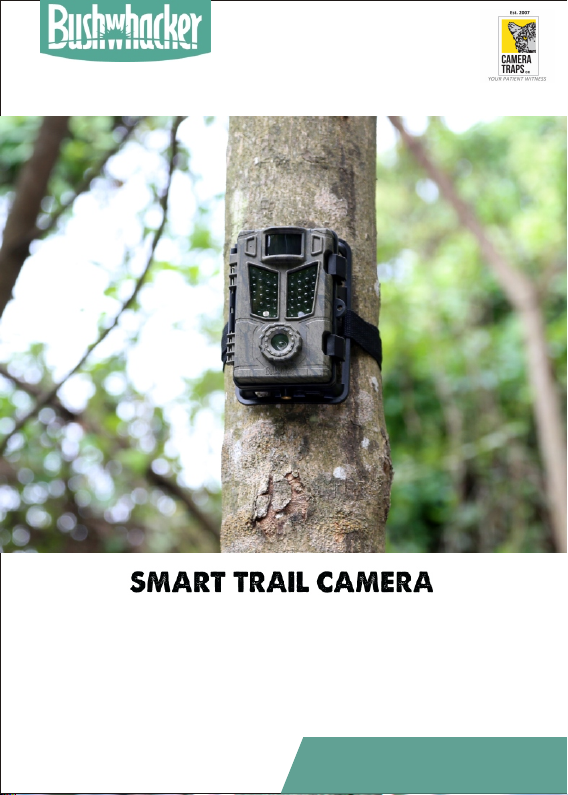
MODEL:ROBOT D30
www.cameratraps.co.za
US ER GUID EUS ER GUID E
VE R
20 1711
.
Page 2

CONTENTS
1 Introduction ........................................................................... 3
2 Quick Start Guide ................................................................... 4
3 Camera Overview .................................................................. 6
3.1 Microphone ................................................................. 6
3.2 PIR sensor ................................................................... 6
3.3 IR LED ........................................................................ 7
3.4 Lock Buckle ................................................................ 7
3.5 Light Sensor ................................................................ 7
3.6 Lock Hole .................................................................... 7
3.7 Indicator Light ............................................................. 7
3.8 Lens ............................................................................. 8
3.9 TFT screen .................................................................. 8
3.10 SD Card Slot .......................................................... 8
3.11 Keypad ................................................................... 8
3.12 Power/Mode Switch ............................................... 9
3.13 DC Port .................................................................. 9
3.14 USB/TV Cable Port ................................................ 9
3.15 SIM Card Slot (Not available for this model) ......... 9
3.16 Speaker .................................................................. 9
3.17 Tripod Nut ............................................................ 10
3.18 Waterproof Plug ................................................... 10
3.19 Battery Slot .......................................................... 10
3.20 Battery Slot Cover ................................................ 10
4 Menu Function .................................................................... 11
4.1 Image: ....................................................................... 11
4.1.1 Mode: ......................................................... 11
4.1.2 Image Size ................................................. 11
4.1.3 Video Size .................................................. 11
4.1.4 Shooting No. .............................................. 11
4.1.5 Video Length ............................................. 12
4.2 Setting ....................................................................... 12
4.2.1 Device No. ................................................. 12
4.2.2 Timer: ........................................................ 12
4.2.3 PIR Sleep ................................................... 12
4.2.4 Time Lapse ................................................ 13
1
Page 3

4.2.5 Stamps ....................................................... 13
4.2.6 Illumination ............................................... 13
4.2.7 Auto Power Off .......................................... 14
4.2.8 Sound Recording ....................................... 14
4.2.9 PIR Level ................................................... 14
4.2.10 AE(After Effect) ........................................ 14
4.3 System ....................................................................... 14
4.3.1 Format ....................................................... 14
4.3.2 Time & Date .............................................. 14
4.3.3 Default Set: ................................................ 14
4.3.4 Language: .................................................. 15
4.3.5 Beep Sound: ............................................... 16
4.3.6 Loop Recording ......................................... 16
4.3.7 TV Mode.................................................... 16
4.3.8 Password Set .............................................. 16
4.3.9 Software Version ........................................ 16
4.4 Replay ....................................................................... 16
4.4.1 Delete:........................................................ 16
4.4.2 Lock Image: ............................................... 16
4.4.3 Slide Show: ................................................ 16
5 Test and View ....................................................................... 17
5.1 Shooting in Test Mode ............................................... 17
5.2 Image ........................................................................ 17
5.2.1 Image Browsing Operation ........................ 17
5.2.2 Video Browsing Operation ......................... 17
6 Firmware Upgrades ............................................................. 18
7 FAQ ...................................................................................... 19
8 Technical Parameters ........................................................... 20
9 Main Features ...................................................................... 23
10 Warranty Policy .................................................................... 25
11 Package Contents ................................................................. 26
2
Page 4

1 Introduction
D30 wildlife game camera (also called hunting camera/trail
camera) is a scouting device. It can be triggered by sudden change of
ambient temperature caused by moving game in a region of interest,
which is detected by a highly sensitive Passive Infra-Red (PIR)
sensor, and then take pictures or video clips automatically.
Application
Camera trap for hunting, animal or incident observation.
Indoor/outdoor surveillance for domestic, office, warehouse,
farm or public use.
Observing wild animals/plants growth process.
For forestry bureau and forest public security to surveil and
take evidence of stealing hunting, etc.
Other evidence-taking works.
Warning:
Please read the user guide
carefully before using this product to
avoid unnecessary loss!
Do not attempt to disassemble the
camera, non-product quality
problems and man-made damages
will not be covered under warranty!
3
Page 5
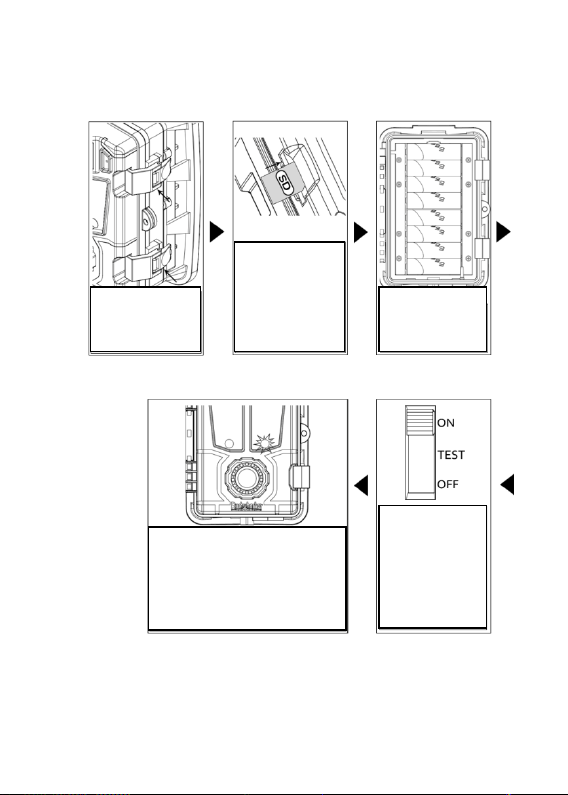
2 Quick Start Guide
1. Open the lid.
Unlock the lock
buckle to open
the lid.
The red indicator flashes for 6 times
slowly, then the blue one flashes for 3
times quickly and camera into
shooting state. If you need to chang
other specifications please do on the
basis of menu section.
2. Insert the SD
card Insert the
card towards
right direction.
4
3. Put batteries
Recommend
installing
8 batteries.
7. Camera starts
to work turn the
switch to “ON”
then close the
camera.
Page 6
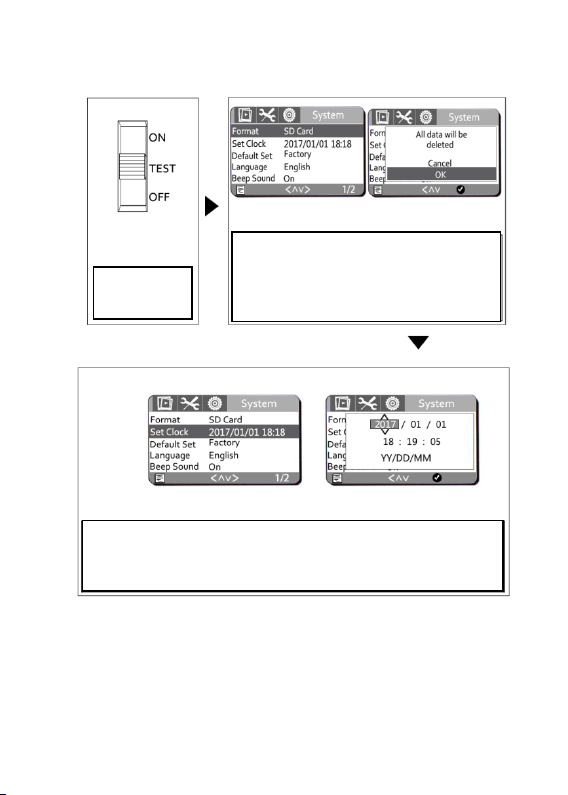
5. Format SD card
4. Turn the
switch to
“TEST”
6. Set time for camera
Choose “Set Clock” to set time and date from the “System” interface
Press “MENU” to menu interface, then enter into
“System” setting and choose “Format” to format S D
card according to the reminder.
5
Page 7
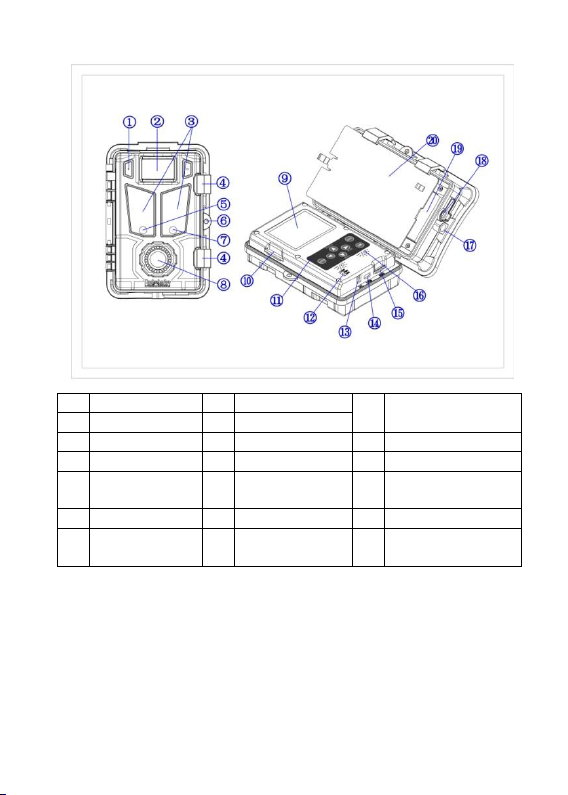
3 Camera Overview
1 Microphone 8 Lens
2 PIR sensor 9 TFT screen
SIM card slot
15
( for GPRSmodel)
3 IR LED 10 SD card slot 16 Speaker
4 Lock Buckle 11 keypad 17 Tripod Nut
5 Light Sensor 12
Power/modes
switch
18 DC In
6 Lock Hole 13 DC Port 19 Battery Slot
7 Indicator Light 14
USB/TV Cable
Port
20 Battery slot cover
3.1 Microphone
To collect the scene of the environment sound when taking
video, you can also close this function in the software.
3.2 PIR sensor
This is the PIR sensor window, please don’t cover when using.
The material is relatively fragile, in order to avoid damage, please do
not press firmly.
6
Page 8

When install camera please make sure there are not moving
objects in 3m area in front of PIR sensor, such as branches, leaves,
weeds, strings, color ribbon and other objects which may fluttered in
the wind to avoid potential false triggers. Please do not aim the
camera at a heat source such as boiler, exhaust vents and light, etc.
Avoid mistaking photos or videos.
3.3 IR LED
When shooting in night, the infrared light will be turned on to
fill light. 850nm and 940nm for selection, please confirm before
ordering. 940nm is invisible and the light is weak. 850nm is visible
and the light is strong.
3.4 Lock Buckle
Used to lock and turn on the camera.
3.5 Light Sensor
Used to sensitize the intensity of ambient light, and provide
parameters for reference. The photo resistor senses the light intensity
of camera position, and if there is a difference in light intensity
between the shooting position and the camera's mounting position,
adjust the ISO value for exposure to human intervention.
3.6 Lock Hole
Lock the camera with a small lock.
3.7 Indicator Light
There are red and blue indicator lights that indicate the
working status of the camera.
In “ON” Mode: camera starts successfully if red indicator
light flashes 6 times and then blue indicator light flashes 3 times
continually. The camera fails to start if blue indicator light keep
lighting, if start failed to shut down and start again.
On “TEST” mode, the red indicator light flashes one time at
every 10seconds. When PIR trigger, the blue indicator light flashes.
Low battery tips: In “ON” Mode, Red indicator light flashes
one time at every 1second for 60 seconds.
Upgrade Tip: Red and blue lights are flashing continuously
during the upgrade process.
7
Page 9
3.8 Lens
90 degree and 50 degree are available. 90 degree lens has an
advantage on the near scene; and 50 degree standard lens for
shooting ordinary distance scene.
3.9 TFT screen
Used to display menu settings, view images.
3.10 SD Card Slot
Attention: SD card need purchase by buyer.
Please insert SD card correctly. The supported memory
capacity is up to 64GB. SD card to be formatted before use; and SD
card lock protection off. It’s recommended to use high speed SD
card not less than class 10 to achieve the best performance.
Low-quality SD card and by the TF card into SD card and other
non-standard SD card, will take a picture as a failure. Please don’t
take out batteries, SD card or power supply when camera in “ON”
mode!
The file format of SD card stores: Photos are saved in JPEG
and videos are saved in MOV (H.264).
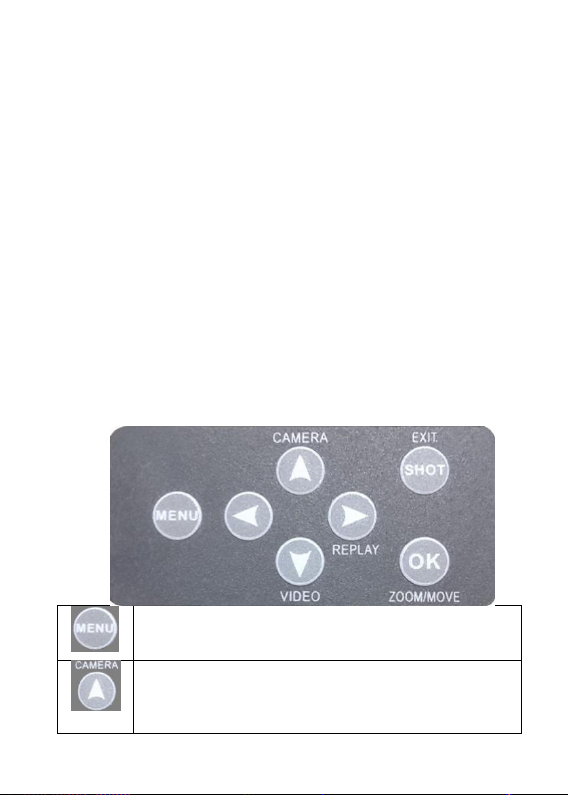
3.11 Keypad
For menu operation
MENU button, press it to set parameters; Switch among
“IMAGE/SET/SYSTEM”; Press “EXIT” button to exit.
Up, Quick switch to camera mode. “ZOOM” mode to
enlarge the picture; “MOVE” mode to move the picture
up.
8
Page 10
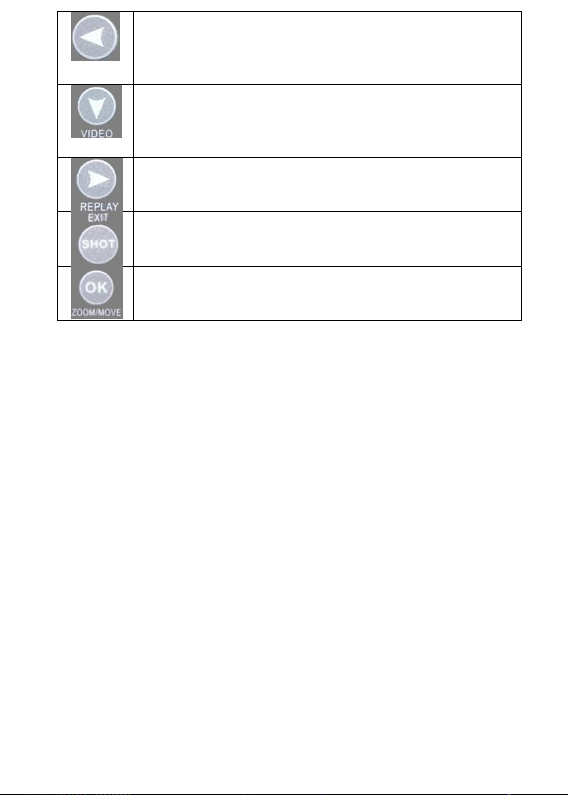
Left, Switch the parameters; on “REPLAY” mode to
check the previous image (only available on Replay
mode).
Down, Quick switch to Video mode. “ZOOM” mode to
shrink the picture; “MOVE” mode to move the picture
down.
Right, Switch the parameters; Replay mode, Check the
next one (only available on Replay mode).
Shot, Manually take photos or videos (only available on
Test mode), EXIT.
Ok, Selected and entered function; in “REPLAY” mode
have the function of “ZOOM”/ “MOVE”.
3.12 Power/Mode Switch
OFF: to turn off the camera.
TEST: to set operational parameters.
ON: to work under surveillance status.
3.13 DC Port
External DC power supply, please use 6V/2A power adapter,
the same specifications of the solar power can also be used as an
external power supply access.
3.14 USB/TV Cable Port
The camera configuration has two cables. When the computer
connect the USB cable, the camera can be identified as a USB
device, the computer can read the camera SD card file; when the TV
or external monitor through the TV cable port, the camera's display
will be closed, the TV Or an external monitor is used as a display.
3.15 SIM Card Slot (Not available for this model)
3.16 Speaker
When replay video, it can play sound. While operate the
keyboard the speaker can send a “beep” sound, and this can be
turned off from menu set.
9
Page 11

3.17 Tripod Nut
Standard camera tripod nut.
3.18 Waterproof Plug
When use an external power supply to charge the camera, just
open the waterproof plug and allow the power line to pass through
the hole and connect power interface.
3.19 Battery Slot
Install two groups of 8 AA (LR6 / 5) alkaline batteries or
rechargeable batteries according to the positive and negative
identification of battery slot .4 AA batteries can also be used, but
with shorter lifetime.
Note: Users need to purchase by themselves.
3.20 Battery Slot Cover
Separate the battery slot from the host to prevent the battery
leakage.
10
Page 12
4 Menu Function
Press “MENU” key to enter the menu, press ▲, ▼ key to
move the cursor to select various function options, “OK” key to
confirm. Press “REPLAY” to enter playback mode. Press the “EXIT”
key to return to the previous menu or exit the menu.
4.1 Image:
4.1.1 Mode:
For modes: camera, video, camera + video, monitoring.
“camera + video” mode: first take picture then video.
Monitoring mode is only available in “ON” mode, and the
camera shoots video continuously according to the user-set video
length.
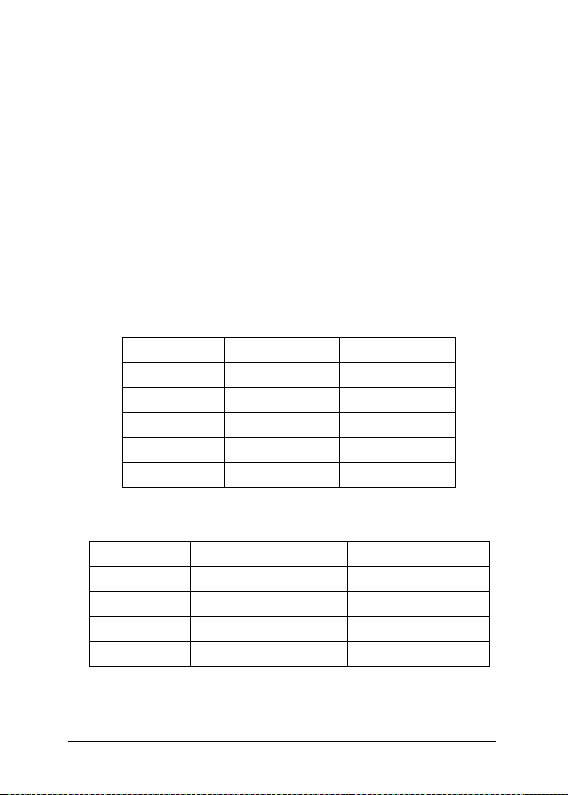
4.1.2 Image Size
Five options: 12MP is the default size
Photo Size Resolution File Size
3MP 1536×2048 395KB
5MP 1944×2592 675KB
8MP 2488×3264 915KB
12MP 3024×4032 1.25MB
16MP 3480×4640 1.55MB
4.1.3 Video Size
Four options for video size, and 1080P is the default.
Video Size Resolution Size of 10s Video
VGA 640×480@30fps 6.8MB
WVGA 800×480@30fps 7.9MB
720P 1280×720@30fps 10MB
1080P 1920×1080@30fps 21MB
4.1.4 Shooting No.
When shooting, users can set up for 1-6 consecutive pictures
Note: Camera can only shoot three consecutive when resolution is
11
Page 13

16MP.
4.1.5 Video Length
Video length: 5s, 10s, 15s, 20s, 30s, 45s, 1min, 2min, 3min,
5min, 10min.
Note: There is a logical association with time lapse shot. Please
read the relevant section.
4.2 Setting
4.2.1 Device No.
Device number defaults to BUSH, composed of 4 characters,
each character can be 0-9, AZ in any choice, it will be the first 4
characters of image filename. When browsing pictures, it can help
user to identify images are taken by which camera.
4.2.2 Timer:
Set camera to work within specified time period every day.
Outside the time period the camera will not be triggered or take
photos/videos, it supports 2 groups of timer set.
Default set:
Off,“00:00——00:00”
Off,“00:00——00:00”
For instance: Set camera starting time in 8:00 to 10:00am and
15:30 to 18:00pm:
On,“08:00——10:00”
On,“15:30——18:00”
4.2.3 PIR Sleep
When camera is shooting in normal sense mode, the PIR will
be disabled after each triggering. After this period of time the PIR
will wait to be triggered again. Set PIR sleep time as 3s, 5s, 10s, 15s,
30s, 1min, 2min, 5min, 10min, 20min, 30min, 1h. If turned off the
PIR will work consecutively.
Note: There is a logical association with time lapse shot. Please
12
Page 14
read the relevant section.
4.2.4 Time Lapse
Under time lapse mode, PIR will be turned off, camera won’t
shoot. And only shoot at the specific time. Users can set:
5s,10s,15s,30s,1min,2min,5min,10min,20min,30min,1h,2h,6h,12h,1
8h,24h.
This function can be turned off and camera will shoot when
detect movement. This set is useless when camera in monitor mode.
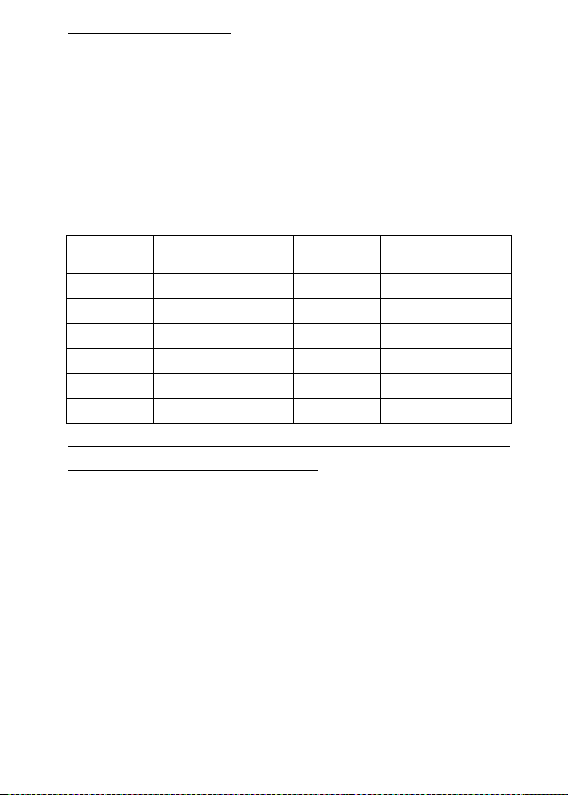
Time lapse time starting point is the point of shooting, so the
time lapse will have a logical limit on recording time. As shown in
the table below:
Video
Length
Shortest Interval
Duration
Video
Length
Shortest Interval
Duration
5s 15s 1min 2 min
10s 30s 2min 5 min
15s 30s 3min 5 min
20s 30s 5 min 10 min
30s 1min 10min 20 min
45s 1min
Note: There is a logical association between video length and PIR
sleep. Please read the relevant section.
4.2.5 Stamps
On/Off mode, If turned on, the bottom of each photo will
show LOGO, temperature, moon phase, photo number.
4.2.6 Illumination
Users can set illumination level based on requirement. There
are three levels: weak illumination, normal illumination, strong
illumination. Users can choose different level based on different
condition. For example, it’s ok to use weak illumination when shoot
close-range or external bright place; better to choose strong
illumination when shoot distant objects or dark outdoors.
Also allows camera to adapt to the environment automatically
adjust light.
13
Page 15

4.2.7 Auto Power Off
Automatic shutdown time: 1 minute, 3 minutes, 5 minutes, 10
minutes. At the specific time, if the keyboard without any operation,
camera will automatically shut down. User can set according to the
need.
4.2.8 Sound Recording
On / Off, when turned on, the video comes with sound.
4.2.9 PIR Level
There are low, normal, high three levels, user can set the
intensity of infrared induction, in order to achieve best shooting
results.
When set to low, the sensing distance will be shorter, easy to
miss; set to high, the sensing distance will increase then leads
mistakenly shoot.
4.2.10 AE(After Effect)
According to the actual shooting scene, user can do preset to i
ncrease or decrease the brightness of photo. These are options: +3, +
2, +1, standard, -1, -2, -3.
4.3 System
4.3.1 Format
When inserting the SD card for the first time, format the SD
card in chase the update, picture, video and other files affect the
camera's normal operation.
Note: Before doing this, please remember to copy the
important files in the SD card to avoid unnecessary losses.
4.3.2 Time & Date
The system default time is January 1, 2017, 00:00 00:00, user
need to set time and date according to the local time when first use.
There are super capacitors to maintain the time settings in the
camera, but the time will be classified as the default time when long
time without batteries.
4.3.3 Default Set:
This operation will restore all system settings in the camera to
factory defaults.
14
Page 16
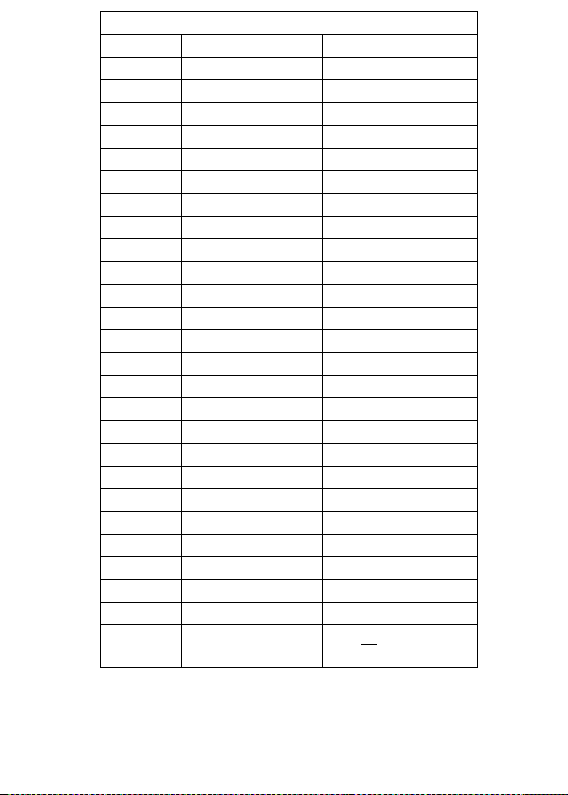
Factory Default Parameters
Photo
Mode Camera
Image Size 12MP
Video Size 1080P
Shooting No. 1
Video Length 5 Seconds
Setting
Device No. BUSH
Timer Off
PIR Interval 3 Seconds
Time Lapse Off
Stamps On
Illumination Auto
Auto Power Off 1 Minute
Record Audio On
PIR Level Normal
AE Standard
System
Format SD Card
Time & Date 2017/01/01 00:00
Default Set Factory
Language English
Beep Sound On
Loop Recording On
TV Mode PAL
Password Set 1234
Software Version
D30__01_6.1.01
MCU Version0
4.3.4 Language:
System language, Users can choose different language version
to purchase. Default setting is “English”.
15
Page 17

4.3.5 Beep Sound:
Turn on / off beep sound.
4.3.6 Loop Recording
If enabled, camera will still shoot when SD card is full, new
files will cover the earliest ones. When turned off, camera won’t
shoot if SD card is full.
4.3.7 TV Mode
PAL and NTSC are two ways for TV connection. When
connect with TV, please set on the basis of local conditions.
4.3.8 Password Set
Password is composed of 4 digits which can choose from 0~9,
please contact the dealer if forget. The default initial password is
1234.
4.3.9 Software Version
D30__01_6.1.01.D30 is model number, 01 stands for
language(default language: English),6.1 is firmware version,01 is
updated version.
4.4 Replay
On “TEST” mode, press “Replay” to review image on TFT
screen. Press
“MENU” key to view below functions:
4.4.1 Delete:
Delete current or all images.
4.4.2 Lock Image:
Lock / unlock current, lock / unlock all. If locked, images
can’t be deleted unless you unlock them. Used to protect important
images, avoid unexpected deletion.
4.4.3 Slide Show:
Auto play images in the way of slide show. On “Replay”
mode, press “MENU” button and choose “Slide Show”, through
◄/► can set interval time “3 seconds”, “5 seconds”, “8 seconds”.
16
Page 18
5 Test and View
5.1 Shooting in Test Mode
Turn camera “TEST” mode then the display works, and the
upper left corner of the display will show the current shooting mode,
resolution, the number of images you can shoot. In “TEST” mode
user can test to take photo and video. Use the ▲ key to quickly
switch to camera mode, use the ▼ key to quickly enter the video
mode. Press “shot” to start test shooting.
5.2 Image
After press “REPLAY” button through ◄/► can review
photos/videos in SD card. Use ▲, ▼ keys to return to camera or
video mode。
5.2.1 Image Browsing Operation
Press “Zoom” button to zoom in current picture. Press ▲
key to enlarge the photo 1 to 8 times
Press “Zoom” key when get the desired magnification, user
can lock the magnification, then use ▲,▼,◄,► keys to move the
observation point to observe the details. When need to zoom in / out
again, press the “Move” key to unlock and continue scaling. In zoom
mode, when zoomed in to the minimum, press the ▼ key again to
enter the nine-rectangle-grid browsing mode. Press the “Menu”
button to delete and lock the current picture. And user can set the
playback time interval when do slide show operation.
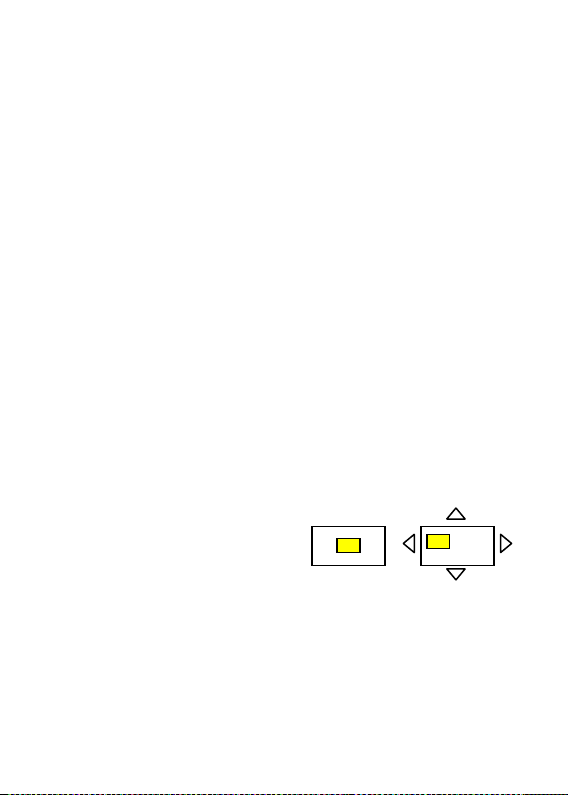
“Zoom” and “Move”
Interface shown as at right:
5.2.2 Video Browsing Operation
For video playback, press "OK" to start playback, “EXIT” to
exit the playback interface and press▲、▼ keys to stop. Press ◄ key
to rewind, each press brings × 2 fast reverse speed, press the ►
button to fast forward, each press brings × 2 fast forward speed.
Press “Menu” key to lock or delete current video.
17
Page 19

6 Firmware Upgrades
The manufacturer reserves the right to upgrade the camera
and the firmware. Users can upgrades firmware through SD card
(SD card capacity less than 32GB)
Follow the steps below to implement the upgrades:
1) Ready a SD cart and format the SD card;
2) Copy the “FWD3A.bin” file into root directory of the SD
card;
3) Insert SD card to camera, while press “OK” button switch
camera to “TEST” mode, after red light flashes loosen the
“OK” button.
4) Upgrading is underway when red indicator light flashes
continually and TFT screen is off. Keep power on until TFT
screen turn on and upgrade process finish (upgrade process
needs 1minute).
5) Restart and check if the new version number is the same as
the old one, to confirm upgrade process succeed.
Perform the upgrade step again if failure.
18
Page 20

7 FAQ
Please do the following checks if camera can’t start or work
normally:
No battery;
Battery loaded reversely;
Run out of battery;
Battery is not in conformity with the specifications;
Not switch camera to “ON” mode;
Not insert SD card;
SD card filled or damaged;
SD card capacity exceed 64GB;
Sensitivity of PIR sensor too low.
19
Page 21
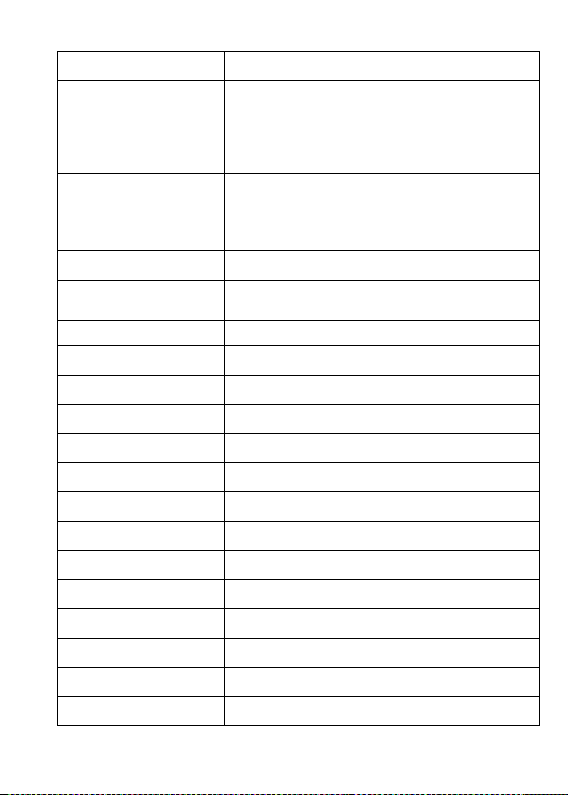
8 Technical Parameters
Item Parameters
3MP: 1536×2048;
5MP: 1944×2592;
Picture Size
8MP: 2488×3264;
12MP: 3024×4032;
16MP: 3480×4640;
VGA 640×480 @30fps;
Video Size
WVGA 800×480 @30fps;
720P 1280×720 @30fps;
1080P 1920×1080 @30fps;
Work Mode Day / Night, switch automatically
Lens
FOV=90°/50°, F=2.4/2.5,automatic filter
switching
IR Flash 65 Feet/20 Meters
IR Setting 44 LEDs;850nm or 940nm
Illumination Auto, Weak, Normal, Illumination
AE + 3, + 2, + 1, standard, -1, -2, -3
LCD Screen 2.4” TFT,RGB
Operation Keypad 7 buttons
Beep Sounds On/Off
Memory
SD Card(≦64GB)
PIR Level Low/Normal/High
PIR Sensing Distance 65 Feet/20 Meters
PIR Sensor Angle 90° (D3R:50°)
Trigger Time 0.5 Seconds(When using 2GB SD card)
PIR Sleep
Interval
3 Seconds~60 Minutes, Programmable
5 Seconds~24 Hour, Programmable
20
Page 22
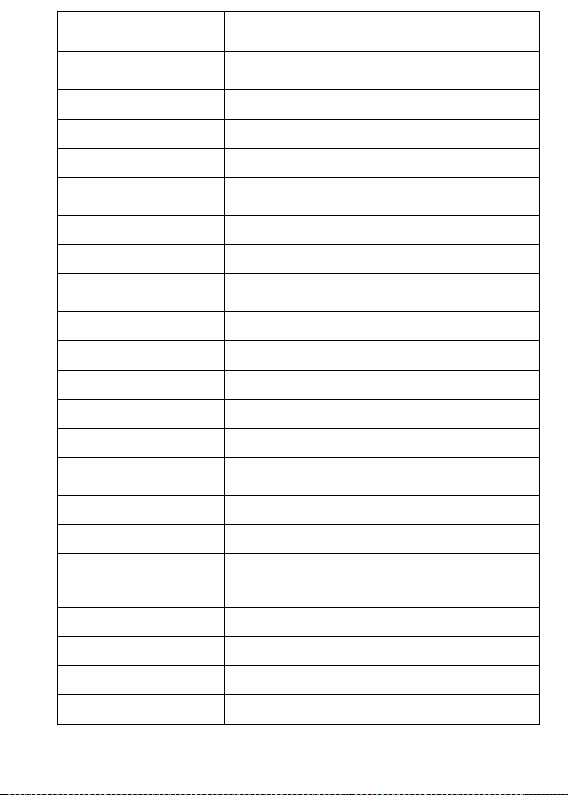
Shooting Numbers
Protect Image
Video Length
1~6 Photos(1~3 Photos available when
choosing 16MP)
Lock Current, Unlock Current; Lock All,
Unlock All
5 Seconds~10 Minutes, Programmable
Camera+Video First take picture then Video
Playback Zoom
Slide Show
1~8 Times
3 Seconds/5 Seconds/8 Seconds,
Programmable
Multi-Image Show Nine-rectangle-grid mode to view images
Loop Recording On/Off
Stamps
On/Off, Temperature, Moon Phase, Logo,
Time and Date
Timer 1 On/Off, Programmable
Timer 2 On/Off, Programmable
Password 4 Digit Numbers, free choice from 0~9
Device No. 4 Digit and 26 Alphabet set by yourself
Power Supply 4×AA, 8×AA
External DC Power
Supply
6V/2A
Stand-by Current 0.4mA
Stand-by Time
Auto Power Off
3~6 Month(4×AA~8×AA)
Auto Power Off in 1-10 minutes while no
keypad controlling
Power Consumption 200mA (+700mA when IR LED lights up)
Low Battery Alarm 4.8V
Interface TV-out, USB, SD card slot, 6V DC External
Mounting Strap; Tripod Nail
21
Page 23

Waterproof IP66
Work Temperature
Work Humidity
-22~+158°F/-30~+70°C
5%~95%
Dimensions 148×99×76(mm)
Weight
Certification
345g(Include battery cover 20g)
FCC&CE&ROHS
22
Page 24

9 Main Features
1) Programmable3/5/8/12/16 Mega-pixel high-quality resolution.
2) 1080P@30FPS Full HD video comes with sounds.
3) In “Camera + Video” Mode, camera first take pictures then
video at every trigger event.
4) 44pcs IR LEDs, can set auto, weak light, normal, strong
illumination;850nm/940nm LEDs optional.
5) Impressively quick Trigger Time (0.5 seconds).
6) Build-in 2.4” TFT color screen to review photos and videos.
7) Locking important image to avoid being deleted.
8) Take multiple consecutive pictures up to 6 photos.
9) 7 kinds of exposure effects optional, user can choose photo
brightness based on the need with different shooting
environment.
10) Two high accuracy timers. When Timer setting is turned on,
programmable to only work in specified period every day.
11) PIR Sleep setting can avoid the camera shoot the same object
multiple times. This feature can be used together with Timer
feature to meet your timetable.
12) In Interval setting, the camera automatically and constantly
takes pictures/videos at specified interval. It's very useful
when observing plants flowering, birds building nest, or when
monitoring unattended properties such as parking lots/yards. .
13) Auto power off in 1-10 minutes whiles no keypad controlling.
14) Date, time, temperature and moon phase can be stamped in
the pictures.
15) 7 operation buttons beep sound on/off available.
16) Free choice of TV out at PAL/NTSC.
17) Support SD Card up to 64GB.
18) Extremely long in-field battery life (in standby mode, up to 6
months with 8*AA batteries).
19) Alarm light flashing when battery power level goes low.
20) Playbacks zoom in 1-8 times.
21) Nine-rectangle-grid mode to view images and auto play in
“Slide Show”.
22) Device Number will be showed on image file name, this helps
users identify which camera captured the image when review
it.
23
Page 25

23) Lockable and password protected.
24) Color pictures at daytime, monochrome pictures at night,
switched automatically.
25) SD card can be set in “Loop Recording” mode, which
automatically deletes the earliest photos or videos and makes
room for new ones.
26) Serration design make camera easy to fix firmly.
27) Battery cover prevents erosion from battery leakage which
may damage the camera.
24
Page 26

10 Warranty Policy
We value our customers very highly and would like to ensure
that our products and service are always of a top standard. However,
if you are experiencing issues with your Bushwhacker products,
please take a moment to read through the information below to
establish whether your products are covered under the warranty.
WARRANTY
We guarantee our Bushwhacker cameras to be free of defects
in materials and workmanship under normal use and service for a
period of a limited times after registered date of purchase.
EXCLUSIONS
This warranty does not cover damages caused by misuse,
abuse, improper handling or installation, or improper storage
conditions and natural disasters, by user installed batteries, or by
repair attempts of someone other than our authorized technicians,
nor does cover loss or theft.
This warranty extends solely to failures due to defects in
materials or workmanship under normal use. It does not cover
normal wear of the product. The camera manufacturer can provide
extra service for your camera after the warranty expiration, but the
customer have to be responsible for extra charges on parts, labor and
shipping costs therefore brought.
Please keep the warranty card for guarantee to keep in repair.
Please contact the regional distributor for more details.
25
Page 27

11 Package Contents
Part Name Quantity
Digital Camera 1
Antenna 1
USB Cable 1
TV Cable 1
Strap 1
Manual 1
Warranty Card 1
www.cameratraps.co.za
[email protected]
+27(0)83 560 0555
+27 (0)82 422 0356
26
Page 28

C T H A C T E ACTH ION
WITH YO RU ROBOT
 Loading...